Category: Photography

  • Tips for Landscape Photography in Exotic Places

    The Exotic Landscape

    Landscape photography is difficult. If you live in a location that lacks spectacular landscapes, or you just fancy going somewhere new, travelling to a new location – especially a beautiful one – may seem like the solution. A few days ,or a week, in a national park or other beautiful spot with your tripod and camera sounds like a great way to create some wonderful new images. What could go wrong?

    Actually, plenty. The weather (and consequently the light) might not do what you want. If you are shooting by the sea, the timing of the tides may not be conducive to taking great photos. You may not have time to find the best places to take photos, and be able to get on location when the light is at its best.

    I wrote more about that, and the advantages that concentrating on your local landscapes here, in my article The Intimate Landscape – 5 Tips for Better Landscape Photography.

    Does that mean you should give up the idea of travel altogether? Of course not. Travel broadens the mind and provides fantastic new photo opportunities. It’s also a lot of fun. But because time is tight when you are travelling, you need to plan well to make the most of the opportunities that come your way. I’m going to show you how in this article.

    Do your research before you leave

    Research is very important. If your visit is brief, you’re going to be under time pressure. The more preparation you do, the better prepared you will be.

    1. Use Flickr and 500px
    The Exotic Landscape

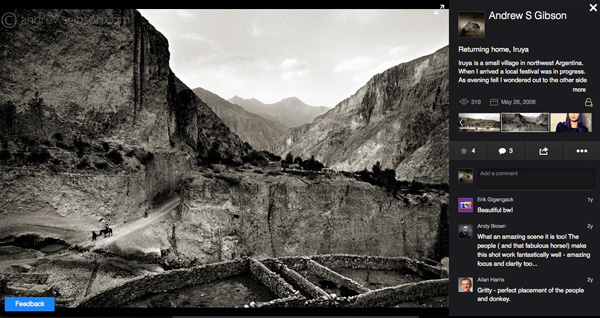
    Get on both of these websites (Flickr and 500px are both free to join) and search for photos taken in the place that you are going. The results will give you a great idea of the potential of that location. You might also find some new spots, away from the ones that everybody else seems to photograph.

    If you are going to a coastal location, try and figure out how the changing tides affect the composition of the images you see. Some places are at their best at high tide, and others are at low tide. If this is the case, do an online search for tide tables. If the best photo opportunities are at low tide, for example, then the ideal time to travel there is when low tide coincides with sunset or sunrise, so you can take advantage of the golden hour and twilight.

    Got a question about an image? Why not send the photographer a message and ask for their advice? Not everybody will reply, but you may receive invaluable advice from those that do.

    2. The Photographer’s Ephemeris
    The Exotic Landscape

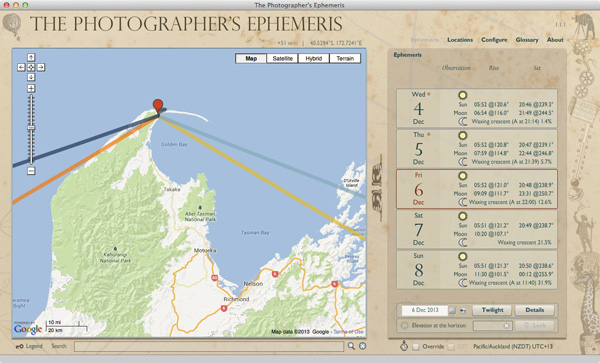
    When you are looking at other people’s photos, bear in mind that the light, and the direction it comes from as the sun rises and sets, changes during the year. There’s an easy way to calculate where the sun will rise and set in any given location, at any time of the year. Simply download The Photographer’s Ephemeris – this application will do the calculations for you. It’s free for Windows and Mac OS X; ideal for research before you go, and you can buy apps for smart phones and tablets; useful if you may need to use it while out in the field.

    3. Check the weather forecast
    The Exotic Landscape

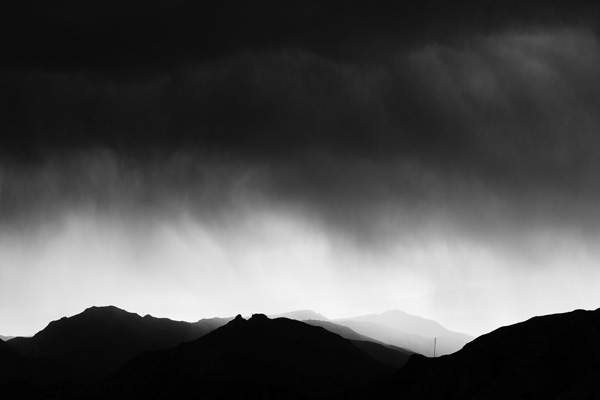
    It sounds almost too obvious to mention here, but it’s important to check the weather forecast before you go. Most trips are booked ahead of time, but long range forecasts are only accurate a few days in advance. Checking the forecast helps you prepare.

    What if the forecast is for rain and cloudy skies? Then you need to work out how you are going to cope with that (for example, you could work in black and white, or concentrate on creating evocative images showing the background blurred out by the rain). If rain is forecast, make sure you have a waterproof camera bag to protect your gear and lens cleaning tissues or cloths to clean water off your front lens element. A cover to protect the camera is also a good idea (you can buy them from Amazon or BH Photo & Video).

    4. Take minimal gear

    Think about the gear you need to take. It’s a personal choice, but the trick is to find the balance between taking enough lenses and accessories to create great images, but not carry so much that you are so worn out when you arrive at your destination that you are too tired to take photos. For example, on a recent trip I took my 17-40mm wide-angle zoom and an 85mm prime lens (plus cable releases, filters etc). That’s it – because of my preparation I knew that I wouldn’t need anything else.

    Tripods are tricky. You need to compromise between weight and stability, not always easy. If you need to buy one, this article (How to Buy a Tripod) covers the factors you should consider.

    Don’t forget personal items, such as protective clothing, rain coats, food, wather etc. They all add weight to your load.

    5. Be flexible

    Good planning gives you a great head start, but don’t be afraid to change plans when you’re on location if you learn something new. Use local knowledge to your advantage. Why not ask the person you deal with in your accommodation, the best places to take photos? You might see postcards, or a local photo book in a shop, that show you new places to take photos. The weather may do something unexpected. Don’t get so locked into your plans that you are unable to see fresh opportunities.

    Above all – have fun. Enjoy yourself and create some beautiful images.

    Mastering Photography
    Mastering Photography

    My ebook Mastering Photography: A Beginner’s Guide to Using Digital Cameras introduces you to photography and helps you make the most out of your digital cameras. It covers concepts such as lighting and composition as well as the camera settings you need to take landscape photos like the ones in this article.

    Post originally from: Digital Photography Tips.

    Check out our more Photography Tips at Photography Tips for Beginners, Portrait Photography Tips and Wedding Photography Tips.

    Tips for Landscape Photography in Exotic Places

    The post Tips for Landscape Photography in Exotic Places by Andrew Gibson appeared first on Digital Photography School.
    Digital Photography School

  • How to Capture the Essence of a Place – Travel Photography Tips

    How to Capture the Essence of a Place

    Storytelling  Sangay Walking Up Trail to Tiger s Nest Monastery  Paro Bhutan  Copyright 2013 Ralph Velasco

    Travel Photography Tips

    If you’re a traveler and you enjoy bringing back photos of the places you’ve visited – let’s face it, who doesn’t – then it’s extremely important to capture a set of images that more completely tells the story of the place. To me, the best way to ensure this in my own work is to work from a well thought out and organized shot list. Then I don’t have to worry about trying to remember the categories of images I have yet to photograph, as I have a check list at the ready all the time and I can easily track my progress.

    Creating a shot list

    The idea of creating a shot list is nothing new. It’s a concept that’s been around since the dawn of photography, and it’s so easy to incorporate into your photography workflow. I research what’s unique about the place so that I know what to be on the lookout for and then I make a list of all the categories of images I’d like to capture before I even set foot in a location. I find the more I know what I’m looking for, the more likely I am to find it. It really is as simple as that.

    Scouting a location

    Recently I had the opportunity to spend 10 days scouting in the reclusive Kingdom of Bhutan. It is one of the few countries in the world that require you to work with a local guide to drive and show you around the country at all times, that is unless you’re from a small number of surrounding countries, like India, whose citizens can come and go as they please.

    Scouting trips are essential to laying the groundwork for the future photo tours I lead to any country, but even more so to this landlocked nation, about the size of Switzerland, but with only about 700,000 inhabitants. During a scouting trip I have a chance to meet, assess and bond with the local guide(s); visit the sites our group will visit; have the experiences they’ll be having; figure out the best times of days to be in certain locations and from where to shoot; and even test out the hotels, modes of transportation, restaurants and other services we’ll be using. But of course I’m also out to capture the quality images necessary to help market the trip to potential clients and to add these to my ever-growing portfolio from around the world. Additionally, although I’m often shooting right alongside my groups, having been to the location allows me to more fully concentrate on helping each participant to bring back the best possible images from their trip.

    Dream location – Bhutan

    Bhutan is a photographer’s dream, and there seems to be a photo opportunity around every corner from most of the categories on my shot list. But instead of shooting randomly, I try to use my list to track and organize the images I’m after. Maintaining your own shot list is as easy as using a piece of pen and paper, creating a spreadsheet, or simply using a free Notes app on your smart phone. Although, I did find the use of a shot list so important that I actually created an app for iPhone, iPad and iPod touch® called My Shot Lists for Travel to aid me in doing this, and it’s always in my pocket.

    Below is a set of images I culled from the many thousands I made during that initial scouting trip, as well as several from the photo tour itself. This select group of images is meant to give viewers a high level sense of what the country of Bhutan is about, and what one might expect on a visit there. I could, of course, add dozens of other images from additional categories (food, interiors, sacred sites, details, etc.) to help create a complete cultural portrait of Bhutan, and when I put together my slideshow presentations I certainly have the chance to do that, but unfortunately space doesn’t allow here. Perhaps in a follow up article I’ll continue this theme.

    The following categories are presented in alphabetical order:

    ARCHITECTURE

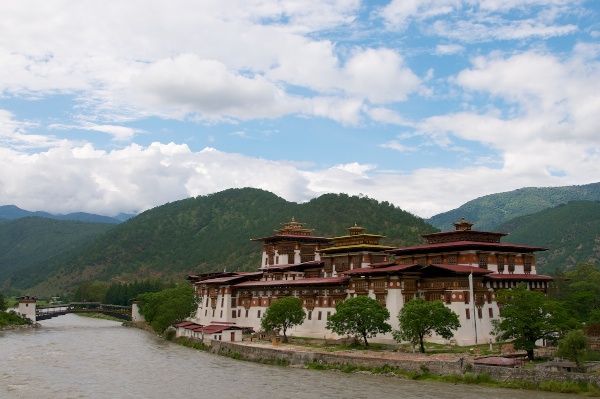
    Travel Photography Tips Architecture  Punakha Dzong  Punakha Bhutan  Copyright 2013 Ralph Velasco

    The architecture in Bhutan is extremely unique and it’s rare to find a single building that doesn’t adhere to this strict building convention. The “dzongs,” or fortresses (Punakha Dzong is pictured here), that dot the country are icons, and as such they’re an essential part of the visual story I want to tell.

    EVERYDAY LIFE

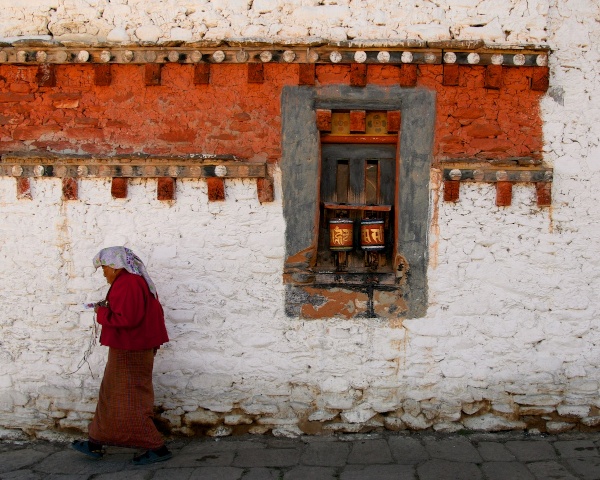
    Travel Photography Tips - Everyday Life  Woman Spinning Prayer Wheels at 7th Century Monastery  Bumthang Bhutan  Copyright 2013 Ralph Velasco

    It’s extremely important to show the local people just doing what they do. It might be standing in doorways, sweeping the local monastery courtyard, or filling butter lamps. As is the custom in Bhutan, many people, from young to old, are found at the local monasteries spinning everything from very large prayer wheels (with the right hand only and in a clockwise direction) to personal ones as they walk, again clockwise, around the building.

    LANDSCAPES

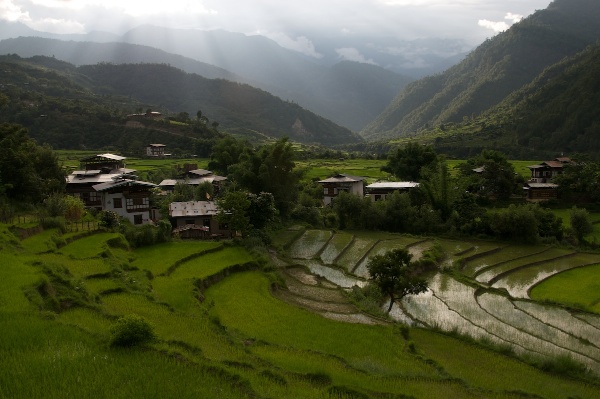
    Travel Photography Tips Landscapes Sunset Over Rice Paddies  Punakha Bhutan  Copyright 2013 Ralph Velasco

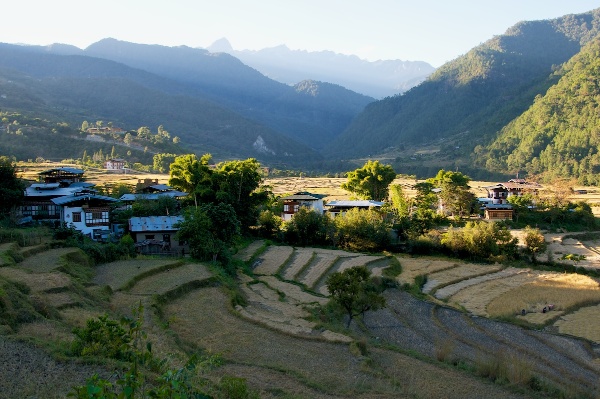
    Capturing the landscapes in Bhutan is a must. Here, venturing just outside the town of Punakha, on a fairly rough dirt road, we came upon yet another series of rice terraces spilling down the hillside. At this time of year (image above), during the summer monsoon season, the fields are an almost neon green, and just as the sun was falling behind the nearby mountains, considered foothills to the mighty Himalaya nearby, we pulled off the side of the road and I was able to make a few images before the good light was gone. Summertime is a great season to highlight the very green rice fields and other local vegetation. Come fall and winter, however, this area is completely dry and brown and a different photo opportunity presents itself (below).

    Travel Photography Tips Landscapes Dried Up Rice Paddy Landscape in November  Punakha Bhutan  Copyright 2013 Ralph Velasco

    MAN-MADE WONDERS

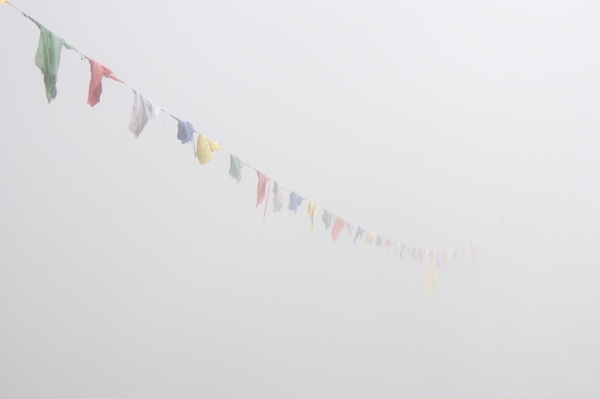
    Travel Photography Tips - Man Made Wonders - Tigers Nest Monastery in Complete Fog  Paro Bhutan  Copyright 2013 Ralph Velasco

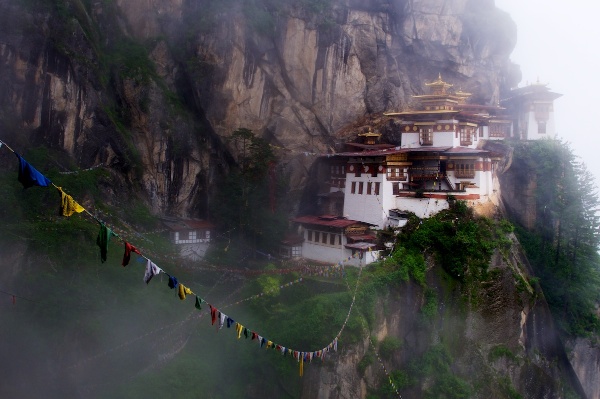
    Travel Photography Tips - Man Made Wonders - Tiger s Nest Monastery in the Mist  Paro Bhutan  Copyright 2013 Ralph Velasco

    The Tiger’s Nest monastery is a classic example of a man-made wonder. First constructed in the late 1600s (it’s since burned down and been rebuilt several times) at almost 3,000 feet above the valley floor on a sheer cliff face, this architectural wonder is a great way of demonstrating man’s ingenuity and building skills. These images were made from the local viewpoint, just across a gaping chasm with a 1,000-foot drop. In the summer, weather is a bit unpredictable, but that can make for some great photo opportunities. I’d prefer to shoot on the fringes of inclement weather any day, as opposed to a plain blue sky, it just makes for much more interesting images. In the first image above I wanted to show what the scene looked like upon arrival, the prayer flags disappearing into the fog. But a bit of patience, one of the photographer’s best qualities (along with curiosity), paid off as the low lying clouds came and went, eventually revealing the Tiger’s Nest in an otherworldly haze, adding to its mystery.

    NATIVE CLOTHING

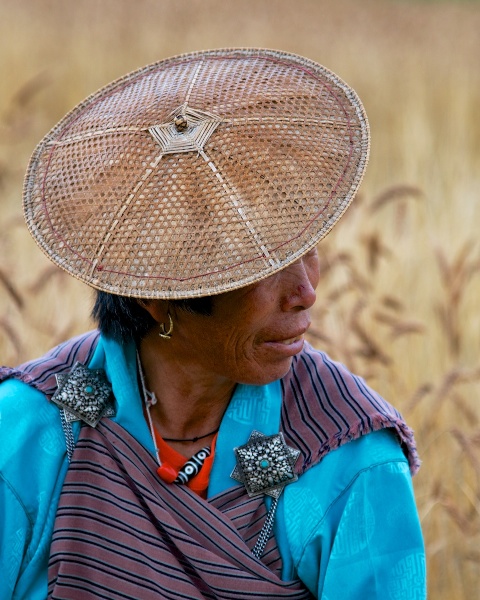
    Travel Photography Tips - Native Clothing - Woman in Kira in Wheat Field  P  Bumthang Valley Bhutan  Copyright 2013 Ralph Velasco

    The people of Bhutan wear very distinctive clothing. The women wear what’s known as a “kira,” often accented by two broaches, as in the first image above. Some of these broaches are antiques and have been handed down to each successive generation and can be worth thousands of dollars. Again, something very distinctive to this place. I encountered this particular woman as she was picking wheat in a field in the Bumthang Valley. Asking my guide/driver to pull over to the side of the road, I climbed over several fences and negotiated some muddy trails to get closer, but I like to think the result was worth the effort. She’s also wearing a traditional bamboo hat often seen in this part of the country, and I certainly want to highlight that.

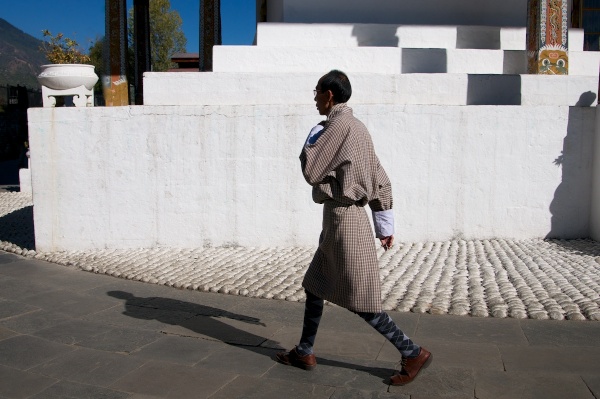
    Travel Photography Tips- Native Clothing - Man in a Gho with Shadow  Thimpu Bhutan  Copyright 2013 Ralph Velasco

    Men, on the other hand, wear what’s called a “gho.” This single piece of cloth, expertly wrapped around the man’s body and accented by the often white, rolled up sleeves, is seen everywhere in Bhutan, from the young school boys to the older men spinning their prayer wheels. The addition of a simple shawl is required to be draped over the man’s shoulder and around his waist as he enters the very sacred dzongs where it’s of the utmost importance to show respect for country and king. Our guide, Sangay, said that it’s law that during working hours a man must wear a gho. One of my tour participants asked him what the penalty is if a man is caught not wearing a gho, and Sangay said, “There is no penalty, it just doesn’t happen.”

    PEOPLE

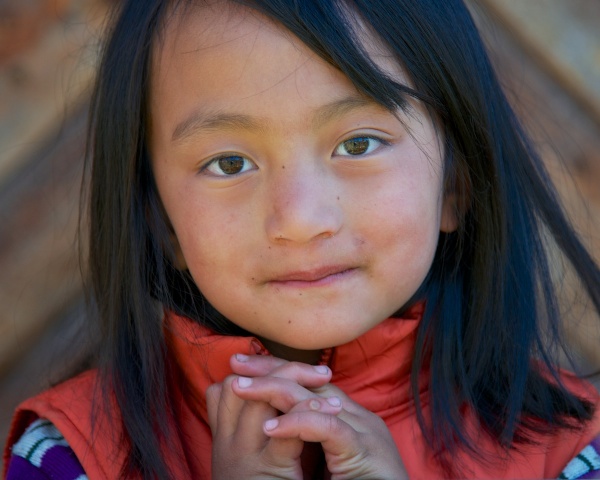
    Travel Photography Tips - People - Little Girl with Hands Folded at Pepper House  Bumthang Valley Bhutan  Copyright 2013 Ralph Velasco

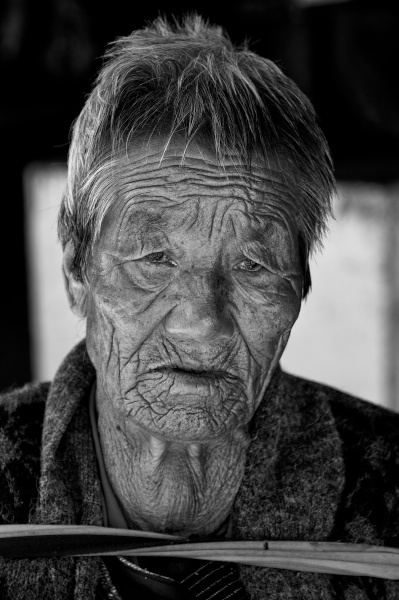
    Travel Photography Tips - People -  Time in a Face  Thimpu Bhutan  Copyright 2013 Ralph Velasco

    As in any country, a people are their culture, and undoubtedly Bhutan is no exception. The people photo opportunities are virtually endless in this nation where everyone seems to be outside most of the time (the interiors of the houses can be very dark and smoky from the wood burning stoves and lack of quality electricity). Although I do make an effort to get inside of people’s homes to experience this essential part of a place, as well. Getting out early in Bhutan will often be rewarded, allowing you to capture the children on their way to school, and the adults on their way to work, all generations dressed in their traditional ghos and kiras.

    STORYTELLING

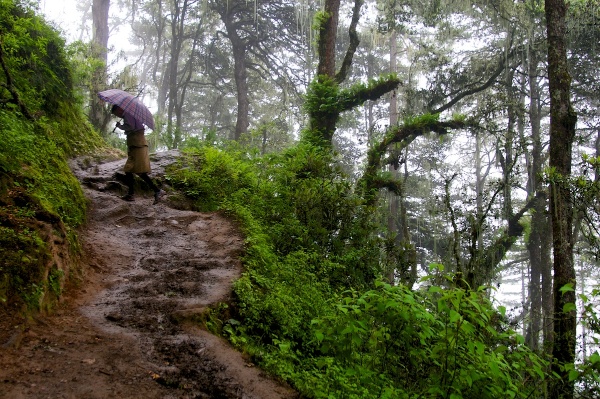
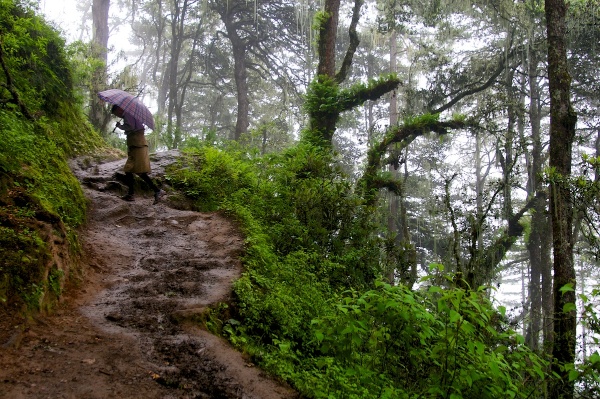
    Travel Photography Tips - Storytelling  Sangay Walking Up Trail to Tiger s Nest Monastery  Paro Bhutan  Copyright 2013 Ralph Velasco

    Although it’s a good aspiration, not every image has to be worthy of a magazine cover. Sometimes it’s important just to make an image so that you can convey the story behind it. In this shot I simply wanted to show the condition of the trail we took to get up to the viewpoint overlooking the infamous Tiger’s Nest Monastery near Paro, Bhutan. It’s not going to win any awards, but I think it conveys this idea, which was my intention.

    Final words of advice

    So my recommendation is to work from your physical shot list, not try to commit it to memory or shoot whatever presents itself at the time. The more prepared you are for the photo opportunities you seek, the more you’ll find them, I can almost guarantee it. Have a goal of five solid images in each category before you tick it off your list, as this will provide you with options when it comes to putting together that book, website or slideshow presentation later.

    Finally, know that any single image may represent two, three or even five or more categories, so there can be some crossover.

    Post originally from: Digital Photography Tips.

    Check out our more Photography Tips at Photography Tips for Beginners, Portrait Photography Tips and Wedding Photography Tips.

    How to Capture the Essence of a Place – Travel Photography Tips

    The post How to Capture the Essence of a Place – Travel Photography Tips by Ralph Velasco appeared first on Digital Photography School.

    Digital Photography School

  • Shooting in The Dark by Dominique Shaw

    My brother Liam and I have been shooting weddings without flash for over eight years. The flash equipment is safely in the car boot just in case of an absolute emergency but for the last four years we haven’t had the need to bring out the flash gun at all! We like to let the […]
    dslrBlog

  • 5 Good Photography Habits to Start Today

    Last week I talked about Five Bad Photography Habits to Quit! Today, I want to talk about five good photography habits you want to start today.

    1. Shoot every day

    gracie-may-photography-18

    Those 365 projects are magical. They encourage participators to take at least one shot every single day. Shooting every day is a really great habit for all photographers. Here are some of the benefits of this habit:

    • You will excel in your capabilities
    • You will start to see the world photographically and frame scenes with your mind’s eye
    • You will be recording your life. This doesn’t always seem important at the time, but later on, you’ll look at those shots and be like “hey, I forgot about that!”

    Those are just a few reasons that shooting every day is a great habit to get into. Further reading: Consider starting into a Photography Project 365 this New Year

    2. Leave your camera at home

    It seems kind of contradictory to habit #1, but leaving your camera at home can be a great habit to get into, especially for parents. I knew I’d overstepped my boundaries when my kids started saying, “Mom, you’re not bringing you camera are you?” I learned to harness the power of my phone’s camera to record memories without intruding on those moments with my massive SLR. Additionally, SLRs can be really impractical, and dangerous. I’m surprised my kids haven’t had concussions from some of the times I’ve bent over and hit them in the head with my camera!

    Learning to harness the power of your device camera can be really liberating. Further reading: iPhone Photography

    3. Keep notes

    By Geek Calendar

    Start keeping notes with your ideas, inspirations, color schemes…anything! I keep so many notes in my phone with ideas and inspirations. There are a few different ways to do this.

    • You can make a physical notebook with written notes and images torn out of magazines
    • Pinterest is an amazing (and addictive) resource for compiling photography ideas. Props, poses, locations, etc.
    • I personally love the app Evernote for keeping my notes easily accessible across all my computers and devices

    This can be a great habit to keep you inspired or give you somewhere to start when you find yourself with time on your hands but nothing in your head.

    In addition to keeping notes for inspiration, keeping records from shoots is a great habit that will really pay off. This can mean many things like:

    • Keeping detailed records of shoots with location information, info about the time of day, season, camera settings used, lighting set up, tips to remember for next time (like ‘the parking wasn’t free’)
    • Keeping records while editing is one thing that I’ve regretted not doing many times. When you’ve nailed an edit, keep a record of the steps you took or the resource you used (Photoshop actions, Lightroom presets, etc) so you have something to refer to next time you edit or if someone asks, you how you did it. When working with actions in Photoshop, I often leave an unflattened version saved as a Photoshop file (.PSD) to refer to later.

    4. Backing up

    By Jeremy Derr

    One of the best possible habits you can start – like yesterday – is backing up your computer religiously. Many  photographers have had their entire history lost because they didn’t back up their hard drives. A few ways you can do this:

    • Back up to physical hard drives using a disk cloning program or an automated system you don’t need to think about. However, this doesn’t protect against theft, destruction (water spill!) or other disasters. You also need to backup in a way that keeps your files away from your computer or even your home/office.
    • You can use a wireless hard drive like Apple’s TimeMachine to zoom your files to an area in your home that isn’t attached directly to your computer.
    • You can backup using online cloud storage. This can be as simple as utilizing Dropbox to drop your files off for safekeeping. But two words of caution: 1.) If you have an absolutely huge amount of files (as in terabytes) DropBox won’t be enough unless you want to pay. However, any service that allows you this much storage will charge you. 2.) If your internet service has an upload limit, be careful. When you do your first big file dump (like a wedding or shooting for a whole day) you may hit your limit and get penalties. These days, most internet providers no longer have these restrictions, but some (like mine) still do so it’s worth checking.
    • You can backup to disks. I’ve burned most of my older files to BluRay as a third mechanism for protecting my files.

    In short, find whatever ways you can to keep your files completely safe. You’ll be thankful you did if something happens.

    5. Look at photography

    I’m amazed about how many photographers can’t name photographers they love most or photographers who have inspired their work. This begs me to ask…are you looking at photography? Do you think any musicians draw a blank when asked what music they draw their influences from? Or painters? Or writers? What goes in, comes out. You must must must get into the habit of soaking up imagery on a regular basis. Become a fan of photography – not just making it, but enjoying it. Visit exhibits. Read books. Scan the web. Some tips for viewing photography:

    • Don’t only view the genre(s) that you like to make. Just because you like taking portraits, that doesn’t mean you can’t become a fan of a great landscape photographer.
    • Don’t be afraid to copy. Photography stands alone in so many ways but it doesn’t have to. One way is that we’re afraid to admit what photographers inspire our work because we think that in saying this, we’re saying that we think we’re like them. This isn’t true in photography any more than in the music industry or any other art form. Another way we stand alone is that we’re afraid to copy. Because of the internet and the pervasiveness of intellectual theft, we’re afraid to experiment with copying. Now, I’m not talking about plaigarism or peddling someone else’s ideas as your own. Further reading: 15 tips for copycatting your way to success.
    • Learn to read images. When you view a piece, stop for a moment and really soak it in. This can be hard these days when we’re chasing content faster than ever before. But stop, breathe and enjoy. Further reading: how to read a photograph

    Also, viewing photography can be a great substitute when you’re not in a position to get out and shoot or when in a rut.

    These have only been five habits and I’m sure there are many more! What helpful habits do you have?

    Post originally from: Digital Photography Tips.

    Check out our more Photography Tips at Photography Tips for Beginners, Portrait Photography Tips and Wedding Photography Tips.

    5 Good Photography Habits to Start Today

    The post 5 Good Photography Habits to Start Today by Elizabeth Halford appeared first on Digital Photography School.

    Digital Photography School

  • How to Make a Portrait of a Stranger in 8 Easy Steps

    While you may be at ease shooting candid street photography, you may not feel quite as comfortable doing street portraits… Making a portrait of a stranger, is a very different approach which requires an interaction with your subject.

    If you are a very social person who talks to strangers anywhere you go, like I do, taking the next step should not be too much of an issue. If, on the other hand, the thought of approaching a stranger terrifies you, keep reading.

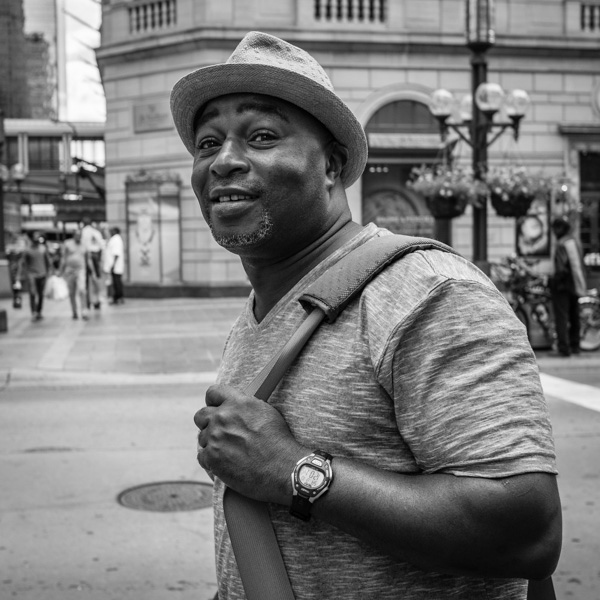
    Meet Steve ~ While waiting for the light to cross the street, I made a comment on his cool hat. We talked for 10 minutes! ©Valérie Jardin

    Meet Steve ~ While waiting for the light to cross the street, I made a comment on his cool hat. We talked for 10 minutes! ©Valérie Jardin

    Step 1 – practice without a camera

    Make it a goal to talk with strangers everyday for a few days. They can be waiting in line at the coffee shop with you or on the subway. Make small talk about the weather, comment on the new coffee flavor, just about anything that comes to mind as long as it’s not weird. You may find it terrifying at first but I can assure you that it will become easier everyday and you will soon look forward to your next encounter.  Granted, there is a big leap between approaching a stranger to comment on their cool hat ,or funky sun glasses, and asking them to make a portrait.

    Yet, if you are shy, the first step will help you get to the second.

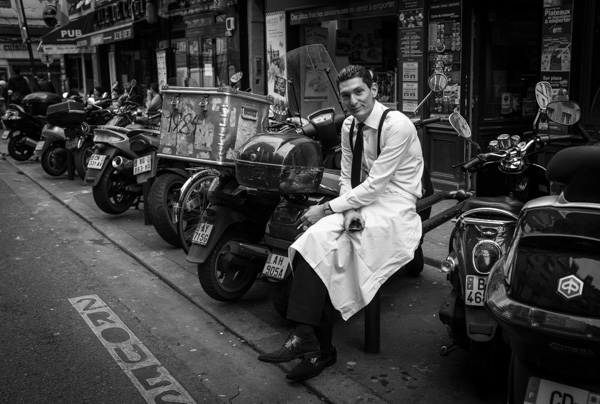
    Once there is eye contact, just tell your subject why you want to take a picture. Here I saw a timeless black and white image and I had to ask! ©Valérie Jardin

    Once there is eye contact, just tell your subject why you want to take a picture. Here I saw a timeless black and white image and I had to ask! ©Valérie Jardin

    Step 2 – photograph a street performer

    Another way to ease into it is by photographing street performers. They are there to be seen and they are easy subjects. Purists will tell you that they don’t count because they are too easy. As far as I know there is no authority or rules for street portraiture or street photography in general, so go ahead! Photograph a street performer and remember to leave a tip.

    Step 3 – go with a friend

    Having another person at your side will embolden you, and you will find it easier to approach a stranger if you’re not alone. The friend doesn’t even have to be a photographer.

    Step 4 – don’t hide behind a long lens

    Just like with candid street photography, the closer the better! Also, a smaller camera will be less intimidating for your subject.

    Step 5 – be confident

    Introduce yourself and tell them why you want to make a portrait of them. You’re not doing anything wrong, so don’t take the shot and run! If they ask you why you want to take their picture, simply explain that you are photographing strangers for a personal project and you found them quite interesting. Most people will be flattered.

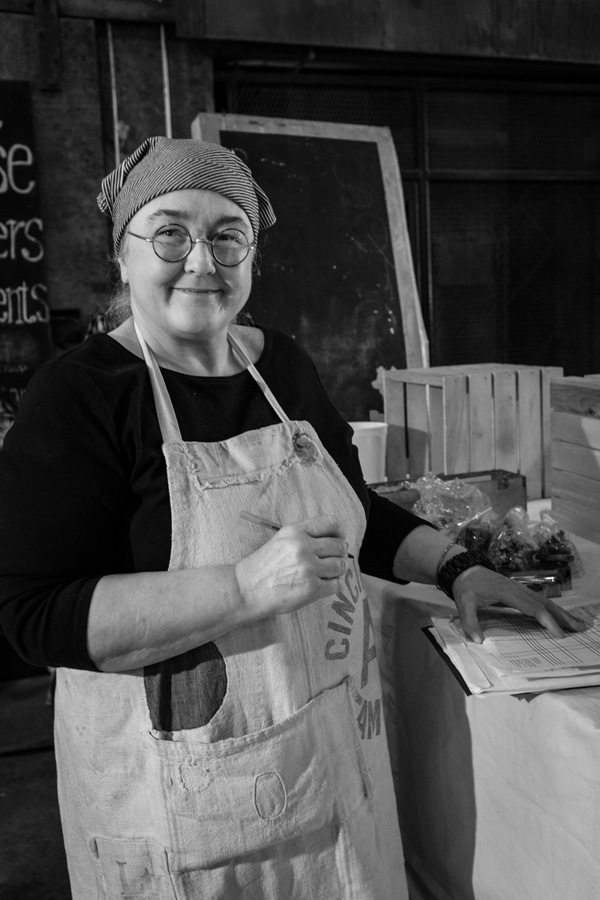
    Most people are flattered that you want to make a portrait of them. ©Valérie Jardin

    Most people are flattered that you want to make a portrait of them. ©Valérie Jardin

    Step 6 – take your time

    You asked for their permission to take the picture, so now it’s your responsibility to do a good job. The background may be distracting, or they may be squinting from the sun in their eyes. Ask them to move or even cross the street if the light is better. Take two or three shots until you are satisfied with the result. Make sure you thank them for their time before you part ways.

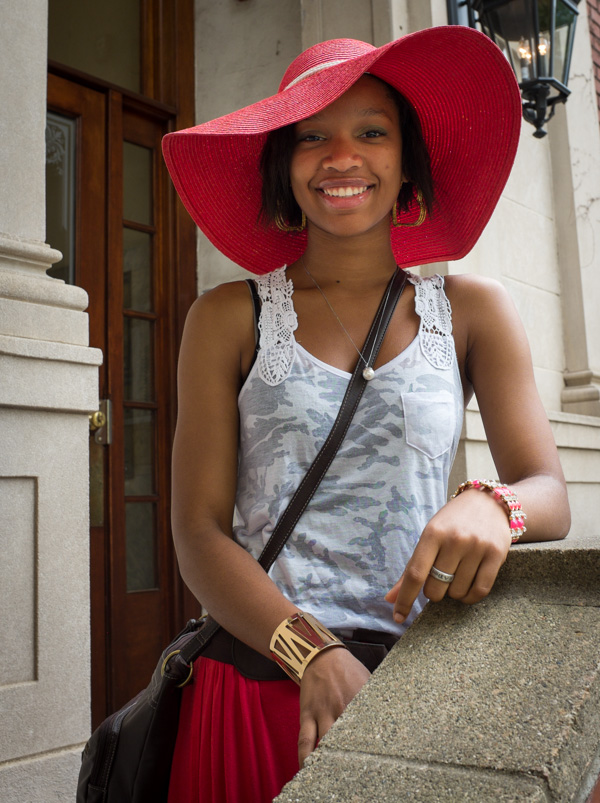
    Once you have the permission to do a portrait, it's okay to ask your subject to move to a more pleasing background. This young woman was part of my ongoing 'Beautiful Smiles' blog series. ©Valérie Jardin

    Once you have the permission to do a portrait, it’s okay to ask your subject to move to a more pleasing background. This young woman was part of my ongoing ‘Beautiful Smiles’ blog series. ©Valérie Jardin

    Step 7 – enjoy the experience

    Ask for their name, maybe you’ll even engage them in a conversation and find out some interesting things about their lives. Show them the picture on the back of the camera. Share email addresses and send them the best picture if they ask.

    Step 8 – share your work

    Those portraits are useless if they stay on your hard drive. Share them on a blog or social media network. The more you share, the better you will feel about your project and the more you’ll want to go out and shoot.

    If you’ve never done this, why not make it a photographic goal for 2014? Good luck!

    Next step . . .

    Please share your experience with the dPS community. How did you start interacting with strangers to photograph them? Do you find it as addictive as candid street photography?

    There are smiles that are irresistible! ©Valérie Jardin

    There are smiles that are irresistible! ©Valérie Jardin

    Post originally from: Digital Photography Tips.

    Check out our more Photography Tips at Photography Tips for Beginners, Portrait Photography Tips and Wedding Photography Tips.

    How to Make a Portrait of a Stranger in 8 Easy Steps

    The post How to Make a Portrait of a Stranger in 8 Easy Steps by Valerie Jardin appeared first on Digital Photography School.

    Digital Photography School

  • Film vs. Digital in Large-format Photography: Which Is Better?

    French photographer Marc Riboud said, “Taking pictures is savouring life intensely, every hundredth of a second.” Although astounding, the human ability to capture and store moments in image rich memory is limited. Visual encoding start with perception follows through to the moment when it is committed to memory and then reaches the period after in which the memory is retained. Continue Reading

    The post Film vs. Digital in Large-format Photography: Which Is Better? appeared first on Photodoto.


    Photodoto

  • A Turn of the Head – Creating More Compelling Bird Portraits

    The last time I counted, there were about seventy two quadrillion photos of birds on the internet. Therefore, if you’re dedicating your time to try to stand out as a bird photographer, there is a ton of competition out there. However, there is one thing that you can try to incorporate in your photos that will at least have them stand out a little bit.

    Creating More Compelling Bird Portraits

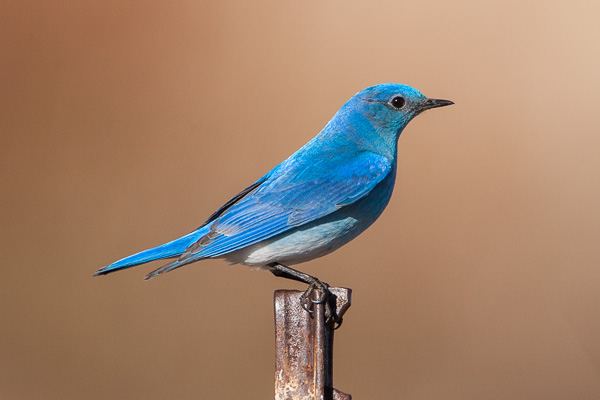
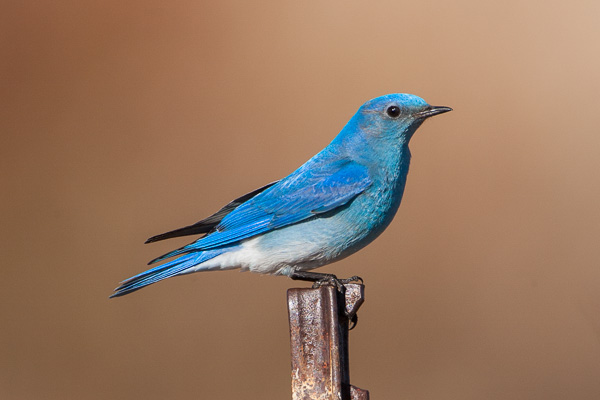
    Wait for the turn of the head. Sounds pretty simple doesn’t it? It sounds simple, but achieving it is often a bit trickier. Many bird species have their eyes placed on opposite sides of their heads. When photographing birds without their heads slightly angled towards the viewer, the images tend to lack a bit of intimacy. Consider the following two images of a Mountain Bluebird. In the first image, the bird’s head is angled away from the viewer, while the second image features the bird’s head angled just slightly towards the viewer.

    Mountain Bluebird looking away from the viewer

    Mountain Bluebird looking away from the viewer

    Mountain Bluebird looking toward the viewer

    Mountain Bluebird looking toward the viewer

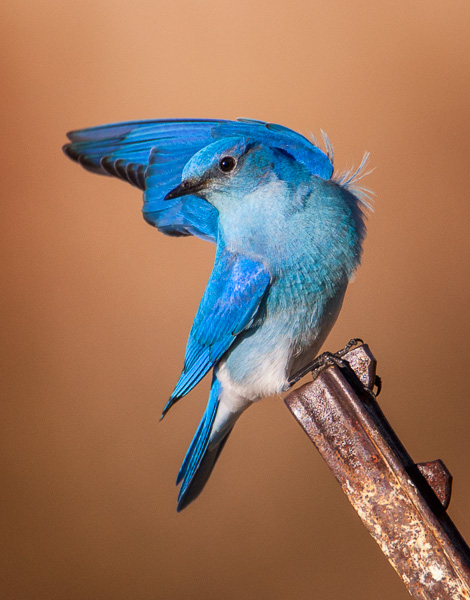
    I’ll bet that for most of you, the second image is more compelling just because of that eye contact. Sure the perch is somewhat ugly (it’s the post used to mount the bird box above the ground), but even with an ugly perch, the second image is more compelling. Then if you’re patient, even with an ugly perch, you can still get a compelling image out of it, slight head turn included.

    Mountain Bluebird posing pretty

    Mountain Bluebird posing pretty

    What to look for – subtle differences are huge

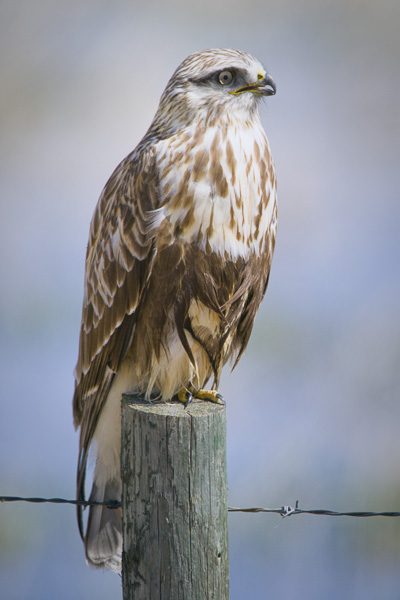
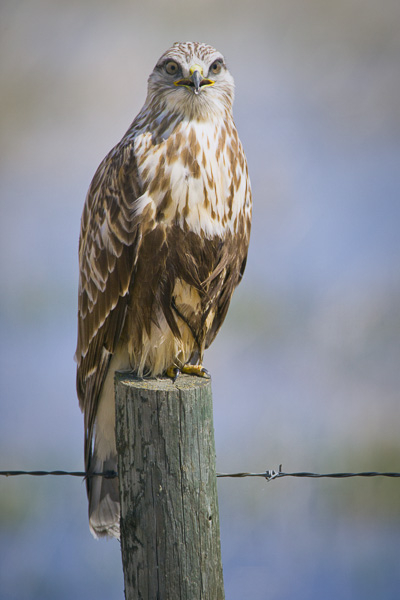
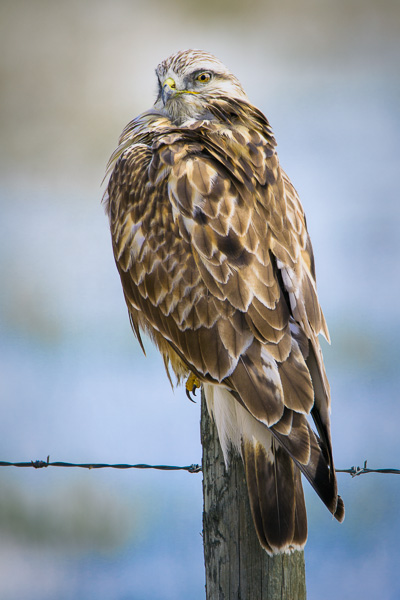
    Consider the following three photos of a Rough-legged Hawk.

    Rough-legged Hawk looking away from the viewer

    Rough-legged Hawk looking away from the viewer

    © Paul Burwell Photography - Rough-legged Hawk looking directly at the viewer

    Rough-legged Hawk looking directly at the viewer

    © Paul Burwell Photography - Rough-legged Hawk with the sexy over the shoulder look towards the viewer

    Rough-legged Hawk with the sexy over the shoulder look towards the viewer

    In the first image, the bird is looking away from the viewer. In the second, he is looking straight on to the viewer, while the third image has my preferred head-turn. In my opinion, in terms of a compelling image, it isn’t even a close comparison. The perch still isn’t ideal (although this is the typical place we find these birds where I live), but the third pose with the head-turn makes that image into a keeper for me.

    Patience or initiative gets the head turn

    So, is it just a matter of patience and waiting for the preferred head-turn? Sometimes that is true. Other times I try to “encourage” my subject to look my way. How do I accomplish this? I imitate the squeak of a mouse. I purse my lips together and suck in air through my teeth to produce an irritating squeaking sound. Sometimes, not always, but some times, the bird is curious enough to look my direction.

    I know of some photographers who prefer to use the “machine gun” approach where they just hammer-down on the shutter button, essentially shooting a slow frame-rate movie.  Occasionally they’ll catch the bird with its head in the preferred position.  I personally don’t favour that approach, but would rather just wait for the appropriate moment and cut down on my post-processing work once I get home.

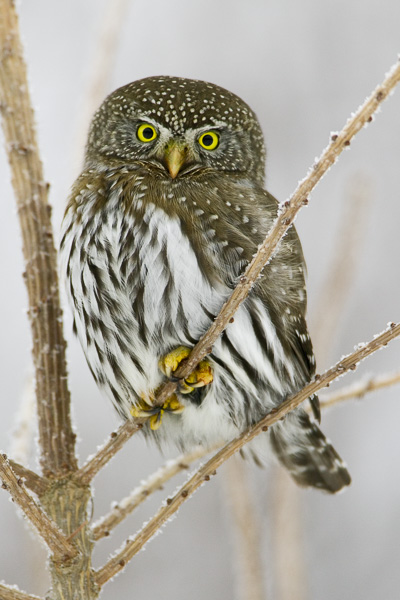
    In terms of the bird looking head-on into the camera, that can occasionally work, but for most birds it just isn’t their best angle. There are definitely exceptions to that and owls are the first bird that springs to mind. Consider this image of the tiny Northern Pygmy Owl for example.

    © Paul Burwell Photography - Northern-Pygmy Owl looking frosty

    Northern-Pygmy Owl looking frosty

    Here are a couple more images to consider:

    © Paul Burwell Photography - www.bsop.ca

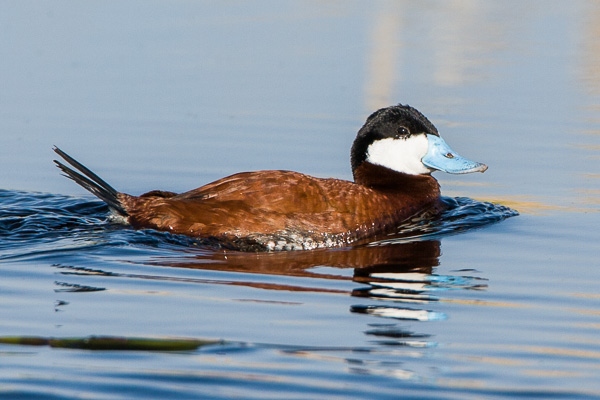
    Ruddy Duck Drake looking towards the viewer

    © Paul Burwell Photography - www.bsop.ca

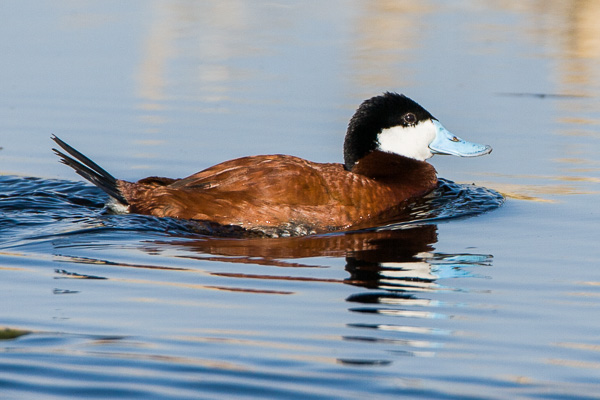
    Ruddy Duck Drake looking away from the viewer

    I made these two images of the Ruddy Duck just seconds apart. In the first image, the bird looked my way due to my incredible squeaking ability, while in the second, his patience expired and he was off to find his girl friend.

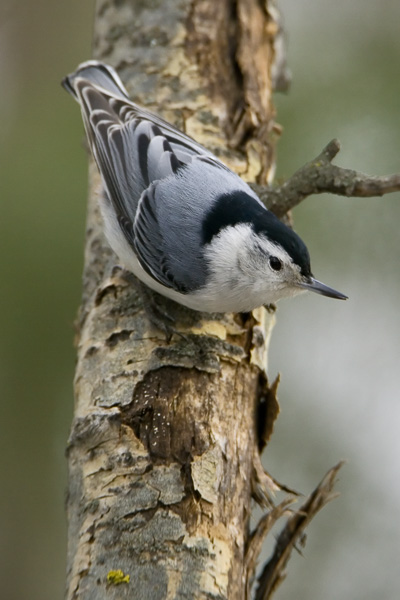
    The following two images of a White Breasted Nuthatch also illustrate the point. In both images, the birds are in their traditional upside-down pose on the side of a tree. The difference between the images is that in the first the bird is looking slightly away from the viewer while in the second exhibits that classic slight head-turn towards the viewer that I strongly favour.

    © Paul Burwell Photography - www.bsop.ca

    White-breasted Nuthatch looking away from the viewer

    © Paul Burwell Photography - www.bsop.ca

    White-breasted Nuthatch looking towards the viewer

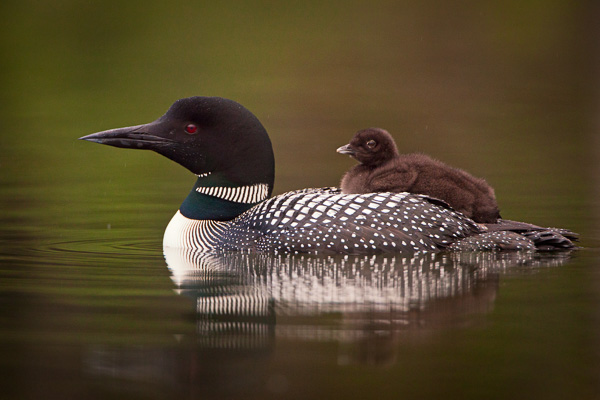
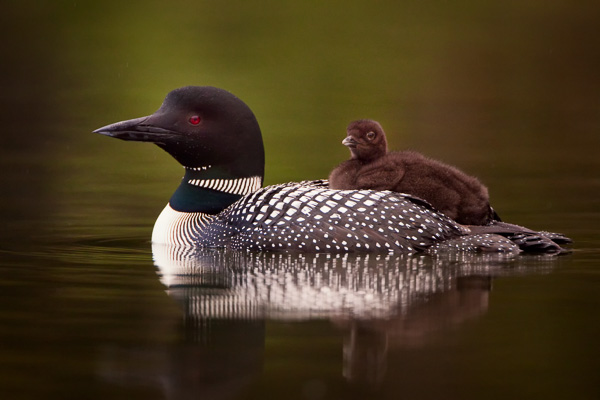
    The last two images I present for your consideration are these two images of a Common Loon carrying a chick on its back.

    © Paul Burwell Photography - www.bsop.ca

    Common Loon carrying a chick on its back with both birds looking away from the viewer

    © Paul Burwell Photography - www.bsop.ca

    Common Loon carrying a chick on its back with both birds looking towards the viewer

    In the first image, both adult and baby are looking away from the viewer. It’s a nice image but lacks a bit of intimacy.  Whereas the second image features both birds looking towards the viewer. The second image is a result of the large goofy photographer, with his lens perilously positioned inches above the water, from an unstable boat squeaking his heart out. For me, there is no comparison between the two images; the second wins easily.

    Therefore, the next time you’re out in pursuit of some bird images that might rank in the top thirty-six quadrillion instead of the bottom, look for the opportunity to capture those birds with their heads slightly turned towards you. Whether you achieve it through patience or “the squeak”, I’ll bet you’ll find your images a bit more compelling.

    Post originally from: Digital Photography Tips.

    Check out our more Photography Tips at Photography Tips for Beginners, Portrait Photography Tips and Wedding Photography Tips.

    A Turn of the Head – Creating More Compelling Bird Portraits

    The post A Turn of the Head – Creating More Compelling Bird Portraits by Paul Burwell appeared first on Digital Photography School.

    Digital Photography School

  • Resources for Better Landscape Photography

    Just a quick post to give you a few places to look for tips on doing better landscape photography.  Links to a few recent articles, and a couple of ebooks for you to check out..

    Ebooks

    On sale now 50% off (expires December 15th, 2013)

    Landscape Photography – The Entire eBook Collection

    This eBook collection has been a really strong seller over at our sister site – SnapnDeals. It’s six landscape eBooks at a great price.

    1385693865783537786

    Also don’t forget to check out our own best selling Landscapes eBook – Living Landscapes – which launched earlier this year.

    Living Landscapes – a Guide to Stunning Landscape Photography

    Some recent articles about landscape photography:

    • The Intimate Landscape – 5 Tips for Better Landscape Photography
    • Wide Angle Lenses and the Landscape
    • A Day at the Beach – Seaside Landscapes
    • How to Shoot Landscapes at Sunset 
    • Composing Dynamic Landscape Images
    • 4 Essential Ingredients for Great Landscape Photographs

    Do you have some other good sources? Share in the comments below – or share your landscape images!

    Post originally from: Digital Photography Tips.

    Check out our more Photography Tips at Photography Tips for Beginners, Portrait Photography Tips and Wedding Photography Tips.

    Resources for Better Landscape Photography

    The post Resources for Better Landscape Photography by Darlene Hildebrandt appeared first on Digital Photography School.

    Digital Photography School

  • Why I Don’t Support “Black Day” at Flickr

    Why I Don't Support Flickr Black Day

    If you notice something different about photos on Flickr today, it might just be “black day.” Over the past week or so, hundreds (maybe thousands) of users who dislike an impending photo page change (and in many cases, redesign changes from earlier this year) have organized and are protesting by posting black protest images to their Flickr accounts today, December 8th.

    Here is why I don’t support this protest.

    Flickr users have protested quite literally *everything* that has ever been changed to the site. Every change over the past decade or so that Flickr has been around, has been meet by strong resistance. When Flickr added video, when Flickr required Yahoo accounts to sign in, and certainly design changes most of all, all of these and so many more have been met with various protest movements.

    The “who moved my cheese” crowd is strong with Flickr.

    At the same time, in order to improve and grow Flickr *MUST* change. Flickr must evolve. Flickr must improve.

    Whether or not Flickr gets their design changes right or wrong, they simply must move forward and compete with other photo sharing sites today. Hopefully they get it more right than wrong, but I simply can’t support something that’s primary premise is based on not changing for the sake of, well, not changing. That is how things die. As good as Flickr is, it can always improve, and if the site is paralyzed by the “no change” crowd it cannot innovate and grow.

    Competition in the photo sharing space is stronger than it ever has been. Flickr, Google+, Instagram, Twitter, Facebook, Pinterest, SmugMug, Behance, 500px and more are all competing for our photos and our attention. If Flickr is going to survive as a contender in this space, they must produce a more compelling experience than they have in the past.

    Many of those currently protesting design changes on Flickr are loud, very loud — and some are some of the rudest, vulgar and offensive people I’ve ever come across online. They way they trashed Marissa Mayer and other Flickr employees’ *personal* photostreams after the last redesign was way over the line.

    Even as a large protest group, however, this group most certainly does NOT represent the majority opinion on Flickr. Most (the silent majority) Flickr users couldn’t be bothered to get worked up about anything and quite simply don’t care enough about whatever happens at some photo sharing site to have much of an opinion one way or the other.

    For this silent majority, the best tool Flickr has is data. The best thing that they can do is watch how the majority use the site and react to changes based on their online usage patterns and actions. I suspect that recent design changes on Flickr have contributed to more users, more views, and more engagement — despite what a small, but vocal, minority might want you to believe.

    Only Flickr has access to this data, but I suspect that they are quite happy with usage results (even just going by my own anecdotal increase in activity that I’ve seen on the site as changes have been rolled out this year).

    Now, as far as the new photo page redesign goes, mostly I like it. I say mostly, because even as I’ve used the page (it’s in an optional opt in or out beta form right now), I usually end up turning it off and going back to the old page. It simply is missing too much functionality that I rely on and need to use Flickr at present.

    For example, I need to be able to click on the faves button and see who has faved my photo. That is important (and pretty basic) social information that I want access to. At present you cannot do this with the new photo page (but it is planned per Flickr’s feedback page). Assuming Flickr gets all of the basic functionality right in the final product though, I like the design better in general.

    I also like the redesign changes that Flickr implemented earlier this year. I think that the justified layout combined with infinite scroll is the fastest, most efficient, way to consume photos on the internet today. Both Google and Facebook use infinite scroll. While some people have claimed that Flickr is slower for them, it is not for me. Images load very quickly on a modern laptop with a broadband internet connection. I also don’t have bandwidth caps on my primary internet connections.

    Flickr has never been faster and I’ve been able to see more images on Flickr this year than any year previous due to these efficiency improvements.

    I think Flickr needs to change even more in fact — mostly around social. There is still so much that could be improved on Flickr from a social standpoint.

    The primary role of a social network should be as a social lubricant. Flickr should be obsessed with social, much more than it feels that they are. How can Flickr create even more social interaction? How can Flickr turn online social interaction into offline social interaction? How can Flickr make it easier and easier to favorite and comment on photos? How can Flickr show me more photos that I like (and will interact with socially) and less photos that I do not like?

    These are the questions Flickr should be asking as they innovate and improve, and, yes, change.

    Why does Explore still exist as it does? It’s so broken. Why are power users blacklisted from Explore? Shouldn’t Flickr care about their power users?

    Explore is boring to me because it is not customized to me. Flickr has so much data about me. Why aren’t they analyzing my data to provide me a better photo exploration tool? Flickr knows whose photos I favorite. Flickr knows what tags on photos I favorite (and with image recognition analysis in the future, even more).

    Flickr knows the geolocational location of photos that I favorite. Why is Flickr wasting valuable Explore real estate by showing me photos with watermarks when I hate watermarks? Why is Flickr showing me images of overcooked HDR? Explore has so much potential to truly provide a compelling image discovery system and yet it still falls flat.

    I hope more change is coming to Flickr, not less. 2013 was the most innovative year of Flickr since Yahoo purchased them. Hopefully 2014 will be every bit as good.

    More comments on this at the original Flickr photo here and on Facebook here.


    Thomas Hawk Digital Connection

  • Lightroom Tips for the Develop Module – the Magic Alt Key

    LR_Alt_option_visualization_opener

    Lightroom tips for the Develop module – one feature in Lightroom that isn’t obvious or easy to discover is the visualization feedback which you can get in the Develop module. In many cases when you hold the Alt key, (Option on a Mac) and click (and hold it) on a slider, the screen will change to give you feedback on the adjustment you are making.

    This feedback (visualization) take some of the guess work out of how the adjustment you are making is affecting the image. Here are some of the useful visualizations available in the Lightroom Develop module:

    Alt and the Exposure, Highlights, Whites, Shadows and Blacks Sliders

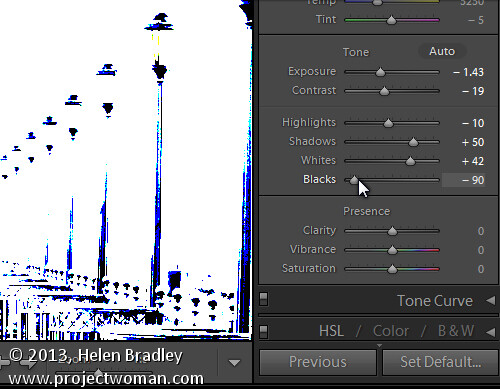
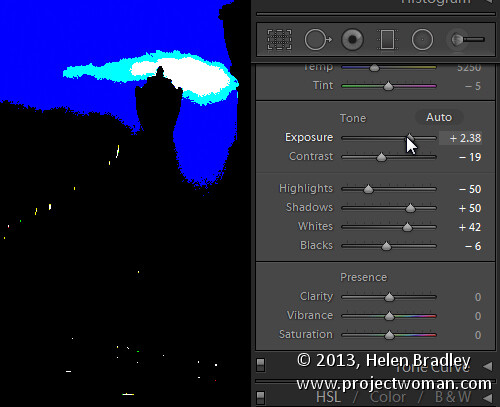
    When you hold Alt (Option) and drag any of these sliders you will see any areas where whites or blacks are clipped as a result of the adjustment – the color shows which channel is being clipped. When you adjust Shadows and Blacks the white areas of the image aren’t clipped.

    LR_Alt_option_visualization_1

    Showing where the blacks are being clipped

    When adjusting Exposure,  Highlights and Whites – the black areas are not clipped.

    LR_Alt_option_visualization_2

    Showing where the highlights are being clipped

    Sharpening

    When adjusting Sharpening you can preview the result of the sharpening on the image by holding the Alt (Option) key and drag on any slider. Alt (Option)  and the Amount slider shows you the sharpening applied to a black and white version of the image – as Lightroom sharpens only the luminance and not color this gives you a better view of the sharpening result.

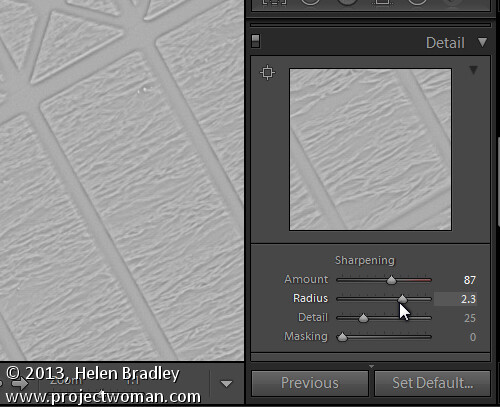
    Alt (Option)  with the Radius slider shows the halos being applied to the edges in the image to sharpen it.

    LR_Alt_option_visualization_3

    Showing the radius or amount of sharpening being applied

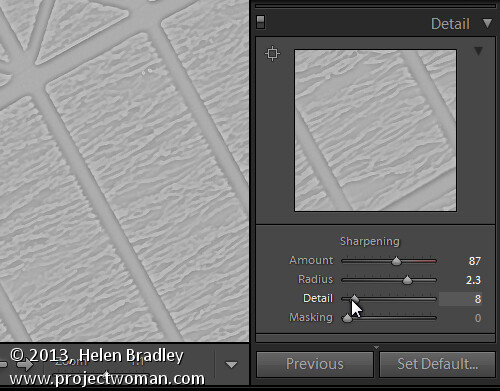
    Alt (Option)  and the Detail slider shows the suppression of the halos occurring as you drag on this slider.

    LR_Alt_option_visualization_4

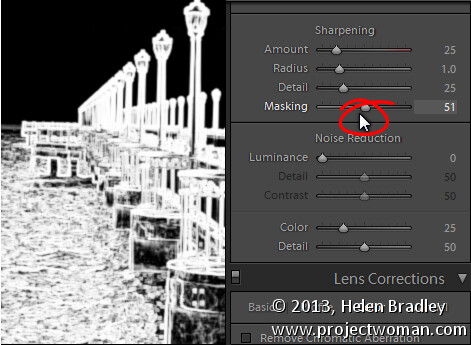
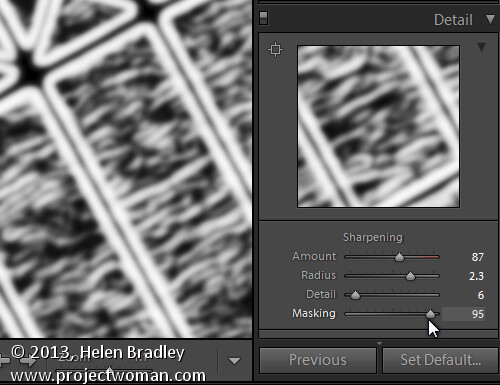
    Alt (Option) and the Masking slider shows a black and white mask over the image – the areas which are black are not sharpened and those which are white will be sharpened.

    LR_Alt_option_visualization_5

    Showing the mask when sharpening – makes it easy to control which areas are sharpened and which are not, very useful for people photos.

    Split toning

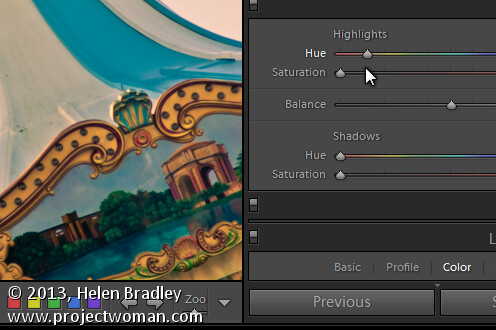
    Alt (Option) and either of the two Hue sliders shows the currently selected hue in place on the image even if the Saturation slider is set to zero. This lets you see the color you are selecting, at 100% saturation, before you apply it.

    LR_Alt_option_visualization_6

    Noise Reduction

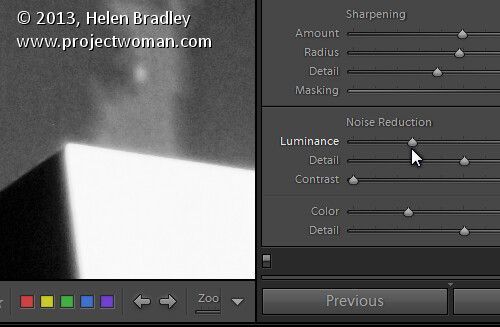
    Alt (Option) and the Luminance, Detail and Contrast sliders for removing  noise converts the image into a black and white image so you can see the effect of the adjustments more clearly.

    LR_Alt_option_visualization_7

    Lens Correction – Color tab

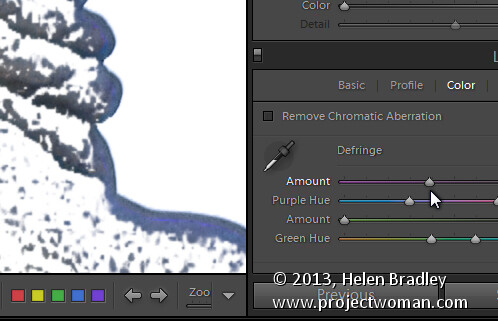
    Alt (Option) and the appropriate Amount slider shows the areas in the image affected by fringing. White is not affected and you will see any areas affected by purple or green fringing.

    LR_Alt_option_visualization_8

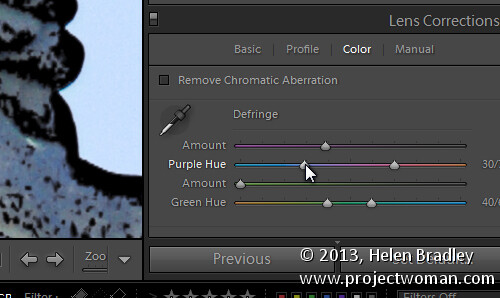
    Alt (Option) and the appropriate Hue slider lets you view the range of hues being fixed. Black areas are already being targeted and any remaining purple or green color indicates residual color fringing.

    LR_Alt_option_visualization_9

    Recognizing the times you can use the Alt (Option) key in the Develop module will help you make adjustments to your images more easily and effectively. I hope you enjoyed these Lightroom tips for the Develop module.

    Post originally from: Digital Photography Tips.

    Check out our more Photography Tips at Photography Tips for Beginners, Portrait Photography Tips and Wedding Photography Tips.

    Lightroom Tips for the Develop Module – the Magic Alt Key

    The post Lightroom Tips for the Develop Module – the Magic Alt Key by Helen Bradley appeared first on Digital Photography School.

    Digital Photography School