Category: Photography

  • The Rewards of Photographing People When You Travel

    One of the most rewarding aspects of photography is that you can use the camera to connect with complete strangers, especially when you travel.

    Unless you are heading to the wilderness, the scenery alone is only a part of any trip.  The people and culture you encounter is the other part.  A travel album feels much more complete when you include images of both scenery and people.  Or even better, images that combine the scenery and the locals.
    asking

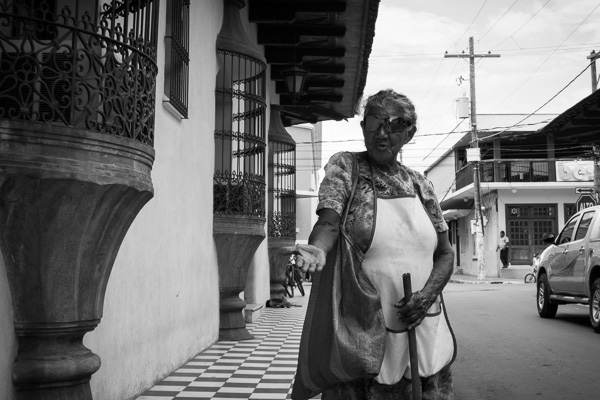
    Maybe it’s a portrait of a seller at a local market, or an interesting person that you pass while walking down the street, or even your tour guide.

    Not everybody will be happy to allow you to photograph them.  In the market in Managua shown in the above and below photos, every other person I asked said no to a portrait, but they still said no kindly.  Even though I didn’t speak the language, a little nod of the camera and a smile would let the person know that I wanted to photograph them.
    That feeling you get when they give you permission to take their portrait, is worth almost as much as the photo itself. It is a powerful connection that will provide some of your favorite moments while traveling, and perhaps you’ll make a new friend.

    Managua Market, The Rewards of Photographing People When You Travel
    Whenever I travel, I try to capture three different types of images.  I try to mix together photographs of the scenery, (whether it be nature or architecture) portraits of people, and candid photographs of people and daily life.  I don’t always succeed at all of these, but I try.

    So here are a few tips to help you capture better portraits when you travel.

    Be respectful and careful of the local culture and laws

    In certain countries, candid photography or even portraits of people are either not allowed or are looked down upon, while in other places, people are more likely to react with excitement.  Different countries and cultures have different views on this type of photography, so make sure to do your research or ask someone with experience.
    Always use judgement when photographing people.  It’s not too hard to tell someone that does not like having their picture taken.
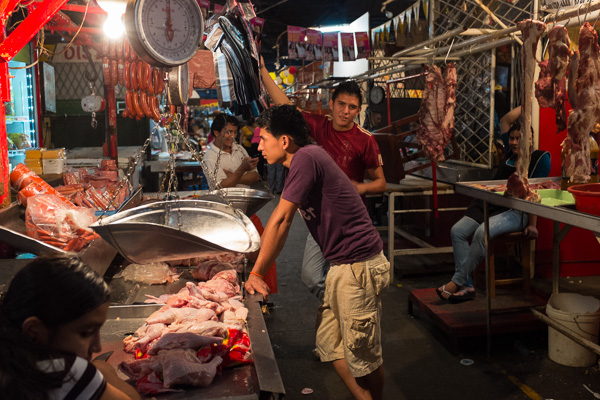
    Managua Market, The Rewards of Photographing People When You Travel

    Get close and focus on the subject’s eyes

    By far, the most important rule when taking a portrait of a person’s face is that their eyes are sharp.  Focus directly on their face, or their eyes if you are close up.  It is not good if their ear is sharper than their eye.
    And get close.  The portrait doesn’t need to be of their whole body.  Try some portraits with just the face and upper torso.

    Soho Skater, The Rewards of Photography People When You Travel

    Managua Market, The Rewards of Photographing People When You Travel

    Pick a background and wait there

    This works for both portraits and candid shots.  You’re going to come across interesting people spontaneously in your travels, but when you have some time, find an interesting background and wait for an interesting person.  Either capture the candid shot or ask them for a portrait, or both.

    chicken_stall

    Take your time

    If someone gives you permission to take their portrait, you owe it to them to create the best portrait that you can. Taking a quick shot, saying thank you, and scurrying away nervously is a waste of time for both of you.

    Don’t take too long, but make sure your settings are correct, the background, and angle of the subject to the main light source is ideal (and if it’s not, tell them where they should move), and that you are composing correctly.  The first compositional aspects that I try to figure out are whether I want to create a vertical or horizontal portrait and how close I want to get.

    market

    Expression and posture

    When you first meet someone and instantly have to take their picture, getting them to give a strong, natural expression is just not always possible. Even if you are nervous and have no clue what you’re doing, try to act like you know what you’re doing.  The more confident you seem, the better they’ll feel.

    Soho Portrait, The Rewards of Photographing People When You Travel

    First tell them where they should stand.  Some people will be naturals, but many will look for some direction from you and will be uncomfortable until they get it.  Telling them where to stand, and to do so in a natural posture that feels comfortable to them is a way to make them more relaxed.  Otherwise, a lot of people will just stand stiffly, while waiting for some direction.

    Throw out a positive word or two.  A simple, “That looks great” will mean a world of difference in making them comfortable, because they will think they are doing something right.  Even ask them to make up a pose for you!  A portrait is a collaboration.

    A good trick to use when you don’t like their expression or they seem uncomfortable is to have them move over a step or two and reposition.  It’s something simple that can break them out of an uncomfortable posture or expression and have them start all over again.

    And if they smile, tell them not to!  Natural smiles are good, but a forced smile can kill a portrait.

    Start with one person

    The biggest problem I encounter is that people who love the idea of capturing people when they travel still don’t follow through on it.  They seem to carry the feeling that they might be doing something wrong, or they might anger someone, or even more likely they simply don’t feel comfortable with approaching someone.
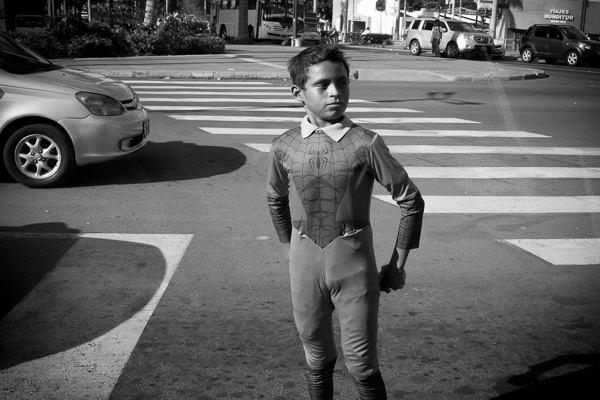
    jugglerMany don’t seem to ever get over the initial hump of capturing that first portrait on a trip.  That’s unfortunate, because once you get past that, you’ll be hooked.

    You probably know this already, but many people enjoy having their photo taken.  A significant percentage of people will be flattered when you ask.  A camera is a great connector between people.  Almost everyone knows what it is.

    So start with one person.  The next time you are out there, just tell yourself that you will capture one portrait of a stranger over the course of the day.  All it takes to start is one.


    Read some other articles on travel and people photography here:

    • How to Capture the Essence of a Place – Travel Photography Tips
    • Terrified of Street Photography? So Am I! Here’s How I Do It
    • Transcending Travel – a dPS ebook

    The post The Rewards of Photographing People When You Travel by James Maher appeared first on Digital Photography School.
    Digital Photography School

  • Architectural Photography Tips to Make Any Building and Structure Look Fantastic

    Architectural photography is for people who have an eye for buildings and structures. It’s the art of taking pictures of buildings as well as structures that are aesthetically welcoming and trustworthy representations of their subjects. Many of the best photographers who specialize in this discipline are normally well-trained in the use of both sophisticated equipment and methods. Architectural photography is Continue Reading

    The post Architectural Photography Tips to Make Any Building and Structure Look Fantastic appeared first on Photodoto.


    Photodoto

  • Opening 2014 Paddling Season on the South Platte River

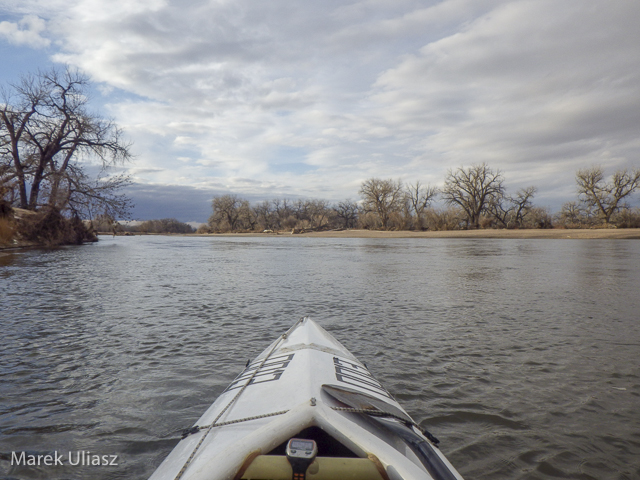
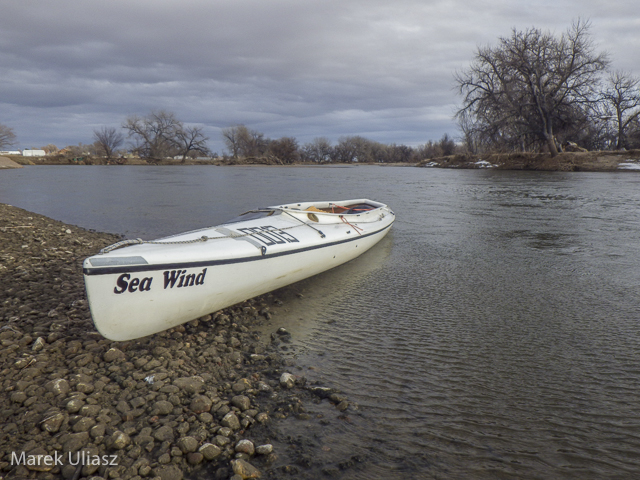
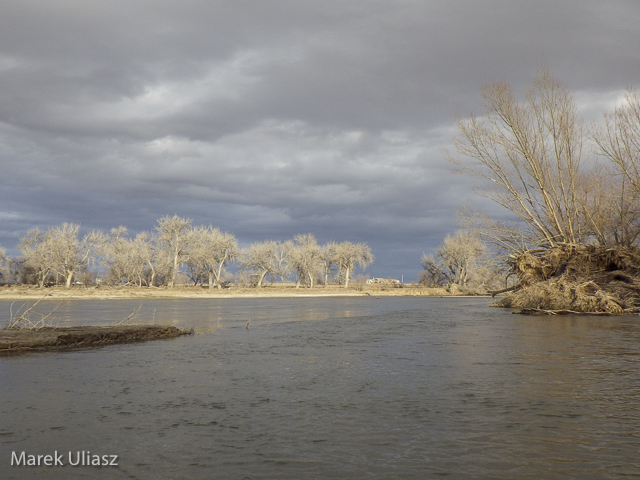
    January 21, 2014. Finally, I started my paddling season for the year 2014. I took the Sea Wind canoe to Kersey and paddled upstream to the confluence with the Poudre River and back. It was my first paddling on the South Platte after last year flooding. There are a lot of signs of that flooding on shores, but the river remains the same – wide open without any new obstacles.

    The river flow was ~950cfs at Kersey. There is a new station near Greeley – PLAGRECO. I don’t know its exact location yet, but it may be pretty useful for planning paddling trips since it shows the river flow not affected by subtraction and addition of water between Greeley and Kersey (2 diversion dams and the Poudre River).

    I will be doing more training runs at different locations on the South Platte during winter time if anybody would like to join me. Most of the time I will paddle the Sea Wind canoe which is my first choice boat for this year Missouri River 340 race. I am hoping also for some downriver SUP runs. You can expect updates to my South Platte River guide.

    south-platte-river-kersey-012114-3

    paddling upstream the South Platte River above Kersey, Colorado

    paddling South Platte River near Kersey, Colorado

    Sea Wind canoe on the South Platte River

    south-platte-river-kersey-012114-2

    looking downstream the South Platte River

    south-platte-river-kersey-012114-1

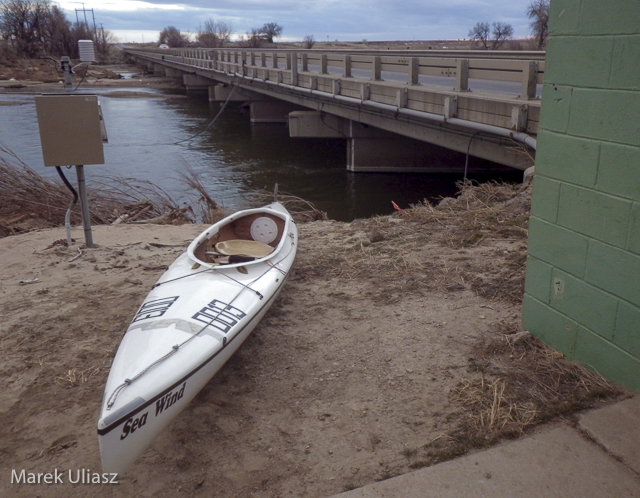
    launching/landing spot on the downstream side of Kersey bridge

    Related posts:
    South Platte River below Denver – GPS/photo river guide
    12th Annual South Platte River All Club Paddle
    Opening 2013 Paddling Season with Badfish SUP on the South Platte River


    paddling with a camera

  • Masters of Photography – Yousef Karsh Portrait Photographer

    Karsh-self-portrait

    Self portrait of Yousef Karsh from his official website

    This is the next instalment of my series on the masters of photography, last time we looked at The Decisive Moment with Henri Cartier-Bresson. Something that my photography instructors gave me was an appreciation and love for the history of photography. If you are not familiar with some of the masters I will be featuring one now and then to help you become acquainted with some of the best in history.

    Today we’re going to look at a man that was considered to be the world’s premiere portrait photographer in his time, perhaps of all time, and his images still stand among the best today. The word “iconic” is often used when speaking of his images of people like:

    • Winston Churchill
    • Ernest Hemmingway
    • Princess Elizabeth (later Queen)
    • Elizabeth Tailor
    • Albert Einstein
    • Georgia O’Keefe
    • Mother Teresa

    Just to name a few! If you haven’t already guessed, or read the title, yes I’m talking about the legend, Yousef Karsh.

    Yousef Karsh 1908-2002

    I’m not going to give you his bio or list his accomplishments here. I want you to do your own research. Google his name and find his famous portraits. Study them. Watch the interview below (ignore the age and quality of this video, instead really focus and listen to what he says). What can you learn from him?

    As I ultimately found myself doing portraits and weddings early in my photography career Karsh was highly influential on my style. I wanted to created the dramatic lighting he used on his subjects, but more than that I wanted to strive to connect with the person in front of my lens the way he did. He was not only a master of lighting, he was a master of getting the expression and making his subject feel at ease.

    Watch and learn from Mr. Karsh!

    Keep in mind this is Part One of this interview. Make sure to view Part Two and Part Three as well.

    Want to take better portraits? Well you are in luck! Starting tomorrow, over the next two weeks we will be doing a Portrait Photography Deep Dive. What that means is we’ll be publishing articles on all things portrait related by both regular and guest authors. Make sure you’re signed up for the newsletter so you don’t miss anything!

    If you want to read some past articles on portrait photography you can try these:

    • Reflectors: Your Secret Weapon for Amazing Portrait Photography
    • Portrait Tutorial Feast – Best of dPS 2013
    • Our 14 Best Portrait Photography Tutorials of 2012

    Want to read more about Karsh and see his stunning portraits?

    Here are a few books. I personally have the middle three in my library!


    The post Masters of Photography – Yousef Karsh Portrait Photographer by Darlene Hildebrandt appeared first on Digital Photography School.

    Digital Photography School

  • Results of the post-processing poll

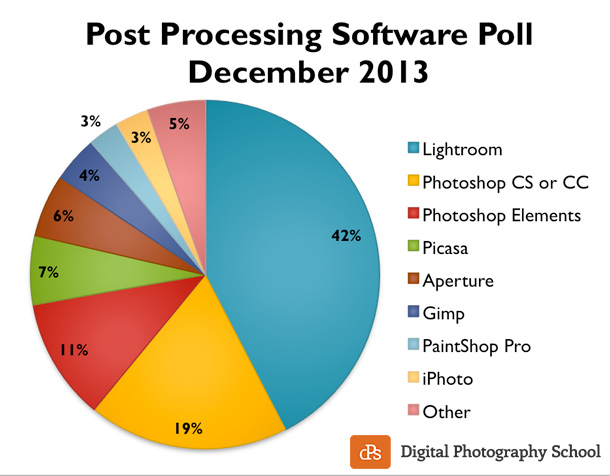
    A few weeks ago I started a new poll on what post-production software you use most often. If you want to add your vote you still can here. We have run this poll twice in the past, every two years, so it will be interesting to see if the results have changed at all from 2009, to 2011 to 2013. Let’s look at the current results first.

    Results – what post-processing software is used most often in December 2013

    With over 27,000 votes at the time of this summary the overwhelming winner was Lightroom with a whopping 42% share. Now let’s see how these numbers compare to 2011 and 2009.

    post-processing-poll-2013-dPS

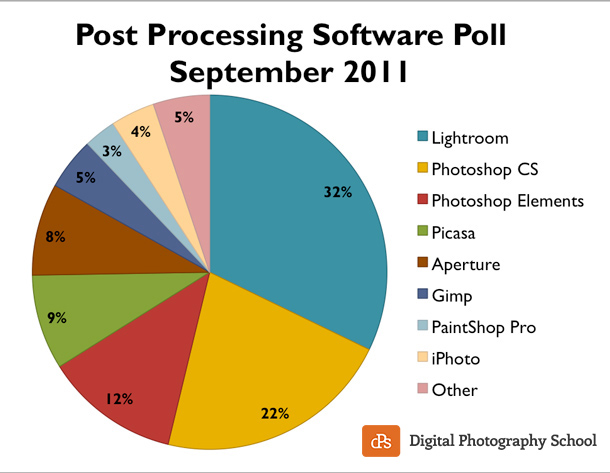
    Survey results from 2011

    Interesting! Lightroom has certainly catapulted to the top in a big way:

    • Lightroom is up 10% from two years ago to 42% currently, that’s a huge chunk of users
    • Photoshop and Photoshop Elements combined are down from 34 to 30% (-4%)
    • Picasa is down 2%
    • Aperture is down 2%
    • Gimp down 1%
    • PaintShop Pro held steady at 3% share
    • iPhoto was down from 4% to 3% share
    • Other was constant at 5%

    These results are from 23414 votes in the 2011 poll.

    post-processing-poll-2011-dPS

     Way different results from 2009!

    According to Wikipedia Lightroom Version 1 was released in January 2007. Within two years (as seen below) it had taken almost 20% of the post-processing market share. Not bad! But compare those stats to the current one and Lightroom has become the clear front runner for photographers in the processing arena.

    Quick comparison of the big two by Adobe

    • 2009 Lightroom had 19%
    • 2009 Photoshop (all versions of CS) had 36%
    • 2009 Photoshop including Element had 49%
    • 2013 Lightroom at 42%
    • 2013 Photoshop down to 19% (pretty much reversed)
    • 2013 Photoshop inc. Elements 30%

    Most of the “also rans” stayed pretty steady in terms of their percentage, within a point or two. I’d say it’s fair to say that Lightroom has taken over in four short years and has become the “go to” software of choice for most photographers (amateur and professional).

    post-processing-poll-2009-dPS

    Want to learn how to use Lightroom and get on board?

    First, grab a copy of Lightroom 5 if you haven’t got it already, or upgrade if you’re still using version 4.

    Next check out some of these tutorials:

    Lightroom tips and tutorials

    The post Results of the post-processing poll by Darlene Hildebrandt appeared first on Digital Photography School.


    Digital Photography School

  • Portrait Plus Retouching Software – A Review

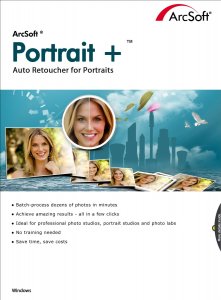
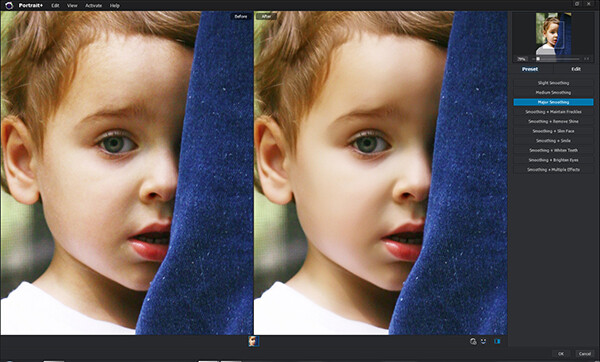
    Portrait Plus from ArcSoft packs powerful facial retouching tools into a user-friendly program.

    Portrait Plus from ArcSoft packs powerful facial retouching tools into a
    user-friendly program

    One of the most difficult tasks in Photoshop is also one of the most common. Since we are in the business of making people look good, solid portrait retouching skills are perhaps some of the most important tools in your digital bag of tricks. A couple of months ago, I wrote an article detailing one of my favorite techniques for basic skin smoothing in Photoshop. It’s a pretty straightforward approach to smoothing skin and removing blemishes and I use it all the time. As convenient as it is, though, it can have an impact on editing time, particularly when I’m dealing with a lot of photos at once.

    Portrait Plus from ArcSoft is a portrait retouching program that works as a stand-alone application (Windows and Mac) or as a Photoshop plug-in under the filters menu (Currently Windows only). It has a simple, user-friendly interface designed for efficient, seamless integration with your portrait workflow.

    How does it work?

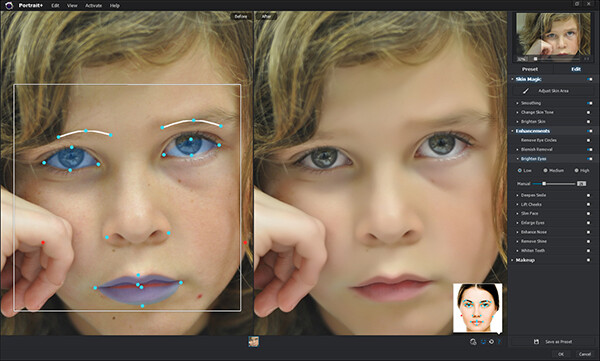
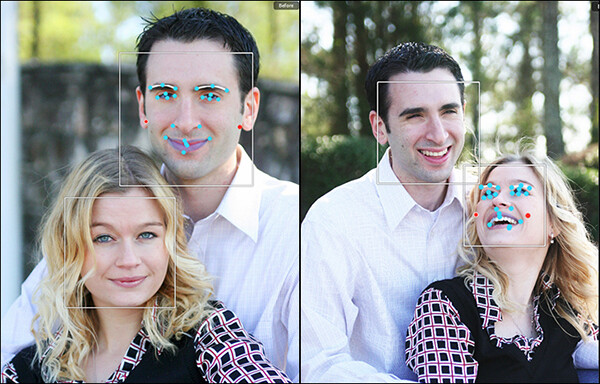
    Simply put, Portrait Plus automatically detects the faces in your photos, and then identifies 24 key facial features. While this auto-detection is really pretty amazing, it’s not always perfect (and therefore my only real complaint).  Profiles turned too far away from the camera and semi-obscured features (think bangs over the eyes) will throw auto-detection for a loop. I had a couple of images where the auto-detection did not work, requiring me to manually select the facial features and target areas. While a bit frustrating, I don’t view this as that much of a negative, since you are likely to manually adjust the target areas yourself anyway as you become more comfortable with the software.

    The overlay on the left shows the facial features automatically detected by the software.

    The overlay on the left shows the facial features automatically detected by the software.

    Once an image has been imported, you have a choice of using one of the program’s ten presets, or editing the photo manually, with the option of saving the results as a preset for future retouching work. While the manual editing tools are very extensive, and allow users to select specific areas and facial features, many of the test photos I ran through Portrait Plus for this review achieved excellent results with the presets alone. Facial retouching that could take several minutes or longer can be drastically reduced down to just one or two clicks of the mouse. In order to ensure consistency throughout the photo, Portrait Plus also detects all visible skin, giving the editor as much or as little control over the final image as possible.

    Powerful editing tools

    Here is a breakdown of the manual retouching tools.

    Skin

    Some skin retouching software simply blurs over the imperfections.  By identifying very specific areas of the face, however, Portrait Plus gives you extensive control over what to repair and to what degree, for a more natural-looking result. By taking this targeted approach, Portrait Plus eliminates deep scars, pimples, scratches, and other imperfections, while restoring or maintaining one of the most important aspects of all–original skin tone.

    • Skin smoothing
    • Skin tone
    • Brighten skin
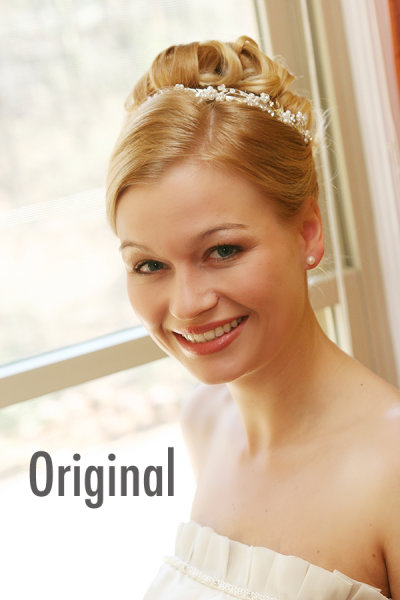
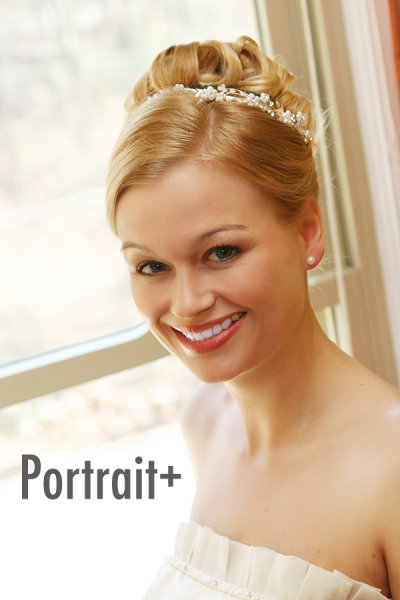
    Original on the left. Skin-smoothed on the right.

    Original on the left – skin-smoothed version on the right

    Enhancements

    If you’ve ever wanted to get in touch with your inner plastic surgeon, here’s your chance. By giving the user control over specific areas like the mouth, cheeks, eyes, and nose, reshaping and fine-tuning facial features has never been easier. Tools included are:

    • Remove eye circles
    • Blemish removal
    • Brighten eyes
    • Deepen smile
    • Lift cheeks
    • Slim face
    • Enlarge eyes
    • Enhance nose
    • Remove shine
    • Whiten teeth

    Makeup

    Depending on your lighting and camera settings, makeup does not always have the look you were going for in the final image. By having the ability to make these adjustments in post-production, you can either save your original idea, or go in a new direction. You’ve got to be very careful with this set of tools, however–a single mouse click can be the difference between a subtle adjustment and “alien eyes”. Effects included:

    • Blush
    • Lipstick
    • Colored contacts
    • Eye color
    • Eye lashes
    • Eye liner
    • Eye shadow
    • Shape eyebrows

    Comparison

    The original version of this portrait is straight off the camera, only edited for size. In the Portrait Plus version, you can see how edits like basic skin smoothing, along with a wider smile, slimmer face, whiter teeth, and digital lipstick provide subtle, but significant changes.

    portrait-plus-dps-review-007

    portrait-plus-dps-review-006

    Many of the effects in this software package would take months to learn, and years to perfect if you were to attempt them yourself in Photoshop. While Portrait Plus does have a bit of a learning curve, it is far less steep than what you’d experience by trying to learn all of these edits on your own.

    Multiple Faces

    Portrait Plus does a great job of detecting multiple faces within the same image.

    Portrait Plus does a great job of detecting multiple faces within the same image.

    While I’ve not yet tested it on photos with more than two faces, ArcSoft’s website claims that Portrait Plus can detect up to 20 faces in a single image. This can come in particularly handy for event photographers, who often find themselves editing photos of large groups of people. Portrait Plus also allows you to “lock” faces, selecting which faces in a photo are retouched and which are left alone.

    Supported file formats

    The Windows stand-alone version can import JPEG, TIFF, PNG, and BMP images of 24 bits per pixel, while the Mac stand-alone imports JPEG, TIFF, PNG, and RAW files with 24 bits per pixel. Both Windows and Mac export JPEG and TIFF files. The Photoshop plug-in will import and export all Photoshop-supported file formats.

    Wrap-up and recommendations

    As a portrait photographer, I strive to get everything as close to perfect in the camera as I possibly can. While even the best portraits can always use a tweak or two, the reality is that some portraits require significant retouching. As important as the editing is, though, so is time with my family. So, whatever I can do to cut down on my editing time is a bonus. As good as I am at retouching, Portrait Plus is a bit of a game-changer. An intuitive, user-friendly Photoshop plug-in, Portrait Plus can seamlessly add a whole new dimension to any photographer’s editing arsenal.

    Portrait Plus is available for download on the ArcSoft website.  Enter coupon code Portrait45 at check-out for a 45% discount. Valid through March 31, 2014.

    The post Portrait Plus Retouching Software – A Review by Jeff Guyer appeared first on Digital Photography School.


    Digital Photography School

  • Review: Comparison Canon 5D MarkIII vs the Canon 6D

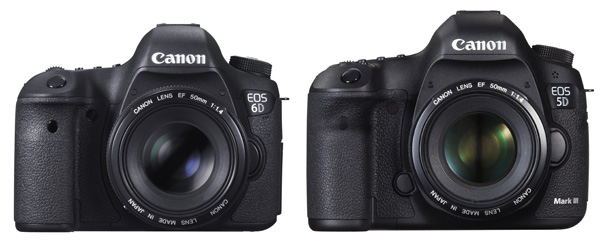
    EOS 5D Mark III and EOS 6D

    Now that Canon has two semi-professional full-frame cameras, the EOS 5D Mark III and EOS 6D, naturally photographers wonder which is the best model for them. As a former Technical Editor of EOS Magazine (the best magazine Canon owners could possible buy) I would like to share my insights.

    But first, if you’re in the market for a full-frame EOS camera, let’s not forget the top of the range EOS 1D-X. This is a high-end, professional camera with a price tag to match. It’s big and heavy and built for the demands of a professional photographer’s life. Most photographers don’t need this much camera, but it’s interesting to look at because its size and price put Canon’s other full-frame cameras into perspective. Here’s a photo:

    EOS 1D-X

    EOS 1D-X

    Big, right? The body alone weighs 1340 grams (nearly three pounds) and will set you back nearly $ 6800 USD+tax if you buy it from B&H Photo Video. The weight and price alone mean this camera isn’t suitable for most non-professional photographers, leaving Canon’s other full-frame models, the EOS 5D Mark III and EOS 6D, as the available choices.

    Let’s compare – Canon 5D MarkIII vs the Canon 6D

    Key differences

    Let’s start by looking at what could be the deciding factor for some people – price. The EOS 5D Mark III costs around $ 3299. The EOS 6D is $ 1500 less expensive at $ 1799 (body only prices). That’s a huge difference, so why would anyone choose the 5D Mark III over the 6D? Let’s take a look.

    Size and weight

    • The 5D Mark III weighs around 950g/2.1 lb.
    • The EOS 6D is Canon’s smallest and lightest full-frame digital SLR. It weighs 755g/1.6lb (body only, but including memory card and battery). It is also slightly smaller.

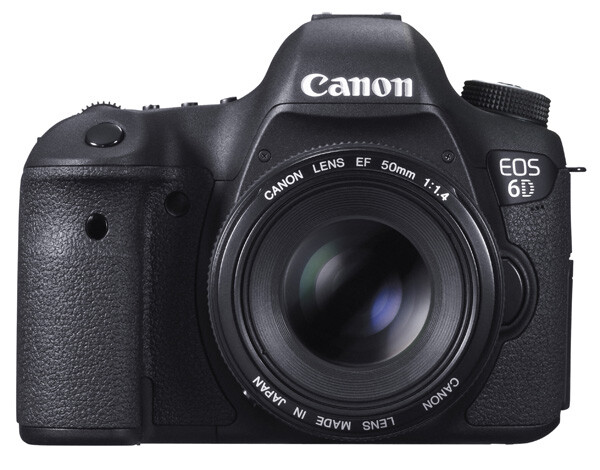
    I own an EOS 5D Mark II and I can tell you that it gets heavy when I carry it around all day. If you’re planning to carry a camera on a strap over your shoulder for hours at a time, then it makes sense to buy the lighter model, and use light lenses (such as the EF 50mm f1.4 lens in the photo below).

    EOS 6D

    EOS 6D with EF 50mm f1.4 lens

    On the other hand, if you are a landscape photographer, keep the camera mainly in the studio, or just take it with you on location and use it for a couple of hours then pack it away again, the weight probably makes no difference.

    Bottom line: If size and weight are critical, then go for the EOS 6D. But not before considering autofocus performance!

    Autofocus

    Autofocus performance is the major difference between the two cameras. It is a big factor if you are into photographing sports, action, portraits or any moving subject.

    • The EOS 5D Mark III has a 61 point AF array with up to 41 cross-type AF sensors (depending on the maximum aperture of the lens mounted on the camera). Along with the EOS 1D-X, it has Canon’s most advanced autofocus system.
    • The EOS 6D has an eleven point autofocus (AF) array with one cross-type AF sensor in the centre.

    Cross-type AF points are more sensitive, and therefore focus more accurately, than other AF sensors. This is especially important if you work at wide apertures (i.e. between f1.0 and f2.8) as depth-of-field is so narrow at these settings.

    As an example, let’s look at how it works with portrait photography. Imagine that you’re taking a portrait of someone with an 85mm lens set to f1.8. Accurate focus is critical as depth-of-field is very narrow at this setting – you may have less than an inch of sharpness to play with. The normal way to focus in this situation is to use the AF point closest to the model’s eye. The photo below shows how this works by overlaying a diagram of the EOS 6D’s AF array over a portrait. The single cross-type AF point in the centre is shown in green, and the AF point the photographer would have to use is in red:

    EOS 6D autofocus array

    You can see the problem right away. As the only cross-type AF point is in the centre, you can’t use it to focus unless the model’s eye is also in the centre of the frame. You have to use one of the less sensitive, and therefore less accurate, AF points at the edge of the array.

    With the EOS 5D Mark III the story changes. With up 41 cross-type AF points available (shown in red), it is far more likely you will find one to cover the model’s eye. The end result is that you will get more in-focus photos.

    EOS 5D Mark III autofocus array

    You can learn more about the autofocus of the EOS 5D Mark III in my article Understanding EOS Autofocus: The EOS 5D Mark III and EOS 1D-X

    Bottom line: If autofocus performance is critical, then (budget allowing) go for the EOS 5D Mark III.

    Wi-fi and GPS

    This is another major difference between the two cameras. However this time, and somewhat counter-intuitively, it is the EOS 6D that has the features and the 5D Mark III that does not.

    • The EOS 6D’s built-in GPS lets you geotag your photos with the camera’s location as you take them. You can then use that to see where they were taken on a map, help organize or search your images in Lightroom, or as extra information if you sell your photos to a stock library. If you want to do the same with an EOS 5D Mark III, you have to buy a GPS unit separately.
    • The EOS 6D’s built-in wireless lets you upload your photos via a local wi-fi connection to a computer as you take them (useful in a studio or even on location if you have a laptop with you), upload photos to Facebook, or remotely control your camera using a Smartphone app. Again, you have to buy a separate wireless unit, which comes built-in to a portrait grip, to do the same with an EOS 5D Mark III.

    Bottom line: If you need GPS or Wi-fi, then buying the EOS 6D will save you a lot of money.

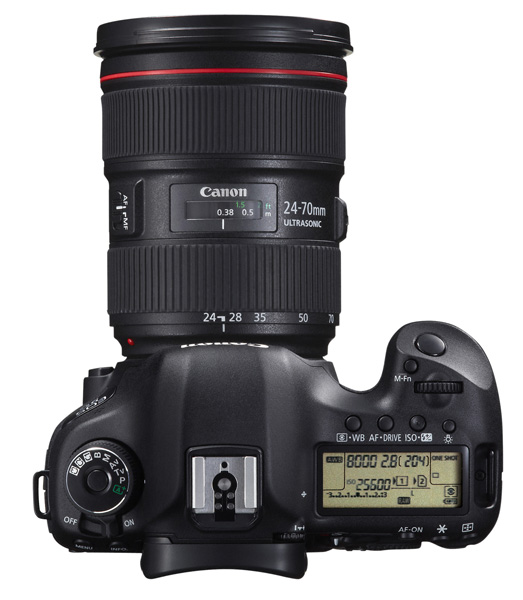
    EOS 5D Mark III

    EOS 5D Mark III with EF 24-70mm f4 lens

    Dual card slots

    • The EOS 6D has a single card slot for an SD type memory card (it also accepts SDHC and SDXC cards)
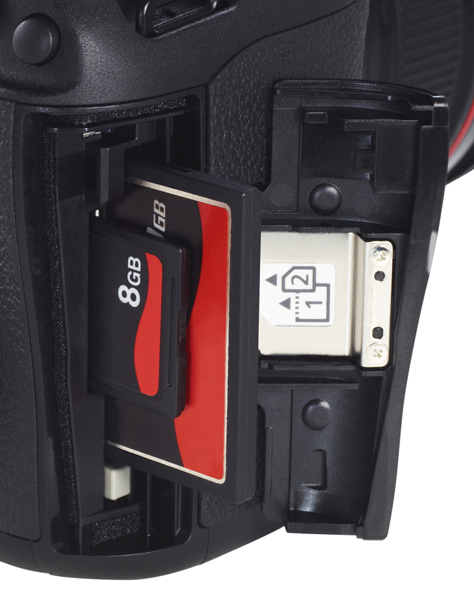
    • The EOS 5D Mark III has two card slots. One takes CF cards, and the other SD (plus SDHC/SDXC cards)

    One benefit of dual card slots is speed. CF cards are faster, which helps give higher burst speeds and assists with recording movies.

    Another is security. You can set the EOS 5D Mark III to save photos to both the CF card and SD card slots at the same time, giving you a back-up in case one fails. Bear in mind it will slow the camera down as it takes longer to write a file to two cards, but it may give you peace of mind on important shoots. I imagine wedding photographers will greatly appreciate this feature.

    Having said that, if you look after your memory cards, and buy a reputable brand, they are highly unlikely to fail. Most memory card failures are the result of corruption caused by user error, such as removing a card from a reader while the computer is writing to it.

    Bottom line: If dual card slots matter to you, then you need the EOS 5D Mark III.

    EOS 5D Mark III dual card slots

    The dual card slots of the EOS 5D Mark III.

    Minor differences

    There are lots of minor differences between the two cameras, so I’ve provided some links to in-depth reviews so that you can get more information before making a purchasing decision. You’ll also see some photos taken with both models. In the meantime, if you own or have used either of these cameras, why not tell us what you think in the comments. Why did you choose one or the other, and do you think you made the best choice?

    EOS 5D Mark III reviews

    • DP Review
    • Photography blog
    • Photography Life

    EOS 6D reviews

    • DP Review
    • Photography blog
    • The Phoblographer
    • Graham Clark Photography

    Understanding EOS

    Understanding EOS ebook cover

    My ebook Understanding EOS is written for photographers who want to learn to get the best from their EOS cameras. Click the link to learn more.

    The post Review: Comparison Canon 5D MarkIII vs the Canon 6D by Andrew S. Gibson appeared first on Digital Photography School.


    Digital Photography School

  • Infographic: 10 Must-Have Wedding Shots for Every Bride

    Getting married but unsure of what kind of wedding photography you want? Flicking through various online galleries, websites, and blogs for inspiration? Never dealt with a professional photographer and not sure of what questions to ask? We profile the top ten wedding shots every Bride should have. From the wedding morning excitement, to when you finally say ‘I do’. We Continue Reading

    The post Infographic: 10 Must-Have Wedding Shots for Every Bride appeared first on Photodoto.


    Photodoto

  • Weekly Photography Challenge – Night Photography

    Earlier I shared 35 stunning night photography images. I hope you got inspired by them because now it’s your turn!

    By Simon & His Camera

    This week’s challenge is night photography!

    There are so many things you can do at night including:

    • city lights
    • night portraits
    • star trails
    • light painting
    • night sky, stars and the Milky Way
    • the moon
    • fire spinning (steel wool)
    • HDR is great at night especially on neon and city lights
    • car light trails
    • ghost making

    By Justin Brown

    By jason

    The possibilities go on and on so you have no excuse for lack of subject matter or ideas. So grab your tripod (you’ll need it), your remote trigger, and a friend (helps if you’re light painting and is infinitely more fun than by yourself) and head out into the night to take some photos.

    Need some tips on night photography?

    Check out these articles:

    • Introduction to night photography
    • Nightscapes: Photographing the City at Night
    • Moon Photography: 6 Tips for Better Moon Photos
    • Light Painting Part One – the Photography
    • Photography in the Moonlight
    • Tips for Photographing Star Trails

    By Bill Dickinson

    By Adrien Sifre

    Share your night photography images!

    Once you’ve taken your ‘night photos we’d love to see them in comments below. Simply upload your shot into the comment field (look for the little camera icon in the Disqus comments section as pictured below) and they’ll get embedded for us all to see or if you’d prefer upload them to your favourite photo sharing site and leave the link to them.

    The post Weekly Photography Challenge – Night Photography by Darlene Hildebrandt appeared first on Digital Photography School.


    Digital Photography School

  • Lighting 101 To Go

    Over the years Lighting 101 had been ported to a portable document format (PDF) in several different languages. But those documents were from the version originale, which was circa 2006. In 2013 Lighting 101 was completely revised, top to bottom, to be more in-depth with more updated info and featuring the photographic work of Strobist's readers.

    Now the most current version has been ported to PDF, for your offline viewing pleasure.

    Read more »
    Strobist