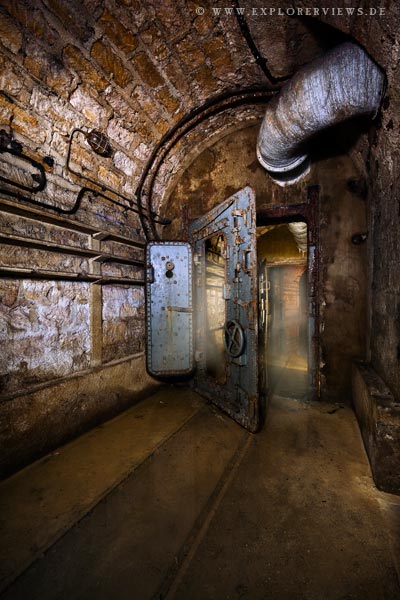
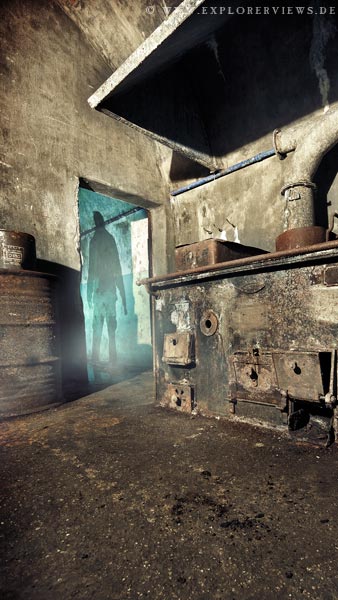
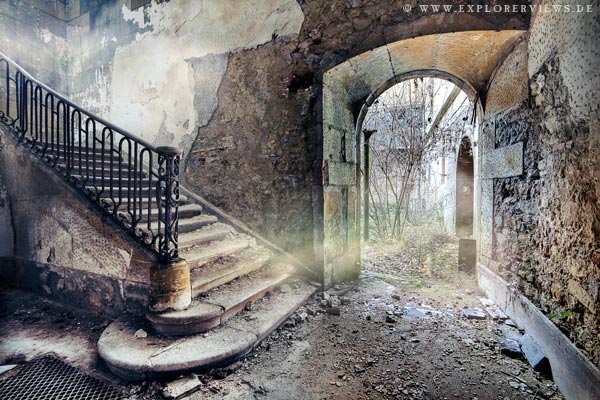
Category: Photography

  • Combining Images for Large Subjects using Photoshop Photomerge

    Have you ever been so close to a subject that you just couldn’t get it all into the frame? You could use a fisheye lens but they creates so much distortion that it doesn’t always work the way you want it to. You can actually get the photo that you want with the lens that you already have! You can accomplish this by taking multiple images over several columns and several rows, and combining them into one very large, extremely detailed image. With a little practice and some information any photo is possible with the gear that you have in your camera bag.

    Combining Images for Large Subjects using Photoshop Photomerge
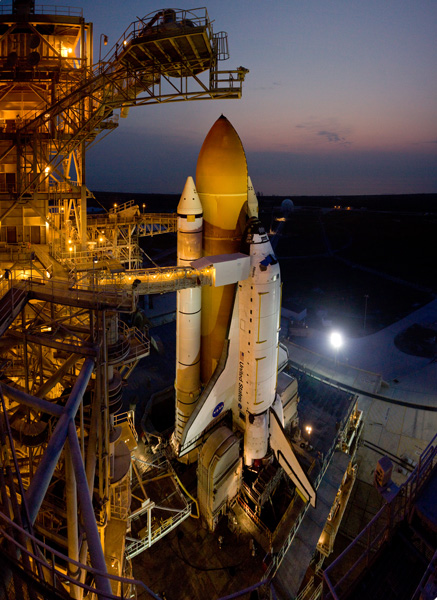
    Fig 2

    WIDE LENS VERSUS IMAGE COMBINING

    Let’s take a look at how to create one of these images. This photo of space shuttle Atlantis was taken just before sunrise as this incredible (and incredibly large) engineering marvel was being prepared for launch. Here are two photos
    for comparison (Image #1 below) and (Image #2 above)
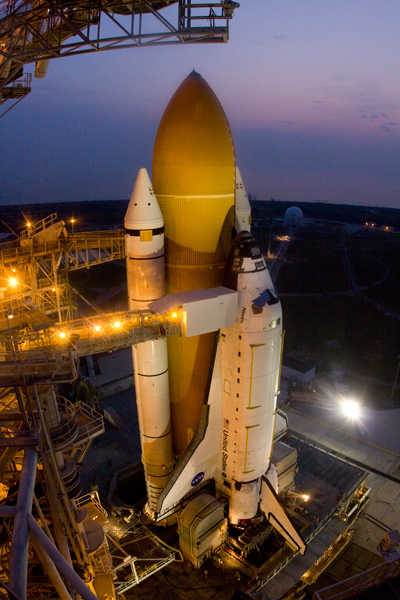
    Fig 1

    The image directly above was taken with a fisheye lens. More specifically a full-frame fisheye lens; one that covers a 180 degree angle of view, but the image still covers the entire frame with no black borders. As compared to a circular fisheye lens which covers a 180 degree angle of view, but the final image is a circle with a black border filling the rest of the frame. This image may be OK for some, but the cartoon like distortion may not be work for others.
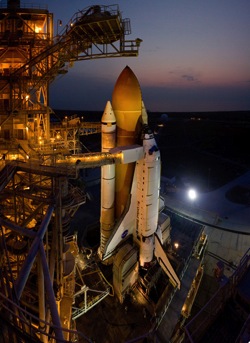
    Fig 2

    You could buy a superwide lens that is corrected to eliminate distortion but those lenses could cost two or three times as much as a fisheye lens. Or maybe you have one but just don’t happen to have it with you on that particular day.

    Image #2 (top and right) was created using a 17-40mm wide angle lens. This was accomplished by taking a series of images in a sequence from top to bottom in one column, followed by a second sequence from top to bottom in a second column. You want to make sure that you overlap your images approximately 20-25 percent so that they can be spliced together later using your editing software. The resulting image in this case was a combination of 12 images merged into one very large, very detailed image!

    One major benefit of using this method is that you can focus each image separately as you take them allowing you to capture a greater depth of field. And when the images are combined you will have one large digital file that has many more pixels than the single images that you normally take. In this example the individual files were 3168 x 4752 pixels each. The total file size of the combined images is 9179 x 12,009 pixels. This composite image was then cropped to show just the desired image, cropping out this outer portion is something that we will take a look at in a minute. Using this method you can make some really large prints if you wanted to.

    USING PHOTO MERGE TO COMBINE THE IMAGES

    So now you know that it’s easy enough to take the images as long as you have sufficient overlap, so let’s learn how to combine them. I use Adobe Photoshop and I have successfully created these on every version that has the ‘Photomerge’ capability. You may have other photo stitching software that you want to try and that’s part of the fun of photography. Experiment with different software and experiment with how you take photos. It’s all part of adding knowledge to your photography tool belt. I’ll show you how we can combine these images using Photoshop CC since that’s what I’m currently using (the results are the same with all versions).

    STEP ONE – SELECT IMAGES
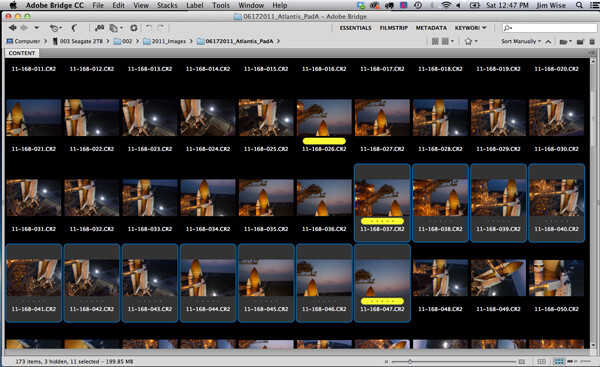
    Fig 3

    Step 1. Using Adobe Bridge select the images that you want to combine

    STEP TWO – PHOTOMERGE
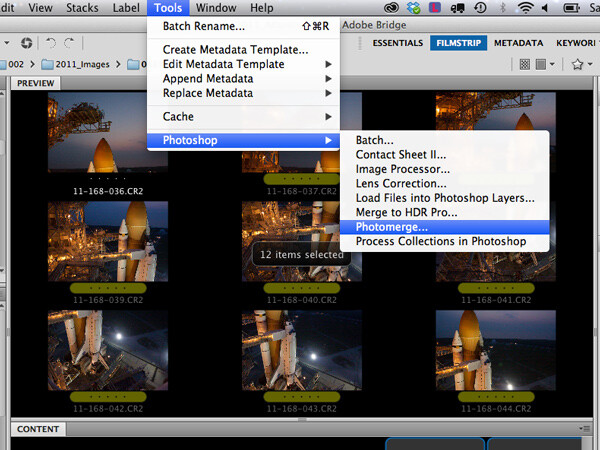
    Fig 4

    Step 2. In Adobe Bridge go to Tools > Photoshop > Photomerge

    STEP THREE – COMBINING SETTINGS

    A new window will appear that shows you which files have been chosen to be combined, this allows you to verify that you have all of the correct files. You will see that you also have some options on how you want to combine the images. I have found that letting Photoshop automatically combine them works perfectly well for most things, so select Layout “Auto”, the top option. Check the ‘Blend Images Together’ option box, and leave the others unchecked. The ‘Blend Images Together’ option will automatically create layer masks in each of the layers of your image and it will greatly aid in seamlessly combining all of these images into one. See screen shot below.
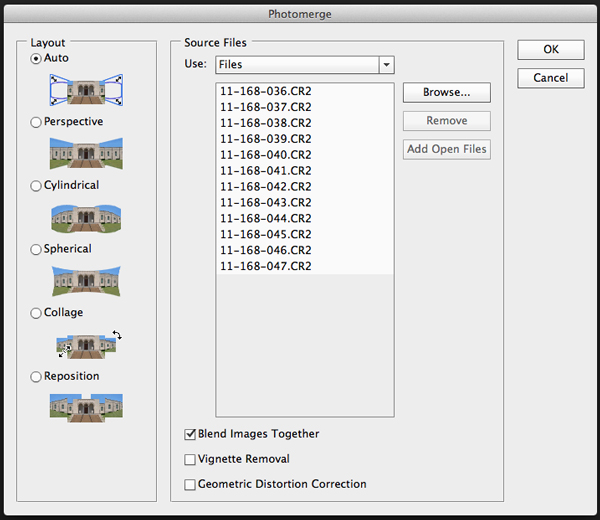
    Fig 5

    Click OK

    Note: At this point you may want to go make a sandwich. This part of the process can be time consuming and there are a lot of variables that will determine just how quickly or slowly your computer can crunch all of these pixels into one remarkable image.

    • Q. How many photos are you trying to combine? A. I recommend trying just 3 or 4 the first time.
    • Q. Are you combining RAW files or jpegs? A. For maximum punch you definitely want to use your RAW files, but for trying this out I would recommend using jpegs initially.
    • Q. How much RAM does your computer have? A. More is always better and will significantly decrease the time that your computer takes to process images like these. Combining these 12 images with 4GB RAM on my 2.4GHz Macbook Pro took almost 60 minutes.

    How fast your processor is, what type of processor you have, which operating system, etc., are all factors that will determine how quickly this process works. Always use your computer’s hard drive (aka local drive) as opposed to an external hard drive that doesn’t respond as quickly as your local drive.

    If you don’t have that super computer that you really would like to have yet, then you could stick to combining jpeg versions of your files instead of RAW files, but if you do that just make sure that your original files are untouched. And by untouched I mean do all of your color correcting AFTER your images are combined into one. That is true for those of you wanting to combine RAW files on your higher end computers also.

    STEP FOUR – CROP AND FINAL TWEAKS

    When photomerge has completed combining and blending your images you will see something like this below.
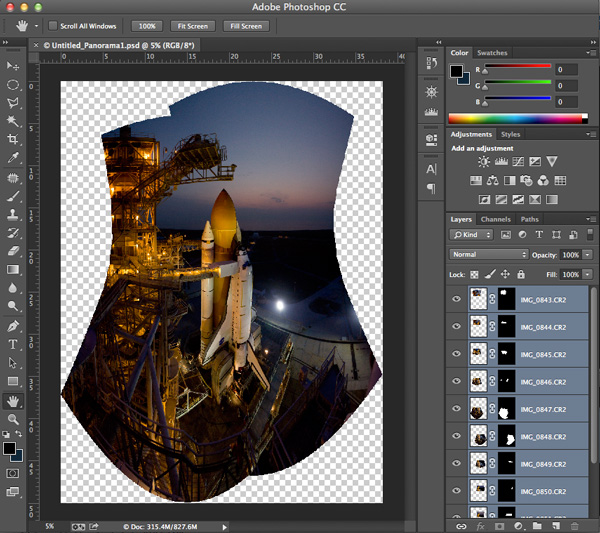
    Fig 6

    Photomerge has created a PSD file, complete with layer masks for showing just the parts of the image that you need to see from each layer. The blending may not look perfect at this point- you can usually see light edges where the masking is and that’s okay. You can see how Photoshop has automatically corrected for distortion and there will be some parts of the image that need to be cropped away. Let’s save the file ‘as is’ so that you will always have this ‘original’ to go back to.

    The next step is to crop the image and save another copy that you can go ahead and flatten. It’s at this point (when the image is flattened) that you will see how well the blending did. Or rather you won’t be able to see it because the blending is seamless. You now have one really large composite image file with lots of detail.
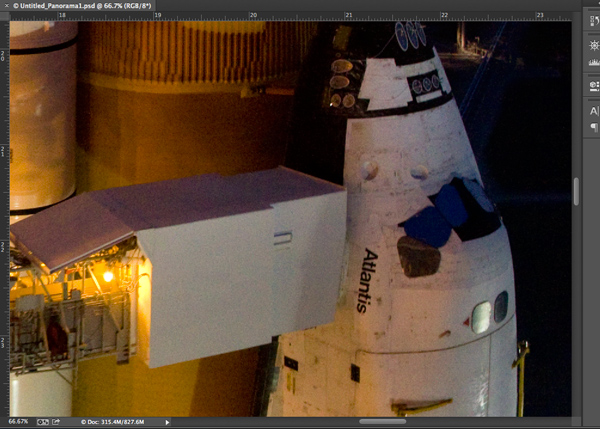
    Fig 7

    You can save this flattened image as a TIF or JPG and make color corrections in Adobe’s Camera RAW, or any photo editing program. You can size it however you would like at this point.

    SUMMARY AND CHALLENGE

    So the next time you’re face to face with a larger than life subject, you can go ahead and take that fisheye capture. But while you’re there take a series of images with one of your other lenses as well. Capture them in columns or rows, leaving about 20-25% overlap, and see what you can create by combining those images. It might be a once in a lifetime opportunity so why not maximize your chances to get that great photo that you were hoping for!

    Here are a few more photo stitching articles for further reading:

    • How to create a panorama with Photoshop and Photomerge
    • Stitching images for larger prints
    • How to shoot really big panoramas
    • Sending panorama sequences from Lightroom to Photoshop

    The post Combining Images for Large Subjects using Photoshop Photomerge by Jim Wise appeared first on Digital Photography School.
    Digital Photography School

  • How I Got The Shot: Portrait Style

    Lynsey Peterson_6howIgottheshot

    Whenever I see “How I Got The Shot” articles, they are typically landscape or nature shots, or difficult lighting situations.  Rarely do you see a detailed account of the taking of a portrait image.  Maybe because for portrait shots, it’s often more about the connection between subject and photographer than the technicals, or maybe because it seems fairly straightforward.  That said, when I was first starting out in portrait photography, I spent many hours drooling over beautiful images I admired and wondering how they had been taken, and more importantly, how could I try to take something similar.

    This article will not only discuss the technical accepts of the shot and the editing process, but also the interaction I had with the subject, which was key to this, and every shot I’ve ever taken.

    Portrait Style

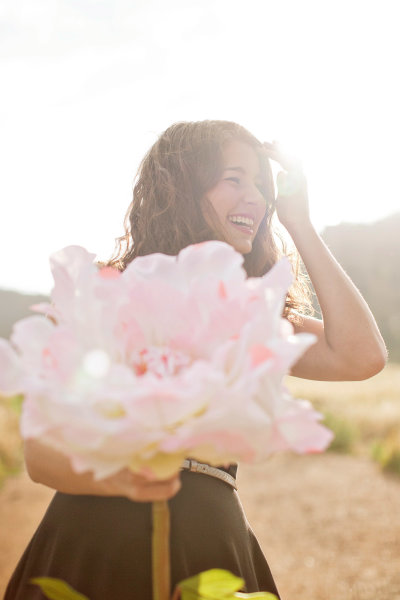
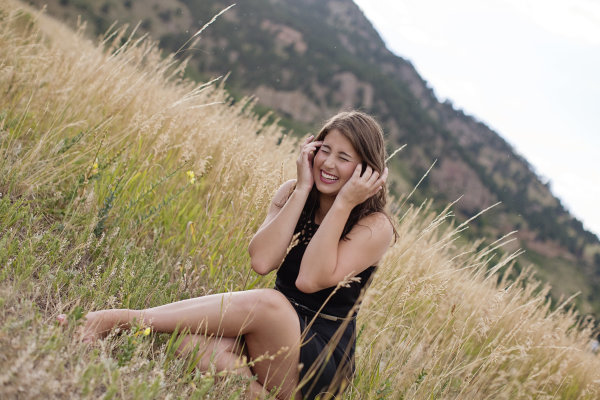
    This beauty is Madeleine and these images are from her high school senior photo shoot taken last September.  I don’t often shoot this type of portrait. But, I say the same thing about weddings and dogs and yet I’ve photographed both in the last week, so maybe I should just face the fact that if you are lovely and ask me real nice, I’ll shoot just about anything.  Except food.  Food photography freaks me out.  Life is hard enough without having to make sure sesame seeds are all in the perfect place, or that there is just the right amount of shine on an edge of cheese.

    Lynsey Peterson_1howIgottheshot

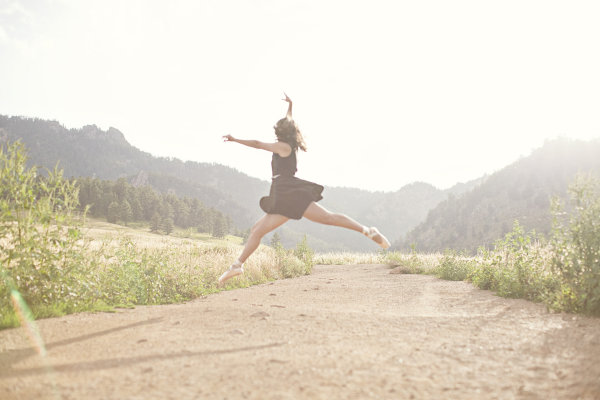
    Madeline has studied dance on and off and had just started pointe dancing prior to this shoot, so incorporating her new pointe shoes into a few shots was something she wanted to try.

    Technical stuff – gear

    These images were shot at Boulder, Colorado’s Chautauqua Park in the rain, near sunset. I was likely wearing a black t-shirt, jeans, and flip-flops if you want to get the full visual, but I doubt that mattered much because 90% of the time I am wearing a black t-shirt, jeans, and flip-flops. Probably of more interest to you was the gear. I travel light and I’m not into fancy equipment (my money is better spent on quality flip-flops), so this was shot with my faithful Canon 5D and my workhorse/splurge Canon 50mm f/1.2L which rarely leaves my camera body.  I typically don’t use a lens hood, and didn’t here as I like a little flare.

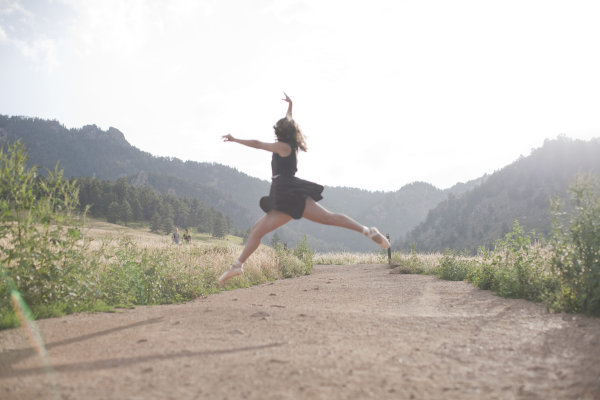
    The image below that I will detail was shot in Aperture priority mode (f/2.5). I could possibly wax poetic about my camera, the settings, and lighting and other technical components for a few more paragraphs but it is truly not necessary. Here, as with most portrait photography, the details of how this image came to be were driven by the subject matter: the location choice was her favorite park; the jump was something that she felt she could do and a way to incorporate the dance element that I felt was least awkward and most genuine; and the settings were dictated by the need to shoot towards the mountains.

    An argument could be made that this isn’t a true portrait, unlike the image I’ve shown above. An argument could also be made that flip flips aren’t real shoes. But they get me from point A to point B, are extremely comfortable, and allow for me to continue my hatred of anything on my feet. A portrait is a documenting someone’s likeness. This is a picture of a 17 year old girl that does ballet, has a beautiful free spirit, and mountain living in her DNA. I can’t think of a better way to document her likeness.

    The Process

    Let’s start with the Straight Out Of Camera (SOOC) image

    Lynsey Peterson_2howIgottheshot

    Other than minor editing to her skirt, this is exactly what the world looked like in my camera. I shot this in RAW and converted it to jpg in Photoshop. My settings were not spot on, and there are flaws. The most glaringly obvious flaw, being that focus on the subject is soft at best.  I mean, really soft–clouds and fluffy bunny rabbits soft. There were other images in this sequence where the focus was much sharper. But in those, I didn’t care for arm placement, or light, or a hundred other picky details. I could have taken the sharpest one of the bunch and edited it to perfection, completely changing or correcting things, turning something unreal into reality. Some photographers would may do that, but I am not going to fight for either side of that battle today. This is a picture of a girl jumping in mid-air and if you are looking at that happening in real life, it’s not going to look sharp as a tack. This is an image worthy of being delivered to the client, soft focus or not.

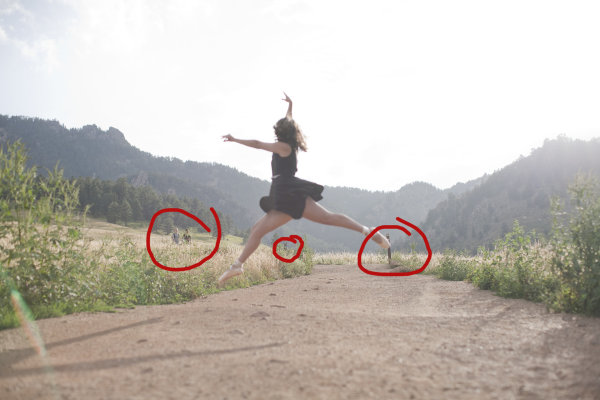
    Image clean up

    The first thing I always do to an image during the editing process is clean it up if necessary. This park is always crowded, and waiting for random people to be out of the shot isn’t an option I like because the entire mood could change. I also don’t like to use Photoshop to drastically change anything (as mentioned earlier when I refused to do Photoshop Plastic Surgery on a sharper image), but here the lessor of two evils is just to remove the innocent bystanders from the image entirely in post-production. Beyond the hikers, there are a few other elements that are distracting including the trail markers, which only take away from her being in midair.

    Lynsey Peterson_3howIgottheshot

    Things to clean up in Photoshop

    Warm up!

    This was not the first image we shot. People take time to warm up. If I had asked her right off the bat to leap as high as she could, without care as to who was watching or how she would do it, or what it would look – she wouldn’t have been comfortable enough to even try it. We started with some basic face-only shots, worked up to some dance poses in the shoes, and then found a spot where she felt comfortable enough to jump. Because of this, I didn’t have a lot of options for the exact frame. This was the flattest and least rocky area for the jump to be safe and successful.

    Whenever I attempt an action portrait shot, I do several things the same when interacting with the subject: 

    #1 – I always watch them the first time with my own eyeballs.  

    I don’t even touch my camera. Not only do I need to see the entire view without the limits of a viewfinder, I need to earn their trust that I am interested in what they’re doing, with or without the picture. Then after encouragement, I make it clear that we may have to try this several times; she may not nail the jump, but then again I may not nail the shot, successful jump or not. To give you an idea, for the five jumps she did, I have 32 shots taken over the course of about 8 minutes.

    #2 – this is typically the only time I break my rule of never letting a client see the image in the back of my camera.

    For an action shot like this, I shoot until I have an image I like and then show my subject. It’s their action, their talent, their special trick. I have no idea how to leap in the air like this; I want to know that whatever they are doing is coming out as they envisioned it, or at least that they are happy with how it is likely to turn out. I, like most of the people who will view this, have no idea if this jump is technically correct in the world of pointe dance. That one ballet class I took in the first grade didn’t really cover much beyond how to stand straight in a tutu. However, in the moment I remember questioning even photographing this considering I didn’t know what to look for. In those moments, it’s best to realize that the only thing you should be looking for is a great image—you’re not always qualified to look for much else.

    Lynsey Peterson_4howIgottheshot

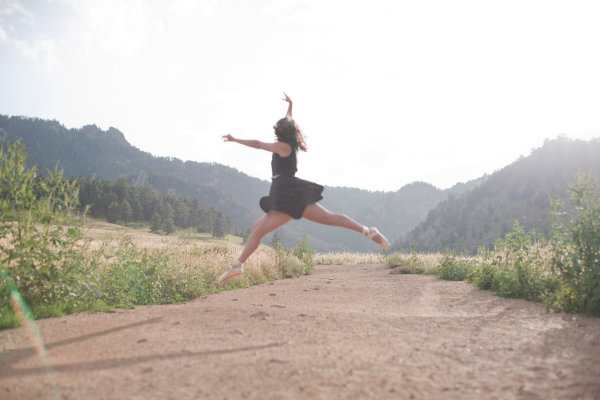
    After image clean up

    Most important – subject’s comfort level!

    Now that I have cleaned up the things that didn’t need to be there and adjusted my exposure a bit, I will tell you the most important technical piece of this image: none of it matters. It really doesn’t. Why? I’m glad you asked. Even if I had the fanciest equipment available, perfect light, sharp eyes, and sturdy flip-flops, there is no way I could have gotten this shot if Madeleine didn’t feel comfortable. Not only is she fairly new to pointe dancing, she is a teenage girl. The most important thing I brought to this shoot was an ability to make her feel comfortable, a ton of patience, and an honest desire for her to love these pictures.

    Without those things, this image and every other one I shot that day, don’t happen. For me, portrait photography is 95% people skills and 5% equipment. Maybe even a little luck thrown in for good measure. But we still need to make it sing the tune it was meant to carry. Throw in a little sparkle.  Wave the magic wand a bit. Put a layer of frosting on this cake.  Everyone loves frosting–I don’t know if I could trust someone that doesn’t.

    Final touches in Photoshop

    I started with a manual adjustment in Photoshop with Levels, a quick sharpener with the oddly named Unsharp Mask (60% and 2.0 pixels is my go-to setting), and then removed a few stray raindrops that were showing on her dress.  I opted to leave the framing the way I shot it—I like the bit of shadow you see of her legs in the bottom left corner, and I like where she is in relationship to the mountains in the background.

    Now for the fun part: I use a few actions to kick-up the color and clarity a notch on most of my images. I like Totally Rad and the Pioneer Woman’s actions quite a bit and over the years have managed to customize my favorites to exactly what I like, saving me a great deal of time. Here I have used a few actions to both sharpen the color and also warm it up a bit, to give a nod to the sun flare that was already there. In doing so, I lost a bit of my sky detail, but I don’t miss it. Here is the finished version of the image:

    Lynsey Peterson_5_finalhowIgottheshot

    And voila! It’s just that easy. Years of ballet lessons, a scheduled photo shoot, waiting out a rainstorm, getting to the perfect jump, and a bit of editing. Oh internet, I kid.

    This is an image that I love. This is an image that my client loved. Will it end up in a magazine or be noticed by people beyond those that love Madeleine, and obviously anyone reading this? No. But it’s a shot that I am proud of. It’s a great example of the kind of portrait photography I like to do and a lovely addition to my portfolio. It happily hangs on a wall in my office, where it will stay as a reminder that not all beautiful and loved shots are technically perfect and portrait photography is a lot more than a camera and a pretty girl.

    Lynsey Peterson_7howIgottheshot

    The post How I Got The Shot: Portrait Style by Lynsey Peterson appeared first on Digital Photography School.

    Digital Photography School

  • How to Choose the Perfect Portrait Lens

    Portrait taken with 85mm lens

    A question we often get asked at Digital Photography School is which lenses are best for portraits. It’s a tricky question because the answer is subjective. It depends on your budget, personal style of photography and the make of camera. It is further complicated by the relationship between sensor size and focal length.

    Let’s start by exploring some of the things you need to think about when choosing the perfect portrait lens.

    1. What about the lenses you already own?

    It may be that you already own a lens that you haven’t thought of using to take portraits, but could actually do the job quite well. Do you have a 50mm prime? Or maybe a 100mm macro lens? A 70-300mm zoom? All of these are capable of being great portrait lenses.

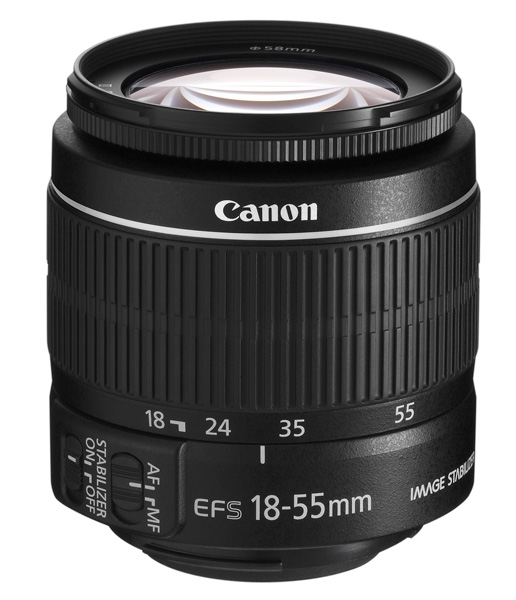
    Even if your only lens is a kit lens, you may still be surprised by how well it performs (within its limitations). You can read more about that in my article Why Your Kit Lens is Better Than You Think.

    Getting to Know Your Lenses will also help.

    2. Do you need a zoom lens or a prime?

    Prime lenses are great for portrait photography. One advantage is that they have a wider maximum aperture than a zoom lens covering the same focal length. This is useful for creating images with shallow depth-of-field (a common technique in portraits). It is also handy in low light, as it lets you take photos with faster shutter speeds or lower ISO than you could with a zoom with a smaller maximum aperture.

    Canon EF-S 18-55mm lens

    Another benefit is image quality. Prime lenses tend to have less elements than zooms, and the result is that image quality is better, and they produce sharper images with more contrast and less lens flare. If you’re on a budget (see next point) then an inexpensive prime will give you better results than an inexpensive zoom.

    3. What’s your budget?

    This is an important consideration because, as with most things, good quality lenses cost more. The best example of this is Canon’s 50mm lens range. There are four models, ranging from around $ 110 to $ 1600 in price. That’s a big difference, and your budget determines which model makes it to your shopping list.

    More expensive lenses usually produce sharper images with less flare. The construction quality is better, they may be weatherproofed and have better or quieter autofocus mechanisms. The difference in image quality is usually greater between expensive and cheap zoom lenses than it is between expensive and inexpensive prime lenses.

    The other trade-off (besides cost) for better quality built lenses, is extra weight. Top of the line lenses are usually made of metal and are heavier than the less expensive plastic lenses.

    Bear in mind that good camera lenses should last decades, and sometimes spending more up front is beneficial in the long run. In the words of Sir Henry Royce (of Rolls-Royce):

    “The quality is remembered long after the price is forgotten”.

    4. What focal lengths do you require?

    The answer to this question depends on the size of your camera’s sensor (our article Crop Factor Explained tells you why). Rather than discuss specific focal lengths it’s easier to split lenses up into four categories. Once you’ve figured out what category of lens you’re interested in, and whether you would prefer a prime lens or a zoom, you can investigate which models are available for your camera.

    Wide-angle lenses

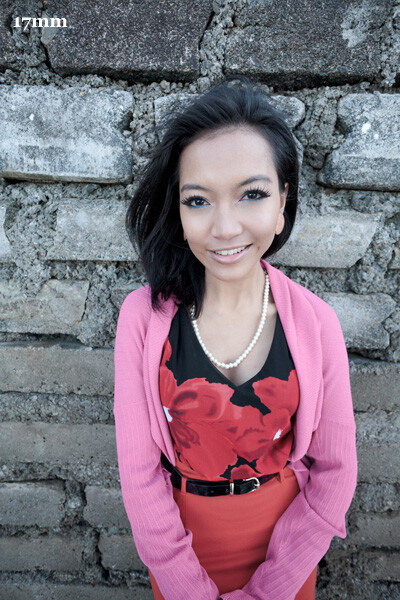
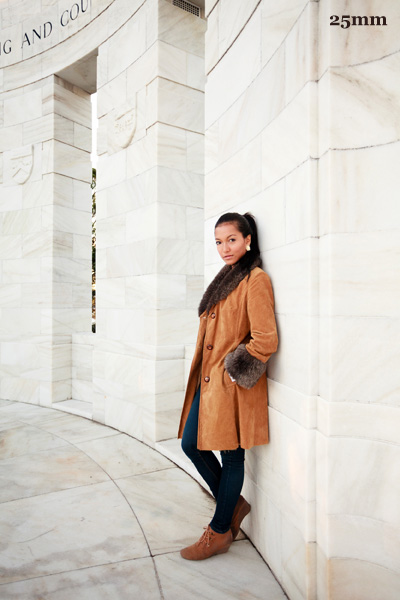
    Wide-angle lenses are good for environmental portraits – those where you keep your distance a little from the subject and include their surroundings. They are generally not as good for close-up portraits as they distort your subject. Here are some examples:

    Portrait taken with 25mm lens Portrait taken with 17mm lens

    Normal lenses

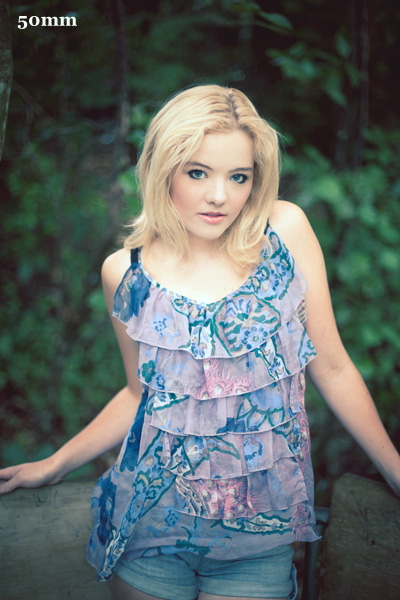
    A normal lens is one with a focal length equivalent to around 50mm on a full-frame camera (that’s around 35mm on an APS-C camera, or 25mm on a Micro four-thirds camera). You may have read that these lenses give a similar perspective to that of the human eye. It’s a debatable point, but there’s no doubt they are interesting for portraits, occupying the middle ground between wide-angle and short telephoto lenses. They can be used for close-up portraits, although not completely without distortion (see image left, below)

    Portrait taken with 50mm lens

    A “normal” 50mm lens portrait

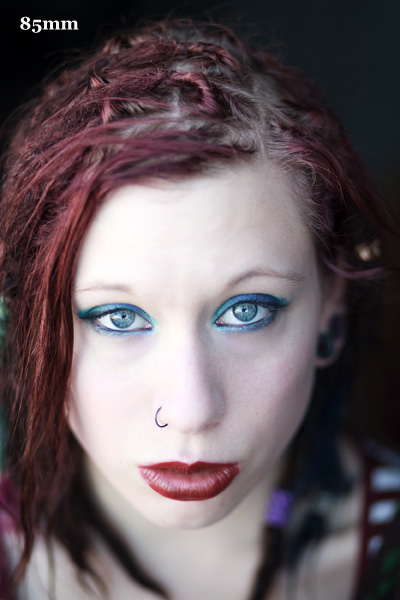
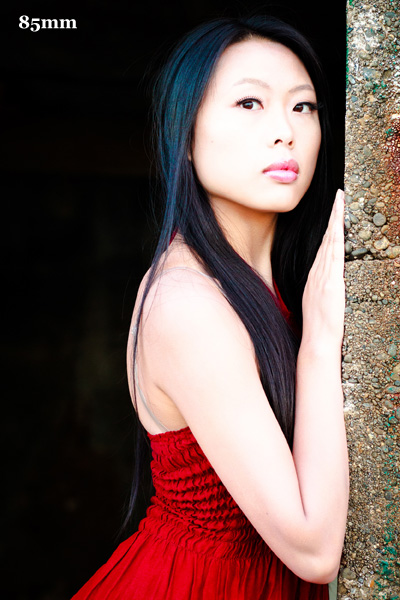
    Portrait taken with 85mm lens

    A short telephoto 85mm lens

    Short telephoto lenses

    These lenses are often called portrait lenses because they are an ideal focal length for taking flattering photos of people. You can move in close and take images without distortion, or step back and include the entire figure without moving so far away that it becomes difficult to communicate with your model. If your short telephoto is a prime lens, you get the additional benefit of wide apertures. Best of all these lenses, especially primes, tend to be reasonably priced.

    My favourite lens for portraits is an 85mm prime lens (you can read more about it in my article How a Humble 85mm Lens Became My Favourite). (see image right, above)

    If you have an APS-C camera then a 50mm prime lens is effectively a short telephoto. Yes, I’ve written about 50mm lenses too – let me point you towards Nifty Fifties – Why I Love 50mm Prime Lenses and Why a 50mm Lens is your new best friend.

    Telephoto lenses

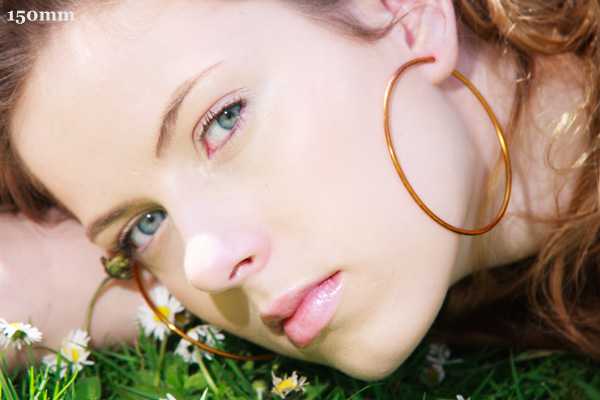
    Telephoto lenses are often used by professional fashion and portrait photographers for the compressed perspective and their ability to isolate the model from the background. The downside of telephoto lenses is that they tend to be more expensive than shorter focal lengths, especially if you’d like one with a wide maximum aperture. They are definitely heavier as well. Having said that, there are plenty of relatively inexpensive lenses, especially zooms, in the 100mm-200mm range.

    Portrait taken with 150mm lens

    Selecting a focal length

    If you’re unsure which focal lengths appeal to you, try this exercise. Go onto Flickr or 500px and do a search for portraits. Mark any you like as favourites. When you have marked at least twenty, go and have a look at them together. Examine them carefully and think about why you liked each one. Are there any common themes? Which focal lengths are used the most? Are the photographers using wide apertures for shallow depth-of-field? Are they predominantly black and white or colour? Is the photographer using natural light or flash? Are they predominantly close-ups or environmental portraits? The answers to these questions may help you decide which lenses to shortlist. Read more: 5 Easy Steps to Choose the Perfect Prime Lens for You

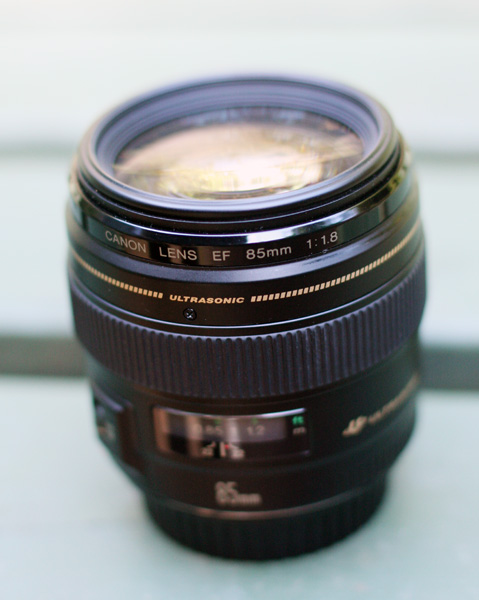
    Canon EF 85mm f1.8 lens

    My thoughts

    I’m going to be specific and tell you exactly which lenses I use. My favourite lens for portraits is my Canon EF 85mm f/1.8 prime lens. I use it for approximately 80% of the portraits I take. I also use my Canon EF 40mm f2.8 pancake lens (it’s a moderate wide-angle) on my full-frame camera and, occasionally, a Canon EF 50mm f1.4 or EF 17-40mm f/4L zoom. The next lens on my list is a 24mm prime, and when I buy one I’ll no longer use the 17-40mm zoom for portraits. I favour primes over zooms because of image quality and the wider maximum apertures.

    Your thoughts

    Now it’s time to share your personal experiences. Which lenses have you purchased for taking portraits, and how did they work out?


    Understanding Lenses

    Understanding Lenses: Part II ebook coverI’ve written two ebooks for Canon EOS users about camera lenses. Click on the links to learn more about each one:

    • Understanding Lenses: Part I – A Guide to Canon Wide-angle and Kit Lenses
    • Understanding Lenses: Part II – A Guide to Canon Normal and Telephoto Lenses

    The post How to Choose the Perfect Portrait Lens by Andrew S. Gibson appeared first on Digital Photography School.

    Digital Photography School

  • A Year of Photographic Lessons – Journey of a Novice Photographer

    About a year ago I decided to try and take my photography to the next level – to go beyond basic snapshots and try and get the wow factor into my images. I hope this article covering my photographic experiences of 2013, and the lessons I’ve learned gives you some ideas for 2014.

    This is the story of my year of photographic lessons – maybe you can relate, or are on a similar journey.

    Note: the images in this article are in chronological order with my early work near the top, and my most recent images at the bottom. Hopefully you can see where I’ve started from and how much I’ve progressed in a year. You can do this too!

    Photography lessons novice 01

    STEP ONE: – join a photography club

    The single biggest thing that made a difference to my photography in 2013 was joining a local club in Dublin, Ireland (www.offshoot.ie). This proved to be the turning point for a few reasons:

    • It was an opportunity to learn from like-minded, enthusiastic and friendly photographers; and a chance to be inspired by their stunning work.
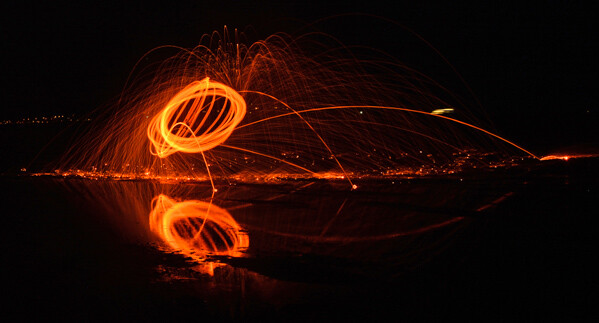
    • Organized field trips; providing some amazing photo opportunities including; a fire breather, light painting, model shoots, etc.
    • Learning by practical sessions – new techniques like portraits and lighting, or macro to introduce new areas of photography I had never explored previously.
    • Joining a club, above all, provided an opportunity to learn, as well as inspiration and motivation to get out taking photos more often, and to do it better.

    Photography lessons novice 02

    STEP TWO – try entering competitions

    Competitions are one aspect of photography clubs which tends to put a lot of people off. However, I found that the competitions are very useful to help concentrate the mind on a particular topic, or learn a new technique. For example: long exposure or macro photography, which I had never tried before.

    Getting expert feedback from judges can be invaluable – usually they will want to help you improve, and will provide helpful feedback on your image, e.g.. exposure, cropping, etc. Competitions are also a chance to show your off your work, and let’s face it, we all like some recognition. So winning competitions doesn’t exactly do any harm.

    STEP THREE – Learn the basics

    It’s important to get to know the basics on the technical side. It’s no substitute for the photographer’s eye, but the lack of technical skills might prevent you from capturing the image that you want. The good news is there are loads of great sources from the photography club, great websites like dPS, flickr, books, and podcasts. The big lessons for me included:

    • Exposure and how to control it with aperture and ISO – is the image too bright or too dark
    • How to get sharp images by adjusting focus modes, shutter speed and using a tripod
    • Depth of field – controlling what is in focus
    • Composition – some of the classic components of a good image, like using the rule of thirds
    • Cropping images – using software to crop to the important part of the image, and remove distracting elements
    • How to do the basics in photo editing software like Lightroom or Photoshop to crop images, correct exposure, resize images and more importantly, to build and safely store your library of images

    Getting a good understanding of the above should make a big difference in the quality of your images.

    Photography lessons novice 03

    STEP FOUR – know your camera

    I try to consider the basics above and the results are improving. I generally manage to get a few images that I really like, and I think the occasional one at least that has the wow factor. With a modern DSLR you don’t need to understand all its complexities but you do need to know the key features, to get the most out of it. You don’t want to miss a shot of a spectacular sunset while you trawl through the manual, so understanding the main controls are essential including:

    • Focus – manual and auto focus modes
    • Image stabilization
    • Metering modes
    • Manual mode – controlling aperture, ISO, and shutter speed
    • Image file type – Jpeg or Raw
    • White balance

    A big milestone for me as I got to know my camera, and got more confident, was stepping out of Auto mode and going Manual. I can attest, when you get it right, it really works. When you get it wrong, delete – it’s the busiest key on my keyboard. I still need to get my head around the focus modes, white balance and some of the more exotic possibilities like HDR.

    STEP FIVE – get the right gear

    Photography lessons novice 04When I joined the club I must say I had a bit of camera envy – mine being a Nikon 8 megapixel E8700 bridge camera, of 2004 vintage, which had served me well. People in the club correctly told me that it’s not the camera that makes the difference but the photographer. My vintage Nikon was great for many situations, but couldn’t match the quality and versatility of a modern DSLR.

    Unfortunately, when I bought it on a family visit to New York in 2004 I explained to my wife that this $ 1100 camera was a lifetime investment. After some negotiation with my wife, I made a new lifetime investment in 2013, and am delighted with my Nikon D7100, although I’m still trying to come to grips with its incredible capabilities. I would definitely recommend a tripod also as one essential piece of gear that will improve your results, and help you to with long exposure, night shots and getting sharp images in focus.

    Don’t rush into buying a whole load of gear however, wait until you find that your current camera or lens is holding you back.

    Note: the images below were all taken with my new D7100.Photography lessons novice 05

    Photography lessons novice 06

    WHAT’S NEXT – plan for 2014

    So where to next? What does 2014 bring, I hear you ask. Now is the time to put a plan together!

    1. Make a calendar of the many sports and cultural events that might provide new and varied photo opportunities
    2. Projects – to develop your skills; e.g. one day in your city, monochrome (B/W), sports, nature, architecture
    3. New things to explore – some new techniques or skills to master to take you out of your comfort zone and try a new area such as long exposures or portraits

    Photography lessons novice 07

    Most of all – think before you shoot

    This was the biggest lesson of all for me – use everything you have learned to get the best possible result. Use your knowledge of the exposure and composition. Try a different camera angle or point of view, depth of field, lens, or shutter speed to try and create an image with the wow factor.

    Above all get out there taking photos and enjoy, there is no substitute for practical experience.

    Photography lessons novice 08

    Further reading

    For more tips for beginners – head over here.

    Photo Nuts and Bolts – know your camera and take better photos, a dPS ebook.

    The post A Year of Photographic Lessons – Journey of a Novice Photographer by Rob Hackett appeared first on Digital Photography School.

    Digital Photography School

  • How to Pose Portraits: Our Brand New eBook Launches Today

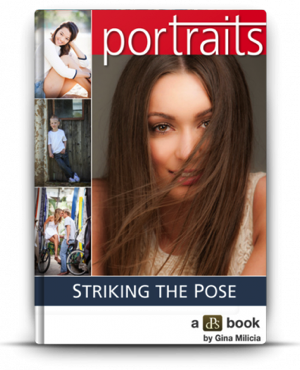
    NewImageToday I’m excited to announce a brand new dPS eBook – Portraits: Striking the Pose – an eBook created with the sole purpose of helping you pose amazing portraits.

    Posing is something that can make or break a portrait.

    • Do it badly and your subject looks awkward and the resulting image is spoiled.
    • Do it well and your subject will be at ease and their true character will shine through.

    That is what this eBook is all about.

    Inside this beautifully designed and illustrated eBook world class photographer (and author) – Gina Milicia – walks you through how she connect with and directs her subjects to take stunning portraits that show their true character.

    Gina has photographed thousands of subjects over her 25 years as a professional photographer and in this eBook draws on this experience to give you a great mix of inspiration but also actionable tips that you can start practicing on those you photograph immediately.

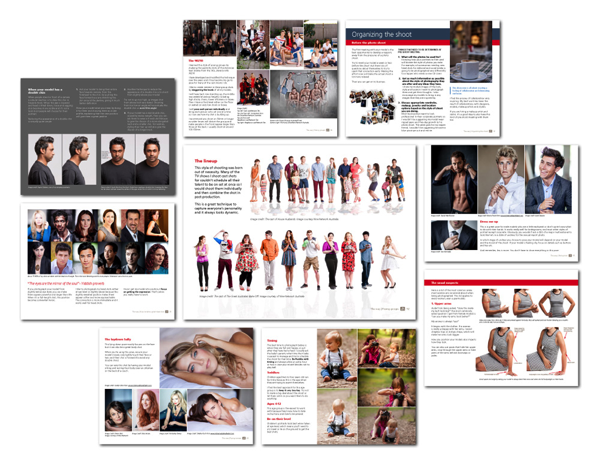
    Here is a quick peek inside.

    NewImage

    Portraits: Striking the Pose is broken down into three sections:

    • The Rules: The golden rules of great poses. Using visual queues, praise, energy and authenticity and much more.
    • The Gear: Whilst covered more comprehensively in Gina’s previous book ‘Making The Shot‘, Gina will remind you what sort of gear you should be looking for to capture great portraits
    • The Way: The most chunky part of the book. Gina will show you how to connect with people, organise and direct like a pro. She then dives into specific details of different posing scenarios (men, women, children, couples, groups and more) with loads of examples for you to refer bad to again and again.

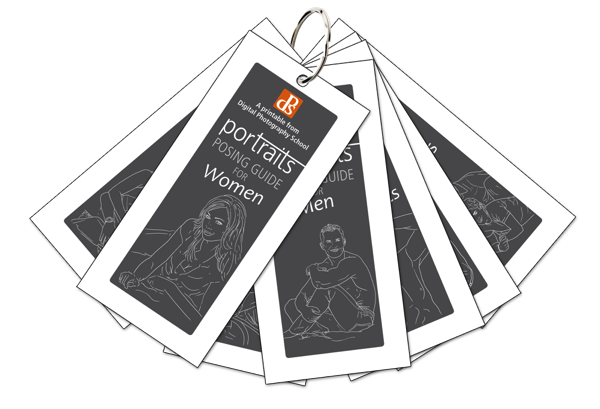
    FREE Launch Bonus: Portrait Posing Printables

    NewImage

    Pick your copy of Portraits: Striking the Pose today and you’ll also get a bonus 7 Posting Printable Guides worth $ 9.95 for FREE!

    These handy ‘printables’ fold up beautifully to pop in your camera bag and pull out whenever you need them. There’s 7 sets of poses that include:

    • Women Posing Printable
    • Men Posing Printable
    • Kids Posing Printable
    • Group Posing Printable
    • Couples Posting Printable
    • Corporate Posing Printable
    • Lifestyle Posting

    In total you’ll have 67 sample poses to give you some great starting points when you next do a portrait shoot.

    To buy these on their own would cost you $ 9.95. To celebrate the launch of Portraits: Striking The Pose for a limited time we’re including them for FREE!

    This bonus is just for a few weeks so don’t delay.

    Perhaps our Best Value eBook Ever

    We’re particularly proud of this eBook for a number of reasons. It’s beautiful, it’s useful, it’s inspiring and it is great value for money.

    For just $ 19.99 you’ll pick up this comprehensive new Portraits: Striking the Pose eBook and 7 printables with 67 posing suggestions.

    Search around the web for other posing guides and you’ll soon see just what great value this is as others sell their guides for hundreds of dollars.

    Guaranteed to Satisfy: We’re super confident that this eBook will help you improve your portraits but if you don’t find it suits your needs just let us know within 60 days and we’ll refund your money for in full.

    Grab Your Copy Today

    If you’re looking to improve your portrait photography grab your copy directly with this link or if you want more information or are looking to bundle this eBook with Gina’s other eBooks for just $ 10 more check out the Portraits: Striking the Pose page.

    Add to Cart

    The post How to Pose Portraits: Our Brand New eBook Launches Today by Darren Rowse appeared first on Digital Photography School.

    Digital Photography School

  • Urban Exploration Photography 101 With Miki Lansdowne

    Urban exploration is one’s exploration of man-made structures that are typically abandoned ruins or elements of the man-made environment that are not readily seen by most people. You may have seen TV shows documenting urban exploration, but it’s not a subject we’ve really tackled in-depth at Photodoto…until now, that is. Recently, I was contacted by Miki Lansdowne, an urban exploration Continue Reading

    The post Urban Exploration Photography 101 With Miki Lansdowne appeared first on Photodoto.


    Photodoto

  • 5 Things to Consider Before Starting Your Photography Business

    Starting a photography business is extremely easy with the accessibility and affordability of digital cameras and processing programs. Often the lure of entrepreneurship, with these low barriers to entry, leads to many photography business owners of all business experiences. Experience levels range from lack of business competence, to the need for growth in photography skills to a mixture of skills with varying weaknesses and strengths. Before entering into business it is important to evaluate whether you are technically proficient, ready to deal with business legalities, have a good grasp of business operating costs, engaging in market research and client management.

    Photography business 05

    #1 – Are you technically proficient?

    The first step is to determine if technical proficiency is at a level to provide a quality, consistent product to each client that comes through the door. The importance of delivering consistently rests in word of mouth marketing and preventing disappointment when a client’s expectations are not met.

    Photography business 04

    #2 – Are you ready to deal with business legalities?

    After technical proficiency comes the battle of business legalities including (but certainly not limited to: business formation, filing appropriate tax documents, acquiring required permits and licenses and using quality contractual documents. These legalities can be acquired through outsourcing to lawyers and certified public accountants, but a good, knowledgeable grasp of business legalities and the requirements placed on business owners is paramount to the success of your business.

    Photography business 03

    #3 – Do you know your business operating costs?

    Following the previous two business necessities comes the costs of running the business. Having arms around the operating costs will assist you in setting appropriate pricing, and in making future investment decisions. Business operating costs are expenses that are directly related to the operation of the photography business. This is calculated by ascertaining costs of resources used to maintain the existence of the business. Operating costs include: rent, utilities, licenses, fees, insurance, maintenance of equipment, office supplies, income taxes, and wages.

    Note: It is a good idea to also include a “rainy day savings” into the operating costs for you to have to fall-back on in times of need.

    Photography business 02

    #4 – Have you done your research?

    An ever-required and demanding aspect of business is the initial and constant research on market influences, demands and overall factors that impact how the business will be maintained and marketed. Engaging in research is an organized effort to obtain information about the local market and potential clients. In order to effectively create and implement a successful business strategy, research must be done. Research should include identifying marketing information, trends, and the SWOT (SWOT = Strength, Weakness, Opportunity and Threats to the business) analysis of competitors. The strategies decided upon from out of this research are a key factor to maintaining a competitive edge over competitors and a higher probability for engaging clients.

    Photography business 07

    #5 – Do you know how to manage clients?

    Juggling all of the previous “business things” can get even more complicated when adding on managing of clients. Having a solid business workflow filled with automation, organization and constant revision is necessity to keep the business moving forward when it becomes easy to be distracted with client management and production of the products and services.

    Photography business 06

    Having the right answers to these considerations does not guarantee a successful business but will increase probability for success, higher level of client satisfaction and less frustration along the way.

    The post 5 Things to Consider Before Starting Your Photography Business by Rachel Brenke appeared first on Digital Photography School.

    Digital Photography School

  • How to Create Portraits With Depth

    Ben Evans - Street Photography, Barcelona

    Would you like to make portraits that show more about the person’s character than what they look like? In this article, you’ll learn some new ways to look at your subjects so you can better understand them; and therefore create portraits with depth and more interest.

    A portrait is a picture of a person. So, what separates the pictures we make from those made by a photo-booth?

    Leaving discussions about mind-body duality aside, it’s safe to say that we’re all flesh and blood. Our photographs, therefore, are of surface appearances. But beauty is more than skin deep.

    What we call character, or soul, or ‘I’ is the driving force that makes, shapes, and motivates our bodies; and our inner thoughts and emotions are often written on our faces.

    This is my personal approach to portraiture and particularly portrait photography, gleaned from countless hours of reading, and a degree in Literature, Philosophy and Psychology. It’s compressed a lot here, but should be useful if you explore each area independently.

    Reading your subject’s character

    Portrait photography aims to capture and communicate some aspect of a person’s character. I think this shows itself in a few ways

    prince-charles-english-photographer

    What are their habits?

    What we do often changes us; makes us. Whether it’s Aristotle talking about excellence as a habit, or Warren Buffett urging graduates to develop the habits of success, habits are an important part of who you are. If you exercise regularly, you get fit. If you eat well, you’ll be healthy. Habits are hard to fake, because they have to be consistent in order to have much effect. Look at your subject; how have habits transformed them?

    Ben Evans Barcelona Documentary photography

    What decisions have they made?

    Satre said that making no choice is still a choice. If I let my beard grow, it can either be a decision to do so, or an unconscious decision not to shave; so decisions can be active or passive. Do they have an afro, or dreadlocks? Both take commitment to grow and maintain so why did they bother? Ask them about the choices that they’ve made with their bodies; it says a lot about their character.

    A tattoo is a good example of a decision to pay attention to when making a portrait. It might indicate teenage rebellion, artistic expression or even affiliation with the Japanese underworld. It’s a choice to permanently mark the body; so it’s likely that some thought has gone into it. Likewise with piercings. Is it a yearning to be different? Or to be the same?

    This is also a space to think about what they spend most of their time doing; and that’s generally going to be their career. Are they following their passion, living their dream? Or are they worn down in a job they’d rather forget? Both tell stories. Uniforms may be one indicator; but it’s not too difficult to tell a rock star apart from a senior diplomat.

    ben-evans-english-photographer-guardsman

    How does the subject present themselves?

    How are the subjects presenting themselves to the world? This can be intentional, like putting on a smart suit with finely polished shoes, or passive, when they are wearing clothes that were chosen ages ago. Chances are that they spent quite a bit of time choosing what they are wearing; at the shop, and on the day. Steve Jobs had his iconic turtleneck sweaters with jeans, and Doctor Who has his bow ties. Which identity have they bought (and bought into)?

    Somebody might think of themselves as belonging to a certain nationality, a subgroup or clan; but photographs are silent, and you’ll want to look at the outward expressions of this in order to communicate this message. People often have ‘props’ that can say a lot about them. It might be an expensive watch; a necklace; a well-designed house; or if they’re young, a light sabre or cuddly rabbit. Assuming your subject isn’t naked, what have they brought with them? Ask them about what they’re wearing; you’ll likely be surprised by the answers you get.

    portrait-photographer-barcelona-art

    Facial expressions and body language

    Make them laugh! I met the chap who photographed the Beatles back in the 60s and he talked about making people say ‘cheese’. I always thought this was just a quirky thing to say to break the tension, but the idea is that the mouth forms a smile when you say the word ‘cheese’. This works better than telling someone to smile; but not by much. Mainly because expression isn’t just in the mouth; it’s a product of a whole range of muscles in the face. Ask the robot designers in Japan who are trying to replicate human emotions on an android’s face!

    So the best way is to actually elicit emotions to create the gestures that you’d like to photograph. There are lots of ways to achieve this, but most need to be taught in person. It is worth noting that people are never just the face they show you; there’s a whole host of different identities that make up their sense of who they are. It’s a matter of bringing them to the fore.

    Body language is also an incredibly revealing aspect of non-verbal communication. Every portrait photographer should have an awareness of different postures, and how they can help in reading a person. And of course, it’s possible to pose a subject too. One part of Holistic Photography (which is the philosophy that photography needs both craft/technique and art/vision) is a study of micro-expressions and how to see, and photograph them. Our faces will register emotions before we have time to control them. So you can photograph someone’s ‘real character’ by eliciting these micro-expressions, and then capturing them in the photograph.

    portrait-photography-YN560iii-flash

    Physical attributes – what can you focus on?

    One thing I didn’t mention, partly because it’s hard to avoid doing, is the ‘flesh and blood’. Some people just have fascinating faces, topographically. It might be that their eyes are bright green. This is a rare and beautiful eye colour, so chances are other’s reactions to it will have influenced their sense of self – rather like Kafka explores in The Metamorphosis. Likewise, my ginger cousins have developed an identity around their red hair. People, unconsciously or otherwise, live up to these imposed identities. I’m 6’2″. It’s a number; my height. But does it mean more than that? What about a ‘Perfect 10′? It’s just an arbitrary measurement; but numbers are intrinsically linked to our self-worth in our consumerist society. Look for physical features that stand out, that are striking. How is your subject restricted by their physical identity? How are they empowered by it?

    Summary

    Hopefully this gives you some different things to think about when you’re photographing people and want to make portraits with a bit of depth. Holistic Photography goes a lot deeper within each category but my writing isn’t good enough yet to properly communicate what’s pretty simple to demonstrate and explain in person. Therefore, have a look at portraits you admire, both photographic and painted, and look at each of the different categories to see what fits.

    Then practice really going beyond the person-as-object photography by finding out more about your subject. Think like Sherlock Holmes. Push like Platon. Light like George Hurrell. And feel like Edith Piaf. Portraiture is like a game of chess; ‘you must think first, before you move’!

    The post How to Create Portraits With Depth by Ben Evans appeared first on Digital Photography School.

    Digital Photography School

  • Warning: “Strobist” Flashes

    There is a disreputable company out of the UK and Australia persistently referring to their flashes as “Strobist Flashes.” Over my protest, they are deliberately implying an association with this site where none exists.

    I have zero connection with either these people or their gear. Had they asked for any kind of endorsement, five minutes worth of research would have warned me off any association with them.

    Of course, they did not ask. They merely appropriate the name and hope enough people are stupid enough not to know the difference. As such, they are merely using my company’s name and brand to try to get into your pants. Which should tell you all you need to know about the company’s ethics.

    The flashes themselves are (surprise) rebranded Chinese mystery meat flashes. For the record, there are no genuine “Strobist” branded flashes. Even the LumoPro LP180, while highly recommended, is not a Strobst-branded flash. For many conflict of interest reasons, I do not sell gear.

    I have asked them to stop, to no response. Clearly, they don’t give a whit about IP. Although they do of course claim copyright over the content of their site, natch. Intellectual property is important—when it suits them.

    Please do not infer any type of endorsement of these (at best) bozos. I obviously do not trust them as far as I can throw them.


    Strobist

  • Urban Exploration Photography – Urbex

    Urban Exploration Photography

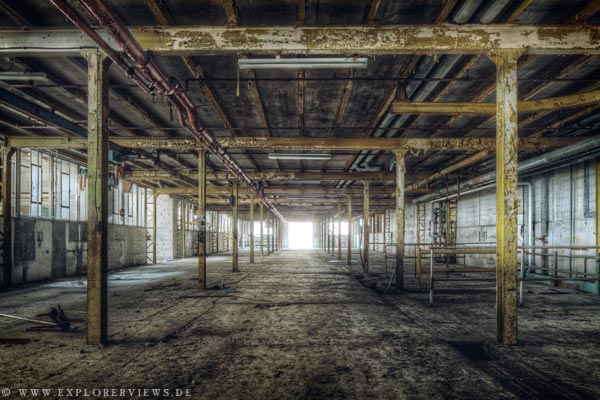
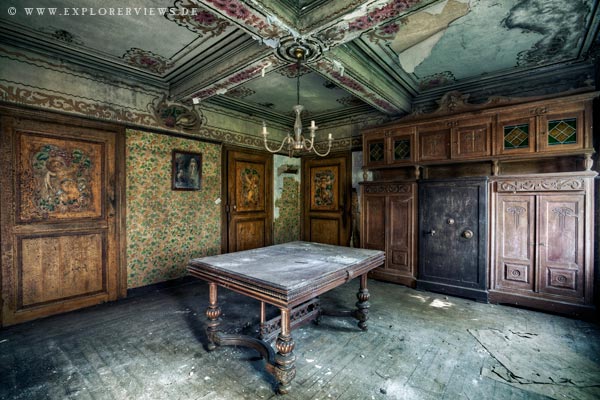
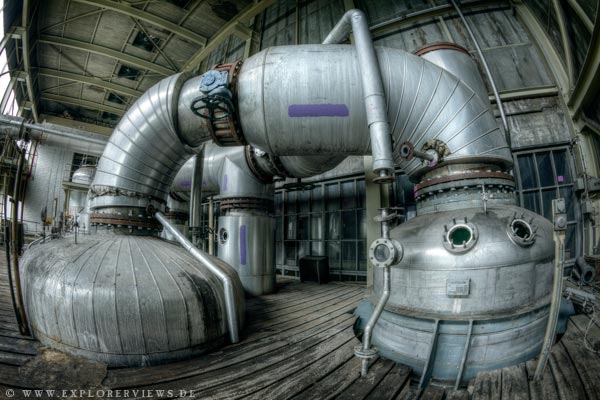
    Dark halls, narrow wet cold rooms, rusted metal, chains hanging from the ceiling – it`s like you`re moving through a horror movie setting. It appears to be a pictorial journey through a strange world – a nightmarish world of shadows and darkness as after an asteroid impact.

    01 black door explorerviews

    Lost places, abandoned buildings and infrastructure are my favourite locations to take pictures. “Urban Exploration” also known as “Urbex” is the exploring of urban, (mostly) abandoned structures.

    In this article I will tell you how I became an urban explorer, and show you how you can take pictures like you see here and on my website yourself. Hopefully you’ll be inspired to go outside to find more of those lost areas.

    02 abandoned industry bretange

    STEP ONE – FINDIN A LOCATION

    The first step is to know the location of such abandoned places. When I got started with this hobby there was nothing on the internet about urbex or lost places. I had to search the locations for my pictures myself. But since then, a few things have changed. If you have a quick look on pages like Google Earth or FlickR you will soon find some adequate places to go. Of course you can also find them by walking attentively through the town you live in.

    Ok, you have found some interesting places, and you are the owner of a DSLR or a camera to adjust exposure and aperture – now let’s get started!

    03 dinner

    SHOOTING

    For most of my urbex photos I take more than just one picture of the same scene with different camera settings to create an HDR later, so it’s important to use a tripod. With this you can set your camera’s f-number (aperture value) to a higher level around f/8 or f/16. This affects the depth of field. Using a tripod makes it possible to take shots from exactly the same spot, important for the HDR in the post-processing.

    You can manage the brightness of the exposure with the shutter speed. It’s easy and the result is a much sharper picture. For example your camera settings might look like this:

    • Aperture: f/14
    • ISO: 50/100
    • Shutter speed: variable, of course

    Now you can take six or more shots with various exposure times. Sometimes three is enough, sometimes you need more than six. This depends on the differences of brightness (from shadows to highlights) in the certain situation.

    The exposure time is a variable value which can not be set in a tutorial. But let me give you an example:

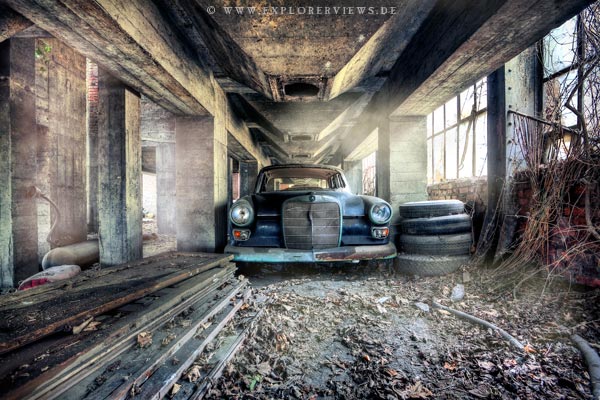
    04 carparkingspace ben schreck

    To take this indoor scene of the Car Parking Space image you see above, I took 8 different shots; the brightest one was 10 seconds (to get shadow detail) to the darkest one at 1/30th second (to get the details in the windows).

    POST-PROCESSING

    After the “outdoor work” is done you can start the post-processing. I take my shots in RAW Format, so I start editing in the Raw Converter. However, that is another tutorial. For the HDR I use PhotoMatix to edit the pictures.

    Here you have to try different settings. I usually create a tone mapped image and save the result as a TIF file. After this I start Photoshop and the creative work begins…

    In PS I work with different layers, contrast and tone correction, color changing etc. Here you have to be creative and find your own style to make your picture a unique one.

    05 industry

    ADDING LIGHT

    To take photos in bunkers like my series of the Maginot Line, you need to bring all the light to the place by yourself. The technique is nearly the same as in a “normal” abandoned place. You will just need additional flashlights and lamps in your bag to create the lightning you want. The trick is to set up the lamps and flashlights so they do not shine directly (flares!) back toward the camera, while still brightening the space evenly.

    06 maginot tunnel

    07 shadow kitchen

    SUMMARY

    The most important part of the process is shooting at the location. That is where your photo comes into existence. You will need a little operating experience to figure out how it works. It’s all about continuing to practice and experimenting.

    I hope I was able to bring you a bit closer to my way of working . More inspiration you can find on my website.

    08 castle


    Editor’s Note

    Do have any Urbex places you’ve discovered that you’d like to share? Please do so in the comments below.

    Need more information on doing HDR – check out these resources:

    • Five Minutes to Realistic HDR using Lightroom and a 32-Bit Plugin
    • 5 Tips for Successful HDR Photos
    • How to Create Realistic Looking HDR Photographs
    • Tips for Great HDR Sunsets
    • The 10 Steps Every HDR Photographer Goes Through
    • HDR and Beyond – Seeing is Believing!
    • Setting Up Your Digital Camera For HDR Shooting-Part one of a 3 part series – follow the links to read part two and three also

    The post Urban Exploration Photography – Urbex by Ben Schreck appeared first on Digital Photography School.

    Digital Photography School