Category: Photography

  • Winter Photography Tips | Bendy straws and Ziploc bags?

    © Paul Burwell Photography

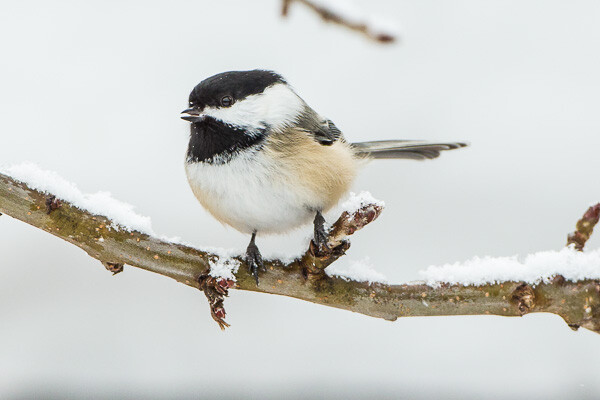
    Black-capped Chickadee on a snowy branch

    While a lot of photographers find that winter is an excellent time to hibernate, there are really no good excuses for staying indoors and avoiding winter.  But, you do need to take steps to protect your equipment.  Here’s a few ideas to keep things safe.

    WINTER PHOTOGRAPHY TIPS

    One of the biggest problems for cameras in cold weather is condensation.  Condensation occurs when you bring a camera from the dry cold temperatures outdoors, to the warm and relatively moist conditions in your vehicle or home. When that warm moist air reaches the sensor on your cold camera, condensation occurs which can leave your sensor covered in spots or even damage the electronics.  The solution to this issue is to remove your memory card and battery(s) from your camera and then transfer your gear into a Ziploc type of bag and seal it in there with the cold air while you are still outside.  Now when you bring the camera gear into a warm area, the moisture can’t get to the camera to condense  on the camera’s sensor.  Once everything warms up to room temperature you can remove it from the baggy.asj-222_1z

    Another issue for winter photography is battery life.  Cold is the mortal enemy of battery life and unfortunately there just isn’t a lot you can do about that.  But, what you can do is keep a spare battery or two in an inside jacket pocket, next to your body.  The warmth of your body will keep the batteries toasty warm and when the battery in your camera succumbs to the cold, all you need to do is swap it for a warm battery.  The cold battery will slowly warm and you’ll probably find it has renewed energy when called upon.

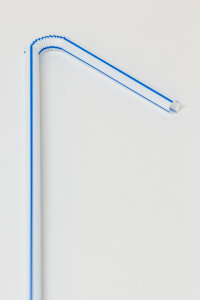
    Bendy StrawAnother bit of winter annoyance comes from having your breath condensate and freeze on your camera’s viewfinder while you’re trying to focus.  The solution for this frustration  may just be the cheapest photography accessory you will ever own. Are you ready for this brilliant invention?  Okay, here it is:

    You can use a bendy straw as a type of snorkel to direct your warm moist breath away from your camera’s viewfinder so that you can continue to make those great winter shots. This  tip also provides endless entertainment for anyone who happens to be watching you.  Try it, it works!

    Fight back against the winter doldrums and get out there and make some great photographs! Hopefully these tips will make your winter photography sessions more tolerable!

    © Paul Burwell Photography

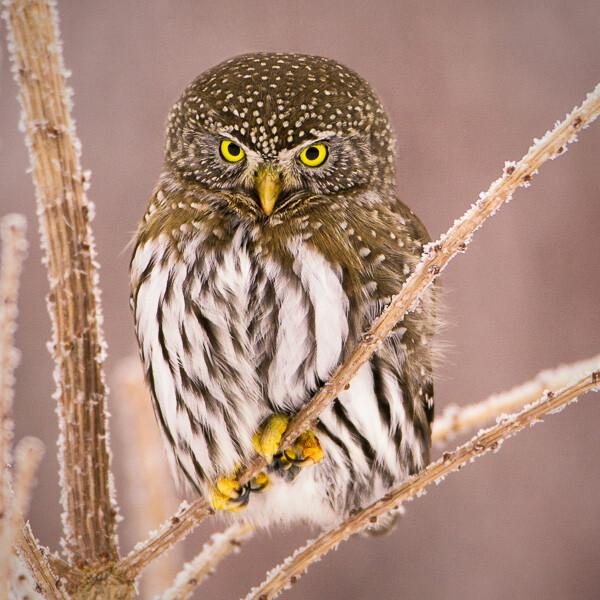
    Northern Pygmy Owl on a frosty branch


    Further reading on shooting on cold or inclement weather:

    • Tips to Protect your Gear in Harsh Weather Conditions
    • How to Protect your Camera in Extreme Conditions
    • 30 Foul Weather Photos for Inspiration

    The post Winter Photography Tips | Bendy straws and Ziploc bags? by Paul Burwell appeared first on Digital Photography School.


    Digital Photography School

  • Create a Cast of Light in Your Image using Photoshop or Elements

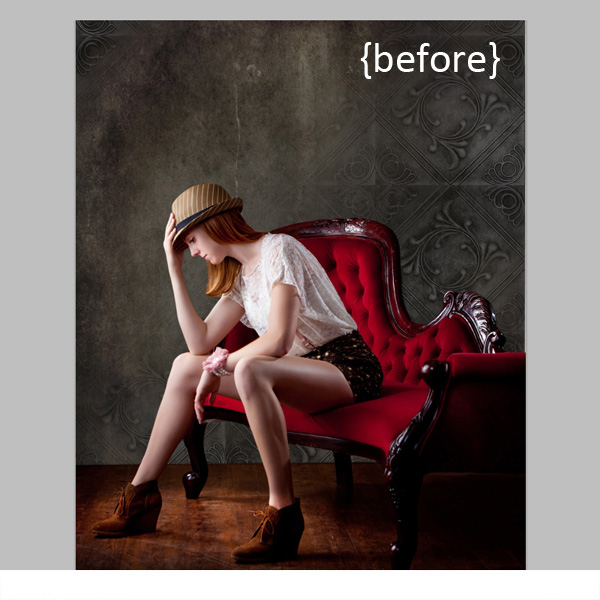
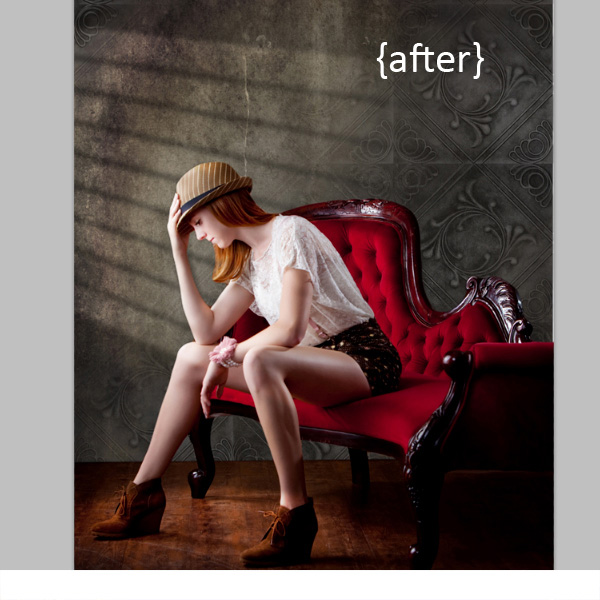
    Light sources add depth and interest to your images immediately. By simply adding some window light to this image we added depth and warmth. If you have an image that you love, but it’s falling a little flat, consider adding some light! With just a few simple steps you can add beautiful light to your images.

    Follow these steps to create a cast of light – works in Photoshop and Elements

    Window Light Cast Before

    Window Light Cast After

    One thing you’ll want to pay special attention to is pre-existing lighting in your image. Make sure the light source you add works with and compliments your image. You can adjust the angles and direction of your added lights to make them work together so your image is both believable and beautiful.

    Let’s get started. Follow these simple steps to make your compositions shine!

    Step 1: Start with a light source

    This can be an image you’ve taken, something you’ve designed or something you’ve purchased. We are using a light element from our Window Cast Light Set. Choose a light source and shape that you want to bring into your composition.

    NOTE: if you want to follow along and try this on one of your images we’re happy to provide our set of Light Casts to you for free. Go here to download them – use the code: FREEBIE when you checkout to get them at no charge.

    Step 2: Add the light source to your image

    If you have your image and the light source both open in Photoshop, you can use your selection tool to drag the light source to your image. Alternatively, you can also copy (Control + C) the window shape layer in Photoshop (or PSE). Open your image and paste (Control + V) the window shape layer into your image.

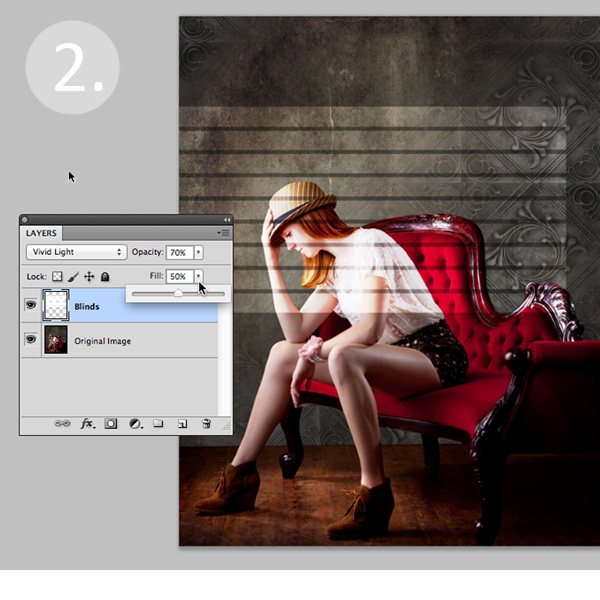
    In this case, we placed the light source over our image. Next we adjusted our Layer Blending Mode by setting it to “vivid light” and then adjusted our opacity and fill on the light source until we achieved the desired look. You’ll want to play around with these settings to get the right look for your image.

    Window Light Cast La ED2363

    Step 3: Adjust the shape of your light

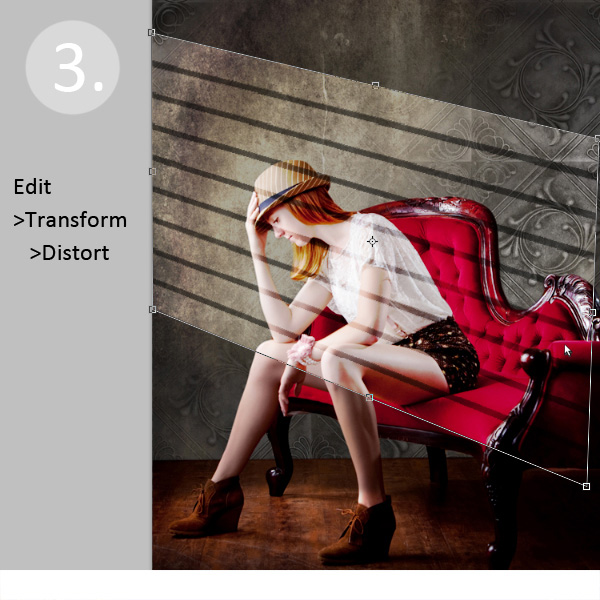
    Next, you’ll transform the window shape to your liking. Go to Edit>Transform>Distort and then move the corners to create the
    shape that works best with your image.

    Window Light Cast Transform

    Step 4: Soften your light

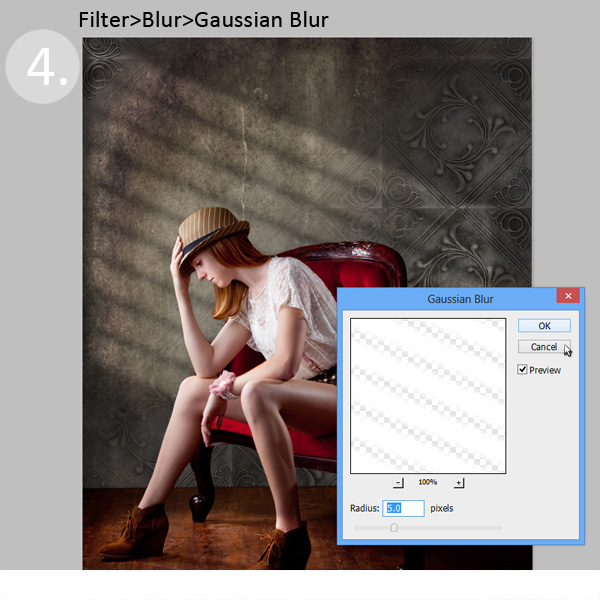
    Now you want to soften the edges of your light so that it is not so harsh. Use the Gaussian Blur filter (Edit>Blur>Gaussian Blur) to soften the edges to your taste. In this case, we set the blur amount to 5. Adjust the amount of blur up and down to see how it softens the light in your image.

    Window Light Cast Blur

    Step 5: Fade your light source for a more natural look

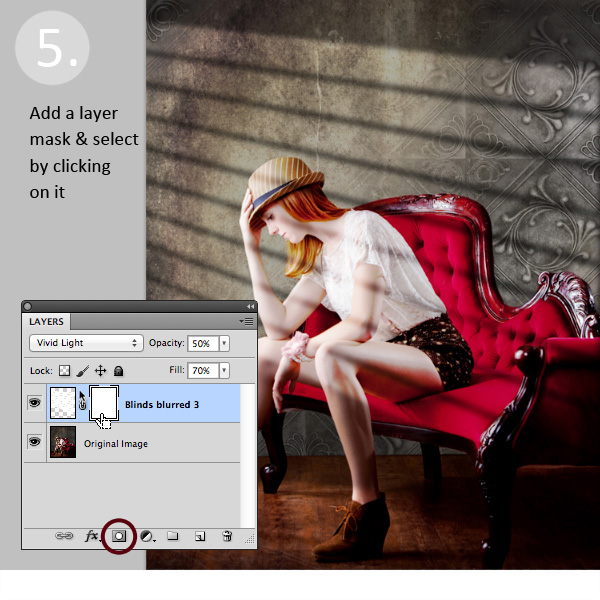
    Now you’ll add a Layer Mask to your window shape layer. First, select your layer, and then click the Add Layer Mask Button at the bottom of your Layers Palette. Click on the new Layer Mask in the layer to make sure it’s selected. (VERY IMPORTANT STEP!)

    Window Light Cast La ED283A

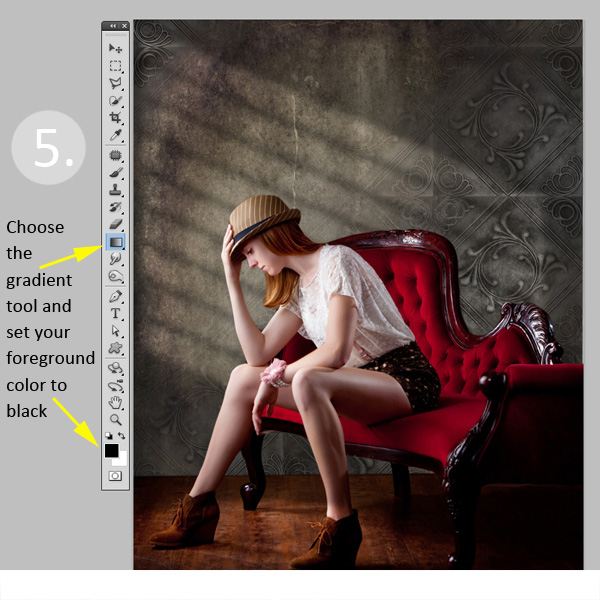
    After adding a layer mask to the light cast layer, set your color palette to black and white, with black in the foreground color. Then use the gradient tool set to “foreground to transparent” to fade the light off.

    Window Light Cast Gradient

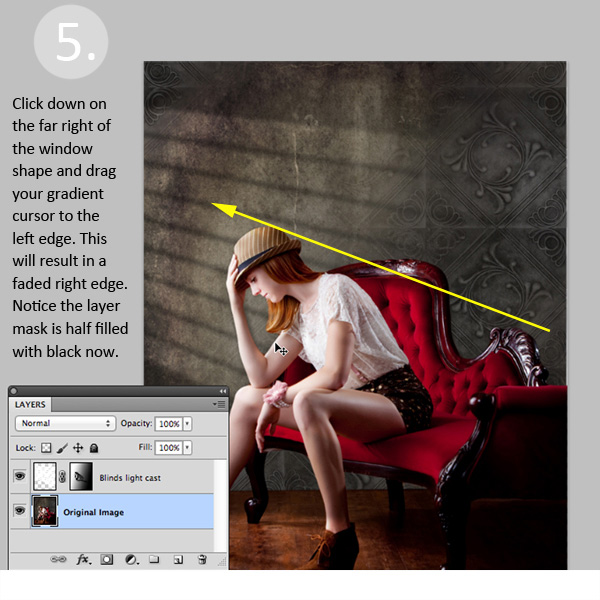
    Simply click into your layer mask and drag your cursor from one end (this will be 0% opacity) to where you’d like to see the light at 100% opacity. If you don’t like your results, fill the mask with white and start over.

    Window Light Cast Gr ED2331

    Step 6: Position the window shape to your liking.

    Use your Selection Tool to adjust the position of your light layer to the desired location in your image. You can also use a soft black brush set to 30% opacity to subtly brush away the window light in the layer mask. We did this to remove extra light from her face.

    Congratulations! You’ve successfully added a beautiful, warm light effect to your image to create more depth and interest in your image.

    Window Light Cast Before

    Window Light Cast After

    Your turn!

    If you’ve tried out this technique please share your images in the comments below, and please ask if you have questions!

    The post Create a Cast of Light in Your Image using Photoshop or Elements by Christina Roth appeared first on Digital Photography School.


    Digital Photography School

  • Create Powerful Silhouettes by Telling a Story

    Create Powerful Silhouettes by Telling a Story

    Telling the Story

    Silhouettes remove all the distractions and clutter in the scene and distill the image down to its most basic, this is why the story is so important. Just using shapes you must make a photo that is recognizable, and that the viewer can relate to. While this sounds easy in practice, it can be difficult to achieve. You must have the right elements. The light needs to be in the right location, the subject needs to be facing the right way, and they need to be in a pose that makes their action recognizable.

    Silhouette 1

    Movement by the subject helps tell a strong story in your silhouettes

    Tips for creating good silhouettes that tell a story

    Clean outlines

    If you have multiple objects that are back-lit you want to make sure there is separation between the objects so that each one is distinct and recognizable.

    Profiles or straight on shots work well

    For people, profiles or straight on shots work best. For profiles you should be able to clearly make out the shape of the nose and chin on their face. For straight on shots the subject’s arms should be away from their body, and their legs parted so you can see both legs and not just a single blob. Recognizable shapes – this is important for every silhouette.

    Capturing action

    Movement in your subject can create strong lines and positions that are instantly recognized by the viewer and help convey the story of what the subject is doing.

    Props

    Silhouette 2

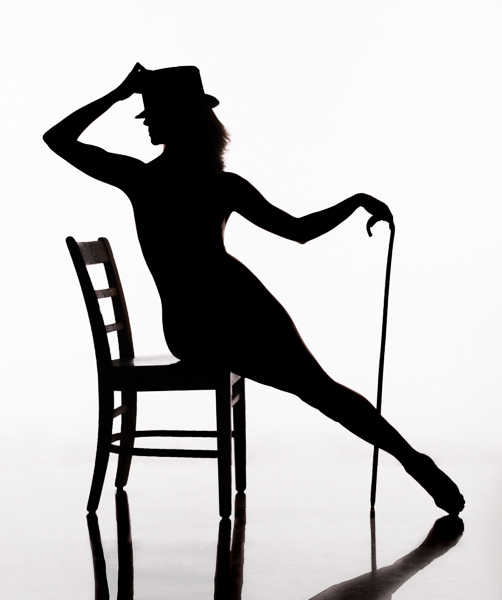
    The added hat and cane help enhance the story in this image

    Props can help tell the story, an outline of a flower, a tip of a hat can add meaning to the image.

    Interaction between subjects

    Having multiple subjects can be challenging because you want to minimize overlap of their shapes so they each maintain their own identity. There is a balance between telling the story and having the subjects interact in a minimal way. For example holding hands or kissing often work well, but a hug results in silhouette that is just a big black blob.

    Silhouette 3

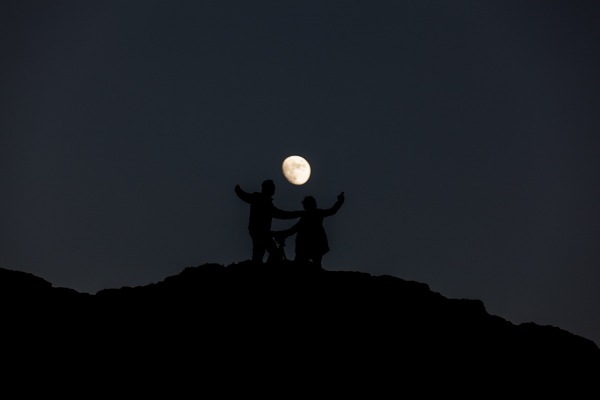
    Separation between subjects is important. This image would be stronger if the man’s leg did not merge with the camera and tripod

    Lighting for Silhouettes

    To light a silhouette you need to light the subject from behind. The type of light is not important; it can be natural or artificial and can be direct or indirect. The important thing is that the lighting is behind the subject, and the subject is not lit. Technically silhouetting occurs when you have a lighting ratio of 16:1 or greater (4 stops), however I will describe how you can create a silhouette in post-production using lower lighting ratios.

    Natural Silhouette Lighting

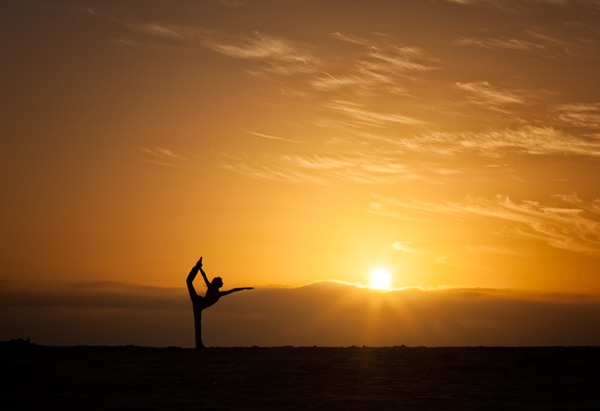
    One of the most common types of silhouettes using natural lighting is to place the subject between the camera and the setting sun or moon. Your camera exposure should be set for the background lighting, either the sunset or moon, and this will cause the subject to appear black against the light background. Another common technique is to use the light reflected off of a wall or the side of a building.

    Silhouette 4

    This lighted wall in Las Vegas provides great back-lighting for silhouettes

    Studio Silhouette Lighting

    There are two common techniques for creating silhouettes using studio strobes. The first is to use a white background and bounce the strobes off the background. The second is to point the strobes towards the camera and place the subject between the strobes and the camera. This second technique can also produce a light flare in the image which can give an interesting effect.

    Post-processing techniques

    Silhouette 5

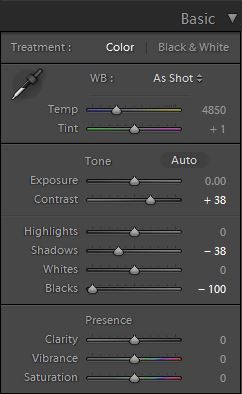
    If you have a backlit subject, but can still see some detail in the subject you can often make it a pure silhouette in Lightroom, or Camera RAW. Use the develop module in Lightroom and adjust the Contrast, Highlights, Shadows, and Blacks sliders. Use different combinations to darken the subject. Typically you will need to increase Contrast and decrease one, or all of the other three sliders. Either the Shadow or Blacks slider should be set to -100, try both to see which produces the desired effect. Decreasing Highlights is typically only necessary if the edges of the subject are lit and you wish to make them darker.

    Conclusion

    Silhouettes are a fun and easy to do and by concentrating on the story being told you can create an image that has impact.

    Want more silhouettes?

    • 5 tips for photography silhouettes (non-human subjects)
    • How to photograph silhouettes in 8 easy steps
    • 12 stunning silhouettes
    • Great B/W silhouette images

    The post Create Powerful Silhouettes by Telling a Story by Craig Colvin appeared first on Digital Photography School.


    Digital Photography School

  • The Definitive Guide to Destination Wedding Photography

    Destination wedding photography is hard work but certainly has its rewards. If you can adapt quickly, can thrive on the new and different challenges, and are naturally resourceful this niche may be for you. There are some additional considerations if you are thinking about becoming a destination wedding photographer. It typically requires more planning and expertise. Because the location is Continue Reading

    The post The Definitive Guide to Destination Wedding Photography appeared first on Photodoto.


    Photodoto

  • Top 5 Shortcuts for Better Photos

    Having taught photography for several years I’ve noticed most students find the following 5 tips provide the biggest ‘aha!’ moments. These are the quickest and easiest techniques for improving your photography.

    Top five shortcuts for better photos

    1. Switch to aperture priority

    Aperture priority

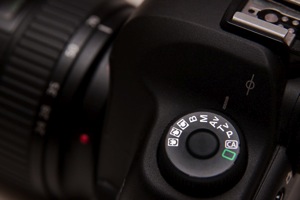
    The main dial on top of your camera will have an option called ‘Av’ or ‘A’, depending on the make of your camera. It’s known as ‘aperture priority’. This mode gives you the perfect combination of a decent exposure (in most situations) and creative control. The only time this setting doesn’t give the right exposure is when a scene is particularly bright (like a snow scene), or dark (like a black Labrador).

    Exposure compensation

    If you’re not happy with the exposure you can use your camera’s exposure compensation setting to make it brighter or darker. This is usually controlled using a +/- button or a large rotary wheel, but check your manual for instructions on how to do this for your make and model of camera. Cameras tend to make very bright scenes too dark and dark scenes too bright.

    A large part of the creativity in photography is adjusting the aperture to ensure more or less of the photo is in focus. The beauty of aperture priority is that you can select the aperture you want, and the camera will select the appropriate shutter speed to get the right exposure. Even if the light changes while you’re composing the photo the aperture won’t change, only the shutter speed will. This means your creative vision won’t change either.

    All you need to remember is the lower the aperture number (f/4 for example), the less of the image that will be in focus. Cameras can be overwhelming and even have different ways of doing the same thing. When you’re starting out in photography it’s important to keep things simple. This means understanding what you don’t need to worry about yet. Sticking with aperture priority means you have one less knob to worry about, which always comes as a huge relief to my students.

    2. How to avoid blurred photos

    One of the most common problems suffered by new photographers is blurry photos caused by having a slow shutter speed. There’s a simple rule to help.

    Your shutter speed needs to be faster than the focal length of your lens. So, if you’re using a 17-70mm lens and you set your lens to 70mm, then you need a shutter speed of at least 1/70th second. If you zoom out to 17mm then you’d need a shutter speed of 1/17th second. Note that this is the absolute slowest shutter speed you could use and the rule assumes that you and your subject are both still.

    Blurred photos

    Obviously your shutter speed can be as long as you like if you use a tripod, unless your subject is moving. You can create lovely effects by using a tripod for landscape photos where part of the landscape is moving. For example: flowing water, trees in the wind, car headlights, clouds etc.

    If your shutter speed is too slow then you can make the aperture larger to let more light into the camera. Select a smaller ‘f number’ (f/4 instead of f/8 for example). If you’re already on the smallest f number you can get, or you don’t want to lower it because less of your photo will be in focus, then you have another option. Choose a higher ISO number and keep the same aperture as before. Again, aperture priority will ensure the exposure remains correct unless the scene is overall very dark or very bright.

    3. Get closer and remove clutter

    Almost every photographer starts out photographing things from too far away. They’ll create portraits where the person has a big area of nothingness around them. Maybe this is because most people are uncomfortable being photographed, and most new photographers are nervous about standing near them to take their picture. A longer lens can really help. 100mm or more allows you to stand outside someone’s personal space and still get a tightly composed image.

    Just before you press the shutter button remember to check for unwanted items and consider whether your main subject is nice and bold in the frame. Our brain often deceives us because when it’s excited by something, it makes it seem bigger than it really is. Look at the background and consider whether it could be less cluttered. If you’re unable to move yourself or your subject to create a cleaner background then use a lower F stop (f/5 or lower, for example) to blur it out.

    Uncluttered

    4. Look for geometric shapes

    If you look at your favourite photos you’ll notice the composition is often made up of quite defined shapes. Triangles, diamonds, circles, squares, parallelograms and trapezoids all slot together to create a pleasing jigsaw. Our brains like things to be ordered. Think about the calming effect of a nicely appointed hotel room. It’s made up of uncluttered geometric shapes, from the neatly stacked towels to the folded triangle of toilet paper and the round mint on the fold of your bed sheet.

    Geometric shapes 2

    5. Get in touch with your feelings

    Whenever you have the urge to create a photo, think about why you’re picking your camera up in the first place. What was it that inspired you to grab your camera in this instant? If you’re photographing a person, then what are their physical and personality traits that you’d like your photo to convey?

    Feelings

    Imagine looking over a rocky coastal bay as the sun sets to your right. There’s a lighthouse straight ahead on the far side of the cove and storm clouds are rolling in behind it. Frothy waves are pummelling the rocks below. Most people would get out their wide angle lens and try and capture the whole scene in one go. The trouble is, the sunset would be distant, and the waves, rocks and lighthouse would be almost imperceptible.

    Feelings 2

    In this situation I’d recommend you create more than one photo. First you could walk to the rocky shore and get down low so the spray of the waves would be majestically backlit against the sunset. Then you could create a stark, bold silhouette of the lighthouse against the inky storm clouds. By creating two photos your message is much clearer.

    So, before you press that shutter button consider if you’ve composed your photo in a way that makes your message clear.

    Do you disagree with any of these tips, or have some better ones? Leave a comment below so we can see who has the best ninja photography techniques.

    The post Top 5 Shortcuts for Better Photos by Dan Waters appeared first on Digital Photography School.


    Digital Photography School

  • Buy our New Posing eBook and Go in the Draw to Win $2000 worth of Lenses

    NewImageLast week we launched a brand new dPS eBook – Portraits: Striking the Pose – an eBook to help you take natural looking portraits that bring out the true character in your subjects.

    When we launched this eBook we suspected it would do well as it’s a popular topic and written by one of our much loved authors – Gina Milicia – who really knows her stuff.

    However we had no idea just how popular it would be. In the first two days of it’s launch we saw more people grab a copy than we usually do in the first two weeks of a launch.

    And the response has been so positive from those who got a copy.

    Check out this comment from one of our readers – Brad Granger – who bought a copy last week:

    I picked up a copy of this eBook last week and have read it through 3 times already.

    I can see that what I’m learning is already improving my portraits but what excites me most is that I took a photo of my wife that she’s proud to show her friends! She normally doesn’t like photos of herself but today she uploaded it to Facebook – something I’ve never known her to do before.

    Thanks DPS and Gina!

    Win $ 2000 USD to Put Towards Camera Gear

    win camera gear with our eBookWe launched Striking the Pose with a bonus set of 7 posing printables with 67 poses that you can put in your camera bag to help you on your next launch. This is an early bird offer only but before we end that discount we thought we’d add one more sweetener for those who pick up the eBook before our launch ends.

    Everyone who buys a copy of Portraits: Striking the Pose before midnight on Friday 28 February US eastern time (including those who already have bought one) will go into the draw to win $ 2000 to go toward camera gear.

    The Prize

    The winner (chosen randomly) can choose a combination of gear to suit their needs. So Canon owners can choose Canon gear. Nikon owners can choose Nikon accessories or a new body. Micro 4/3 camera owners can choose lenses to suit their cameras.

    The winner can choose to spend their $ 2000 USD on one single camera or lens or might choose to buy a bundle of things (as long as they total up to $ 2000).

    FAQ

    Based upon previous competitions I know we’ll get a number of questions on this so here’s some FAQs:

    • what if I already purchased Portraits: Striking the Pose? – you’re in the draw and don’t need to do anything else. This is also the case if you bought it as part of a bundle of Gina’s other eBooks.
    • is this open to all international readers – yes, everyone. We’ll ship the lenses to you anywhere at our cost. Our preference is to use B&H Photo and Video but if you live outside of their delivery area we’ll work with a local supplier to you to get you your lenses.
    • can I enter more than once? – no, there is one entry per person. Multiple purchases of the eBook only get you one entry
    • are there any conditions of entry? – yes, just one. The only condition of entry is that you allow us to publish your name on the blog when you’re drawn as a winner (we’ll keep any other details private). This way everyone will know who has won (we’ve previously had winners ask not to be named which has been difficult to be transparent about winner announcements).

    Here’s the deal in a Nutshell

    Buy Portraits: Striking the pose before midnight on Friday 28 February (US eastern time) and you get:

    • 7 Bonus Posing Printable Guides (worth $ 9.95)
    • an entry into the $ 2000 gear giveaway
    • Plus (and most importantly) you’ll come away from reading the eBook with some inspiration and knowledge to go away and take beautiful portrait images – this eBook has the potential to transform your photography!

    To enter simply buy Portraits: Striking the Pose before midnight on Friday 28 February (Eastern US time). We’ll draw the winner that evening and notify them of their win and then publish their name here on the dPS blog in the coming days. If the winner doesn’t respond within 7 days we’ll draw another winner and publish their name on the blog.

    As this post goes up you have just a few weeks to take advantage of this offer – so don’t hesitate and pick up your copy of Portraits: Striking the Pose here today!

    The post Buy our New Posing eBook and Go in the Draw to Win $ 2000 worth of Lenses by Darren Rowse appeared first on Digital Photography School.


    Digital Photography School

  • Yep, That’s an OCF Magnet at The South Pole.

    Back in 2009 we had a little game going wherein people left Strobist OCF magnets at various places around the world. Some were dropped off and tweeted for the first finder to claim. Others were just placed and photo’d in what can only be considered some pretty impressive spots. One might say it even got a little competitive.

    Five years later, reader Sebastian Stewart has just dropped an OCF A-Bomb. He has placed an Off-Camera Flash magnet at the South Pole.

    Sebastian is on a team of NASA scientists who measure atmospheric conditions by shooting (frickin’) lasers into the air and measuring the returns they get from various particles. As such, he travels around the globe. Which makes any OCF challenges a bit easier, natch.

    Says Stewart:

    I finally returned to the South Pole for work, I actually just returned to the states after about seven weeks of travel, split between New Zealand and Antarctica.  I’m only stateside for a few weeks before jetting off to SE Asia for a month of more work.

    I was at the Pole replacing an old legacy instrument that was barely hanging on.  The new instrument I replaced it with is unique in it’s ability to differentiate between spherical and non-spherical particle shape, and give us some information about what exactly is reflecting the laser light back to the instrument.  It’s much more reliable and should provide a great data set for the coming future.

    I remembered to bring your OCF magnet to the Pole with me!  I attached two photos for you – one of me holding the magnet in front of the geographic pole sign (the actual 90?S latitude point – the Earth’s axis) and one at the ceremonial pole ~30 feet away (solely for photos and PR stuff – you can see the flags of the Antarctic Treaty signatory nations in the reflection).  I am sad to admit that the sign was aluminum so I couldn’t stick the magnet to it, but I did my best at holding it still for the photo.

    __________

    Magnetic South Pole, my ass. Aluminum? Pfft.

    As it happens, Stewart has availed himself of some pretty cool travel photography opportunities as a result of his far-flung atmospheric science. You can see his work at sebastianstewart.com.

    Many, many thanks for the photo evidence, Stewart. Lotsa luck to anyone trying to top that. And trust me, there have been some worthy efforts to date. Just none quite this cool.

    Which Begs the Question…

    You may find yourself wondering, what was the previous high-water mark?

    There were some cool placements, including some classified locations not generally available to the public. Military bases in deserts, that sort of thing. But I previously had thought this one all but unbeatable:

    That’s not just any Mercedes AMG. That one happened to be parked at One Infinite Loop in Cupertino California back in the day. No license tag, tho. Hmm.

    And that trunk is not magnetic either. But chewing gum works. Name withheld (and metadata stripped) to protect the innocent.

    I had thought Jobs’ car as an OCF placement to be unbeatable. I was wrong. But still, I don’t see anyone topping the South Pole.
    __________

    #StrobistOCF


    Strobist

  • The Weavers of Varanasi by Jayant Neogy

    Varanasi is the ancient name of Banaras located in UP, India, a city considered most holy to the Hindus. It is the longest continuously occupied city in the country. While some claim a 5000 year old history, the city may actually be about 3,500 years old, making it one of the few oldest continuously occupied […]
    dslrBlog

  • Personalities and Portraits – and Getting Them to Mix

    Portraiture can be a lot of fun; capturing entertaining characters and drawing out quieter personalities, but sometimes it can be a challenge as those ‘entertaining’ characters can soon become too much to handle and getting the shyer folk to even look in your direction can be like getting blood out of a stone. So here are a handful of tricks, tips and techniques to use when dealing with four of the most problematic personality types.

    Personalities and portraits . . .

    ©Natalie Denton 2013

    ©Natalie Denton 2013

    The loud ones – identified by volume and wise cracks

    You know the type; the person who is constantly wise-cracking and trying to make everyone around them laugh, usually at the expense of you, the photographer. You’ll tend to find this person when you take group shots, and there’s always one at a wedding.

    Often these people are only acting that way because they are deflecting their own insecurities and are actually really uncomfortable with having their photograph taken so they go overboard and say very witty things like “I’m ready for my close up now” or “If you sell these images to Vogue I want a cut.”

    In these situations, it’s better to go along with it rather than get prickly or confrontational. Smile, and have a joke. A splash of playful banter will probably put them at ease, and you’ll soon notice real smiles on the faces of the people around them, which helps to make the resulting shots look much more genuine and natural. If you’re photographing this person as part of a group, it might help you to break off into smaller groups first and photograph this person with their close friends or family first, helping them to relax. Better still, try and get a portrait of them on their own, away from others which will soon bring them down to earth and ease down their barriers, especially if there’s no one for them to entertain. That way when it’s time for the group shot, they’ll be more relaxed and have more respect for you and your work. You can even use them to your advantage in getting them to round people up and getting others into line.

    The shy ones – identified by nervous laughter and lack of eye contact

    Having photographed numerous shy brides over the years I’ve realized there are a number of ways you can put those who aren’t comfortable in front of the camera, at ease. The first thing to do is to test the water. Take a few shots and see how they respond. Some slowly relax into it, and these first few timid frames can often make for stunning imagery (especially in black and white) – and if this is who they are as a person they may embrace the resulting pictures. The problem is, while a few frames of the model looking away from the camera can be charming, after a while the lack of diversity and eye contact can become awkward and restrictive.

    ©Natalie Denton 2013

    ©Natalie Denton 2013

    Put the camera down and take time to talk to them about something else, like the scene around you or the clothes they are wearing. Making them laugh can always help to break the ice and commenting on how great they look as you reap the images can help to settle their nerves. I usually then take a little time to show them a few of the images collected so far, on the back of the camera, and explain how they look stunning in them.

    Ultimately the trick with the shy ones is ‘slowly, slowly, catch the monkey’. There’s no point rushing them or being over the top with them. Keep your manner calm yet confident and reassure them that they are doing well. Start with them in a group and then move them away on their own, after a while they’ll start to relax and the images will shine as a result. Then move them back into a group and you can bet your bottom dollar the second round of group shots will be ten times more sincere, relaxed and memorable than the first.

    The wannabe model types – identified by pouting and uncontainable enthusiasm

    Usually this type of subject has watched too much model-focused reality TV and thinks they are the next undiscovered talent. Normally these (tends to be younger females in my experiences, but not exclusively) people are pleasant just extremely excited and want to try a whole portfolio of expressions and outfits, in a catalogue of scenes and scenarios. If you’ve got the time and they’ve got the energy then great – this is surely a recipe for success.

    ©Natalie Denton 2013

    ©Natalie Denton 2013

    Yet when you are restricted by time, or if this individual is overshadowing a group shot, then you might need to step in to calm things down. Furthermore if the images are looking too posed and fake, there’s a risk the client won’t be happy with them. So the key is to tame them, without killing off their enthusiasm.

    For most people, having your picture taken is a novelty and as such after a few frames they will usually start to relax, settle and tone the drama down. It can help to praise others (usually younger siblings or the parents) in the group; pulling them out of the wannabe’s shadow. If things get too ‘posey’, suggest some more natural poses and reference famous celebrities who are known for more subtle trademark looks. Distract their attention by having the family or group interact by doing something fun together –  as though you weren’t there; such as a game of catch, piggy back races or if weather permits – a water fight, and catch them off guard. Often people look much more attractive in these candid exposures than the posed ones. Show them evidence of this on your camera and you’ll soon have them acting like a professional rather than a wannabe.

    The fellow photographer – identified by taking their own shots and eagerness to divulge camera trivia at every turn

    Enthusiastic or secure fellow photographers- great. Know-it-all or insecure photographers – bad. It’s this latter category who can be the hardest of all types of people to photograph, because ultimately they think they can do a better job than you – usually to the disagreement of the client, otherwise they wouldn’t have hired you.

    ©Natalie Denton 2013

    ©Natalie Denton 2013

    The best thing to do is to indulge them, if time permits, and throw a little peacocking into the mix. Take the time to discuss their gear, find out what they like to shoot and let them impart any pearls of wisdom they wish to share. Now comes the fun part, you get to show how talented you are by giving them advice and taking their image. Show it to them and discuss the lighting and exposure values you’ve used and explain why you used them. They are sure to be impressed (again, they would have been hired if they were better than you) and they’ll probably back off and let you do job, but may hassle you for tips or a discussion on something incredibly geeky such as hyper-focal distances, after the shoot.

    Bottom Line

    At the end of the day; as humans, we share similar quirks and personality traits but everyone is different and that’s what makes portraiture so appealing. It’s the chance to capture these little idiosyncrasies in a beautiful visual representation. So go on! Embrace the ‘loud ones’, excite the ‘shy ones’, flatter the ‘wannabe models’ and indulge your ‘fellow photographers’, as long as you’re having fun doing it, then where’s the harm?

    For more help on doing portraits and relating to your subjects try these:

    • How to Help Your Clients Feel Comfortable In Front of Your Camera
    • How do YOU get Portrait Subjects to Relax?
    • Posing for Portraits: A Quick Way to Get Inside Your Subjects Head

    The post Personalities and Portraits – and Getting Them to Mix by Natalie Denton (nee Johnson) appeared first on Digital Photography School.


    Digital Photography School

  • 15 Tips for More Powerful Portraits

    15 tips every portrait photographer must know for making more powerful portraits!

    Powerful portrait tips 01

    Here are 15 tips on getting powerful portraits

    1. Have respect

    This is my number one rule. It doesn’t matter if I am photographing a poor boy in Laos or the CEO of a large company in New York-I always respect the people I photograph. I live by the motto: “you should never get close to people in order to take their photo; you should take their photo in order to get closer to them”. Act as if your camera is a bridge and not a weapon. I have friends who are amazing street photographers, who manage to work with such discretion that they can get the portrait without the person realizing he was photographed. Certainly, there are some exceptions, but I believe that people are not zebras and we are not hunters. To summarize the point, I photograph old people in same manner I would like someone to take pictures of my grandmother.

    Powerful portrait tips 04

    2. Ask yourself – Do I understand what a portrait is?

    “A Portrait is painting, photograph, sculpture, or other artistic representation of a person […] the intent is to display the likeness, personality, and even the mood of the person” (from Wikipedia)

    While this is a very basic definition of the concept, it can help us to understand the true nature of good portrait photography. A portrait must tell a story. What kind of story? A story about the person in the image. How can you tell a story of a person in one image? You can’t! You can never capture the whole story, because human beings are too complex. You can either choose to focus on a specific emotion expressed by the subject or by yourself. I call the first method “highlighting”, in which you zero in on a specific story, at a specific time.

    Powerful portrait tips 02

    For example: when I took the photo of the Japanese girl (above) I was trying to highlight this specific moment, when she held her mother’s hand, when she has not yet decided – whether to leave or hold on tight. Sometimes the best stories don’t reveal the whole story at once. Like in this image from China (below). Do you think this girl is waiting for someone who should be coming soon, or is she watching someone leave?

    Powerful portrait tips 03

    The second method, in which you imprint your on feeling onto the story, can start with answering the following question: How did you feel when you met this person? Because a good image is told by two people – the one in the image, and the one behind the camera.

    3. Look for emotion

    Someone’s exotic face from some remote tribe is nice to look at, but for it to be a true visual storytelling portrait, this face must evoke emotion. Steve McCurry called this the “unguarded moment”, the essential soul peeking out. It can be happiness, fear or excitement. Emotion is the best way to create a bond between the image and your viewers.

    The best way to “catch” emotion on your camera’s sensor is by choosing the right moment to click the shutter. Be on the lookout for a specific powerful moment that can evoke the story on the person’s face.

    Powerful portrait tips 05b

    4. Start with your comport zone

    Going out to the streets to shoot portraits of strangers is not an easy task to start with. The best way to hone your craft is by starting with a person you already know. By skipping the need to “break the ice”, it will be easier for you to think about other important elements in your portrait, such as: the light, composition, posing and color. You don’t have to travel far for an interesting face; you can start with friends and family.

    Powerful portrait tips 11b

    5. Get out from your comfort zone

    A day without learning something new is a wasted one. One of the most important things to note when dealing with portrait photography is that usually, the problem is with ourselves. “I do not want to hurt or offend”, and “I do not want to invade someone’s privacy” are all excuses which we tell ourselves on why we photograph people with a telephoto lens from a distance. So, if you truly want to take your portrait photography to the next level and be able to evoke emotion in your work, you must, as my mother says: “fake it till you makes it”. It is not as complicated as it seems in your head. Get out to the streets, find an interesting person and just go for it by saying: “Hello, I am a photography enthusiastic and I would like to take your photo…I would love to send you a copy as well”. You might be surprised with the results. By using this technique, the worst thing that can happen is that you will get a refusal and then just move on to the next person.

    Powerful portrait tips 08

    6. Choice the right focal length

    “What is the best lens for portraits?” is a very common question among my students, and the answer is simple – there is no one best lens for portrait photography. You should adjust the focal length to your working style. When considering your next lens, you should take into account the following elements:

    • The distance from which you usually like to photograph people
    • The weight you are willing to carry around
    • What is the maximum aperture for low light photography and for shallow depth of field?
    • And of course, price

    For me, most of my portraits are done with an 85mm or 24-70mm lens.

    7. Choice the wrong focal length

    Try this creative exercise. Go outside and take a portrait with a lens you are not used to working with. If you always work with a telephoto lens, try using a wide angle one. If you prefer to get close to your subject, take a step back and wait for the decisive moment. A good photographer is a flexible one.

    Powerful portrait tips 10b

    8. Study the great masters of portrait photography

    Whenever I need inspiration, I turn to the portfolios of this great photography masters:

    • Dorothea Lange – one of the first photographers of Social realism
    • Steve McCurry – probably the best color portrait maker in history
    • Richard Avedon – unique fashion and portrait photography
    • Sebastião Salgado- outstanding B&W documentary portraits
    • Annie Leibovitz- Editorial portraits

    (Please add your own in the comments section)

    Powerful portrait tips 19c

    9. Experience variable depth of field

    We all love portraits with that sweet low depth of field, which makes everything blurry in the background. In portraits, shallow depth of field is usually good because it leads the viewer’s eyes directly to the subject by making it sharper than the rest of the image. YET, please note that there is such a thing as a too shallow depth of field. In this case, the sharpness by the AutoFocus may be on the eyebrows or eyelashes instead of the eyes. Practice in order to understand the elements that affect the depth of field: the distance to the subject, focal length and aperture.

    Powerful portrait tips 13

    10. Leave the flash behind

    The more gear you have with you, the less available you are to give attention to the person you are photographing. If we are dealing with studio photography, then the person knows what to expect. There is no need take your flash to India or China when there is so much beautiful available light. Craft your skill while working with natural light only BEFORE jumping to the next step of using reflectors, flashes or any other extra gear.

    Powerful portrait tips 14

    11. Don’t follow the crowd

    Try this little exercise: type “woman with cigar in Cuba” into Google and see what happens. The same woman appears in almost all the images right? Those are images of many different photographers. I do not mean to hurt anyone, but how come with 3 million people visiting the country each year and with a population of 5,612,165 women, the same woman comes up in almost every image? Here’s a tip for you, before heading somewhere, anywhere, near or far, you should understand the place, culture and the “story” of the person in front of you. By doing your homework you will not fall into the trap of the “fake authenticity”

    Powerful portrait tips 15

    12. Think about the background

    Many elements are required to create an interesting portrait: light, composition, angle, etc.., but one element is so important that I sometimes give it my pure attention: the background. You can think of the background in two levels. First, as an aesthetic element. Make sure there are no distracting elements, such as bright colors or moving objects in the background. Secondly, another level of using the background, is as an element to bring your story to life.
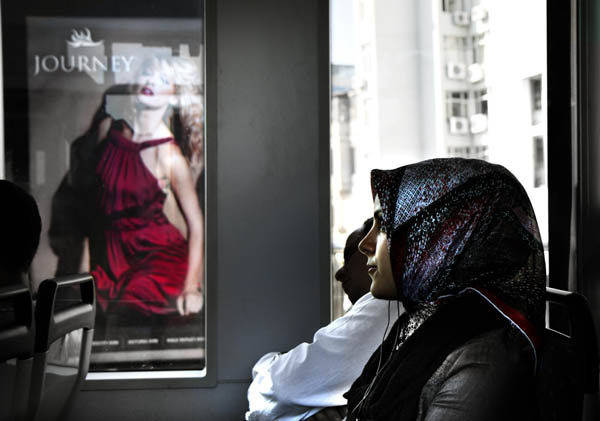
    Powerful portrait tips 16

    13. Keep it fun

    If you are dealing with subjects who are not paid models, you should give something back as well as taking the photo. I do not want to discuss paying the person (maybe in another post) but you should make it easy and fun for your subject: telling a joke, showing the image on the back of the camera and making sure they are not in the sun are good points to start with.

    Powerful portrait tips 17

    14. Always ask for the person’s name

    It doesn’t matter if you do travel portraits of strangers or work as a wedding photographer; always ask for the person’s name and if promised, send the photo. Don’t make excuses about the language barrier. If I don’t work with a fixer (a local man or woman, who can help with the translation) I will always have a phrasebook or try to use drawings and images that can help me to communicate.

    15. Add depth to your images by the a 45 degrees light

    Think carefully about the direction of light. By placing the subject at an angle of 45 degrees from the light source, you can create a wonderful effect of volume. As I made this picture (below), which was taken at a grocery store Georgia, using only natural light by a window on the right.

    Powerful portrait tips 18

    And one more…

    ENJOY

    It does not matter if you’re photographing people as a hobby or to pay your rent. Teach yourself to enjoy to process and not just the outcome (the finale image). Enjoy getting closer, getting to know each other and overcoming cultural barriers. If you do what you do with passion, your viewers will see it right away.

    I would like to thank Linda Burnette for her help in writing this article.

    The post 15 Tips for More Powerful Portraits by Oded Wagenstein appeared first on Digital Photography School.


    Digital Photography School