Category: Photography

  • Accent Lighting for Portraits

    accent lighting

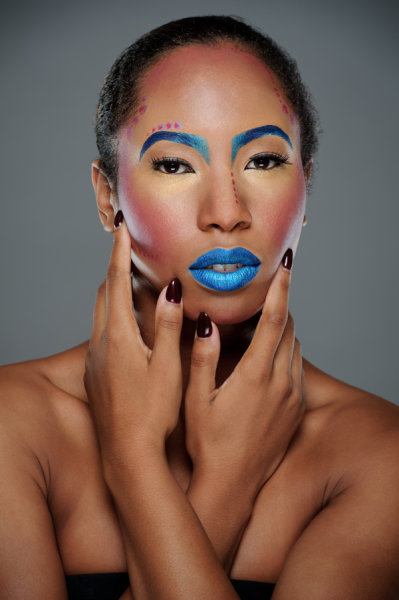
    Tthanks to the wonderful Bridgette for her work as the make-up artist in this image

    Studio lighting continues to mystify and bewilder many developing photographers. The intimidation of lighting ratios, modifiers, set-ups, etc… often seems as complex as deriving the quadratic equation or suffering through an explanation of Michaelis-Menten enzyme kinetics. Oh yes, for those of you biochemically privy folk, I did just go there! Well, one does not have to get lost amidst the photonic chaos if they understand how to interpret and understand the meaning of light.

    Wow! Meaning of light? Sounds kind of deep and metaphysical doesn’t it? Please don’t worry! The only thing you need to remember about light is that it illuminates and creates shadows. Fairly simple, huh? We all know that when we shine a light onto something it allows us to visualize whatever is illuminated by the light. That is simple enough, right? Now, consider that behind every good light is a shadow waiting to give shape, form and dimension to your subject. This intricate interplay between what you illuminate and what you keep in shadow is what brings visual interest and creative acuity to your images. In studio lighting, this is your raw material with which you have to work and create.

    There are many articles and books that describe studio lighting and as the student you may tend to focus on that main key light with simple one or two light set-ups, so we can dip our toe into the pool, so to speak, and see if the temperature is warm enough for us to dive in. A main or key light is simply the light source that is providing the primary illumination for our subject. Now, don’t get me wrong, one can create some amazingly, captivating portraits with a single light, but what if you want to add a little something extra? A little hint of spice to get some unique seasoning and flavor?

    This is where accent lighting comes out to shine.

    What is an accent light?
    accent-lighting-01

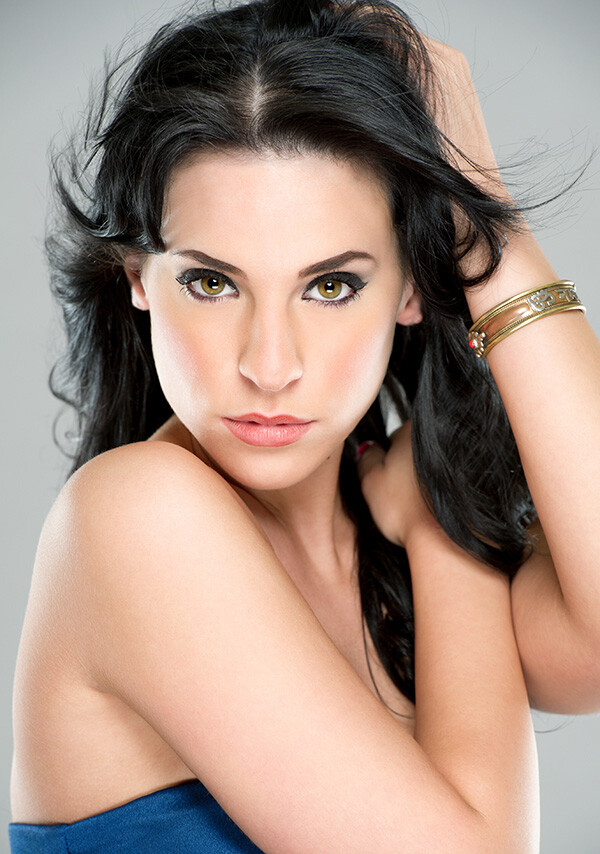
    Accent lighting is typically a very controlled light source that highlights specific areas of the subject. It can be a hair light that gives you some separation from a background, or a side light that illuminates the drops of sweat on an athlete after an intense workout. It gives some shape or form to elements of the photo allowing your eyes to experience the different dimensions of the image. Now, there are two important things you want to remember about accent lighting:

    1. The source should be very controlled and only hit the areas you desire
    2. It should be brighter then your main light to create a proper highlight

    Easy ways to control accent lights are with modifiers such as barn doors, spot grids or small strip soft boxes. Basically, anything that will narrow and direct the beam of light coming form the light source. Heck, it could be a flashlight beam, the sun shining on the back of a subject’s head, or even the bright screen of a tablet or computer in the right conditions (yes, the eye fatigue from staring at the LCD screen is setting in). Add some colored gels to the accent lights to really make your images pop or bring some warmth into the mix.

    Personally, I love adding side accent lighting to my portraits by firing my strobes into narrow V-flats (two large pieces of foam core taped together to form a v-shape) directed at the subject on either side to highlight the cheekbones and neck and really sculpt out those beautiful forms in light and shadow. The possibilities with accent lighting are truly endless, and the luminous results are absolutely stunning.
    accent-lighting-02

    For more on portraits and lighting check out these articles:

    • Portrait Tutorial Feast – Best of dPS 2013
    • 4 Tips for a Perfect White Background in High Key Photography
    • Portraits – Lighting the Shot, a dPS eBook

    The post Accent Lighting for Portraits by Alex Smith appeared first on Digital Photography School.
    Digital Photography School

  • LedGo 4 x 150 LED Photo and Video Lighting Kit Review

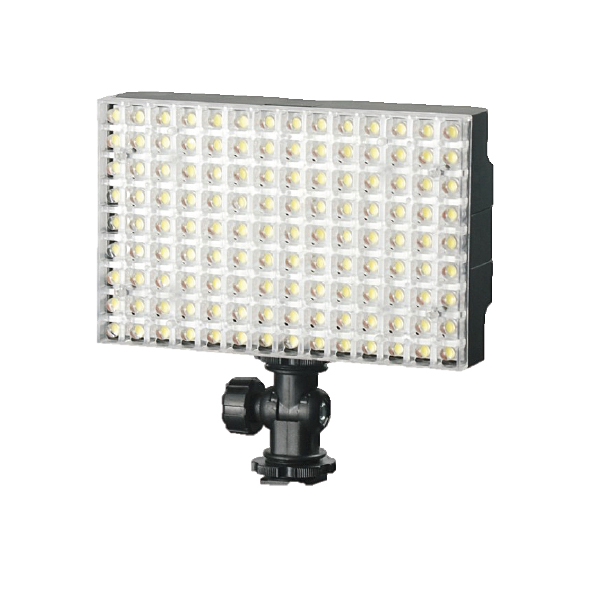
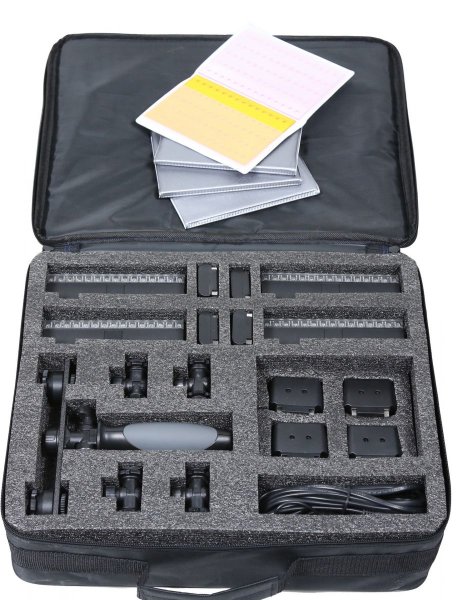
    It’s been a long while since I used LED lighting for photography! In fact, it was the 6th of April, 2010. Reading back over that review, I can confirm that LED technology has come a long way! I have a great little kit on loan from ProTog here in Melbourne that consists of four LED panels, 150 LEDs each, lithium batteries, charger, AA battery adaptors, four gel packs to colour up your lights and mounting hardware, too.

    LGB1504KB

    LedGo 4 x 150 LED Photo / Video Lighting kit

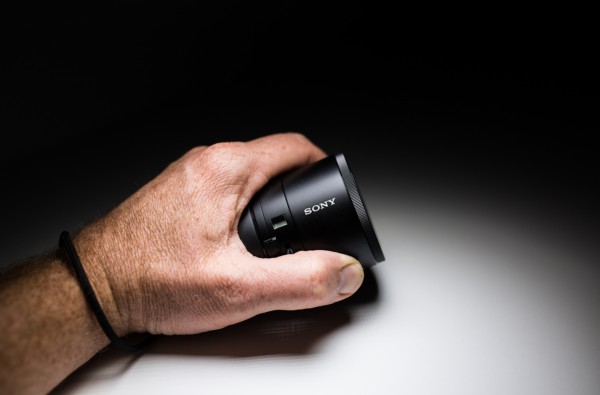
    I first saw this little kit (which comes in different forms with various sized panels) when working with Jeff and the team from ProTog at the recent Digital Show here in Melbourne, I had a few chances to play with it as I was working the booth at the show. I noticed a massive difference by comparison to the LED panels I’d tried before (and I sound like a laundry detergent commercial, but…) whiter whites and brighter brights! I could see right away that these little panels had the ability to put out a decent amount of the good stuff! And, at the same time it can be so nicely controlled. A photograph below of something I’m playing with right now, the Sony QX100, but more on that later…

    gtvone_sony_qx100_ledgo

    So, I’ve been using the kit for three weeks now, I’ve used it for macro, portraits, fill lighting (in a boardroom on a boom) mixed with daylight and to say I’m very impressed is a tiny little massive understatement! It’s not that I can’t achieve the lighting I’m getting from the LedGo kit with a conventional flash, it’s that I can really quickly light a scene or even hand a light to a seven year old and say “here, point it at the side of your head” without them burning themselves or having to use two hands to hold the lights up.

    The individual panels with battery attached weigh in at 334 grams (0.75 lbs) as per my kitchen scales, so easily within the realm of what a model can hold if you need to take a portrait. You can very quickly and easily gang two of the 150 panels together to give you plenty of light for a standard portrait, but remember that you have four panels in the kit, so you can use two as your key light and two as a hair light or… well, the possibilities are many.

    LedGo_LED_LIGHT_LG1504-KIT-bag_REVIEW

    If you’re not confident with your ‘mastering light’ something you may find appealing is the “forgiveness factor”. It’s very easy to grab a LedGo panel, pop it on a stand, or as I did so many times, a NastyClamp, and turn it on and flick my camera into “live View” mode – What You See is What You Get – this means it’s very easy to see exactly what effect you will have on your scene and subject if you have the light in the wrong spot. Shifting your hand, stand, or clamp an inch to the left will make your subject more backlit, moving it forward gives less shadow etc. All of this is right there in front of you and you can set up your scene as you like it and shoot it. Of course you can do this with flash too, but constant light may be easier for you to deal with if you’re just starting out.

    I’ve only had the gear for three to four weeks, but it’s been used a lot! By me AND (don’t worry ProTog!) by my 4 year old. It’s very sturdy and very easy to use! My little man likes to copy what I do and so, I found him lighting his dinosaurs one morning and taking photographs with my 5D MK3! I was somewhere between super impressed, and a little amused by the fact that he’d used the light as “the Dino door” — My point is that the LED panels can be handled by a 4 year old with no issues (for the light or the child).

    LedGo_LED_Light_ProTog_Review

    The first images I took with the kit were a small handful of product type shots – I’m not a product photographer but I liked the results…

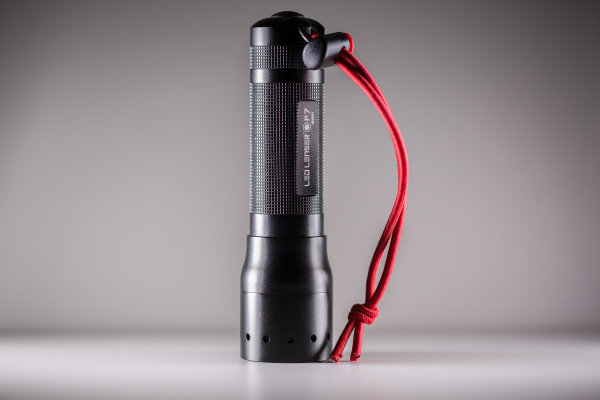
    Led_Lenser_photograph_gtvone_ledgo_review

    Above, the Led Lenser P7 is lit with two lights, one on each side. Same with the espresso below…

    espressor_simon_pollock_ledgo_led_kit_protog_review

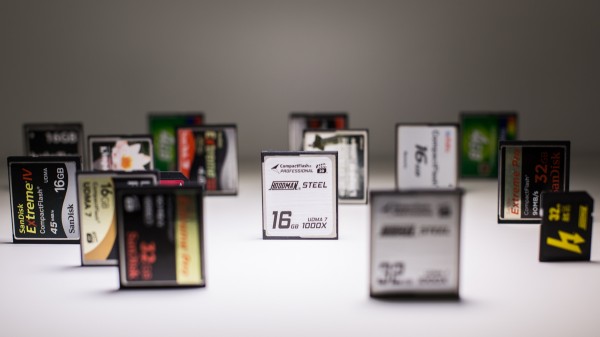
    The photograph below of the memory cards is one single LedGo panel over the top, in nice and close to give me a bit of dramatic fall off.

    memory_cards_ledgo_led_lighting_kit_review

    I can’t fault the LedGo LED kit – the 150 led panels are rated at 90+ CRI (colour rendering index) which means that they’re very color accurate – the clip together and clip apart feature, the gels clip on and off very easily as do the feet that allow you to use a single light in the hotshoe of your camera or you can flip the bracket around and mount it to anything with a 1/4 20″ threaded mount. (like a tripod plate, so you can stick a panel(s) on a tripod very easily)

    PROS:

    • ease of use
    • durability
    • not silly expensive
    • flexible

    CONS:

    • The gels need to go on and the lights need to go together a certain way – the guys at ProTog told me how, so I knew, but it’s not in the instructions so you could damage a mounting tab if you’re a bit gung-ho about putting them together. (It’s pretty obvious, you’d have to be a bit of a muppet)

    I have since picked up my own LedGo panel for myself from ProTog and do not hesitate in suggesting you pop out and try one – they’re not for everything, but for video, product, and spontaneous selfies (no, really) they’re utterly fantastic!

    I rate the LedGo 4 x 150 LED Panel kit a Nine of a possible Eleven stars. Clearer instructions and iIll hand those stars back to you…

    –Sime

    The post LedGo 4 x 150 LED Photo and Video Lighting Kit Review by Sime appeared first on Digital Photography School.


    Digital Photography School

  • Weekly Photography Challenge – Winter Sports

    If you guessed by the post earlier today of images of winter sports that the challenge this week would be the same – you’re right!

    This week’s photography challenge is – winter sports!

    Here’s a few more images of winter sports to get you inspired to get out into that cold and go shoot something. Don’t worry I’ll also give you some links to articles that will help you prepare for shooting outdoors in the cold.

    By kmichiels

    By der Knut

    By Jen Rossey

    By Shay Haas

    By Sangudo

    By Visit Greenland

    Share your winter sports images!

    Simply upload your shot into the comment field (look for the little camera icon in the Disqus comments section as pictured below) and they’ll get embedded for us all to see or if you’d prefer upload them to your favourite photo sharing site and leave the link to them.

    Tips for shooting in inclement weather:

    • Winter Photography Tips | Bendy straws and Ziploc bags?
    • Tips to Protect your Gear in Harsh Weather Conditions
    • How to Protect your Camera in Extreme Conditions

    The post Weekly Photography Challenge – Winter Sports by Darlene Hildebrandt appeared first on Digital Photography School.

    Digital Photography School

  • 38 Amazing Images of Winter Sports

    As the 22nd Winter Olympics finish up in Sochi, I thought it fitting to share some images of winter sports. Personally my idea of a winter sport is getting on a plane and sipping a Piña Colada on the beach. However, there are many talented athletes, and photographers who enjoy participating in many winter sports.

    I hope you enjoy these images of winter sports:

    By Zach Dischner

    By gianluca platania

    By Jenn Vargas

    By Tyler

    By GP(MPK)

    By Jared Polin

    By clyde

    By Ville Miettinen

    I’m Canadian – we like hockey!

    By Juan Carlos Labarca

    By jacinta lluch valero

    By Bob Bob

    By jenny downing

    By Johan Røed

    By Denis Messié

    By Sharat Ganapati

    By Justin Kern

    By Niels Linneberg

    By ZeroOne

    By Dustin Gaffke

    By G MacRae

    By Bruce McKay

    By Eric Lanning

    By Sugin Ong

    Typically Canadian!

    These next few images are really typical in Canada. Snow angels, hay rides on a wagon pulled by horses, having a nice beverage after our winter sport, tobogganing (my home city even), curling and driving snowmobiles (people in Saskatchewan call this “sledding”).

    By paulmcdee

    By Rona Proudfoot

    By Gideon Chilton

    By Edmonton Economic Development Corporation

    The image above is my home city of Edmonton, Alberta, Canada. This is why I go to Cuba and Nicaragua for  photo tours at this time of year! In fact, I’m outta here this weekend, leaving those back home to enjoy – well – that! ;-)

    By Benson Kua

    By Ken FUNAKOSHI

    By New Brunswick Tourism

    By Adam Taber

    Luge – bizarre sport in and of itself. Get on a small piece of wood and throw yourself down a track made of solid ice, and go as fast as possible. Double man luge – makes even less sense to me. Do all that, but two guys on top of each other. Some sports, you just have to wonder – who was the first to do that, and why did they think it was a good idea? I give full kudos to those that do it, but I can still think it’s just a little bit nuts. Right?

    By Scott Robinson

    By Ronel Reyes

    What’s your favourite winter sport to shoot or participate in? If you live in a place were you don’t get winter like this (usually) do you see these and think as many of my New Zealand and Aussie friends do, “Oh how pretty the snow is!”? My standard answer is – you can come visit any time and I’ll hand you my snow shovel so you can see it up close and personal! ;-)

    I would argue that snow shovelling IS winter sport! It takes physical endurance. Raises the heart rate. The faster you do it the better (so you don’t freeze solid). Welcome to my world 5 months of the year!

    By D. Sharon Pruitt

    By bulldog1

    By Shinichi Higashi

    By Chris Ford

    By Corey Templeton

    The post 38 Amazing Images of Winter Sports by Darlene Hildebrandt appeared first on Digital Photography School.


    Digital Photography School

  • 5 Street Portrait Tips to Overcome Your Fear of Approaching Strangers

    It can be scary to start taking street portraits, especially if you’re an introvert. You like being quiet, people are busy and you don’t want to bother anyone. But you’re a photographer, so you see all of these “decisive moments,” and every time they slip away, it hurts a little. With practice and a few tips, though, you can shoot Continue Reading

    The post 5 Street Portrait Tips to Overcome Your Fear of Approaching Strangers appeared first on Photodoto.


    Photodoto

  • Do You Need to Upgrade to the Latest Camera?

    Camera-envy is the bane of many photographers. Discussion forums are filled with conversations about the benefits of the latest and greatest camera gear, and our commercial-driven societies fill us with the deep-seated need for more, more, more! But do you really need to upgrade to the latest camera?

    By Portrait / Wedding Photographer

    What matters more: the camera or the photographer?

    This is the question truly at the heart of most photography gear debates: what really matters? Is it the camera or the photographer?

    You know what you want the answer to be. When you show someone a favourite picture, you are looking for compliments and congratulations for yourself, not your equipment. You likely don’t post an album on Facebook hoping to get a “Way to buy that new camera!” style of comment. If you compare yourself to a chef and use the analogy that no one would think to praise the frying pan for an excellent meal.

    But yet. . .

    You see the photographs of others and immediately start making excuses. “Oh, well, he has a 400mm zoom lens” or “Well, she has a full frame sensor,” and at the same time we overlook the years of training or the hours of planning that went into that shot or that set-up. You choose not to wake up early or to stay up late and then wonder why your sunrises or sunsets do not have the same pizzazz or punch as another’s. You choose to shoot quickly and move on, rather than staying around, observing, and find that ‘decisive moment.’

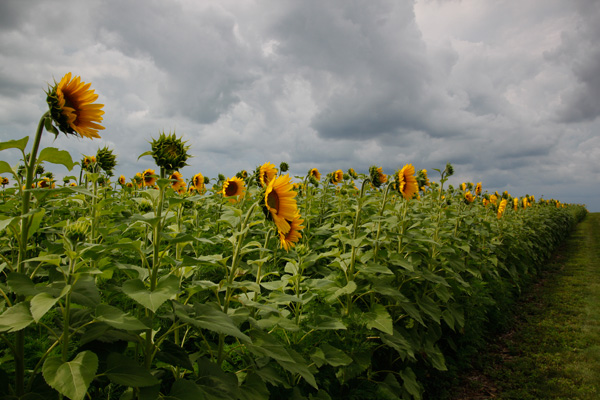
    sunflowers, field, flowers, nature, clouds, storm, photography, CanonT1i

    You are the variable that matters. If you want to take better pictures, there are unlimited steps you should be taking before you worry about upgrading to the latest and greatest. Think about the time and energy that you put in to your photography. Are you truly pushing your camera to its maximum potential?

    Many of the latest and greatest benefits touted by newer model cameras are those that will rarely be used or exploited by the vast majority of camera owners. 61 compared to 9 possible focal points are not necessarily useful if you consistently use the center point to focus-and-recompose or if you rarely use auto-focus or servo-focusing modes for moving subjects.

    water crown, splash, drip, drop, water photography

    A faster frame rate of 6 compared to 3 frames per second is useful, perhaps, if you are shooting a rapidly changing subject like a bird in flight or kids jumping into a pool, but you do not need six (or even three) identical photographs of a rock formation or a bouquet of flowers. Ask yourself how often you even shoot in such a burst mode.

    You should also think about the strengths and limitations of the current lenses that you own. A fast prime lens can open up a wide-range of new shots and opportunities. If you do not already have at least a 50mm f/1.8 lens, then you have not even begun to explore the potential of your current camera body. Many photographers recommend putting your purchasing power into lenses, especially ones that you can hold on to and use down the line.

    What I shoot

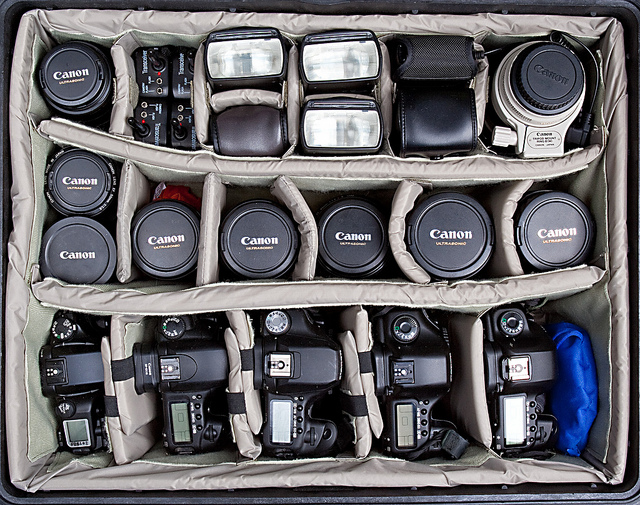
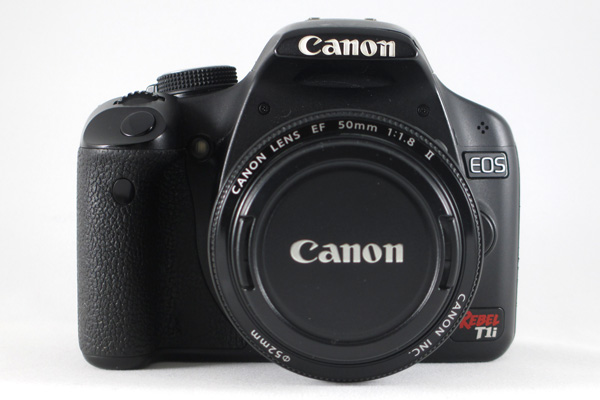
    Full disclosure, I shoot with a Canon T1i (500D for the European naming system), a camera that went on the market in early 2009 and has since been upgraded four additional times. At nearly a year-old, the current Canon T5i is likely due for an upgrade in the near future: the Canon T5 was just announced February 12th. In many photography circles the T1i would be considered a nearly ‘ancient’ digital model. It is also in the entry-level line of Canon DSLRs, with multiple tiers of both cropped and full-frame sensor cameras above it. All photographs in this post (other than the shots of cameras and gear) and my other articles on dPS, were taken with this camera.

    camera, canon, CanonT1i, T1i, photography, rebel, EOS, 500D

    I will readily admit that there are trade-offs and limitations to my camera. I know that I cannot push the ISO very high without introducing significant noise into the final images. I know that my buffer will fill quickly and then stall if I take a series of RAW shots in rapid succession. I know that I cannot adjust my LCD screen or see myself while standing in front of the camera for a selfie. Has that ever negatively impacted a shot that I was trying to take? Not often.

    I also know that I can carry a tripod and use it if shooting in low light. I know that I can switch into just JPEG if I am trying to take a hurried sequence of shots. I know that I can use cues from a test shot to figure out how to tweak a self-portrait and use a remote to set the focus when I am in position. I know that 15 MP can look great at web sizes as well as printed on canvas or aluminum and hung on my wall.

    What frustrates you about your current camera? Think about whether it is something that you could change or whether it really an issue with your camera.

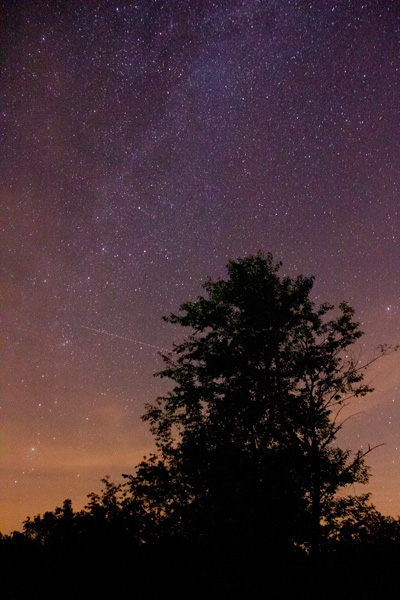
    Milky Way, silhouette, night, star photography, astrophotography, stars

    Agree or disagree: will you upgrade your camera?

    Are you a frequent camera-upgrader or are you shooting with an “old” digital camera too? Share your constructive thoughts or an example photograph in the comments below.

    Some other options to buying more stuff:

    • Start Feeling GOOD About YOUR Photography
    • A Year of Photographic Lessons – Journey of a Novice Photographer
    • 5 Photography Rules Moms [and Dads] Can Ignore

    The post Do You Need to Upgrade to the Latest Camera? by Katie McEnaney appeared first on Digital Photography School.

    Digital Photography School

  • Landscape Photography and Hyperfocal Distance

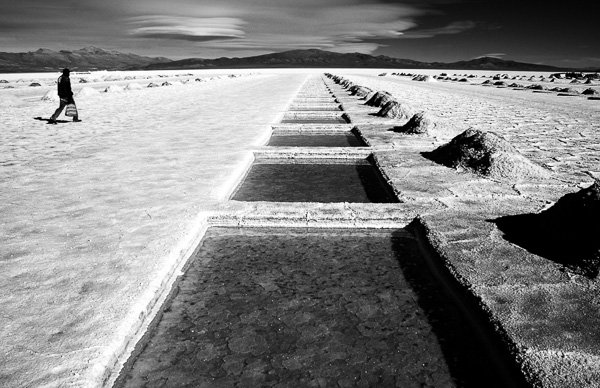
    Salinas Grandes, Argentina

    I can remember when autofocus was relatively new and many photographers distrusted it. Now it’s the other way around – autofocus has become so good and so ubiquitous that manual focus lenses are a rarity. It’s easy to forget that sometimes it’s better to turn it off and use manual focus instead.

    A good example of this is when you use a wide-angle lens to take a landscape photo. In this situation, you probably want to record the entire scene as sharply as possible. But how do you do this when the nearest part of the scene may be only centimetres (less than an inch) from your camera?

    The answer is that you need to understand depth of field and be willing to take control and decide exactly where you want to focus the lens, rather than leave it up to the camera.

    What is depth of field?

    Depth of field is the area either side of the point of focus that appears to be sharp. The amount of depth of field depends partly on camera settings (the focal length of the lens and the aperture) and partly upon other factors such as the size of the photo and the eye of viewer. Sharpness is subjective – what might appear to be sharp to one person may not appear so to another. Keep this point in mind as we progress through the article.

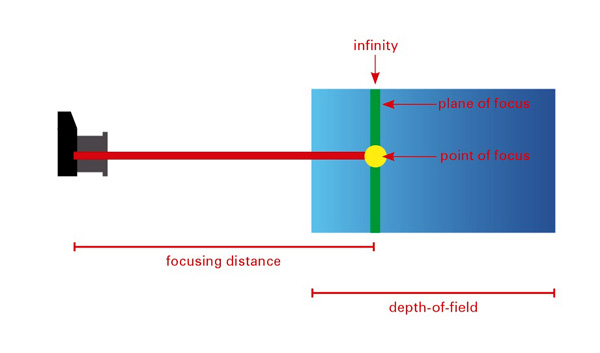
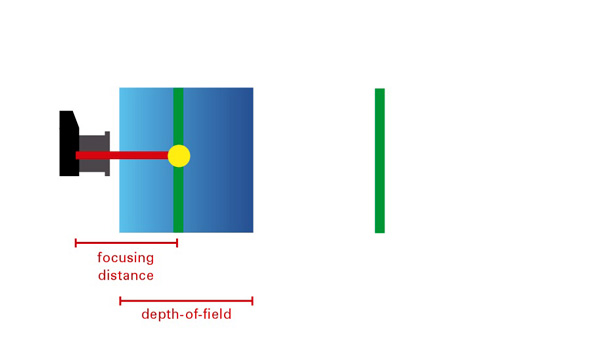
    Hyperfocal distance diagram

    This diagram shows the depth of field when you focus on infinity. You can see that most of the zone of sharpness (another term used to describe the areas that are in focus) extends beyond the point of focus and is effectively wasted.

    Depth of field in action

    The best way to understand how depth of field works is with a practical example. Imagine that you are using a 24mm lens (or a zoom lens set to 24mm) on an APS-C camera focused on a point exactly one metre (3.3′) from the camera. You want a nice sharp image so you have set the aperture to f/11 (the sharpest aperture settings on most lenses are f/8 and f/11). In this case everything between around 73cm (28.75″) and 157cm (5’1″) will be sharp.

    Hyperfocal distance diagram

    This is what happens if you focus too closely to the camera. You will get the area around the point of focus sharp, but anything close to the horizon will not be sharp.

    In reality, what is happening is that anything one metre (3.3′) from the camera (the point the lens is focused on) is sharp, and then everything either side gradually becomes less so until it reaches the point where it no longer appears to be in focus to the human eye.

    Where did I get the above figures from? I used the depth of field calculator at DOF Master and selected EOS 7D as the camera. The camera is important as depth of field as affected by sensor size, as well as lens focal length and aperture.

    We have already seen that focusing on infinity effectively wastes depth hyof field. You’ll get a better result using the hyperfocal distance.

    What is hyperfocal distance?

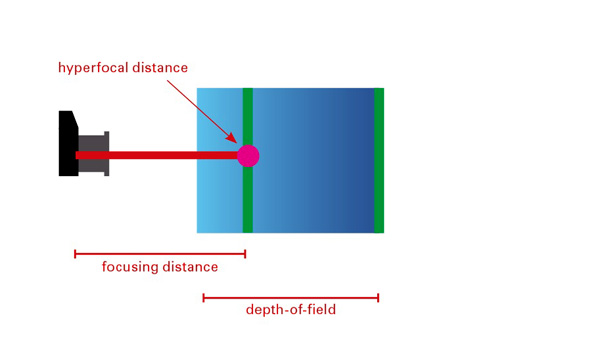
    The depth of field calculator throws up another figure – the hyperfocal distance. This is the closest point at which you can focus the lens at this focal length and aperture settings, and still keep everything from the focusing point to infinity in focus.

    In this example the hyperfocal distance is 2.7m (8’11″). Focus on this point and everything from 1.34 metres (4’5″) to infinity is in focus. That maximizes depth of field and helps you get the entire scene sharp.

    Hyperfocal distance diagram

    This diagram shows what happens when you focus on the hyperfocal distance. Depth-of-field is maximised, helping you to create a sharp image.

    Note that the near focus point (1.34 metres or 4’5″) is half the hyperfocal distance of 2.7 metres (8’11″). This ratio holds true no matter the hyperfocal distance of your lens, aperture and sensor size combination.

    Hyperfocal distance in action

    The easiest way to use the hyperfocal distance is to print out or photocopy some hyperfocal distance tables to take with you on a shoot (the DOF Master website has tables you can print out here).

    Alternatively, there are several smartphone apps that will perform the calculations for you such as these (do a search for DOF or hyperfocal distance, there are plenty of others)

    • Simple DoF
    • DOF Master
    • Tack Sharp
    • DoF Viewer
    • Digital Photo Calculator

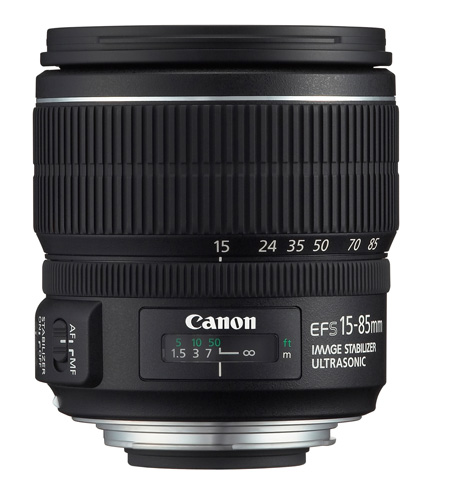
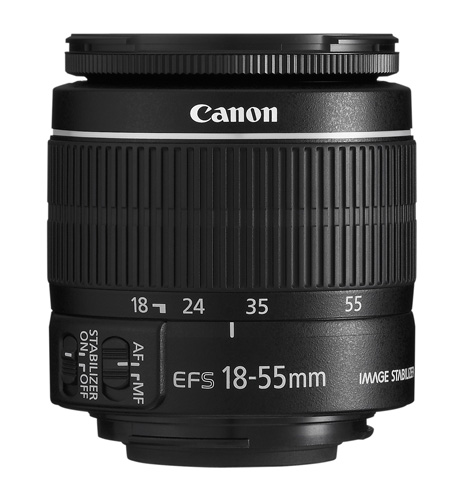
    Once you have the information, you need a lens with a depth of field scale on the barrel to tell you the distance at which the lens is focused. Many lenses have these, but some don’t (including lots of kit and pancake lenses). Distance scales aren’t precise, so be prepared to work with approximate measurements.

    Canon lens with distance scale

    An example of a lens with a distance scale.

    Canon lens without distance scale

    A lens without a distance scale.

    If your lens doesn’t have a distance scale, your only option is to guess the distance (or use a tape measure!). Luckily, it’s not hard to guess distances. In the above example, you would know that focussing on a point around 3 metres (approx. 10′) from the camera will maximize depth of field, so it’s not that hard to make a guess.

    After you have taken a photo you can double check sharpness by playing it back on the camera’s LCD screen and enlarging it as much as you can. The usefulness of this depends on the clarity and size of your LCD screen, but you should be able to tell if the parts of the scene closest to you are unsharp. You will only really know for sure once you get home and look at the photo on your monitor, but checking the LCD screen reveals any major errors in your calculations.

    Given all the variables and potential for mistakes, one way to apply hyperfocal distance is to use the calculations for one aperture setting (e.g. f/8) but set the camera to a smaller aperture (such as f/11). This gives you margin for error.

    Notes on using hyperfocal distance

    A couple of things to be aware of:

    First, the depth of field calculations in this article are based on something called the circle of confusion. This is the maximum size at which an out of focus dot appears to be sharp to the human eye. Circles of confusion are necessary because they form the basis of depth of field calculations. Each camera and lens manufacturer makes its own judgement as to which size circle of confusion they will use for their calculations. That means the figures in depth of field calculations and hyperfocal distance tables vary according to the circle of confusion size the figures are based on.

    If you didn’t understand that, don’t worry. This video explains it perfectly:

    Second, you will often read that depth of field extends 1/3 in front and 2/3 behind the point being focused on. This isn’t true. Focus on something close to the camera and the split is closer to 50/50. Focus on something far away from the camera and the split may be 10/90. Advice that you should focus 1/3 of the way into the scene to maximize depth of field is well intended, but inaccurate.

    More reading on this topic at Getting Landscapes Sharp: Hyperfocal Distances and Aperture Selection


    Understanding Lenses ebooks

    Understanding Lenses ebooksMy ebooks Understanding Lenses Part I and Understanding Lenses Part II will help Canon EOS owners decide what lenses to buy for their cameras. They are both filled with lots of tips to getting the most out of your Canon lenses. Click the links to learn more.

    The post Landscape Photography and Hyperfocal Distance by Andrew S. Gibson appeared first on Digital Photography School.


    Digital Photography School

  • 5 Easy Photoshop Tips for Beginners

    Photoshop CC iconPhotoshop has changed the way we transform our imagination. If you are into any digital workplace, learning Photoshop can be a great help. Photoshop today is certainly a centre of creativity to which almost every digital domain; from web designing to animation; from photography to digital magazine, is deeply connected. Today, when it comes to photography, it is not possible to imagine it without Photoshop.

    Good Photoshop skills can’t make a mediocre picture perfect unless you are into manipulation. However, it can certainly help you to enhance your best photo into an amazing masterpiece. Learning Photoshop is a slow process, and you should try it with enough practice, after all it is a digital art.

    In this article I will walk you through some basic Photoshop retouching skills. These 5 easy Photoshop tips for beginners will be a great start to learning to proces your photographs.

    1. Learning Keyboard Shortcuts

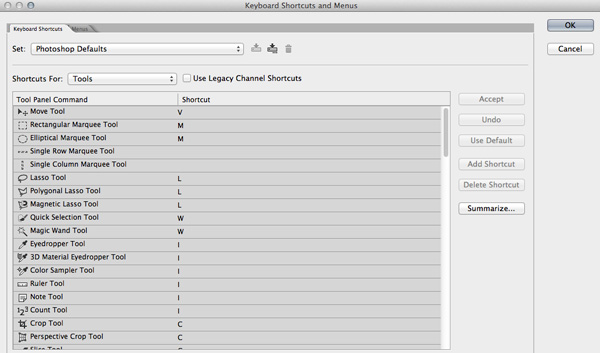
    Learning keyboard shortcuts will help you to speed up your processing workflow. There are few key shortcuts for different tools in the tool bar. A few of the most widely used shortcuts are:

    Photoshop keyboard shortcuts

    • V = move tool
    • F – toggles through display screen modes
    • Space bar = temporary hand key
    • B – paintbrush tool
    • D – sets the foreground/background colorss to default
    • X – swaps between background and foreground color
    • E – eraser tool
    • S – stamp or cloning tool
    • W – quick selection tool
    • Ctrl+j – duplicates the selected layer

    There are just few of the most regularly used Photoshop shortcuts. When you start using the program more, your knowledge of shortcuts will gradually increase. Once you are aware of the most used shortcuts retouching pace will be faster than ever.

    2. Color Enhancing – Saturation versus Vibrance

    Photoshop tips vibrance

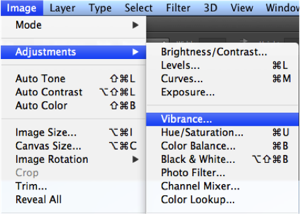
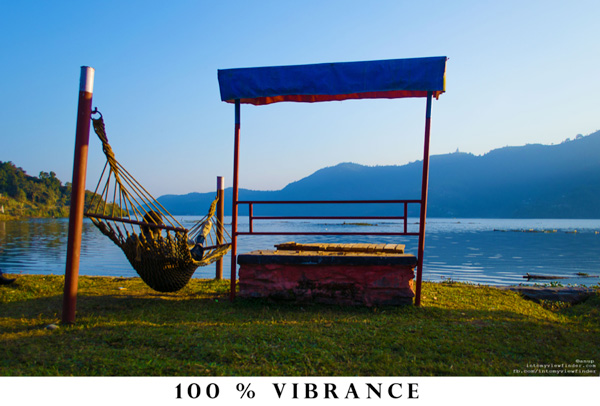
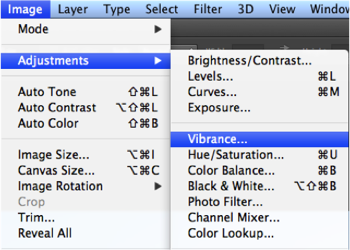
    Color is another domain you can try while enhancing your photographs. Generally when you are beginning in photography, enhancing the color of every image looks good, as if the colors are speaking out of the photographs. It will be lot more helpful if you can understand the difference between how saturation and vibrance works. Go to Image menu and choose Adjustment under the menu

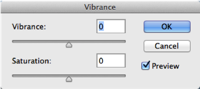
    As shown in the image to the right, select the Vibrance option. You will get two options under the menu – Vibrance and Saturation. Vibrance increases the saturation of less saturated colors. This option avoids yellow and orange skin tones. Basically vibrance works best for portraits.

    Photoshop tips saturation color adjustments

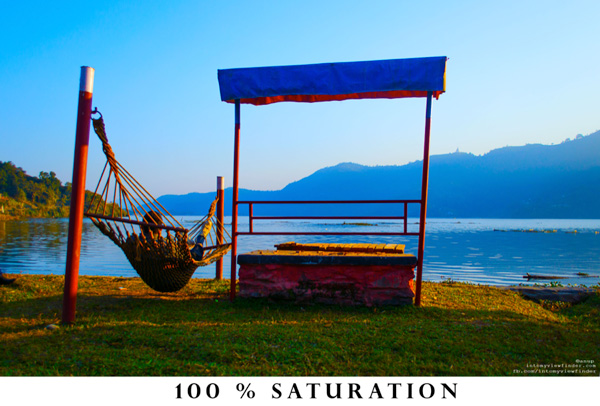
    On the other hand, saturation increases the intensity of all the colors in your image equally. This may not be a good option for portraits or peoples photos. What I can recommend is this: slowly start with vibrance for the color enhancement and use saturation later if you want to pump up the color more.

    If you compare the two photos below, you will understand how vibrance is only responsible for increasing the intensity of less saturated colors, where as saturation increases the intensity of all colors equally.

    Photoshop vibrance adjustment

    Photoshop saturtation adjustment

    3. Adding a Vignette

    Photoshop vignette

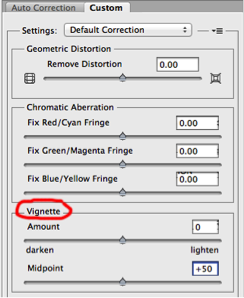
    Vignetting is basically a technique to darken the edges of your frame so that the eyes move to the subject more easily. This procedure works best when you have a subject in the center. Our eyes tend to move towards the brighter part of the image and recede on the darker side. This technique will result in dark space around the subject.

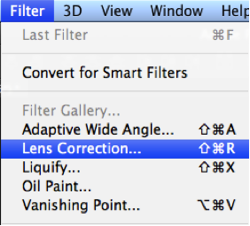
    There are lots of manual ways you can add vignetting in your photos but I will talk about how to easily add vignetting in your images via Photoshop. Go to Filters Menu at the top and select “Lens Correction”, then choose the Custom Tab on the right. The third section down is for adding a vignette. Slide the Amount to the left to darken, and Midpoint to adjust the size of the circle.

    Photoshop tips vibrance Photoshop tips vignetting

    4. Adding Sharpness and Details

    Photoshop filter lens correction vignette

    Adding sharpness is another technique for beginners in Photoshop. This will make your image look more detailed. I would suggest detailing most of your images with appropriate values. But make sure you sharpen, or detail your images with a small value if you are going to upload images on Facebook because it compresses the images and adds some detail to make it took a bit sharper. So when an already sharpened image is uploaded in Facebook, there is a change of it looking too edgy.

    Like any other technique, there are many ways you can add details in Photoshop. I will show you a very simple technique. Once you understand how this works you can experiment with some of the other techniques.

    • Photoshop high pass filterStep 1. Duplicate the selected layer with a keyboard shortcut Ctrl+J (PC) or Command+J oP MAC
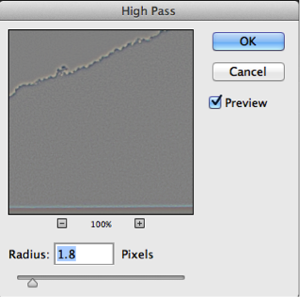
    • Step 2. Open the High Pass filter: Filter > Other > High Pass on the top layer
    • Step 3. Apply an appropriate value (just to see the edges in the image) and click Okay
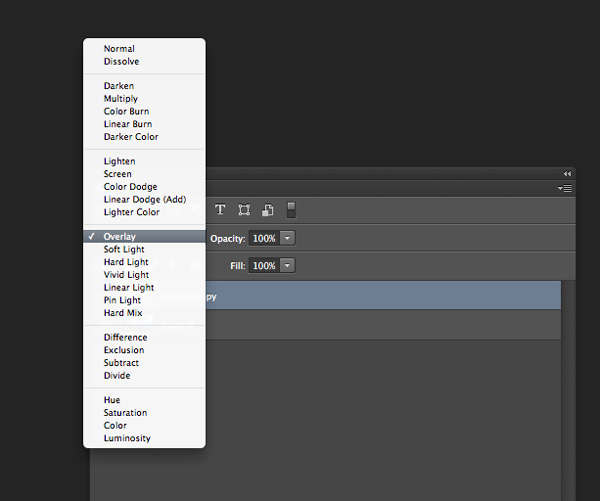
    • Step 4. Change the blending mode of the top layer to Overlay
    • Step 5. Adjust the opacity of that layer to your taste
    Photoshop-tips-layer-blend-mode

    Layer blend mode

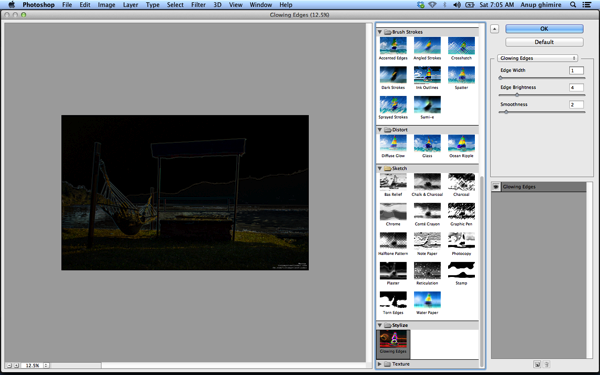
    5. Photoshop Filter Gallery

    Photoshop tips filters

    Filters are basically automated effects that you apply to your images with a few clicks. Filters can help you to achieve certain special effects or looks. There are various filters in Photoshop, which you can pick individually, each filter results in different effect when applied to different images. You an also apply more than one and stack them. Though I don’t use filters much, it’s good to explore if you are just starting out in Photoshop. Later, when you are more familiar with advanced tools and techniques you can try to create the similar effect from manual options and controls.

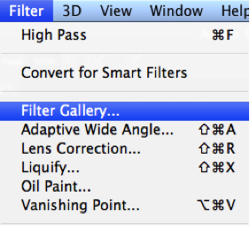
    To apply a filter select the layer and go to Filter > Filter Gallery. Before you apply any filter in the gallery make sure to change your image to 8 bit. You can do that by going to Image > Mode > 8 bits/channel

    Photoshop filter gallery

    I hope these 5 basic Photoshop tips will help you to retouch and enhance your photos. If you have others suitable for beginners please share in the comments below.

    For further reading on Photoshop head to:

    • Photoshop Tips
    • Photoshop “blend if” feature
    • 18 Useful Photoshop shortcuts
    • How to replace a face in 6 easy steps

    The post 5 Easy Photoshop Tips for Beginners by Anup Ghimire appeared first on Digital Photography School.


    Digital Photography School

  • Getting Started in Newborn Photography

    Newborn photography has been around in the United States for fifteen or so years, but it’s only taken hold here in the UK in the last three to four. And take hold it certainly has!

    All professional photography involves a multitude of skills and newborn photography is no different, with one very important exception. It is the only area of photography that involves the photographer being completely responsible for the safety and welfare of the subject – the baby. As a newborn photographer you will hold, comfort, soothe, pose, wrap, and often even feed and clean up after your subject, even with the parents present.

    Newborn photography tips 06

    It is because of this difference that it is so specialized, and requires the right set of skills. Not having those skills is about more than the risk of poor images – someone’s safety is at stake.

    So having decided it’s for you, you’ll have a huge number of questions. Here I aim to answer some of the biggest, and most important ones.

    Newborn photography tips 02

    DO I REALLY NEED TRAINING?

    The short answer is yes. It doesn’t matter how skilled you are at photography, because the skills required to be safe and of a good standard as a newborn photographer are really very different than anything you have done before. If you decide to become a wedding photographer with no training, the worst that may happen is you let down a couple on their big day. As bad as that could be, no one will get hurt.

    Newborns are delicate and must be handled correctly. They can suffer circulation problems, are poor at regulating their temperature, and cannot tell you when they are feeling uncomfortable, which means they are relying on you to take care of them at all times. The correct training will teach you safe handling techniques, how to spot signs of baby not being happy for many reasons, as well as general safety and other important areas.

    Newborn photography tips 03

    WHY DOES A SESSION TAKE SO LONG?

    The average session is 3-4 hours, and you will soon realize why when you have done a couple of your own. The session is taken up by everything BUT taking photos. When I do a session my camera is in my hand for less than ten minutes the entire time. The session will involve settling, cuddling, reading baby, soothing for sleep, and gentle posing. They baby runs the show, of that there is little question, and as each baby is different, so is each session. Try to rush it and clock watch, and you’ll put yourself under huge pressure, and babies pick up on stress, which could cause you to have an unsettled baby on your hands. As a general rule, most newborn specialists will do just one session a day.

    Newborn photography tips 04

    WHAT IS THE BEST AGE FOR A NEWBORN SESSION?

    If you have children, you may well remember that newborns sleep a lot, at least through the day, and seem able to sleep through pretty much anything too. But that changes really quickly, and by week three babies are waking more easily, and spending more time awake each day. You cannot pose a baby that is awake, so a sleeping newborn is what you need, meaning you need to aim for under two weeks, and under ten days is even better.

    Sleep isn’t the only issue that dictates though. Newborns are gorgeously squishy, floppy and bendy under ten days old, which, coupled with being sound asleep, makes them perfect for gently posing into those adorable positions parents love. Much after two weeks and they begin to gain muscle tone, which means they lose the flexibility that makes such posing possible.

    So that covers not doing a session too late, but you need to know why doing it too early isn’t good either. Newborns don’t usually look their best after birth, and it can take time for their faces to settle. Also, feeding needs to be established because until a baby is feeding well, he won’t sleep well. My advice would be don’t do a session under 5 days of age.

    Newborn photography tips 01

    HOW DO I MARKET NEWBORN PHOTOGRAPHY?

    You are selling emotions. That is really the bottom line with newborns. The parents are melting with wonder and love at their new baby, and emotions are running their lives completely. If you can build a relationship with your clients that taps into their emotions, and leaves them feeling that you can truly relate to them and their baby, they will be more inclined to not only book you, but trust you.

    Talk in a way that shows their baby means almost as much to you as he does them. Ask them lots of questions about their baby, and life since his arrival. New parents can talk all day about their baby, so showing he interests you will really endear you to them. Use emotive language on your site and Facebook page. Rather than saying “I like doing baby shoots” say “I simply adore capturing images of beautiful, squishy babies!”

    Look after the parents when they are with you. Provide drinks and snacks, and comfortable seating. Mum will be sore and they are both likely to be exhausted.

    Word of mouth is one of the best marketing tools in this genre. Mums talk, and will recommend you if they came away feeling that their baby was safe, respected and adored. The testimonials that will get you more bookings will not be the ones where mum says the pictures are good, but rather the ones where she gushes about how lovely the experience was while with you.

    Newborn photography tips 05

    WHAT WILL I NEED AS A BEGINNER?

    Keep it simple. Training will show you the basic equipment you’ll need, like beanbag and backdrop stand, as well as a small selection of throws, hats, headbands, and wraps. The most important area for your development as a newborn photographer will be developing safe handling of the baby in your early months. The confidence in posing takes time, and that is where your focus should be, not on having all the props and the biggest selection of hats. What will set you apart as a top newborn photographer will never be the amazing set up you design – it will be how good your posing is, and how comfortable your baby looks in the images.

    So in summary, I would suggest you take your time setting up as a newborn photographer. Research good training, and consider that in this area especially, you get what you pay for.

    Newborn photography tips 07

    For more on newborn photography and business see these articles:

    • The Ultimate Guide to Going Pro as a Photographer
    • How to Photograph Newborns
    • Newborn Photography Tips for Beginners
    • Different ways to Photograph your Baby
    • The Sensitive Side of Newborn Photography

    The post Getting Started in Newborn Photography by Maddy Rogers appeared first on Digital Photography School.


    Digital Photography School

  • The 22 Stupidest Questions That Photographers Hate to Hear

    The hunger for knowledge and the willingness to learn are priceless, but you may have noticed, sometimes both the reason and the aim of a question are ignorant. Sometimes questions are not asked to gain knowledge, but to show off, simply provoke you or… just for really no reason. People of many professions probably have a list of the stupidest Continue Reading

    The post The 22 Stupidest Questions That Photographers Hate to Hear appeared first on Photodoto.


    Photodoto