Category: Photography

  • The Ultimate Five Secrets to Better-Looking Photographs

    All photographers want their snapshots to turn out extremely well. This means pictures that are sharp, aesthetically appealing and sure to impress. Of course, many photographers don’t consistently turn out this type of quality in their photographs. These days, so many people are also pressed for time that they don’t really have the time or patience to study the masters Continue Reading

    The post The Ultimate Five Secrets to Better-Looking Photographs appeared first on Photodoto.


    Photodoto

  • 10 Ways to Improve Your Travel Photography Portraits

    Last year I travelled all across South East Asia – a trip which not only expanded my personal horizon, but also helped to immensely improve my photography. At the beginning of my trip, my biggest struggle was taking good portraits. The problem wasn’t the lack of opportunities; I encountered incredible and the utmost photogenic scenes around almost every corner. Instead, it was that I just felt too shy or not confident enough to get close to my subject.

    I had lots of excuses which might sound familiar to you: “I don’t want to disturb the moment”, “I don’t want to intrude on people’s privacy” or “It’s just a game of luck and chance anyhow”. It was frustrating and I knew that, despite all of the excuses, this was something I really had to work on. By lots or trial and error, and the help of some amazing photographers I met on the way, I gained some important insights on how to bring my people photography to a whole new level. I want to share these and hopefully help you overcome that awkward feeling and false reservation you have when photographing people.
    Travel Photography Portraits 01

    10 Ways to Improve Your Travel Photography Portraits

    #1 Be ready

    This is very basic and obvious, but so important. People photography is about brief moments, a glimpse which is normally not replicable. You are not doing landscape photography which leaves you with all the time you need. So have your lens cap off, have your camera switched on, be prepared to adjust settings and BE READY.

    Travel Photography Portraits 06

    Being ready to capture that one, special moment

    #2 Get close

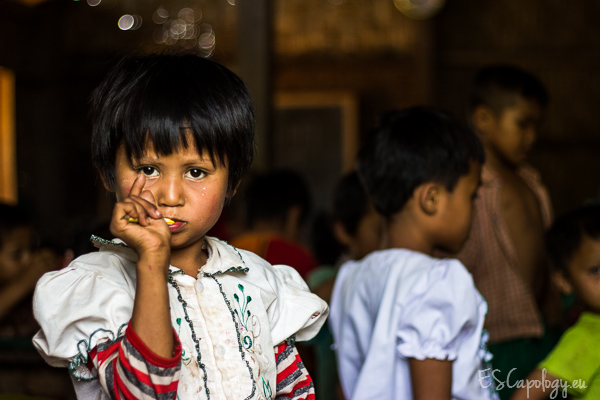
    If you are unhappy with your portraits or if they looks boring, it is probably because you are too far away. I know it feels awkward to get really close to someone you don’t know, especially in a foreign country. It seems so much easier to break out your big lens, zoom in and just click away, hoping that your subject won’t notice you. Unfortunately this won’t work.

    If you want to have crisp, sharp and extraordinary images which tell a story and leave your audience in astonishment, you have to overcome your shyness and get close. This will help to add more details on your subject’s face, increase sharpness and focus on only one or two elements. The viewer will automatically understand more about your image. Moreover, getting close will put you in control of things: the lighting, the background, the composition and the depth of field. These factors are so vital for a good portrait and so much easier to adjust when you are close to your subject.

    Travel Photography Portraits escapology 11

    Get close to your subject to control your image

    #3 Practice approaching people

    Travel Photography Portraits escapology 01

    Learning to approach people with the right attitude – the secret of good portraits

    You might think “That sounds great, but how do I get close to people?” This leads us to the biggest challenge in people photography, which has nothing to do with photography itself: dealing with people. Are you comfortable walking up to strangers, making small talk, then asking, “Can I take your picture?”

    If not, the good news is, it’s something you can practice just like everything else in photography. It is all about your attitude and how you approach people. Get in contact, have a positive attitude, talk, and most importantly smile. Don’t be afraid of intruding on people’s privacy. Particularly in South East Asia the concept of privacy is totally different from ours in the West. Approaching strangers and asking very personal questions is considered perfectly normal. Open yourself and people naturally respond in the same manner. In short, don’t be shy, adapt to the local culture, get to know people, make friends and you will take better pictures.

    #4 Learn the basics of the local language

    How do you approach people if you don’t speak their language? I will let you in on a secret. It’s actually even easier to approach people if you DON’T speak the same language. It’s a great place to start since it is then not so much about WHAT you speak, but HOW you speak and the energy you give off. Learning a few words and phrases in the local language will go a long way to helping you approach people, and it doesn’t take much effort to learn. From my personal experience the six most important phrases you should learn beforehand are:

    • Hello, how are you?
    • My name is …?
    • I am from …?
    • What is your name?
    • Thank you!
    • Beautiful!

    The last one will put a big smile on people’s faces after you have taken that nice portrait and show it to them. Get a small phrasebook. You can look up phrases when you need them or practice on longer bus rides. Ask your receptionist, taxi driver or local travel agent how to pronounce words. Don’t be afraid to make mistakes. It’s fun and will not only help to approach people, but also make your whole travel experience so much more worthwhile.

    Travel Photography Portraits escapology 12

    Knowing a few phrases in the local language can go a long way

    #5 Smile – smile a lot!

    Even if you don’t know any words or phrases, make sure to smile. A smile can go such a long way. If you are grumpy and angry because you are not getting your shots right, it will put people off and no one will want to go near you, and definitely won’t want to get their picture taken by you. When you come home from a photo walk, your mouth and cheeks should hurt from all the smiling.

    Travel Photography Portraits 05

    A smile can go a long way

    #6 Take your time

    Once you have made contact and established a good vibe, it is time to take your picture. Take advantage of all the “work” you have put in and take your time. It would be a shame to just hectically click away once or twice now. Be calm, think about the light, about what you want to emphasize (the eyes, the hands or the person itself) and about the background.

    Since you are close to your subject now, you can control all of these things. Take a deep breath and try a couple of shots, maybe switch angles and try different things. By doing this, you will notice that your subject will also become more relaxed and get used to the camera. There is no need to rush. A rushed photo is usually never a good one.

    Travel Photography Portraits 04

    Waiting for the right moment is usually worth it

    #7 Get moving

    Reality can be quiet boring. There might be things in your scene that are boring or disturbing. We already talked about taking your time. Make use of it and arrange the scene to your needs, change angles, get moving. Don’t be lazy. You can eliminate things or include things just by moving around a little bit. Don’t just rely on the zoom.

    Travel Photography Portraits 07

    Move to create the image you had in mind

    #8 Get a 50mm lens

    What helped me to counter my laziness and actually get moving was the purchase of a 50mm prime lens. If you don’t have one in your bag yet, buy one. It is the one piece of equipment that boosted my creativity and the quality of my images almost instantly. You will not only learn to move more but also open your eye for new perspectives.

    Travel Photography Portraits escapology 03

    A 50mm lens to boost your creativity – give it a try

    #9 Start with kids and people that are doing something

    If you feel shy but are still willing to practice approaching people and getting close, start off with photographing kids and people that are doing something. Kids are easy to photograph. They usually love getting their picture taken, posing and never get bored doing so. I found it very rewarding in Asia but would suggest taking a more cautious approach in Western societies. Please always ask the parents first.

    Shoot in busy areas or settings. People that are doing nothing will surely be looking at you. People that are doing something, can’t be bothered to look at you. When they are busy with their task, they will not care about you taking pictures. Look for traditional workshops or handicraft businesses. They usually make for great picture taking opportunities.

    Travel Photography Portraits escapology 15

    Occupied with traditional crafts – great picture opportunities

    #10 Get out of the touristy areas

    The touristic hubs are usually far from the country’s reality. At the same, time getting off the beaten track is usually not so difficult. Sometimes it just takes 15 minutes to find yourself in a small, local village. This is where you want to be as a photographer. You will meet real people who aren’t out to sell things. You will have more chances to interact, to practice your newly acquired language skills and take more authentic photographs. At the same time it will make for a much better travel experience than sticking to the “Lonely Planet Path”.
    Travel Photography Portraits escapology 09

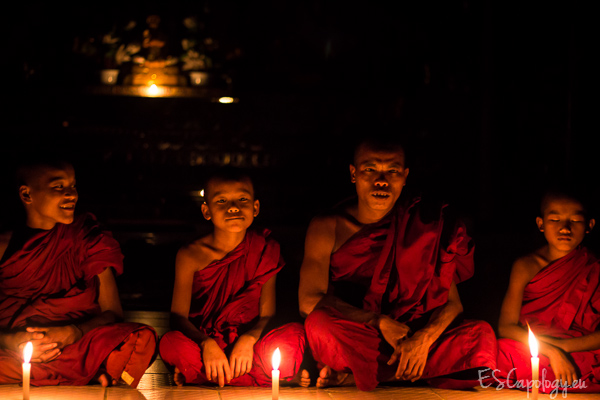
    Hosted by monks in a monastery in Myanmar. No tour, no guide

    All of this takes a little getting used to and practicing along the way. But it’s worth it. Please don’t just jam your camera in people’s faces when traveling abroad. It’s not nice and the pictures won’t be either. Take your time to interact with people, open up, get close and don’t forget to smile. This will make for great experiences, unforgettable memories and even better pictures.

    Please share some of your favourite people photos with us in the comments and if you have another tips for photographing people, we’d love to hear them.

    For more articles on travel and people photography check out these:

    • 6 Tips for Photographing People When Travelling
    • 5 Reasons Why Having People in Your Photos is a Good Thing
    • The Rewards of Photographing People When You Travel

    The post 10 Ways to Improve Your Travel Photography Portraits by Philipp Dukatz appeared first on Digital Photography School.


    Digital Photography School
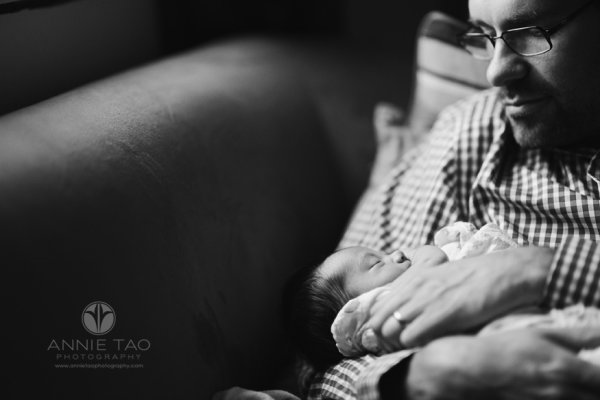
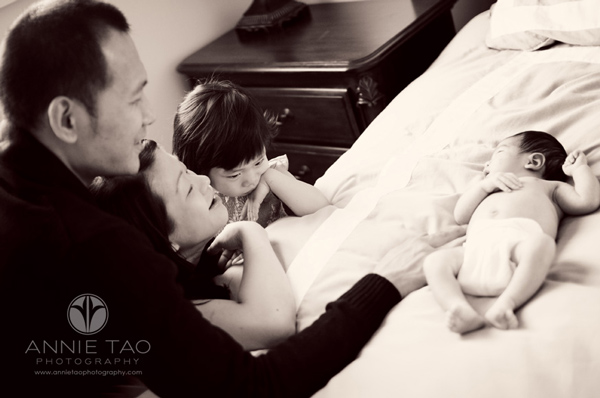
  • 6 Tips for Lifestyle Newborn Photography

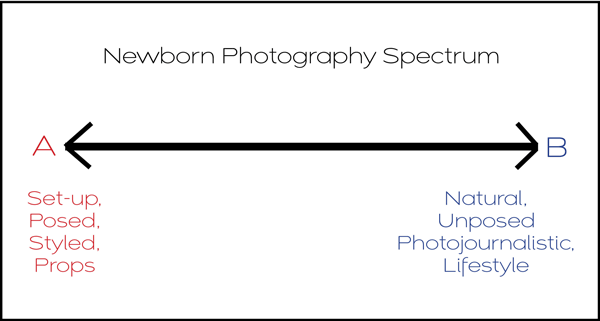
    Newborn Photographers fall somewhere on a spectrum between producing posed, styled imagery and natural, lifestyle imagery.

    Annie-Tao-Photography-newborn-photography-spectrum2b

    While I enjoy looking at styled images of sleeping newborns in costume or appearing as though they are holding their own head up with the use of proficient Photoshop work, the emotions and stories captured in Lifestyle Photography images are what make my heart sing! So I stand comfortably and proudly on “side B” of the spectrum.

    After following the rules outlined in The Sensitive Side of Newborn Photography, I follow these six tips for Newborn Photography:

    1. Capture every detail

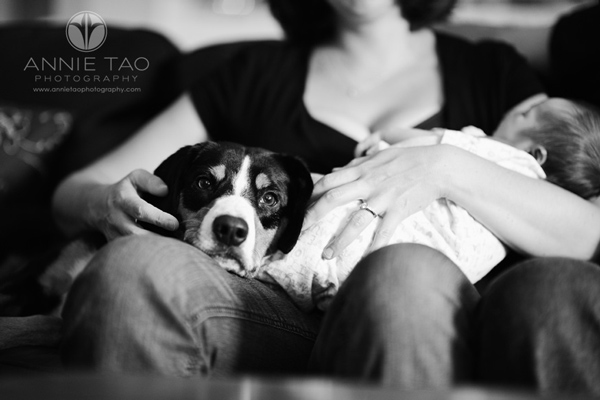
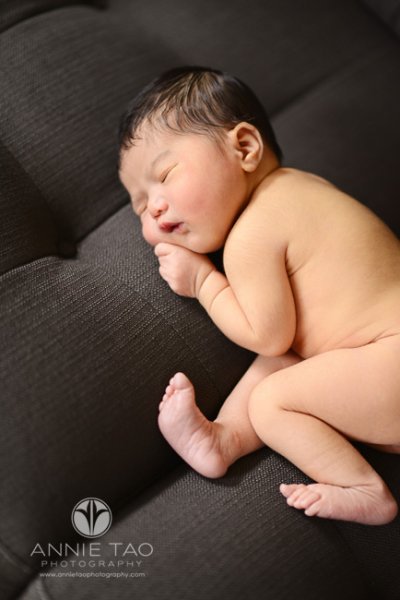
    Whether the baby is crying heartily, yawning, or sleeping peacefully, they are all important and precious because the newborn stage is so brief. A yawn of a 4-day new infant, for example, looks different than a yawn of a 4-year old child, so photograph it all!

    Annie-Tao-Photography-Lifestyle-Newborn-Photography-article-5b

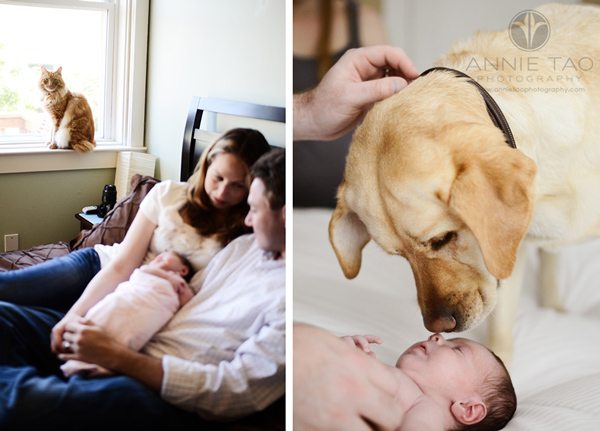
    Memorialize the details, including items in the nursery. Talk to the parents and find out what baby items are meaningful to them. Maybe the grandparent knit the blanket or the dog is considered the first-born!

    Annie-Tao-Photography-Lifestyle-Newborn-Photography-article-12b

    2.  Photograph them at home

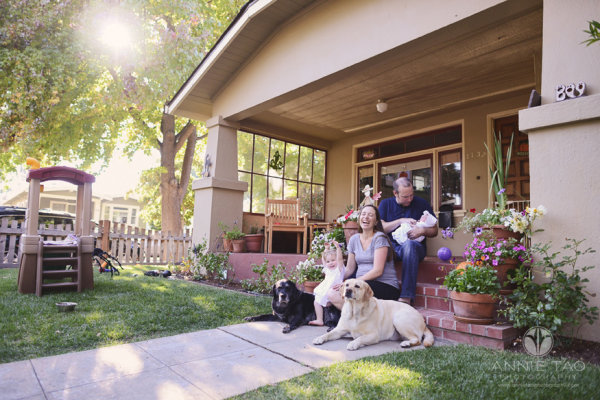
    Capturing images of the baby in his or her very first home means every backdrop and furniture will be meaningful in the photos. It also means every session will be unique since every home looks different than the other.

    Annie-Tao-Photography-Lifestyle-Newborn-Photography-article-6bg

    Annie-Tao-Photography-Lifestyle-Newborn-Photography-article-13

    3.  Do the newborn photography session within the first 10 days

    Annie-Tao-Photography-Lifestyle-Newborn-Photography-article-8Technically, babies are considered “newborns” the first 3 months of birth. However, in the first 10 days, babies sleep most of the day and can more easily handle noises and movement. Though in Lifestyle Photography, newborns do not need to sleep the entire time, the session will run smoother if the baby is calm.

    They also have a better chance of not having skin issues, like newborn acne, which will save you time in post-processing after the session.

    4. Be well-equipped

    Most of the time, I confidently tell other photographers that their equipment is NOT as important as the person behind the camera when it comes to good imagery. This is still true with photographing newborns, however, you do need to have equipment that performs well in various indoor conditions, such as tight spaces and low light, A wide angle prime lens and a reflector are key. You should also have a macro lens to capture detail shots of the baby.

    When I arrive at a client’s home, it usually looks like I’m staying overnight because I have a roller bag and carrying case!

    Annie-Tao-Photography-Lifestyle-Newborn-Photography-article-1bg

    5. Use natural light

    Flash can startle newborns.

    Also, when you are photographing new parents with their baby, using flash or other lighting equipment can take away from the spontaneity and natural tone of the shoot.

    Annie-Tao-Photography-Lifestyle-Newborn-Photography-article-3b

    6. Be flexible

    A lot can happen when you’re photographing a newborn, like having unexpected baby visitors looking over your shoulder or being spit on, pooped on, vomited on! (that has all happened to me.) Just remember, you can’t always prepare for what happens at a newborn shoot, so stay calm and take everything in stride.

    The first few days of a newborn’s life can be a hazy memory for new parents who are often sleep-deprived and running on adrenalin. Know that you are capturing a magical time for the family, and your photos of their life in that narrow slice of time will be treasured.

    Annie-Tao-Photography-Lifestyle-Newborn-Photography-article-10b

    Have you photographed any newborns or small babies? Do you have any additional tips or comments to add?

    For more information on photographing babies and kids read these:

    • A Guide to Birth Photography
    • Maternity Photography – 7 Tips for Taking Great Shots
    • 7 Tips for Photographing Newborns without Becoming Clichéd, Derivative or Boring
    • Baby Sessions on a Shoe String

    The post 6 Tips for Lifestyle Newborn Photography by Annie Tao appeared first on Digital Photography School.


    Digital Photography School

  • 7 Tips for Taking Better Photographs of Cars

    Taking photos of cars is such an interesting thing on its own. It’s like science. Every time I shoot a car I learn something from it! I would like to share some basic guidelines to get you started and help you understand this interesting niche in the photography world.

    7 Tips for Taking Better Photographs of Cars

    1. Shoot at the right time of day

    This is by far the most common mistake people make when shooting cars. The best time to shoot will be a few minutes after sunset (or a few minutes before sunrise). Use a tripod and get that perfect soft light on the paint! This photo was taken for TopGear a few minutes before sunrise.

    Car photography BMW M135i

    2. Be on the lookout for reflections

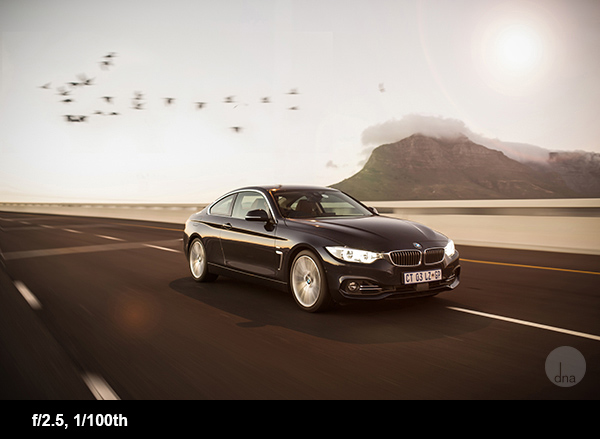
    You must be very careful of what reflects in the car. Have a look around you and look closely at the car and see what reflects on its surface. A car (especially a new shiny one) is like a mirror. Try and have an open space behind you like a field. Try and avoid shooting with buildings or trees behind you. One of the most important things you want to show in your car pictures are the design lines of the car, or as I like to call it, ‘her curves’. Reflections can spoil these curves.

    Also be very careful not to have your own reflection in the photo. If you can’t avoid your own reflection its best to put the camera on a tripod, set the timer and move out of the shot. Just look at this photo I took of a dark shiny BMW 428i, behind me was nothing except the horizon. You can clearly see the horizon reflecting in the car.

    Car photography tips BMW428i

    3. Driving shots

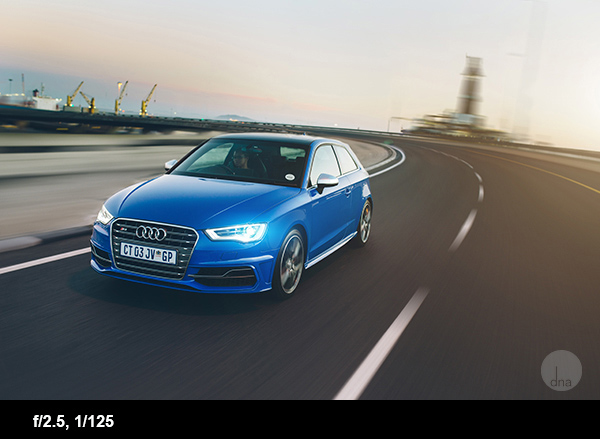
    One very easy way to get a cool image, is to shoot the car out of another moving car. (Please be super careful when doing this!) Shoot the car out of your window while driving at 60 km/h (40 miles/h) with a shutter speed of 1/100th of a second.

    By doing this you will get some nice movement on the road and on the wheels. You can even decrease the shutter speed some more, but this will increase your chances to sit with unsharp photos afterwards. This Audi S3 was shot before sunset, driving at 70 km/h with a shutter speed of 1/80th of a second.

    Car photography tips S3 driving shot

    4. Color of the car

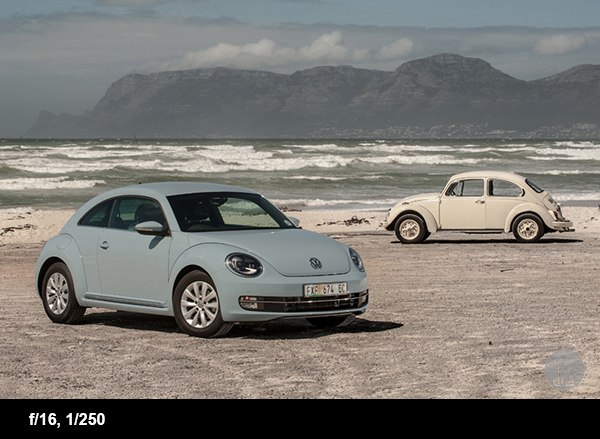
    All types of paint react differently at different times of the day, with different light. Most colors hate direct sunlight, but some color works really well in direct sunlight. Just look at this baby blue beetle shot in the middle of the day.

    Car photography tips beetle

    5. Background

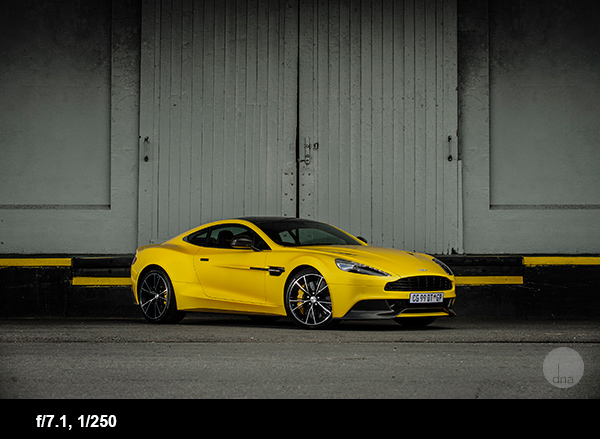
    Make sure your background suits the car and the theme. Avoid having things in the background that will distract the eye. Things like dustbins, power lines and other cars can kill a picture. For this Aston Martin, I used a simple background . The yellow paint matches the car’s color.

    Car photography aston martin

    6. Panning for motion blur

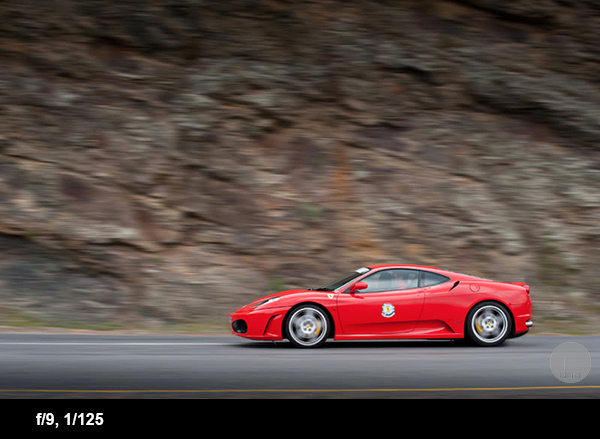
    A cool way to get some motion in your picture is to stand next to the road and let the car drive past you. Follow the car with your lens in one smooth action and set the shutter speed to 125th of a second. You will be amazed how easy this is! This Ferrari was shot at 125th of a second at 200mm. The car was driving roughly 60 km/h (40 miles/hr)

    Car photography tips ferrari

    7. Let the car interact with nature

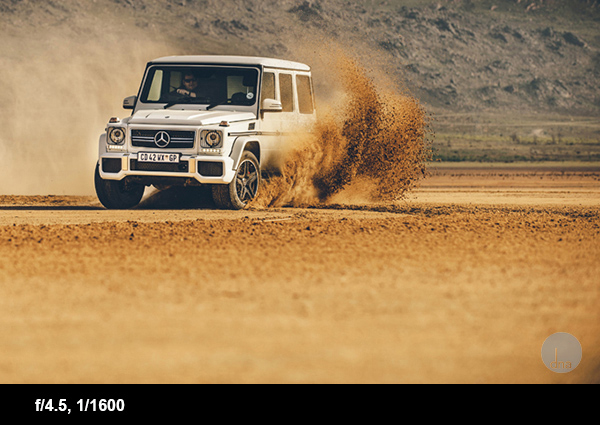
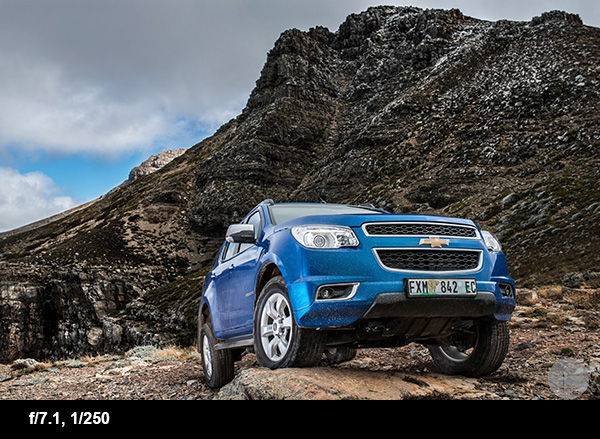
    Another way to make the photo speak to you is to make the car interact with its surroundings. Examples of this could be the car making dust, a 4×4 climbing over an obstacle. Look at this Chevrolet Trailblazer climbing over a rock or this G-Class AMG drifting on loose sand!

    Car photography tips G AMG

    Car photography tips trailblazer

    8. Shooting at night

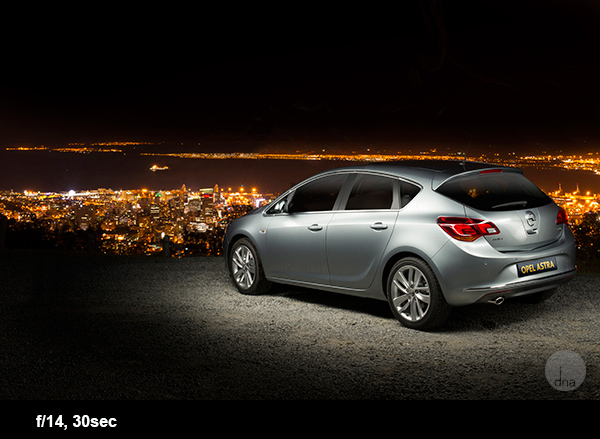
    This might sound daunting but you will be amazed how easy and awesome this is! The biggest secret here is to find a spot where it’s completely dark, any streetlights or even a full moon could make life tricky.

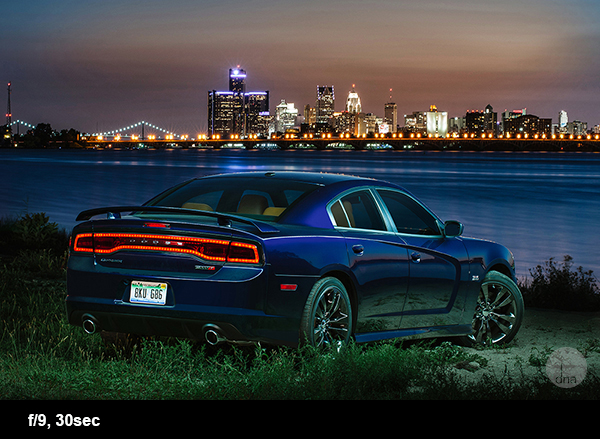
    When you have found this spot, set the camera up on a tripod. Set your ISO to 100, the shutter speed on 30 seconds and the aperture to f/9.
    When the shutter opens take a strong constant light source and walk around the car ‘painting’ the car with your light. A normal household torch (flashlight) works for this.

    There are no rules here, paint the car in different ways to get different effects; you will be blown away with the results! Here are some examples of this technique:

    Car photography tips Opel Astra

    This is an Opel Astra shot next to Table Mountain with Cape Town in the background.

    Dodge Charger with the skyline of Detroit City

    This is a Dodge Charger with the skyline of Detroit City in the back. This photo took me no longer than 5 minutes to set up and take.

    Do you have any other car tips or favourite images you’ve taken of cars? Please share in the comments below.

    For more related tips try these:

    • Light Painting Part One – the Photography
    • Showing Speed: Using Panning When Shooting Action
    • 3 Tips for Creating Dramatic Images using Motion
    • Do you pack up and leave after sunset and miss the fun of night photography?

    The post 7 Tips for Taking Better Photographs of Cars by Desmond Louw appeared first on Digital Photography School.


    Digital Photography School
  • The Winner of our Posing eBook Prize Is…

    NewImageOver the last few weeks we’ve been launching our brand new Portraits Posing eBook and as part of the launch we offered anyone who picked up a copy would go in the draw to win $ 2000 towards a new camera, lenses or other gear.

    Today I’m excited to announce that the winner of that competition is…

    Editha Schoeffler!

    Congratulations Editha – we’ve just shot you an email to notify you of your win and to arrange to get you your prize.

    Thanks everyone else for picking up a copy.

    We’re going to keep offering the eBook with the 7 bonus printables for just a few more days now so it’s not to late to still grab and get a little Early Bird goodness.

    Order your copy with the bonus printables here.

    The post The Winner of our Posing eBook Prize Is… by Darren Rowse appeared first on Digital Photography School.


    Digital Photography School
  • Don’t Look Down: 50 Inspiring Examples of Rooftopping Photography

    You have probably heard of a new photography fad called “rooftopping,” in which brave daredevils find the way to the top of skyscrapers and other tall buildings to snap majestic shots. Just imagine the buzz of the roof topper who reached the top of the highest building in the city and saw the incredibly breathtaking view. If you want to Continue Reading

    The post Don’t Look Down: 50 Inspiring Examples of Rooftopping Photography appeared first on Photodoto.


    Photodoto

  • Masters of Photography: Bruce Davidson, Master of the Subway

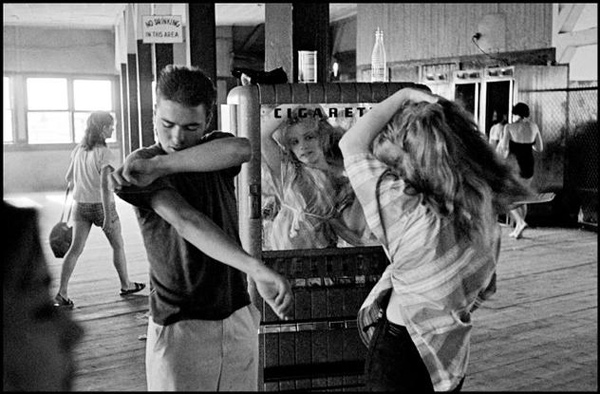
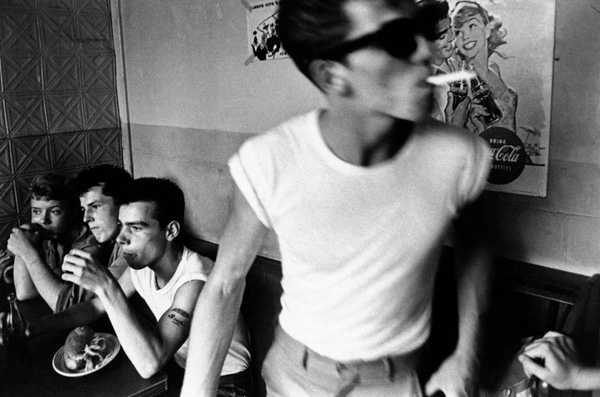
    Coney Island, NY. 1959. From Brooklyn Gang.

    Coney Island, NY. 1959. From Brooklyn Gang – Bruce Davidson/Magnum

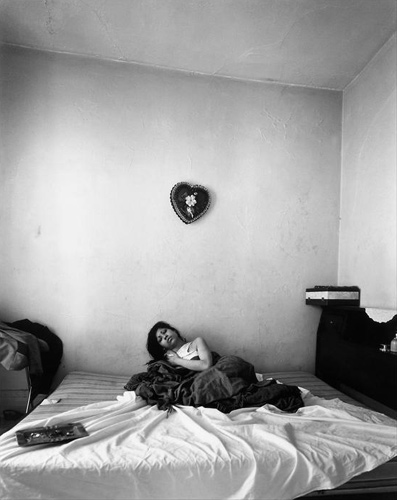
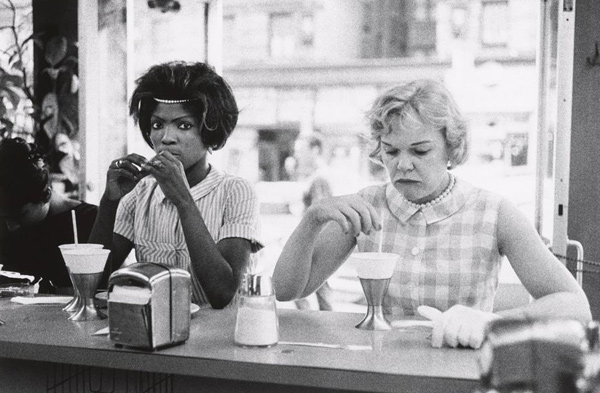
    We can all learn a great deal by studying the work of photographer, Bruce Davidson. Born near Chicago in 1933, Davidson has extensively photographed for over 50 years, including subjects such as the Civil Rights Movement in the early ’60s, circus performers, a Brooklyn gang, Spanish Harlem, and a five year project on New York’s subway system in the gritty days of the ‘80s. A few of his main influences were Robert Frank, W. Eugene Smith, and Henri Cartier-Bresson. Davidson joined the Magnum photo agency in 1958.

    Besides Davidson’s intimate photographic style, which you need to view a few of his projects in their entirety to get a feel for, there are a few very important lessons that he can teach you about your own work.

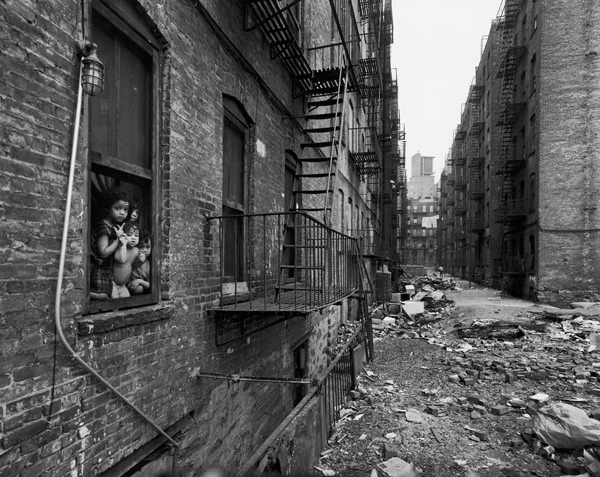
    Much of Davidson’s work was focused on series and projects. One of his most important works is East 100th Street, where he captured life within a single block in East Harlem in the late ’60s. While many photographers may have tried to capture East Harlem in its entirety, Davidson honed in. He got familiar with a smaller area with a lot of life, and told broad stories by narrowing the subject matter. By focusing on a small part of a large area, he was able to become much more familiar and intimate with his subjects.

    East 100th Street, Spanish Harlem, 1966.

    East 100th Street, Spanish Harlem, 1966 – Bruce Davidson/Magnum

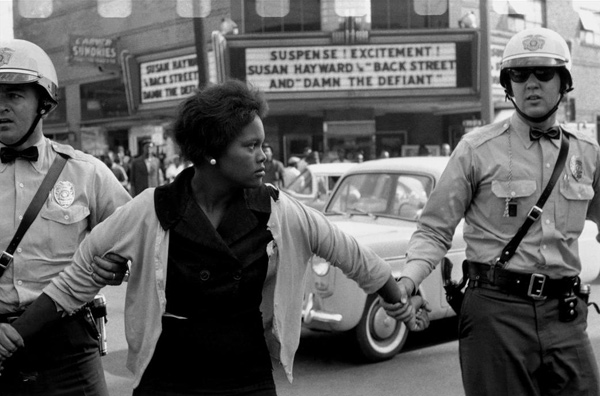
    Davidson also spent time following a Brooklyn gang of youths called the Jokers in 1959, and he created a series of civil rights work when he following a group of freedom riders in the south (in 1961) through dangerous situations.

    Besides his technical ability, one of Davidson’s main strengths was figuring out where the interesting stories were and putting himself where the action was. Then, he got close and familiar to his subjects. That idea might make you nervous, but based on some of his writings you can see that he was nervous at points as well. However, he did not let that stop him from doing it. He got close with his subjects and this closeness is shown within his images. It is one of the most important aspects of why his photographs are so successful.

    New York City, 1962.

    New York City, 1962 – Bruce Davidson/Magnum

    While this intimacy was very important in his work, Davidson did not seem to think of himself as a documentary photographer, stating, “Documentary photography suggests you just stand back, that you’re not in the picture, you’re just recording. I am in the picture, believe me. I am in the picture but I am not the picture.”

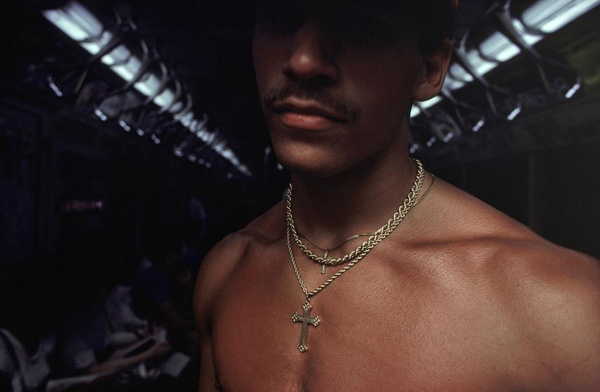
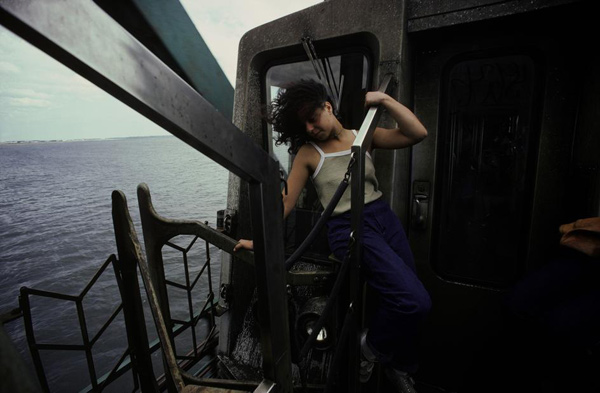
    Starting in 1980, Davidson began an extensive five year project documenting the New York Subway system. The subway project is what hits closest to home for me, and it is inspiring to read about. When you visit New York City it is interesting to compare his photographs to the modern day look of the subway system. It helps to see your own work through this perspective. How would he do his project today? The subway system looks so much different, so how can I also capture it in an interesting way?

    NYC Subway, 1980.

    NYC Subway, 1980 – Bruce Davidson/Magnum

    When talking about prolific photographers, it is easy to think that we cannot repeat their success. They seem bolder and more fearless. However, when you read Davidson’s quotes about the project, he does not sound much different than any of us would probably feel. He was just self aware enough and able to push through it. It is inspiring to say the least.

    “As I went down the subway stairs, through the turnstile, and onto the darkened station platform, a sinking sense of fear gripped me. I grew alert, and looked around to see who might be standing by, waiting to attack. The subway was dangerous at any time of the day or night, and everyone who rode it knew this and was on guard at all times; a day didn’t go by without the newspapers reporting yet another hideous subway crime. Passengers on the platform looked at me, with my expensive camera around my neck, in a way that made me feel like a tourist—or a deranged person.

    It was hard for me to approach even a little old lady. There’s a barrier between people riding the subway—eyes are averted, a wall is set up. To break through this painful tension I had to act quickly, on impulse, for if I hesitated, my subject might get off at the next station and be lost forever. I dealt with this in several ways. Often I would just approach the person: “Excuse me. I’m doing a book on the subway and would like to take a photograph of you. I’ll send you a print.” If they hesitated, I would pull out my portfolio and show them my subway work; if they said no, it was no forever. Sometimes, I’d take the picture, then apologize, explaining that the mood was so stunning I couldn’t break it, and hoped they didn’t mind. There were times I would take the picture without saying anything at all. But even with this last approach, my flash made my presence known. When it went off, everyone in the car knew that an event was taking place—the spotlight was on someone. It also announced to any potential thieves that there was a camera around. Well aware of that, I often changed cars or trains after taking pictures.”

    Read more from Davidson on this project: Train of Though: On the ‘Subway’ Photographs. Now it’s time to explore Davidson’s work and think about a photographic project that you can do in your own area.

    Subway.

    NYC Subway, 1980.

    NYC Subway, 1980 – Bruce Davidson/Magnum

    Brooklyn Gang.

    Brooklyn Gang, 1959.

    Brooklyn Gang, 1959 – Bruce Davidson/Magnum

    East 100th Street.

    East 100th Street, Spanish Harlem, 1966.

    East 100th Street, Spanish Harlem, 1966 – Bruce Davidson/Magnum

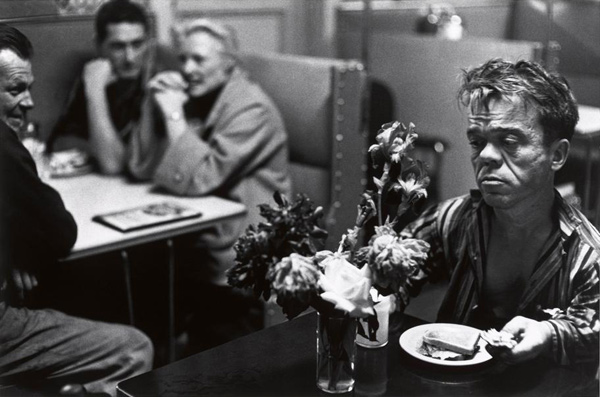
    Circus

    The Dwarf, Circus, Palisades, NJ. 1958

    The Dwarf, Circus, Palisades, NJ. 1958 – Bruce Davidson/Magnum

    Times of Change: Civil Rights. 1961-65.

    Birmingham, Alabama, 1963 by Bruce Davidson

    Birmingham, Alabama, 1963 by Bruce Davidson/Magnum

    The post Masters of Photography: Bruce Davidson, Master of the Subway by James Maher appeared first on Digital Photography School.


    Digital Photography School
  • A Buyer’s Guide to Canon Normal and Telephoto Lenses

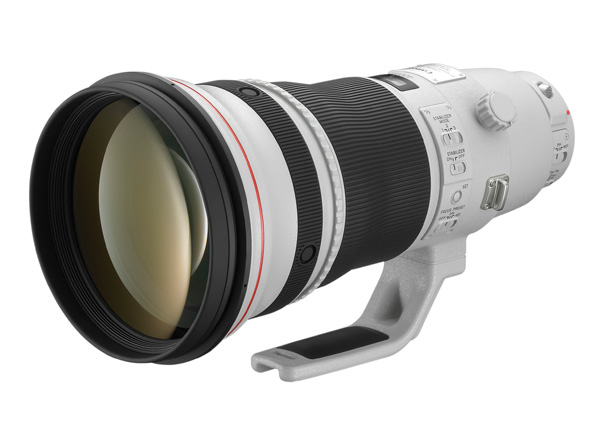
    Canon 400mm lens

    Canon EF 400mm f2.8L IS II USM lens

    Andrew S. Gibson is the author of Understanding Lenses Part II: A Guide to Canon Normal & Telephoto Lenses, on 40% now at Snapndeals for a limited time only.

    With so many lenses to choose from, it’s little wonder that photographers become confused about which option is the best. In this article I’m going to take a look at some of Canon’s best or most interesting normal and telephoto lenses, to give you a head start when it comes to understanding just what Canon offers in this part of their lens range.

    But first, let’s take a quick look at the state of Canon’s lens line-up. I have no inside knowledge about which lenses Canon may introduce this year, but I do see a couple of emerging trends.

    Trends in Lenses

    The first is that Canon is not afraid to take an old lens and update it with a newer version. Good recent examples are the new EF 24mm and 28mm f/2.8 IS USM lenses. Both replaced older versions and included an Image Stabilizer (IS) which the previous models didn’t have.

    The second trend is that newer lenses tend to be more expensive than the ones they replace. This is reasonable, as the newer lenses are better quality. If a new lens comes out and it seems expensive, you can be patient and wait a year or so for the price to drop if you don’t need it urgently. The two wide-angle lenses mentioned above have dropped in price by over 30% since their release.

    That does mean it is possible that Canon will replace some of their aging normal and telephoto lenses in the near future. If you’re thinking about buying one and are worried about this, it’s up to you to decide how badly you need the current version. While the rumour websites like to speculate about forthcoming lenses, and are sometimes accurate, you never really know what will happen as Canon keep the details of new releases under wraps until the official day of release.

    A good example of this is the EF 50mm f/1.4 lens. Some rumours sites are saying this is due for an update. But if this is true, and how far in the future it will happen, no-one really knows. Plus the replacement is likely to be more expensive than the current 50mm f/1.4 lens (but it may have IS). In the end, it’s up to you, but my advice is don’t spend too long waiting for new lenses – you could be waiting a long time.

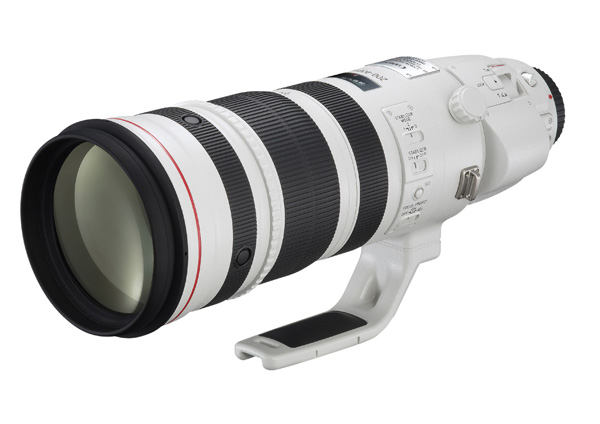
    Canon EF 200-400mm f/4L IS USM – the beast!

    Canon 200-400mm zoom

    Canon EF 200-400mm f/4L IS USM Extender 1.4x– only about $ 12,000 USD!

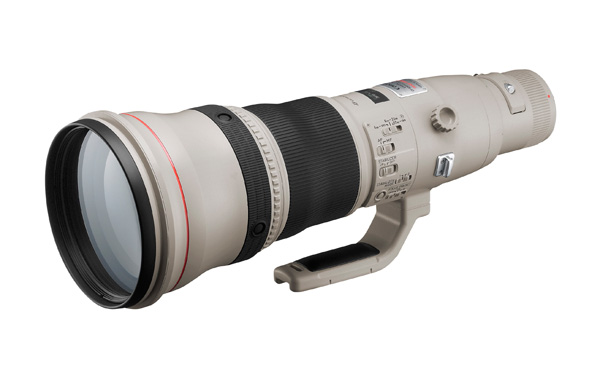
    Let’s start off with this beast. It’s fun to speculate who would buy such an expensive lens. A professional sports photographer? Agencies like Getty or Reuters? This L series, super telephoto zoom, comes with a built in 1.4x extender (the only Canon lens to do so), a four stop Image Stabilizer, and a fixed f/4 aperture throughout the zoom range. It weighs over three and half kilos (7.9 pounds), but is not Canon’s heaviest lens. That honour belongs to the Canon EF 800mm f/5.6L IS USM lens (below), which weighs four and half kilos (9.9 pounds) and is another option for those of you with $ 13,000 to spend on new glass.

    Canon 800mm lens

    Canon EF 800mm f/5.6L IS USM Super Telephoto Lens for Canon Digital SLR Cameras

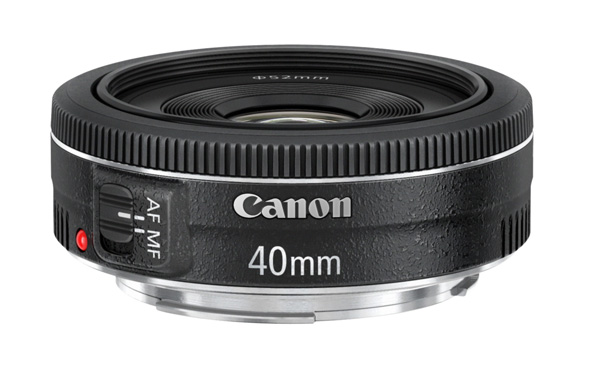
    Canon 40mm f/2.8 STM

    Canon 40mm pancake lens

    Canon EF 40mm f/2.8 STM Lens

    At the other end of the scale is one of Canon’s lightest, smallest and least expensive lenses. This 40mm pancake lens delivers excellent image quality, and excellent value for money. However it doesn’t have IS or a distance scale on the lens, features which may be important to some people.

    How does this lens give such excellent quality for such a low price? It contains just six optical elements that measure little more than a centimetre across (0.4″). They are cheaper to manufacture than the larger elements found in Canon’s other lenses, and the result is a lower price.

    This focal length is a short telephoto on an APS-C camera or a normal lens on a full-frame camera.

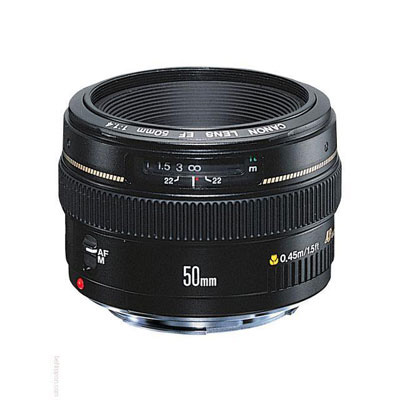
    Canon 50mm f1.4 USM

    Canon 50mm f1.4 lens

    EF 50mm f/1.4 USM

    Canon users aren’t lacking for choice when it comes to 50mm lenses. Canon makes four models, including the 50mm f/1.8, the 50mm f/1.2L and 50mm f/2.5 macro. But my favourite is the EF 50mm f/1.4 USM. It’s a third of the price of the more expensive L series 50mm lens, but has better autofocus and smoother bokeh than the f/1.8.

    50mm lenses make great portrait lenses on APS-C cameras and deliver value for money in terms of image quality and versatility. You can use a 50mm lens with extension tubes or close-up lenses for close-up photography, or with a reversing ring on a longer lens for macro photography.

    Read more about 50mm lens in my article Nifty Fifties – Why I Love 50mm Prime Lenses.

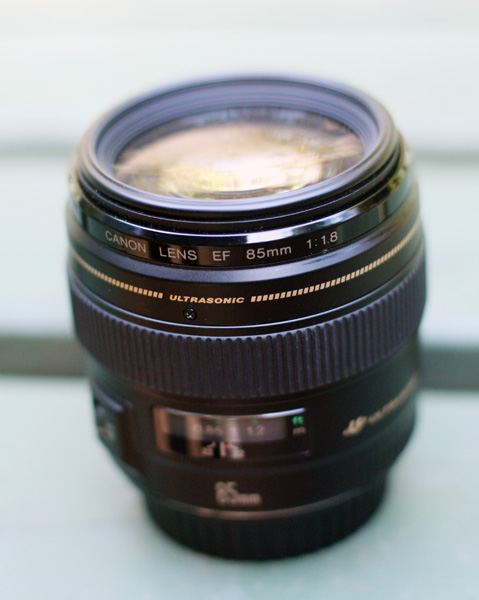
    Canon 85mm f/1.8 USM

    Canon 85mm lens

    Another of my favourite lenses is the 85mm f/1.8. It’s an ideal portrait lens for owners of full-frame cameras. It’s also great for close-up photography with the addition of a 500D close-up lens. It’s a shame it doesn’t have IS, but that would push the price up. If you have deep pockets you can also consider the EF 85mm f/1.2L II USM lens, but bear in mind the wide f/1.2 aperture means it has a large front element (to let in the more light) and that makes the lens heavier and slower to autofocus.

    Read more about this lens in my article How a Humble 85mm Lens Became My Favourite.

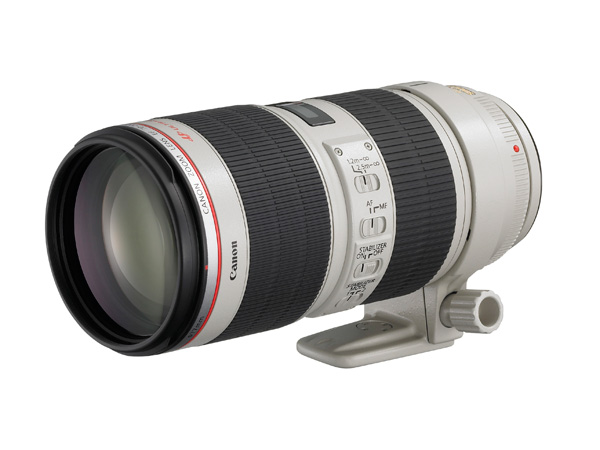
    Canon 70-200mm zooms

    Canon 70-200mm zoom lens

    EF 70-200mm f2.8L IS II USM

    Canon has four 70-200mm zoom L series lenses. Two of these have maximum f/4 apertures and cost less. The other two have maximum f/2.8 apertures. For each aperture setting there is both a non-IS and an IS model. This gives you plenty of choice, for what is a very versatile focal length. The EF 70-200mm f/4L USM lens is Canon’s cheapest L series lens and a great option for anyone wanting to experience L series quality on a low budget. The EF 70-200mm f2.8L IS II USM (above) is the most expensive and comes with a collar so you can mount it on a tripod.

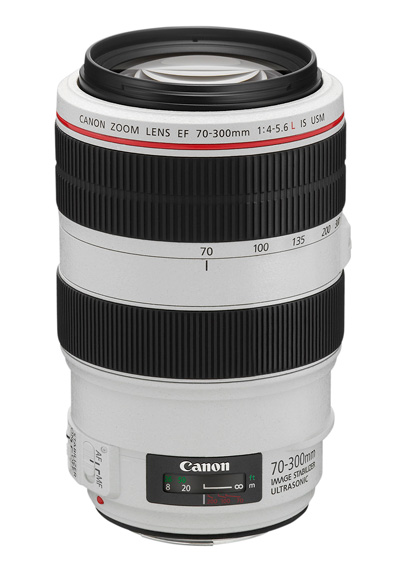
    Canon 70-300mm f/4-5.6L IS USM

    Canon 70-300mm zoom lens

    Canon EF 70-300mm f/4-5.6L IS USM UD Telephoto Zoom Lens for Canon EOS SLR Cameras

    If 200mm isn’t long enough for you then Canon’s trio of 70-300mm zooms may appeal. The only drawback of these lenses is the variable aperture, but it’s hard to avoid this along such a long focal length range. The EF 70-300mm f/4-5.6L IS USM is the most recent model, but also the most expensive. The EF 70-300mm f4/-5.6 IS USM lens is the least expensive and ideal for those on a tight budget.

    The EF 70-300mm f/4-5.6 DO IS USM lens is an interesting alternative. DO stands for Diffractive Optics. The construction of the lens elements in DO lenses means they are smaller and lighter than their non-DO equivalents, making this a good option for photographers concerned with size and weight. In every other respect DO lenses are equivalent to L series lenses. Will Canon make more DO lenses in the future? I hope so, because they are a great idea. The only other DO lens in Canon’s range is the EF 400mm f/4 DO IS USM.

    Hopefully that has given you a good overview of some of Canon’s more notable normal and telephoto lenses. It’s impossible to include every model, let alone those made by other manufacturers, but that’s where you come in. What normal or telephoto lenses have you purchased? How have they performed and what would you recommend? Let us know in the comments.


    Understanding Lenses Part II: A Guide to Canon Normal & Telephoto Lenses

    Understanding Lenses ebookMy ebook Understanding Lenses Part II will teach you how to get the most out of Canon’s normal and telephoto lenses. It contains a buying guide, takes a deep look at aperture and bokeh, and shows you how to focus accurately with telephoto lenses. It’s offered for a special price now on 40% off at Snapndeals for a limited time only.

    The post A Buyer’s Guide to Canon Normal and Telephoto Lenses by Andrew S. Gibson appeared first on Digital Photography School.


    Digital Photography School
  • Chat with Commercial Photographer Joey Lawrence

    This week I found a video interview with photographer Joey Lawrence. When he first hit the photography scene he was only 16, that was 2006. By 2009 he was living in NYC shooting celebrities, traveling the world, and had an instructional DVD. Who can say they did they all before they were 21?!

    I have to admit when I first saw his work, I had two reactions.

    1. I was really, really impressed
    2. I was also a little pissed off!

    Here was this kid doing what I had done for almost 20 years, and hitting the big time almost over night. I admit, I was a little jealous. But I soon settled in to really liking his work, regardless of his age, and allowing it inspire me rather than get mad about it.

    Originally from Lindsay Ontario, Canada, Joey L (his working name) moved to New York to further his career. He shoots posters for movies, Hollywood actors and travels the world working on persona projects in India, Indonesia and Africa. Pretty much a dream job of what most photographers aspire to – and he’s only 24!

    Here’s a short 8 minute interview with Joey where he talks about his philosophy, and gives advice for newbies just getting started.

     Some links to see more of Joey L’s work:

    • His personal projects including those mentioned about in remote villages, people from dying cultures
    • Learn from Joey, his educational site
    • How he got started, you can see his first photo contest entries on DPChallenge starting in 2004 when he was barely 15. I think this is helpful to understand that we all start at the beginning, and it takes hard work to make your dreams a reality.
    • I highly suggest you go into the video section of his site and watch “The Perfectionist”, and the Behind the Story video on it. He talks about his dad and how he encouraged him and gave him his drive to do things right the first time. A very heartfelt homage to his dad.

    There is also a full length documentary on his journey back to Africa to actually show the people the photos of themselves. I couldn’t find it online, perhaps you can and share a link with us. But I did find this one below showing just how much he goes through to get this shots. Please keep this in mind as you look at his images and say to yourself, “I wish I could do that” and think long and hard about whether you have what it takes to do what he does in this video below.

    I hope you find his work inspiring and it gives you some ideas. Maybe you won’t be jetting off to the rain forest of Indonesia any time soon, but perhaps you can think about how to use his tips, his energy, and philosophy of relating to the people he photographs, in your photography.

    For more on portrait photography lighting check out:

    • 15 Tips for More Powerful Portraits
    • Portrait Tutorial Feast – Best of dPS 2013
    • Portrait Gear Essentials – by dPS eBook author Gina Milicia
    • Portraits: Striking The Pose – our newest dPS ebook, this one is flying off the shelves, grab a copy here

    The post Chat with Commercial Photographer Joey Lawrence by Darlene Hildebrandt appeared first on Digital Photography School.


    Digital Photography School

  • Live Pics io – a Way to Live Share your Photos

    LivePicsio ScreenIt happens all the time. You came from a shoot, moved everything from memory cards and… your phone rings. It’s your friend and he wants to see what you’ve got. Right now.
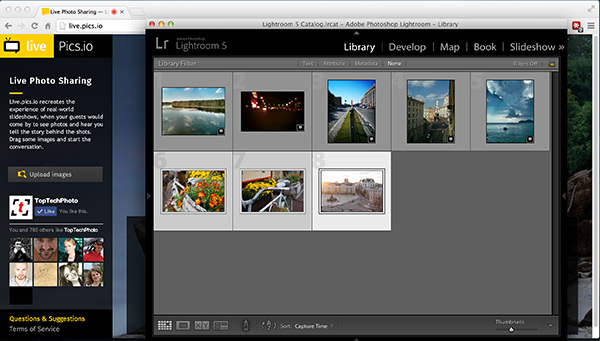

    That’s not always so easy, especially if you are shooting RAW. You need to export images to JPEG, upload somewhere, send your friend a link and occasionally explain what to do with this link in a series of emails. Things get even harder if it’s a client and you want to get directions before starting the post-processing step.

    I have a good news. Just recently appeared a new web-service that leverages HTML5 and WebRTC technologies to deal with situation in a new way.

    Live Pics io is a service for live photo sharing.

    The sweetest part – it integrates seamlessly into your existing workflow. Here’s what you need to do to show someone a photo-shoot from within Lightroom:

    Step 1. Run Lightroom and select a number of images from your recent shoot.

    Step 2. Open Chrome or Firefox and type https://live.pics.io into the address bar. Allow the app to use your microphone and check that it’s connected to a computer (in case you use an external one).

    Step 3. Drag and drop the images from Lightroom to the browser window.

    LivePicsio Lightroom

    Live.pics.io supports CR2 and NEF formats, so if you’re Canon and Nikon owner it should work perfectly (Editor’s note, I tested it with a DNG and that worked also)

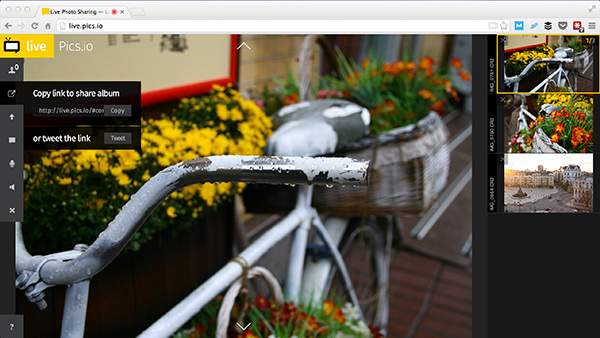
    Step 4. Copy share album link to your clipboard.

    Copy link

    Step 5. Send it to your friend/client via IM, Skype or something else. Note, that they have to enable their microphone too and use the same browser (and not the mobile version).

    Facebook message

    Step 6. Navigate to the next image using arrow keys or simply clicking on a thumbnail. The image will change on your friend or client’s screen keeping you in the same context.

    Note that images aren’t compressed. They are always displayed as is. But without the possibility to save an image (right-click protection).

    Step 7. You can start another session simply reloading the page.

    Important! Don’t close the window or the session will be closed and they won’t see anything. This is for real-time communication, nothing’s getting saved on servers.

    P.S.: if you want to show images to more than one person, it’s totally ok. Send the same link to others.

    The post Live Pics io – a Way to Live Share your Photos by Konstantin Shtondenko appeared first on Digital Photography School.


    Digital Photography School