Category: Photography

  • Is the Death of HDR Photography Coming?

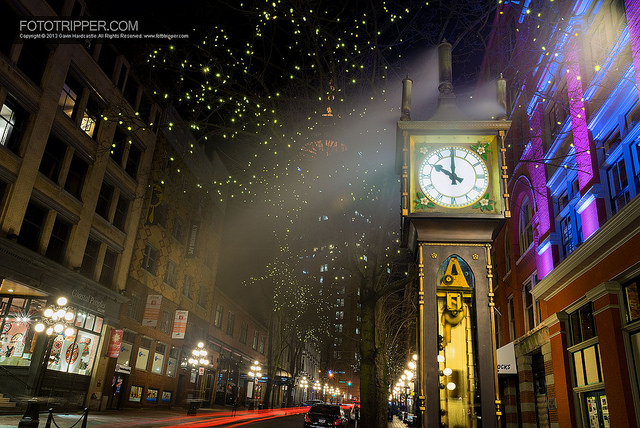
    ‘Condensation’ By Gavin Hardcastle – Location, Gastown, Vancouver, BC

    Adapt or die. It’s the way of the world, and with the ever changing rhythms of the digital age, you’ve got to be light on your feet in order to survive. I’m no oracle, but I direct these words of warning to all software companies that have a vested interest in HDR (High Dynamic Range) processing for photography.

    If you’ve seen any of my work, you’ll know that I rely on HDR photography techniques to handle the huge dynamic range in the scenes that I shoot. The thing is, ever since I started shooting with the Sony A7R, I’ve been using HDR less and less.

    Better Sensors = Better Dynamic Range

    The new wave of digital sensors is upon us and the Bayer sensor in the Sony A7R is by no means the best out there. If you’ve got deep pockets, you’ll get the best dynamic range out of digital camera backs from Phase One, MamiyaLeaf and Hasselblad, but it’s only a matter of time until the prosumer market catches up, like it always does.

    Below, you’ll see some recent examples of high dynamic range images (not tone mapped) that I made from just one exposure with my Sony A7R. With my old Canon 5D MkII, I would have had no choice but to bracket 3 different exposures and then blend them in my HDR app of choice. These days, I only need to do that in extreme cases , such as sun star shots where there can be major lens flare. These images were processed mostly in Adobe Camera Raw with some additional colour correction on Photoshop.
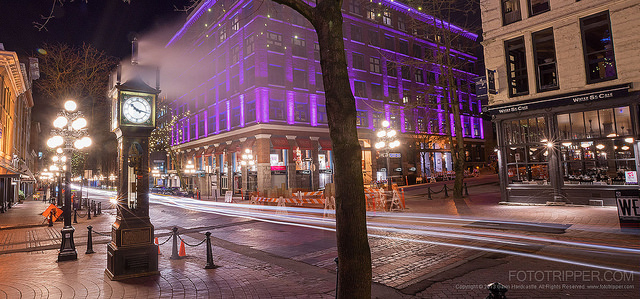
    ‘Cold & Steamy’ By Gavin Hardcastle – Location, Gastown, Vancouver, BC
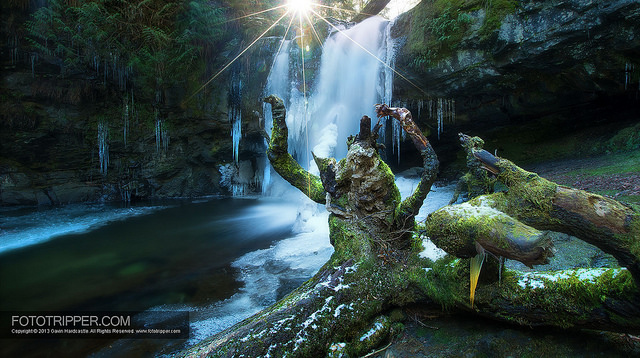
    ‘Stumpcicle’ By Gavin Hardcastle – Ladysmith, BC
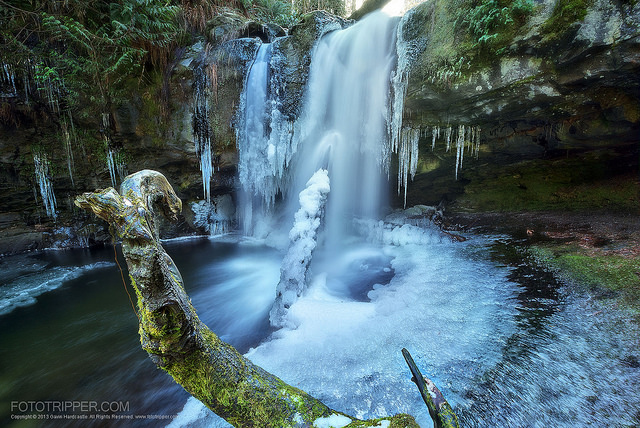
    ‘Stocking Freeze’ By Gavin Hardcastle – Ladysmith, BC
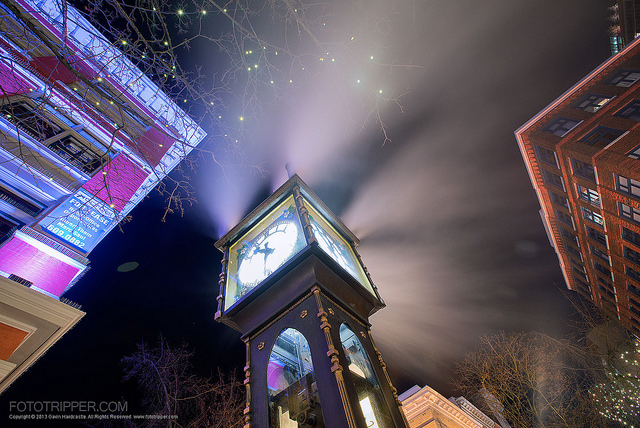
    ‘Steam Powered’ By Gavin Hardcastle – Gastown, Vancouver, BC

    With the images above I basically exposed for the highlights and pulled the shadow detail back up in Adobe Camera Raw to create even dynamic range. Had I tried this with something like the 5D MkII, the noise and lack of image clarity would have made this unusable. Now I’m not comparing older camera sensors to newer ones, that’s pointless, my purpose here is to highlight how awesomely powerful the new wave of image sensors can be when it comes to dynamic range and how that’s going to affect the HDR software companies.

    Imagine the freedom of knowing that you’ve nailed that epic sunset shot with just one exposure. It gives you more time to move around and try different compositions. With no need to bracket you’ll save time during a shoot, allowing you more creativity. You’ll also save on hard disk space and processing time which will speed up your workflow.

    If you’re new to HDR and are not familiar with terms like ‘bracketing’, head over to my HDR Tutorial to learn how it’s done or these dPS articles:

    • Five Minutes to Realistic HDR using Lightroom and a 32-Bit Plugin
    • Tips for Great HDR Sunsets
    • The 10 Steps Every HDR Photographer Goes Through

    What’s next for HDR Software Companies?

    I don’t have a crystal ball, but my advice to companies like SNS-HDR, Oloneo and Photomatix is to gear their software more towards creating RAW file presets that give HDR results from a single exposure. As sensors get better and capture more dynamic range, it’s going to become the norm for us to capture all of the dynamic range we need in just one RAW file. The magic will come from being able to process those RAW files in a beautiful way with just one click of the mouse. After all, those RAW files don’t come out of the memory card looking their best. You need to do a little tweaking to pull out those details and crank up the eye candy. That’s where I see a gap for the software companies.
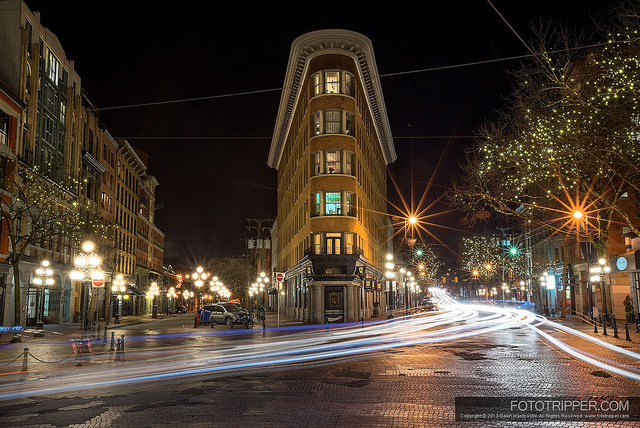
    ‘BBQ Corner’ By Gavin Hardcastle – Fototripper

    I’ve come to love my HDR apps and accepted them as an integral part of my workflow, but what it all boils down to is that HDR processing is simply a means of overcoming the technical limitations of a digital camera sensor. When those limitations are no longer an issue, what’s the need for HDR processing?

    I have great respect for the software companies that make these awesome HDR apps and I’ve happily paid for their software because they deliver great results. I’d hate for them to fall on hard times because they didn’t heed this message, so I invite them to post their comments on where they see HDR in the next few years.

    The new wave of camera sensors are coming, will they be ready? Are you ready? Share your thoughts in the comments below.

    The post Is the Death of HDR Photography Coming? by Gavin Hardcastle appeared first on Digital Photography School.


    Digital Photography School

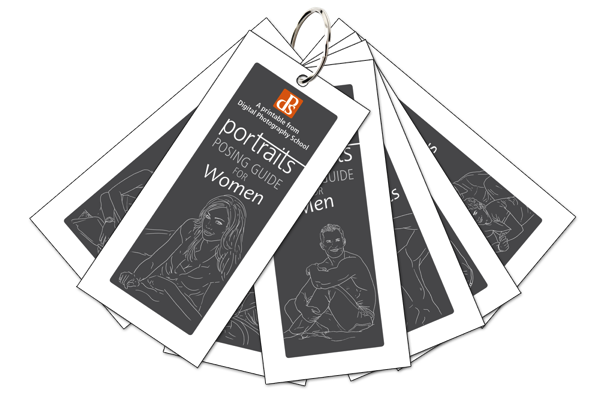
  • Grab our 67 Portrait Posing Printables Set for Just $10

    A little over a month ago here at dPS we launched Striking the Pose – an eBook all about posing portraits – our fastest selling eBook ever.

    As an Early Bird bonus for those who picked up that eBook we gave everyone who bought it in the first month a Posing Printables bonus that contained 67 Poses that you could use in your posing shoots.

    Printables graphic

    This early bird offer is now over but we had so much positive feedback about these printables that we’ve now made them available for you to purchase as a stand alone product for just $ 10.

    It includes 67 poses which are broken down into 7 different sets. There’s a set for each of the following categories:

    • Posing Women
    • Posing Men
    • Posing Kids
    • Posing Groups
    • Posing Couples
    • Posing in Corporate Settings
    • Lifestyle Portrait Posing

    When you order you’ll receive two versions:

    1. A printable version that is designed for you to print, fold up and pop in your camera bag for use at your next shoot

    NewImage

    2. A digital version that is designed for you to keep on your phone or tablet for screen viewing.

    NewImage

    While we designed these printables as a companion for the larger Striking the Pose eBook where we do a heap more teaching on the topic – they’re going to be useful for anyone shooting portraits who wants a little inspiration.

    Grab your Posing Printables Here for just $ 10

    How One Reader Used These Printables to Become a ‘Cool Uncle’

    A few weeks back we got this feedback about the printables from one of our readers – John Warren.

    “I just wanted to swing back here and let you know that last week I was asked to photograph my niece (16) and was very worried I wouldn’t be able to pose her in a way she’d want to be photographed. Reading this book gave me the confidence I needed to work with her and let me approach the shoot knowing what I wanted to do.

    The printables were a life saver. Between each setup I’d show her a pose and she found being able to visualise what I was asking her to do helped a lot.

    The results of her beyond anything I expected and now all her friends want me to photograph them too! I just became the ‘cool uncle’!”

    Get Your Posing Printables Here

    The post Grab our 67 Portrait Posing Printables Set for Just $ 10 by Darren Rowse appeared first on Digital Photography School.


    Digital Photography School

  • Tips for Photographing Popular Tourist Destinations

    As photographers, we often note that one way to make interesting images that are different from the norm is to get our camera to out-of-the-way places that haven’t been flooded with photographers. But what about those times when you’re heading somewhere that has been photographed millions of times already? Is it possible to create interesting photos of tourist destinations? Can you create something intriguing if you’re headed to the Eiffel Tower, Golden Gate Bridge, Great Wall of China or Mount Rushmore?

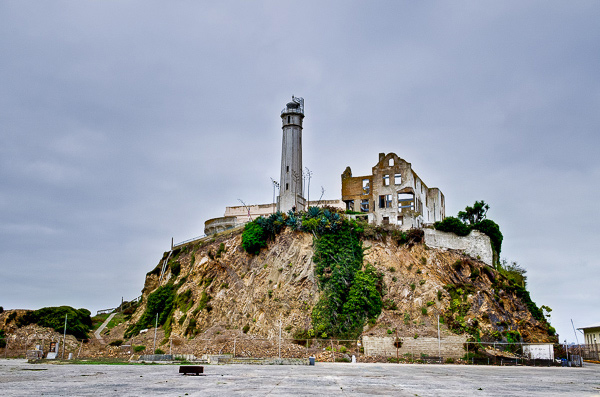
    I say yes. Let’s consider how you can make an interesting photo, or series of photos, at a famous location. Let’s look at an example from Alcatraz Island, the former prison that’s now a tourist destination in the San Francisco Bay.

    Ahockley alcatraz 1

    #1 First, cover the usual

    Although we want to make photographs that go above and beyond the usual tourist snapshots, that doesn’t mean you’ll want to ignore those vantage points entirely. You’re at the location and you’ve probably seen the postcard photo a hundred times, but this might be your first time there with your camera.

    If you’re going to Alcatraz, sure, take a photo of the island from the boat (see image above). It’s not the most interesting composition, but it provides a sense of location. Everyone else has done it, so why shouldn’t you?

    #2 The Usual… with a twist

    Try to mix it up a bit. How about that usual shot but with some sort of twist? Is there an element you could add to the composition for context? How about:

    • A photo of your ticket stub, with the date of the visit, in front of the tourist destination?
    • Intentionally including huge crowds in your photo instead of fighting with them?
    • Photos of other photographers as they make photos?

    What would the usual shot look like if you got there before everyone else? Could a lack of people improve your shot? Do some research and see if there are any early entry or behind-the-scenes options.

    At Alcatraz, you could take a photo from the boat, including the flag at the bow indicating your destination.

    Ahockley alcatraz 2

    #3 Turn around and look behind you

    I’ve made many photographs simply by turning around and looking in the opposite direction to where everyone else is pointing their cameras. Could you get an interesting photo of the Marin Headlands while most folks photograph the Golden Gate Bridge from the north? As someone is photographing a sunset over the Pacific Ocean, what if you turned around to see what the golden light is doing to the scene at your back?

    In this case, most everyone else was looking the opposite direction and photographing the San Francisco cityscape.

    ahockley-alcatraz-3b

    #4 Look for details

    Capture the big-picture (pun intended) images. Get one with the whole Golden Gate Bridge in the frame. Go wide and ensure you have a photo of the full height and breadth of the Arc de Triomphe.

    After you’ve done that, look for details. Instead of all of Lady Liberty (Statue of Liberty), how about a zoomed-in shot of just the tip of her torch? Take a look around at signs. What stories do they tell? Is there something old and worn out that helps tell the story of the location? Is there something fresh and new?

    Ahockley alcatraz 4

    Whether you use a zoom lens or just “zoom with your feet” and walk closer, get up close. Photographing a ship in port? Get a shot of the rope wrapped around the cleat at the dock. Hiking to a waterfall? Fill the frame with the area where the water hits the rocks, and get a photo of the trailhead sign as well.

    Ahockley alcatraz 5

    Each of these detail shots will help you as you get ready to use your images to…

    #5 Present a story

    You came, you saw, you photographed. What next? Go above and beyond the average tourist by creating an interesting presentation for your images.

    After I visited Alcatraz a few times, I made a Blurb book, that’s one idea. Perhaps you would like to print three or four of the best images and display them together on your wall, that’s another. Lightroom’s print module allows you to create a nice album, which can be a fun way to display the images even if the only “printing” that you do is to create a PDF. If you’re going to share the images online, consider how you might present them in an organized gallery rather than just a haphazard fashion.

    One of the reasons that good wedding photographers can charge a premium price for their services is not just that make good images, but also that they present those images in a nice fashion. You can do the same. After you’ve returned from your trip or photo expedition, think about how to wrap everything together into a nice storytelling package. Your friends, family, and others who enjoy your images will thank you.

    Your turn

    Do you have any additional tips for photographing popular tourist locations? Have you visited one recently that you’d like to share? Please do so on the comments section below.

    Try these tips for more travel photography ideas:

    • How to Capture the Essence of a Place – Travel Photography Tips
    • Transcending Travel – a dPS ebook
    • 6 Tips for Photographing People When Travelling
    • 5 Ways to Create Detail Photos

    The post Tips for Photographing Popular Tourist Destinations by Aaron Hockley appeared first on Digital Photography School.


    Digital Photography School

  • Mastering Self-Portraiture: What You Need to Get Started

    With the rapid increase in the immediate smartphone-picture “selfie,” it’s hard not to start taking your own. Self-portraits are, after all, the new trend . They are almost always the default profile picture, and super convenient when you have nothing else to do . For photographers, this poses another question: Should I take a professional self-portrait? Have you ever thought Continue Reading

    The post Mastering Self-Portraiture: What You Need to Get Started appeared first on Photodoto.


    Photodoto

  • How Your Pricing Structure Could be Losing you Money

    Jackie is the creator of the Portrait Photography Pricing Workbook – on sale now, for a limited time at SnapnDeals.

    Are you 100% confident you are making a profit with each and every client?

    As artists, photographers may not be as business-minded as they should be. This can get many of us into trouble, both legally and financially. In order to call your photography business successful, it should first and foremost be profitable. If you are not making money from your photography business, you need to call it what it is: a hobby.

    How do you make sure you are not losing money, but rather making money and running a profitable photography business? Despite what you may think, it has little to do with the number of clients your business is attracting, or how high or low your prices are. It has everything to do with your pricing structure.

    Paper and pen

    Here are some questions you need to ask yourself if you think your photography business is losing your money:

    What expenses does my business have? Whether it is a reoccurring expense or a variable one, a business expense is a vital factor to consider when pricing your business. An expense for your photography business can include any or all of the following:

    • Studio rental
    • Insurance (liability, equipment, health, and/or disability)
    • Accountant fees
    • Retirement accounts
    • Advertising
    • Loan Payments
    • Equipment purchases
    • Office Supplies
    • Workshops
    • Intern or Assistant
    • Props

    These are just some examples of expenses for a photography business. Obviously there are many others that may be specific to yours. Once you total your fixed expenses (expenses that don’t change from month to month or on a yearly basis) and your variable expenses, you can have an idea of how much money you should be making per year in order to at least cover those expenses.

    What is my cost of goods sold?

    Cost of goods sold is separate from expenses, even though it acts like an expense. The definition of “cost of goods sold” is the cost of materials used to create the product. Basically, it is how much a product costs your business before you turn around and sell it to your client.

    In the photography industry, the cost of goods sold can include any of the following:

    • Printing costs
    • Cost to ship the product to you
    • DVDs
    • USB drives
    • Print packaging

    Before you set the price of any of your products, you must determine the cost of goods sold of each product. Otherwise, you risk losing money on each sale. Once you figure the cost of goods sold, you can set a break-even price for each product and mark the product up from there.

    Calculator

    How big are my package discounts?

    Along the same lines, you need to make certain your packages are not priced too low. While there should be a discount to the client, you obviously do not want to discount the package to the point where your business is losing money with each sale.

    Do I accept credit cards and what is the processing fee?

    Even though the credit card processing fee is probably small, it can add up over time or with larger transactions. Think about what percentage of your clients pay with a credit card and integrate that into your pricing structure.

    What taxes do I have to pay and what are the rates?

    There are several different kinds of taxes you will have to pay as a business owner.  The 4 most common ones for your photography business would be:

    • Federal Income Tax
    • State Income Tax
    • Sales Tax
    • Use Tax

    Check out the IRS Small Business and Self-Employed Tax Center to find more tax information (if you are US based). Since each state’s (or your country’s) income, sales, and use tax laws vary, you will have to check with your state’s Secretary of State’s office to get all of the applicable tax information for your photography business.

    Finally, I’ll explain a little more about use tax, because it is very commonly overlooked. Use Tax is a tax you are responsible for paying to the state for items your business purchased, but did not pay sales tax on at the time of purchase. Some examples would be a portfolio album for your studio or a lens purchased online. It is typically paid at the same time as your sales tax.

    How much time do you want to spend on your business?

    This question is crucial. With the rise of digital cameras taking over film, the perception is that running a photography business does not cost much money. While you might be saving money on film and developing, it still is costing you the same amount of time, if not more of your time! However, since the perception is there is no monetary cost with each shoot, it seems easy to charge less for your services and product.

    Don’t make this mistake, or you and your business will be headed down a dangerous path. If you are working too much, for too little money, you risk burning out. So, how do you calculate your time into your prices? Everyone’s personal situation is different, so it is difficult to put an exact number on your “time”. What it comes down to is:

    • How many sessions and/or weddings do you want to shoot each year?
    • How much money does your business need to bring in each year?

    If you want a low workload, your prices should be higher, if you need to bring in more money. If you can handle a high workload, your prices could be set lower. But, don’t forget to include the factors above, so you aren’t under-pricing yourself and losing money.

    Running a photography business encompasses so much more than just the photo shoot! You need to consider all of your time spent on your business, not just the time spent shooting. For instance, managing emails, editing photos, packaging and sending orders, meeting with clients, and holding in-person ordering sessions are all examples of tasks to run your photography business. Make sure you are compensating yourself appropriately for all that time!

    Pricing workbook

    These hold true for ALL businesses! I assure you that if you ask yourself these questions and calculate it all out, your photography business will be profitable and not lose you money.

    Here are some summary points for you to remember:

    • Total up all your expenses
    • Figure in all taxes and credit card fees
    • Consider the total cost of goods sold
    • Factor in your time, workload, and financial situation!

    What if you don’t want to do these calculations manually?

    You might want to check out my Portrait Photography Pricing Workbook! You just plug in the numbers and watch the magic happen before your eyes. It will automatically calculate suggested retail prices and what you should be charging based on the points above. On sale now for a limited time only on SnapnDeals.com.

    The post How Your Pricing Structure Could be Losing you Money by Jackie Boldt appeared first on Digital Photography School.

    Digital Photography School

  • 5 Tips for Better Environmental Portraits

    Environmental portraits typically show the subject in their natural environment. They are different from traditional portraits in that they tend to show more of the character of the subject, rather than just the subject in front of a neutral background. Most people, unless they are professional models or natural hams, tend to stiffen up in front of the camera. Because your subject is in his or her natural environment, they tend to be more relaxed, resulting in better facial expressions and body language.

    Environmental portraits are my favorite way to photograph people. I love it when I get a shot that makes the subject’s friends and family say ‘Oh yeah, he’s got you down!” In this article I’ll discuss five things I always keep in mind when taking environmental portraits.

    For this portrait, my client was very specific that she wanted to be captured in her apartment, just being who she is. It became quickly apparent that her dog was a very important part of that, so it was decided early that we would include him. EOS 5D Mark III with EF 24-70 f/2.8L IS II. 1/125 @ f/4, ISO 640.

    For this portrait, my client was very specific that she wanted to be captured in her apartment, just being who she is. It became quickly apparent that her dog was a very important part of that, so it was decided early that we would include him. EOS 5D Mark III with EF 24-70 f/2.8L IS II. 1/125th at f/4, ISO 640

    1. Do your homework

    To properly photograph someone in their environment, you need to know your subject. You don’t have to be close friends, but generally speaking, when someone asks for an environmental portrait, you want to make sure you capture who they are. Ask what they have in mind. Ask what their hobbies are. If they want a portrait in their home, what’s their favorite spot in the house? What do they do in that spot? If it’s outside the home, where do they want to be photographed? Why? You need to become a bit of a reporter and sniff out the story. Then you need to illustrate it.

    2. Get them talking

    Now that you know a little about your subject, what they like to do, and where they like to do it, it’s time to point a camera at them.  This can be the “make-or-break” point of the shoot. If your subject is uncomfortable in front of the camera, this will come across in the images, unless you find a way to get them to relax. One of the easiest ways to get them to relax is to start a conversation. Make them forget that you are taking their photo by asking them about themselves. Have them talk about the spot they’ve chosen for the portrait, their hobbies, their families, their job – anything to get their mind off of the camera in front of them.

    In the portrait below, my subject lives in the shadow of this bridge, and is most definitely a New Yorker. This was an impromptu session after a private tutoring session and she was reluctant to let me point the camera at her. She wanted to learn photography herself, so I wrapped a lesson into the banter and pretty soon she was just talking photography and forgetting I was snapping images.

    My subject lives in the shadow of this bridge, and is most definitely a New Yorker.  This was an impromptu session after a private tutoring session and she was reluctant to let me point the camera at her. She wanted to learn photography herself, so I wrapped a lesson into the banter and pretty soon she was just talking photography and forgetting I was snapping images.  EOS 5D Mark II with EF 70-200 f/2.8L IS II. 1/200 @ f/4; ISO 100.

    EOS 5D Mark II with EF 70-200 f/2.8L IS II – 1/200th at f/4,  ISO 100

    3. Use Live View (if your camera has it)

    This plays right along with item number two above.  Most people tense up when you raise the camera to your eye, waiting for the image to be taken. Some may even inadvertently shut their eyes, expecting a flash. If you can use Live View on your camera, you can get it away from your face. Your subject will be looking at you, and not at the camera, and will not necessarily anticipate you pressing the shutter button. This works especially well with cameras that feature articulating screens. It can be helpful to mount the camera on tripod as well, using a remote release to trigger the camera.

    This is an image of my friend Chris (below), taken while he was supposed to be shooting me and my kids. We were discussing what shots we wanted next when I clicked this, using Live View to frame the shot and focus.

    This is an image of my friend Chris, taken while he was supposed to be shooting me and my kids.  We were discussing what shots we wanted next when I clicked this, using Live View to frame the shot and focus. EOS-1D X with EF 24-70 f/2.8L II. 1/2500 @ f/2.8; ISO 100.

    EOS-1D X with EF 24-70 f/2.8L II – 1/2500th at f/2.8, ISO 100

    4. Modify the light

    I try to go as minimal as possible with gear for environmental portraits, using the natural light at the location. However, there are always times where the light is less than optimal and you need to modify it in some way. This can be as simple as adding a reflector in a strategic location, or setting up a flash in a soft box or umbrella. It will all depend on what the available light is like and the look you are going for. One thing I always try to do is keep the light looking as natural as possible.

    This was a business portrait, but my client wanted more than a simple headshot. It was taken late in the day, meaning I had to create my own light. She wanted her team in the background working, to show when you worked with her, she had a whole team backing her up. I used a Canon 430 EX II to light the background, aiming it off a white wall and the ceiling, out of the frame. I then used a Canon 580 EX II off camera in a Westcott Apollo 28″ soft box to light my client. I adjusted the intensity of the lighting so that the background light was at a 2:1 ratio with my main light.

    This was a business portrait, but my client wanted more than a simple headshot.  It was taken late in the day meaning I had to create my own light. She wanted her team in the background working, to show when you worked with her, she had a whole team backing her up. I used a Canon 430 EX II to light the background, aiming it off a white wall and the ceiling, out of the frame. I then used a Canon 580 EX II off camera in a Westcott Apollo 28" soft box to light my client.  I ratio'd the lighting so that the background light was at a 2:1 ratio with my main light. EOS 5D Mark II with EF 24-105 f/4L IS. 1/100 @ f/4, ISO 400.

    EOS 5D Mark II with EF 24-105 f/4L IS –  1/100th at f/4, ISO 400

    5. Don’t be afraid to shoot tight

    While it’s true than an environmental portrait normally means showing some of the area around your subject – the environment – you can get close and still show your subject’s character.  Take an element of your subject’s hobby, and show them participating in the hobby. If they’re a model builder, you could do a tight shot of them applying glue or assembling the pieces.  This is your chance to be creative, trying different angles, focusing on different aspects of  their personality and character.  Emphasize features that stand out, in a flattering way, if that’s the goal. Find out what makes the person in front of your camera special, and capture it!

    Here's my subject from the shot in front of the bridge. She's a photographer as well now, but back then she was just a hobbyist who wanted to know more about her camera. I used the beautiful sunset light I was getting, and set up a reflector to camera right to bounce the light back into her face.  I wanted her peeking out from behind her camera, illustrating that she's into photography. EOS 5D Mark II with EF 24-105 f/4L IS. 1/250 @ f/4, ISO 100.

    EOS 5D Mark II with EF 24-105 f/4L IS – 1/250th at f/4, ISO 100

    This is the same girl as the shot in front of the bridge. She’s a photographer as well now, but back then she was just a hobbyist who wanted to know more about her camera. I used the beautiful sunset light I was getting, and set up a reflector to camera right to bounce the light back into her face. I wanted her peeking out from behind her camera, illustrating that she’s into photography.

    Do you have any additional tips you’d add to this list? Please share in the comments below.

    For more portrait photography tips check out these articles:

    • How to Create Great Environmental Portraits
    • 10 Techniques for Amazing Portraits
    • How to Choose the Perfect Portrait Lens
    • Portraits: Striking The Pose – a dPS ebook
    • Portraits Lighting The Shot – another dPS ebook

    The post 5 Tips for Better Environmental Portraits by Rick Berk appeared first on Digital Photography School.


    Digital Photography School

  • 10 Crazy-Cool iPad Accessories for Photographers

    Many smartphone gadgets in the market these days take full advantage of all the mobile devices we carry. There are high-tech gadgets for hikers, pet lovers, health junkies, graphic designers and the kitchen. There are even wearable accessories. Today, I’d like to share with you a list of 10 cool, iOS-enabled iPad gadgets for photographers. iPad is a comfortable tool Continue Reading

    The post 10 Crazy-Cool iPad Accessories for Photographers appeared first on Photodoto.


    Photodoto

  • Using a Photography Project to Spark your Creativity

    Get out there and create!

    Hazmat Alan

    Do a photography project for yourself

    As photographers, it’s natural we all reach that point where we become a bit bored with our work, especially if you work on the same type of photography everyday. After thousands of landscapes and flower photos, you can start feeling that desire to do something different. Starting a personal photography project can help ignite that creative fire again.

    Don’t sit around and wish you had creative projects to work on. Get out there and create exactly what you want! Working on personal projects allows you to think outside the box. It allows you to play by your own rules, where there are no rules! It’s just you and your own vision. There is great power in that.

    Josh Burst

    A project can help overcome a creative slump

    Behindthescenes

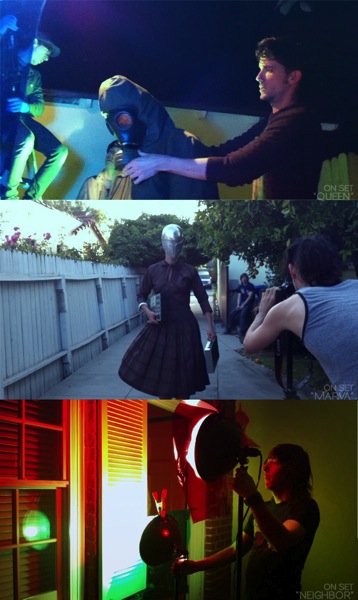
    A couple of years ago I was in a creative slump. I had been wanting to do a cohesive photo series but I didn’t know what the subject was going to be. I’ve heard the phrase time and time again, “Go with what you know.” So I got thinking about what inspires me. I knew it had to be a narrative driven project. I knew it was going to be something stylish and probably a bit dark. Then one day, as I was about to wake up, it came to me like a dream. It really did! A sci-fi horror series it was.

    Even though I grew up in the 80′s, I found myself watching campy sci-fi shows from the 60′s and 70′s. I loved Lost in Space, Land of the Giants, The Twilight Zone and Star Trek. I was drawn to the unusual locations, the great costumes and bright colors of these shows. I also grew up watching a lot of horror films from the 70′s and 80′s. The abstract lighting and gorgeous sets of Dario Argento and the zombie takeovers from George Romero struck a chord with me. In my photo series, “Invasion” I would combine these two loved genres together.

    Think outside the box and be resourceful

    Before After

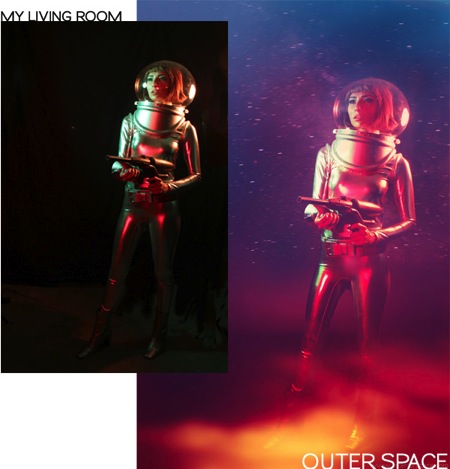
    I wanted clones, mad scientists, abductions, robots, aliens, and bombshells in space suits. I hunted up costumes, searched for locations, gathered friends and then I started creating. I shot at friends’ houses that fit the 50′s and 60′s time period. I also found models and friends who were more than happy to be in a cool sci-fi photo. Since shooting in outer space was out of the question, I shot in my living room. Basically, I worked with what I had.

    Dare to dream big

    Deven faceToday it’s easier than ever to dream up anything you want for free or almost free. You can find great costumes and props in flea markets, at your local resale shop or even in a dumpster! Put ads out on craigslist for models or makeup artists. Use your friend’s house as a set. Take your camera out of auto mode and play around with settings. Maybe use a flashlight or the television as a light source instead. The possibilities are as unlimited as your imagination. Once you have a goal in mind, with a little bit of sweat and photoshop you’ll be amazed at what you can dream up!

    This Sci-fi inspired photo series has been the most rewarding project I’ve ever worked on. It’s been an incredible learning experience. I also believe “Invasion” is my strongest and most original photography that I have ever done. I contribute that to the fact that I went with what I knew, and channeled what I was interested in and passionate about. I challenge you to do the same and most important have fun doing it!

    Marva2

    Here are some other ideas on starting a photography project:

    • Photography projects that make you feel alive
    • Jumpstart Your Photography: Start a 365 Project
    • Lost your Photo Mojo? Ten Tips to Bring Back the Magic

    Have some other tips or ideas, please share in the comments! If you’ve done a project, or started one recently – tell us about it!


    The post Using a Photography Project to Spark your Creativity by Patrick McPheron appeared first on Digital Photography School.


    Digital Photography School

  • 5 Steps to Help you Take Better Landscape Photos

    When photographing landscapes, it can sometimes be difficult to produce a an image that is focused in its content, that leads the viewer’s eye exactly where you as the artist want it to go.   Sometimes, even though you may be presented with a beautiful vista, an image may not present itself and you have to work to find it.  Here are five basic steps to help you take better landscape photos. I follow these any time I’m looking to create a landscape image.

    #1 Find your subject

    Sometimes it’s easy. You choose a building, or a rock formation, or a tree, and it all just comes together.  Other times, it becomes more difficult.   Sometimes nothing in particular stands out.  Look around the scene, find something that draws your eye. Look through your viewfinder, and see how things frame up through your camera’s eye.  Once you have found your subject, you have more decisions to make.

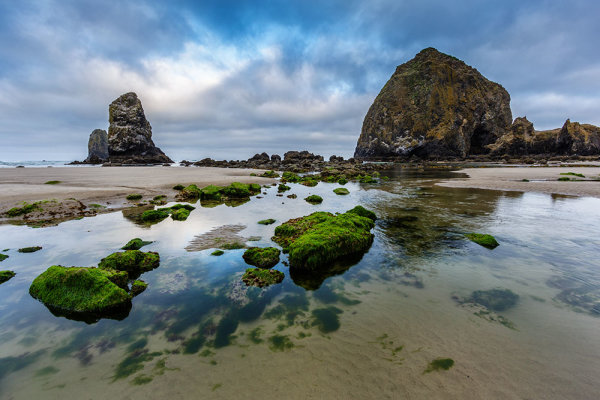
    Haystack Rock is a fairly obvious subject. But there are myriad options when it comes to photographing it.  For this image, I decided to use a tidal pool and some rocks in the foreground, but also wanted to include plenty of sky since there was so much interest in the clouds.

    Haystack Rock is a fairly obvious subject. But there are a myriad options when it comes to photographing it. For this image, I decided to use a tidal pool and some rocks in the foreground, but also wanted to include plenty of sky since there was so much interest in the clouds.  The rocks and water create some nice lines leading right to Haystack Rock.  EOS 5D Mark III with EF 14mm f/2.8L II, at f/16, ISO 100.

    #2 Where is your subject in the composition?

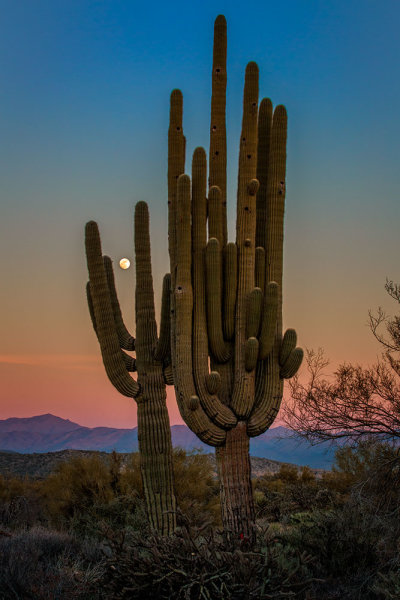
    There was no real foreground to speak of here. Just a lot of sand and some uninteresting brush.  What I did see was the way the moon was rising between the arms of the saguaro, and the soft gradation from orange to blue as the sun set behind me.  Taken with EOS 5D Mark III, EF 70-200 f/2.8L IS II, 1/20 @ f/22, ISO 1000.

    There was no real foreground to speak of here. Just a lot of sand and some uninteresting brush. What I did see was the way the moon was rising between the arms of the saguaro (cacti), and the soft gradation from orange to blue as the sun set behind me. Taken with EOS 5D Mark III, EF 70-200 f/2.8L IS II, 1/20 @ f/22, ISO 1000.

    This will partly be dictated by its location in relation to you, but also by what else is in your scene. Look for interest in relation to what you’ve chosen as the subject. Is there an interesting object or pattern in the foreground, which could lead the viewer’s eye to the subject? Is there something in the foreground that frames your subject or otherwise adds interest without being distracting?  I will often use water or rocks in the foreground if I can.  If it’s water, can you get a reflection of your subject in it?  Sometimes it’s leaves, sometimes trees or a fence.

    If there is nothing in the foreground, try minimizing it by putting the subject as the foreground, and looking for background interest.  Interesting clouds or sky, buildings, or trees, can all create a backdrop for the landscape. Sometimes, you’re lucky enough to get both an interesting background AND foreground. These are the times to play with your composition and vary the amounts of foreground and background to see what works best, or what doesn’t work at all.   Generally speaking, if the sky is flat and lacks interest, I will place it in the top third of the frame, using the rule of thirds.  If the foreground lacks interest, I place that in the bottom third.

    #3 Tie it together

    Once you decide where your subject goes in the frame, what’s in the foreground and what your background will be, it’s time to find a way to tie it all together. Are there leading lines that will lead your viewer from foreground to background?  Leading lines are an easy way to tie your composition together.  Framing is another way, which I included in my discussion of choosing your foreground.  Without tying your composition together, it can often seem like you have two separate images in one.  Creating a composition that pulls the viewer through it and leads them where you want them to look is the best way to create an effective landscape image.

    For this image of Kaaterskill Creek, I knew the small cascade was my main subject.  There were some rocks to create interest in the foreground, and the water creates a nice leading line back to the cascade in the middle ground, and then to the foliage in the background.  EOS 5D Mark III with EF 16-35mm f/2.8L II. I was zoomed into 35mm on this one. Exposure was 1.6" at f/20, ISO 100.

    EOS 5D Mark III with EF 16-35mm f/2.8L II. I was zoomed into 35mm on this one. Exposure was 1.6″ at f/20, ISO 100.

    For this image of Kaaterskill Creek (above), I knew the small cascade was my main subject. There were some rocks to create interest in the foreground, and the water creates a nice leading line back to the cascade in the middle ground, and then to the foliage in the background.

    #4 Read the light

    Are you at your location at an optimal time? Some locations are better in the early morning, some in late afternoon.  Some are good no matter what time you are there. The difference in the light at these times can mean the difference between a dramatic landscape image, or a snapshot of a pretty place. To find out where the sun will be in a given location at a given time, use an app such as The Photographer’s Ephemerus, or Sunseeker Pro, which will show you the sun’s exact location.  This will enable you to plan when to be a location for optimal light.

    Side lighting will create dramatic shadows and show off textures. Backlighting will help create silhouettes, which can be very effective for dramatic images with prominent features breaking the horizon. Front lighting will reveal detail everywhere. Often, I will photograph the same location at different times, as different light will create a variety of images from the same location.

    Montauk Point is a great location with lots of photo opportunities, but it's a much better location at sunrise than later in the afternoon or at sunset, due to the shadows created by high cliffs. At sunrise, it can be magical. EOS 5D Mark II, EF 17-40 f/4L. Exposure was 15 seconds, f/11, ISO 800.

    EOS 5D Mark II, EF 17-40 f/4L. Exposure was 15 seconds, f/11, ISO 800.

    Montauk Point (above) is a great location with lots of photo opportunities, but it’s a much better location at sunrise, than later in the afternoon or at sunset, due to the shadows created by high cliffs. At sunrise, it can be magical.

    #5 Choose your shutter speed

    Finally, think about what your shutter speed will do to the image.  If you’re shooting water, shutter speed has a lot to do with the water’s appearance in your image. If there are trees, and it’s a breezy day, a faster shutter speed will be necessary to freeze the leaves and avoid motion blur. These are things to be aware of when composing your image.  Learning to visualize these effects in your mind before pressing the shutter button will go a long way toward making you a better photographer.

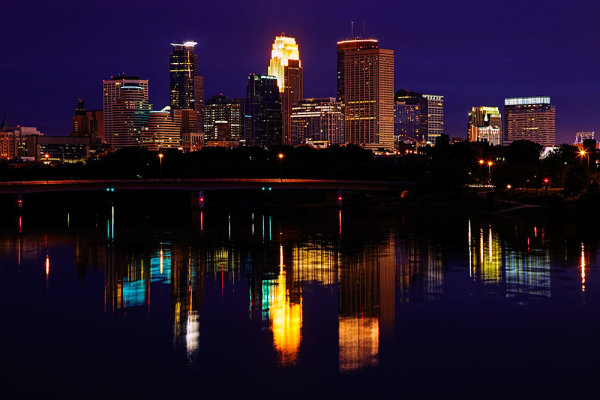
    The Minneapolis skyline was an obvious choice for subject here. But the sky was flat for a background, so I pushed the skyline to the top of the frame.  Thankfully, I caught the Mississippi River on an uncharacteristically calm day and was able to get a nice reflection for foreground interest.  EOS 5D Mark II with EF 24-105 f/4L IS. Exposure was 10 seconds at f/11, ISO 400.

    EOS 5D Mark II with EF 24-105 f/4L IS. Exposure was 10 seconds at f/11, ISO 400.

    The Minneapolis skyline was an obvious choice for subject here. But the sky was flat for a background, so I pushed the skyline to the top of the frame. Thankfully, I caught the Mississippi River on an uncharacteristically calm day and was able to get a nice reflection for foreground interest. I used a slow shutter speed  (or long exposure) to smooth the waters even more.

    Do you have some great landscape tips you’d add to this list? Please share in the comments below.

    The post 5 Steps to Help you Take Better Landscape Photos by Rick Berk appeared first on Digital Photography School.


    Digital Photography School

  • 8 of the Best Smartphone Camera Accessories

    It’s amazing how quickly things change. There was a time in the not-too-distant past when nobody really took camera phones all that seriously. I can even remember a heated debate about eight years ago in which a friend of mine– a seventh-generation photographer whose great grandfather photographed the emergence of New York City at the turn of the 19th century– said to me, “Listen– My camera doesn’t make phone calls, and my phone doesn’t need to take pictures.”

    Now armed with the latest iPhone, an arsenal of photo apps, and an Instagram account, his tune has obviously changed. I think a lot of people have seen their attitudes towards “iPhoneography” change in recent years, so it’s only fitting that the accessory market for these amazing devices has evolved and grown right alongside those changing attitudes. As a result, we now have the ability to take what is already a pretty good camera and raise the creative bar.

    Here’s a sampling of the best smartphone camera accessories currently available.

    Pocket Spotlight

    best-smart-phone-accessories-dps-001

    If you think that the pop-up flash on a DSLR is the most unflattering light source known to man, you’re close, but the flash on your smartphone is even worse. The Pocket Spotlight is designed to fix that, providing continuous lighting that you can either hand-hold or plug into your phone’s headphone jack. A full charge via USB will last about an hour. The light works well for both stills and video.

    Triggertrap

    You use your phone for everything else these days, so why not use it to trigger your DSLR? One end of the cord plugs into your camera, and the other plugs into your phone. Download the free app and you’re good to go. Modes include: standard trigger, motion trigger, sound trigger, time-lapse, distance-lapse, face-detection trigger, customizable HDR, star trails, and more. Features vary somewhat between Android and iOS versions, so make sure to double-check if you’re looking for something specific. Individual components are available on Amazon, but check the website to make sure you get what’s right for your camera.

    best-smart-phone-accessories-dps-002

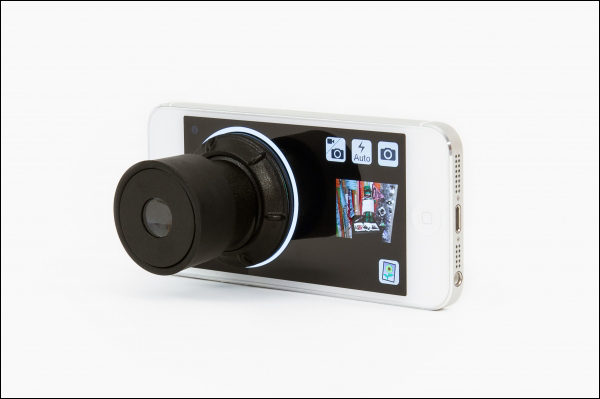
    iPhone Viewfinder

    My biggest complaint about smartphone cameras is the inevitable glare on sunny days that keeps me from getting an accurate look at what’s in the frame. This handy viewfinder cuts the glare, as well as the trial and error.

    best-smart-phone-accessories-dps-003

    Olloclip 4-in-1 Lens

    The Olloclip 3-in-1 is now a 4-in-1.  In addition to the fisheye, wide-angle, and 10x macro lenses, the newer version now includes a 15x macro as well. The 10x and 15x  lenses have focal distances of approximately 18mm and 12mm respectively. The fisheye captures approximately a 180-degree field of view, and the wide-angle lens approximately doubles the field of view.

    best-smart-phone-accessories-dps-004

    Manfrotto Klyp

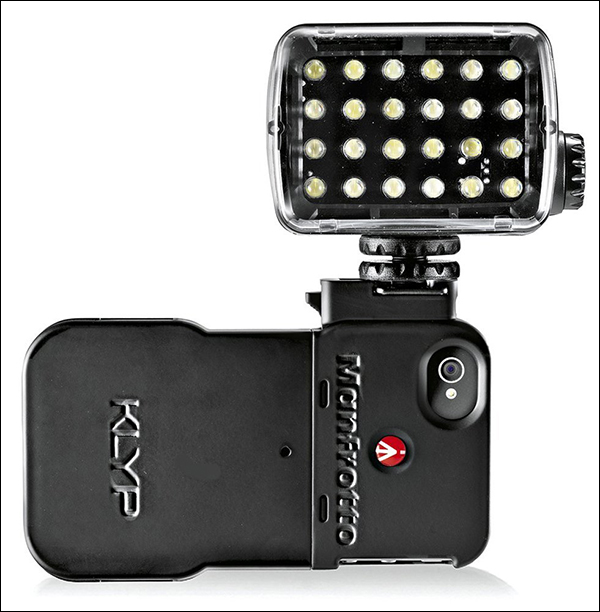
    If there was a Swiss Army knife full of smart phone gadgets, this would definitely be part of it. The Klyp by Manfrotto (for iPhone 4/4s) is a continuous, soft, daylight-balanced LED panel which combines with a case that has a 1/4-inch thread adapter that will mount on most tripods. Rated at 20 lumens when placed three feet from a subject, the package also includes a free iOS app that lets you take photos by clapping your hands.

    best-smart-phone-accessories-dps-005

    Optrix XD5 Case

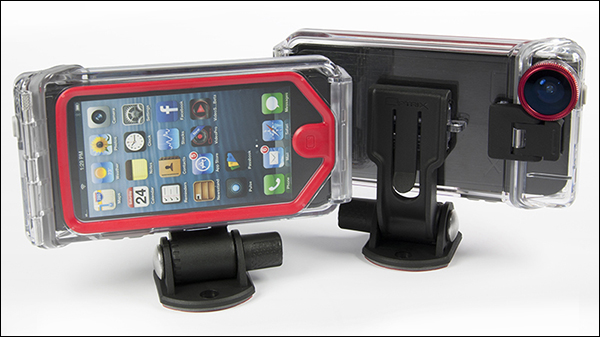
    This tough iPhone 5/5s case from Optrix can handle a 30-foot drop or watery depths of up to 15 feet. With buttons and touch screens still fully functional under water, the three-element, all glass, super wide-angle lens adds a new level of creativity and availability for your iPhone camera.

    best-smart-phone-accessories-dps-006

    iPro Lens Series 2 Trio

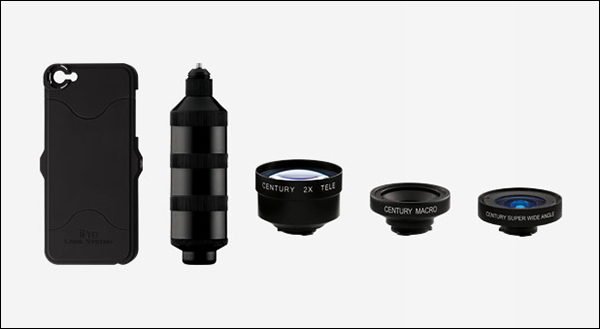
    The latest iPhone lens kit from iPro has three lenses that twist on and off a hard, protective phone case. The macro, super wide-angle, and 2x telephoto all have a multi-layer coating that reduces lens flare.

    best-smart-phone-accessories-dps-007

    Sony QX10 and QX100 “Lens Cameras”

    Camera and lens in one? Pretty much. Your iPhone or Android device acts as a live viewfinder. Either attached to the phone or “off camera,” a wi-fi signal is established between the QX and the phone. Sony’s proprietary app gives the user control over white balance, exposure settings, zoom, and more. In addition to a manual zoom control, the QX100 has a 1-inch, 20.2 megapixel sensor, Zeiss lens, and a 1.8 aperture for low light and shallow depth of field. The compact QX10 offers a 10x optical zoom.

    best-smart-phone-accessories-dps-008

    Do you have a favorite smart phone accessory that you can’t live without? Share it with us in the comments.

    The post 8 of the Best Smartphone Camera Accessories by Jeff Guyer appeared first on Digital Photography School.


    Digital Photography School