Category: Photography

  • The Triangle of Color Adjustments in Lightroom

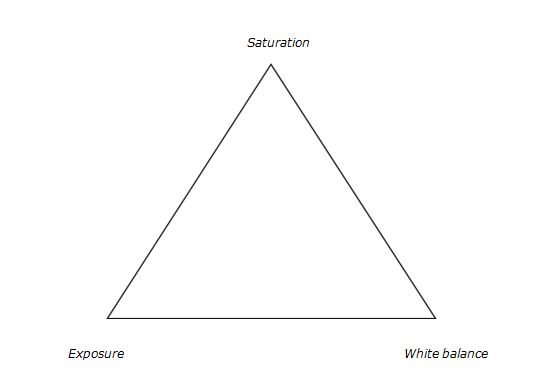
    In digital photography, just like exposure, colors too have a triangle of their own.

    3 Color correction triangle

    Color adjustment triangle

    The triangle of color adjustments in Lightroom. The three attributes that form the triangle are shown above, now let’s see how they affect the colors of an image.

    Exposure

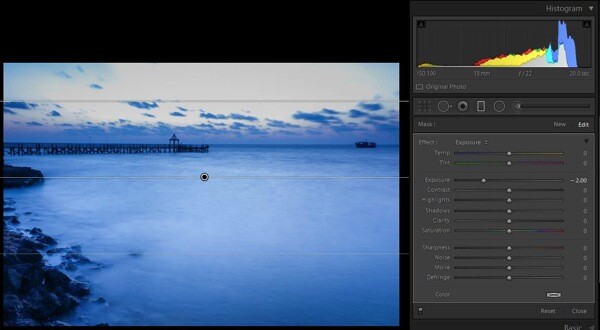
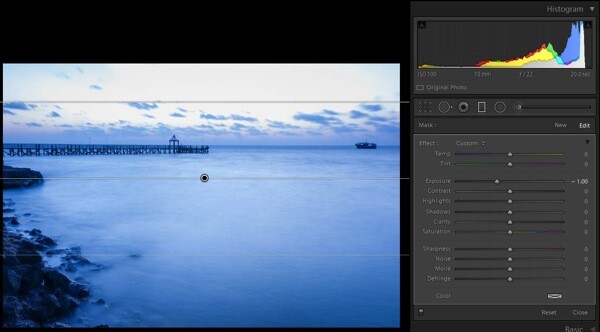
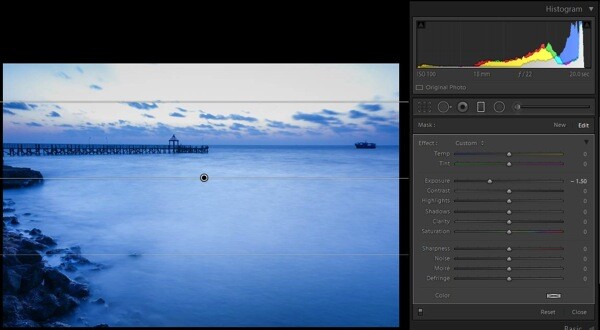
    This attribute controls the brightness level of all the pixels that constitute an image. Whenever the brightness level of the pixel is altered, the color value too gets changed. You can easily identify this effect in a photograph of a landscape. Apply a Graduated Filter on the sky area with a value of -2.00 on the exposure slider and then take a look at the sky area. You will immediately notice that the blue color has become richer. You would do well to remember that you didn’t change any other value in that sky area except the exposure.

    Let’s look at some examples of exposure adjustments and how it affects the color:

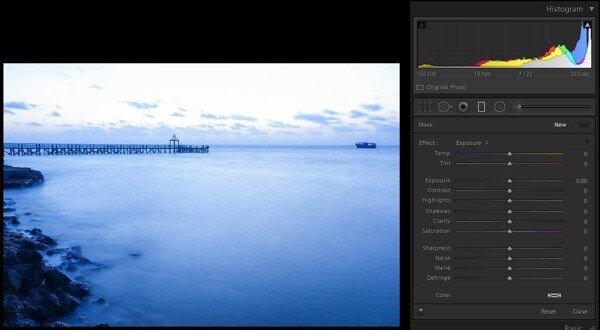
    1 with nothing applied

    No adjustments applied on graduated filter

    2 EV minus 1

    -1.0 stop exposure adjustment applied

    2 EV minus 1 5 applied

    -1.5 stop exposure adjustment applied

    2c EV minus 2 applied

    -2.0 stop exposure adjustment applied

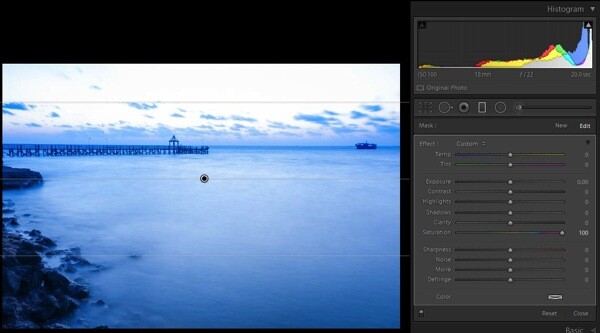
    Saturation

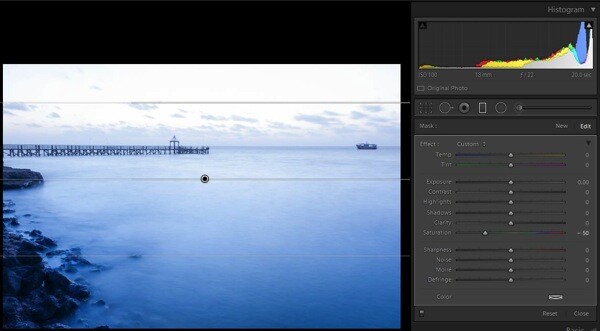
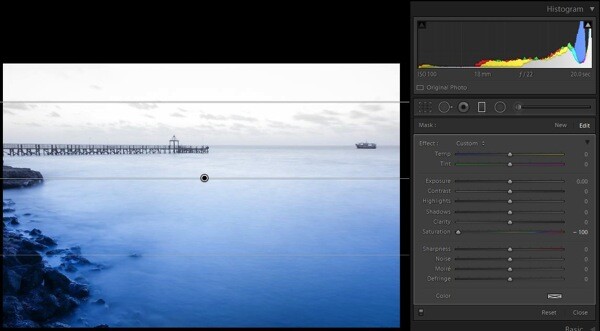
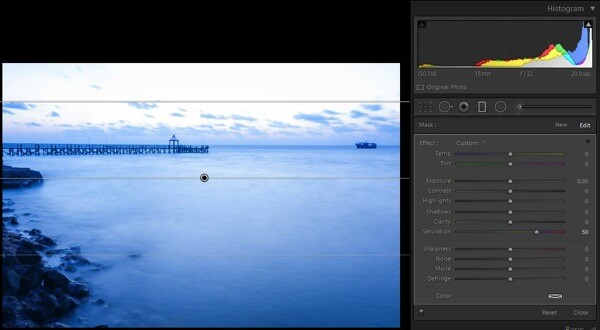
    This attribute controls the intensity of all colors in all of the pixels that constitute an image. Since the effect of this tool is global, it needs to be used with caution; otherwise it is guaranteed that the picture will end up looking artificial. To check the effect of this tool, keep the same graduated filter applied and active, reset the exposure values by double clicking the exposure slider (or the word Effect), then move the saturation slider towards the right; you will notice the changes that are wrought in the sky area.

    4a Sat minus 50

    Saturation set to -50

    4b Sat minus 100

    Saturation set to -100

    4c Sat plus 50

    Saturation set to +50

    4d Sat plus 100

    Saturation set to +100

    There is another tool called Vibrance, just above the saturation slider. I have considered this as part of saturation tool. It plays only with the less intense colors, one of the smartest tools in Lightroom (Note: this tool can be found only in the Basic Deveolop panel not in the Graduated Filter or any other local correction tools).

    White balance

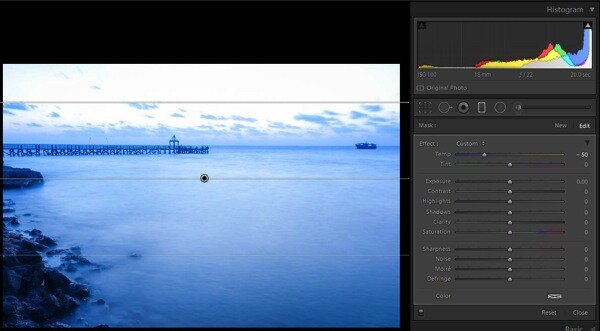
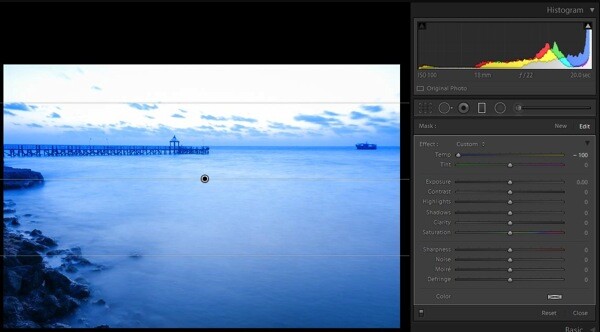
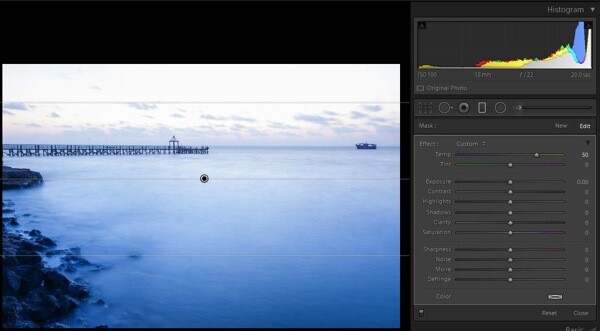
    This is one of the most discussed topics in the internet. What white balance exactly does is to change all of the color values of all the pixels in the photograph; yes I mean all three RGB values of a pixel. When you move the White Balance slider towards the right the photograph gets warmer, specifically towards yellow side. When you move it towards the left, the photograph gets cooler, specifically towards blue side. (Note: this tool is at its full power when the image is captured in RAW format) To check this effect, reset the previous graduated filter and move the White Balance slider either way to see for yourself.

    3a WB 50

    White Balance adjustment made to -50

    3b WB minus 100

    White Balance adjustment made to -100

    3c plus 50 WB

    White Balance adjustment made to +50

    3d plus 100 WB

    White Balance adjustment made to +100

    There is another tool below White Balance called tint, it is part of adjust the white balance. This tool needs to be used cautiously, as the name suggests the tool can be used to add or remove the tint primarily green or magenta in color, and mostly helps to bring out the real colors. If this tool is used carefully, it will help you to remove the color cast from your photograph if any.

    Putting it all together

    Now that you know how all three major tools control the colors in a photograph, the question is how to apply this knowledge. There is no universal prescription, and each photograph demands its own treatment. Understanding how all these tools work, and developing your skill by practicing on a few photographs, will make you so much better in visualizing and bringing out the colors in any given photograph.

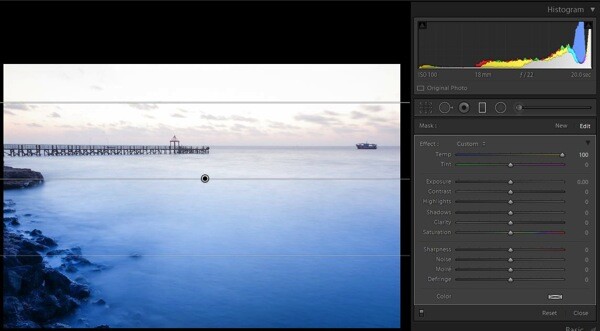
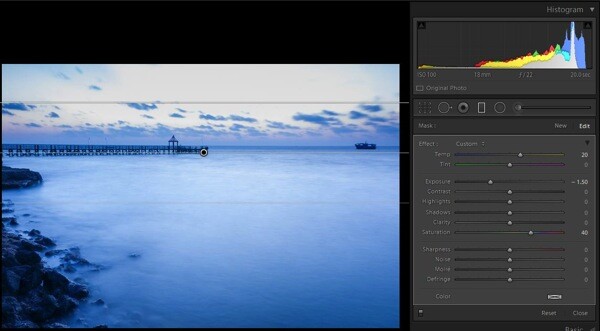
    5a all 3 components applied

    Graduated Filter all sliders applied

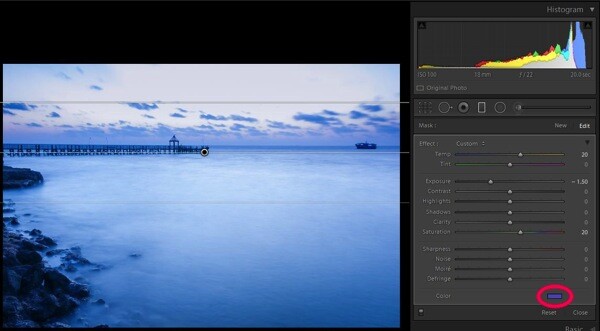
    Now, you know the major tools controlling the colors in an image and how they are being applied on this sample image (see screen shot above) but I still felt something was missing in the sky region. So I applied a slight color tint from the color picker tool (see image below).

    5b small colour tint used  balance

    Graduated filter slider adjustments plus a color tint added, see red circle

    Some photographs might be underexposed, whereas others might be under saturated to some extent. Remember RAW images tend to be less saturated, lower in contrast, and less sharpened. In some photographs a little adjustment to the White Balance slider may fix almost all the problems.

    Final image

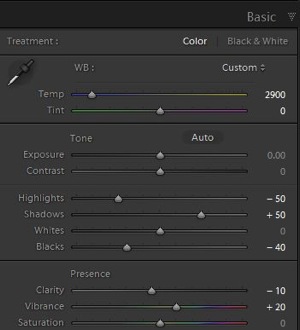
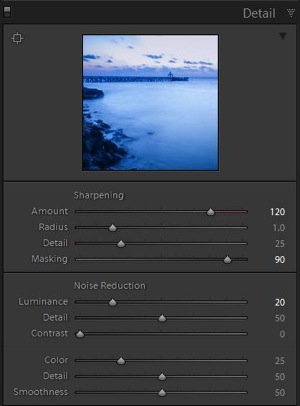
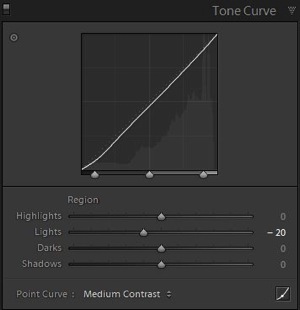
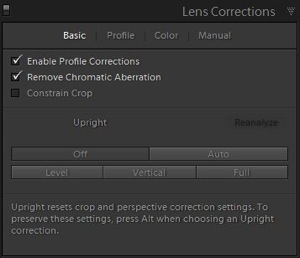
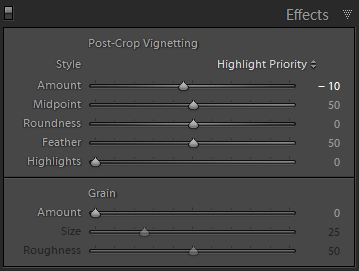
    Here is a look at the sliders in all the panels used to produce the final image.

    6a Global adjustments

    Basic panel slider adjustments

    6c Detail panel adjustments

    Detail panel slider adjustments

    6b adjustments Tone curve panel

    Tone curve panel adjustments

    6d Lens correction panel adjustments

    Lens correction panel adjustments

    6e mild vignetting

    Post-crop vignette added

    After using almost all the panels in Develop module here are the before and after photographs.

    1 As shot

    As shot right out of camera

    2 Final image

    Final image after all corrections have been applied

    All said, you are the creator of your photograph. You have to decide which tool needs to be used and in what proportion with other tools, to give you the results you hoped for when you pressed the shutter button. Hope this article helps you make more beautiful photographs.

    If you have any other Lightroom color adjustment tips of tricks please share with us in the comments below.

    The post The Triangle of Color Adjustments in Lightroom by Navan Viswa appeared first on Digital Photography School.


    Digital Photography School

  • Life is too Short to be Taking Photos of Great Subjects in Bad Light

    Sometimes the lessons are so basic, they are overlooked. This is one I feel needs to be repeated for new photographers as well as a gentle reminder for those of us with decades of shooting experience.

    Peter-West-Carey-_MG_5589

    Photography is the process of recording light. It is the same with your eyes, every waking moment of every day you use them. You see subjects around you and mentally are so busy classifying and figuring them out (“What a beautiful red Ferrari! Is it slowing down for a right hand turn?”) that when it comes time to lift a camera to your eye, you forget to stop and think about what is really going on.

    You make pictures of light first

    Of what are you really taking photos? You are taking photos first and foremost of light. Most of the time it is light reflected off of a subject but sometimes it is of the light source itself (e.g. sunsets, light painting, fireworks, etc.). In the case of the former, you need to remember the subject itself might be interesting, but if the light is ‘bad’ then the subject doesn’t stand a chance.

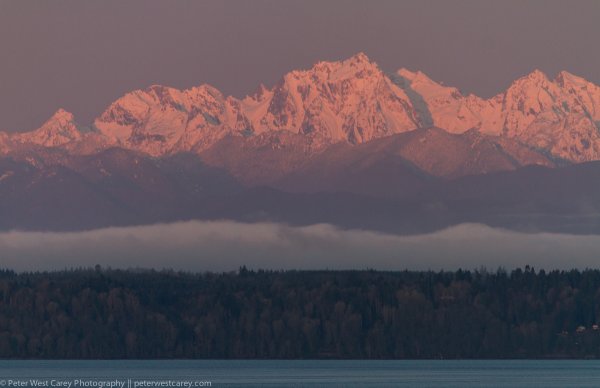
    Let me illustrate by example. These images are of the Olympic Mountain Range in Washington State, where I live part of the time. They are beautiful this time of year, when it’s not raining so much we can’t see them, and when they still have a full coating of snow for contrast. I took the pictures at different times of day of the exact same subject, but the results are different each time.

    Sunrise 6:12AM

    Sunrise 6:12 a.m.

    After Sunrise 7:04AM

    After Sunrise 7:04 a.m.

    Nearing Mid Day 10:28AM

    Nearing Mid Day 10:28 a.m.

    An Hour Before Sunset 6:10PM

    An Hour Before Sunset 6:10 p.m.

    The Morning Before At Sunrise 5:59AM

    The Morning Before At Sunrise 5:59 a.m.

    Light changes throughout the day

    The images were all processed exactly the same and while the color balance naturally changed, what is most dramatic is the change in light and effect it has on the impact of the image.

    A great photographer always thinks about light, even when she or he doesn’t have a camera up to their eye. It is light that makes the photo. The great thing about it is there is no ‘perfect’ that need be obtained in this regard. There is simply different light which will impart a different feel to the subject and whether or not you like that light.

    What if the light is bad?

    Sometimes it is the tone of the light, or the angle, or the intensity, or the temperature. The best practice for taking the best picture possible of a given subject, in my mind, goes something like this, “Wow, that’s a beautiful subject! Does the light work right now?”

    This process has stopped me from taking more bad pictures than I can count. This is because I have reviewed thousands of my own crappy images with bad light, but great subjects, that this process has been cemented into my mind.

    The next time you are enamored by a fabulous subject, ask yourself, “Is this the best light for this subject?” If not, your photos will be lackluster. If the light is not right, find a time or place where it will be better. If the situation won’t allow for great light, set your camera down and just admire the subject that caught your attention in the first place.

    Life is too short to be taking photos of great subjects in bad light.

    The post Life is too Short to be Taking Photos of Great Subjects in Bad Light by Peter West Carey appeared first on Digital Photography School.


    Digital Photography School

  • Western Digital announce My Passport Pro Thunderbolt Raid storage

    Western Digital have just announced a new portable storage solution for photographers and digital content creators! The My Passport® Pro Thunderbolt Raid, the first portable, Thunderbolt™-powered dual-drive solution, comes in a 2 or 4TB  flavour and has the cable built into the drive as you can see in the photographs below.

    My Passport Pro_thunder2_HigRes

    Here’s the official press release;

    SYDNEY, Australia, – Mar. 28, 2014 – WD®, a Western Digital (NASDAQ: WDC) company, and world leader in storage solutions for the connected life, today introduced My Passport® Pro, the first portable, Thunderbolt™-powered dual-drive solution, providing creative professionals and enthusiasts high performance and capacity in a truly mobile solution. For Mac systems, My Passport Pro has user-selectable RAID functionality to deliver needed performance for the most demanding applications in the field, without the need for power adapters or extra cables. My Passport Pro is available in 2 TB and 4 TB capacities.

    “The only Thunderbolt dual-drive solution that’s bus-powered, WD’s My Passport Pro enhances the workflow of mobile creative professionals by providing fast transfers and data protection for the large amounts of digital content they generate outside the studio,” said Jim Welsh, executive vice president of branded products and worldwide sales, WD. “From photographers, videographers and musicians to graphic designers and architects, people who depend on portable storage for their livelihood will find My Passport Pro defines a new level of performance, reliability and especially portability.”

    “Thunderbolt™ technology makes new approaches possible for high-performance workflows,” said Jason Ziller, Intel’s Director of Thunderbolt Marketing. “By combining dual storage drives on a portable, bus-powered device, the My Passport Pro from WD is a uniquely powerful storage solution with high capacity for today’s demanding users.”
    Directly powered via the integrated Thunderbolt cable — a design unique to WD — performance of My Passport Pro clocks in at speeds up to 233 MB/s, providing super-fast transfer, edit and backup capabilities. Another key feature of the dual-drive My Passport Pro is its user-selectable RAID function, which lets users choose data striping (RAID 0) for high performance or mirroring (RAID 1) for data redundancy, depending on the user’s needs. Superior to both FireWire 800 and USB 3.0, the integrated Thunderbolt technology of My Passport Pro makes video manipulation quick and easy—with the ability to copy a 22 GB high-definition video file in half the time typically required by a USB 3.0 drive working in RAID 0 format.

    Consisting of two 2.5-inch hard drives housed in a sleek aluminium enclosure, My Passport Pro is thoroughly shock-tested for extra durability to perform reliably when working on the go.

    simon_pollock_wd_my_passport_pro_intro

    Here’s what I think;

    I’ve had the “My Passport Pro” for a few days now and this is by no means enough time to fully get used to working with a new device, but having worked with storage of all different kinds for so long, it’s enough to get a good feeling about something. Now I just want something to fulfill a certain storage need that I have, so I was very impressed when the WD team pulled out this little beast and handed it to me over a nice chicken schnitzel sandwich (yes, really). The build is solid with little rubber feet to keep it steady, and a fan that’s built in to keep the temperature within its working range. The fan doesn’t come on much – I’ve had the drive sitting running for a couple of days, and even under a lot of load it hasn’t activated – nice and quiet.

    I have it configured to speedy Raid 0 for now, checking out the performance of the drive. The 2TB version is going to be more than enough for almost any shoot, even when setup in Raid 1 (mirrored) giving you just under 1TB of useable space. The real test of this device will be in a couple of months when I take it to Israel for a week long photo tour with Kinetis (and our very own dPS writer Oded Wagenstein) and will be writing about the drive and how it performs along the way!

    gtvone_wd_my_passport_pro

    The My Passport® Pro has filled a gap in my workflow and has filled it nicely – time will tell in terms of drive stability and build quality, nothing beats three copies of important content, but a mirrored raid disk in the field is a great start.

    You can buy one of these little beauties on Amazon:

    The post Western Digital announce My Passport Pro Thunderbolt Raid storage by Sime appeared first on Digital Photography School.


    Digital Photography School

  • 5 Steps to Validating the Next Idea for Your Photography Business

    You have ideas. Things that cross your mind that you should do as you build your career as a photographer. They all seem like good ideas but how do you actually know for sure? You’ll need to make decisions on these ideas as you grow as a professional. This can be how you set your prices, your packages or even the look and feel of your website. The problem is most of us try to validate these ideas in our own head.

    By ed ouimette

    Your audience and potential customers are real people, not imaginary. So it doesn’t make much sense to be validating ideas in your head? You need real, hands-on feedback. This feedback helps you make better decisions.

    In this article, I’m going to share an easy-to-follow, 5-step process for idea validation. We’ll talk about how to keep it simple, how to get your idea out there, and how to get feedback. This straightforward approach will help you ensure you are putting out things that people like and that actually work for you instead of against you. I know because I personally tried what I’m about to share with you many times in my own business. On of those times was back in June 2013, when my partner, Nicole, and I needed to validate Business Republic’s new tagline. We used this exact process and it worked brilliantly. More about our experience later.

    First, let’s get a broader idea of what idea validation actually is.

    What is Idea Validation?

    Idea validation is the process of testing and validating your idea prior to launching it in the real world. This is like the research and development process big companies use to test product ideas before they’re released to the general public.

    Idea validation can involve anything from information-gathering interviews to electronic surveys. The entire purpose is to expose the idea to your target audience before you build and release it to them.

    I personally think the best way to conduct the idea validation process is face-to-face, in person or over a Skype video call. The advantages will be highlighted below.

    Why Should I Do this Idea Validation Thing?

    In short, it will save you a ton of time and money, as well as generate interest in your idea and interest in you as a photographer offering professional services. Since you’re testing your idea, you will be exposing it to “the marketplace” or people that would be interested in your services.

    Don’t make the rookie mistake of working on an idea that no one is really interested in. Idea validation can save you time by giving you a good feel as to whether your idea appeals to your audience. It can also save you a lot of money. For instance, you can spend thousands of dollars on a website design that may look amazing to you but be confusing to the typical client.

    5 Steps to Validating the Next Idea for Your Photography Business

    Dreamstime buttercream filter Title Text

    Idea validation is fairly easy but it will require some hustle on your part. In order to best demonstrate how to do this, I’ll be using a running example. Say hello to our running example:

    All new businesses need a good set of professional photos to display on their website and social media platforms like Facebook and Pinterest. You have a few ideas for what your photography packages for new businesses should include and what they should be priced at, but you are not sure what they actually need and what they will pay for.

    Step 1: Brainstorm Internally

    You need to have some starting ideas to present to your potential clients. You probably have thousands of ideas about what you want to do but you need to present only four or five at a time. In our example we will need to come up with 4-5 different photo packages at different price points.

    Any more than five is too confusing. Trust me. Plus, you do not want to take too much of the potential customer’s time. Ten minutes max. You may want to contact them later for more info so you want to keep it light.

    In this step, your goal is to offer your best solutions or versions of your idea, not all the versions that you may have.

    Step 2: Don’t ask Family and Friends

    Yes, in step 2 you are required to NOT do something. Why did I include this step? Because it’s so hard to skip. We all want to feel good about what we are doing so sometimes we ask our loved ones about our ideas knowing that it will feel good.

    I’m not saying that your family and friends are liars. I’m saying that they are biased and in most cases not one of your potential customers. They also might feel forced to give feedback for feedback’s sake. They might even make up a point they don’t really believe in so you feel like they’re being unbiased. Do you see how tricky asking family and friends about this can get?

    Unless your mom is a new business owner and needs photos for her new website, please save sharing with your friends and family until after you finish this process.

    Step 3: Choose your Interviewees

    Next, make a list of 15 potential clients you can reach out to and interview for ten minutes in person, or over a Skype video call. Think about your ideal customers. In our example, we would contact new small business owners. They can be local businesses or online businesses.

    After reaching out to them you will likely end up with around ten who say “yes”, a few “I’m sorry, I can’t” and a couple that don’t reply.

    Make sure you can secure ten minutes of their time in person, or over Skype. A natural back and forth conversation is essential. It’s hard to see or feel hesitation, excitement or a “wow” expression over the phone. This is essential when we cover the actual discourse you’ll be having.

    Laptop CU filter buttercream title

    Step 4: Conduct Your Informal Interview

    The first thing you want to do when conducting your informal interview is thank them for their time and tell them how their time will help you offer something that your customers will actually want.

    Second, explain plainly that you are not selling anything to them and what you are going to be talking about is actually not even available yet. Put them at ease and remind them of how much their feedback is valued and will influence your business. People like knowing that their opinion matters.

    Third, take a minute to explain what you do and the nature of your business before explaining what you need their opinion on. Remember to explain things with their perspective in mind. Don’t use jargon that they wouldn’t understand.

    Fourth, tell them you are going to present four to five versions of your idea. And that you will show all of them first, then go over each one asking for their thoughts on each one at a time. Let them know you might be jotting down some notes during the process to remember their advice later on.

    Fifth, after going through all the options, ask them for their initial thoughts on each one individually. Ask them how the idea makes them feel as well as think. Look at their body language and how quickly they answer. Compare their reaction to the reactions of other ideas you present to gauge what is a brilliant offer to them and what is a dud. Not everyone wears their emotions on their sleeve.

    Lastly, after you have received their feedback on each idea, thank them again. Ask them if they would mind if you contacted them again if you need to later on.

    Step 5: Review and Decide

    The last step is to review all your feedback and decide what worked best for your potential clients. Look at what the majority of your potential clients have said. What is worth noting? What is worth omitting immediately?

    When you decide based on the feedback you received, remember that it’s about the customer, not you. Sometimes you will have to give up what you think is best for your business based on what you learned. After all, your customers are the reason why you exist.

    Restaurant business chef buttercream filter text over it

    Our Experience

    As I mentioned before, I used this exact 5 step idea validation process when we were trying to validate our new tagline for our business. We came up with four versions of what we thought was the best tagline for our business. One of the taglines on the list was our existing headline at the time, “ Build a Brand That Matters. Share it Effectively.”  Before our idea validation process, we thought this was the best tagline of the four.

    We spoke to 10 potential clients of ours, in person, at local businesses around town . We collected their honest feedback, noticed their body language and took plenty of notes. When it was all said and the feedback told us somethings we really needed to hear.

    For starters, what we thought was the best tagline was the worst one of the four. We got feedback like:

    •  The word ‘brand’ doesn’t resonate with me. I’m about business. I care about doing business.”
    • “The words ‘share it effectively’ sounds too self-helpy.”
    • “I just want to be known so I can have more customers.”

    We got an overwhelmingly positive response to one of our taglines. People immediately raised their eyebrows and said, “That’s what I’m talking about!” That tagline became our tagline as it is now: Build a Business That Can’t Be Ignored. We realized all new businesses share one common fear: being ignored. By tapping into a huge fear or pain our customers are having and telling them we will help elevate that pain or fear was a huge game changer for us. The change to that tagline has attracted more interested clients to us than anything else we’ve ever done on our website. This process works!

    A month ago, we surveyed our members in The $ 100 MBA asking what are some areas of business they wanted/ needed to learn. The answers we got back greatly differed from the courses we had planned to plan, create and rollout for the next 6 months. We had to put our customers first and put the courses they wanted at the top of the to-do list and put most our planned courses off for the time being. At the end of the day, we created our community for them not for us. so when we got the feedback and we knew we had to shift gears.

    One Last Thing

    This doesn’t have to be painful. Don’t be afraid to have fun with it.

    This is your passion, your livelihood, your baby. Show your love and care for it and for your customers. Your interviewees take cues from you, so if you are relaxed and casual about it they will loosen up and give you more than you ask for.

    This isn’t a sales exercise. It’s a great conversation with someone you respect. It’s not win or lose. It’s a win-win! And it’s the best way to take your idea and career as a professional photographer to the next level.

    Wow! You made it to the end of this post! You’re obviously serious about nailing your idea and creating something your customers want. I don’t want your learning to end here, so as a dPS reader you get access to our free course and workbook on idea validation here.

    Have more tips or strategies to share about idea validation? Have you tried doing any real-world idea validation yourself? Share in the comments! We’d love to chat about your experience.

    The post 5 Steps to Validating the Next Idea for Your Photography Business by Omar Zenhom appeared first on Digital Photography School.


    Digital Photography School
  • How To Start a Photography Project You’ll Love

    Once called the “Jay-Z of documentary photography,” Martin Parr is known throughout the world for his absurd, colorful, yet tongue-in-cheek photographs of modern life. But if you asked him about his favorite shots, he wouldn’t mention individual photographs, instead he’d point you to photography projects. And if you want to improve your photo-taking skills, starting a project you love is a Continue Reading

    The post How To Start a Photography Project You’ll Love appeared first on Photodoto.


    Photodoto

  • Alpacka Yukon Packraft on the Poudre River

    packraft on Poudre River

    Packraft on the Poudre River in Fort Collins, Colorado – February 2014

    I had two paddling photo sessions with my Alpacka Yukon packraft on the Poudre River in February. Both times I started at Kingfisher Point Natural Area. There is about half mile of slow water behind the diversion dam there. My cruising speed in a packraft is about 2.5 mph. So, paddling against even a slow current provided a pretty good workout.

    Related posts:
    Wintertime Canoe, Packraft and SUP Paddling in northern Colorado
    Wildcat Mound Run – the South Platte River by Bike and Packraft
    Biking and Packrafting – A Selfsupported Classic Run on the South Platte River near Greeley
    Inline Skating and Packrafting – Road and River Test on the South Platte


    paddling with a camera

  • How to Avoid Blurry Photos by Choosing the Right Autofocus Mode

    Sometimes the light is perfect, the moment is right, but when you get home you find out that your photo is blurry. Arrgh!

    Why are your pictures blurry? One obvious reason might be that your camera isn’t focused properly. Today’s cameras and autofocus lenses can help you quickly take sharp images in a wide variety of situations, provided you choose the right autofocus mode.

    Here are some questions to help you diagnose any situation and choose the correct auto focus setting

    autofocus modes

    Photo by Lynford Morton

    Are you using the Auto-area autofocus or Single-point autofocus selection?

    Who gets to decide your focus point? That’s the question you are deciding with this option. In an Auto-area autofocus, your camera decides what it should use as your focal point. It usually decides based on what looks most prominent in the viewfinder or closest to the camera. This might work when your subject is obvious and there are no potential distractions.

    For more control, choose a Single-point autofocus setting. That mode allows you to choose your specific auto focus point (check your camera’s manual if you aren’t sure how to do this). After all, only you, not your camera, knows where you want to place your subject.

    Is your subject moving?

    Most DSLR cameras give you four basic options for autofocus settings: single, continuous, auto or manual. To help you choose the right option, ask yourself, “Is my subject moving?”

    No, my subject is not moving

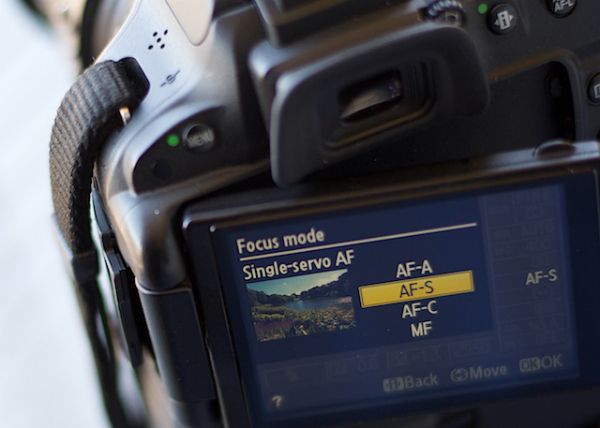
    autofocus modes

    Photo by Lynford Morton

    If your subject is not moving, choose “AF-S” for Nikon or “One Shot” for Canon. This mode locks in your focus based on the distance to your subject. As long as your subject stays at that distance, your photo will be in focus. Your subject has to be stationary for this mode to work. In fact, your camera will not take the photo if your subject is moving (or it cannot lock focus).

    This mode also allows you to recompose. Let’s say the autofocus point is in the center of the frame, but you want your subject on one side or the other. Keep depressing your shutter button slightly, and focus remains sharp on your subject. Then you can move the camera slightly left or right, recomposing with your subject out of the center of the frame.

    Yes, my subject is moving

    By Amsterdamized

    If your subject is moving, use continuous autofocus (AF-C for Nikon or AI Servo for Canon). In this mode, you place your autofocus point over your subject, and focus continues to adjust while you hold down the shutter button, keeping your subject in focus as it moves.

    For example, if someone is riding a bicycle, place the AF point on your subject and slightly depress the shutter. As long as you are pressing the shutter, the autofocus will continually adjust to your subject, keeping them in focus as they move. When you are ready to take the photo, depress the shutter completely, and the camera will focus on your subject for a sharp image.

    No, my subject isn’t moving, but it might

    A third option merges the functionality of the single autofocus and continuous autofocus. This hybrid mode, (AF-A for Nikon or AI Focus for Canon), starts out as a single auto focus. Your camera won’t focus until you lock in on a stationary subject. Once you have your subject in focus, you can take the photo as you would in a traditional single auto focus mode.

    If your subject starts moving, however, the autofocus releases and continues to track your moving subject. It gives you the best of both worlds. One note of caution, I have noticed at times, if you recompose a stationary object quickly in AF-A mode, the camera can be fooled into thinking the subject is moving and release the autofocus.

    My autofocus just isn’t getting it right

    You always have the option of turning off the autofocus function and choosing the Manual setting. If your camera is having trouble detecting your focus point, it might be more efficient to focus the camera yourself.

    How about the opposite situation? You turned off your autofocus by accident? Every now and then, when your camera can’t seem to focus, and you don’t hear the motor searching back and forth, check to see if you selected Manual autofocus by accident. This can happen more frequently than you might think.

    Other issues to consider

    What if you set up your autofocus properly, and the lens still won’t focus? Try these considerations:

    • You might be too close. Try backing away. If you are too near the subject, it might prevent the camera from focusing properly.
    • Your subject might not have enough contrast. Your image needs to have some contrast for many autofocus systems to work. If you try to photograph a solid sheet of white or any single color, most autofocus systems will struggle. Why? The camera compares adjacent pixels and when one is different, it uses that point to determine its focus. If it can’t find any contrast, it can’t focus.
    • You might have an extremely shallow depth of field. In this case, your autofocus is working, but the depth of field is so shallow, it is hard to tell that your subject is in focus.
    • You have camera shake. When you depress the shutter, you move the camera. If the shutter speed is too slow, the camera picks up that movement, and it looks like a blurry photo. Make sure your shutter speed is faster than the equivalent of your focal length. For instance, if you are zoomed to 100mm, your shutter speed should be 1/100th of a second or faster to avoid camera shake.

    Why is your picture blurry? If the answer is in your autofocus, your fix could be as simple as choosing the right setting.

    Do you have any other autofocus tips or comments you’d like to share? Please do so below.

    More tips on sharper images and focus modes:

    • 5 Tips for Getting Sharper Images
    • Understand Exposure in Under 10 Minutes
    • Making Sharper Wildlife Photographs – [Part 1 of 2]
    • Making Sharper Wildlife Photographs – [Part 2 of 2]

    The post How to Avoid Blurry Photos by Choosing the Right Autofocus Mode by Lynford Morton appeared first on Digital Photography School.


    Digital Photography School
  • To be or not to be a Street Photographer

    Top 6 Reasons NOT to do Street Photography:

    1 – Your pics won’t get many ‘likes’

    Most people on social media don’t appreciate the art of street photography. Cats and flowers do get more ‘likes’.

    2 – Your prints won’t sell

    People usually don’t buy prints of street images unless the photographer is somewhat famous.

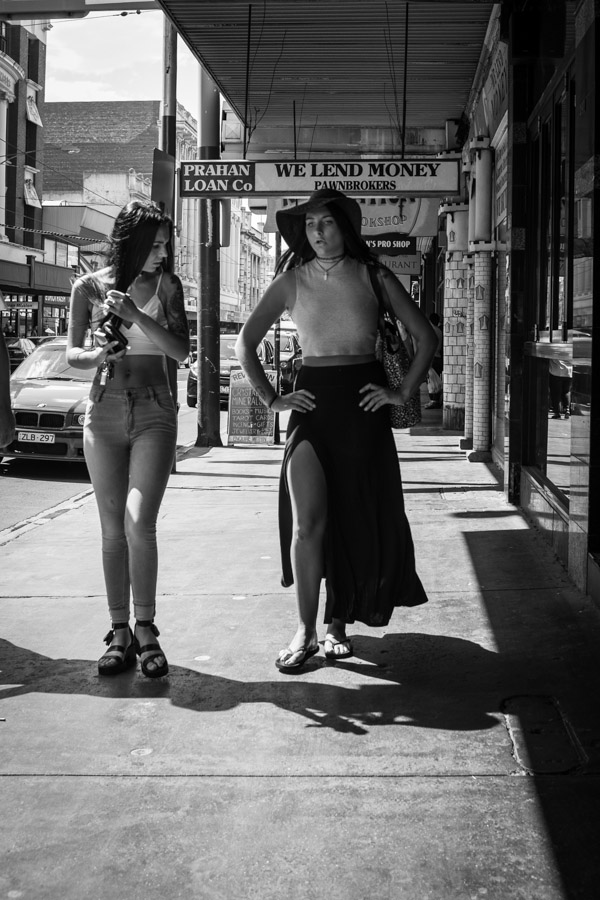
    ©Valérie Jardin

    ©Valérie Jardin

    3 – You won’t make any money doing it

    No one is going to pay you to walk for hours with your camera to take pictures of strangers. Period.

    4 – It’s intimidating

    It can be scary to photograph strangers in the street or to ask a stranger to make a portrait. It’s not for the faint-of heart! You will get rejections and some people may even get angry and confrontational.

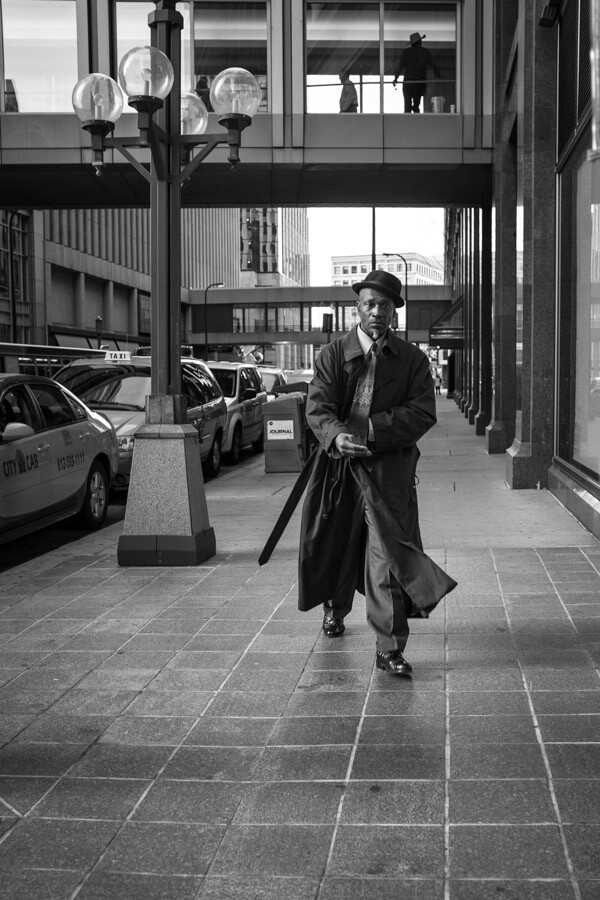
    ©Valérie Jardin

    ©Valérie Jardin

    5 – It requires a lot of patience and a lot of walking

    You can be out for hours and go home with an empty memory card. The hunt for the story, the right gesture or expression can take you many miles. You have to learn to be satisfied with just one good shot for the day, if any!

    6 – A technically perfect shot does not mean it’s a good street photograph

    You only have one shot at getting the shot. That fraction of a second that will never happen again. As a result, many of your best shots will have motion blur and noise. When you have to compromise between the technically perfect shot and the story, the story always wins!

    You only get one shot! ©Valérie Jardin

    ©Valérie Jardin

    Top 6 Reasons TO do Street Photography

    1 – You will be part of a very cool community

    Only people who truly appreciate the art of street photography will like your work and it will be a lot more meaningful and gratifying than any ‘likes’ you’d get for a pretty picture. The street photography community is awesome. They are so passionate because they are doing it for the pure love of it, not to please anyone or get recognition on social media.

    ©Valérie Jardin

    You are documenting life around you.
    ©Valérie Jardin

    2 – You are documenting life around you

    Street photography is not a hot seller in the fine art world. As a street photographer, you have to look at the bigger picture (no pun intended). You are creating images that reflect a moment in time that will provide some valuable insight for future generations. Just look at the work of street photographers from 50 years ago, and how much we learn from it. That said, you never know when someone is going to connect with one of your images and want to buy a print. Be open to the idea of an occasional sale but don’t bet the farm on it. 

    3 – You shoot street photography for yourself

    You won’t get paid to walk the streets with your camera but, on the bright side, you won’t have to compromise with a client either! Make money doing paid gigs on the side, and get out on the streets for YOU!

    ©Valérie Jardin

    The technical aspect of the resulting image is not what street photography is all about.
    ©Valérie Jardin

    4 – It’s addicting

    Street photography never really stops being intimidating. But the rush you get is just as powerful as the rush the wildlife photographer gets when she gets that perfect shot of a wolf in the wild. Street photography is thrilling, exhilarating and addicting. 

    5 – Walking is good for you!

    Street photography will make you appreciate the world around you so much more. You will never be bored again, anywhere! Get a good pair of shoes and get out there, practicing your street photography is one fun way to get your exercise!

    Valerie Jardin Photography -Melbourne-2

    ©Valérie Jardin

    6 – You won’t waste too much time in post processing

    Street photographers don’t care about noise, they embrace it! Documentary street photography doesn’t require any fancy post processing. A quick exposure adjustment, an occasional crop, a custom black and white conversion if that’s what you like… Et voilà! That’s about the extend of the time you’d ever spend on a picture.  You are capturing a slice of life that will never happen again. It’s not going to be perfect, life on the streets is not perfect! No Photoshop action is going to turn a boring picture into a story. You need to know your camera and be ready to get the best possible shot. With practice you learn to anticipate and be ready without attracting too much attention to yourself. Those rare moments, when the story, the light and the composition all come together, are what keep us roaming those streets tirelessly with our camera.

    Street photography is something you can do almost anywhere. As long as there are people. No matter where you are, the number one rule of street photography is respect. As a bonus you will make friends along the way, and that’s a beautiful thing! I will leave you with a quote that, in my opinion, best represents what street photography is all about:

    “Get a good pair of walking shoes and… fall in love.” Abbas ~

    Those rare moments, when the story, the light and the composition all come together, are what keep us roaming those streets tirelessly with our camera. ©Valérie Jardin

    Those rare moments, when the story, the light and the composition all come together, are what keep us roaming those streets tirelessly with our camera.
    ©Valérie Jardin

    Why are you a street photographer? Please share with our readers in the comment section below!

     Need a few tips on practicing your street photography? Check out some of these articles:

    • Practical Tips To Build Your Street Photography Confidence
    • Tips for Taking Street Portraits – Lessons Learned in India
    • In the Dark: 10 Tips for Street Night Photography
    • Using Street Photography to See Beyond the Ordinary
    • How to Approach Street Photography in 12 Easy Steps
    • Street Photography: Exploitative vs Respect

    The post To be or not to be a Street Photographer by Valerie Jardin appeared first on Digital Photography School.


    Digital Photography School
  • Seven Pieces of Advice for New Lightroom Users

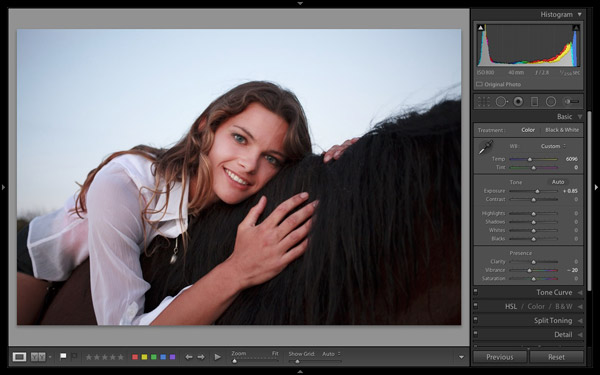
    Lightroom Develop module

    Andrew S. Gibson is the author of Mastering Lightroom: Book 2 – The Develop Module. There’s a special deal on now at Snapndeals, get 40% off for a limited time only.

    A Digital Photography School poll held earlier this year revealed that the majority of readers carry out their post-processing in Lightroom. Lightroom is attracting users all the time as it is not just a photo processor – it helps you organize, search and view your photos as well. If you are new to Lightroom then these tips will help you get started.

    1. Understand the Lightroom Catalog

    The Lightroom Catalog is a database containing all the information that Lightroom holds about your photos. It includes metadata, records of any edits you have made, star ratings, keywords, Collections and the locations where your photos are saved.

    ***An important note: the Catalog doesn’t contain any photos, just information about them.***

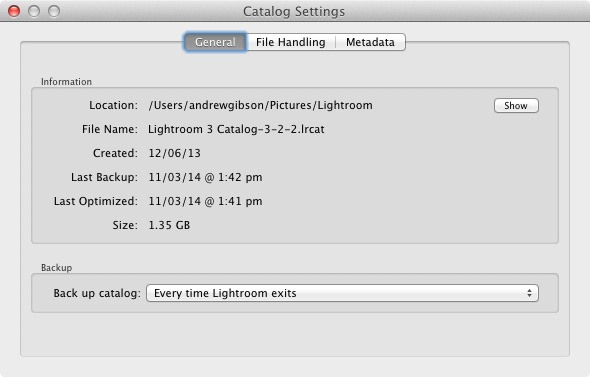
    The Catalog is important, and for maximum peace of mind you should set Lightroom to make a backup copy every time you close the program. Do this by going to the General tab in Lightroom > Catalog settings and setting Back up Catalog to Every Time Lightroom Exits:

    Lightroom Catalog settings

    The next time you exit Lightroom it will give you the choice where to save the backup – it’s a good idea to save it on a separate hard drive to the one containing your Lightroom Catalog (located on the computer’s main hard drive). If the backup and the original Catalog are on the same hard drive, and it fails, you will lose both.

    2. Appreciate the advantages that using Lightroom gives you

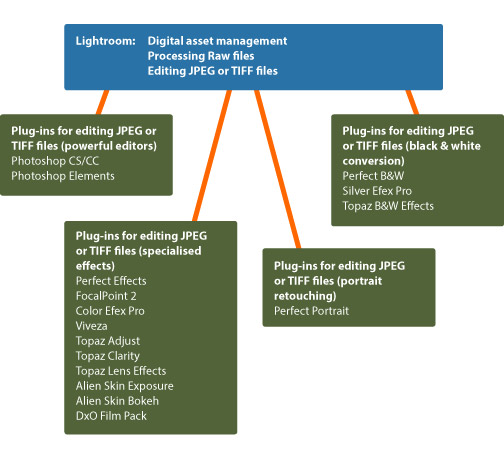
    The main benefit of using Lightroom is that it becomes the heart of your post-processing workflow. You can do most of what you need in Lightroom: including viewing, organizing, searching and key-wording photos, through to post-processing and exporting. If you need to finish a photo in Photoshop or another program you can export it from Lightroom first, then bring it back into Lightroom when it’s done, where the two versions will exist side by side.

    This diagram shows the workflow:

    Lightroom workflow

    Another advantage is that Lightroom saves you hard drive space. Think about what happens if you process a Raw file in Photoshop. You start by converting it in Adobe Camera Raw, then open the file as a 16 bit TIFF in Photoshop itself, before finally saving it. Depending on what format you save it in, you end up with either a Raw file and a JPEG, or a Raw file and an 8 bit or 16 bit TIFF.

    In Lightroom, on the other hand, all the edits you carry out on your photos are saved as text commands in your Lightroom Catalog. This takes up a lot less space and you only need to export your files into another format (JPEG, TIFF etc.) when you actually need them for something.

    You can save even more hard drive space by converting your Raw files to the DNG format when you import them into Lightroom. This also makes Lightroom run faster. This is covered in more detail in my article Make Lightroom Faster by Using DNG.

    3. Learn what you can and can’t do in the Develop module

    Lightroom is primarily for processing Raw files, although it can also be used for editing JPEGs and TIFFs. All this is done in the Develop module. Even if you are processing a Raw file with the intention of exporting it to another program (like Photoshop or a plug-in) it is a good idea to do as much editing as you can in Lightroom first.

    Why? The main reason is that using Lightroom saves you hard drive space, as mentioned earlier. When you export a photo to use in a plug-in, Lightroom converts it to a 16 bit TIFF (or other format of your choice) first. This negates the benefit of using Lightroom to save hard drive space, so you should avoid it where possible.

    Things you can’t do in the Develop module are anything involving layers, creating HDR images by tone mapping, exposure blending, adding textures, creating composite images or adding fancy borders. For these you will need Photoshop or another program.

    4. Retouching portraits in Lightroom

    There are lots of Lightroom plug-ins available designed to help you retouch portraits. Indeed, there are so many that it’s difficult to know which are any good, especially as some cost more than Lightroom itself.

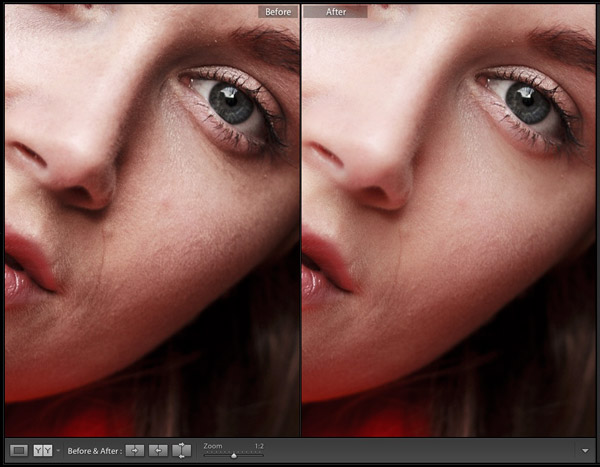
    While you may need a plug-in (or Photoshop) for high-end retouching work, Lightroom has a built in Adjustment Brush preset that will do the job for you. It’s called Soften Skin and is a quick and easy way to retouch a portrait.

    This before (left) and after (right) comparison shows what you can achieve in Lightroom:

    Lightroom portrait retouching

    This is a good example of learning what you can achieve within Lightroom, saving yourself time, hard drive space and the expense of purchasing another plug-in in the process.

    For more on retouching portraits in Lightroom see: How to professionally retouch portraits in Lightroom

    5. Learn to organize your images in the Library module

    If you are new to Lightroom you will be accustomed to organizing your photos into folders on your hard drive. In Lightroom though, things are different. There’s only one module (Library module) that gives you direct access to the folders on your hard drive. The others all use Collections instead.

    Lightroom is set up that way because Adobe wants you to organize your photos in Collections. The advantage of working this way is that a Collection can contain images that reside across a multitude of folders and bring them together in a way that makes sense for you. You can organize your images by date, subject matter, people’s names or any other way that is useful. My article Use Lightroom Collections to Improve Your Workflow goes into this in more detail.

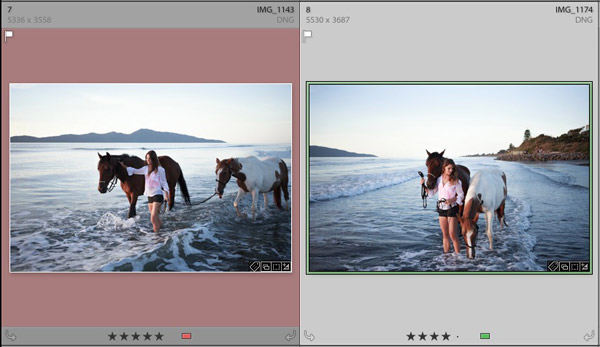
    6. Decide how to use colour labels, star ratings and keywords from the beginning and stick with it

    This is the hardest piece of advice to follow because when you are starting out you’re still figuring how to use these features. As your understanding of Lightroom grows, you will work out how to use these things in a way that suits you. Just be aware that consistency is your friend. If you start out using (for example) colour labels one way, then change your mind after a few months, it has the potential to cause confusion.

    Lightroom colour labels and star ratings

    For help with keywords, read my article Creative Ways to Use Keywords in Lightroom 5.

    7. Put all your Raw files in a single folder on an external hard drive

    This makes it easy to back them up. If you need help with deciding on a file structure then my article Organising Photos for Lightroom will help. The main benefit of keeping all Raw files in a single folder is that it is easy to back up. I recommend that you back your Raw files up to at least two different hard drives. Given that hard drive failure is inevitable (it is always a question of when, not if, even if the when is years into the future) it is wise to have multiple copies. That way if the worse happens it is an inconvenience, not a disaster.

    Over to you

    Now it’s your turn. What advice would you give to new Lightroom users? What do you wish you had known from the start?


    Mastering Lightroom: Book Two

    Mastering Lightroom: Book Two – The Develop Module ebookMy new ebook Mastering Lightroom: Book Two – The Develop Module teaches you how to process your Raw files in Lightroom for spectacular results. Written for Lightroom 4 & 5 it takes you through every panel in the Develop module and shows you how to creatively edit your photos. It’s now 40% off at Snapndeals for a limited time only.

    The post Seven Pieces of Advice for New Lightroom Users by Andrew S. Gibson appeared first on Digital Photography School.


    Digital Photography School
  • Travel Photography without the Travel – Going Local

    Many photographers love to travel. They love the thrill of being in a new place, of capturing new scenes and experiences, and of coming home with quality images. But landscape and travel  photography do not need to be confined to weeks-long trips to far-flung locations. This article will explore how to get the most out of a weekend (or even weekday) local photography outing (all photographs in this article were taken within a few miles of where I live).

    city, urban, night, lighttrails, reflection, traffic

    Before: Planning and Packing

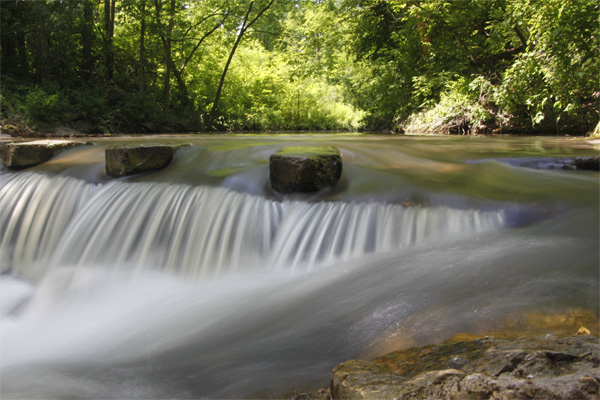
    Making a plan or having a bucket list of photography wants is a great place to start. Always wanted to photograph a slow, silky waterfall? Looking to capture candid street photography shots of interesting people? Want to bring home that idyllic sunset shot over open water? Now is the time.

    Start by spending a little time evaluating the photographic potential of what is already around you. We often become so accustomed to our day-to-day that we forget to recognize the possibilities of the familiar. Challenge yourself to find and seek out a nearby or local photography opportunity. Try browsing on Flickr for waterfalls and streams in your area or make a plan to spend some time in an older part of town watching for street photography opportunities.

    waterfall, silky water

    Urban waterfall

    Want to catch that sunset or sunrise? Plan for the light. Look up sunrise and sunset times for your date(s) and location, and decide where you want to be shooting during the blue hour and golden hour in the morning and evening. You can even use programs like the Photographers’ Ephemeris to determine the timing and angles of sunrise, sunset, moon rise, and moon set, which can help you capture dramatic photographs of these events and their relative surroundings.

    sunrise, tree, silhouette, reflection, morning

    Now that you have a plan, create a packing list. Consider creating a ‘basic’ packing list for any photographic excursion that you can reuse for future trips. At a minimum, be sure to bring your camera body and any extra lenses, extra memory cards and batteries, your battery charger, a camera case, and basic cleaning supplies (blower, brush, and cloth). You may also wish to add a tripod, remote shutter release, and any additional filters or flash units, depending on your anticipated shots. Also do not forget about basic travel or emergency supplies like a flashlight or headlamp, cell phone, and snacks. Finally, I always stash a gallon sized plastic bag in my camera case or purse as well, which makes an impromptu rain or snow cover (cut out a corner to keep shooting) or just easy protection from unexpected weather.

    During: Follow Your Plan, Amend Your Plan, and be Flexible

    Getting the most out of a quick photography outing requires using your time wisely. This is where you will reap the benefits of your pre-trip planning and research. Give yourself extra time at each location to scope out the scene before you start photographing. Minutes spent walking around without your camera raised will help you zero in on the shots and angles you want rather than simply trying to capture it all and hoping something turns out well. Avoid the temptation to ‘lock’ yourself down once your tripod comes out. Be sure to consider alternate views of your subject. Read more about the importance of Perspective in Photography: don’t just stand there, move your feet!

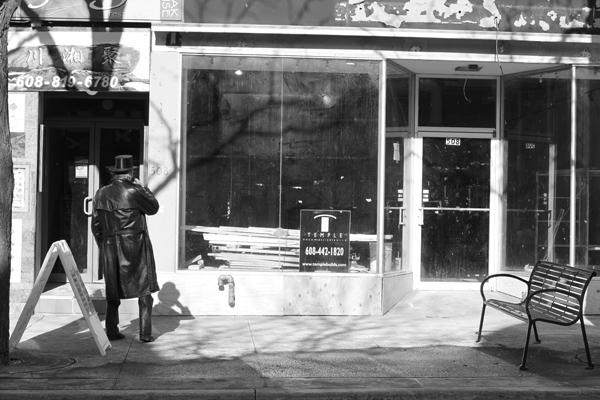
    street photography, black and white, B&W, urban, city, decay

    As with any photography, you should also be prepared to amend your plan as necessary. Weather, crowds, unexpected building closings, and innumerable other factors can interfere with even the best laid plans. Consider having a backup indoor plan for your outdoor day or an alternate location nearby, just in case. The benefit of exploring a nearby photography location is that it is much easier to return again if your first time does not work out the way you had planned.

    After: Workflow and Reflection

    fog, foggy, morning, railroad, tracks, black and white, B&W

    Once you get home, be sure to download all of your photographs immediately and back them up as well, using whatever system you have established (multiple hard drives or disks, portable hard drives, cloud backup, etc.). Establish a system for tagging and evaluating your shots so that you can find your favorites quickly and easily.

    Don’t shortchange yourself after the outing either. Take some time to review the trip as well as to review your shots. Write yourself some notes about what worked well and what did not. Continue to add on to your bucket list by thinking of new ideas or missed opportunities. You may be surprised at how much photographic potential you can find around you!

    Have you been able to check items off your photography bucket list by focusing on opportunities closer to home? Share your favorites in the comments below.

    The post Travel Photography without the Travel – Going Local by Katie McEnaney appeared first on Digital Photography School.


    Digital Photography School