Category: Photography

  • Finding the Time to do Photography Part 1- Business Trip to Las Vegas

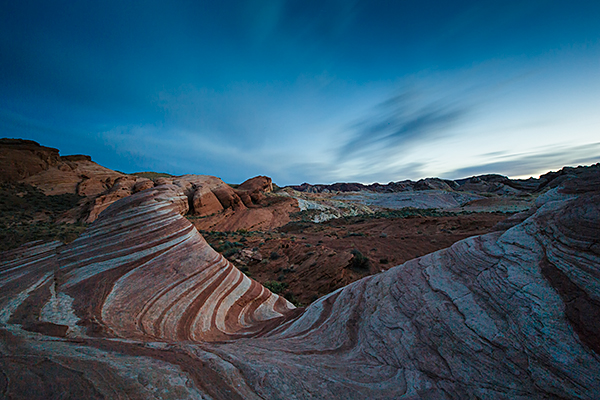
    The Fire Wave at Valley of Fire State Park. 4 minutes, f/16, ISO 160. EOS 5D Mark III with EF 16-35 f/2.8L II.

    The Fire Wave at Valley of Fire State Park.Exposure: ISO 160, 4 minutes, at f/16. EOS 5D Mark III with EF 16-35 f/2.8L II.

    About a month ago, a question was posed on the DPS Facebook Page, “What is the number one obstacle to you taking better photos?” While some answered that they were unsure how to set exposure in Manual mode, and others thought their gear might be limiting them, the overwhelming number one answer was TIME.  In this day and age of being always on, always connected, and always on the go, it can be difficult to find time to do photography.  Like many, my day job, which isn’t as a full time photographer, keeps me busy and eats up much of my time. On weekends, I can occasionally make time but often life and family get in the way.
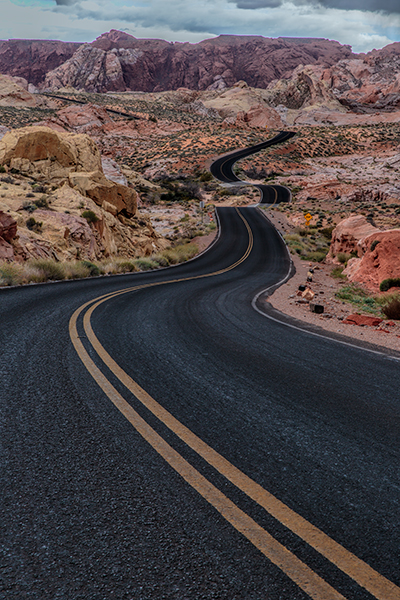
    Scenic Drive in Valley of Fire. 1/10, f/16, ISO 100. EOS 5D Mark III with EF 24-70 f/2.8L II.

    Scenic Drive in Valley of Fire. 1/10, f/16, ISO 100. EOS 5D Mark III with EF 24-70 f/2.8L II.

    So what to do when you need a fix?  There are several things you can do. What I do is to take advantage of my job when I can. I do occasionally travel for work, and when I do, I bring my camera with me.  While I may not have an entire day, often I can find an hour at the end of the day, or I can even go shoot at night.  This was true when I went to Las Vegas recently for a trade show.  I had two days of training seminars, two days of trade show setup and four full days of trade show to work. Was I tired at the end of the day? Yes, but photography is how I relax, so it seemed only natural to eschew the neon glow of the restaurants and casinos and go grab my camera.

    First of all, the day I arrived, my flight got in earlier in the afternoon.  I rented a car and headed out to Valley of Fire State Park, about 45 minutes northeast of Las Vegas. I got a mixed afternoon of clouds, which parted for a nice sunset. I then hung around for darkness and got a few night shots just to finish things off.

    The next day, the work began, but after my work day ended, I headed out to the strip to shoot some of the neon.  The Vegas strip is an awesome place to shoot no matter what you like to shoot. Cityscapes, architecture, or people, it’s all there and it’s there every night. You need only spend an hour and you’ll get more than your fill. The beauty of it all is, Las Vegas makes its own light, so you can shoot 24-7 there.
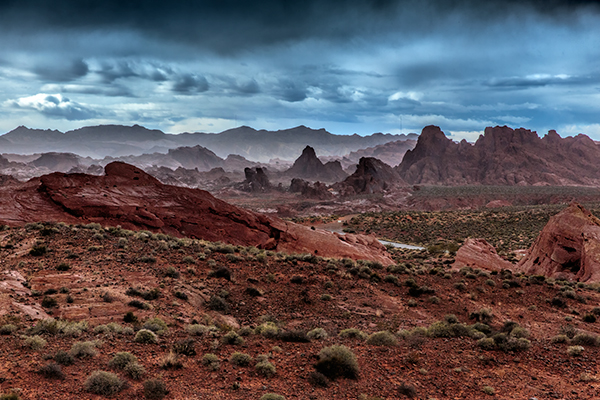
    Valley of Fire Storm. 1/1000, f/8, ISO 1600. EOS 5D Mark III with EF 24-70 f/2.8L II. I managed to catch the Valley of Fire on one of the few days it rained all year.
    Valley of Fire Storm. 1/1000, f/8, ISO 1600. EOS 5D Mark III with EF 24-70 f/2.8L II. I managed to catch the Valley of Fire on one of the few days it rained all year.

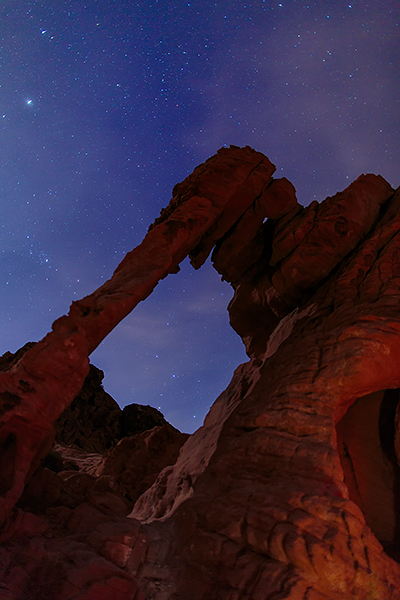
    Elephant Rock, in Valley of Fire, at night. 15 seconds, f1.4, ISO 800. EF 24mm f/1.4L II.

    Elephant Rock, in Valley of Fire, at night. 15 seconds, f1.4, ISO 800. EF 24mm f/1.4L II.

    Get over your objections

    I know what your objections will be:

    • I can’t carry everything I need.
    • I don’t have room in my luggage.
    • I’m tired after a day of work.

    I’ve said all of those myself, and at times, this attitude won out. But if you have a passion for taking pictures, you’ll find a way.  I carry a small travel tripod- a Gitzo 1541T.  It fits right in my luggage.  I realize that one’s a bit pricey, but there are many other options. Try a Gorillapod. They are small, lightweight, and come in a variety of sizes to fit almost any camera. Perfect for traveling light.

    Don’t want to carry a DSLR?  Get yourself a smaller setup you won’t mind carrying.  I own a Canon G16 for when I don’t want to bring my full kit. I can still shoot RAW, have full manual control, but it’ll fit on my belt.  And if you do want a DSLR? Consider minimizing your kit for travel. Pick one or two lenses that can cover most of the standard range. I always have a hard time minimizing, but when I do, I usually carry my EOS 5D Mark III with EF 16-35 f/2.8L II and EF 24-70 f/2.8L II. This is the kit used for the shot of Fire Wave, and of Scenic Drive.  I added the EF 24mm f/1.4 for night shooting. If you’re using a DSLR with an APS-C sensor, an 18-135 is an excellent choice for a do-it-all lens.

    I’m not saying finding the time is easy.  Sometimes it will require sacrifice. But I have never regretted spending even a minute with my camera, even when I was tired, or pulled in many directions.  If photography is a passion for you, you make time.  I’m not saying every day.  But I do make it a point to make time to indulge my passion.  You should too. Even if it’s just a minute.  In part two, I’ll discuss ways to make time when you’re at home.
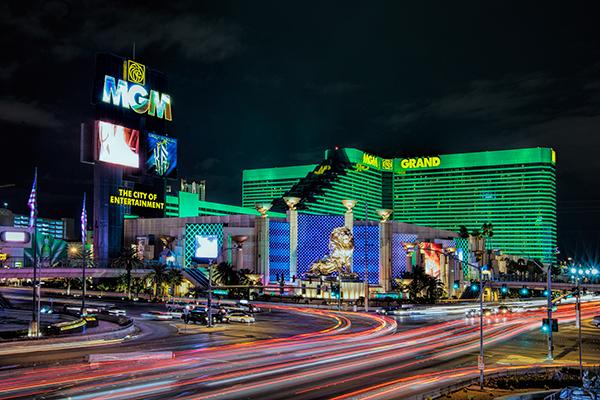
    EOS 5D Mark III with EF 16-35mm f/2.8L II. 5 seconds, f/11, ISO 200.

    EOS 5D Mark III with EF 16-35mm f/2.8L II. 5 seconds, f/11, ISO 200.

    EOS 5D Mark III with EF 16-35mm f/2.8L II.  1/25, f/8, ISO 640.
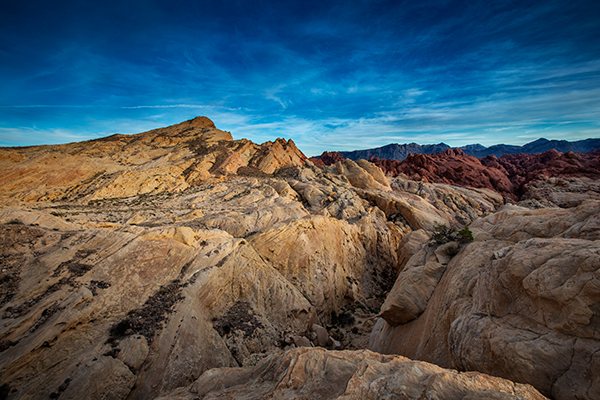
    EOS 5D Mark III with EF 16-35mm f/2.8L II. 1/25, f/8, ISO 640.

    Fire Canyon. EOS 5D Mark III with EF 16-35mm f/2.8L II. 1/5, f/16, ISO 100.

    Fire Canyon. EOS 5D Mark III with EF 16-35mm f/2.8L II. 1/5, f/16, ISO 100.

    The post Finding the Time to do Photography Part 1- Business Trip to Las Vegas by Rick Berk appeared first on Digital Photography School.


    Digital Photography School

  • Contest – Win an Olympus E-M10 Camera from Macphun!

    Win an Olympus E-M10 Camera from Macphun! Every photo entrant receives a prize!!!

    Contest Image 01

    Over the last several years here at dPS, we’ve run some very popular competitions. This week, we are very happy to bring you our latest photo contest, “Get Outside and Shoot” from Macphun, makers of award winning photo apps for Mac OS!

    EVERYONE is a WINNER!

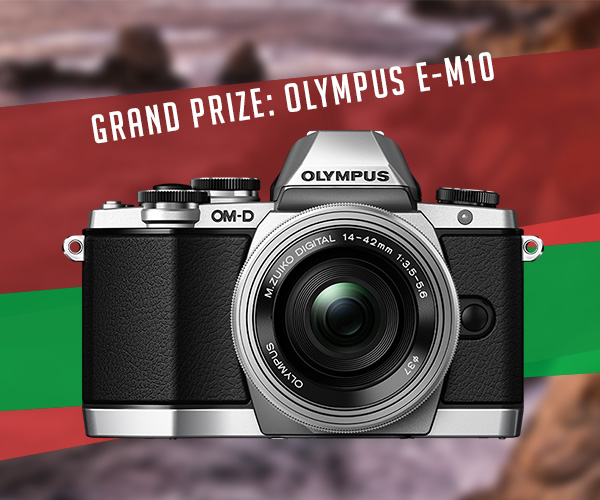
    For this competition, Macphun is giving away a Grand Prize of an Olympus E-M10 Camera, photo submissions published on canvas, and Macphun photo apps of your choosing! Plus, EVERY entrant will receive a complimentary copy of ColorStrokes for Mac – an award winning photo application!

    These five prizes are designed to be helpful for every level of photographer, so don’t wait to enter. Here’s what you could win:

    Contest Grand Prize Image 01

    • Grand Prize: Olympus E-M10 Camera – $ 700 Value
    • Weekly Winners will receive their submission on canvas – value varies
    • Runners-up will receive the Macphun photo app of their choice (Intensify Pro, Snapheal Pro, Fx Photo Studio Pro, or Focus Pro) You can view each product here.

    How to Win

    Anything you see outside is already a perfect subject. So take your camera or a smartphone, get outside, find the best angle and shoot. All you need to do is submit your photos to our photo contest and check back on weekly basis: we will be awarding prizes each Wednesday throughout the contest timeframe.

    Deadline is Wednesday May 21, 2014, 12:00 a.m. PDT (PST). Photos submitted after deadline will not be considered.

    Contest Outline

    The Grand Winner will get a shiny new and amazing Olympus E-M10 camera!

    There are also very cool prizes for runners-up, and a guaranteed gift for everyone who enters. Just remember, these will work with your Mac OS only. Sorry Windows users.

    You can submit your photo on here. The contest is called “Get Outside and Shoot”, so we urge you to submit images that are on topic, as others will not qualify. You can submit up to three different images.

    Your FREE gift, just for entering!

    Every entrant will receive a free copy of ColorStrokes for Mac – award-winning photo app by Macphun Software . The Macphun team will email you the app (download link and serial code) 2-3 days after your first submission. There will be only one app per entrant. Learn more about Macphun photography software here.

    Colorstrokes

    Winners and Prizes

    • The Macphun Team will pick and announce four winners of the week (one Grand Winner and three runners-up) every Wednesday for the duration of the contest; April 23rd, April 30th, May 7th, and May 14th, 2014.
    • One (1) Grand winner of the week will get his/her submission printed on canvas and shipped directly to them. Please note that the winner will be contacted by Macphun Team to confirm the shipping address.
    • Three (3) runners-ups will receive a Macphun photo app of their choice (Intensify Pro, Snapheal Pro, Fx Photo Studio Pro or Focus Pro)
    • The Grand Prize Winner will be picked by the Macphun Team and announced on Wednesday, May 28th, 2014. The Winner will receive an Olympus E-M10 Camera ($ 700 value)
    • The Macphun team may decide to add more prizes for the entrants of the contest. Entrants will receive an email newsletter, announcing new prizes, so make sure to enter today!!

    Macphun is passionate about photography! They develop software that inspires photographers of all levels to create the most stunning pictures ever. You capture the moments, Macphun products help you to unveil the real beauty of an image.

    Disclaimer: Macphun is a paid partner of dPS.

    The post Contest – Win an Olympus E-M10 Camera from Macphun! by Darlene Hildebrandt appeared first on Digital Photography School.

    Digital Photography School

  • Improve Your Backgrounds – Improve Your Photography

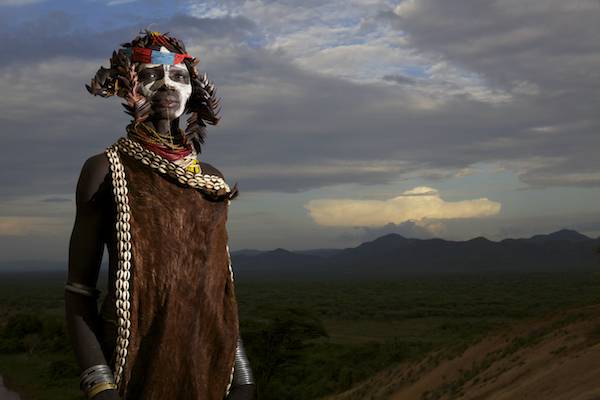
    Photography-backgrounds-Omo-Valley-Piper-14

    The background in your image can quickly reveal your skill level as a photographer. Learning to see past an exotic or exciting subject, to catch the details in the background, is what will distinguish you from a beginning, hobbyist photographer to an experienced professional. The background in your image immediately stands out to a trained eye. Learning just this skill can very quickly elevate and improve your photography.

    Most times, the difference between a snapshot and a strong, compelling image can be as simple as one small step, slightly changing your perspective, or blurring out a background. If the photograph is about an exciting subject, then try to eliminate the background, making it about your subject. If you wish to photograph your subject in their environment check to make sure that:  the background is equally as  impressive as your subject, is part of the story, and adds value to the image.

    Keep it simple for a more powerful image

    Here are several examples of how one simple movement or adjustment can change an unusable image into a very powerful one. In the portrait below, the light had become too harsh to make a usable image.  I moved my subject into a hut, but then the light coming through the wood created a horrible background.

    photography, distracting, background

    Watch for bright, distracting spots in the background

    I looked around, picked up one of the skins lying on the floor, and put it up behind the subject. This removed the distractions by making the background solid and created a powerful portrait.

    photography, backgrounds

    The image below on the left is beautiful, but once you look at the subject your eyes wonder up to the sky and out of the photograph. The sky is not part of the story. My subject is the story, therefore the sky is a distraction. I got a little higher and zoomed in a little closer, filling the frame with my subject, eliminating the distraction of the sky. Here the viewers eyes are drawn directly to the subject and stay there.

    photography backgrounds photography background

    Where is the horizon?

    photography, backgrouds

    Look where the horizon falls in respect to your subject

    If you are going to have sky in your image, you want to make sure the horizon does not cut through the head of your subject, like the image above. To adjust and create the image below, I dropped  down about a foot lower and zoomed in slightly so the horizon line is below the subjects head, creating a stronger image.

    photography backgrounds

    Below is another example of keeping your subjects head above the horizon. This was a difficult shot. If my eyes had not been trained to quickly hone in on the background, the horizon could easily have cut right though his head, or been on a slant.   This would have ruined the power of this image. It is these small details that make the difference in a great shot or a snapshot.

    Photography-backgrounds-Omo-Valley-Piper-Mackay-10

    Create separation between subject and background

    photography backgrounds

    Separation between your subject and background is essential to draw the viewers eye to the subject

    In the image above I was careful not to clip the toes and have the subject’s shadow in the frame, but the background around his head was distracting. I simply took a step to the left and the v-shape of the tree-line now leads the viewer directly to my subject. The man’s face is now in plain view without any distractions (image below).

    photography background

    Watch for bright spots

    In this image I wanted to show the subjects connection with nature, but I was challenged by not being able to create a composition without the distraction of the bright sky coming through.

    Photography background

    Where does your eye go in this image? To the bright sky

    The solution was to slightly change my angle and shoot it as a vertical (see below)

    Photography backgrounds

    Blur it out

    photography backgrounds

    The background in the image above is not bad, but since the subject is the bird it is distracting. The best way to handle this type situation is to blur the background by opening up to f/2.8 and zooming in on your subject, filling the frame. This is a much stronger image (below)

    Photography backgrounds

    Color can be a distraction

    Photography background

    When you are filling the frame with your subject always check for distracting elements in your background. In this first image (above) there is a brown line going directly across the background. Your eyes look directly at the cheetah, but then immediately pick up the break of color, distracting you as the viewer. The next two images have solid backgrounds. Your eyes go directly to the subject and stay there.

    Photography backgrounds

    Photography backgrounds

    Great subject alone is not enough for a wow image

    The image below looks more like a photograph that was taken because it was the first time the photographer saw a lion or because the photographer did not have a long enough lens. Sometimes a situation is what I call eye candy; just for looking at, and not for taking a photograph.  Just because your subject is exotic it does not mean it will make it a great photograph.

    photography backgrounds

    If the background does not add to the photograph or story, then remove it. Get up close and make the photograph about the subject.

    photography backgrounds

    Notice how much stronger this image is than the one above?

    Put it into practice

    The easiest way to train your eye is to practice. Get out and shoot, but before you head out, take a quick look through  a few of your existing galleries. Were you seeing what was in the background, when you clicked the shutter?

    Challenge your self by going to a busy downtown tourist area and try to isolate your subjects or  visit the zoo where the backgrounds can be difficult. Download the images and view them on your monitor. Looking at them in the back of your camera is a good tool for a quick peek. But it is when are no longer in the emotion of the moment, viewing the images on your monitor, that unwanted elements will scream out at you. The more you see these mistakes on your computer, the more you will remember them behind the camera. Repeat this exercise often until what you see on the monitor is what you were seeing in the frame when you click the shutter.

    Practice putting your subjects in simple clean environments first, as the sample images below.

    photography backgrounds

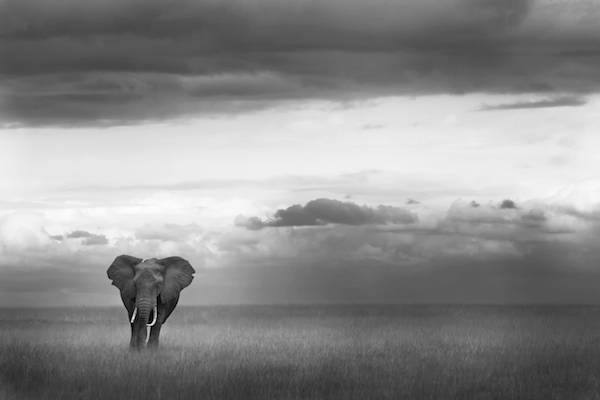
    Photography-backgrounds-elphant-africa-Piper-Mackay-01

    Photography-backgrounds-Omo-Valley-Piper-14

    Soon you will be able to introduce a secondary subject in the background for a more complicated image. This draws the viewer to the main subject and then through the image to the discover what else is going on in the images, holding their attention in your image a lot longer.

    Good Luck and enjoy the process

    Photography-backgrounds-lion-africa-Piper-Mackay-02

    Photography-backgrounds-Omo-Valley-Piper-Mackay-11

    The post Improve Your Backgrounds – Improve Your Photography by Piper Mackay appeared first on Digital Photography School.


    Digital Photography School

  • How to Plan the Perfect Portrait Shoot

    Natural lIght portrait

    In my last article I gave you five reasons to use natural light for portraiture. The next step in creating the perfect portrait shoot is planning. The more details you figure out in advance, the more likely you are to come away from the shoot with some beautiful portraits to make you proud.

    Generating ideas

    The creative side of portrait photography is something that some photographers seem to find easy, and others really challenging. One approach to generating ideas is to look at the work of others and let their portraits inspire you.

    You’re probably familiar with the main photo sharing sites already (Flickr, 500px and 1x) and there’s no doubt that you will find plenty of inspiration if you take the time to search them. To help you out I’m going to give you a short list of portrait photographers and websites to look at. The work you will see here will open your eyes to the possibilities within the world of portrait photography.

    For high quality black and white portraits take a look at the work of Betina la Plante, Eduardo Izq and Phil Sharpe (Phil has a lot of colour portraits in his portfolio too).

    For beautiful colour portraits view the portfolios of Cristina Hoch, Alex Benetel, Alessio Albi, Emily Soto, Ling Li, Anna Karnutsch and Sarah Ann Wright. You can gain greater insight into how some of these photographers work by checking out my interviews with portrait photographers.

    Other websites where you can see more work by portrait photographers are Faded & Blurred (leans towards the fine art and documentary side) and The D Photo (leans towards the creative side).

    Creating mood boards

    If you’ve had a good look through some of those links you’re probably feeling a little confused. That’s no surprise, I selected the photographers because they represent a wide variety of styles and techniques. So, how do you make sense of it all?

    My favourite technique is to create a mood board with Pinterest. A mood board is a place where you gather photos that you like in order to communicate the feel or mood that you want to create. You’re not copying the photos you’ve added to your mood board, but using them for inspiration and to communicate to potential models what you’d like to achieve.

    Creating mood boards is easy with Pinterest. You can make as many as you like, pin photos and move photos between different boards. Here is one of mine as an example, containing black and white portraits of men or this one on the dPS board – Portrait Inspiration.

    Mood boards are also a good way to get a handle on what sort of portraiture appeals to you. When I look at my mood board of black and white portraits of men, it tells me that I like dark, moody portraits taken with natural light. As you look at your own mood boards you will see patterns emerge as to what style of portrait appeals to you. Use this feedback to inspire your portrait shoots.

    Finding locations

    Finding locations depends on where you live and the style of portrait photography you’d like to pursue. You may shoot in a studio and that makes the decision easy. Others may prefer to shoot outside, utilizing local beauty spots and other interesting locations. Here are some things to consider:

    Are you looking for an urban environment or a rural one? If your mood boards contain photos taken in natural environments like forests or fields, then that is the sort of location you should look for. Going back to my mood board of black and white portraits, I can see that I have mostly chosen ones taken in gritty urban environments. I need a similar location to create portraits consistent with the feel of the images in this mood board.

    Natural lIght portrait

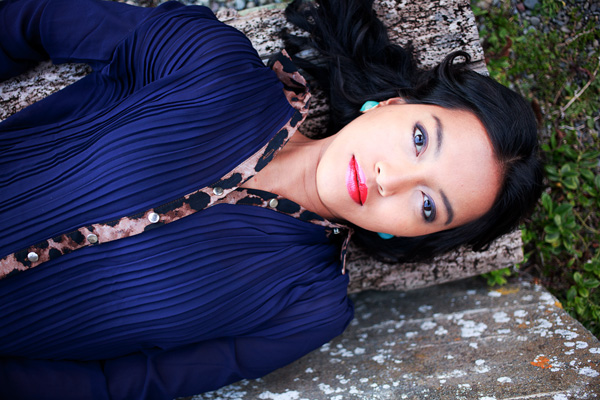
    The background in this photo was a bush, giving it a rural feel. Can you imagine how different this portrait would be if it had something like a concrete wall as a background? The atmosphere would be completely different.

    How public or private is the location? You may prefer quiet places without many people around where you can concentrate on your portrait shoot.

    Choose a lens

    What lens will you be using? This is important when choosing a location. If you use a wide-angle lens, you will be including a great deal of the location in the photo. If you use a telephoto lens, you may only utilize a small part of the location, and that may be out of focus if you shoot at a wide aperture. Telephoto lenses give you more freedom when selecting locations because they can transform a small area such as a fence or wall into a beautiful background.

    Natural lIght portrait

    The portrait on the left was taken with a wide-angle zoom (focal length 26mm) and the one on the right with a short telephoto lens (85mm). Can you see how the focal length affects the background? Wide-angle lenses include more of the background, therefore you need a location suitable to this approach. Telephoto lenses include much less, and can turn mundane locations into interesting backgrounds.

    Read my article How to Choose the Perfect Portrait Lens for more information on this topic.

    What will the light be like at your location when you are there? Think about what time of day you will be shooting, and where the light will be coming from. The weather is a major factor, the nature of a location and its suitability for portrait photographer depends on both the weather conditions and time of day.

    Natural lIght portrait

    This portrait was taken at the end of the day as the sun was setting, casting a beautiful soft light with a red glow over the scene.

    Build a dossier of locations

    With these things in mind build up a mental dossier of locations close to where you live that you can use for portrait shoots. Keep your eyes open when you are out and about and you will find yourself seeing the potential of locations in a new way.

    Natural lIght portrait

    I took this portrait in a children’s playground. Every day places like this can become interesting locations. Take note whenever you find somewhere new that could one day be used for a portrait shoot.

    Finding models

    The final step is finding models to work with. By now you should have a fairly good idea of what type of portraits you’d like to create, and where you’d like to take them. Now you need a model to make that happen.

    You may be lucky enough to have friends or family members who would make good models. If have to search a little harder, a good place to start is Model Mayhem. There are other websites where models and photographers can connect, but Model Mayhem is my favourite because it lets you search by location. You can centre the search around the city or town you live in, and save time wading through profiles of models from other parts of the country.

    The good thing about websites like Model Mayhem is that its members are people genuinely interested in modelling. You will find that the models who come up in your search range from inexperienced to professional. You may feel most comfortable looking for somebody whose experience matches yours. For example, if you are new to portrait photography then you may feel a little intimidated by an experienced model, and prefer to approach somebody who is also starting out.

    Bear in mind that if you have the budget, one advantage of using professional models is that you will benefit from their experience and expertise with posing. Inexperienced models will expect you to direct them. Depending on the style you are pursuing, you may learn quicker and create better portraits with a professional.

    There are downsides to websites like Model Mayhem. Some of the models you approach won’t respond and others won’t like your style of photography. Some might let you down at the last minute. But on the whole, my experience has been positive, and I’ve found some of my best models here.

    Here are a couple of other ideas that photographers I know have used successfully for finding models. One put up a sign at her local university (where she was also a student) and found models that way. Another friend of mine had some business cards made and approached people in the street to ask them if they would like to model for him. Not all responded, but he found a few good models that way.

    By the way, if you’re a model based near Wellington in New Zealand, then feel free to get in touch. Contact details on my website (link below).

    Perhaps the readers can share some of their experiences about searching for models. I would like to hear your stories, both the positive experiences and the negative.

    Putting it all together

    Hopefully these ideas have given you a head start in planning the perfect model shoot. What are your experiences with creating portraits? What advice would you give other photographers? Let us know in the comments.


    The Natural Portrait photography ebookThe Natural Portrait

    My ebook The Natural Portrait teaches you how to take beautiful portraits in natural light. This 240 page ebook, published by Craft & Vision, takes you through the entire process of natural light portrait photography through from finding a model, deciding where to shoot, working with natural light and post-processing your images. Click the link to learn more or buy.

    The post How to Plan the Perfect Portrait Shoot by Andrew S. Gibson appeared first on Digital Photography School.


    Digital Photography School

  • How to Improve Your Photographic Eye Super-Effectively

    What does it mean to have an eye for photography? Is it something you are born with, or can you can learn? Besides taking pictures, our photographic eye lets us recognize situations, composition, subjects and then puts together all these elements in a frame that makes a great picture. Taking good pictures is not always easy, as there is a Continue Reading

    The post How to Improve Your Photographic Eye Super-Effectively appeared first on Photodoto.


    Photodoto

  • 3 Ways to Get Killer Portraits Using a Tripod

    As photographers, you’re all looking to “wow” the people we’re taking pictures of, whether they’re clients or just friends. When you show final images, there’s that sense of anticipation, excitement and nervousness as you gauge reactions. And when you hear the words “amazing” or “I love them,” it’s truly a great feeling. So how do you get the “wow” and avoid the “just okay?” Well that’s not always easy. With so many good photographers out there and so much of their work getting exposure via social networks, expectations for good photography is as high as it’s ever been.

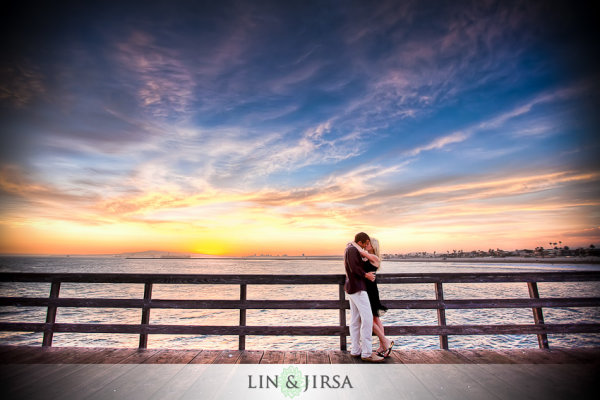
    shutter-drag-wedding-photography

    Here are three ways to achieve killer portraits with the use of a tripod that we use in our studio. These include the following, all of which we’ll show you – keep reading:

    1. Shutter Drags
    2. Composites
    3. HDRs

    Required Equipment

    • Sturdy tripod – that old hand-me-down tripod might not be stable enough, as any movement will show in the images
    • Shutter release – using a cable release will help you avoid touching the camera and causing movement
    • Wide angle lens – as you can see from the images in this article, a wider lens is going to bring out many of the “wow” elements like the clouds, the ocean, the streaking lights, and more
    • Camera – as with any type of photography, the camera is only as good as the photographer. You can get amazing results with both entry level DSLRs and full frame cameras.

    1. Shutter Drags (Long Exposure Photography)

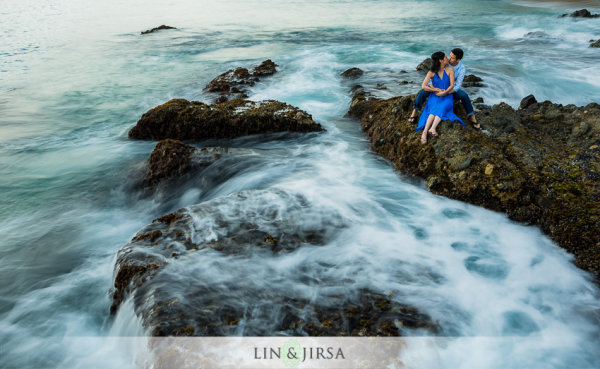
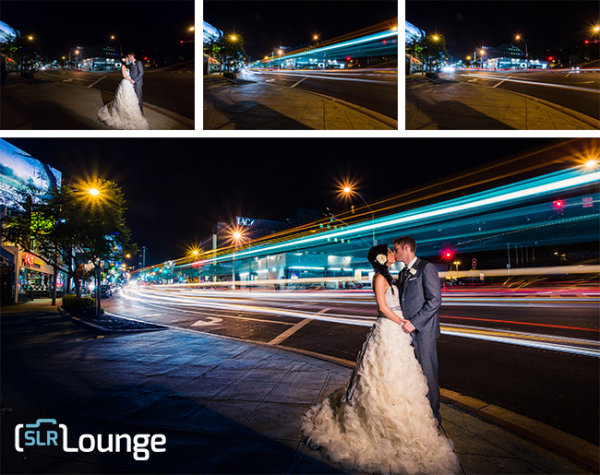
    Dragging the shutter refers to using slower shutter speeds to capture movement. This captures motion of anything in your frame that is moving, while keeping the static objects in the scene nice and crisp. If you can get your couple to hold still, you have the opportunity to create awesome effects with moving people, cars or waves like you see in the image below. Additional saturation and contrast is added in post production using some Lightroom Presets.

    wedding-photography-los-angeles

    Shutter Drag Quick Tips:

    • How slow do you go? – well that depends entirely on how fast the other elements in the scene are moving. If cars are zooming by, you can get away with faster shutter speeds like 1/60 or 1/30, but if you are capturing moving people and they are slowly strolling, you may have to drop it even lower like 1/10th or even lower. For water, like the shots above, we are generally around 1/2 to 1 second.
    • Ensure that your subjects are holding really still – instruct your subjects to hold very still, avoid blinking during the shot or sequence of shots, and even hold their breath.
    • Utilize static poses –  posing for these types of photos will have to be static. Dips, jumps, and walks will add too much motion in the scene and result in blurry photos. However, static does not have to mean boring. You can still have them in flattering, romantic poses.
    • Snap a few extra shots to ensure you have one crisp photo – take a few extra shots because a photo may look crisp on the back of your camera, only to show noticeable motion blur as it’s taken into post production.

    2. Composites

    wedding-photography-composites-1

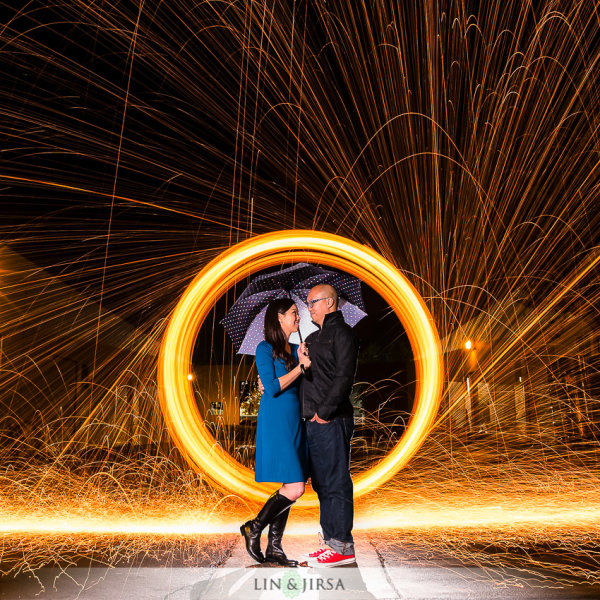
    Compositing multiple photographs into one is sometimes the best solution when it’s unreasonable to have your couple hold still for as long as you need to achieve the desired effect. For example, if you’re looking to capture the beautiful stars in a night sky or if you’re looking combine multiple streaks of passing car lights –  the five, ten, or even 30 second exposure time is much too long to expect any live subject to be still. Below is an example where our couple would have had to hold still for around 15 seconds as we spin flaming steel wool just behind them.

    wedding-photography

    Composite Tips:

    The tips for capturing composites are actually very similar as the tips for capturing shutter drags. For example, you still need a sturdy tripod and a shutter release; and you should certainly snap a few extras to make sure you have enough choices to work with in post-production. In addition, here are some more quick tips for capturing composite photos.

    • Expose for the couple’s skin tones first – your lighting can be anything from flash to constant lights; but the most important thing is to focus primarily on the subject.
    • Have the subjects exit the scene – after you’re sure you have a shot with a good pose and good lighting, you can have them exit the scene.
    • Then adjust your settings as needed to expose for the background and create your desired effects. For example, if you’re looking to capture the streaking lights, adjust your shutter speed down and wait for the cars to pass.
    • If you can keep the overall exposures identical between shots, compositing will be incredibly simple. Just layer the images in Photoshop, and then mask in and out elements on each layer. However, if the exposures and look of each image varies, then it will require quite a bit more advanced compositing work which would be beyond the scope of this article.

    3. Try HDR Portrait Photography

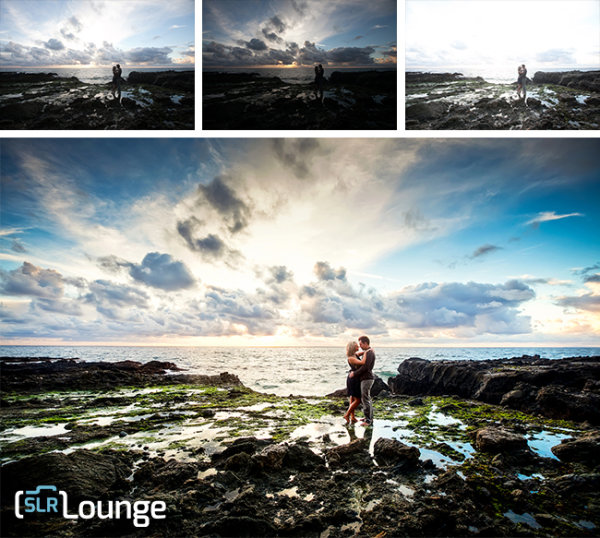
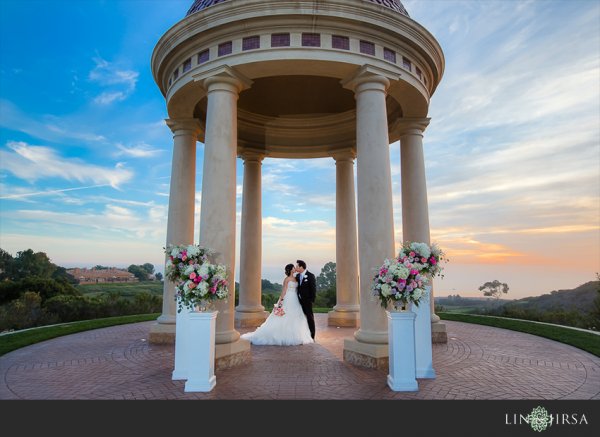
    hdr-wedding-photography-1

    While HDR Photography gets a bad rap sometimes for being gaudy and fake, when done correctly, you have the opportunity to create memorable, distinct photography. This is especially true with outdoor scenes on a cloudy day. Grab your tripod, pose your couple in a static pose, dial in the right settings, and shoot away. What are the right settings? Well start with ISO 100 and a decent aperture (f/4 and up). From there, the shutter will vary depending on the brightness of the scene. For more information, feel free to check out some of these HDR tips on dPS.

    hdr-architecture-wedding-photography

    HDR Quick Tips:

    Here are a few more things to keep in mind.

    • Study how to bracket exposures on your specific camera. Almost all cameras have the AEB (Auto Exposure Bracketing) feature, but you will need to know how to access it to dial in the correct settings.
    • Keep your minimum shutter speed at 1/200 or higher. Any movement in the couple or background can cause unnatural “ghosting,” so keeping the shutter speed high will really help you save time in post production.
    • Avoid strong and overpowering flares. If you’re shooting into the sun, strong flares can desaturate your image and create a loss of sharpness. If you are shooting into the sun for compositional purposes, choose an angle where the flare isn’t going to distract from the subject.
    • Choose the right time of day. Sunrise and sunset are still going to one of best times to shoot, as you are most likely to have amazing color in the sky during that time. Remember that the same general photography rules still apply when shooting HDR, we simply are using the HDR process to bring out more detail.
    • Watch the weather report. Partly cloudy days are great times to shoot HDR photography. Capturing all of the contrast and interest in the clouds, as you see in the sample images in this article, really add the “wow” factor.

    Conclusion

    intimate-hdr-poses

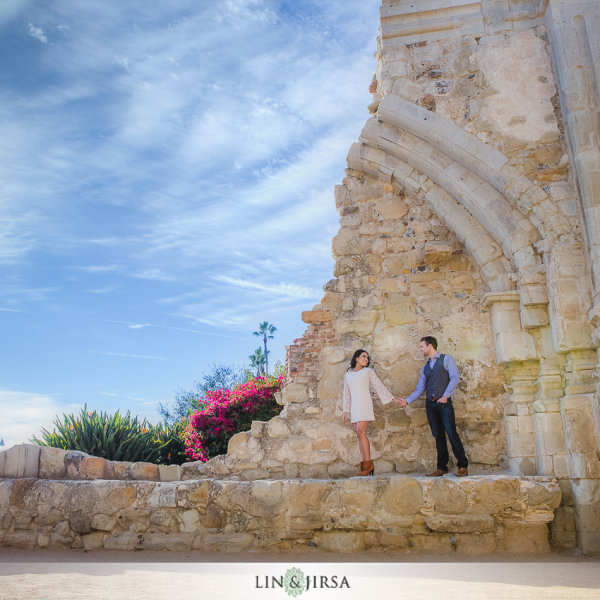
    By no means are these three techniques enough for a solid session. In fact, the majority of the photos you take during any portrait session should revolve around candid posing, story-telling, and emotion. For us, we use these dramatic environmental shots to “set the stage” in a final album, canvas mural or other print medium. They are the big grand images that sets the scene, and they are followed by the close up candid images showing the couple interact in said scene and environment.

    These techniques are also wonderful in creating “wow” shots, i.e. the shots they share on Facebook and the shots they end up printing on a canvas at their wedding. The shots that make everyone else go, “how’d they do that!?”

    Do you have any other killer tips you’d like to share? Please do so in the comment section below.

    sunset-hdr-wedding-photography

    The post 3 Ways to Get Killer Portraits Using a Tripod by Post Production Pye appeared first on Digital Photography School.

    Digital Photography School

  • Waterfall Photography Video Tips

    To help you out with this week’s photography challenge of waterfalls, I found a few video tutorials to walk you through how to photograph a waterfall. I also shared a collection of stunning waterfall images to get you inspired, if you missed it you can see those here.

    This first video shows you the two choices you have when photographing a waterfall. You can either freeze or blur the water. Watch as he walks you through the camera settings for both options.

    In this quick tip Tony Northrup goes over such tips as using a sturdy tripod, using shutter priority mode, and using a Neutral Density filter to block some of the light so you can get longer exposures, and finding a unique camera angle.

    In this last video the photographer goes over step by step how to get that nice milky looking water. He talks about using a Polarizing filter, a tripod, and back button focus to help you get everything else in the photo nice and sharp.

    I hope those help you get a handle on some of the technical aspects of waterfall photography. Now get out there and get shooting for this week’s challenge!

    The post Waterfall Photography Video Tips by Darlene Hildebrandt appeared first on Digital Photography School.


    Digital Photography School

  • Light Blaster [ For Special Effects Lighting ] a Review

    Sometimes a new piece of camera equipment will let you do something better, faster, or cheaper. But sometimes it lets you do something wholly new, that nothing else can do, and it opens up a whole new world of creative opportunities. The Light Blaster is that kind of gear.

    Light blaster 33 1024 resize

    By combining a flash, a lens, and one of many different slides which you can buy or provide yourself, the Light Blaster lets you project an image into your scene or onto the subject. Like any new piece of equipment there’s a bit of a learning curve, but you can create effects that add to your photo in ways only possible with tricky DIY hacks until now.

    How it works

    The Light Blaster is a strong plastic shell that acts as a mount to hold the three key elements – lens, flash and slide – securely in place and in the correct relative positions. You provide a lens and a flash. The lens attaches to the front via an EOS bayonet mount (a Nikon adapter is available). There’s no lock, but it is held firmly. At the back you slide in your flash, which is held in place with a strong leather friction-secured strap, which is adjustable and held in place with velcro. Flashes of many sizes are accepted, and I tested with a Canon 580EX and a Lumopro 160.

    In the centre of the Light Blaster there is a slot which accepts the provided caddy. The caddy holds the slide which is to be projected. You can use standard mounted 35mm slides or small plastic sheets about the size of a coloured gel you might put on the front of your flash. Just on that topic: you can gel the flash you’re using to give a colour tint to the projected image as well. The caddy is super easy to swap, although putting the slide in can be a wee bit fiddly. Topping off the well designed and sturdy construction is a metal tripod thread on the bottom in the thickest part of the plastic body so that you can securely mount the whole arrangement on a light stand.

    Looking at the whole thing assembled, one might think it’s a bit precarious and that the lens or flash could be bumped and fall out, but that was not my experience at all. Everything felt sturdy and secure, and I didn’t mind picking up the light stand with everything attached and moving it around the set.

    The Light Blaster also comes with a convenient case which safely holds everything, including a whole bunch of slides and an extra caddy in a small package with a fabric handle.

    The Results

    While I was testing out the Light Blaster I used it primarily in three different ways:

    1. Projecting onto the background
    2. Projecting onto a model
    3. Projecting into the air itself with the aid of a smoke machine

    Here are some examples:

    Creek 131110 078 X3 resize

    Model: Mei Hikari

    For this shot I projected a pair of wings onto a large wall behind the subject. It was dusk and low light, so the flash projection was easily visible, even though it’s a dark wall. The contrast was enhanced in post processing. The image projected ended up being about three meters wide. It took a few shots to get myself and the model lined up exactly right, since you can only see the projection on the camera screen. Have a look at the rest of the photos from this shoot here.

    Creek 140319 236 X3 resize

    Model: Graciously

    I used the Light Blaster to project a simple circle of light onto the backdrop behind my model in this burlesque style shoot for a “stage” feel. While a snoot can restrict the light to a spot, only a focussed light can create the sharp clean edge I wanted, like a stage spotlight, or the Light Blaster. See more photos from this shoot.

    Creek 140319 383 X3 resize

    Model: Graciously

    Later in the same shoot I fired up my smoke machine, and using a random geometric pattern on one of the effects slides, I created cool light beams through the smoke. The shafts of light you see wouldn’t be possible with a single light. It needs to be broken up in order to cast shadows into the smoke.

    I NXG3q3z X3 resize

    Here a photo of autumn leaves was projected directly onto the model and background, creating interesting layers of texture and shadow. I filled in the shadow of the model’s face with a tightly gridded flash to make his whole face visible. Projecting onto the model can be tricky to get right, but the results can be impressive. I want to experiment more with this technique. I think it is particularly well suited to art nude photography.

    Any Problems?

    There’s a couple of potential ‘gotchas’ when using the Light Blaster, which you’ll need to overcome and learn how to work with, but that’s true of any piece of gear in your kit.

    Firstly, you’ll most likely want the projected image to be in focus, which is achieved by turning the focus ring on the attached lens, (make sure it’s in manual focus mode). Since the image is only visible when the flash fires, you’ll need to use a flashlight in place of the flash before you add the flash to the back. You’ll need the set to be quite dark or use a bright flashlight to see well enough to focus, and if you move the Light Blaster relative to the surface it’s being projected onto, you’ll need to take the flash out and re-focus.

    As mentioned in the first example shot above, it can be tricky to get the best placement of the image, your model and yourself. You might need to take several shots and make small adjustments each time.

    Because there’s a powerful flash shining through the slide, the blacks are never going to be truly black. Some of the light will still pass through the black ink or emulsion, so the contrast might not be as good as you’d like it to be. To address this issue, a brand new set of laser-cut metal “slides” has just been announced for the Light Blaster. This will give you absolutely solid blacks.

    Conclusion

    I had a great deal of fun testing this product, and I’m looking forward to using it in future shoots. With a good variety of effects slides available from the Light Blaster site, the ability to take any 35mm slide, and even home-printed acetate slides, there is literally unlimited creative potential. You can put any backdrop you like behind your subjects, and transport them to another world. Or you can use it in ways similar to what I have here. Have a look at the Light Blaster site for more example photos. For under $ 100, this is a super versatile creative tool to add to your kit.

    Want more on special lighting techniques? Try these articles:

    • How to Create this “Fight Club” Inspired Portrait using One Light
    • Accent Lighting for Portraits
    • Studio Lighting: Building a Light Set-up
    • How the Shot was Done: SNK Police Cosplay

    The post Light Blaster [ For Special Effects Lighting ] a Review by Neil Creek appeared first on Digital Photography School.


    Digital Photography School

  • HDR Darkroom 3 Software Review

    Digital cameras may be making incremental improvements with dynamic range capabilities, but are still lacking in terms of what they can capture. Bracketing multiple exposures of the same scene and merging them together with tone mapping software is one way of creating an HDR photograph allowing you to capture the full range of the scene in front of your camera.

    HDR-darkroom3

    The people at Everimaging have recently upgraded their HDR tone mapping software offering to its third edition, and as a result today we’re going to talk about HDRDarkroom 3. It’s available for both Mac and Windows users, and a free trial version can be downloaded from their site.

    What’s Cool About HDR Darkroom 3?

    The number one thing that stands out to me is the user interface. The simplicity of the way that HDR Darkroom 3 uses presets to get you started with tone mapping is unique, and takes a lot of the work out of finding the right starting point. The program is also stripped down in a way that gives even the most novice HDR photographer an easy learning curve to get started.

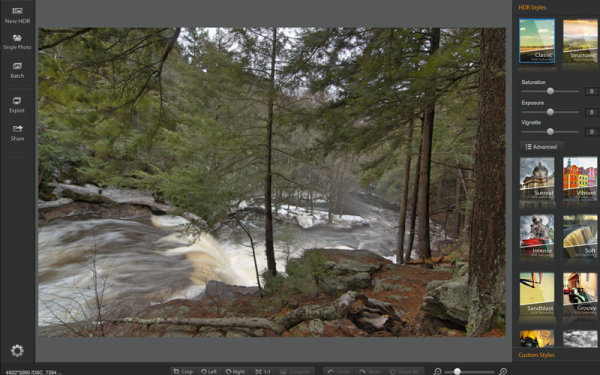
    HDRDarkroom3-review-2

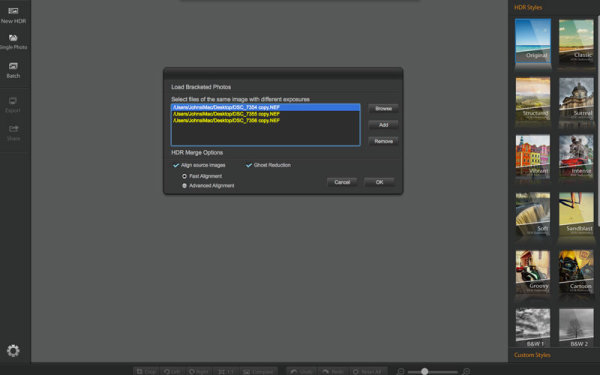
    When you launch the program you can choose from three different import methods: New HDR, Single Photo and Batch. These work as you might expect where New HDR allows you to choose the set of bracketed images that you’d like to work on, single photo allows you to tone map a single photograph and batch processing allows for processing a batch of HDRs using the same settings.

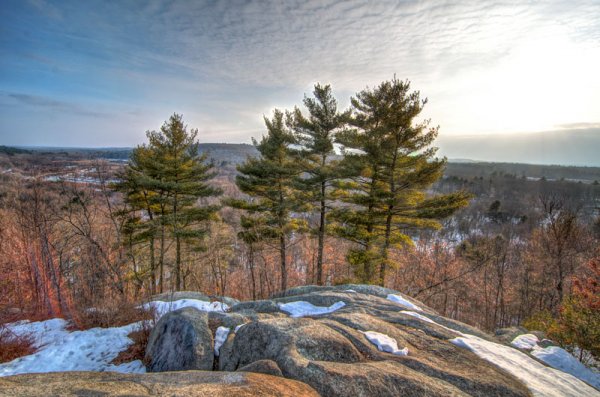
    For this review I’ll be using a three bracket set I took while photographing waterfalls recently. When importing photographs you can have HDR Darkroom 3 align the images by either a fast method or advanced method. When switching between the two options there is no difference to the user interface (both options are completely software driven) so I’m assuming this is just going to depend on the amount of time it takes for the merge to be completed.

    On top of the alignment you can also have HDR Darkroom 3 take care of ghosting effects by checking the appropriate box. Again, this is a very simplistic approach, where the user is left at the mercy of the algorithm inside the program with no ability to customize which areas of the photograph to focus on, or the intensity of the ghosting effect removal.

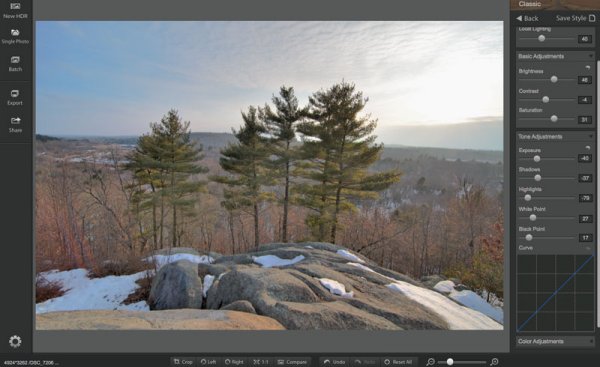
    HDRDarkroom3-Review-3

    After importing your image you are defaulted to the ‘Classic’ preset which is a very standard almost uninteresting HDR image. On top of this preset the program comes packed with 15 more for you to choose from and the option to save any modifications that you’ve made as custom presets.

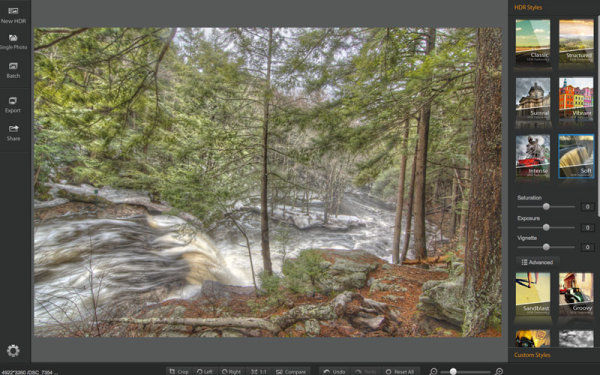
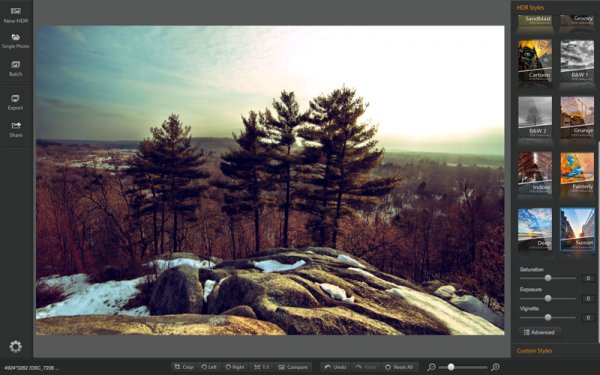
    HDR Darkroom 3, unlike the other programs in the industry, actually forces you to start with a preset. You choose which one you like best for the image that you’re working on and each one will change the image to achieve a particular look.

    HDRDarkroom3-Review-6

    When you have found a preset that you like for the image, you can then customize it to your liking with three different sliders for Saturating, Exposure and Vignette as well as an advanced button for more freedom in the editing process.

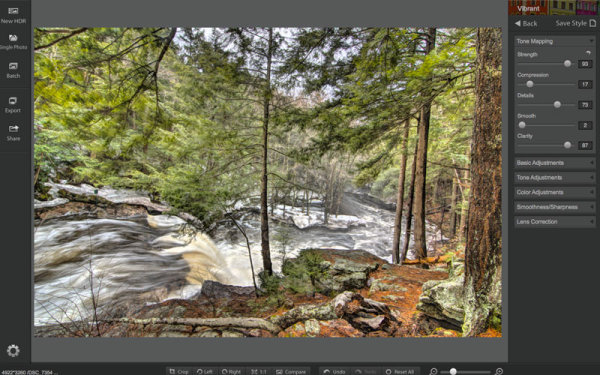
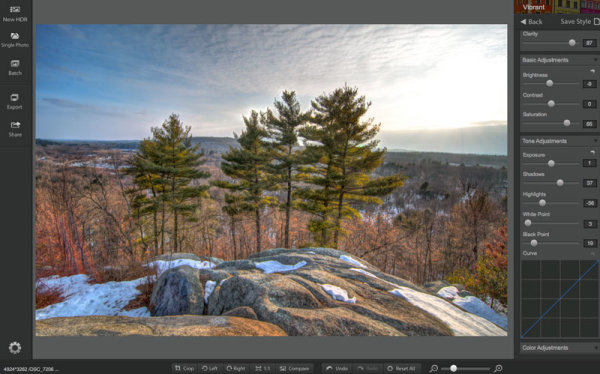
    HDRDarkroom3-Review-5

    Once in the advanced section you have access to many of the tools you might expect like: tone mapping, basic exposure and contrast control, highlight and shadow adjustments, white and black point adjustments, and other tools for color, smoothness and even lens correction.

    HDRDarkroom3-Review-4

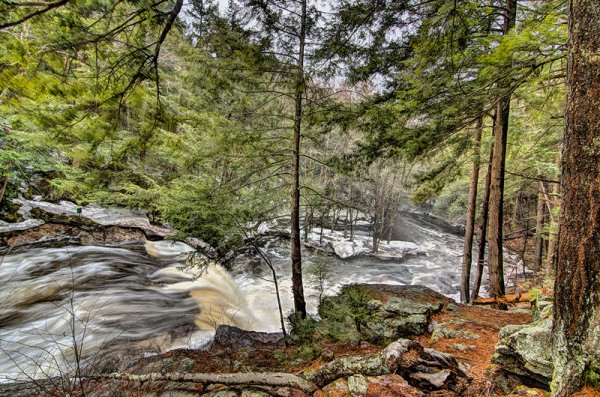
    Overall, HDR Darkroom 3 does do a good job at processing a bracketed set of photographs with a slick, easy to use interface to boot. However, for those who do want a little more control, it might be just a bit too limiting. One of the biggest things that I felt was missing was a local adjustment brush for finer control over where effects were being applied.

    HDR-Darkroom3-Review-7

    How’s HDR Darkroom 3 handle worst case high dynamic range?

    The waterfall photo above that I used for the walkthrough is a fairly easy shot for an HDR process as its low on dynamic range and won’t really push the software to its maximum potential. But, I didn’t want to be too unfair in the introduction.

    So let’s take it a bit further, let’s try and and do something close to a worst case scenario HDR. The image below is made up of three bracketed images shot at +2, 0, -2 directly into the sun. Plus there’s snow and shadows in the foreground to deal with as well, making for a truly difficult shot.

    Admittedly HDR Darkroom 3 did struggle here, I tried to recover those highlights in the sky, but no matter what I did they were always blown out. Below are screenshots of three different presets plus advanced adjustments that I applied in order to try to control the image.

    Sunset-HDR-Darkroom3.2 Sunset-HDRDarkroom-3.3 Sunset-HDR-Darkroom3

    While the presets make for some easy switching between different effects of HDR, the overall fine-tuning control of the process is lacking in some situations. On most occasions when I went to reduce the highlights I was left with something that was lacking detail and muted in color. Not to mention the sliders are very heavy handed and effect a much larger portion of the tone curve than the respectively named ones in Lightroom.

    The best I was able to come up with, shown below, has a few issues with haloing around the trees (the blown out highlights around the sun. It’s something that you may be able to fix in Photoshop later by masking in the sky from one of the brackets, but that’s beyond the scope of this review.

    HDR Darkroom 3

    HDR Darkroom 3 Final

    Compared to the Merge to 32-Bit Lightroom Plugin by HDR Soft

    Being that this was a challenging photograph it’s worth checking out two other HDR options to see how they would handle the same scene. Both of the options I’m testing below are offered by HDRSoft. One of these is very budget friendly at a price of $ 29, while the other one is more comparably priced to HDR Darkroom 3 listing for only $ 10 more at $ 99.

    Our budget friendly option is a plugin called Merge to 32-bit HDR for Lightroom. It’s a very simple process that really strips out the tone mapping process of creating an HDR image, but still allows you to merge the data from a bracketed set of photos directly inside of Lightroom 4 and greater. For more about how it works you can read Five Minutes to Realistic HDR using Lightroom and a 32-Bit Plugin.

    Now it’s not surprising that the 32-bit plugin struggled with this photograph, as after all, it is very limited. However, because it imports the 32-bit TIFF file back into Lightroom for you to work on, I think it may have handled the highlights in the sky slightly better than HDR Darkroom 3, it’s a judgement call, but for the price difference I’d say it’s a win.

    LRPlugin

    Merge to 32-Bit HDR Plugin for Lightroom

    HDR Darkroom 3 Versus Photomatix 5.0

    Next up would be the flagship offering from HDRSoft, and one of the leaders in the HDR tone mapping word, Photomatix 5.0. It’s no surprise to me that Photomatix did a fairly decent job with the foreground detail and even most of the sky, it still had some problems with the sun, but that’s not surprising given the circumstances of the image set.

    Photomatix-+-LR-3

    Photomatix 5.0 + Quick Lightroom Cleanup

    Overall I’d argue that this particular image set is one of the more challenging that you will run through an HDR tone mapping software, and all three options above gave it a fair attempt.

    My thoughts on the three software in terms of how they did overall:

    • Photomatix 5.0 – Probably did the best overall job at merging the three images. However, it’s a more involved process, requires more training, and ultimately isn’t a standalone editor you’re going to need to clean up the tone mapped image in LR or some other program after the fact.
    • Merge to 32-Bit plugin – It’s quick and dirty. You are able to collect more data from the scene and basically create an HDR image without ever leaving Lightroom all for less than 30 dollars. Yes it’s limited, but it’s also affordable.
    • HDR Darkroom 3 – Like I said at the start of this article – I think HDR Darkroom 3′s best features are its user interface and intuitive preset oriented process of tone mapping images. I’d argue that it struggles the most when it comes to complicated scenes mainly due to the fact that the localized tone controls of highlights and shadows are a bit heavy handed and could stand to be more refined.

    Would I Recommend HDR Darkroom 3?

    HDR Darkroom 3 is a bit more affordable than some of the other premium tone-mapping solutions out there and does make a fair attempt at providing a good amount of the basic functionality into a nice looking and affordable package.

    I think it boils down to this…

    If you’re the type of person who likes to keep it simple and you don’t mind giving up a bit of control for the sake of simplicity then HDR Darkroom 3 might be the best option for you. But I’d urge you to check out the Merge to 32-Bit plugin first, as it may be all you need considering the price points.

    However, I just can’t recommend it to those who are looking for a full featured product with total control over the HDR tone mapping process – there are better tools for the job such as Photomatix Pro and the small amount of savings here just doesn’t justify what you’ll give up.

    Have you used HDR Darkroom 3? Tell us your own thoughts on it in the comments below – after all I’m just one opinion.

    The post HDR Darkroom 3 Software Review by John Davenport appeared first on Digital Photography School.


    Digital Photography School

  • Weekly Photography Challenge Waterfalls

    Earlier today I shared a collection of waterfall photographs to get your weekend going, and earlier this week we launched our latest dPS eBook  – Loving Landscapes A guide to landscape photography workflow and post-production. So in keep with the theme of landscape and nature photography the weekly photography challenge will be waterfalls.

    By paul bica

    Even if you live in the city you can probably find some manmade waterfalls or fountains nearby. Think outside the box. Is there a park with a stream? Perhaps a babbling brook? Do some digging and find some running water and go photograph it. It need not be a full on waterfall, use a fountain if you have to. The principals are the same.

    The main concern when photographing a waterfall is how to capture the moving water. You basically have two approaches to choose from: freeze it, or blur it. Freezing the water will give a motionless effect, with water droplets suspended in mid air. Blurring it can have a dreamy, foggy look and a totally different feeling. Neither is right or wrong, they just produce different results. So choose one and see what happens, or better yet, do a variety. You may be surprised with the results and which ones you prefer.

    Here are a few examples to give you ideas:

    By Kerry Sanders

    By Joe Parks

    By Centurion

    By zev

    By blmiers2

    By Peter Roome

    By thomas brown

    By Alex Shamis

    Share your waterfall images!

    Simply upload your shot into the comment field (look for the little camera icon in the Disqus comments section as pictured below) and they’ll get embedded for us all to see or if you’d prefer upload them to your favourite photo sharing site and leave the link to them.

    Need help? How about some articles on nature and waterfall photography like these:

    • 4 Tips for Shooting Drop Dead Gorgeous Waterfalls
    • 3 Tips for Creating Dramatic Images using Motion
    • Picking A Waterfall Shutter Speed For The Best Look
    • Waterfall Digital Photography

    Check ou the newest dPS ebook – Loving Landscapes A guide to landscape photography workflow and post-production – a brand new dPS ebook by the authors of Living Landscapes

    The post Weekly Photography Challenge Waterfalls by Darlene Hildebrandt appeared first on Digital Photography School.


    Digital Photography School