Category: Photography

  • Bounce Flash Secrets – Bouncing Your Way to Better Photography

    If you have ever seen a professional photographer using flashgun on top of their camera, and wondering why the flash is not pointing directly at the subject, that’s because they are bouncing the flash. In this article I will reveal to you the secrets of bounce flash, which I have learned over the years working as a professional wedding photographer. I will unveil my killer techniques that will allow you to bounce your way to better photography.

    If you are new to photography you may be apprehensive about using flash. I understand. A lot of it has to do with when you first buy a point-and-shoot camera the flash on it just creates a horrible direct flash look and that is what you associate with flash photography. Once you master the art of bouncing however, I promise you will never look back.
    Garry Chung Photography 100

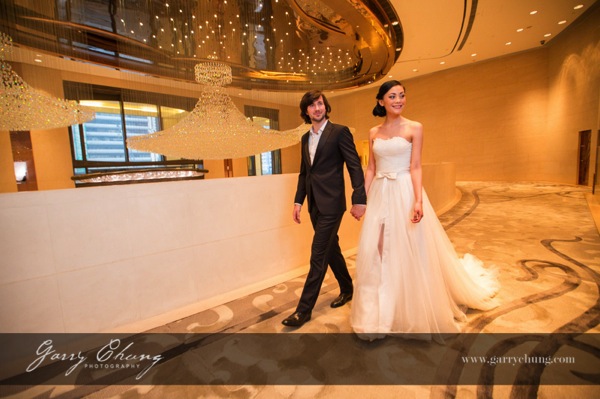
    The image above is lit by bouncing flash off the wall on the right side, just out of frame. Notice how it doesn’t look obviously flashed.

    What is bounce flash?

    Bounce flash is when, rather than firing your flashgun pointing directly at your subject, you point it elsewhere typically up or at an angle, bouncing off a wall or ceiling. The objective is to “bounce” light to soften it before it hits your subject.

    Why bounce it and not point directly at my subject?

    Because generally speaking direct bare flash, pointing at your subject, is terrible for two reasons:

    1. The light is “hard” and can cash horrible shadows on your subject. It just generally is not very nice light for portraits. The definition of hard and soft light if you are confused is simply the transition the light makes between shadow and highlights. A gradual transition is called soft light and a sudden transition where you have a strong shadow edge is called hard light. Portrait photographers talk a lot about nice soft quality light and that is why they use light modifiers such as soft boxes and umbrellas.
    2. Direct flash produces “flat lighting” which gives that deer in the headlights look and also does not give a 3-dimensional quality to the photo

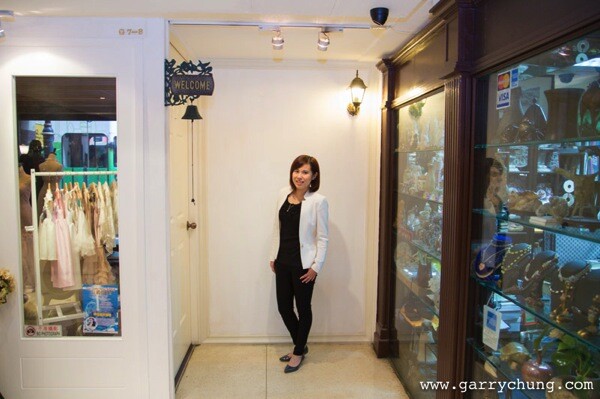
    It is probably easier to show you in pictures so here are a few images of my friend Theresa, that I took just to illustrate the point. Just to set the scene, below is the area where I took these photos. This is a shopping center in Hong Kong and I have chosen the area because of the white walls.
    Bounce flash 100

    This was shot with the flash pointed directly at the subject. Because there were a lot of white walls surrounding Theresa, there was a lot of wrapping light and it didn’t turn out too bad. But, there is a hard shadow in the neck area and the lighting is flat.

    Bounce flash 101

    Manual Mode, 50mm lens, f/4, 1/80th, ISO 800, flash in ETTL Mode

    This was shot with the flash tilted upwards towards ceiling. The light is much softer and you can see that the shadow on her neck is softened. It’s OK but could be better.

    Bounce flash 102

    Manual Mode, 50mm lens, f/4, 1/80th, ISO 800, flash in ETTL Mode

    This is the way I would light this portrait. The flash is tilted, in this case aimed to bounce off the wall to the left, and bounce back. The result is a nice soft light, and also notice the eyes have better catch lights.

    Bounce flash 103

    Manual Mode, 50mm lens, f/4, 1/80th, ISO 800, flash in ETTL Mode

    But wait, I think I can do one better. I want a more dramatic and contrasty image so I cut out the ambient light by setting a faster shutter speed and stopping down to f/8. Still with the flash pointed to the left I now have my nice professional high key headshot, one flash on camera, no light modifier shot in a shopping mall.

    Bounce flash 104

    Manual Mode, 50mm lens, f/4, 1/200th, ISO 800, flash in ETTL Mode

    When do I bounce my flash?

    Indoors when there is ceiling or wall, preferably a white wall so there is no colour cast in the light, or outdoors if there is a surface nearby to bounce off. I see so many “professional photographers” have their flash pointing upwards when shooting outdoors when there is nothing to bounce off and I assure that does nothing other than sap power from you flash as it requires more power to light your subject.

    How do I bounce my flash?

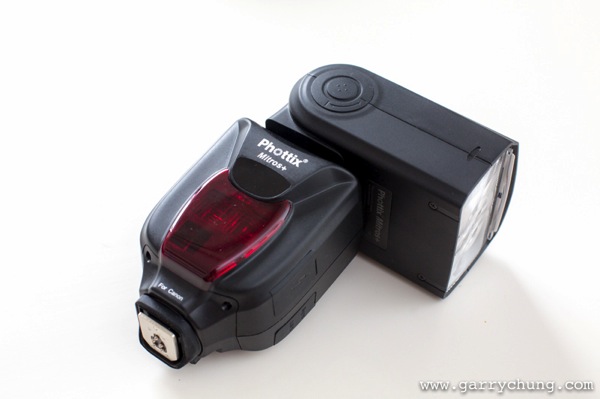
    Firstly you will need a hotshoe flashgun (speedlight) that allows you to both tilt and swivel the head such as a Canon 600EX-RT, Phottix Mitros+ or if you are a Nikon user a SB900. Some flashes allow only tilt such as the Canon 430EX. This is not ideal as I like to bounce the flash in all directions.
    Bounce flash 105

    Phottix Mitros+ with swivel head

    Which direction to bounce the flash?

    Most people just point the flash upwards, which is fine, but I actually seldom do this because I always want to light a portrait using directional light if possible. So most of the time I am pointing the flash to the side, or tilted behind me to one side to give that nice slimming shadow on the face.

    There is a simple formula to achieve this look that I learned from Jerry Ghionis – just point your flash head in the same direction as the nose of the subject so you are bouncing. So you are normally pointing the flash away from your subject, to one side. This is of course assuming that you have something to bounce off within a reasonable distance. The other way is to think of your walls as the light source itself, position your subject, frame your shot and then adjust your flash to target the walls.

    Remember if you ware shooting events and weddings to readjust your flash direction when shooting from portrait to landscape. For me I am always looking at ways to bounce my flash. One final tip is to crop out the wall or ceiling that you are photographing, that way you don’t end up with a distracting bright wall in your photo.

    Camera settings

    In terms of camera settings I rely heavily on the Auto TTL system which works for me, so all I do is set the camera in manual mode so something like 1/60th of a second, ISO 1000 and let TTL do the rest. If you have a light subject and dark background, you can bring in more ambient light by:

    • Increasing ISO
    • Have wider aperture, lower F number
    • Slowing down the shutter speed

    The more ambient light you drag in, the less “obvious” the flash effect. When it is a really dark scene, and most of the light is actually coming from your flash, I will drag the shutter down to 1/20th which sounds crazy because you could never handhold a shot at 1/20th in daylight. But, as you know the flash helps freeze the frame and hence helps get rid of camera shake. You want to be dragging in as much ambient light as possible if you don’t want your subject to be lit and the background very dark.

    One method I use to see what Manual settings to dial into camera is to just take a picture with no flash and if it is totally black then I will increase ISO or switch to a faster lens. One I have the camera dialed-in with my Manual settings for the scene, I will use the flash exposure compensation to properly expose my subject.

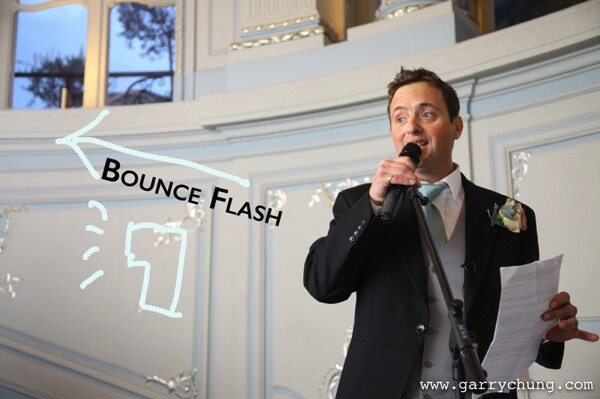
    You can see from the below image taken of the best man at a wedding reception, there is no obvious harsh shadow behind him, there is nice light falloff and modelling on his face which adds to 3 dimensional quality of the picture, and the surrounding area is properly exposed. I was kneeling down at the time shooting at 1/30th, 1600 ISO, f/4, 50mm lens with the flash pointed camera left tilted upward behind me about 45 degrees.
    Bounce flash 106

    Some people put a plastic diffuser on top of their flash what is that for?

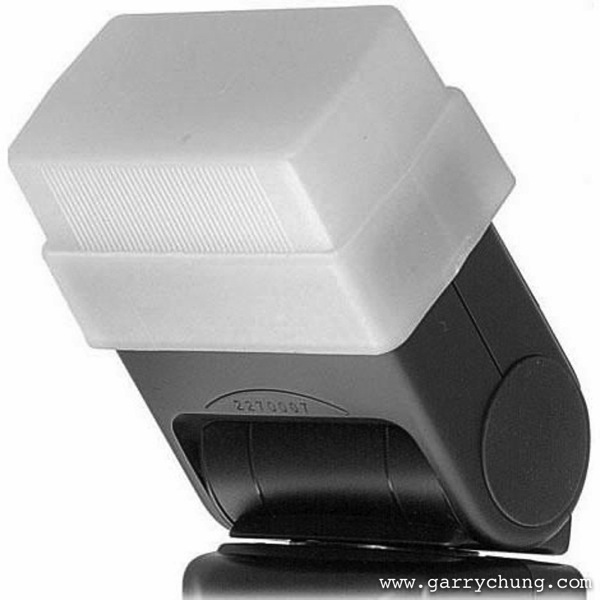
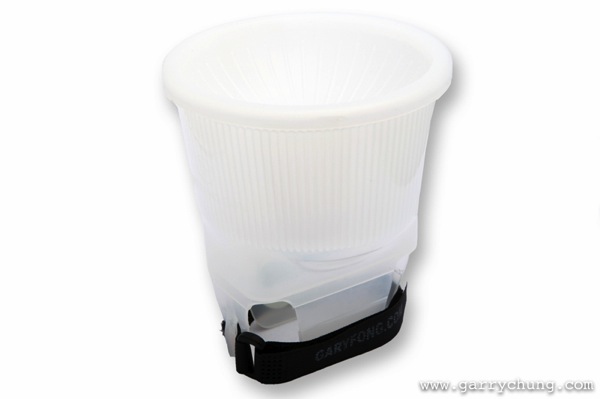
    I should mention this, many photographers use diffusers on top of their flash to spread the light out in all directions, below are the two most popular products on the market, the Gary Fong Lightsphere and the Stofen Onmi Bounce. There are many more cheaper products, and copies, that essentially do the same thing.
    Bounce flash 2

    Gary Fong Lightsphere

    Bounce flash 3

    Stofen Onmi Bounce

    I have actually owned, and tried, most of the diffuser products and I have nothing against them but I don’t use any of these any more. I prefer more bare bulb bouncing for more directional light and what the diffusers do is the opposite because they spread light in all directions.

    Conclusion

    Practice makes perfect and I have photographed many wedding receptions in the UK in the winter where it can be pitch black by 5 p.m. Mastering bounce flash technique really improved the quality of my work. Now when I know that there is not enough light and I have to use flash the first thing I do is look for surfaces to bounce off. Remember you have to be adjusting the direction of the bounce dependent on each frame if you are recomposing. So go ahead get a flashgun if you haven’t already and start experimenting with bouncing flash.

    The post Bounce Flash Secrets – Bouncing Your Way to Better Photography by Garry Chung appeared first on Digital Photography School.
    Digital Photography School

  • A Step By Step Guide to Making Your First Panorama Photo

    Image 4

    While visiting an art gallery or a photography exhibition, at times you may have noticed certain landscape photographs have extremely elongated fields of view. They seem quite impossible to have been photographed with a standard camera. If you wonder how such elongated photographs are made, you are not alone. I had my first encounter with a panoramic image of the Himalayan mountain range being displayed at Das Studios in Darjeeling, a Himalayan resort town in West Bengal, India. That photograph had a huge impact on me and it led me to searching for ways and means to photograph panoramic images.

    During my initial search I figured panoramas were probably made with highly specialized cameras and lenses. But, to my surprise I found that panoramic photographs can be made with any kind of camera at your disposal. All you need is a camera, preferably one capable of shooting in Manual mode. Yes, with certain cameras and Smartphones you can get Apps for recording a panorama in a sweep but I never found the results quite satisfactory. Shooting your own panorama gives you the creative freedom and a sense of satisfaction.

    How to shoot a panorama

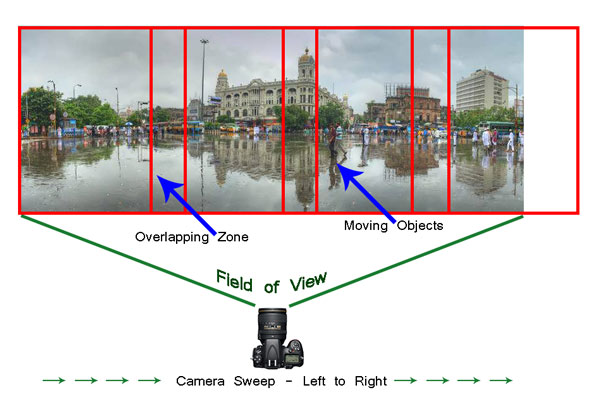
    A panorama is a combined set of individual photographs, in which two adjacent photographs have at least 20% overlapping areas. These two, or more, overlapping photographs are “stitched” with the help of software to produce extremely elongated fields of view. The overlapping is required as the software is able to understand the common areas in two adjacent photographs and hence can eliminate duplication of a scene by stitching the same into a single photograph.

    Image 1

    Before shooting a panorama, you need to plan out well. Here is a list of guiding factors for creating your own panorama.

    #1 Shoot in Manual Mode

    Since a panorama is shot over a large field of view where lighting conditions can be different, it is imperative to shoot in Manual mode with Manual Focus. This will ensure all the photographs shot have an exact exposure value and focus throughout all the images. Shooting in Automatic, Program or Semi-Automatic modes (like Shutter priority or Aperture priority) will result in different exposure values for each photograph, which in turn may cause the final merged photograph to have varied exposure and color casts in different parts of the photograph.

    #2 RAW or JPEG

    While you generally want to shoot in RAW, it is preferable to switch to JPEG for panoramas. Shooting in RAW is absolutely fine, but since the photographs will not be edited individually (we will see this at a later stage) and to reduce shutter lag, shooting in JPEG is preferred. A word of caution – as we will be shooting in JPEG make sure the exposure values are correctly adjusted.

    #3 Tripod or handheld?

    If the weight of your tripod is not a factor, carrying it is always preferable. However on a bright day you can very well rely on your own hands. A steady posture, or using your camera bag or any sturdy object available to rest the camera on, will save you the weight of carrying a tripod.

    #4 Horizontal or vertical

    We are generally accustomed to shoot in Landscape (horizontal) mode. Shooting in Landscape is fine but the resulting panorama will be short in height, since Landscape photographs will be stitched together. Additionally, during the stitching process there will be a lot of redundant or blank areas (you will see later during the post-processing) which need to be cropped out. This will further reduce the height of the panorama. To overcome this issue you may choose to shoot the panorama in Portrait (Vertical) mode. This will help in achieving a greater image height which can be cropped out as per requirement, say for printing or aesthetics.

    #5 Be fast

    Be very quick in shooting since light conditions change fast. Additionally if you are shooting a cityscape, a populated beach or a scenario where there is movement, be cautious. If you are not shooting fast enough, you will find moving objects (e.g., people, cars, bikes) will be duplicated across the frames. You would not want to see the same object twice across the panorama.

    # 6 Plan it out well

    Stand at the selected spot and plan the number of shots in advance. This will help you in keeping a control of the number of shots rather than shooting randomly. Be sure to do a mock round without actually shooting.

    When you are ready, start shooting from left to right. Make sure you have at least 20% overlapping areas in two consecutive photographs. An visual estimate will suffice. Look through your viewfinder and shoot. Do not look at the individual photographs on your LCD screen until you finish shooting. Before leaving the scene turn on the LCD screen and review the photograph series. If you are not happy, shoot again.

    Image 2

    Stitching your panorama

    The sext step is stitching your panorama. There are plenty of panoramic stitching software available on the internet. I will put a list of links to some of the best software at the end of this article. The stitching process is similar across software but as of now we will use the standard photo editing tool – Adobe Photoshop. The stitching process in Adobe Photoshop is fully automated.

    Since you may have shot more than one panorama series, for the purpose of identification it would be easier to store each series in a separate folder. You may have shot in JPEG or RAW but make sure you do not edit individual photographs.

    Steps to stitch a panorama:

    1. Open Photoshop
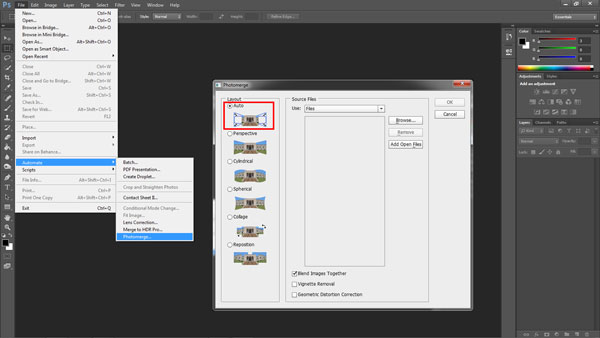
    2. Click File > Automate > Photomerge
    3. “Auto” is the default Layout option. Photoshop analyzes the source images and applies either a Perspective, Cylindrical, and Spherical layout, depending on which produces a better Photomerge. Choose “Auto” if it is not selected by default.
    4. Check “Blend Images Together”
    5. Next Click “Browse” and locate the separate Folder where you have put in your panorama series. Select the series and click “Ok”

    Image 3

    1. Depending on the number and size of the photographs, it may take a while for Adobe Photoshop to stitch together the images.
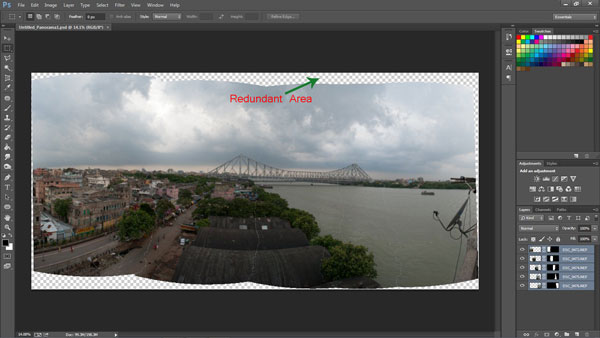
    2. After the stitching process is completed you will find a roughly shaped panorama (with a few redundant spaces). Refer to the image above
    3. Right click on a Layer in the Layers panel and click Merge Layers
    4. The next step is to use the Crop Tool to trim out the redundant portions of the panorama
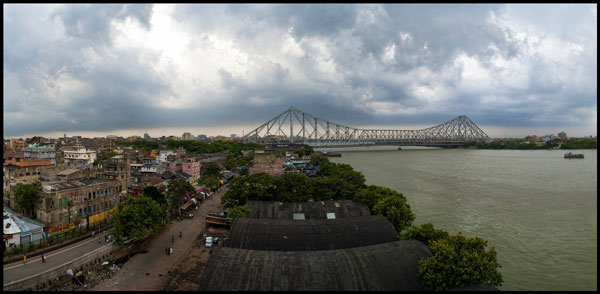
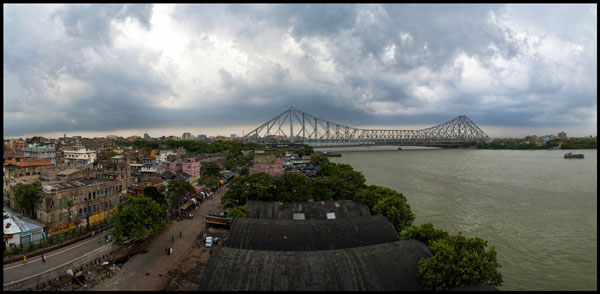
    5. After the final touches you are done with your very own first panorama

    Image 4

    Links to panorama stitching software:

    • AutoStitch
    • pTGui
    • Hugin
    • Autopano
    • Microsoft Image Composite Editor

    If this is the first time you are creating your panorama, I would love to receive your feedback or to share your panorama in the comments below.

    The post A Step By Step Guide to Making Your First Panorama Photo by Soumya Shankar Ghosal appeared first on Digital Photography School.

    Digital Photography School

  • Winners of the ViewBug Landscape Photography Contest

    The wait is FINALLY over!!! The Winners of the ViewBug Landscape Photography Contest Are…

    Grand Jury Winner

    Grand Jury Winner – Church Mountain Falls

    A BIG thank you to everyone who entered our recent Landscape Photo competition. The winners receive Year Long PRO Subscriptions from our friends at ViewBug.

    ViewBug LogoThe response was amazing with THOUSANDS of entries. The response was so great that the team at ViewBug wants to invite ALL of the Digital Photography School readers to register for a free basic membership to ViewBug. Start participating in all theViewBug photography contests now! To register now, click HERE.

    But first – here are the winners of the competition, and an extra special thank you to Guest Judge, professional photographer, Chris Burkard:

    • Grand Jury Winner “Church Mountain Falls – Redux” by Scott Don Schikowski
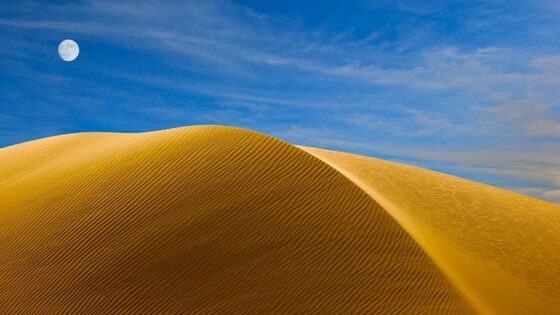
    • Runner Up “Dune Rise” by Tra Rader
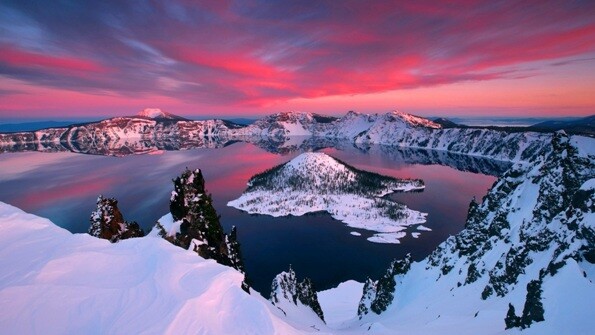
    • Runner Up “Crater Lake Winter” by Lugji Photography
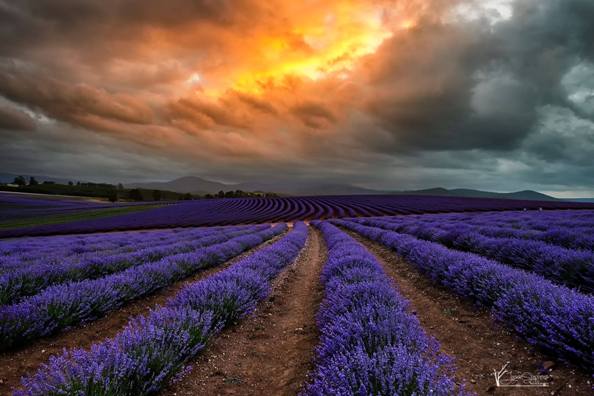
    • People’s Choice Winner “Lavender Delight” by Jason L. Stephens

    And now, the Winning Photographs!

    Grand Jury Winner – Church Mountain Falls

    Grand Jury Winner

    Runner Up – Dune Rise

    Runner Up 1 Tra

    Runner Up – Crater Lake Winter

    Runner Up 2 Lugji

    People’s Choice Winner – Lavender Delight

    People s Choice

    Thanks again to everyone for entering and to ViewBug for sponsoring this competition. Don’t forget to sign-up for your complimentary basic membership here.

    The post Winners of the ViewBug Landscape Photography Contest by Darlene Hildebrandt appeared first on Digital Photography School.

    Digital Photography School

  • 10 Accessories To Make Your Camera Bag Super-Interesting

    Once you get into photography, many of the things you want to buy are very expensive, and all of the sudden those 15 lenses on your wish list seem to compete with your children’s college fund. For some reason, you start feeling like you “need” stuff to be a better photographer. Truth be told, you don’t need much, but it’s Continue Reading

    The post 10 Accessories To Make Your Camera Bag Super-Interesting appeared first on Photodoto.


    Photodoto

  • How to do Great Photography Even When Your Surroundings are Boring

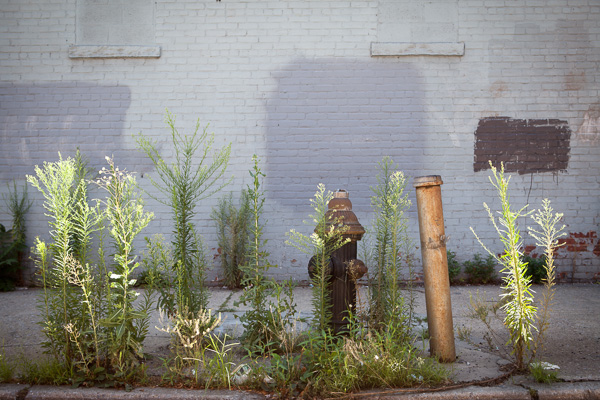
    Gowanus Fire Hydrant

    Gowanus Fire Hydrant

    I have always been fascinated with great photography taken in areas that people might commonly refer to as ‘boring.’

    I use the word boring because that is the specific word I most often see used as an excuse for people having trouble with their photography. Someone will say, “I wish I lived somewhere more interesting and beautiful”or “I can’t do interesting work where I live. It’s too boring.”. Can you relate to that?

    What these people don’t realize is that what might seem boring and routine to them could seem fascinating to others, and by dismissing where they live they do not even give themselves a chance to try and photograph it in an interesting way.  They take themselves out of the game before they even start.

    When someone uses the word boring, I tend to think that they mean quiet and not traditionally picturesque, or maybe there are not many people around and the ones that are around seem uninteresting.  These are not reasons that you cannot take an interesting photo. In fact, these topics all sound fascinating to me. Use these aspects to your advantage and figure out ways to make them interesting, photogenic, and appealing. Also, keep in mind that often the people that seem the least interesting, actually tend to be the most interesting.

    Here are some tips to capture interesting photos in ‘boring’ places, and I hope after you read this article you will never use the word boring again.

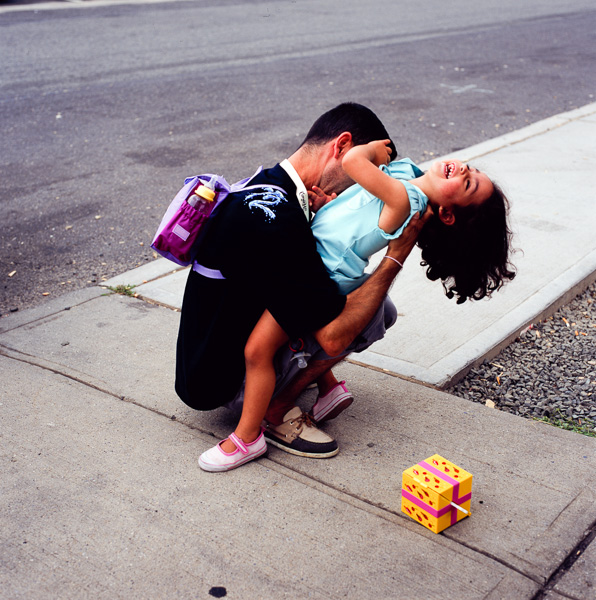
    Capture images of people you come across in everyday situations

    Capture people that you come across in everyday situations

    Take a camera with you on everyday excursions

    Many people have the habit of only taking their camera out when there is supposed to be a picturesque moment. Maybe it’s a sunset, or to the park, or on a trip. This is a tough way to shoot because you already have the images you want to capture in your mind before you take them.

    The goal here is to not stop yourself from taking images before you even start. The more ‘boring’ you think the place is, the more you should bring out your camera. Go into a situation with the mindset that you are going to figure out how to take an interesting photo no matter what happens.

    Try to create interesting images in the course of your everyday life. Photograph your neighborhood. It could be at the gas station, at a roadside diner, in a supermarket, in a parking lot, or stopping on a quiet street corner at dusk. For me, this is the true fun of photography. It’s a way of helping you see aspects of your everyday world in an unique way.

    Remember, if you have a DSLR that is too heavy to carry around frequently, there are alternatives. The most important one is the cellphone in your pocket. Cellphone cameras have come a long way, and while they are not close to the quality of a camera, you can still make good prints out of them. The most important reason for using a cellphone is that you are training your eye by using them when you otherwise wouldn’t take a camera with you.

    Some other alternatives are to purchase a smaller prime lens or a pancake lens to lighten your DSLR for everyday use, or purchasing a mirrorless or micro 4/3rds camera. I personally love the Fuji X100s.

    Dancer in Pharmacy

    Dancer in Pharmacy. Taken with iPhone 4S.

    Find beauty in the mundane

    This is the most important point. Try to go beyond the safe photo. Capture something that you find interesting even though many people might not choose to put it on their walls. Don’t be afraid if other people hate it. That’s often a good sign. It only matters if you like it.

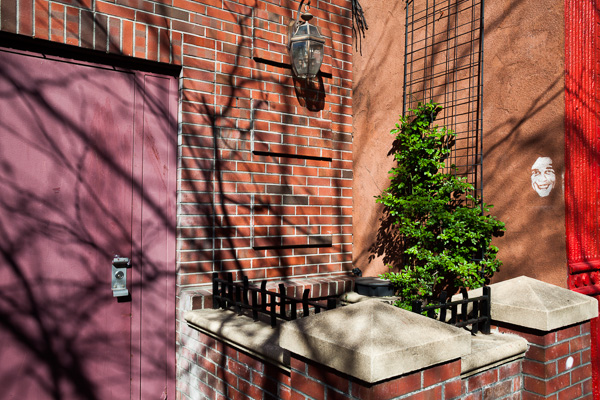
    Focus on details and use everyday elements to make an image interesting. You don’t have to have a mountain, a stream, or a sunset in your photo to make it interesting. A brick wall, a parking cone, a street sign, or a bare building can all be beautiful when captured in the right way. Capture people that you come across over the course of your everyday routine. These can be the most interesting images since you will already know the subject well.

    Aim to capture subtle images as part of your work. Subtle images might not jump out at a viewer right away, but they will stick with them. These images will make someone think and will become more interesting to the viewer over time as they wonder about them. Subtle images can be very powerful when done correctly.

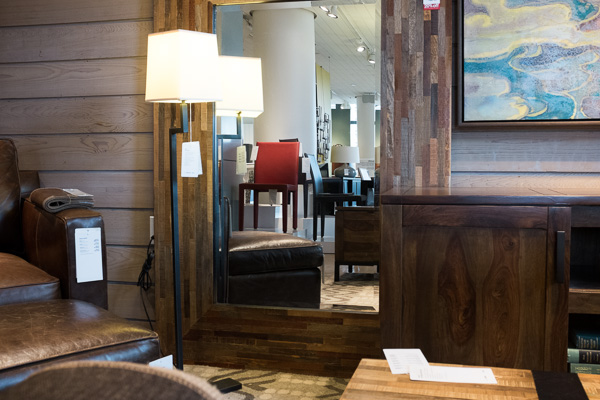
    Red Chair, Crate and Barrel

    Red Chair, Crate and Barrel

    To be honest, the jury is out on what I think about this image above, and I think it will have to age before I figure it out.  But I had to try it.  It might look completely normal and banal, especially if you live in the U.S., but it takes on a different meaning when you compare it to this image taken by William Eggleston in 1984.  The ‘boringness’, the browns and muted tones become the point of this image.

    Tell a story

    Pretend you have a viewer that knows nothing about where you are from. Maybe you live in a quiet corner of suburbia, where all the houses look the same, or maybe you’re in the middle of a rural area.

    Your photos should tell the viewer what it is like to be there. Think about it as though you are talking to the viewer through your images. Use your images to tell the stories that surround you, no matter how big or small.

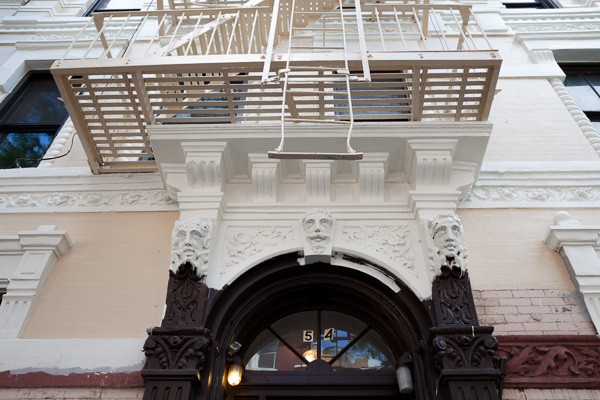
    Gentrification

    Gentrification

    I have walked past this building with my camera every couple of days for almost seven years.  Then, one day there was an interesting image.

    Experiment

    It is a hard process to learn to photograph this way and you will undoubtedly take many bad photos during the learning process. You will have a hard time figuring out what is good and even asking for feedback might confuse you further. I don’t know about you, but that sounds like fun to me.

    Find a friend or two or a fellow photographer that you trust and show them your images over time. Let them grow with your work while you do. This will become invaluable feedback down the road and help you talk out your work with them.

    The only constant in this process is that it takes time to succeed and to figure out what you are doing and what you are photographing. There is no roadmap for doing this type of work.

    White Face

    White Face

    Don’t take your area or lifestyle for granted

    Just because something does not seem interesting to you, does not mean it is not interesting. The way you do things and your environment are both vastly different from the rest of the world. Keep that in mind. Capture intimate aspects of your world for others and they will find those photographs fascinating, even if they might feel routine or normal to you.

    Great photographers can do great photography anywhere, however it sometimes can take a little inspiration to get the wheels turning. The most important thing is to walk out the door frequently. If you think you are not going to capture any interesting images then you are not going to walk out the door.

    Take a long walk, anywhere, at anytime, and challenge yourself to capture an interesting image.

    A Plant Grows, Chase Bank

    Plant, Chase Bank

    Further viewing

    For further viewing, I highly suggest exploring the work of Williams Eggleston, Lee Friedlander, and Stephen Shore.  They are photographic masters who have spent much of their time photographing in this way.

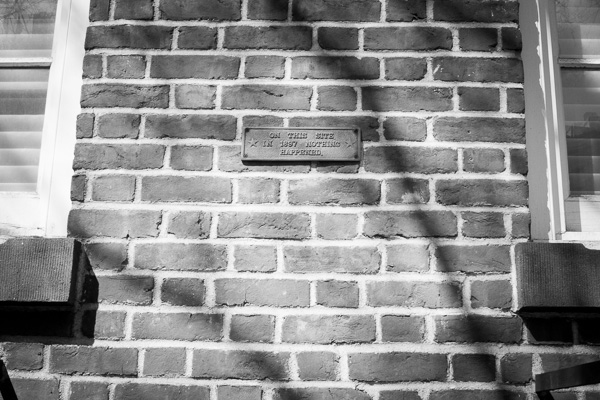
    On This Site in 1897 Nothing Happened

    On This Site in 1897 Nothing Happened

    The post How to do Great Photography Even When Your Surroundings are Boring by James Maher appeared first on Digital Photography School.
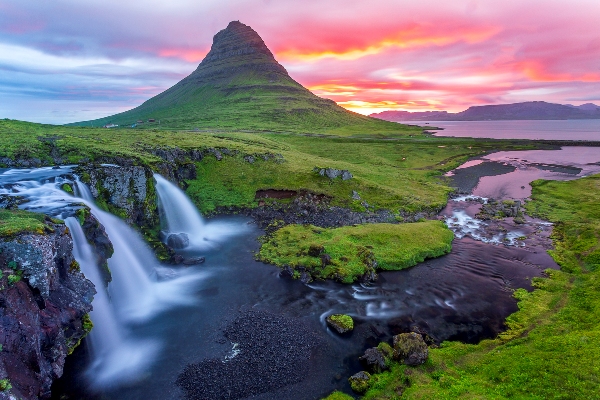

    Digital Photography School

  • 8 Steps to Create Mouth Watering Food Photography

    On sale now at SnapnDeals for a limited time at 50% off Photographing Food 8 eBook Bundle by Taylor Mathis. Get it now if you want more great food photography tips.

    Have you ever tried taking a picture of food and it just didn’t look as good as the dish tasted? Don’t worry, you aren’t alone. Taking pictures of food requires a different mindset and approach than what you would use in your portrait or landscape photography. Here are 8 steps you can take that will help you create mouthwatering food images.

    Step 1. Choose one light source

    Mathis photographing food 8 steps tip 1

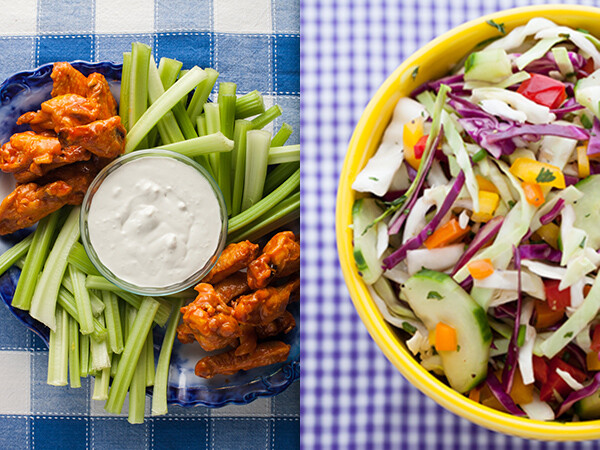
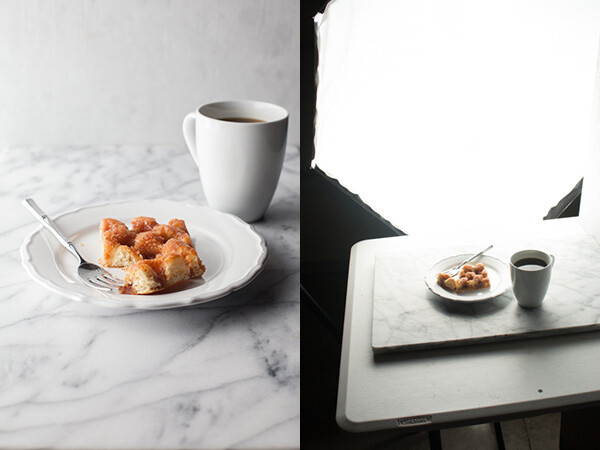
    I know what you may be thinking. The more lights the better, right? Adding lights in portrait photography does give you ability to shape and light the face in beautiful ways, but when shooting food, one large diffused light source will yield amazing results!

    This doesn’t mean you need to spend a ton of money to get started. All you need is a window. You can use a window where you live or if you are shooting on location, try a large restaurant window.

    Step 2. Embrace food’s color

    Mathis photographing food 8 steps tip 2

    Food comes in a wide range or colors and textures. From your dark leafy greens, vibrant orange carrots, or pale purple shallots, you can have a rainbow of colors in front of you at meal time. Embrace this color with your prop selection and food styling. If you are lost on where to begin, look for inspiration in an artist’s color wheel! A color combination that I like is matching blue accessories with yellow or orange foods.

    Step 3. Know when to use artificial light

    Mathis photographing food 8 steps tip 3

    I love using natural daylight in my food photography, but there are times when I need an artificial solution. A tungsten lamp or a small compact flash make great options for shooting your food at night. The key is to use a large diffusion source to create a beautiful, soft light that will fall over your set. I like to modify my light with umbrellas, soft boxes, or a large diffusion scrim.

    Step 4. Get creative with the ingredients

    Mathis photographing food 8 steps tip 4

    Don’t overlook the ingredients and head straight for the shots of the main meal. With an ingredient shot you can create an interesting story that begins the journey to the final plated dish. For fruits and vegetables, I like to create visually interesting arrangements shot from an overhead angle. This is the type of shot that any camera can do, even just one on your cell phone. If you have a macro lens, take advantage of your close-up ability to shoot spices and ingredients with interesting textures. Close-up shots of these shapes and textures will bring an interesting and new perspective of food to your viewers.

    Step 5. Think about final use

    Mathis_photographing_food_8_steps_tip_5_new_crop

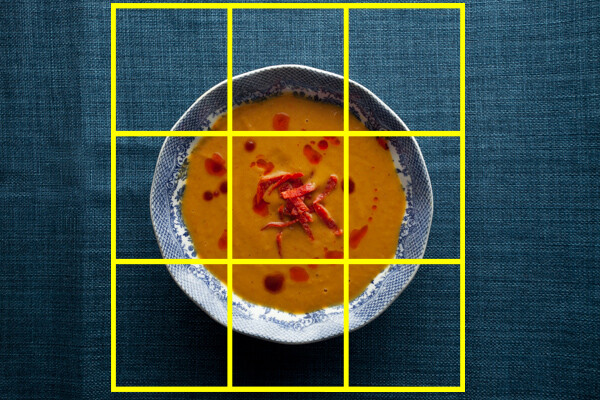
    Your food image will commonly be cropped to a different size for its final use. It could be a square for use in a restaurant menu or a narrow rectangle that will fit on the side of a package. It doesn’t do you or the client any good if you create a beautiful image, but half the dish is cropped out when it comes time for printing. When shooting, you want to know what this final crop will be so that you can ensure that all the essential parts of the dish make it into the shot.

    Step 6. Taking your food on location

    Mathis photographing food 8 steps tip 6b

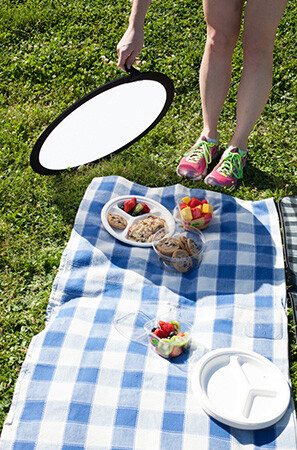
    Taking your food shots out of the kitchen, and on location, will allow you to create images with beautiful outdoor scenic backgrounds. Whether it is a trip to the farm to capture fruits and vegetables ripe and ready to pick, or creating an outdoor entertaining event, an on location shot is one where weather may become a concern. There isn’t much you can do about rain cancelling a shoot, but you do have control over the harsh light from a bright and sunny day. When shooting outdoors, I always bring a collapsible diffuser with me. Placing this between my subject and the sun diffuses any harsh light that may be on my set. I am left with a soft evenly lit set on which I can create mouthwatering food images.

    Step 7. Vary your background

    Mathis photographing food 8 steps tip 7

    What you shoot your food on top of will have a huge impact on the final photo. There are millions of options from which to choose. You can use anything from painted wood to cloth to stone. My favorite place to find backgrounds is at my local hardware store. There are thousands of potential backgrounds there. If you are feeling creative, you can stain and paint wooden boards to create a truly custom shooting surface. If you want a background that doesn’t require any customization, try painted ceramic or stone tiles. The large tiles, like you would use in a bathroom floor, are a sturdy surface with a ton of variety. Changing out your background to a new one, might just be the thing needed to create a more interesting food shot.

    Step 8. Modify Your Light

    Mathis photographing food 8 steps tip 8

    A large soft diffused light is my go to for any food shot, but sometimes the shot may require a little bit more. Through blocking with black foam board, reflecting with white foam board, bouncing your light source or adjusting its height and placement, you can fine tune your lighting to create the mood and scene you desire. If you find yourself consistently using the same set-up, try switching things up. Using a different sized soft box or even a large white bed sheet can have a great impact on your final shot.

    If you have felt intimidated or struggled with taking pictures of food, I hope these steps will help. If you want to take your food photography to the next level, give photographing FOOD issues 1-8 a try!

    On sale now at SnapnDeals for a limited time at 50% off Photographing Food 8 eBook Bundle by Taylor Mathis. Get it now if you want more great food photography tips.

    The post 8 Steps to Create Mouth Watering Food Photography by Taylor Mathis appeared first on Digital Photography School.


    Digital Photography School

  • How Self-Portraiture Makes You a Better Photographer

    As long as art has existed, so too has the self-portrait. Van Gogh famously painted more than 30 self-portraits, using the available subject-of-self as both an outlet for his artistic talents, and as a method for perfecting his craft. Rembrandt, as perhaps the most prolific master of the self-portrait, painted, etched and drew more than 100 images of himself throughout his lifetime. One can even imagine the cavemen as having injected some degree of self into the prehistoric images painted on their cave walls.
    Nebulous-1

    Self-portraiture is NOT the same as a Selfie

    But as rich in history as the self-portrait is, its categorization as a photographic ‘art’ is vulnerable due to the endless arms-length phone snaps, or ‘selfies’, now littering the internet. Lately, there has been a blurring of lines between the selfie and the self-portrait. As someone who has focused his own artistic energy toward self-portrait photography, I feel obligated to promote this art form, as self-portraiture provides value in terms of both the photos it produces, and the education if offers you as a new photographer.

    The most patient model ever – you!

    For me, self-portraiture began as a way to develop my own portrait photography skills, without the need for a model. As you probably know, learning the principles of photography, and the strategies for creating and controlling light, is a time-consuming process. It involves a great deal of trial and error, and asking a model to pose patiently while you make mistake after mistake isn’t always ideal. But you, yourself, are an infinitely more willing subject. Hours pass, memory cards fill with lackluster images, yet you don’t complain. Alone, you’re able to relax and focus on the task at hand: learning to become a better photographer.

    Experimenting with artificial light (orange-gelled strobe imitating fire)

    Use self-portraiture as a creative outlet

    When enough solitary time passes, you’ll find that you begin to produce decent results. Soon, what began as a learning device morphs into a creative outlet. Self-portraiture is no longer an exercise to be performed in preparation for real photography; self-portraiture has become the real photography. Unlike selfies, your self-portraits are well conceived. The location, framing, lighting, depth of field and posing associated with the images are carefully planned. You work both sides of the camera with increasing efficiency, and the quality of your photography reflects the education received.

    Self-portraiture offered a unique photo opportunity during this extended flight delay in Shanghai

    From that point forward, you don’t hesitate to jump into frame should the inclusion of a person improve your photograph. When you want to test a new piece of gear, fine-tune a new technique, or kill a boring Sunday afternoon by setting up your camera, you do so with absolute independence. When photographing other subjects, you borrow from the lessons learned through self-portraiture, and the result is stronger photography, all-around.

    ‘Producing’ self-portraits offers both artistic challenges and skill-building opportunities

    For those considering an attempt at self-portrait photography, here are a few tips to get you started:

    Technique – focus

    While taking self-portraits, one of the more difficult aspects to nail down is focus. You don’t have the luxury of pinpoint-focusing on the subject’s face, for example, when you, yourself are the subject. To get around this challenge, it is important to have a stand-in object on which you can focus the camera. I personally use my light stand, as it’s usually with me, and is tall enough to mirror my own height.

    First, I determine where, in the frame, I will position myself and I place a ‘mark’ on that spot to ensure I’m continually in the right position. Small rocks, a line of chalk or a crack in the sidewalk have all worked well as my mark. Next I focus my camera on the light stand. Once my focus is perfect, I switch my DSLR to manual focus mode. From that point forward, unless I make manual focus adjustments, the focus will remain unchanged. As long as I stand on my mark, I’ll be in focus. This is particularly important when using shallow depth of field, where a single step forward or backward will cause you to be out of focus, ruining the shot.

    Proper focus was critical to the success of this image, taken at a razor-thin f/1.4

    Gear:

    • Tripod – when you’re in front of the camera, you can’t also hold the camera. Therefore, a tripod is an absolute must for serious self-portrait photographers. This is an obvious recommendation, I know. My real tripod tip is this: invest in a quality tripod that’s robust, yet light, so you won’t mind carrying it. Also make sure it offers flexibility with regard to the positions it can assume. If the legs act independently, and if the tripod can effectively hold your camera at heights from ground level to eye-level, it’ll come in handy.
    • Wireless remote trigger – while not essential, a wireless shutter release for your camera is a definite plus. The timer setting built into most cameras can get the job done, but for those serious about self-portrait photography, an inexpensive wireless remote is a no-brainer, and will save you from having to walk back to the camera after each frame.

    My flexible tripod, offering a low perspective, and the remote in my pocket, allowed me to work quickly

    Planning:

    • Self-portrait photography is a production. The act of selecting the location, framing, camera settings and your own placement within the frame is a slow and deliberate process. Taking self-portraits forces you to consider all of the individual components that combine to make a good photograph, and successfully intertwining these ingredients into a successful end result requires planning. So, plan, and learn to enjoy the process of planning your next photograph. The mental thought process will help your self-portrait photography as well as any other type of photography you choose to tackle.
    • Create and maintain a ‘shot list,’ which includes the theme, location, lighting information, prop information and any other specifics related to your upcoming shots. A shot list will help your photography in a few different ways. First, it will help you plan your upcoming shots, by forcing you to think through all of the photograph’s elements. Keeping a shot list will also cause you to view the world through your own photographic lens. You’ll find yourself on the lookout for new ideas, and will regularly pull out your phone (where my shot list is saved) to add new photo ideas. Finally, and most importantly, keeping a shot list will motivate you to get out and photograph more. It’s like a ‘honey-do’ list for yourself, and a shot that lingers for too long on the list will begin to bother you.

    This image was on my ‘shot list’ for more than 3 weeks while I waited for the perfect rainy night

    If you are eager to learn the art of photography, getting in front of the camera can provide a boost in your educational journey, and just may evolve into an enjoyable creative outlet.

    Have you done any self-portraits? Please share in the comments below.

    For more tips on doing self-portraits pick up the dPS ebook The Art of Self-Portraiture or read the 5 Benefits of a self-portrait project.

    The-Other-Side-Tracks-1

    The post How Self-Portraiture Makes You a Better Photographer by Ryan Pendleton appeared first on Digital Photography School.


    Digital Photography School

  • Review of the Olympus TG-850 ‘Tough’ Waterproof Camera

    I’ve discovered a flexible companion for all weather action, adventure, and family fun.

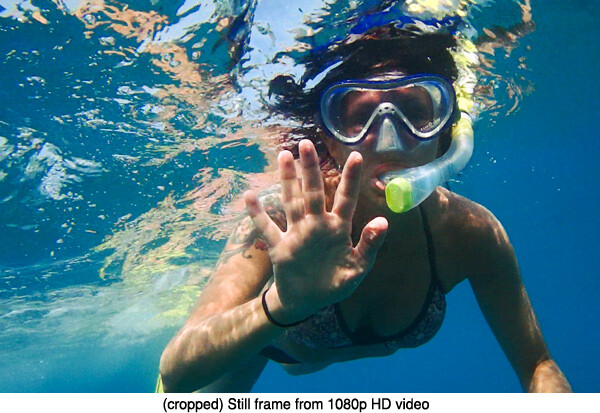
    JillSnorkeling-TG-850-HD-video-frame

    I’d been researching the ideal pocket-sized, waterproof, and shock-resistant camera to take to Hawaii for one of my Land and Sea Photography workshops. I’d compared every “tough” camera available online, but not one jumped out and said “Buy Me!”

    Besides the full DSLR kit that I’d haul to the islands, I wanted to test and demonstrate a well-featured compact for capturing outdoor sports and vacation adventures. Almost every small durable camera available had been on the market for at least a year. Surely something ideal had been unveiled at the recent 2014 CES show in Vegas, but nothing was to be released in time for my imminent sailing.

    My wish list of desirable features was brief:

    • Pocket-sized
    • Light weight, solid build
    • Comfortable, intuitive controls
    • Button-triggered Movie mode
    • Real wide-angle zoom below 28mm
    • Articulating LCD screen
    • Good LCD visibility in bright daylight and underwater
    • Fast power-up to shoot time
    • Fast to focus
    • Intelligent Auto ISO and low minimum ISO
    • One-button navigation to common shooting options
    • Exposure compensation
    • Underwater shooting modes
    • LED illumination for extra lighting
    • HD 1080p video
    • Hi-Speed 60fps or faster video for Slow-Motion fun
    • Sequential timer for action capture effects
    • Fast frame rate for recording bursts of action
    • Eye-Fi SD card compatible to shoot and upload images and video
    • Under $ 300 USD
    • Oh, and it must be crushproof, droppable and waterproof to at least 25 feet depth

    I held out patiently, but my departure date was nearing and I was reluctant to purchase last year’s technology. Then I learned of the new Olympus ‘Tough’ TG-850, loved what I read on the Olympus Website. I made contact and a pre-release sample was sent overnight to my hotel just in time.

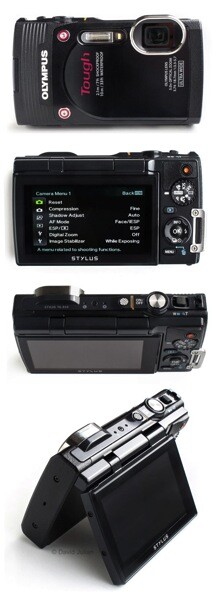
    Olympus TG 850 camera 4VIEWS sm

    I charged it up with the supplied direct-connect USB–>MiniUSB cable and secured a fast SD card into the waterproof double-locking connection, memory and battery compartment. My test camera had arrived in a generic box without instructions, yet I was delighted to find that the camera’s menus are the most intuitive I’ve seen, and feature a brief description for each selected menu option.

    Once I’d configured some favorite user options, I tethered the camera’s supplied strap to my wristband for some body surfing to see how the TG-850 handled pounding surf breaks. The TG responds well to capturing spontaneous action and the lens clears of water drops easily. Power-on to shoot time feels very responsive at about 1.3 seconds. Weighing under 8oz (226g), it’s easy to use for hours without fatigue.

    Features and User Experience

    LCD screen

    The TG-850′s hinged 3″ diagonal 460k-dot LCD screen is a unique feature in today’s compact waterproof camera market. The sturdy LCD screen can be flipped upwards to 180º, and is also one of my favorite features. It allows the convenience of shooting at low and high angles, or when snorkeling along at the surface or wanting an ant’s eye view of nature. Flip the LCD all the way facing forward and it’s great for solo selfies and group portraits.

    Wide lens

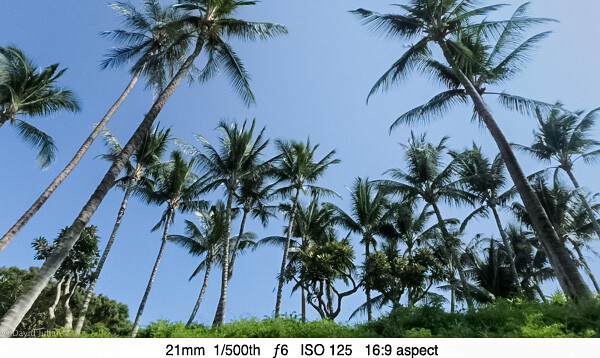
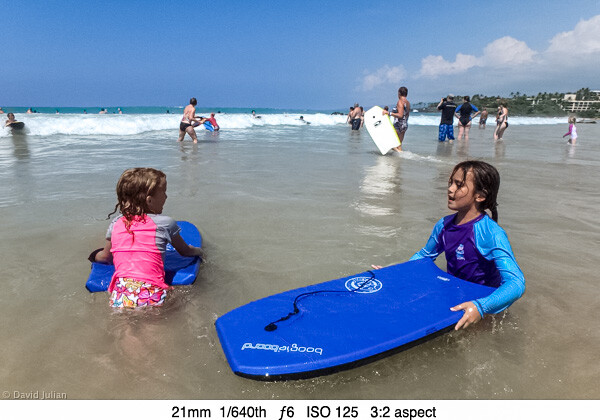
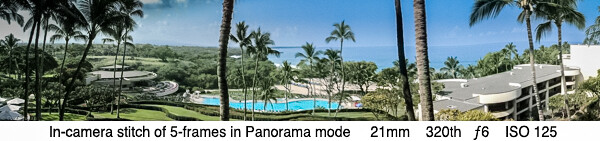
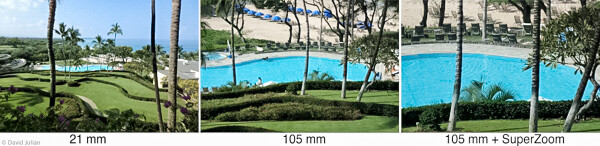
    The very wide 21mm lens is my favorite feature of this camera. At review time, it’s the only waterproof pocket compact lens that is that wide without needing any extra attachments. Such a wide view allows more dramatic landscape compositions, in-the-action sports captures and easier group portraits. A digital zoom feature add extra reach, but as can be expected, there is some loss of quality. The on-off, zoom, Shutter, Movie, Mode and Playback controls are placed well for my single-handed operation. The TG-850 contains Olympus’s latest 16mp back-side illuminated CMOS ½.3 sensor coupled the powerful TruePic VII processor, for faster frame rates, video processing and other options.

    DJulian Palm Trees 21mm

    DJulian Kona kids boogieboards

    Exposure settings

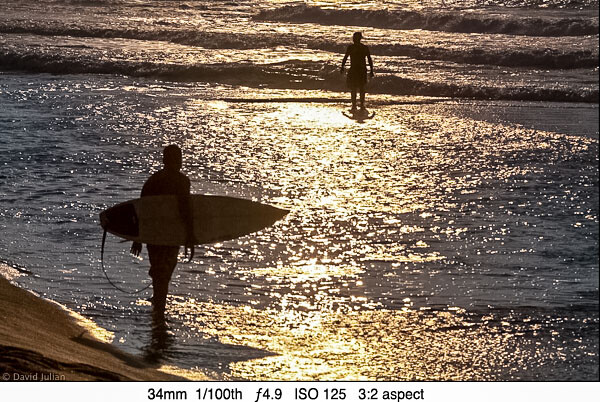
    The sensor’s light sensitivity (ISO) can be set from 125 to 6400, HIGH or AUTO. My test of ISO settings revealed better quality than expected at settings from 200-1600, and after that it’s noisy as expected under magnification. With shutter speeds from 4 seconds to 1/2000th, there is plenty of room for creativity under many conditions. Set to Sports mode, my photos revealed very crisp water droplets shaken from a wet pooch. The onboard flash helps fill in harsh shadows or in backlit portraits. Metering can be switched from ESP Auto to Spot Center for more accuracy when needed. High contrast backlit scenes are easily balanced using the Exposure Compensation.

    DJulian Backlit surfers Kona

    File format and image quality

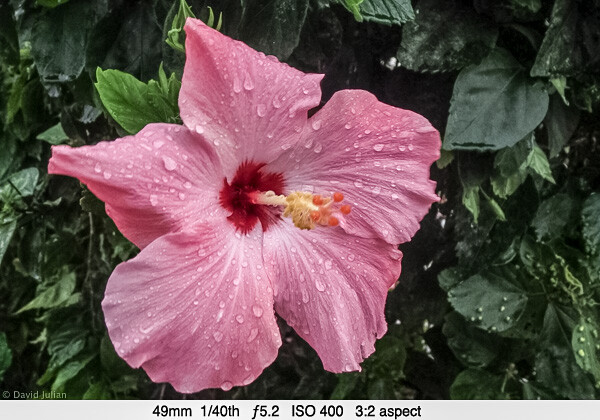
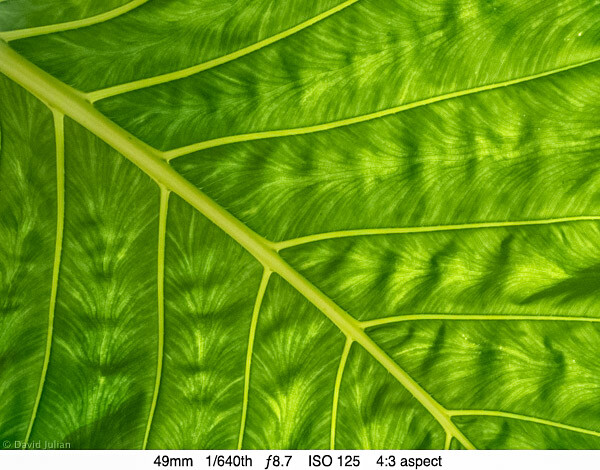
    This camera does not shoot RAW format. No waterproof compacts do at this time, and I’m not expecting RAW anytime soon. Apparently the manufacturers uniformly conclude that this market segment isn’t after RAW processing. The good news is that the full-resolution 16mp JPGs I shot under varying conditions appear quite sharp when viewed in Lightroom at 1:3 magnification. At full-screen and 1:1 viewing, one can see the typical effects of compact sensor JPG processing that results in a rather painterly appearance. Photos shot at ISO 125-200 revealed the best shots of the trip.

    DJulian Pink Hibiscus

    DJulian Molokai Leaf Detail

    Video

    The TG-850 can shoot video at 1080 60p, 1080p, 720, VGA, high-speed 120fps at 640×480 and even 240fps at 432×324 video captures. Dual-mode lens-shift stabilization reduces normal handheld camera shake, and Hybrid mode reduces rhythmic shake during video shooting. I was ready to take the camera snorkelling off Lanai. Truly crisp contrasty underwater photography is a challenge for compact cameras, but the TG-850 produced very acceptable video for my online posts. Water depth plays a big part in color temperature and contrast, and three Underwater scene options help warm up the underwater blues.

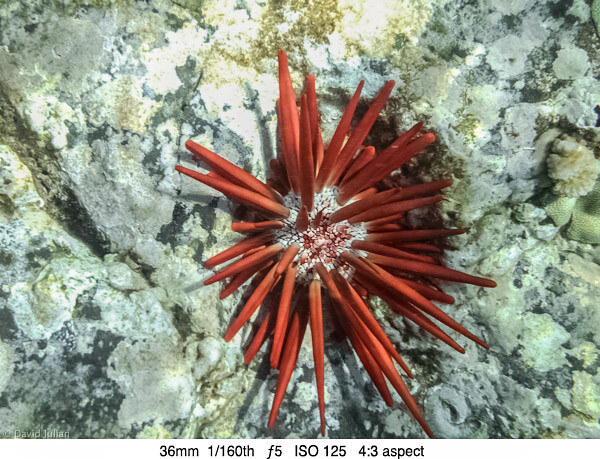
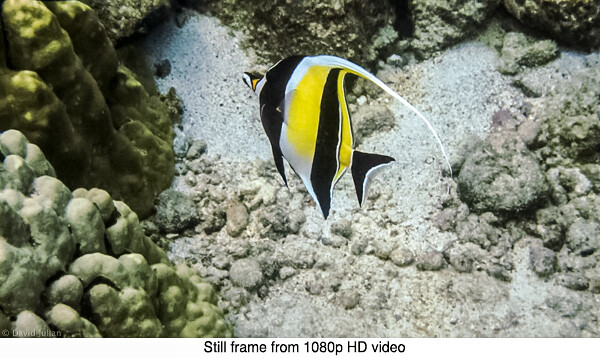
    I am impressed with the sharp stills I clipped right from the 1080p video using a menu option. My use of the 120fps High Speed video produced fairly smooth slow-motion playback, though not quite as smooth as a Hero3 camera. The TG-850 videos are not distorted at the corners and edges as those I made with the Hero3. I found auto-exposure struggling when panning in uneven light conditions, but worked well enough for pleasing videos.

    DJulian-Hawaii-Red-Urchin.jpg

    DJulian Moorish Idol HD still

    DJulian Sea Turtle Makena Maui Video Still

    Here is a couple samples video done with the TG-850, the second one is done using 120fps high speed shooting mode.

    Another feature that’s a lot of fun is the sequential shooting modes that allow fast frame bursts. Options include four different sequence settings including the ability to record a 60-frame burst in one second, a 60-frame burst at 20 fps for 3 seconds, or a 200-frame burst at 2.5fps for 80 seconds. A built in interval timer is also completely configurable for start delay time, interval time and sequences up to 99 frames. To replay the shot sequence you select the image ‘stack’ and the images show automatically in sequential order. Smart, easy and intuitive. For those who want to upload their images to a smartphone for social media, the TG-850 even has a menu setting to enable Eye-Fi SD card wireless transfers. I look forward to testing this soon.

    DJulian Kona pool 21mm PANO TG 850 iso125

    DJulian Kona pool TG850 ZOOM illo 3

    DJulian Jill pool twirling frame sequence TG850

    The 5-way control pad’s center button gives instant access many common shooting options:

    • 18 Picture styles including: Natural, Interval, Night Scene, Miniature, Backlight HDR, three underwater modes and some artsy effects you will at least try once
    • Flash control and LED assist lamp on/off – helps add light for closeups, macro and even video in low light
    • Exposure Compensation, +/- up to 2 stops helps compensate for difficult lighting
    • White Balance, including two custom WB settings
    • ISO including a very smart AUTO ISO mode
    • Timer and Multi-Frame speed modes
    • Image Size settings from 16mp to 3mp and VGA, which is great for emailing and social media
    • Aspect Ratios of 4:3, 16:9, 3:2, and 1:1 (square)

    Other creative features accessible in the camera menus include:

    • AF Face/ESP detection – locks focus onto faces for quick grabs at gatherings
    • AF Spot – tracks the center of the frame. Works well when the subject is in a busy environment
    • AF Tracking – when a subject is moving across the frame or towards you
    • Spot or ESP pattern metering
    • Four sequential frame modes
    • The eighteen scene modes include the common standards as well as three underwater modes
    • Custom self-timing mode
    • Regular and Hybrid Stabilization for smoother video
    • Super Macro mode

    Conclusions

    The TG-850 is an excellent value for the features provided. It’s ease of use will appeal to families, and creative features will win over active enthusiasts. I cannot wait to take it back out into the wilds and have more fun.

    Pros:

    • Well designed, fully-featured and very durable compact camera for outdoor and family adventures
    • Sturdy tilting LCD encourages experimentation
    • 16mp images and HD video quality are just right for most web and print publishing needs
    • 400-1600 ISO photos are better than other cameras we tested
    • Solid build and double-locked battery/card/cable door has a strong yet easily replaceable gasket
    • Little motor noise recorded when zooming video
    • Excellent creative options for shooting action
    • Face-detection ESP AF is rapid and helpful
    • Fast power-up to shoot time
    • Intuitive menu navigation and quick-button access to shooting options
    • Eye-Fi card ready for WiFi transfers
    • Recessed lens is well protected and clears easily when wet

    Cons:

    • No RAW format
    • High quality JPGs seem overly processed when viewed full screen
    • The TG-850 has forgone the 720p high-speed video of its predecessor, the TG-830. Even my iPhone 5s can shoot 120fps High-speed in HD
    • Ridged plastic grip could be a durable rubber for wet hands
    • Slight jumpiness and motor noise at times when zooming during video
    • HD Video crops slightly into wide angle, appearing more like 24mm
    • Zoom switch could be sturdier, with smoother video zoom

    Advice

    • Buy a floaty strap if you plan to use the camera around deep water. At the time of this review, Olympus is offering a free one with each camera purchase.
    • Try attaching a mini tripod or telescoping monopod such as the ones from iStabilizer for even more active shooting fun.
    • You will want at least one spare battery. I found a set of two Halcyon 1500 mAh batteries and a matching AC+Auto charger from Amazon for under $ 20. The Halcyon batteries are higher capacity than the originals, though I have not compared their actual hard-use longevity. (Note from the Editor: please note that using off market batteries can cause a void in your warrantee if anything should go wrong – be cautious and proceed at your own risk)
    • Check the battery/card door gasket for tiny particles of sand before every use in water. Any residual particles can admit water if under pressure.

    The post Review of the Olympus TG-850 ‘Tough’ Waterproof Camera by David Julian appeared first on Digital Photography School.


    Digital Photography School

  • Putting Personality Into Your Pictures: A How-to Guide

    What makes a great photograph? There a hundreds of fundamentals – from lighting to image structure, depth, color, personality and composition. Mastering the art of photography is what evokes emotions and makes people’s jaws drop when they see that image. Art is not what you see, but what you can make others see – Edgar Degas. Adding, revealing and capturing Continue Reading

    The post Putting Personality Into Your Pictures: A How-to Guide appeared first on Photodoto.


    Photodoto

  • A Beginners Introduction to Using Layers

    Using layers in your photo editing software is one of the most important things you can do to create great images. Layers are so powerful, even the most basic understanding of them can improve your photography tremendously. The good news is that using layers is extremely easy, and very quick. If you follow along with this tutorial and incorporate the techniques, you’ll see a huge difference in the quality of your images.

    22 use gradient

    While there are countless things you can do with layers, it’s convenient to group them into three main categories:

    1. Exposure blending
    2. Local adjustments to specific parts of an image
    3. Special techniques

    We’ll go through all three categories in this tutorial. Please keep in mind this guide is meant to demonstrate the power of layers and why you want to use them. It’s not a software-specific guide and the exact mouse-clicks and menu items may vary slightly among the different photo editing packages available. That said, the use of layers is very similar in all software.

    EXPOSURE BLENDING

    Exposure blending is one of the best techniques you can use to improve your photos. It’s critical to understand and use this skill. It’s also super-easy!

    First, let’s understand why you need to blend exposures. We know that a camera has limited “dynamic range”. That means the camera has a hard time capturing very bright parts of a scene and very dark parts in a single photo. As a photographer, you would generally choose to prioritize one over the other. This is a sacrifice photographers have been dealing with for decades.
    Exposure blending solves this problem.

    You simply take two or more photos of the scene at various exposures and blend the best parts of each exposure to produce a single image where all areas are exposed correctly. Wait you say, isn’t that HDR? In a way it sort of is. The difference between automated HDR software and this technique is that HDR software uses a computer algorithm to choose the areas of your photo to blend, while using layers gives you complete control over the final image. It can also be a much quicker process than using dedicated HDR software. Both processes can be considered “High Dynamic Range” photography, and both have their place.

    So how do we do it? It’s very simple, you layer the photos with different exposures on top of each other and then manually blend them. Before we blend exposures, let’s take a quick look at how layers work.

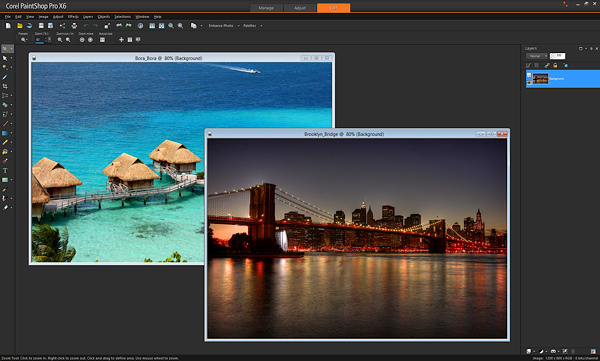
    Here we see two photos, one of the Brooklyn Bridge and one from Bora Bora.

    1 Brooklyn and Bora Bora separate

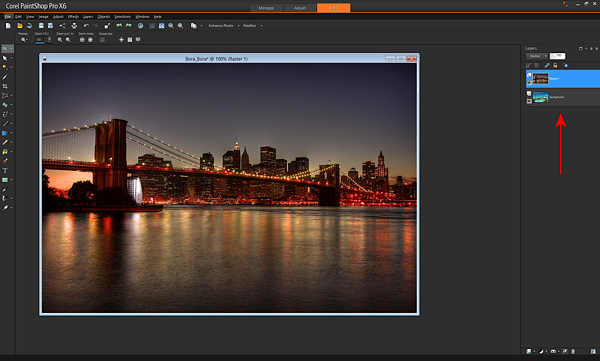
    To layer them, I’ll copy-and-paste one photo on top of the other in my editing software. (There are a variety of ways to layer photos depending on the software you use. I use copy-and-paste). After I paste the Brooklyn Bridge photo on top of the Bora Bora photo, you can now see on the right of the screen, where the red arrow points, that the photos are now layered in one document (see image below).

    2 Brooklyn and Bora Bora layered

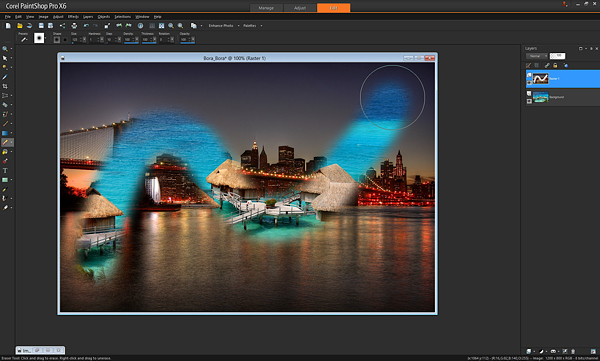
    If I were to take an eraser brush and swipe it across the top layer, I will erase that top photo and “reveal” the photo below it. Here’s an example after I’ve taken a swipe with the eraser brush.

    3 Brooklyn and Bora Bora erased

    That’s all there is to understanding the very basics of how layers work. With just that little piece of knowledge, your photography can be completely transformed.

    In the example above, I used the eraser brush to reveal the layer below. That’s one way of doing it, and I showed you that first because it’s an easy way to demonstrate layers. However, most people use what’s called a “layer mask” instead of the eraser brush. Don’t worry, it’s not complicated.

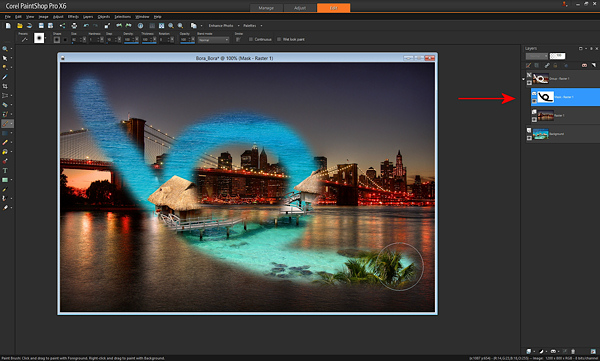
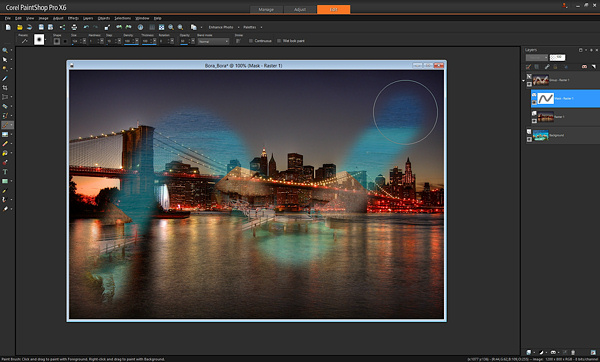
    A layer mask is just another way of revealing the photo below. Instead of using the eraser brush to reveal the bottom photo, you create a middle layer between the two photos called a “mask layer” and you draw on it with a paintbrush – wherever you paint, the top photo is “erased” revealing the bottom photo.

    To create a layer mask, just layer two photos on top of each other like I did above, then from the menu click “Create Layer Mask –> Reveal All”. Then you use the paintbrush on the mask to reveal the bottom photo. Painting with the color black reveals the layer below, and if you switch the color to white, it will “undo” wherever you’ve painted black so you can clean up any strokes you didn’t want to make (black reveals, white hides the layer below). Here is the same example below with a layer mask – you’ll see the effect is identical. Notice the new mask layer by the red arrow.

    4 Brooklyn and Bora Bora mask layer

    The great part about layer masks is that you can save the entire set of multiple exposures along with the masks in a single file, which you can edit later. The original exposures are left completely untouched. That’s the difference between using a mask and using the “eraser brush” directly on your photo. With a mask, you can always go back at any time and paint with the white paintbrush to undo anything you need to.

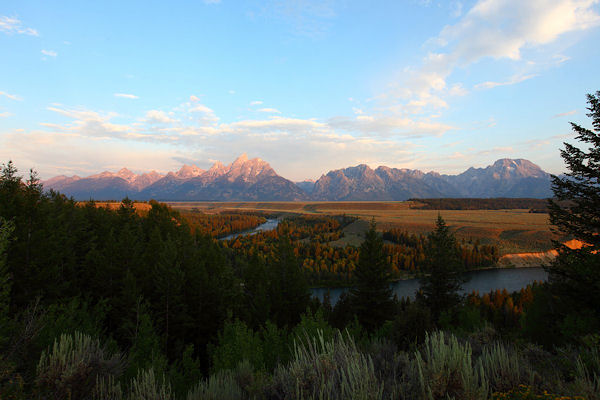
    Now that you know how to use layers, exposure blending is very easy. Here’s a photo I took in Grand Teton National Park. Notice that the mountains and sky look properly exposed, but the foreground foliage is way too dark.

    5 Tetons Mountains background

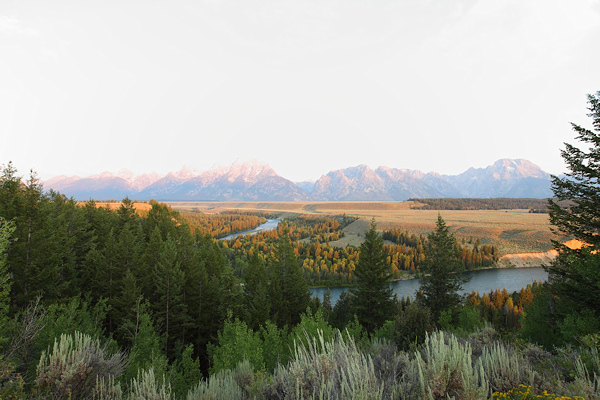
    Without exposure blending, the photo above is the best I could do. However, while I was at the location, I also took another photo with the foreground exposed properly. Notice though how the sky is completely blown out and the mountains are overexposed now.

    6 Tetons Foreground

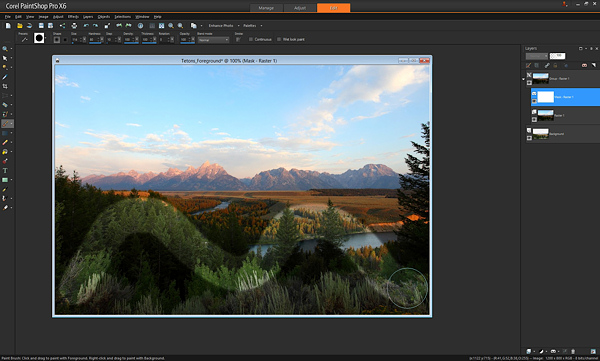
    With layers, I can easily blend these two images to create the perfect combination, and it only takes a few seconds. I just take the photo with the good exposure for the mountains and paste it on top of the photo with the good exposure for the foreground. With the properly exposed foreground on the bottom, I use the brush to reveal that bottom photo wherever the leaves are too dark. Here it is after one swipe with the brush. You’ll see the better exposure is revealed below.

    7 Tetons brush swipe

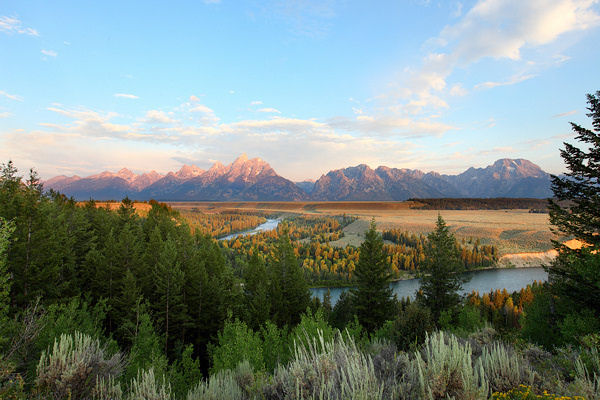
    That’s it. After some practice, you’ll be able to do this very quickly, with the final photo looking like this.

    8 Tetons Blend

    Of course there is one key thing to remember: You must take multiple exposures at varying brightnesses when you’re at the scene!

    If you forget, you can sometimes fudge it and brighten dark areas in your editing software, but you can never darken the overly bright parts if you forget to take a photo with those areas properly exposed. Always make sure at least one photo has the bright areas exposed properly (nothing clipped or overexposed).

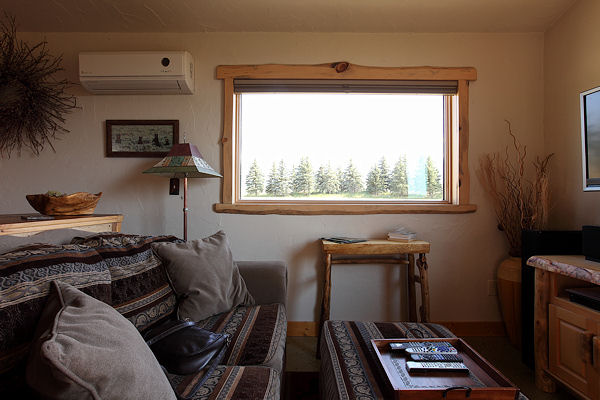
    Here’s an additional example of exposure blending below. How many of us have taken this shot? Sure would be nice to see what’s outside that window.

    9 Montana Interior

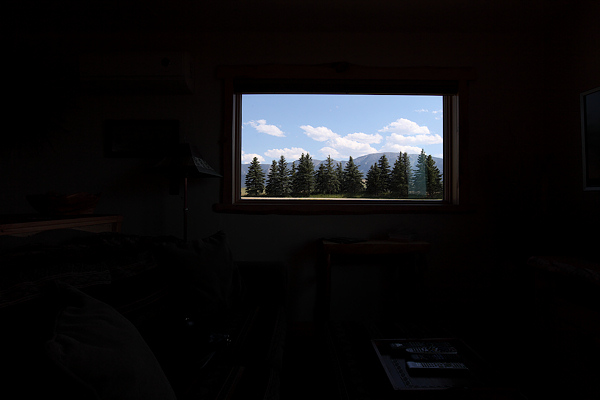
    If you took another exposure with the outside properly exposed, it’s simply matter of layering the two photos on top of each other and revealing the bottom photo with the properly exposed window. Here’s the photo for just the outside.

    10 Montana Exterior

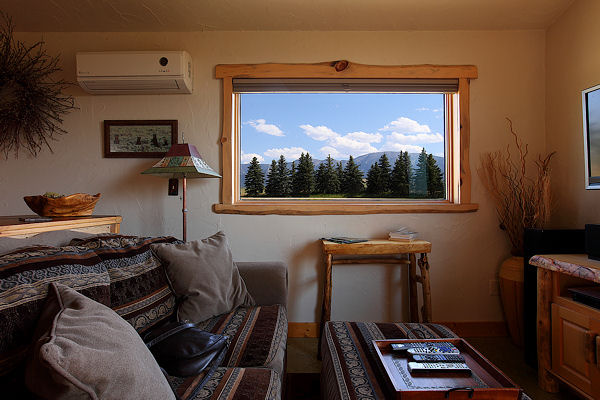
    …and the final blend looks like this.

    11 Montana Blend

    Let’s talk about the opacity and color you can use with the brush when painting on a mask layer. We know that a black paintbrush erases the top photo revealing the photo below, and that a white paintbrush is like an “undo” that puts the top photo back where needed. In addition to just the white and black paintbrush, you can also use any shade of grey. Using a grey paintbrush blends the two photos together, making the top photo slightly transparent so you see both the top and bottom photo at the same time. The darker the grey the more the top photo is erased. The lighter the grey, the more the top photo is visible. This allows for very subtle and realistic blending of the two photos. You may also see it as “opacity” in your software. When the brush opacity is 100%, the brush is at “full strength”. When you swipe the brush, it erases 100% of the top layer fully revealing the layer below. If you set it for 50%, a swipe of the brush works at half-strength.

    Here’s an example of a swipe of the brush at 50% opacity or medium grey.

    17 Brooklyn and Bora Bora opacity

    Notice how you can see both the Brooklyn Bridge and Bora Bora at the same time. Adjusting the opacity or grey-level lets you apply the effects more subtly and with more control as needed. For example, with the Grand Teton photo in the earlier example, where the foreground leaves meet the background mountains, I might use the brush with 50% opacity so it’s a nice seamless blend, that’s unnoticeable. Another way to create a seamless blend is to use a brush with a low “hardness” — that is, the center of the brush is 100% opacity while the outer edges are less strong, creating a smooth effect.

    LOCAL ADJUSTMENTS

    After exposure blending, one of the most important techniques you can do with layers is to make local adjustments. That just means tweaking certain parts of the photo while leaving the rest of the photo as is.

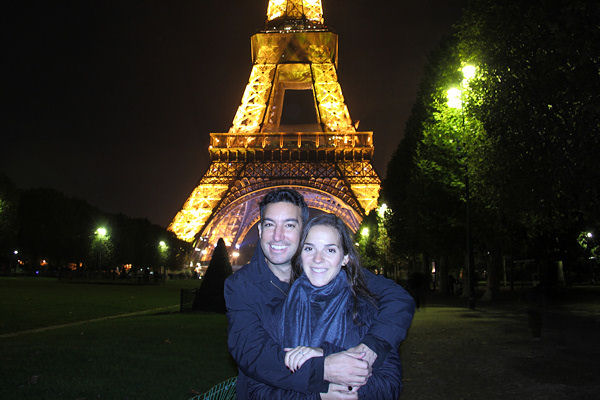
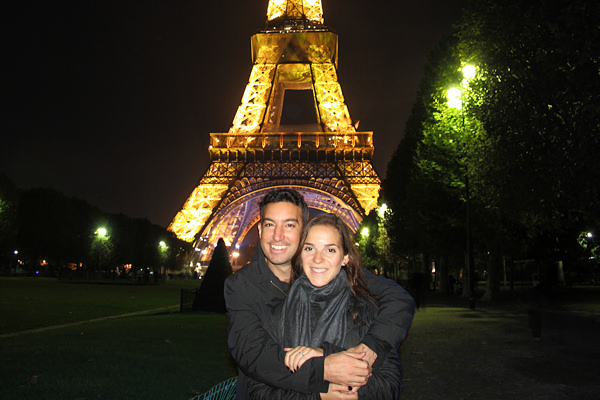
    Below is a great example of using layers for a quick local adjustment. Have you ever taken a photo where different parts of the photo have mixed lighting and different white balances? In the photo below, you can see that the camera’s flash has cast an unflattering blueish tint onto the people’s faces, contradicting the warm glow of the Eiffel Tower in the background.

    12 Paris 1 White Flash

    With layers, you can easily solve this problem. Here is the corrected photo.

    13 Paris 2 blend

    To do this requires just three quick steps:

    1. Create a copy of the original photo and set it aside
    2. Adjust the original photo paying attention only to the area that needs to be fixed (in this case adjust the White Balance of the image paying attention to the faces and ignoring everything else)
    3. Paste the untouched copy that you put aside on top of the adjusted photo, and “erase away” the top photo revealing the adjusted layer below, just where you want to see the adjustment.

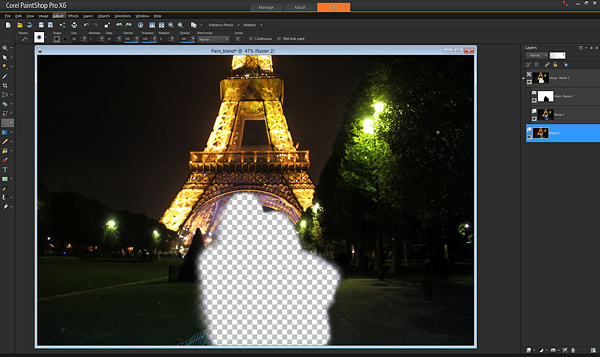
    In this example, you can see exactly where I “erased away” the bad white balance revealing the better white balance below.

    14 Paris 3 layer removed

    If you shoot in RAW format, you can create the two versions of the photo with the two appropriate white balances in your RAW converter. If you don’t shoot raw, just create a second copy of the original photo, change the color balance in your editing software, and layer as described above.

    Using layers you can selectively apply saturation adjustments, brightness/contrast, sharpening, etc. This allows for an incredible amount of control over the final image. Just create a version of the photo with the adjustments, put it as the bottom layer, and reveal it with the brush just in the spots you choose.

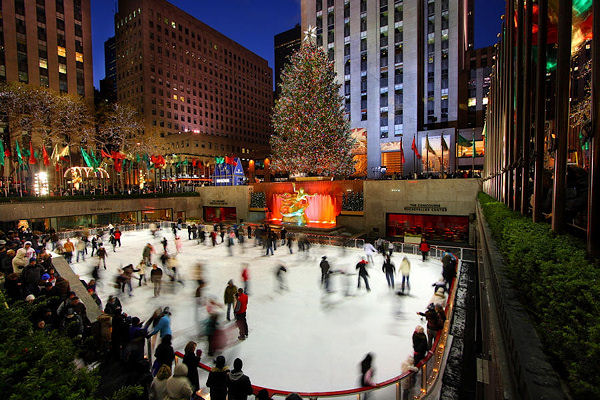
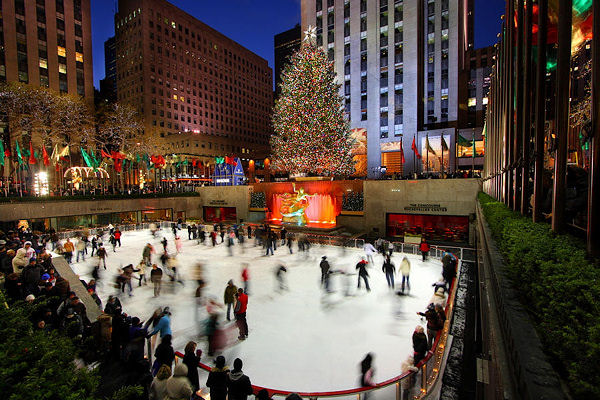
    For example, in this photo of the Rockefeller Center Christmas Tree in NYC, just the lights on the tree needed a levels and sharpness adjustment. You can see the difference that local adjustment makes to the entire photo in this before and after.

    15 Rock Center 1a blurry

    Before

    16 Rock Center blend

    After

    SPECIAL TECHNIQUES

    In addition to using layers for exposure blending and applying local adjustments, you can use layers for a wide variety of additional purposes. I’ve listed some really cool techniques below.

    Blinking in group portraits: Have you ever taken a group shot and there’s always one person blinking or making an odd face? Next time, mount the camera on a tripod and use your camera’s continuous shooting (i.e. rapid-fire) mode to take a few photos in quick succession. If one person is blinking in the photo you like best, just put that photo as the top layer and put another photo without him blinking underneath, and “erase” the top photo with the blink to reveal the bottom photo below with his eyes open.

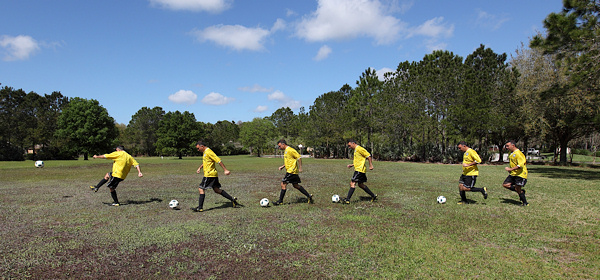
    For cool sports effects, use a tripod and take rapid-fire photos of the action, layer the photos, and “erase” away the top photo to reveal the person moving in the subsequent shots.

    18 soccer line

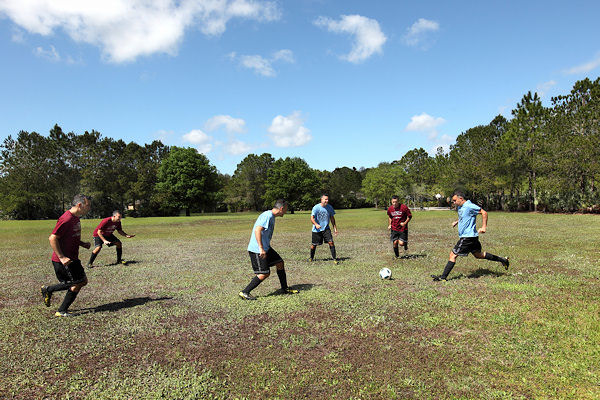
    You can get really creative with this effect – here’s six of me playing a soccer game.

    19 soccer team

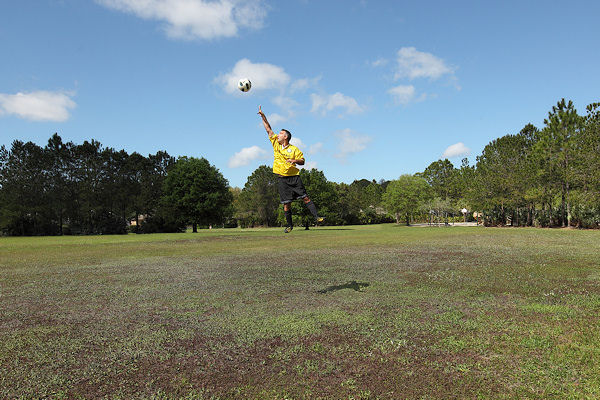
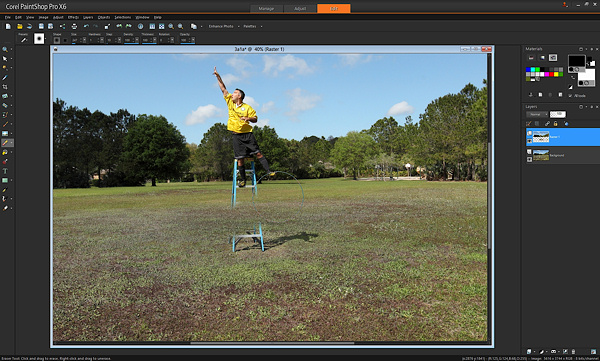
    For special “flying” effects, take two photos from a tripod, one with a person on a ladder, one with the just the background (ladder and person removed). Then layer the photos and “erase” the ladder.

    20 soccer jump

    Here’s what it looked like with one swipe of the brush “erasing” the ladder and revealing the background.

    21 soccer ladder

    Many people find that automated HDR software can produce unnatural effects. If you’ve used HDR software to create an HDR image that you like, but there are certain parts that appear unnatural (for example, the sky), blend a little bit of the original non-HDR photo using layers to make it more natural.

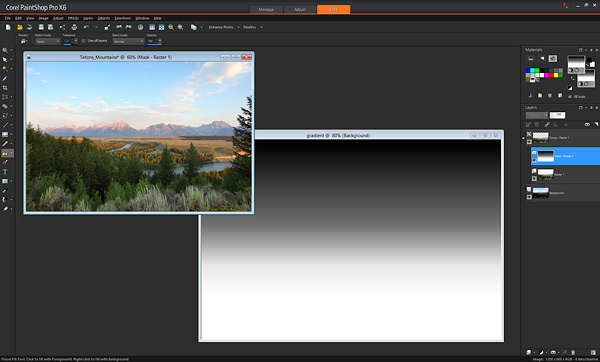
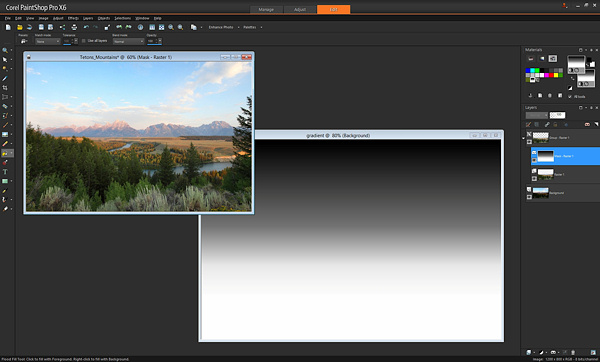
    You already learned that painting with a black brush reveals the layer below. Wherever there is black, the top layer is “erased”. What if we didn’t use a brush at all, and instead used another way to paint black? This opens up a whole new set of possibilities. For example, this is a simple gradient, a pattern that goes from white to black gradually.

    22 use gradient

    If instead of using a black brush to reveal the bottom photo, we used this gradient, we get an instant Neutral Density filter! Apply this gradient using the Fill tool on the mask instead of painting with a brush, and where the black is, the bottom photo will be revealed. Put the black part of the gradient over the area of the photo where you want to adjust exposure and you’ll have a beautiful transition.

    You can also use other tools to apply black to the mask. In the earlier example with the view outside the window, rather than painting with a brush, you could use the “draw rectangle” tool to place a black rectangle over the window, revealing the view outside.

    Hopefully you’ve seen just how simple it is to use layers in your work, and how powerful they are. From blending multiple exposures, to adjusting your photos and using special techniques, layers take your images to a whole new level.

    Please feel free to ask any questions in the comments below.

    The post A Beginners Introduction to Using Layers by Paul Timpa appeared first on Digital Photography School.


    Digital Photography School