Category: Photography

  • How to use Texture to Improve Your Photos

    texture in composition

    I recently wrote about the importance of texture in my article about converting photos to black and white in Lightroom and my review of MacPhun’s Intensify app. Today I thought it would be interesting to take a closer look at this compositional element, and how becoming more aware of it can help you create stronger images.

    Why is texture important? The primary reason is that it helps you create a sense of depth and tactility within your photos.

    Let’s look at some practical examples.

    Photo with lots of texture

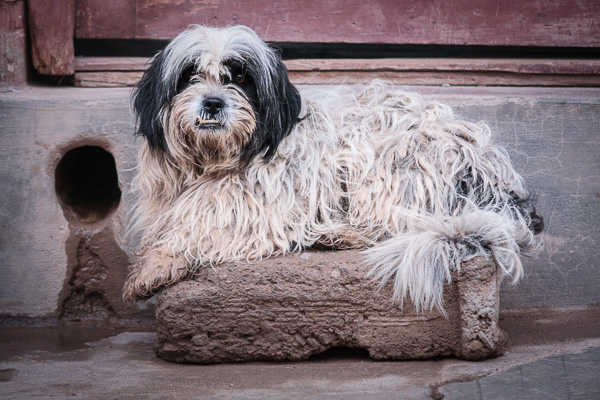
    Here’s a photo I took in a Bolivian town.

    texture in composition

    Look at all the beautiful textures; in the dog’s fur, the stone he is laying on, the concrete step and wooden door behind him. Can you imagine what the dog’s fur is like to touch? Or the stone, concrete or wood? The textures of those objects help you do that, and bring a two-dimensional image to life.

    Photos with some texture

    Here’s another photo taken in South America.

    texture in composition

    There are several contrasts that make the photo interesting. One is the difference in brightness between the church and the sky (tonal contrast). The other is the contrast in texture. The stonework has a rough surface and a lot of texture. The sky has none. The contrast between the rough and the smooth adds an extra layer of interest.

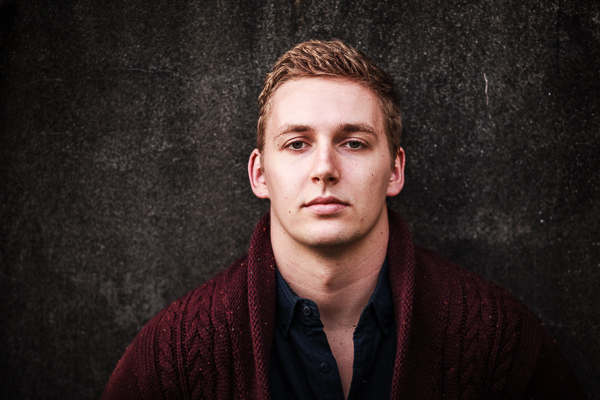
    Portraiture is another subject where you can exploit the contrast in texture between the relatively smooth surface of someone’s skin, and a highly textured background. The portrait below is an example of that. The lack of texture in the model’s skin contrasts with the textures in his sweater, hair, and the background.

    texture in composition

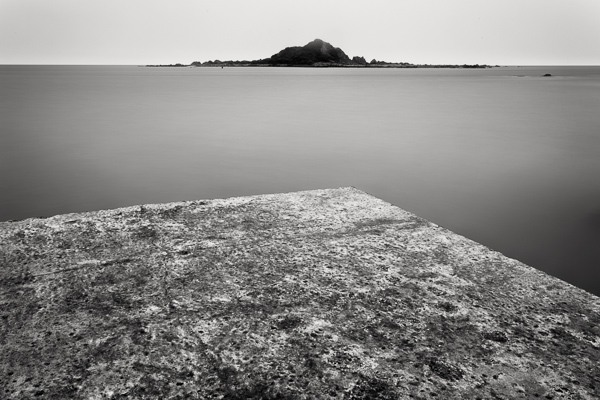
    The contrast between rough and smooth is also common in long exposure photography, where photographers use shutter speeds of a minute or longer to blur the motion of the sea, or other body of water. The result is a photo containing both still elements (such as the concrete jetty and the island in the photo below) and moving elements that have recorded as a smooth, even tone, thanks to the long exposure.

    texture in composition

    Post-processing and texture

    One of the benefits of digital photography is that you can use the tools available in programs like Lightroom to emphasize texture. Or in the case of portraits, to de-emphasize it by applying a local adjustment to smooth skin (my article Four Ways to Improve Your Photos With the Clarity Slider in Lightroom shows you how to do that in more detail).

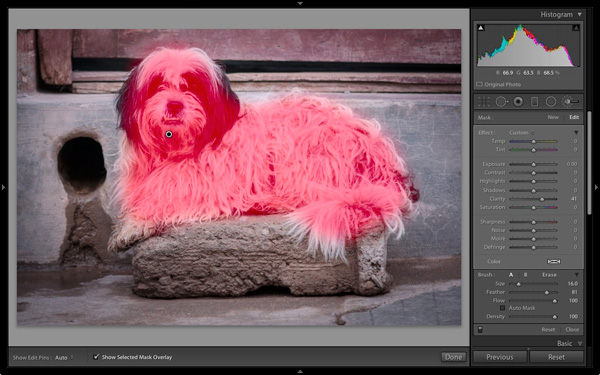
    Here’s a quick tip. Think about enhancing texture as a local adjustment rather than a global one. In the example of the dog above I made two Clarity adjustments in Lightroom. The first was a global adjustment made by setting Clarity to +12 in the Basic panel. The second was a local adjustment made by using the Adjustment Brush to select the dog (see below) and setting Clarity to +41. The result is that the textures of the dog’s fur and the background don’t compete.

    texture in composition

    The red mask shows where the Adjustment brush has been applied locally to only the dog

    Practical Exercise

    The aim of this article is to get you thinking about texture and how you can use it to make your photos better. Here are a couple of exercises to help train your eye to see texture:

    1. Street photography

    Take a walking trip around your neighbourhood, looking for subjects with lots of texture. Think of things like doorways, letterboxes or anything made from concrete or stone. They don’t have to be fantastic photos, the aim is to raise your awareness of texture and get you thinking about how you can use it in your photos.

    2. Portrait photography

    Find a friend or a model to be your subject and find backgrounds with interesting textures. This could be anything from a wall, a doorway, or a large rock. The idea is to play with the contrast between the relative lack of texture (on skin) and the texture of the background.

    Once the exercise is complete, the next step is to experiment with emphasizing texture in post-processing. Whether you use Lightroom, Photoshop or a plug-in like Intensify or Silver Efex Pro2, think about how can you use these tools to emphasize texture, or the contrast in texture between skin and a textured background.

    Your turn

    Now it’s your turn. How do you use textures in your photos? Do you have any tips for our readers, especially when it comes to post-processing? Let us know in the comments.


    Mastering Lightroom: Books One, Two and Three

    Mastering Lightroom ebook bundleMy Mastering Lightroom ebooks are a complete guide to using Lightroom’s Library and Develop modules. Written for Lightroom 4 and 5 books One and Two take you through every panel in both modules and show you how to import and organise your images, use Collections and creatively edit your photos. Book Three shows you how to create stunning black and white images in Lightroom.

    The post How to use Texture to Improve Your Photos by Andrew S. Gibson appeared first on Digital Photography School.


    Digital Photography School

  • Travel Photography Tips – Video Tutorials

    Summer is here in the northern hemisphere and you may be heading out on vacation soon. So today I have a couple videos for you with some travel photography tips.

    First up is an interview by This Week in Photo podcast host Frederick Van Johnson with our own dPS writer Ralph Velasco.  They talk about tips on how to scout locations, being prepared, getting out early, avoiding crowds, gear, approaching and photographing people, and more.

    See more of Ralph’s images and tips in his dPS articles below:

    • How to Capture the Essence of a Place – Travel Photography Tips
    • 18 Tips for Shooting from a Train
    • The Only Tip You’ll Need for Creating a More Interesting and Well-Rounded Set of Images of Any Destination or Subject

    In this second video Justin Weiler from DSLR Traveller shows you his Top 10 DSLR Traveler Tips including: what equipment to bring, vary your shots, shoot  more than you think you’ll need, cut before you share your images, get in some shots yourself, do research, meet the locals, and have a good time.

    Do you have any additional travel tips you’d like to share? Please do so in the comments below.

    The post Travel Photography Tips – Video Tutorials by Darlene Hildebrandt appeared first on Digital Photography School.


    Digital Photography School

  • A Set of Awe Inspiring Majestic Mountain Images

    Summer in the northern hemisphere usually means school’s out and families take vacations. A popular destination, at least where I live, is the mountains. Who doesn’t love driving through, or camping in the mountains.

    Here’s a set of majestic mountain images and rolling hills to help light a fire under you for a possible road trip and photography journey.

    Photograph Teton Tarn Sunrise by Chip Phillips on 500px

    Teton Tarn Sunrise by Chip Phillips on 500px

    Photograph Mingle by Ted Gore on 500px

    Mingle by Ted Gore on 500px

    Photograph Burning Peak by Osamh Alshaalan on 500px

    Burning Peak by Osamh Alshaalan on 500px

    Photograph The Cascade Flow by Greg Boratyn on 500px

    The Cascade Flow by Greg Boratyn on 500px

    Photograph Japanese Tranquility by Natasha Pnini on 500px

    Japanese Tranquility by Natasha Pnini on 500px

    Photograph You may say I'm a dreamer by Karen Plimmer on 500px

    You may say I'm a dreamer by Karen Plimmer on 500px

    Photograph [ … klifatindur ] by D-P  Photography on 500px

    [ … klifatindur ] by D-P Photography on 500px

    Photograph Mirror Mountain by Jonathan Besler on 500px

    Mirror Mountain by Jonathan Besler on 500px

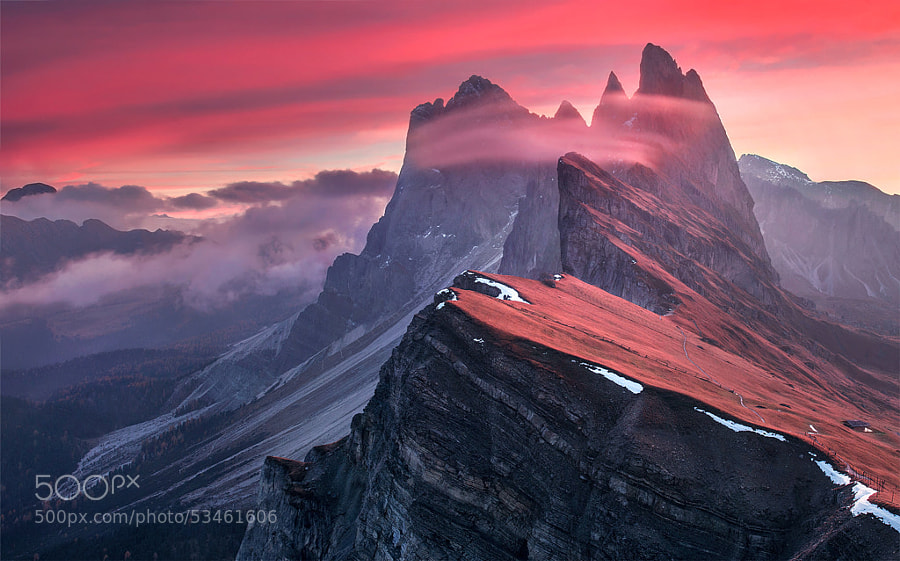
    Photograph The Red Barrier by Max Rive on 500px

    The Red Barrier by Max Rive on 500px

    Photograph Fisherman Wanderer by Joel Santos on 500px

    Fisherman Wanderer by Joel Santos on 500px

    Photograph Morning valley by Pawe? Uchorczak on 500px

    Morning valley by Pawe? Uchorczak on 500px

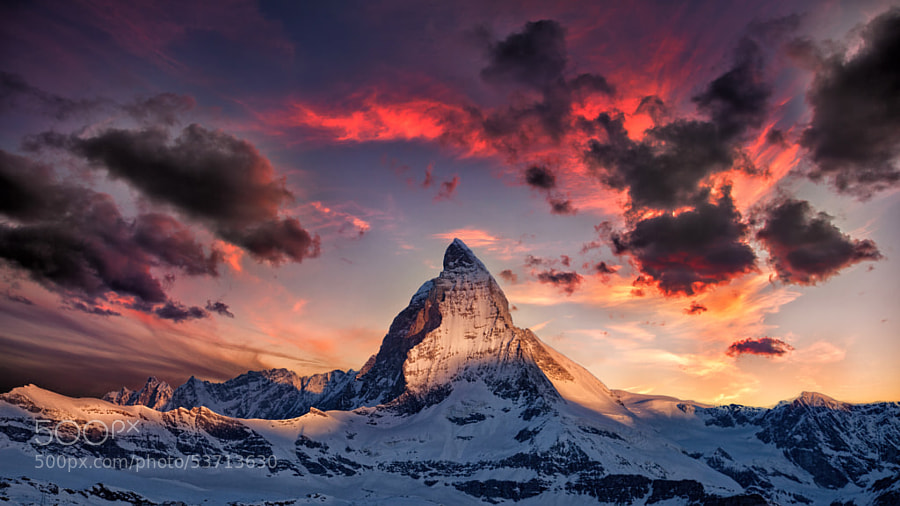
    Photograph Amazing Matterhorn by Thomas Fliegner on 500px

    Amazing Matterhorn by Thomas Fliegner on 500px

    Photograph Autumn Dreams by Robin Halioua on 500px

    Autumn Dreams by Robin Halioua on 500px

    Photograph Celestial Assiniboine by Callum Snape on 500px

    Celestial Assiniboine by Callum Snape on 500px

    Photograph The Rise by Aaron Reed on 500px

    The Rise by Aaron Reed on 500px

    Photograph Still Life, Life Still by Ryan Dyar on 500px

    Still Life, Life Still by Ryan Dyar on 500px

    Photograph Growth by Matthew Hahnel on 500px

    Growth by Matthew Hahnel on 500px

    Photograph Yosemite: Bridge Across the Merced River by Larry Marshall Photography on 500px

    Yosemite: Bridge Across the Merced River by Larry Marshall Photography on 500px

    Photograph Moraine Lake Sunrise by Chip Phillips on 500px

    Moraine Lake Sunrise by Chip Phillips on 500px

    Photograph Podere Belvedere, San Quirico d'Orcia by Edwin Kremer on 500px

    Podere Belvedere, San Quirico d'Orcia by Edwin Kremer on 500px

    Photograph Morning idyll by Marcin Sobas on 500px

    Morning idyll by Marcin Sobas on 500px

    Photograph Beautiful time by Hidenobu Suzuki on 500px

    Beautiful time by Hidenobu Suzuki on 500px

    Photograph Sheep and Volcanoes by Florent Courty on 500px

    Sheep and Volcanoes by Florent Courty on 500px

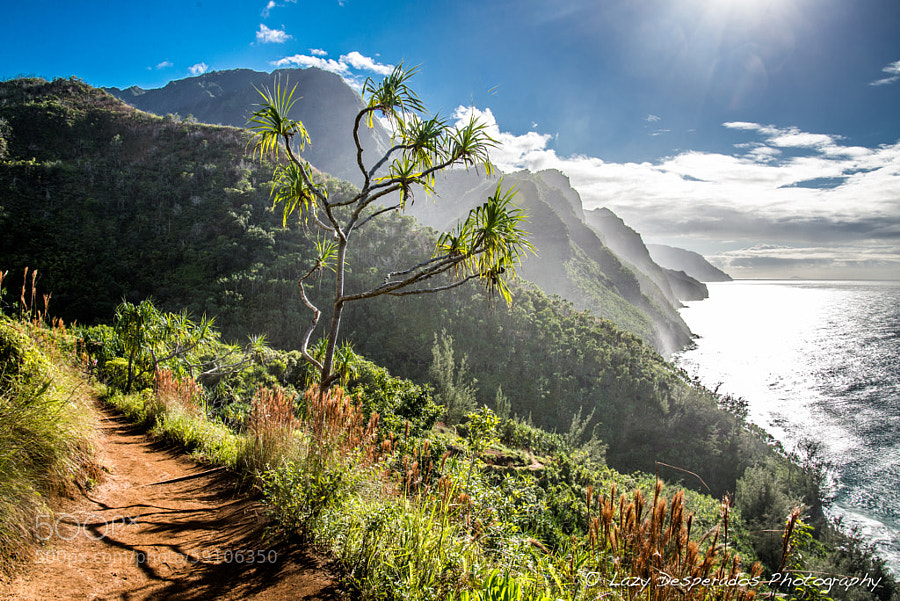
    Photograph Coastline Journey by Lazy Desperados  on 500px

    Coastline Journey by Lazy Desperados on 500px

    Photograph Lindy Point Sunset by Steve Perry on 500px

    Lindy Point Sunset by Steve Perry on 500px

    Photograph Preikestolen by Robin Kamp on 500px

    Preikestolen by Robin Kamp on 500px

    Photograph Lac Blanc by Sven Müller on 500px

    Lac Blanc by Sven Müller on 500px

    Photograph Surprise Awakening by Aaron M on 500px

    Surprise Awakening by Aaron M on 500px

    Photograph The Last Ride by Rob Dweck on 500px

    The Last Ride by Rob Dweck on 500px

    Photograph A morning with clouds by Jonathan Mourglia on 500px

    A morning with clouds by Jonathan Mourglia on 500px

    For tips on landscape and nature try these articles:

    • 25 Landscape photography articles
    • Living Landscapes – a dPS ebook
    • Loving Landscapes a guide to landscape photography workflow and post-processing – a dPS ebook
    • How to do Surreal Digital Infrared Photography Without Expensive Gear or Camera Conversions

    The post A Set of Awe Inspiring Majestic Mountain Images by Darlene Hildebrandt appeared first on Digital Photography School.


    Digital Photography School

  • Weekly Photography Challenge Hills and Valleys

    Earlier today I shared a collection of images of hills and mountains. Now it’s your turn.

    This week’s photography challenge is to get out and do some landscape photography. Specifically hills, valleys and mountains – get out into some natural landscape.

    Some ideas to get started:

    By Centurion

    By rachel_thecat

    By Justin Brown

    By Earthwatcher

    By arbyreed

    By *Light Painting*

    By Daniel Peckham

    By Mark Wassell

    For tips on landscape and nature try these articles:

    • 25 Landscape photography articles
    • Living Landscapes – a dPS ebook
    • Loving Landscapes a guide to landscape photography workflow and post-processing – a dPS ebook
    • How to do Surreal Digital Infrared Photography Without Expensive Gear or Camera Conversions

    Show use your mountain and hill images

    Simply upload your shot into the comment field (look for the little camera icon in the Disqus comments section as pictured below) and they’ll get embedded for us all to see or if you’d prefer upload them to your favourite photo sharing site and leave the link to them. Okay, ready to impress us?

    The post Weekly Photography Challenge Hills and Valleys by Darlene Hildebrandt appeared first on Digital Photography School.


    Digital Photography School

  • 5 Not-So-Obvious Mistakes Photographers Make When Starting a Business and How You Can Avoid Them

    By plantoo47

    When starting your photography business it’s easy to get caught up in how good your portfolio looks, buying new equipment, or how many followers you have on social media. While these tasks are important, you risk overlooking some crucial numbers that will help you to hold yourself accountable and succeed as a result.

    Large corporations have whole departments tracking data to help their CEO’s make better business decisions. So why is this completely overlooked in one-person businesses?

    In this article you will learn the Five not-so-obvious mistakes photographers make when starting a business. I will also give you some handy tips on how you can avoid these mistakes in the future.

    Mistake #1 – Not knowing your income goal

    One of the most common mistakes you can make as a freelance photographer is not setting any targets around how much money you want to make. I think we can all agree that it is an amazing feeling to be able to earn enough money to support yourself.

    An effective way to grow your income is to first be aware of how much you’re currently earning so that you can figure out how much you want to earn in the future. Have a good solid brainstorming session about the next 12 months and really ask yourself, “How much do I want to realistically earn this year?”

    By Simon Cunningham

    Making a million dollars a year photographing would be fantastic, but you have to be realistic about your financial goals. You don’t want to set a figure that is so high that you feel discouraged. You also don’t want to set a figure that undervalues your talent. You want to choose a figure that makes you feel a little stretched but is still achievable with some hard work.

    A good place to start is to look at how much income you made in the last year, and then add 30% on top of this amount to calculate how much you’d like to make in the next year. For example, if you earned $ 15,000 last year, your goal this year should be $ 19,500 ($ 15,000 x 1.3).

    If you don’t have any income records from last year, just choose a figure that you feel comfortable with, and that is attainable.
    After you’ve worked out your target income for the year, the next thing to do is calculate your average fee. You can calculate this by dividing your total income by the number of sales (clients) you had over the last year.

    So now that we know what your target income and average fee is, we can move on to calculate the number of photo sessions required to reach your target income goal.

    By Historias Visuales

    Mistake #2 – Not knowing how many photo sessions you need to do

    The number of sessions that you need to do in the next 12 months is dependent on your target income and average fee. For example, to make $ 20,000, you will need to do 40 sessions within the next 12 months to reach your income goals. This is calculated by dividing your income goal of $ 20,000 by your average fee, which in this example is $ 500.

    Your required number of sessions may feel daunting at first. It’s important to break it down into smaller increments so that you can visualize these amounts so it appears more attainable, so 40 sessions for the year turns into 3.3 sessions per month. This is calculated by dividing 40 sessions by 12 months.

    When you’re setting your income goal, think about how much time you want to take off for the year. You need to give yourself leeway for traveling, illness, recovery, planning and so forth. Just because you’re a business owner doesn’t mean you don’t need
    to have time off like the rest of the world.

    Going back to the example, the number of sessions required is 3.3 per month. Let’s round this down to three sessions to make things cleaner. This means you need to do 0.75 sessions per week.

    By Korry Benneth

    If you’re not comfortable with the volume, you could tweak your targets. For example, if you were to get more skilled at charging higher fees, we could set your average fee to $ 1000 instead of $ 500. How would this impact your volume? Well $ 20,000 divided by $ 1000 is 20. That’s 20 less photo sessions you have to do for the year, which equals out to just 1.6 sessions per month or only one photo session every couple of weeks.

    So the next question is, should you focus on doing more sessions, or should you learn how to effectively increase your fees? The choice is ultimately up to you, but this example illustrates the importance of knowing your numbers so you can make the necessary adjustments in your business that will help you succeed.

    Mistake #3 – Not knowing how many inquiries you need

    Inquiries are the first point of contact you have with potential clients. Your main goal when you receive an inquiry is to convert it into a booking.

    Measuring the number of required inquiries in your photography business can be a little challenging as some of the people that contact you initially don’t end up booking for various reasons. So as a rule of thumb I like to use a 50% conversion rate. This means that to get three bookings for the month, you need to get at least six inquiries.

    As you can see, generating inquiries is easily one of the most important steps in the sales process. When it comes down to it, if you want to achieve your goal of $ 20,000, you need to generate six inquiries per month with an average fee of $ 500. Once again, you will only know this if you are aware of the important numbers in your business, which I’m sure, most of your competition is overlooking.

    Mistake #4 – Not knowing how many bookings you need

    Converting enquires into bookings is another often overlooked part of the photography sales process. Not only do you get the opportunity for income now, it gives you an opportunity to book future business through referrals.

    By Ken Teegardin

    The number of bookings required in your business should match the number of sessions required. So if you need to do three photo sessions per month, then you also need to book three clients per month.

    Obviously the bookings you get today could help get you more sessions in the future. However, I have found that these numbers tend to correct themselves if you focus on getting your target bookings each and every month. So if you’re not doing enough sessions, you have to revisit your bookings and see how you can increase your inquiries.

    Mistake #5 – Not having a method of keeping track of your numbers

    Hopefully by now you have a better understanding of the relationship between different targets in your photography business. It is clear that more inquiries lead to more bookings, which lead to more sessions, which ultimately leads to more income.

    It’s all well and good to be aware of the numbers, but to make significant change in your photography business requires you to hold yourself accountable and ensure that you’re following through on your goals. There are a couple ways you can do this.

    One way is to draw a table in your notebook that displays each target for the month. You then record a dash next to the target when you get it done. So if you have a target of three sessions for the month, every time you do a session you draw a dash next to this target. You can also break this down into weeks if that makes it easier for you to update.

    By Wendy House

    You could also track your numbers by drawing up your targets on a whiteboard in your home office or studio. This is an excellent idea as you’re constantly looking at it.

    Another way to do this is to create a spreadsheet. I know a lot of creative professionals cringe when they hear the word “spreadsheet”. However I encourage you to push through your barriers and use a spreadsheet to track your numbers.

    The advantage of a spreadsheet is that it does all the work for you. All you have to do is input your progress and the spreadsheet can tell you how you’re doing. I can just hear what you’re saying at the moment. “Michael, this sounds great, but how do I actually create this spreadsheet you’re talking about?” I thought you might ask, so I’ve prepared a spreadsheet for you to download for you to use in your business. I initially created this spreadsheet for my partner’s photography business to track her numbers, and it really helped change her mindset in her business.

    Before using my tool she couldn’t tell me what percentage of inquiries were converting into bookings. After she started tracking her numbers, she felt empowered and knew exactly how her business was going at any given time. Sometimes it was a pleasant surprise to know that she smashed her targets, other times she knew that she had to find ways to generate more business.

    You don’t have to look at your numbers daily. I recommend updating your numbers at the end of each week. I also suggest that at the end of each month you send your numbers to an accountability partner. Knowing that you have to submit your numbers will only motivate you more. Choose someone you trust and you’re comfortable enough with to share your goals. This could be your spouse, sibling, good friend or business buddy. Sometimes all you need is some encouraging words to keep you focused in your business.

    Bonus mistake #6 – Not tracking your expenses

    It can be somewhat soothing to plan and think about how much money you’re going to make. Having said that, it’s just as important to understand how you’re spending your income.

    Lots of new and even seasoned professional photographers overlook this highly important step. Reducing your costs is another method of making more money so you can spend it on more important things, like a new lens or a holiday.

    By Jorge Franganillo

    So how can you go about tracking your expenses? Well it’s quite simple, use accounting software. There are many accounting solutions on the market that are both free and paid. Personally, I recommend going with Wave (because it’s free) or Xero (because it’s awesome). Both systems allow you to automatically pull your transactions from your business account bank statement directly into your accounting software. This means you don’t have to spend hours entering your expenses. Pretty cool huh?

    Most photographers get overwhelmed when they think of financial management. But investing time in this area will do wonders for your business.

    By far the most important feature of accounting software, is the ability to create reports that allow you to see where, and how much, money you are spending in your business. From there you can make necessary adjustments to cut back on your costs.
    By M.Kemal

    Bringing clarity to your business

    The whole purpose of this article is to bring clarity into your business. A lot of photographers like yourself start a business because you want to earn a living doing something that you enjoy. But you soon come to realize that making a living and growing your business is not easy. It can be overwhelming thinking about how you’re going to get through tomorrow’s to-do list while keeping all of your existing clients happy. This overwhelming feeling often leads to “fog brain” and prevents you from having clarity in your business.

    Being aware of your numbers will ultimately help you make better decisions. Instead of spending one hour on Facebook today, you could spend that time contacting potential referral partners for your business.

    At the end of the day, activities that generate more inquiries are much more important than getting bogged down with emails, packaging, social media, design and other administrative activities, especially when trying to reach higher income targets. Get someone else to do those things so you can focus on what’s important: servicing your clients, doing sessions, finalizing bookings and generating so you can fund the lifestyle that you want and deserve.

    For more photography business tips read these articles:

    • The Ultimate Guide to Going Pro as a Photographer
    • How to Calculate Your Cost of Doing Business – And Other Necessary Numbers
    • 5 Things to Consider Before Starting Your Photography Business
    • 30 Things you Should Know to Help you Start a Photography Business

    The post 5 Not-So-Obvious Mistakes Photographers Make When Starting a Business and How You Can Avoid Them by Michael Ofei appeared first on Digital Photography School.


    Digital Photography School

  • Reviewing the Loka UL Adventure Backpack from F-Stop Gear

    The new Loka UL backpack from F-Stop Gear combines rugged protection for your camera gear with the space you need for other outdoor essentials.

    The new Loka UL backpack from F-Stop Gear combines lightweight rugged protection for your camera gear with the space you need for other outdoor essentials.

    Among the many life lessons learned from my father was the one about always making sure you have the right tool for the job. I think we all do our best to apply this wisdom to the gear we pack inside our camera bags, but I’ve always felt that it’s just as important to apply it to the bags themselves. For starters, the bag that gets you to the gig isn’t always the best bag for getting you through the gig. I have a lot of bags. A lot. Until recently, though, I never had a bag that adequately combined protective storage for the gear with room for other essentials like a jacket, food, or other hiking gear for when an assignment– or life– takes me off the beaten path. The just-released Loka UL (Ultra Light) from F-Stop Gear not only combines those elements for me, but does so in one of the more innovative ways I’ve seen in a while.

    First Impressions

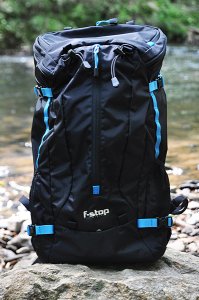
    Fresh out of the box, I was impressed with the high-quality construction and attention to detail. Modeled after F-Stop’s original Mountain Series Loka pack, the Loka UL has been stripped down to the essentials.  More than a full 1/3 lighter than the original, this newer version has been simplified in the interests of weight reduction and better freedom of movement. Those goals have been achieved without any compromise whatsoever in the build quality. A ripstop nylon water-repellent shell, internal aluminum frame, and a new ergonomic harness provide the lighter weight, as well as a more even distribution of the load.

    Specs and Features

    • Height:  22 inches (55.9 cm)
    • Width:  12.5″ (31.8 cm)
    • Depth: 11″ (27.9 cm)
    • Volume: 37 liters
    • Weight empty:  2.25 lbs. (1.02 kg)
    • Price: $ 249.00 (USD)
    • DWR (durable water repellant) treated, 210D Ripstop Nylon with PU2 (Urethane moisture curing) coating
    • EVA (Ethylene vinyl acetate) padded hip belt, EVA-padded shoulder straps, and internal aluminum frame for easier handling of heavy loads
    • Jersey laminate EVA-padded back panel for ventilation and comfort control
    • YKK brand reversed zippers for extra weather protection
    • ITW brand buckles
    • Easy-to-reach side mesh pocket with ripstop nylon base and elastic cuff for water bottles
    • Drainage weep holes on sides and front pockets
    • Rain cover pocket in base of pack
    • Organizer pockets in top lid for batteries, memory cards, smart phones, etc.
    • Front panel pocket ideal for jackets, extra layers, ground tarp, etc.
    • Internal nylon sleeve fits up to a 13″ laptop, or doubles as a hydration bladder pocket
    • Quick-release side compression straps can secure tripods, ski poles, skis, etc.
    • Sternum strap includes integrated whistle for emergencies
    • Belt and shoulder suspension straps help adjust load for optimum weight distribution
    • Several exterior D-rings and attachment points for accessories
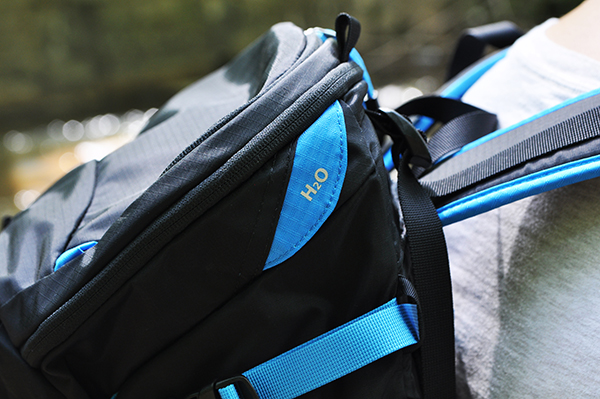
    An integrated hydration system (bladder not included) will be a plus for outdoor photographers.

    An integrated hydration system (bladder not included) will be a plus for outdoor photographers.

    Internal Camera Unit (ICU)

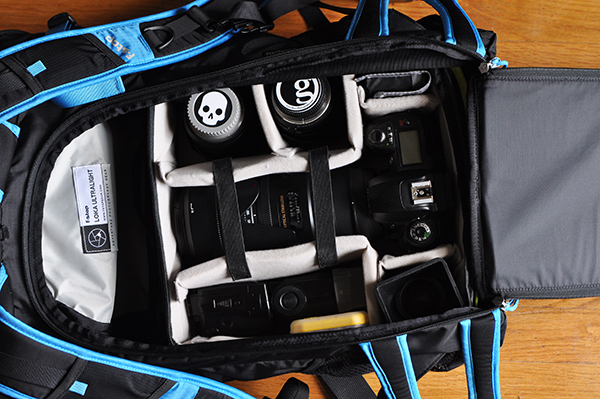
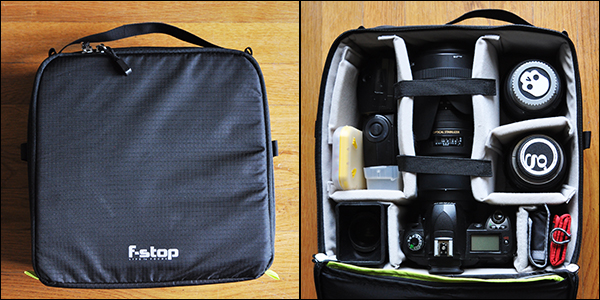
    The heart and soul of the F-Stop Mountain Series is the Internal Camera Unit (ICU). Available in ten different sizes, the ICU lets you select the ideal-sized padded insert for your camera gear, while balancing available space between camera gear and other essentials like clothes, food, camping equipment, etc. Like other bags in the Mountain series, the Loka UL can accommodate one or more ICUs, depending on the size selected. Pictured here is the Shallow Medium ICU– one of the three recommended ICU sizes for this bag. Six of the 10 available ICUs will fit the Loka UL, but the other larger ones would seriously cut down on space available for non-camera essentials, defeating the entire purpose of the bag. The ICU rests securely in the bottom of the Loka UL and is kept in place with four Velcro tabs around the internal aluminum frame. Camera gear is accessed through the back panel of the pack.

    Gear stored in the ICU is accessed through the back of the pack.

    Gear stored in the ICU is accessed through the back of the pack.

    Every ICU is made with double ripstop nylon and a polyurethane coating.  High-density cross link foam dividers and side walls keep gear secure and protected. The ICU also works well as a modular storage system for your gear. The foam lid protects your precious cargo when used for storage or transport, and can be folded back and out of the way for easier access to gear when it’s in the pack. The dimensions of the ICU shown here are:

    • External:  5″ (L) x 11.5″ (W) x 11″ (H) (12.7 cm x 29.2 cm x 27.9 cm)
    • Internal: 4.5″ x 10.5″ x 10″  (11.4 cm x 26.7 cm x 25.4 cm)
    • Weight Empty: 0.95 lbs (0.43 kg)
    ICUs also work well as modular storage systems when the bag's not in use.

    ICUs also work well as modular storage systems when the bag’s not in use.

    It’s worth pointing out that the Loka UL makes for a great all-around backpack with the ICU completely removed, for those unheard of situations (GASP!) when you might actually leave the photo gear at home. Note: If this happens to you, seek help immediately.

    Hitting the Trails

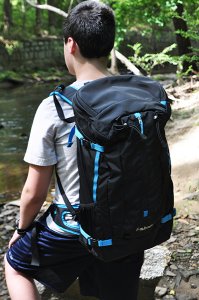
    Stabilizing straps on the shoulders and at the waist help maintain a comfortable, even distribution of weight.

    Stabilizing straps on the shoulders and at the waist help maintain a comfortable, even distribution of weight.

    Summer has already hit here in Georgia (USA) with all the grace of a runaway freight train, so I’ll have to get back to you on how the Loka UL performs in cold, snowy conditions. But I can say that it did great in the heat, humidity and rain while hiking through paths, hills and riverbeds. Obviously, comfort is the #2 priority when choosing a camera backpack. I say #2 because let’s face it– protecting the gear is #1. But comfort is key and the Loka not only met my expectations, but vastly exceeded them. By biggest complaints in the past about camera backpacks has been the comfort issue. I’ve never doubted their ability to protect the gear. Sometimes, though, it’s their unfailing gear protection that makes them too heavy or unwieldy for actual hiking or camping. The fact that the Loka has been designed specifically for hiking, camping, skiing and other outdoor activities helps ensure that it strikes a great balance of form and function.

    I was very impressed with the wide variety of pockets on this bag. Someone was obviously paying attention to the real-life needs and concerns of outdoor photographers. Features such as a pocket perfectly sized for a protein bar on the harness straps, as well as drainage “weep holes” at the bottom of some exterior pockets all add up to maintaining what you need and discarding what you don’t. There’s an old saying when it comes to hiking– “Take only pictures and leave only footprints.” This bag even has multiple pockets available for responsibly taking your trash with you.

    With stabilizing straps at both shoulders and each side of the hip belt, adjusting and readjusting distribution of the load was extremely easy. Obviously, the bag alternates between getting lighter and heavier over the course of the day. The camera goes in and out of the bag. You stop to eat. Put on or take off a jacket. Being able to make those adjustments quickly and easily takes one more item off the list of things you need to worry about. The stabilizers and harness straps work well together to keep any potential back strain to a minimum.

    We did encounter some light to moderate rain while testing the Loka. I opted to skip the rain cover, and was pleased to see that the water-repellent fabrics did exactly what they were supposed to do.

    What I Packed in Mine

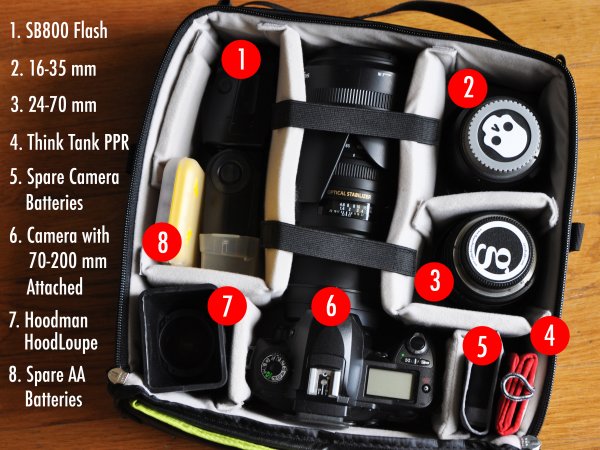
    The image below breaks down the camera gear I packed in the ICU. Other items packed in the remaining areas of the bag included: Jacket, hat, towel, dry shirt, bug spray, two water bottles, lunch, and a few snacks.

    fstop-loka-review-dps-008

    Wrap-up and Recommendations

    Variety is the spice of life and that same philosophy can (and should) apply to camera bags. I have bags that I only use for storage. I have one that’s been configured for nothing but lighting equipment. I have “everything but the kitchen sink” bags for commercial shoots, and small shoulder bags that won’t hold much more than a camera and two lenses. They all serve their specific purpose and the Loka UL is no different. It’s the first bag I’ve had that can carry not only the right amount of gear, but the other essentials needed for a day on the trails. Outdoor photography is both a challenge and an adventure. The Loka UL from F-Stop Gear helps you meet those challenges head-on and I highly recommend it for whenever adventure comes knocking on your door.

    fstop-loka-review-dps-005

    I try to steer you guys towards Amazon as much as I can, but the Loka UL backpack is currently available exclusively through F-Stop gear. That’s actually a good thing, insofar as configuring your bag and ICU combination is a lot easier when you have every possible combination in one place. Prices for the bag and ICU as shown in this review: Loka UL Backpack ($ 249.00 USD), Medium Shallow ICU ($ 79.00 USD). Click here for more information. As always, feel free to post any questions you have in the comments.

    The post Reviewing the Loka UL Adventure Backpack from F-Stop Gear by Jeff Guyer appeared first on Digital Photography School.


    Digital Photography School
  • Tips to Establish a Smart Photography Business

    Establishing your own photography business is a full time job, if not more. It’s a great gig, don’t get me wrong, but running this or any other business will instantly make you the wearer of many hats. The best way to make it work and avoid headaches along the way is to have a plan, even if it is a Continue Reading

    The post Tips to Establish a Smart Photography Business appeared first on Photodoto.


    Photodoto

  • Review of the Turfstand by Windborne

    The Turfstand sheds the legs of conventional light stands and adds ground-anchoring spikes for a new layer of stability in outdoor lighting.

    The Turfstand sheds the legs of conventional light stands and adds ground-anchoring spikes for a new layer of stability in outdoor lighting.

    When you stop and think about it, how much is there to really say about a light stand? I suppose we could discuss height, weight or materials, but once we got our preferences out on the table, it would be a pretty short conversation. As long as it holds what you put on it safely and securely, and you can get it where you need it, the discussion is pretty much over, right? If we were talking about a traditional light stand, maybe. But since we’re talking about the Turf Stand, there’s actually quite a bit more to discuss.

    Created by Michigan photographer Mike Drilling, the Turfstand is anything but traditional. Replacing the three legs we’re all used to with five sharp, metal spikes, at first glance the Turf Stand bears more of a resemblance to Poseidon’s trident than it does to a light stand. But a light stand it is. Obviously designed for outdoor photography, the base goes about ten inches into the ground, anchoring it securely into just about any terrain.

    Specifications

    • Height:  8 feet from base to top of stand when fully extended (2.4 m)
    • Weight:  2.5 lbs (1.13 kg)
    • Spikes:  5 – the longest of which are 10″  (25.4 cm)
    • Materials:  aluminum and steel
    • Maximum load:  approximately 4.5 lbs (2.04 kg)
    • Price:  $ 139.00 (USD) on company website. $ 99.95 (USD) on Adorama and Amazon

    First Impressions

    There is no question that a lot of thought went into the design and manufacture of the Turfstand. Straight out of the box it appears to be sturdy and well-crafted. While I’ll confess to having one of those, “Why didn’t I think of this?” moments, I also have to admit to being a bit skeptical. After all, a conventional light stand and sand bag have always served me well in the past, so what’s the big deal? Then I remembered how much I hate dragging sand bags around with me, so that became a quick point in the Turfstand’s favor. Then I thought about uneven terrain, odd angles, and some of the other dilemmas that Mother Nature and circumstance sometimes throw in our way. Skepticism slowly gave way to intrigue and I was eager to put the Turfstand through its paces.

    turf-stand-review-dps-001

    Caution #1 – those spikes are sharp!

    Considering the fact that the stand was designed to give you a sturdy base in grass, dirt, mud, sand, clay, etc., I would fully expect the spikes to be sharp. I would, however, also expect there to be a guard of some sort included for when the stand is not in use. First and foremost, you MUST be abundantly aware of how you carry this thing, especially when walking with or moving around your subject. Regardless of which direction I had the spikes pointed, I was a bit nervous- not only for the safety of the people around me, but for my own as well. After all, this was designed for uneven terrain. Tripping while carrying this stand unprotected could have some pretty serious results. Putting it in my light stand bag was not a viable solution, out of fear that the spikes might damage the bag itself, or the umbrellas and softboxes also stored in it. I addressed my concern with some heavy-duty cardboard.

    turf-stand-review-dps-006

    Caution #2 – this is not an air-cushioned stand

    If you’ve been doing this a while, you know that air-cushioned stands lower slowly, regardless of how much weight is mounted on them. Non-air-cushioned stands, on the other hand, will slide down pretty fast as soon as the thumb screws are loosened. While this should not be a factor that prevents you from using this stand, you should be aware of it. As with all light stands and background stands, maintain control of each section as it’s lowered. You’ll not only keep the people around you safe, but you’ll also avoid accidents that could damage your gear.

    turf-stand-review-dps-010

    Out in the field

    I do a lot of portrait location work, so I was pretty excited to see how the Turfstand performed. As noted, the spikes are pretty sharp, so driving the base into the ground was pretty easy. I tried it out on grass, hard-packed gravel, wet soil, and our famous Georgia clay. I couldn’t find anything on the Turfstand website regarding water-resistance, so I passed on the idea of trying it out in a running, shallow river nearby, but my guess is it would be fine, as long as the base was not completely submerged.

    One area where the Turfstand performed exceptionally well, was when I tried it at odd angles. How many times have you been shooting portraits on location and not been able to get your light stand down low enough? Portraits with subjects sitting on the ground often require an assistant holding the light, or turning a light stand on its side and laying it horizontally on the ground. The Turfstand’s unique design allowed me to stick it securely in the ground at a 45 degree angle, bringing the softbox down to a lower height, without the usual hassles.

    turf-stand-review-dps-003

    Taking odd angles and uneven terrain a few steps further, I decided to see how the stand would fare if stuck into the side of a hill. As you can see from the photo below, it’s pretty adept at putting a light in places you wouldn’t be able to even try with a conventional light stand. Even better, it lets you do so without putting you, or an assistant, in a physically dangerous or precarious position. We all want to get “The Shot” but personal safety should come first (most of the time).

    turf-stand-review-dps-008

    The other big question mark for me was how the Turfstand would perform under windy conditions. Starting with the premise that no light stand is going to stay 100% still in even a light breeze once an umbrella or softbox is mounted on it, my concern was less about movement and more about falling over. By virtue of its three legs, a traditional light stand is going to have a lower center of gravity, resulting in less lateral sway. The down side is that on a windy day your traditional stand will either stay up or get blown over. Up or down. There’s not going to be much in between. An assistant or a sand bag will obviously help, but not everyone has the luxury of a second set of hands on a photo shoot. While I did notice some sway with the Turf Stand–particularly when used at unconventional angles–I was never worried about it being dislodged from the ground.

    As with any piece of equipment, you have to use some common sense. In windy conditions, a softbox will fare better than an umbrella, but remember that any chain is only as strong as its weakest link. In the case of the Turfstand, my weakest point was where my speedlight and softbox were attached. Just because the Turfstand can withstand a heavy wind, don’t assume that your light or modifier can. As the product insert says, “Nothing works in a hurricane.”

    For purposes of this test, I used a Nikon SB800 speedlight in a 24″ Glow HexaPop softbox (one of my favorite modifiers for ease of use and quality of light, full review coming soon). The combination of the two was well below the 4.5 pound load limit. As with any light stand, exercise caution against pushing the maximum load limit, or maximum extension.

    turf-stand-review-dps-007

    Pros of the Turfstand

    • Lightweight and easy to use
    • Sturdy and secure
    • Quality materials and construction
    • One-year, 100% guarantee
    • Great performance on irregular terrain
    • Reasonably priced

    Cons of the Turfstand

    • The spikes could be a hazard
    • Non-air-cushioned construction

    Final thoughts

    I review a lot of photography products, and some of the highest praise I can offer is that a product does what it says it’s going to do and does it well. That is certainly the case with the Turfstand. Plant it in the ground and it’s not going anywhere. It’s a unique solution to a problem that any location photographer has faced, and any solution that lets me leave the sand bags at home is a solution well worth considering. You’ll notice below that I’ve given the Turfstand 4 out of 5 stars. If the designers can come up with a guard for the spikes when not in use (something I’d be willing to pay extra for, by the way), and switch to air-cushioned construction, I’d gladly give the 5th star.

    As noted, the Turfstand sells for $ 139.00 (USD) on the Windborne website, but even at its $ 99.95 Adorama price, I can’t help but think the price is maybe a bit high. Realizing that you can buy two conventional air-cushioned light stands for the cost of just one Turfstand makes you stop and think about whether the added versatility is worth the added cost. As with any gear purchase, only buy it if your answer is “yes.” For me, I don’t see it being a major part of my workflow right now, but it’s nice to know that an option like the Turfstand is available if that changes.

    The post Review of the Turfstand by Windborne by Jeff Guyer appeared first on Digital Photography School.


    Digital Photography School

  • 7 Proven Ways to Come Home with Better Travel Photos

    It s all about the light

    Your next vacation or around-the-world escapade is the perfect time to brush up on your photography skills.

    After all, taking a great photograph is never more important than when you’re seeing people and places you may never see again. Travel opens your eyes to other cultures, and if you prepare before you leave, it can also open the eye of your camera lens to infinite possibilities.

    But first things first – let’s make sure you have a basic understanding of photography before you step onto the plane. Here’s a list of seven proven ways to come home with better travel photos.

    #1 Take a good look at your gear

    You don’t need to spend a million dollars on crazy-expensive gear. However, you do need a camera from this century. Better yet, a camera that was made in the last five years. Technology is changing so rapidly that you’re really going to notice a difference with newer cameras.

    Also, don’t be afraid to check out the new lightweight DSLR cameras that are all the rage. You may feel cooler hauling around a huge Nikon D5300, but a more compact model can take great pictures too (plus compact is always better when you’re traveling).

    #2 Get intimate with your settings

    Get intimate with your settings

    You haven’t just been leaving your camera in Auto mode, have you? What fun is that? Now I’m not saying you have to learn how to manually focus before you take-off for say, Fiji, but at least get familiar with these three need-to-know settings (the Exposure Triangle) on your DSLR camera.

    #3 Do your research

    Dive into Google Images, Flickr, or 500px to look for photos (and photographers) you love. Choose at least three travel photographers and follow their blogs.

    Not only will get some great ideas for photographs, you’ll be able to find tips and techniques for getting specific effects you’ve seen in the photos you admire.

    #4 Get to know your subject

    Get to know your subject

    Photographing people is one of the most exciting parts of travel photography. Imagine getting great shots of Buddhist monks in Laos, a tribesman in the African bush, or mountain people in the Himalayas. But you’re not just going to walk up to someone you’ve never spoken to and stick a camera in their face (promise me you won’t do that).

    So how are you supposed to approach your subject? The #1 tip is to make friends first. That can be tough in and of itself when there is a language barrier, but it’s not impossible. Read: Practical tips to build your street photography confidence (which also applies when travelling).

    #5 Get lost

    Get Lost

    You’re not going to get great travel photographs taking pictures of the monuments and sites that every other tourist on earth has already photographed. When you travel, get lost! Venture out into villages and unknown areas that no one else goes to. Don’t be afraid to get off the beaten path.

    The most exciting photos you’ll take won’t be of the Empire State Building, they’ll be of the ancient bartender in that random dive bar in Astoria, Queens (the one you never would have found if you hadn’t gotten completely lost).

    #6 Get close

    Repeat after me: “I will not be a lazy photographer.”

    Get close

    Lazy photographers use lenses instead of legs. I want you to use those legs of yours to walk, run, jump, swim, crouch, bend, and move any way you can to get close to your subject. Why? Because the simple act of getting close to your subject will drastically improve your travel photographs.

    Once you’ve followed step #4, don’t be afraid to put your camera as close as possible to your subject, sometimes right in their face even.

    Disclaimer: this tip does NOT apply to house fires, political violence, or wildlife safaris.

    #7 It’s all about the light

    It s all about the light

    The other day a student of mine showed me a photograph that was taken in the middle of the day, under the hot Hoi An sun. There were several problems with the shot, but the main reason it looked flat and lifeless was simply because of the time of day it was taken.

    I told her what I tell everyone; don’t bother getting out your camera between the hours of 8 a.m. and 4 p.m. The light is too harsh. Get up before the sun and/or wait until the sun is about to set, and you’ll enjoy amazing light that will work wonders for your photographs.

    That same student sent me a photo the following day, this time taken just before sunset. It was 10x better. Had she suddenly become a better photographer in less than 24 hours? Yes. But only because she learned to tell time.

    Follow these seven tips and I have no doubt you’ll be taking amazing travel photographs on your next trip. Have any additional tips you’d like to share? Please do so in the comments below.

    Safe travels!

    The post 7 Proven Ways to Come Home with Better Travel Photos by Etienne Bossot appeared first on Digital Photography School.


    Digital Photography School
  • How to Create and Use Photoshop Actions to Speed up Your Workflow

    Photoshop_CC_icon.pngWhat are Photoshop Actions?

    Photoshop Actions are very useful time savers. Should you find yourself applying the same Photoshop commands or a series of commands repeatedly to images, wouldn’t it be nice to just push one key and apply that series of commands to your image, or even to a whole folder of images? It can be done, read on.

    What kind of things can you do with Actions?

    Inside Photoshop, just about everything you do to enhance images can be done with an Action, ranging from: applying creative styles, resizing, converting to Black and White, sharpening, watermarking, or even compositing star trails – all with one click of the mouse or a keyboard short-cut.

    Why use Actions?

    The use of Actions will streamline image processing by combining multiple commands into one key stroke, or batch, which will save you lots of computer time and give you more time for shooting. Every photographer wants more time for shooting.

    Create a simple Action

    Okay, so perhaps you want to resize an image for the web. This simple action will resize the image to 600 pixels wide, and also add copyright and contact information to the image.

    action_palette-with-callouts

    Steps-by-step how to create your own Action

    1. In Photoshop , open the photo file you want to work on.
    2. Open the “Action Palette” or panel (Alt+F9)
    3. Select “Create New Action” from menu or click on the “New Action” button.new action3
    4. Name your Action; use a name that will tell you what the Action will do. In this case we will name it “Save for dPS Blog”.
    5.  Assign a key board short-cut.
    6. Assign a color to Action button. (This is optional, but can be useful to organize your Actions when you set up multiples.)
    7. Assign a set in which your Action appears. This is useful if you want many Actions for many different types of work, for example “Sizing Actions”.
    8. Start recording – select record from the menu or click the  “Start Recording” button.
    9. Now, simply apply all the Photoshop commands to your open image that you want saved in that Action.
    10. Select image size (Alt+Ctrl+I) and set to 600 pixels wide.
    11. Select File Info (Alt+Shift+Ctrl+I) and enter your Copyright information.
    12. Select “Stop Recording” from menu or click the “Stop Recording” button.If any of your commands require variable settings that need to be changed on an image by image basis, click on the pause button for that Action. Now when you run your Action, it will stop at that command for your input. Otherwise, your action will run just as it was recorded with all input being applied the same.

    How to use Actions

    There are three ways Actions may be used:

    1. Applying it to a single open image
    2. Applying it to a batch of images
    3. By creating a Droplet of your Actions

    Explanations of how each of these work follow.

    Applying to open image

    You can apply your Action to an open image by simply selecting the desired Action in the Action Palette and then selecting Play from the menu or by clicking the Play button.

    Applying to a batch of images:

    1. Place all the  images into one folder
    2. Select the Action you want to run
    3. Under the File menu, select Automate and then Batch (because the Action you want to run is already selected, the action field will have already been preloaded with the right one)
    4. Under Source, select the desired folder from the menu.
    5. Click on the Choose button and select the folder that contains your images.
    6. Under Destination, select Folder.
    7. Click on the Choose button and select a folder where you want the final images to be saved.
    8. Select Override Action “save as commands”
    9. Click OK and Photoshop will automatically start opening all the files in the source folder one at a time and running the Action, then saving them to the destination folder. Cool, huh!?batch

    Make a Droplet from an Action:

    With this method you can create an executable file, which you can be place on your desktop. Then if you want to run an Action on a file, you can just drag it to your Action Droplet and the changes will be applied to your file and saved to a specified folder.

    Creating a Droplet:

    1. Select the Action that you want to use to create your Droplet.
    2. Under File menu, select Automate and Create Droplet, the Create Droplet menu will open.
    3. Under Save Droplet In: click on Choose and select a destination for your droplet. Your computer desktop is a great destination and makes the Droplet easily accessible.
    4. Under Play, since we already selected the Action in step 1, this section already contains the correct command info.
    5. Under Destination select Folder.
    6. Under Destination click on Choose and select a folder where you want the finished images to be stored.
    7. Select Override Action “Save as Commands”.
    8. Click OK and Photoshop will automatically create your Droplet.
      Now simply drag your image to the Droplet and the Action will be applied to the image and saved to your specified folder.Droplet

    Actions can be used for the simplest series of commands, but after you get the hang of it you can create some very complex applications. The purpose of this article is to show just how easily you can create your own Actions and thereby simplify and speed up your work flow.

    If you have other tips for using Photoshop Actions please share in the comments below.

    For more on Photoshop Actions try these articles:

    • Tips for Learning to Love Photoshop Actions
    • Get Creative with Photoshop Actions
    • Lightroom Presets vs. Photoshop Actions

    The post How to Create and Use Photoshop Actions to Speed up Your Workflow by Bruce Wunderlich appeared first on Digital Photography School.


    Digital Photography School