Category: Photography

  • On Assignment: Cellist Carolyn Rosinsky

    I love shooting at mix. Especially when there are epic clouds on the move. And even more so while monitoring my Dark Skies app to know exactly when the rain will start falling on a OMGHowMuchDidThatThingCost? cello.

    Just keeps things interesting, you know?

    Read more »
    Strobist

  • Four Reasons to Display Photos of Your Children

    As parents and photographers, we take thousands and thousands of photos of our children every year. Looking at my Lightroom catalogue from last year, I have over 3000 photos of the kids, and that doesn’t include all the pictures I took with my phone camera!

    Amy lee 3

    In our house, the camera is always out. I take pictures of them throughout the day, no matter what they’re doing. The kids know the camera is a part of our lives, and they don’t act differently when they see me taking pictures of them, as some adults would.

    I’m a big believer that photos are too precious to live on computers. Hard drives fail and images can get lost so your best insurance is having the tangible photo right in front of you. Twice a year I go through thousands of our photos to print a few for display, I recommend you do this also.

    Amy lee 2

    In our house, we use photos as home decor. We have a couple large collections of photos throughout the house, smaller prints displayed everywhere, as well as photobooks alongside the framed photos.

    These photos really are a gift because it helps us remember how much we are loved, and it reminds us how blessed we are to have each other. There are times when I have had a bad day and seeing a photo of us laughing and hugging each other reset my mind and helped me remember what is most important.

    Aside from these reasons, here are four other reasons why you as parents (or grandparents) should display photos of your kids.

    Self-Esteem

    It is amazing to see what a boost of confidence and self-esteem comes to the child whose parents display a lot of photographs of them around the home. Your children understand that you have taken the time to hang, frame, and display their photos, and it makes them understand that you value them, find them to be beautiful, and want to see them each day.

    Amy lee 1

    Memories

    In the hectic pace of modern family life we can forget what kids looked like only a year earlier. Images not only give us a glimpse into the past, but they can also bring us back to the moment in an instant. Remember how proud you felt when your child was a newborn and how perfectly they fit in your arms? Photos bring you back to those feelings when the photos were made.

    Forgotten

    How often do you scroll through your phone’s photo roll or look at the folders full of images on your hard drive? Hard drives could fail and images could be forever lost. Why lose out on the opportunity to put all of those smiling faces on your walls? You have a museum full of gorgeous artwork just waiting to be printed.

    Sharing

    When you print out and display these images in your home it opens a dialogue and creates a habit of sharing memories. Kids may not look at certain photos for a long time, and then suddenly lean in and remember something important. When some of these photos were taken during the best moments of your lives, it is worth reliving and remembering.

    I could go on with the list, but these are the reasons I continually hang new photos on the walls and update my displays. Do you have others? Do you display your photos in your home?

    Other related articles:

    • How to Create a Family Photo Essay
    • Click! How to take gorgeous photos of your kids – a dPS ebook
    • How to photograph children {and other stuff} indoors


    Editor’s challenge: this is something I feel strongly about as well, so I challenge you. If you have not got any printed photos of your own family around your house – do it now. Go select a few, order the prints, and get them framed. Or make a photo book. Or both! Involve your kids in helping select the images, make it a family project. Then take a photo of your newly hanging family artwork and share it with us here in the comments.

    The post Four Reasons to Display Photos of Your Children by Amy Lee appeared first on Digital Photography School.


    Digital Photography School

  • The Camera Histogram Explained

    This video does a great job of explaining how the histogram on your camera works and how to read it.

    I do slightly disagree with his tip on having a mountain in the center is the best option, as it does depend on the subject. If you are photographing a black cat on a black sofa that would be an incorrect overexposed image.

    For more info on histograms check these dPS articles:

    • Histograms: Your Guide To Proper Exposure
    • How to Read and Use Histograms
    • Understanding Histograms

    The post The Camera Histogram Explained by Darlene Hildebrandt appeared first on Digital Photography School.


    Digital Photography School

  • How to use the Contrast Checker Technique to Give Your Images More Punch

    I am about to reveal a technique that will have your images looking awesome in seconds every time you use it. I am even going to share the Photoshop Action with you so you can edit in lazy mode, I mean efficiency mode! Before I bare all, I need to give you some background information, and I am pretty sure you have been in the exact same position at some point in your photography hobby or career.
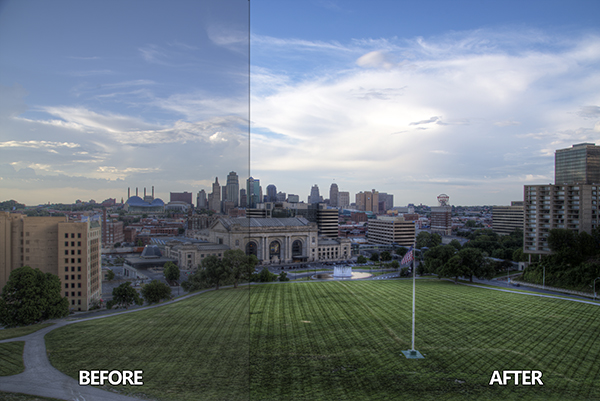
    DPS Tutorial Image 9

    Not long ago, early 2010, I was horrible at photo editing. I was literally tossing my camera in a box and packing it away. My problem was that I was extremely frustrated with the quality of my images. Not necessarily the composition or the subject matter, but I couldn’t get my images to look “good” like all the photographers who were crushing views on Flickr. Thank goodness 500px was not around at the time, I really would have hated my photos.

    Just before I sealed the tape on my box of photo gear I discovered High Dynamic Range imaging. Wait, before you judge me, I have been doing it long enough to know the process is not everyone’s cup of tea. However, the HDR process, from the brackets to the tone mapping, forced me to embrace new techniques I never would have dreamed of prior to stumbling upon it.

    I started to understand my camera on a level that was foreign to me prior to that time. I also began to accept that it was not necessarily the camera making the great photos, but the person behind it and, more importantly, their post-processing techniques. Nonetheless, I became a tone mapping fool. I tone mapped everything, my car (for the record a Scion xD does not necessarily need to be HDR’ed), candid pictures of my wife, food, candid pictures of my wife eating food, I really tone mapped everything.

    You have probably been there before as well, anyone new to HDR thinks it is the greatest thing on everything from the urban landscape to the selfie in the mirror. I would really shy away from the latter of the two! Through all of this understanding and acceptance came another realization, the HDR process can wreak havoc on the contrast in a good photo.

    Through the HDR process you are mapping tones from multiple images to obtain one photograph that gets the best of both worlds with a vast amount of detail. The problem with this is that shadow areas lose their depth when too much detail is revealed, and areas that were specular highlights, or inviting highlight blowouts, tend to compress in ways that make them look dark, dingy and stale. Let’s not forget about the hideous over-saturation that can occur if you take the sliders too far.

    So how do you combat this? How do you analyze a photograph, HDR or not, and tell what it needs to make it better?

    It’s all about contrast

    The answer, while simple, holds complexities that can take years to train your eye through trial and error. We are not about to let it take you years to understand. The secret is contrast which is the key to making better photographs right now.

    You may know that the Contrast slider exists in nearly every post-processing program, but what is contrast? Simply stated, contrast is the ratio between light and dark in a photograph. If there is no contrast the image appears to look predominantly gray and dismal. On the flip side, an image can be too “contrasty” or devoid of gray (mid tones), a battle between white and black. It is difficult to see this on a color photograph since contrast typically deals with tone.

    I studied Fine Art in college, I was a Printmaker (Woodcut, Etching, Screen Printing, and Lithography). I had a fabulous professor. She told me a piece of information once that changed my art forever during a one-on-one critique.

    She said if I ever had a question about how harmonious my color print was that I should take a picture of it and convert it to gray scale. If it did not have strong black and white points with a smooth grayscale gradation somewhere in between, then it needed work.

    Like any normal college kid, I did not understand her methodology at the time and I rarely took her advice. It was not until nearly ten years later that her advice finally clicked.

    The Contrast Checker Technique

    You can use this technique in every aspect of your workflow: beginning, middle, and end. It keeps your contrast in check throughout the process. Rightfully so, it is named “Contrast Checker”.

    The photograph below is a tone mapped photo of Kansas City, straight from Photomatix Pro. You should always try to tone map your images so that they are not too dark, too light, too saturated, or too stylized.
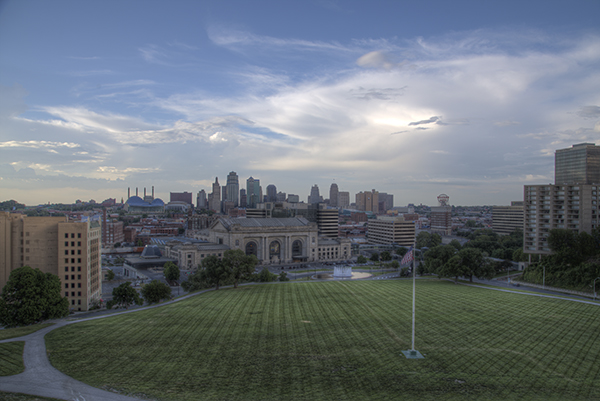
    DPS Tutorial Image 1

    Let’s Check the Contrast you can download the image and follow along if you would like (there is also an Action and a video at the end if you learn better from video)

    Step one

    Create a new Gradient Map Adjustment Layer to create a Black and White photo.

    Step two

    Ensure that the Gradient Map is set to Black and White. By default the Gradient Map Adjustment Layer will pull from the colors that you have set as your foreground and background in the tool bar. To ensure they are set to Black and White press the “d” key to reset them to the defaults.

    Step three

    Make a new Curves Adjustment Layer above the Gradient Map. Your Layers Palette should look like this and your photo should be Black and White.
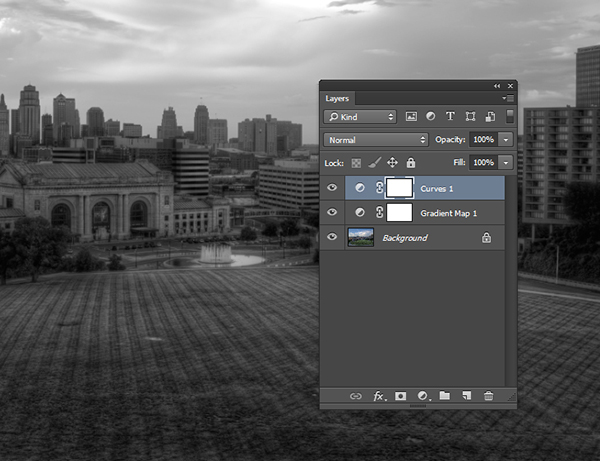
    DPS Tutorial Image 2

    Step four

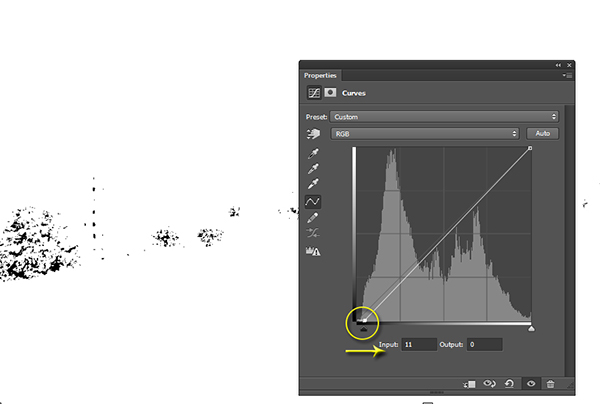
    While in the Properties of the Curves Adjustment Layer press and hold “Alt” (Option on Mac) and click the Black triangle on the bottom of the Curve.

    Step five

    Your photo may turn all white with a little bit of black. This is telling you where black is present in your photo. If your photo is all white with no black specks then your photo currently contains no black point. Move it slightly to the right until more black starts to appear.
    DPS Tutorial Image 3

    Step six

    This is called clipping (no detail). By clipping the blacks you are telling Photoshop what you want black to be in the photo. It is important that you do not take this too far, you want a solid black point in the photo, but you don’t want to destroy your shadows either.

    Step seven

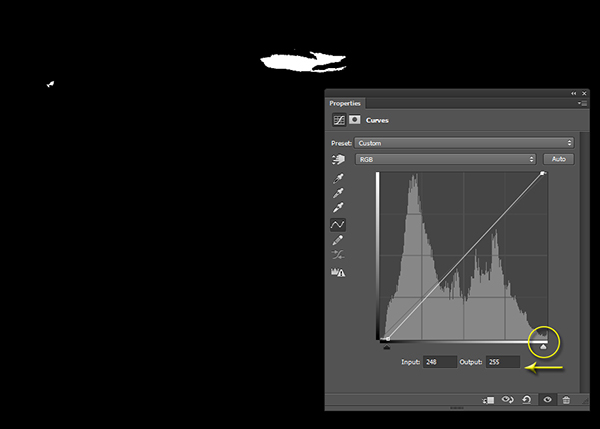
    Now press and hold “Alt” (Option on Mac) and select the White Triangle.

    Step eight

    Your photo should turn all black with little specks of white. This is telling you where pure white is in your photo. If your photo is all black with no white specks then your photo currently contains no white point. Move it slightly to the left until more white starts to appear.
    DPS Tutorial Image 4

    Step nine

    Just like the blacks it is important that you do not take this too far to the left as you will be clipping too much of the whites. You are going for just a bit of clipping beyond the specular highlights.

    Step ten

    The reason you are doing this on a grayscale photograph is to ensure that you are only seeing the clippings of the lights and darks. If you were to do the same thing on a color photograph you would see the clippings for all of the colors within their channels. This makes the process a bit more difficult.

    Step eleven

    At this point you should already be seeing more drama in your photograph, but you can take it a step further.

    Step twelve

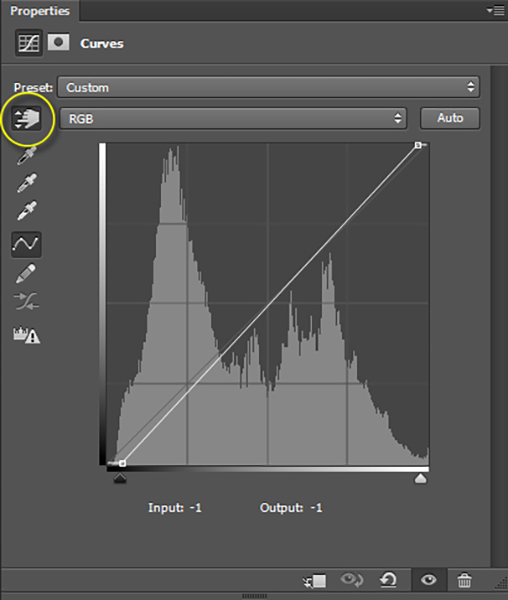
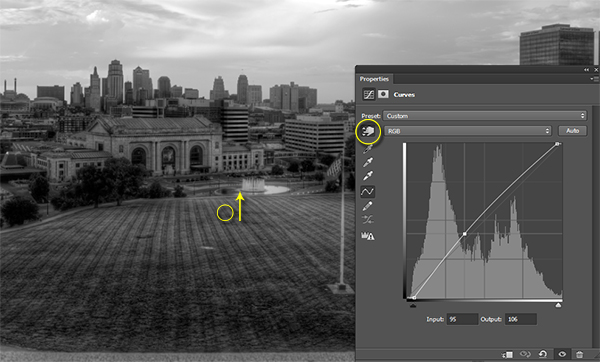
    Click on the Targeted Adjustment Tool within the Properties of the Curves Adjustment Layer. This allows you to target specific areas of the photo and edit them independently on the tone curve.
    DPS Tutorial Image 5

    Step thirteen

    With the targeted adjustment tool selected, as you hover over the image you will see what is being effected on the tone curve. For this image I started with the lighter colored grass. I clicked on it and dragged the cursor up making it even lighter.
    DPS Tutorial Image 6

    Step fourteen

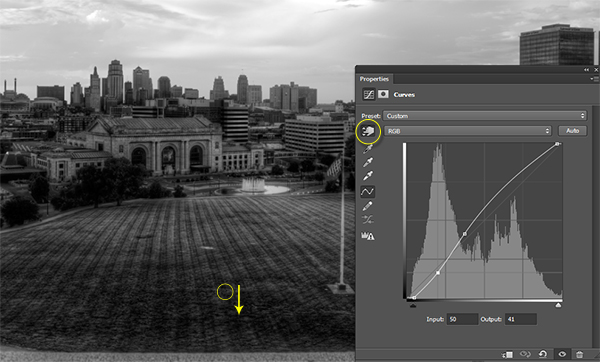
    I also selected the darker colored grass and moved the cursor down to make it darker.
    DPS Tutorial Image 7

    Step fifteen

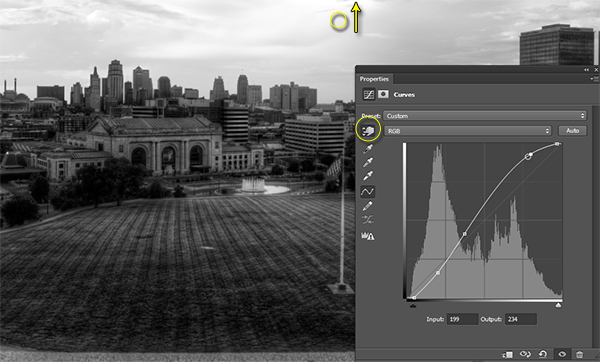
    I then selected an area in the sky that was close to white, but contained a little bit of detail, and dragged the cursor up to make it brighter.
    DPS Tutorial Image 8

    Step sixteen

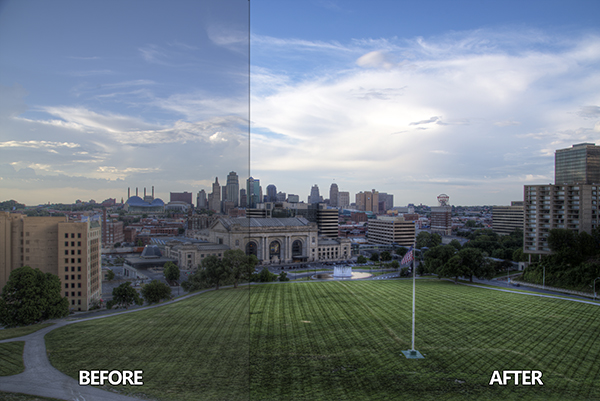
    At this point you should be looking at a black and white photograph with much more contrast than you started with.

    Step seventeen

    The magic happens when you delete the Gradient Map layer to reveal the Curves effect on the original color photograph.
    DPS Tutorial Image 9

    Step eighteen

    If you are not satisfied with the effect the Curve has on the colors in the photo you may change the Blending Option to Luminosity which will only allow it to effect the tones in the image, protecting the color saturation.

    For more tips and tricks and to see how the downloadable action for this process works watch the video tutorial below.

    The post How to use the Contrast Checker Technique to Give Your Images More Punch by Blake Rudis appeared first on Digital Photography School.


    Digital Photography School

  • 5 Tips for Doing Photography from the Hip

    Photographing from the hip is, quite literally, having your camera near or resting on your hip and pressing the shutter button. This photography method is typically used in street photography when the photographer wants to take candid, incognito photos. But, sometimes, trying this as a deliberate photography method is just as fun. It forces you to change your perspective, your vision and your creative eye. You start to look at the scene as a bigger picture rather than as a tunnel vision through your viewfinder. Plus, if your family is anything like mine, where they turn away and run the opposite direction when you bring out the camera, this technique is a great way to get candid pictures of difficult, and uncooperative subjects.

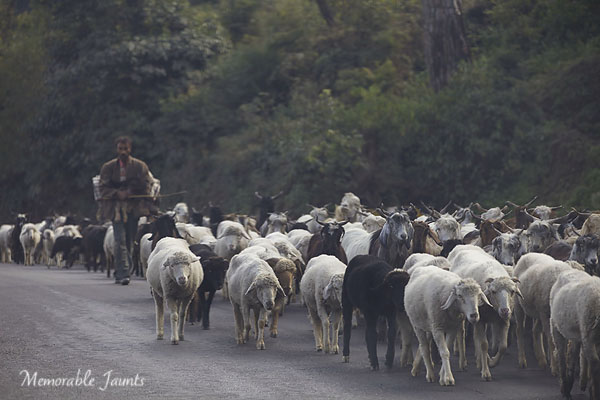
    Photographing From The Hip Sheep Herder Walking With Flock of Sheep By Memorable Jaunts

    When you put your eye to the viewfinder, often times you lose focus of all the other elements and entities beyond your line of vision. Photographing from the hip gives you, the artist, freedom to shift your perspective and opens up opportunities for alternative compositions for your images. Use it for personal projects or client sessions where you view the scene in front of you quite differently than what you actually capture in your camera. Travel photography is another great place to use this method of photography for an alternative perspective.

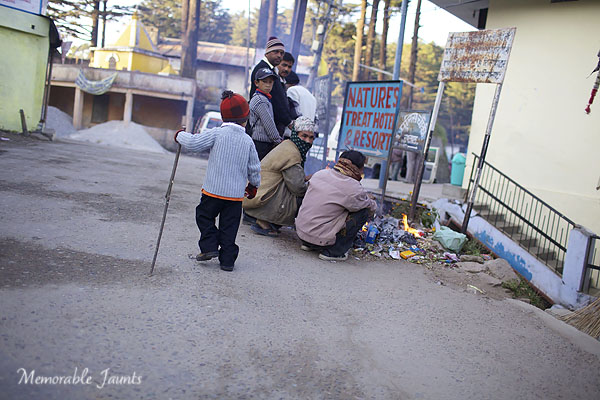
    Photographing From The Hip Chilly Morning In India By Memorable Jaunts

    There are some tips and tricks you may want to consider to get the best images from this angle of doing photography from the hip.

    #1 Preset your settings like exposure and aperture

    Since you cannot really change your settings based on what you see through the viewfinder, it is best to preset your exposure ahead of time. If you are a 100% manual shooter, this might be the one time you give yourself the luxury to go into full auto mode of your camera. Additionally, use evaluative metering instead of spot metering to assist with the exposure for this type of photography. In terms of aperture, the general rule of thumb is to have a smaller aperture for photographing from the hip (anywhere from f/8 to f/16). This improves the likelihood that more of the elements will be in focus especially if your subjects are moving. Having a larger aperture is also okay if you want to go for a more artistic image.


    #2 Increase shutter speed

    Having a higher shutter speed gives you a better probability that your subject will be sharp especially if you are moving or clicking in continuous mode and don’t have the luxury of a steady hand. Try to stay at least 1/250th of a second, or higher. Do not pay too much attention to ISO in this genre of photography, just embrace the noise as part of the creative element of the image. If you had to choose, give more priority to shutter speed. Things like exposure and noise (grain) can always be adjusted in post-processing as long as you have a sharp image.

    #3 Preset focal point

    This is probably the one time where having a back button focus might be inconvenient. Try auto focus and then throw MF switch on the lens so that the focus point is locked. You can also use center focus point and just move your camera slightly as a way to recompose with the focus locked.

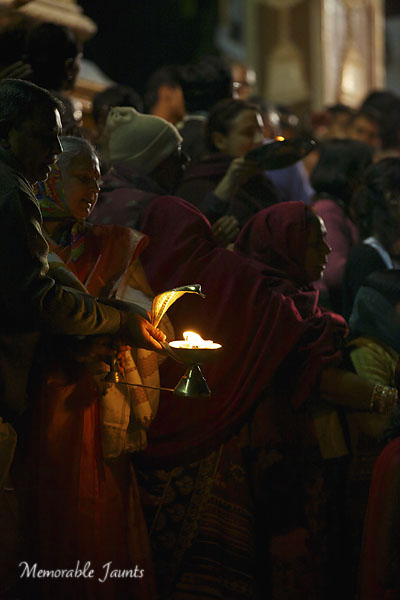
    Photographing From The Hip Ganga Aarti In Rishikesh By Memorable Jaunts

    #4 Use your camera’s silent mode if you have one

    If you really want to go incognito, use the silent drive mode in your camera. Some of the newer DSLRs have this feature. It suppress the sound of the shutter being pressed and you can get some really candid images of the scene in front of you.

    #5 Use a fixed focal length lens

    Prime lenses work better for this type of photography since you really don’t want to recompose with every movement of the scene in front of you. Just move your feet instead. You can also change the angle by holding the camera at a slight upward or downward angle depending on your relative height in relation to the scene in front of you.

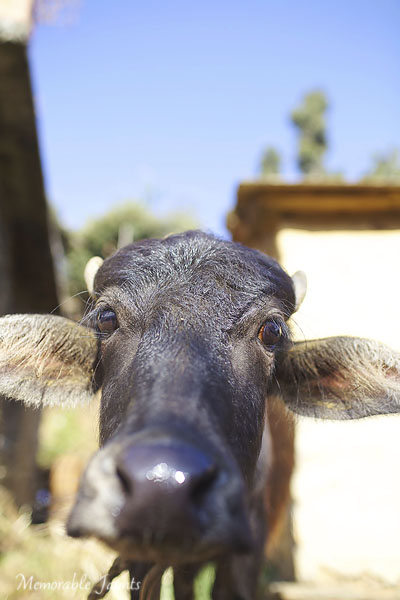
    Photographing From The Hip Water Buffalo in India By Memorable Jaunts

    Remember to get creative with this type of photography. You may be tempted to bring the camera to your face every once in a while to make sure you are getting some “decent” shots. That’s okay, but resist the urge to chimp every time the shutter is clicked. Try doing this for five to ten minutes at first. Once you get comfortable, take this method out for a spin for longer periods of time. Make a mental note of your settings so that you can reevaluate and reassess what worked, and what did not work, at the end of your shooting exercise.

    Remember to have fun and don’t get too hung up on the technicalities. In a worse case scenario, if you take enough shots, there is a chance you will have a few good images that are artistic and technically correct. If nothing else, it gives you the opportunity to view the scene through your eyes rather than your viewfinder. So get out, put the camera around your neck using your camera strap and get clicking.

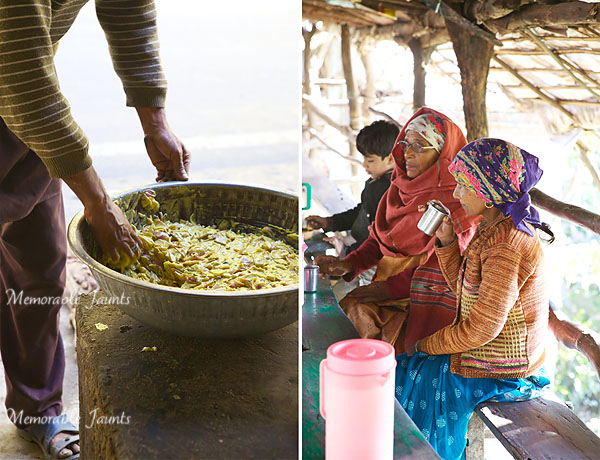
    Photographing From The Hip Local Tea Shop in India By Memorable Jaunts


    The post 5 Tips for Doing Photography from the Hip by Karthika Gupta appeared first on Digital Photography School.


    Digital Photography School

  • Weekly Photography Challenge Things at the Beach

    Earlier today I shared a bunch of jaw-dropping images of beaches. As you may have guessed, this week’s photography challenge is one in the same.

    Even if you aren’t near the ocean you can get out and find a body of water somewhere near you – perhaps a lake, pond, stream or even the reflecting pool at your local town hall. The idea is to get out and photograph the stuff near the water including:

    • the beach and the sand
    • pathways
    • reflections
    • clouds and sky
    • rocks
    • silhouettes of people against the sun or sunset
    • marine life in tidal pools
    • the local flora or vegetation
    • go wide, and go closer and do some macro photography

    You get the idea. Need some more examples?

    By @Doug88888

    By C/N N/G

    By Pete

    By Dan Queiroz

    By Mike Pratt

    By Peter Gorges

    By John Turnbull

    By kristos_b

    By Moyan Brenn

    Show use your things at the beach

    Simply upload your shot into the comment field (look for the little camera icon in the Disqus comments section as pictured below) and they’ll get embedded for us all to see or if you’d prefer upload them to your favourite photo sharing site and leave the link to them. Okay, ready to impress us?

    The post Weekly Photography Challenge Things at the Beach by Darlene Hildebrandt appeared first on Digital Photography School.


    Digital Photography School

  • Deal Extended! Get $20,048 Worth of Top-Quality Resources – From $49

    Do you remember the awesome design bundles from InkyDeals? We told you before that InkyDeals is one of the leading deals websites in the design community, with a devoted community of more than 300,000 design enthusiasts. Whenever an awesome deal appears on Inky Deals, we share it with the Photodoto audience, so that you never miss interesting and useful stuff. Continue Reading

    The post Deal Extended! Get $ 20,048 Worth of Top-Quality Resources – From $ 49 appeared first on Photodoto.


    Photodoto

  • A Collection of Breathtaking Images of Beaches

    Seeing as how I’m writing this while I sit with a view of the Pacific Ocean on the Oregon coast, I thought I’d round up some great images of beaches, the sea and the ocean for you this week.

    Some of them incorporate some great long exposure techniques, and many are shot at the magical time of day the Golden Hour.

    If you live near the sea you always have a great subject right nearby. If not, find a local pond, lake, stream or other smaller body of water and make your own magic.

    Enjoy!

    Photograph Shelley Beach by Ashley Poyyayil on 500px

    Shelley Beach by Ashley Poyyayil on 500px

    Photograph The Return by Jonathan Danker on 500px

    The Return by Jonathan Danker on 500px

    Photograph Winter Sunset Haystack Rock by Chip Phillips on 500px

    Winter Sunset Haystack Rock by Chip Phillips on 500px

    Photograph s t o r m 3 by Aaron Pryor on 500px

    s t o r m 3 by Aaron Pryor on 500px

    Photograph Aurora Shore by Max Ramuschi on 500px

    Aurora Shore by Max Ramuschi on 500px

    Photograph Moeraki Boulders by Yan Zhang on 500px

    Moeraki Boulders by Yan Zhang on 500px

    Photograph Southern Oregon Coast Sea Arch by Chip Phillips on 500px

    Southern Oregon Coast Sea Arch by Chip Phillips on 500px

    Photograph The Reward by Dylan Fox on 500px

    The Reward by Dylan Fox on 500px

    Photograph Rocky path to dawn.. by Zelda T on 500px

    Rocky path to dawn.. by Zelda T on 500px

    Photograph Thunder of Zeus by Alban Henderyckx on 500px

    Thunder of Zeus by Alban Henderyckx on 500px

    Photograph Peak hour train ride by Pat Charles on 500px

    Peak hour train ride by Pat Charles on 500px

    Photograph Silent Morning by Hendri Suhandi on 500px

    Silent Morning by Hendri Suhandi on 500px

    Photograph Colossus by José Ramos on 500px

    Colossus by José Ramos on 500px

    Photograph Beach Bum by Rick Lundh on 500px

    Beach Bum by Rick Lundh on 500px

    Photograph Charleston Boneyard Beach Sunrise Reflection Lowcountry South Carolina by Mark VanDyke on 500px

    Charleston Boneyard Beach Sunrise Reflection Lowcountry South Carolina by Mark VanDyke on 500px

    Photograph Overflow by Yury Prokopenko on 500px

    Overflow by Yury Prokopenko on 500px

    Photograph Fury by Oscar Martinez Diego on 500px

    Fury by Oscar Martinez Diego on 500px

    Photograph Beat of the Ocean by Hugh-Daniel Grobler on 500px

    Beat of the Ocean by Hugh-Daniel Grobler on 500px

    Photograph New Beginning by Bobby Bong on 500px

    New Beginning by Bobby Bong on 500px

    Photograph Sunrise:Twirl by Bipphy Kath on 500px

    Sunrise:Twirl by Bipphy Kath on 500px

    Photograph Blue Hour Paard van Marken by Iván Maigua on 500px

    Blue Hour Paard van Marken by Iván Maigua on 500px

    Photograph Sunset at Portland Head Light by Noppawat Charoensinphon on 500px

    Sunset at Portland Head Light by Noppawat Charoensinphon on 500px

    Photograph Noctis by Lincoln Harrison on 500px

    Noctis by Lincoln Harrison on 500px

    Photograph Oltremare by Francesco Gola on 500px

    Oltremare by Francesco Gola on 500px

    Photograph Beach Morning by Mobeen Mazhar on 500px

    Beach Morning by Mobeen Mazhar on 500px

    Photograph Fishing boat beached by Anek S on 500px

    Fishing boat beached by Anek S on 500px

    Photograph STUCK IN THE MOMENT by ManButur Photography  on 500px

    STUCK IN THE MOMENT by ManButur Photography on 500px

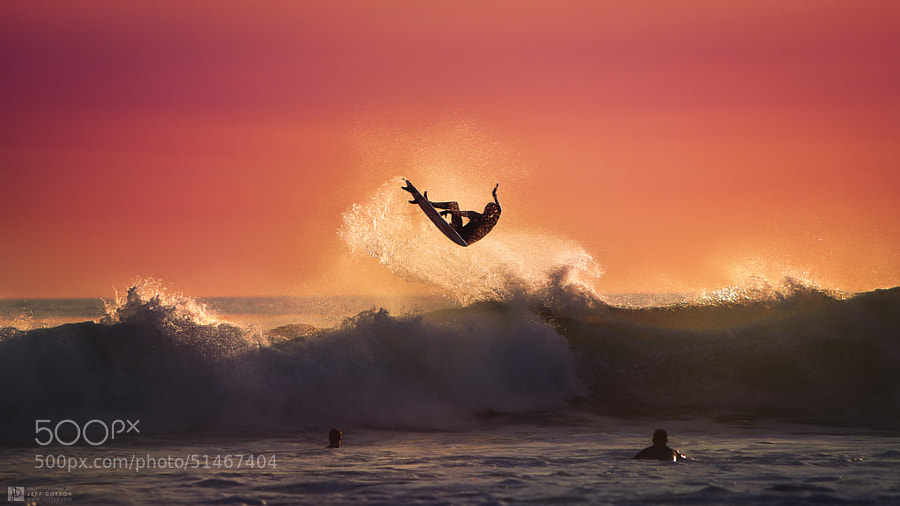
    Photograph Aerial by Jeff Dotson on 500px

    Aerial by Jeff Dotson on 500px

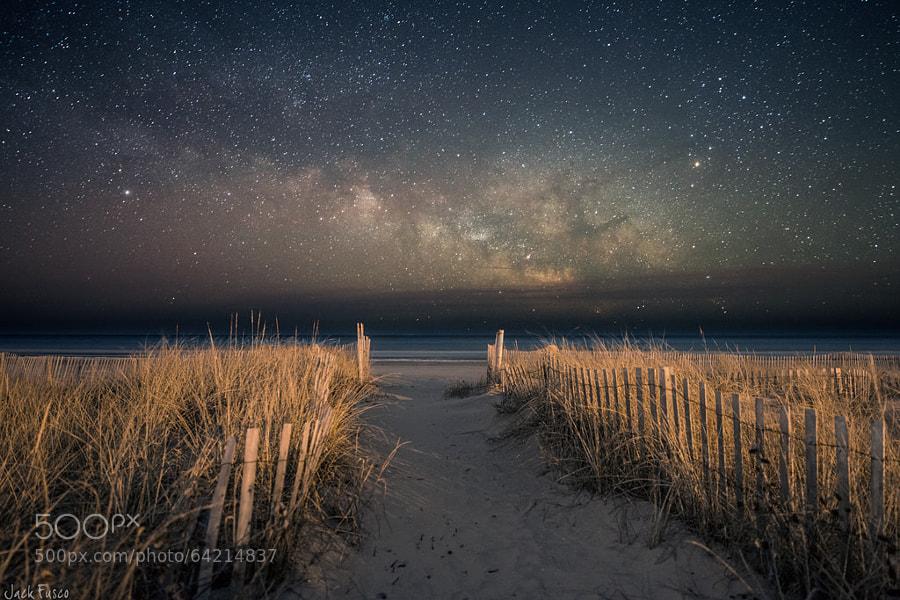
    Photograph Dreamers by Jack Fusco on 500px

    Dreamers by Jack Fusco on 500px

    Photograph White & Welsh by Mark Broughton on 500px

    White & Welsh by Mark Broughton on 500px

    Photograph Heading Out by Jason  Crowell Photographics on 500px

    Heading Out by Jason Crowell Photographics on 500px

    Photograph After Hours by Carlos Resende on 500px

    After Hours by Carlos Resende on 500px

    The post A Collection of Breathtaking Images of Beaches by Darlene Hildebrandt appeared first on Digital Photography School.


    Digital Photography School

  • Actionable Tips to Get Sharper Photos Every Time

    There’s almost nothing (besides maybe losing a memory card) that hurts more than having a great shot that ends up poorly focused! And even though sometimes we can blame our equipment, there are other factors that come into play when focusing. Sharper and crisper photos are the goal of every photographer, so it’s time we cover  the basics to achieve Continue Reading

    The post Actionable Tips to Get Sharper Photos Every Time appeared first on Photodoto.


    Photodoto

  • Three Tips for Being Ready to Shoot Faster so you Never Miss a Shot

    We’ve all heard one of the cornerstones of making better photographs is to slow down; be deliberate and take your time. This is very true. In no way am I advocating not being purposeful in your shooting. However, sometimes there are situations when the difference between getting a good image, instead of a blurred and washed out frame, is separated by only a few precious seconds. This is especially true when it comes to working in action filled situations like sports or street photography, but it can also be just as easy to miss moments in nature and landscape photography if you go into situations ill prepared.

    Here are three tips that can improve your reaction time and make you more ready to obtain quality images for processing when you find yourself in those “shoot from the hip” scenarios.

    Being Ready to Shoot Faster – Never Miss a Shot

    Be Self Aware

    Knowbeforeyougo

    “Know thyself.” No, Socrates wasn’t a photographer (though I’m sure he would have been awesome). In this case, the saying of “know thyself” means becoming aware of your surroundings more so than having a deep introspective understanding of your own self, although that’s a good thing to have, usually. We exercise this on a daily basis, albeit almost unconsciously. You notice a stain on your shirt, or you see the little boy chasing a ball towards the street, or you see a dark alley that’s just a little too dark to walk down alone. You can incorporate this same inherent awareness into your photography to make you a faster shooter.

    Here’s an example: Let’s say you find yourself taking an afternoon to work on your street photography. When you first begin your expedition, it’s very bright outside. You are probably still able to shoot at a reasonably fast shutter speed and low ISO. As the evening starts giving way to night, there is of course less available light. So, a good idea would be to begin thinking about bumping up your ISO so that you can maintain the same exposure settings. Or alternatively, slowing down your shutter speed or increasing the size of your aperture (remember, low F-number means a bigger opening and more light into the lens such as f/2.8). Keep in mind however, that a higher ISO will introduce more noise into your final image, but it will have less of an overall impact than changing the shutter and aperture settings.

    In photography, your surroundings are in a state of constant flux. So, to be a good photographer, you must be aware of the changes in your surroundings and mould yourself the best you can in order to produce consistent and quality work. This means learning to understand what is happening around you, whether it be: changing lighting conditions, approaching weather, wind, the presence or absence of people and objects, – the list goes on indefinitely. Anticipate what is going to happen next and make adjustments now, to save time later.

    Shoot Comfortably

    This would seem to go without saying, but you still see many photographers looking down right uncomfortable or awkward while they’re out shooting. Sadly, the majority of the pain is self-inflicted. To shoot faster and to be ready for the shot when the time is right, your camera must be available for use at a moments notice without restricting your movement or causing discomfort. One of the best ways to make this happen is to have your camera suspended from a quality camera strap. Camera straps, like most things, can become a very personal item for new and seasoned photographers alike. Don’t buy a strap because its got pretty flowers embroidered on it or because its made from the latest space age whatever-foam. Do a quick search for “camera strap” here on dPS and you will find a large number of reviews and write-ups of great camera straps. But don’t stop there. Shop around, read reviews, ask your photographer friends and sift camera forums. Being able to comfortably retrieve your camera quickly is key to not missing great images.

    Have a budget? Most of us do, even more of us can’t afford to spend thousands on the latest lens or camera body that we dream of owning. Luckily, the majority of the accessory market is crammed with makers competing to sell you their wares. It’s easier than ever to strike a balance between what you need and what you can afford. If you can, have more than one camera strap in your kit so you can choose what fits best for a particular outing.

    Badstrap

    Prepare Beforehand

    This is the big one, yet many people don’t seem to understand that preparation is golden. A close cousin to situational awareness, research and preparation prior to any photo work should become second nature and will pay huge dividends. It will also make you a faster shooter and help to prioritize your workflow, not to mention make you appear more competent as a photographer.

    Preparedness

    Know what you’re walking into beforehand and prepare accordingly. Are you going on a hike? Find out what wildlife and plants are native to the area and pack your bag with long lenses so you can get close to your subjects from a distance. Travelling abroad? Be sure to read up on the local attitudes towards photography before you start snapping away to avoid any awkward confrontations or worse. Of course, the most unpopular, but useful, aspect of being well prepared is practice, practice, pactice. Practice, and then practice some more. Want faster and more smoother lens changes? Practice at home, so you lose less time in the field and have fewer fumbles. Practice finding your camera adjustment buttons without looking. This will save you loads of time and frustration when you find yourself shooting at night. If you haven’t figured it out by now, the key word here is practice. Practice everything and you will be amazed at how much easier quicker most things suddenly become.

    Do you have any other tips for shooting faster and being ready? Please share them in the comments below.

    The post Three Tips for Being Ready to Shoot Faster so you Never Miss a Shot by Adam Welch appeared first on Digital Photography School.


    Digital Photography School