Category: Photography

  • How to Create a Vintage Look using Lightroom

    How to create the vintage look in Lightroom

    Before you create a vintage look using Lightroom, you have to decide what characteristics you think that look should have. It may mean different things to other people, but here’s my version. Photos with the vintage look are nostalgic, evoking the look of faded photos taken decades ago. There may be a colour cast or faded blacks, and they should look as if they may have been taken with film.

    What is your definition of the vintage look? Whatever it is, once you have arrived at it, you can think about how you can achieve that look in Lightroom.

    Using Lightroom Develop Presets

    The easiest way to create a vintage look is to buy Develop Presets or download free ones. Don’t worry, I will explain how you can create the vintage look yourself, without buying somebody else’s presets, in the second part of this article. But I think it’s wise to acknowledge that sometimes the easiest path is to let someone else do the hard work of figuring out the mechanics, and buy into their expertise.

    By the way, if you are new to presets, my article A Concise Guide to Lightroom Develop Presets will give you an introduction to the subject.

    Free Vintage Develop Presets

    An easy place to start is with onOne Software’s free Develop Presets for Lightroom. I recommend Nicolesy’s Matte Presets for Adobe Lightroom 5 and the onOne Signature Collection Presets (available for Lightroom 4 and 5). There are also some presets for Lightroom 2 and 3 if you are using those versions.

    You can also try these free vintage presets from Presets Heaven.

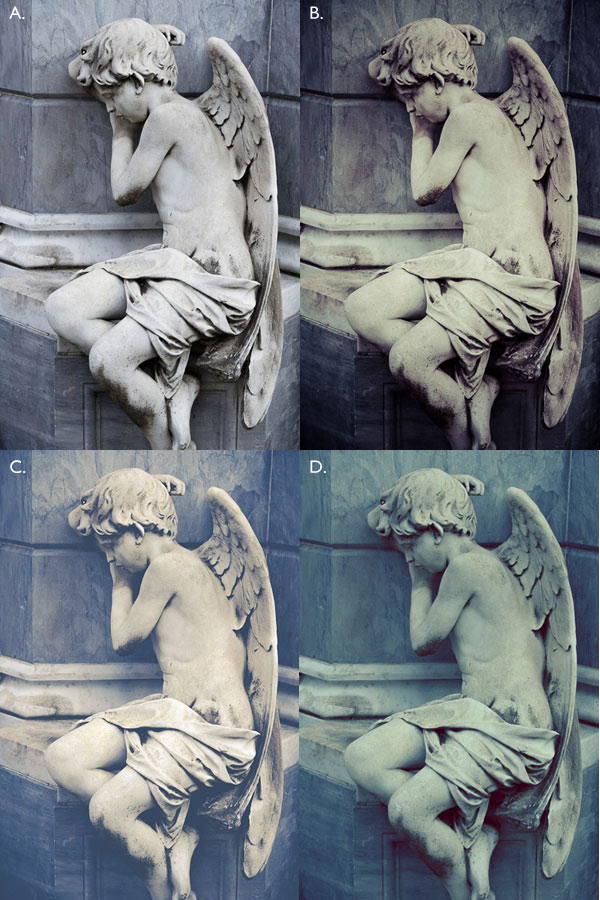
    This comparison shows you some of the effects you can create with these presets. Please remember that the best way to use Develop Presets is as a starting point. Once you have applied the preset you can then go to the right-hand panels and tweak the settings to get the most out of your photo (something I haven’t done with these examples as I wanted to show you how they work straight out of the box).
    How to create the vintage look in Lightroom

    A. Original photo B. onOne Signature Collection: Vintage – Grandma’s Lemonade preset C. Nicolesy Matte Lightroom Presets: Nicolesy Matte 2 preset D. Presets Heaven: PH Vintage IV preset

    Best Paid Vintage Develop Presets

    Not everybody wants to pay for Lightroom Develop Presets (my article Are Lightroom Develop Presets Worth the Money? asked that question) but there are certainly some great preset collections out there if you don’t mind doing so. I recommend (and have personally bought and used) the following:

    Nicole S. Young’s Vintage Fade presets. These are the least expensive out of all these preset packs. The set includes Photoshop Actions and ACR presets as well as Lightroom Develop Presets.

    Lightgram Instafade presets. These presets emulate the beauty and nostalgia of film. I like Lightgram’s presets a lot. They also have some free presets you can try out.

    Really Nice Images Faded Films presets. These are the more expensive than the others, but you get nearly twice as many presets plus a toolkit to help you tweak the settings. But most importantly they are really good.
    How to create the vintage look in Lightroom

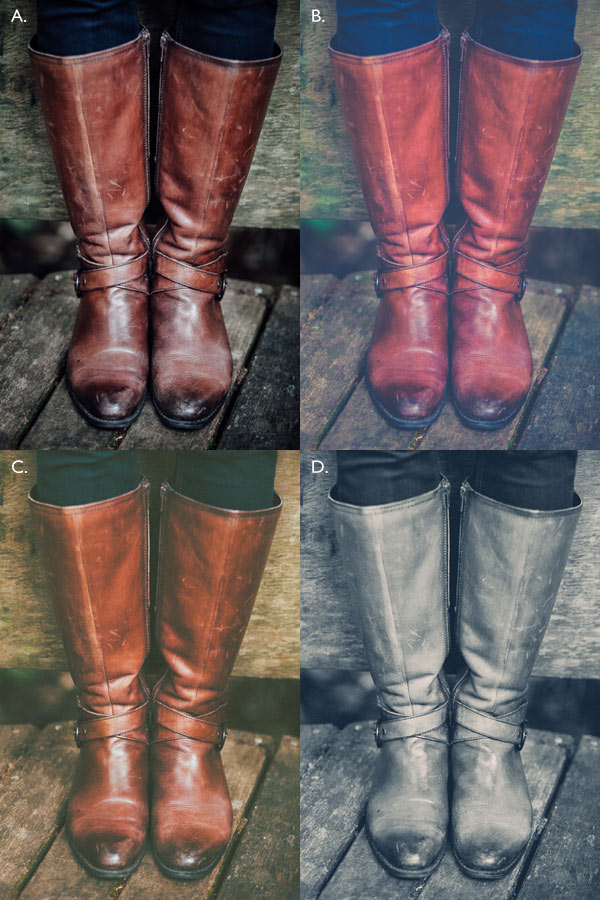
    A. Original photo B. Nicolesy Vintage Fade: Rainfall preset C. Lightgram Instafade: Lightgram Faded 12 preset D: Really Nice Images: Faded Films – Utah Monochrome preset

    How to create the vintage look yourself

    Now it’s time to take a look at a few of the techniques you can use to create the vintage look yourself in Lightroom.

    1. Fade out with the Tone Curve

    Go to the Tone Curve panel and raise the left side of the RGB curve upwards. Doing so removes true black from the photo, making the darkest tones lighter. How far you move it is up to you – the best way is to judge the effect by eye.

    You’ll get the best results when the RGB curve starts from its linear position (a straight line from bottom-left to top-right). If you are planning to use the Tone Curve to create a matte effect, it is best to carry out tonal adjustments such as increasing contrast in the Basic panel. You may also wish to reduce Saturation or Vibrance to weaken the colours in the photo, emphasizing the vintage look created by the matte effect.

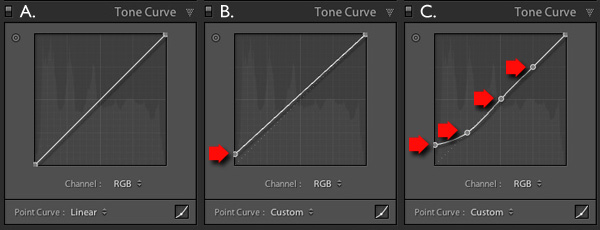
    Alternatively, click on the RGB curve three times (where the lines intersect it on the grid) before lifting the left-hand corner. This gives a slightly different look. Experiment with both techniques to see which one suits your particular photo best. This is what the curves look like.
    How to create the vintage look in Lightroom

    A. Linear curve B. Entire curve raised. C. Left-hand side of curve raised only.

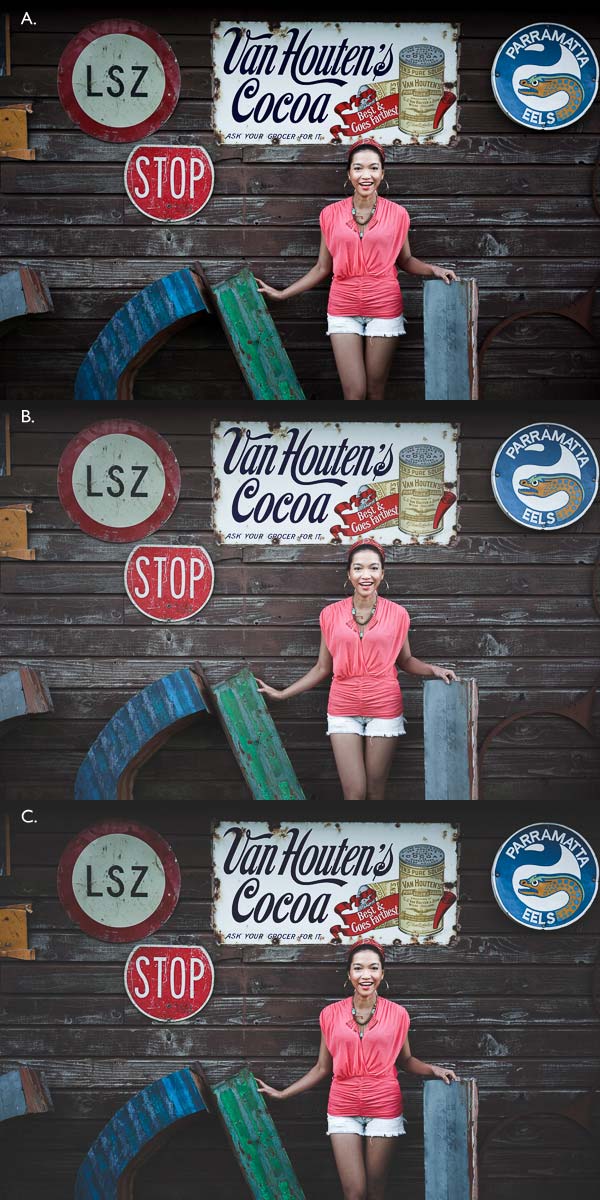
    This is how those curve adjustments affect the photo.
    How to create the vintage look in Lightroom

    A. Linear curve B. Entire curve raised. C. Left-hand side of curve raised only.

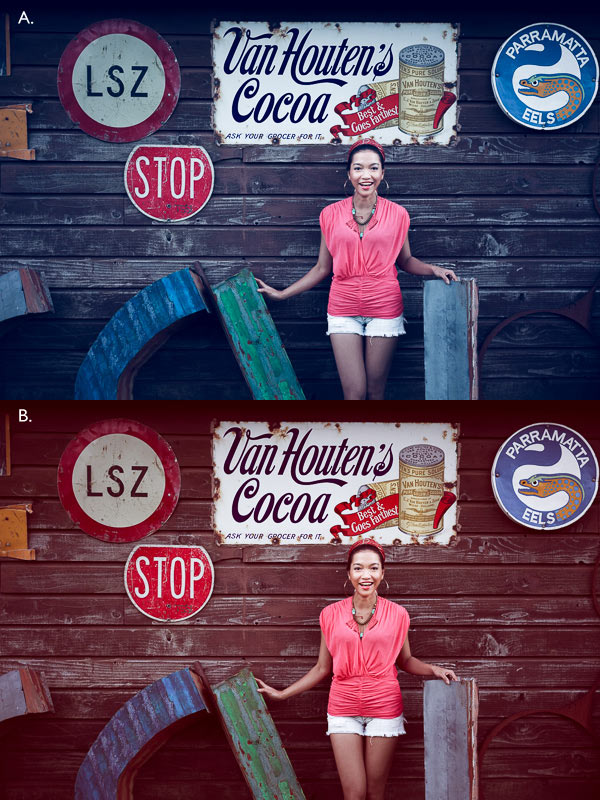
    Using the RGB Tone Curve applies a matte effect without affecting the colour. However, you can play with the colour curves as well. If you use the same technique on a colour curve, it affects the colour of the photo as well as the contrast. Here are a couple of examples.
    How to create the vintage look in Lightroom

    A. Blue curve raised. B. Red curve raised.

    2. Split toning

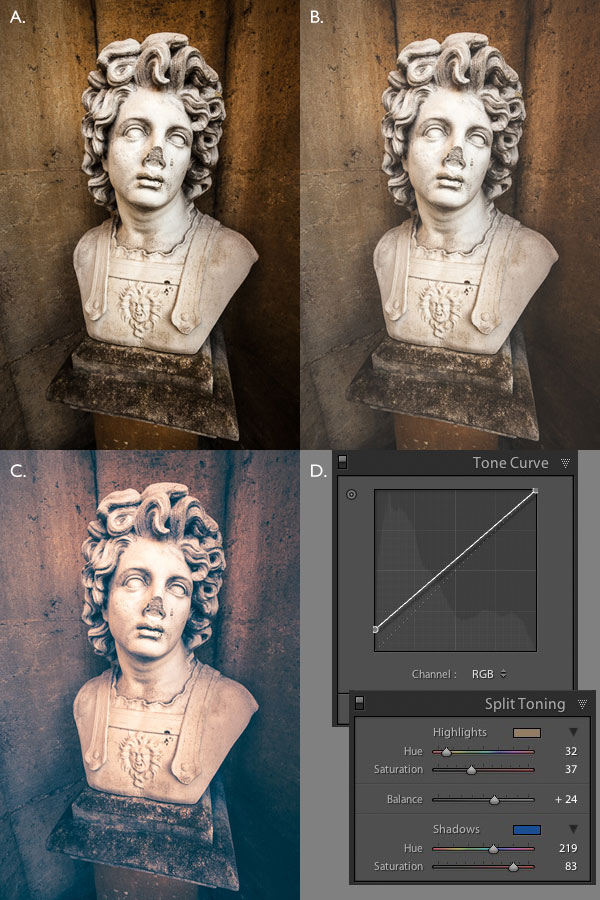
    Another way to add colour is with split toning. The basic concept is simple. Apply a warm colour to the highlights (such as orange, red or yellow) and a cool one to the shadows (for example blue, dark green or teal). You may be aware that warm colours appear to move towards the viewer, and cooler ones away. Split toning builds on that principle.
    How to create the vintage look in Lightroom

    A. Original photo. B. RGB Tone Curve raised (neutral colour). C. Split tone applied. D. The Tone Curve and Split Toning settings used for these photos.

    Conclusion

    Now you know how to create a vintage effect in Lightroom. If you have any other tips for creating a vintage effect, please leave them in the comments below.

    Mastering Lightroom: Book Four – The Photos ebookMastering Lightroom: Book Four – The Photos

    My new ebook Mastering Lightroom: Book Four – The Photos takes you through ten beautiful examples of photography and shows you how I processed them step-by-step in Lightroom. It explores some of my favourite Develop Presets and plug-ins as well as the techniques I use in Lightroom itself. Click the link to learn more.

    The post How to Create a Vintage Look using Lightroom by Andrew S. Gibson appeared first on Digital Photography School.


    Digital Photography School

  • Seeing More Creatively with Bryan Peterson

    creativity2

    Bryan Peterson is well known for his photography books and workshops. He’s also now one of the featured photography teachers on Adorama TV. You can get his book Learning to See Creatively on Adorama.com.

    In these three videos Bryan gives us a few tips on doing just that.

    Seeing Creatively

    This first video is a quick tip on using Selective Focus:

    In this second video Bryan is leading a workshop, ironically on the Oregon coast where I was just two weeks ago. This video shows how to get creative shooting things on the beach.

    Make note they are shooting a starfish but they did not harm it or pull it off the rocks which can damage his little arms (please take care to do that if you are shooting on a beach for last week’s photography challenge). 

    Lastly this video shows three quick tips on how to add motion to your images in an abstract and creative way.

    Hopefully these have given you some ideas to get out and shoot.

    The post Seeing More Creatively with Bryan Peterson by Darlene Hildebrandt appeared first on Digital Photography School.


    Digital Photography School

  • 10 Tips on How to use Photography as a Tool for Personal Transformation

    Have you ever found yourself in a relationship that’s not really working, or a job that has you feeling trapped? Or maybe your day in, day out lifestyle has you feeling glib.

    Whatever the case may be, we’ve all been there. We use different things to cope. Some people drink, while others go to therapy or journal. Well, there is a way that photography can play a part in raising you up out of that negative mindset.

    From the Nap Series, Nov.09th, 2012 @Catherine Just

    When I was a new mom, my son Max was not really napping. It was driving me absolutely crazy. So I decided to take my iPhone to nap time and when he fell asleep I’d take a photograph. When I saw the photo, I realized that I was so caught up in what I wanted to do that I was missing this very sacred moment between the two of us. It became a three year photo project, and changed my own perception of what was important. I teach a course called In Plain Sight that was inspired by this experience. Below I share some tips from that course, and my own life, so that you can partake in the transformation as well.

    You can use whatever camera you wish, and you don’t need to be a pro photographer to make this work for you. I used my iPhone for the Nap series and it worked perfectly.

    Here are 10 tips on how to use the camera as a tool for transformation:

    #1 Identify the issue

    Identify what the issue is that you want to focus on. Let’s say you’re in the middle of a bad breakup, or you’re moving across country.  That’s going to be the topic of your photography project.

    NapSeries_CJust2

    #2 Photograph the thing that frustrates you most

    Instead of taking photos of that person, or of the things about this situation that drive you mad, instead, focus on how to create a gorgeous photograph of the thing that is frustrating you the most. Sounds pretty hard doesn’t it? But if you detach a bit from the story line, and start to look at things through your viewfinder as a photographer, you’ll find light wrapping itself around the subject in a way that means more than it did before.

    napseries_Cjust4

    #3 Take one photo every day for 30 days

    Make this an investigative process. What could you learn every day about your life and how light, composition, shadows, objects, and the space around these objects all intersect with the story line that’s running in your head?

    napseries_Cjust3

    #4 Get closer

    Remove the details that don’t serve the photograph. See what can be said with less.

    #5 Pay attention to the light

    Notice when things are illuminated and how that plays a roll in creating a more dramatic or emotional image.

    napseries_Cjust5

    #6 Go slow

    No need to just snap a billion photos. Take one a day. Be thoughtful and on purpose.

    #7 Move around the subject

    Move around your subject to find the best way to express the emotion. Don’t just hold up the camera and take the photo. Be more in charge of what you create and remember that you can change your vantage point.

    Nap series_CJUST_06

    #8 Organize your photos

    Keep all of your images in a folder on your computer and label them with the date and time you took the photo. Over time you will start to see something emerge that you didn’t expect. Something shifting about how you view this situation. A deeper awareness of who you are, and what this situation wants to tell you.

    #9 Share your photos

    Post your photos daily on your Instagram feed, and make up a hashtag for the project. People will want to join in and it’s actually an amazing thing to get feedback and support as you move through this process.CatherineJust_Naptime_1

    #10 Keep going

    You don’t have to stop at 30 days. My Nap Series turned into a three year project. The frustrating situation may stay the same, but you will have a new relationship with it. It’s about progress rather than perfection. If you miss some days, it’s no big deal. You’re not getting graded. This is for you. My Nap series is not a perfect daily project. I missed days for sure, but the transformation happened regardless.

    So just keep going and pay attention to what the photographs are telling you. The shift will happen and you’ll be amazed before you are half way through. You’ll be more present for the moments that matter and be a little more curious within the areas of life that are triggering you. You’ll see them in a new light.

    The post 10 Tips on How to use Photography as a Tool for Personal Transformation by Catherine Just appeared first on Digital Photography School.


    Digital Photography School

  • Bird Photography Tips for Beginners

    The colour and texture of birds’ plumage makes them fascinating subjects for photography, made all the more exciting by their fleeting and elusive nature. With a lot of patience and practice, and the help of these tips, you’ll soon be on your way to making memorable photographs of our feathered friends.

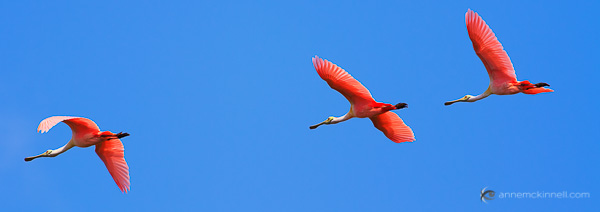
    Roseate Spoonbills in Flight by Anne McKinnell

    Equipment

    To capture the best bird photography, the most important thing you’ll need is a lens with a very long focal length. How long, exactly? Generally, the longer the better for maximum magnification. But keep in mind that lenses get remarkably heavy – if you’re hiking up a mountain, it might not be practical to carry an extreme telephoto lens, which can weigh in at over ten pounds.

    A 70-300mm zoom lens is one of my favourites because it is very versatile and some of them are fairly lightweight. But you’ll get a sharper image with a fixed focal length lens. I recommend trying out a 300mm or 400mm prime lens.

    The extra weight of a long lens will increase the likelihood of hand shake blur, which will then be magnified by the distance between you and your subject. If you’re working with a heavy lens, a tripod or monopod will be a great benefit for taking the weight of the lens.

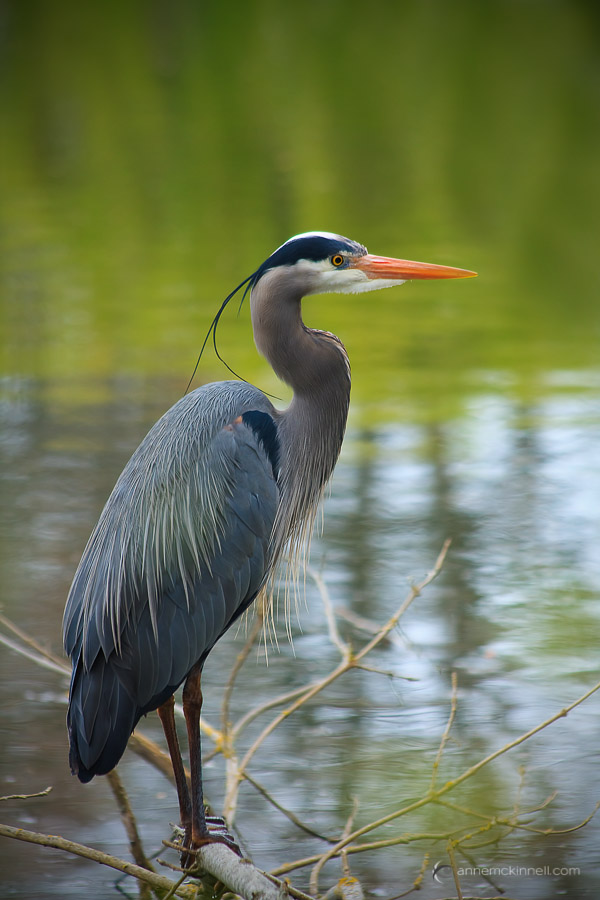
    Great Blue Heron by Anne McKinnell

    If you want the increased flexibility you’ll get by not using a tripod or monopod, be sure to use a very fast shutter speed to compensate for the hand shake blur.

    Camera Settings

    Exposure

    When photographing birds, using shutter priority mode and a fast shutter speed will ensure you are ready for any action that might happen, even if the bird is standing still at the moment. You never know when it will take flight and you want to be ready when that happens.

    Using a wide aperture like f/2.8 or f/4 will give you a shallow depth of field, which helps to isolate the bird from its background and direct attention to its shape and colour.

    When you want to have total control over the shutter speed and aperture, use manual mode and set the ISO to auto. That way, the camera will decide which ISO is the best to balance the exposure.

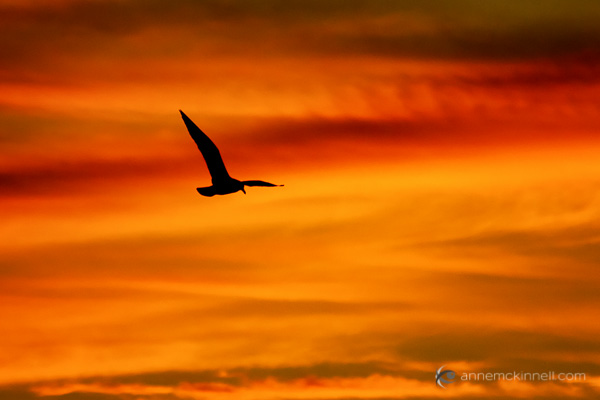
    If you have a colourful sky, one option to try is to expose for the sky and allow the bird or birds to become silhouettes.

    Seagull In Flight at Sunset by Anne McKinnell

    Focus

    How you focus on your subjects will depend on which approach you’re taking, as well as what equipment you have. Some lenses and some camera bodies auto focus faster, and much more accurately than others, so some experimentation is needed to get a sense of how quickly your auto focus motor moves.

    Birds are moving subjects, so if you do use auto focus, change it to the “continuous focus” mode (usually called AF-C or AI Servo) which tracks motion. However, you might find that you get better results by learning to focus manually.

    There should be an AF/MF switch on your camera and/or lens. If you switch it to MF (manual focus), you can turn the focus ring on your lens to adjust it by hand. This is fairly easy when your subject is still, but it takes a lot of practice to be able to do this quickly enough to lock in on a moving subject.

    Juvenile Bald Eagle flying by Anne McKinnell

    One method is to set up a perch (such as a bird feeder), with your camera on a tripod, and pre-frame and pre-focus your shot where the bird will be. When it lands, you just have to hit the shutter. There will be no focusing delay, so you can get the exact moment you have been waiting for.

    Getting the Shot

    Timing and Location

    Birds are very active in the spring – the ground softens, plants and seeds starting coming out, and bugs are everywhere. They finally get the feast they’ve been struggling to find all winter. Similarly, in autumn they are avidly gathering food before the frost sets in. Both of these seasons are the best for finding birds near the ground – and whatever the time of year, early mornings and sunny days will draw the most action.

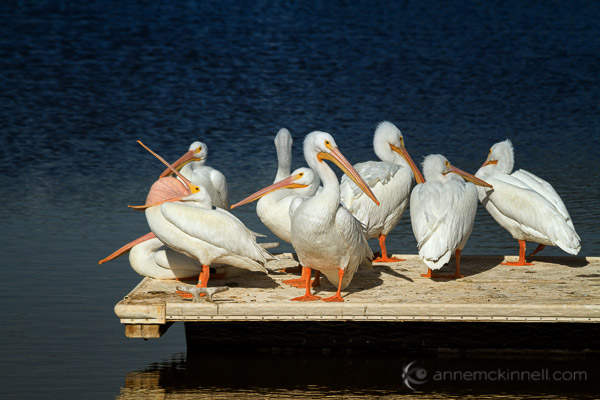
    American White Pelicans at the Salton Sea, California, by Anne McKinnell

    You might get lucky walking along a forest path, making photos of birds as you see them, but because birds see us as predators they will usually flee at the sound of our footsteps.

    Instead, you may have better luck by finding a location birds enjoy, hiding yourself, and waiting. This is where the patience comes in to play! The better you hide yourself, the safer they will feel coming near you. Tuck yourself in next to a tree or bush, or hide behind a blind to camouflage yourself, and try to stay as still and quiet as possible.

    One of the best places to start photographing birds might be your own backyard. Keep your camera handy with the right lens and camera settings for bird photography so that when one lands in your yard, you’re ready.

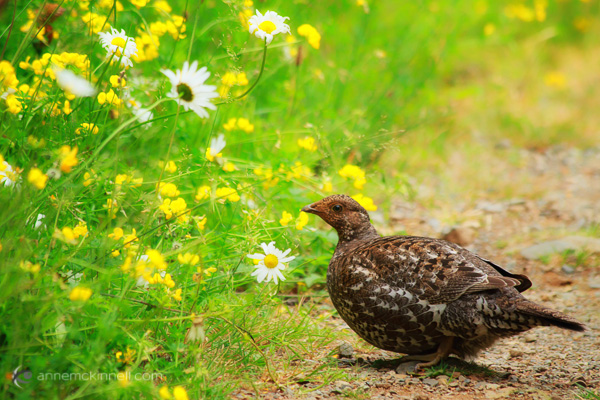
    Female Sooty Grouse by Anne McKinnell

    You can also seek them out in their natural habitats such as local forests, waterways, and beaches. You can find exotic and interesting species by visiting zoos, bird sanctuaries, and humane societies, or you can take a trip to a nearby national park or nature preserve. Birds that live in areas with more frequent human visitors will likely be less skittish and camera-shy.

    Composition

    Take care not to neglect your background. It should be clean and simple. Too much clutter will distract attention from the subject itself. Use your perspective and point of view to remove unwanted background objects from the frame, and choose a large aperture to blur them out.

    Tips for the Field

    • The better your camouflage, the more likely the birds will come near you. Cover your camera with a green or brown sweater to mask its strange appearance.
    • Wear neutral clothing and avoid bright colours.
    • Make sure to remove or cover all reflective objects on and around you, including your equipment, camera bag, cell phone, and any jewelry you might be wearing.
    • If you do find yourself needing to get closer to a bird, keep a low profile. Don’t approach them directly, but rather move toward them in a zig-zag pattern. Keep very quiet and avoid making quick movements and startling them.
    • Birds often choose favourite perches. Even if it flutters off before you can get your shot, if you wait silently for a few minutes, it may come back.
    • Birds are easily startled, so a beeping camera can frighten them away. Turn off any beeps your camera might make.
      The same goes for flash – turn it off or your bird will be startled by your first shot and quickly leave.

    Do you have any other bird photography tips you’d like to add to this list? Please share in the comments below.

    The post Bird Photography Tips for Beginners by Anne McKinnell appeared first on Digital Photography School.

    Digital Photography School

  • Weekly Photography Challenge – Highways and Byways

    Earlier today I shared a collection of images of paths and roadways. Leading lines are a great compositional element, and paths and roads are a great way to incorporate them into your images.

    More info on using leading lines:

    • How to Use Leading Lines for Better Compositions
    • How to Use Converging Lines to Enhance Your Photography
    • Using Diagonal Lines in Photography
    • A New Photographer’s Guide to Composition

    This week the weekly photograph challenge is Highways and Byways – meaning, going find those trails, paths, roads, and use them as leading lines to create some stunning images.

    By mike138

    By sherifx

    By Dan Bergstrom

    By Tobias Lindman

    By Riza Nugraha ?

    By Lutz-R. Frank

    Show use your highways and byways photos

    Simply upload your shot into the comment field (look for the little camera icon in the Disqus comments section as pictured below) and they’ll get embedded for us all to see or if you’d prefer upload them to your favourite photo sharing site and leave the link to them. Show me your leading lines using pathways and roads in this week’s challenge.

    The post Weekly Photography Challenge – Highways and Byways by Darlene Hildebrandt appeared first on Digital Photography School.


    Digital Photography School

  • A Collection of Pathway and Roadway Photos to Lead You

    As I’ve been on the road for a couple weeks now I’ve seen more than a share of roads recently. So I thought I’d find some pathway and roadway photos to lead you on – hopefully to get out and do some of your own photography.

    Enjoy the journey down these highways and byways!

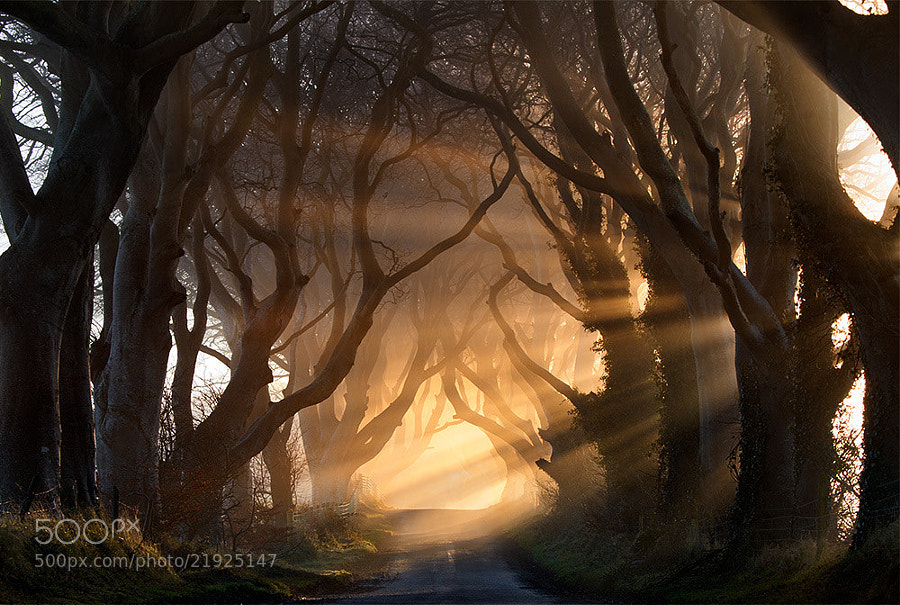
    Photograph The Pathway by Ian David Soar on 500px

    The Pathway by Ian David Soar on 500px

    Photograph bench in foggy autumn park by Sergiy Trofimov on 500px

    bench in foggy autumn park by Sergiy Trofimov on 500px

    Photograph Foggy Road by Casey McCallister on 500px

    Foggy Road by Casey McCallister on 500px

    Photograph The pathway by Jorge Maia on 500px

    The pathway by Jorge Maia on 500px

    Photograph Tuscan Farmhouses by Alberto Di Donato on 500px

    Tuscan Farmhouses by Alberto Di Donato on 500px

    Photograph Pathway by Derek Toye on 500px

    Pathway by Derek Toye on 500px

    Photograph foggy mountain forest and man by Sergiy Trofimov on 500px

    foggy mountain forest and man by Sergiy Trofimov on 500px

    Photograph Along the Way by Carlos Gotay on 500px

    Along the Way by Carlos Gotay on 500px

    Photograph Untitled by Ursula Rodgers on 500px

    Untitled by Ursula Rodgers on 500px

    Photograph Margam Abbey Ruins by Linda Bullock on 500px

    Margam Abbey Ruins by Linda Bullock on 500px

    Photograph Pathway to the light I by David Brand on 500px

    Pathway to the light I by David Brand on 500px

    Photograph Spring Awakening by Bernard Chen on 500px

    Spring Awakening by Bernard Chen on 500px

    Photograph Smoky BB by Kalevi Tamm on 500px

    Smoky BB by Kalevi Tamm on 500px

    Photograph Morning Glory by Stephen Emerson on 500px

    Morning Glory by Stephen Emerson on 500px

    Photograph In Motion by Bee Eye on 500px

    In Motion by Bee Eye on 500px

    Photograph Fortress of Solitude by LEE INHWAN on 500px

    Fortress of Solitude by LEE INHWAN on 500px

    Photograph Coliseum, past and future !  by Beboy Photographies on 500px

    Coliseum, past and future ! by Beboy Photographies on 500px

    Photograph The road by Vendenis . on 500px

    The road by Vendenis . on 500px

    Photograph The Cistern by Pawe? Uchorczak on 500px

    The Cistern by Pawe? Uchorczak on 500px

    Photograph Road to Home by Ethan Shox on 500px

    Road to Home by Ethan Shox on 500px

    Photograph Phare du Petit Minou by Stefan Cruysberghs on 500px

    Phare du Petit Minou by Stefan Cruysberghs on 500px

    Photograph Autumn Melancholy by Andreas Steegmann on 500px

    Autumn Melancholy by Andreas Steegmann on 500px

    Photograph One always wonders about roads not taken... by Sandeep Thomas on 500px

    One always wonders about roads not taken… by Sandeep Thomas on 500px

    Photograph Trollstigen by Jiri Paur on 500px

    Trollstigen by Jiri Paur on 500px

    Photograph Road Trip by Jake Olson Studios on 500px

    Road Trip by Jake Olson Studios on 500px

    Photograph Rainbow Bridge Experience by Loïc Lagarde on 500px

    Rainbow Bridge Experience by Loïc Lagarde on 500px

    Photograph roadway by Alexa Capricious on 500px

    roadway by Alexa Capricious on 500px

    Photograph Street Scene Stone Town - Zanzibar Africa by Gerry Legere on 500px

    Street Scene Stone Town – Zanzibar Africa by Gerry Legere on 500px

    Photograph La Ferrería by Ariasgonzalo . on 500px

    La Ferrería by Ariasgonzalo . on 500px

    Photograph Street Noir by András Sümegi on 500px

    Street Noir by András Sümegi on 500px

    Photograph Winding Road by Danny Seidman on 500px

    Winding Road by Danny Seidman on 500px

    The post A Collection of Pathway and Roadway Photos to Lead You by Darlene Hildebrandt appeared first on Digital Photography School.


    Digital Photography School

  • Top 7 Gear Picks 2014 to Try This Summer

    Summer is a great time to get outdoors and shoot amazing photos. The weather is sublime, the plants are all blooming and it’s just an all around great time of year. The last thing you want to do is lug around your hunky DSLR. This list of sleek and compact image makers will provide you with all of the best Continue Reading

    The post Top 7 Gear Picks 2014 to Try This Summer appeared first on Photodoto.


    Photodoto

  • Using Composition to Create More Powerful Portraits

    As part of my series on portrait photography, in this article, I will discuss composition, one of the most important aspects of creating a good portrait image.

    F11A6332 1

    • Are there any laws regarding framing a portrait?
    • Can I leave hands, fingers, or part of the head out of the frame?
    • Does a portrait have to include a face?

    I will answer these questions that my students often ask. It is important to keep in mind that as in all aspects of art, there are no “rules” or “must dos” here, because you can do anything as long as it works for you. So, I will describe techniques that work for me and I hope that they will work for you, resulting in much stronger portrait photography portfolio.

    What is a good portrait?

    A good portrait is an image of a person that manages to tell a story. A good portrait evokes emotion. A good portrait tells us something about the person in the image, and composition is a key element that helps us create a storytelling portrait.

    How can I create a storytelling portrait with the help of composition?

    I think good composition is a combination of the scene on the ground and the scene within your head. It combines the available with the desirable.

    Here are a few examples of portraits I made recently (using natural light only) with explanations of the thinking process and goals in terms of composition. As Ansel Adams said, don’t forget that every image has two people behind it. the photographer and the viewer. So you might not feel the same emotions as I do with the images I created. But that’s okay, because photography is both an art and a science.

    Choosing how much background to include

    F11A3496 Exposure 1

    Focal length 24mm

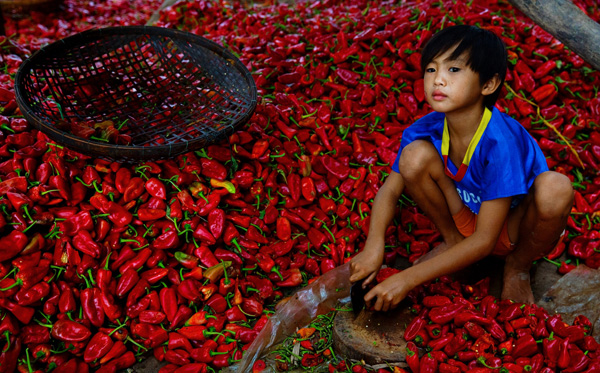
    I met this boy cutting Paprika in rural Cambodia. It was summer vacation and he was there with his family and other villagers. What’s my visual narrative in one line? “Small boy, big work.”

    I immediately knew two things: one, the background is a significant element and two; I wanted to capture the boy working alone. So, I started with the background and decided on a high angle in order to capture this “mountain” of Paprika. It was important for me to show the boy’s entire body with some space above his head so that the viewer could compare (remember my one line story?) the size of the boy to the size of the work.

    I even included that basket in the composition to add balance to the entire frame. After I set up my composition, I waited about 20 minutes to capture the boy looking up. I knew that if he was working with his head and eyes down, the whole story would fall apart. I think the wait was worth it.

    For me, this is one of the most complex decisions in photography: to identify visual storytelling potential and decide how much time you’re willing to wait until the story materializes.

    Story 56 the kid 1

    Focal length: 17mm

    I used the same technique here in Kyrgyzstan, for this shot of six year old Aytinger, which I made for National Geographic Traveler magazine. Visual narrative in one line, “Small boy, big world”.

    Here, I made the background much more dominant compared to the previous image. Here the boy is very small compared to the land. Imagine if I framed this image with only his face? I would lose the entire story, because his face alone doesn’t tell the story I want to portray. It was important for me to “include” the path and the big cloud in the horizon, to add sense of an “epic” feel to the image.

    Web11 1

    Focal length: 70mm

    Here, you can see a different kind of portrait framing. Visual narrative in one line – “Quiet, peaceful, youth”.

    I wanted to evoke peace and harmony. So I focused only on the face of this young monk, and included almost no background, in order to avoid interference from the environment. Also, note how the central composition (the subject is in the center of the frame) is balanced with the two orange frames on the sides.

    I used soft natural light (coming from the right side of the frame) in order to create a sense of something religious and pure.

    Cropping in tight

    42 1

    Focal length: 70mm

    This is the type of framing that I’m asked many questions about by my students: whether it is allowed to cut off part of the head like this. Sure, as long as it helps the visual story you want to tell. Visual narrative in one line, “A sad reflection”.

    Apollo’s wife died not long before I met him in the hills of northern Laos. In the image, Apollo’s face and the feeling of something tilting or shifting in his world is the only important thing. By framing his face on the right, while he was looking down and to the right, I wanted to create a feeling of an “unbalanced world”. Compare the very low key, dim lighting (with negative exposure compensation) in this image to the previous one of the monk. I was using the dark part of his house to evoke this story.

    TheAccess 4photography people

    Focal length: 85mm

    This framing is even more radical than the previous one. Please note that this is the composition I did on the ground (no cropping) for a story I did for National Geographic Traveler magazine on Western China. Visual narrative in one line, “Strong and wise”.

    Leaving space

    When I saw the eyes of this man, the oldest man sitting in the back of a teahouse in remote western China, I knew I didn’t need anything else but his blue eyes. So I made it the dominant factor of my composition.

    Story 35 alone 1

    Focal length: 24mm

    Now you might ask, is this a portrait too? Well, yes, for two reasons: one, do you see a person, and two, do you feel a sense of story?

    What’s my visual narrative? It was a particularly hot afternoon. Dozens of worshipers left the mosque. I paused for a moment, trying to change lenses, as I noticed this guy. It seems that he was not affected by the hustle passing him by. He remained alone, continuing to read the prayer book. At first, my initial thought was “wow, what loneliness”. But then I thought, ”wow, what strength”.

    I used the empty spaces of the place to enhance the sense of loneliness, but the balanced; “by the rules” composition (rule of thirds) should give the sense of power I was aiming for. The reason I chose to use negative exposure compensation and thus create a silhouette was to not compete with red color in the background and give it a sense of harmony.

    Put it all together

    You may be asking – “Okay, I understand the thought process. But honestly, do you really think about it before the creation of the frame or only afterwards?”.

    Well, I do believe that good portrait photography is an outcome of a thinking process. Should I add the background or not? Should I crop the head or leave it full? Sometimes by over-thinking, the subject might lose patience. It has happened to me more than once. But for me, having the time to think, to plan, and to achieve the story I wanted is part of the fun.

    Feel free to leave questions and comments below.

    Note: the author would like to thank Nicholas Orloff for his help of writing this article.

    The post Using Composition to Create More Powerful Portraits by Oded Wagenstein appeared first on Digital Photography School.

    Digital Photography School

  • 6 Tips to Take Your Architecture Photography to the Next Level

    Liams Seattle

    Architectural photography may seem like an incredibly boring subject, but there is lots of creativity involved with shooting buildings, not to mention it’s a rather lucrative way to make a side income as a photographer. However, the rules of photographing a building versus a person are quite different. Whether you are a relatively seasoned architectural photographer looking to refine your approach, or a budding photographer curious about how to create impactful architectural photos, these tips should help take your photography to another level. This post is written for a photographer approaching an official architectural photography assignment, but the tips also apply to casual shooters.

    1. Do your homework and see if there are any photos of the space online

    Most buildings in the world have been photographed at least once thanks to Google. A quick Google Image search of the space you’re looking to shoot should pull up a variety of photos by both professionals and amateurs. Use the work of others to your advantage. Check to see what angles other photographers may have already shot, and which ones they haven’t. Examine the photos for any potential challenges that may arise, such as tall interiors or exteriors, or areas that look better when naturally lit by a sunset. Do what you can to anticipate your needs on site before you arrive.

    Puerto Vallarta

    2. Know the geographical aspect of your building

    Speaking of natural light, this can be your friend or your foe. Many modern buildings today are being built with lots of features that offer natural light such as floor-to-ceiling windows and skylights. While these may seem great for the actual building occupant, these features can make or break your architectural photo shoot. More than ever, it is important to know the geographical aspect of the building you are shooting. Is it east-facing or west-facing? Depending on the time of day, it truly matters. Be sure to consider the geographical aspect in relation to the time of day you choose to shoot.

    3. Always walk through the space first

    There are a couple reasons why a walk through is essential. First, it is much easier to remove any clutter or unorganized elements. Two things to always look out for are trashcans and wrinkles in fabrics such as curtains or bed spreads. These are two things that are much easier to remove before you shoot rather than in post-production. Second, think of the walk through as your scouting mission. Look for any “special access” places such as nooks and crannies or elevated spaces, that you may be able to squeeze yourself into to get an alternative view of the space. In this day and age where just about everyone has a camera, capturing stand out photos is about finding the angles of a space that aren’t so obvious.

    Hecho Seattle

    4. See if the space has been styled

    Before you walk through the space, check with your photography coordinator to find out if the space has been staged or styled by a designer. If so, you’re in luck! Staged spaces tend to look like they’re straight out of a magazine with furniture, artwork, and props carefully placed in the area, making your job much easier. If the space hasn’t been staged, you will have to put in more effort to figure out the architectural importance of the space and have these elements shine through in your images. Ask yourself, “without furniture, what is it about this space that makes it special?”. Perhaps it’s the exposed brick and wood beams, or the floor-to-ceiling windows. Whatever it is, make sure these elements become the focal points of your photos.

    5. As you begin shooting, watch for vertical lines

    When shooting architecture, you almost always want to use a wide-angle lens such as a Canon 16-35mm, but these lenses have a tendency to cause converging verticals. This happens when two parallel lines in an image appear as if they are leaning in towards each other. To make your photos appear more professional, and the architectural subject appear more structurally sound, it is important to correct these converging verticals. The easiest way is to simply change your perspective. Take a few steps away from your architectural subject, or elevate yourself until your vertical lines appear more parallel. Other ways to correct for converging verticals is to fix it in Photoshop, or if you have the budget, invest in a perspective control or tilt-shift lens.

    Fairwinds Seattle

    6. Elevate yourself

    There are two main reasons why you want to get to higher ground while shooting a building. The first is to correct for converging verticals as mentioned above. The second reason is to strive for a different photographic perspective. If you’re lucky, the space you’re photographing may come with a balcony, staircase, or natural element that lets you rise several feet for a taller perspective. However, keep in mind that again this is an obvious element that many other photographers will make a beeline for. This is why in 90% of architecture photography situations it pays to have a foldable, portable ladder or step stool and a monopod with you always. Having these two relatively cheap and lightweight items will help you achieve different, elevated perspectives of interiors and exteriors from atypical angles. Keep them in the trunk of your car; you never know when they will come in handy.

    EMP SFM Seattle

    Architectural photography at face value may not seem like an interesting subject, but think of it this way: when you travel, how many buildings do you see that you end of taking a photo of? Use these tips not only for approaching a real estate photo job, but whenever you plan to take semi-professional photos of buildings or just for yourself.

    Have any other tips you want to share, please do so in the comments below.

    The post 6 Tips to Take Your Architecture Photography to the Next Level by Suzi Pratt appeared first on Digital Photography School.

    Digital Photography School

  • On-Assignment: Full-Sun Group Shot

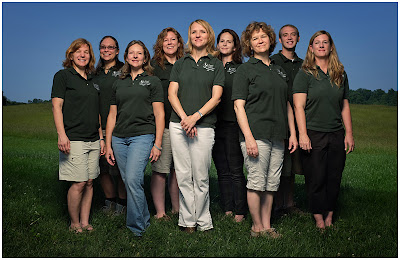
    If you have never done it before, lighting a group shot outdoors in full sun can be daunting. After all, sun is pretty bright. And your subject is pretty big and thus harder to light at a high level.

    But with a leaf-shutter camera and a couple of battery powered monoblocs, you can easily own the sun and just about anything you can put under it.

    Read more »
    Strobist