Category: Photography

  • Event Photography: How To Take Electric Photos of Rock Bands

    Do you remember the photographs that inspired you to want to take photography more seriously? If so, you must have a better memory than me. 😉 I don’t remember the specific photographs that made me want to keep me camera with me at all times. Maybe it was Henri-Cartier Bresson’s street photography, or maybe it was Andreas Gursky’s Rhine which Continue Reading

    The post Event Photography: How To Take Electric Photos of Rock Bands appeared first on Photodoto.


    Photodoto

  • Capturing Better Portraits Between Poses

    1-Mike_Bataki

    If you do portraiture of any kind you are probably used to people giving one look when the camera is away from them and another when it is on them. This is the unfortunate game of the portrait photographer.

    For my own work, I find that many of the most poignant portraits of people are the ones in between the actual ‘portraits’ taken during a session. These are the moments when your subject is at ease, in their element, thinking about something, and when they have the most interesting expressions.

    So how do you capture these and take better portraits?

    Paul KostabiThere is an important reason for taking your time to do a portrait session. It gives your subject time to get comfortable with you and the way you work. You can go through multiple backgrounds and ideas, and it is common for subjects to get over the initial portrait trepidation as the time goes on. That deer in headlights look will often (but not always) go away as they get used to how you work and what you want from them. This is the reason that you do not want to start off right away with your best idea because that will often be at their most uncomfortable moment.  Wait until they seem comfortable and in the right mindset.

    Give them direction, especially at first. When people do a portrait session they want to be told what to do, even if you want them to just be natural. Talk to them about what you’re doing and what you want from them. Do you want them to give you an emotion? How are their hands and arms? How is their posture?  Where should they stand? I personally prefer to engage the subject and get them standing and interacting in a natural way, but often I will pose people at the beginning just so they feel confident that I know what I’m doing. Then over time I will start trying to get them to pose in ways that feel the most natural for them, as they get more comfortable with what they are doing.

    The main key to this is that you want to get them interacting with you. Some types of shots are better posed of course, but you want them in some sort of moment. When they feel something, or think about something interesting, that feeling will shine through in the photograph.

    Talk about the person’s life. Get to know them. Ask them questions and get them thinking introspectively. Tell them this is part of the process so they don’t feel uncomfortable or unsure of what to do when they are talking. This is one of the reasons that I sometimes like to interview people as part of portrait sessions. Then, within the interview, right after they have finished talking about something interesting or emotional, I will stop them and ask them to stay just like that and I will take their photo.

    Portraits

    Sometimes you even have to fake people out. Tell them that you are just taking a few shots to test the light and to relax for a moment. Some of my best images have been taken that way.

    There are ebbs and flows in a portrait session. Sometimes it makes you feel like a boxer, bobbing and weaving with what they give you. Other times you will feel like a psychiatrist, trying to bring something out of them. If someone starts to look more and more uncomfortable, don’t keep photographing them hoping they’ll start to get better. Break them out of it by asking them to move to another location or take a break. Keep them on their toes and engaged.

    All subjects are different and will react differently to you, but the key is always that you must find ways to get through to them . Then to have the wherewithal to be able to catch the moment once they finally give it to you, because often the best moments are quick and fleeting.

    The post Capturing Better Portraits Between Poses by James Maher appeared first on Digital Photography School.


    Digital Photography School

  • Creating Swirly Bokeh with the Helios 44-2 lens

    Hacking_Photography_Helios_44-2_Lens-0086

    I recently bought a Sony A7 to compliment my Canon 6D DSLR. A friend convinced me that having small-form, full frame camera would be an entire different way of shooting. I value his opinion, so I picked one up. You can see how I used it in my last article:  when to trick your camera for the perfect exposure.

    A New Love of Prime Lenses

    I started off with a Sony 55mm f/1.8 and a 24-70mm f/2.8 lens that requires a Sony adapter. The 55mm shoots like a dream and is insanely light-weight.

    The 24-70mm and adapter are super heavy and ridiculously front-heavy. It’s a great lens but after taking it out a few times, I concluded it wasn’t for me. I really enjoy having big apertures available for low light so I started looking for another prime lens.

    A Lens Defect Leads to Awesome Bokeh

    I was looking through photos on Flickr and noticed a few images in which the bokeh appeared to be swirling in a circular pattern. It was awesome and unlike anything I had ever seen!

    I did some quick digging and found out this was called “swirly bokeh” and certain vintage lenses created this effect through a manufacturing defect. Well, this “defect” looked really cool to me and I wanted to incorporate it into my lens collection.

    Meet the Helios 44-2 58mm f/2 Lens
    sony a7, helios lens,

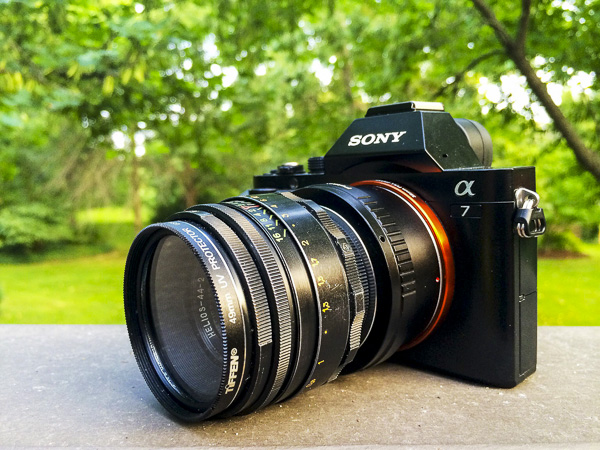
    Sony A7 with Helios 44-2 58mm f/2.0 lens

    I quickly found out that there is a cult following for a lens called a Helios 58mm f/2. This was a Russian-made lens that essentially tried to emulate a famous Zeiss one.

    Several companies made these lenses over several decades, in the millions of units, so they aren’t exactly rare. This means they are really inexpensive because they are so common.

    Where to Find the Helios 44-2 Lens

    Out of the several models of these lenses, the Helios 44-2 model lens reportedly creates the “swirly bokeh” I was looking for. I did a quick search on Ebay and quickly found a ton of these for sale out of Russia and the Ukraine.

    After looking at several of them I found one in excellent condition and ordered it for less than $ 50 including shipping. What a deal! I’ve seen plenty of people get even better deals on Ebay than I did.

    Mounting it on the Sony A7 Camera
    sony a7, helios lens, helios 44-2,

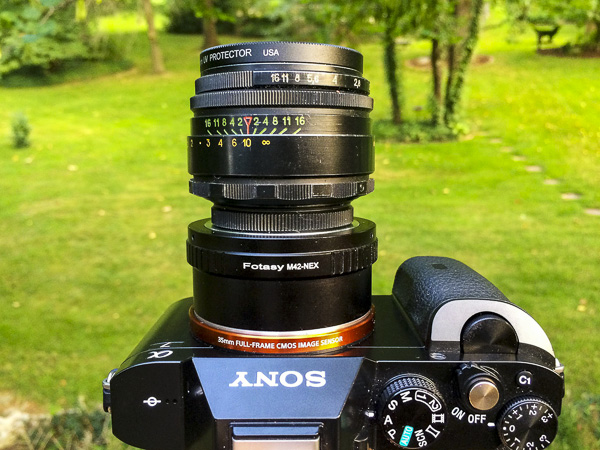
    Mounting the Helios 44-2 to the Sony A7

    These lenses were created for the Leica M-mount so I needed to get an M mount adapter for the Sony A7. I picked up a $ 10 Fotasy M42-NEX adapter which works perfectly.

    It looks like a Franken-camera. I really dig how crazy this thing looks. Other photographers have stopped to ask what the heck this lens setup is.

    Using Manual Focus and Manual Aperture Lenses
    english setter, helios 44-2 lens,

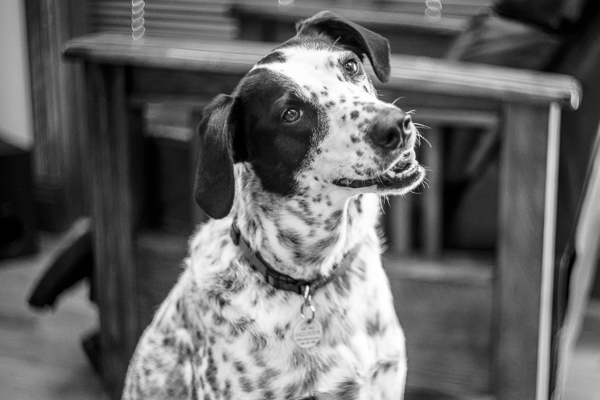
    The Sony A7 focus assist feature makes it easy to nail perfect focus each time.

    I’ve never had a lens that was manual focus only, much less manual aperture. Instead of using a front or rear dial on the camera to choose your aperture, you grab a ring on the front of the lens to change it by twisting it to the left or right.

    Some of you reading this are used to these type of lenses, but this was new to me.

    Using the Manual Aperture Lens

    While the aperture ring took some getting used to it really slowed my photo-taking process down. The aperture ring on the front of the lens reads 16 on the left, then 11, 8, 5.6, 4, 2.8, and 2 as you turn to the right. Simply twist the dial to change the aperture.

    Manual Focus Rocks with the A7 and the Helios 44-2

    Hacking_Photography_Helios_44-2_Lens-0431

    Light pole in a Missouri truck stop parking lot surrounded by corn.

    The standard challenge with manual focus is trying to eyeball the focus correctly. You might think your subject is in focus but you might be just an inch or two out of focus.

    The A7 has focus assist (also called focus peaking) that lights up in-focus sharp details in red so you know what part of the image is in focus. This makes it so simple.

    Taking a portrait? Twist the focus ring until a person’s eyes are rimmed in red and guarantee the eyes are sharp in focus. It’s so easy its almost like cheating!

    Finally – the Swirly Bokeh
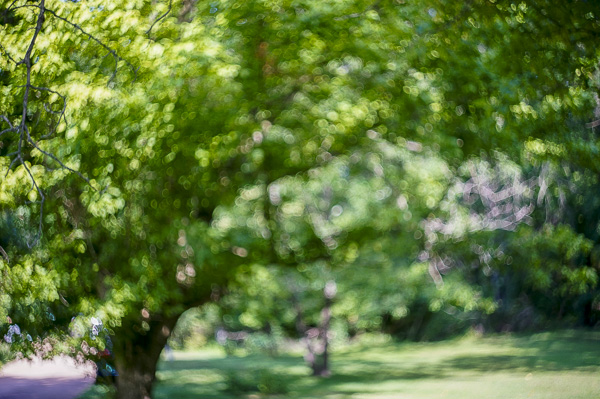
    Hacking_Photography_Helios_44-2_Lens-0100

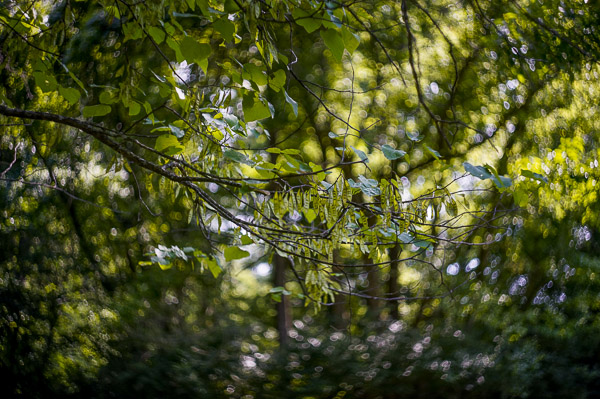
    This unfocused image shows the popular swirly bokeh effect

    I bought the lens right before a two-week trip to St. Louis, Missouri to visit family. It arrived the day before we left so it was ready to go right away. After a quick test shoot I decided I was going to shoot this Helios 58mm 44-2 exclusively for the entire trip.

    Finding the swirly sweet spot

    I took the lens into my in-laws yard to find out how best to find the swirly spot. When you shoot wide open at f/,2 close up to the subject, the background is a beautiful, buttery, soft bokeh.
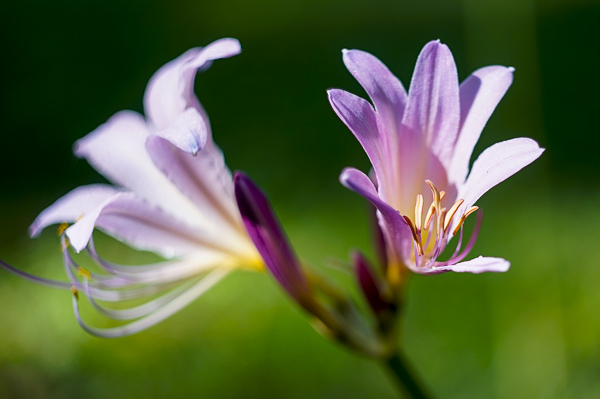
    flowers

    This image was shot up close which caused the background to blur too much for the swirl I was looking for. I aimed up at a leaf that was a little further away, still shooting wide open at f/2.

    It isn’t swirly bokeh yet, but it definitely has more shape to it. I’m getting closer.
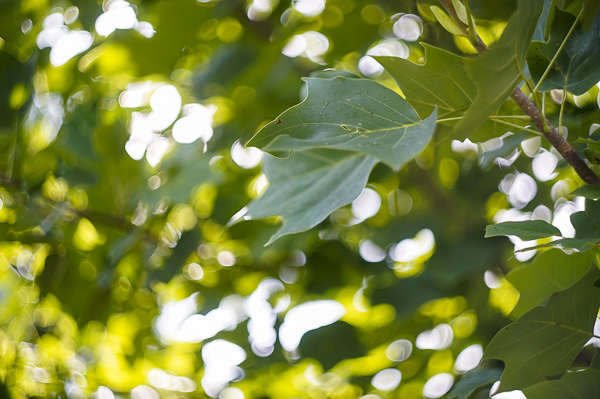
    branch bokeh

    I took another shot with a subject at mid range, perhaps 4-5 feet away while still shooting wide open at f/2.
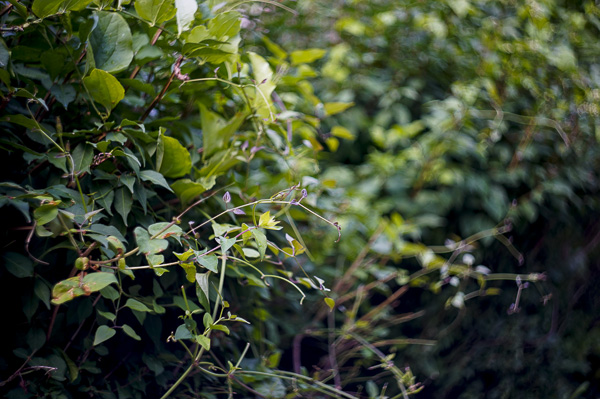
    swirly bokeh, helios lens, helios 44-2

    Can you start to see the swirl shape in the background? This photo showed me I’m getting closer. It seems that you need some decent distance from your subject, and you need some background that can fall into swirly bokeh in the distance.

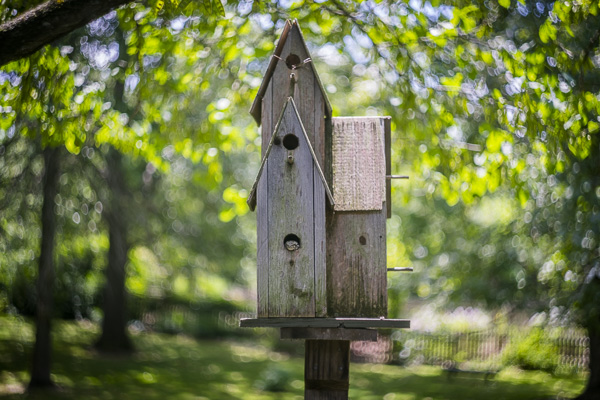
    I aimed up at a birdhouse about 8 feet away, which conveniently had a cute little toad in the lower peep hole and took the shot.
    swirly bokeh, helios lens, helios 44-2

    Success! Apparently you need a pretty good distance in the background so the little light spots and details can register into that swirl shape. I’m really in love with this Helios 44-2 lens.

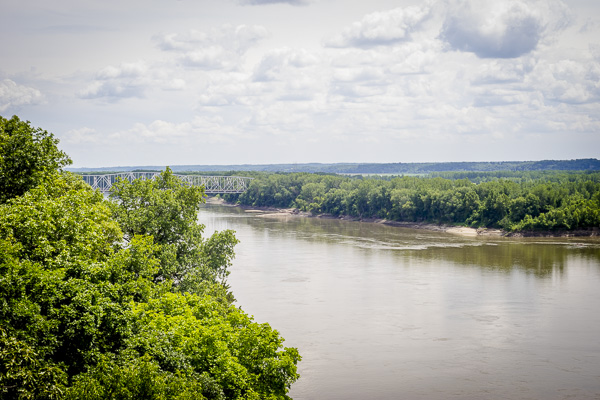
    The Helios 44-2 lens is fast with the f/2 aperture, weighs next to nothing, and was incredibly inexpensive at less than $ 50 including shipping. Even at very small apertures, it tops out at f/16, the lens puts out beautiful images.
    Mississippi river,

    The first of many manual focus prime lenses

    I’ve had such a great time with this lens that I’m going to purchase more manual focus primes. The glass creates very unique images and I can’t wait to pick up my next one.

    Have you ever mounted older lenses with your DLSR camera?

    If so let me know what lens(es) you have in the comments below as I’m looking to try out even more. Share your images too please.

    The post Creating Swirly Bokeh with the Helios 44-2 lens by Mike Newton appeared first on Digital Photography School.


    Digital Photography School
  • 15 of the Best Cheat Sheets, Printables and Infographics for Photographers

    Everyone loves cheat sheets, and photographers are no exception. Squeezed into a set of short tips, schemes, and definitions, a cheat sheet is a quick way to learn something, as well as refresh your knowledge about any particular subject. Moreover, now that infographics are an extremely popular format of delivering information on the Internet, cheat sheets can also be a source for visual inspiration.

    Here is a large collection of some noteworthy cheat sheets, infographics, and printables for photographers. From shooting basics to photography marketing tips, every aspect of photography is covered in this round-up. No matter whether you’re an amateur or an experienced professional, below you can find some really helpful resources, all presented as easy-to-read checklists, infographics, and printable cheat sheets for your advantage.

    Enjoy this compilation and don’t forget to bookmark this page for quick access to this exhaustive cheat sheet list. Note, you need to click on screenshots below in order to view the full cheat sheet since most images were cropped for proper fit.

    Photography Tech and Creative Process

    Learn the basics every photographer must know and save some useful tips and camera settings for quick reference. Click the links to see the original article and source.

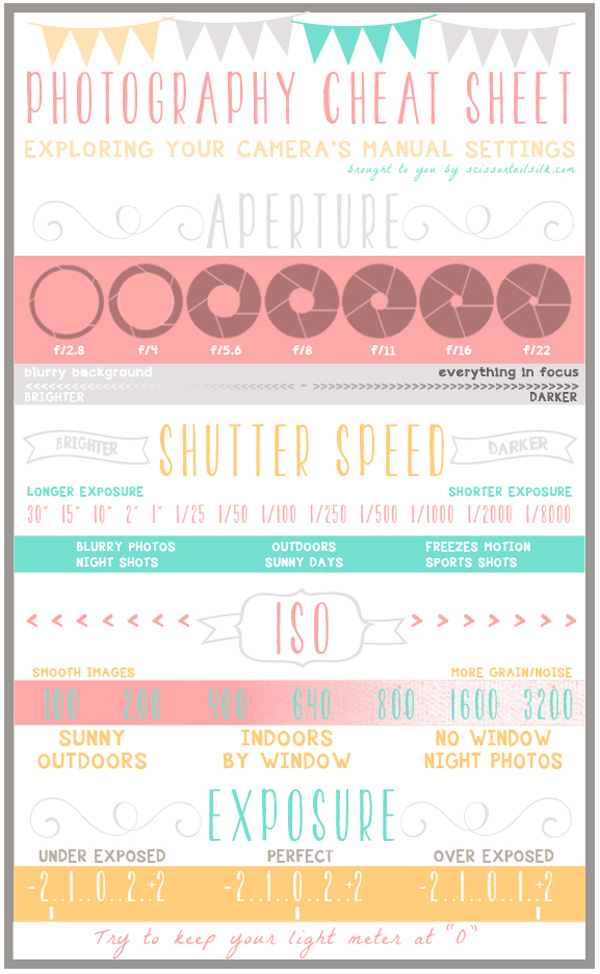
    #1 Photography 101 – Cheat Sheet and Camera Basics

    01-full

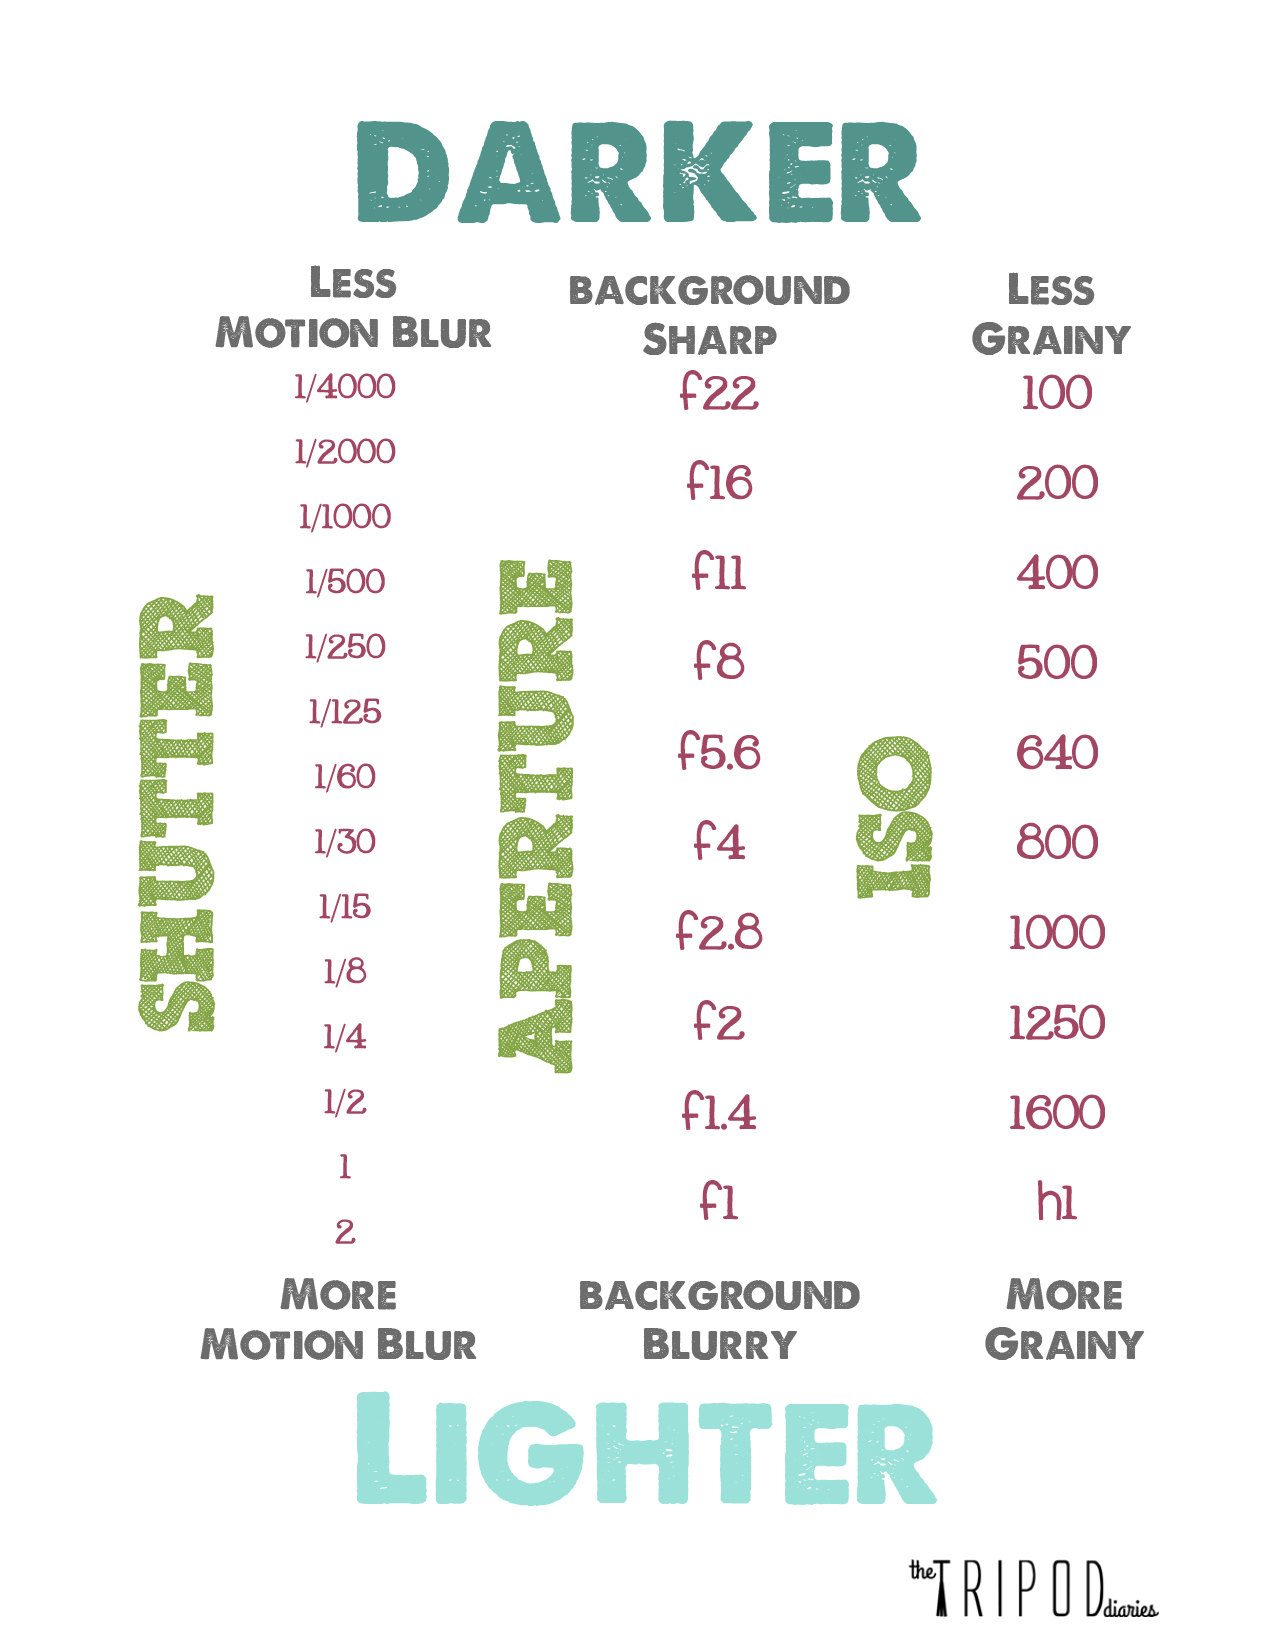
    #2 Shutter, Aperture, ISO Explained

    02-shutter-apperture-iso-full

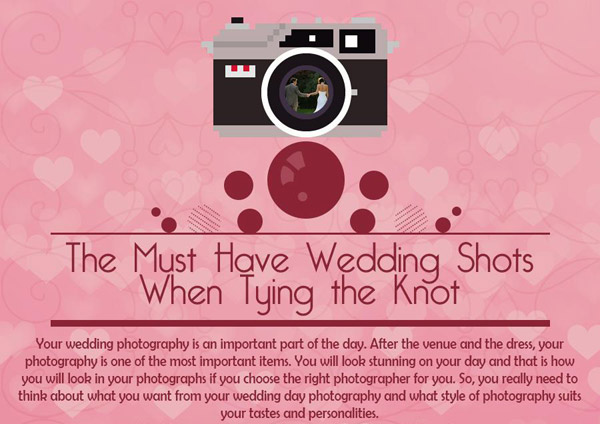
    #3 10 Must-have wedding shots for every bride

    (Click the image to get a larger view of this graphic)

    04-wedding-shots-bride.jpg

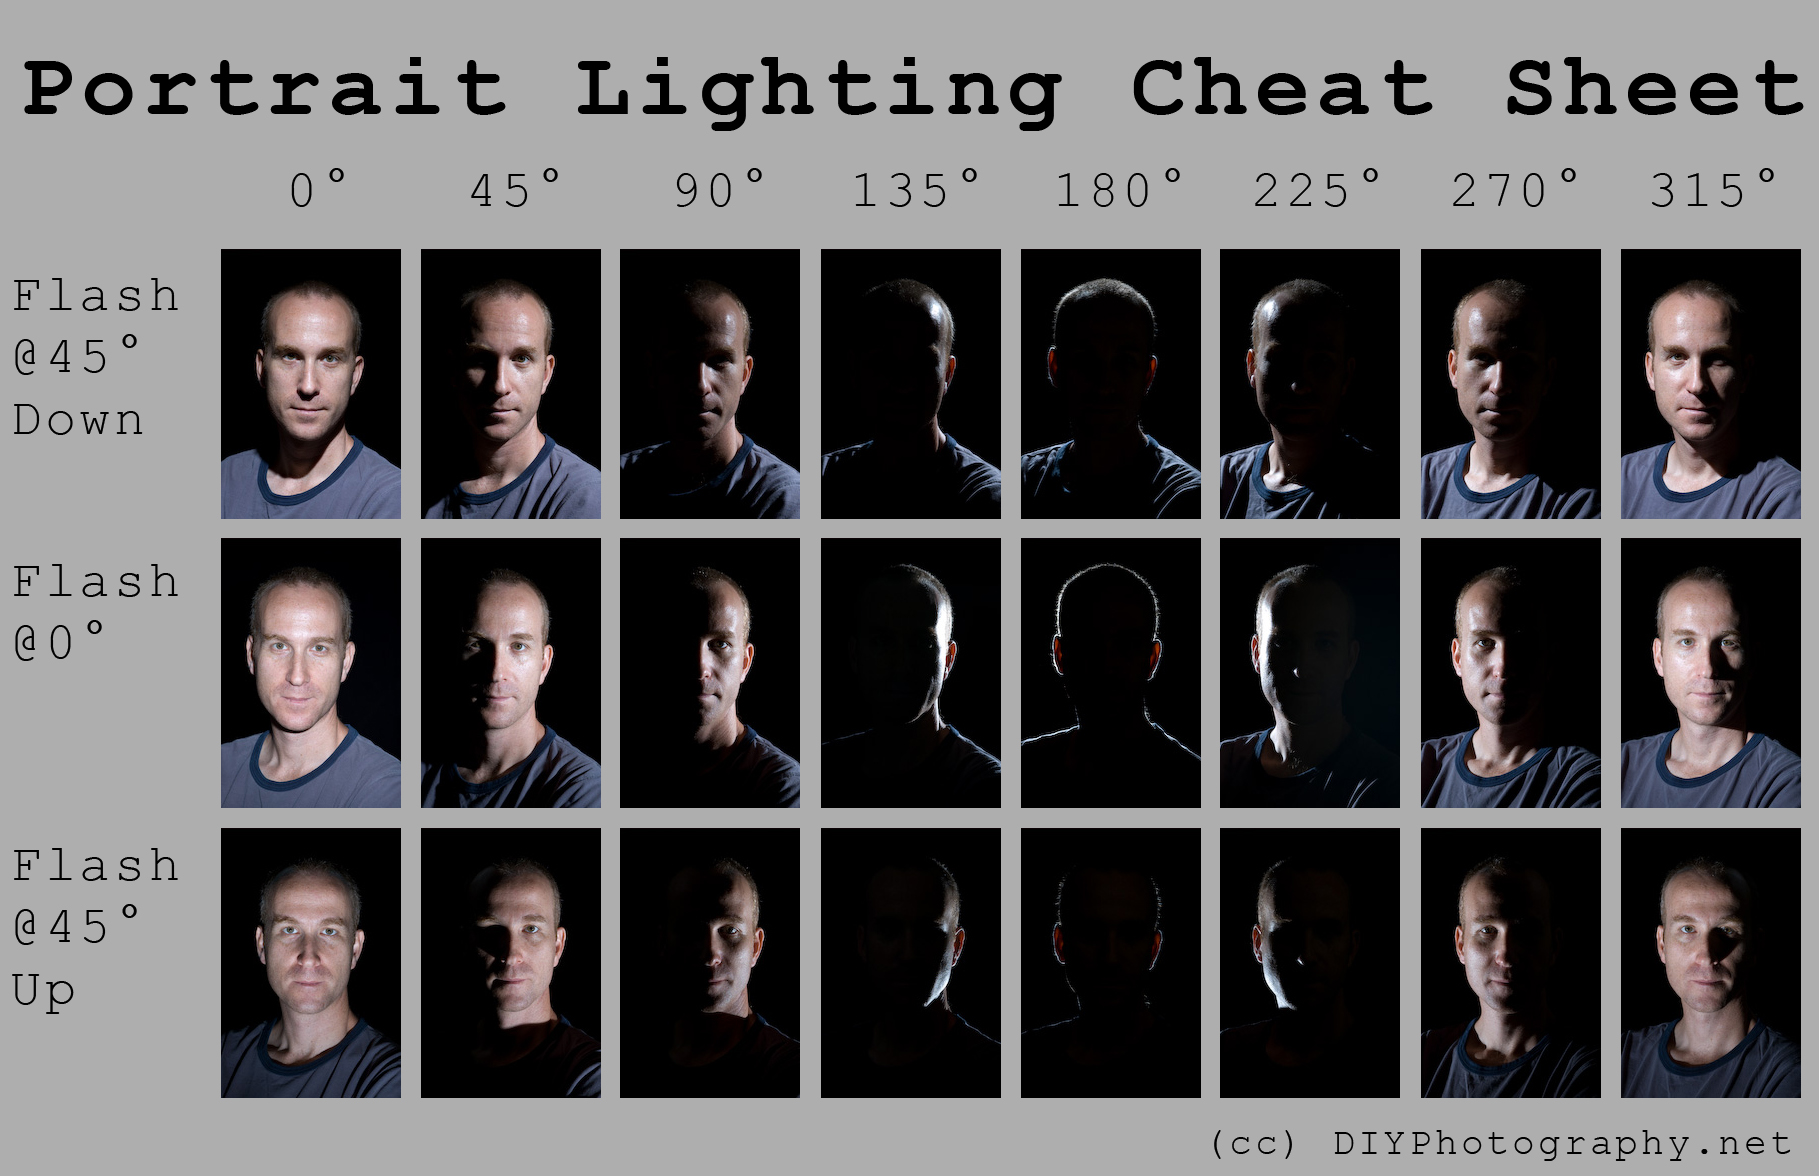
    #4 Portrait Lighting Examples

    (Click the image to get a larger view of this graphic)

    05-portrait-lighting-full

    #5 Focal Lengths Cheat Sheet (click to see the whole article and cheat sheet)

    06 focal lengths

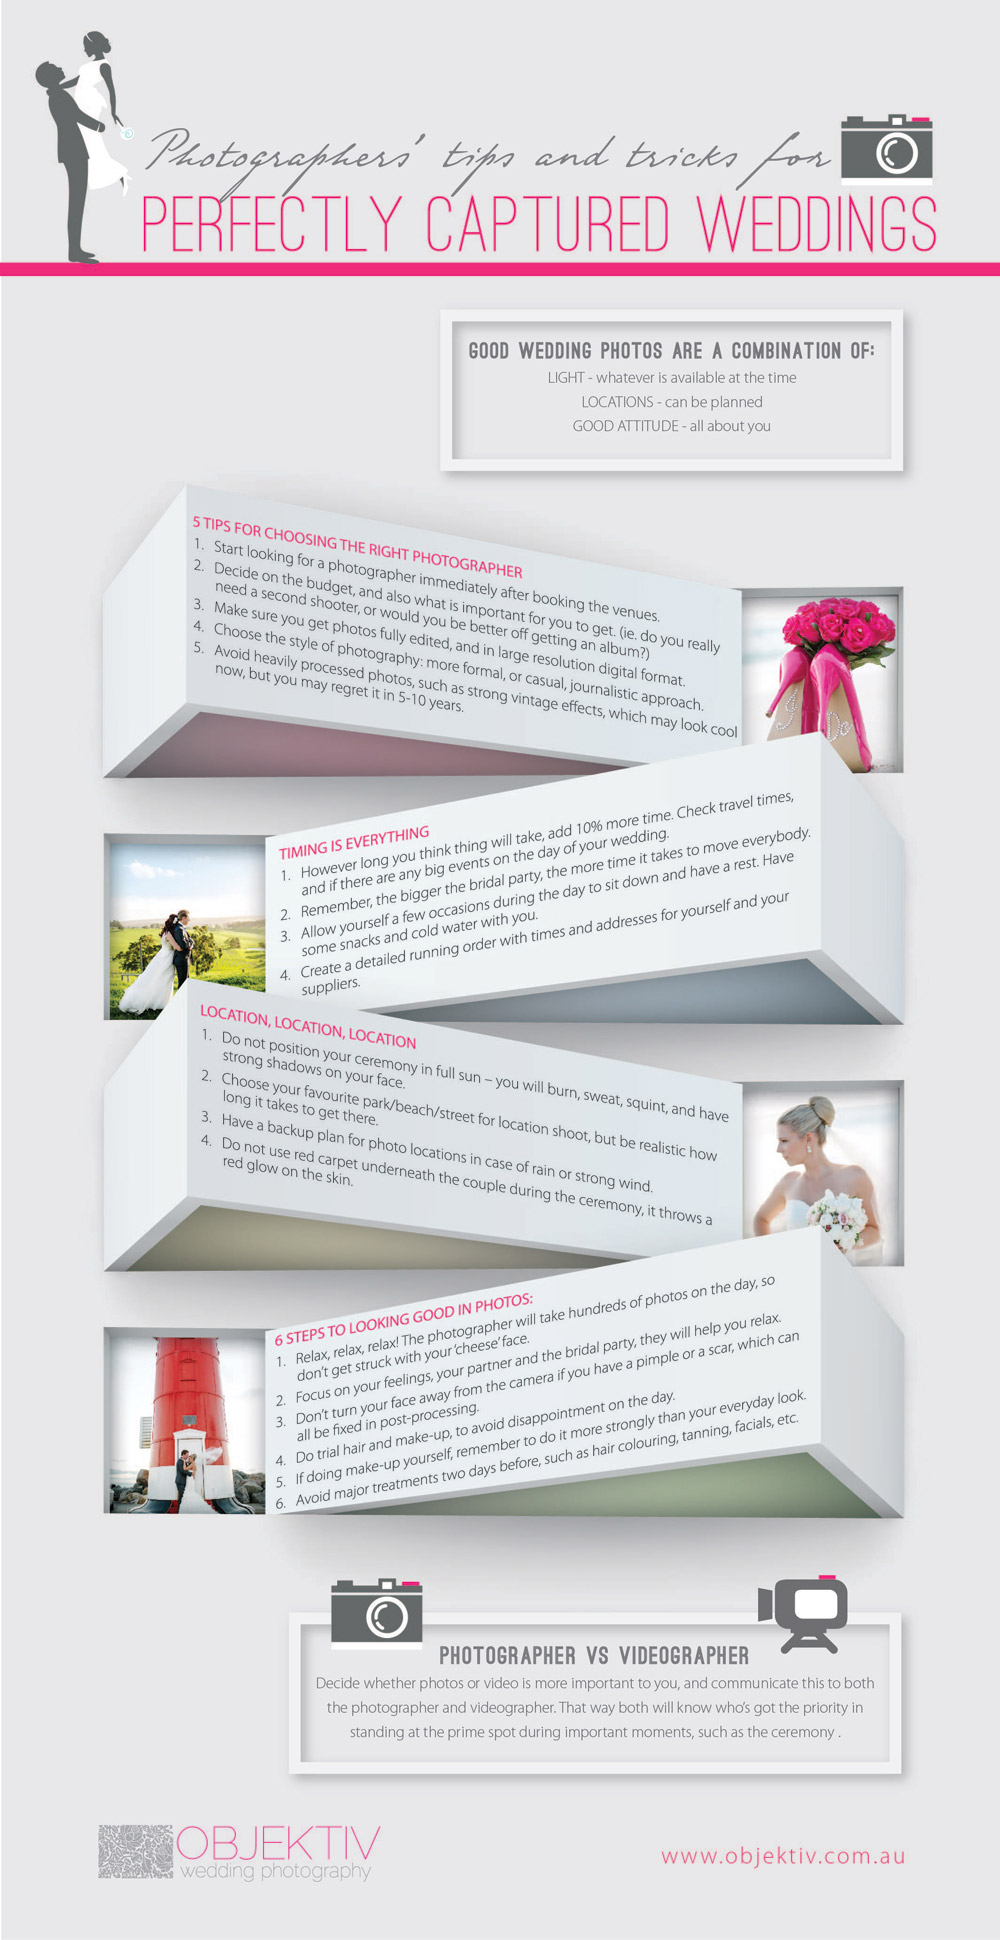
    #6 Capturing Perfect Wedding Photos

    (Click the image to get a larger view of this graphic)

    07-wedding-photos-perfect-full

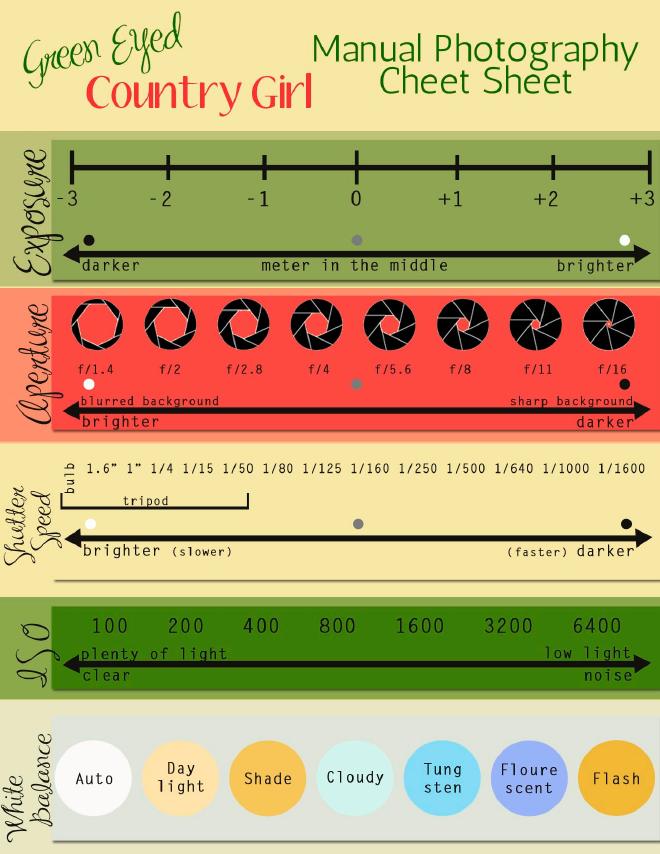
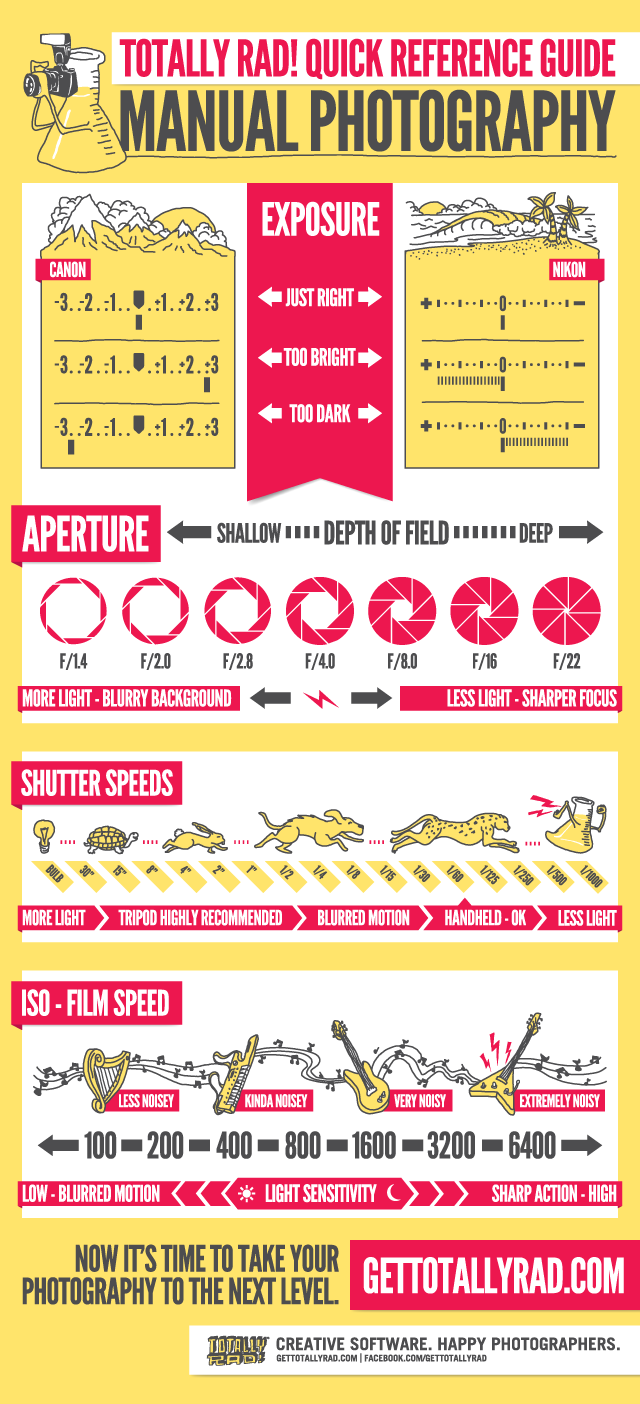
    #7 Manual Photography Cheat Sheet

    (Click the image to get a larger view of this graphic)

    08-manual-photography-full

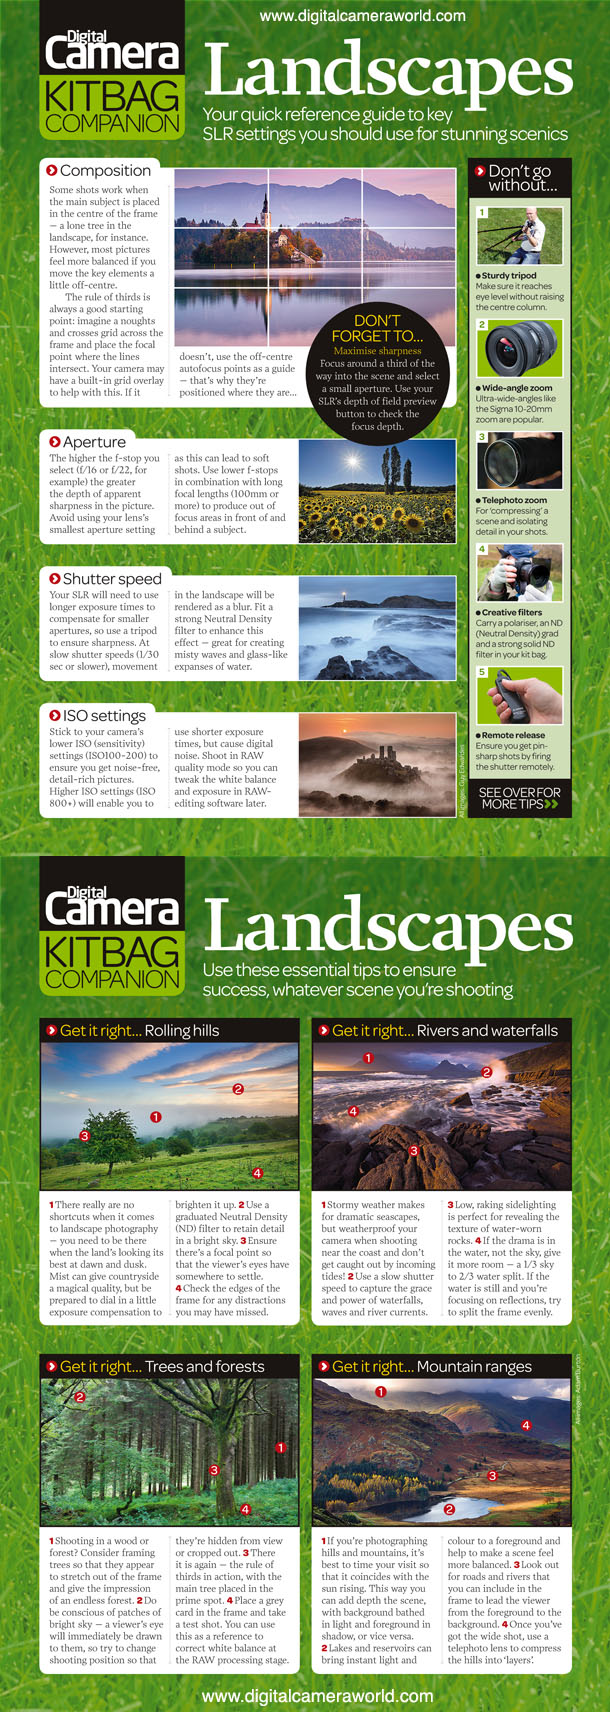
    #8 Landscape Photography Tips

    DCM104.tips_cards

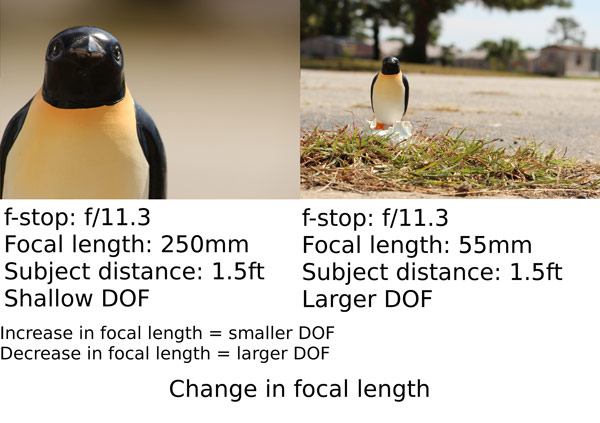
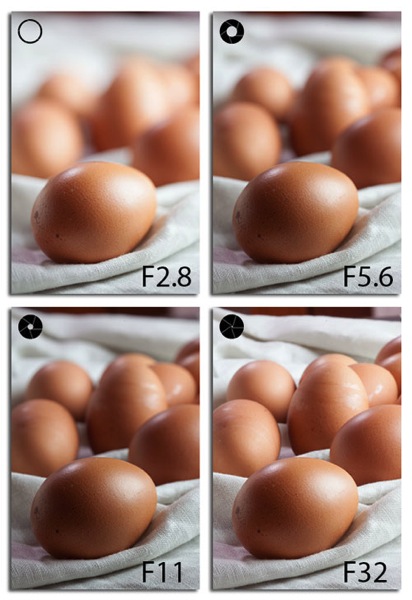
    #9 Depth of field: Quick Memory Cheat Sheet

    (click the link to read the full summary and see all the images)

    10 depth of field

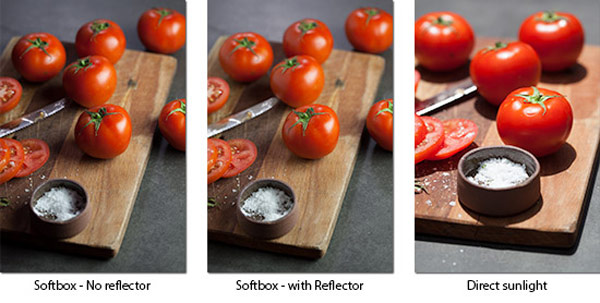
    #10 Food Photography Guide

    (click the link to read the full summary and see all the images)

    11 food photography 01

    11 food photography

    #11 Photography Basics: Metering and Exposure

    (Click the image to get a larger and full view of this graphic)

    12 metering exposure

    #12 Low Light Photography Tips

    low light photography
    Snapsort’s Low Light Photography Infographic – See more at: http://snapsort.com/blog/2011/04/05/low-light-photograph/#sthash.Sqx4QMsQ.dpuf

    #13 Free Printable: Backlight and Sunlight

    Backlight and Sunlight Cheat Sheet www.lightroompresets.com

    #14 Guide to Manual Mode Magic

    (Click the image to grab the PDF Printable file)

    15-m-mode

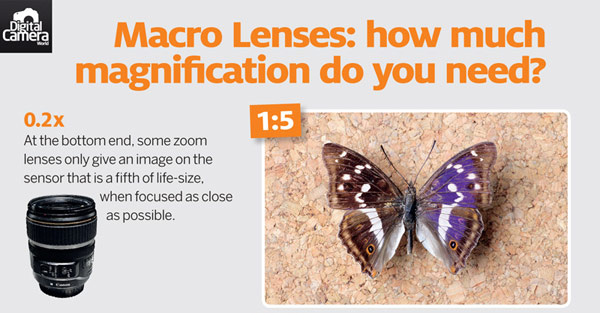
    #15 What is a macro lens? Magnification and minimum focus distance explained

    (Click the image to get a larger and full view of this graphic)

    16-macro-nes

    Any useful resource I missed? Share your suggestions in the comments!

    The post 15 of the Best Cheat Sheets, Printables and Infographics for Photographers by Julia May appeared first on Digital Photography School.


    Digital Photography School
  • How to Get More Referrals Than You Can Handle

    Referrals are an incredibly effective way to build your business and get great clients. Referred clients are often more loyal, consistent, more suited to work with you and they often send more referrals your way. How do I know this?

    By Leo Reynolds

    Referrals work – but have a system

    My partner Nicole and I have gotten 80% of our videography work from referrals. And it didn’t happen by accident, we created a system that ensures we don’t have to go out looking for our next gig. A system that we created at the start to have referral clients reaching out to us with projects they wanted us for. Talk about turning the tables! So now, I’m going to share with you our exact system and how you can implement it right now.

    What to consider before you get started building your referral system

    But before we get into the nitty gritty of our system, there are a few important things you need to consider. Let’s take a look at the questions below; they will help you frame your understanding of our system. Answer these questions before we dive in and you’ll be ready to start implementing this system as soon as you finish reading this article.

    By Stefano Bertolotti

    1. Why would someone send a referral your way?

    Before you begin to ask for referrals, create a list of the benefits your clients experience when they work with you. These are the same benefits a referral client would experience if they worked with you as well. What are the social, emotional and professional benefits that go along with being someone who refers people in need to those who can help? In this case, the referral client is in need and you are the person that can help.

    2. Who would make an ideal referral for you?

    Write down the types of people who make great referrals. Your customers may have no idea whom to refer to you, so make it easy for them to send the right people your way.

    3. Where would a client find a potential referral to actually send your way?

    Write down the places where your referrers would meet or connect with good referrals for you. Your goal here is to help your clients, and other acquaintances, understand who in their lives will benefit most from a referral, and where they cross paths with these people. This makes it easy for the referrer to start thinking of people to refer to you immediately.

    4. How should someone go about sending you a referral?

    Empower your clients to have a simple conversation with a potential referral who will effectively connect them to you and what you do. You absolutely cannot leave this to chance. You must be able to articulate what you do in a way that truly connects you to the people you want to serve. This is absolutely essential.

    Write down how you’d like people to refer their contacts to you. What do you want them to say? Create a short script for them- they’ll thank you for it as you just made things even easier for them. How do you want them to talk about what you do? What specific words and phrases do you want them to use? Get very specific. You decide how you want people to talk about you.

    Just thinking about these questions and writing down your responses is going to put you ahead of most of your completion. Your answers to these questions will play a major role in implementing our getting more referrals system; so take it seriously.

    The four step referral system

    All answered up? Okay, let’s get into the four steps of the referral system.

    At the bottom of this post, there is a link where you can download a checklist that goes along with this system. Go ahead and download it now and I’ll meet you back here once you have it open along with this post.

    Downloaded and opened? Awesome! Let’s get started. This system is broken into four major steps:

    By Shereen M

    Step 1: Know when to ask for a referral

    We recommend asking for referrals at the time of delivery of your project, when the quality of your work, and the experience of working with you is fresh in the client’s mind. The optimal opportunity to ask for referrals during this time is when the client compliments your work or asks you questions about your business.

    Step 2: Know how to ask for a referral

    The actual words you use to ask for a referral is critical to getting the referral you want. This is why we are just flat-out giving you a script you can use when asking for referrals:

    I really appreciate all the positive feedback about my work. I always want to exceed my client’s expectations; it’s actually how I get most of my projects. Most of my work comes from referrals from clients like you.

    Can you take a few minutes today to help me help others with their photography needs? Could you introduce me to three of your contacts that you think might need my expertise? By making these connections, sharing with them how much you enjoyed working with me and how happy you are with the results, I can continue to serve people I love working with.

    Thank you in advance for the introductions and creating the potential for another great experience.

    A few things are being said here in this script.

    1. Your work speaks for itself and is the reason you continue to succeed in your field.
    2. The client understands that giving you referrals is what is expected since that’s how you get most your work.
    3. The client starts to feel important and plays a critical role in creating connections and providing great experiences for others.
    4. The “thanks in advance” assumes that they will actually take action which sets up an expectation. The client understands you expect them to send you some referrals.

    Step 3: Your post referral strategy

    Once you get a referral, follow up with them ASAP. You don’t want to wait too long. Reply the next day at the latest. Many times your client referred them to you the same day they reach out to you. You will want to capitalize on that moment of good will and excitement.

    Also, make sure you circle back to the referrer, thank them and tell them how the project is going. It shows how serious you take your business and they will send you more referrals in the future.

    Step 4: Giving referrals to get referrals

    By Nan Palmero

    Don’t just sit around and wait for clients to send you over referrals after you ask them to. One of the best ways to get referrals is to give them. Who are the other service providers that serve your target market? Make a shortlist of people you can refer to?

    Are you a wedding photographer that can refer a videographer or banquet hall manager to someone? Maybe even a client of yours? The next time you see someone who would be an ideal client for someone else, go ahead and make that referral. If you are giving your colleagues in your target market referrals, chances are they will want to do the same for you in return.

    Final advice

    This is a tried and true system. Use it. The key is to stay consistent and go through the steps of this system every time you have a client.

    Not working with a client right now? You don’t need to wait to put this into practice. Reach out to past clients you haven’t already asked for a referral and use the script above. You can change up the first paragraph of the script with: “I was reviewing some of my past work in my portfolio and was reminded how much I enjoyed working with you as a client. I’m always looking for ideal clients like you to work with.”

    You got this! Don’t hesitate. Use this system and start getting more referral work today.

    Download the checklist

    Remember, there is a nifty checklist that goes along with this getting more referral system. You can download it here!

    The post How to Get More Referrals Than You Can Handle by Omar Zenhom appeared first on Digital Photography School.


    Digital Photography School

  • How to Wake a PRO Photographer in You

    Being a pro, full-time photographer takes courage. You should be pushing yourself out of your comfort zone all the time and do some new things. First things first: Becoming a full-time photographer means that you need to start a photography business. You should try new photography genres you never tried before. You should take photos at new locations. You should Continue Reading

    The post How to Wake a PRO Photographer in You appeared first on Photodoto.


    Photodoto

  • Time-Lapse Photography – a Quick Guide to Building Your Movie

    Time-lapse photography shows you events that occur over an extended period that are captured on camera and shown in a relatively short time.

    Time-lapse imagery is the capture of individual images of a subject at preset intervals over a preset duration. These individual images are then combined using software, thereby compressing the event into a much shorter time span.  If you were to witness an ice cube melting it would take an hour or more. With time-lapse the process from solid to liquid could be seen in seconds.

    What do you need to do time-lapse photography?

    Cameras

    Though point-and-shoot cameras will do the job, digital single lens reflex cameras (DSLR’s) and mirror-less cameras allow for the most flexibility. They not only capture images that are of a higher quality but have features most suitable for time-lapse. In particular, they are capable of manual exposure and focus control. They also have an array of lenses to choose from and all the accessories required for capturing time-lapse sequences.

    Lenses

    All focal lengths are suitable based on the subject you select. A lens that has a manual aperture ring is best as the aperture blades do not open and close for each shot captured.

    Intervalometer

    The key to achieving a great lime-lapse sequence is a good intervalometer. This is a device capable of triggering your camera with accurate intervals and precise shutter actuations. It can be an external or internal device.

    Tripod

    Image Stabilization and Vibration Reduction are good but they are no substitutes for a good tripod for time-lapse photography. Use a solid tripod.

    Batteries and/or AC Couplers

    Because of the long duration of time-lapse sequences, the batteries in your camera may drain out before the sequence is completed. Here are a few tips to help you increase your battery life:

    • The single battery in your camera powers a number of functions. Many of these can be switched off for time-lapse capture or you can decrease their “on-time”.
    • A major drain on the battery is the LCD display and Live View. Use these screens only if it is imperative and then make certain that you lower the brightness using one of the custom functions. Also, limit the preview duration, keeping it to a minimum.
    • Don’t use your camera’s LCD screen for viewing and deleting images. Leave that activity to be performed on your computer after you have downloaded your images.
    • If you are shooting a sequence indoors you can use an AC coupler to power your camera.  An AC coupler is used in lieu of the camera battery.

    Formula for Time-Lapse Capture

    The typical frame rate for movies is between 24 and 30 frames per second. As a guideline, the greater the frames per second the smoother the playback.

    When using a DSLR, you have all the control to create good time-lapse sequences. Selection of shutter speed, depth of field and the interval between shots can be set as desired. Just remember, the faster the movement of the subject or subjects within your project, the shorter the interval between images captured. However, you may be limited in low light situations.

    Here is a guide for intervals:

    1 Second

    1 – 5 Seconds

    15 to 30 Seconds

    3 – 15 minutes

    Air and Road Travel

    Sunrise Sunset

    Moon going across the sky

    Growing Plants

    City Scenes with Traffic

    Crowd Scenes

    Stars and Milky Way

    Home Building Projects

    Bicycle Rides

    Slow Moving Clouds

    A good starting point for any subject matter is to create your time-lapse with a shorter interval than you may think is appropriate. You can always discard alternate or irrelevant images from your final sequence if you want to speed up the action.  For example, if you decide to use a 30 second interval for a moon sequence, but want to be sure that the final sequence will be smooth, shoot at 15 second intervals. You can get back to your original plan by removing every alternate image for the final sequence.

    Prepare your images

    Using any software editing program, crop or size your captured images to a width of 1920 pixels and a height of 1080 pixels for a 1080p HD video (use 1280 pixels by 720 pixels for 720p video). Make sure your crop registration is identical for all the images.  If you are not comfortable doing this, use the automatic resizing provided by most time-lapse assembly software.

    Now that the images of the sequence are ready, you can use one of the many free applications for Windows and Mac operating systems to create your video. Some of these are VideoVelocity from CandyLabs, Photolapse from Stephan van der Palen and Time-Lapse Assembler created by Dan Bridges. For under $ 30 Apple Quicktime Pro 7 can be used to create some excellent time-lapse video.

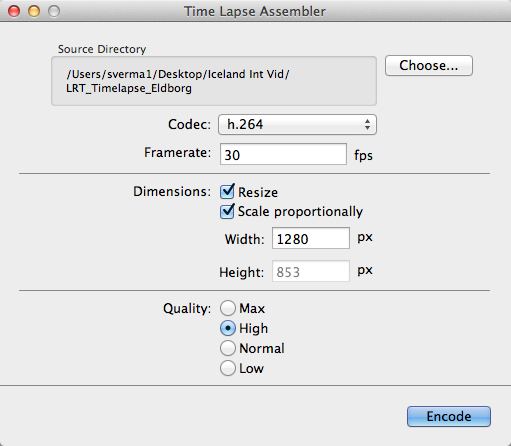
    How to use Time Lapse Assembler for Mac

    tla-1

    1. Open Time Lapse Assembler
    2. Select the directory that contains the image sequence
    3. Select the codec. Use h.264 or mp4v for making .mov files or mp4v for making .mp4 movies
    4. Leave the frame rate at 30fps
    5. Set the dimension to resize
    6. Scale proportionately
    7. For HD video you can adjust the width to 1920 or 1280 (1920 for 1080P video and 1280 for 720p video)
    8. Select Quality High (you can always use Max but the rendering will take longer
    9. Click on Encode
    10. You will be presented with a Save window. Name your sequence and click Save.

    tla-2

    The software will produce a Quicktime compatible movie file that can be viewed as is, or used for further editing in iMovie or any other video editing software.

    See below an example of the video in very low resolution:

    Here are the steps for Quicktime Pro 7

    1. Open Quicktime
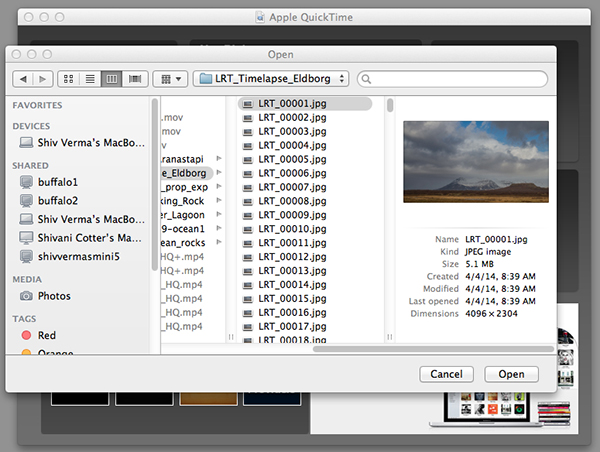
    2. Go to the menu and under File – click on Open Image Sequence. Go to the directory where you downloaded your images (make sure you have only the images that belong in the sequence in this folder)
    3. Click on the first image of the sequence and click Open

      Select the Sequence

      Select the Sequence

    4. You will be presented with a choice for picking your frame rate – use 30 frames per second for a smooth sequence. Now click OK
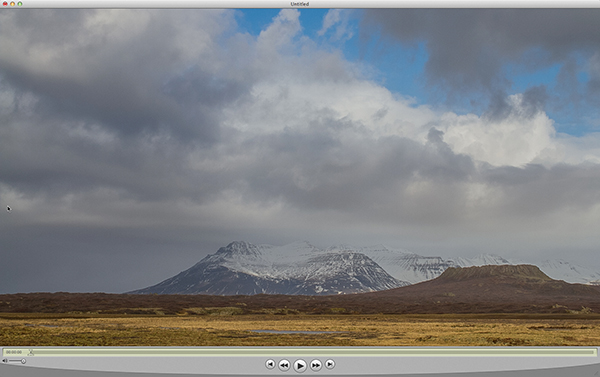
    5. Quicktime will import all the images in that folder and assemble them in their original sequence and at their original resolution. You probably will not be able to see the entire image as it is larger than the resolution of your screen but you can go to the Menu>View>Fit to Screen. You now have the first frame visible in its entirety.
      Assembled Sequence

      Assembled Sequence

      If you attempt to play this sequence you will not see the movie as you might like it to be. It will not be smooth and may pause for long periods. This is because the individual frames are very large and the video has not been rendered for playback.

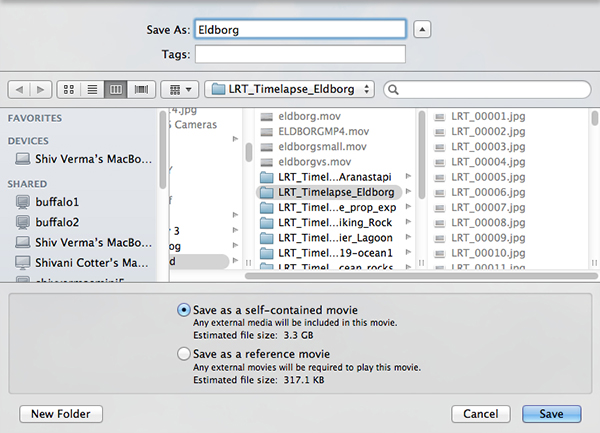
    6. Save this sequence File>Save
    7. You will be presented with options as to where you would like to save the Quicktime file.
    8. Save the file in the same directory as the original images and name the file

    The next steps will render a viewable video

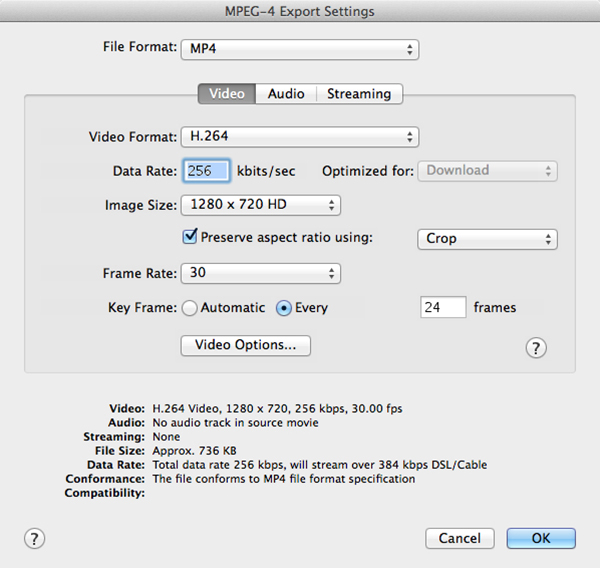
    1. You will export this sequence File>Export
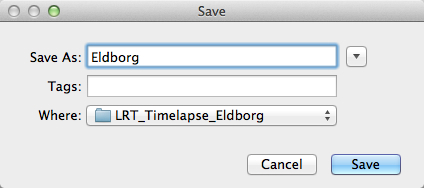
    2. You will get the typical “Save As” option and the “Where” option. Save the export in the same folder as the original files giving it a pertinent name.
      QT-3
    3. There are two other sets of export criteria and an options button. For now, export the sequence as a QuickTime Movie and in the Options Section use H264.
      QT-4
    4. The export will take some time so be patient. Once the rendering and export is complete you will be able to watch the video. 

    Have fun making your time-lapse – enjoy!

    The post Time-Lapse Photography – a Quick Guide to Building Your Movie by Shiv Verma appeared first on Digital Photography School.


    Digital Photography School

  • 6 Commonly Used and Confused Tools in Photoshop Explained

    There are lots of tools in Photoshop that are sometimes a bit confusing due to the similar nature of their functionality. With subtle differences, these tools have been a topic of confusion between a lot of Photoshop enthusiasts. In this article I am going to share a distinction between Fill and Opacity, the Healing brush and Stamp tool, and “Merge Visible” and “Flatten image”. I hope it will help you one understand these tool a little better.

    Distinction

    Fill versus Opacity

    Both Fill and Opacity control the transparency of a layer. They work exactly same except for the layer styles. When you reduce the percentage of opacity the layer starts to get transparent and at 0 % the layer is completely invisible, even if layer styles likes drop shadow, stroke, inner glow etc., are applied. Where as, if you reduce the fill, the layer starts to get transparent, but layer style stay the same. Keeping it simpler:

    Opacity = Takes away both layer content + layer style

    Fill= Takes away only layer content – but leaves the layer style as it is

    Additionally there are eight blending modes that react differently with Fill and Opacity. These are called special eight groups. These 8 blending modes are Color Burn, Linear Burn, Color Dodge, Linear Dodge, Vivid Light, Linear Light, Hard Mix, and Difference. When these blending modes are applied, the 50% Fill will have different effect than 50% Opacity.

    The below images should help you understand the concept better.

    Opactiy 100 fill 100

    I added text and then applied two layer effects, outer glow and a drop shadow. Opacity and Fill both are both at 100%

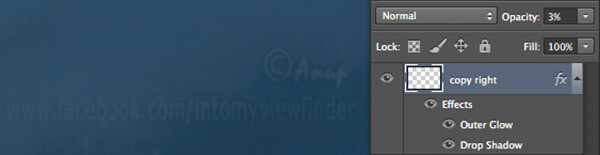
    Opacity 3 fill 100

    Now I have reduced the opacity to 3 percent, you can see the layer is almost invisible. If I reduce the percent to 0%, the layer would be completely invisible.

    Fill 0 opacity 100

    Now, I have changed the Opacity back to 100% and reduced the Fill to 0%. You will see, the layer content became transparent, but the layer style remains the same.

    Healing Brush versus the Stamp Tool

    Healing brush captures the texture of the area you sampled and blends with the color tone of the area you are painting. Another option: Spot-healing brush is more like content aware. It analyzes the texture around the brush and fills in the center, blending with the color tone.

    Stamp tool is more like a copy and paste. It copies the area you sampled and pastes over the area you are healing.

    So when is each tool will be most appropriate to use?

    I mostly use the Healing Brush whenever I have to remove the blemishes of the skin, remove the mark or any texture (pimples, wrinkles) but like to have the same natural skin color tone. This helps my image remain evenly colored.

    I use Stamp tool, when I want to remove something from image. For example, if I want to remove the hanging clock on the wall, light bulb or anything whose both texture and color both need to be removed.

    Below is an immage of skin with blemishes. I used Healing Brush to remove the pimple by sampling a clean area and painting over the blemish.

    Pimple2 copy

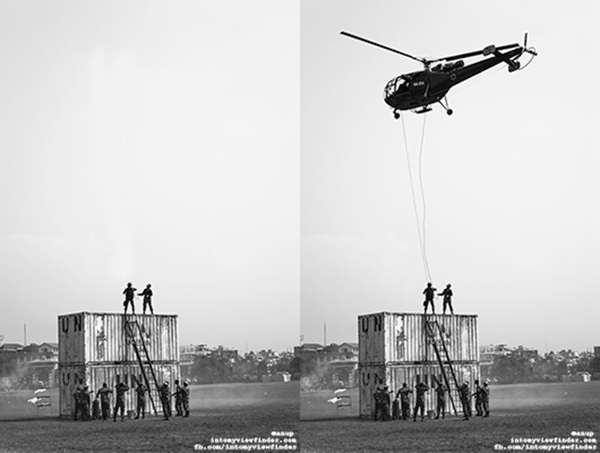
    Here in the image below I have used the Stamp Tool to remove the helicopter. This is the after and before version of an image.

    Compositional balance

    Merge Visible versus Flatten Image

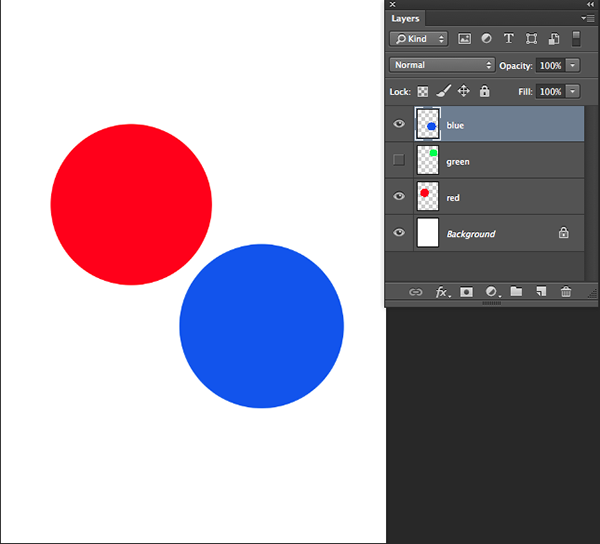
    This is a very simple technique we regularly use whenever we work in layers, but a lot of photographers are still confused about the distinction between these two options. If you are working with multiples layers and apply Merge Visible, only layers will be merged which are visible or with eye icon turned onon. Where as Flatten Image merges all layers together, discarding the invisible layers.

    The images below should help you understand better:

    3 layer with one hidden

    I created three layers with only two currently visible (blue and red)

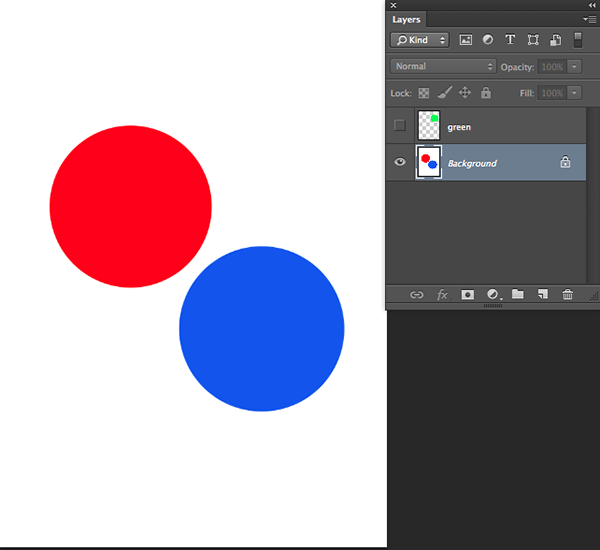
    Merge visible

    Apply Merge Visible by going to: Layer> Merge Visible

    Merge visible applied

    You can see that only the visible layers have been merged, leaving the hidden layer alone. Now we will apply Flatten Image.

    Flatten image

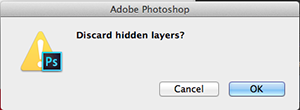
    If there are any hidden layers when you apply Flatten Image, you will get this dialog box:

    Discard hidden image

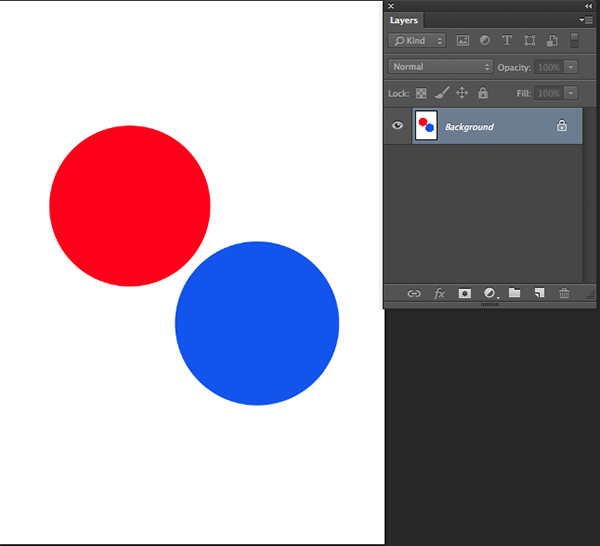
    Now if I click OK in the dialog box, the hidden layer will be deleted and all visible layers will be merged like this:

    Flattened image applied

    Have you used these tools before? If you’ve had some confusion over the subtle differences I hope that has helped clear that up. Please share if have any questions or comments on these tools.

    For more Photoshop tips and tutorials see here.

    The post 6 Commonly Used and Confused Tools in Photoshop Explained by Anup Ghimire appeared first on Digital Photography School.


    Digital Photography School

  • 3 Tips for Taking Great Cloud Photos

    You may already have your own method of effectively shooting cloud photos. If so then you understand that conditions may vary greatly. Some days, your photos may turn out happy and light. On other days they may turn out dull and grey. However, there are at least three techniques you might consider in order to capture better sky and cloud photos.

    Shoot when the sun is brightest and cloud movement is dynamic

    01 DSC 1788

    The best time to photograph an epic cloud shot is when the sun is at its brightest and is directly appearing and disappearing from behind the clouds. The above photograph was shot on a day in Prague when the clouds were particularly dynamic. It was windy so the clouds kept hiding and revealing the face of the bright sun.

    Below is an example of why shooting when the sun is directly behind the clouds may be more compelling. Although the clouds in the photo below are interesting, the result is not as mysterious or as epic in my opinion as the one above. This is of course a matter of personal preference. Be patient, observe the situation and find out, which you like better.

    02 DSC 1838

    Wait for sunset to capture vibrant colors

    03 DSC 8130

    Many different techniques come into play when you want to photograph sky and clouds of different colors, but one of the more important factors to consider is the time of day. Sunset is the easiest time to capture vibrant colors. The reason is that as the sun goes down on the horizon, the sky and clouds will take on various hues of pink, orange, yellow and blue. The above photo was shot in Los Angeles where the sunset colors change every few minutes. At first, the clouds turned a bright orange and yellow.

    Compare this to the photo below, where just a few moments later, some of the clouds cleared, the sky became a lighter blue and the remaining clouds turned reddish pink.

    04 DSC 8135

    By shooting clouds during sunset you will be able to capture a variety of unique colors.

    Shoot on a tripod and bracket exposures to produce different moods

    If you’re shooting with a DSLR, I recommend using a tripod and taking multiple photos in “Auto bracketing mode” or “Auto exposure mode”.

    First, set your camera to Aperture Priority and then turn on Auto bracketing (AEB). It’s best to set your bracket exposures to -1, 0, and +1. This will give you three pictures of the clouds at various exposures. The three photos below were shot at -1, 0 and +1 exposures. Notice how distinctive they are in terms of mood.

    05 DSC 8164

    This image was shot at -1 has a dark and sinister mood.

    06 DSC 8162

    This photo, shot at 0 exposure, has a serene mood.

    07 DSC 8165

    Lastly, this image, shot at +1, has a light mood.

    If you prefer, you can combine all three to create an HDR photo, which aggregates all the details from the different exposures. You may then edit the HDR photo to produce a photo with your own desired mood.

    What other tips can you think of for shooting great cloud photos?

    Do you ever shoot during thunderstorms? What’s the best cloud photo you’ve ever shot, and in what conditions? Share with us some examples and of course, if you have any other tips for great cloud photos that you think I’ve missed, please share those as well.

    The post 3 Tips for Taking Great Cloud Photos by Ry Sangalang appeared first on Digital Photography School.


    Digital Photography School

  • Infographics 101: How to Take A Great Selfie Like a Master

    We all know the obvious, selfies are here to stay! So why not make the best out of them? Shutterfly’s guide offers tips on how to capture a great selfie that’s worth sharing. It teaches you everything from how to find the best lighting to giving your picture that little extra oomph before posting. Follow these tips, capture your selfie, Continue Reading

    The post Infographics 101: How to Take A Great Selfie Like a Master appeared first on Photodoto.


    Photodoto