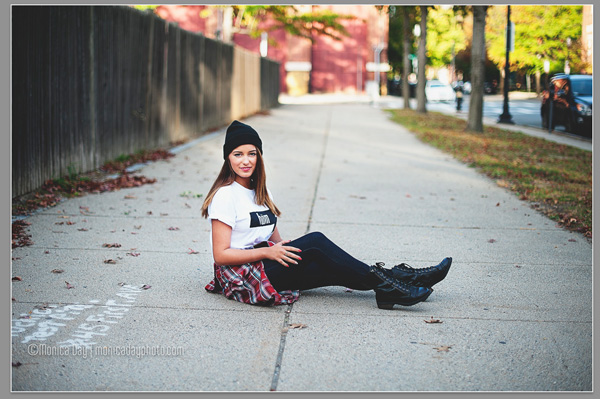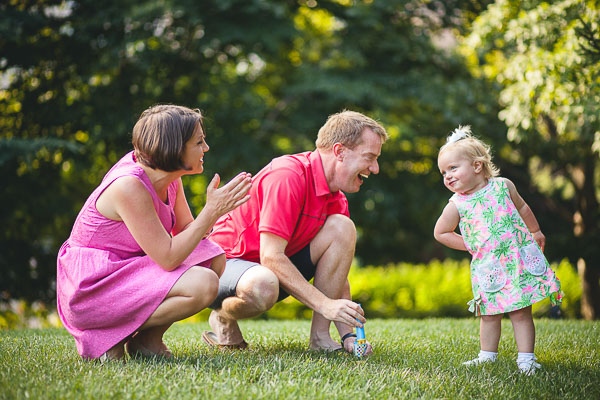
Category: Photography

  • New: The dPS Guide to Portrait Post Production and Workflow

    Our Exciting News in a Nutshell

    Today I’m excited to announce the launch of a brand new eBook – Portraits: After the Shot – a Guide to Portrait Post Production and Workflow by Gina Milicia.

    It’s available for a limited time with an early bird bonus of a collection of great Lightroom and Photoshop presets. Get your copy here.

    The Story So Far

    • In January 2013 we released our first Portrait Photography eBook by Gina Milicia – Portraits: Making the Shot – a fantastic overview of taking beautiful portraits with soul.
    • In September 2013 we released Gina’s second eBook – Portraits: Lighting the Shot – a guide to lighting portraits with both natural and artificial light.
    • In January of this year we added to Gina’s library of eBooks with a 3rd – Portraits: Striking the Pose – an eBook all about working with your portrait subjects to get natural looking portrait poses.

    Portraits ebooks

    To say Gina’s first 3 eBooks have been popular would be a gross understatement. They’ve each outsold the previous one and have received fantastic reviews from many of our readers.

    But we’re not finished yet. So far Gina has focused her eBooks on taking beautiful portraits. Here at dPS we’re big believers in getting the best photo you possibly can in-camera – but we also know there’s a lot you can do after you take the shot.

    It’s for this reason that we’ve been working with Gina over the last 6 months on a new edition to this wonderful little collection of eBooks and today can introduce to you… Portraits: After the Shot

    Portraitspostproduction

    This eBook is all about giving you the confidence and skills to work with the portraits you take and bring them to life using the wonderful tools available to us today.

    Inside Portraits: After the Shot you’ll discover topics such as:

    • The fundamental rules of portrait post processing
    • How keeping your processing simple can be much more profound
    • How to develop your own post processing style
    • All the gear you’ll need to support your processing
    • Storage and backup solutions
    • Detailed run though of Ginas exact workflow
    • Lightroom fundamentals and shortcuts
    • Lightroom ‘go to’ recipes
    • Photoshop essentials and recipes

    There’s much more too.

    See the full table of contents, some screenshots from the eBook and learn more about the early bird bonus here on our Portraits: After the Shot page.

    For those of you who’ve not invested Gina’s previous eBooks you’ll also find a great bundle deal that gets you 38% off the full collection!

    The post New: The dPS Guide to Portrait Post Production and Workflow by Darren Rowse appeared first on Digital Photography School.


    Digital Photography School

  • Five Things You Need to Know Before Starting a Pet Photography Business

    Pet photography is a fast growing and super fun genre of photography, and it’s awesome to see so many people wanting to celebrate animals and the role they play in our lives! But how do you turn your passion for animals and photography into a thriving and successful business? What do you need to consider before setting up your business? Today I’m sharing the knowledge I’ve gathered over the last three years to help you prepare yourself for what is the best job in the world.

    Image Nine

    #1 Do you really love animals?

    Pet photography is messy, dirty, and at times incredibly frustrating work. You need to be comfortable with being jumped on by Great Danes, pawed by pugs, and scratched by cats. You need to be happy crawling through the mud, and bending and stretching at weird angles.

    Image Six

    This was shot lying on the wet ground on a freezing cold morning – but totally worth it!

    You also need to be exceptionally patient. Often at the start of a shoot your subject will spend about half an hour running around like crazy, and jumping all over the place before finally calming down enough for you to photograph. You also need to accept that you will never have that much control over your subject – try telling a puppy to sit still and tilt his head 45 degrees!

    At some point, your camera equipment will get covered in drool, your shoes will get peed on, and you will end up ruining several pairs of pants. So if you don’t really, truly, love animals, you are going to find the whole process miserable and give up very quickly.

    #2 Is there a market for it?

    I am lucky enough to live in a city (Melbourne, Australia) that has the highest rate of dog ownership in the country. People here absolutely adore their pets. There are high-end pet stores, hundreds of dog friendly cafes and parks, and so many Pet Expos that I have lost count. But that’s not always going to be the case for your area, so do your research. Some good things to find out are:

    • What’s the rate of pet ownership? Your local council is a good resource.
    • What is the general attitude towards pets? Do people see dogs as “just dogs” or are they part of the family or substitute children?
    • Are there lots of pet friendly cafes, restaurants, and parks? What are the pet shops in your area like? Do they sell just the basics or are they a bit fancier?
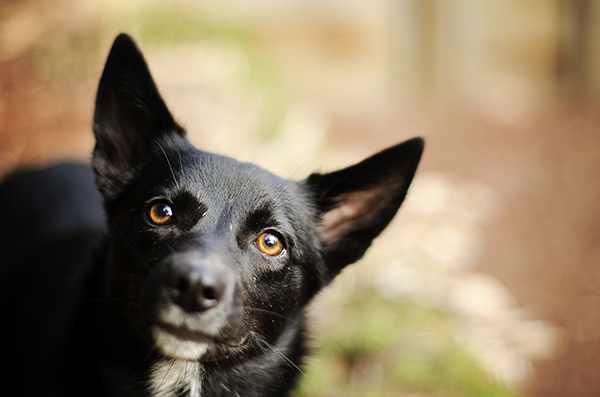
    Image One

    Kimbo is most definitely part of the family.

    It’s also a good idea to factor in things like the amount of disposable income the average pet owner has, and the general cost of living. One really handy tip – if the area you are in isn’t particularly pet friendly, focus your marketing on areas further afield.

    #3 Do you have the right equipment and know how to use it?

    Pet photography is similar to sports and wedding photography in the sense that if you miss a moment, it’s not likely to be repeated. We all know that equipment doesn’t make the photographer, but at a minimum you want to have a DSLR, prime lenses that autofocus (the 50mm f/1.4 is a great place to start), a good quality zoom lens, high-speed memory cards, and an speedlight you can use off-camera if necessary.

    Image Two

    Proof that with the right equipment, you can make it look as if a puppy is standing still.

    Get to know your equipment back to front before you start charging for your work. Figure out how to change your shutter speed, aperture, and ISO without looking, and know how to change your lenses quickly. Some of the best shots come without warning, and if you’re staring at your camera wondering why something isn’t working, you’ll miss the shot.

    As you know, practice makes perfect, and the only way to get really good at photographing pets and knowing your equipment is to find the most badly behaved animals you can and shoot, shoot, shoot. There’s no point in using well behaved, well trained dogs, because there are so many that aren’t. You know the friend who has a dog that jumps all over the furniture and runs in circles constantly? The friend with the cat who hates everyone? Practice with these sorts of pets and your camera will become like an extension of you before too long.

    #4 What’s your style?

    You know you’ve made it as a photographer when people can pick out your work from a line up. Having a distinct style is so important for setting you aside from the crowd. Here are some things to consider to help you find your style:

    Are you a natural light or a studio photographer?
    Do you like clean, clear backgrounds that don’t distract from the pet, or do you like contrasting backgrounds that add to the photo?
    Do you like posed shots or natural?
    How do you feel about styled shoots? Using props?
    Do you want a soft or high contrast feel to your shots?
    Do you like obvious post production or a more subtle approach?
    Do you want to incorporate the pet owners in the shots?

    When I started my business, I saw a gap in the market for really beautiful, shallow depth of field shots of pets. I also happen to love shooting with my lenses wide open, so that became my style. It has been refined over the years, but people hire me because they want beautiful, close up, emotive shots with a sense of warmth and humour to them. I only shoot in soft natural light, no direct sun, and I don’t do high action shots such as agility shows. I also very rarely photograph people with their pets, because it’s not my thing.

    Image Four

    Props can be an awesome way to bring a bit of humour to your shots.

    Remember – do what you love and what feels good for you. Copying another photographer’s style is a waste of time and won’t help you grow.

    #5 How are your animal handling skills and knowledge?

    This is such an important thing to consider before you start your business. Safety (both yours and your subject’s) is extremely crucial. At best, you can be opened up to a law suit, at worst, you could seriously injure or kill someone’s pet.

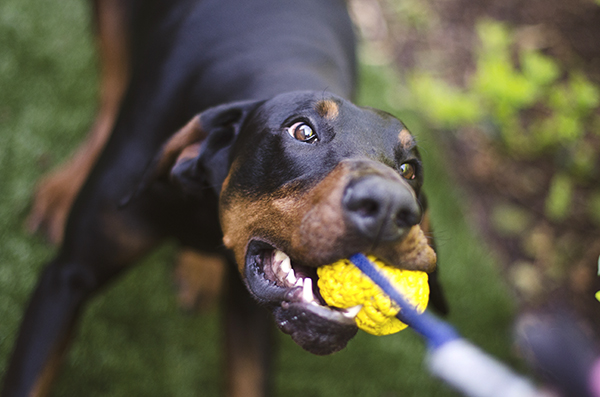
    Image Eight

    When you’re dealing with 40 kilos (88 pounds) of Doberman, you want to be confident with your animal handling skills.

    Be honest with your skill level. For example, I have grown up and volunteered around cats my entire life, and I’m very comfortable with them. I also know their body language, signs of stress, and how to play with them properly. But I didn’t know nearly as much about dogs. I volunteered for a shelter walking dogs, taking photos, and doing general handling, which helped me a huge amount. I also did some basic dog handling courses, as well as reading up on different breeds and their personalities. I’m now at the stage where I’m 100% comfortable dealing with all breeds and sizes of dogs.

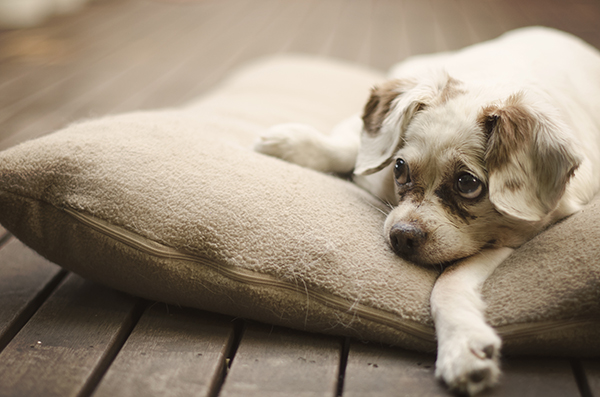
    Image Three

    Ellie is fourteen years old, so I was very mindful of her range of mobility. She was happiest lying on her bed, so I shot around this rather than forcing her to stand up.

    Even if you grew up with dogs, it’s a great idea to read up on the different breeds and their traits. This will help you so much when you are shooting, and by knowing what makes a certain breed tick you’ll be able to produce some great pictures.

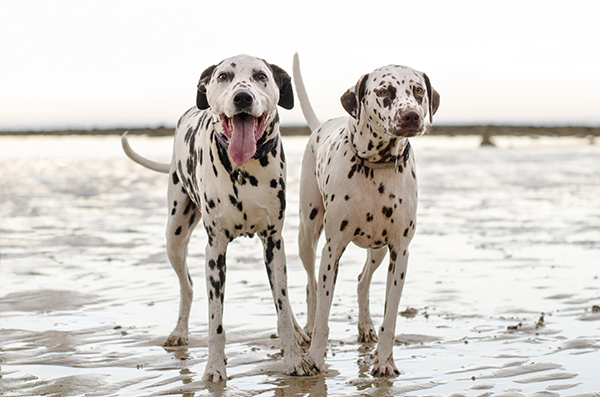
    Image Five

    Ralph and Gidget were on lead for this session, and the leashes were removed later in Photoshop. We had so much more fun knowing that there wouldn’t be any unforeseen accidents.

    Unless you’re shooting in a fenced in, off-lead area, it’s better to be safe than sorry and keep the dog on a long lead. That way you avoid any accidents, and you can always edit leads out later in Photoshop (a big secret of pet photographers). Never, ever force a dog or cat to do something physically uncomfortable.

    Lastly, one final safety tip – always talk to the owner BEFORE you start shooting. Find out as much as you can about their pet. That way, if certain things terrify or stress them, you know what to avoid. Always check for food allergies before offering treats!

    Image Seven

    Did someone say treats??

    I hope that this article has given you some things to consider – and most importantly, don’t forget to have fun!

    The post Five Things You Need to Know Before Starting a Pet Photography Business by Erin McNulty appeared first on Digital Photography School.


    Digital Photography School

  • How to do Quick and Easy Curves Adjustments in Photoshop

    Photoshop-make-adjustments-using-the-curves-dialog-opener

    When you are starting out learning to edit in Photoshop there are a lot of tools from which to choose. The Curves Adjustment is one of the more advanced tools, so it often overwhelms new users. However it is such a powerful tool that it is well worth investing some time learning to use it. In this article I’ll explain what you can understand about your image from the Curves dialog and how to use curves to edit your photos.

    Creating a Curves Adjustment

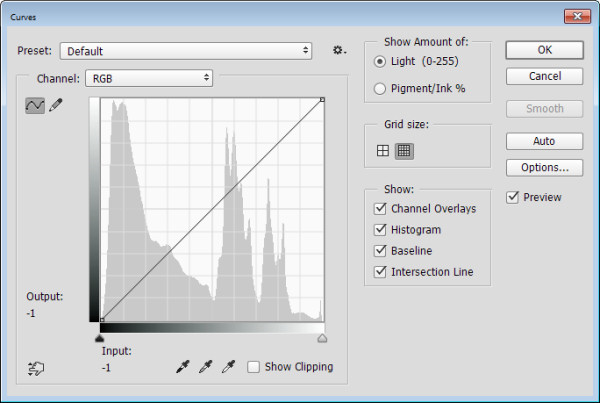
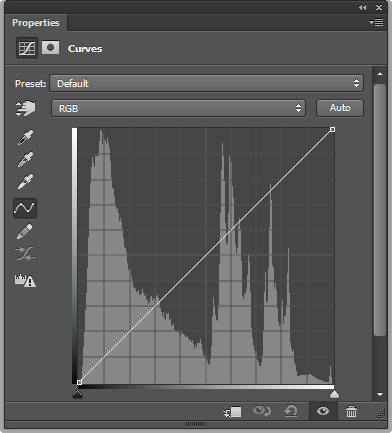
    You can get to the Curves dialog in two ways; by choosing Image > Adjustments > Curves or you can add it as a new adjustment layer by selecting Layer > New Adjustment Layer > Curves. In each case the dialog is a little differently laid out but the same features are available.

    This is the curves dialog you see when you choose Image > Adjustments > Curves:

    Photoshop-make-adjustments-using-the-curves-dialog-1

    And this is the Curves dialog you see when you choose Layer > New Adjustment Layer > Curves:

    Photoshop-make-adjustments-using-the-curves-dialog-2

    In this article I’ll focus on the Curves Adjustment Layer dialog because when you edit a photo using Adjustment Layers you can come back later and remove the adjustment or fine tune it. It would be more difficult to do this if you were to apply the effect directly to the image. In addition an adjustment layer has a mask that you can use to remove its effect from selected areas of the image. In short, using a Curves adjustment layer is a non-destructive editing technique.

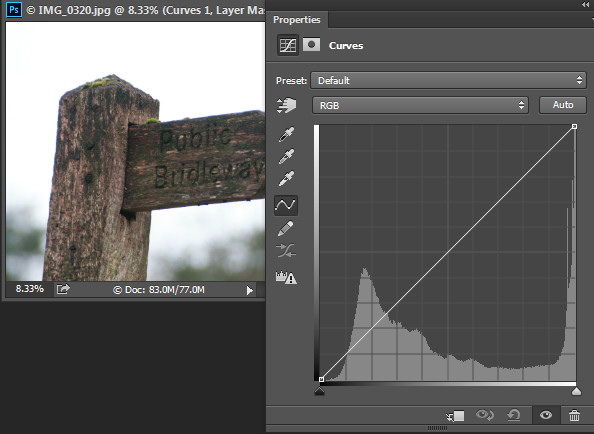
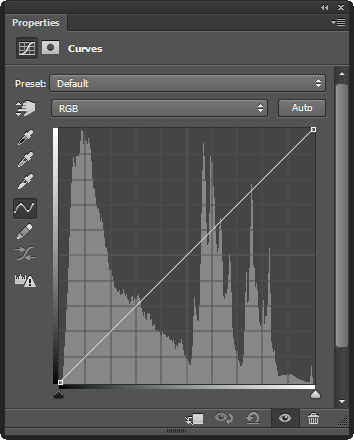
    When you open the Curves dialog you’ll see a chart – called a histogram – beneath the curve line (you must be using Photoshop CS3 or later to see this). The histogram is a plot of the brightness of every pixel in the image so it is an indication of the image’s tonal range. The darker pixels are plotted on the left and the lighter pixels on the right.

    Photoshop-make-adjustments-using-the-curves-dialog-3

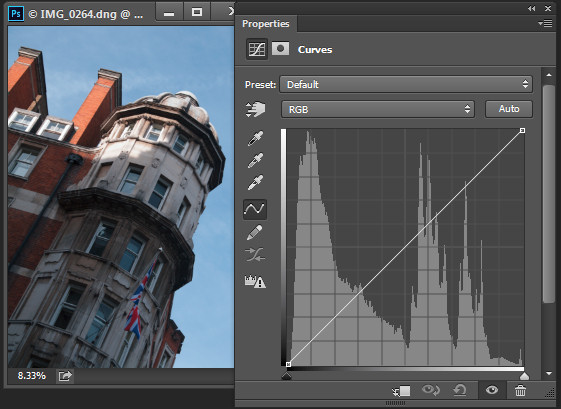
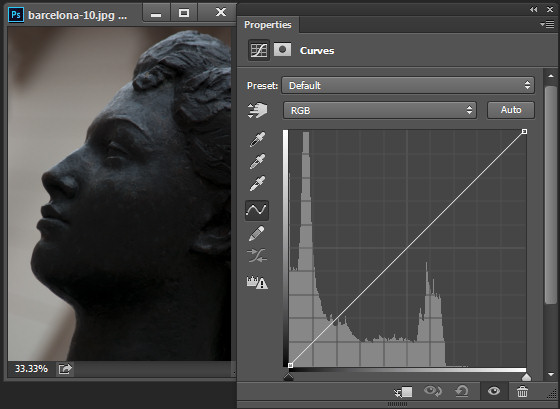
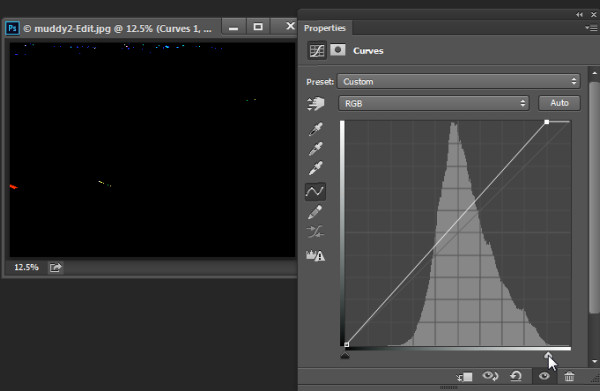
    Ideally the histogram should stretch between the left and right side of the grid without bumping up heavily against either edge. If the histogram is hard up against the left edge of the grid as in the following example, the image is underexposed so the image contains plugged up shadows where detail has been lost.

    Photoshop-make-adjustments-using-the-curves-dialog-4

    On the other hand, if the histogram is jammed up against the right side of the grid, the image contains blown out highlights. It is overexposed and some detail has been lost in the highlight areas.

    Photoshop-make-adjustments-using-the-curves-dialog-5

    Plugged up shadows and blown out highlights may be difficult, if not impossible to recover, particularly if you capture images as jpeg files. If you capture in a raw format you have a better chance of recovering detail in these areas because more data is retained in the raw file.

    Setting the White and Black points

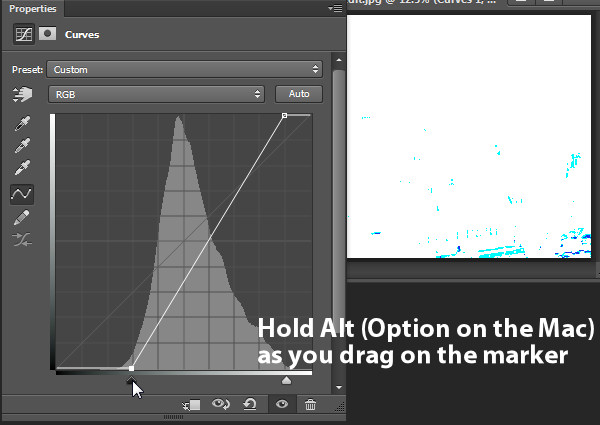
    If the histogram does not reach either edge of the grid then you will have an image that lacks either blacks, whites, or both. Hold the Alt key (Option key on a Mac) and drag each triangle marker underneath the histogram to move them inwards so they appear just under the point where the first white or black pixels are located in the chart.

    Photoshop-make-adjustments-using-the-curves-dialog-6

    Holding the Alt or Option key ensures that you can see the pixels change on the image as you are adjusting them. Adjust the markers under the chart until you only just see a few white and black pixels in the image (as seen above as areas that are light or a color).

    Photoshop-make-adjustments-using-the-curves-dialog-7

    Remove a Color Cast

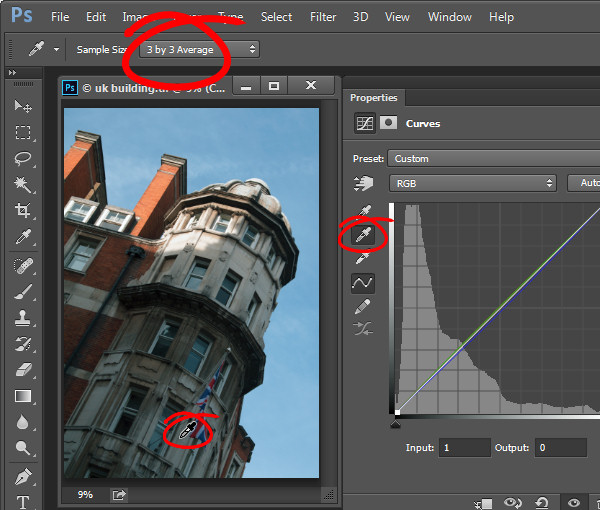
    The Curves dialog also has an eyedropper that you can use to remove a color cast from the image. Click the middle of the three eyedroppers to set a grey point by clicking on an area of the image which should be neutral grey. If the color under the eyedropper isn’t neutral (if it’s Red, Green and Blue values are not equal) then Photoshop will adjust the image to make the color neutral – effectively removing the color cast. You can click repeatedly on the image until you find a place that gives you a good result. It is advisable to set the sample size on the tool options bar to 3 by 3 Average before you sample a gray point so that your sample is more than just a single pixel.

    Photoshop-make-adjustments-using-the-curves-dialog-7a

    Adjusting the Curve

    The standard curve is actually a straight line running diagonally across the grid from the bottom left to the top right of the chart. This straight line is equivalent to no adjustment at all so, by default, the Curves adjustment does nothing to the image.

    Photoshop-make-adjustments-using-the-curves-dialog-8

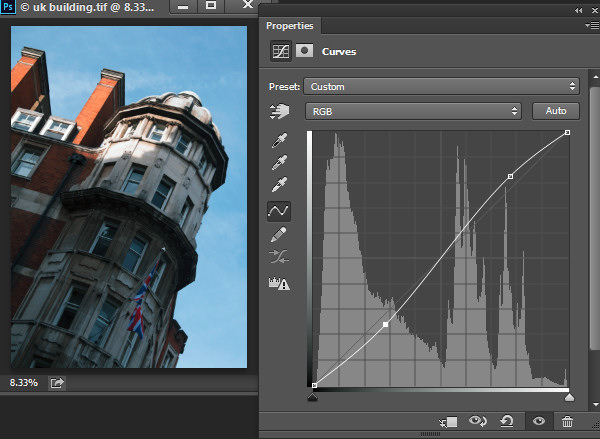
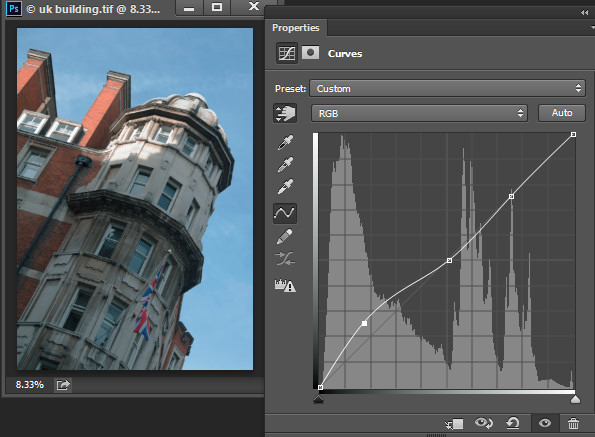
    You can adjust the Curve line a couple of ways. One option is to click and drag on the line in an upward or downward direction to adjust the pixels of that tone in the photo. One adjustment that you can perform using this technique is to drag the line into what is often referred to as a shallow S-curve.

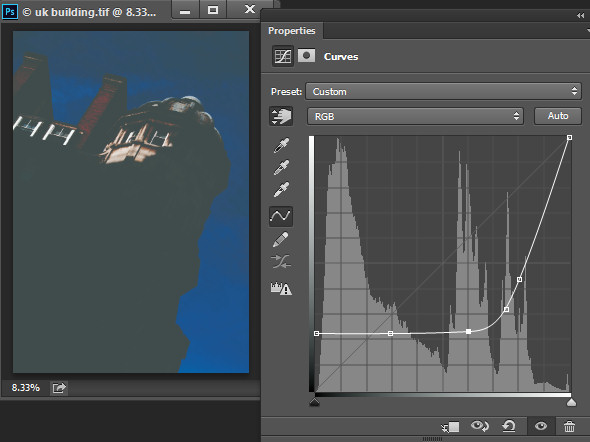
    To do this, click and drag the line down on the left side of the grid and drag the line slightly up on the top right of the grid. This adds additional contrast to the image mid-tones – because anywhere that the curve line is steepened, you add contrast and anywhere it is flatter you reduce the contrast. By dragging the line into a shallow S-curve you’re steepening the line through the area in which the image mid-tones are located increasing contrast in those tones.

    Photoshop-make-adjustments-using-the-curves-dialog-9

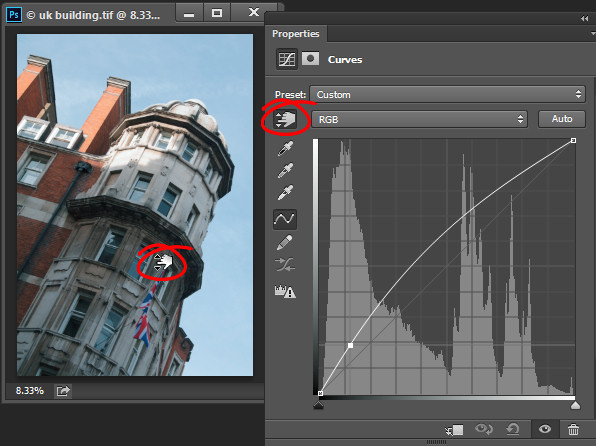
    You can also adjust the curves line by clicking the onscreen adjustment tool and then drag on an area of the image that you want to adjust. Drag upward to lighten the tones represented by the pixels under the eyedropper, and drag downward to darken them. Notice that you aren’t just adjusting the area around the point where you are dragging, you are also adjusting all the pixels of that tonal value in the image, wherever they are located.

    Photoshop-make-adjustments-using-the-curves-dialog-10

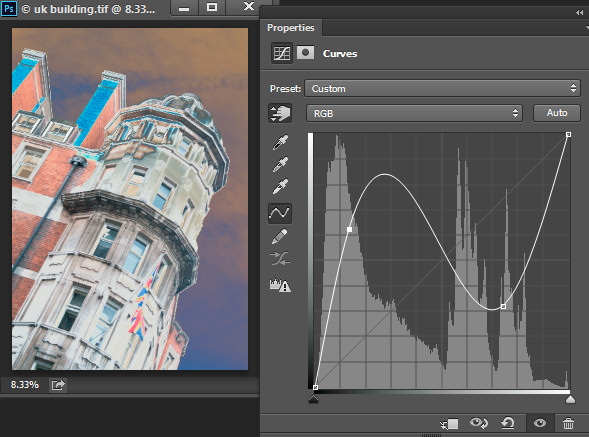
    Whenever you’re adjusting the curve line make sure not to flatten it or invert it. If you invert the line as shown below then you’ll invert the colors in the image.

    Photoshop-make-adjustments-using-the-curves-dialog-11

    If the line is flat (horizonally) then the pixels in the flat area will all become the same shade of gray.

    Photoshop-make-adjustments-using-the-curves-dialog-12

    Working with Points on the Curve

    To add points to the curve line simply click on the line where the point should be added. To remove a point on the curve, click on it and drag it off the edge of the chart and it will be removed.

    Sometimes you may want to fix the line so it does not move, thus allowing you to adjust the curve on either side of the fixed point. To fix the line, click on it to add a point at its current position. Sometimes you may need to add a couple of points so that you can then adjust other areas of the line without also affecting tones that you don’t want to change. In the image below I have fixed the highlights so that the curve line wouldn’t move when I dragged up on the left end to lighten the darker areas of the photo. If I hadn’t locked down the highlights the entire curve line would have moved upwards, risking the highlights become too light.

    Photoshop-make-adjustments-using-the-curves-dialog-13

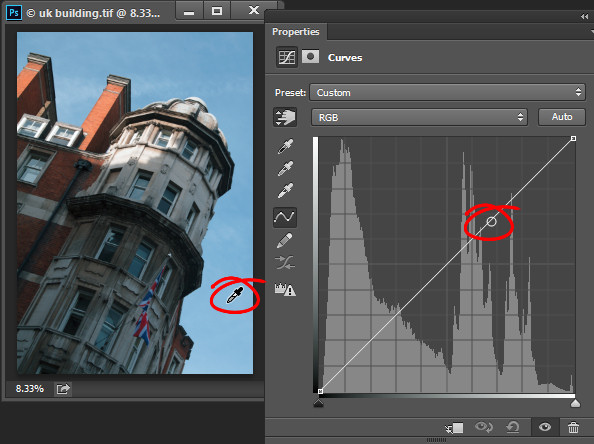
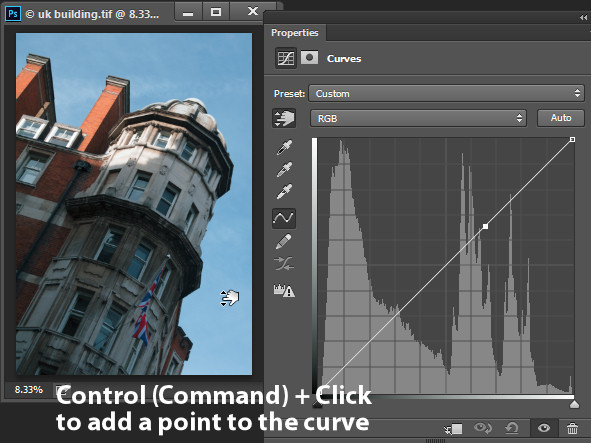
    Using the onscreen (targeted) adjustment tool you can also determine where on the curve line certain tones in the image are located. Instead of clicking and dragging on the image, simply hold your mouse pointer over an area of interest. When you do this the appropriate point on the curve that relates to the pixels under the mouse pointer will be indicated with a hollow circle.

    Photoshop-make-adjustments-using-the-curves-dialog-14

    If you want to add a point on the curve at this location Ctrl + Click (Command + Click on a Mac) on the image to do so.

    Photoshop-make-adjustments-using-the-curves-dialog-15

    Adjusting Individual Colors with Curves

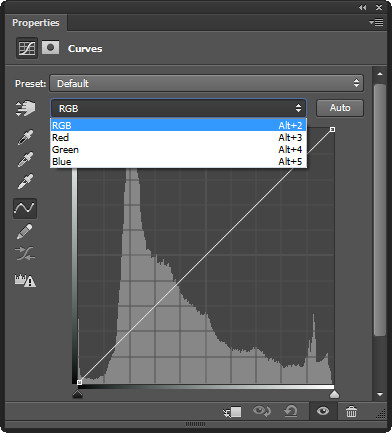
    In addition to the RGB channel you can also adjust the curve for individual color  channels. From the dropdown list that displays RGB by default, choose the channel you want to adjust – there are selectors for Red, Green and Blue.

    Photoshop-make-adjustments-using-the-curves-dialog-16

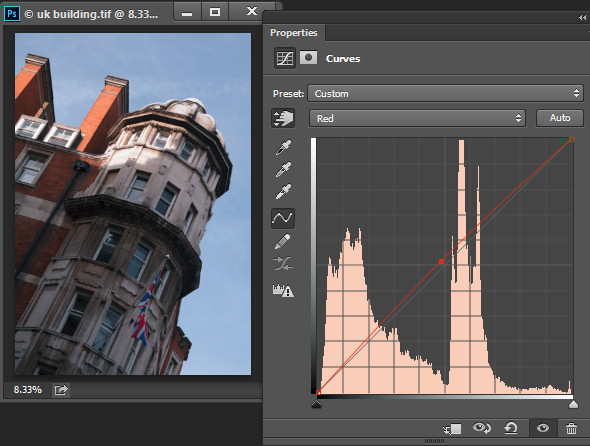
    The red channel controls both red and cyan in the image; drag upward to add red to the image and downward to add cyan. The green channel controls green and magenta, so drag upward to add green and downward to add magenta. Likewise the blue channel controls blue and yellow; drag upward to add blue and downward to add yellow.

    Using the color channels you can, for example, warm up an image. You could do this by adding red (drag up on the curve in the red channel) or yellow (drag down on the curve in the blue channel), or both.

    Photoshop-make-adjustments-using-the-curves-dialog-17

    Adjusting the Curves Adjustment

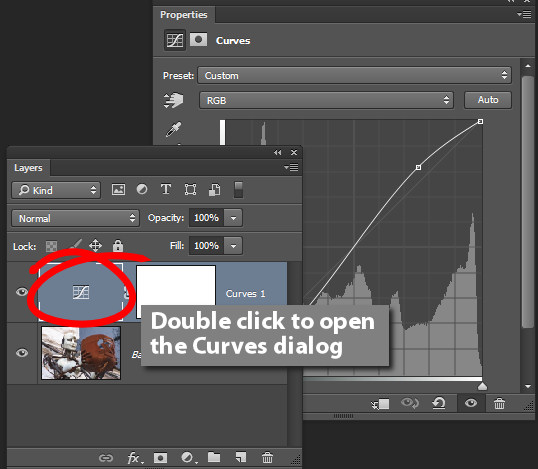
    Once you have applied a Curves adjustment to your photo you can close the Curves Properties dialog. At any time, if you used a curves adjustment layer you can double click on the curves layer thumbnail to open the curves dialog and further adjust it.

    Photoshop-make-adjustments-using-the-curves-dialog-17a

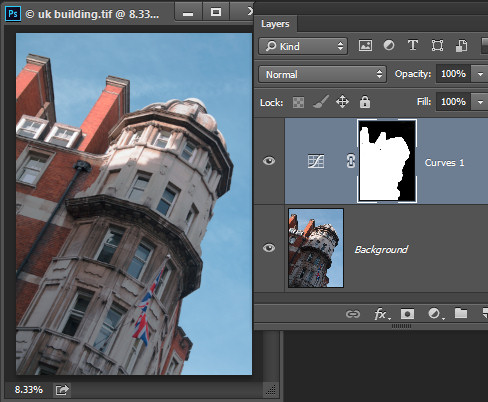
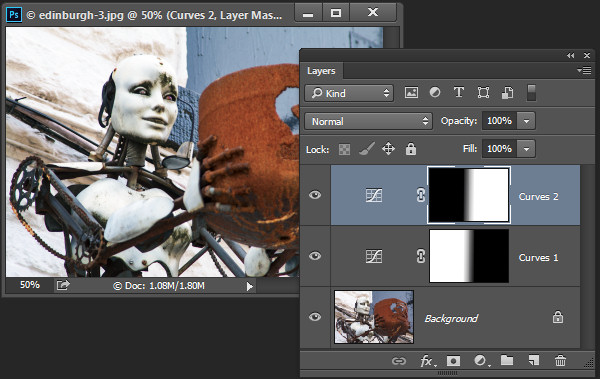
    As with other adjustment layers a layer mask is automatically added to the curve adjustment layer. Target the mask in the Layers palette and you can then paint on it with black or gray to remove the effect of the curve from a selected area of the image. Paint on the mask with white to paint reveal the adjustment in that area again. In the image below, the mask shows that the curves adjustment affects only the building (white area) and not the sky (black area).

    Photoshop-make-adjustments-using-the-curves-dialog-18

    You can also add a black to white gradient fill to mask the curves adjustment so it is applied to the top part of the image and not the bottom.

    In some situations you may want to add multiple curve adjustments to an image – the first which fixes one part of the photo and another to fix another part of the photo. You can use the layer masks to control how each curves adjustment affects the photo.

    Photoshop-make-adjustments-using-the-curves-dialog-19

    Using Presets

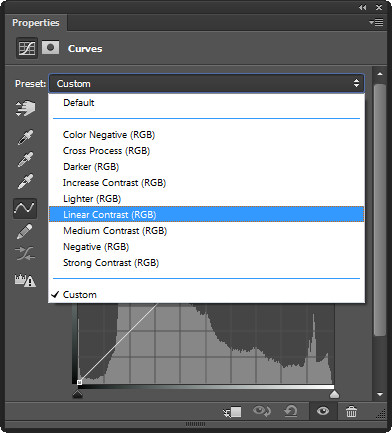
    Photoshop ships with some curves presets that you can use by selecting them from the Preset dropdown list.

    Photoshop-make-adjustments-using-the-curves-dialog-20

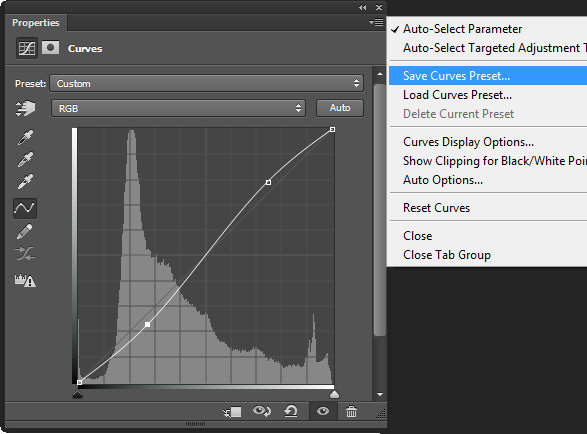
    You can also create your own presets. So if there is an adjustment such as a shallow S-curve that you like to apply to many of your photos, you can save this curve as a preset by first adjusting the line to the desired shape then click the fly-out menu and choose Save Curves Preset, type a name, and click Save. In future your preset will be available from the list.

    Photoshop-make-adjustments-using-the-curves-dialog-21

    Learning to use curves will give you more options when editing your images in Photoshop. You’ll find curves are a feature of most advanced editing software so it is an adjustment you will find in other programs including Gimp, Lightroom and Adobe Camera Raw.

    You can view a video of this tutorial on curves below:

    Do you have any other tips for using curves in Photoshop? Please share in the comments below.

    The post How to do Quick and Easy Curves Adjustments in Photoshop by Helen Bradley appeared first on Digital Photography School.


    Digital Photography School

  • DSLR Lens Reviews 2014: Which Lens To Buy?

    For many photographers, a beautiful portrait shot combines two essential elements: a flattering view of the subject set against a blurred background. This is easy to achieve if you have the correct lens. If you want to zoom up to a subject that is rather far away you’ll need a telephoto lens. These lenses are also ideal for sports and Continue Reading

    The post DSLR Lens Reviews 2014: Which Lens To Buy? appeared first on Photodoto.


    Photodoto

  • Ready to Upgrade Your Kit Lens? Tips for Which Lens to Invest in Next

    Most cameras come with a kit lens that generally works well as a decent all-around workhorse. A common focal range for these lenses is 18-55mm, which means they are capable of wide-angle shots as well as medium-telephoto pictures, and everything in between. The tradeoff for this zoom range, however, is a limited maximum aperture range of roughly f/3.5 when zoomed out (18mm), and f/5.6 when zoomed in to 55mm.

    Of course some kit lenses cover a longer focal range and have different maximum apertures, but overall most kit lenses are designed for the types of all-around shooting conditions in which you may often find yourself. While this is not necessarily a bad thing, it does mean that the kit lens is more of a jack of all trades while being the master of none, and after a while you might start wondering what other options are available to you and how they will affect your photography. This all begs the question: which lens should you buy when you want to upgrade from the one that came with your camera?

    Child bear

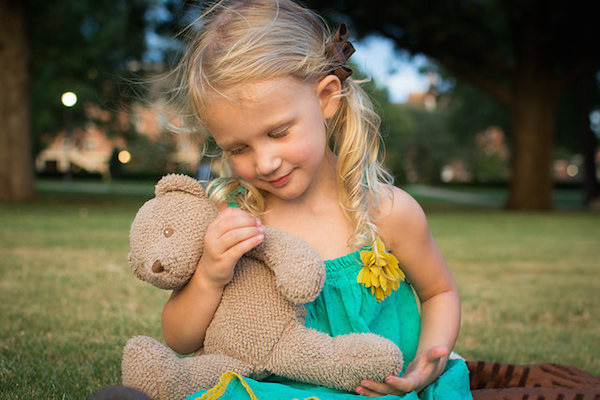
    A 35mm or 50mm lens can work well for shooting portraits

    Lenses are like apps

    Think of lenses like different apps for your camera, and just as apps on your smartphone or tablet have specific functions, each lens is designed to meet a specific set of photographic needs. Next, think of the kit lens as a basic set of apps you might find on a device. It does many things well, but doesn’t really unlock the true potential of your camera. For some people, that’s fine: they don’t feel the need to install new apps (i.e. buy new lenses) and instead only use the ones that come with their device.

    But when you start exploring the myriad of apps available for phones and tablets you might wonder how you ever lived with your device’s basic apps at all! The same holds true for lenses, but there is one key area where the analogy breaks down – price. When you start looking around for lenses, you might find that your vision quickly outstrips your budget! The choice, then, is this – which lens should you buy after exhausting the possibilities of the kit lens that came with your camera?

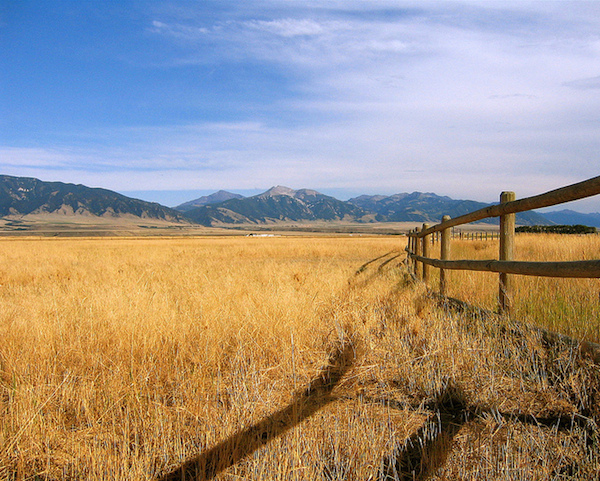
    Montana

    Wide-angle lenses are great for capturing photos of natural landscapes and other outdoor scenery.

    Know what you need for the photography you do

    The answer, unfortunately, is not as black and white as it might seem. While there are hundreds of options available, what you buy ultimately comes down to your unique needs and style as a photographer. After using your kit lens for a while, you will hopefully have an idea of what type of photography you enjoy most: landscapes, architecture, portraits, nighttime long exposures, pets, sports, weddings, etc. Or maybe you do a combination of everything! Before spending hundreds of dollars on another lens it’s important to know what will suit your needs – much in the same way that purchasing a vehicle is a matter of finding one that works for you, as opposed to simply buying the same car that all your friends have.

    Grapes

    A lens with a wider aperture will enable you to shoot get nice blurry backgrounds that are not always possible with a kit lens.

    Prime lenses pros and cons

    My first bit of advice, though, is to find a prime (non-zooming) lens that can accommodate your shooting style. If you take a lot of landscape and outdoor shots, you will likely want a wide-angle lens with a focal length of around 10-20mm (for cropped sensors, 15-35mm if you have full frame). For portraits, anything between 50-100mm is a good choice. Sports and wildlife shooters tend to use lenses that are on the telephoto end, such as 100-300mm. Remember the tradeoff between zooming and aperture I mentioned in the first paragraph? If you eliminate the zoom functionality you will find plenty of lenses with much larger apertures, which will let in much more light and allow you to use faster shutter speeds, as well as capture pictures in low-light situations that might not otherwise be possible without the use of a flash.

    Church

    Prime lenses can’t zoom, but you gain the ability to shoot in dimly-lit situations without the need for a flash because they often have large apertures.

    It admit it can be a bit nerve-wracking to use a lens that can’t zoom in and out, but once you try it you may find a whole new world of photographic possibilities that you never knew existed, thanks to the larger aperture. Remember that you haven’t lost the ability to zoom, you can still move yourself around physically, which is another fantastic way to explore and stretch yourself as a photographer. You can often find prime lenses for a couple hundred dollars that will suit your needs exceedingly well, though even prime lenses with longer focal lengths could easily push the limits of your budget.

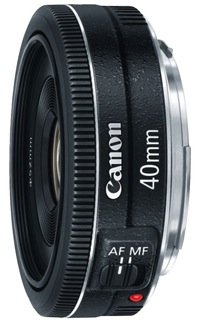
    40mmPancake

    It might be small, but Canon’s 40mm f/2.8 pancake lens packs a big punch.

    If you would like to upgrade from your kit lens but are not entirely sure exactly what your individual needs are, I would recommend one of the following. All are fairly inexpensive as far as lenses go, and will suit a variety of photographic situations, though they are not the best for sports and wildlife due to their somewhat short focal lengths:

    • Canon 24mm f/2.8 – and the newly released pancake version at only $ 149 US
    • Canon 40mm f/2.8 (pictured on the right)
    • Canon 50mm f/1.8
    • Nikon 35mm 1.8G – get the DX if you have an APS-C or cropped sensor, get the ED if you have full frame.
    • Nikon 50mm 1.8G

    Zoom lens options

    You can buy prime lenses with longer focal lengths, but they can easily cost many times that of their cheaper counterparts. If you decide you absolutely cannot live without the zoom functionality, I would recommend going with a lens that covers one end of a focal range (i.e. wide-angle to medium telephoto) rather than one that covers both ultra-wide and ultra-telephoto. Of course this is all subjective, and there are as many opinions on this topic as there are photographers. In my experience lenses that try to cover as many focal lengths as possible are generally not as sharp as their more limited counterparts, unless you are willing to spend hundreds or even thousands of dollars. Lenses I would recommend include:

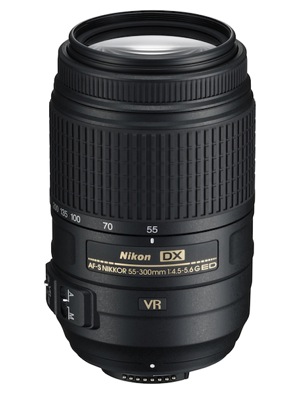
    55 300mm

    [caption: Nikon’s 55-300mm picks up where most kit lenses leave off and is a great option if you are interested in shooting sports and wildlife.

    • Canon 75-300mm f/4-5.6
    • Canon 28-135mm f/3.6-5.6
    • Canon 24-105mm f/4
    • Nikon 18-105mm f/3.5-5.6
    • Nikon 55-300mm f/4.5-5.6G

    There are also many other really good third party options available. The options are almost endless so I’ve stayed with the two big brands here, but you can also look at Sigma and Tamron who both make some really good lenses also.

    Deciding

    The more you are willing to spend on a lens, particularly a zoom lens, the more features it will have like: image stabilization, higher-quality glass elements, weather sealing, and larger maximum apertures. These lenses are just the beginning. The sky’s the limit when it comes to upgrading your lens, and it’s important to not overlook options like simply borrowing one from a friend, buying older gear, renting, or even looking online for used equipment. Whatever you decide, it’s important that the lens is right for you and your photography goals, but chances are if the kit lens is too limiting there is a fantastic one out there with your name on it, waiting for you to come and explore what it can do for you.

    The post Ready to Upgrade Your Kit Lens? Tips for Which Lens to Invest in Next by Simon Ringsmuth appeared first on Digital Photography School.


    Digital Photography School

  • 3 Ways to Combat Photography Boredom

    Boredom is one of the most powerful and inescapable forces on this world and photography is not immune to it. A bored photographer will likely stop to photograph or start producing boring images, which in turns will bore the viewer or client, who will likely stop following or buying the photographer’s boring work. Fighting boredom is, therefore, an absolute priority.

    Photo6

    When you specialize in a certain kind of photography, after a while you will probably master it. You will know what lens and settings best suit the scene you have in front of you, to get this or that particular mood or effect in the final image. This is all as good as gold, don’t get me wrong, but at the same time you are also building up your comfort zone, together with your style, and producing a solid stream of consistent images.

    The downside of staying too long in the comfort zone is that you may get bored; bored of the subjects you are used to photographing or bored because of lack of ideas. It is at this time, when you are looking at your portfolio and all you get is that same old same old vibe, that you need to step outside your comfort zone. Do something different, either by stepping into a new field or by changing the way you look at the subjects you are already familiar with. In one way or another, you have to bring some sparks back into your work, something that let’s you say wow once again when reviewing your own work.

    I am an enthusiast urban and landscape photographer. If you are like me, chances are you have an enthusiast kit or semi-pro gear, built for the kind of photography you are interested in. Stepping outside your comfort zone and embrace a whole new photographic genre can be troublesome, both economically and for your self-esteem. Moving from landscape to portraiture, for example, may require you to buy flash guns, triggers, soft boxes and diffusors, and zoom or prime lenses that are probably not in the regular Joe’s (the landscape photographer) equipment. Then there is the self-esteem part. Chances are you will produce nothing new in the field and, if you compromise too much with the equipment, you may produce nothing more than an average portrait of a model. I think a more interesting way to step out from your comfort zone is to remain in your regular field but spice it up by adopting a different approach. This way you have the advantage of knowing the subject, and the rules to do this, before start twisting and bending them in a new and refreshing way.

    Three easy ways to fight back photography boredom

    Go mobile

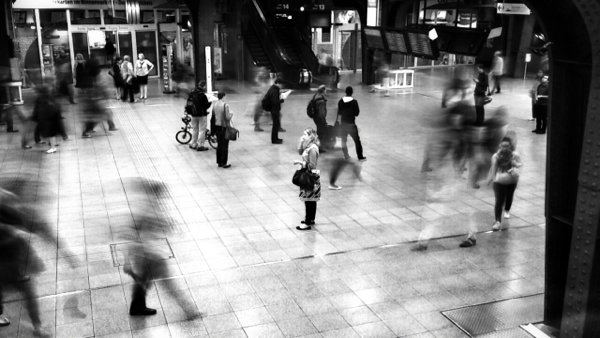
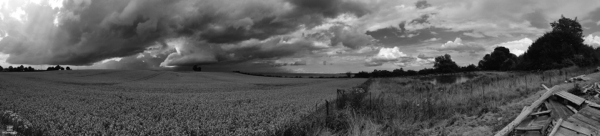
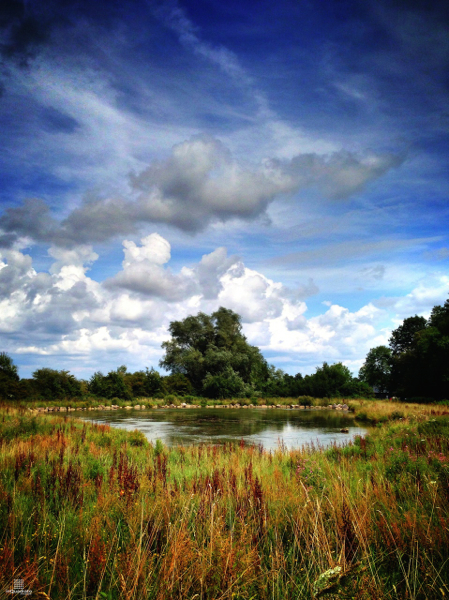
    Today’s mobile phones are equipped with decent cameras the can easily compete with many point and shoot cameras, with the plus side of having tons of apps to add extra functionalities (such as: slow shutter speed, in-phone HDR, filters and effects, panorama mode, burst mode) along with the ability to edit your photos on the fly. If you have one of these devices, use it to photograph your usual subject. It is challenging because of the intrinsic limitations of camera phones with respect to DSLR or mirrorless systems, but the results can be just as rewarding. It is a bit like forcing yourself to shoot with a single prime lens (forget the zoom of a camera phone). Having quite a short (35mm equivalent) focal length (the iPhone 5 is about 31 mm equivalent) makes camera phones suitable for landscape and street or urban shooting. Of course, you can alway zoom in and out by walking farther away or toward the subject. Here some photos taken from an iPhoneography project (where photos are taken and edited exclusively on my iPhone).

    Photo1

    Using an app to control the shutter speed, allows you to be creative with crowded places like stations.

    Photo2

    Panoramas are great to capture the full drama of a storm rushing in over the countryside.

    Photo3

    HDR apps can extend the dynamic range of your phone’s camera.

    For my mobile phone tips check out the dPS eBook: iPhone Photography or 8 of the Best Smartphone Accessories.

     Play with the invisible light

    Infrared photography was a revelation for me. If you are not living or travelling in the great wilderness but are based in, say, the same-old-same-old sleepy European countryside, you can forget about all those great and dramatic scenes you love which are featured in many magazines like National Geographic. Nevertheless, if there’s something that can add a spark to an otherwise boring countryside or city garden it is to capture the scene in infrared. This because infrared light is absorbed and reflected by different subjects quite differently than visible light. For example, green grass and leaves will appear white in an infrared photograph, while clear blue sky and water will be rendered almost pitch black. The result is usually quite surprising. Your photo will likely capture the viewer’s attention and, because of the intrinsic challenges of infrared photography, will spark your enthusiasm as well. When you start with infrared photography, chances are you will photograph trees and puffy clouds, but you may soon be asking yourself; okay, what else? You will probably start to photograph other objects in infrared, like the city, or even people.

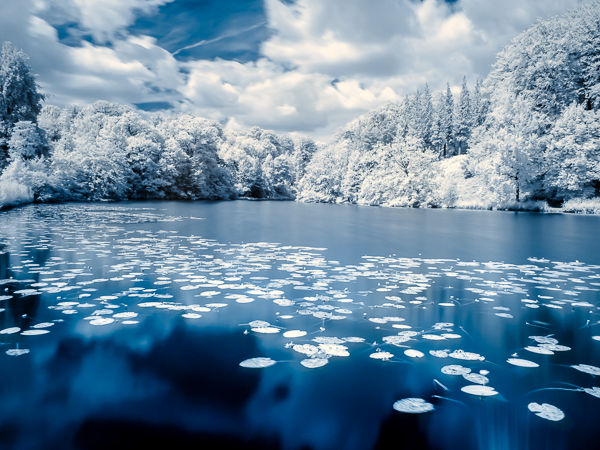
    The best and cheapest way to try out infrared photography is to already have a camera that is sensitive, to some extent, to infrared light. Manufacturers place a filter right in front the sensor to cut infrared light, but if you are in luck, it will not do a perfect job. If you can see and photograph the light coming from the infrared emitter of a TV remote control, chances are you are good to go. Next, you will need an infrared filter to place in front your lens. Ideally this filter should cut all the visible light while letting only the infrared pass through. A good filter to start with is the HOYA R72, which allows also some visible red light to pass, making it easier to frame and compose your shot. One downside is that your shutter speed will be greatly reduced. Under the bright midday sun, you may need an exposure of a few seconds in order to get a properly exposed image. This means hand-held shots are not possible and a tripod is required. A welcome side effect is that a moving crowd in front your subject will be almost, or completely gone. Also, if you are dealing with trees, in particular if they are close to you, it is best to photograph with little or no wind, so as to avoid blurring them too much. All these limitations aside, great black and white and false-colour infrared scenes can still be captured with out-of-the-box cameras and with little financial investment. Here few of my best infrared photographs using my unmodified Panasonic Lumix DMC-GF2 with a HOYA R72 filter screwed on the Panasonic 14-42mm kit lens.

    Photo4

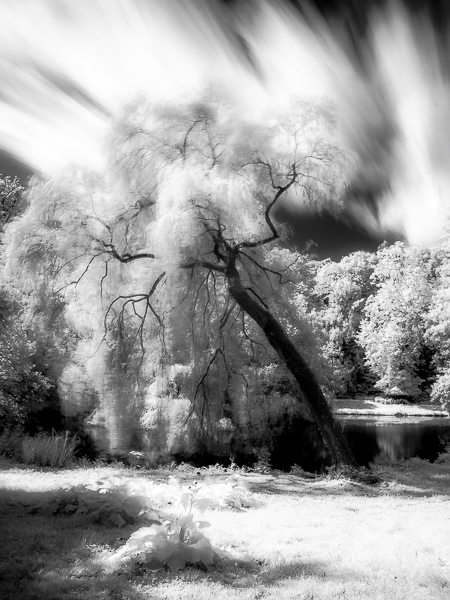
    False-colour infrared photography of a pond in a park near Brussels. A quite common view is turned into a very interesting winter-like scene.

    Photo5

    Fast moving clouds and an interesting tree can make for a great infrared image.

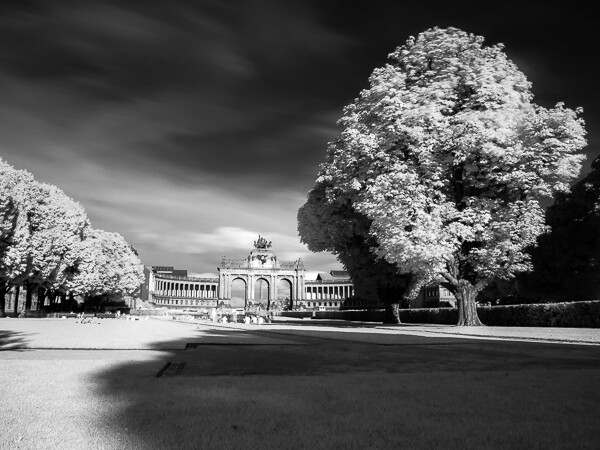
    Photo6

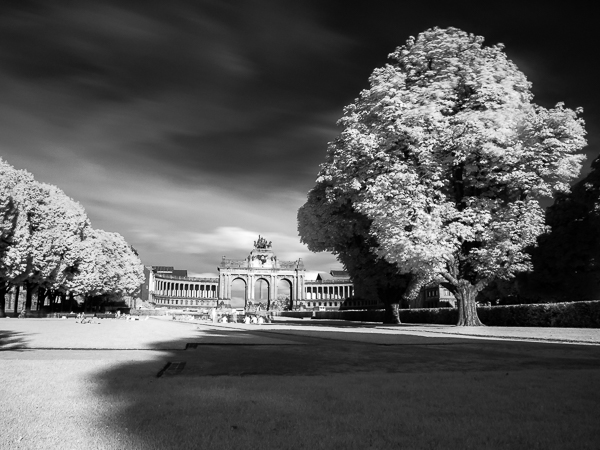
    Infrared photography can also be successful in the city like this image of the Triumph Arch in the Parc du Cinquantenaire, in Brussels. The moving crowd disappeared because of the long exposure emptying the scene.

    For more information on shooting the processing infrared with your camera read these dPS articles:

    • How to do Surreal Digital Infrared Photography Without Expensive Gear or Camera Conversions
    • 5 Creative Ways to Process Infrared Photographs in Photoshop

    Introduce distortion

    With a bit higher financial investment, you could consider buying a fisheye lens (please avoid fisheye lens converters because the infrared image quality is usually poor). Invest in a real fisheye lens; the fully manual (and relatively cheap) Samyang, Rokinon, and Vivitar lenses are in my opinion, the best way to start out. They are cheap, small, super sharp, relatively fast, with a great field of view. You can set the focus around the two meter mark (6.5 feet) and never touch it again as long as you stop down (use a smaller aperture than wide opened) your lens a bit.

    Fisheye lenses produce very particular images. I suggest you to read about them and research as much as possible before buying one; see if the images you can create with a fisheye lens suit your photographic taste. I have recently purchased a Samyang 7.5mm f/3.5 for my Lumix and it simply blew me away. I got this lens only a few weeks ago, but boy I love its compactness, lightness, how sharp it is, and the huge field of view (15mm equivalent on full frame) at a fraction of the price of an ultra wide angle lens. Of course, this comes at the cost of having some distortion, but if you like it and you can work it to your advantage, it is a great deal, and is a killer lens for travel photography too.

    Work your fisheye lens – tilt it upward to have a concave horizon and tall buildings bending and looming over the scene. Tilt it downwards to have a convex horizon, accentuating Earth’s curvature. Keep the horizon levelled or tilt the camera to see how the scene changes. Get down low by kneeling, or up high by raising the camera on a high vantage point (yes, even mounted on your monopod held high above your head). Accentuate distortions, or reduce them keeping straight lines towards the edges or towards the centre of the frame. Notice how objects at the edges of the frame are magnified with respect to those at the centre. Mix and match those distortions to create some unconventional, striking, and definitely not boring photographs. Below are some examples from my first photo walks in Brussels (Belgium), a very touristic city with very famous and well photographed landmarks.

    Photo7

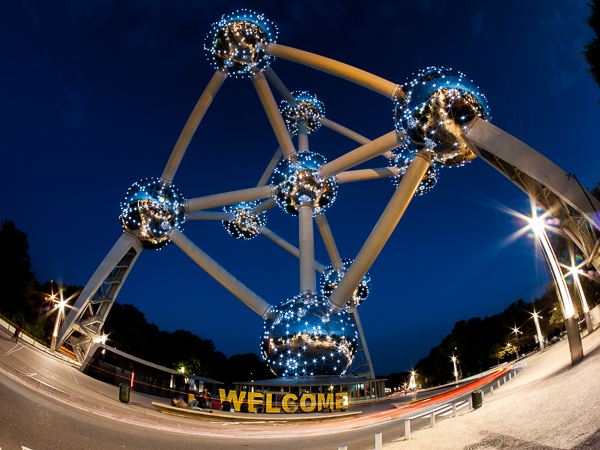
    The Atomium: huge monuments and landmarks can easily be squeezed into the frame and be portrayed in a quite a dynamic way.

    Photo8

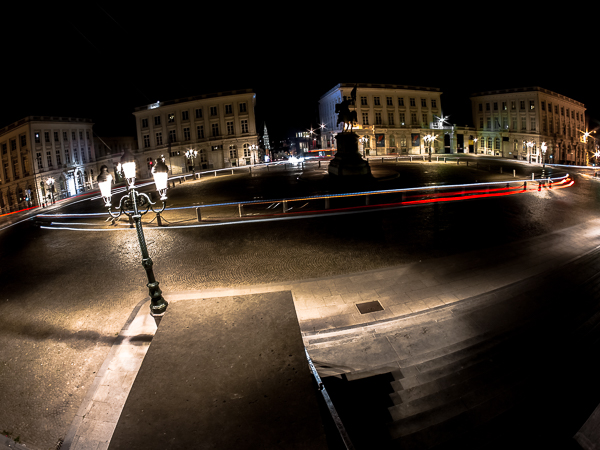
    Frame a busy roundabout by night from a high vantage point to capture great urban merry-go-rounds.

    Photo9

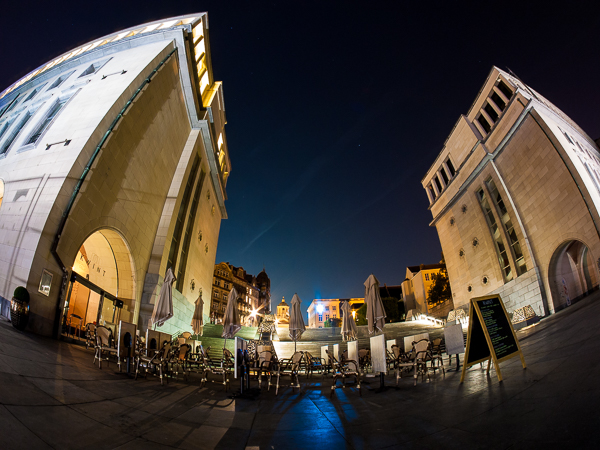
    Thanks to the fisheye’s distortions, even an empty square becomes interesting.

    Bonus tips

    • Get out during unusual times of the day (dawn and night)
    • Experiment with HDR and exposure fusion for more dramatic or gritty and punchy image
    • Go out with bad or stormy weather to take advantage of the dramatic sky

    Do you have any other tips for shaking it up and combating photography boredom? Share in the comments below.

    The post 3 Ways to Combat Photography Boredom by Andrea Minoia appeared first on Digital Photography School.


    Digital Photography School

  • How to Watermarking Images With Photoshop and Lightroom

    Have you seen the writing on images? You know, the little pictures or words that show the photographer’s name? Those are called watermarks. Photographers often watermark their images so that they are properly credited for their work. Here are a few ways to watermark images with Photoshop and Lightroom.

    Watermarks using Photoshop

    You can create watermarks in Photoshop several different ways. Here are a few of them.

    1. Text layer

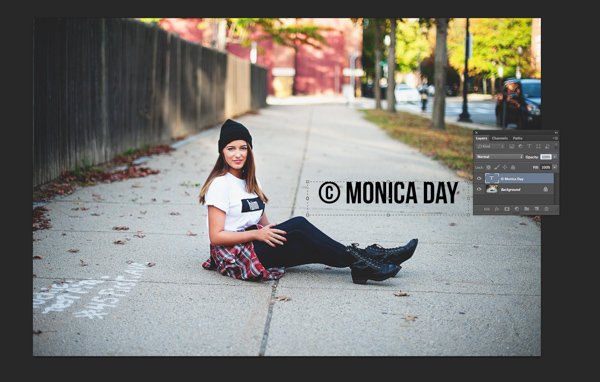
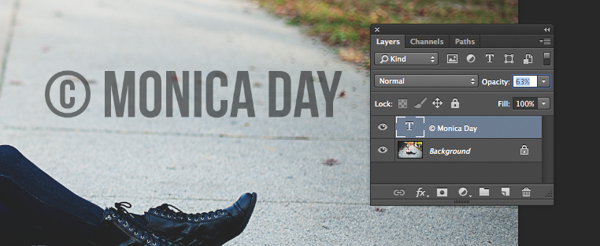
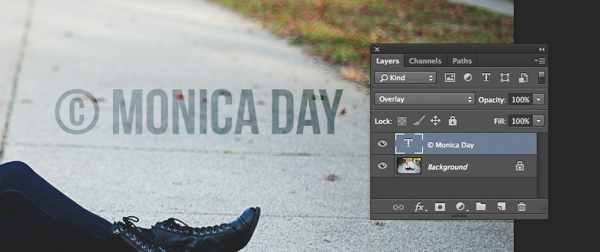
    The first way is to create a text layer. This is great for simple word watermarks. You can then write your name or your photography business’ name. From there, you can adjust the opacity as you see fit. Try adjusting the blending mode to achieve the look you want. To get the © symbol type; option+g on a Mac, or Alt+0169 on a PC.

    MonicaDayDPS-Watermark-01

    Normal blending layer with black font at 100% opacity.

    MonicaDayDPS-Watermark-03

    Normal Blending Mode with an opacity of 63% in black font.

    MonicaDayDPS-Watermark-04

    Overlay Blending Mode with a black font color at 100% opacity.

    2. Logo file

    If you have a logo you can place it on your image. You want to make sure your logo has a transparent background. Usually, this will be a PNG file, a GIF or even a vector graphic. If you are unsure, check with your logo designer. Use the place option to put your logo on your image. Again, you can adjust your opacity and blending modes to get the desired effect.

    MonicaDayDPS-Watermark-05

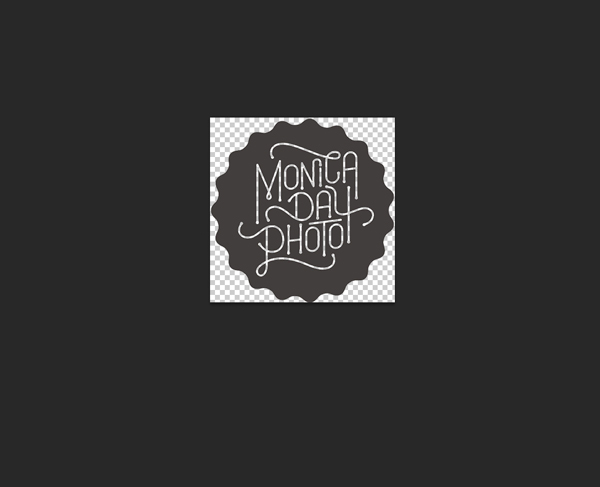
    PNG file with a transparent background. The checker pattern lets you know that the background is transparent.

    MonicaDayDPS-Watermark-06

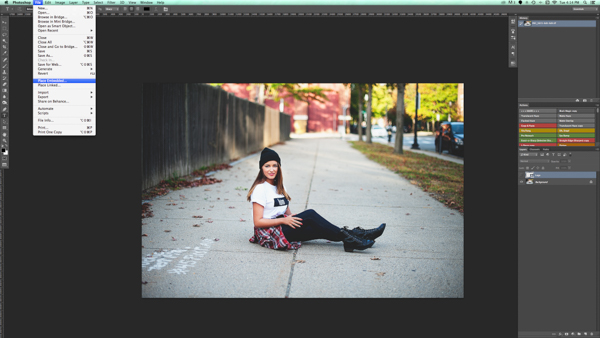
    Place function in the Photoshop CC menu. You then choose the file you’d like to place.

    MonicaDayDPS-Watermark-07

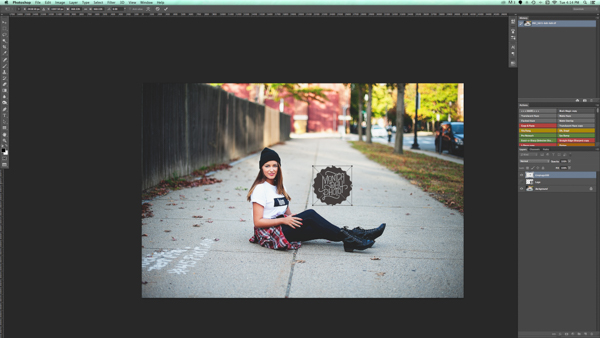
    Place the file and adjust the size as you wish. (Hold the Shift key down as you resize to maintain the aspect ratio and proportion of your logo)

    MonicaDayDPS-Watermark-08

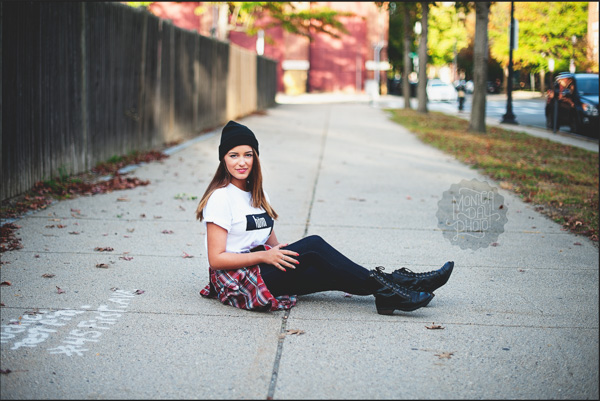
    You can again adjust the opacity and blending mode to get your desired look.

    2a. Making your logo background transparent if it isn’t already

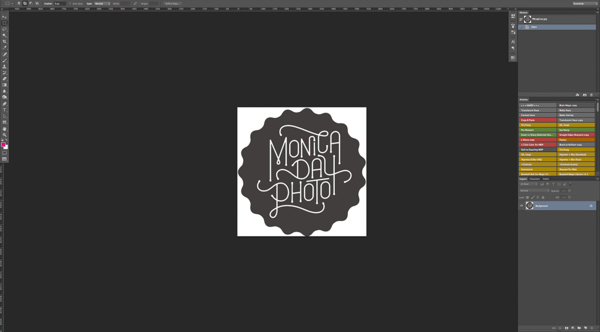
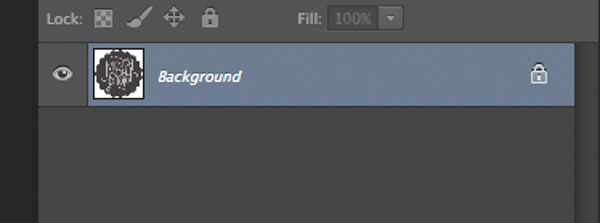
    If you have a logo file that does not have a transparent background then follow these simple steps to create one. First, open your file in Photoshop. Go ahead and unlock this layer (double click it, then hit Enter).

    Watermark-01

    Watermark-02

    Background layer locked

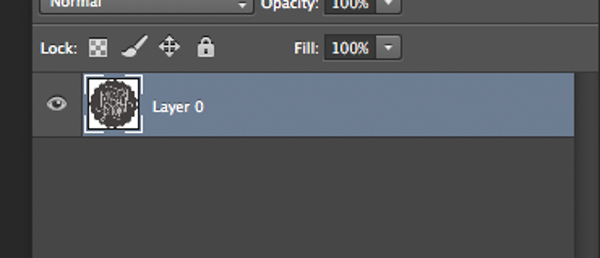
    Watermark-03

    Layer is now unlocked.

    Next, use the magic wand to select the background. If the background is not a solid color then select your logo image and then invert the selection. Now that your background is selected, simply cut. You can do this with cmd+x (Mac) or ctrl+x on a Windows computer.

    Watermark-04

    Select the background only.

    Your image should now have a transparent background. Save this file as a .PNG (JPGs cannot hold transparency) and you’re ready to go.

    Watermark-05b

    Where you see the grid pattern it’s now transparent.

    3. Using the brush tool

    For an even easier way to watermark, create a brush. This way you do not have to go through these steps each time you want to watermark your images.

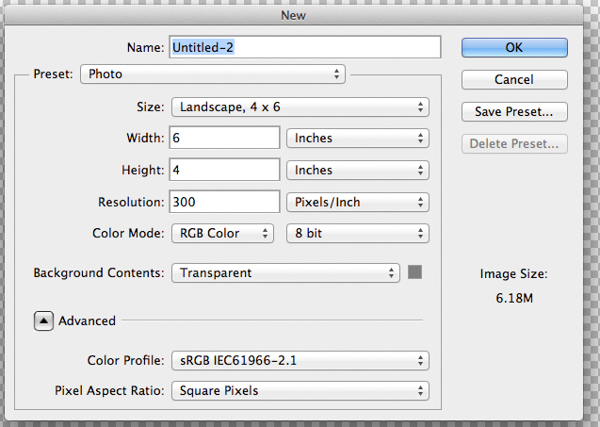
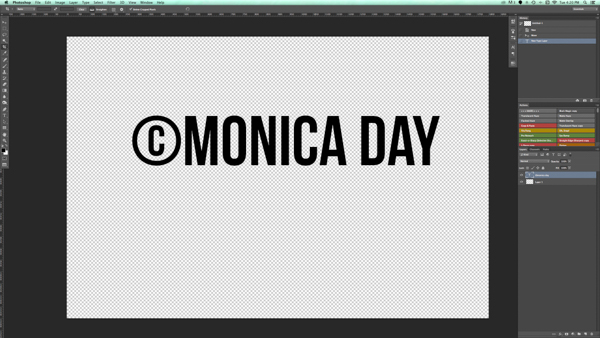
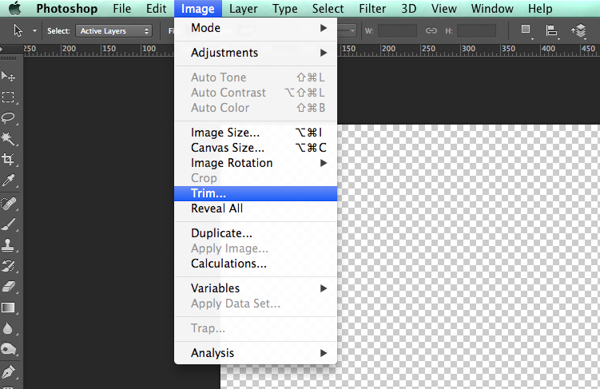
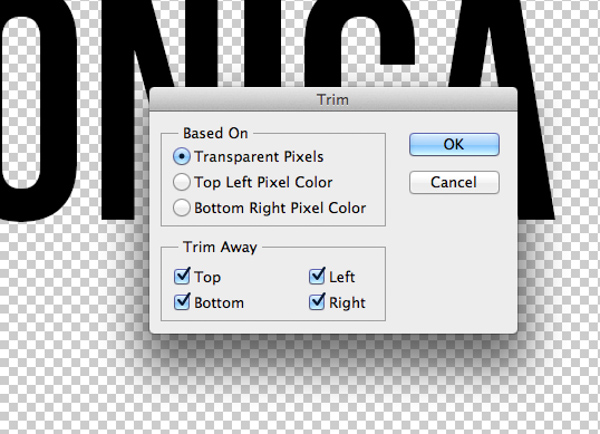
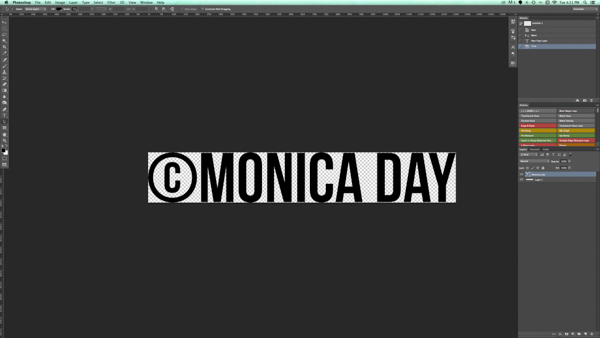
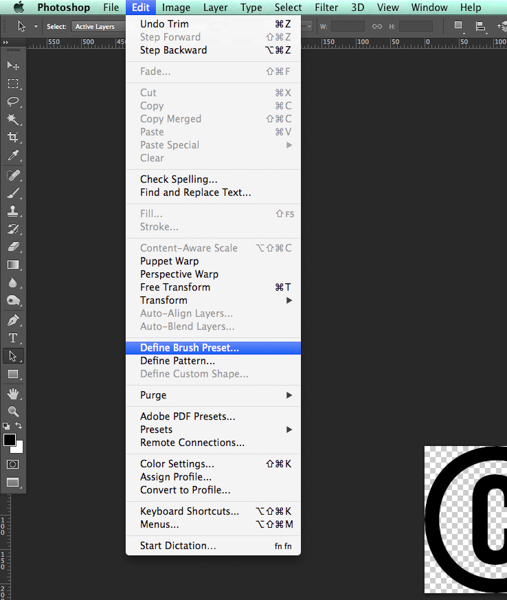
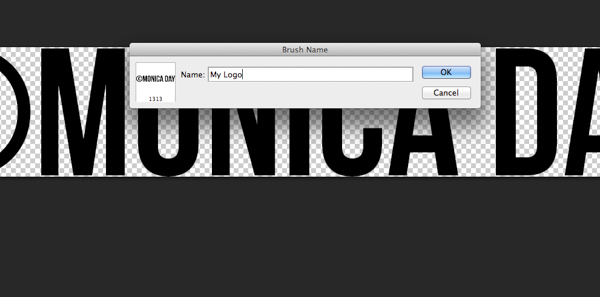
    To create the brush with text you’ve written you will need to open a new document in Photoshop. Make sure your document has a transparent background. Type the information you want to have on your watermark. Make sure you have it set up exactly like you want it on your images. Once you have your watermark just as you want it you should go to Image > Trim > Transparent Pixels. Next, Edit-Define Brush Preset. Name your brush and you’re ready to go. The same process can be done with your logo file.

    MonicaDayDPS-Watermark-09

    These are sample settings that work well in most cases. Make sure your background is set to “Transparent”.

    MonicaDayDPS-Watermark-10

    Notice that the font is written very large.

    MonicaDayDPS-Watermark-11

    Make sure you trim your watermark text.

    MonicaDayDPS-Watermark-12

    MonicaDayDPS-Watermark-13

    Your trimmed text should have no space around it.

    MonicaDayDPS-Watermark-15

    Define your brush in the edit menu.

    MonicaDayDPS-Watermark-16

    Give your brush a descriptive name.

    MonicaDayDPS-Watermark-17

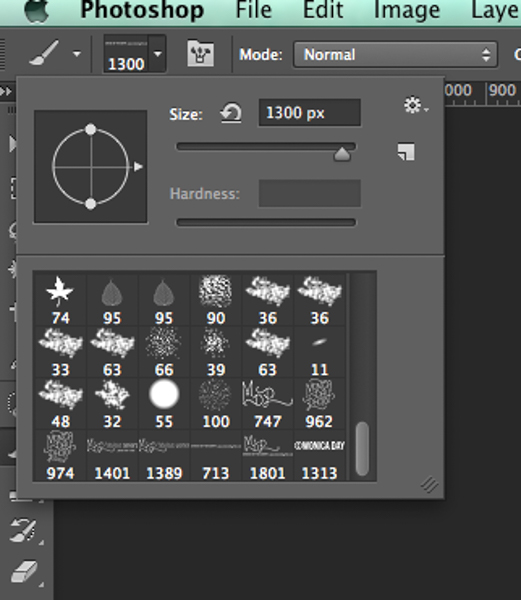
    Notice that your brush is now in your brush menu. You can see it at the bottom right in this picture.

    You can now use your brush as you would any other brush. The key to having it watermark is to create a layer and select the brush that is your watermark. A simple click will watermark your image. You can adjust the size, opacity, and blending mode as your like.

    For more on making a signature brush read: How to make a signature brush in Photoshop

    Watermarks using Lightroom

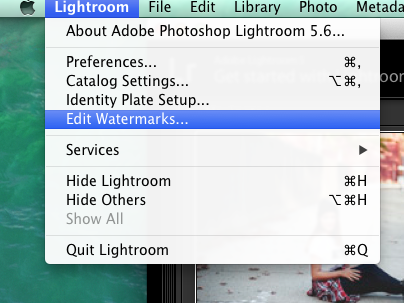
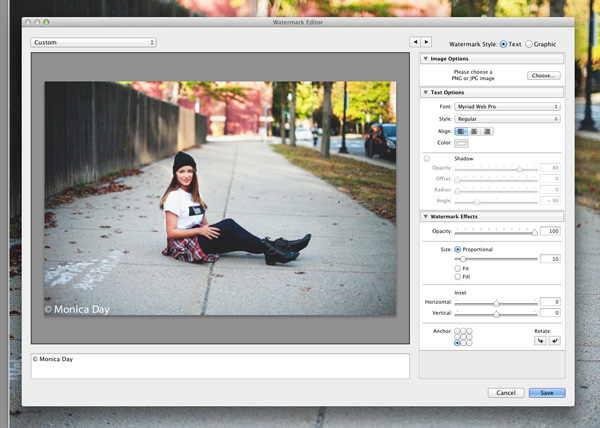
    Lightroom has an awesome feature built-in that allows you to watermark your images upon export. In order to use this feature you must first set up your watermark, to do that go to Lightroom>Edit Watermarks.

    Screen Shot 2014-09-16 at 5.49.22 PM

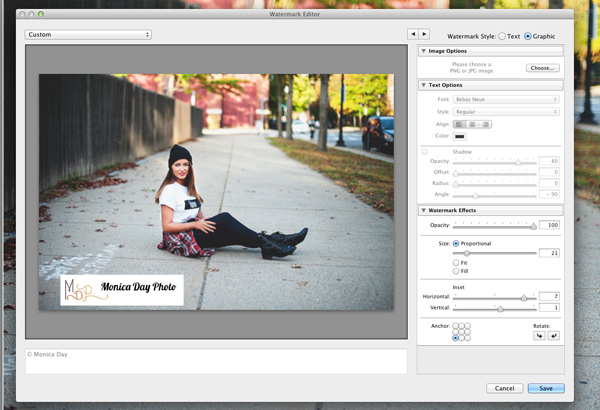
    You can choose an image or text. There are several different settings that allow you to adjust your watermark like you want. Remember, to get the best results you’ll want to use a PNG file with a transparent background. If you don’t, you’ll have a white box around your logo. You’ll need to save and name your watermark.

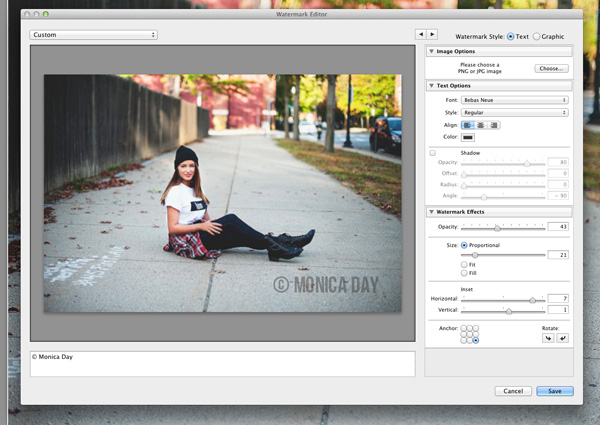
    For a text watermark simply write your desired information in the white box. You can change the font, color, shadow, and size of your watermark. Watch the image to see your desired effect. Use the Anchor option to adjust placement and the Inset option for further tweaks.

    For a text watermark simply write your desired information in the white box. You can change the font, color, shadow, and size of your watermark. Watch the image to see your desired effect. Use the Anchor option to adjust placement and the Inset option for further tweaks.

    Screen-Shot-2014-09-16-at-5.02.11-PM2

    The font, opacity, size, and location can be altered as you like.

    Make sure you use a logo file with a transparent background to avoid this white box. JPEG files do not have transparent backgrounds.

    Make sure you use a logo file with a transparent background to avoid this white box. JPEG files cannot have transparent backgrounds.

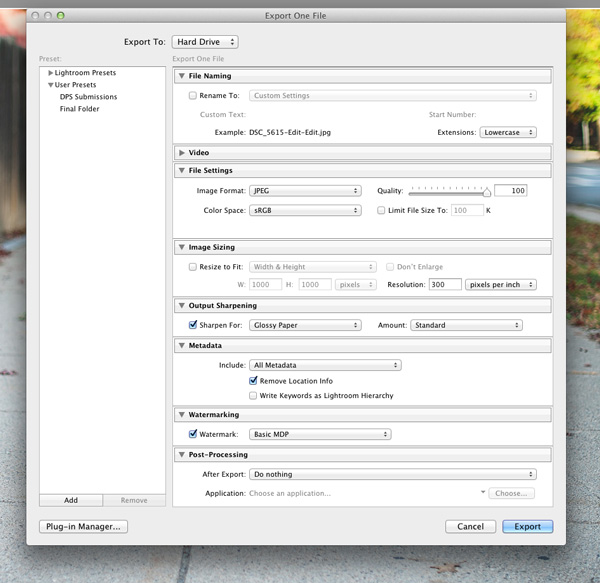
    Now that your watermark is all set up, let’s apply it to your image. Go to Export and Watermarking. There you can choose whatever watermark you have setup. Your image will be exported to the desired location with the watermark chosen.

    Screen-Shot-2014-09-16-at-5.06.01-PM2

    This image was watermarked in Lightroom with a shadow.

    This image was watermarked in Lightroom with a shadow.

    Have you got any other methods for adding a watermark to your images? Please share your tips or your results using these methods in the comments below.

    The post How to Watermarking Images With Photoshop and Lightroom by Monica Day appeared first on Digital Photography School.


    Digital Photography School

  • 7 Tips for Interacting with People to Create Better Portraits

    Sassy kid

    Interaction is the basis of a portrait session, in every single way. In the most obvious ways, for example, you must interact with the client to set up the session, during the session, and when the images are done.

    The portrait session is also an interaction with self, both for you the photographer and for your subject. You the photographer, who is creating with integrity, must meet with yourself inside to bring about bold creativity. The subject, likewise, is faced with many insecurities that they may have very little experience with in their day to day lives. They are in a vulnerable position. The portrait session brings about all kinds of internal interactions.

    The photos themselves are a form of interaction with the future. The way a portrait portrays someone goes a long way to communicating who they are – or, at least, who they’d like to be seen as, which is important in its own right.

    It’s for this reason that developing habits for skillful human interactions is so important. They make everyone more comfortable, but, more so, it means capturing images of someone who is comfortable at the moment the image was taken.

    The way someone responds to you is the way they will look in their images. The difference may be imperceptible to a stranger, or when simply viewed at a glance; but a strained smile, or nervous eyebrow might be clear as day to the people who care about them. You as a photographer are not a plumber who can still fix the pipes, even if your subject is having a bad time. Among the most important tools you have is the one that elicits an honest and flattering response from the subject:

    The way you interact with people is key
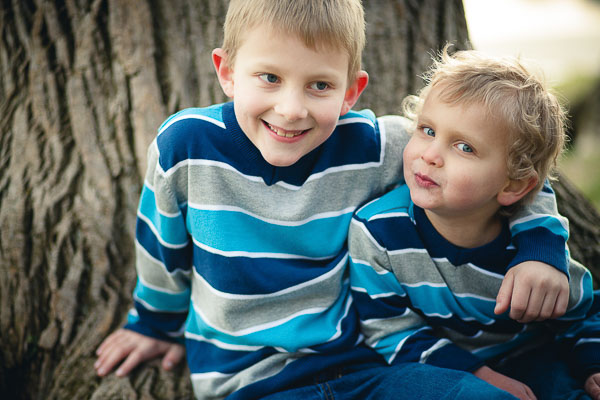
    Casual kids

    Everyone is a Little Kid

    If you who wish to bring about a truth and transparency in your subjects, you can take a clue from the rules of photographing little kids; don’t slow the child down for your shot – you keep up with the kid!

    Your goal is to keep your subject engaged and having a good time during their session, so what is true of working with children is also true for adults. It’s important to move at their pace. Adults get bored when you move too slowly and then you have pictures of bored adults trying really hard not to look bored. When you’re moving too fast, adults get anxious. They start having trouble understanding and interpreting your instructions. Then, you have photos of anxious adults trying really hard not to look anxious.

    Getting a sense of your subject’s natural pace is all about how you interact with them. You can’t simply bark orders at your subject. You can’t withdraw into a technical and creative cocoon, sticking your lens out just far enough to take their picture. You have to actually engage with them personally. Allow time in between arrangements and locations to chat. Be open with your subject; make yourself vulnerable to them. Remember, that is the challenging posture a portrait session puts the subject in: vulnerability.

    Pay attention to the things your client is saying, and the jokes they are making. If they say something like “I’m sorry, I must be terrible to work with” pay attention! They are blaming themselves, but it is likely because you are moving too fast and failing to communicate. The client is likely to blame themselves since they have seen all of your amazing photos and assume that all those people must have been able to keep up. Take this as a personal critique to communicate more openly and slow down.
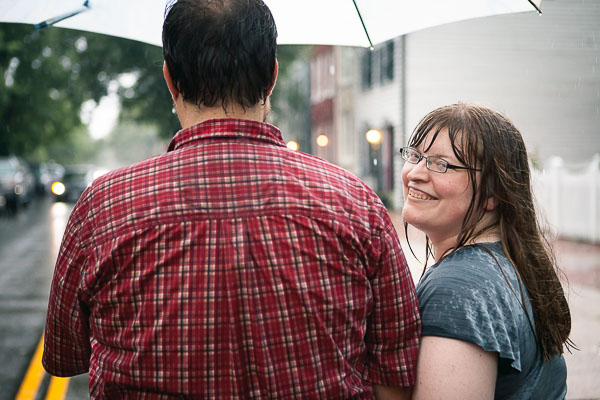
    Unexpected circumstances

    Learn to Speak in Positive Terms and Say Positive Things

    As you are open and communicating with your subject, remain positive as much as possible. When you have to be honest about something challenging or difficult, do so in positive terms. This takes practice, but it’s beneficial to your own well being as well.

    I’m not advocating lies, or even twisting the truth. I’m talking about finding a legitimate perspective in whatever you’re saying, so that some form of positivity is also in view.

    For example, say you’re shooting in a local park and the shot you’re working on just isn’t working the way you want. When you know the shot that you wanted is dead, there’s no reason to keep wasting time; you should just move on. If you say “Ugh, this spot just isn’t working out, let’s look somewhere else”, you would be telling the truth, but in a negative way, with the focus on what isn’t working right. That’s not the important part. Instead, if you say “Hmm, this spot isn’t turning out how I’d hoped, I think there might be something even better over in that direction” it sounds more hopeful, positive, and encouraging.

    Both of those statements are essentially the same. But in the first, the emphasis is on a problem right then and there. In the second statement the problem is acknowledged, but the emphasis is on something positive “over in that direction”.

    Keeping an attitude like this helps your subject remain optimistic about the result, which is important. As your subject’s optimism goes down, they will have to work harder to appear comfortable and relaxed. So even if you’re struggling in the beginning, and your subject might have objectively good reason to become more pessimistic, if you allow that to happen, you’ll be damaging your chances of recovering later.

    Stay positive!
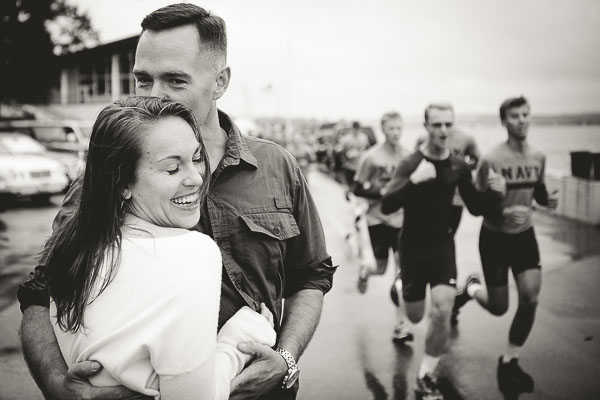
    Naval Academy Runners Romance

    Use Humor as a Diffuser

    The situation your subject is stepping into is a vulnerable one. It’s your job to scrutinize how they look in order to present them in their most flattering light. Most of us feel uncomfortable being under the microscope like, especially concerning the way we look. People don’t like their looks being judged poorly and they spend a great deal of time, energy and money to avoid it. In fact, hiring you might itself, be a part of that desire.

    So part of your job is to diffuse that feeling. You need to keep your subject comfortable, which typically means obscuring the overt need to scrutinize them and the way they look. An excellent method for this, without having to resort to being deceitful, is to place yourself under their microscope.

    If you make a mistake, be open about it and laugh it off. By presenting your own momentary shortcomings, you make yourself vulnerable, and by contrast make them feel less vulnerable. You’re not lying, or manipulating them. You’re just levelling the playing field.

    Likewise, if your subject has said or done something embarrassing, you can use humor to turn the embarrassment on yourself. For example, if my subject accidentally steps in a puddle of water and seems embarrassed, I might use the opportunity to tell them about the time I fell in the water during a portrait session. It’s humanizing.

    By positively applying humor to your own shortcomings, you’re able to change the tone of the session from one where the subject feels that they must perform for you, into one where they must engage with you.
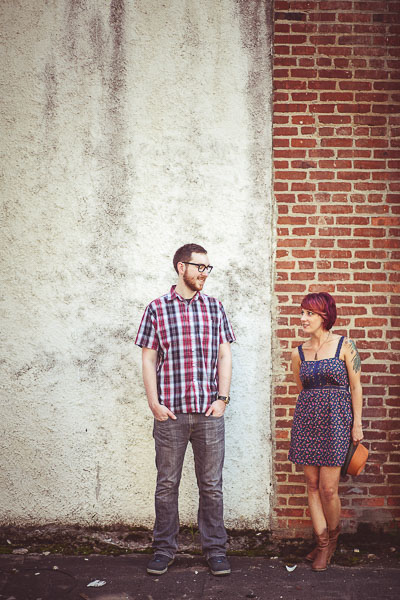
    Engaged couple two tones

    Speak in Terms Relative to Your Subject

    In many cases, unless your subject has been trained as a model, they’re going to spend a fair amount of their mental energy trying to interpret what you’re telling them to do.

    If you say, “tilt your head”, that means a lot more to your subject than that specific thing you want them to do, so for them, it has almost no meaning at all. Instead, you could say “tilt your forehead toward your toes”, or “bring your left ear closer to your left shoulder”. The same goes for the direction they’re facing and movements you need them to make. If you tell them to “step forward” they will often move in whichever direction their feet are facing, or they’ll feel confused about what you want them to do, and shuffle around awkwardly. Instead, you could say, “take a step toward me”.

    These are specific instructions which are relative to your subject, rather than your vision. Giving subject-relative instructions also sounds a bit funny to many people at first so it acts as an excellent ice breaker too.

    If you master no other subject-relative language, master your subject’s left and right. Instead of saying “step to the left”, say “step to your left”. By giving your subject terms that they do not have to interpret, they can devote more mental energy to the intangible elements of the shoot – like having a good time, or interacting with you.
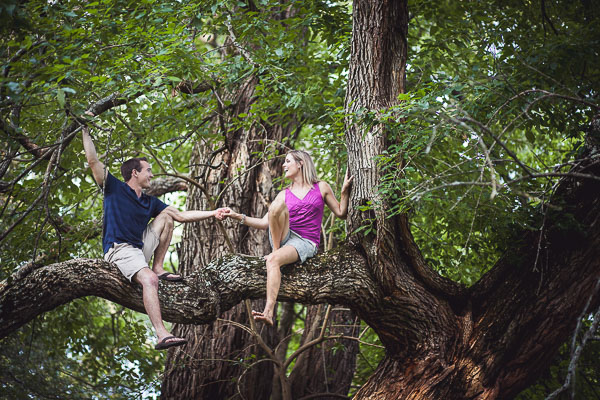
    Engaged couple in a tree

    Demonstrate Posing

    This is an extension of speaking in subject-relative language, except it takes it one step further. Taking a moment to demonstrate how you’d like your client to pose can have multiple benefits.

    First, demonstrating a pose can often act as an icebreaker, since the motions you will ask your subjects to carry out sometimes feel a little silly, even though they look great in a photo! When you demonstrate the pose, the subject has a chance to see you feeling a little silly, or not feeling silly and also not minding.

    Second, as with speaking in terms relative to them, demonstrating a pose helps remove a big chunk of the subject’s need to interpret what you want them to do. They can more easily just go for it and try, rather than timidly wondering if they’re “doing it right”.
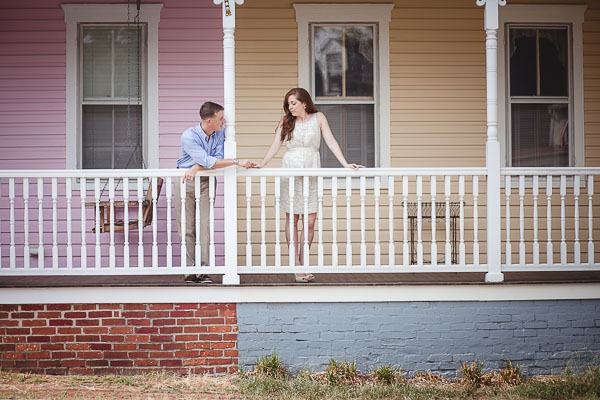
    Relaxed romance

    When I demonstrate a pose for a subject, I tell them what I’d like them to do, as I do it.

    So, I may sit down in the spot I’d like my client in and say, “Okay, I’d like you to sit right about here”. Then I’ll sit down and say, “You can cross your legs like this, or something like this, if it feels more natural for you” as I demonstrate a couple of different acceptable positions for their legs. Then I might point over to where I’m planning on shooting from and say “I will be shooting from right over there, so you’ll want to look in that direction”.

    By the time the client sits down, they have a kind of template for what to do and can act more confidently in giving it a try. This also has the added benefit of allowing you to help your subject find their way into a pose that is more natural for them, rather than putting them in a position you’d never see them use in real life.

    For more on posing check out this dPS eBook – Portraits: Striking the Pose

    Be a Constant Stream of Affirmation for Your Subject
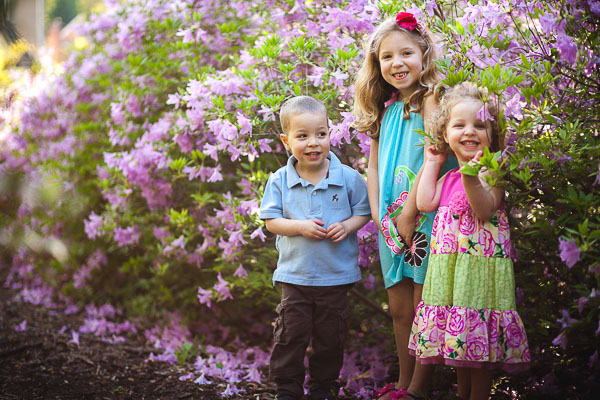
    Hide and seek

    I’ll say it again; remember what a vulnerable situation your subject is in when they’re in front of your camera. One of the simplest ways to offset that feeling for your subject is to be a constant stream of affirmation.

    • Thank you!
    • You’re doing a great job
    • Yes! That’s perfect, hold onto that!
    • You’re looking great!

    Of course, you’re walking a line here, because what if your client isn’t doing a “great job” and they are in fact making your job a lot more challenging. Well, get over it. It’s your job as a photographer to work with who your customer is; some people are easier going with pictures, others need more attention, but the images will be yours and so the responsibility is too.
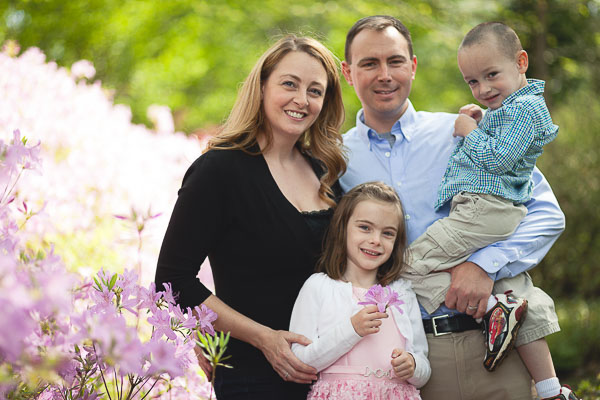
    Friendly family

    I wouldn’t advise lying if you’re struggling to get something you like while working with your subject. But affirmation is still important. Perhaps even more so. The thing about affirmation in this context is that it doesn’t necessarily have to be affirming anything the subject themselves is doing. Of course, that certainly works best to mitigate the feelings of a subject who is insecure about their appearance, or feels bad at photos. But simply affirming that the shoot is going well and you are excited is often enough to let the subject relax. Keep them coming – seriously, about every 15-20 seconds while you’re behind the camera.

    • Wow, this shot is coming out even better than I expected!
    • I love this background!
    • You and I are like a dream team!
    • The textures in this foreground are so interesting and juxtapose just right with your dress!

    Easing a subject’s sense of vulnerability by making positive exclamations about the shoot makes sense logically too. By helping the subject to realize that they are only a part of what you’re paying attention to will relieve the pressure, and let them relax.
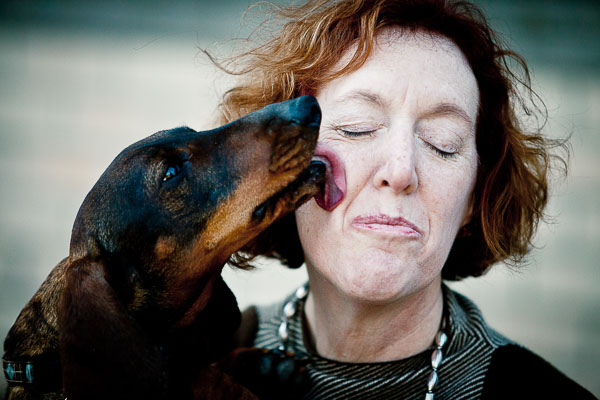
    Dog kisses

    Don’t Laugh at Anything that Shows up on the Viewfinder

    Here’s what I want to leave you with. This advice, I believe, carries with it the heart of everything I’ve said here.

    Never laugh at something that shows up on your camera’s screen.

    I’m sure you can understand why – your subject’s vulnerability, of course. How might they interpret your laughter? It’s possible that you’ve cultivated an atmosphere of humor. Maybe you have consistently made yourself the butt of many jokes, and your subject might have joined in the fun and so maybe at this point it’s okay to laugh a little, as long as you’re laughing together. But let’s be honest, the average subject is pretty insecure. They’ll probably think you’re laughing at them and they’ll clam up.

    But all of that is quite obvious. People don’t like to be laughed at. That’s not what is so important about this though. It’s not that you’re laughing, it’s not even why you’re laughing. It’s why your subject thinks you’re laughing. Truth is not important, your subject is going to respond to what they think, regardless of whether that is true or not.

    It’s not that laughing is a problem. It’s that the subject thinks you’re laughing at them in some way. And it’s not just about laughing.

    Let’s say you’re having some annoying problem with your camera for some reason. As you’re trying to work it out, you become visibly frustrated. Your subject probably doesn’t know what camera problems look like and their sense of vulnerability is causing them to take on a lot of blame. It’s not that you’re frustrated, it’s that you’re subject thinks you’re frustrated because of them.

    Subjects place themselves in a position of vulnerability with photographers to a degree few other professions have access. Doctors and lawyers are a good example example. Doctors need access to the skin and the stuff underneath. Patients have to reveal their bodies to doctors – a vulnerable feeling indeed. Defence lawyers need access to the minute and truthful details of a defendant’s life. You as a photographer need access to their spirit – people must be who they really are with you.

    You must take great care not to trample the spirit of your subjects. You must do mental, emotional, and creative gymnastics to avoid crushing the delicate structure of trust and assured respect. That allows their spirit to be reveal itself in honest smiles, cracked jokes, and a temperament of self-confidence standing in front of the camera.

    Without your subject’s spirit, there is little reason for the photo.

    Do you have any other tips for working with people and taking better portraits? Please share them and any stories you have in the comments below.

    The post 7 Tips for Interacting with People to Create Better Portraits by William Petruzzo appeared first on Digital Photography School.


    Digital Photography School

  • Mastering Family Photography: What You Need to Get Started

    One thing that I shoot my fair share of is family pictures. I love the family dynamic so much… the “over primpers”, the “get me out of here’s”, the “I’ll be in the picture, but I’m going to ruin every single shot”, the “smile or I’ll beat the snot out of you later’s” and the “gee, we’ve known that we Continue Reading
    The post Mastering Family Photography: What You Need to Get Started appeared first on Photodoto.


    Photodoto

  • Street Photography Video Tips With Valerie Jardin

    I have been a regular co-host or guest on the popular This Week in Photo podcast. Recently they launched their new website and are going to be rolling out new spin off podcasts including one by our very own dPS writer Valerie Jardin on street photography. There is also one by Doug Kaye on gear, and interviews done by the host of TWiP Frederick Van Johnson. You can check out all their shows here.

    In this first teaser Valerie and Frederick chat about various things regarding street photography, and traveling with your gear.

    You can see more articles on street photography here:

    • Using Humor In Street Photography
    • 7 Street Photography Tips and Exercises to Try This Season
    • How to Create Amazing Urban Landscape and Street Photography Images
    • Practical Tips To Build Your Street Photography Confidence
    • How to Approach Street Photography in 12 Easy Steps
    • 103 Things I’ve Learned About Street Photography
    • 8 Things You Should Know if You are Dating a Street Photographer

    You can also check out my last appearance on TWiP when we discussed the new iPhone6 and the newest releases from Canon and Nikon.

    The post Street Photography Video Tips With Valerie Jardin by Darlene Hildebrandt appeared first on Digital Photography School.


    Digital Photography School