Category: Photography

  • How to do Great Black and White Conversions Using Photoshop

    Black-and-white-in-photoshop-1

    Some photos that you take you’ll want to convert to black and white. Photoshop has some tools that you can use to convert your photos to black and white and I’ll show you what these are and the best way to do the conversion.

    Why you should shoot in color and convert to black and white

    If your camera saves photos as jpeg images, even if it can capture in black and white, it’s advisable to avoid this setting and instead shoot in color and convert later. The reason is that when you capture in jpeg and have the camera set to black and white, all the color information is discarded when the image is saved and you can never get it back. So you will only ever have a black and white image. On the other hand if you capture in color you will have the choice to convert the photo to black and white, but you will also have a color image in case you decide it looks better that way.

    Black and white conversions in Photoshop

    You have a couple of choices when converting to black and white in Photoshop. You can desaturate the image by choosing Image > Adjustments > Desaturate. This removes the color from the image but you have no control over how it is converted.

    Black-and-white-in-photoshop-2

    A better way to convert an image is to use a black and white adjustment layer. So choose Layer > New Adjustment Layer > Black & White and click Ok to create the new adjustment layer.

    Black-and-white-in-photoshop-3

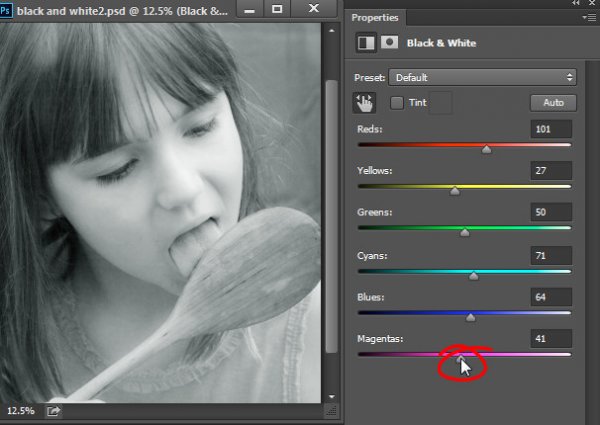
    When the Properties dialog appears you will see sliders for red, yellow, green, cyan, blue and magenta. You can use these to control how the colors in the photo are converted. Drag a color slider to the left to darken areas in the image which are that tone and drag to the right to lighten them.

    Black-and-white-in-photoshop-4

    In some cases you may see little or no change when you drag a slider – this will happen if there is little or none of that color in the image.

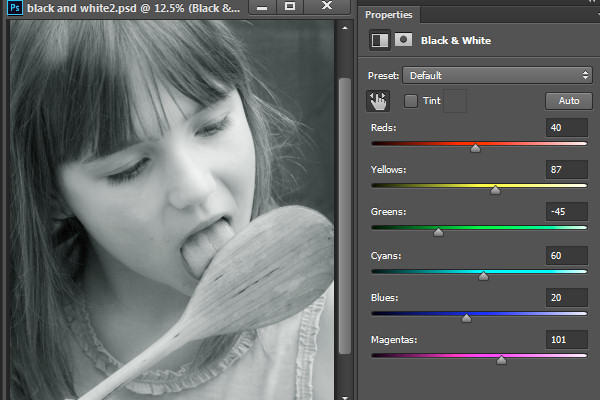
    The sliders allow you to create a custom black and white conversion for your photo and you can also adjust how similar value colors are converted. In this image the girl’s pink shirt and the green background convert to a similar shade of grey – but adjusting the green slider to the left darkens the background and creates a more pleasing black and white image.

    Black-and-white-in-photoshop-5

    In addition to adjusting the sliders you can also use the targeted adjustment tool by clicking its icon in the Properties panel (circled in red below). You can then click on a specific area of the image and then drag to the left or to the right to adjust the color under the eyedropper. Drag to the left to darken the color, and to the right to lighten it. You should be aware, that this will, of course, adjust every occurrence of that color in the image, not just the area of color underneath your cursor.

    Black-and-white-in-photoshop-6

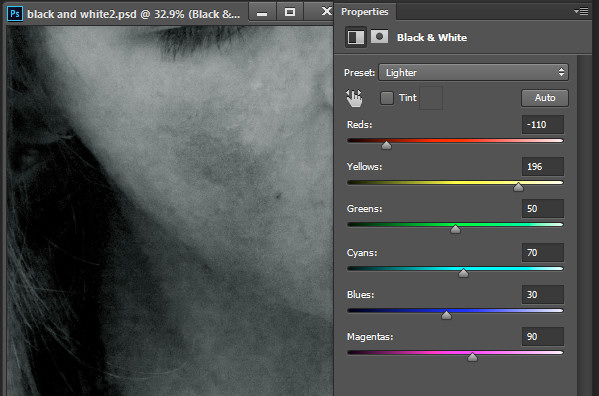
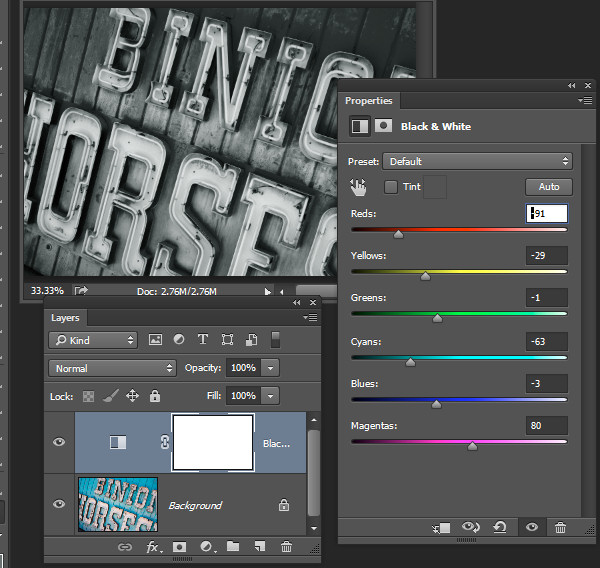
    As you adjust the sliders take care to avoid dragging adjacent sliders in completely opposite directions. You are adjusting colors which are likely to be found in close proximity to each other in opposite directions – making one color light and the other dark. The risk is that you will create areas of mottled darks and lights in the image which won’t be aesthetically pleasing as in this image below:

    Black-and-white-in-photoshop-7

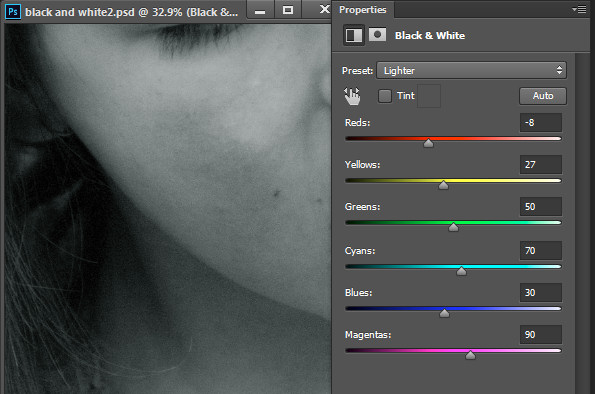
    Instead, adjust adjacent sliders so their values are closer to each other for a smoother and more pleasing result as in this next image:

    Black-and-white-in-photoshop-8

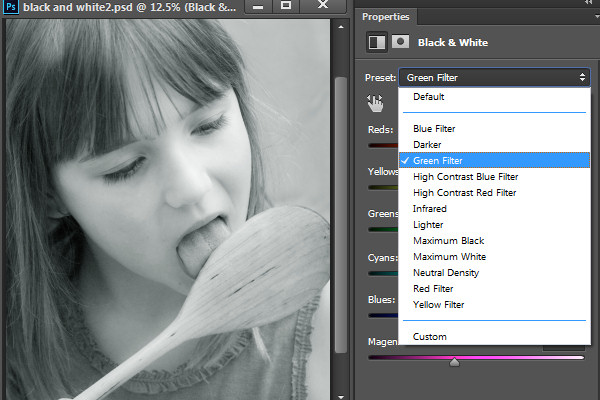
    There are also presets options available from the Properties dialog that you can use as a quick start converting your image to black and white. Click a preset in the list to apply it. If you find one you like you can use it as is, or continue to adjust the sliders to fine tune the result.

    Black-and-white-in-photoshop-9

    Although you can apply this black and white conversion directly to the image using Image > Adjustments > Black and White, I suggest you use the adjustment layer method instead. The reason for this is that, when you use an adjustment layer you can double click the adjustment layer thumbnail to fine tuning the result at any time.

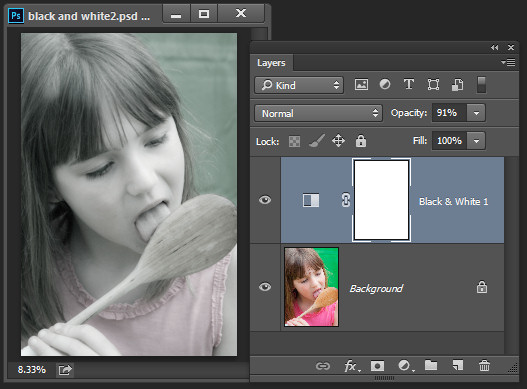
    If you apply the adjustment as an adjustment layer you can blend it into the image below by reducing its opacity. Here I reduced the opacity of the black and white adjustment to reveal some of the original color image to give an almost hand tinted look to this image.

    Black-and-white-in-photoshop-10

    You can also, as I will explain below, add multiple black and white adjustment layers and use the built in masks to control how each adjustment layer affects the image.

    Tinting a black and white image

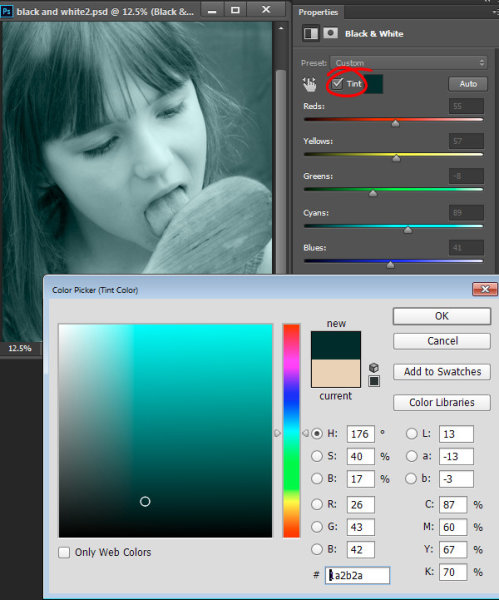
    The Black and White Adjustment Layer Properties dialog also gives you the option of tinting the black and white image. To do this click the Tint button and click the color selector which allows you to choose a color to tint the image. Choosing a bright color will result in a brighter and more colorful tint and choosing a darker color will give a more subtle tone to the image.

    Black-and-white-in-photoshop-11

    Multiple black and white adjustments

    Occasionally you may want to treat two areas of similar color in a photo in different ways. For example you may have an image that has a blue sky as well as other elements which are also blue. If you adjust the image using a single black and white adjustment layer all the blues in the image will be converted to a similar grey value and this may not be the effect that you want.

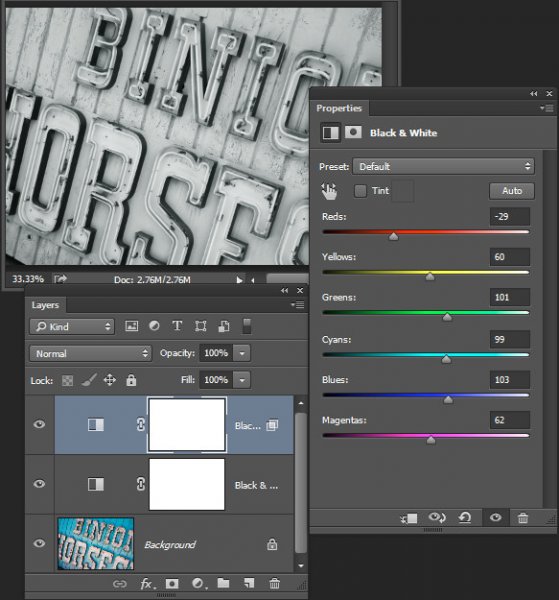
    When you need to adjust two areas of similar color in an image in different ways you can apply two separate black and white adjustment layers. To do this, add the first black and white adjustment layer and use it to adjust the image the way you want it to look for one area of color. In this example I’ve adjusted the top of the image.

    Black-and-white-in-photoshop-12

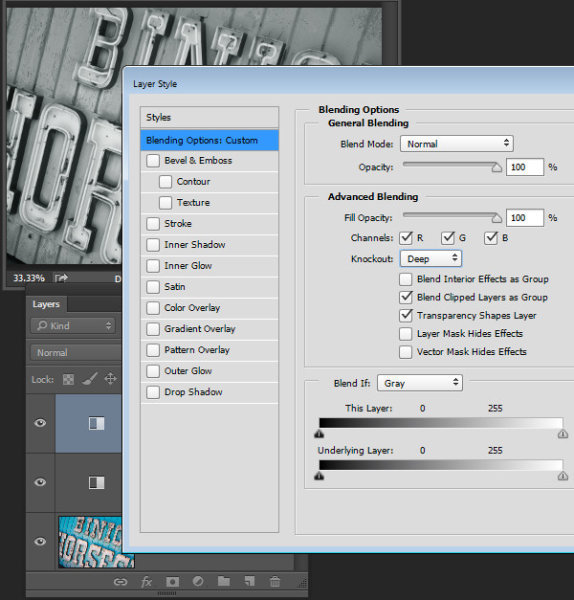
    Then add a second black and white adjustment layer to the image. At this point you may notice that making changes using the second adjustment layer has no effect on the image at all. This is to be expected – a black and white adjustment layer won’t have any effect when applied over the top of what is basically a black and white image. You can change this behavior by selecting the new adjustment layer and choose Layer > Layer Style > Blending Options. From the Knockout dropdown list select Deep and then click Ok.

    Black-and-white-in-photoshop-13

    Now you can use the new black and white adjustment layer to fine tune the image. In this case I used it to adjust the image so the bottom part looked the way I wanted it.

    Black-and-white-in-photoshop-14

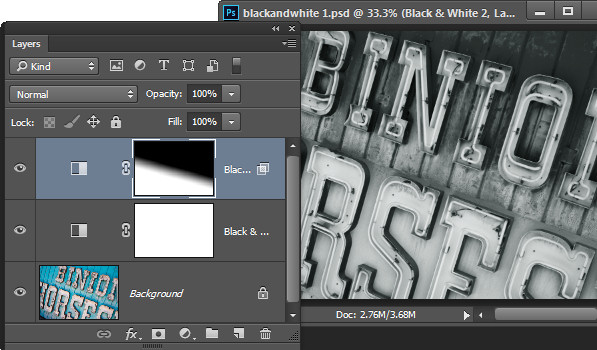
    To finish the image you can blend the two adjustments using the masks on one or both adjustment layers.

    For this example I targeted the mask on the topmost adjustment layer and filled it with a black to white linear gradient using the Gradient tool. I dragged down at an angle across the middle of the image so the gradient would follow the angle of the sign. The result is that the top most black and white adjustment layer no longer has any effect on the topmost part of the image (the mask is black in that area).

    Black-and-white-in-photoshop-15

    This process has allowed me to convert two areas of the photo, both of which contain a similar blue color to different tones of gray, one light and one dark.

    If you prefer to watch a video showing these adjustments see below for the same steps:

    This second video shows how to craft custom black and white images in Photoshop:

    For tips on using Lightroom for your black and white conversions try these:

    • Tips for Shooting and Processing Better Black and White Photographs
    • How to Convert Photos to Black and White in Lightroom
    • Create Better Black and White Photos Using Local Adjustments in Lightroom 5
    • 3 Tips for Better Black and White Conversion using Lightroom

    Do you have any other tips for black and white conversion using Photoshop?

    The post How to do Great Black and White Conversions Using Photoshop by Helen Bradley appeared first on Digital Photography School.


    Digital Photography School

  • Photographer’s Guide to iPhone 6: Capabilities, Tips & Gadgets

    After many months of waiting, the iPhone 6 and its big brother, the iPhone 6 Plus, have finally arrived! Apple made the decision to keep the 8-megapixel sensor for the iPhone 6 iSight camera, despite other smartphones which have up to 20-megapixel cameras. However, the iPhone 6 camera is not the same as the one you’ll find in the iPhone Continue Reading

    The post Photographer’s Guide to iPhone 6: Capabilities, Tips & Gadgets appeared first on Photodoto.


    Photodoto

  • Why Prime Lenses are Better Than Zooms

    35mm - SoHo Fire Escapes.

    35mm – SoHo Fire Escapes, NYC

    How heavy is your camera?

    If you have an SLR with a zoom lens attached, the answer is pretty damn heavy. A large SLR body, such as a Canon or Nikon with a 24-105mm lens attached feels like a tank; forget the 70-200mm.

    Of course there are many situations when using a zoom lens is ideal. However, I’m hoping to try and convince you to ditch the zoom lens for a prime.

    But what if I need the zoom? What if I don’t have the perfect focal length? – I have heard those questions more times than I can count. A wise photographer once told me that you will get the same amount of good shots no matter what lens and camera you use; they will just be different. Zoom lenses can be just as limiting as prime lenses, and prime lenses can be much more freeing than zoom lenses.

    By walking out the door with a single prime lens, you are limiting yourself. There are certain shots that you will not be able to capture, that is a fact. However, the benefits can far outweigh that single negative. Prime lenses cause you to take more time to compose your shot, since will you need to zoom with your feet. This can make you think more critically about your composition. A prime lens will free you up to focus on the subjects in the range that the prime lens works best at. You will become much better at finding things within that range and your work will be more consistent because of these limitations. A prime lens makes you think in a certain way, since it is tougher to use. The limitation ends up being an advantage in the long run.

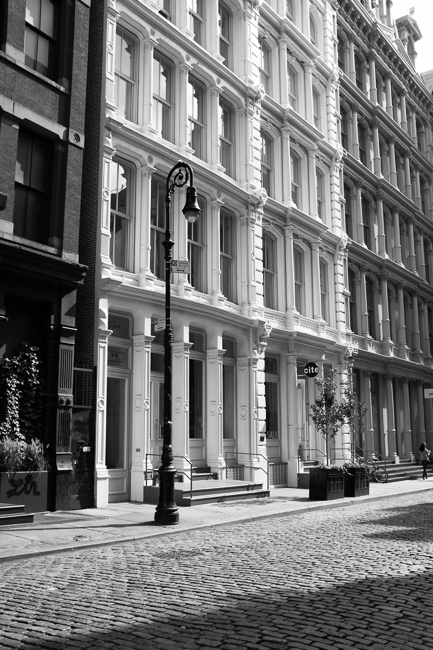
    35mm - Cast Iron Building, SoHo

    35mm – Cast Iron Building, SoHo NYC

    Think about how many famous photographers throughout history used prime lenses.

    Prime lenses are lighter. They make your camera more fun to take out. You don’t need a heavy camera bag and you will be able to walk further, explore more, and capture more images. You will have a bounce in your step that you didn’t before. You will be able to bring your camera with you on a daily basis. That will more than make up for missing out on a few shots that a zoom lens could capture. Photography will become more fun! It will become more of an element of your everyday life, versus something that takes planning to do.

    After awhile you will learn to see specifically in that focal length, and this is where things really click. It will almost feel like the camera isn’t there. You will be faster and more intuitive as a photographer. This is all because you ditched the zoom in favor of the more limited prime lens.

    Oh, and did I mention that prime lenses are cheaper than zooms? Any money that you will spend purchasing a new prime lens will be saved in medical bills from your neck and back eventually giving out from the weight of that gigantic zoom lens that you use now.

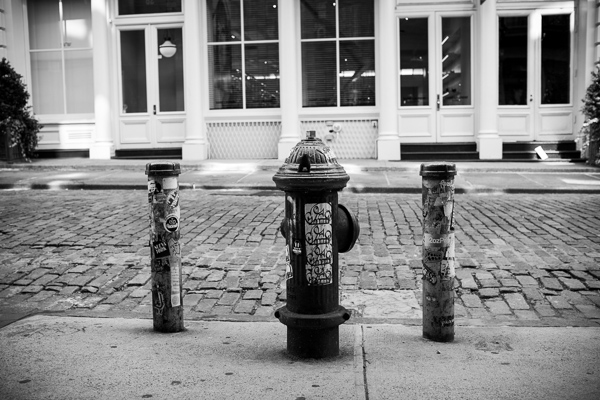
    35mm - Fire Hydrant, SoHo

    35mm – Fire Hydrant, SoHo NYC

    So what focal length should you choose? I prefer a 35mm lens (on a full frame). It is just wide enough to work well anywhere but not too wide. Other common focal lengths are 28mm, 50mm, and 85mm (which is a fantastic focal length for portraits). Rent a few lenses and try them to see what you like best.

    After a few days of using a prime you may realize that the real limitation was with your zoom lens.

    The post Why Prime Lenses are Better Than Zooms by James Maher appeared first on Digital Photography School.


    Digital Photography School

  • How to Photograph Lightning – the Ultimate Guide

    If someone told me I could only take pictures of one thing for the rest of my life – I’d think about it for awhile, and then choose lightning. Luckily I live in reality and no one will ever say that to me, but it does speak to how passionate I am about photographing this stuff.

    I’m a storm chaser at heart, so I love everything about weather. It would be difficult if I couldn’t also capture awesome dust storms, supercells, flash floods and whatever else might happen out there. But lightning – I love lightning.
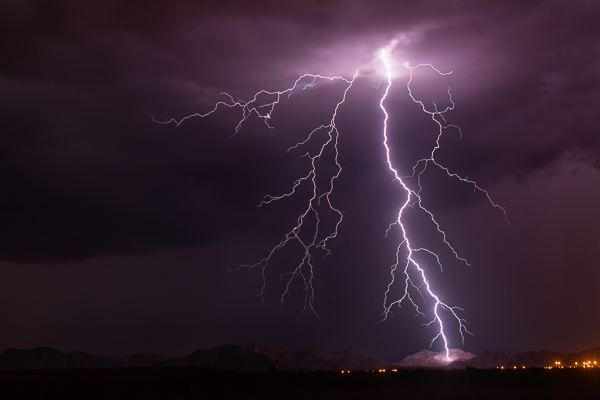
    MountainSide

    “MountainSide” – Buckeye, Arizona – 50mm, ISO 100, f/8.0, 20 sec

    The Adrenaline Rush

    What is it about lightning? I’ve lived in Arizona my entire life and I grew up loving our summer monsoon season. One of my early memories as a kid was sitting on our back porch with my dad and being blinded by a strike hitting the field behind our house. I still remember being blinded for a few seconds. It was that close and that intense.

    Arizona is a fantastic venue to capture lightning. We get a lot of high-based storms, which means you tend to see more of the strike. Our landscape is beautiful, from deserts and cacti, to rolling grasslands and the Grand Canyon. I once met a guy in Tucson who was spending two whole weeks in Arizona solely to photograph lightning, and he was from Germany!

    Trying to capture lightning is an adrenaline rush. It’s addicting. You can look at the back of your camera and know you just caught an epic bolt, but still not be satisfied, or maybe that’s just me. It’s never enough. I want more. More and more.
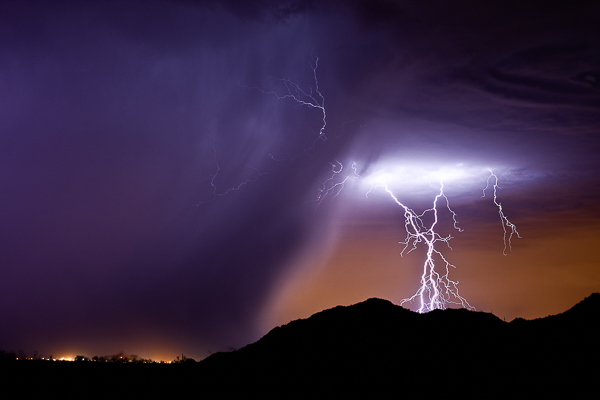
    PurpleRain

    “Purple Rain” – Highway 347, AZ 50mm, ISO 200, f/6.3, 25 sec

    Lightning is freaky. You want to get close, but not too close. The closer the better – sometimes. Suddenly it gets quiet and you realize a storm just built up right over your head and a strike from nowhere makes you double-check your shorts. I am usually out in the middle of nowhere, late at night, and there is something crazy spooky about seeing an entire landscape get lit up in the blink of an eye.

    What makes lightning fun to photograph is the uniqueness of it all. No two bolts are the same. You never know what you’ll end up with. Plus, if you are all alone out there, no one else can have the same image as you do.

    Finding the Storms

    This is in reality the hardest part of photographing lightning. You may worry about your settings and lenses and all that, but if you do this for a while, that all becomes second nature. Finding the storms is the difficult task. You may live in a part of the United States, or even the world, where lightning just doesn’t happen much, if at all. But if it does, then you have to learn the patterns and watch the forecasts to be prepared.

    The best way to do that here in the U.S. is to bookmark the webpage of your local National Weather Service, which you can find on NOAA.gov. Their pages have links to radars where you can track the storms. If you want to really get intense, grab a copy of RadarScope (iOS or Android) to have it on your Smartphone anytime you want.

    If you don’t have lightning in your area, you may want to invest in a storm chasing tour, or vacation somewhere like Arizona during the summer.
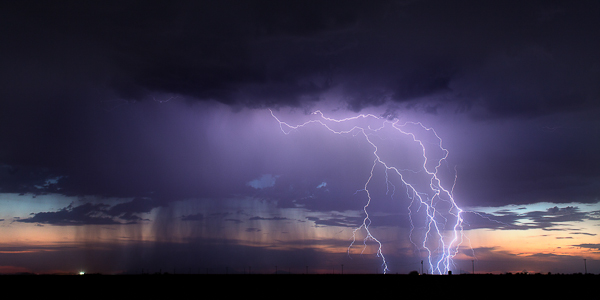
    BUckeye

    “Buckeye” – Buckeye, AZ – 50mm, ISO 160, f/10, 8 sec

    Tools You Need

    Okay, these next few sections are what you really care about anyways, so let’s get to it. Tools, meaning things you need to capture lightning.

    The fact is, I started out with a little point and shoot that took three shots per second. I actually caught a crazy strike with it on my third or fourth time out, and that’s what really got me hooked. So you can literally capture lighting with basic cameras if you want to depend on luck. There are even apps for your Smartphone.

    But if you want to eliminate as much luck as you can AND capture mind-blowing, jaw dropping images – you’ll likely want to upgrade your tools. You don’t have to go crazy though. Here’s the basic list of what you need:

    • A DSLR, SLR or any camera that lets you control the length of your exposure.
    • Lenses of course. Varying focal ranges are a must, although I’m a fan of primes.
    • A tripod – the sturdier the better.
    • A wireless shutter release or intervalometer.

    That’s really the essentials. You don’t need the most expensive equipment either. Basic DSLRs are a good starting point. My first upgrade from the point and shoot was a Canon Rebel XSi. It did the job for about a year, but I knew I wanted to go full frame eventually.
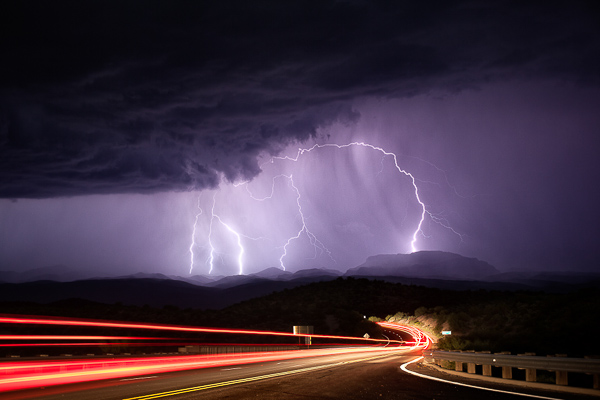
    Mammoth

    Mammoth, AZ – 50mm, ISO 200, f/6.3, 25 sec

    I use Canon products, specifically a couple of 5D Mark III’s and a Mark II as a backup. The lenses I carry on a storm chase:

    • Rokinon 14mm f/2.8 (mostly for time-lapse photograph, but also for big landscape shots)
    • Canon 16-35mm f/2.8
    • Canon 17-40mm f/4.0
    • Canon 35mm f/1.4
    • Canon 50mm f/1.2
    • Canon 135mm f/2.0

    Your tripod just needs to sturdy and heavy duty. When you are shooting during a thunderstorm there will usually be wind issues. I’ve had tripods get blown right over by a strong gust of wind. I haven’t spent as much on tripods as I do on camera gear and time-lapse tools, but I use Manfrotto legs and heads. If you can afford it, upgrade to a tripod that has independent legs and a steadier base, that will allow you to shoot with a wider stance.

    Finally, you will need some kind of external shutter release. It can be anywhere from your basic wired cable release, all the way up to a wireless intervalometer. I personally like the wireless intervalometers because you can control your camera from inside the car where you are safer than standing outside during a lightning storm. I also love the wireless ones because the cabled ones can get tangled in your tripod legs if you are packing up in a hurry. They are are just easier to use.

    A Little About Lightning Triggers

    Another external control for lightning photography is a lightning trigger. The brilliance of one of these triggers is that it senses the flash of lightning and automatically fires the shutter on your camera. You can comfortably put it on your camera, day or night, and sit back in your car and let the trigger do all the work.
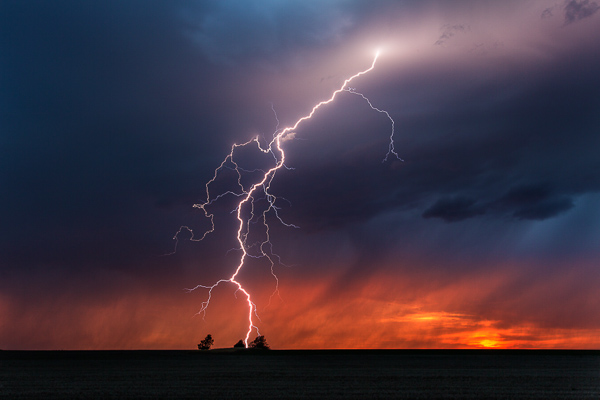
    Kansas

    Scott City, KS – 33mm, ISO 100, f/16, 2 sec, lightning trigger

    The tough part about lightning triggers is finding one that is reliable. I’ve had three different ones and it took until I bought one of the most expensive (The Lightning Trigger IV) for me to feel like I found one that works. I’ve had a few of the $ 100-200 variety and they don’t always trigger from a flash of lightning. That’s kind of the point right? So to me, if you can save up for a good one, it’s worth the price instead of spending $ 100 two or three times trying to find one that works.

    My opinion on lightning triggers is that they are good during the day, but become less useful the darker it gets. Most photographers like to use a trigger because it helps for shooting daytime lightning, and it also saves your shutter. During the day, you could either take a ton of photos in a row and hope to get lucky, or you could use a trigger. The triggers works then. Great invention.
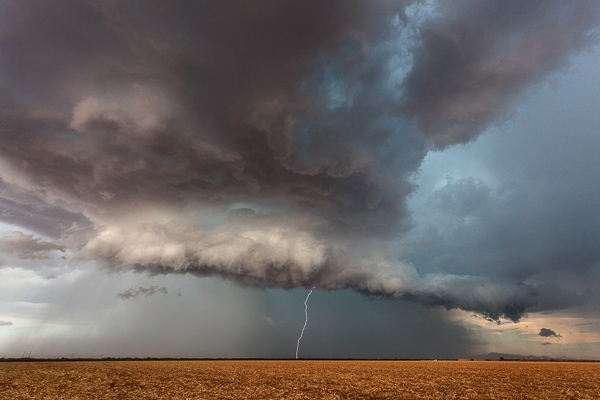
    RedRock

    Red Rock, AZ – 17mm, ISO 400, f/8.0, 1/160th, lightning trigger

    There is also an argument that it can save your shutter at night too. But whenever I’m out shooting lightning, there is enough flashing going on that my trigger is going to keep firing over and over anyways. The anatomy of a lightning bolt is that there are parts of it that could be missed if you wait for a trigger to fire your shutter. I’d much rather increase my odds of a capturing the entire lightning bolt by doing 15-25 one second exposures over and over. Once the sun goes down and I can start getting two or three second exposures, I take off the trigger and use the intervalometer. But that’s just me!
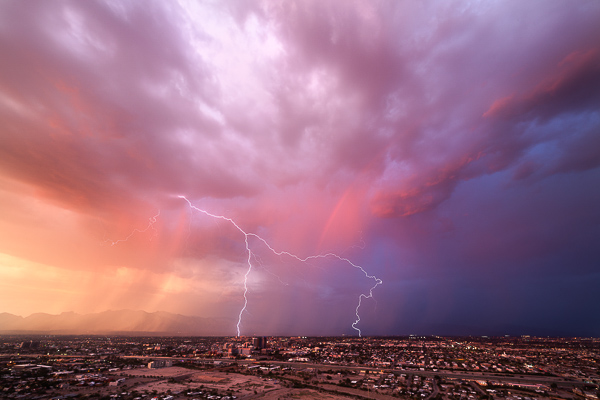
    TucsonSunset

    Tucson, AZ – 14mm, ISO 50, f/16, 2 sec, time-lapse capture

    During the day, since I love to do time-lapse, I’ll actually get lucky enough to capture bolts just from that, without a trigger. Taking shots every one or two seconds allows you to record a sweet time-lapse and also hopefully snag a few lightning strikes. This has happened to me countless times. I’ve even captured a few with an even longer interval on the time-lapse. You might give it a try if you are interested in time-lapse at all.

    Camera Settings

    People ask me all the time “What are good settings for taking lightning photos?” and the answer is that it varies just like anything else in photography. But there are some good guidelines to get you started.

    For daytime lightning, you want to do your best to to have as slow of an exposure as you can, which might mean f/16-f/22 and maybe a neutral density filter. I personally don’t like ND filters for this kind of photography because when I’ve used them in the past, they tend to wash out the lightning a little, but it’s something to at least try. You might slap an ND filter on, increase the ISO to 200, and hope that helps the bolt show up a bit more intensely. Daytime lightning is tough regardless. The best results are usually when it’s really dark with heavy clouds, without much sunlight. The strikes are going to show up a lot better against a dark background.
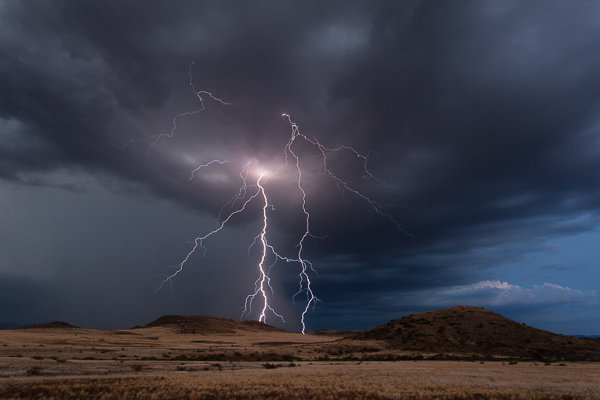
    CampVerde

    Camp Verde, AZ – 23mm, ISO 100, f/18, 6 sec

    Nighttime is a whole different ballgame. There are lots of things that can alter your settings. Are you in the city? Complete and utter darkness? Is there a full moon? Are the bolts coming in fast and furious, or spaced minutes apart? Is the lightning a only a few miles, or 25 or more mile away?

    Here are some situations and common settings to use as the sky darkens on a night out chasing storms:

    • Dusk/sunset: f/10-16, 2-10 seconds, ISO 200. You might raise your ISO even more because the sky still has some light in it and you want the lightning to really stand out.
    • Blue hour – as it gets darker, you will open up your aperture and maybe increase your shutter speed.
    • Once it gets dark, your ISO becomes more important. The lightning flash against a dark sky means you don’t need as high of an ISO or you risk blowing out your bolt.
    • After dark in the city – narrower aperture yields better results with city lights, so you might be shooting at f/10-16 even after dark. The shutter speed would depend on how bright the lights are; same with the ISO. Usually in the city I like 10-15 second exposures.
    • After dark, away from light – wider apertures – typically f/5.6-f/8. You’ll want to drop your ISO to 100 to make sure you don’t have blown out shots. If it’s really dark, you may want longer exposures, 20-30 seconds.
    • After dark, but lots of ambient light, for example, a full moon – shorter exposures to reduce motion in the clouds if you don’t want that.
    • Close lightning – narrower aperture, low ISO.
    • Far away – varied aperture, maybe higher ISO so the bolts show up better.

    The bottom line is none of this is set in stone. You have to get out there and practice to learn the best settings for you and what you like.
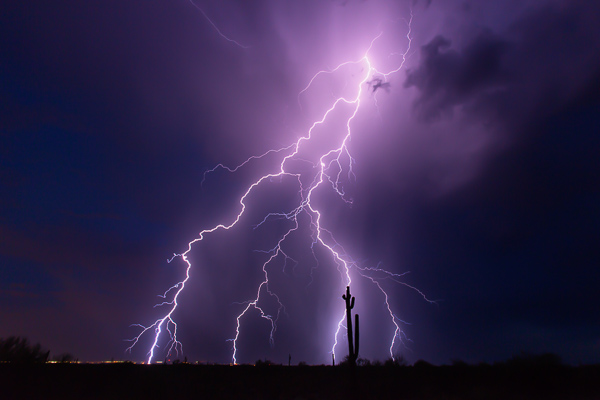
    SaguaroBolt

    “Saguaro Bolt” – Wickenburg, AZ – 16mm, ISO 200, f/11, 10 sec

    The Biggest Things to Watch for:

    •Don’t blow out your lightning. Sometimes bolts are so bright that there is nothing you can do about it. But when you realize the strikes are so intense that you are blowing stuff out, narrow your aperture or drop the ISO.
    •Don’t let your lightning be too dark. Ah the other side of the coin. If your aperture is too narrow and your ISO too low, that distant lightning may not be so bright and vivid. It will require a lot of post-production, and might result in excess noise if you have to increase your exposure to make it look good. You are also probably not going to get a lot of the surrounding clouds and landscapes unless the bolt is very bright. You want to make sure you still have a good exposure so you get details in the clouds and landscape if you can.
    •Cloud ghosting. If you are taking really long exposures for lightning (25 seconds or longer), you will risk seeing ghosting in your clouds as they get illuminated by different strikes over the course of your shot.

    Focusing

    I could have included focusing in the above section, but I find it so important that I wanted to put extra emphasis on it. The biggest, most common mistake I see in lightning photography is out of focus images (close second is blown-out lightning). This seems to be the toughest thing to learn how to do correctly.

    I include myself in that! Even this past summer I was excited about some lightning images only to get home and realize they were out of focus. We all mess this up.
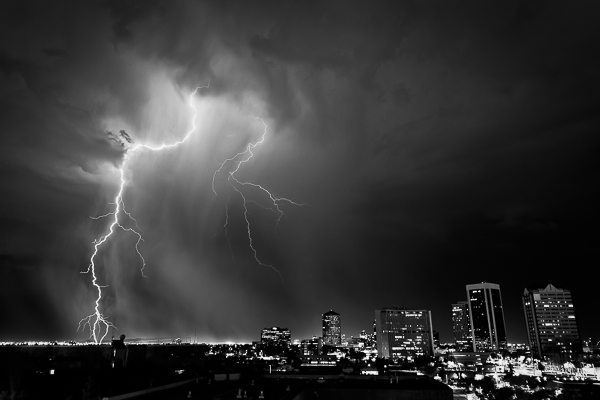
    DowntownPhoenix

    Phoenix, AZ, ISO 200, 26mm, f/8.0, 15 sec

    I think the biggest reason for this is that ofter we rely on the “infinity” setting on our lenses. While some lenses have a hard stop for infinity (I am definitely not well versed in many lenses other than Canon), most of them don’t. Even if it does have a hard stop, is that actually perfect?

    The best way to focus at night:

    • Autofocus on distant city lights if you can. I find this to be the most reliable way at night. Sometimes the moon is out which is another good way.
    • If there aren’t enough lights to focus on, then Live View is your next best method. Use Live View, zoom in (on the screen only not with your lens) to anything you can – even if it’s a single light on the horizon, and manually focus on it.
    • If all else fails, use infinity. But once you get a lighting strike on camera, check to see if it’s in focus. If not, adjust.

    Remember, the wider your aperture (like f/5.6), the tougher the focusing. For example, you could focus on lights that are only a mile away, but the bolt lands five miles away and it might be slightly soft. A narrower aperture really does help with this issue. Once for me, it was so completely dark, I chose to focus on an incoming truck’s lights about a half mile down the road. Turns out, the lightning 10 miles away was out of focus. I cried – a little.
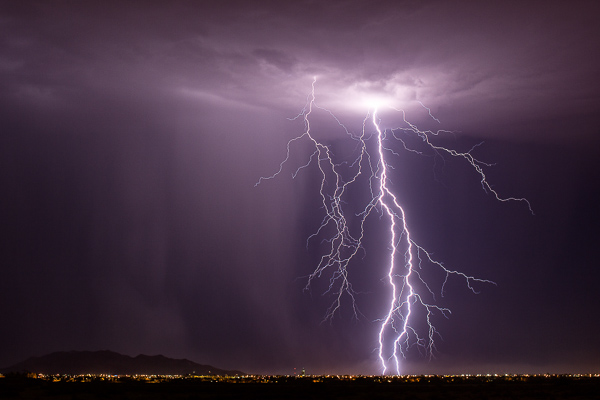
    CasaGrande

    Casa Grande, AZ – 50mm, ISO 125, f/9.0, 25 sec

    Another tip, which I’ve never done myself, is that when you find that perfect infinity spot at say f/8-f/10, put a little scratch on your lens with an X-Acto knife, or a thin line with a paint pen, and just line it up whenever you need it.

    Last but definitely not least – if you don’t have back button focus set up on your camera, then you will need to set your lens to manual focus. You don’t want to go through all the work of focusing on distant lights with Live View, only to take your first shot and have your camera try and focus in the dark! Your absolute best solution here to is look up back button focus on dPS. From landscape to wedding and portrait photographers, this is a must.

    Practice, Stay Safe and Have Fun!

    All my advice is based on my experience. You may find different opinions or thoughts elsewhere, or you might even have your own methods. That’s okay. Figuring out what works best for you is how photography works in general.

    The best advice I can give you though, is to practice. You may not have much lightning where you are, so perhaps plan a trip somewhere (like Arizona) where you can spend a few weeks just shooting lightning every chance you get.
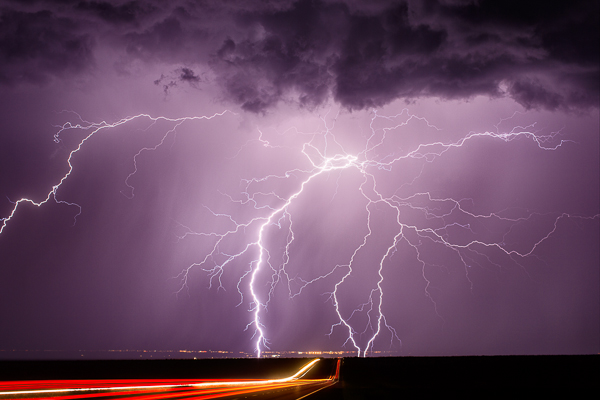
    Whetstone - (Highway 90 near Whetstone, AZ 50mm, ISO 100, f/5.6, 25 sec)

    Whetstone – (Highway 90 near Whetstone, AZ 50mm, ISO 100, f/5.6, 25 sec)

    Like anything in life, practice makes you better. You can read this article and totally have a good idea of what to do, but actually being out there, in the moment, is a different story. I’ve done this enough that I can pull up to a spot and pretty much know my settings before I pull the camera out of the bag. But there are still times when I’m not quite sure and need to take a few practice shots. Not all situations are the same, so you will slowly learn the right settings for each scene.

    Please stay safe! In the last three months, I’ve had lightning strikes hit within 75 feet of me. Yikes. It’s scary for sure. Do this knowing the closer you get, the more risk you run of getting hit. Two storm chasers have been struck by lightning this year. It’s a real danger.

    But have fun. There is nothing like capturing an amazing strike on camera. I wish you the best of luck.

    The post How to Photograph Lightning – the Ultimate Guide by Mike Olbinski appeared first on Digital Photography School.


    Digital Photography School

  • 5 Tips for Newbie Landscape Photographers

    It doesn’t matter if you are a seasoned photographer or a beginner, most photographers want to learn how to make great landscape images. Once you have shot a few hundred sunset shots and a few sunrise shots, you may think you know how it’s done. Then you get out into the wild on a crisp early morning, before sunrise, and try and get some dramatic mountain scene or amazing seascape. Suddenly it’s not that easy. Landscape photography requires more than simply setting up and waiting for the shot. Sometimes you have to go back to a scene four or five times to get the shot you want.

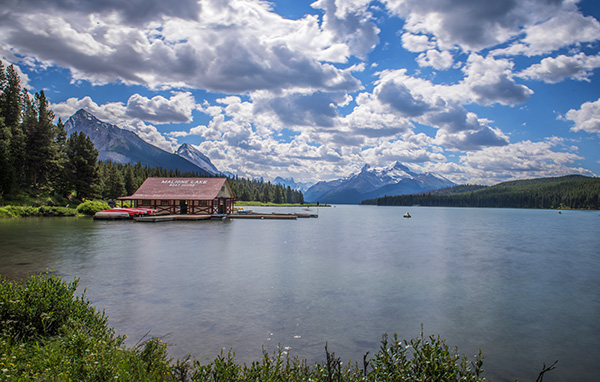
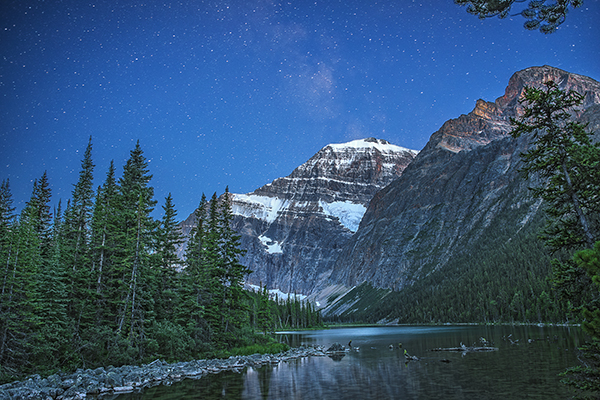
    Canadian Rockies DL1_2975 LR

    The majestic beauty of the Canadian Rockies

    Landscape images can be seductive. When done properly, those viewing the image are transported to that place, they can feel the crisp mountain air or the warmth of the desert. So, you might be asking “How do I get those kinds of shots?” or “I think landscape photography is too difficult, am I good enough?” This article will answer these questions and a few more hopefully. The truth is, landscape photography is not difficult, but it does require dedication and passion. It will often require being up before sunrise, staying out late into the evening, or even early hours of the morning. It also requires good knowledge of your gear. Let’s take a look at how you can start getting better landscape images.

    1. How to find good landscape photography locations?

    Depending on where you live, you may have to drive somewhere to get some great landscape scenes. That may not be far, or you may need to get out of your city or suburb. What I often do before I visit a new place is google the area for dramatic landscapes. I will do a search like landscape scene canadian rockies and see what comes up. Sometimes you will see a vista that you didn’t know was in the area and you can start getting some ideas of what you will able to shoot.You can do the same on 500px or even Flickr; do a quick search for the name of the place you are visiting and see what comes up. From there you can narrow down what type of scene you want to shoot. Maybe you want to shoot from the mountain tops overlooking the city, a seascape, or even a forest scene.

    Once you have some idea of what you want to shoot you then need to figure out the lighting. My go to tool is The Photographer’s Ephemeris. What I love about it is that I can simply drop a pin on a map and immediately see where sunrise and sunset will be, as well as moonrise. It gives me the direction of the sun and what time sunrise and sunset will happen. You can decide what time of day will work best for the shot you are planning.

    2. What time of day is best for landscapes?

    The Golden Hours are the best time for dramatic colours in landscape photography. You can also use blue hour to make some beautiful shots too; I prefer it for cityscapes, the city lights contrast beautifully off the blue sky. Golden Hour is your guide here. You will need to shoot at sunrise, sunset, or both, but plan beforehand though. There is nothing more frustrating than arriving at a scene, only to find out that as the sun is setting and your subject is in shade. If possible, visit the scene the day before at the time you anticipate shooting and watch where the light moves, that way you will know exactly where to set up your shot.

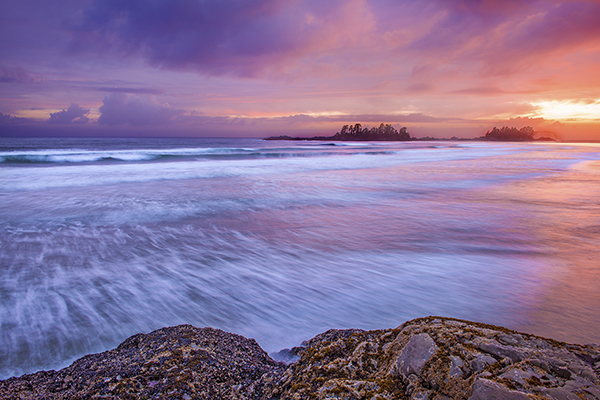
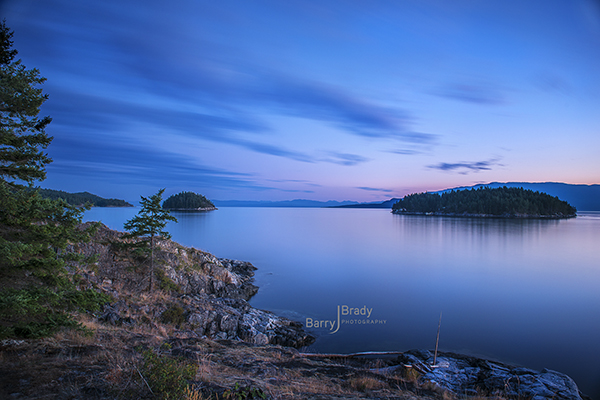
    Moving water and a warm sunset make for a great landscape scene

    Moving water and a warm sunset make for a great landscape scene

    3. What camera gear do I need for landscape photography?

    A Camera

    Of course, this is a critical part of the whole formula, however, getting great landscape images does not require a 40 megapixel camera. You can shoot landscapes on any DSLR with 10 megapixels and more. The reason you don’t want to be shooting landscapes on a four megapixel camera is that you might shoot a great scene. Afterwards, you may want to print the shot nice and big and hang it on your wall, but if the resolution is too low, you may struggle to print a decent size image.

    A Tripod

    Yes, you will need a tripod. If you are shooting at sunrise or sunset, the amount of light will be minimal. You need to shoot at longer shutter speeds so you need to have your camera on some sort of support. A sturdy tripod will make all the difference. The beauty about a tripod is that once you have set up your composition, you can simply keep clicking away and not worry about composing your image each time, unless you move the tripod.

    A Cable Release

    I took a while to buy a cable release (remote trigger) when I first started photography, but once I had it, I wondered why I took so long to get one. A cable release allows you much more freedom. You can simply hold it in your hand, stand away from the camera and release the shutter whenever you want. Also, I like to observe the whole scene, rather than just looking through the viewfinder. I connect my cable release (I use a wired one), step away, and start shooting. Be sure that once you have locked focus to switch your camera to manual focus (or use back button focus),  especially if you are shooting at sunset. If you don’t, what can happen is that as night falls, the camera may struggle to lock focus and this could waste time. The best idea is to set your focus while the scene is still well lit, click it onto manual focus and then shoot away.

    Filters

    Graduated Neutral Density filters have long been the tool of choice for landscape photographers. This is still largely true, however, in recent years, many photographers have started to do more blended images. What that means is that you will expose for the bright part of the scene and take the shot, you will then expose for the dark part of the scene and take that shot. Very often, the bright part will be the sky and the dark part the foreground. Afterwards in Photoshop, you can then blend the two best exposed shots together. This is a very effective technique in tricky lighting conditions and sometimes can work better than a filter. I use a combination of both techniques. I will take some shots with a filter, then take some at different exposures and see what works best afterward.

    The important thing is to make sure you get the best shots while you are out in the field. There is nothing worse than coming back from an early morning or late evening shoot to see that your images did not work out well because you exposed incorrectly. Getting the exposure right in the camera is key. It takes practice, so your first attempts may not be very dramatic. Keep working on it though, you will learn how to see the light, how to use the filters, and how to expose correctly if you practice enough.

    A neutral density filter was used to make the exposure longer  and to soften the water

    A neutral density filter was used to make the exposure longer and to soften the water

    Lenses

    For the most part, a wide angle lens will work best for landscapes. You want to capture as much of the scene as possible in your shot to make the image look majestic and sweeping, and a wide angle lens creates that effect. Be careful not to use a fisheye lens; the distortion may not work well in a landscape shot. When you use a wide angle lens, it is a good idea to have foreground interest, that means, have something in the foreground that anchors the image. If you don’t have foreground interest, thats okay, you can still get some good shots. You will find though, the images with foreground interest tend to work better. You may also want to shoot landscape images with a zoom lens. This can work well, but not on every scene. Try it out, but if it’s not working, switch back to a wider angle lens.

    Stitched Panorama

    This was not a wide angle shot, but it still works well

    4. What settings should be used?

    Exposure settings

    There are no formulas for how to get the best landscape shot; there are a few guidelines though. First, you will generally want everything in your scene to be in focus. That means your aperture should be at f/8, f/11 or f/16. Once that is set, then you will need to set your shutter speed accordingly. You may have to take your shutter speed down to a few seconds to get a properly exposed shot. Thats okay, it adds to the image. Long exposures work really well when there is moving water or clouds in the scene; the water becomes soft and silky as do the clouds. Sometimes, the trees in your scene may wave in the breeze and the blur from that can work well too.

    Another setting to look out for is your ISO. I recommend not to shoot in Auto ISO. This will create all kinds of problems especially at sunset. Your camera will see that the light is fading and it will simply bump up the ISO to compensate for the loss of light, this may result in digital noise, not very good for your landscape scene. Set your ISO to 100 (or as low as your camera goes) and keep it there. Only adjust your shutter speed to make sure you get the shot and of course, you will need to be on that trusty tripod!

    White Balance

    This is a creative choice. Start out shooting your scene in daylight white balance. Avoid using auto WB as this function will try and neutralize the colours in your scene. You want as much colour depth in your scene as possible, so start off with the daylight preset. You can then use the white balance creatively, for  example, using the Fluorescent preset will add magenta to your scene, Cloudy and Shade will add orange or red, and Tungsten will add blue. If you want to emphasize any of these colours in your scene, switch to the WB that will boost that. So, if you are shooting a sunset, use cloudy or shade to boost the reds and oranges. If these don’t work well for the scene, stick to daylight as it will render the colours in the scene correctly.

    5. What’s next?

    Once you return from your shoot, download your images and take a look through them. Normally, you will be doing this very late at night, so it is best to leave them until the next before you start editing them. Whatever your editing suite of choice is (Lightroom or Photoshop) you can get to work on them there. If you have shot some bracketed shots, you can do all that blending in Photoshop. The only guideline here is to take your time editing the images. Choose only the best images to be edited. You may find that you will shoot 100 images but only three or four are worth editing, thats okay. Edit only the best images and spend time making them look as dramatic as the scene you saw! For some quick tips on how to get your images to pop take a look at this article, you can also browse through this list of articles on Photoshop to get some in depth techniques.

    A blended shot, the foreground was shot earlier in the evening and the stars much later. This was blended in Photoshop afterwards

    A blended shot, the foreground was shot earlier in the evening and the stars much later. This was blended in Photoshop afterward.

    So, to wrap it all up, landscape photography is a combination of skill and patience. Skill takes time to develop, and patience enables you to wait for the right scene to unfold. In this fast paced digital life, there is something calming about shooting landscapes. You have no control over the weather, you have no control over the light, you simply have to be there, and press the shutter release if the conditions are right. The beauty is that, if the conditions do work out, the reward will be unreal. You will have some great images and you will have spent some quiet time in nature, enjoying a beautiful sunrise or sunset. The most important tip is to take your time. Don’t rush the process, don’t pack up until you are certain you cannot get a better shot than the last one you just made. Always go out and have fun, even if the light doesn’t play along or the weather is not what you hoped for, use it as a practice session and pretty soon, you will be capturing those breathtaking scenes with ease!

    The post 5 Tips for Newbie Landscape Photographers by Barry J Brady appeared first on Digital Photography School.


    Digital Photography School
  • Taking out the Garbage – 7 Tips for Choosing Your Best Photos Fast

    style2

    One of the most time-consuming and difficult things in photography is going through all the unedited images you took and choosing your best photos, the ones to keep, and which images to pass by. When I first started out as a photographer, I’d get hung up on this every time. I’d spend way too much time agonizing over every photo, and worrying so much about throwing away a good one. If this sounds like you, then read on, maybe I can save you a lot of time and headaches with a few simple tips!

    #1 Don’t take so many in the first place

    When you take hundreds of images at a time, the idea of looking through every photo and choosing the best is daunting! If you take each photo with intent, and wait for the right moments before pushing the shutter, you won’t have so many throw-aways to wade through. Be careful to notice composition as you shoot, and focus carefully. Time is money (and if not money, time is sanity), so don’t waste your time with so many extra images to go through.

    #2 Choose images that reflect your style

    It’s actually quite surprising how much the images you choose reflect who you are as a photographer. Two different photographers could take the same set of images and they’d choose completely different images to keep or toss. This is actually a great thing. It’s what makes you stand out from all the rest, and it lets your heart and soul shine through. I might keep images that others wouldn’t, and toss some that they’d keep, but many people have told me that they can always tell a Melinda Smith, and that is one of the greatest compliments anyone could give me.

    #3 Watch for distractions

    style

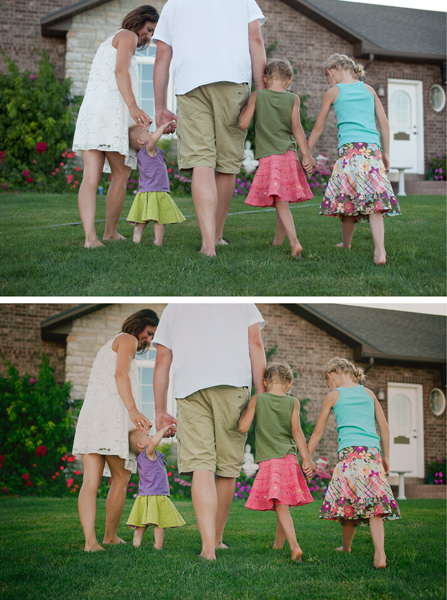
    You may notice something in the photo that you know you’ll have to fix in post-processing. You have to decide if this is a deal-breaker, or if it’s worth the fix. In the image above, there was a garden hose (I should’ve moved it before we took the photo, but it was someone else’s home, and I didn’t know how much I should disturb). I decided that I loved the style of the image (my style) enough that it was worth fixing the garden hose. Other times I might decide that I have enough images that don’t require extra work, and it’s not worth the hassle. It’s your call, but try not to keep too many that require extra time.

     #4 Blurry photos go

    blurry

    If any photos have softness, or blurriness, they’re automatically out. What if the client wanted to print that particular image on a huge canvas? I don’t want to be the one to have to tell them that yes, the expressions are adorable, but it’s going to look horrible when it’s blown up big. It’s so hard sometimes when everything else is great, but if you missed it, you missed it. You can’t fix blurry. You might have to pick a second choice photo, but do you want to be the photographer that gives out blurry photos? There are rare exceptions to this; sometimes a photographer will shoot out of focus on purpose, or a particular photo will work as an abstract blurry image, but be very picky. This rule can also apply to any photos that are way off with exposure. Just let them go!

    #5 Eliminate similar photos

    same

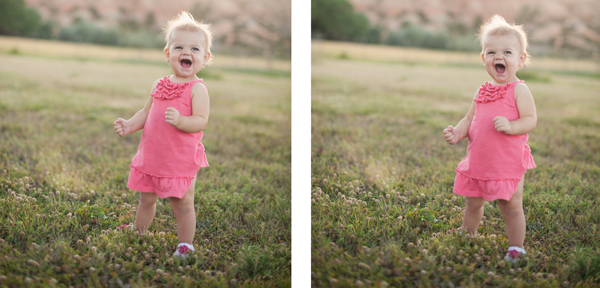
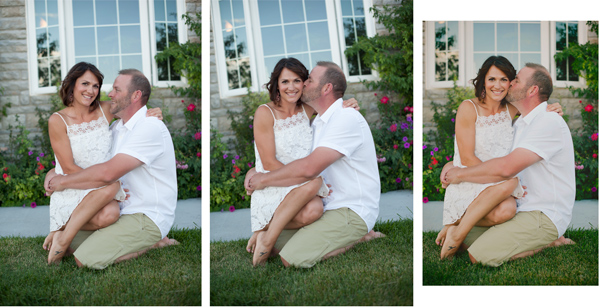
    You may have two (or more) photos that are very similar. They might both be cute, but one must go. You will lose a lot of impact with your collections of photos if many of them look the same. I know that it can be hard to give up a photo that you like, but nobody needs five photos of nearly the same look and pose. Decide which one speaks to your style better, check sharpness, or choose the one that shows the subject’s personality a little better. In the above set I chose the photo on the right. They are almost the same photo, but the one on the right was slightly more enthusiastic, and this little girl was FULL of enthusiasm! I had to keep it.

    #6 Don’t miss the hidden gems

    potential

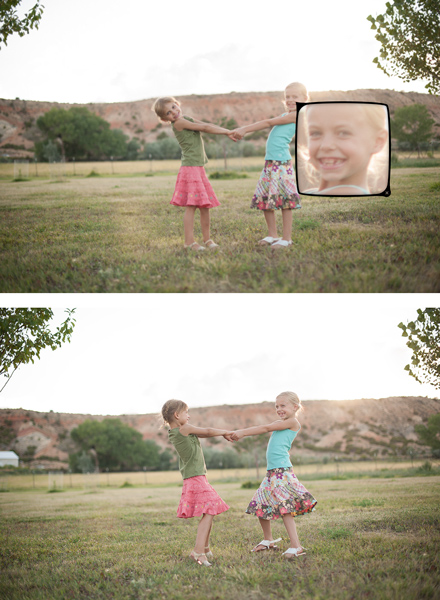
    You might have a photo that you know could be really great with just a little bit of work. Maybe a head swap, or a little bit of magical editing will make it into a photo you absolutely love. Sometimes photos that you might pass by initially may end up being your favorite. Watch for those photos that might be your favorites with a little wave of your editing wand.

    #7 Be ruthless, be quick

    ruthless

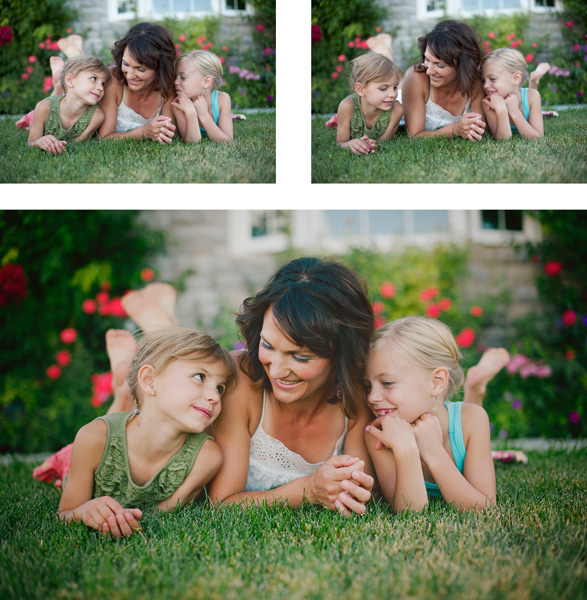
    I know, this sounds like a contradiction of the last tip, but unless you want to be agonizing over every photo for hours, you have to move quickly. You have to be somewhat ruthless as you go through your photos. You can’t edit every single one, and sometimes you just have to make quick judgment calls and move on. In the photos above, the one on the left is cute, but I decided that I liked the connection in the one in the middle the best, so that’s the one that I kept. If I’m having a really hard time giving photos up, I will give them star ratings as I go through them; five stars for definite keepers and four stars for maybes. I usually end up with more five stars than I need, so the four stars automatically go. Sometimes it’s easier to let them go after you’ve given them a fair trial.

    What are some strategies that you use to choose which photos to keep and which to toss? I’d love to hear your ideas in the comments:

    The post Taking out the Garbage – 7 Tips for Choosing Your Best Photos Fast by Melinda Smith appeared first on Digital Photography School.


    Digital Photography School
  • On Assignment: Ben Lurye

    To some a foot bridge abutment, to others a studio.

    I've long kept a picture file of versatile nearby locations for photographing people. This foot bridge abutment on Columbia Road about two miles from my house is a great example, and it actually gets used a lot.

    Above it's seen in normal daylight. But with the right light it offers so many different looks.

    Read more »
    Strobist

  • Mastering Family Portrait Part II: How to Deal with Clients

    So you had your pre-shoot consultation, and you’re ready to go. You get to your location, and the family are all there on time, in happy moods, excited to shoot, and looking great. Except for that toddler who just wouldn’t go down for his nap. (Note: NEVER shoot a toddler during his naptime…EVER!!!) Or that grandfather who doesn’t want to Continue Reading

    The post Mastering Family Portrait Part II: How to Deal with Clients appeared first on Photodoto.


    Photodoto

  • Childhood Obesity – Effects On Body and Mind

    Children and the future have always been seen as signs of hope. However, with childhood obesity being in the way, the future has ceased to be promising and hopeful as parents often desired it to be. This is because obesity as a threat has lifelong and long-term effects that kids face in future.

    Much disheartening possibilities, poor life quality and health, shorter longevity and compromised psychological health are just some of them. Thus with such desolate scenario, adults must now take action to give kids of this generation, a better future. For this to happen, it is vital for them to understand the causes and effects of obesity.

    Causes of Childhood Obesity
    Obesity in children is known to be caused by several factors including:

    Genetics: Truth is, it is more likely for obese parents to bear obese kids. This shows the fact that genetics have momentous influence on obesity. However, just like any other genetic potential, all this can be controlled depending on the surrounding of the kid.

    Lifestyle patterns: A person’s lifestyle is mostly influenced by family activities, culture and food preferences.

    Environmental factors: Besides genetics and lifestyle patterns, there are other environmental factors, which are very influential. They are the major issues that the bigger society should curb. Some of these factors include processed food surplus with preservatives sold in groceries, food commercials that support unhealthy foods and new technologies that promote sedentary lifestyle among many others.

    The good news is, all these can be restrained mostly through parental care. This is because of the wide scale patronage. But with working class moms of this generation, the whole situation again becomes more complex.

    Effects of Childhood Obesity to the Body and Mind
    Obesity among both adults and kids can bring grave medical disorders. Kids are prone to develop major health concerns such high blood pressure and high cholesterol that make them liable to heart illnesses as grownups. According to private study, Type 2 diabetes, which used to be a disease for adults, is nowadays noted to grow in obese kids. However, kids with normal BMI are free from such disorders and run a lesser threat of catching the same during maturity.

    The most worrisome childhood obesity effect is mental health. This is because the effect can be immediate and could run to lifetime potentially if not addressed at an early stage. Obese kids have a low self-esteem and feel discriminated by other kids because they think they are different and worse than other kids. According to a study performed by Schwimmer in the year 2003, overweight kids compared their quality of life to those of youthful chemotherapy cancer patients.

    The study further proceeds to reveal that various obesity-linked problems affect these childrens’ wellbeing. Such problems include bullying at school, sleep apnea, difficulties in playing many sports and fatigue. As if this is not enough, overweight kids are much more likely to drop school leading to miserable lives without employment or low salaries.

    Help the Kids Feel Better
    With a society that has been filled with biased cultures and many stereotypes, feeling discriminated by these kids is not so imaginary. Bullying comes from friends and adults like teachers and families. As the children internalize this feeling, they tend to feel more inferior, imperfect and also lose aspiration.

    The powerful communication presented to them by the society at large about the idyllic body weight only help to exacerbate their psychological sufferings. This brings up a question that everyone should ask themselves. Does everything change for the better as these children become older disputed rather than conquered? There are very few instances when surmounting the odds made them successful. However, statistics show that many of them end up defeated with the rest of their lives becoming poor and depressed.

    After all is said, there are various things all responsible adults can do to soften childhood obesity effects. In the United States, solutions by Surgeon General’s “Call to Action to Prevent and Decrease Overweight and Obesity” were proposed. Most of them lied within the capacity of what parents may do for their kids. Regrettably, not all environmental features can be controlled by these kid’s parents. Thus, the only thing left is to hope that the society in this generation will wake up with this major call.

    Your Child’s Health

  • Western Digital’s My Book Thunderbolt Duo, An Awesome Way to More Securely Store Your Photos

    Western Digital's My Book Thunderbolt Duo, An Awesome Way to More Securely Store Your Photos

    For the past month or so I’ve been testing out one of the 8TB Western Digital My Book Thunderbolt Duos and I have to say I dig it. Before trying this out, my entire storage setup was built around Drobos. I’ve got 2 Drobo 5Ds with 15TB each in them and a Drobo Mini.

    I was interested to see what the performance would be like with Western Digital’s large storage solution and I have to say I’m a fan.

    What I like about it:

    1. It’s quiet. So quiet. My Drobos are not bad, but the Western Digital My Book Thunderbolt Duo is even quieter. You don’t even know it’s on or there, except for the tiny little pinhole light that is on in the front, and of course you see it on your Mac. For some reason one of my Drobo 5Ds feels like it almost goes to sleep sometimes. When I try to access it in the finder I have to wait a few seconds and I hear it powering up a bit. This doesn’t happen with the My Book Thunderbolt Duo.

    2. Thunderbolt is sooooo fast. Whoever invented Thunderbolt should get a Nobel prize for speed. I can’t believe how quickly I can copy hundreds of gigabytes of photos around.

    3. The Duo is a bit cheaper than the Drobo for those who may be on more of a budget and need less storage. To get 4TB of replicated storage on a Drobo 5D I’d have to buy about 6TB worth of drives. This would cost me about $ 800. You can buy an 8TB My Book Thunderbolt Duo for about $ 650 or so. You can mirror the drives so that you get two copies of everything or about 4TB of replicated storage. Because the Western Digital My Book Thunderbolt Duo doesn’t rely on a proprietary format for replication, if one drive fails, you would always have a perfect backup copy on the other. I haven’t had a problem with Drobo’s proprietary format before, but it’s something that some folks have criticized in the past.

    4. Primary data is automatically backed up. I can’t use a backup strategy that requires my manual contribution. With both the Drobos and the My Book Thunderbolt Duo your primary versions of photos are more secure.

    5. The Western Digital My Book Thunderbolt Duo is smaller than the Drobo 5D and much lighter.

    Setting up the My Book Thunderbolt Duo was easy. It’s just plug and play. Similar to my Drobos.

    I know a lot of people will probably comment on this post about how they are doing things even cheaper by building their own solution with their own replicated in home RAID servers, etc. That’s just great, but I’m not a very technical guy when it comes to computer hardware and I’d wayyyyy rather pay a little bit more and have a Thunderbolt solution that is just plug and play, without me having to do any work, or do any coding, or manually buying and installing drives into a server body and all that. Different strokes for different folks though and each person should do whatever works best for them.

    There is also a 4TB and 6TB version of the My Book Thunderbolt Duo. You can learn more about them including all of the technical specs on Western Digital’s site here.

    Mmmmm... 8TB of @westerndigital storage.  Looking forward to trying this puppy out!

    A HUGE disclaimer on any device like the Drobo or My Book Thunderbolt Duo. These solutions may protect you against hard drive failure, but they will not protect you against fire, theft, etc. For that reason you may also want to incorporate both offsite and/or cloud storage to whatever your backup strategy may be. I see replicated hard drives really only as a first line of defense. In my own case I also purchased a large fireproof gun safe and when I’m out of the house or on a trip or something I usually lock my drives up in there. I also have off site backup storage for my images and I’m actually working on a plan this year to begin moving my offsite storage into a bank security deposit vault.

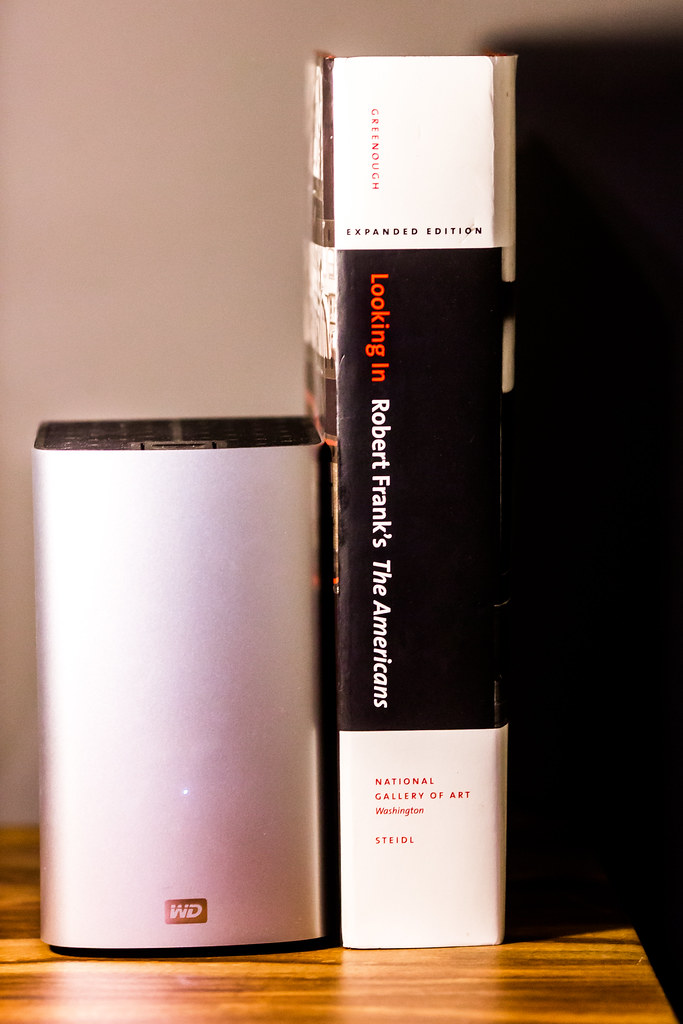
    The book next to the My Book Thunderbolt Duo by the way to compare size is the excellent expanded edition version of Robert Frank’s The Americans which was reissued a few years back and is *highly* recommended. One of the best photography books ever published. It’s one I go back to and revisit over and over again.


    Thomas Hawk Digital Connection