Category: Photography

  • Six Months with the Fujifilm X-T1

    You have probably read about it. You may have a friend who bought one. You may have noticed it on the streets. You have most certainly seen one in a camera store window. The Fujifilm X-T1 is currently one of the most popular mirrorless cameras, and is the model that is persuading many people to leave their DSLRs, be they enthusiast or professional photographers. For the past six months, I have been using it in various situations to discover exactly why people have fallen head over heels for Fujifilm’s high-end model.

    Six months x t1 DPS image 1

    Dials versus menu system

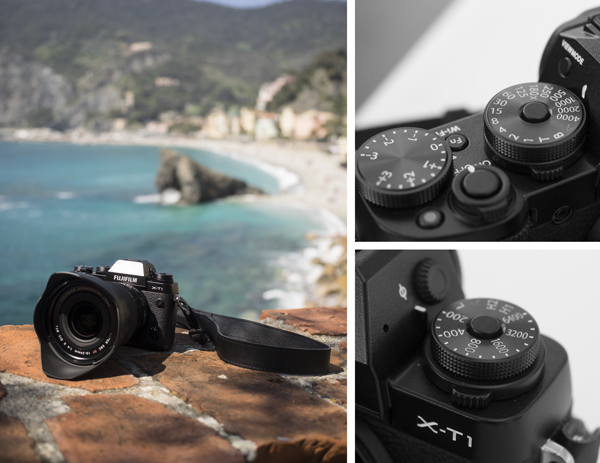
    I began using the X-T1 during a trip in April to Cinque Terre, Italy. The first aspects you notice about the design are its manual control dials inherited from SLR film cameras. (The X-T1 itself was inspired by the Fujica.) If you are familiar with film cameras, you most certainly already know this type of layout. If, like me, you mostly shoot digital, it is something you can learn to appreciate.

    Most of the time I shot in aperture priority so I didn’t use the shutter speed dial much. The same went for the ISO dial, which I kept at 200 during the day and set to Auto with a limited maximum value in low-light situations. At first, these manual dials seemed more like a tribute to the past than something that could benefit my shooting.
    Six months x t1 DPS image 2

    Then, on the last day in the Cinque Terre, I decided to use the camera strictly in manual mode. That is where I started to appreciate the difference. Walking through the hills and coloured towns, I started to memorize the ideal settings for each situation. Normally I would check the metering on either the LCD or the EVF (electronic viewfinder) to see if the picture was under or overexposed but the more I used these dials, the more I remembered which shutter speed I had used in a similar situation.

    Seeing your settings marked on physical dials rather than on a digital screen helps you remember them better. Once you get used to it, you will start to set your exposure even before composing your image. The advantage is that you can concentrate on your composition. It takes some practice but it is something you will enjoy once you gain confidence in your abilities.

    Most Fujifilm XF lenses have an aperture ring. Used in tandem with the dials and sub-dials of the X-T1, you can change all the most important settings without ever having to check the LCD/EVF or dig into the Quick Menu.

    The only complaint I have is that Fujifilm doesn’t physically mark the aperture values on all of its lenses. Some like the 35mm f/1.4 have them, but the XF 10-24mm f/4 I bought with the camera does not.

    Portrait test
    Six months x t1 DPS image 3

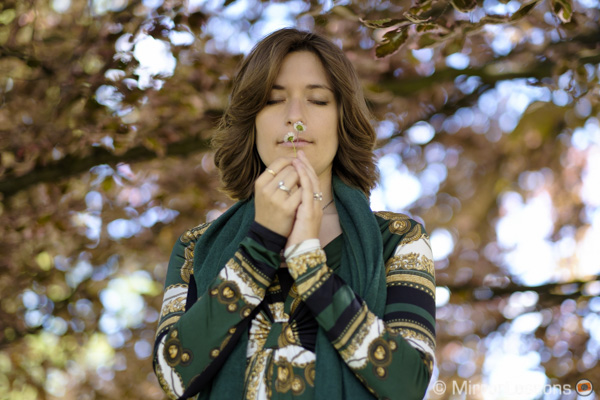
    The second great moment I had with the X-T1 was in May when I tested the XF 56mm f/1.2 lens. I used it for a portrait session in natural light. This particular example helps me summarize the great image quality this system can deliver. The X-Trans APS-C sensor found in the X-T1 wasn’t something new to me because I had already used the X100s and the X-Pro1. What I like about this sensor is the colour palette rendition. The way in which the colours are reproduced is less digital in comparison to other cameras. They aren’t necessarily better; they are just different. They don’t exactly emulate film, even though Fujifilm likes to call its profiles Film Simulation Modes. My favorite is Astia/soft as it maintains a vivid tone but with softer rendering and less contrast.

    During this portrait session, I also appreciated working with the ProNeg presets, especially now that they are included as camera profiles in Adobe Lightroom. This allowed me to use the RAW files and keep the original colours produced by the camera. I also love the delicate skin tone renditioning, and the vast dynamic range.

    If you like cameras, you probably like lenses even more. Often the glass in front of the sensor is as important, if not more important, than the camera. Shooting with the 56mm f/1.2 showed me that Fujifilm cares as much about its cameras as it does lenses. The quality of Fuji’s primes is top-notch and I can understand why many photographers have started to use the X-T1 and 56mm combo for weddings and portraits. The gear is light, yet gives you quality that is as good as a DSLR system. My other favorite lenses are the 35mm f/1.4 and the 14mm f/2.8. The zoom lenses also deliver great performance, including the kit lens.

    Autofocus

    Six months x t1 DPS image 4

    An aspect for which Fujifilm cameras have been criticized is the autofocus. When the X-Pro1 was released, it was slow but they gradually improved it with firmware updates. The X-T1 represents the best of what Fujifilm has to offer in the autofocus department at the moment. To test it properly, I shot bike races and a marathon in June with the 10-24mm f/4 and the XF 55-200mm f/3.5-4.8.

    If you’ve ever tried shooting a marathon runner coming towards you with a long focal length, you’ll know just how challenging it is to keep him in the centre of the frame. Why is this important on the X-T1? Because even though it has continuous autofocus, it doesn’t include real autofocus tracking that is capable of following a subject within the frame like other compact system cameras and DSLRs. This means that you have to keep the AF point on the runner at all times. In general, I’ve found that the X-T1 works better in AF-C with a single large focus point and the 7.5 fps (frames per second) Continuous High shooting mode selected.

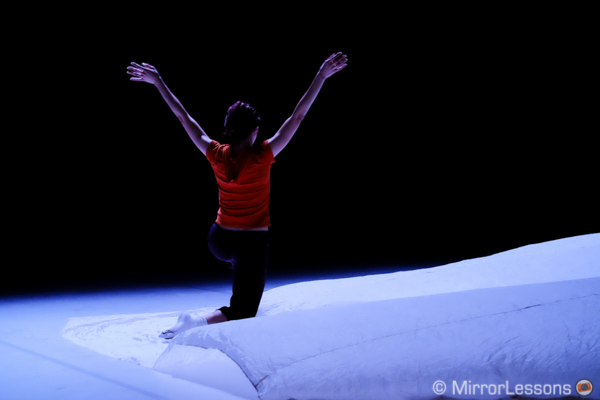
    Overall, the camera performs really well for action photography. It passed the test for marathon runners, bike races and bike polo. It even worked at a contemporary dance rehearsal, a challenging low-light situation. In the end, it is simply a matter of understanding the best settings for the AF system and helping the camera with the composition.
    Six-months-x-t1-DPS-image-5

    In June I also used the X-T1 for a couple of events. For one of them, the opening of a new shop in Turin, I decided to take some shots by manually focusing with the 35mm f/1.4. I love this lens but being one of the first releases for the system, it also has the slowest autofocus speed. What’s more, while the AF-C is very efficient on the X-T1, I sometimes find the AF-S unpredictable, sometimes it won’t even lock in ideal shooting conditions.

    Six months x t1 DPS image 6

    Thankfully, the X-T1 possesses the best electronic viewfinder on a digital camera. The lag time is almost non-existent (0.005s), and the magnification is 0.72x, making it the biggest EVF on the market. If you wear glasses like me, you will find it easy to use, especially with the X-T1’s various manual focus assist options. You get the standard magnification and peaking, as well as two unique features called Digital Split Image and Dual Mode. The latter is my favourite because it displays a magnification of the focus area on the right next to the frame. It is the feature I found the most efficient when manually focusing with the X-T1. The EVF is actually so big with so much resolution (2.360k dots) that I often find myself manually focusing without using any of the MF assists.

    Further testing and usage

    By this time, I had already tested the most important aspects of the camera, so the following months were pure pleasure for me. I didn’t shoot much with it in July but my partner used that to her advantage and shot some architecture and public events in Turin.
    Six months x t1 DPS image 7

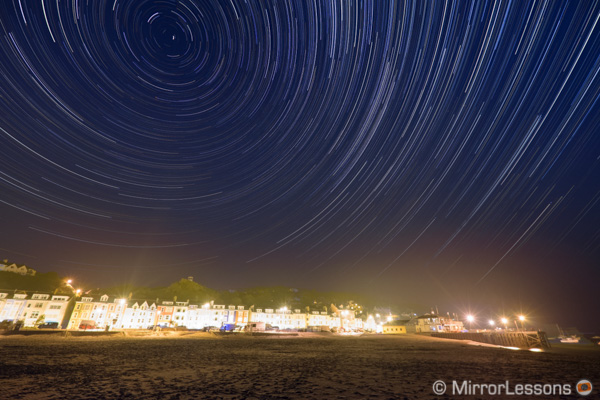
    I started using the X-T1 once again in August while on holiday in Wales and my impressions were no different than before; a simple, straightforward camera that is a real pleasure to use. During that month, I also experimented with long exposures and star trails, taking advantage of the clear night skies. Creating this kind of shot is very easy with the X-T1. If you want to try it yourself, I highly recommend the Triggertrap dongle for your Android or Apple device.

    September was very busy between work and Photokina. I used the X-T1 to test some new Fuji lenses, and back home, it was my second body for a wedding. This brings us to the current month, the sixth I’ve had with the camera.

    I’m going to be totally honest with you and say that my favourite Fujifilm camera is still the X100s. That said, I can understand why so many people are falling for the X-T1. It is Fujifilm’s most mature camera and a good example of how the X system, as young as it is, is evolving to perfection.

    Cons

    Are there aspects I don’t like? Yes, but they are minor complaints. Some buttons could have been bigger and easier to press, the grip is limiting with larger lenses, and the somewhat flimsy SD card door sometimes swings opens. The battery life could also be better, and when you mount a tripod plate, it blocks the battery door.

    Updates and the future

    One last point I’d like to make regarding the constant updates Fujifilm makes to its X series cameras. Have you ever experienced the satisfaction of returning to the same camera store and being treated with courtesy and attention because the owner recognized you as a returning customer? Well, with Fujifilm you get something like that via its firmware updates. Even for cameras that are more than two years old, you have the possibility to receive updates that enhance functionalities and add new features. At the end of the year, the X-T1 will receive a massive update that will bring a silent mode, electronic shutter, a new picture profile and better video capabilities, a weak point on all Fujifilm cameras. If you would like to own a camera that doesn’t grow old after six months, this is something extra that Fujifilm does very well indeed.
    Six months x t1 DPS image 8


    The post Six Months with the Fujifilm X-T1 by Mathieu Gasquet appeared first on Digital Photography School.

    Digital Photography School

  • How to Use LAB Color in Photoshop to Add Punch to Your Images

    Have you ever wished you could stretch out the color palette of your picture? Or that you could separate colors that looked too flat or close together?

    Well, with Photoshop, you can – by converting your picture to something called LAB colorspace and adjusting the color there. That might sound complicated, but it is actually pretty simple. If you have ever made a levels or curves adjustment, you already know everything you need to know to accomplish this.

    Grand Canyon

    The left side of the picture is an anadjusted Raw file. The right side of the picture is the same except for a curves adjustment layer done in the LAB color space.

    In this article, you will learn two things. First, you will learn the five simple steps to achieve color separation using the LAB color move. You can follow these steps without even understanding how any of this works and it will work just fine for you. Second, after walking you through the steps, you will see how this move works. That way, if you want to apply this move to your photos in a more nuanced fashion later it will help you to do so.

    The LAB Color Move

    So let’s walk through the steps of “the move.” There are five steps in this process, all of which are simple and can be accomplished in 30 seconds or less.

    1.  Convert to LAB Colorspace

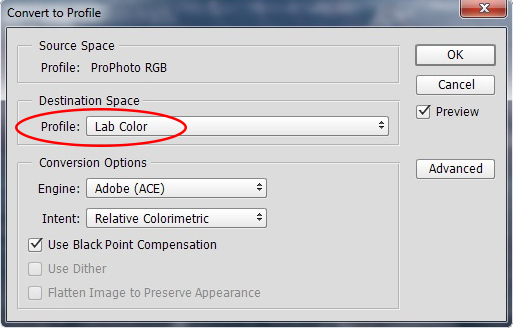
    First, you have to convert your picture to the LAB color space. To do that, just click “Edit” on the top menu, then choose “Convert to Profile.” When you do so, a dialogue-box will pop up.  From the drop-down, choose “LAB color.” That’s all there is to it.

    Convert to Profile Dialogue Box

    For now, your picture looks exactly the same. All you have done is changed the way Photoshop renders color in your image (more about this later).

    2.  Create A Curves Adjustment Layer

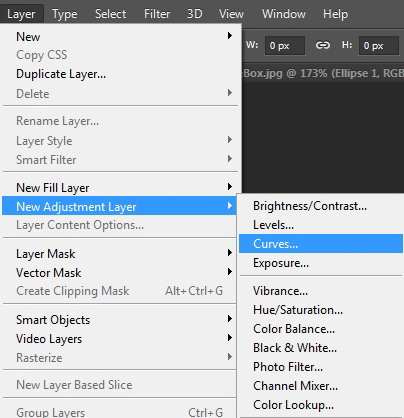
    Next, you will need to create a curves adjustment layer. There are a few ways to do this, but if you don’t already have your own way, just click on “Layer” in the top menu, then choose “New Adjustment Layer,” then “Curves.” Click “OK” in the box that pops up.

    Creating a New Curves Adjustment Layer

    3.  Scoot in the Endpoints of the A Channel

    Everything so far has been mere prelude to get you to this point, and you haven’t actually changed your picture at all yet. You have converted to the LAB colorspace and created an an adjustment layer to work on. Now the fun begins.

    You will see a drop-down menu near the top of your adjustment layer and the current selection will be “Lightness.” Click on it and you will see three choices: the Lightness (or L) channel, the A channel, and the B channel. Select the A channel.

    You will immediately notice that your histogram changes dramatically. Most likely, it now looks like a big spike in the middle. Don’t worry about that – that’s the way most histograms look in LAB color.

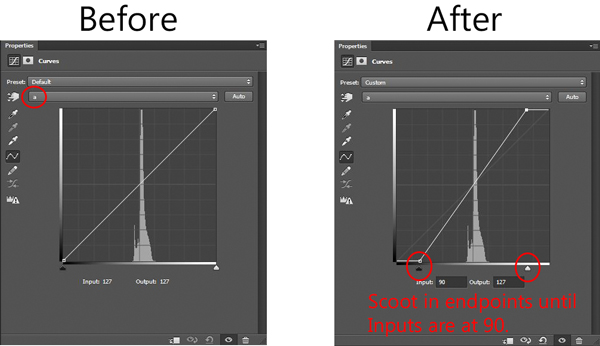
    What you are going to do is grab the left (black) endpoint and drag it toward the middle of the histogram a little bit. There is no set amount to move it, but if you are looking for a little guidance drag it until the Input number reads -90.  Your picture probably just turned an ugly shade of green but don’t worry about it. Now, grab the right (white) endpoint and pull it to the left. In fact, pull it to the left the exact same amount that you moved the left endpoint to the right. You can use the Input numbers below to make sure you are moving each side in the same amount.

    A Channel - before and after adjustments

    That should fix the green cast. But don’t worry too much about what your picture looks like right now. Let’s go on and perform the second part of the LAB move.

    4.  Scoot in the Endpoints of the B Channel

    What you are going to do here is exactly what you just did in the step above, but this time you are going to do it in the B channel. So, go back to the drop-down that currently reads “A” channel. Click on that and now select the “B” channel.

    As you did above, just scoot in your endpoints toward the middle of the histogram. So grab the left (black) endpoint and drag it toward the middle a little bit. Your picture just turned a shade of blue but don’t worry about it. Now, grab the right endpoint and pull it to the left the exact same amount that you moved the left endpoint to the right. Again, input values of about 90 should get you roughly where you want to be.

    5.  Inspect Your Handiwork

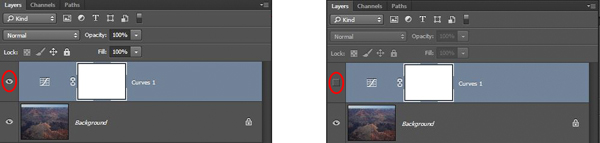
    Now it is time to see the “before” and “after” pictures of your image; this is one of the benefits of working with layers. On the right side of your screen where your layer is shown, you will see a little eyeball just to the left of each layer. For the curves adjustment layer you just created, click on the eyeball. When the eyeball disappears, you will see your picture before the adjustments you just made. Click again to see the eyeball with your changes to the image.

    Eyeball On and Off - Showing Changes in Image

    On the left, the eyeball is on, so the changes will be shown. On the right, the eyeball is deselected, so the changes will not be show.

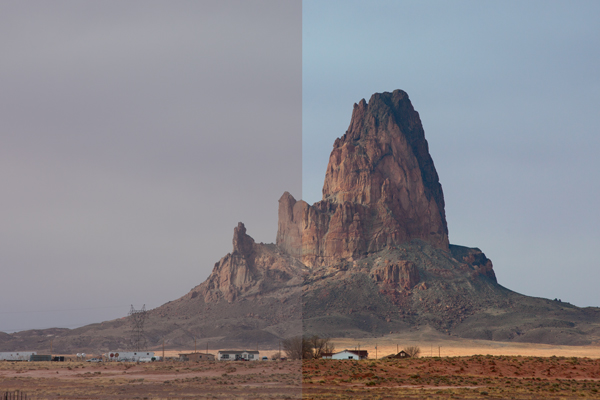
    Do you see how your color range has been increased? The colors should also appear more rich and vibrant. If you are not noticing much of an effect, try scooting in the endpoints of the A and B channels a little bit more (say, down to 80 if you are using the input numbers). On the other hand, if the colors look too garish to you, drag the sliders out a little bit (to say, about 110 on each side). Or you can reduce the effect by decreasing the opacity of the curves adjustment layer.

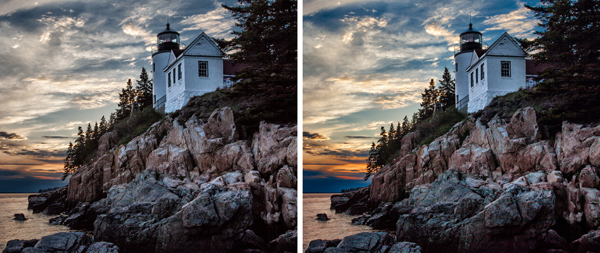
    MonumentValley-halves

    That’s it, you now know the LAB color move. Go ahead and switch back to your original colorspace and perform any other edits you want on your picture. Then, try this move out on a few different pictures. You will probably find that it doesn’t help pictures that already have vibrant colors, but it can perform miracles on certain landscapes you previously found too flat.

    How it Works

    Upon learning this move, you may have questions about how this works and why you couldn’t just do it without switching to the LAB colorspace. I will explain that in the remainder of this article.

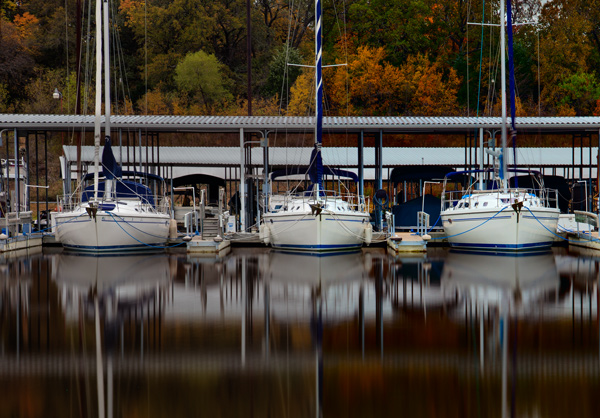
    Sailboats-halves

    How LAB differs from your usual colorspace

    For starters, we need to have a general understanding of how LAB differs from RGB color. So first you should understand how colors are rendered in RGB, and then we will move on to show how LAB differs.

    RGB color

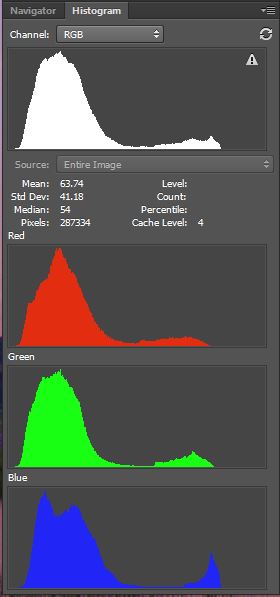
    RGB histogram

    Histograms of the RGB channels

    The RGB colorspace is the standard used in digital photography. This is the colorspace that your camera uses, and the one that Photoshop defaults to. RGB simply stands for Red, Green, Blue, and that tells you a bit about how it works. In this scheme, the camera or computer starts with these three colors and then combines them to create a whole host of different colors. Thousands of them, in fact. If you are having trouble getting your head around how really light colors (say, yellow) can be created by combining red, green, and blue, understand that there are many different shades of red, green, and blue, starting with very, very light (bordering on white) shades. In fact, the way that RGB and LAB deal with lightness is a key difference between them, as you will see.

    When you look at a histogram for a picture in RGB, you are seeing a combination of the values for each color channel. You can see each of the individual color channels by clicking on the drop-down labeled “RGB” in your curves adjustment layer. When you do so, you will notice that the histogram for each of the channels is different, but not that different.

    LAB color

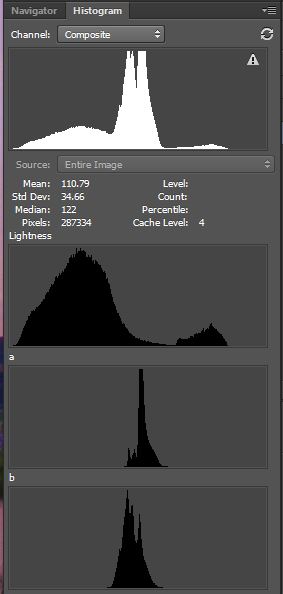
    LAB histogram

    Histograms of the LAB channels

    The LAB color space goes about defining colors differently. Whereas RGB defines color by a combination of red, green, and blue values of different shades, LAB uses three different channels. They are: Lightness, something called the A Channel, and the B Channel. Hence, Lightness, A Channel, and B Channel are shortened to L-A-B, LAB.

    But what are these channels? Let’s start with Lightness, partially because it is first, but also because it is likely to be the most familiar to you. It represents the relative brightness of the pixels without regard to color. So Lightness is kind of like a greyscale image, where each pixel is defined by how close to white or black it falls on the scale. The Lightness histogram probably looks like something you are used to. The values of a properly exposed picture with good contrast should spread out over most or all of the histogram.

    The A and B Channels will likely be unfamiliar to you. Whereas the Lightness Channel defines the lightness of the pixels without regard to color, the A and B channels define color without regard to lightness. Color and lightness are addressed separately in LAB, not together as they are in RGB (more on this in a bit).

    Let’s talk about the A Channel first. The “A” doesn’t actually mean anything. They just call the two color channels A and B. The A Channel is just a definition of color values based strictly on how much green on one hand, or magenta on the other, are contained therein. The very middle is actually gray, and the hues get progressively more green to one side and progressively more magenta to the other.

    The B Channel works the same way as A, except that it defines color by how much blue on one side, and yellow on the other, it contains.

    It might help to think about it like this. Whereas RGB renders color by defining each color as some combination of red, green, and blue, LAB renders color by defining each color as some combination of green, magenta, blue, and yellow, with lightness addressed separately. However, while each color gets its own channel in RGB, colors share channels in LAB (two per channel).

    If you are starting from scratch with the LAB colorspace, try playing with it. Load a few of your pictures, go into LAB, then go into the three channels on a curves adjustment layer. Look at the effects of sliding in the endpoints of just one side of the histogram. You should start to see how the A Channel is a measurement of the balance of green or magenta. The B Channel is a measurement of the balance between blue and yellow.

    The Power of LAB

    Here is the really interesting bit and why LAB is so different, and in many ways superior to RGB. Look at the histogram of the A Channel of your picture. There is, no doubt, a spike in the middle. That is because LAB is such a ridiculously broad color space that all the colors you and I would consider “normal” are bunched up in the middle of the histogram. If you go outside of that bunch in the middle, you would soon get some really psychedelic colors, and beyond that you would get into impossible or imaginary colors that are outside the realm of anything we can actually use.

    The impossible colors don’t matter, but what does is the effect on the histogram that all this creates. Having the colors of your image all bunched up in the middle of the histogram means that you have lots of room to scoot in the endpoints of the histogram and effectively stretch the color palate.

    This move is not possible in RGB. Typically, in RGB you will not have enough space on the sides of the histogram to scoot in the endpoints. The colors will usually be stretched over most of the histogram. But even if you have room to do so on the histogram, in RGB it will affect the brightness and the color balance of the picture.

    The other reason LAB is so powerful is the separation of lightness from color.  As a result of this separation, resetting the black point and the white point in the histogram of the A or B channels affects only color.  You can stretch out the colors without making them lighter or darker.

    Before and after LAB color enhancements.

    Before and after LAB color enhancements.

    Conclusion

    Just knowing and using the basic LAB color move will significantly impact your pictures in ways that were not previously possible. It is more than just an increase in saturation – it’s stretching the color palette.

    This move is only possible in the LAB colorspace because:

    • The LAB colorspace is so broad that there is always room to scoot in your black points and white points on the histogram.
    • Separating the lightness values from the color values, and putting the lightness values on its own channel (the L channel) means that you can impact the colors without affecting the brightness or contrast of the image.

    The the basic move is just the beginning of what you can do.  From here you can make additional adjustments to the A and B channels that will remove color casts by moving in one side more than the other.  Or you can apply masks and affect color in specific areas of your image.  Start with this basic LAB color move and you’ll see immediate improvement and soon will start seeing other possibilities.

    The post How to Use LAB Color in Photoshop to Add Punch to Your Images by Jim Hamel appeared first on Digital Photography School.

    Digital Photography School

  • 5 Beginner Tips for More Autofocus Success

    When you’re just starting out, it can sometimes be frustrating trying to get sharp photos. The camera’s autofocus often seems like it has a mind of its own. Here are five quick tips that can help you get the autofocus under control.

    AI Servo AF or Continuous Focus will continue to track moving subjects.

    AI Servo AF or Continuous Focus will continue to track moving subjects.

    1. What is your subject doing?

    If your subject is sitting still and not moving, be it a person, a still life, or a landscape, you’ll want to choose One-Shot autofocus (AF-S for single on Nikon). One shot AF allows the camera to focus, and then as long as the button is depressed, focus will stay locked. This is useful if you want to focus and recompose your shot, especially if an autofocus point doesn’t cover the area you want to be in sharp focus (see #2 below).

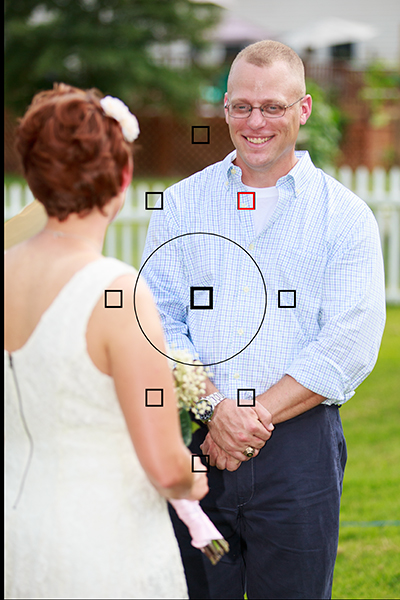
    If your subject is moving, such as a child at play, an animal, or a car, change the autofocus mode to AI Servo AF, or Continuous AF (AF-C, depending on the brand of camera you have). This means the camera will continue to focus on the subject even as it moves toward or away from you. Just be sure to keep the AF point on your subject. The image at left was taken using AI Servo AF with the center point as the active focus point. If you use AI Servo (AF-C) with automatic point selection, you will most likely start tracking with the center focus point, and as your subject moves, the AF point will automatically shift to another area to maintain focus. Some cameras offer the option of letting you choose which point focusing starts with before shifting to other points. In manual autofocus point selection mode (not to be confused with manual focus), you choose one point and keep your subject covered with that one point.

    2. Check your AF point selection mode

    Using Manual AF Point Selection I was able to keep my brother in focus despite the fact that my sister in law was closer and covered by an AF point. Automatic AF point selection would have selected her instead.

    Using Manual AF Point Selection I was able to keep my brother in focus despite the fact that my sister in law was closer and covered by an AF point. Automatic AF point selection would have selected her instead.

    If you find your camera isn’t focusing where you want it, check your AF point selection mode. All DSLRs offer at least two modes. There may be other options as well, but most people use one of these two main modes. The first is automatic AF point selection. This means that all AF points are active, and in one shot mode, the camera will try to focus on the nearest object to it with detail. This means that if something between you and your subject is covered by an AF point, the camera will focus there, rather than where you want it to. This can be a problem if trying to photograph through a window or fence as well.

    To combat that problem, you’ll want to choose a single AF point. This will most likely be called Manual AF Point selection, depending on the brand of camera you have. This mode allows you to choose which AF point you want to use, giving you the ability to choose the one that covers your subject, regardless of what’s between you and the subject.

    3. There are two types of autofocus points

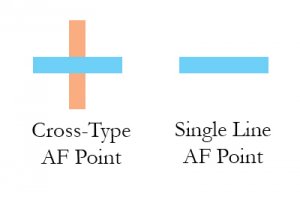
    AF_PointsMost modern cameras have two types of AF points: Single-line, and Cross-type.  Single line AF points are able to focus on lines going either horizontally or vertically. Which one it reads will depend on how the AF point is oriented. Horizontally oriented AF points can focus on vertical lines, and vertically oriented AF points can focus on horizontal lines.

    Cross-type points are simply vertically oriented AF points, overlaid with horizontally oriented ones. So a single cross-type AF point can read both vertical and horizontal lines, making it more likely that it will be able to focus on the right object. Why is this important? If you have selected an AF point and the camera is unable to focus on the subject, it could be that there isn’t any detail that the AF point can pick up. A cross-type AF point has a better chance of finding a line of detail to focus on. Try selecting one of the cross-type points in your camera. Most of today’s DSLR’s have at least one, if not more.  Check your camera’s manual to find out where the cross-type points are in your autofocus array.

    4. Learn how to change AF points without taking your eye from the viewfinder

    Once you’ve learned to set Manual AF Point Selection, and have started using a single AF point, you’ll want to practice selecting an AF point quickly without taking your eye away from the viewfinder. Some cameras offer a single control such as the joystick type controller on the EOS 5D Mark III, while other cameras such as the EOS Rebels require a combination of a button push and spin of the dial to change an AF point. The faster you are able to do this, the less likely it is you will miss a key moment.

    5. Try to compose with the AF point you are using exactly where you want it

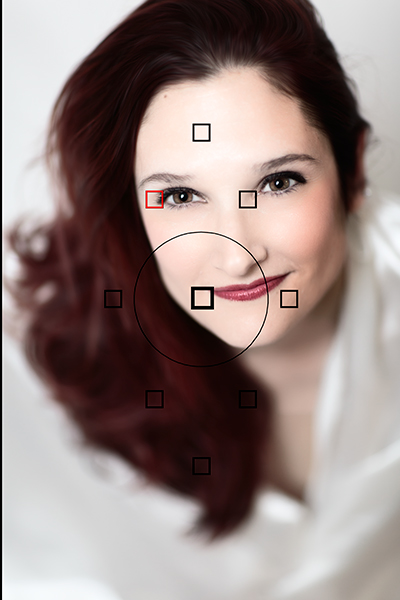
    Putting the AF point right on her eye meant that despite having a very shallow depth of field, I was still able to focus on the eyes and keep them sharp, without having to recompose.

    Putting the AF point right on her eye meant that despite having a very shallow depth of field, I was still able to focus on the eyes and keep them sharp, without having to recompose.

    Many people who are just starting to do photography often stick to the center AF point for focusing, and then lock focus and recompose the shot to put the subject where they want in the frame.  For most shots, this will work just fine. However, there is a chance that when recomposing, you are actually shifting the plane of focus enough that your subject will no longer be sharp.  This is very likely when you are close to the subject with a shallow depth of field.  To avoid this, choose the AF point that is closest to, or covers your subject. For instance, when shooting a portrait, use the AF point that covers your subject’s eye.

    Your thoughts

    Keep these five tips in mind the next time you take out your camera.  What are your favorite autofocus tips?

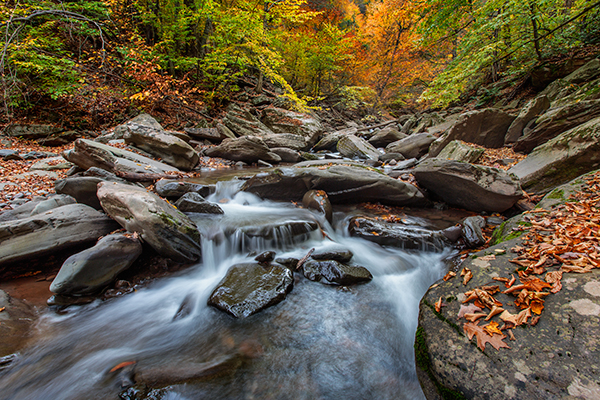
    I have had people who let running water confuse them, unsure which AF mode to select. Yes, the water is moving, but the stream is not, it stays the same distance from the camera, so you would use One Shot AF for a shot like this.

    I have had people who let running water confuse them, unsure which AF mode to select. Yes, the water is moving, but the stream is not, it stays the same distance from the camera, so you would use One Shot AF for a scene like this.

    The post 5 Beginner Tips for More Autofocus Success by Rick Berk appeared first on Digital Photography School.

    Digital Photography School

  • Writer’s Favorite Lens the Nifty Fifty on a Cropped Sensor Camera

    50mm1Growing up, the first letter of my last name was towards the end of the alphabet, which meant that I was one of the last kids who got to choose my electives in high school. It was for this reason that I ended up with strange electives such as Physics, Advanced Placement Composition, Metal Shop, and eventually Black and White Photography. I was less than thrilled about taking Photography – I had SATs to take, colleges to get in to, and certainly did not have time for a photography class taught by the Psychology teacher who was notorious for making kids walking around campus with their hands in the shape of a rectangle, “visualizing” the shot. Despite my best efforts, somewhere between the enlarger and placing my paper in the developer for the first time, I fell in love.

    I clung to black and white film photography for a number of years, until husband bought me my first DSLR – a Canon Rebel XS. One of the very first things I noticed was that something was wrong. Even when shooting with some of my favorite focal lengths, something looked off. After consulting Dr. Google, I quickly realized that the difference was that I learned photography in 35mm film format, and that the cropped sensor of the Canon XS made my lenses function in a different way than I was used to. There are plenty of articles that go into great depth explaining the hows and whys of cropped sensors, but what you need to know is that if you own an entry-level DLSR, you probably have one. If you do have a cropped sensor camera, you also need to know that a 50mm lens on a cropped sensor camera doesn’t actually act like a 50mm lens. Rather, APS-C (cropped sensor) cameras have a magnification factor of either 1.6x (Canon) or 1.5x (Sony & Nikon). So, you need to multiply the length of the lens on your camera by the magnification factor above in order to see what focal length that particular lens will function as on your camera. For example, if you put a 50mm lens on a cropped sensor camera, you have to multiply by 1.6x which means that your 50mm lens is actually functioning more like an 80mm lens.

    50mm3

    This is important because when you see reviews of lenses, or even when professional photographers talk about lenses, chances are that the images that they include will be taken with a full frame camera, which does not have a cropped sensor. In other words, even if you buy exactly the same lens, your photos will probably not look similar if you are using a cropped sensor camera. Now, please hear me when I say that this doesn’t mean that your camera is “bad” or that you need to upgrade your gear – you are capable of taking some absolutely amazing photos with a cropped sensor camera and a nifty fifty lens. There is a TON of potential there at a fairly low price point, which is why the 50mm f/1.8 lens is the first upgrade that a lot of new photographers make, and rightfully so! Today, I’d like to showcase a few of my favorite uses of a 50mm lens on a cropped sensor camera. In fact, every photo in this article was taken with a Canon 50mm f/1.8 lens and either a Canon XS or Canon 60D, which are both cropped sensor cameras.

    Newborn Photography

    50mm2

    When I’m photographing newborns, I’d say that the 50mm lens is on my camera 90% of the time. I like to go to the new parents rather than have them come to me whenever possible because I tend to find that mom and baby relax a bit faster in their own space, and I like to include a lot of “lifestyle” images in the session as well. However, doing so comes at a trade-off, which is that I don’t have as much control over the light in their home as I would in my space. Yes, I can move furniture if necessary or even shoot in the kitchen if that’s where the best natural light is, but it’s also nice to have a lens that can accommodate lower-light situations if needed, and the 50mm certainly can do just that when I shoot wide open or close to it. I find that the sweet spot in terms of aperture with this lens is around f/2.5, which is typically sufficient, but I like the fact that I can go down even further if I want to bring the focus to little feet, hair, or newborn features.

    Nature Photography

    50mm4

    While I have experimented with landscape photography using my 50mm lens, I prefer a wide angle lens (somewhere around 35mm) for that purpose. That said, while the 50mm may not be your best option for capturing waterfalls or beautiful mountain ranges, the 50mm lens shines in capturing the smaller details of nature – think flowers, vegetables, fruit, leaves, snow covered branches, and buds on trees.

    50mm5

    Portraits

    Of course, one of the most common uses for the 50mm lens is for standard portraits. I use my 50mm lens most often for portraits of one or two people, but have pulled it out quite frequently for groups of about three to six people as well (any more than six, and I prefer a wider angle lens). When I first purchased the 50mm lens, I was so excited about the ability to create a blurred background in portraits that I almost always shot wide open, with the aperture at f/1.8. It was so exciting to be able to achieve that bokeh!

    However, I also created a lot more work for myself and ended up with a lot fewer photos that nailed focus because the depth of field was so shallow, and any small movement of a kid could throw the focus out of whack . Now, I tend to set the aperture around f/2.5 when I’m shooting portraits, which still gives plenty of blur in the background but also makes my life a little easier. This is especially true when it comes to photographing toddlers and young kiddos that are often moving even when they’re “sitting still”. The bottom line? Don’t fall into the trap of shooting wide open all the time just because you can!

    50mm6

    Unexpected Surprises

    When I’m out and about, I often toss my camera with the 50mm lens in my purse or in the car. As I’ve mentioned, it’s my favorite lens, and the one that gets the most use, so it’s a generally safe bet. That said, there have been a handful of occasions in which my 50mm lens may not have been my first choice if I had other options with me, but it performed better than expected nonetheless.

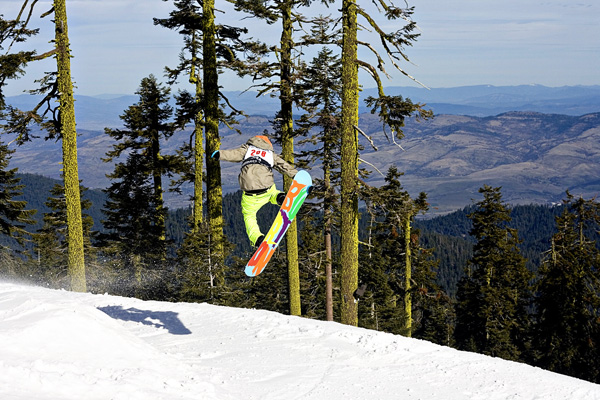
    One such instance was when we ended up at a ski resort on the day of their high school snowboarding competition. I grabbed my camera just for fun, and was surprised at how well the 50mm lens handled a shot that I’d typically prefer a wider angle for. So, don’t be afraid to experiment with a 50mm lens even beyond the standard portrait applications, there’s a whole lot of potential there!

    50mm8

    Your Thoughts?

    Do you own a 50mm lens? What do you find yourself using it for most often? Do you have a cropped sensor or full frame camera?

    The post Writer’s Favorite Lens the Nifty Fifty on a Cropped Sensor Camera by Meredith Clark appeared first on Digital Photography School.

    Digital Photography School

  • How to Find Great Backgrounds for Portraits

    Portraits and backgrounds

    I used a short telephoto lens at a wide aperture to throw the cliff in the background out of focus in this photo. With this technique, the background itself isn’t so important as no-one can tell what it is, but it must still complement the subject.

    Finding great backgrounds that complement the subject is an essential part of the process of creating beautiful portraits. My article How to Plan the Perfect Portrait Shoot will help you with the other aspects of putting together a portrait shoot, but today I thought it would be interesting to delve deeper into the subject of backgrounds for portraits. Here are some things to think about in your search for the perfect background for your portraits.

    Do you want your background to be sharp or blurred?

    This is an important question because the answer dictates your entire approach to the portrait shoot.

    If you want the background to be in focus, then this suggests that the background is in some way relevant to your subject. For instance, if you are taking a portrait of a performing musician, then perhaps it would be nice to take a photo in a venue where they perform, including the background to show the environment.

    On the other hand, if your aim is simply to take a pretty portrait of somebody, then the background may not be so relevant, but it must be complementary. A good example of this is taking a portrait of somebody on a beach, where the environment becomes an important part of the composition.

    The easiest way to take a portrait with the background in focus is to use a wide-angle lens with a smallish aperture (f/8 is ideal). You should be careful not to get too close to the subject (avoiding distortion) and to include lots of background.

    Portraits and backgrounds

    I used a 24mm lens at f/4 for this portrait. With such a wide-angle lens f/4 was sufficient to ensure the entire background was relatively sharp.

    If you want to take photos with a completely blurred background, then the background itself isn’t so important. It will be out of focus, so nobody will be able to tell what it is. The important thing is that you need to be able to position your model some distance from the background. Then all you need to do is to use a short telephoto lens with a wide aperture, and if the model is far enough from the background it will go out of focus.

    This technique works best with prime lenses because of their wider maximum apertures. But you can still make it work, even with an 18-55mm kit lens (which typically have maximum aperture settings of f/5.6). You’ll just need to move your model further away from the background, and get as close to her as you can (try taking a simple head and shoulders shot) to make it work.

    Don’t forget there’s a middle ground between these two extremes. You may want to render the background slightly out of focus, so it is still recognizable but not so sharp it competes with the model for attention.

    Portraits and backgrounds

    The background of this portrait is out of focus, but still sharp enough for the viewer to tell what it is.

    Are you going to take your photos indoors or outside?

    The answer to this question is important because it leads to the question of how you are going to light your photo.

    For example, indoor locations can be great for shoots that take place in the winter time, or even at night, when you can’t rely on the weather to be good enough to take photos outdoors. While you may be able to use your house as a location, another idea is to keep an eye out for interesting indoor locations in your local area that you may be able to use. Examples are cafes, bars and hotels. Once you’ve found a photogenic location, it’s a simple matter of finding the right person to ask for permission to use that location for a shoot.

    Once you’ve found the location, you need to decide how to light the portrait. You might be fine with natural light, especially if there are large windows or your camera works well at high ISOs. You’ll probably need an assistant with a reflector to help out.

    If you decide to use flash to light your portrait, things may be a little more complex. You’ll need room for lighting stands, and you may need to run power cords across the floor. If you intend to use flash, make sure you mention this when you ask permission to use the location.

    Portraits and backgrounds

    I took this portrait in a cafe, using natural light from the windows.

    If you are going to take your photos outside then the question of lighting still applies. Do you intend to use natural light? Again, an assistant with a reflector may be useful. If you intend to use flash to supplement or even overpower the natural light, then you need to consider if you have enough room in your chosen location to set them up? Will you need someone to help you? Thinking through the practicalities will help your shoot run smoothly.

    Background ideas

    Finally, here are some of my favourite locations for taking portraits. You may find these suggestions useful in your search for great backgrounds.

    Beaches: I especially like rocky beaches as rocks make great backgrounds. The key to getting the best from a beach location is to take the portraits close to the sunset and utilize the beautiful quality of light during the golden hour.

    Gardens or parks: Public gardens can be a great place to take portraits. They are normally quite beautiful and may contain a variety of plants and trees that you can’t find elsewhere in your area.

    Urban or suburban areas: I like to wander around interesting parts of the city I live in with my model looking for good backgrounds. It’s amazing how many times a wall or doorway can make a simple yet effective background for a portrait.

    Portraits and backgrounds

    This portrait was taken using an ivy covered wall (that I found on a street near my house) as a background.

    Woodlands: These can be tricky as the light tends to come from above, between the trees, almost like a spotlight. The result is harsh shadows under your model’s eyes and nose, even on an overcast day. The solution is to use a reflector or flash to fill in the shadows. While the lighting isn’t always easy in woodlands, the results can be worth the effort.

    Children’s playgrounds: Use a playground at a quiet time and your model can have lots of fun on the rides, adding a sense of movement and vitality to your portraits.

    Portraits and backgrounds

    We went to a children’s playground in the late afternoon (no kids to disturb) to take this portrait. My model enjoyed playing around on the rides.

    Your turn

    These are my suggestions, now it’s your turn. Can you suggest any locations or types of background that are suitable for portraits? Please let us know in the comments.


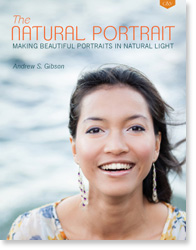
    The Natural Portrait photography ebookThe Natural Portrait

    My ebook The Natural Portrait teaches you how to take beautiful portraits in natural light. This 240 page ebook, published by Craft & Vision, takes you through the entire process of natural light portrait photography through from finding a model, deciding where to shoot, working with natural light and post-processing your images. Click the link to learn more or buy.

    The post How to Find Great Backgrounds for Portraits by Andrew S. Gibson appeared first on Digital Photography School.

    Digital Photography School

  • Welcome to the Future of Photography Websites with MotoCMS 3.0

    Modern web is focused on photographers. It is stated in devices more and more improving screen resolution. And especially with an introduction of Retina Display that brings the image quality to the forefront. Despite a wide range of photography-focused social networks available like Flickr, Tumblr, Pinterest, and even Instagram, a personal website still matters for photographers. It’s a private sphere Continue Reading

    The post Welcome to the Future of Photography Websites with MotoCMS 3.0 appeared first on Photodoto.


    Photodoto

  • The Traveling Photographer_PARIS is Now Available

    Paris, the latest installment in The Traveling Photographer series, has just posted to Lynda.com. Photographed this past May, the hour-long episode includes lots of practical, real-world advice for anyone who may be considering traveling to Paris with their camera.

    In addition to all of the city-specific travel advice, much of the episode explains how to make the most of your time there as a photographer. There are segments on where to go to get the best cityscapes, street shooting and even a section on shooting in Paris through a specially adapted toy camera lens.

    If a trip to Paris is in your future (or you are just open to being talked into the idea) you’ll find this episode of The Traveling Photographer to be time well spent.

    Like the rest of the Traveling Photographer series, the Paris episode is available on Lynda.com. You can find out more about the series itself in this earlier post.


    Strobist

  • The Photographer’s Guide to Self-Promotion

    Deanna Wardin

    By Deanna Wardin

    Have you ever been told by your parents “Don’t talk about yourself too much; people won’t like you!” or “Don’t show off!”? Talking too much about your achievements leads not only to criticism, but can also lead to disappointment. There is always going to be someone who worked harder and who has done more than you. The minute you realize you’ve achieved so much in your personal and work life, the reality smacks you and shows you that you’re too big for your boots. Some of us engage in far too much self-adulation and bragging, while the rest of us are afraid of being criticized and afraid to talk about ourselves.

    In the photography industry we are met with obstacles that challenge our motivation to market themselves effectively. Self-promotion is an art that allows you to sell yourself – your personality, your knowledge, your experience – as a brand. Learn how to do it properly to achieve the best results. Here are some tips and tricks on how to overcome your fear of self-promotion and make people believe in you and your products.

    The importance of self-promotion

    Obviously, photographers want to spend most of their time taking photos. However, if you take yourself seriously and want to set up a successful photography business, then you need to dedicate some time to raise your profile and promote your work. Running any kind of business means you’ll have to wear many different hats, and in this instance you’ll need to be both a good photographer and a good marketer for your business.

    You may be brilliant in what you do, but if no one knows about your products and services, there is no point in bothering. By being a self-promoter, you’ll be given an opportunity to demonstrate your talent. There is nothing shameless in creating something beautiful and wanting to share it with people who can benefit. Nobody will hire you until you tell and show people who you are and what you can do. If you’re not comfortable talking about your achievements and promoting yourself, it’ll be difficult, if not impossible, to get ahead in your photography career.

    Fear of self-promotion

    You may be shy or afraid to tell others what you can do and what you have achieved. No matter who you are, if you are afraid of self-promotion, there is a 100% likelihood that this fear stems from somewhere. Your main goal should be to identify what the fear. Once you find the root of this fear, you will be able to reduce its power on you.

    Where could this fear be coming from? It could be a fear of rejection, a fear of showing off your artwork as it’s deeply personal to you, or a fear of success and its influence on your life. For most of us this fear is what other people would think or say about us. Therefore, your major task is to identify your personal fears and try to overcome them from within. You never know before you try, so give it a try before imagining your worst fears.

    1 fear of self promotion

    Photo by SplitShire

    Most likely, the fear of self-promotion is accompanied by the fear of failure. To promote yourself means taking some risks. It means coming out from your comfort zone and putting yourself out there in front of other people.

    Everybody fails. Even the billionaire Steve Jobs failed; back in 1984 he was fired from Apple. He co-founded Apple Computer at the age of 21. At 23 he became a millionaire. He was a global celebrity and highly successful man, but he still got fired! In 2005 he said the following words about that incident:

    “I didn’t see it then, but it turned out that getting fired from Apple was the best thing that could have ever happened to me. The heaviness of being successful was replaced by the lightness of being a beginner again, less sure about everything. It freed me to enter one of the most creative periods of my life.” – Steve Jobs

    In other words, failure is a path to success, even if you don’t see it at first. If everything goes smoothly all the time, you’ll have no reason to move forward and change things for the better. There are many other bright examples throughout history, when famous and successful people were not recognized at first. Don’t be afraid to give it a try!

    Four Essential self-promotion tactics

    It’s essential to know how to promote your brand and your business effectively. I hope that with the help of these tips you’ll have a grasp of what is required to make your work more visible and to build a successful career in photography.

    Get your business online

    As a photographer, you need a portfolio to back up your title. A portfolio website is the easiest place for you to showcase your work in the best way and is also the easiest place for people to find your photography. Your portfolio is what the client will use to evaluate whether they want to use your services. It will be what they judge you on. For the digital world, where browsing for photographers is as easy as clicking on the screen, it might even take them five seconds to discard you or to like you based on the images you are displaying in your portfolio. It’s critically important for self-promotion, it’s your image and the face of your company.

    There are many ways to build your portfolio online these days. You can order a website from a creative agency or use one of the numerous software solutions available to create a website yourself. Fortunately, this market evolves really fast and brings some really advanced yet affordable options. For instance, Defrozo is an all-in-one marketing platform that helps you better display and market your business online. It’s currently available in Beta version, but it’s totally free and will remain so forever, according to the developers – that’s a great option if you are just getting started with your own business.

    2 zenfolio screenshot

    For established photography brands, there is Zenfolio and PhotoShelter that offer a long list of advanced features for hosting and selling your work online. These are just a few options to mention, you can find more website building solutions in this list here on Digital Photography School.

    Aside from a portfolio, set up your profiles in all the major photo sharing services like Flickr, 500px, Pinterest, Facebook, Twitter, and Google+. The links from those websites alone will contribute to better ranking in search engines. Done wisely, social media can become your most important source of leads and clients. So get your name out there, and more importantly, invest your time and effort in building a credible, socially engaged online presence.

    Help and over-deliver

    Every time you have a client, they are a potential word-of-mouth marketer, so be sure to be on the top of your game when it comes to customer service.

    Not only must the time you spend with your client while shooting be an amazing experience, but the whole overall experience you deliver should be excellent. Take care of the process of delivering photos to your client. You could even send beautiful “Thank You” cards displaying your logo with a flash drive or DVD.

    VancityAllie .com

    By VancityAllie .com

    Another great way to make people talk about you is to HELP. This tip can be easily misunderstood so let me be clear. I’m not talking about helping someone for selfish gain. What I mean is that people are usually happy to recommend someone who helped them in a time of need and this additional buzz is a nice bonus, an amazing feeling you get when you do a kind gesture for someone else. Therefore, a blog post sharing your expert advice, taking part in a charity project, or simply photographing your new neighbors’ kid’s birthday party for free can bring you some really great self-fulfillment, and boost your incoming referrals for sure.

    Finally, don’t forget about your social media presence. Spend time where your clients are and share something they might care about. For instance, post a few photos shortly after the shoot and tag your clients. Then grab a cup of coffee and expect a phone call from customers who are sure to be pleasantly surprised. Learn the specifics of each social network and make the best out of it: use Quora to share your expertise and Pinterest to give inspiration to those seeking it. Remember, the key word in “social media” is “social”, so be social and give some likes and comments to your friends’ recent posts as well.

    Study psychology

    If you want to get ahead using self-promotion and become really successful, consider learning some psychological tips and tricks on how to communicate with clients and talk about yourself correctly. You, as a photographer, have to talk about yourself a lot. However, sometimes it’s challenging to write a proper bio or a good recommendation of yourself. This could sound disappointing, but remember that your potential customers are not visiting your site to hear about you, they want to hear about themselves!

    They’ll read the information about you not like “Look how cool I am!”, but “Look how well we could work together!”. See the difference. Your bio or story about yourself is just one more chance for your potential customers to hear: “Hey! I’m here to solve your problems”.

    In fact, people love to talk about themselves. That’s why selfies and all these social media sites are so popular. Harvard neuroscientists have found that we share our thoughts because it triggers the same sensations in our brain that food and money do.

    4 study psychology pleasure of talking about ourselves

    Their studies also shows that people even tend to pay money to talk about themselves. So, listen to your clients more and talk less. But make them understand that you’re experienced enough to solve their problems, for instance, with their wedding photo session.

    Network online and offline

    Last but not least, utilize the power of in-person meetings. The internet, and social media in particular, have given us enormous opportunities in terms of communication. However, after spending just an hour with your clients face-to-face, you’ll have a considerably better understanding of who they are and what they need. So be sure to get out there a couple times a week and practice your ninja social skills in real life.

    Carry your business cards around with you at all times. Don’t be shy to “sell” yourself and give your card to family and friends. Leave them at the nearest coffee shop or a bookstore, exchange them with other media artists and vendors, you never know the source of your next clients!

    Creative examples of self-promotion

    These days the market grows rapidly and it takes a lot of effort and time to create a truly outstanding self-promotional campaign. Sometimes, it can happen that success comes to a person who even didn’t expect it. Along with the tips shared above I’d like to showcase a few creative examples of photographers’ self-promotion that worked out and brought fame to their creators.

    The most epic self-promotion piece ever made

    Photographer Jens Lennartsson created 400 GI Jens action figures of himself to send out as promotional materials.

    Ami Vitale – Instagram

    Ami Vitale, a National Geographic photojournalist who has visited over 85 countries, made a name for herself by uploading her travel images to Instagram.

    Sam Horine – Instagram

    Sam Horine is a photographer who is most well known for his images of New York City which he posts to Instagram. He has over 370,000 followers there and has worked with such prominent brands as Delta Airlines, NBC/Universal, Sony Electronics and Nike just to name a few.

    Jeremy Cowart – Help Portrait

    John carver help portrait yeg

    The Help Portrait charity project

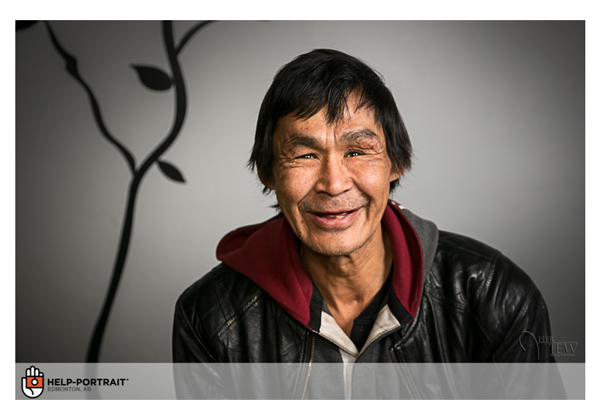
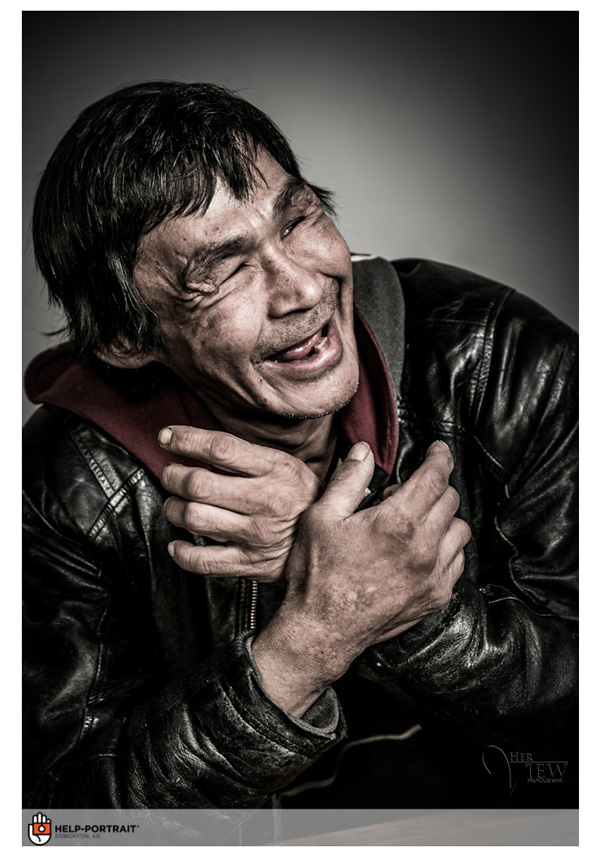
    Jeremy Cowart, a celebrity photographer, became famous with his charity project Help Portrait. The project was founded in 2009 as a community of photographers who gather in cities all across the globe to take portraits for people in need.

    John artist help portrait yeg2

    Images by dPS Managing Editor Darlene Hildebrandt – Photos of John Carver, sculptor – Help Portrait customer.

    Danny Cohen – a 43 Foot banner on a bridge

    Photographer Danny Cohen wanted to work for David LaChapelle so much that he opted to plaster a 43 foot sign on a bridge in Melbourne the night before LaChapelle was scheduled to shoot at that location.

    Elena Shumilova

    Photograph Untitled by Elena Shumilova on 500px

    Untitled by Elena Shumilova on 500px

    You have probably heard about Elena Shumilova by now. She is a Russian photographer who came into the spotlight when 500px ISO interviewed her. After that her heart-warming photography quickly spread around the internet, from Reddit, BoredPanda, and ABC news.

    Roof Topper

    Photograph I dont usually take selfies by Roof Topper on 500px
    I dont usually take selfies by Roof Topper on 500px

    You’ve probably also seen Roof Topper’s pictures on Facebook or Pinterest many times before. Tom Ryaboi who became famous for his spectacular view photos from the highest buildings in his city.

    Over to you

    There’s no right or wrong formula for successful self-promotion. Your business is like your baby – you need to experiment and try a number of things to understand what works. Try, mix, and discover different marketing tactics to see what works for YOUR photography business.

    What are your most effective self-promotion tactics? Share your tips in the comments.

    The post The Photographer’s Guide to Self-Promotion by Nancy Young appeared first on Digital Photography School.

    Digital Photography School

  • Some Wedding Photography Tips with Two Different Perspectives

    Today I wanted to share these two videos with you that offer pretty my completely opposite ways to do wedding photography; candid storytelling and posed shots.

    In this first video 19 year wedding veteran  photographer, Joe Buissink, talks about his philosophy on shooting weddings in a storytelling style. He says he started in 1995, I actually have him beat on that one – 1990 for me. Unlike Joe however, I started off doing the more traditional posed style which was popular at the time. Eventually I became a bit bored with it and moved towards using 35mm cameras with high speed b/w film and I got the same reaction Joe talks about in the video. Other photographers would gasp and tell me how wrong that was, that the images would be grainy and it wasn’t quote, “professional”. Like Joe, I did it anyway and my clients loved it because I was able to capture more of the storytelling he talks so passionately about.

    While you’re telling their story, your story is also in there (your images) as well. – Joe Buissink

    See what else Joe has to say and be inspired by his moving images:

    In this second video, Moshe Zusman talks about creating poses rather than capturing moments. This is a different approach to wedding photography. Often many photographers use a mix of both candid storytelling images and posed. See if you can grab some tips from Moshe on posing in this video:

    I don’t think either style and philosophy is right or wrong, just different. So which style do you relate to more? If you were getting married which would you want your photographer to shoot?

    Want more wedding photography tips? Try these dPS articles:

    • Are you Ready to be a Wedding Photographer?>
    • Wedding Photography – 5 tips for the Speeches
    • How Connecting with Vendors Can Help Skyrocket Your Wedding Photography Business
    • Wedding Photography 101 (Part 1)

    The post Some Wedding Photography Tips with Two Different Perspectives by Darlene Hildebrandt appeared first on Digital Photography School.

    Digital Photography School

  • Writer’s Favorite Lens – the Canon 40mm Pancake Lens

    Like many beginning photographers, I’ve been a long-time fan of zoom lenses throughout much of my four year photography career. This past year, however, something in my brain shifted and I began to first accumulate and suddenly prefer using prime lenses. I began with the humble Canon 50mm f/1.8, eventually adding a 100mm f/2.8 macro lens. For many months, this combination of lenses paired with my Canon 6D became my preferred travel photography kit, replacing my beloved 16-35mm f/2.8. I loved the compact, significantly lighter kit that I was now able to tote around in my discrete Kata DSC 437 camera bag.

    DPS 08

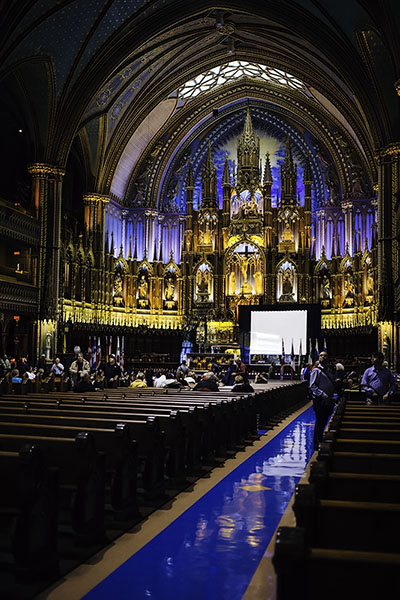
    Several weeks ago, I decided to pull the trigger on another prime lens: the Canon EF 40mm f/2.8 STM pancake lens. Announced by Canon in June 2012, this is a relatively new lens and is the smallest ever made by Canon. Intrigued by its smaller size and slightly wider focal length, I decided to use it in place of my nifty fifty lens on a two week trip to New York and Montreal. The resulting images I took and overall experience shooting with the 40mm have secured it as my favorite new all-around shooting lens. Here are some reasons why you too may want to consider adding the 40mm pancake lens to your collection.

    DPS Pancake lens 03

    Makes DSLR cameras even more compact

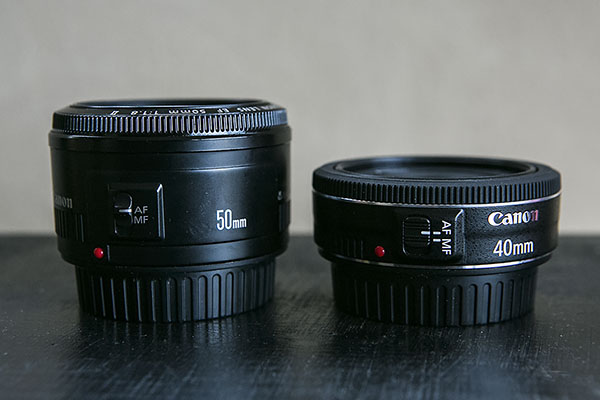
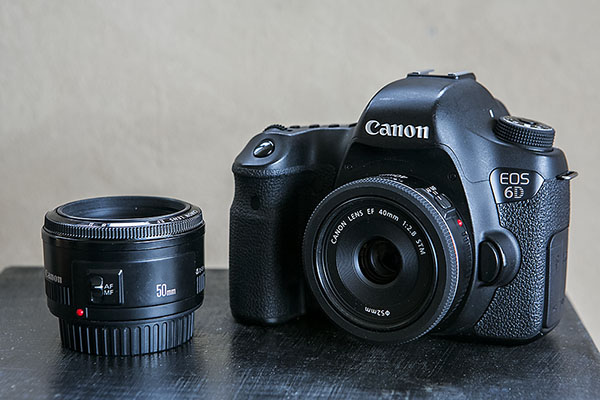
    At 22mm (0.86″) deep, the 40mm is significantly shorter than the 50mm f/1.8, which measures 41mm (1.6″) deep. The 40mm’s shortened length makes it easy to slip it into a relatively small camera bag, or even a medium sized purse.

    DPS Pancake lens 02

    Allows for the “perfect normal” focal length for full-frame cameras at a reasonable price

    While the 40mm will work on every Canon DSLR ever made, it is optimized for use on full-frame digital cameras. I always found 50mm to be slightly too long for most of the casual street photography or travel shots that I want to take, and Canon doesn’t make a 35mm for less than $ 500. Priced brand new at $ 199.99, the 40mm is the perfect balance in terms of focal length and cost, providing an incredibly natural perspective to images at a reasonable cost.

    DPS FINAL 05

    Solidly built with instant manual focus override

    Despite being drastically shorter than the 50mm f/1.8, the 40mm actually weighs about the same at 4.6 ounces (130 grams). This is likely due to the 40mm being constructed of both metal and plastic, giving it a very solid and secure feel, especially when compared to the mostly plastic 50mm f/1.8. Like the 50mm f/1.4, the 40mm also has an outer focus ring that can be adjusted at any time for instant manual-focus override when shooting in Canon’s One Shot focus mode.

    DPS New York Food

    Ideal for street, architectural, and food photography

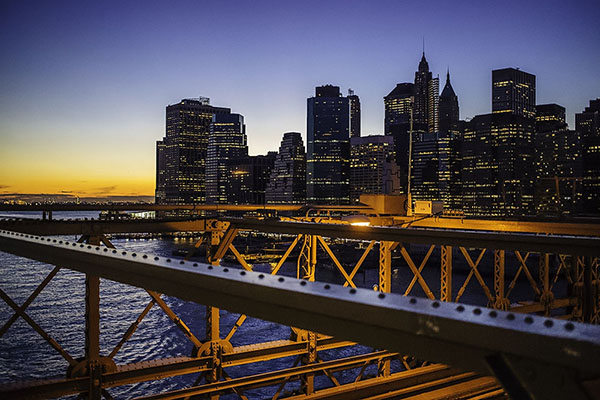
    The 40mm’s compact build makes it very easy to stow in casual bags of nearly any size. Its size also makes it more inconspicuous, making it ideal for street or documentary photography, as opposed to the popular 24-70 f/2.8 lens, which always seems to stick out. My travels through New York and Montreal saw many tall buildings and skyscrapers which were admittedly harder to shoot with the 40mm, making me miss my wider 16-35mm.

    DPS FINAL 02

    However, the 40mm was still wide enough to capture certain architectural scenes, and the benefit was the lack of distortion when captured at 40mm versus 16mm. This meant far less lens correction in post-processing. Another area of photography that is immensely easier with the 40mm is food and drink photography for the casual shooter.

    DPS New York Food

    If you want to make less of a show of grabbing a few snaps of a dish while being seated at a restaurant, the 40mm’s wider focal length and minimum focusing distance of 0.3m (11.8″)  – compared to 0.45m (17.7″) on the 50mm f/1.8 – is perfect for capturing what is immediately in front of you without having to stand up and fuss with angles.

    DPS Portrait 02

    The One Downside to Having a Pancake Lens

    Throughout my three weeks of shooting with the 40mm, I had only one minor complaint that to me is the compromise of having a slimmer lens: lack of space to properly handle the lens during lens changes. It is much harder to attempt spur of the moment lens changes without accidentally getting fingerprints on one side of the lens or potentially dropping it.

    Do you have a favorite lens? Have you tried this little gem? Share your thoughts in the comments.

    The post Writer’s Favorite Lens – the Canon 40mm Pancake Lens by Suzi Pratt appeared first on Digital Photography School.

    Digital Photography School