Category: Photography

  • Writer’s Favorite Lens – the 50mm f/1.4 Lens

    005

    1/400, f/4.0, ISO 320

    It’s easy to love the 50mm f/1.4 lens. It’s a jack-of-all-trades. It’s that best friend that never lets you down. It’s the cowboy of all the lenses; it can pretty much do anything you ask it to do. If I was forced to only keep one lens, I’d have to choose this one. I’d even go as far as to say that most of you probably have this lens, and if you don’t, you should.

    Sometimes the 50mm f/1.4 doesn’t get appreciated as much as it deserves to be. It’s unassuming. It doesn’t look intimidating and professional on your camera. It doesn’t cost you an arm and a leg or your first-born child. It’s definitely not showy, and not really a lens that you’re going to brag about to your photographer friends. But man, when you need a lens that’s got your back, this is the one.

    Before I go on, I want to clarify that I’m talking about my Nikon 50mm f/1.4 lens on a full frame body. If your camera is a cropped sensor, the 35mm f/1.4 lens will have similar results. You can also get the 50mm 1.8 lens for less money, but if you can spend a few extra dollars, get the sturdier, faster, 50mm f/1.4 (or even the 50mm f/1.2 if you’re a Canon user).

    008

    1/400, f/3.5, ISO 400

    Convenient and Lightweight

    The 50mm f/1.4 is great to take just about anywhere when you want to capture life around you. If you don’t want to lug around a bunch of heavy equipment, throw this lightweight gem on your camera, and go. Sure, there will be some shots that won’t be perfect with the 50mm, but you’re going to be able to get most of what you want. If you’re a smaller person like I am (5’3″ if I’m on my tiptoes), a little less weight can make a big difference if you’ve got a lot of walking around to do. I’ll admit that my arm gets really tired with the bigger lenses sometimes.

    The freedom of smaller and lighter weight will allow you to move around more, without the restriction of maneuvering a big long lens, or pulling out a tripod. You can get it in and out of your camera bag easily, and keep it close to you, which will lessen the chance of gear getting stolen or broken.

    You’ll be able to get up close if you need to, if you’re in a public place, or you can pull back a bit and get the whole scene. Your 50mm sees about the same as how things look to your eye in real life. So if you see something you want to capture, you just put the camera up, and there it is, pretty much how you just saw it. You don’t have to worry about everything being closer or farther away than you expect.

    Ready for Anything

    006

    1/500, f/2.8, ISO 400

    If your 50mm is on your camera most of the time, you’re ready to capture the unexpected. You won’t be stuck with a lens that absolutely won’t work for the situation. There are few situations that the 50mm can’t at least do a decent job. Sometimes you don’t have time to change to a different lens, because deer don’t come knocking at your front door very often, and they don’t stay for tea and cookies!

    I’m not saying that you can’t ever use another lens, but the 50mm is a great lens to have on-the-ready.

    Great at Capturing Details

    001

    1/1250, f/1.8, ISO 400 // 1/640, f/2.5, ISO 400

    The 50mm lens is great to capture those details around you. Your feet make great zoomers, and you can easily move back to get more of the scene or closer to get those details in the shot. It feels like an extension of your eyes and brain, so taking photos becomes second nature.

    Expert at Depth of Field and Bokeh

    007

    1/125, f/2.2, ISO 800

    The 50mm f/1.4 offers awesome depth-of-field options. You can have just one small part in focus with the rest of the photo dropping away into creamy bokeh. You can also open that aperture all the way up to f/1.4 when you don’t have much light to work with. Those extra couple of f-stops can make a huge difference when every bit of light counts. If you’ve never owned a faster lens like this one (for example, if you’ve only been using the kit lens that comes with your camera), this will open up a whole new world to you!

    Perfect for Portraits

    009

    1/1250, f/1.8, ISO 400

    The 50mm can be a great portrait lens. Yes, there are lenses that might be better for portraits, but sometimes I really love the portraits I can make with my 50mm. You don’t have to get so close to your subject that you’re breathing on their face, but you don’t have to get so far away that you’re shouting instructions to them.

    I find that sometimes the 50mm allows me to have the best connection to my subjects. I can touch their arm to move them into a better position, and talk to them and connect. Then I step back slightly and capture exactly what I just worked on, before I lose the connection and natural look we just achieved. Also, sometimes those big lenses can feel intimidating to your subject; the 50mm doesn’t look quite so scary.

    Best All-Around Lens

    004

    1/320, f/2.0, ISO 800

    You can also use your 50mm for other things besides people, of course (sometimes I do forget about that, because I’m kind of attached to photographing human beings). You can use the 50mm for still-life photos, scenery, and even some wildlife (especially if a deer comes right up to your house). There aren’t many things that the 50mm is useless for. It’s a great lens to have when you don’t know for sure what kind of photography you want to do, and you want to experiment for a little while.

    Essential for Indoor Shooting

    003

    1/100, f/3.2, ISO 800

    The 50mm is almost essential if you want to shoot indoors. If you want to read more ideas on using this lens indoors with natural light, go check out Tips For Great Indoor Portraits Using Natural Light. I love that I can maneuver in almost any space, even small homes, and still get everything I want in the photo. It’s also great if you don’t have tons of natural light available indoors, and you don’t want to use additional lighting and flash equipment.

    002

    1/250, f/4.0, ISO 400

    The 50mm f/1.4 is so versatile that you can capture a family with their beautiful surroundings, or you can capture the most intimate close-up detail. It’s so easy to carry around that you won’t dread taking it along with you on your adventures. It’s so intuitive that you will feel like your heart is making photos, and your brain doesn’t have to work as hard. It’s so inexpensive that most photographers can add it to their collection.

    Are you in love with your 50mm lens? Share in the comments why or why not. I’d love to hear what you think.

    The post Writer’s Favorite Lens – the 50mm f/1.4 Lens by Melinda Smith appeared first on Digital Photography School.
    Digital Photography School

  • Mastering Family Portrait Part III: Posing Guide

    It might be the redheaded stepchild of photography, the gum under your shoe, the backwash left in the glass when you think you’re drinking champagne, but posing is one of the most important parts of any photograph. I am not a traditional poser, so I’m not going to get into thumbs in or out of pockets, or serious or smiley, Continue Reading

    The post Mastering Family Portrait Part III: Posing Guide appeared first on Photodoto.


    Photodoto

  • How to Correct Skin Blemishes Using the Patch Tool in Photoshop

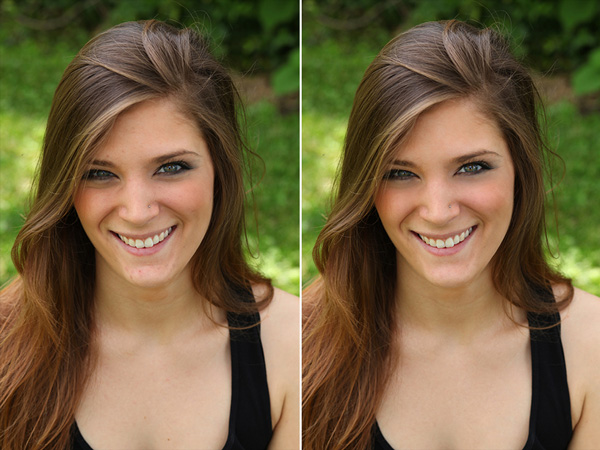
    There are many articles that discuss the overuse of skin smoothing in portrait photography. Photographers strive to find a balance between realistic skin and fixing the imperfections. Obviously, one way to minimize the use of Photoshop for skin issues is to hire a phenomenal makeup artist who can make the skin look realistic and flawless all at the same time. For the times when there are issues with a client’s skin I try to not go overboard and fix every little thing. I want my client to still look like themselves when I am done editing.

    UsingPatchToolSidebySideBeforeandAfter_DigitalPhotographySchool_LoriPeterson600

    Some photographers use the spot healing brush religiously. I never use it. Instead I use the patch tool. My reasoning is that the Patch tool actually takes samples of the pixels and closely matches them to what you are trying to fix. If the results are not quite right, you can tweak them to suit your needs.

    Step 1. Open your image

    As you can see my model is absolutely beautiful, but she does have a few blemishes on her skin and we are going to fix those before we give the image to her.

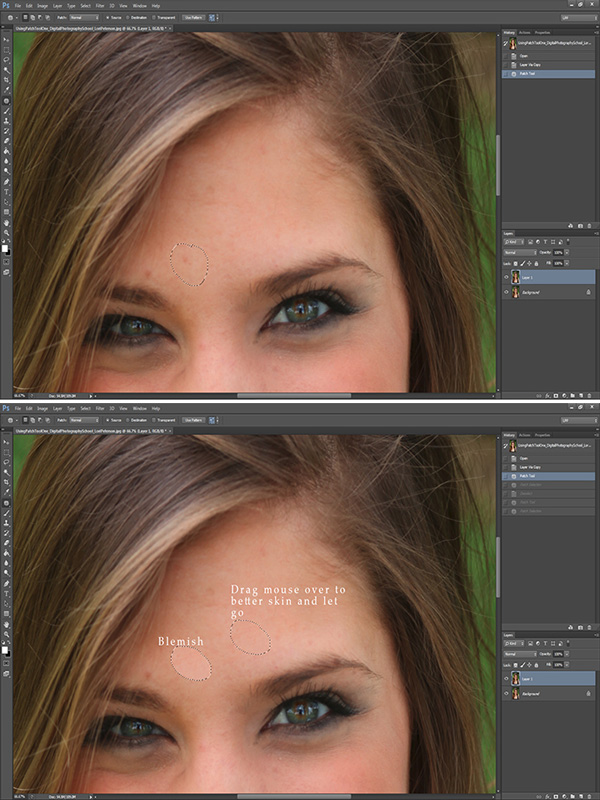
    Step 2. Select an area and apply a path

    Hit Ctrl or Command + J to duplicate your layer. You can add a Layer Mask in case you want to undo anything later.  Then select the Patch tool and draw around the part of the skin that you want to replace (make sure the “Source” setting is selected to patch the source from the destination so it will use information from the area you drag to fix the blemish). Once selected, keep holding your mouse down and move it over to better spot of brighter skin. The skin does not have to be in the same area where you are working. You can use skin from the neck, shoulder, hand, or wherever you find better, smooth skin.

    1UsingPatchToolEdits_DigitalPhotographySchool_LoriPeterson600

    Step 3. Repeat and refine

    Repeat the process for any other skin issues. Just keep circling the area you want to replace and dragging the circle over to a clean area. If you change something you did not want to or it doesn’t look right you can use your layer mask to hide it or you can click undo (Cmmd/Ctrl+Z).

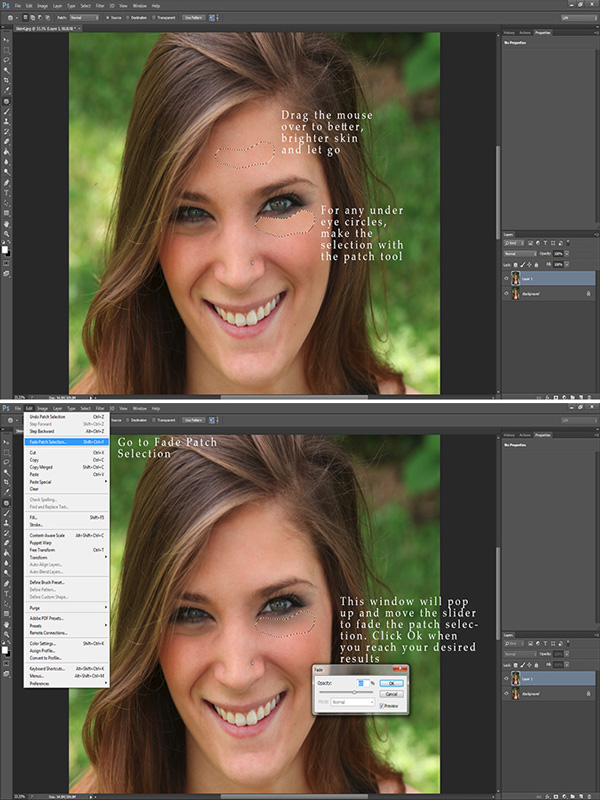
    Step 4. Reduce dark circles under eyes

    Most of the time you will find that some dark circles under the eyes are showing. While it’s actually normal, we want our clients or models to look bright eyed.  If you want to decrease these, simply use the patch tool and circle the under eye area. Drag that circled area over to better skin. The result will be very harsh if left like that, so fade the technique. Go to Edit > Fade Patch Selection and a pop up window will appear. Lower the slider until the fade looks like it will blend in. Repeat the process for the other eye. The percentage of fade you use may not be the same on both sides, depending on the lighting.

    2UsingPatchTool_DigitalPhotographySchool_LoriPeterson600

    Step 5. Review and merge layers

    Once you finish, you will see that the skin looks much better and smoother, but the details of the skin are still there without being overly fake looking. If you are satisfied, merge your layers. If you are going to do any further edits, go to your History in the Layers Palette and make a snapshot of the image so you can always come back to it.

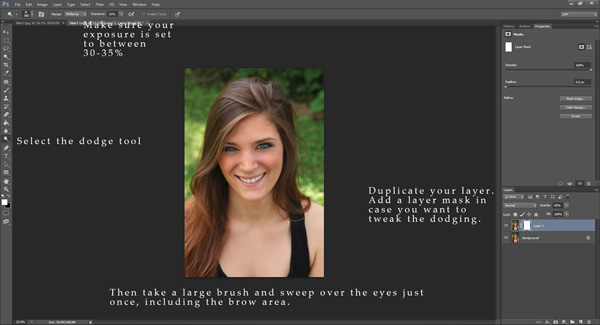
    Step 6. Brighten eyes optional

    Optionally, you can brighten up the eyes a bit. Duplicate your layer again using Ctrl or Command + J. Again, add a Layer Mask in case you might want to change anything later. Select the Dodge Tool and make sure your exposure is set to around 30%. Take a big brush that covers the eye and the brow and in one motion with your mouse sweep over the eye and the brow. You can adjust the layer if it’s too bright or use your Layer Mask and remove the parts that might be too overdone.

    3UsingPatchTool_DigitalPhotographySchool_LoriPeterson600

    The Patch Tool can be one of the easiest and quickest ways to clean up skin and still retain the overall look of your client without making the image seem overdone. After a few times, using the Patch Tool can become like a second nature and skin edits will go quicker. Here is the before and after showing that with just a few motions with the patch tool you can achieve an overall better image where skin looks smoother, brighter, and still looks natural.

    UsingPatchToolSidebySideBeforeandAfter_DigitalPhotographySchool_LoriPeterson600

    The post How to Correct Skin Blemishes Using the Patch Tool in Photoshop by Lori Peterson appeared first on Digital Photography School.

    Digital Photography School

  • Top 10 Mistakes that Cause Blurry Photos

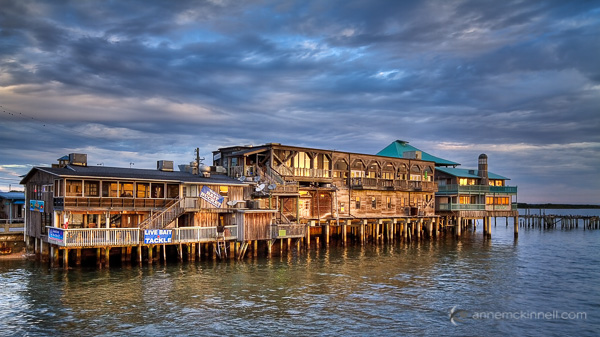
    Cedar Key

    If your photos are not sharp, you are not alone! The most common question I get asked by beginning photographers is “how do you get your images so sharp?”

    Blurry photos is very common issue with a whole plethora of possible culprits, making it very difficult to pinpoint exactly what the problem is. But if you go through this list of the top 10 mistakes that cause blurry photos, you will probably find the answer that works for you.

    1. Your shutter speed is too slow

    This is the #1 culprit of blurry photos. You might think you can hold perfectly still for half a second, but I assure you there are very few people in the world who can. When hand-holding your camera, remember this rule of thumb to avoid blur caused by camera shake – your shutter speed should be the reciprocal of your lens’ focal length – that is, if you’re using a 60mm lens, your exposure should be 1/60th of a second or faster. With a 200mm lens, use at least 1/200th of a second, and so on. Camera shake is magnified the longer your telephoto length, so wider angle lenses will suffer its effects much less.

    Using a 400mm lens, I selected a shutter speed of 1/400th of a second to reduce the possibility of camera shake.

    Using a 400mm lens, I selected a shutter speed of 1/400th of a second to reduce the possibility of camera shake.

    Some lenses and cameras have image stabilization technology built into them – particularly with longer focal lengths. Image stabilization usually allows you to slow your minimum shutter speed by around three stops, meaning that a 60mm lens can now handle shutter speeds as low as 1/8th of a second without camera shake.

    What is YOUR minimum shutter speed?

    In addition to this rule of thumb, it’s important to know your own personal minimum shutter speed. We all shake a little, some more than others, so it’s good to know at what point camera shake becomes an issue for you. Try an exercise to find out: put your camera in shutter priority mode and make the same photo at 1/500th of a second and keep going slower and slower. Back at your computer, look at your images and see when you start to notice the blur. Personally, I don’t usually go below 1/125th of a second if I’m hand-holding my camera.

    2. Not using a tripod

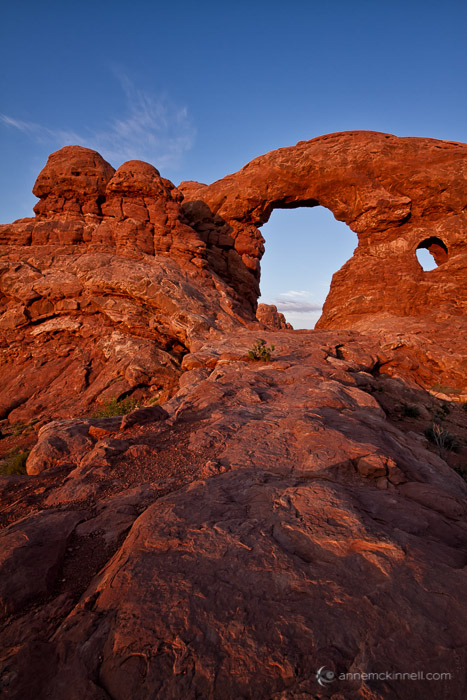
    Sunset Arches

    If you’re experiencing camera shake and you can’t use a faster shutter speed (due to low light conditions) or you don’t want to use a fast shutter speed (because you’re purposefully trying to blur something in the frame) then you need to steady your camera another way such as using a tripod or monopod.

    When you use a tripod, image stabilization is not necessary and may even be counter productive, so it’s a good idea to get in the habit of turning it off when you put your camera on a tripod and turning it back on when you take it off.

    3. Bad camera holding technique

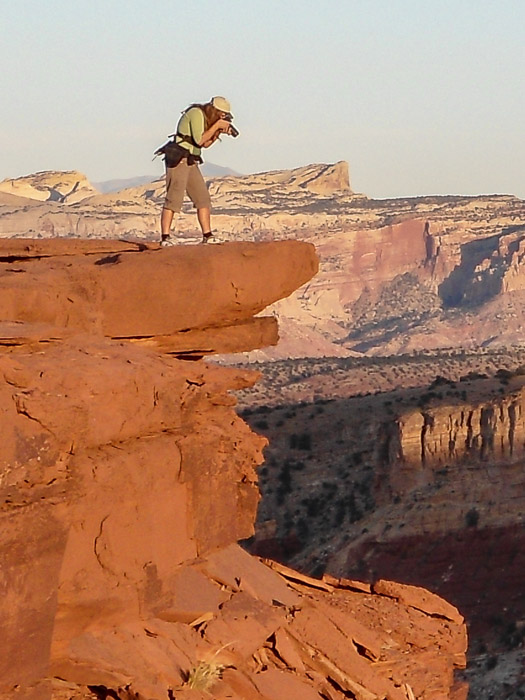
    For the best stability, practice the official photographer position: stand with your feet slightly apart, one staggered forward, and firmly planted to stabilize your body right-to-left and back-to-front. Support the camera with your left hand by holding the lens from underneath, and use your right hand to grab the grip and gently press the shutter button. Tuck your elbows tight to your chest and use the viewfinder rather than the live view screen, as holding the camera to your face will also help hold it steady. Some photographers even go so far as to listen to their breathing and heartbeat, taking care to fire the shot in between breaths and beats for maximum stability.

    Proper technique when hand-holding your camera.

    Proper technique when hand-holding your camera.

    4. Your aperture is too wide

    The size of the aperture also has a direct effect on the sharpness of your photo in that it determines depth of field, which is how much of the image is in focus from front to back.

    When a lens finds focus, it locks in on a specific distance known as the plane of focus. If your focus is at, say, 15 feet, everything 15 feet away from the camera will have maximum sharpness, and anything in front of or behind it will start to fall into blur. The amount of this effect depends on the aperture.

    If you use a wide aperture, like f/2.8, the depth of field is very shallow. This effect is emphasized with longer focal length lenses. So if you are using a telephoto lens and the aperture is f/2.8, there may be only a razor thin sliver of the image that is in sharp focus. If you use a small aperture, like f/11 or f/18, the depth of field is larger so more of the image will be sharp.

    Choosing the right aperture depends on the type of image you want to create. But if you are trying to get everything in the frame as sharp as possible, try using a small aperture (a larger f-number such as f/11 or f/22). However, by using a small aperture you will need to use a slower shutter speed to compensate for the loss of light. See problem #1.

    5. Not using autofocus

    How good is your eyesight? Not great? Wearing glasses? You should probably be using autofocus. These days cameras are sophisticated – let them do what they are good at. Another thing to keep in mind is that your viewfinder should have a diopter on it. It’s a little wheel next to your viewfinder that allows you to adjust how clearly things appear when you look through it. It is particularly useful for people who should be wearing glasses but are not.

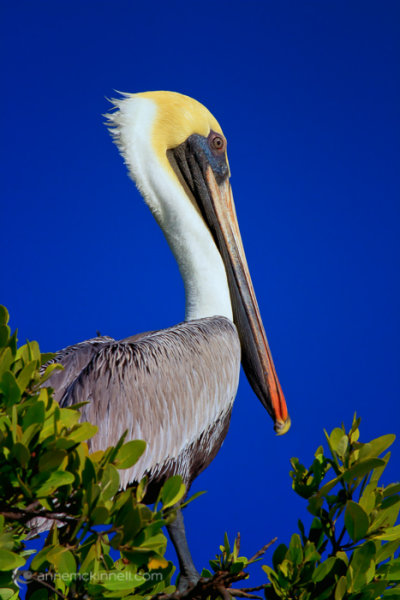
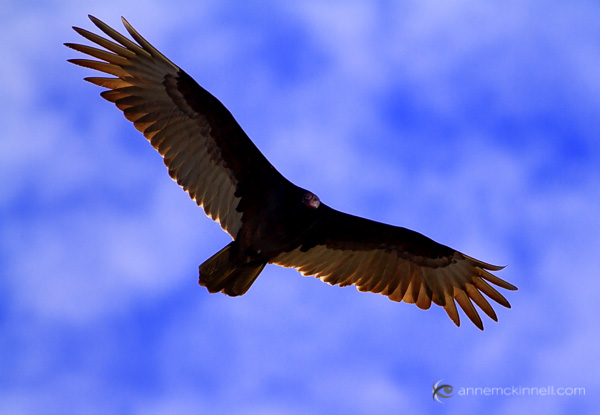
    Black Vulture in Flight

    6. Not focusing in the correct place

    Even if you have a sharp, clear prime lens on a bright day, using a small aperture and a fast shutter speed with a low ISO, it doesn’t count for much unless you can get the camera to focus on the right spot. This is even more crucial when using a wide aperture, which can create a razor thin depth of field. A slight miscalculation in the focus can throw the subject completely out of the focal plane, or give you a portrait with a perfectly sharp earlobe and blurry eyes.

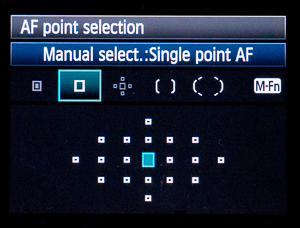
    Often photographers leave their cameras set on auto-area AF mode, which tells the camera to use its best judgment to decide what part of the picture should be in focus. Most of the time modern cameras are pretty good at this, particularly if the subject is prominent in the frame. However, with more complex compositions the camera can get confused and try to focus on the wrong thing. To specify the focal point yourself, switch to single-point AF area mode.

    f-spotWhen you look through your viewfinder, you should see an array of little dots or squares laid over the display. These are your focus points, and they show you where in the frame the camera is capable of finding focus. In single-point AF area mode, you can use the camera’s direction pad to select one of these dots, and the camera will always focus on that point and that point alone.

    To tell the camera to focus, you would normally depress the shutter button halfway before pressing it the rest of the way to take the shot. This works pretty well, but can be sensitive – if you press too lightly, it may come unpressed and try to re-focus after you’ve already found your spot. If you press too hard, you might make the exposure before the focus is ready. If you take multiple pictures in succession, it will try to focus again before each shot. For these reasons, some photographers swear by the back focus button instead.

    This is a button on the back of your camera, probably near your thumb. It might be labeled “AF-On” or simply “Fn”, and it might be set up by default or you might have to activate it in your camera’s menu settings, but it can be assigned to take over the autofocus function. When you press it, the camera focuses and won’t focus again until you press the button again. This way, you can re-compose and take shot after shot, and the camera won’t lose your focus every time you hit the shutter button.

    7. Using the incorrect focus mode

    There are three main autofocus modes that every camera should have. The first is single-shot focus, usually called AF-S or One-shot AF; it is meant to be used with still subjects. The second, continuous autofocus (AF-C or AI Servo) is specially designed to track movement through the frame, so is best to use when your subject is in motion. The third is an automatic mode, AF-A or AI Focus AF, and likely the default setting on your camera. It reads the scene and determines which of the first two modes it should use.

    Cactus Flower

    8. Not using manual focus

    While I’m a big advocate of autofocus, there is one particular time when manual focus comes in very handy. When your camera is on a tripod and you are using a wide aperture to achieve a very shallow depth of field, and you want to make sure the most important thing in your frame is sharp, switch to manual focus and then use the LCD zoom function to magnify the display by 5x or 10x allowing you to make tiny adjustments to the focus to get it just right.

    9. Junk on or in front of your lens

    If you have a big smear on your lens, that is going to affect the clarity of your image. By the same token, if you put a cheap plastic filter in front of your lens, that is going to degrade image quality as well. If you always use a UV filter, you might want to try taking a few shots without it to see if the quality of your UV filter is negatively affecting your images.

    Using an aperture of f/20, everything is sharp from foreground to background.

    Using an aperture of f/20, everything is sharp from foreground to background.

    10. Poor lens quality

    This item is last on the list for good reason; it is the most common thing for beginners to blame their blurry images on, but it is rarely the real reason. Still, lens quality does make a difference.

    Lens quality is determined by the materials and construction inside the lens itself, which is usually made up of several pieces of glass precisely aligned in order to focus, zoom, and correct for optical aberrations.

    Some lenses are simply sharper than others or are better in different ways. Some lenses may be sharp in the center, but get blurry around the corners and edges of the image. Some are clear at certain apertures but slightly fuzzy at others. Some lenses cause colour fringing around points of contrast. Every lens has a unique character that may or may not be useful to the type of work you’re doing. It’s also worth noting that each lens has a “sweet spot” – a certain aperture at which it performs its best. This is usually in the middle of its aperture range, around f/8 or f/11.

    For the sharpest image quality, fixed focal length lenses usually take the cake. It’s not always convenient to carry around two or three lenses rather than a single all-purpose zoom, but their simple construction makes even the cheapest prime lens crystal clear.

    The post Top 10 Mistakes that Cause Blurry Photos by Anne McKinnell appeared first on Digital Photography School.

    Digital Photography School

  • How to Photograph a Tent and the Night Sky

    In this Adorama video tutorial host Corey Rich shows you how to photograph the iconic (as he puts it) glowing tent and starry sky photo. It’s easier than you think! Watch the video and scroll down for some added bonus tips below:

    He also mentions a second episode of shooting around a campfire at night, you can watch that video below as well or check out my own article here on dPS: 5 Tips for Creating fun Campfire Photos

    I tend to disagree with two things he mentioned: shooting with a tripod lessens your creativity and shoot in burst mode to make sure you have it in focus. For me just the opposite is what I tell my students. I find that using a tripod makes you slow down for sure – but that’s more often than not a good thing.

    Shooting to quickly is the cause of many issues such as not checking your composition or exposure closely, and getting carried away with the shot and not thinking it all the way through. In a scenario like this you have time to do test shots as the light goes down so do those hand held and once you find your perfect spot, set up and shoot on a tripod to get the sharpest images.

    As for shooting in burst mode, that’s a bit of a pet peeve of mine. I come from the days of film where every button press cost money in terms of film and processing so you shot a lot more deliberately. Shooting a whole bunch of shots on burst mode might get you a good shot but I personal find that slow and methodical will get better results and way less culling and editing later.

    Where do you stand on these two issues?  Tripod or not? Burst mode or decisive moment? Discuss  it in the comments and share any tent or campfire photos you’ve taken as well.

    The post How to Photograph a Tent and the Night Sky by Darlene Hildebrandt appeared first on Digital Photography School.

    Digital Photography School

  • 5 Tips for Filtering Advice from Other Photographers

    Things seems to all be falling into place. You have your gear all set, a fancy new logo, a great new set of business cards and your portfolio is starting to shape up nicely.

    DSC 1760

    But you still have a lot of questions – ranging from technical to business. So you decide to seek out the advice from a seasoned professional photographer and hope they will help you with all of your unanswered questions about starting just starting out.

    But who is there to help you decipher whether the advice you are receiving from said pro is good or not-so-good?

    Here are some great tips to help you filter out the good advice versus the bad when it comes to improving your photography skills and business.

    #1 – Consider the source

    You have done a lot of research when it comes to photography and even running a business, so take the time to learn a little more about who it is you are talking to for advice. There is nothing wrong with looking at people’s credentials when seeking advice about something so important to you. Look at their resume and portfolio. Ask them how long they have been working in the field of photography, why they got started, why the love it and so on. Seek those out you admire for specific reasons – their technical abilities, website, blog presence, and so on.

    DSC 2411

    #2 – Don’t be scared to ask questions

    The worst thing someone might say to you is NO. It never hurts to ask the questions you have in mind. Connecting with others is a great way to become a better photographer and business person. Check to see which photographers you admire offer one-on-one mentoring sessions, workshops or e-learning courses.

    #3 – Ask the right questions

    You have the undivided attention of an experienced photographer – make sure you prepare some questions before you speak with them. Be specific, not vague. If you are having technical issues show them some of your most recent work and ask how to improve. If you have some business questions, have paperwork and numbers handy (if you are comfortable sharing). The more specific you can be with your questions, the better they can help you with your problems.

    DSC 1735

    #4 – Listen and take advice with a grain of salt

    There is no one said all, do-all, be-all, fix for any problem or issue. Just like life, different things work for different people. Certain photographers have different ideas about how to do different things – especially when it comes to business. Listen to the advice and do what is best for YOU. Some photographers sell the rights to their digital images, others don’t. Some photographers do in person sales, others do business online. While some practices might be successful for them, they may not be for you. Consider all the factors before making big decisions and do what is best for you and your business.

    #5 – Be prepared for constructive criticism

    What is the saying, “If you put yourself out there, be prepared”? While it would be wonderful to think that everything is rainbows and apple pies, you can’t grow from sugar coating things, especially if you want to grow. If you are willing to put yourself out there and ask for advice – you will be able to grow and learn from it. Participate in photography challenges, join a local photography group – put yourself out there. Yes, it might be uncomfortable. You might not like what you hear, but it is much better knowing the honest truth from trusted sources.

    DSC 5027

    #6 – Stay true to who you are

    Advice is a pretty powerful thing and can be help solve many unanswered questions – but don’t cast aside who you are as a photographer and artist. Remain true to your core principles, what you believe in creatively and always follow your gut.

    Best of luck in all of your photography endeavours.

    DSC 1765

    The post 5 Tips for Filtering Advice from Other Photographers by Allison Gipson appeared first on Digital Photography School.

    Digital Photography School

  • Writer’s Favorite Lens – the Tamron 18-270mm

    Darren recently suggested that the dPS writers to contribute to a semi-regular series featuring our favorite lenses, and I knew, hands down, which lens I wanted to feature: my daily workhorse, the Tamron 18-270mm lens. All photographs in this article, with the exception of the lens itself were taken with the Tamron 18-270mm.

    church, fall, autumn, architecture, framing, fall leaves, Tamron18-270mm

    Introducing the Tamron 18-270mm

    The full name of this lens is the Tamron 18-270mm f/3.5-6.3 Di II VC PZD lens. It is a great all-in-one zoom lens and covers a wide-range of photography situations. Vibration control (VC) allows you to handhold at slower shutter speeds, and the proprietary piezodrive autofocus is quiet and fairly fast. Tamron makes versions of this lens compatible with Canon, Nikon, and Sony camera bodies. While some may argue that this lens is a “jack-of-all-trades but master of none,” I would contend that the Tamron is a perfect fit for the photographer looking to get a lot of use out of a single lens.

    camera lens, tamron, tamron18-270, all-in-one zoom, zoom lens, photography

    Ideal Uses for the Tamron 18-270mm

    The Tamron 18-270mm is a perfect lens for travel photography and for the photographer-on-the-go who does not want to spend time constantly switching lenses or hauling large amounts of gear. In a single lens, you have the capability of shooting everything from wide angle, to 50mm, to a pretty substantial zoom.

    When I made the decision to upgrade and replace my two kit lenses (the Canon 18-55mm and 55-250mm), I knew that I wanted a lens or lenses that would cover a similar range of photography situations and offer an improvement in image quality. I was also preparing for some extensive traveling (including backpacking) and did not have an endless budget, so both weight and cost were important considerations.

    hiking, backpacking, Badlands, tent, camping, travel photography, Tamron18-270mm

    At 450 g (0.99 lbs) this is not a light lens, but it compares favorably to other long zoom lenses, such as the Canon 55-250mm I was replacing (390 g or 0.86 lbs), the Canon 24-105mm (525 g or 1.16 lbs), or the Canon 70-300mm (630 g or 1.39 lbs). After a long day of hiking and photographing, you will know that you have been carrying your camera around, but you would be hard-pressed to find another lens for a DSLR that will give you this range and flexibility that is any lighter.

    Price-wise, the Tamron is a steal. This lens retails today for around $ 450 USD, and its newly-released upgrade, the Tamron 16-300 f/3.5-6.3 Di II VC PZD Macro currently retails for $ 599 USD, after rebate. This is a great value for a quality lens for those who lack unlimited funds to spend on multi-thousand dollar lenses.

    Advantages of All-in-One Zooms

    The main advantage of an all-in-one zoom lens, like the Tamron, is the flexibility. You can go from shooting a wide-open landscape shot to a close-up zoom of an individual bird in the flick of a wrist. These two photographs at Mammoth Hot Springs were taken just moments apart, at the two extremes of the Tamron’s range. If look carefully in the middle left of the wide view, you can just make out the bird. You will no longer have the excuse of “not having the right lens” if you miss a prime photographic opportunity.

    Yellowstone, Mammoth Hot Springs, landscape, photography, National Park, wide angle, Tamron18-270mm

    Yellowstone, Mammoth Hot Springs, landscape, photography, National Park, zoom lens, Tamron18-270mm, bird, wildlife

    Never having to change lenses also keeps my camera and sensor cleaner, my reaction speed faster, and my backpack and purse emptier. I rarely travel around with a full camera bag, since I can slip an extra battery or a few filters into a pocket or my purse. In fact, I can easily stow the entire camera, with the Tamron lens attached, in my fairly-small purse without incident (though I usually use a neoprene wrap around it).

    Tamron18-270mm

    The Tamron 18-270mm lens is a great lens for you if you do not want to specialize or you want to shoot a wide range of subjects and situations. You can go from shooting close-ups in the mornings, to architecture at midday, to your child’s soccer game in the afternoon, and still have the same lens on for shooting a few shots of the moon before bed.

    closeup, macro, bee, bumblebee, Tamron18-270mm

    architecture, theater, blackandwhite, Tamron18-270mm

    moon, full moon, eclipse, night photography, astrophotography, Tamron18-270mm

    The main downside to an all-in-one zoom is that you have a range of aperture values across the different focal lengths. With the Tamron 18-270mm, I can shoot as wide as f/3.5 at 18mm but only have f/6.3 at 270mm. Prime lenses offer much wider aperture values. As a workaround, backing up and using the longer focal lengths still allow you to capture decent blur and bokeh.

    If you want a zoom or all-in-one zoom lens with a wider aperture value across the whole range, you need to be prepared to shell out significantly more money (say, a cool $ 2199 USD for the Canon EF 70-200mm f/2.8L IS II USM or $ 1450 for the version without image stabilization).

    Why I Love the Tamron 18-270mm

    In the end, your favorite lens comes down to what you want to shoot and how much you can afford. For me, the Tamron 18-270mm was an excellent choice to satisfy my wide-ranging photographic interests on a limited budget. The majority of photographs that I take, including those for my articles here on dPS, have been shot using my trusty Tamron 18-270mm lens. With this single lens, I am ready for nearly any photographic opportunity that comes my way.

    6 month old, newborn photography, infant, baby, mother and child, mom, Tamron18-270mm, portrait

    What will you shoot? What’s your favorite lens?

    The post Writer’s Favorite Lens – the Tamron 18-270mm by Katie McEnaney appeared first on Digital Photography School.

    Digital Photography School

  • Fake Perfect Fall Colors Using the HSL Tab in Lightroom

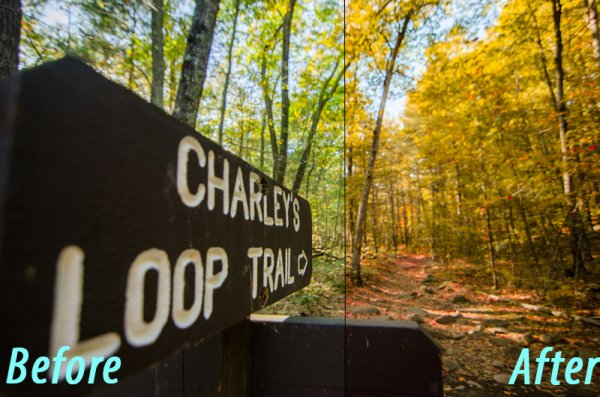
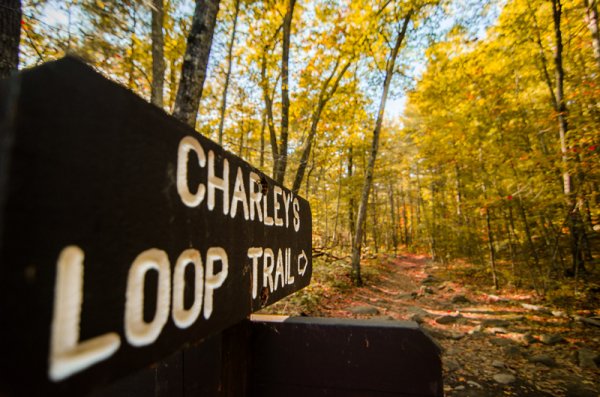
    It can be extremely hard to predict when and where the peak colors of falls will hit. If you’ve ever been a week or two early you’ll know the frustration of seeing little splattering of color when you were hoping for full on peak color. Well, using a little bit of post-production magic, you can add some life to those early fall shots and get it closer to the vision you’d hoped mother nature would’ve given you in the first place. Let’s see how we can fake fall color using the HSL tab in Lightroom!

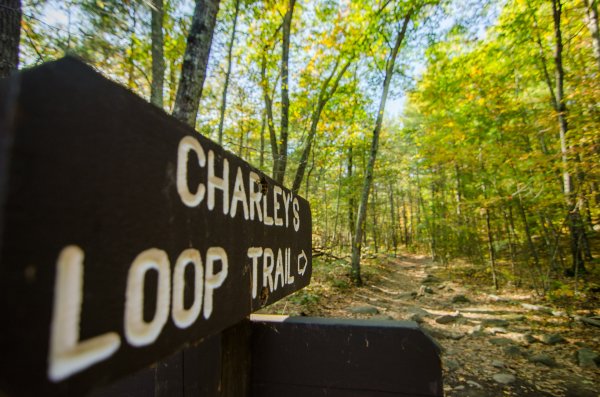
    before&after

    As a side note: I do want to mention that while this article is about faking the colors to create a vision that didn’t exist in the first place, a lot of these techniques can be applied to enhancing fall colors that do exist. Even if you’re completely against the idea of changing the world in post-production it might be worth reading through it to see how you might be able to use these techniques in a way that retains a more true to life look in your image.

    What is the HSL tab

    HSLThe workhorse of the manipulations you will see today is the HSL tab in Lightroom. It allows you to control the Hue, Saturation, and Luminance of your photograph on a color by color level. This gives you the ability to modify reds separately from oranges, blues from greens and so forth.

    Each of the HSL controls have a unique slider for the eight different color tones that make up an image and as you’d expect, each of the HSL controls allow you to modify different aspects of that color.

    • Hue – Controls the tonal range of the color that you’re modifying. For example greens can be anywhere from yellow to aqua.
    • Saturation – Controls the intensity of the color that you’re modify. More saturated means deeper and more intense color, less saturated and you’ll have muted or even no color for the selected color.
    • Luminance – Controls the brightness of the color you select. Moving a slider to the right will brighten the selected color, while moving to the left will darken it.

    As you can see there is a wealth of specialized controls built into the HSL tab. I hope the walkthrough below gives you some ideas on what you can do with it. Remember it’s not just limited to faking the colors of the fall season.

    Fake perfect fall colors with Lightroom

    To get started you’ll need a photograph to work with. It is going to be important that you choose your images carefully here as not every photograph will work for this kind of post-production.

    For example – you’ll want to make sure that the trees you’re featuring do in fact change color in fall (evergreens do not), and, that the other surrounding features of your photograph are outside of the green/yellow spectrum that you’ll most-likely be changing, or you’ll be altering them as well as your trees.

    fall

    Once you have a great shot and you’ve completed some of the basic post production steps then you’ll want to hop over to the HSL tab in your Lightroom develop module.

    As you’ll be working with trees that have yet to change color you’ll mostly be working with greens and maybe some yellows or reds. Again, this is why it’s important that the photograph you’re modify doesn’t contain any non-leaf items in these color ranges – or you’ll change them too – and that might looking more unnatural than the fake fall colors you’re creating.

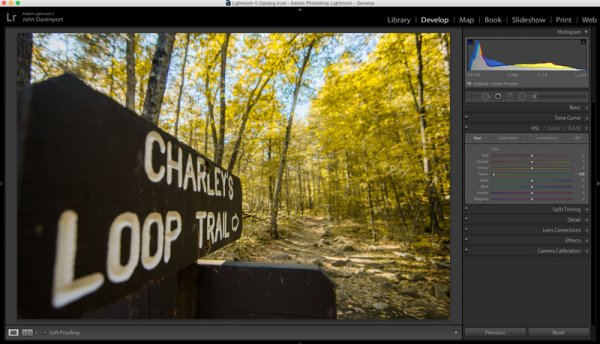
    fakingfallcolor-green

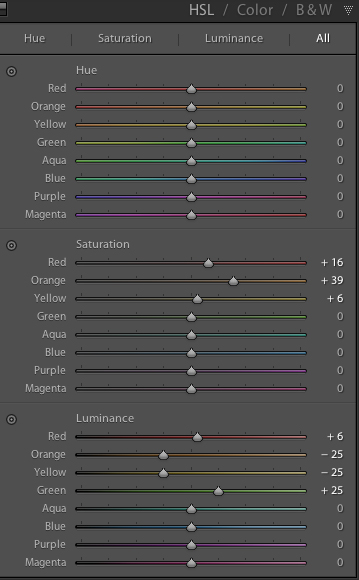
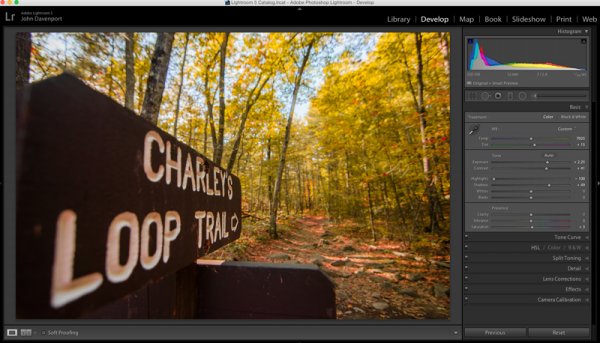
    As you saw above, the shot I’ve chosen for this article contains mostly green leaves with just a few hints of fall color. The first step is to remove the greens from the image by moving the green’s hue slider all the way to the left. This effectively changes the green colors in the image to yellow giving a more fall like look the the photograph, but we’re not done just yet!

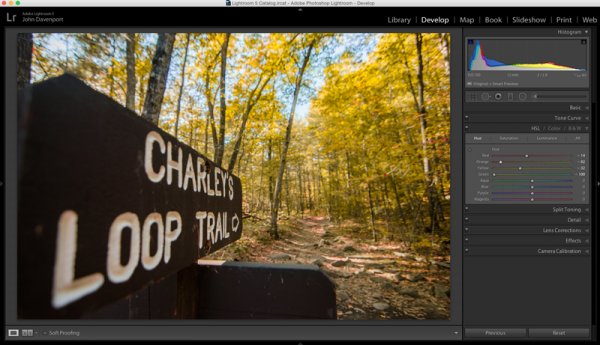
    Next you can experiment with moving the reds and yellows sliders around to try and see how they effect the image. Different color tones will come to life that you may not even realize were there in this step so it’s important to take it slow and look at the entire photograph as you make the changes. In this image the leaves on the ground took on a rusted red look while the trees themselves got a deeper orange look.

    fakingfallcolor-hue

    Once you’ve got the Hue the way you like it you may want to move into the Luminance and Saturation tabs of the HSL tool. This will allow for further modifications of the colors tones by effecting the richness and brightness of the colors you’re presenting.

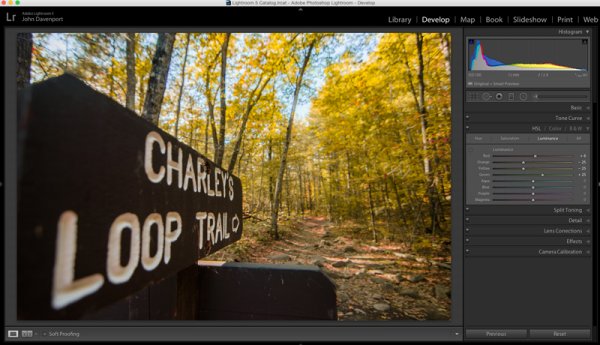
    fakingfallcolor-luminance

    Remember the color tones are still the same as they were in the Hue slider, so even though the greens appear as yellow, moving the green Luminance slider to the right brightens the trees a bit, while the orange and yellows sliders effect their respective color tones.

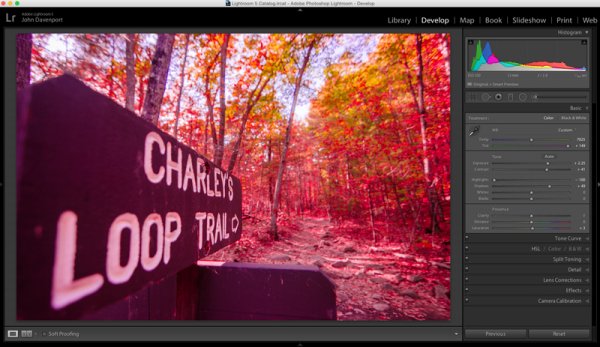
    Another idea that you might want to toy around with is modifications of the white balance. Adding more yellows with the Temp slider or more magenta with the Tint slider can add even more dimension to the shot giving the colors a more dynamic feel.

    fakingfallcolor-wb

    However, it is extremely important to be careful with the white balance sliders when you’re doing these manipulations as bad things can happen very quickly if you’re too aggressive with the changes!

    fakingfallcolor-toomuch

    After you’ve set your color tones and adjusted the white balance of the image it’s time to give the entire photograph a good, close, once over.

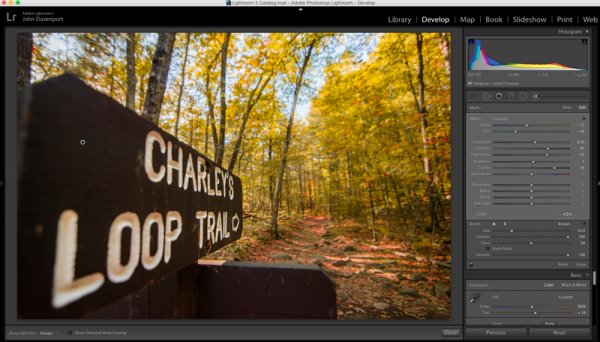
    For this demonstration image the lettering on the sign started to take on a reddish/yellow tint after the white balance tweaks were performed. To fix this an adjustment brush was added to the sign which reduced both the Temp slider (to remove yellows) and the Tint slider (to remove the magenta colors). Also at this point the sign was given a little more definition with the adjustment brush by increasing the clarity and fine tuning the exposure.

    fakingfallcolor-adjustment

    All in all using the HSL tab in Lightroom can be a fun way to create that fall color when it might have been just out of reach. Of course, this doesn’t compare to the real thing so, the best way to get fall color is to go find it in person. Therefore don’t let this stop you from getting out and planning your next hiking trip – the unpredictable nature of the fall season is one of my favorite parts about it!

    fall-2

    Watch this technique in action

    Do you have any other fall photography or post-processing tips to bring out those great colors? Please share in the comments below.

    The post Fake Perfect Fall Colors Using the HSL Tab in Lightroom by John Davenport appeared first on Digital Photography School.

    Digital Photography School

  • Collection of Images of Generations

    We all age and get older every year. Families grow and have children and grandchildren. Generations are formed. In my family there are currently five generations, the matriarch being my grandmother who is 93. This week’s collection is of images that capture those generations, be it people, animals or objects. Enjoy the . . .

    Generation gap

    Photograph Generations Apart.. United in Prayer. by Nima  Baharlooie on 500px

    Generations Apart.. United in Prayer. by Nima Baharlooie on 500px

    Photograph I'd like to buy some of those by Lisette Lebaillif on 500px

    I’d like to buy some of those by Lisette Lebaillif on 500px

    Photograph Expansion #1 by Bjorn van der Meijs on 500px

    Expansion #1 by Bjorn van der Meijs on 500px

    Photograph Loving Hands by Ben Robson on 500px

    Loving Hands by Ben Robson on 500px

    Photograph Now and then by Zoran Milutinovic on 500px

    Now and then by Zoran Milutinovic on 500px

    Photograph 18 and 88 by Kittiyut Phornphibul on 500px

    18 and 88 by Kittiyut Phornphibul on 500px

    Photograph Years by Ehtiram Jabi on 500px

    Years by Ehtiram Jabi on 500px

    Photograph The Old and the Young by Esther Visser on 500px

    The Old and the Young by Esther Visser on 500px

    Photograph Grandfather & Grandson by Bartosz Mazur on 500px

    Grandfather & Grandson by Bartosz Mazur on 500px

    Photograph Generations... by Emanuele  Toscano on 500px

    Generations… by Emanuele Toscano on 500px

    Photograph Two generations by Alexander Dragunov on 500px

    Two generations by Alexander Dragunov on 500px

    Photograph Generations by Stephanie Beaty | Lifeography on 500px

    Generations by Stephanie Beaty | Lifeography on 500px

    Photograph Timeless Touch by Jeff Clow on 500px

    Timeless Touch by Jeff Clow on 500px

    Photograph happy by Tikhon Tikhonov on 500px

    happy by Tikhon Tikhonov on 500px

    Photograph Love among generations by Cathrine Nørgaard on 500px

    Love among generations by Cathrine Nørgaard on 500px

    Photograph My Kids by Emilio Cabida on 500px

    My Kids by Emilio Cabida on 500px

    Photograph GENERATIONS by Florence Vahl on 500px

    GENERATIONS by Florence Vahl on 500px

    Photograph Generations by Florin Bandas on 500px

    Generations by Florin Bandas on 500px

    Photograph Look grandpa... by KnikmanAV - Hans Knikman on 500px

    Look grandpa… by KnikmanAV – Hans Knikman on 500px

    Photograph Generations Apart by Axel Halbgebauer on 500px

    Generations Apart by Axel Halbgebauer on 500px

    Photograph Emotions by Reidulv Lyngstad on 500px

    Emotions by Reidulv Lyngstad on 500px

    Photograph Generations by DEREK HEISLER on 500px

    Generations by DEREK HEISLER on 500px

    Photograph 3 Generations by Martin Davies on 500px

    3 Generations by Martin Davies on 500px

    Photograph Generations by Johan Nilsson on 500px

    Generations by Johan Nilsson on 500px

    Photograph Sad old woman with a baby doll by Johann Frank on 500px

    Sad old woman with a baby doll by Johann Frank on 500px

    Photograph Generation gap by Roberto Cornacchia on 500px

    Generation gap by Roberto Cornacchia on 500px

    Photograph three generations on tonle sap by Stephen Wallace on 500px

    three generations on tonle sap by Stephen Wallace on 500px

    Photograph GENERATiONS by Dani Mantis on 500px

    GENERATiONS by Dani Mantis on 500px

    Photograph Slice Of Americana by Alan Crosthwaite on 500px

    Slice Of Americana by Alan Crosthwaite on 500px

    Photograph 3 Generations by Patrick Dugan on 500px

    3 Generations by Patrick Dugan on 500px

    Photograph 3 generations by Elad Koren on 500px

    3 generations by Elad Koren on 500px

    Photograph 3 Generations by Christian Lengert on 500px

    3 Generations by Christian Lengert on 500px

    Photograph three generations by janaalt morren on 500px

    three generations by janaalt morren on 500px

    Photograph Three generations by Madyx Jane Photography on 500px

    Three generations by Madyx Jane Photography on 500px

    Photograph THREE GENERATIONS by Xavi Rosell on 500px

    THREE GENERATIONS by Xavi Rosell on 500px

    Photograph Three Generations by Manuel Orero on 500px

    Three Generations by Manuel Orero on 500px

    Photograph Three generations by James McClave on 500px

    Three generations by James McClave on 500px

    Photograph Three Generations by Brett Walsh : Perfect Strangers on 500px

    Three Generations by Brett Walsh : Perfect Strangers on 500px

    Photograph three generation ladies. by erol sesi on 500px

    three generation ladies. by erol sesi on 500px

    Photograph Three Generations by Leo Stenzel on 500px

    Three Generations by Leo Stenzel on 500px

    Photograph Three Generations by Ahmad Syukaery on 500px

    Three Generations by Ahmad Syukaery on 500px

    The post Collection of Images of Generations by Darlene Hildebrandt appeared first on Digital Photography School.

    Digital Photography School

  • Weekly Photography Challenge Generations

    Georgie Pauwels

    By Georgie Pauwels

    In this earlier collection of images I found some fantastic photos that represent generations. In this challenge your job will be to capture the idea of generations. You could take that literally and use your own family, or friends, or step out of the box a little and try something a little different.

    • Animals
    • An old and new vehicle side by side
    • An antique record player and an MP3 player
    • Old TV and new plasma screen
    • Bicycles
    • Crumpled old weather paper and smooth, new paper

    Getting some ideas?

    Here are a few images to get you started.

    Hartwig HKD

    By Hartwig HKD

    Andrea Costa

    By Andrea Costa

    Robert S. Donovan

    By Robert S. Donovan

    Nathan O'Nions

    By Nathan O’Nions

    Fouquier ?

    By Fouquier ?

    Florian Meinhardt

    By Florian Meinhardt

    Hamed Saber

    By Hamed Saber

    Simon

    By Simon & His Camera

    Ian Sane

    By Ian Sane

    Share your images of generations

    Simply upload your shot into the comment field (look for the little camera icon in the Disqus comments section as pictured below) and they’ll get embedded for us all to see or if you’d prefer upload them to your favourite photo sharing site and leave the link to them. Show me your best images in this week’s challenge.

    Here are some more  images to give you ideas:

    Xflickrx

    By xflickrx

    Westkeasman69

    By westkeasman69

    Shena Tschofen

    By Shena Tschofen

    Khánh Hmoong

    By Khánh Hmoong

    The post Weekly Photography Challenge Generations by Darlene Hildebrandt appeared first on Digital Photography School.


    Digital Photography School