Category: Photography

  • Dicapac WP-S10 Underwater Housing Review

    Peter-West-Carey-Case2014-1229-7411In an industry known for getting what you pay for, I am always skeptical of cheap, new solutions where only expensive ones existed previously. But curiosity got the better of me before a trip last year to Barbados when I wanted to take photos of turtles underwater, but lacked funds for a $ 3000 underwater housing for my DSLR. That’s when I dropped $ 60 on a housing and prayed it would not kill my Canon 7D.

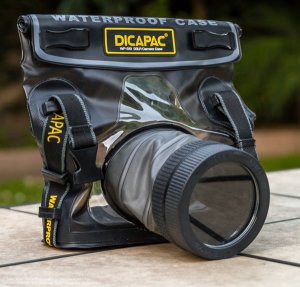
    The housing I chose is from a company you probably have never heard of – Dicapac USA. They have a few models for different sized cameras and mine is the WP-S10 model, suitable for normal size DSLRs (they have smaller size bags for point and shoot as well as mirrorless cameras).

    The lay of the bag

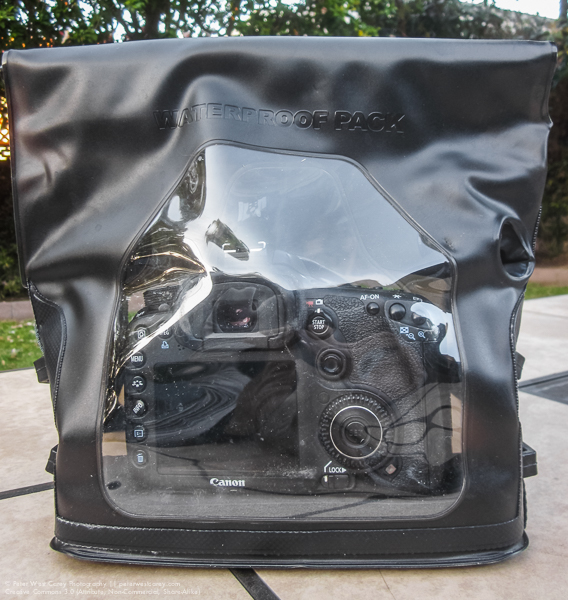
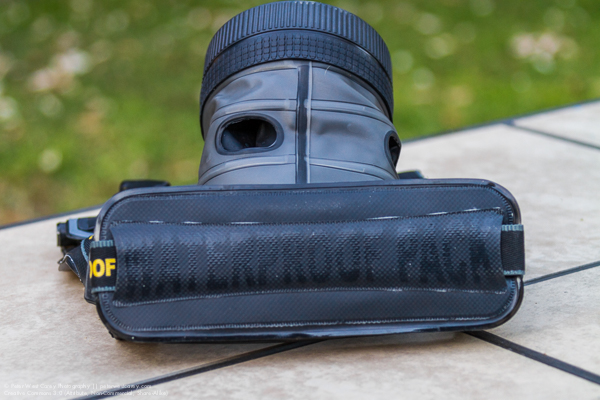
    For lack of a better term, the Dicapac is a heavy duty Ziploc bag with a special port for your lens. But unlike your average sandwich bag, the plastic on the Dicapac is heavy duty PVC/TPU and the seams are all welded tight on the inside.

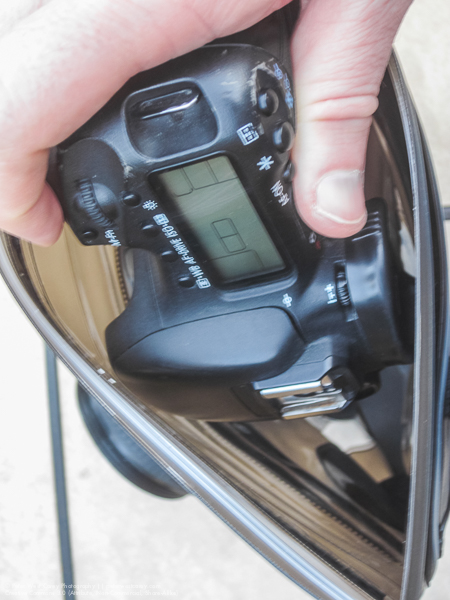
    With a clear plastic back, LCDs are easy to view and there is a softer rubberized plastic opening for a shutter release finger. Extending out the front of the bag is the lens tube with a special screw on port for the end. The tube also has two of the finger holes to allow for adjustment of zoom (typically on zooms that use a dial, rather than push/pull type) and focus. It is also conceivable to activate side-of-lens controls, such as VR/IS or manual focus modes.
    Peter-West-Carey-Case2014-1229-1298

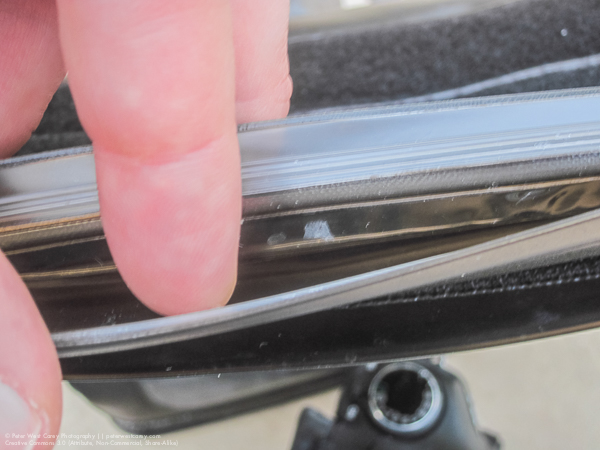
    The top of the bag is where the sealing happens. There is a double industrial plastic clamping zip along the top and then strips of Velcro to hold things in place.
    Peter-West-Carey-Case2014-1229-1287

    Inside, the bag is fairly sparse but it does come with a one inch thick foam pad to place beneath your camera.

    How it works

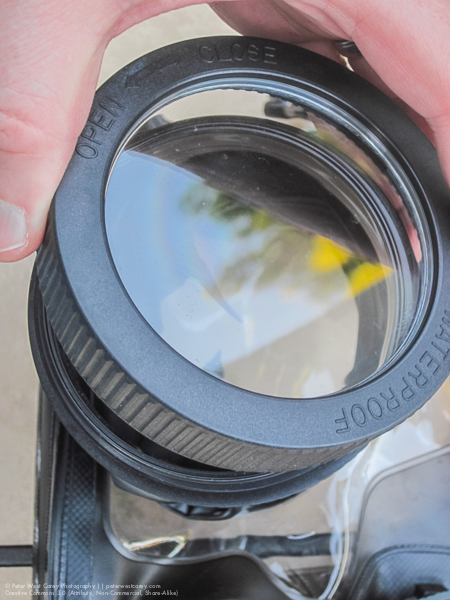
    Following trial and error and then searching the Internet, I found it easiest to insert my camera with the lens off. I was using a Canon 7D without the standard battery grip. This made it easy to slide in the top with the zip open. I was then able to take off the front port and insert my Canon EF 10-22mm lens, attaching it to the body inside the bag. A smaller camera, like the Digital Rebel lineup of cameras, would probably fit easily without removing the lens. For me, it wasn’t required, but it was easier.
    Peter-West-Carey-Case2014-1229-1288 Peter-West-Carey-Case2014-1229-1289

    I then checked the front optics of my lens for smudges or dirt before screwing on the lens port. It was a little tricky finding the beginning thread but easier after a couple of practices. Now, like any Ziploc, I had to squeeze out the excess air and then clamp shut the top zip. This isn’t a sandwich in a bag so this too took a few practice tries to get most of the air out. So far, nothing earth shattering.

    Next, you need to roll down the zip a few times and then attache the first velcro strip to hold it in place. Lastly, you attach one last, larger velcro strip, to hold everything closed. There is also an additional neck strap that can be clipped into the buckles, but I usually didn’t use it.

    In use

    As an operational note, I practiced zipping up the bag with only paper towels inside a few times. I then dunked the unit in my bathtub to make sure no water got inside. I suggest new owners do the same to ensure their unit is not faulty.

    Peter-West-Carey-Barbados2014-0808-1330

    After a few very boring photos of the drain in my bathtub, and a flight to the Caribbean Island of Barbados, it was time for a real world test of the case. With no pretty coral out front our hotel, I took some inspiration from Clark Little and decided to shoot through wave tubes toward the setting sun.

    The camera was already in the bag when I realized my best bet was to use manual focus and simply set it to a given depth, rather than miss shot after shot in the fast breaking surf. With the holes in the side of the lens tube I was able to switch over to manual focus without much problem. Setting my focus took a little more effort as the holes don’t allow a wide range of movement. Meaning I had to spin my focus ring about half an inch at a time. No biggie, it just takes longer and won’t work well for lots of fast action.

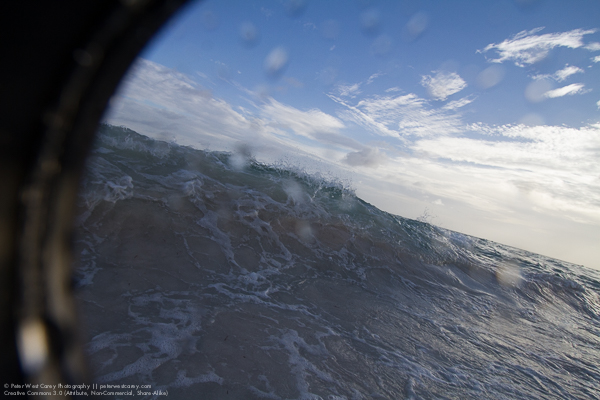
    Because my lens didn’t fully fill the lens tube, I had to pull back on the tube with my fingers in both tube holes to keep the port flush against the front of my lens. In time this causes fatigue and after about 30 minutes of shooting I was starting to feel cramps in my hands. Not bad, but I wouldn’t want to shoot a weddings with this setup.

    This is what happens if you don’t pull back on the tube with a wide angle lens installed:
    Peter-West-Carey-Barbados2014-0808-1202

    But it can be used to create a nice “porthole” effect:
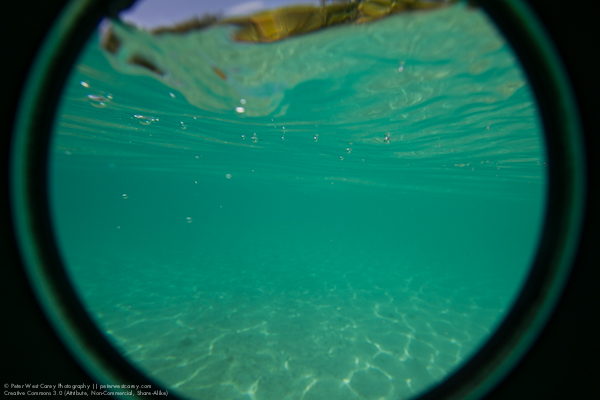
    Peter-West-Carey-Barbados2014-0809-2878

    Shutter activation was easy but most controls, especially the rear wheel, on my camera were not accessible. This meant I had to think ahead and set the frame rate to continuous and choose my metering mode as well as shooting mode. I could spin the front/top dial which controlled my aperture but the back dial was useless as I couldn’t reach it.

    Here is the range of motion you can expect from the activation access hole. That black thing at top is my finger:
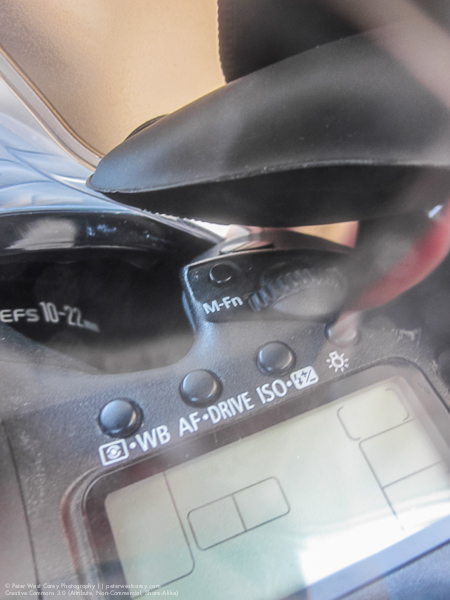
    Peter-West-Carey-Case2014-1229-1291

    I was able to adjust my zoom with the same effort needed for focusing. So, again, not swift but doable.
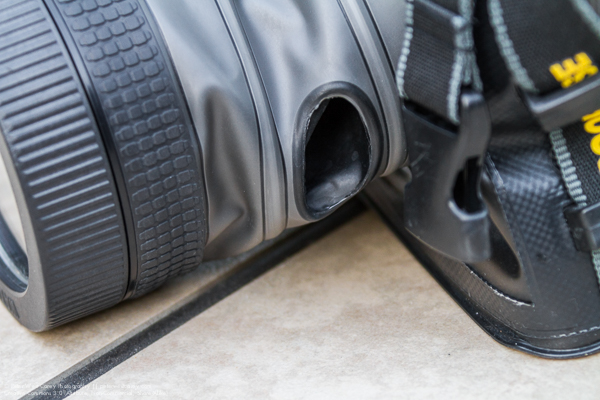
    Peter-West-Carey-Case2014-1229-7420

    How did it do?

    My first run with the bag in the surf showed me that it could take a pounding but after a while I needed to check to make sure the top Velcro was still tight. It needed to be adjusted a couple times because of this specific use and I noticed a few droplets of water on the inside of the case. nothing much. I was able to dry the bag off with a towel on the beach, remove it (this time leaving the lens on so as to not let water get in the threads of the front port) and review images. After making some adjustments, I placed the camera back in and waded back to the surf for more.
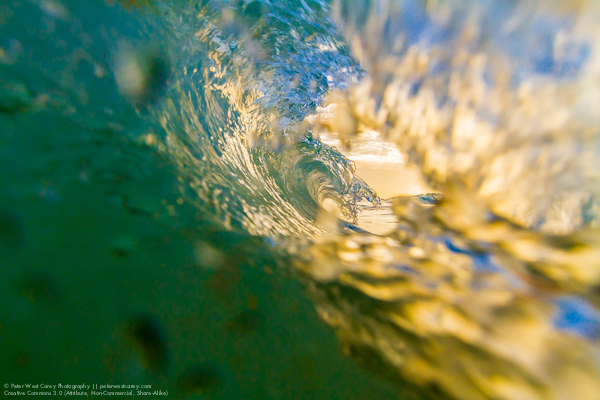
    Peter-West-Carey-Barbados2014-0808-1330

    Closing down my aperture made motion blur possible:
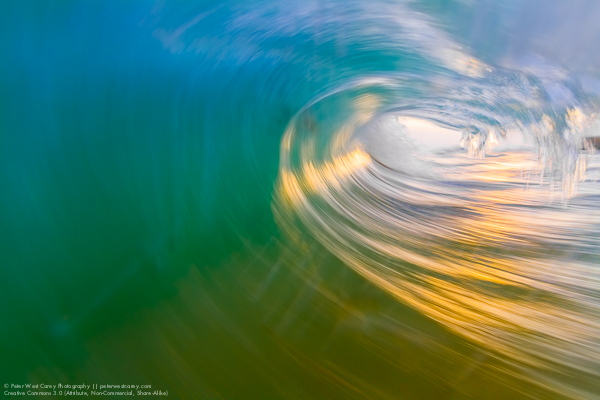
    Peter-West-Carey-Barbados2014-0808-1903

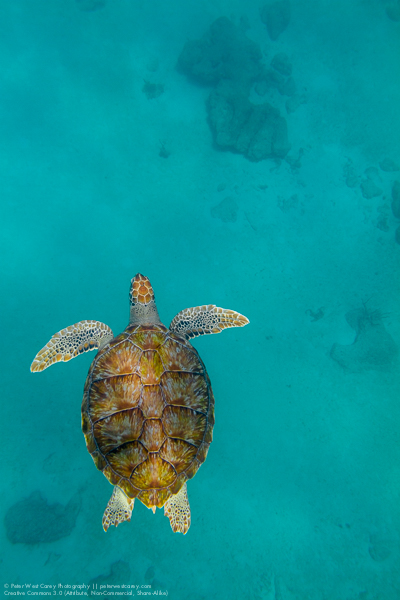
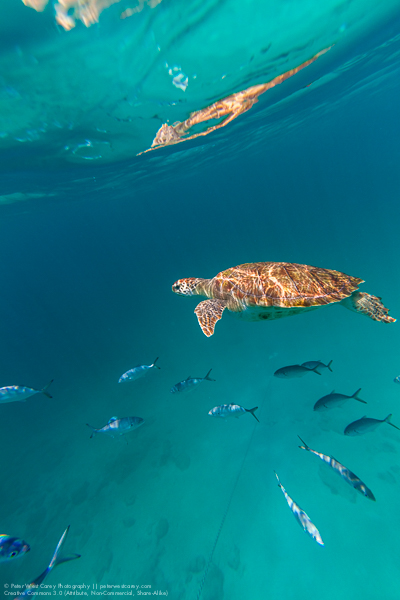
    While use of the viewfinder is possible, it is difficult in waves with goggles on. Later, when I was snorkeling and shooting turtles, I was able to better line up shots. But truth be known, it was just easier to shoot blindly and let experience help me line up the shots. Use of the rear LCD in LiveView mode is also possible with slower moving action, like the turtles.

    For my three times taking the the bag into the saltwater, including duck-dives in the waves and 15 foot dives to meet turtles, the bag never leaked significantly. It does get a little hard to hold after a while as your hand is in a non-normal grip.
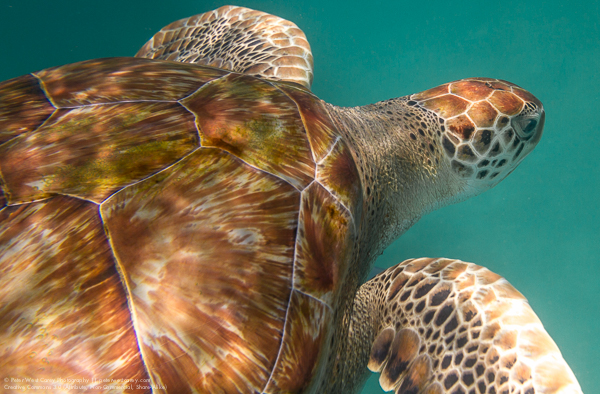

    Peter-West-Carey-Barbados2014-0809-2553

    A hawksbill sea turtle (Eretmochelys imbricata) swims directly a

    Gliding Along Peter-West-Carey-Barbados2014-0809-2376

    Conclusion

    For the money and intended use, this bag is worth the expense. As proof, I have already sold a stock photo of one of the turtles, which covered the cost of the bag.

    This bag is good for recreational use but not SCUBA. It is rated to 16’/5m (JIS IPX8 standard). Some people have voiced concerns about cameras overheating but I left my camera on inside the bag for over two hours with no problem (the 7D has a warning when it gets too hot).

    Peter-West-Carey-Barbados2014-0809-2912

    It also works well as a general dry bag and I think it would be great for times you want to keep spray or sand out of your gear. It would be idea for whitewater rafting or piece of mind while ocean kayaking. I heard talk of an adapter which helps the front port attach to your lens as a filter would, which would greatly aid in shooting and cramps. I have not yet found it.

    I will be heading to Mexico, Belize, Alaska, Jamaica, Australia and New Zealand this year and plan to take the bag with me for each trip. I will also get a small bottle of Rain-X to help with beading when taking wave shots.

    PROS

    • Cheap – $ 70 on Amazon.
    • Can be used with multiple cameras.
    • Packs small for traveling as compared to hardshell housings.
    • No need for different ports for different lenses. Would work well with a 100mm macro, for instance.
    • Viewfinder use is possible, but not often used.
    • Port window comes off for easier camera and lens insertion.
    • Neck strap and loops you can clip to keep it with you, hands-free, while swimming.
    • Functions as a drybag out of the water.
    Peter-West-Carey-Case2014-1229-7421

    CONS

    • Limited button and dial control. You have to think ahead about some settings.
    • It takes practice to seal properly.
    • It’s hard to zoom and focus quickly, but it can be done.
    • Holding the lens to the port is tiring.
    • While not holding the camera, it flops around inside the bag.
    • Lens port has a coating which makes polarizing filter use impractical (shows rainbows). Otherwise, it is fairly neutral.
    • No flash use, internally nor with external flash, although it may be possible with a wireless transmitter.

    If you have specific question, I am happy to answer them in the comment section below.

    googletag.cmd.push(function() {
    tablet_slots.push( googletag.defineSlot( “/1005424/_dPSv4_tab-all-article-bottom_(300×250)”, [300, 250], “pb-ad-78623” ).addService( googletag.pubads() ) ); } );

    googletag.cmd.push(function() {
    mobile_slots.push( googletag.defineSlot( “/1005424/_dPSv4_mob-all-article-bottom_(300×250)”, [300, 250], “pb-ad-78158” ).addService( googletag.pubads() ) ); } );

    The post Dicapac WP-S10 Underwater Housing Review by Peter West Carey appeared first on Digital Photography School.

    Digital Photography School

  • How to use Photoshop’s Quick Selection Tool to Change a Background

    It’s the question I get asked the most in my workshops and classes – “How do you change the background of an image?” Or “How can I cut my subjects out of an image and place them on a new background?”

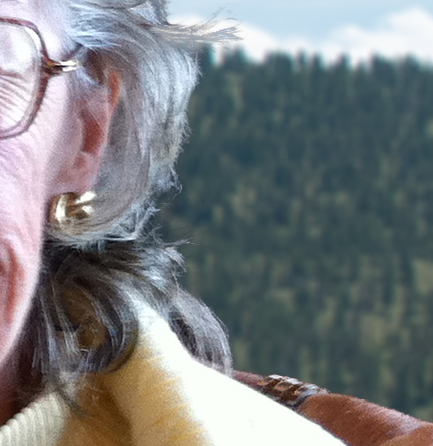
    A quick capture of my parents at a coffee shop.

    A quick capture of my parents at a coffee shop. The BEFORE image.

    Perhaps, despite your best efforts at placing your subjects in a pleasing, non-distracting environment, the situation made it impossible. Maybe you used your smartphone to capture a spontaneous moment and now the image needs a little background work? Maybe you want to cut your subjects out of the background to isolate them or use them on a website banner or other marketing material? Whatever the reason, this task has challenged every photographer, beginner or pro, since the invention of the camera! I’m going to show you how to use one of Photoshop’s most underrated tools for easily extracting your subjects from the background.

    This photo (above) was a very spontaneous iPhone capture of my mom and dad, the photo itself isn’t great (lots of things wrong with it technically) but it has big sentimental value for me. It’s the last photo I have of my parents together.  But it also has a busy background which typically causes problems for many photographers when trying to use Photoshop’s Selection Tools to remove it. In previous Photoshop versions, selection tools like Magic Wand and Lasso would get confused by the similar colors, and patterns of this type of background, making it a difficult and frustrating project. But with a relatively new selection tool it’s pretty straight forward, so this is a good example photo for learning the technique.

    In this demonstration, you can make this a stronger image by removing the cluttered background to make it less like a snapshot and more like a portrait. The secret of any image editing is to use the right tool for the job. In this situation you want to use the Quick Select Tool to remove your subjects from an image and place them on a different background.

    How to use the Quick Select Tool

    In the past, you may have avoided most of the Selection Tools in Photoshop because they were not easy to use. The Quick Select Tool has changed all that. It has never been easier to make selections that don’t look like they were “cut and pasted.” There are two, or sometimes three steps.

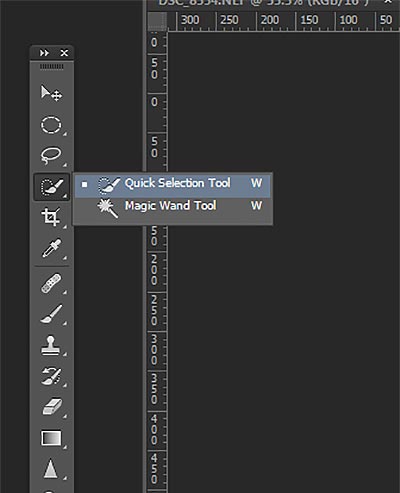
    Choose the Quick Selection Tool from the Toolbox palette:

    tool

    It works like a Brush so you can change the size of the tool by using the [ –  ] keys on your keyboard (  [ to make it smaller, and ] to make it larger).  Give the tool a size that makes it easy to select your subject.

    Step 1: Make your selection

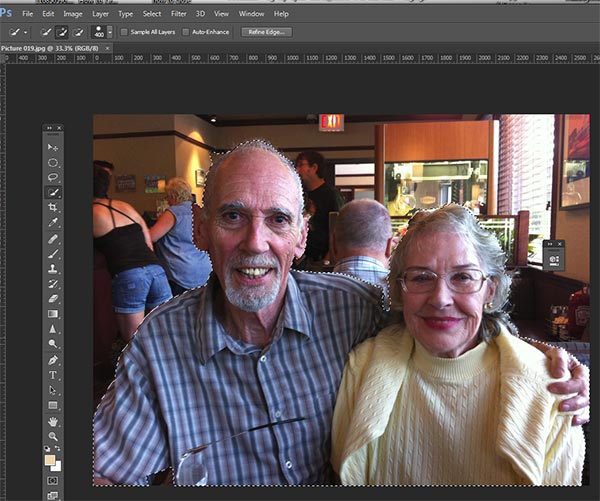
    Just drag the tool over your subject and stop when the “marching ants” get to the edge. The tool is smart and can detect the change in pixels so most of the time it will stop on the edge correctly. If it selects something that you don’t want it to, just click on the Alt key to switch to “deselect” mode and drag the selection back to where it should be.

    selection

    The Quick Select Tool selecting the subject with the “marching ants” outline.

    Step 2: Refine the Edge

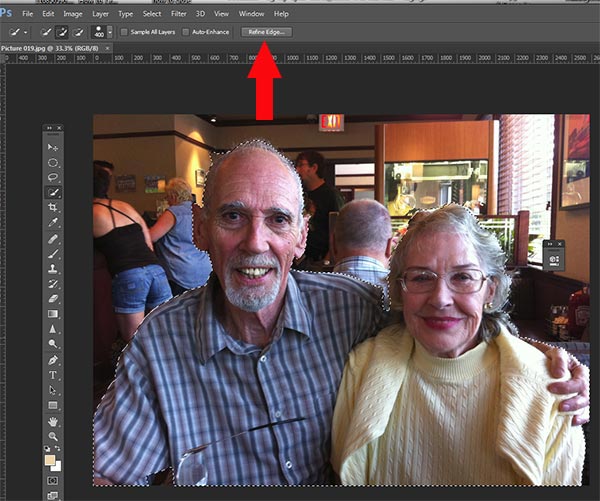
    Once you’ve got everything selected as you want it, click on the Refine Edge button on the top menu. In this area, you’ll adjust the pixels around the edges of the selection. This will make the “cut” more smooth and realistic.

    refine-edge


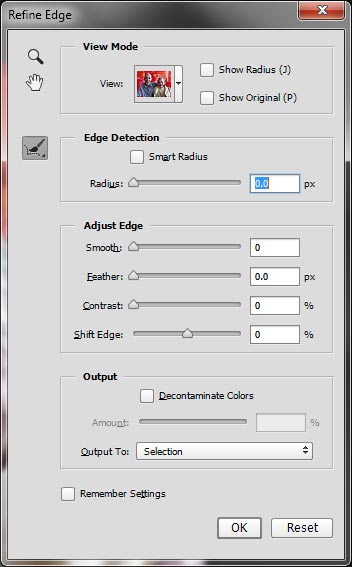
    The refine Edge tool opens a pop up that looks like this:

    refine-edge-palette

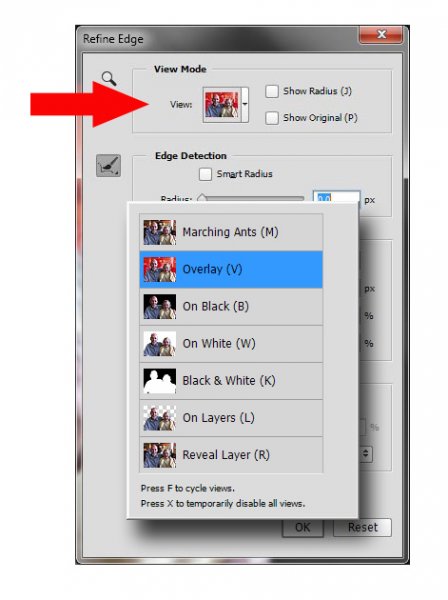
    From here you can select how you want to view your selection against a few background options. You can select the Mask overlay which you may be familiar with if you’ve used layer masks before. This view allows you to see the background as well as your selection. But you can also check it against a black background, which I like, so you can clearly see how your edge looks and if you have selected everything accurately. To change views, click the drop-down to get the View Options box. Scroll through these to get a feel for how they display your data. The Adjust Edge sliders give you many options to smooth, feather, and further refine your edge if needed.

    For now, select Black & White view mode. Hover over the Black & White Box and click.

    popup

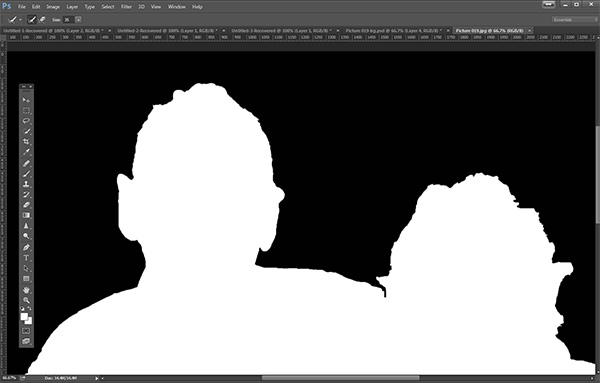
    You should see something like this (below). You can see your edges very well against the black. You can see that the edges look okay, they are well defined, and not pixelated or blocky. But what about that hair? My poor dad with his fine and wispy (almost no hair), and my mom who had recently undergone chemo also has fine baby-like hair, making the hair selection task a bit of a challenge. But the Quick Selection Tool has a method for this too!

    b+wmask

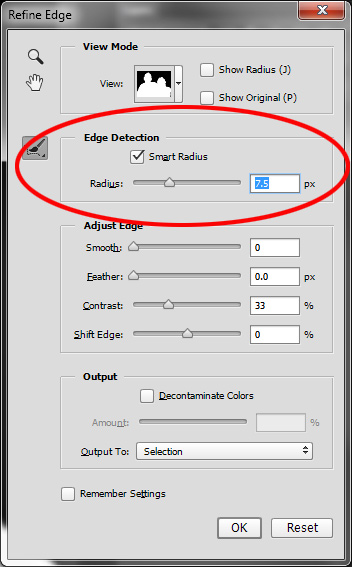
    Click the Edge Detection Smart Radius box and move the slider to the right just a bit. watch how the edge around the hair change to be a bit more transparent. Be sure to watch the rest of your edges to make sure they don’t change too much.

    Step 3: If needed, use the Edge Detection Brush

    If you still need to get more transparency for hair, make sure the brush icon on the left is selected and carefully brush around where you need more transparency. You can switch between the View modes to see what is being displayed or removed. If you remove too much you can click and hold the Refine Edge brush to reveal the Eraser which lets you undo your brush strokes, much like a regular layer mask.

    Untitled-2

    When you’re happy with your results, Look for the Output section at the bottom of the Refine Edge box, and click on Decontaminate Colors and select a small number as the amount, 2 is usually good, depending on your image.  Change Output To: New Layer with Layer Mask.

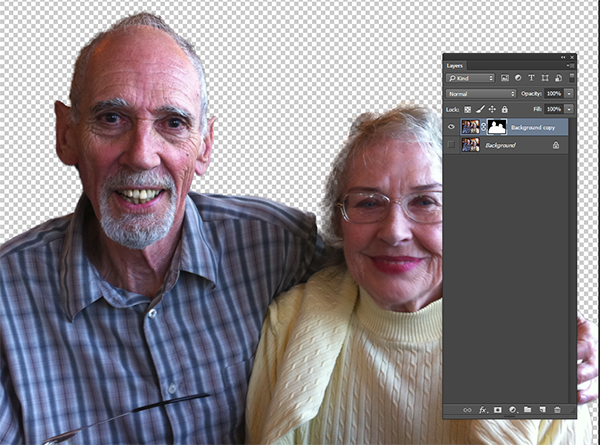
    This is what you should see now:

    layermask

    Note: to see the transparent background you must turn off the visibility of the bottom layer.

    Your cluttered background is gone!  You have a nice transparent background and all on new layer. This will be your main image.

    Add your new background layer

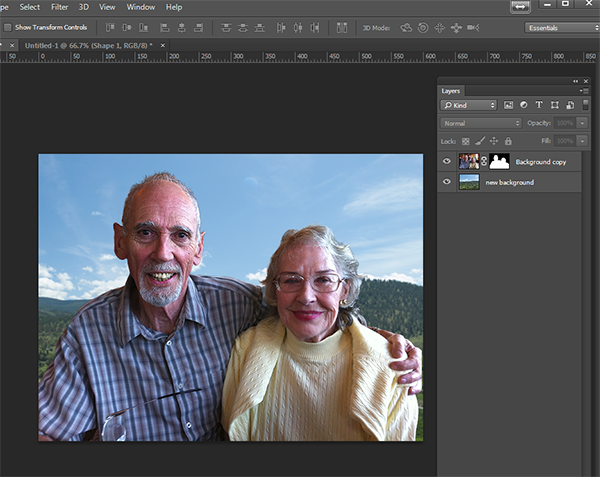
    Open the image you want to use as your new background, and using the Move Tool, drag the new background into your main image. Voila! You have a great new background layer and your subjects look very realistic and not like cut and paste paper dolls.

    You may have to drag the new background layer under the subject layer – the one with the mask. I’ve deleted the original Background layer and replaced it with the scenery background and called it new background. You could also make any existing background layer invisible if you don’t want to display it.

    almost-done

    Here’s a 100% close up look at the job the Quick Select tool and Refine Edge brush did on my mom’s hair (yes the image is a bit shaky at 100%, but I think you can see that took works pretty well to give you very realistic extractions, with the right amount of transparency and detail preservation).

    100crop-hair

    The finishing touches

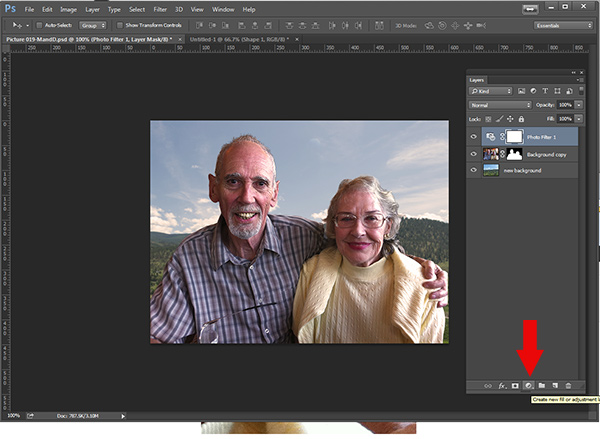
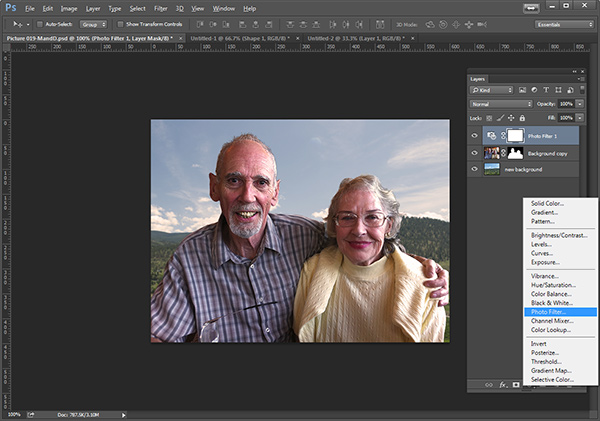
    So for the final image, let’s balance the colors a bit and give this photo a nice warm tone, by using a layer mask and a warming Photo Filter.

    layermaskto-photofilter

    photofilter

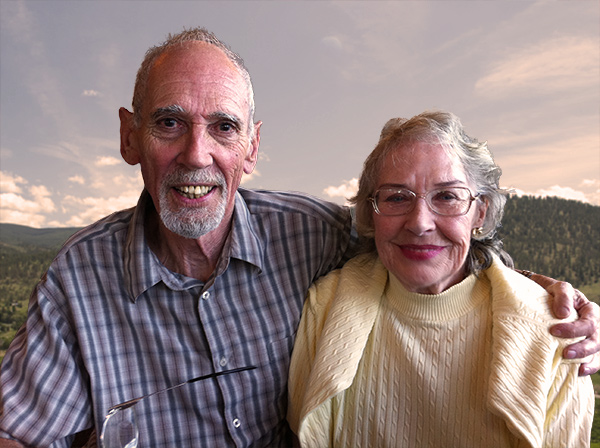
    And here is the final image:

    final-warming-filter

    Final image AFTER changing the background. Not a snapshot any more!

    What do you think? Is it better than the original? Was it worth the 10 minutes to edit and give it a new background? Just imagine, with a well captured image (not a shaky iPhone capture) think  of all the new possibilities you will have if you master this process.

    Why not give this nifty tool a try and post your results here – I’d love to see how you use this. If you have questions or problems, just let me know, I respond to my comments and questions regularly.

    googletag.cmd.push(function() {
    tablet_slots.push( googletag.defineSlot( “/1005424/_dPSv4_tab-all-article-bottom_(300×250)”, [300, 250], “pb-ad-78623” ).addService( googletag.pubads() ) ); } );

    googletag.cmd.push(function() {
    mobile_slots.push( googletag.defineSlot( “/1005424/_dPSv4_mob-all-article-bottom_(300×250)”, [300, 250], “pb-ad-78158” ).addService( googletag.pubads() ) ); } );

    The post How to use Photoshop’s Quick Selection Tool to Change a Background by Alex Morrison appeared first on Digital Photography School.

    Digital Photography School

  • 4 Things You Must do BEFORE Becoming a Professional Photographer

    Are you considering making the leap from being an amateur photographer to a professional? Join the club!

    There are many pro photographers today making a living off of the craft, but of course there are a fair number of challenges that come with the job. I’ve been a successful full-time professional photographer for two years now, and like most others, I have my share of things I wish I had done to prepare for the lifestyle. Here are four basic things that every aspiring professional photographer should do before they make the leap.

    John Lee Maverick

    By John Lee Maverick

    1. Determine what kind of professional photographer you want to be

    The most important thing you should carefully detail is what type of photographer you strive to be, and who is your ideal client. Do you want to shoot weddings and families, corporate events and head shots, or creative portraiture for editorial or advertising use? The answer to this question is crucial to help you identify if the market segment you choose is profitable, and if so, who is your target audience and how best to appeal to them to hire you. You wouldn’t market wedding photography services in the same way that you would sell corporate headshot services because your ideal client is different.

    Once you determine the photography skills you want to market, the next step is to make sure that you have demonstrated skill in that area. Do you and the current clients you’ve worked with feel that your photography work to date demonstrates commercial viability (in other words, would enough other people pay for it)? If so, then it’s time to build an online portfolio of images demonstrating your creativity and skill. Make sure your portfolio not only contains a fair number of unique images, but also some words that introduce yourself and establish the qualities that set you apart from your competition. Don’t skimp on the words – remember that some people connect better with words over images.

    Jonathan Chie

    By Jonathan Chie

    2. Establish your baseline expenses and make sure you have some savings

    One of the biggest challenges that professional photographers can face is the instability of a reliable paycheck. Unless you can strike up long-term photography contracts with clients or find a steady stream of clients, there’s no guarantee you’ll be getting a monthly paycheck. Even if you do get clients, there’s a huge chance that payments will come in later than expected (to compensate in these instances, be sure to charge a late fee).

    As a result of potential payment instability, it’s important that you assess your monthly baseline expenses and know how much you absolutely need to be making in cash each month. Next, match these expenses to how much you currently have in savings and make sure you would have enough saved away to cover yourself in case you don’t bring in enough revenue. Give yourself about six months to a year to establish your business and generate regular income; if over time you can’t cover your baseline expenses with your savings and sales, that’s the first signal that your professional photography career might need some reconsidering.

    Kenny Louie

    By Kenny Louie

    3. Buy and insure all of the gear you will need, and know where to rent if needed

    As a professional photographer, you should own, or have regular access to, all of the essential camera gear that is needed to fulfill the photography jobs that you are seeking. For example, wildlife and sports photographers absolutely need to have telephoto lenses, whereas real estate photographers need to have wide angle lenses. Do your homework and know what kind of gear you’ll need, and start acquiring it, or at least know where you can rent the gear that is too expensive or impractical to own. If you’re lucky, you’ll have a brick-and-mortar camera rental center in your town or a nice friend willing to loan out gear; if not, there are several gear rental options online worth looking into.

    If you do purchase your own gear, be sure to get insurance on all of your equipment to aid in covering the expenses of needing to fix broken gear or replace stolen gear. As an amateur photographer, you’ll likely be able to have your equipment covered by personal property insurance, which is usually pretty affordable. However, as a professional photographer, you’ll need to get professional or business insurance coverage of your gear, which tends to be a bit pricier, but also more inclusive of business-related problems that could occur such as liability issues.

    Vintspiration

    By vintspiration

    4. Get professional photography memberships

    As a professional photographer, you’re entitled to some benefits if you know where to look. One of the first memberships you should look into is Canon Professional Services (CPS for Canon shooters) or Nikon Professional Services (for Nikon shooters) – there will be a membership for your brand in your country, just do some searching. The benefits of each vary but can include expedited shipping on repairs, equipment loans, and on-site support at certain events. To enjoy the full benefits of Professional Services, you’ll have to prove that you are a full-time professional or that you own a set amount of professional gear, and in the case of Canon pay an annual fee. But the value of having quicker repairs is immeasurable for professionals.

    Another membership worth looking into is with the Professional Photographers of America (PPA). A non-profit association with over 27,000 members in 50+ countries, the main benefits of membership are equipment insurance and discounts and savings from select vendors, all of which are included in PPA’s annual fee. There are of course many other photography associations, distinguished mainly by the types of photographers they serve, each offering its own set of benefits. Examples include the American Photography Association, National Press Photographers Association, and North American Nature Photography Association, to name a few. This is again when it becomes pertinent to specialize in a specific type of photography. Look for similar groups in your area or country.

    Are you considering becoming a professional photographer? What other questions are on your mind as you prepare?

    googletag.cmd.push(function() {
    tablet_slots.push( googletag.defineSlot( “/1005424/_dPSv4_tab-all-article-bottom_(300×250)”, [300, 250], “pb-ad-78623” ).addService( googletag.pubads() ) ); } );

    googletag.cmd.push(function() {
    mobile_slots.push( googletag.defineSlot( “/1005424/_dPSv4_mob-all-article-bottom_(300×250)”, [300, 250], “pb-ad-78158” ).addService( googletag.pubads() ) ); } );

    The post 4 Things You Must do BEFORE Becoming a Professional Photographer by Suzi Pratt appeared first on Digital Photography School.

    Digital Photography School

  • 4 Tips for Effective Lighting Using Only One Speedlight

    Flashes

    If the idea of incorporating flash into your photography work strikes fear in your heart, this is a must read article for you!

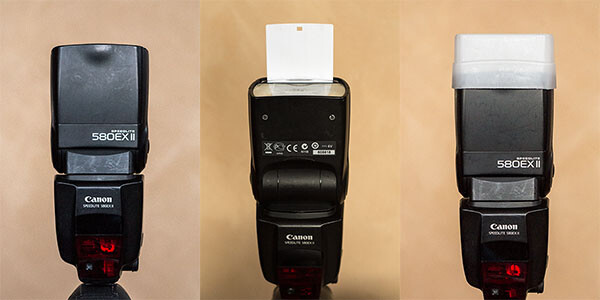
    The ability to use a portable electronic flash can do wonders for your work by giving you more creative options, and the truth is you don’t need a ton of fancy equipment to begin utilizing flash. In fact, this article is focused purely on the speedlight, the Canon 580 EXII Speedlite to be exact (equivalent to the Nikon SB-900), and how you can get started experimenting with lighting effects using just one speedlight.

    Among the smallest, most compact forms of external lighting, speedlights offer consistent, daylight-balanced lighting powered by four AA batteries. They are easy to fully integrate with your DSLR camera, allowing the two units to operate as one. While most speedlights offer manual settings, it is also easy to just leave it on auto (TTL) and let it adjust the light output according to your camera settings. Depending on what kind of camera you own, it might come with its own built-in pop up flash, but a speedlight is still recommended due to its ability to tilt and swivel, giving you more control over where the flash is aimed.

    The following examples were photographed using a Canon 5D Mark III and a 580 EXII Speedlite. All included photographs were shot in auto (TTL) setting and received no retouching other than cropping and resizing.

    Ambient Light Isn’t Always the Best Light

    No Flash

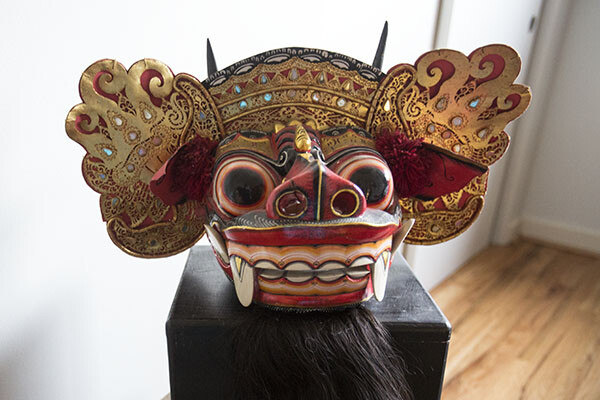
    While ambient lighting is often the easiest lighting source to use, it comes with its share of shortcomings. There might be too much or too little ambient lighting, it might be coming from the wrong direction, or it might have a strong color cast. To kick-off this example, let’s see how this Balinese mask photographs using just the ambient light available in the room (see image above). Notice that the colors are dull and the surfaces of the mask are unevenly illuminated. It’s a less than optimal photo, showcasing all of the shortcomings of relying purely on ambient lighting.

    If you’re lucky, the ambient light might be able to be moulded using a reflector or simply moving your photo subject. But say you can’t control the ambient light? Here are some tips for using a speedlight in your favor.

    Option 1: Shoot with the flash straight on

    Straight On

    The easiest way to use your speedlight is to aim it directly at your subject. The result is a decently lit subject, similar to the type of photo that a built-in pop up flash would produce. Notice how that colors pop more and the mask is more evenly lit compared to the photo shot in ambient light. However, aiming your flash straight forward can result in some harsh shadows, not to mention cause human photo subjects to be temporarily blinded by light flashing in their faces. It is also very non-directional light making the subject appear flat and lacking dimension.

    Option 2: Bounce the flash off the ceiling or wall

    Straight UP

    Flash bounced straight up off the ceiling

    The simplest way to soften the speedlight’s effects is to bounce the flash off of a nearby surface. In this case, the flash is aimed directly up at a white ceiling. When the flash is fired, the light is spread out onto the ceiling and reflected down on the subject. As a result, the front part of the mask from the eyes to the nose are nicely lit, but the mouth, ears, and ornamental headdress are left in the shadows. This is one of the pitfalls of simply bouncing the flash off the ceiling: the image will generally produce shadows on any protruding elements of your subject.

    Bounce Off Wall My Left

    Bounced of the wall to the left of the camera.

    Alternatively, the flash can also be pointed directly at a nearby wall so the light is bounced in another angle. In the above example, the flash was bounced off a white wall to the right of the mask. The result is more dramatic lighting that focuses on one side of the mask, using the shadows to indicate more depth.

    Option 3: Use the built-in white bounce card


    Straight Up with Whitecard

    To solve the problem of shadows produced by bouncing the light off the ceiling, one solution is quite simple. Keep the speedlight pointed at the ceiling, and simply pull up the thin white bounce card that is built into the top of the flash. When the flash is fired, the light not only bounces off the ceiling, but a portion of it is also reflected off the bounce card, as seen in the catchlight of the mask’s eyes.  The resulting image is much more evenly illuminated, all thanks to a thin piece of plastic. However, the eyes do reflect quite a bit of the spilled light from the ceiling.

    Option 4: Use a white flash diffuser cap on your speedlight

    Flash Cap copy

    When it comes to flash modifiers for speedlights alone, there are a ton of options to choose from. One of the most effective modifiers is also incredibly compact and cheap: a translucent white cap or box that fits snugly on your flash. It helps to evenly spread out the light to eliminate harsh shadows. In this case, the diffuser cap was attached to the flash which was pointed directly up at the ceiling. The effect is similar to using the built-in white bounce card in Option 3, but the light is more controlled. The evidence is strongest in the mask’s eyes, which now only have the catch light and not the spilled light bounced from the ceiling.

    This is just a very basic introduction to flash photography with a speedlight, intended to simply demonstrate how adding a single external flash can produce dramatically different results. What is your take on flash photography? Do you prefer natural light, speedlights, or strobes?

    googletag.cmd.push(function() {
    tablet_slots.push( googletag.defineSlot( “/1005424/_dPSv4_tab-all-article-bottom_(300×250)”, [300, 250], “pb-ad-78623” ).addService( googletag.pubads() ) ); } );

    googletag.cmd.push(function() {
    mobile_slots.push( googletag.defineSlot( “/1005424/_dPSv4_mob-all-article-bottom_(300×250)”, [300, 250], “pb-ad-78158” ).addService( googletag.pubads() ) ); } );

    The post 4 Tips for Effective Lighting Using Only One Speedlight by Suzi Pratt appeared first on Digital Photography School.

    Digital Photography School

  • 10 Recent Articles with Real-world Tips to Help You Grow as a Photographer

    As 2015 came into play, we thought it might be a good idea to make a list of some recent educational resources to share with you. In this period of added motivation and energy the beginning of the year usually brings, take time to upgrade your photographic skills and build up some business muscle. The following 10 articles are full Continue Reading

    The post 10 Recent Articles with Real-world Tips to Help You Grow as a Photographer appeared first on Photodoto.


    Photodoto

  • 5 Tips for Using Pinterest for Photography Inspiration

    Untitled-1

    Let me just come right out and say it – I think Pinterest is amazing. Not only is it a wealth of information when it comes to recipes and easy craft projects for my two kids, but it is also an incredible source for both photography instruction and inspiration. As a photographer, I am constantly inspired by the images that I see while browsing the “Photography” category on Pinterest, and I think it can be a really valuable tool in terms of identifying your personal style in photography as well as pushing yourself as a photographer.

    That said, I think it goes without saying that Pinterest is not always used appropriately. We’ve probably all had a prospective client email us asking, “Can you do this?” with a link to a particular pin on Pinterest, where the client means that exact pose, backdrop, and that exact style of post processing. This isn’t inspiration, it’s flat-out stealing. But Pinterest really can be a great resource when used correctly, so here are some tips on the best way to use Pinterest for photography inspiration:

    1. Don’t (Only) Browse Your Favorites

    If you’re a newborn photographer, don’t just search Pinterest for newborn photos. Rather, try browsing the general photography category, or searching for more general terms like “golden hour” or “high contrast photos”. I’m a firm believer that portrait photographers can be inspired by landscapes, and vice versa. There’s no good reason to limit yourself!

    2. Click Through

    Once you find an image that you love, take the time to click through the link and make sure that (a) the pin leads to the proper photograph or specific blog post, (b) the correct photographer is credited (Google is not a photographer), and (c) that the photographer wants the image to be pinned. Many photographers pin their own photos and encourage others to repin, or include “pin now” buttons on their blog, which generally makes me feel comfortable with repinning their work. Others install a script that will not allow images from that website to be pinned, which is pretty self-explanatory that they’d prefer their work did NOT appear on Pinterest. If you’re not sure whether or not it’s okay to pin an image after visiting the original website, it’s a good idea to shoot the photographer a quick email or leave a comment asking if they’re open to their images being pinned. This is really new territory without much legal precedent, so I just think it’s better to be safe than sorry!

    3. Caption Everything

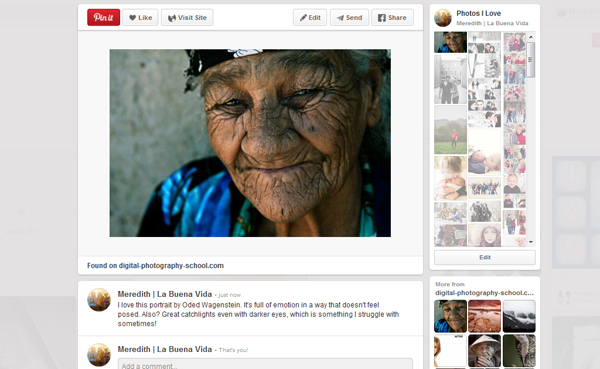
    Leave yourself thoughtful and detailed comments about what, specifically, you love about the photo. Is it the lighting, the pose, the processing, the coordination of outfits? Or is it the emotion behind the image? Whatever it is, try to identify something concrete that speaks to you about each and every image that you pin. I also think it’s good practice to include the photographer’s name in your caption, especially if the image isn’t watermarked, not only to help ensure that the images are properly attributed, but also to begin to identify who inspires you as a photographer.  Here’s an example of how I captioned one image that I pinned as inspiration, coincidentally from this article by Oded Wagenstein about using reflectors here on dPS.

    Pinterest2

    Text Reads: “I love this portrait by Oded Wagenstein. It’s full of emotion in a way that doesn’t feel posed. Also? Great catch lights even with darker eyes, which is something I struggle with sometimes!”

    4. Reflect Regularly

    Every couple of months, be sure to go back and look at the images that you’ve pinned, and see if there’s anything that you can glean from what they have in common. Are you noticing a lot of photos with a particular style of processing, or that you’ve pinned many images from a different genre of photography that perhaps you’d like to try? Are you noticing that you’ve selected lots with strong posing, which is something that you could possibly brush up on a little? Try to identify at least one theme across the images that you’ve pinned.

    Several years ago I realized that nearly every photography blog I followed was written by a newborn photographer. After months of admiring from a far, and soaking up everything I could read about newborn photography, I finally decided to ask a couple expecting friends if I could come over and take some pictures of their new babies, “just for fun”. My first time photographing a newborn certainly wasn’t perfect, but it ignited a love of a whole new genre of photography that I may never have pursued otherwise. I’m sure this won’t be the last time that I discover a love of something new photographically!

    Pinterest3

    This is an image from that very first time photographing a friend’s newborn. Years ago, I never would have guessed that this would be a genre of photography that I now love!

    5. Put it into Practice

    Once you’ve identified some common themes about images that you admire, carve out some time with your camera to put it into practice. Are you a portrait photographer who was pinning lots of images of food? Make some time in your schedule to read about techniques for food photography, and then give it a shot.

    Here’s a personal example: one area that I’m not as confident in is posing several people together. I recently did a session for a friend’s family, and checked out several of her Pinterest boards before the session. I noticed that many of the captions on the images that she had pinned were about how she liked how the siblings were posed in the portraits – arms wrapped around each other, holding hands, etc. So, I made it a personal goal to really spend some time looking at small group posing before their session, which made me more confident in posing in general. I think that I was more able to encourage her daughters into a pose that would emulate the feel that their mom liked, while also being more natural for them than it would have if I had tried to recreate one specific pose that I’d seen on Pinterest.

    Pinterest1

     Do you use Pinterest to find inspirational images? Any dos or don’ts you’d like to add to the list?

    googletag.cmd.push(function() {
    tablet_slots.push( googletag.defineSlot( “/1005424/_dPSv4_tab-all-article-bottom_(300×250)”, [300, 250], “pb-ad-78623” ).addService( googletag.pubads() ) ); } );

    googletag.cmd.push(function() {
    mobile_slots.push( googletag.defineSlot( “/1005424/_dPSv4_mob-all-article-bottom_(300×250)”, [300, 250], “pb-ad-78158” ).addService( googletag.pubads() ) ); } );

    The post 5 Tips for Using Pinterest for Photography Inspiration by Meredith Clark appeared first on Digital Photography School.

    Digital Photography School

  • 3 Video Tutorials – How to Use On-Camera Flash

    This week I have found some great videos to help you to understand how to use on-camera flash to your advantage. Flash can be confusing to understand and using on-camera flash incorrectly can make unflattering light, or worse yet ruin your photos completely. Have a watch of these tutorials on flash and see if you can pick up some helpful tips:

    Video #1 Ed Vorosky – On-camera fill flash basics

    Ed Vorosky covers some of the basics you will need to get a grasp on using flash on-camera. He goes over some of the settings to look for on your flash, different lighting situations, and which camera shooting mode to use. There’s a helpful demonstration of using Flash Exposure Compensation and how it affects your photo as well.

    Video #2 Tony Northrup – Bounce Flash Basics

    In this second video tutorial Tony Northrup goes into a little more detail using on-camera flash indoors and bouncing it for various different looks. He shows the results using just ambient light, flash straight on, and bounced off both the ceiling and side walls. You can see how just a small adjustment with your flash can completely change the look of your image or portrait.

    Video #3 Mark Wallace – On-camera flash basics

    In this last video Mark Wallace covers some of the basic flash settings for both Canon and Nikon flashes, then he goes outside to demonstrate how to control the exposure on the background (ambient) using both systems. Then he goes back indoors and shows several options for using the flash on-camera in that environment including bounce flash techniques.

    Do you have any anxiety around using flash? Or are you a pro? Share any questions and comments you have below.

    googletag.cmd.push(function() {
    tablet_slots.push( googletag.defineSlot( “/1005424/_dPSv4_tab-all-article-bottom_(300×250)”, [300, 250], “pb-ad-78623” ).addService( googletag.pubads() ) ); } );

    googletag.cmd.push(function() {
    mobile_slots.push( googletag.defineSlot( “/1005424/_dPSv4_mob-all-article-bottom_(300×250)”, [300, 250], “pb-ad-78158” ).addService( googletag.pubads() ) ); } );

    The post 3 Video Tutorials – How to Use On-Camera Flash by Darlene Hildebrandt appeared first on Digital Photography School.

    Digital Photography School

  • 5 Quick Reasons to Use the Nifty Fifty for Landscape Photography

    The 50mm prime lens, or as it’s more commonly known, the Nifty Fifty; we all know the name, even inexperienced photographers have likely heard of it. Most of us know it for its outstanding qualities; an inexpensive, quality, prime lens that is in plenty of photographers’ bags around the world, and one of the most popular lenses of all time.

    What we might NOT think of it as, however, is a lens normally used for landscape photography. The zoom is tight, and doesn’t possess a field of view wide enough to usually be considered proper for this sort of work.

    But I have. For four years, the 50mm f/1.8 has been my workhorse for portfolio building (which is primarily nature and landscape), and even though I’m branching off with other lenses, I can’t stress the usefulness of the Nifty Fifty. And I’m not alone.

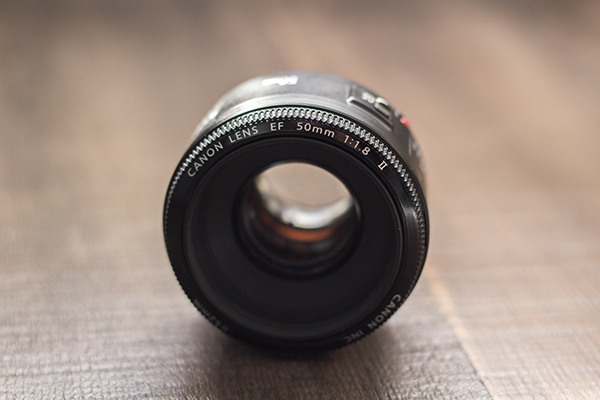
    50mmLens

    My primary reasoning for using the 50mm instead of going out and buying a proper wide angle lens such as a 35mm or even wider? Cost. I was delving back into photography, and was on an extremely tight budget. After buying my camera, spending $ 500 on a lens simply wasn’t an option. It didn’t take long for me to hear my fellow photographers sing the praises of this wonderful lens; cheap, fast, and sharp. Right up my alley.

    There are no tricks or immaculate revelations here, and you won’t likely become famous for taking only landscape shots with 50mm lenses – but there are a few reasons why shooting landscapes with a 50mm lens can produce great results. Giving it a try can only improve your photography and make you a better observer of the world around you.

    Focus on What’s Important

    We think of landscapes as sprawling, wide shots, that include many elements in one frame, but does it have to be that way? Can we not capture the beauty of the area around us, in a tighter package? The rolling hills and an interesting tree in an outdoor scene are more than enough to create a photo that provokes thought.

    The Nifty Fifty makes it easier to focus on whatever is most important in your photo, while still capturing enough around the subject to lend it scope.

    The Nifty Fifty makes it easier to focus on whatever is most important in your photo, while still capturing enough around the subject to lend it scope.

    Shooting at this focal length forces us to focus on the most important parts of what we’re seeing around us. Trimming the fat, as they would say. In doing this, we’re also training ourselves psychologically to do the same in all of our shots.

    Quality

    Landscapes usually require very good sharpness, and the 50mm prime lenses excel at that. No extra moving parts normally required for varied focal lengths (zooms) mean a crisper, sharper result. As with most lenses, its sweet spot isn’t wide open, but more in the f/4 to f/5.6 range. Even narrower apertures will still yield excellent results.

    The 50mm prime allows you to capture very sharp images

    The 50mm prime allows you to capture very sharp images.

    Take Your Time

    Since the 50mm is a prime lens, you’ll get an added benefit (or detriment, depending on how much you care for walking); the single focal length means you can’t just shoot from anywhere, you’ll need to move around to find the best angle and distance. This automatically forces you to think about your shot a bit more, which is always a good thing.

    The 50mm allows you to think differently about the landscape or subject you're framing, and to make more creative choices.

    The 50mm allows you to think differently about the landscape or subject you’re framing, and to make more creative choices.

    With a zoom, you’d adjust focal length without even thinking, until the scene is framed in a way that looks good. But what if that isn’t the best angle or distance? The Nifty Fifty will give you incentive to take a chance and try something different, whether it be an angle, a distance, or even perspective.

    No Wide Angle…or Can There Be?

    Of course there can! The 50mm gives you a gentle push into playing around with some panoramic shots. Three, four, five, or more shots can be stitched into a flattering wide angle composite, sometimes with even more dramatic results than a single wide angle shot.

    By stitching together shots, we can create a panorama that gives us the wide field of view we're looking for

    By stitching together shots, we can create a panorama that gives us the wide field of view we’re looking for.

    Lightweight is King

    If you’re serious about landscape photography, you’re probably already lugging around a considerable amount of gear; camera bodies, other lenses (you don’t go out with just one lens, do you?), tripods – the list goes on. The last thing you need are more heavy lenses when you’re out and about, right? Do you know what the Canon 50mm f/1.8 weighs? 4.6 ounces (130 g). It’s short, sweet, and light to boot.

    At the end of the day, all lenses and focal lengths have advantages and disadvantages, and the case can certainly be made for using glass with wider angles. But as a teaching tool, the 50mm prime lens is a great option for your landscape photography; it will make you think a bit differently about those types of shots and easily provide you with clear, sharp images.

    What are your experiences with this lens? What images have you captured? Tell us your opinion below, and show us those Nifty Fifty shots!

    googletag.cmd.push(function() {
    tablet_slots.push( googletag.defineSlot( “/1005424/_dPSv4_tab-all-article-bottom_(300×250)”, [300, 250], “pb-ad-78623” ).addService( googletag.pubads() ) ); } );

    googletag.cmd.push(function() {
    mobile_slots.push( googletag.defineSlot( “/1005424/_dPSv4_mob-all-article-bottom_(300×250)”, [300, 250], “pb-ad-78158” ).addService( googletag.pubads() ) ); } );

    The post 5 Quick Reasons to Use the Nifty Fifty for Landscape Photography by Tim Gilbreath appeared first on Digital Photography School.

    Digital Photography School

  • A Super Simple Way to Make Landscape Photos POP Using Lightroom

    It seems like virtually all outdoor or landscape photographs suffer from the same illness when they come out of the camera. The symptoms are:

    • An overly bright sky
    • Foreground that is too dark
    • A general lack of color and contrast.

    Sound familiar?

    Fortunately, there is a cure for this ailment. Actually, as anyone who has worked with post-processing software for any length of time knows, there are a lot of different cures. But I want to show you a super simple way to fix pictures with these problems. I performed these fixes in Lightroom, but you can also do them on the Adobe Camera Raw screens of Photoshop or Photoshop Elements.

    Colorado road photo with Lightroom adjustments

    The quick-fix shown here will involve nothing more than moving six sliders, each of which is in the Basic panel of Lightroom’s Develop module. The edits will take less than 30 seconds of your time. I performed these edits – and only these edits – to the pictures you see throughout this article to show you the effects.

    The Steps

    Let’s not dally with a lot of explanation just yet. Here are the steps to perform a quick-fix of landscape photos. The first three steps are the most important, where you will see about 90% of the changes to your pictures. After walking you through these steps I will explain the process in a little more detail.

    1. Decrease the Highlights: Just pull the highlights slider to the left as much as is needed to add more detail to your sky.
    2. Increase the Shadows:  Pull the Shadows slider to the right to brighten the foreground. Don’t worry if it looks a bit washed-out after this step.
    3. Reduce the Blacks: Pull the Blacks slider to the left. This will add contrast back to the picture, and will fix the washed-out look that might have crept into your picture after the last step.
    4. Increase Vibrance: Pull the Vibrance slider to the right a bit to add more color to the picture.
    5. Increase Contrast: Pull the Contrast slider to the right a little bit to increase overall contrast. Don’t go too far, or it might start to undo the changes you just made above.
    6. Increase Clarity: Pull the Clarity slider to the right to add some clarity (edge contrast) to your photo and make it appear less soft.

    That’s it. Just move these six sliders and you should see a vast improvement in your landscape pictures. This might seem more complicated than it actually is, because there are six steps. But after a while you will be able to do all of it in a matter of seconds.

    Bass Harbor photo with Lightroom adjustments

    What’s Going on Here

    Now that I’ve shown you the steps and a few examples, let’s talk about this process.

    What you are doing first is reducing the tones in the sky by using the Highlights slider. The sky is typically the brightest part of landscape photos. The Highlights slider will ONLY affect the brightest tones in the image, so decreasing it should tone down your sky but not touch the darker portions of your picture. Decreasing the highlights will not only keep the sky from being too bright, but will also add detail and texture to the clouds.

    After the change to the sky, step 2 is to increase the brightness of the foreground. The foreground is almost always too dark in outdoor photos, and you need to brighten it up and add detail there. As you pull the Shadows slider to the right, you should see your foreground brighten up. The sky, which is not among the shadows of your photo, should remain largely unaffected. Your photo should be looking a lot better at this point.

    Many times, when you make the change to the foreground in step 2, that area starts to look a little bit washed-out. Therefore, step 3 is the pull the Blacks slider to the left. Whereas the previous step brightened the shadows, we are now taking the very darkest tones in the photo and bringing them closer to black. The shadows were made brighter in the last step, and now the blacks are made even blacker. That adds more contrast to the foreground and eliminates that washed-out look. It often adds a little bit more contrast to your sky as well.

    Note: For a handy tip on using sliders, read The Magic Alt Key article here. 

    At this point, your photo should be looking pretty good. In fact, about 90% of the effect is applied to your photo after step 3. Now you will just clean up by making the photo a little clearer, and more colorful.

    Texas field photo with Lightroom adjustments

    In step 4, we will just increase the vibrance of the photo to add more color to the scene. The Vibrance slider is just below the sliders you have been working with.  Pull it to the right to add more color to the picture. You can adjust this slider however you want, but don’t overdo it.

    You might wonder why you should use the Vibrance slider instead of the Saturation slider. The answer is that vibrance is designed to have a higher impact on less saturated colors. Saturation adjustments apply to all colors equally, so an increase in saturation can make certain highly saturated colors look garish. Vibrance, by focusing on colors that are less saturated, lets you increase the overall saturation of your colors without overdoing any colors.

    Next, you add a little contrast. Pull the Contrast slider to the right a little bit. You have to be careful here because essentially what you did in the first three moves of this process was reduce overall contrast (making the bright sky darker and the dark foreground lighter). If you crank the contrast up now using the Contrast slider, you will be working against the moves you previously made. A small or moderate increase in contrast, however, can add more texture to the photo, so I recommend you do that.

    Finally, a small to moderate increase in Clarity usually makes the photo look sharper and clearer. Don’t overdo this, as clarity is a powerful tool. Just add a little bit by pulling the Clarity slider to the right, and this final step can really make your photos pop.

    After having gone through this process, there is nothing stopping you from continuing with additional editing, if you wish.  You can take your photo into Photoshop and make a lot of other changes, or you can use the plug-in of your choice. But even if you decide to do additional editing, the process I have described in this article can still be a good starting point for your landscape photos. It also works really well when you are in a hurry or you’d like to process a lot of photos at once.

    Head Harbor Lighthouse photo with Lightroom adjustments

    Bonus Tip

    I want to keep this process as simple as possible and not confuse it with a bunch of other things, but there is just one more tip I want to pass along in this article. It is a way to add more contrast to your skies in Lightroom (or in ACR in Photoshop).

    Scroll down to the HSL/Color/B&W panel in Lightroom’s Develop module, where you will see sliders for eight different colors. Go to the Blue slider and make sure the Luminance tab is selected just above the colors. Decrease the luminance of the blues in your picture by pulling the Blue slider to the left. This will make the color in your sky a deeper, richer blue.

    Recall that Step 1 of the process above was to decrease the highlights in an effort to tone down and add detail to your sky. If you decrease the luminance of the blues, you might find that you don’t need to do Step 1 (or at least that you do not need to pull down the highlights as much). In fact, keeping the highlights nice and bright, while decreasing the luminance of your blues, can really add some nice contrast to your skies.

    Colorado National Monument photo with Lightroom adjustments

    Conclusion

    This is one simple way to make super fast changes to your landscape photos. After you have done it a few times, you can make these changes in mere seconds. I know we are all sensitive to falling into ruts and doing the same thing over and over again, so you don’t want to do this process all the time. But it is great when you just want high impact in a short amount of time, or as a quick baseline for further changes.

    googletag.cmd.push(function() {
    tablet_slots.push( googletag.defineSlot( “/1005424/_dPSv4_tab-all-article-bottom_(300×250)”, [300, 250], “pb-ad-78623” ).addService( googletag.pubads() ) ); } );

    googletag.cmd.push(function() {
    mobile_slots.push( googletag.defineSlot( “/1005424/_dPSv4_mob-all-article-bottom_(300×250)”, [300, 250], “pb-ad-78158” ).addService( googletag.pubads() ) ); } );

    The post A Super Simple Way to Make Landscape Photos POP Using Lightroom by Jim Hamel appeared first on Digital Photography School.

    Digital Photography School

  • Weekly Photography Challenge – Music

    This week the theme of the image collection was music – view the 35 magical musically inclined images here.

    Phil Hilfiker

    By Phil Hilfiker

    Carrying forward, naturally your challenge this week will be involving music as well. That could look a few different ways depending on your own situation, what you have access to, and what’s in your area, including:

    • photos of musical instruments (check with stores, they may be willing to lend you one to photograph or find a friend who has one)
    • photos of people actually playing an instrument
    • a rock concert
    • a marching band or parade
    • music CD, DVDs or old-time LPs
    • a singer
    • street musicians

    What other ideas can you come up with for music?

    Weekly photography challenge – music

    Here are a few ideas to get you started:

    Martinak15

    By martinak15

    Caroline

    By Caroline

    Francesco ?2015?

    By francesco ?2015?

    Adrien Sifre

    By Adrien Sifre

    Tanakawho

    By tanakawho

    Michael Kötter

    By Michael Kötter

    Fabrizio Lonzini

    By Fabrizio Lonzini

    Jorge Américo

    By Jorge Américo

    Georgie Pauwels

    By Georgie Pauwels

    JH Images.co.uk

    By JH Images.co.uk

    Share your music images here:

    Simply upload your shot into the comment field (look for the little camera icon in the Disqus comments section) and they’ll get embedded for us all to see or if you’d prefer upload them to your favourite photo sharing site and leave the link to them. Show me your best images in this week’s challenge. Sometimes it takes a while for an image to appear so be patient and try not to post the same image twice.

    googletag.cmd.push(function() {
    tablet_slots.push( googletag.defineSlot( “/1005424/_dPSv4_tab-all-article-bottom_(300×250)”, [300, 250], “pb-ad-78623” ).addService( googletag.pubads() ) ); } );

    googletag.cmd.push(function() {
    mobile_slots.push( googletag.defineSlot( “/1005424/_dPSv4_mob-all-article-bottom_(300×250)”, [300, 250], “pb-ad-78158” ).addService( googletag.pubads() ) ); } );

    The post Weekly Photography Challenge – Music by Darlene Hildebrandt appeared first on Digital Photography School.

    Digital Photography School