Category: Photography

  • 5 Tips for Getting Fresh Ideas for Macro Photography

    Are you seeking some inspiration for getting creative with some new macro photographs? Perhaps you’ve grown tired of taking close-ups of typical macro subjects like flowers and insects. Help is on the way.

    There is a whole world of macro photography available to you that doesn’t involve the typical subject matter so often associated with close-up photography. There are some amazing images of insects and flowers to enjoy on the web, but what about going in a different direction?

    Photo 1 macro photography ideas

    Here are some ideas to get your creative juices flowing, to challenge your imagination, and direct you to doing more interesting macro photography:

    1. Pick a location

    This is a good technique to use when the weather outside isn’t the best for macro work. Your kitchen is the easiest place to start generating ideas. I usually grab a notebook, or a tablet and a pen, and start brainstorming by opening drawers and cabinets and writing ideas down.

    You have appliances, silverware, glasses, cooking utensils, and plates to start with. Add food and liquids to your list and you’ve got a great big inventory to work with. Coffee beans, cherry tomatoes, and peanuts work well because of their size and variety in surface and color (see photo above).

    A few years back, I gave myself a photo assignment to create some new macro images using bathroom subjects. I don’t consider myself an expert macro photographer, but I did have a good time with the challenge of making a few non-typical macro photos. Cottons swabs, a suction-cup shampoo bottle holder, and a razor became the subjects from the bathroom.

    Photo 2 macro photography ideas

    Other locations could be an office, a workshop, or yes, perhaps even the bedroom. You could also leave your house and take a trip into town, visit a junkyard, or go to a local thrift store.

    2. Come up with a theme

    Rather than limit yourself to a single location, take a theme approach. What if you picked texture as a theme to develop? Take a second right now to jot down anything you can think of that has texture. Take a deep breath, relax, clothes your eyes, and let your mind go.

    Use a mind map like the one pictured below. This is just a brainstorming method to generate creative possibilities. Here are just four random examples. These can lead to other tangent ideas so write down all of your thoughts and you can edit your lists later.
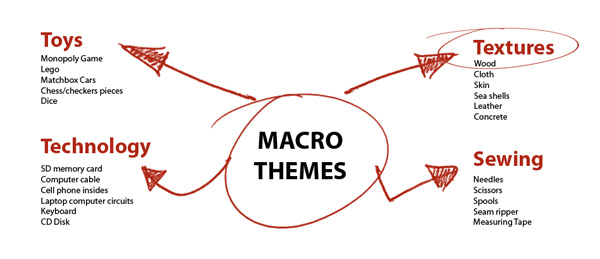
    Photo 3 macro photography ideas mind map

    3. Take a workshop

    There are plenty of courses online you can take, or find a live workshop nearby. Not only will you be exposed to the close-up photos from the instructor, but you’ll surely have an opportunity to interact with other budding macro shooters.

    You could ask them what their most unusual macro subject has been. They may have ideas that never would have occurred to you.

    I started a practice of attending a minimum of at least two workshops or seminars yearly, and it has been a great way for me to recharge my creativity.

    4. View macro photography portfolios

    One of the most powerful idea tools I use is Google. Try using a variety of keyword searches with “macro” and “close-up”. Search specific categories and those search results will lead you to other themes and ideas.

    You can go to big photo gallery web sites that have search boxes to explore literally millions of macro images. Do a variety of macro searches, based on subject, lighting, or location at web sites like 500pixels, SmugMug, or Flickr, just to mention a few.

    5. Play with the lighting

    Challenge yourself to come up with a few completely different ways to light one of your subjects. We know photography is a form of painting with light. Try to significantly change the appearance of your subject by dramatically changing the way you light it.

    Change the direction, the size of your light source, and the shadow to highlight ratio in a variety of ways to get new results. This may lead to the discovery of different ways to reveal specific characteristics of your subject like texture, color or compositional lines.

    The red pepper photo below was lit with a single speedlight, bounced off of a small white piece of cardboard, above and behind the subject.

    Photo 4 macro red pepper speedlite

    Idea generating tips

    The best time for creative thinking is when your mind is fresh and rested. Many personal development books and various brain studies make the point that there are specific peak performance conditions that you can implement to boost your creativity and effectiveness.

    For many, certain environments or activities can work. A few minutes of focused and relaxed breathing, time during or after exercise, a walk in the woods, or even brainstorming while in the shower can bring forth great ideas.

    Other avenues you can explore can be taking your macro photographs with different lenses or manipulating them afterward with software. The photo below is of a plastic model turbine engine.

    Photo 5 macro photography ideas software

    I liked all of the details revealed in the close-up, but the original photo had remnants of a yellowish glue from its assembly. I used Nik Silver Efex Pro 2’s Low Key filter to convert it to a black and white image.

    In addition to these five ways of getting creative ideas for macro photography, there is a wealth of information available to you for creativity, imagination, and brainstorming techniques in general which you can apply to your photography.

    Some of the books by Michael Michalko, Amy Wallace, and Austin Kleon are worthwhile reading if you are looking to apply creativity to your photography or any another aspect of your life.

    Have a blast and share any comments or images you have below.

    googletag.cmd.push(function() {
    tablet_slots.push( googletag.defineSlot( “/1005424/_dPSv4_tab-all-article-bottom_(300×250)”, [300, 250], “pb-ad-78623” ).addService( googletag.pubads() ) ); } );

    googletag.cmd.push(function() {
    mobile_slots.push( googletag.defineSlot( “/1005424/_dPSv4_mob-all-article-bottom_(300×250)”, [300, 250], “pb-ad-78158” ).addService( googletag.pubads() ) ); } );

    The post 5 Tips for Getting Fresh Ideas for Macro Photography by Bruce Lovelace appeared first on Digital Photography School.



    Digital Photography School

  • A Starter’s Guide to Film Photography: What You Need to Know

    Photography has never been more accessible than it is now in the digital age. Every cell phone features a camera, and those cameras are quickly becoming more advanced. DSLRs are becoming more affordable while offering increasingly higher quality and functionality. And the advent of mirrorless cameras are packing more photo punch into smaller and easier to use packages. So why would Continue Reading

    The post A Starter’s Guide to Film Photography: What You Need to Know appeared first on Photodoto.


    Photodoto

  • 7 Photography Podcasts That are Worth a Listen

    There is no shortage of podcasts about photography. They cater for everyone from beginners to experienced amateurs, semi-pros and professionals. A quick search in Google returns so many options it can be a bit overwhelming. It’s impossible to listen to them all, so how do you decide which ones to download or subscribe to? The simplest answer is to follow recommendations from friends and colleagues. So, in no particular order, here are seven photography based podcasts that I currently subscribe to, that I think will be of interest to you as a photographer:

    1. This Week in Photo

    Image 1 twip podcast logo sans text 480

    This Week in Photo (TWiP) has been on my playlist for a long time now. My listening goes back to when Scott Bourne was running it. I found the show early in its lifetime, and have enjoyed listening each week as the many guests and co-hosts share their knowledge and expertise. TWiP is now hosted by Frederick van Johnson. It’s a light hearted look at the major stories from the previous week. Frederick and his guest hosts get down to the nitty gritty of the photographic world. The show is topical, very relevant and usually delivered with just a smattering of humour. It’s one of those podcasts that hasn’t left my playlist from the time I first discovered it quite a few years ago!

    Editor’s note: yours truly, Darlene Hildebrandt, has been a co-host on the show several times as well! Always a good time and great discussion.

    2. TWiP Street Focus

    Image 2 TWiP SF

    Street Focus is a new podcast under the TWiP umbrella, hosted by dPS author, Valerie Jardin. She says on her website, “The day I picked up a camera I became a storyteller. Photography is my passion, my obsession, my addiction. I live and breathe in pixels!”

    This is obvious when you listen to the Street Focus podcast. I listened to a couple of episodes and immediately subscribed. These days I have to think a podcast is very good before I subscribe because I always unsubscribe from another to make way for the new one. There just isn’t enough time to listen to all the great podcasts out there. This one was good enough for me to do just that! Valerie shares her knowledge about street photography openly, and freely, and has some great guests too.

    Her interviews draw out interesting snippets of information from her guests. If you’re thinking of travelling somewhere for the first time, it might pay you to check out the Street Focus archives and see if Valerie has interviewed a photographer from the city you’re visiting. They always describe locations, often in areas not usually frequented by tourists, that offer great opportunities for street photography.

    3. The Digital Story

    Image 3 Derrick with TDS logo

    The Digital Story is a short and pithy podcast hosted by Derrick Story. He usually covers a few topical stories at the beginning of each episode before getting into three more in-depth stories. His technical knowledge is very good and he distills that knowledge into language that everyone can understand. Derrick wears many hats as a photographer and technologist, and his stories cover all manner of subject matter that relate in some way or another to photography. Derrick is also known as the “Nimble Photographer” and enjoys sharing ways to make your life easier as a travelling photographer. He is also a semi-regular guest host on This Week in Photo.

    4. The Candid Frame

    Image 4 TCFlogo3

    I discovered The Candid Frame a couple of years ago and it is one of the most refreshing photography podcasts I’ve heard. You won’t find anything to do with the latest cameras or equipment. Nor will you find anything to do with technique. What you will discover is Ibarionex Perello, a man with a deep insight and understanding of the photographic world.

    Each episode, Ibarionex interviews someone new and delves deep into their psyche to extract information about their thought processes. He has grown as an interviewer and is a pleasure to listen to. It’s obvious that Ibarionex does his research before each interview because his questions are not those you would normally expect to hear. They are insightful and deliver responses that go to the core of the interviewee.

    5. Photobiz Xposed

    Image 5 PhotoBizX logo 600

    The Photobiz Xposed podcast by Andrew Hellmich is well worth a listen for any photographer. Its primary focus is the business of photography, particularly for those specializing in portraits and weddings. To be honest though, any photographer can learn from the expert guests Andrew has on his show. In fact, I’d say many of the strategies and much of the information could be helpful to anyone running a business, no matter what it is. The principles explained during the podcast episodes could translate equally well across many platforms.

    Andrew has a relaxed way of interacting with his guests and manages to elicit great information from them. There are two levels for this podcast – a free version and a subscription version. Those that pay the monthly subscription get the full interview, whereas those that subscribe to the free version get a shortened, but still very valuable, version. There are usually downloads for those who subscribe too. I’m a fan, and I do pay the monthly subscription.

    6. Martin Bailey Photography Podcast

    Image 6 mbpp logo 600px

    The Martin Bailey Photography Podcast is another long running show. Martin has been putting out weekly episodes since 2005. He hails from England originally, but has been based in Tokyo for many years and specializes in nature and wildlife photography. He’s also a regular guest host of This Week in Photo, an author, and a Master in The Arcanum. Martin is a font of knowledge and his relaxed attitude makes him easy to listen to each week. He covers many topics related to photography and the business of photography. Another must listen!

    7. Tips from the Top Floor

    This is probably one of the first, if not THE first photography podcast to hit the air. Hosted by Chris Marquardt, Tips from the Top Floor has been running since about 2005 and covers all sorts of photography related topics – from photographing the night sky, to answering reader / listener questions and shooting portraits. Each episode is relatively short and easy to listen to. Like the other podcasts in the list, Chris has an easy going approach and shares his knowledge freely.

    Honourable Mentions

    Although this is the list of seven podcasts I currently listen to, there have been many others I’ve subscribed to over the years. There just aren’t enough hours in the day to listen to them all, so I have to unsubscribe from some occasionally. That doesn’t mean they’re bad podcasts, or not as good as the seven above, it simply means that at this current time I find myself listening to these seven. So, here’s a few more that might be more suitable for you (check out them all and you decide):

    TWiP Your Itinerary is a new addition to the TWiP network and I’ve listened to them all so far to check them out. I’m not sure I’ll subscribe at this point, but I’m certainly keeping my eyes and ears on it. The content is good and Rob Knight is well suited to the hosting role. The podcast covers topics related to travel photography.

    TWiP All About The Gear is another one from the TWiP network. Frederick van Johnson has made some really good decisions with the format of the main show and then branching out into sub-genres. This one is no different. Host Doug Kaye and Frederick discuss the nitty-gritty of cameras and other related products. They delve into the heart of the subject to keep listeners informed about all the latest gear. This is a great podcast, but not one I subscribe to. I regularly visit their website to check what the latest episode is about and then listen if it’s of particular interest to me. So I pick and choose the episodes I listen to.

    Ready Steady Pro is a podcast hosted by Michael Rammell out of the United Kingdom. It’s dedicated to those moving from amateur to pro and has some great information. The show has been on a bit of a hiatus lately but Michael is planning more episodes again soon. The podcast will be moving from weekly to bi-weekly when it resumes. I’m looking forward to listening to this one again as Michael always covers interesting topics.

    Digital Photo Experience hosted by Juan Pons and Rick “Godfather” Sammon is a fantastic listen. Although I’m not currently subscribed, I highly recommend this podcast. Both Juan and Rick discuss all sorts of topics around photography. They’re easy to listen to and get the information across in a way that’s easy for beginners to understand, without being too simplified for the advanced amateur. I’m sure Rick’s mind only stops when he’s sleeping and I’m not sure it even stops then! There’s always something new and exciting on this show.

    Adorama TV post numerous video podcasts covering quite a range of topics. There’s tutorials by Mark Wallace, Gavin Hoey, Tamara Lackey – there’s something for everyone under the Adorama banner. They’re well worth checking out. I tend to watch them ad hoc when I have some spare time because they’re video related and I usually listen to my regular podcasts while I’m driving.

    Do you have any other favourite podcasts not on this list? We’d love to hear about them or if you listen to the ones mentioned tell us what you enjoy about those.

    googletag.cmd.push(function() {
    tablet_slots.push( googletag.defineSlot( “/1005424/_dPSv4_tab-all-article-bottom_(300×250)”, [300, 250], “pb-ad-78623” ).addService( googletag.pubads() ) ); } );

    googletag.cmd.push(function() {
    mobile_slots.push( googletag.defineSlot( “/1005424/_dPSv4_mob-all-article-bottom_(300×250)”, [300, 250], “pb-ad-78158” ).addService( googletag.pubads() ) ); } );

    The post 7 Photography Podcasts That are Worth a Listen by Ken Lyons appeared first on Digital Photography School.


    Digital Photography School

  • How to Choose Which Version of Lightroom to Buy

    Lightroom creative cloud

    Buying Lightroom used to be simple. All you had to do was buy the full version of the program, and upgrade (if you wished) every time a new version came out. But ever since Adobe announced the Creative Cloud subscription service, photographers have been faced with two choices. You can still go for the standalone version, or you can buy Lightroom as part of a Creative Cloud monthly membership. But how do you know which is the best option for you? Read on to find out.

    Creative Cloud is announced

    Adobe’s initial announcement of the Creative Cloud licensing concept was somewhat controversial as the price for a subscription to Photoshop ran at $ 20 a month (all prices in this article are in US dollars). For photographers who had already purchased the full version of Photoshop this represented a significant price increase. Not only was subscribing more expensive in the long run, compared to upgrading Photoshop regularly, but the license to use the software expired once monthly payments stopped.

    There’s little doubt this was a raw deal, but Adobe listened and introduced a new package for photographers – a subscription to both Lightroom and Photoshop CC for $ 9.99 a month (or $ 119.88 per year).

    Lightroom creative cloud

    Read about this on forums and photography websites and you will still come across a lot of negativity towards the Creative Cloud subscription model, especially from Photoshop users upset at the loss of a perpetual licence. But today, I aim to cut through this negativity and take an objective look at the differences between the two options.

    Two types of Lightroom users

    To start, we have to acknowledge that there are two types of Lightroom users.

    The first uses Lightroom in conjunction with Photoshop and wants access to both programs. For this user, the Creative Cloud option is the only choice if you want the latest version of Photoshop CC. Alternatively, if you own a version of Photoshop CS and are not bothered about upgrading to Photoshop CC, you can buy the standalone version of Lightroom and use them together.

    The second type of user carries out the bulk of their image processing in Lightroom. For tasks Lightroom can’t handle, they may use an older version of Photoshop, a less powerful program like Photoshop Elements, or a plug-in such as the Nik Collection or Perfect Photo Suite 9. These users may be wondering whether to continue using the standalone version of the software or to subscribe.

    Financial considerations

    If you are on a budget, and don’t need Photoshop CC, then it is definitely less expensive to buy the standalone version of Lightroom. At the moment a new version of Lightroom comes out approximately every 18 months. At $ 9.99 a month, the subscription service would cost you $ 179.82 over that period. If you are new to Lightroom, the full version (priced at $ 149 from the Adobe website) saves you money, and if you already own Lightroom, then the upgrade (priced at $ 79) is even less, saving you a little over $ 100 over the same time period.

    As a standalone version user you get free upgrades until a full new version comes out. So, if you upgraded to Lightroom 5.0 when it first came out, you can upgrade to the latest version (5.7) for free, taking advantage of new features introduced since then. But when Lightroom 6 comes out, you will need to pay the upgrade fee to use it. Upgrading isn’t compulsory, and you can continue to use your earlier version of Lightroom as long as you want.

    Adobe have stressed their commitment to continuing the standalone version of Lightroom for the foreseeable future.

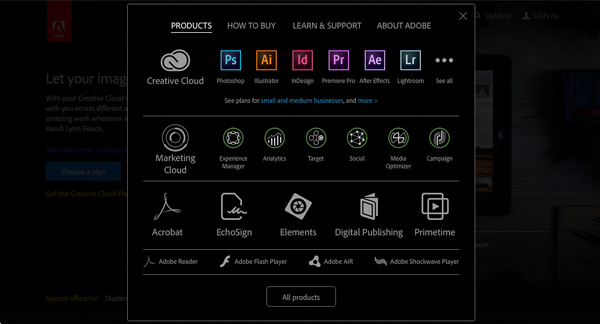
    Note: The standalone version of Lightroom is a little hard to find on Adobe’s website. You can get there by going to Adobe’s home page and clicking the Menu option at the top. Click the All Products button at the bottom, scroll down to Lightroom and click Buy. Or you can also find it here on Amazon. 

    Lightroom creative cloud

    What the Creative Cloud subscription gives you

    The Creative Cloud subscription is more expensive, so what do you get for that extra money? The two headline features are Photoshop CC, a powerful image editing program that you are likely familiar with, plus access to Lightroom Mobile, a mobile version of Lightroom that works with iPads and iPhones (but not currently with devices using the Android or Windows operating systems).

    There are several additional features that may interest some people, such as 2GB of online storage space, access to Lightroom Web and the ability to use Photoshop CC and Lightroom on multiple machines (although not at the same time).

    What happens when the Creative Cloud license ends?

    If you stop paying your subscription fee you no longer have the right to use the full versions of Photoshop CC and Lightroom. Photoshop will stop working completely (or at least until you renew the subscription).

    But Lightroom is different. Bear in mind that with Lightroom your Raw files are untouched. The edits you make are stored in the Catalog. If you lose access to the Catalog, you lose access to all the edits you have made to your images, including all post-processing.

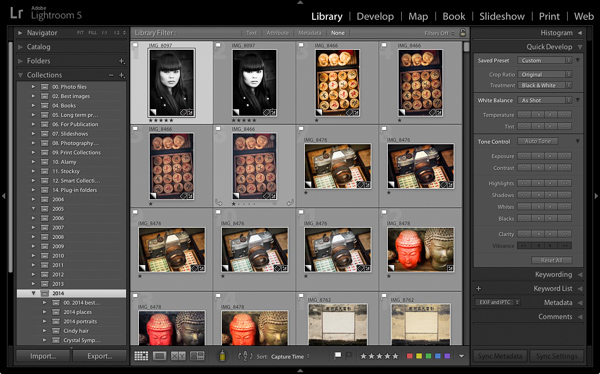
    Adobe doesn’t want that to happen, so it gives you partial access to Lightroom even if you cancel your Creative Cloud subscription. You have full access to the Library, Book, Print, Slideshow and Web modules. The Develop module is severely restricted (you can’t make any adjustments using the right-hand panels) and there is no access to the Map module.

    Lightroom creative cloud

    Your Catalog remains intact, including any Collections you’re created and any changes to metadata, including ratings and keywords. So does your post-processing, and the ability to make basic edits to photo files using the Quick Develop panel. You can also export your photos any time you want.

    You need to have Lightroom Version 5.5 or later installed for this to work.

    Conclusion

    Hopefully you are now clearer about how the two ways of buying Lightroom differ, and which is best for you. If you want to use the most up to date version of Photoshop CC, or Lightroom Mobile, then the Creative Cloud subscription service is the choice for you.

    However, if you don’t require the latest version of Photoshop CC, or Lightroom Mobile, then buying the standalone version is the least expensive way to go.

    What do you think? Have Adobe got it right with the price and services offered for the Creative Cloud Photography plan? Do you use the Creative Cloud version of Lightroom or the standalone version? Please let us know in the comments.


    Mastering Lightroom: Book Five – The Other Modules ebook coverMastering Lightroom: Book Five – The Other Modules

    My new ebook Mastering Lightroom: Book Five – The Other Modules shows you how to use Lightroom’s powerful features to create fun and interesting projects using the Map, Book, Slide show, Print and Web modules. Whether it’s geotagging, putting together a photo book, printing your best photos or creating web galleries all the information (and inspiration) you require is right here.

    googletag.cmd.push(function() {
    tablet_slots.push( googletag.defineSlot( “/1005424/_dPSv4_tab-all-article-bottom_(300×250)”, [300, 250], “pb-ad-78623” ).addService( googletag.pubads() ) ); } );

    googletag.cmd.push(function() {
    mobile_slots.push( googletag.defineSlot( “/1005424/_dPSv4_mob-all-article-bottom_(300×250)”, [300, 250], “pb-ad-78158” ).addService( googletag.pubads() ) ); } );

    The post How to Choose Which Version of Lightroom to Buy by Andrew S. Gibson appeared first on Digital Photography School.


    Digital Photography School

  • 4 Ways to Use the Warp Command in Photoshop

    Custom-mode-warp-command

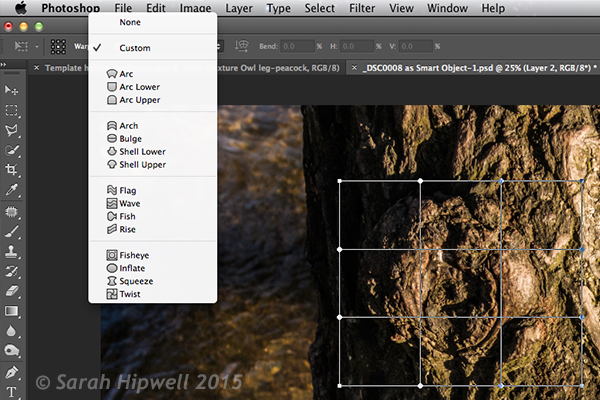
    Warp command in Photoshop, showing the grid over a selection and the presets

    What is Warp?

    The Warp command was introduced in Photoshop CS2 along with Vanishing point feature. This meant an image, or part of one, could now be distorted or transformed into a new shape. You may have seen popular online tutorials where the warp command was used to create a realistic page curl in Photoshop?

    How useful is the Warp Command as a photographer?

    Honestly, to answer this question it will depend on the type of photography you specialize in, and to what degree you post-process your images. For a lot of photographers, the less time in front of the computer editing the better. I include myself in this group. That said, I rarely get that perfect in-camera shot that requires minimal processing after the fact. If you composite images together, do a lot of retouching, or you just simply want to know what this command does in Photoshop, then read on. I’ve put together five tips that you may find useful.

    How do you access the Warp Command?

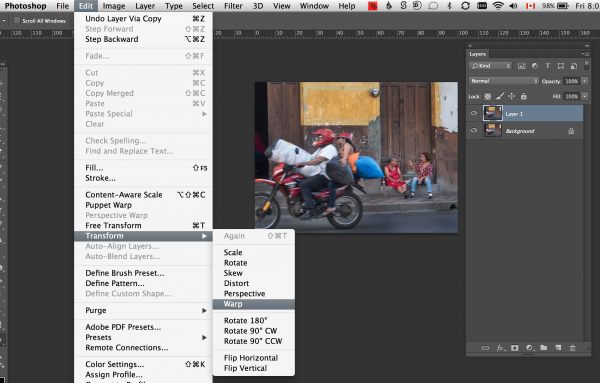
    To access the Warp Command, you need to first have a selection or a layer selected (you cannot use your background layer, you must duplicate it first). Go up to Edit>Transform>Warp.

    Screen Shot 2015-01-09 at 8.02.21 PM

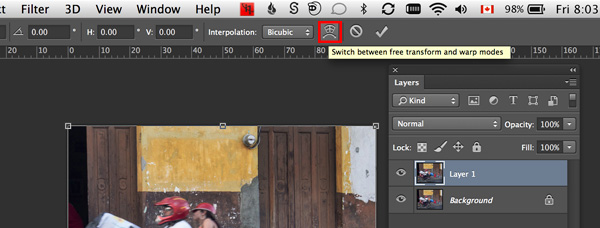
    Alternatively, CMD+T on a Mac or CTRL+T on a PC. This brings up the Free Transform command. Click on the Warp mode button in the tool Options bar or right click within the Free Transform bounding box.

    warp-mode-toggle

    A grid with nine boxes appears with control points on the perimeter. The four corner square control points are similar to the bezier handles when using the pen tool. As you drag on those points, the handles appear. You can drag on the other points, and within the boxes to change the shape of the selection in any direction. There are also a number of built-in presets (see below).

    Custom-mode-warp-command


    Are the Puppet Tool or Liquify Filter alternatives to the Warp Command?

    Well not exactly. Both have their merits when it comes to distortion but each have their own characteristics and differ again to the Warp Command. The Puppet Warp tool allows you to place points or pins systematically around a displayed mesh (polygons) which will create bending or warping points. The object or subject selected must be isolated from the background first. Puppet Warp can also be applied to a Smart Object.

    The Liquify Filter will work on ordinary layers but If you convert your layer to a Smart Object, then the Liquify Filter won’t work in Photoshop versions up to CS6. However, Liquify does work with Smart Objects in Photoshop CC. The Liquify filter takes a bit of getting used to. When you open it, a separate dialog box appears, like a plug-in of sorts with its own set of warp tools. It works on pushing and pulling the pixels around, similar to a smear effect.

    4 Ways of using the Warp Command

    1. Wrapping

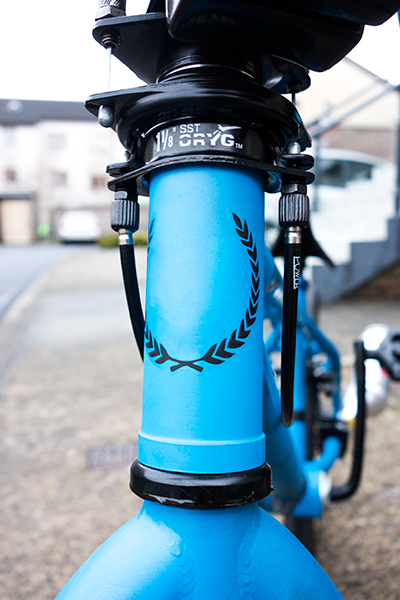
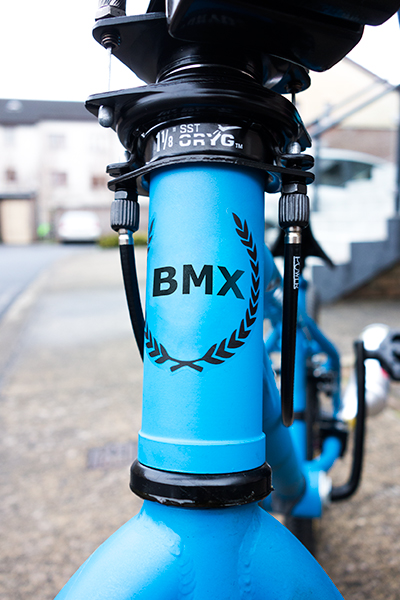
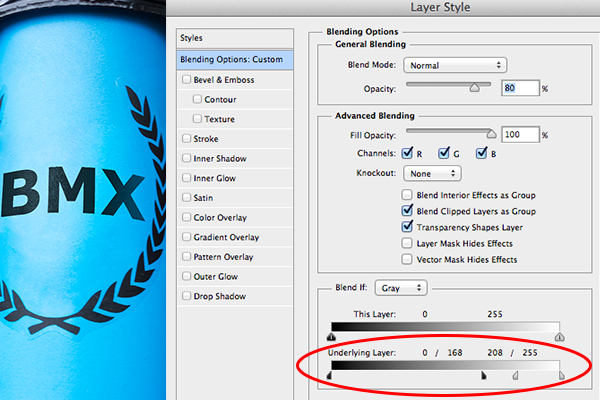
    The Warp Command is great for wrapping text, logos, or even textures around cylindrical objects such as bottles to give it that 3-D look. For example, a bike has a lot of cylindrical shapes on it, the front forks, frame, etc. So any logos on a bike will look bendy to fit the shape it sits on. In the photo of the BMX bike which I deliberately shot wide(focal length-10mm) to emphasize the cylindrical shape of the tube. I removed part of the existing logo to illustrate how I wrapped some text around the front tube. Type ‘BMX’ on a separate later and convert this to a smart object. You will need to do this to access the custom mode of the Warp Command. By using the existing Logo as a guide, I was able to warp ‘BMX’ in place. I then applied the Blend-if layer style to the underlying layer to give it a more authentic look.

    bmx-bike

    A wide angle shot of a BMX type bike

    bmx-logo-removed

    I removed the centre part of the logo on the bike

    text-wrapped-bmx-bike

    I wrapped the letters ‘BMX’ around the front tube area of the bike using the Warp Command

    Blend-if-mode-applied-to-BMX

    Holding down the ALT key on Mac, Option key on a PC, will split the slider arrows to get a finer adjustment.

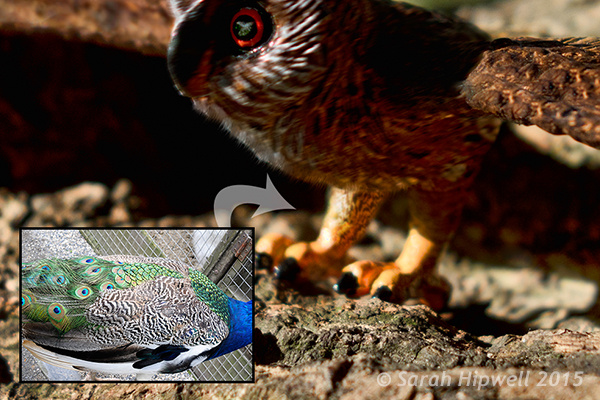
    The Warp Command can also be used to wrap texture around an object.

    Owl-peacock-texture-wrapped-around-leg

    I used an image of a Peacock to add texture and realism to the owl’s leg

    2. Duplicating a similar element in an image and distorting it to make it look different

    When you use the Clone Tool to replicate a similar object or element in an image, it does a fantastic job. However, if you don’t want the cloned look, this is where the Warp Command is great for changing the shape of a duplicated element in an image, to give the appearance of a completely different one. I found this particularly useful when I used the same heron claw to replicate four Owl’s talons.

    Owl-with-Heron-talons

    I used the same heron claw to manipulate four owl talons

    3. Retouching – adding elements

    Retouching an image can mean many things. Usually, it means removing or taking away parts of a photo so that the final image looks better. This includes removing imperfections and blemishes from a model or subject’s skin. It could also mean removing distracting elements from a photo, and the list goes on.

    But what about adding to an image to enhance it? For example, you have a shot of a subject but you want to add volume to his or her hair. You can do this using the Warp Command by selecting part of their existing hair. Put the selection on a separate layer, make sure you convert that layer to a Smart Object (working non-destructively). You will then need to apply a layer mask to hide hard seams or obvious cloned areas.

    Jacket-original

    Photo of a jacket with a fur hood

    Jacket-hood-fuller

    This is the same jacket but I’ve added more volume of fur to the hood by using the Warp Command

    4. Retouching – removing things

    The Liquify Filter is a choice for many retouchers. It is very powerful, but as I mentioned before, it does take a bit of mastering and Smart Objects cannot be applied to this filter, unless of course you use Photoshop CC. I find the Warp Command quick and easy to use. It does a great job of slimming areas on the body. Sometimes due to the angle of how a model or subject was photographed, it might require that you raise or lower a shoulder, for example to give symmetry or balance to the shot.

    Take the Love Handles for example in the photo below. Make a quick selection using the Marquee Tool. Use CMD+J on a Mac or CTRL+J on a PC. This puts the selection on its own layer. Right click on the layer and convert it to a Smart Object. Hit CMD+T/CTRL+T, to bring up the Free Transform Tool, then click on the Warp mode button in the Options bar. Distort just enough to keep it real. Add a layer mask to hide any hard seams.

    Love-handles

    Even sport models can have slight ‘Love Handles’

    Love-handles-removed

    Love Handles removed using Warp

    Warp-grid-love-handles

    Careful nudging of the Warp Command to get rid of Love Handles

    When using any of the distortion tools or commands in Photoshop, do so with restraint. A slight adjustment is often all that is required. It is this small change that can sometimes add a big difference to your image.

    Just for a bit of fun, I produced the animated cow.gif to illustrate a slight adjustment where I made the nose smaller. I then went on to show no restraint by enlarging the eyes and making the jowls slimmer!

    cow

    googletag.cmd.push(function() {
    tablet_slots.push( googletag.defineSlot( “/1005424/_dPSv4_tab-all-article-bottom_(300×250)”, [300, 250], “pb-ad-78623” ).addService( googletag.pubads() ) ); } );

    googletag.cmd.push(function() {
    mobile_slots.push( googletag.defineSlot( “/1005424/_dPSv4_mob-all-article-bottom_(300×250)”, [300, 250], “pb-ad-78158” ).addService( googletag.pubads() ) ); } );

    The post 4 Ways to Use the Warp Command in Photoshop by Sarah Hipwell appeared first on Digital Photography School.

    Digital Photography School

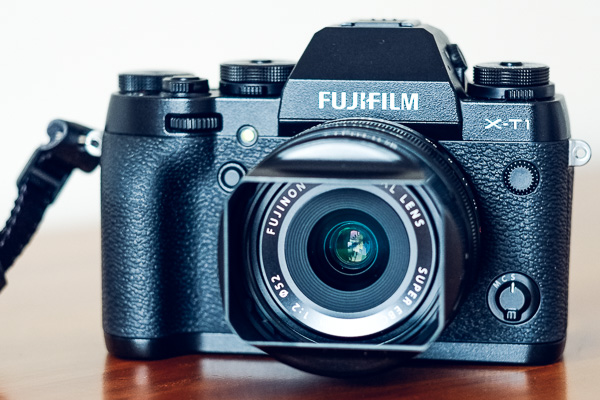
  • Fujifilm X-T1 Firmware Update: New Features

    Fujifilm X-T1 firmware upgrade

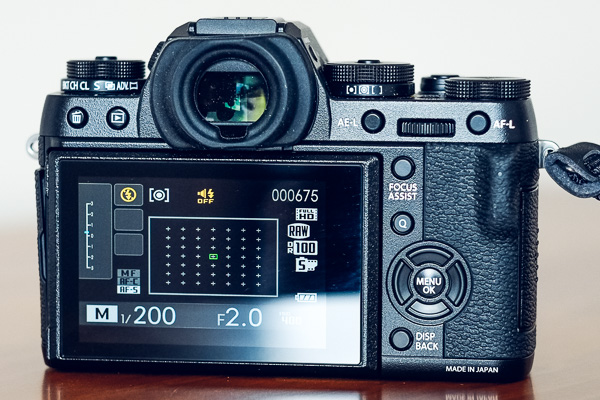
    In December 2014 Fujifilm released the latest firmware upgrade (version 3.00) for its X-T1 camera. More than a minor upgrade, the new firmware adds a number of new features that greatly enhance the camera’s capabilities. Let’s take a look at ones most likely to be of interest to X-T1 owners.

    By the way, if you’d like to learn more about firmware (for all makes of camera) then read our article Updating Your Camera’s Firmware – What is it and Why It’s Important.

    Electronic Shutter

    A new electronic shutter allows you to take photos at shutter speeds of up to 1/32000 second (the fastest mechanical shutter speed available is 1/4000 second). This enables you to take photos in bright light with prime lenses at wide aperture settings, something the lowest available ISO speed of 200 (when shooting Raw) makes difficult.

    Sports and action photographers shouldn’t get too excited though, as the rolling shutter effect may cause distortion in moving subjects.

    Another advantage of the electronic shutter is that it is completely silent, something that street photographers (and others who prefer to work unobtrusively) may appreciate.

    AF+MF

    The X-T1’s autofocus is extremely accurate but there may be times when you want to override it. Now you can do so by enabling the new AF+MF feature. When it’s activated (you need to be in AF-S mode) press the shutter button half-way down to activate autofocus, then turn the focus ring on the lens to override the camera. Essentially, it lets you switch from auto focus to manual focus without having to move the Focus mode selector.

    This will help you out in those rare instances when the camera’s autofocus fails to lock on the subject, or if you want to shift the point of focus (perhaps to utilize the depth-of-field bar that appears in the viewfinder).

    Classic Chrome Film Simulation

    Film Simulation settings are one of the strengths of the Fujifilm system and they seem to have been thought through a bit better than the equivalent settings from other manufacturers. The result is that the Fujifilm cameras have gained a reputation for creating excellent quality JPEG files.

    Classic Chrome is Fujifilm’s latest Film Simulation setting, giving a faded, slightly vintage, high contrast look to the photo that you might expect from an older type of slide film.

    Classic Chrome is also available in the latest versions of Lightroom and Adobe Camera Raw.

    Fujifilm X-T1 firmware upgrade

    A photo processed using the Velvia Film Simulation setting.

    Fujifilm X-T1 firmware upgrade

    A photo processed using the Classic Chrome Film Simulation setting. Note the difference in the hue and saturation of the colours. 

    Natural Live View

    The view of the subject seen through the X-T1’s electronic viewfinder (or on the LCD screen in Live View) is affected by the white balance and Film Simulation settings selected by you, the photographer. While this may help you visualize how the final photo will look, I’m sure you may miss the neutral view presented by optical viewfinders. Natural Live View fixes this by giving you a neutral view of the scene unaffected by Film Simulation, contrast or white balance settings.

    The new EVF Color and LCD Color menu options also lets you change the hue of the electronic viewfinder or LCD screens.

    Quicker Access to AF Frame Buttons

    Now you can switch the active autofocus frame using the four selector buttons on the back of the camera, without having to press the bottom button beforehand. This makes adjusting the AF frame while looking through the viewfinder much easier.

    The only downside is that the selector buttons can no longer be used to access functions such as white balance and Film Simulation selection. You can compensate for that by adding them to the Quick menu.

    Fujifilm X-T1 firmware upgrade

    With the new firmware upgrade, you can select the active autofocus frame using the four selector buttons, without having to press any other buttons first.

    Customized Quick Menu Layout

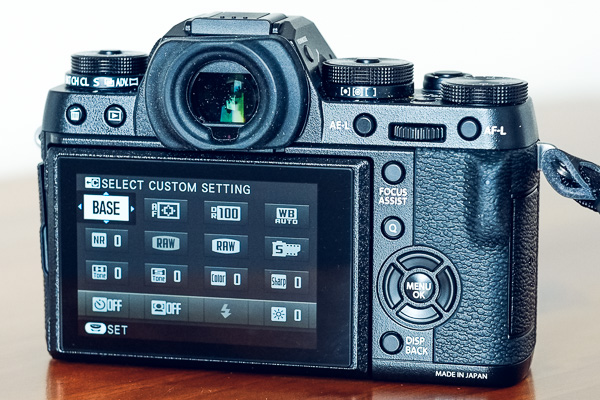
    Pressing the Q button on the back of the camera brings up a Quick menu with sixteen functions. The idea of the Quick menu is to give you rapid access to the most used menu items without having to navigate your way through the camera’s menu system. Now, with the latest firmware upgrade, you can choose which functions (from a list of 25) you’d like to appear in the Quick menu, and which order they are displayed in.

    Fujifilm X-T1 firmware upgrade

    The default Quick menu displayed with earlier firmware versions. After upgrading to version 3.00 you can customize the Quick menu with the settings you need to access the most.

    More New Features

    The full list of new features is available on the Fujifilm website.

    Which firmware version do I have?

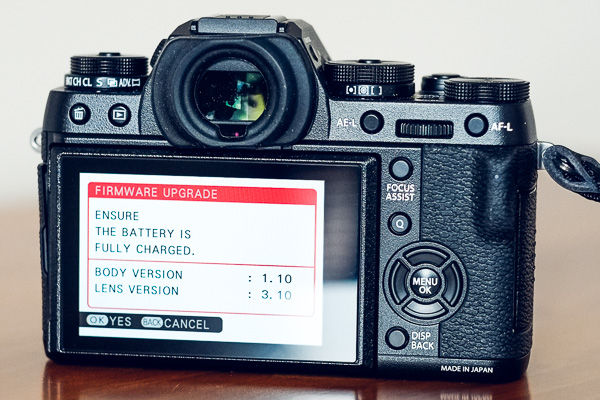
    To see which firmware version your X-T1 camera has (I believe this works for all Fujifilm cameras) turn the camera off, hold down the Disp/Back button and turn the camera back on. The camera displays the currently installed firmware versions for both the body and lens.

    Fujifilm X-T1 firmware upgrade

    This Fujifilm X-T1 has firmware version 1.10 installed, and hasn’t yet been upgraded to the new firmware.

    How do I install new firmware?

    Start by going to this page on the Fujifilm website, scrolling to the bottom and clicking I Agree. You can download the new firmware file on the next page, which also contains instructions on how to load it into your camera. You’ll need a newly formatted memory card to do so.

    Have you tried out the firmware update for the Fujifilm X-T1 yet? Please let us know what you think of it in the comments.


    Mastering PhotographyComposition and line

    My ebook Mastering Photography: A Beginner’s Guide to Using Digital Cameras introduces you to digital photography and helps you make the most out of your digital cameras. It covers concepts such as lighting and composition as well as the camera settings you need to master to take photos like the ones in this article.

    googletag.cmd.push(function() {
    tablet_slots.push( googletag.defineSlot( “/1005424/_dPSv4_tab-all-article-bottom_(300×250)”, [300, 250], “pb-ad-78623” ).addService( googletag.pubads() ) ); } );

    googletag.cmd.push(function() {
    mobile_slots.push( googletag.defineSlot( “/1005424/_dPSv4_mob-all-article-bottom_(300×250)”, [300, 250], “pb-ad-78158” ).addService( googletag.pubads() ) ); } );

    The post Fujifilm X-T1 Firmware Update: New Features by Andrew S. Gibson appeared first on Digital Photography School.

    Digital Photography School

  • Using Low Key Lighting in Your Portraits: Getting Moody On the Down Low

    So you’ve been shooting for a while and you want to add a little more visual oomph to your shots, why not try a little low key? Low key lighting is a classic technique, a la where you use shadow and high contrast to show the shape of your model. Making the background dark can be super complicated or super Continue Reading

    The post Using Low Key Lighting in Your Portraits: Getting Moody On the Down Low appeared first on Photodoto.


    Photodoto

  • 6 Steps to Growing Your Photography Business Using a Recommended Vendors List

    In this article I talk about a technique used in all types of business, but of course will relate it to photography. To make it easy to understand, I am going to discuss the technique specifically for wedding photographers. But it is important to know that the technique you will learn in this article can work for any type of photography niche or genre.

    Wedding cake

    Utilizing a business partner vendor list to grow your business

    How so? By creating something of value to offer website visitors, which will in turn get them to give you their name and email address. When someone offers you contact information in exchange for something of value, they are now considered a lead. From there you have the potential to convert that lead into a paying customer.

    Let’s break it down piece by piece. I’ll start with a list and then talk about each individually:

    1. Create a PDF document that is attractive to your potential customers. This PDF is intended to act as a conversion tool – a free offer.
    2. The offer utilizes a business partner vendor list by recommending preferred and partner vendors. This helps add more value to the download and also improves the relationship between you and the vendor.
    3. Create a way for site visitors to enter their contact information on a landing page, a magnetic spot like blog sidebars, or a pop-up box.
    4. Capture emails of website visitors, which then turn into quality leads (because they downloaded something specifically for their intention of hiring a photographer).
    5. The vendors included in the document are also likely to further promote the document.
    6. You now have huge potential of converting those leads into customers, via phone calls and email marketing.

    Now let’s get into the nitty-gritty of each of those points. As mentioned earlier, this is geared to wedding photography. So if you are not a wedding photographer, take all I am saying and relate it to the type of photography you do.

    Step one – create a PDF

    The first step is to come up with a PDF document which you can offer for free on your website. Ideally it will contain everything that your potential customer would need to know about planning a wedding. It’s important that the document is branded to your business, and has an attractive design overall. You can use your letterhead (with logo of course), or a pre-made design for the task at hand (which I have made available) or templates from Keynote or PowerPoint. The important part is that your branding is in the design and that it won’t turn people away by looking unprofessional.

    Photographer free pdf

    Step two – utilize your list

    Inside the PDF categorize it for different types of vendors. You may have a page of florists, and another for wedding venues that you recommend. Ideally make each a two-page spread if possible. One page would provide the information on the vendors, and the other page would contain your photography examples related to the vendor. Think of it like a portfolio of your best work combined with your recommended vendor list.

    The beauty of this is that you are getting your photographs in front of couples planning their wedding. Your brand is there as well vendors, which the couple might also hire.

    Step three – create the opt-in

    Next up is creating a way convert website visitors into leads. This is a bigger section due to the complexity. By this point you will have already created the PDF, which leads will download. But the process of gathering the email addresses confuses many people.

    The first step is to use an email marketing service like Mailchimp or Aweber. Both are fantastic. I personally use Mailchimp for its ease of use and pricing.

    Both services offer a feature, which can automatically send emails based on certain actions. In Mailchimp it is called Automation, in Aweber it’s called Follow Up Series. There you will set up an automated email, which will be sent to anyone who signs up for the “Free PDF” list that you will have created. Definitely name the list something you will recognize immediately when logging into your account.

    These services allow you to attach a PDF to an email, which is what I recommend. But if you are using a service that does not allow attachments then create a Dropbox or Google Drive link and include that in the email.

    This is where the fun part starts. There are many places where you can place what’s called an opt-in form. That means, a form which asks a website visitors for a name and email address, or any other information you want to request like a phone number.
    Note that the less information you request the higher your conversion rate will be – meaning, the more people will fill it out. So I typically ask for email addresses only (you will see why later).

    The first place you want to place the opt-in form is on a landing page specific to the free PDF. The benefit of having a unique page for the document is connected to SEO (search engine optimization). A dedicated page can be filled with additional text and image content optimized to rank well on search engines. It can also increase the conversion rate (percentage of people who sign up compared to number of page visits) for the opt-in because there are no distractions from blog articles or other content available only your website. Services like Mailchimp and Aweber offer embed codes for your opt-in forms. You use it like you were copying and pasting HTML from YouTube, Vimeo or 500px.

    The second place you can have the opt-in form is on your blog’s sidebar, or in a pop-up form. These are called magnetic areas because they draw the attention of a visitor’s eye directly to them. There are a few ways you can do the magnetic opt-ins. For sidebars you can use the standard embed code. Some services offer pop-up codes as well. For WordPress sites I recommend services like OptinMonster or Pippity, which come with many design options as well as timing and split testing so you can see what converts the best. I have helped a many photographers with this method.

    Optinmonster

    Step four – leads versus quality leads

    Now that you have the PDF done, and everything set up for visitors to convert into leads – it is important to note the difference between a lead and a quality lead.

    A lead is anyone who contacts you about anything. An example of a standard lead is a couple who contacts you for a price list. They might be interested in your services, but there is no way of knowing how interested they really are, how far along they are in their wedding planning, or how serious they are about you.

    A quality lead is someone who has taken specific actions to do research and wants valuable information. For example, a quality lead would be a couple downloading your free PDF because it contains information specific to their needs. They understand that it will contain every vendor they need to know about to plan their wedding.

    Quality leads have a much higher chance of converting into paying customers over standard leads. That’s because a quality lead is already more interested in your services than a standard lead.

    Step five – inform your vendors

    If the couple books a venue listed on your PDF, then it is highly possible they will mention you as a referral. Your vendor partners will appreciate that. So, be sure to send a copy to your partners so they know what you are offering potential customers. Then they are also more likely to promote it, and promote you.

    Your best sales people are your brand advocates. Those are your customers and your business partners.

    Biz partners

    Step six – converting to customers

    You have your free PDF and are converting site visitors into leads. You are utilizing an email marketing service as recommended. Next is where it really comes into play.

    I mentioned earlier that I typically only ask for email addresses. That is because with email marketing you can learn more about your leads, so names and phone numbers are NOT essential. In fact, you may find that through nurturing those leads via email marketing that you will have more people contacting you than you contacting them.

    After doing some testing, I came to the conclusion that sending one email a week to my list is most effective. You may find yourself in a different situation. But having an email marketing service that tracks statistics will help you identify the optimal sending scenario – days and times.

    One effective trick I find for converting leads into paying customers is to ask a question, which warrants a reply. Whatever the question might be, you will find people replying. That is where the conversation really takes off. Something like this perhaps:

    As a wedding photographer I am always so curious what types of gowns brides pick.  Please reply with the type of dress you will be wearing at your wedding.  Or if you already picked it out, I’d love to see a photo!

    What have you learned

    To wrap-up this article, I want to restate what you learned here and what your first step should be.

    Your business partner vendors are more important than ever to your business. You can foster those relationships online, and offline, by creating a free PDF as described here. That PDF will be used as leverage for converting website visitors into quality leads. Using email-marketing you can nurture those leads and convert them into paying customers. All with a little help from a simple PDF that includes super valuable information.

    New family

    Once again, I used wedding photography as an example, so if you are not a wedding photographer then be sure to think hard about your vendor list and what your clients would need. Then start creating that document.

    Hop to it!

    Disclaimer: dPS does not agree or disagree with any recommendations made by the author. The author receives no extra compensation for these referrals and benefits in no way. He only recommends them because these are the services he uses – do your own due diligence when selecting any service for your business.

    googletag.cmd.push(function() {
    tablet_slots.push( googletag.defineSlot( “/1005424/_dPSv4_tab-all-article-bottom_(300×250)”, [300, 250], “pb-ad-78623” ).addService( googletag.pubads() ) ); } );

    googletag.cmd.push(function() {
    mobile_slots.push( googletag.defineSlot( “/1005424/_dPSv4_mob-all-article-bottom_(300×250)”, [300, 250], “pb-ad-78158” ).addService( googletag.pubads() ) ); } );

    The post 6 Steps to Growing Your Photography Business Using a Recommended Vendors List by Scott Wyden Kivowitz appeared first on Digital Photography School.

    Digital Photography School

  • Understanding the Basic Sliders in Adobe Camera Raw

    In this short video tutorial by Tuts+ you can get a quick overview of how the basic sliders work in Adobe Camera Raw. It has a great demonstration using a white to black grayscale image which shows what each slider does, and which parts of your image each are affecting. There is also a good indicator of why you want to be shooting RAW format instead of JPG, showing the same corrections done on both formats and the difference the the larger RAW file makes.

    Enjoy the video:

    For more Photoshop tips check out our post-processing section. The Basic sliders in Lightroom do pretty much the same thing, but they have slightly different names. Give it a try yourself and see if this helps make sense of the basic panel.

    googletag.cmd.push(function() {
    tablet_slots.push( googletag.defineSlot( “/1005424/_dPSv4_tab-all-article-bottom_(300×250)”, [300, 250], “pb-ad-78623” ).addService( googletag.pubads() ) ); } );

    googletag.cmd.push(function() {
    mobile_slots.push( googletag.defineSlot( “/1005424/_dPSv4_mob-all-article-bottom_(300×250)”, [300, 250], “pb-ad-78158” ).addService( googletag.pubads() ) ); } );

    The post Understanding the Basic Sliders in Adobe Camera Raw by Darlene Hildebrandt appeared first on Digital Photography School.

    Digital Photography School

  • Kupo Grip Master C-Stand Review

    I’ve been using studio lights for a couple of years now, I’ve used a few different brands with all sorts of different modifiers, from the basic softboxes that your less expensive lighting kits might come with, to my current favourite, the 2 meter Octa from Studio-Flash.com.

    The one consistency with bundled lighting kits is that they mostly all come with a set of lightweight stands that, for the most part, are great and will certainly do what you need them to do when you’re starting out and they’ll get you a long way with clever use of sandbags and counterweights. But when you start using bigger, heavier modifiers on these stands, you may find it’s time to get yourself a dedicated “big” stand.

    Enter stage left, Kupo Grip. (Thanks to the crew at ProTog for sourcing what I was after – also available on Amazon)

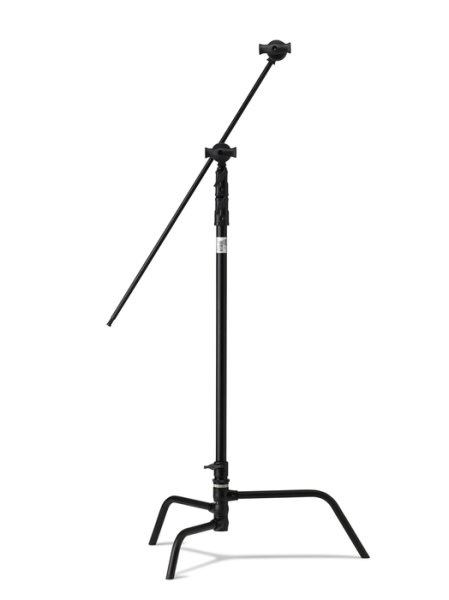
    I wanted a stand that was going to take anything I’d ever use, I wanted it to be modular and easy to put up and tear down, I’m a one man show and setting up and packing down needs to be easy! (I’m not lazy, honest) so after visiting the crew out at ProTog in Melbourne, I settled on the 40″ C-Stand (C for Century, folks) with the Kupo Turtle base. The base and the upright pole come apart for easy packing and transporting.

    Kupo-grip-light-stand-review-simon-pollock

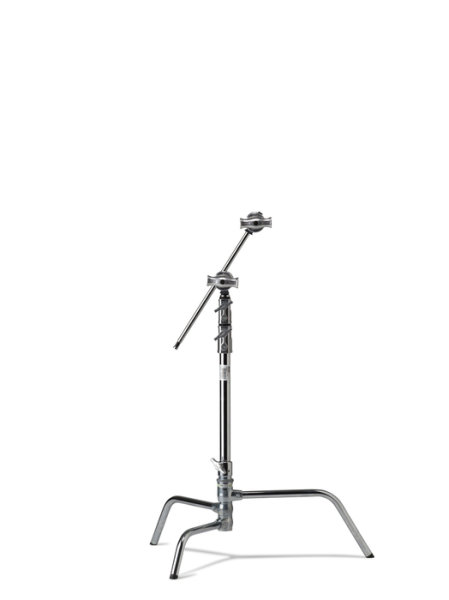
    They come in 20″ or 40″ and in black or silver (I went for the black option, for no real reason…)

    silver_kupo_c-stand_20_inch

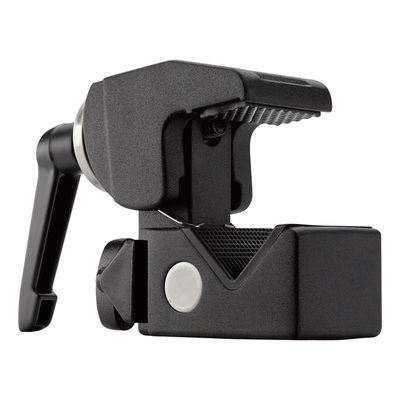
    It isn’t always the strength (or weight) of the stand riser that gives you problems, it might be when you first get a 70cm beauty dish and put it on the front of your studio light and then find that the locking mechanism that holds the stand’s legs in place just doesn’t have the wherewithal to hold it all up. Maybe you simply need something more sturdy to hold a light and Kupo Convi Clamp (like the little beast below) or something similar like a Magic arm that you sit a Tether Tools Aero on… Anyway, you get the point – one solid workhorse of a stand has made all of these things much easier for me.

    Kupo_Grip_C-Stand_Master_Review_Clamp

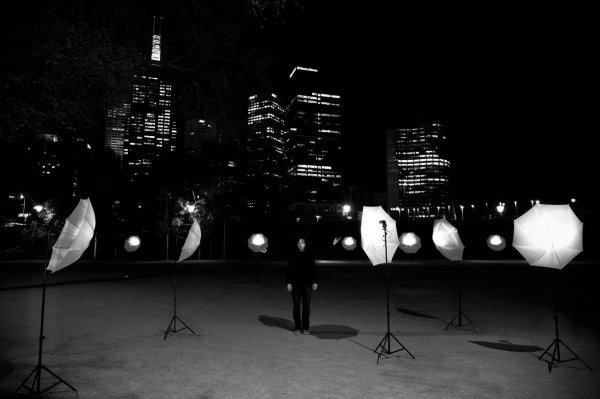
    The other main reason I love my C-Stands is that with the legs the way they are, sticking out low to the ground and horizontally to the riser pole, you can load them up with some big heavy sandbags and use them in most any weather. If you’ve ever had even a single flash on a lightstand blow over and smash on the ground, you’re most likely nodding along right now! I have a special umbrella at home that’s kind of flat on one side – as a reminder. Use a solid stand OR bag your lightweight stands.

    lightstand-smashed-brolly-on-ground

    No sand bags, a lightweight stand in a light breeze… An accident waiting to happen.

    As I mentioned earlier, with the ‘Turtle base’ they’re easy to pack down but obviously not as easy as a small telescopic light stand or a tripod with a long neck and you might not want to fly a whole lot with them, but when you need a heavyweight and you want innovative, maybe take a look at the Kupo Grip Master C-Stand.

    Kupo Grip gear (well, my stands at least, I’ve not checked ALL of their products) comes with a two year warranty which, if you register, gets you an extra three years giving you five years warranty.

    My summary, if you will… They’re priced nicely, they have a really solid build and a great finish, I can’t fault the things – that’s five big smiley stars from me.

    googletag.cmd.push(function() {
    tablet_slots.push( googletag.defineSlot( “/1005424/_dPSv4_tab-all-article-bottom_(300×250)”, [300, 250], “pb-ad-78623” ).addService( googletag.pubads() ) ); } );

    googletag.cmd.push(function() {
    mobile_slots.push( googletag.defineSlot( “/1005424/_dPSv4_mob-all-article-bottom_(300×250)”, [300, 250], “pb-ad-78158” ).addService( googletag.pubads() ) ); } );

    The post Kupo Grip Master C-Stand Review by Sime appeared first on Digital Photography School.

    Digital Photography School