Category: Photography

  • Are Mirrorless Cameras Here to Stay?

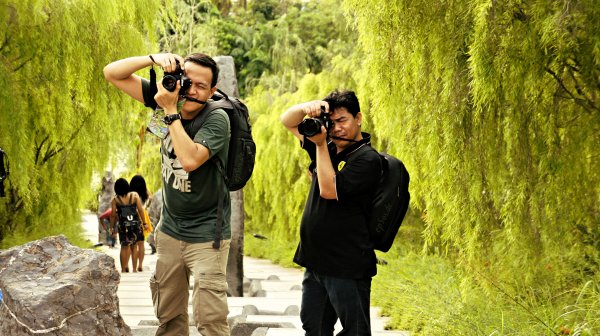
    In the late 2000s a new segment formed in the photography industry. This segment goes by many names, but the most common nowadays is “Mirrorless”. These cameras fall between the generic point and shoot cameras and the professional full frame DSLR systems.

    Zhao !

    By Zhao !

    So what is Mirrorless all about?

    The first mirrorless cameras came out with a traditional rangefinder design. They were small, had many manual settings, and were geared more towards street photographers who wanted great image quality in a small body. From these first cameras it became evident that a smaller camera with great image quality, professional grade, could be very useful. Soon there were several manufacturers developing mini-DSLR looking cameras, more rangefinder designs, and adding more and more features that are found in very high-end cameras. Along with these smaller bodies and variety of sensor sizes new lenses were engineered to take full advantage of the mirrorless design. Some of these manufacturers include Leica, Sony, Panasonic, Olympus, Fuji, Canon, Nikon.

    First impressions

    When these cameras hit the market they were sought after by photojournalists, and street photographers as well as the techie part of the industry. Some thought it was just a trendy segment while others laughed at their size and functionality, forever comparing with full frame DSLRs (this is due to the fact that many mirrorless cameras don’t use a full frame sensor). Even after many articles had come out talking about the benefits of these cameras, many looked passed them and considered them amateur gear. But, manufacturers continued to produce new cameras with more features and better performance.

    What really sets Mirrorless apart?

    2936145 orig

    As the segment continues to gain traction several key features are really starting to turn heads.

    EVF: Electronic Viewfinder

    Unlike traditional viewfinders which show you what is reflected via the mirror you actually see a small built-in display in the viewfinder showing you what the sensor sees. Try to picture a mini-tv monitor inside the viewfinder showing you what the camera sees.

    This might seem strange, but there are tons of benefits to having it set up this way. You see what the sensor sees. So, you can point the camera into the sun and not get blinded. Or you can set the camera to black and white mode and you’ll see everything in black and white. On some cameras you can access your full camera menu through the viewfinder without having to look at the screen on the back. Also, you can fully customize the information you see in the viewfinder. What you see is what you get.

    Ergonomics

    9977912 origMirrorless cameras are small, compact, and very well built. They are made with high grade materials, and just by holding them you know you’re not using a generic point and shoot. To some photographers this is a huge selling point as they look to get away from their heavy camera gear. It also makes it easier to blend into the background without a big DSLR pointed at someone. Some of these cameras are even fully weather sealed, or have a flip out display, and just about all of them have a hot shoe for an external flash.

    But, it goes further. The button layouts and menu systems are designed to be easy to use for even the most demanding of photographers. Unlike point and shoot cameras all the main controls are easily accessible. Some of these design cues come from professional full frame cameras while others look towards old film cameras for inspiration. With all this variety there is system for everyone.

    Image quality

    As each new generation comes out there has been an improvement in sensors, autofocus, and even better lenses. All of these things have caught the eye of the whole industry. The mirrorless segment is maturing at a rapid pace and it shows! Unlike the large DSLR companies who are fighting the megapixel race, the mirrorless segment is working on improving image quality in low light situations, fast moving subjects and lens quality. They have found ways to make it easier to take photos with manual focusing lenses as well. Image quality is a very important part of the development of the mirrorless segment.

    The future of mirrorless – predictions

    The mirrorless segment of the industry has really caught fire in the last few years. All major manufacturers have jumped on board, which means there are lots of options for anyone interested in giving them a try. New adapters have come out so you can use your existing lenses on your new mirrorless camera. Improvement on sensors, auto focus, weather sealing, range of lenses, and options, are attracting more and more people to mirrorless. Fujifilm as well as others are already developing a huge loyal customer base. Firmware updates seem to be the big game changer regarding loyalty. The constant updates and improvements are much more useful than what we’ve seen from most DSLR manufacturers.

    9144849 orig

    This segment will continue to grow and get better at a much faster rate than other segments. Although still young, mirrorless is here to stay. There is something for everyone. Even the most traditional photographers are getting excited about the possibilities of the Electronic Viewfinder as it keeps getting better and better. At the lower price point, much smaller form factor and close to equal image quality to the very large and expensive DSLRs means that it makes sense that more and more photographers will look to add, or replace, their gear with a shiny new mirrorless system.

    Zhao !

    By Zhao !

    What are your thoughts? Where do you stand?

    googletag.cmd.push(function() {
    tablet_slots.push( googletag.defineSlot( “/1005424/_dPSv4_tab-all-article-bottom_(300×250)”, [300, 250], “pb-ad-78623” ).addService( googletag.pubads() ) ); } );

    googletag.cmd.push(function() {
    mobile_slots.push( googletag.defineSlot( “/1005424/_dPSv4_mob-all-article-bottom_(300×250)”, [300, 250], “pb-ad-78158” ).addService( googletag.pubads() ) ); } );

    The post Are Mirrorless Cameras Here to Stay? by Tomas Haran appeared first on Digital Photography School.

    Digital Photography School

  • What Defines an Amateur versus a Professional Photographer?

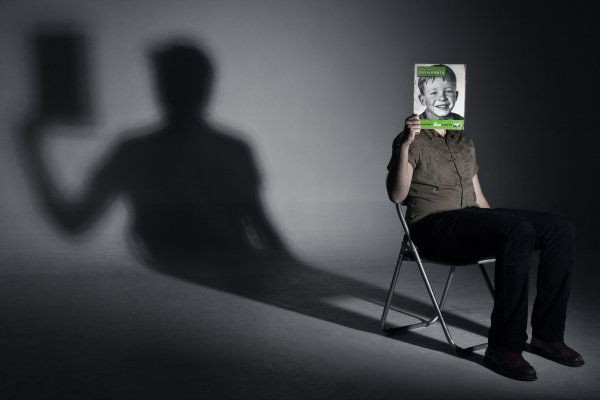
    If you’ve been taking photos for a while, this question will undoubtedly cross your mind at some point: “Am I a professional photographer or an amateur?” The idea of what separates an amateur from a professional sparks many debates, and there are many ways of looking at it.

    Bob Prosser

    By Bob Prosser

    What the Dictionary says

    Perhaps the most straightforward way of separating amateurs from professionals is looking in the dictionary. By definition, an amateur is “a person who engages in a pursuit or activity for pleasure rather than for financial benefit.” On the other hand, the definition of a professional is a little less straightforward. Sources define a professional as simply as “one who earns a living for their occupation,” or as vague as “a person who is expert at his or her work.” Clearly, it’s this vagueness of what a professional is that is at the root of many debates. Still, by using dictionary definitions, we are left with the notion that if you are not pursuing photography for profit, then you are considered an amateur, and the reverse is true for professionals.

    Tax Credits

    By Tax Credits

    What the Government says

    Regardless of how you personally classify yourself as a photographer, it’s more important to understand if the government sees you as a professional or an amateur. Depending on where you live and conduct your photo shoots, there may be certain rules and regulations you need to abide by if you are a professional photographer. For example, American citizens who make money through photography are subject to paying federal and state income taxes on either an annual or quarterly basis, depending on the amount of income earned. There are also state and federal business licenses that must be obtained, and depending on the type of photography you do, you may even need to collect sales tax from your clients.

    However, one bright side to being a professional photographer in the government’s eyes is the ability to write-off certain photography expenses to lower your overall tax obligations. These licenses, fees, and taxes will vary according to where you live, but it’s important to do your research and make sure you are operating within the laws to avoid future penalties. I recommend consulting with a local tax professional to make sure you are squared away. Bottom line: most governments say that if you are collecting a paycheck for your photography work, then you are considered a professional, and with this designation comes responsibilities.

    EpSos .de

    By epSos .de

    As a Professional, Think of Yourself as a Business

    Dictionary and government definitions aside, another way to distinguish yourself as a professional is to confidently present yourself as a business, not just a photographer. Think of any small businesses you patronize regularly, and all of the aspects that make them a respectable commercial entity. Everything from customer service and marketing, to accounting and operations are vital pieces that should be part of your own photography business.

    One aspect that is particularly important for separating yourself as a professional photographer is the way you handle new client inquiries. Have a comprehensive process in place, such as a form or worksheet, that helps your client thoroughly and efficiently present the scope of work they have in mind. Also have your own rate sheets, contracts and invoices set up and ready to be filled out.

    Photography inquiry form

    Example work flow:

    1. Incorporate inquiry forms on your website’s contact page that allows clients to submit photo project details ahead of time to help prequalify them. Also, have a predetermined rate sheet that you can easily refer to if you need to come up with a price on the spot. Remember that confidence is key, especially when asserting your rates.
    2. Have a quote and contract for every job. Based on project scope, send the client a proposed photography evaluation form and a contract that outlines the services you can offer and includes details such as usage rights, delivery options, and proposed timelines. Get the contract signed by the client to confirm agreement.
    3. After the job is complete, send client an invoice using your accounting software or an invoice template you keep on hand. Also be prepared to send over any tax-related documents such as w-9 if the client requests it.

    By making the initial inquiry process easy for your client, you are not only gaining their trust in you, but also making your own work flow easier.

    So what do you think? How do you define the difference between a professional photographer and an amateur?

    googletag.cmd.push(function() {
    tablet_slots.push( googletag.defineSlot( “/1005424/_dPSv4_tab-all-article-bottom_(300×250)”, [300, 250], “pb-ad-78623” ).addService( googletag.pubads() ) ); } );

    googletag.cmd.push(function() {
    mobile_slots.push( googletag.defineSlot( “/1005424/_dPSv4_mob-all-article-bottom_(300×250)”, [300, 250], “pb-ad-78158” ).addService( googletag.pubads() ) ); } );

    The post What Defines an Amateur versus a Professional Photographer? by Suzi Pratt appeared first on Digital Photography School.


    Digital Photography School

  • How to Use the Text Tool in Photoshop

    royal-albert

    There are  many reasons that you might want to add words over your images. Text on photos makes great promotional items such as postcards; you can create your own social media messages with quotes or inspirational  sayings; and you can add your name or your website URL. I’m sure that once you understand all the creative options for adding text, you’ll come up with hundreds of other things you can create with your photos.

    This article will guide you through the many ways you can work with text in Photoshop to create beautiful and eye-catching messages with your photos.

    Basic Text Tools

    It may seem like a pretty simple topic, but Photoshop has a really versatile selection of tools for working with text. Like so may other Photoshop goodies though, some of the best ones aren’t really obvious. So, in this section you’ll learn the various ways to add, adjust, and work with text.

    Here are the basic text tools in Photoshop:

    tools_

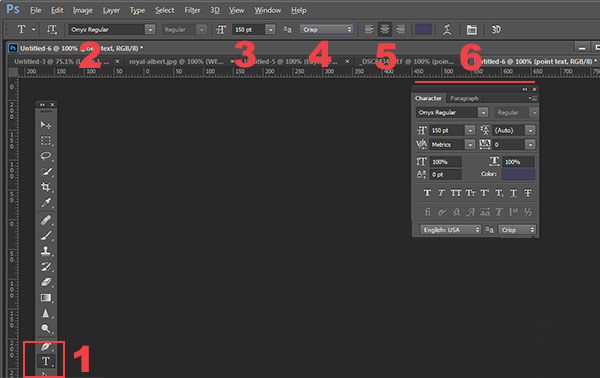
    • When you click the Text Tool in the Tools Palette (#1), the context menu on top will display most of your text tools.
    • #2 Select your font  (the typeface ), font style, bold, italic, etc.
    • #3 Font size (TIP: you can type any number in here, you’re not limited to the numbers that are displayed so your text can be ANY size you like – type 500 into this space and see what happens!)
    • #4 Anti-aliasing options
    • #5 Alignment of the text
    • #6 Text adjustments pop out

    There are a few more tools in here but we’ll talk about them later. So now that you know the lay of the land, lets add some text and play with it.

    Playing with Text

    There are 2 ways of adding text, and it’s critical that you know when to use one way, and when to choose the other.  The first way is how most people use text, by using what is called the Point text tool. You simply click on the Text Tool in the tools palette, click back on your image and start typing. The second way is to use Paragraph Text. Let’s try both.

    Open a new document in Photoshop, and click on the Text tool (keyboard shortcut = T). Start typing. you’ll see something like this:

    point-text

    Your text will have an underline and a cursor will show where you are inserting the next letter.  If you keep typing, the text will continue along in one long single line. To get text on a new line you have to hit ENTER. You have just created text using the POINT TEXT tool. Save this and call it “point text.”

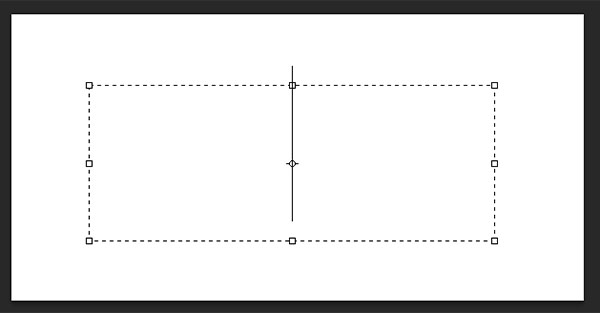
    Open another document, click on the Text tool if it’s not already clicked, now take the text tool and DRAG it out to make a rectangle. You should see something like this.

    paragraph-text-box

    paragraph-text

    Go ahead and type. Type a lot of text. See how the text is constrained by the size of the box? This is Paragraph text. You can grab the text box handles (the little boxes on the middles and corners) to define the size of the area in which you want the text to appear. You can see this is great for larger areas of text. Because you can change the size of the text box, you have great flexibility using paragraph text.

    You can use the MOVE tool to position the entire block of text anywhere on your page.

    Paragraph text is also easier to center on your page. To center your text, just grab one of the handles and drag it to the right edge of your page. Drag the left box to the left edge of your page, then up in the context menu, click the CENTER text icon where number 5 is on the diagram above. It’s a little miracle! Your text is now precisely centered horizontally on your document. No more guessing.

    Transforming letters in text

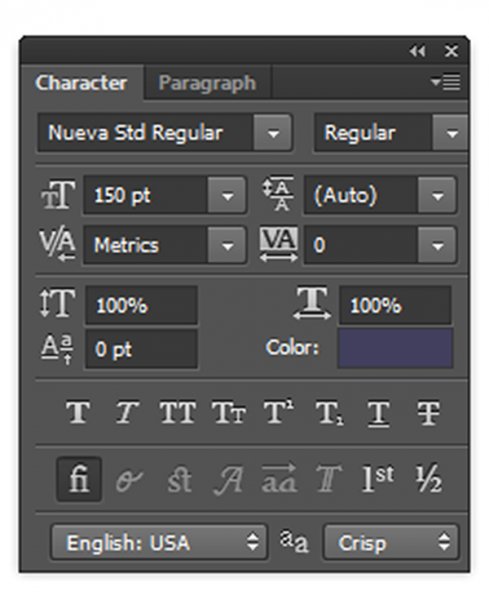
    To give your text variety, you can also change the spacing of the individual letters, the height of the letters, and the width of letters. You can also instantly change a block of upper case text to lowercase, and vice versa. Sometimes the font you are using might be missing the italic version. You can create faux italic in Photoshop. So let’s explore the Text Character pop up box where you can try out all the nifty tricks.box

    You’ll find this box in the context menu – so make sure you have your Text Tool selected, and look where number 6 is in the diagram above. Click the icon that looks like a sheet of paper (above the #6 above). This will open the Character Transform panel.  If you’re editing Point text, your text layer needs to be selected for these edits to work. If you’re using Paragraph text, you’ll need to select the text you want to transform. So, choose your text, and try going through all these options. Hovering over an item will cause a tool tip to pop up that gives you a brief explanation of what each does.

    Transforming blocks of text

    You can easily create attention-grabbing text by angling or slanting it. With your text layer or text selected, go to the main menu, and select EDIT>Transform>Skew. Grab a handle one of the corners and drag. You should see something like this:

    skew

    You can do the same with Edit>Transform>Scale and Edit>Transform>Rotate. Easy peasy!

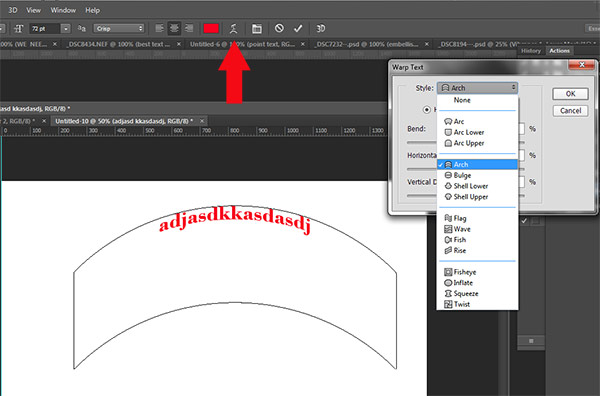
    To make text follow a curve, use the Warp Text tool (select the text tool in the tools palette and look between 5 and 6 on the context menu – it looks like the letter T with a curve underneath).

    Create some text, and  make sure you are on the text layer. Click the Warp Text Tool to open the section popup box. Here you can select what type of shape to give your text, it’s so easy!

    warp-tool


    Three simple ways to make text really pop

    Sometimes when you add text to a photo it can get a bit lost in the image. Even if you make it larger it just doesn’t seem to be crisp or clear. There are a few options:

    A) It may be your anti-aliasing settings, #4 on the top context menu. Make sure this drop down is NOT set to None. This is particularly important on images that you will be using online. Select any of the other options and see how they change the edges of the text. These chooses are personal preferences, as to what type of smoothing look you prefer.drop

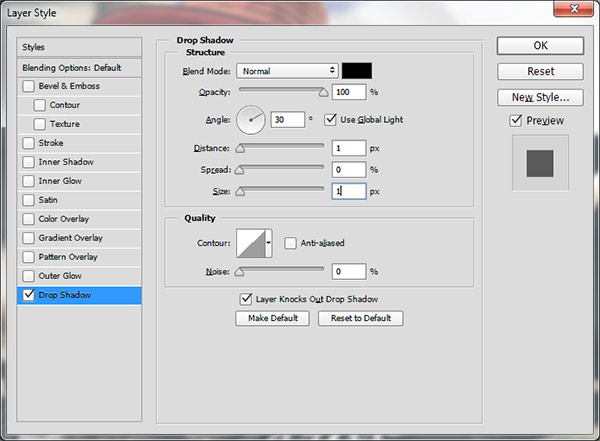
    B) It may be your choice of colors. Often white works best as it has a clean, elegant look. But it’s easy for white text to get lost in the details of the image. Here’s an old web designer’s trick to make light colored text really pop. Add a drop shadow of black. But not just any random drop shadow. This one will be almost invisible but the subtle punch it adds is tremendous. Here’s how:

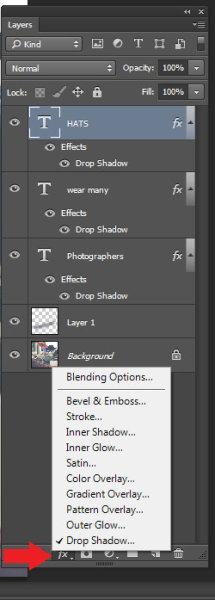
    First select the text layer you want the drop shadow on. Go to your layers palette and select the Layer FX icon at the bottom, then select Drop Shadow.

    In the Drop Shadow dialog box make your drop shadow with these settings. If you are working on a high res image from print, change the shadow size from 1 to 10. You may need to adjust these setting depending on the size of your image, just make sure they are both the same number.

    drop2

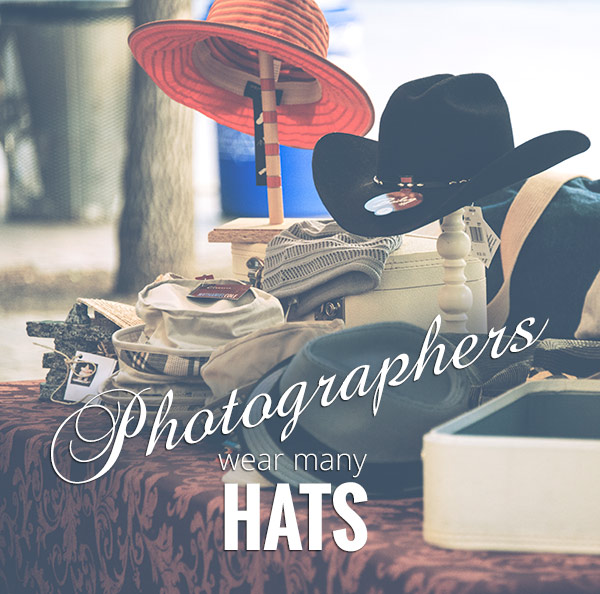
    See how the white text pops in this image even though the image is all soft shades? No cheesy 1990’s drop shadows here.  It gives just enough edge separation and dimension to make the text obvious, without being obnoxious.

    _DSC8453---W

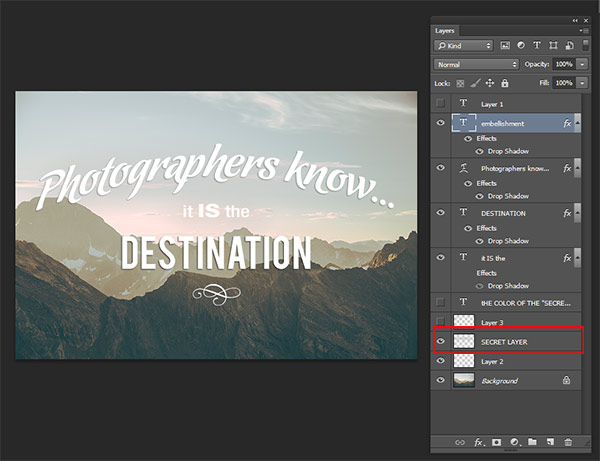
    C) Finally, another text popping trick from the graphic design world  – add a “secret” layer behind your text and use layer blending modes to darken it down just a bit, to give your text a darker background for more contrast.

    In the example below, you want to get rid of the clouds behind the text, and make the sky just a touch darker to make the text stand out more.   Select a soft-edged brush, and use the eye-dropper tool to select a mid-tone brush color – in this image I selected the sky just above the “P”. Make the brush diameter equal to the height of the letters. Now add a new layer between the photo and your text, this is your secret layer, and just brush over the text – which will really be under the text as your layer is “under” the text. Change the blending mode to Darker Color or Darken ( this will depend on the color you’re using) and then you can adjust the layer’s opacity to suit.

    secret-layer

    _DSC7232--

    Text before the secret layer. 

    With the secret layer added.

    With the secret layer added.

    Text embellishments and decorations

    One of the most common questions I get asked about text on photos is how did I make the swooshes and swirly decorations and embellishments. These in most cases are simply fonts that are decorations rather than letters. There are hundreds of free fonts like this. Here’s one place you can get started: Embellishment fonts.  Be sure to check the licensing restrictions on free fonts  – some require payment or donations if you are selling your images.

    _DSC8194---

    So there you go – the basics of adding creative text you your photographs. You can now elegantly add messages, taglines, quotes, and verses to your images. You can make text grab your viewers’ attention by  placing it at an angle or on a curve; you can make it really stand out by using a few simple techniques, and you can add interest and artistic flair by adding embellishments and decorations. Unleash your inner graphic artist – you have the technology!

    Give it a try – I’d love to see what kinds of messages you add to your images!

    googletag.cmd.push(function() {
    tablet_slots.push( googletag.defineSlot( “/1005424/_dPSv4_tab-all-article-bottom_(300×250)”, [300, 250], “pb-ad-78623” ).addService( googletag.pubads() ) ); } );

    googletag.cmd.push(function() {
    mobile_slots.push( googletag.defineSlot( “/1005424/_dPSv4_mob-all-article-bottom_(300×250)”, [300, 250], “pb-ad-78158” ).addService( googletag.pubads() ) ); } );

    The post How to Use the Text Tool in Photoshop by Alex Morrison appeared first on Digital Photography School.


    Digital Photography School

  • 3 Principles of Light Behaviour Every Photographer Needs to Know

    In this short video by Ed Vorosky he covers three rules about the behaviour of light. When you understand these principles you can then use them better in your photography.

    1. Light travels in straight lines
    2. The subject receives less light as the distance to the light source is increased
    3. The larger the light source relative to the subject, the softer the light source

    Watch the video for a more detailed description and demonstration of each:

    So what does that mean for your photography? How can you use this information in practice?

    googletag.cmd.push(function() {
    tablet_slots.push( googletag.defineSlot( “/1005424/_dPSv4_tab-all-article-bottom_(300×250)”, [300, 250], “pb-ad-78623” ).addService( googletag.pubads() ) ); } );

    googletag.cmd.push(function() {
    mobile_slots.push( googletag.defineSlot( “/1005424/_dPSv4_mob-all-article-bottom_(300×250)”, [300, 250], “pb-ad-78158” ).addService( googletag.pubads() ) ); } );

    The post 3 Principles of Light Behaviour Every Photographer Needs to Know by Darlene Hildebrandt appeared first on Digital Photography School.

    Digital Photography School

  • Weekly Photography Challenge – Long Exposures

    In this collection of long exposure photographs you can see some great examples of how you can use this technique to produce stunning images.

    Stewart Ayrey

    By Stewart Ayrey

    I teach a night photography class and many times I’ve seen a whole new world of exciting things open up for my students when they learn about long exposures. Of course you can use this technique in the daytime as well, but it is often associated with night photography. On a weekend workshop I lead we go out and photograph the sunset and I MAKE them use tripods, amid much grumbling. Then after the sun goes down they start to pack up and head back to our hotel. I tell them to keep shooting. Many times I’ve been told “I didn’t know you could take photos in such dim light”. Then we get out the flashlights and do some light painting and the magic begins.

    To see some of the top articles on night photography on dPS in 2014, head over here.

    Weekly photography challenge – long exposures

    Have you tried any long exposure photography before? If not, now is the time. You will need a good, sturdy tripod and ideally a remote trigger to fire the camera (reducing camera shake). Here are a few long exposure images to give you some ideas on what you can do:

    Mike

    By Mike

    Kostas Kokkinos

    By Kostas Kokkinos

    José Miguel

    By José Miguel

    Duane Schoon

    By Duane Schoon

    Howard Ignatius

    By Howard Ignatius

    Bill Devlin

    By Bill Devlin

    Abi Booth

    By Abi Booth

    Trey Ratcliff

    By Trey Ratcliff

    William Cho

    By William Cho

    José Miguel

    By José Miguel

    Jason

    By jason

    Dave Wilson

    By Dave Wilson

    Nicholas Chai

    By Nicholas Chai

    Note: please take note if you are going to attempt doing fire spinning with steel wool, please make sure you read about safety and do so at your own risk. IT IS dangerous and can result in fire or injury if precautions are not taken.

    Okay it’s your turn – go! Show us what you can come up with. Get creative.

    Share your long exposure images here:

    Simply upload your shot into the comment field (look for the little camera icon in the Disqus comments section) and they’ll get embedded for us all to see or if you’d prefer upload them to your favourite photo sharing site and leave the link to them. Show me your best images in this week’s challenge. Sometimes it takes a while for an image to appear so be patient and try not to post the same image twice.

    googletag.cmd.push(function() {
    tablet_slots.push( googletag.defineSlot( “/1005424/_dPSv4_tab-all-article-bottom_(300×250)”, [300, 250], “pb-ad-78623” ).addService( googletag.pubads() ) ); } );

    googletag.cmd.push(function() {
    mobile_slots.push( googletag.defineSlot( “/1005424/_dPSv4_mob-all-article-bottom_(300×250)”, [300, 250], “pb-ad-78158” ).addService( googletag.pubads() ) ); } );

    The post Weekly Photography Challenge – Long Exposures by Darlene Hildebrandt appeared first on Digital Photography School.


    Digital Photography School

  • 37 Ethereal Almost Supernatural Long Exposure Photographs

    Landscape photographers use a technique involving long exposures to create those milky smooth waterfalls, and misty images of coastlines. But what other ways are long exposures used?

    Here are a few long exposure photographs that seem almost otherworldly or supernatural in their appearance for you to ponder and enjoy:

    Photograph Smoking Jungle by Karim Nafatni on 500px

    Smoking Jungle by Karim Nafatni on 500px

    Photograph Snake on a Train by Brian Donovan on 500px

    Snake on a Train by Brian Donovan on 500px

    Photograph Skipping Rocks by Michael Shainblum on 500px

    Skipping Rocks by Michael Shainblum on 500px

    Photograph Autumn Swirl by Andrew Kumler on 500px

    Autumn Swirl by Andrew Kumler on 500px

    Photograph 49 Shades of Grey by Dylan Toh  & Marianne Lim on 500px

    49 Shades of Grey by Dylan Toh & Marianne Lim on 500px

    Photograph The Proposal by Ryan Buchanan on 500px

    The Proposal by Ryan Buchanan on 500px

    Photograph Children of the Atom by WK Cheoh on 500px

    Children of the Atom by WK Cheoh on 500px

    Photograph Stars over Teton homestead by Royce's NightScapes on 500px

    Stars over Teton homestead by Royce’s NightScapes on 500px

    Photograph Cascading Levels by Jason Hatfield on 500px

    Cascading Levels by Jason Hatfield on 500px

    Photograph Beach Morning by Mobeen Mazhar on 500px

    Beach Morning by Mobeen Mazhar on 500px

    Photograph Timeless by Stefan Mitterwallner on 500px

    Timeless by Stefan Mitterwallner on 500px

    Photograph Erosion of an Iceberg by André Alessio on 500px

    Erosion of an Iceberg by André Alessio on 500px

    Photograph Trollstigen light trail by Attila Roszjár on 500px

    Trollstigen light trail by Attila Roszjár on 500px

    Photograph Forever Strong by Max Rive on 500px

    Forever Strong by Max Rive on 500px

    Photograph Machu Picchu by Jacky CW on 500px

    Machu Picchu by Jacky CW on 500px

    Photograph Onshore by Dave Cox on 500px

    Onshore by Dave Cox on 500px

    Photograph Long WayTo Sun by Mostafa Ammar on 500px

    Long WayTo Sun by Mostafa Ammar on 500px

    Photograph Persistence - Blue Boat Shed, Perth. Western Australia by Luke Austin on 500px

    Persistence – Blue Boat Shed, Perth. Western Australia by Luke Austin on 500px

    Photograph Colosseum Lite Trails by Yhun Suarez on 500px

    Colosseum Lite Trails by Yhun Suarez on 500px

    Photograph Startrails by Kittikorn Nimitpara on 500px

    Startrails by Kittikorn Nimitpara on 500px

    Photograph Time by David Watson on 500px

    Time by David Watson on 500px

    Photograph Grand Central by Conor MacNeill on 500px

    Grand Central by Conor MacNeill on 500px

    Note: long exposures of busy places full of people can help make all the people disappear magically!

    Photograph Dubai 2014 Happy New year by Dalia Al Ameen on 500px

    Dubai 2014 Happy New year by Dalia Al Ameen on 500px

    Photograph Viva sant'Agata! by Giuseppe Torre on 500px

    Viva sant’Agata! by Giuseppe Torre on 500px

    Photograph SkyWheel in Niagara Falls, Canada by Roberto Machado Noa on 500px

    SkyWheel in Niagara Falls, Canada by Roberto Machado Noa on 500px

    Photograph Carnival by Photo Bones on 500px

    Carnival by Photo Bones on 500px

    Photograph C A R N I E by Matthew James on 500px

    C A R N I E by Matthew James on 500px

    Photograph L I G H T | S P I N by Matthew James on 500px

    L I G H T | S P I N by Matthew James on 500px

    Photograph Spinning by Benjamin King on 500px

    Spinning by Benjamin King on 500px

    Photograph fountain of fire by Zachary Voo on 500px

    fountain of fire by Zachary Voo on 500px

    Photograph The Spin by Bipphy Kath on 500px

    The Spin by Bipphy Kath on 500px

    Photograph Fire show amazing at night by Sasin Tipchai on 500px

    Fire show amazing at night by Sasin Tipchai on 500px

    Photograph Insane Crazy by Ben Hirst on 500px

    Insane Crazy by Ben Hirst on 500px

    Photograph Flurry II. by Christopher Chung on 500px

    Flurry II. by Christopher Chung on 500px

    Photograph THE WINDMILLS OF YOUR MIND, LES MOULINS DE MON COEUR... by Magda Indigo on 500px

    THE WINDMILLS OF YOUR MIND, LES MOULINS DE MON COEUR… by Magda Indigo on 500px

    Photograph Tunnel of Fire by Luc De La Mare on 500px

    Tunnel of Fire by Luc De La Mare on 500px

    Photograph The Tunnel by Dave Brightwell on 500px

    The Tunnel by Dave Brightwell on 500px

    googletag.cmd.push(function() {
    tablet_slots.push( googletag.defineSlot( “/1005424/_dPSv4_tab-all-article-bottom_(300×250)”, [300, 250], “pb-ad-78623” ).addService( googletag.pubads() ) ); } );

    googletag.cmd.push(function() {
    mobile_slots.push( googletag.defineSlot( “/1005424/_dPSv4_mob-all-article-bottom_(300×250)”, [300, 250], “pb-ad-78158” ).addService( googletag.pubads() ) ); } );

    The post 37 Ethereal Almost Supernatural Long Exposure Photographs by Darlene Hildebrandt appeared first on Digital Photography School.

    Digital Photography School

  • The Contest Winners of the Three Tamron Lenses Are…

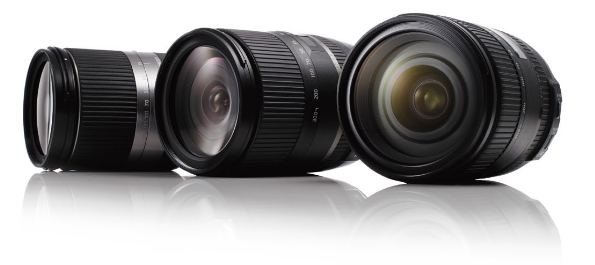
    Tamron Lenses for Front Contest Graphic

    A VERY BIG Thank You to everyone who entered our recent competition to win one of three lenses from our friends and site sponsors at Tamron.

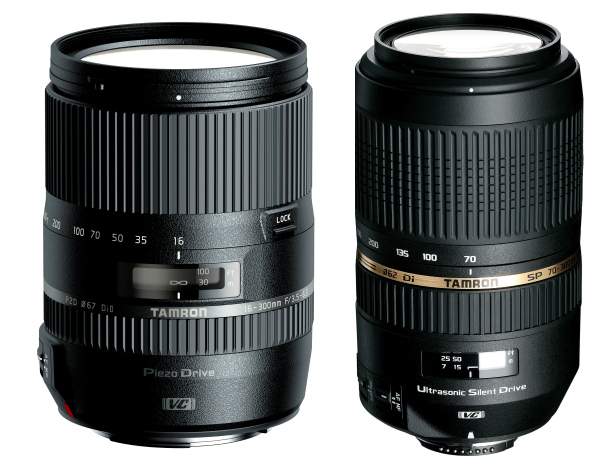
    Lens A and Lens B

    Tamron 16-300mm Di II VC PZD Macro and Tamron SP 70-300mm Di VC USD

    This was not actually a photography competition, per se, but so many of you shared your beautiful photographs, we encourage you all to go back and scroll the comments section for some wonderful photographs and links to reader pages/sites.

    The response was absolutely AMAZING with over 1,000 entries! In fact, it was so great that we here at Digital Photography School decided, again, to add a new category of winners – Honorable Mentions – and provide each Honoree with a dPS eBook of their choice. But now… onto the winners!

    Here are the 3 winners of the competition:

    • The Tamron 16-300mm Di II VC PZD Macro goes to – Vera Irwin!
    • The Tamron SP 70-300mm Di VC USD goes to – Wayne Ellyson!
    • The 2nd Tamron SP 70-300mm Di VC USD goes to – Christopher Sperry!

    A note to each of our winners:

    • Vera, VERY creative! Was a pleasure to read!
    • Wayne, enjoy all your Tamron lenses and we hope the new lens does the trick at all of the upcoming festivals.
    • Christopher, enjoy Morocco!

    Ohhh, and James Garcia – We think that these are FREAKING COOL as well! Rudy, your Tamron/dPS 12 Days of Christmas song was truly inspired. Thank you for that!

    Honorable Mentions:

    Keith Starkey, D90Rich, Amanda Evans, 6YuQk5Ngnz, Jodi O’Neill, Aaron, Paul Kidero, Crystal, Sarah Williams, Penny Katz, A.Stone, Dustin White, Andy Cunnington, Kim Manzoni, and Sachi Sakai.

    We were all thrilled with the entries… you tugged at our heartstrings, made us laugh, made us smile, but most importantly, you made us keep wanting to do more of what we are doing; providing you quality information and guidance to become a better photographer. We were so pleased to see that you came from every part of the world, young adults to grandparents, and everyone in between. Thank you all for your entries!

    Tamron Nightime eBook Graphic

    Now, for those of you that didn’t win, Tamron has invited ALL dPS readers to download their eBook series!

    You can find those HERE!

    Tamron  Winter Savings Rebates

    For all of you residing in the USA, when you do purchase your next select Tamron Lens, please make sure to take advantage of Tamron Rebates*. Find additional information HERE!

    *Current rebate offers end February 28, 2015. US RESIDENTS ONLY.

    Winners will be emailed with details of how to collect their prize. Please make sure to look for our email. Thanks you again for all the wonderful submissions and to Tamron for sponsoring this competition.

    Tamron logo

    About Tamron

    googletag.cmd.push(function() {
    tablet_slots.push( googletag.defineSlot( “/1005424/_dPSv4_tab-all-article-bottom_(300×250)”, [300, 250], “pb-ad-78623” ).addService( googletag.pubads() ) ); } );

    googletag.cmd.push(function() {
    mobile_slots.push( googletag.defineSlot( “/1005424/_dPSv4_mob-all-article-bottom_(300×250)”, [300, 250], “pb-ad-78158” ).addService( googletag.pubads() ) ); } );

    The post The Contest Winners of the Three Tamron Lenses Are… by Darren Rowse appeared first on Digital Photography School.


    Digital Photography School

  • Food Photography – How to Shoot A Beverage With Only Two Lights

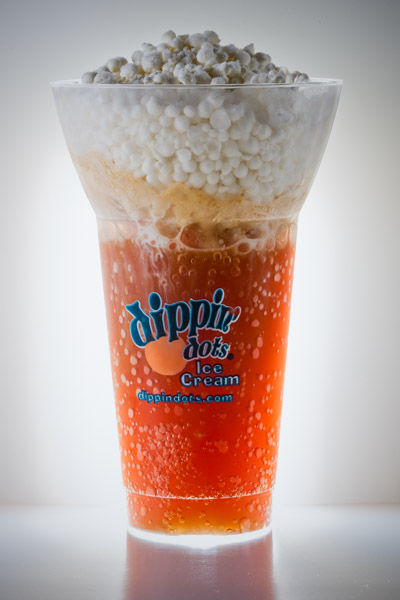
    The wonderful thing about food photography is that you can easily turn your apartment, home, or garage into a studio. This image was shot for a local ice cream franchise that offers a different spin on the traditional root beer float. The set was constructed on a coffee table with common household items, and was lit with just two lights.

    Final image with real ice cream

    Final image

    You might be thinking that the featured photo does not look like your normal, every-day root beer float, and you would be right. The ice cream pellets in the float were created by flash freezing ice cream mixed with liquid nitrogen.

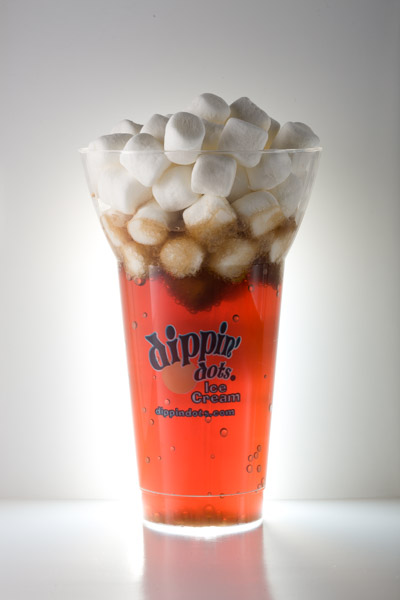
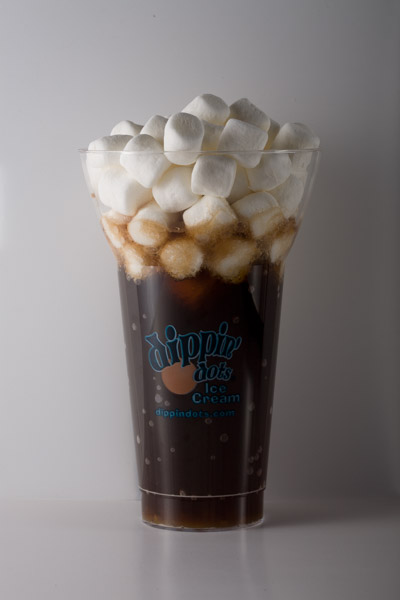
    Because the ice cream was made up of these small pellets, it melted quickly, leaving little time to get the “money shot”. To solve this problem, I created a stand-in cup that was filled with soda and mini marshmallows. This stand-in allowed me to tweak my lights while the ice cream was safely stored in an ice chest filled with dry ice.

    Marshmallow stand-in

    Marshmallows used as stand-in for ice cream, during set up phase.

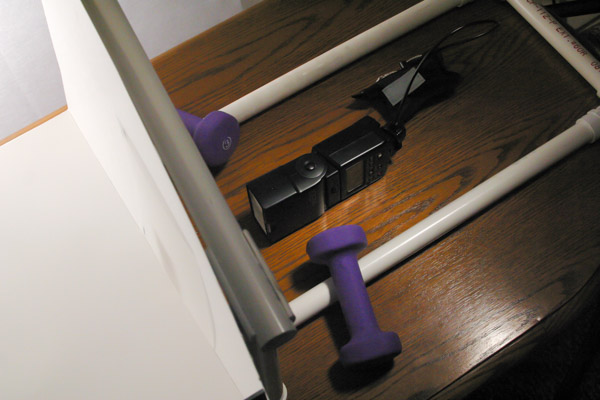
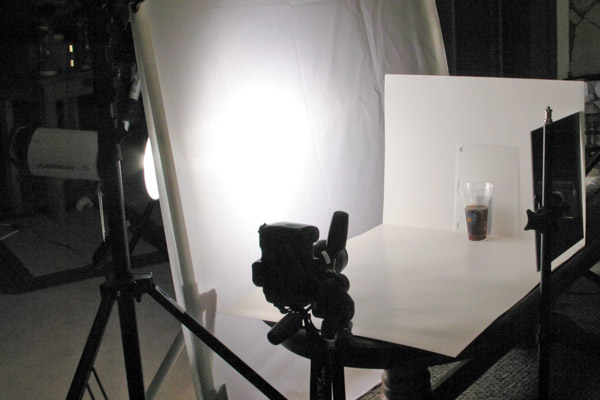
    Two pieces of white poster board were used to construct the set. One for the floor and one for the background. The background piece was attached to sections of PVC tubing, which were re-purposed from homemade DIY light panel frames. Small one pound dumbbells were placed on top of the PVC frame to secure it and keep it from moving around.

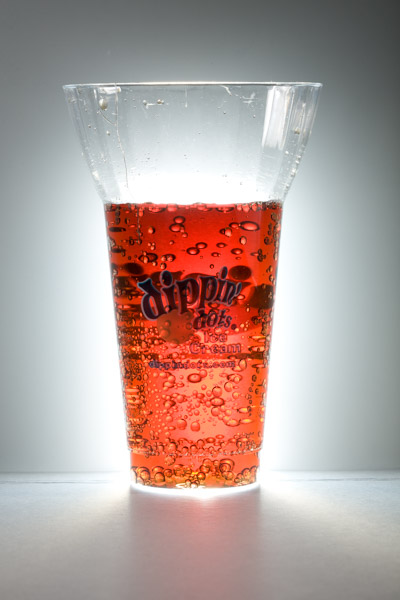
    Whenever you photograph beverages, it is important to backlight them in order to show the transparency of the container and/or liquid. That is what makes soda, iced tea and beer ads look so delicious.

    For this shot, I decided to achieve the effect by creating a really tiny pseudo-softbox behind the glass of root beer. I started by cutting a rectangular hole in the back of the poster board. Careful attention was taken to insure that the hole was large enough to cover the entire lower portion of the glass, while still being hidden from the camera’s view.

    A small off-camera flash fitted with a radio trigger was then placed behind the background. Since the hole and glass were tall and narrow, the strobe was placed on its side, to match.

    View from behind background

    View of PVC frame and hotshoe flash with radio receiver. Notice how flash is placed on its side, vertically.

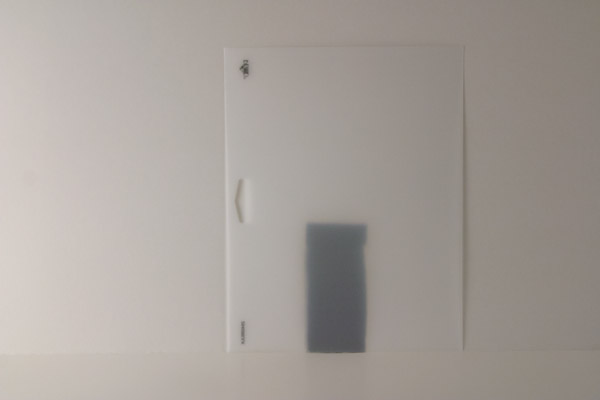
    Next, a small sheet of frosted stencil paper purchased from a local hobby store was placed in front of the hole, to evenly diffuse the light across the opening. The translucent properties of the paper also created a soft falloff to the background, as if it were being lit from the front instead of the back.

    frosted stencil paper

    Frosted stencil paper was butted against the background, behind the glass, to evenly diffuse the light shining through the hole in the poster board. The sheet was moved so that the edges, logo and holes were not seen from the camera’s angle of view.

    backlit root beer

    First backlight test, before marshmallows were added.

    Now that the liquid was backlit, we needed to add a light to illuminate the ice cream. To do this, a large piece of diffusion fabric attached to a PVC frame was placed just out of frame, towards camera left. A strobe light was then placed behind the panel. The diffusion fabric created a large source of illumination, which created a very soft transition from the highlights to the shadows.

    float without backlight

    Light shining through diffusion panel with back light turned off

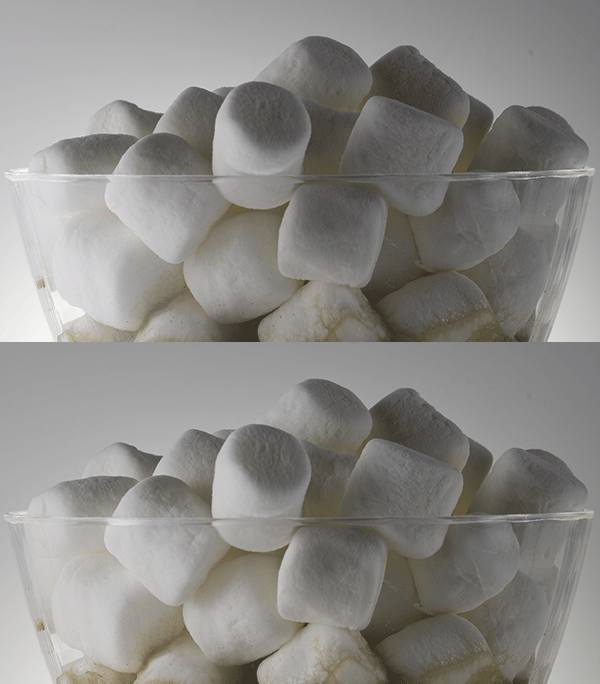
    Finally, an acrylic mirror was attached to a light stand and placed just out of frame, towards camera right. The mirror reflected and bounced some of the light from the large panel back into the shadows.

    Before and After of Mirror Fill

    Mirror fill: Before and After

    setup view

    View of entire setup.

    The final image was shot using a Canon EF 100mm f/2.8 Macro lens. The camera was set to f/14 at ISO 100.

    Final image with real ice cream

    Final image using real ice cream.

    With a little imagination and ingenuity you too can create professional looking food images on a budget, with minimal equipment. In fact, here are a few cheaper alternatives that could have been used to create the image above:

    CFL or LED Light Bulbs

    The wonderful thing about still photography is that your subject is “still”. This means you can use regular household bulbs to light your scene if you do not have the money for strobes. All you have to do is lower and adjust the shutter speed of your camera, since the bulbs do not emit as much light as a strobe or off-camera flash. Experiment with different bulb wattages, or try alternating the amount of bulbs to create different lighting ratios. Just make sure you have the bulbs placed behind some source of diffusion. By diffusing the lights, you will create a single large light source; otherwise, you will create multiple shadows and weird reflections from the various sources of light.

    White Twin Bed Sheet

    A white bed sheet is an inexpensive and great form of diffusion. You can attach it to a PVC frame or stretch it between two light stands using spring clamps. The sheets are also great for portrait work. Need a GIANT softbox? Try a king size sheet!

    googletag.cmd.push(function() {
    tablet_slots.push( googletag.defineSlot( “/1005424/_dPSv4_tab-all-article-bottom_(300×250)”, [300, 250], “pb-ad-78623” ).addService( googletag.pubads() ) ); } );

    googletag.cmd.push(function() {
    mobile_slots.push( googletag.defineSlot( “/1005424/_dPSv4_mob-all-article-bottom_(300×250)”, [300, 250], “pb-ad-78158” ).addService( googletag.pubads() ) ); } );

    The post Food Photography – How to Shoot A Beverage With Only Two Lights by Joel Dryer appeared first on Digital Photography School.

    Digital Photography School

  • 11 Tips for Creating Stunning Photographs of Cities at Dawn

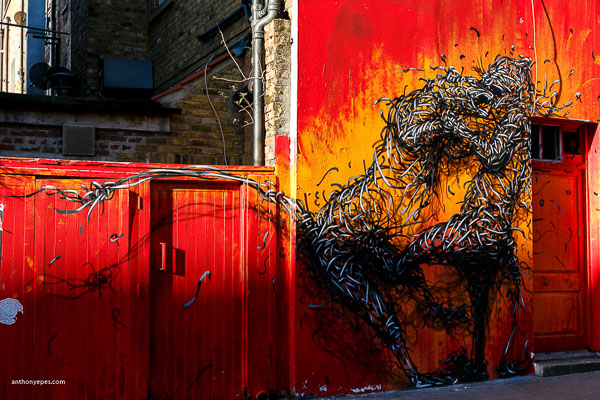
    We’ve all seen hundreds of gorgeous photos of sunrises over beaches and beautiful landscapes. Of course they have the capacity to wow and inspire, but I would argue that it’s far more interesting to photographs cities at dawn. You have so much more to work with – buildings, graffiti, debris, rivers, glass, the odd person, roads, and greenery in the midst of all of this urban-ness. The possibilities to create unique photos are endless. So, if you combine all this intense city landscape with the wonderful and quickly-changing light of dawn, you have an amazing combination.

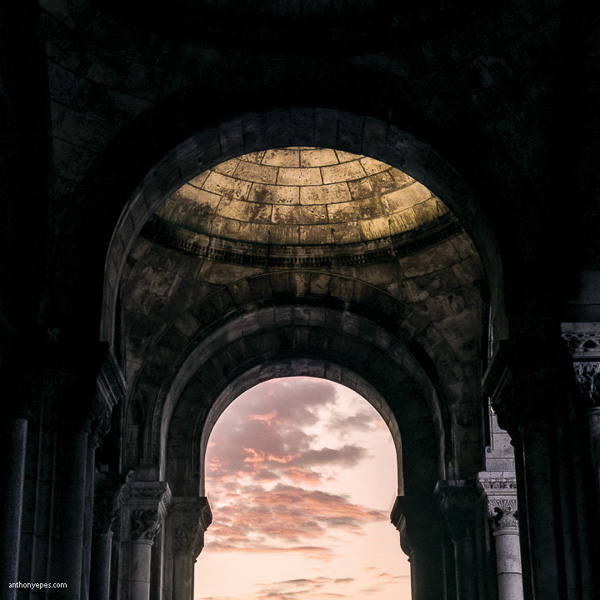
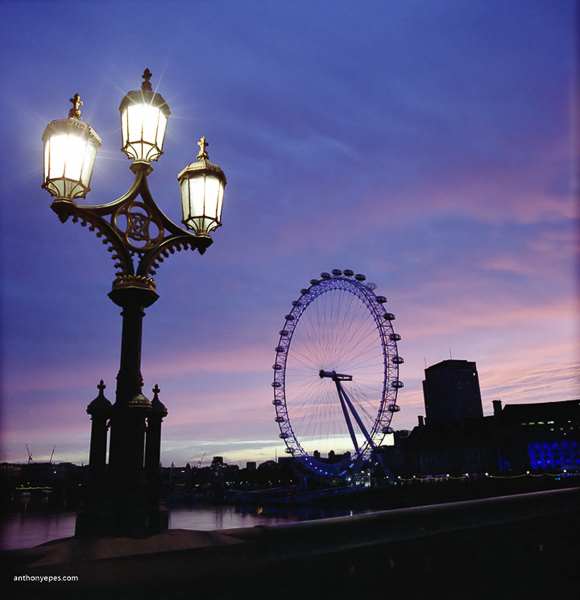
    Anthonyepesphotography DPS 1

    I’ve been shooting cities at dawn for over a decade now. For me cities are at their most inspiring when they are empty of people, traffic, and chaos and bathed in the beautiful light of dawn.

    Here are 11 tips on how to create stunning photographs of cities at dawn:

    1. Sunrise

    Sunrise, especially when it’s an epic one, is obviously the focus for any early morning shoot. But it shouldn’t be just about capturing the sunrise.

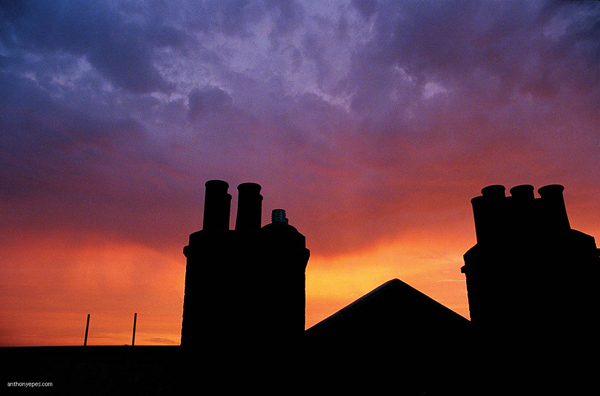
    • Clouds: To me what is special about any given morning is what kind of clouds are in the sky. Clouds are what make mornings different from day to day and are one of the reasons to keep going back to the same place again and again.
    • Other elements: Think about other elements you can use to enhance the photo. Try framing the sunrise, and the sky, to create an interesting contrast (see photo above).
    • Foreground: Find an interesting subject for your foreground, using the sunrise like a tapestry.

    Anthonyepesphotography DPS 2

    2. Emptiness

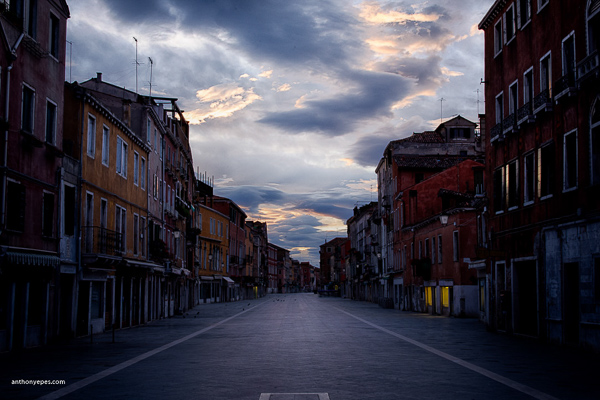
    Being in a city (which is usually densely packed with people) suddenly deserted, creates a feeling that you are in a different world. You see the city as it really is, and it changes what you see but also what you photograph.

    This sense of emptiness is made especially impactful when you photograph:

    • Tourist attractions
    • Roads
    • Monuments
    • Public squares

    Anthonyepesphotography DPS 3

    3. Varying types of light

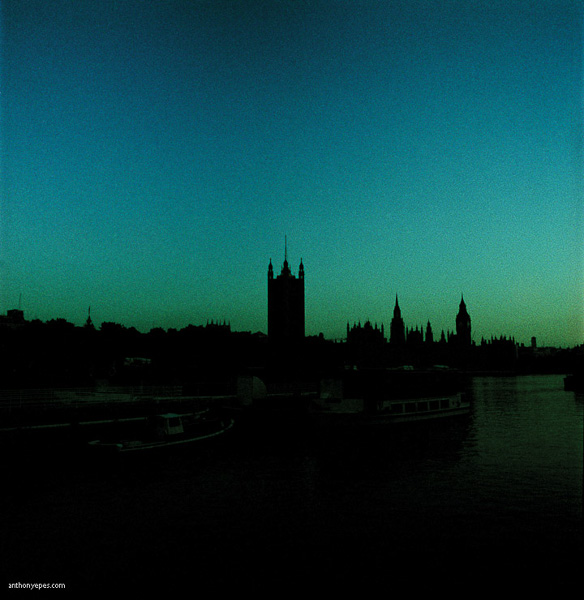
    The sunrise may be the shining moment of the morning, but don’t forget other unique qualities to early morning photography.

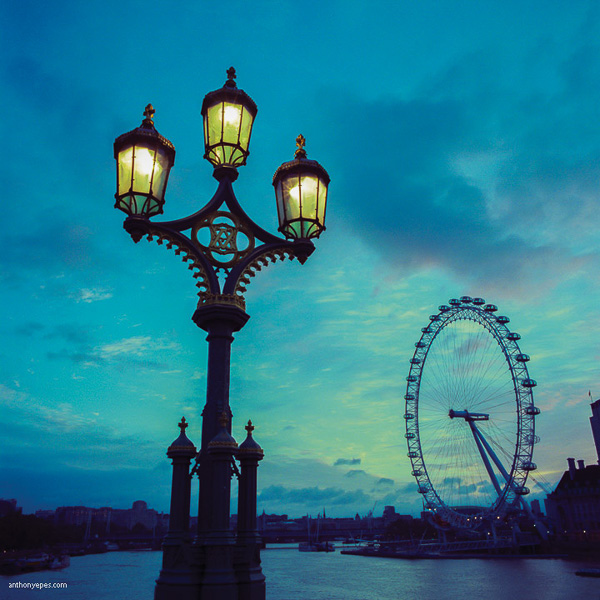
    • Blue hour: Is a very short time between night and sunrise, when the sky changes quickly from dark to light. It happens again before sunset, but at dawn the beauty of the blue hour is enhanced by the emptiness and stillness of the city. When you are shooting during the blue hour, be prepared as the light changes very quickly. Get your camera set up on a tripod and have your scene already composed, so that when it arrives and the light is changing, you won’t miss it. If you have a shot you really like, be patient, and shoot slowly as the light changes. Slowing down like this also creates the opportunity to relax enjoy the view and look around for the next shot.

    Anthonyepesphotography DPS 4

    • Artificial and natural light: Contrasting artificial and natural light. There is a very short time at dawn when you have both, and the effect is beautiful.
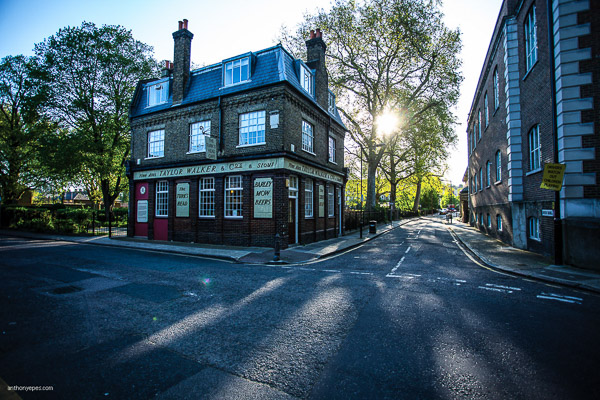
    • Low sun, long shadows: At dawn the sun rises from below the horizon and moves up into the sky at a height dependent on the time of year (and what part of the world you are in). The effect of a low sun is that it creates long shadows, which are stunningly effective with the low light of dawn. Stick around for a few hours after sunrise to capture the light falling over the streets and buildings like this:

    Anthonyepesphotography DPS 5

    4. Look for light sources

    A bundle of different elements like buildings, roads, glass, and windows with the light falling onto them creates a myriad of opportunities for light to bounce, reflect, bend and distort. If you see light falling onto a wall, or reflecting onto a piece of glass, look for its source. It could be that the source is more interesting than the effect the light is creating.

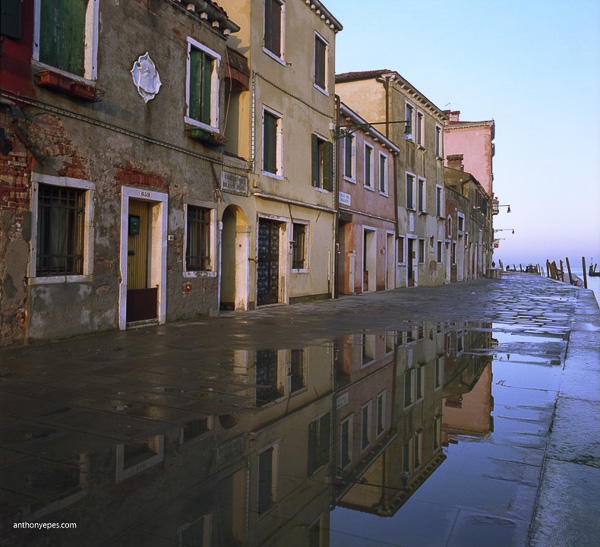
    • Reflections: Are a gem to photograph and dawn is such a brilliant time because there aren’t people crowding around disturbing them. Search out water as it’s usually still – puddles, canals, ponds and my favourite – glass buildings.

    Anthonyepesphotography DPS 6

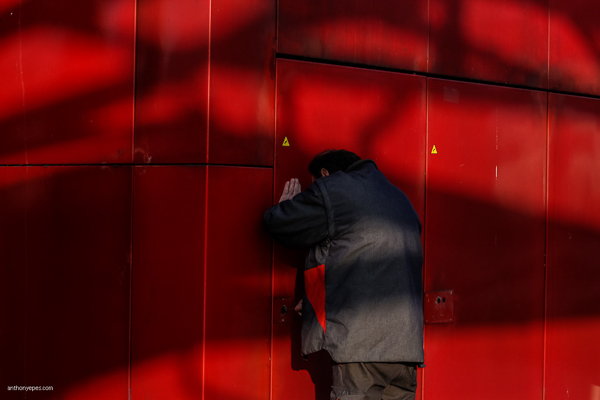
    • Light effects: The low sun creates a myriad of effects as it filters through trees, buildings and other city architecture. Look at this man, locking up, and how the shadows enhance the mood and meaning of the photo.

    Anthonyepesphotography DPS 7

    • Use the light for contrast: Search out the unusual. I love the contrast of some of the rougher, decaying edges of a city with the vibrant light of dawn.

    Anthonyepesphotography DPS 8

    5. Seek out people – they are usually doing interesting things at dawn

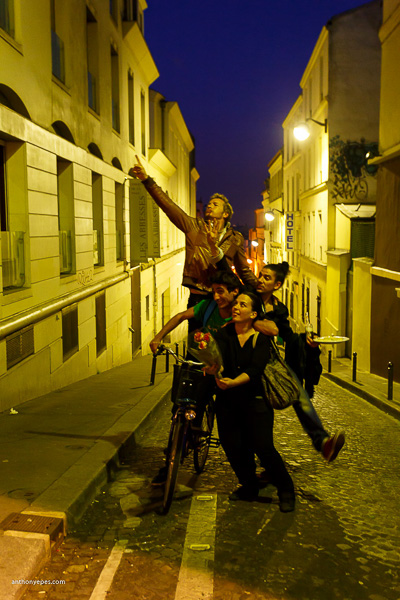
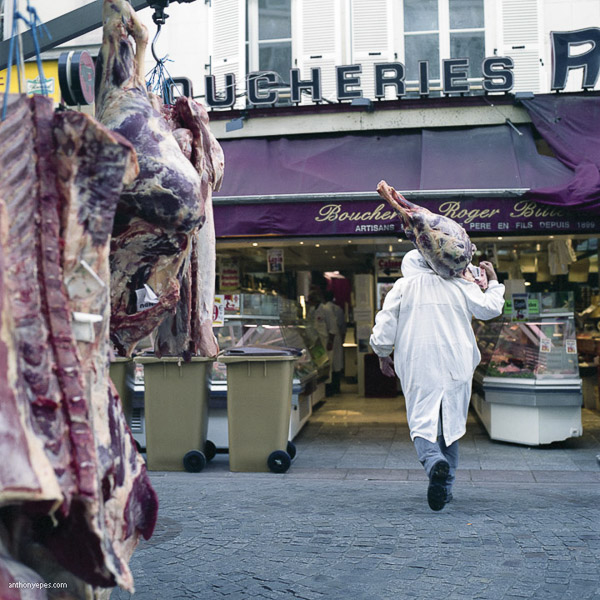
    Most people out at dawn are either working or they’ve been out all night enjoying themselves. They make interesting, and often very willing subjects!

    Anthonyepesphotography DPS 9

    Anthonyepesphotography DPS 10

    6. Return to your favourite spots

    No two sunrises are the same. So, if you have a favourite spot, go back and photograph it on a different day, during different seasons. The quality of the light will be different, perhaps there will be changes in the cityscape (London is never the same year to year), you will notice contrasts. Give yourself a challenge, ask yourself: How can I make this same scene a distinctive photograph? What else can I do? Push yourself to create more unique photographs every day.

    Anthonyepesphotography DPS 11

    Anthonyepesphotography DPS 12

    7. Explore

    Go off the beaten track. Photographing the iconic sites is amazing in any city (it’s iconic for a reason, right?) and having St. Mark’s Square in Venice to yourself at dawn is a heady experience. But there are always so many areas of any city that are not so frequently photographed. It could be the docklands in London’s East End, the rough and run down area east of Paris’s Sacre Coeur or the eastern edge of Venice, where I found abandoned buildings and ancient fortresses. Everything seems other-worldly at dawn and worth exploring.

    8. Look behind you (and above, below, around and everywhere)

    When you are going out to shoot, it’s important to really look around you. Doesn’t this sound like a simple task that we spend all of our lives doing? Actually no! You will be surprised by how much we all miss as we rush around in the little bubble of our minds, distracted by our thoughts and our tasks for the day.

    Don McCullin says it brilliantly: “You can feast your eyes on a daily basis, although I suspect the average man on the street goes through life with narrowed vision, not seeing the whole scope of what’s going on around him.”

    If you want to create images with a WOW factor you have to pay attention to what’s around you. What the photo world calls, “The art of seeing”.

    I find being out at dawn helps me see, because there isn’t the usual distractions, our senses are more heightened, it’s an unusual time of day to be awake (for most of us) and we are seeing our familiar streets and places in a new light.

    9. Get started early

    I like to have found my location before I go out. From there I wander, but it’s good to have a initial place so you don’t waste time. I like to be in this first location at least an hour, sometimes an hour and half, before sunrise. There are some incredible opportunities to photograph the blue hour.

    10. Be prepared with your kit

    The light changes very quickly at dawn, and you definitely don’t want to miss that spectacular sunrise. My essential kit list for dawn shooting includes:

    • A small torch (flashlight) for setting up your camera in the dark
    • A plastic bag for my camera in case it rains (cheap but it works!)
    • A visor or hat as walking into the sunlight is hard on the eyes
    • Gloves (it’s often cold at dawn, even in summer)
    • A light, but sturdy tripod, (you’ll need this for the first couple of hours, but then you’ll be carrying it, hence it should be light)

    11. Get yourself acquainted with your camera

    This may seem a bit obvious but it is something most people don’t do; know your camera. Lack of camera knowledge can turn a simple shoot into a difficult one (especially in the dark)! Know what all those buttons do, some may make your life easier.

    Does that give you some ideas for photographing your city at dawn? Or perhaps getting up early on the next trip? Share your comments below please.

    BIO
    Photographer Anthony Epes is currently publishing a series of photo books on Cities at Dawn, with instalments on London, Paris, Venice, New York and Istanbul. Inspired by his books Anthony runs photo workshops at dawn in some of the world’s most interesting and beautiful cities. His work has been featured on BBC World, French Photo Magazine, The Economist, Hyperallergic and CNN. He blogs about photography on his website.

    SOCIAL MEDIA
    • https://plus.google.com/u/0/+AnthonyEpes/posts

    Twitter
    • https://www.facebook.com/londonatdawn
    • https://www.flickr.com/people/anthonyepes/
    • https://www.linkedin.com/in/anthonyepes

    googletag.cmd.push(function() {
    tablet_slots.push( googletag.defineSlot( “/1005424/_dPSv4_tab-all-article-bottom_(300×250)”, [300, 250], “pb-ad-78623” ).addService( googletag.pubads() ) ); } );

    googletag.cmd.push(function() {
    mobile_slots.push( googletag.defineSlot( “/1005424/_dPSv4_mob-all-article-bottom_(300×250)”, [300, 250], “pb-ad-78158” ).addService( googletag.pubads() ) ); } );

    The post 11 Tips for Creating Stunning Photographs of Cities at Dawn by Anthony Epes appeared first on Digital Photography School.


    Digital Photography School

  • Handiwork: How to Pose Hands

    “Never neglect the little things. Never skimp on that extra effort, that additional few minutes, that soft word of praise or thanks, that delivery of the very best that you can do. It does not matter what others think, it is of prime importance, however, what you think about you. You can never do your best, which should always be your trademark, if you are cutting corners and shirking responsibilities. You are special. Act it. Never neglect the little things.” – Og Mandino

    All images copyright Gina Milicia

    Hands main

    What to do with your model’s hands is the one thing most photographers and their models get flustered with. Hands can feel like the leftovers of a pose but giving your models relaxed and natural looking hand poses is going to make your portraits look really polished. In fact, skillful hand placement is one of the abilities that separate an experienced photographer from a beginner.

    How to pose hands

    I can remember, back in my assisting days, we used to hire professional hand models to hold objects for advertising shots. Their hands were truly beautiful with long elegant fingers and perfect soft flawless skin that made everything they held look really expensive.

    Sadly, not everyone you photograph will be born with these kinds of hands so here are a few things to keep in mind when photographing hands.

    1. Clean nails are a must. I always ask my models to at the very least have clean nails and clear nail polish for women.
    2. If your model is wearing makeup on their face, remember to add a bit of bronzer to hands, as nothing looks worse than hands that are three shades lighter or darker than rest of body or face.
    3. Watch out for clenched hands, which is a common instinct to help with nerves but it doesn’t photograph well!

    Hands 002

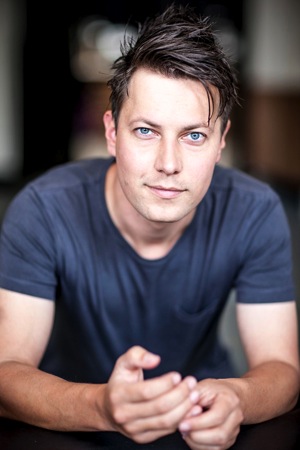
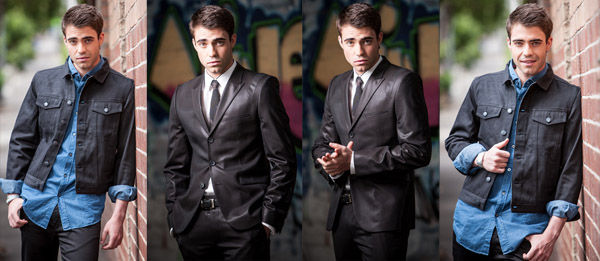
    Model Credit: Jonathan Newton. A great hand pose for men is to hold their hands as if they are holding a pen or to ask them to pretend they are twirling a ring on their little finger.

    Hands 003

    Business Chicks Ceo, Emma Isaacs, Arms crossed in front of a female model looks more elegant but make sure you balance the shot with both hands showing to give the body language a more open feel. Get your model to only lightly touch their arms when they are crossed.

    Hands 005

    Model Credit: The Cast of Fat Tony/image courtesy Nine Network Australia

    Giving your model something to do with their hands helps create a natural looking pose. Putting hands in pockets, doing up buttons or rubbing hands together can all create a natural pose for hands.

    Hands hair

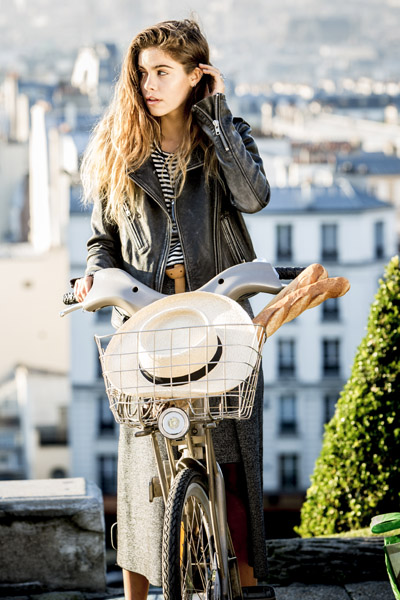
    Model Credit_ Mimi Elashiry on location, Sacre Coeur , Paris. Playing with strands of hair or running hands through hair. This works for male and female models.

    Hands HIPS

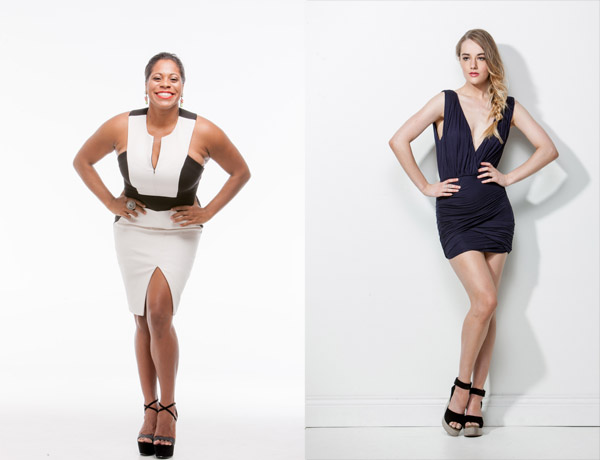
    Model Credit Shareena Clanton/Foxtel ( left) Piperlane (right). For female models, placing their hands on their hips can create an optical illusion of a smaller waist.

    Hands chin

    Model Credit Rachael Lever

    Hands chin2

    Model Credit Shareena Clanton/Foxtel

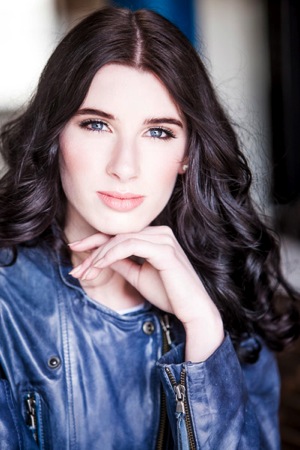
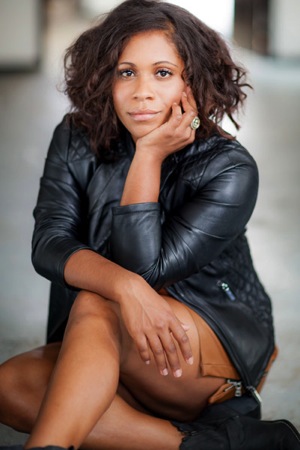
    When asking models to rest their hands on their face or their bodies, ensure they are only lightly touching with their hands so they don’t distort the face or body. Hands look best when they are photographed side-on as it reduces their size.

    Hands 004

    Hands 007

    Model credit: Lester Ellis/Nine Network Australia

    This “soccer goalie” pose is a classic “go to” pose for most men when they are not given any direction. This is a sign that they are feeling vulnerable and insecure and, thus protecting their masculinity. There are many alternatives to the soccer goalie pose. Try asking your model to place hands in pockets, hanging them from belt hoops, or pretending to adjust an item of clothing.

    Group White

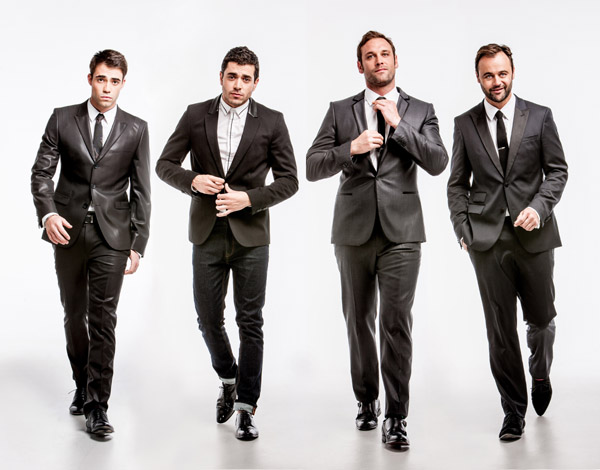
    When posing groups, I like to ask each of my models to do something different with their hands because I think it makes the portrait look more dynamic.

    What are your techniques for posing natural looking hands? If there is anything I may have missed? I’d love to hear from you.

    googletag.cmd.push(function() {
    tablet_slots.push( googletag.defineSlot( “/1005424/_dPSv4_tab-all-article-bottom_(300×250)”, [300, 250], “pb-ad-78623” ).addService( googletag.pubads() ) ); } );

    googletag.cmd.push(function() {
    mobile_slots.push( googletag.defineSlot( “/1005424/_dPSv4_mob-all-article-bottom_(300×250)”, [300, 250], “pb-ad-78158” ).addService( googletag.pubads() ) ); } );

    The post Handiwork: How to Pose Hands by Gina Milicia appeared first on Digital Photography School.

    Digital Photography School