Category: Photography

  • Getting Started with Off-Camera Flash

    Does the thought of attempting off-camera flash sound intimidating? If so, you’re not alone! Many photographers gravitate toward natural light or simple flash setups when tackling photo projects, but the truth is that mastering off-camera flash is one way to really make your work stand out from the rest. Best of all, it isn’t as complicated as it might seem. For this demonstration, forget about strobes, soft boxes, beauty dishes, umbrellas, and all of those gadgets. We’re going very basic with a simple speedlight – no light modifiers needed!

    Basic off camera flash product photography

    Basic Off-Camera Flash Equipment

    To get started with off-camera flash, you need a lighting source. Arguably the most portable and convenient flash is a speedlight. When choosing a speedlight, be sure to consider features such as an articulating head that allows you to angle the direction of your flash, and connection ports for external battery packs and pc sync cables. Most flashes require four AA batteries to function and the power of the flash can suck up batteries really quickly; ports to external battery packs offer options to keep the flash powered longer and reduce recycling times. The pc sync port is also important as many trigger options will require this to connect your camera to the flash. Be sure that your flash includes these aforementioned ports. My Canon 430 EXII backup flash, while cheaper and smaller than the 580 EXII, fails in this sense since it lacks the battery port AND pc sync port.

    Next, you need a way to sync the flash with the camera. The easiest way to do this is by using an inexpensive sync cord, although depending on your flash and camera models, you may need to purchase adapters such as the universal translator. Another more expensive, yet arguably more convenient option, is to use wireless flash transceivers. PocketWizard is probably the most well known in this department. One transceiver connects to your camera via the hot shoe mount and another connects to your speedlights via the pc sync port. These triggers are very dependable and durable, but they are pricey, costing as much as $ 149 each for the newest PocketWizard Plus III models.

    For those on a budget, there are many cheaper, and just as high quality, transceivers out there. While I’ve been using PocketWizards for a couple of years, I recently invested in four Yongnuo RF-603 II wireless transceivers. Costing just $ 31 for two triggers, they connect to both the camera AND the speedlight via the hot shoe mount; this makes it much easier to sync flashes without the pc sync port, such as the cheaper 430 EXII. As an added bonus, the Yongnuo transceivers can also double as remote triggers by activating the shutter on your camera. If you’re on a budget or just getting started with flash, the Yongnuo transceivers are a great low-cost investment.

    The final piece of gear that you should have is a light stand to support your speedlight. Light stands are lightweight and pretty cheap, but you’ll want to make sure that they include an adapter to hold your flash.

    Off-Camera Flash in Action

    The following demonstration uses the basic tools mentioned above – a Canon 6D, 580 EXII flash, two PocketWizard Plus III transceivers, and a light stand with a swivel umbrella adapter. The photography subject is a wooden sculpture procured during a vacation in Mexico, sitting on a bamboo mat, with a colorful quilt as a background. The bare flash with no modifier is situated camera left, and there is some natural window light coming from camera right.
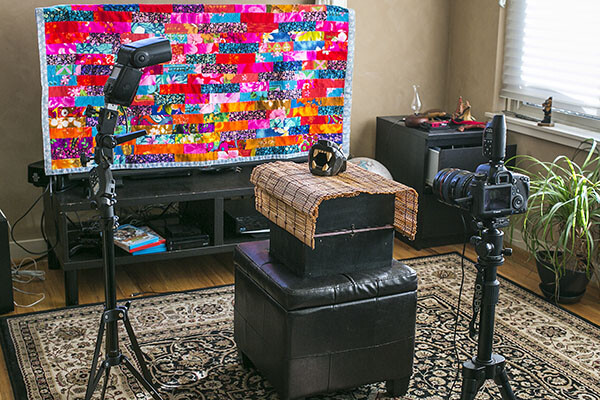
    Off Camera Flash setup

    With the camera set at 1/160 for shutter speed, f/2.8 aperture and ISO 250, the natural light shot as seen below isn’t half bad, but the left side of the product is a bit shadowed.

    Basic off camera flash product photography

    Enter the speedlight! If you aren’t familiar with a speedlight, all of the buttons and controls on the back can look intimidating, but the first button to be familiar with (besides the “on” switch) is the “Mode” button. This is what you hit to get from ETTL (automatic) to M (Manual) to Multi (for firing repeated flashes during a single long exposure). Leaving the flash on ETTL is fine when the flash is connected to your camera’s hot shoe mount, but it can produce disastrous, blown-out photos when the flash is moved off-camera. I won’t waste a photo showing you the result, but the resulting image is completely blown out and unsalvageable.

    In order to adjust the off-camera flash’s output to better sync with your camera settings, it’s time to switch the flash onto Manual mode. Simply press the Mode button until M shows up on the flash LCD. Then, start playing around with the flash’s output. On the bottom portion of the flash, press the middle button that reads SEL/SET that is surrounded by the Select Dial. Numbered fractions will appear blinking in the LCD. Turn the Select Dial clockwise to change the numbers, going from 1/1 down as far as 1/128. The result below is shot at the same camera settings, but the off-camera flash firing at camera left at 1/16 power. The resulting image below is still blown out, but not nearly as bad as when the flash fires on ETTL mode.

    Basic off camera flash product photography

    Flash power set at 1/16


    To continue balancing out the overpowering flash, dial the power down to 1/64. The result is much more balanced.

    Basic off camera flash product photography

    Flash power set at 1/64


    Take the flash power down even lower to 1/128, and the photo subject is a bit more shadowy, adding more edge to it and really separating it from the background.

    Basic off camera flash product photography

    Flash power set to 1/128


    This is just the start to experimenting with off-camera flash; many other variables such as camera settings, modifiers, and multiple light sources can produce similar and superior effects. However, the first thing to realize is how dramatic effects can be by just playing around with a single speedlight flash and its the manual settings.

    googletag.cmd.push(function() {
    tablet_slots.push( googletag.defineSlot( “/1005424/_dPSv4_tab-all-article-bottom_(300×250)”, [300, 250], “pb-ad-78623” ).addService( googletag.pubads() ) ); } );

    googletag.cmd.push(function() {
    mobile_slots.push( googletag.defineSlot( “/1005424/_dPSv4_mob-all-article-bottom_(300×250)”, [300, 250], “pb-ad-78158” ).addService( googletag.pubads() ) ); } );

    The post Getting Started with Off-Camera Flash by Suzi Pratt appeared first on Digital Photography School.
    Digital Photography School

  • How to Control Aperture and Create Images You Love

    This article is sponsored by the New York Institute of Photography. NYIP offers high-quality online photography courses that are affordable, convenient, and accredited.

    1 aperture

    Controlling the aperture is one of the most powerful ways to improve your images. It’s also the topic that continues to perplex photography students everywhere. Rather than unnecessarily complicating matters, I prefer to demystify the subject. In this tutorial, I’ll reveal how both a wide and small aperture can be used to create consistent and beautiful results.

    Consider the Background

    2 butterfly

    When I’m about to take a photo, the first question I ask myself is, “What kind of background would be best?” With wildlife, sports, portraits, and still-life objects, I often want the subject sharp, and the background to be a soft blur. As you’ll see in the example above, the blurred background allows the viewer to focus on the beautiful details of the butterfly, not on the leaves behind it. To do this, I chose a wide aperture by adjusting to a smaller f-number. At f/5.6 the opening in your lens is physically wide open, creating what’s known as shallow depth of field.

    3 puffin

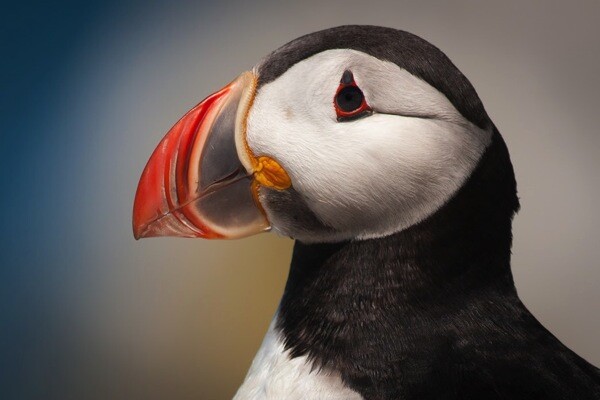
    In the example above, I photographed an Atlantic Puffin at f/5.6. The bird is tack sharp while the foliage in the distance is very soft. The theme of the photo is clearly about its colorful beak, and there is little else in the photo to detract from it. For this reason, wildlife photographers typically use wide apertures for the majority of their work. To further emphasize the effect, try positioning yourself so there is distance between the subject and the background.

    Freezing action

    4 soccer

    If you flip through the pages of Sports Illustrated, you’ll notice how most of the players are sharp while the fans are out of focus. The wide aperture chosen by the photographer not only creates that shallow depth of field, but it also lets a great deal of light into the camera. As such, it’s possible to use a fast shutter speed to freeze the action. If you are serious about sports photography, a lens that opens all the way to f/2.8 is worth the investment. You may even hear people refer to them as “fast lenses” which describes the speed in which the wide aperture lets light into the camera.

    Focus on what’s important

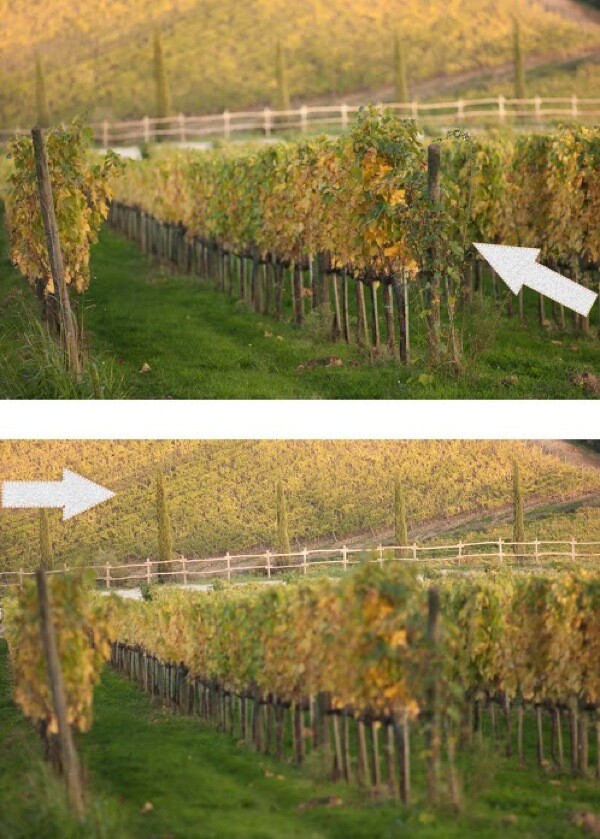
    Before going any further, allow me to spend a moment on focus. When using a wide aperture, be sure to place your active focus points on the subject you want sharpest. These two vineyard photographs were both taken with the same wide aperture of f/1.8, but they look very different. This is due to my placement of the focus point indicated here by the arrows. For the image on top, I focused on the vines closest to me. As a result, everything behind it is soft. For the image on the bottom, I focused on the distant vines. The shallow depth of field then works to blur everything in front of the focus point.

    5 focus example

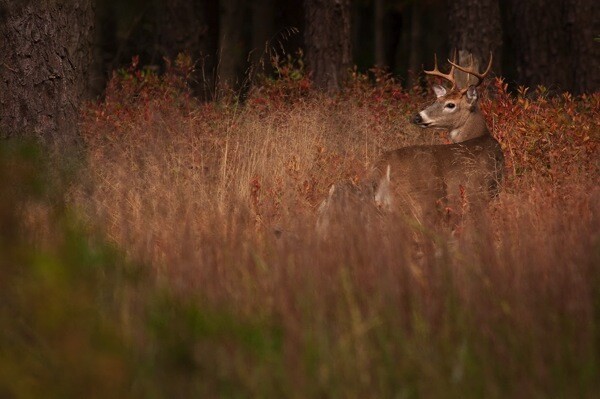
    We can see how all of this comes together in the image of the male buck. I saw the large deer in October just after sunrise. With my active focus point on his face, I knew the deer would be sharp. A wide aperture of f/5.6 created a shallow depth of field. Not only was the background blurred, but the tall reeds in the foreground as well. The perspective makes it seem as if we’re spying on the creature through the tall grasses.

    6 buck

    As you can see, a wide aperture can help you create images that surpass routine snapshots. With this new knowledge, you’ll start to recognize the techniques other photographers have used in their photographs. Begin practicing with wide apertures and you’ll soon be changing settings like a pro. Now, let’s turn our attention to small apertures.

    Small apertures

    7 castle

    There’s a common misconception amongst photography students who believe sharp photos are solely result of fast shutter speeds. While that is part of the equation, the other equally important consideration is the aperture. By achieving greater depth of field, it’s possible to keep the entire subject in focus. In this second portion of our aperture tutorial, I’m going to share the specific f-stops and techniques used to create tack sharp images.

    8 aperture opening

    Don’t let the terminology trick you. The term “small aperture” refers to the physical size of the lens opening. This may seem counterintuitive since the actual f-number is larger. Yet, f/22 is a smaller aperture than f/16 because the aperture blades inside the lens don’t open as wide. See the example above.

    9 empire state

    When you hear photographers say they are “stopping down”, it means they are using a narrower aperture opening, for example going from f/8 to f/11, or from f/11 to f/16. This renders everything sharp from near-to-far, hence the phrase “great depth of field”. I’ve created a phrase to help you remember this. “The greater the f-stop number, the greater the depth of field.”

    10 brooklyn bridge

    Great depth of field is also useful when you’re photographing flowers or close-up objects. If the aperture is too wide like f/2.8, only a handful of the petals will be sharp. The solution doesn’t necessarily have to be f/22 which is more suitable for a vast landscape; a better compromise would be f/8 which provides enough depth of field for most macro opportunities. Then, by simply focusing on the center of the flower, the entire subject remains reasonably sharp.

    11 dahlia

    In a big sweeping landscape, it can be tricky to determine where to focus. For me, apps that calculate precisely where to focus are just not practical (or fun). To further emphasize the effect of the small aperture, I have found a simple solution that really works. Place your focus point on an object that’s 1/3rd of the way up from the bottom of the frame and use a small aperture like f/22. Not only will the object in the bottom third be sharp, but so will everything in front of, and behind it. As an example, I focused on the large boulder towards the bottom of the frame in this photo from Yosemite National Park.

    12 yosemite

    Where the tripod comes in

    While f/22 may be an ideal setting for a landscape, it does present photographers with a challenge especially in low light situations. Since a small aperture doesn’t let much light into the narrow opening of the lens, a slower shutter speed and/or higher ISO become necessary to achieve a good exposure. These longer exposure times are the primary reason most landscape photographers use tripods.

    13 central park

    Bonus tip

    If carrying a tripod is not possible, you can create a makeshift camera support by placing the camera on a bag, a wall, even the ground. Then, to avoid jostling the camera during the exposure, set the two second timer to automatically trip the shutter.

    14 jefferson

    This article is sponsored by the New York Institute of Photography. NYIP offers high-quality online photography courses that are affordable, convenient, and accredited.

    googletag.cmd.push(function() {
    tablet_slots.push( googletag.defineSlot( “/1005424/_dPSv4_tab-all-article-bottom_(300×250)”, [300, 250], “pb-ad-78623” ).addService( googletag.pubads() ) ); } );

    googletag.cmd.push(function() {
    mobile_slots.push( googletag.defineSlot( “/1005424/_dPSv4_mob-all-article-bottom_(300×250)”, [300, 250], “pb-ad-78158” ).addService( googletag.pubads() ) ); } );

    The post How to Control Aperture and Create Images You Love by Chris Corradino appeared first on Digital Photography School.


    Digital Photography School

  • Valentine’s Day Photography Tips for Your Inspiration

    Ahhh, Love. It can be giddy, maddening, complacent, jealous, warm and gooey, and downright crazy, usually all in the same day. And the weirdest day for love? Valentine’s Day, The Amateur Night red headed step child of New Years Eve, but instead of drinking too much and waking up pantsless while in a pool of your own vomit, you’re forced Continue Reading

    The post Valentine’s Day Photography Tips for Your Inspiration appeared first on Photodoto.


    Photodoto

  • Wide and Telephoto Lenses – What is the Difference?

    In this Adorama TV video Joe McNally goes over some of the key differences between wide angle and long or telephoto lenses.

    The lenses Joe mentioned in the video:

    • Nikon 20mm f/1.8
    • Nikon 200-400mm f/4
    • 600mm f/4

    Of course there are Canon and other brand equivalents also.

    Other dPS articles about lenses:

    • Writer’s Favorite Lens – the Canon 40mm Pancake Lens
    • Going Wide With the Tokina 11-16mm f/2.8
    • Lens Review Canon 300mm f4 Lens for Sports Photography
    • Lens Review Tamron SP 150-600mm f/5-6.3 Di VC USD

    googletag.cmd.push(function() {
    tablet_slots.push( googletag.defineSlot( “/1005424/_dPSv4_tab-all-article-bottom_(300×250)”, [300, 250], “pb-ad-78623” ).addService( googletag.pubads() ) ); } );

    googletag.cmd.push(function() {
    mobile_slots.push( googletag.defineSlot( “/1005424/_dPSv4_mob-all-article-bottom_(300×250)”, [300, 250], “pb-ad-78158” ).addService( googletag.pubads() ) ); } );

    The post Wide and Telephoto Lenses – What is the Difference? by Darlene Hildebrandt appeared first on Digital Photography School.

    Digital Photography School

  • 5 Tech Trends Photographers Should Know (Report from CES 2015)

    SamsungTomorrow

    By SamsungTomorrow

    The dust has settled on the Consumer Electronics Show of 2015, but with the thousands of new tech products hitting headlines this January, what trends, exactly, should photographers be taking note of? Amid the 4K TVs, wearable technology and unusual inventions, the photography industry welcomed a few new announcements in cameras, lenses, drones, data storage and printing. Here’s what technology is headed to the imagining world in 2015.

    Cameras

    Cameras were admittedly, a disappointment at this year’s CES. There were a handful of compacts and extended zooms from Canon and Panasonic, but only two cameras advanced enough to interest enthusiasts and serious photographers.

    Nikon5500b


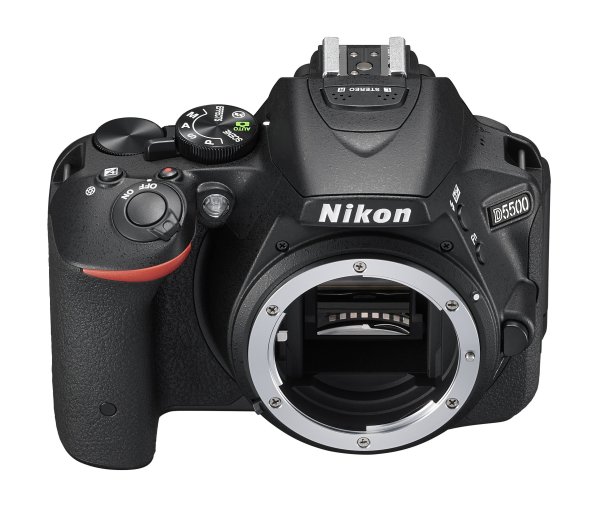
    The most exciting CES camera announcement comes from Nikon, as an update to their mid-range APS-C camera. The Nikon D5500 replaces the D5300 as the camera giant’s middle option out of three entry level models. While the tech guiding the image quality remains largely unchanged, the D5500 is the first DSLR to feature a touchscreen. The D5500 also continues the trend of smaller camera bodies, shrinking the size gap between DSLRs and mirrorless cameras.

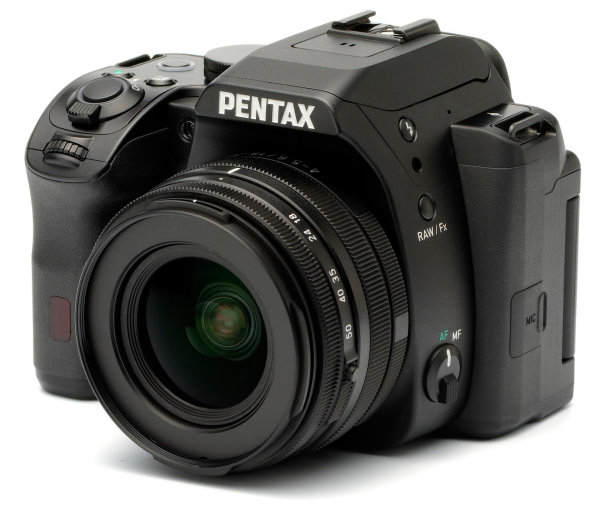
    Pentax also announced a DSLR, but hasn’t yet released the name or full technical specs. It does look to be the replacement for the K-50 and appears to have an APS-C sensor, but with only a handful of details, it’s hard to say where the new camera fits in.

    Lenses

    While cameras are getting smaller, lenses are following that same trend. Out of Pentax’s three new lens announcements, the most notable is actually the 18-50mm kit lens, because it is collapsable. When collapsed, it appears to be as small as a prime lens. While collapsable lenses have been around for some mirrorless cameras, it’s a refreshing update to bulkier DSLR lenses.

    new_pentax_camera


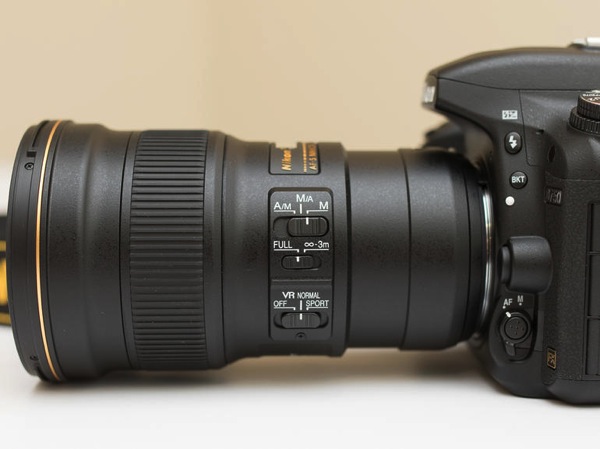
    Nikon is following the smaller-is-best trend as well, with a 300mm that they say is the lightest full frame fixed focal length AF lens. They don’t appear to be sacrificing features to get down to the smaller size either, offering 4.5 stops of image stabilization, ED glass, and electromagnetic aperture control. Technology called Phase Fresnel helps keep the size down while fighting distortion.

    Nikon 300mm f4

    Drones

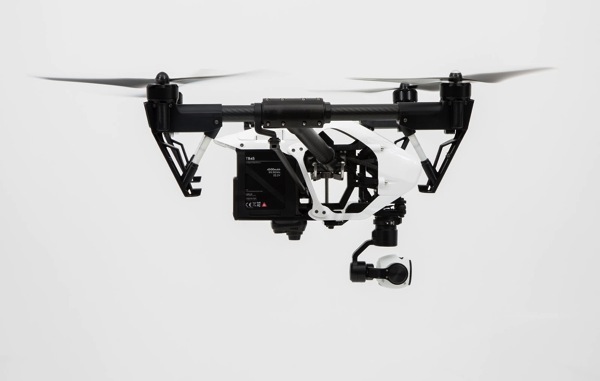
    2015 could be described as the year of the drone, at least for CES anyways. Several dozen new models were on display with a variety of different features. Some models include a built-in camera, including one capable of shooting 4K video or 12 megapixel RAW, the DJI Inspire 1, while others allow you to rig any camera and lens mount. The new Airdog follows you (or whoever is wearing the wristband) around automatically taking video. While most use a remote, the Hexo+ is controlled completely via smartphone app. More are also becoming capable of ariel stunts, though these models have yet to see a battery life long enough to make them practical.

    DJI Inspire 1

    One thing is for sure, soon there will be a drone on the market to fit nearly any ariel photography need, and the more widely available the technology becomes, the more affordable it will be as well.

    Memory

    While storing images isn’t exactly exciting, CES 2015 brought more than a few image storage solutions worth noting. Samsung and Seagate both introduced remarkably small external hard drives, though a few stand out as advancing beyond just big capacity in a tiny size.

    Canon has finally given a name and full details to the system they’ve been hinting at since 2010, now known as the Canon Connect Station CS100. Using wi-fi to connect to phones and wi-fi enabled cameras wirelessly, images and video can be easily uploaded to the system. The CS100 is designed to be used with a TV to display family photos and videos, like a Roku box but for photos. The 1TB of storage won’t be enough for serious professionals, but it’s worth watching to see how the technology expands in the future.

    Canon connect station

    Toshiba also introduced a new form of memory cards. While they appear to be more gimmicky than actually useful, it’s an interesting change and indicates some potentially interesting advancements in the future. The cards can be read with a NFC-enabled Android smartphone, but it only allows you to see 16 thumbnails and how much space is available. Actually transferring photos would require adding a power source to the card, and NFC doesn’t have the bandwidth for that kind of transfer yet. Still, seeing the advancements offers an interesting glimpse into what might be possible a few years down the road.

    Printing

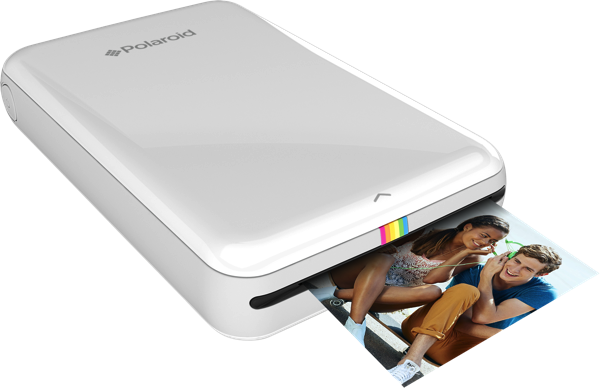
    While Polaroid certainly may not seem like a company making big CES digital photography announcements, their Zip Mobile Printer is worth taking a look.

    Zip mobile printer

    Printing 2×3 images wirelessly from any smartphone or tablet, the Polaroid Zip is keeping in tune with the manufacturer’s foundation on instant, easily-shared physical images. But perhaps even more interesting is that the printer doesn’t use ink. Developed by Zink, the photo paper is made with embedded dye crystals. Heat from the printer determines which colors are activated to make the print, which is smudge-proof. The entire printer is about the size of a smartphone.

    While designed for smartphone use, it’s worth noting and perhaps wondering if something similar might be in store in upcoming years for use with wi-fi enabled DSLRs and mirrorless cameras. The images print in under a minute, without the need for ink – an advanced version could come in handy for event photographers or photo booth style applications.

    If this year’s CES is any indication, cameras and lenses will continue to get smaller without sacrificing on image quality, while accessories continue to expand in unusual ways. From drones to wirelessly printing images without ink, it’s bound to be an interesting year for photography-related tech.

    googletag.cmd.push(function() {
    tablet_slots.push( googletag.defineSlot( “/1005424/_dPSv4_tab-all-article-bottom_(300×250)”, [300, 250], “pb-ad-78623” ).addService( googletag.pubads() ) ); } );

    googletag.cmd.push(function() {
    mobile_slots.push( googletag.defineSlot( “/1005424/_dPSv4_mob-all-article-bottom_(300×250)”, [300, 250], “pb-ad-78158” ).addService( googletag.pubads() ) ); } );

    The post 5 Tech Trends Photographers Should Know (Report from CES 2015) by Hillary Grigonis appeared first on Digital Photography School.

    Digital Photography School

  • How to Form a Band of Cheerleaders for Your Photography Business

    Let’s take a walk down memory lane with the song “One” written by Harry Nilsson. It was made famous by Three Dog Night in the late 1960’s. The song is particularly renowned for it’s opening line :

    “One is the loneliest number that you’ll ever do.
    Two can be as bad as one.
    It’s the loneliest number since the number one.”

    I believe there is a lot to be learned from this song. The core message being, don’t go through your life without any social interaction. I am not taking about your Facebook fans or your Instagram followers, but of the actual social connections you make among the people you interact with on a daily and weekly basis. As humans we all crave connections and contact with others. Sad as it may seem, we photographers, in general, are introverts. For the most part, we love to hide behind the camera – one eye looking through the viewfinder and the other closed to the outside world. It can certainly get very lonely and depressing.

    We all know and understand the value of friends and co-workers. However, often times we tend to only gravitate towards like-minded people or those in the same profession. I am not undervaluing the importance of having friends in the industry. Personally, I have a select group of fellow photographers whose opinion I really value, appreciate, and am honored to call my friends. Some are local to me while others are through an online community – we not only talk shop but also talk about our families, our kids, and even send holiday cards to each other . But I find it mentally stimulating when I interact with people from many other professions – either related to my genre of photography (weddings and family portraits) or of a completely different field. Trust me, they all are invaluable in your growth as an artist and as a professional.

    Here are some tips on how to form your own sphere of influencers and well-wishers for your own personal and professional growth. Some of these tips may seems very technical or business-school like, but are actually very simple to follow and implement for your photography business.

    #1 Conduct a social network analysis

    As per Wikipedia, Social Network Analysis is the study of network theory in a social analysis. Quite simply, network theory is the study of connectivity among different entities. In a social scenario, it is the mapping of “Who do you know?” also known as, “Who are your friends?” and “Who are your friends’ friends?”. Social media platforms like Facebook and LinkedIn actually have the underlining structure built already. When you friend someone, you can immediately see if you have any common friends or business acquaintances. Use your social media accounts as a starting point and map out who you know, and who those people know. Go as deep and wide as you can without getting confused or lost!

    Kenneth Freeman

    By Kenneth Freeman

    #2 Narrow down your sphere of influencers

    Once you have documented your social network analysis, narrowing your sphere of influencers is fairly easy to do. Look to your key friends, well-wishers and family as a starting point. Are there some people who are more invested in you than others? Distinguish those in some way. Are there people who are in the same field as you? What about completely different areas of expertise?

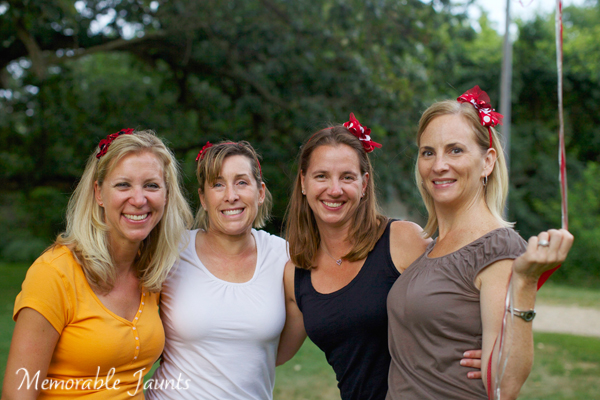
    As a photographer, I love colors. A tip that works for me is to color coordinate the different groups. Warm colors like red/orange are people who are in my immediate circle (my core circle of trust). Cool colors like blue/green are people who are important but not as much as my sphere of direct influencers. Neutral colors like brown/peach are acquaintances. Also find a way to distinguish between local connections and online connections. Another tip is to keep your photography and business goals in mind while analyzing your network. This could help you focus on connections and contacts that could help you achieve your specific goals.

    Memorable Jaunts DPS Article How to form your band of wellwishers 02

    #3 Invest in meaningful engagement

    Now that you have completed the technical part, take the time to engage on an emotional level. Connect with people with genuine intent. Take time to get to know the people you want to connect with. Find commonalities – either common interests, or common friends. Ask your friends to provide an introduction.

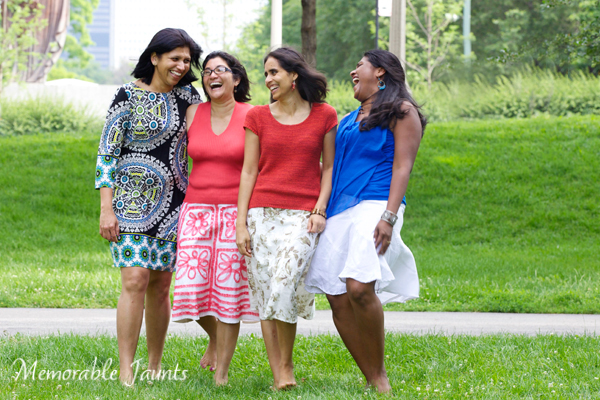
    I cannot tell you the amount of times I have gotten a random friend request from someone – with or without mutual friends. If I don’t know you at all, chances are I am not going to respond. However if you send me an email, introduce yourself and let me know a bit about you and what exactly you want from the reach out, I am more likely to send a response back. Give me a reason to want to connect with you.

    Memorable Jaunts DPS Article How to form your band of wellwishers

    #4 Work out a mutually beneficial arrangement

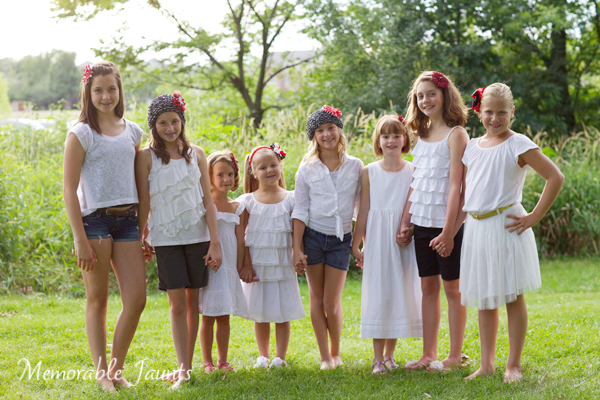
    Among the connections you make, some will be social, while others will be purely business and professional. That’s perfectly okay. You cannot be friends with the whole world, but you can certainly be cordial and pleasant with everyone you meet. When you are interacting with a vendor or a business peer, keep it professional and ensure that it is a mutually beneficial agreement. If you are reaching out to a small clothing boutique to do a styled shoot, ensure that you provide them with images from the shoot that they can use to promote their work. If you are asking acquaintances to model for you, provide them with images that they can use however they see fit. My personal rule is to provide watermark-free images, but to ask for image credit when they post the images online.

    Memorable Jaunts DPS Article How to form your band of wellwishers 01

    Invest in a core group of friends and wellwishers

     #5 Give more than you receive

    This one ties in with #4. Don’t forget to thank people for their time and effort – either for promoting you or for helping you in some way. Just because the job is done, does not mean you forget about them and move on. Keep in touch and keep the connection strong. You never know when you may need to reach out to them again. Make sure that your cheerleaders remain your advocates for a long time.

    I know what you are thinking. Shouldn’t something like friendships and relationships come from the heart? Does it really need to be plotted and mapped like a cross-country road trip? There really are a lot of benefits to doing just that. We all know that time is limited, and often time is more valuable than money itself. So, why not use that time wisely? When you are strapped for time, engage in relationships that bring the most value. I am not equating value with money or business. Value is a very personal choice and decision, and can mean whatever you choose to matter most to you – true connections, selfless relationships and/or business transactions.

    How do you build your team of cheerleaders? Please share in the comments below.

    googletag.cmd.push(function() {
    tablet_slots.push( googletag.defineSlot( “/1005424/_dPSv4_tab-all-article-bottom_(300×250)”, [300, 250], “pb-ad-78623” ).addService( googletag.pubads() ) ); } );

    googletag.cmd.push(function() {
    mobile_slots.push( googletag.defineSlot( “/1005424/_dPSv4_mob-all-article-bottom_(300×250)”, [300, 250], “pb-ad-78158” ).addService( googletag.pubads() ) ); } );

    The post How to Form a Band of Cheerleaders for Your Photography Business by Karthika Gupta appeared first on Digital Photography School.


    Digital Photography School

  • How to Create a Simple Blurb Photo Book in Lightroom

    How to create a simple photo book in Lightroom

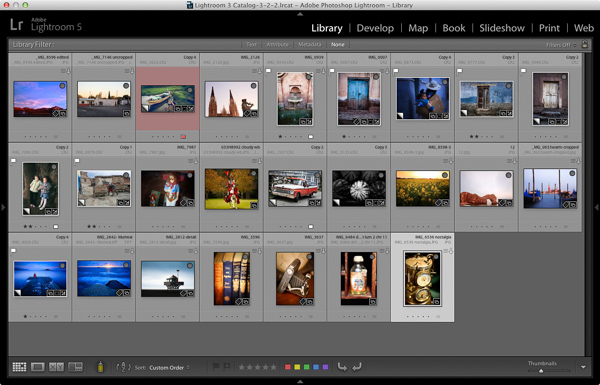
    The easiest way to get started with Lightroom’s Book module is to create a simple photo book, letting Lightroom do most of the work for you so you don’t get bogged down in the extensive design process involved in making a more complex book.

    Things to do before you start

    You will make the book design process much easier by doing, or at least thinking about, the following things before you start:

    • Select which photos you’re going to include. Or at least narrow it down as much as you can. You might change your mind many times as you work on the design. Organize them in a Collection.
    • Arrange the photos in the approximate order they will appear in the photo book by clicking and dragging. You can do this in the Filmstrip in the Book module, but it is much easier to do it in Grid View in the Library module. It helps if you have created a Collection containing the photos you wish to include in the photo book. Again, this doesn’t need to be precise as you will probably change your mind as you work your way through the design process.

    How to create a simple photo book in Lightroom

    • Choose photos for the front and back covers. The cover photo is the first one in the Collection, the back cover photo is the last. You can change your mind later if you need to.
    • Process your files, if required. Naturally, you have probably already processed the photos you would like to include in your book, but are the photos processed in a consistent way? For example, if you are creating a book containing toned black and white photos have they all been toned the same colour, or are they different? It might be better for the book if they are all toned the same colour. If your photos need processing, it may be helpful to make Virtual Copies, so the originals are unaffected by the changes.
    • Pick which Blurb photo book size to use. There are five to choose from: small square, standard portrait, standard landscape, large landscape and large square. Sizes and prices of Blurb books are outlined on Blurb’s website.
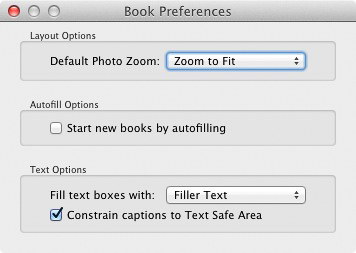
    • Go to Book Preferences, which are found under the Book menu in the Book module (you can’t open them from any other module). Set Default Photo Zoom to Zoom to Fit and leave the Start new books by autofilling box unchecked. The other settings don’t matter for simple photo books.

    How to create a simple photo book in Lightroom

    Creating a simple photo book

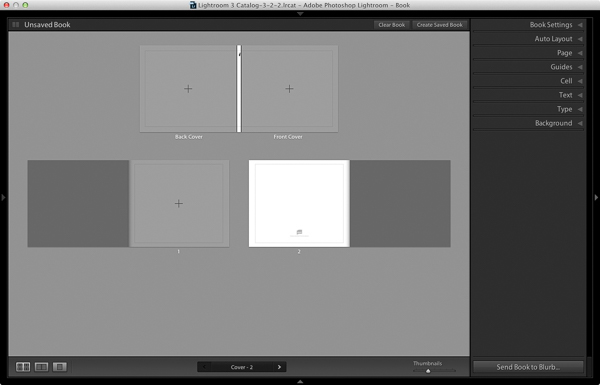
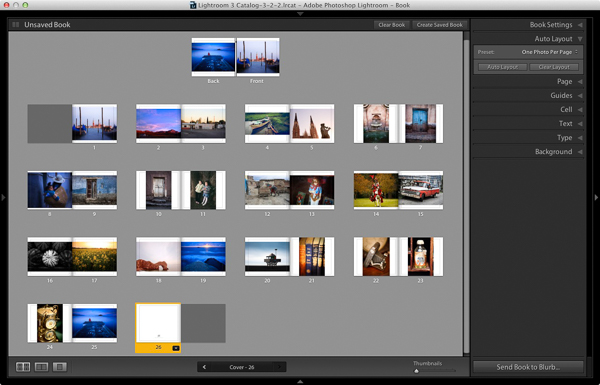
    Go to the Book module. If you set your Book Preferences as recommended above, you will see something like this.

    How to create a simple photo book in Lightroom

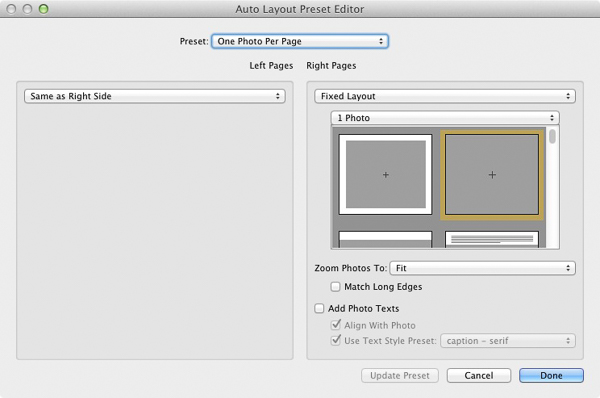
    Regardless of what you see on screen, start by clicking the Clear Book button at the top of the Content window. Then go to the Auto Layout panel, set the Preset to One Photo Per Page and use the drop down menu accessed by the double arrow icon to select Edit Auto Layout Preset. The Auto Layout Preset Editor window opens (below). Look for the Zoom Photos To setting and set it to Fit (if it isn’t there already). Click the Done button at the bottom of the window.

    How to create a simple photo book in Lightroom

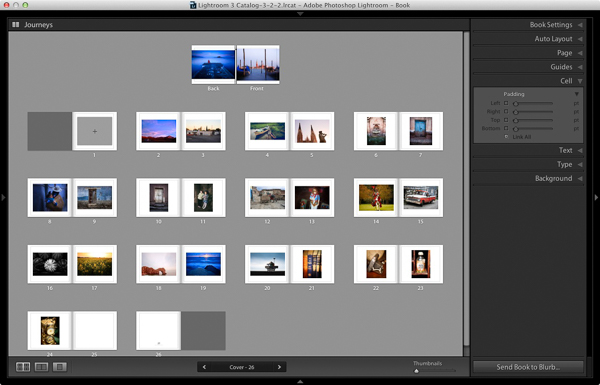
    Click the Auto Layout button in the Auto Layout panel. Lightroom creates the book for you. It will look something like this, depending on the number of photos in your book.

    How to create a simple photo book in Lightroom

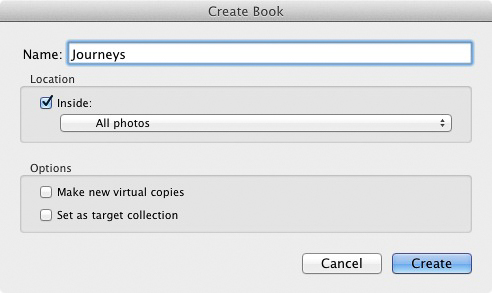
    At this stage you will see the words Unsaved Book in the top-left corner. They indicate that the current book layout hasn’t been saved. Click the Create Saved Book button. This prompts Lightroom to open the Create Book window and create a Book Collection – a specialized type of Collection containing photos used in a photo book.

    Give the book a name and select a Collection Set to store it in. Click the Create button. Lightroom duplicates the current Collection and turns it into the new Book Collection. It is displayed in the Collections panel with a book icon to differentiate it from other Collections. The name of the Book Collection is also displayed in the top-left corner of the Book module. Lightroom updates the Book Collection every time you make a change, so you can come back to it at any time without losing your work.

    How to create a simple photo book in Lightroom

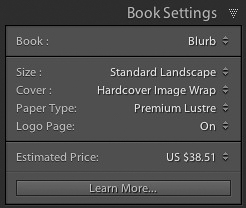
    Go to the Book Settings panel and select the Size of the book and the type of Cover you’d like (I chose Standard Landscape with Hardcover Image Wrap for this example). It’s important to decide now which you want, as it may affect the layout if you change them later.

    Lightroom displays the estimated price of the photo book at the bottom of the panel (click the double arrow icon to the right of the price to see it in a different currency). The figure changes according to the size of the book, the number of pages in it, and the Paper Type (there is more information about paper types on Blurb’s website.

    You can save money by including the Blurb logo page – an extra page at the back of the book with Blurb’s logo. Doing so gives you a discount, but adds an extra page to the layout.

    http://www.blurb.com/proline

    The first and last photos in the Book Collection are used as covers, but Auto Layout also adds them as the first and last photos in the book. If you don’t want them in those positions then you need to remove them.

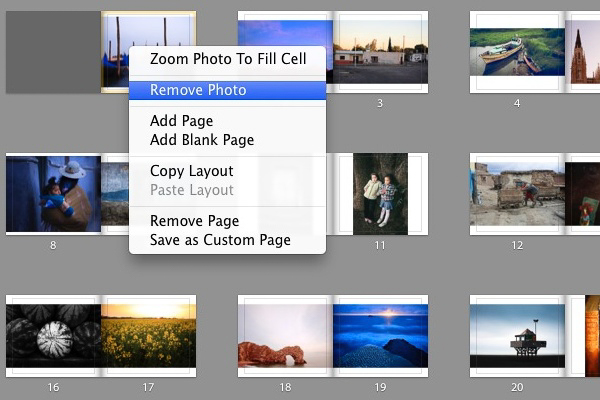
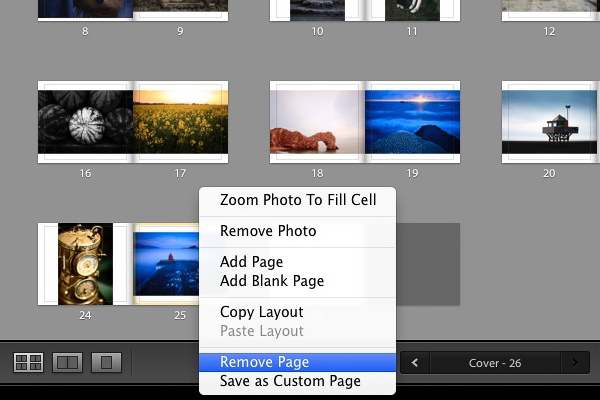
    Starting by going to the first image, right-clicking and selecting Remove Photo.

    You should now see a grey square with a cross in it (if you don’t, go to the Guides panel and tick the Show Guides and Photo Cells boxes). The icon indicates the page contains an empty Photo Cell – Lightroom’s term for the spaces allocated to photos within the layout.

    The left-hand page is dark grey, indicating that it’s the inside of the front cover, and that you can’t add anything to it.

    How to create a simple photo book in Lightroom

    Repeat the process with the last photo in the book. This time, right-click the photo and select Remove page.

    How to create a simple photo book in Lightroom

    Add a white border

    The next step is to create a white border around the photos in the book, rather than run them up to the edge of the printed page. The photos will be smaller, but the additional white space will give the book a more professional look.

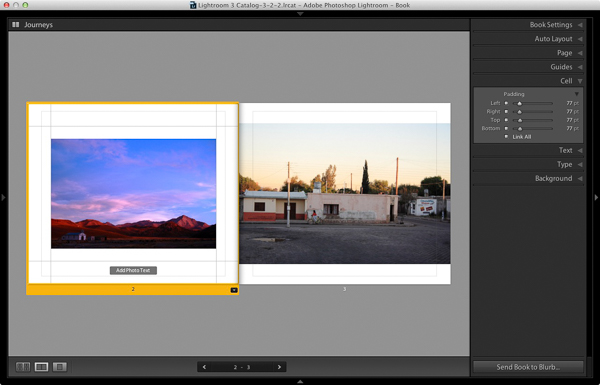
    Click on a page containing a photo in the landscape orientation to activate it and go to the Cell panel. Grab the bottom slider and move it right. The other sliders should move with it at the same time (if they don’t, click the grey Link All square – when all the squares are white, they will move together). Adjust the sliders until the photo has a solid white border around it like the one in the screen shot below.

    How to create a simple photo book in Lightroom

    Right-click on the page and select Save as Custom Page. Switch to the Multi-Page View and go to Edit > Select All to select all the pages in the book (the cover isn’t included).

    Click any arrow in a yellow frame, go to Custom Pages and select the page layout you just created. If this is the first time you have done this, it will be the only one there. Lightroom updates the selected pages with the chosen layout.

    How to create a simple photo book in Lightroom

    Design the covers

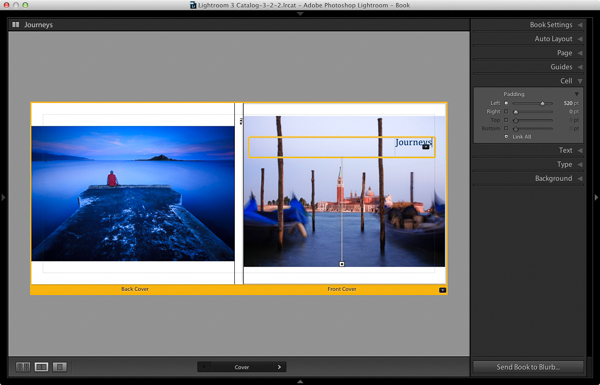
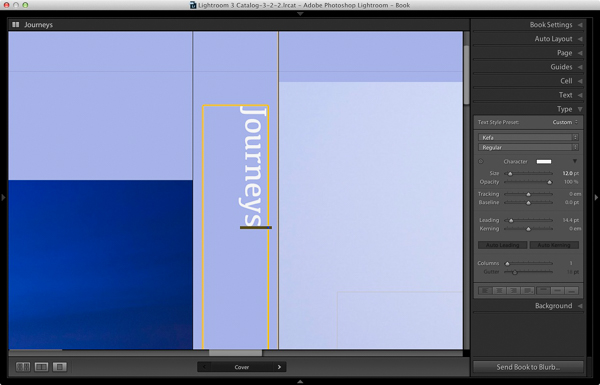
    Go to the covers spread, click on the front cover and then the grey Add Photo Text button at the bottom. Type in the book title. You can change the font colour, size, and text in the Type panel. Click and drag the yellow border to move the text.

    You can’t change the width of a Photo Text Cell. But you can easily move the title left or right by going to the Cell panel and moving the Left slider until the title is positioned where you want it.

    How to create a simple photo book in Lightroom

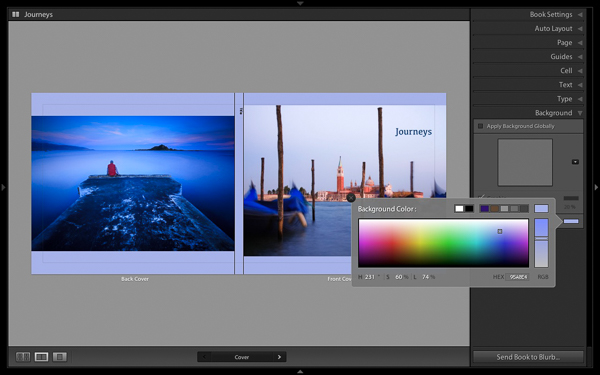
    Open the Background panel and select a background colour that complements the front and back covers.

    How to create a simple photo book in Lightroom

    Go to the title on the spine of the cover, and change it to the title of your book. For consistency, you should use the same font you selected for the title on the front cover.

    How to create a simple photo book in Lightroom

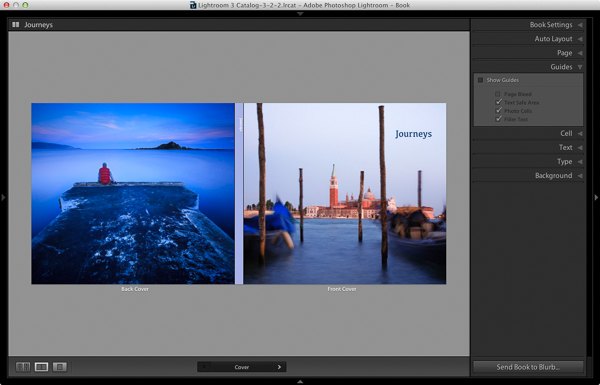
    Another option for the cover is to expand the photos so that they fill the available space. This will crop the photos, which you may not want, but can look really effective. You may also need to move the title. To do so, right-click on the cover images and select Zoom Photo to Fit Cell. This is what it looks like with my covers.

    How to create a simple photo book in Lightroom

    Congratulations, you have finished your photo book! There are lots of ways you can tweak and improve your design in the Book module,  I may go into those in a later article. But hopefully you now see how easy it is to get started in the Book module. Indeed, if you are happy with this simple design, you can create a photo book in a few minutes.

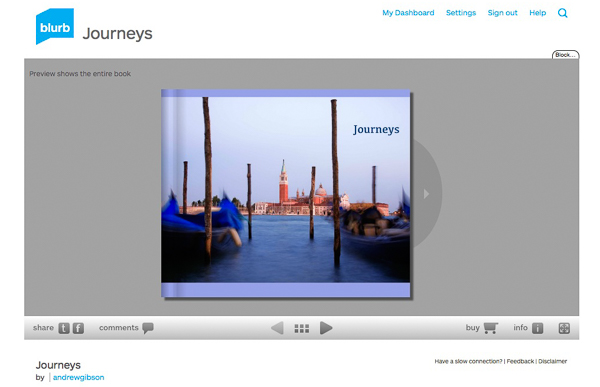
    Uploading your photo to book to Blurb

    In order to print your book with Blurb you need a Blurb account, which you can sign up for on their website.

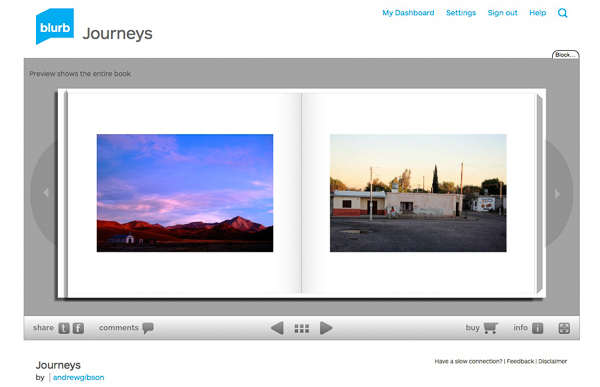
    Then, press the Send Book to Blurb button underneath the right-hand panels. Lightroom prompts you to sign into your account. Then, enter the title and author’s name and click the Upload Book button. The upload takes some time, but when it’s done you can sign into your Blurb account online and see your book. Leave this step until you’re ready to order though, as Blurb will delete the book from your account if you don’t order at least one copy within 15 days.

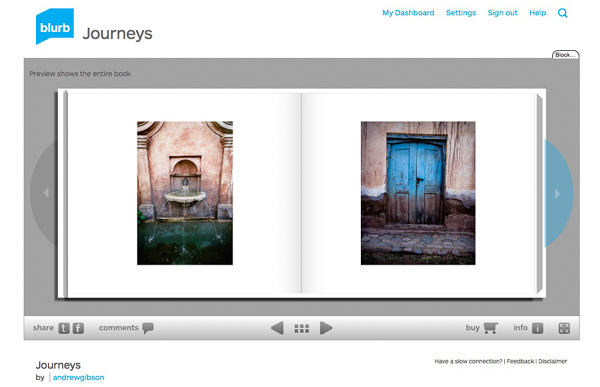
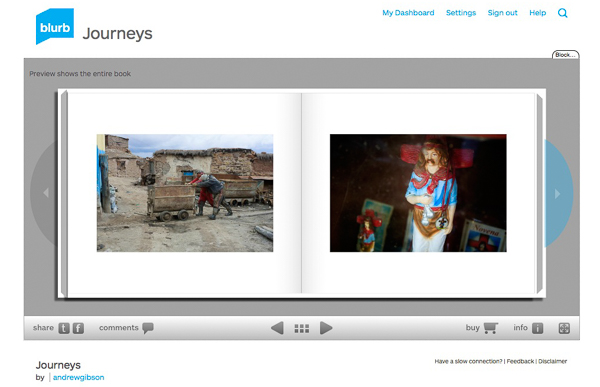
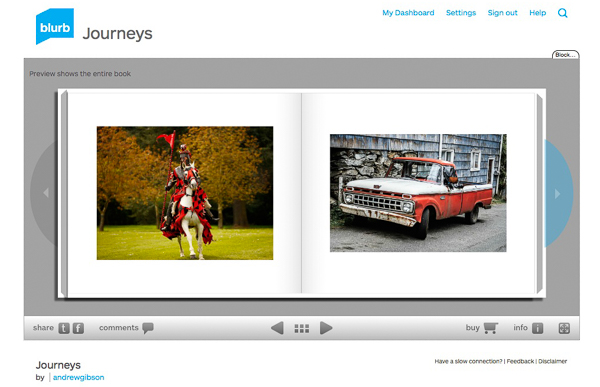
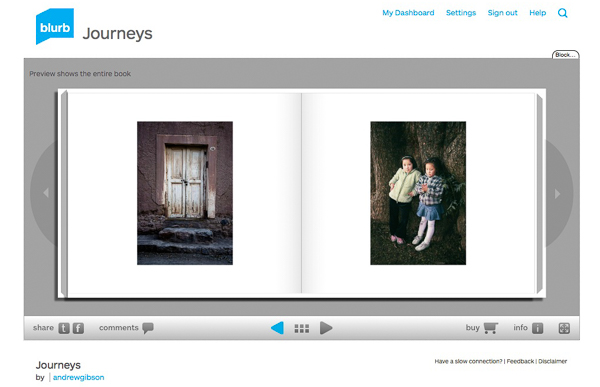
    Here are some preview pages from the photo book I just created.

    Have you made a book yet? Please share your comments and questions below.
    lightroom-create-simple-photo-book-18
    How to create a simple photo book in Lightroom
    How to create a simple photo book in Lightroom
    How to create a simple photo book in Lightroom
    How to create a simple photo book in Lightroom


    Mastering Lightroom: Book Five – The Other Modules ebook coverMastering Lightroom: Book Five – The Other Modules

    My new ebook Mastering Lightroom: Book Five – The Other Modules shows you how to use Lightroom’s powerful features to create fun and interesting projects using the Map, Book, Slide show, Print and Web modules. Whether it’s geotagging, putting together a photo book, printing your best photos or creating web galleries all the information (and inspiration) you require is right here.

    googletag.cmd.push(function() {
    tablet_slots.push( googletag.defineSlot( “/1005424/_dPSv4_tab-all-article-bottom_(300×250)”, [300, 250], “pb-ad-78623” ).addService( googletag.pubads() ) ); } );

    googletag.cmd.push(function() {
    mobile_slots.push( googletag.defineSlot( “/1005424/_dPSv4_mob-all-article-bottom_(300×250)”, [300, 250], “pb-ad-78158” ).addService( googletag.pubads() ) ); } );

    The post How to Create a Simple Blurb Photo Book in Lightroom by Andrew S. Gibson appeared first on Digital Photography School.


    Digital Photography School

  • Weekly Photography Challenge – A Need for Speed

    In this set of speed busting images you can see the effect that using a fast shutter speed can have on your images. If you want to photograph a moving subject and freeze them in mid-action, that is what is required.

    TexasEagle

    By TexasEagle

    Weekly Photography Challenge – A Need for Speed

    This week your challenge is to find something moving – fast! It could be traffic on a busy street, or something involving sports of some kind. Just get out there and work on using a fast shutter speed to freeze the subject at the peak of action.

    You can try the following settings to help you get sharp images:

    • Continuous focus mode, will continually focus on the moving target as long as you have the button pressed part way down.
    • Zone focus or having some or all of your focus points active. That allows the camera to pick where to focus.
    • Back button focus – this is how the sports shooters I know do work.
    • High speed or continuous drive – so you take a few shots in succession when you press and hold the shutter button.
    • Shutter priority set to a fast setting. You will usually need at least 1/500th or faster to freeze anything moving quickly. NOTE: if you do use shutter priority keep an eye on your exposure. If the aperture is flashing at you in the viewfinder it means your shutter speed is TOO fast and the aperture cannot open wide enough to make a good exposure. In that case you may have to increase your ISO – but just keep an eye on it. OR use aperture priority set to your widest aperture which in turn will automatically give you the fastest shutter speed possible in that light. If it’s not fast enough – bump that ISO!

    Here are a few examples to get you started:

    Danny Perez Photography

    By Danny Perez Photography

    Contact-Centres-Highland

    By Contact-Centres-Highland

    BANAMINE

    By BANAMINE

    Mark Robinson

    By Mark Robinson

    Ib Aarmo

    By Ib Aarmo

    USAG- Humphreys

    By USAG- Humphreys

    Pepe´ Cam Photography

    By Pepe´ Cam Photography

    Share your fast images here:

    Simply upload your shot into the comment field (look for the little camera icon in the Disqus comments section) and they’ll get embedded for us all to see or if you’d prefer upload them to your favourite photo sharing site and leave the link to them. Show me your best images in this week’s challenge. Sometimes it takes a while for an image to appear so be patient and try not to post the same image twice.

    googletag.cmd.push(function() {
    tablet_slots.push( googletag.defineSlot( “/1005424/_dPSv4_tab-all-article-bottom_(300×250)”, [300, 250], “pb-ad-78623” ).addService( googletag.pubads() ) ); } );

    googletag.cmd.push(function() {
    mobile_slots.push( googletag.defineSlot( “/1005424/_dPSv4_mob-all-article-bottom_(300×250)”, [300, 250], “pb-ad-78158” ).addService( googletag.pubads() ) ); } );

    The post Weekly Photography Challenge – A Need for Speed by Darlene Hildebrandt appeared first on Digital Photography School.


    Digital Photography School

  • How to Use Foreground for Dramatic Portraits

    I remember a long time ago, I took a close up shot that I absolutely loved of a little kid on a slide for an article on a local park that had won a national award. I proudly brought it to my magazine editor, who said, “That’s great , but where’s the rest of the shot?” She couldn’t tell if Continue Reading

    The post How to Use Foreground for Dramatic Portraits appeared first on Photodoto.


    Photodoto

  • 26 Speed Busting Fast Shutter Speed Images

    Last week we saw some ethereal and mysterious long exposure photos. Now let’s go the opposite way and look at some images there would not be possible without fast shutter speeds (with a couple that have some help using flash to freeze motion too).

    Images at either end of the shutter speed scale give us a chance to capture life in an altered state; one we cannot see with our eyes. Long exposures blur things beyond recognition and add mystery. Short exposures freeze things in time and space and capture literally a millisecond of time in an image.

    Add flash and you can stop bullets, speeding arrows and more. Enjoy the world of high speed photography:

    Photograph Bubbles by Chloe Veltkamp on 500px

    Bubbles by Chloe Veltkamp on 500px

    Photograph Jump to the beach by Lily Nedolya on 500px

    Jump to the beach by Lily Nedolya on 500px

    Photograph Patience my friend, patience.  by Lasse Lundh on 500px

    Patience my friend, patience. by Lasse Lundh on 500px

    Photograph Spinning Reverse by Rajat Bhargava on 500px Spinning Reverse by Rajat Bhargava on 500px

    Photograph Focus by Tin Man on 500px

    Focus by Tin Man on 500px

    Photograph Dancing on the Water by Teddy Winanda on 500px Dancing on the Water by Teddy Winanda on 500px

    Photograph High Flyer by Tony Antoniou on 500px

    High Flyer by Tony Antoniou on 500px

    Photograph The flying car by Tristan Shu on 500px The flying car by Tristan Shu on 500px

    Photograph skaugvold451 by Peter Skaugvold on 500px

    skaugvold451 by Peter Skaugvold on 500px

    Photograph Jump ! by Rarindra Prakarsa on 500px Jump ! by Rarindra Prakarsa on 500px

    Photograph Super Dog by Abbrar Cheema's photography on 500px

    Super Dog by Abbrar Cheema’s photography on 500px

    Photograph Volley by Mary Ruiz on 500px Volley by Mary Ruiz on 500px

    Photograph Soft Touch by Max Rinaldi on 500px

    Soft Touch by Max Rinaldi on 500px

    Photograph A Splash of Rose by Anthony Chang on 500px A Splash of Rose by Anthony Chang on 500px

    Photograph Head shake by Derek Watt on 500px

    Head shake by Derek Watt on 500px

    Photograph Show Time by Max Rinaldi on 500px Show Time by Max Rinaldi on 500px

    Photograph Oops~! by kimerajam . on 500px

    Oops~! by kimerajam . on 500px

    Photograph Crossing the river by Edwin Leung on 500px Crossing the river by Edwin Leung on 500px

    Photograph Splash!!! by Ástur Montes on 500px

    Splash!!! by Ástur Montes on 500px

    Photograph JOYFUL by Ario Wibisono on 500px JOYFUL by Ario Wibisono on 500px

    Photograph Inle Smoker by Vichaya Pop on 500px

    Inle Smoker by Vichaya Pop on 500px

    Photograph Bang by Jinsoo Park on 500px Bang by Jinsoo Park on 500px

    Photograph Burn Crew Concept by Philippe Lejeanvre on 500px

    Burn Crew Concept by Philippe Lejeanvre on 500px

    Photograph Turkestan Shrike ‹Lanius phoenicuroides› hunting Spiny-tailed  Lizard by igano Kabamaru on 500px Turkestan Shrike ‹Lanius phoenicuroides› hunting Spiny-tailed Lizard by igano Kabamaru on 500px

    Photograph Mudskipper (Oxudercinae) by igano Kabamaru on 500px

    Mudskipper (Oxudercinae) by igano Kabamaru on 500px

    Photograph Watch Out! by Gary Brookshaw on 500px Watch Out! by Gary Brookshaw on 500px

    googletag.cmd.push(function() {
    tablet_slots.push( googletag.defineSlot( “/1005424/_dPSv4_tab-all-article-bottom_(300×250)”, [300, 250], “pb-ad-78623” ).addService( googletag.pubads() ) ); } );

    googletag.cmd.push(function() {
    mobile_slots.push( googletag.defineSlot( “/1005424/_dPSv4_mob-all-article-bottom_(300×250)”, [300, 250], “pb-ad-78158” ).addService( googletag.pubads() ) ); } );

    The post 26 Speed Busting Fast Shutter Speed Images by Darlene Hildebrandt appeared first on Digital Photography School.


    Digital Photography School