Category: Photography

  • Improve Your Photography in 10 Days with These 10 Tips

    For beginners, learning the ins and outs of the fundamentals can often seem daunting. Intermediate photographers might feel confident of their grasp of the photography basics, but find themselves lacking inspiration. Even seasoned photographers might occasionally find themselves stuck in a rut. So we put together a list of tips you can use to get your shutter firing and improve Continue Reading

    The post Improve Your Photography in 10 Days with These 10 Tips appeared first on Photodoto.


    Photodoto

  • Review: slingShot DSLR Remote Control App

    One of the great advantages of smartphone technology is the way that it makes photography more convenient. I’m not just talking about using the camera that came with your phone. There are now smartphone apps coming out that allow you to connect with, and even control, your DSLR camera. One of these apps is the brand new slingShot DSLR Remote Control, which just came to the Google Play Android market on January 25, 2015. Using this app makes it possible to adjust the settings on your camera, see what the camera sees in live view, and view the resulting image after it’s snapped. All of this, and you don’t even have to be standing right next to your camera.

    How it Works

    The slingShot app connects with your camera in one of two ways: via Wi-Fi if your camera has it, or via a physical USB On-The-Go (OTG) cable. If you have a Wi-Fi enabled camera, you’re already likely to be familiar with how the function works in that your camera will create its own Wi-Fi network that your phone will then sync with. For photographers with non-Wi-Fi cameras, the connection to your phone is made with the aforementioned OTG cable. While these cables definitely aren’t as common as others, they are cheap, easy to find online, and really convenient for connecting other devices to your phone or tablet besides your DSLR, such as a wireless USB mouse or keyboard.

    slingShot Remote DSLR Controller

    Compatibility

    At this moment, the app claims on its website to only support the following models:

    • Camera Via Wi-Fi Connection: Canon EOS 6D, Canon EOS 70D and Nikon 5300.
    • Camera Via USB Connection: Canon EOS 6D, EOS 70D and Nikon D5300 and D7000.
    • Phone: Android 4.0 or higher; phone must also have Wi-Fi or full USB host support capabilities.

    Despite the app’s relatively short list of supported devices, you may want to try it out for yourself. For example, the app doesn’t specify compatibility with the Canon EOS 5D Mark III, but it worked just fine with mine.

    How to Control Your Camera with the App

    1. Assuming you have a supported camera model and Android phone (no iOS support at the moment), the first step is to download the slingShot app from the Google Play store. This app does cost $ 8.99, but its features may make it worth the cost, depending on how useful you find them.

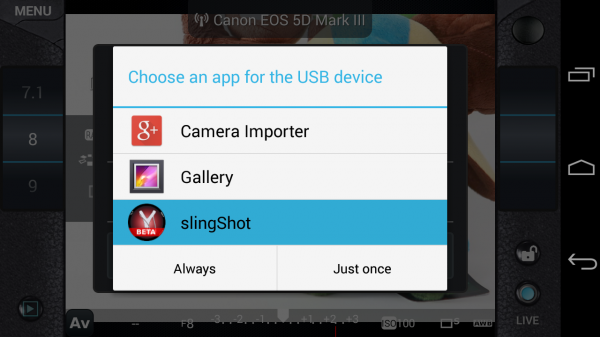
    2. After you install the slingShot app, proceed to connect your camera to the phone. If your camera has Wi-Fi, walk through the procedures to enable the wireless connection, or simply connect the camera by using a OTG USB cable. When your camera and phone are successfully connected, you’ll see the screen below pop up, asking which app you want to activate. Choose the slingShot app.

    slingShot Remote DSLR Controller

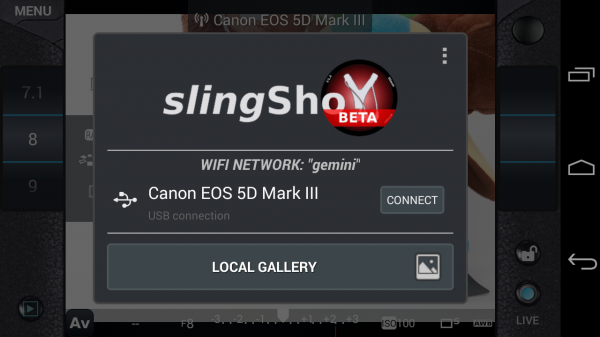
    3. A screen will then flash up on your phone indicating that your camera has been detected. Press the “Connect” button to continue.

    slingShot Remote DSLR Controller

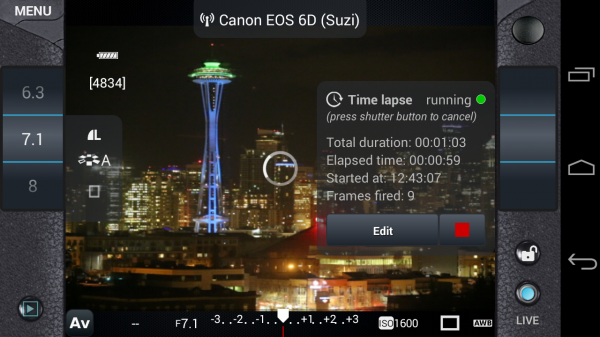
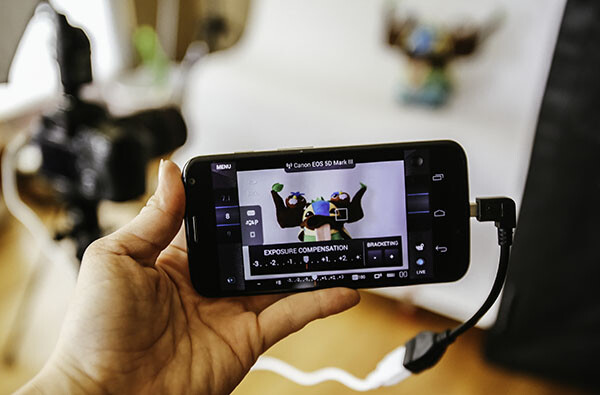
    4. You will then see the menu controls on your phone (see below), as well as an indicator in the upper middle of the frame confirming that your camera is connected; in this case, I have my Canon 6D connected via Wi-Fi. You will also have the ability to use your phone to control aspects of your DSLR such as shutter speed, aperture, exposure, ISO, white balance, and image quality; you can even tap on the button in the upper right corner to take a photo.

    However, you won’t be able to see what the camera is seeing until you enable live view mode on your camera and then press the “LIVE” button on the lower right corner of the app. Once the live view is on, the rest of the app controls are very smooth and easy to use, requiring just a tap or swipe of the finger to enable. There are also some extra features that appear when you tap on the menu button in the upper left corner, one of the most notable being the ability to do time lapse shots.

    slingShot Remote DSLR Controller

    Time lapse feature

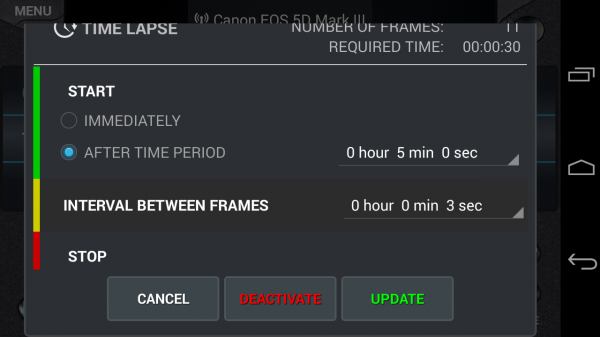
    I’ve played around with quite a few DSLR remote control apps, but none have come with the time lapse functionality. slingShot’s time lapse feature is in the Menu and it offers a range of customizable settings. You can set it to start immediately or after a set period of time, you can also set the interval between frames, and give it a time to stop or have it stop after a certain number of frames are snapped. I tried the time lapse function out on both my Canon 6D and 5D Mark III and it worked perfectly the first time around.

    There are a couple things that didn’t work so well. First, if your camera falls asleep, the time lapse function is turned off, even if you have a timer set. Second, the ability to reset the time lapse with different conditions is difficult to do; each time I had to simply reconnect my camera and phone to get rid of the initial settings I input. However, the fact that this app can do basic time lapses is still impressive and will likely be improved upon in future updates.

    slingShot Remote DSLR Controller

    Previewing images

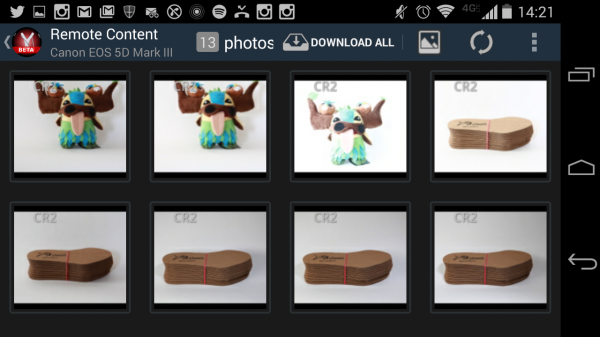
    Another simple use of the slingShot app is to use it to preview DSLR content on your phone. Simply connect via Wi-Fi or OTG cable and press the play button in the app’s lower left corner. You’ll then see the screen show (see image below) a neat gallery of photos from your CF or SD card. Even if you have older content that wasn’t shot with the app,  you’ll be able to see it and download it to your phone, or share via email or social media. This app will even read and convert RAW files at pretty decent speeds.

    slingShot Remote DSLR Controller

    Potential Deal Breakers

    While there are many positive aspects to the slingShot app, there are a few possible deal breakers. First, there are a few bugs in the app that don’t necessarily affect its overall functionality, but make its cool trick features such as time lapse not work as well as one might hope. On the other hand, the team behind the app is still actively making updates, so there’s a good chance these errors will be fixed. Another possible point of contention is the app’s $ 9.99 price tag. While you can download slingShot’s Beta version for free, you can only use it for 11 days before you’re made to purchase the actual app in order to keep using it. While the price isn’t super extravagant, it is on the steeper side compared to some other apps available. Also, there are a few other DSLR controller apps that offer the same functionality at lower prices. In fact, if you have a Wi-Fi DSLR, such as the Canon 6D in my case, there’s a (free) app from Canon that comes with it that enables DSLR control.

    If the idea of being able to control your DSLR with your phone sounds like a winning deal, be sure to download slingShot app! Has anyone else given it a try? Thoughts?

    googletag.cmd.push(function() {
    tablet_slots.push( googletag.defineSlot( “/1005424/_dPSv4_tab-all-article-bottom_(300×250)”, [300, 250], “pb-ad-78623” ).addService( googletag.pubads() ) ); } );

    googletag.cmd.push(function() {
    mobile_slots.push( googletag.defineSlot( “/1005424/_dPSv4_mob-all-article-bottom_(300×250)”, [300, 250], “pb-ad-78158” ).addService( googletag.pubads() ) ); } );

    The post Review: slingShot DSLR Remote Control App by Suzi Pratt appeared first on Digital Photography School.


    Digital Photography School

  • 6 Eye-Catching Photos and How They Can Help You Improve Your Photography

    Each photographer has their own way of approaching a scene, choosing which settings on their camera will best reflect their vision, and then crafting the final image. You get to make this series of decisions each time you take a photo, and it’s a highly personal experience.

    But you can still learn a lot by going behind the scenes of a photo, and hearing how the photographer made their own decisions. Whether you pick up a new tip for creating an interesting effect, a new way of looking at a scene, or simply the inspiration to go and shoot, it’s both informative, and a lot of fun too.

    So here are six of my favourite photos, and details about how they were taken. Get out your notebook, have your camera handy, and let’s go.

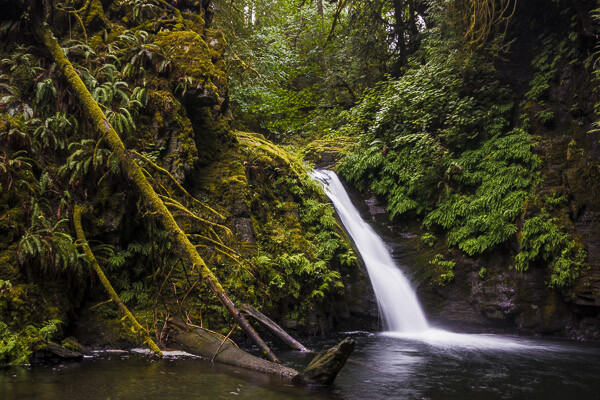
    1. Waterfall in the Woods

    Extremely essential camera skills 1

    Vancouver Island, Canada – Settings: 14mm, f/10, 1.6 seconds, ISO 80

    This shot is a great example of what happens when you pick a slow shutter speed. Moving water takes on this flowing look and adds a softer feel to the image.

    If you want to get this effect, first set your shutter speed to a long value. Here the setting was 1.6 seconds – a value around there is a good place to start. Then you’ll need to adjust the rest of your settings to get a good exposure. This can be tricky sometimes, especially if it’s a really bright scene. A high (small) aperture, and low ISO can really help. But if that’s not enough, you may need to use a neutral density filter.

    Then make sure you can keep your camera steady for the entire shot. The ideal would be to use a tripod, but it doesn’t even need to be a big, heavy one. This shot was taken with a point and shoot camera (the Sony RX100III) and the tripod was just a tiny tabletop tripod set up on the rocks.

    Finally take the photo, and enjoy a beautiful waterfall image that really grabs your viewers’ attention.

    2. The Bee and the Flower

    Extremely essential camera skills 2

    Edmonton, Canada – Settings: 85mm, f/4.0, 1/3000th, ISO 200

    This photo has two elements to pay attention to, the first being the composition. The bee is very small, but you can still easily make it out. That’s thanks to negative space. All of the blue, empty sky is negative space that draws your eye towards the subject. One of the keys to finding negative space in a scene is to move your feet. Walk around, looking to see if you can find an angle that helps simplify your frame by incorporating negative space. Don’t stop there, though. Change your position even further by climbing up high, or, as in this case, lying on the ground. Yep, this photo was taken lying flat on the grass. Don’t be afraid to get messy in the pursuit of a great shot.

    The second thing to note about this shot is the shutter speed. There’s a very fast setting chosen here (1/3000th of a second) and that allowed the bee to be in sharp focus, even when it was moving very fast. A slower shutter speed could have led to motion blur of the subject, losing that crisp, sharp detail. When shooting fast moving objects, make sure your shutter speed is set appropriately.

    3. The Internet Man

    Extremely essential camera skills 3

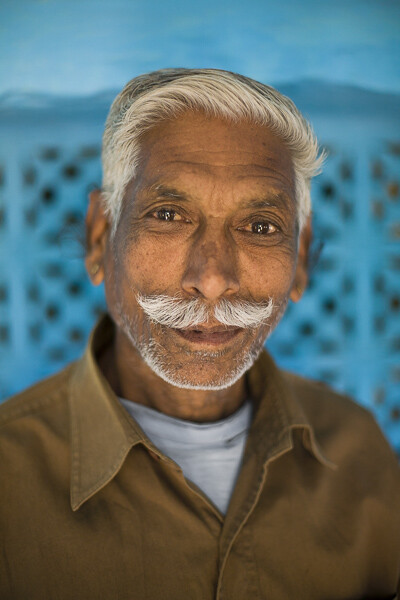
    Jodhpur, India – Settings: 50mm, f/1.6, 1/320th, ISO 400

    There’s a great story behind this image. On a trip through India we found ourselves in Jodhpur, known as the Blue City. The walls of many of the houses are painted a vibrant blue, and it made for some incredible images. But this portrait was not taken on a photo walk, but rather after we made our daily visit to the internet shop.

    After we finished up on the computer, we got to chatting with the man who owned the shop. He was a wonderful guy, with a great face, so we asked for a portrait. He was happy to oblige, and by standing in the doorway of his shop we got both a beautiful blue background, and catchlights in his eyes from the light coming in the door (catchlights, those white specks in the eyes, are a great way to add life and sparkle to your subjects’ eyes).

    One final note on the settings: using a low aperture value can help your subject stand out from the background, especially if you can’t bring them very far forward from the background. In this image f/1.6 was used, which is definitely very low, but it really helped create some background separation.

    The best part of the story? After we took his photo (and gave him a copy of the file) he thanked us, and told us that he’d pray that we’d have a son before returning to India. Well, we did have a son. Now we just have to go back, don’t we?

    4. Cows in the Field

    Extremely essential camera skills 4

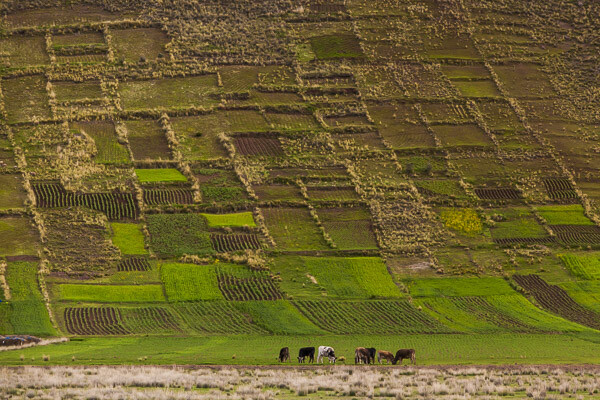
    The Sacred Valley, Peru – Settings: 200mm, f/7.1, 1/1600th, ISO 800

    Learning how to use lens compression to your advantage can make for some really impressive shots. This image is a great example of this technique.

    Very simply, when you use a longer focal length (like the 200mm used in this photo) it makes the distance between objects in the frame appear to be less. It makes the background appear closer to the foreground, and in this example it makes the hills appear very close to cows. Essentially, it compresses the space in the image.

    Here you can see how it makes the hills really fill the frame and create a strong, patterned background that contrasts nicely with the organic shapes of the cows.

    In your own photography you can use a long lens to make clouds appear much larger and closer to your subject, or make your friends look like they’re stepping on top of a building, Godzilla-style. There’s no limit to the creative effects you can achieve when you use compression.

    5. Down the Stairs

    Extremely essential camera skills 5

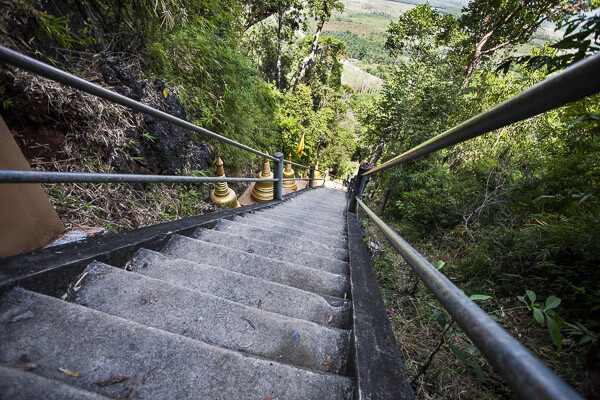
    Krabi, Thailand – Settings: 17mm, f/5.0, 1/400th, ISO 400

    If long lenses make objects appear closer to each other in your frame, what about wide angle lenses?

    Here’s a great example. This shot, taken while looking down a few of the 1,272 treacherously steep steps of the Tiger Cave Temple, makes you feel like you may just fall down them, along with the photographer.

    The wide angle lens (17mm) helps to create that feeling. The wide angle exaggerates the distance between objects, especially at the edges. Take a look at those hand rails at the edge of the frame. They look very far apart, especially compared to the distance between the hand rails further down the stairs. But this exaggeration at the edges helps to turn the rails into leading lines, drawing your eye down the stairs, and creating that falling feeling.

    So if you want to add some drama to an image, or exaggerate perspective, grab a wide angle lens. Place objects near the edges and make use of the stretching it causes.

    6. Camel at Sunset

    Extremely essential camera skills 6

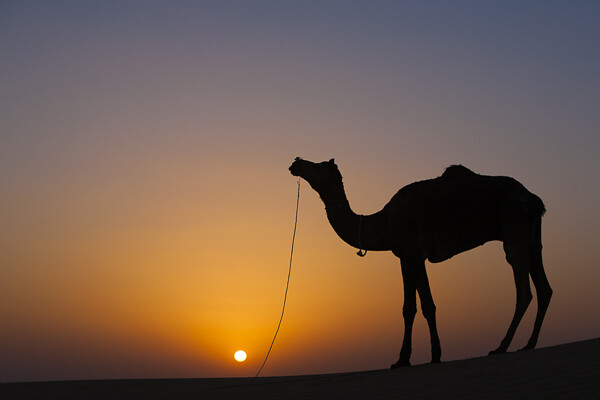
    Jaisalmer, India – Settings: 70mm, f/7.1, 1/400th, ISO 125

    Doesn’t a great silhouette image just grab your attention? It’s so different from how we normally see the world that it can add a big impact to your work.

    But a silhouette is a prime example of how your camera can easily be fooled by light, and how you, the photographer, need to know how to control it.

    In this example your camera might very well try to expose for the camel, or somewhere in between the camel and the sunset, and you’ll wind up with something really bright, or sort of dark, but it probably won’t look like a nice, crisp silhouette.

    So what to do? Take control. When aiming for a silhouette you’ll want to expose for the sky, not the subject. Then you can either use exposure compensation to dial in the exposure you’re looking for, or better yet, jump into full manual control and choose your settings to get exactly the exposure and depth of field you want.

    Hopefully this peek behind the decisions and settings of these photos gives you a few tips to take some great shots of your own. The more you learn about how all the settings on your camera affect the look and feel of your images, the better decisions you’ll be able to make. Best of all, this stuff doesn’t have to be hard to learn, and you’ll get to use the knowledge to create better images for the rest of your life.

    googletag.cmd.push(function() {
    tablet_slots.push( googletag.defineSlot( “/1005424/_dPSv4_tab-all-article-bottom_(300×250)”, [300, 250], “pb-ad-78623” ).addService( googletag.pubads() ) ); } );

    googletag.cmd.push(function() {
    mobile_slots.push( googletag.defineSlot( “/1005424/_dPSv4_mob-all-article-bottom_(300×250)”, [300, 250], “pb-ad-78158” ).addService( googletag.pubads() ) ); } );

    The post 6 Eye-Catching Photos and How They Can Help You Improve Your Photography by Lauren Lim appeared first on Digital Photography School.


    Digital Photography School

  • The Importance of Scouting for Landscape Photographers

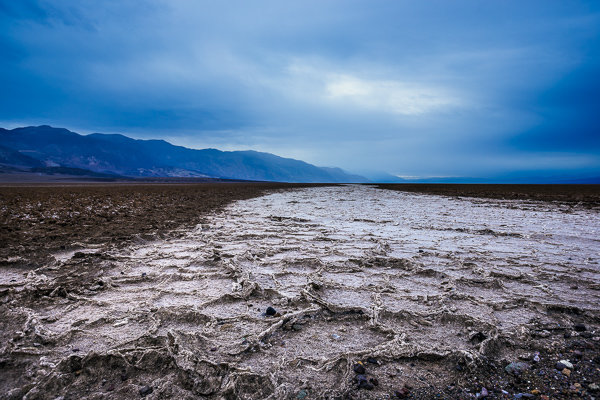
    What Lies Beneath | West Side Road, Death Valley National Park

    What Lies Beneath | West Side Road, Death Valley National Park

    As I start writing this post, I’m sitting by my gate at Las Vegas McCarran International Airport. I loathe Vegas, but that’s beside the point. I managed to avoid the strip this time and will be home soon. I just wrapped up an incredible week leading a workshop in Death Valley National Park with my good buddy Brian Matiash and nine awesome students. This was my fifth trip to the park, and I’m starting to feel like I know the place like the back of my hand (even though there are still a several places I’d like to visit).

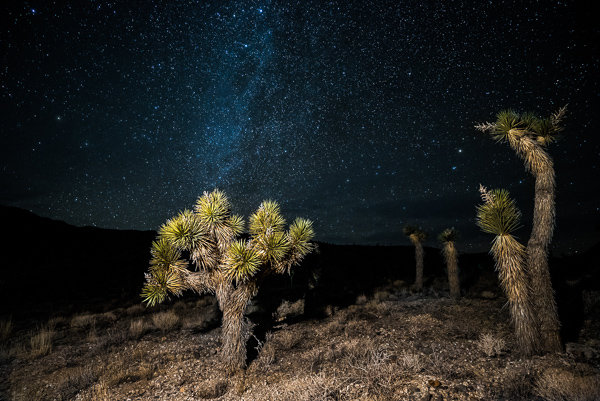
    Joshua Trees in Death Valley

    Joshua Trees in Death Valley

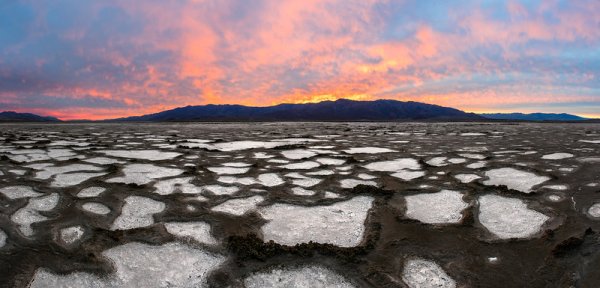
    Ever since hearing about a lesser known area of the park known as Cottonball Basin (or Cottonball Marsh), I’ve been on the hunt for a certain kind of pattern found there. Cottonball Basin is hiding in plain site of virtually everyone who visits Death Valley. It’s located about five miles north of Furnace Creek off Highway 190, but there are no signs for it, and no areas for parking. You simply have to pull off into the gravel on the side of the road and start hiking out.

    The trouble is that Cottonball Basin (and much of Death Valley) is always changing. Badwater Basin (which feeds into Cottonball) is an underground river, so the surface is always morphing and looks different with each visit. If you pick the wrong spot of the highway to pull over and start hiking, you could spend hours hiking around the marsh and find nothing.

    During my last visit to the park (before this one), I hiked out to Cottonball twice and while I was able to come out with some decent shots, it wasn’t what I was looking for. I was never able to find the patterns I had seen in a few photos.

    Even though I hadn't found what I was looking for, there is still plenty of beauty to be found all over Cottonball Basin.

    Even though I hadn’t found what I was looking for, there is still plenty of beauty to be found all over Cottonball Basin.

    This time around, I was bound and determined not to come up empty handed. Right before heading out, I purchased a Garmin Oregon 600 Handheld GPS. I had a cheaper Garmin before, but it was so unintuitive and difficult to use that I wasn’t willing to risk using it again. The Oregon series is a touch screen model that is responsive, quickly acquires satellites, and is very easy to use and understand.

    The day before the workshop began, Brian and I hiked out to Cottonball Basin. We found essentially nothing. I felt pretty defeated. We ended up changing the workshop itinerary and nixed Cottonball Basin altogether. It wasn’t until a chance encounter at Racetrack Playa that my luck would change.

    As our group began exploring The Racetrack, Brian and I noticed a group of four photographers at one of the best rocks on the playa. They were taking turns standing on the rock, sitting on it, and taking all sorts of photos with them in it (probably for Instagram or something). This made my blood boil, so before too long, we went over and laid into them pretty good. They apologized for what they were doing and promised to stop (I really don’t understand that behaviour).

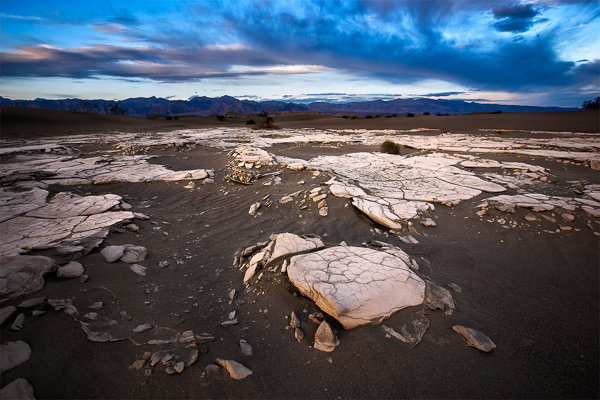
    Mesquite Sand Dune Crust | Death Valley National Park

    Mesquite Sand Dune Crust | Death Valley National Park

    After going back later that evening (they stayed at that same rock the entire evening) we began chatting with the main guy from the group taking pictures. He mentioned that he found some good patterns at Cottonball and showed us the shots he took with his iPhone. These shots were the closest I’ve seen in a long time to the patterns I was looking for and he was nice enough to let us know where to find them. Unfortunately, we only had one last day of the workshop so we’d have to try our luck alone after the students had already left.

    On the last day of our trip, after the workshop had concluded, we headed out again to explore and scout the basin. Using my Oregon 600, I dropped a pin at our parking spot off the highway and began hiking out. Around half a mile in, we saw some good patterns starting to forming (this was after walking over some very unwelcoming terrain that would probably cause most tourists and/or photographers to turn back). Things were starting to look good. As we kept hiking out, the patterns began getting tighter and tighter together. Finally, around 1.5 miles into the basin we hit the mother-load. I dropped around 7 pins at different locations out on the basin because I knew these spots were going to be difficult to find again. It’s hard to describe, but Cottonball Basin is a massive expanse of completely flat terrain for the most part. You can pick the same exact parking spot, but if you hike out 20 degrees to the left of where you found the patterns, you’ll miss your mark by enough to not even see something useful.

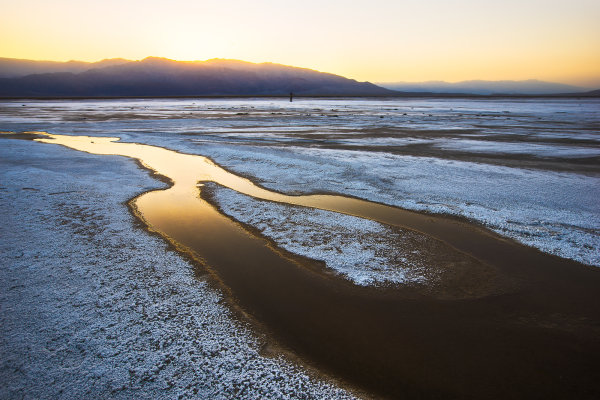
    Cottonball Basin

    The shot I had been waiting thee years to get was finally mine. I wanted to capture as much as possible so I created this panoramic by taking five vertical images and stitching them together in PTGui Pro.

    After lunch and a good nap, we headed out again for sunset. The Oregon 600 led us directly to the exact same spots we stood in earlier that da,y with plenty of time to spare for the light to be right. Oh man, did the light get right. Sunset that evening was one of the top three sunsets I’ve ever seen in my life (and I take ranking my sunsets pretty seriously).

    If we hadn’t been relentlessly scouting this location, I’m quite confident I would still be in search of those patterns today.

    Start to Finish Video Tutorial

    Below is a video I put together from the trip. This is an in-depth video showing the scouting process, the sunset shoot, as well as the post-processing of the image once I got back home. Let me know if you have any questions!

    googletag.cmd.push(function() {
    tablet_slots.push( googletag.defineSlot( “/1005424/_dPSv4_tab-all-article-bottom_(300×250)”, [300, 250], “pb-ad-78623” ).addService( googletag.pubads() ) ); } );

    googletag.cmd.push(function() {
    mobile_slots.push( googletag.defineSlot( “/1005424/_dPSv4_mob-all-article-bottom_(300×250)”, [300, 250], “pb-ad-78158” ).addService( googletag.pubads() ) ); } );

    The post The Importance of Scouting for Landscape Photographers by James Brandon appeared first on Digital Photography School.


    Digital Photography School

  • How to Recover Lost Files from a Memory Card

    Whether you’re a novice or veteran photographer, chances are you’ve experienced a moment of dread when you thought all of your precious photos were lost forever. Maybe you damaged a SD or CF card, or accidentally formatted a card before offloading your images. As long as your memory card can still be plugged in to, and recognized by your computer, there’s a good chance you’ll be able to salvage your photos, even if you did an accidental deletion. Sometimes you can achieve this all by yourself, and recover your lost files.

    There are many programs and apps that can help you recover data from a memory card, but the one I’m going to introduce you to is SanDisk RescuePRO. Created by the same folks who produce trusty SanDisk memory cards, RescuePRO has in my experienced maintained the same reliability and quality that one can expect from SanDisk products. Their recovery program is straightforward, easy to use, and does a great job at recovering lost photos. So before you make an appointment with an IT professional, give this memory card recovery method a try.

    SanDisk Recovery PRO memory card recovery

    About SanDisk RescuePRO

    RescuePRO is a downloadable, data recovery program available for Mac or Windows. Using proprietary media recovery algorithms, RescuePro will scan your memory card and display previews of any recoverable data such as photos (JPG and most RAW formats), video, and audio. The software will work with most brands of digital cameras and memory card types including; SD, SDHC, CompactFlash, Memory Stick, CDs, and DVDs.

    There are two versions of RescuePRO, regular and deluxe, with the main difference other than price being in the extra formats of photos and video/audio that deluxe promises to recover. RescuePRO has a fee of $ 39.99 for the regular version and $ 59.99 for deluxe, but they do offer a free evaluation so you can verify if the program will work with your memory card before you purchase. Payment buys you a one year subscription, which must be renewed annually to continue using the service. But on the bright side, this is a small price to pay if you stand to recover important photos or videos.

    How RescuePRO Works

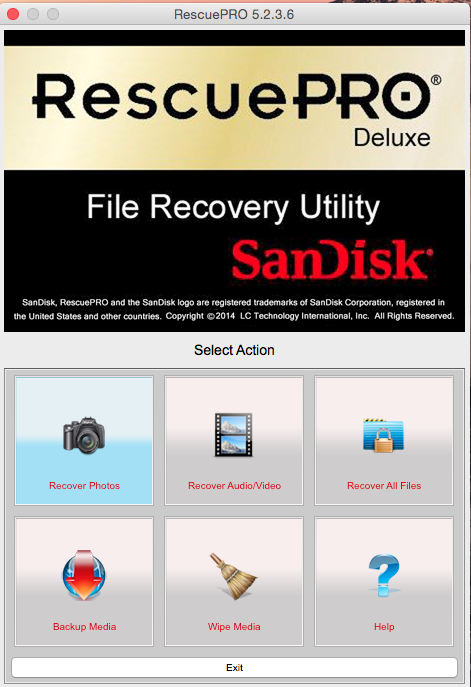
    1. After you buy a subscription, download the RescuePRO program to your desktop computer. Insert your memory card into your computer and launch RescuePRO. The below menu will pop up on your screen, and you’ll want to select the option that’s relevant to your needs: either Recover Photos, Recover Video/Audio, or Recover All Files.

    SanDisk Recovery PRO memory card recovery

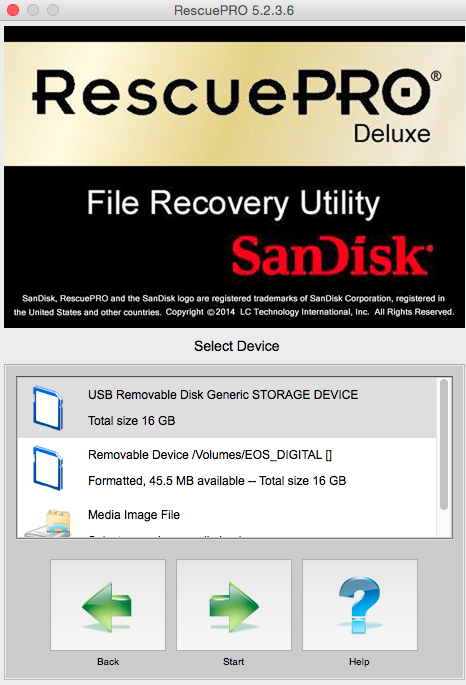
    2. After you select your desired outcome, the below screen will prompt you to select the memory card in question. Be sure you have your memory card connected to the computer. Select your card and hit the green Start button.

    SanDisk Recovery PRO memory card recovery

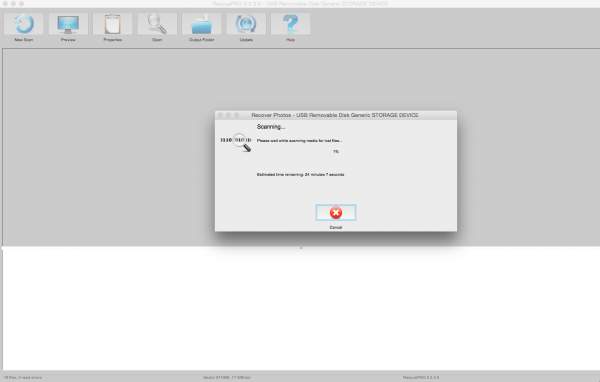
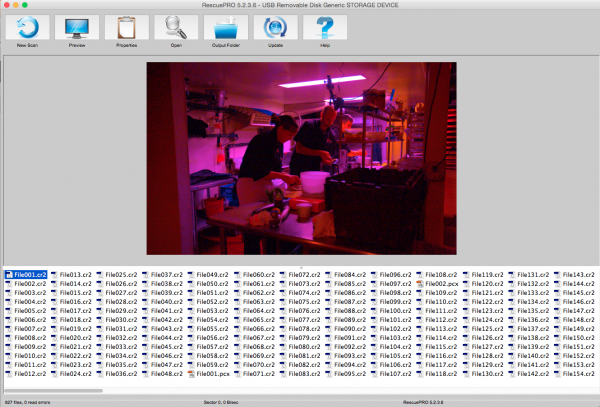
    3. Now it’s time to sit tight and let the program do its thing. Feel free to pull up an Internet browser or Photoshop and multitask as you wait. Data recovery from your memory card can take a bit of time depending on how many files there are to be retrieved. In this particular instance, I had 927 files to recover from my CF card and it took about 30 minutes.

    SanDisk Recovery PRO memory card recovery

    4. When the program is done recovering data, it unfortunately doesn’t do a great job at alerting you. There’s no fanfare, but you’ll know the recovery process is done when you see the bottom portion of the screen filled with recovered files. To verify what content the program has recovered, click on each individual file name and a preview will appear. In this particular instance, the previewed images were showing up tinted in pink, but the actual recovered images were just fine without any distortions.

    SanDisk Recovery PRO memory card recovery

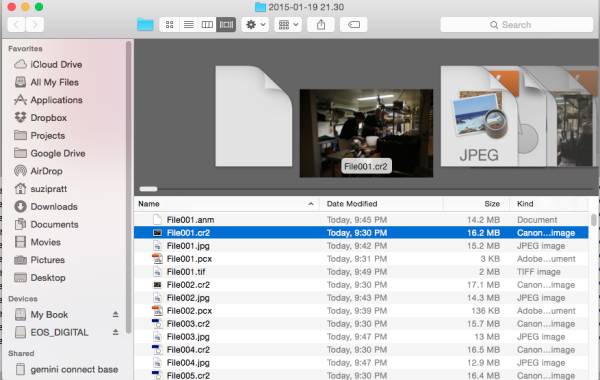
    5. Once you verify that your files have indeed been saved, it’s time to locate them on your computer. The great part about RescuePRO’s long recovery process is that it includes saving the files on your device automatically. As a result, all you have to do to find the desktop folder full of your recovered images is click on the giant Output Folder button. The program should then pull up a desktop window like the one below, showing you a folder full of recovered data. Also, notice in the preview below that the recovered image does indeed, not carry over the extra coloring that RescuePRO’s software assigned to it in the preview.

    SanDisk Recovery PRO memory card recovery

    There you have it; a relatively simple, low cost way, to potentially get back precious photos that you thought were lost. Either way, do yourself a favor and remember to always format your memory card in your camera (not your computer) after every use; doing this will keep your memory card up to speed, and lessen the chance of it becoming corrupt over time.

    Since this is one of many options, let me know in the comments below if you have a preferred method or program for recovering lost images.

    googletag.cmd.push(function() {
    tablet_slots.push( googletag.defineSlot( “/1005424/_dPSv4_tab-all-article-bottom_(300×250)”, [300, 250], “pb-ad-78623” ).addService( googletag.pubads() ) ); } );

    googletag.cmd.push(function() {
    mobile_slots.push( googletag.defineSlot( “/1005424/_dPSv4_mob-all-article-bottom_(300×250)”, [300, 250], “pb-ad-78158” ).addService( googletag.pubads() ) ); } );

    The post How to Recover Lost Files from a Memory Card by Suzi Pratt appeared first on Digital Photography School.


    Digital Photography School

  • 10 Portrait Composition Tips to Frame Your Subject Perfectly

    How you compose and frame your portrait is important for creating visual impact and connection with the viewer. It can dictate the mood and feel of the portrait, making it feel inviting or uncomfortable. Knowing a few rules, and how to break them effectively is a good place to start. In this article I’m going to give you some general Continue Reading

    The post 10 Portrait Composition Tips to Frame Your Subject Perfectly appeared first on Photodoto.


    Photodoto

  • 3 Questions to Ask Yourself When Starting a Photography Business

    I have met a lot of people who, upon getting their first DSLR, immediately want to start taking pics of their kids, their friends, some high school seniors, or maybe even a wedding. They want to dive headfirst into the deep end of the photography pool, even if they aren’t entirely sure what they are doing. For the record, I fully support this! Experience can be the best teacher of all, and even if the stakes are high like a wedding or graduation, I admire those who can throw caution to the wind and jump right in, even if they may be a bit unprepared.

    father-boy

    That sense of excitement and wonder, as well as a willingness to try new things and experiment with your equipment, is something that tends to wane as the years go by and so many cameras start gathering dust on closet shelves. It’s this sense of newness and enthusiasm that, in my opinion, is missing from some of the more seasoned photographic veterans that I visit with from time to time.

    However, if you are one of those individuals with a new camera who just can’t wait to start snapping photos of friends and family, and maybe even create a Facebook page for your new photography side project – I would advise you to pause and consider a few questions first. This will help ensure that you are getting your photography business started on the right foot and setting yourself up for long-term success, not just a few bucks on the side and some clicks to your website.

    1. What does my client expect?

    “Wait a second,” you might be saying to yourself right now. “These people are my friends and family…not my clients!” While this might be true, if you don’t start seeing the people you photograph as clients, you might find it hard to separate your personal relationships from your professional side as you get more established in your craft.

    student-fence

    The first thing you need to square up are their expectations of what you will provide. Everyone you photograph, whether it’s people you have known your whole life or new clients who found your website or social media account, will have a unique set of expectations for what their photography session will involve. Aunt Ginny might think you will take some tasteful outdoor pics like the ones her sister posted on her Instagram. Your buddy George might want some indoor studio photos of his kids like the ones he saw at an art fair downtown last weekend. Someone named Rachel, who emailed you from your website, would like you take bridal photos like the ones she saw in a wedding magazine. Meanwhile, your own personal style is more suited to newborns and infants since you are not very comfortable directing people and telling them what to do during a photo session.

    That’s just the beginning! If you don’t know what these people are expecting, they will likely walk away less than satisfied, even if you think your photos of them are beautiful.

    Setting expectations for success

    One of the best ways you can manage your clients’ expectations is to provide them with some existing images that showcase your overall style and approach. Plan on giving your clients some examples of the types of photographs you take so they know whether or not you will be a good fit for what they want. You can also visit with them over email, social media, phone, or in person to make sure you can provide the types of photos they are looking for.

    family2

    If you do not already have a portfolio to show potential clients, you can enlist the help of some friends and family specifically for this purpose–but again, remember to manage expectations. If you take this approach, the goal is to get pictures that you want, not necessarily what your models want. Make sure the people you are photographing in these situations know that they are doing this to serve you and your needs, and if they do happen to like the pictures you take then you could reciprocate by doing a session for them in the future.

    The flip side of knowing what your clients expect is making sure that you understand your expectations, which is just as important. Do you want to take photos that are posed or candid? Will you travel outside of your community, and if so, will you charge a fee? Do you plan to do extensive edits after the shoot, or are you the type of person who prefers to shoot in JPG and not alter things afterwards? Will you photograph major life milestones like weddings, if given the chance, or do you prefer more subdued scenarios like casual family photos?

    Of course one of the best ways to mitigate any potential problems is to have a contract in place so you can make sure you and your clients are both on the same page. At this point you might be thinking “Why does it have to be so complicated? I just want to go out and shoot photos.” This might all seem like it’s a big hassle, but if you don’t spend some time considering your expectations as well as those of your clients, you are likely going to end up with far worse problems sooner than you think.

    student-tree

    Being clear on exactly what this young man wanted, as well as what I would do, helped make this high school senior photo session go smoothly.

    One of the most painful experiences you can have as a photographer is when your clients are unhappy with their photos. Usually, but not always, this is a result of mismanaged expectations. They were wanting one thing, and you delivered something else. By making sure you understand what your clients want, whether they are family, friends, or perfect strangers, you will make great strides in not only providing the best photos possible, but building long-term relationships that will keep them returning for pictures in years to come.

    2. Can I make my camera do what I want it to do?

    There is a strong temptation when you first upgrade to a DSLR to put it in Auto and expect your photos to be amazing. To some degree, that can certainly happen–the Auto mode on modern cameras does a good job of getting things like exposure and white balance right, but this is only a small part of the total photographic equation. As a photographer you need to spend time learning not only about the basics of exposure, but how to control your camera in such a way so as to make it do what you want.

    Knowing how various f-stops affect the image is one thing, but knowing how to quickly change the aperture while in the middle of a photo shoot is another thing entirely. Less expensive cameras like the Nikon D3300, Canon Rebel T3i, and Sony a6000 are, in many aspects, just as capable as their more expensive counterparts. But many of them require you to use various menus and multi-purpose buttons to change settings instead of having dedicated buttons for things like ISO, White Balance, etc.

    I know it sounds elementary, but reading the manual for your camera is a great way to familiarize yourself with its capabilities. Make sure to have your camera in your hands while doing this so you can start to learn not only what your camera can do, but how to make it happen. As the saying goes; practice, practice, practice. If you’re in the middle of a shoot and you need to quickly change from matrix to spot metering, or do some bracketing in order to get the proper exposure, you don’t want to waste time fiddling with buttons and menus while the moment passes before your eyes.

    Popular entry-level cameras like the Nikon D3200 have many advanced functions, but their lack of dedicated buttons and dials requires you to use menus to access them.

    Popular entry-level cameras like the Nikon D3200 have many advanced functions, but their lack of dedicated buttons and dials requires you to use menus to access them. Make sure you know how to do this before doing a photo session.

    As an example, I recently spent some time with my father who is an avid photographer, and throughout the course of our conversation we got to talking about off-camera flash techniques. He shoots with a Rebel T4i, and through some experimentation we discovered that it is capable of triggering an off-camera flash with the built-in pop-up flash. We both thought this feature was reserved for Canon’s more expensive cameras, and he was delighted to find out that he would not need to purchase wireless triggers for photo sessions that require off-camera lighting. The moral of the story is that your camera can probably do more than you think, but it requires some research, experimentation, and the courage to move away from the convenient Auto mode.

    With a little practice, you will start to figure out the many capabilities your camera has, and how to use them on photo shoots. If you are trying to achieve a particular look or style when shooting photos for clients, you might not need to buy any new gear at all–you just need to make sure you know all the details of operating what you already own.

    Of course it’s also entirely possible that your camera, lenses, or other gear can’t do what you want them to do. Your creative vision and goals for a photo session might be far beyond the reach of what your setup is capable of achieving, and you might discover that in order to fulfill your, or your client’s, wishes you will need to spend hundreds or even thousands of dollars on equipment. But remember the old adage; knowing is half the battle.

    You might not need to get any new camera gear in order to pull off a particular photo shoot–you might, instead, have to simply adjust your expectations and make sure to communicate with your client about it as well. Even a DSLR with a basic kit lens can do many things, but there are some limits. Knowing them before you are on location or in a studio with a client will help ensure you can get the most out of what you do have.

    canon-70-200-L

    Canon’s popular 70-200mm f/2.8 lens is an outstanding workhorse, but costs as much as several less-capable lenses. You might discover that you need to spend money on equipment like this, but it’s also possible that you can get by with what you already own.

    3. Am I prepared for the long haul?

    It’s such a thrill to start taking photos for other people, and in a way I envy all you new photographers who are reading this while pondering the incredible opportunities in front of you. But if this is you, I would advise you to take a step back and spend some time thinking about your long-term goals so you have a better understanding not only of what you want, but what you will be able to do for your clients.

    As you take on more jobs and word begins to spread, you might find yourself becoming far too wrapped up in what was once just a fun hobby. Planning for sessions, re-shooting when things don’t work out, investing in new gear, and spending hours editing and fine-tuning in Lightroom or Photoshop are not the sorts of activities people usually have in mind when they start to get into photography as more than just a simple pastime. But all these elements (and many more) will ultimately become factors in how you approach your photography, so it’s important to think about them upfront.

    Before you start spreading the word to your friends about your newfound photography venture, spend some time considering all the other elements besides just taking photos that will come into play as the months and years go by. It’s entirely possible that a month or two down the road you might find yourself dreading the editing process, but so many people like your photos that you are getting dozens of requests for photo sessions. This would put you in a bit of a bind, enough so that you might be tempted to toss your camera aside and wish you had never even started taking photos in the first place!

    Considering right upfront whether you are prepared to do this over the long run will help you deal with these situations if and when they arise.

    family

    Photography can be a lot of work, but it can also be a ton of fun. And it’s such a good feeling knowing you can capture moments that people will have with them for the rest of their lives.

    Of course the flip side of all this is that you might be positively giddy at the prospect of meeting with clients, taking photos, editing them, and all the other activities that are involved with photography. But, no one notices. Months go by without getting any clients or photo opportunities and you could find yourself wondering why you bothered to even do this in the first place. Again, you need to have a plan for how you will deal with these types of situations, and figure out if you really are in this for the long haul. The truth of the matter is everyone has their ups and downs, with periods of frantic activity followed by long stretches of finger-tapping. If you spend time thinking about how you will deal with both of these extremes and everything in between, it will help you set yourself up on the road to success from the very beginning.

    Of course these are just three questions to consider, and I feel as though we have barely touched the surface. What about you? Are you a seasoned pro with some advice to people just starting out, or are you just beginning to think about doing more with your camera, but wondering what to do? Leave your thoughts in the comments below.

    googletag.cmd.push(function() {
    tablet_slots.push( googletag.defineSlot( “/1005424/_dPSv4_tab-all-article-bottom_(300×250)”, [300, 250], “pb-ad-78623” ).addService( googletag.pubads() ) ); } );

    googletag.cmd.push(function() {
    mobile_slots.push( googletag.defineSlot( “/1005424/_dPSv4_mob-all-article-bottom_(300×250)”, [300, 250], “pb-ad-78158” ).addService( googletag.pubads() ) ); } );

    The post 3 Questions to Ask Yourself When Starting a Photography Business by Simon Ringsmuth appeared first on Digital Photography School.


    Digital Photography School
  • Thoughts on the Newly Released Olympus OM-D E-M5 Mark II


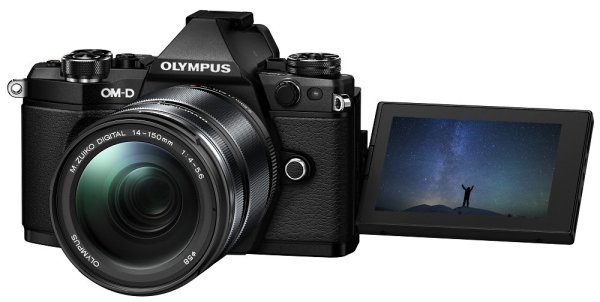
    OMD-EM5-markii-1

    Photo courtesy of Olympus

    Olympus recently released an update to their flagship mirrorless camera, the new OM-D EM 5 Mark II. It’s been eagerly awaited by Olympus fans – let’s take a look at some of the new features and see how it stacks up.

    In a hands-on field test the guys from The Camera Store (in Calgary, Canada) put the camera through its paces. See their thoughts in this video as the try out:

    • The new High Res mode for making large files
    • Image stabilization
    • High ISO settings
    • Video mode

    Some other new features include:

    • Improved 5-axis image stabilization
    • Rotating and tilting screen
    • Electronic silent shutter to maximum 1/16,000th of a second
    • 10 fps burst mode
    • A new optional tilting/rotating clip-on flash
    • WiFi
    • Mic jack for video input
    OMD-EM5-markii-2

    Photo courtesy of Olympus

    For more of an overview of some of these and more, check out this video by Olympus themselves (hosts name is Rich).

    I had the pleasure of using the OM-D E-M5 original for 2 months in Nicaragua after my Fuji X-T1 had some issues and had to be sent back to Canada. A friend was nice enough to loan me her Olympus and I have to say I was really impressed with it. I’m happy with the Fuji now (they replaced the motherboard) but I’m kind of interested in giving this puppy a test drive. If it’s that much better than the first edition it could blow my socks off.

    So have you considered this camera? Do you have the original and are ready for an upgrade?

    What are your thoughts? Is this a real improvement or just an update for the sake of launching an update? At what point do you say, “Okay I gotta have that!”?

    googletag.cmd.push(function() {
    tablet_slots.push( googletag.defineSlot( “/1005424/_dPSv4_tab-all-article-bottom_(300×250)”, [300, 250], “pb-ad-78623” ).addService( googletag.pubads() ) ); } );

    googletag.cmd.push(function() {
    mobile_slots.push( googletag.defineSlot( “/1005424/_dPSv4_mob-all-article-bottom_(300×250)”, [300, 250], “pb-ad-78158” ).addService( googletag.pubads() ) ); } );

    The post Thoughts on the Newly Released Olympus OM-D E-M5 Mark II by Darlene Hildebrandt appeared first on Digital Photography School.


    Digital Photography School
  • Understanding the Radial Filter in Lightroom

    One of the most useful features in Lightroom is one that tends to get overlooked, or at least under-utilized. The Radial Filter, introduced in Lightroom 5, is an incredibly powerful image adjustment tool that can be used to enhance your photos in many ways. From creating vignettes, to enhancing colors, to adjusting the exposure, and white balance, this humble little icon sitting on the right-hand side of the Develop module can unlock a variety of creative possibilities and bring new life to not only your photos, but your photography as a whole.

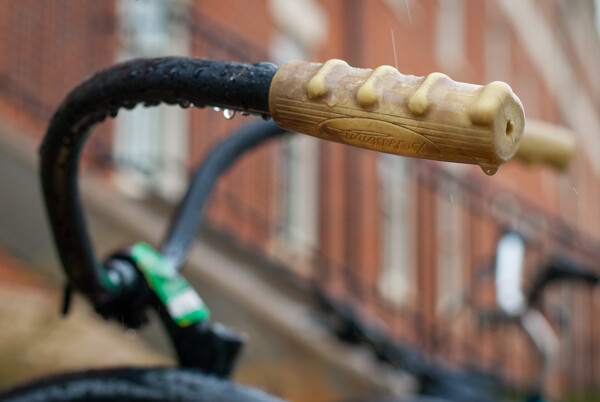
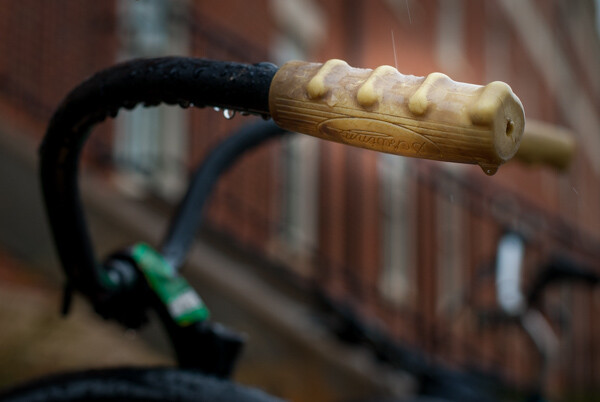
    bike-handle-before

    Before you start using the Radial Filter, it’s important to understand just what it does. Similar to the Adjustment Brush and Graduated Filter, you can use the Radial Filter to add one or more specific adjustments to a select area of a photograph, and edit your changes dynamically after they have been implemented. But while the Graduated Filter adds a gradual adjustment in a linear fashion, the Radial Filter adds a similar adjustment in a circular pattern. For example, here’s a picture of a bicycle handle before adding a radial filter (see above image).

    It’s a decent image, but I’d really like to draw the viewer’s eye directly to the yellow handle by adding a Radial Filter. In this image below the filter has been applied a bit too extreme, but I wanted to give you a clear idea of what exactly this tool does.

    bike-handle-after

    By adding a Radial Filter adjustment and decreasing the exposure, I created a vignette effect to highlight the bicycle handle.

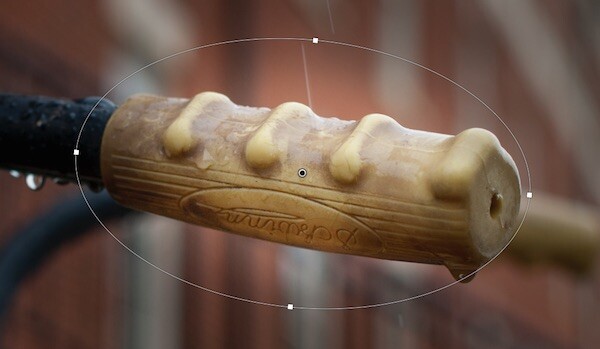
    Notice how the effect is centered on the hand grip and gradually fades from light to dark. Various parameters can be adjusted as well, such as the degree to which the filter darkens or lightens the image, how gradually it fades, and even whether to use a custom color for the filter itself. Radial Filter adjustments, like most edits done in post-processing, are better if the effect is subtle and understated. As you can see in the following example, the filter can be rotated to better match your creative vision for the shot.

    bike-handle-radial-filter-rotated-closeup

    In this image the effect is subtle, but you can see how such flexibility would come in handy in other situations as well. By matching the rotation and size of the radial filter to the bicycle handle, I was able to create the exact type of adjustment that the picture needed.

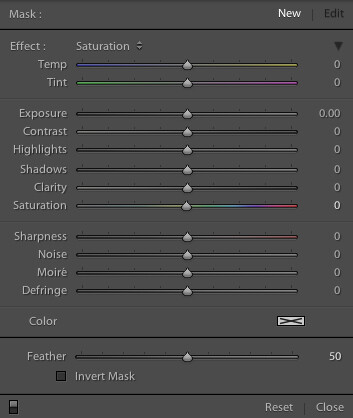
    One of the best things about the Radial Filter, though, is that it is not limited to just making things brighter or darker. Lightroom gives you over a dozen parameters to adjust such as White Balance, Tint, Saturation, and even whether to invert the filter so the effects are applied on the inside of the circle, instead of on the outside.

    radial-filter-panel

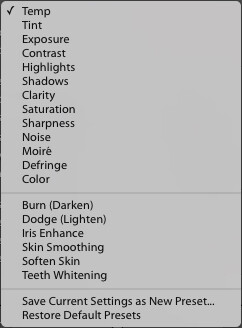
    There are several built-in presets as well, so if you’re not quite sure where to start you can pick one of them and use it. You can also create your own presets for repeating a particular effect in the future.radial-filter-panel-presets

    Finally, the flexibility of the Radial Filter can hardly be overstated. You are free to edit your adjustments at any time, and once you apply a filter to your image you can go back and change it as much as you like. You can use multiple filters on a single image too, giving you complete creative control over your photos.

    For an example of how the filters can be used to adjust color and not just create a vignette, here’s a photo of a girl holding a teddy bear without any radial filter adjustments.

    girl-before-filter

    The original image, without any adjustments applied.

    I was fairly pleased with the original, but wanted to isolate her face and focus the viewer’s attention on her, so I used two Radial Filters: one to increase the saturation and shadows on her face, and another one to de-saturate the entire rest of the photo.

    I intentionally went a bit overboard with the changes here, and as with most adjustments a more balanced and subtle approach is probably best, but I wanted to give a clear illustration of how this works so you can start to see the usefulness of the Radial Filter in your own work.

    girl-after-filter

    Adding two different Radial Filters had a dramatic impact on the image as a whole.

    At this point you might be wondering why you would use the Radial Filter, when some of these adjustments can be implemented using the Adjustment Brush tool. The key to remember is that the Radial Filter is graduated, meaning its effects are implemented in terms of increasing value–less at the edge, and more at the center. You can also control how gradual the filter actually works each time you use it, which is a bit different than the brush tool. While the latter does have a feather parameter to give you some control over how gradually a brush adjustment is implemented, it’s not well suited for adjustments that need to change in value over a wide area of the photo. That’s where the Radial Filter really shines.

    Regardless of how you choose to implement it, the Radial Filter can be a powerful addition to your photo editing workflow and if you have never looked into it I would encourage you to do so.

    What are your favorite uses for the Radial Filter? Do you have any other tips to share? Post them in the comments below!

    googletag.cmd.push(function() {
    tablet_slots.push( googletag.defineSlot( “/1005424/_dPSv4_tab-all-article-bottom_(300×250)”, [300, 250], “pb-ad-78623” ).addService( googletag.pubads() ) ); } );

    googletag.cmd.push(function() {
    mobile_slots.push( googletag.defineSlot( “/1005424/_dPSv4_mob-all-article-bottom_(300×250)”, [300, 250], “pb-ad-78158” ).addService( googletag.pubads() ) ); } );

    The post Understanding the Radial Filter in Lightroom by Simon Ringsmuth appeared first on Digital Photography School.


    Digital Photography School
  • Vital Tips for Photographing and Editing Interiors

    Shooting interiors can be tricky. Spaces tend to either look cold and empty, or warm and inviting. While we always strive to capture what the eye sees, the complexity of the human eye will never be matched by the lens of any camera. Still, there are things you can do before, during, and after shooting an interior space that will go a long way in improving your chances of ending up with stellar photos.

    Not sure where to start for improving your architectural photos? Here are my favorite tips for photographing interiors, plus some tricks for touching them up with Adobe Lightroom.

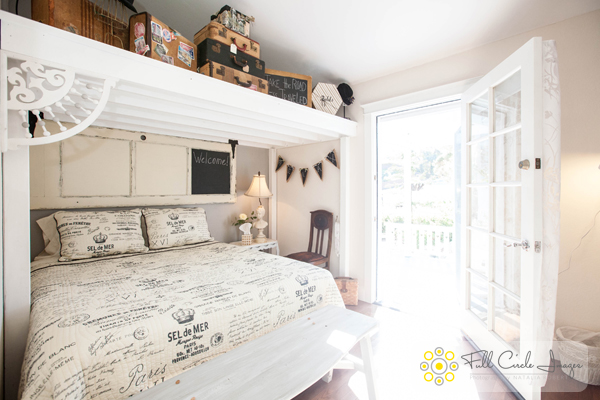
    Interiors1

    How to Shoot Your Best Interior Photos

    Grab your favorite camera and use these tips for snapping more professional-looking photos every time.

    1. Prepare the space

    Set the stage by taking the time to de-clutter and open up the space. Clear all flat surfaces and floor areas. Open all blinds and curtains. Clean any dirty dishes in the sink and put them away. Be sure to clean the space much more so than you would for yourself. We get used to clutter and become blind to it, but a bit of clutter in a photo goes a very long way.

    2. Add warmth and life with personal touches

    The space should feel lived-in and inviting, like the kind of place you can imagine yourself spending your days.

    You can create those feelings in your photos, by adding personal touches. Set the dining table for two and place a vase of fresh flowers in the center. Transform an empty breakfast nook into a great spot to lounge by adding a newspaper, coffee cup, and a plate or bowl of light (and pretty) snacks. Hang a fluffy bathrobe on a hook next to the bathtub.

    When it comes to decorations or color palettes, you want to either fill the space with personality to play up the uniqueness of it, or keep everything neutral with pops of bright color.

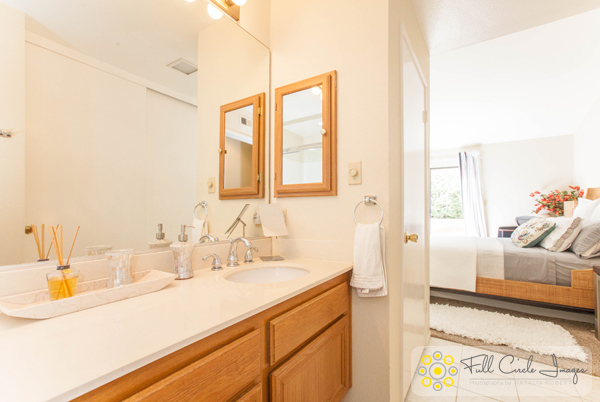
    Interiors2

    3. Fill the room with light

    All interior lights MUST be on. While they’re not necessarily helpful in actually lighting the space, they help to create the ambiance. The absence of interior lights will give the space a cold, empty feel.

    When using flash, never directly point it into the space. Instead, bounce it off the ceiling or walls, depending on what the space offers. If you can help it, always use flash as a source to fill in shadows, rather than as a main source. That said, if there is enough ambient light (which is your ultimate goal), skip using flash altogether.

    Also, play with the strength of your flash. For my Canon, I like to slightly overexpose by about 1/3 of a stop and push the flash to about +2/3 in ETTL mode. Each camera can be different, so don’t be shy about experimenting with what works best with yours.

    For outdoor shots, consider setting your flash to manual mode and using it as the fill light. I tend to set mine at 1/16th of full strength, but again, experiment with what works with your camera’s setting and your personal preference.

    4. Shoot low

    Keep verticals as truly vertical as possible by shooting from a slightly lower camera angle. If you’re going for a graphic composition, watch your horizontals as well. It’s quite easy to fix these issues in Lightroom during your final edit (see more in the first editing tip below).

    5. Strike a balance

    When composing your shot, focus the viewer’s attention on where you want it to go. Consider using staged items to add depth and interest in the foreground. Try blurring the background to make foreground objects really pop. Avoid flat looking photos by contrasting different elements in the foreground, middle-ground and background. Remember to aim for balance, not distraction.

    Using the background to show a connecting room is also a great way to give the viewer a sense of space. This will add interest and make the viewer feel like they can visualize walking through the home.

    Interiors3

    How to Edit Your Interior Photos

    Import your photos to Lightroom and follow these basic editing steps to create more powerful images. Tip: You can also use Photoshop for many of the steps laid out below.

    1. Straighten out the lines

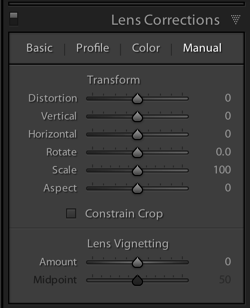
    Doing this will instantly polish up your photos. If you shot at a height of roughly five feet from the floor and kept the camera level, the amount of straightening you have to correct should be minimal. In Lightroom, you can find this tool under Lens Correction under the Manual section (tab).

    2. Fill in and even out the light

    Screen Shot 2015 02 10 at 2 01 28 PM

    Before doing any adjustment to brightness or exposure, be sure to correct any lens vignetting that may have happened. This is when the corners of the image are a bit darker, and is a common effect in wide lenses. You can find the slider for this setting in Lightroom under Lens Correction, Manual, then Vignetting.

    Once your corners are corrected, use the Adjustment Brush to correct the exposure in bright or dark areas. This is your time to “dodge and burn.” I find that erring on the side of overexposure actually has a more natural feel to the space. I recommend pushing the overall exposure up slowly, then when it feels too bright, start pulling back.

    You can also lighten dark areas slightly with the shadows slider in the top (Basic panel) section. However, be careful not to lighten so much that you bring out grain (noise) or that the image looks fake.

    3. Perform color corrections

    Adjust the overall temperature as needed. You’re aiming for warmth, not yellow. Also, bump up the Vibrance a bit instead of messing with the saturation. Oversaturating can quickly make a photo look too fake, while Vibrance is a more subtle tool that helps give the color a little extra kick. Again, playing with the sliders on these settings, and seeing what your eye is comfortable with, will go a long way toward honing color-correcting skills.

    Interiors4

    4. Adjust the clarity and sharpness

    Push the Clarity slider up (to the right) slowly. Clarity is a great way to polish up a photo without going overboard on contrast; plus, it gives the photo an overall crisp look. Depending on the image, you may want to simultaneously play with darkening the blacks a bit, too.

    Lightroom has two great presets built-in for sharpening: faces and scenic. I use scenic for architectural mages because it sharpens a bit more than the preset for faces. It’s a subtle, but vital, touch.

    5. Clean up with spot removal and cloning

    Use the Spot Brush tool to remove any dust spots or other anomalies that may have gotten onto the photo. You will see two options in Lightroom for the brush: Clone and Heal. Healing is a great option when correcting small spots, as it will have a softer blend to it. Next, use the Cloning tool to remove any glares or reflections of you in the photo. You can also use it to remove address numbers, if requested.

    While I typically use Lightroom for editing photos, my personal preference for cloning is Photoshop’s stamp tool. It seems to allow for more control over the brush itself, therefore making it easier to clone in a way that looks natural.

    How do you shoot and edit interior spaces? Share your tips and photos in the comments section below.

    googletag.cmd.push(function() {
    tablet_slots.push( googletag.defineSlot( “/1005424/_dPSv4_tab-all-article-bottom_(300×250)”, [300, 250], “pb-ad-78623” ).addService( googletag.pubads() ) ); } );

    googletag.cmd.push(function() {
    mobile_slots.push( googletag.defineSlot( “/1005424/_dPSv4_mob-all-article-bottom_(300×250)”, [300, 250], “pb-ad-78158” ).addService( googletag.pubads() ) ); } );

    The post Vital Tips for Photographing and Editing Interiors by Natalia Robert appeared first on Digital Photography School.


    Digital Photography School