Category: Photography

  • Natural Looking HDR in Photoshop and Lightroom in 5 Easy Steps

    HDR (High Dynamic Range) photography was developed out of necessity to overcome limitations of photography equipment, mostly in digital cameras’ sensors. From the beginning, the technology was intended to make photographs as close as possible to human experience by bridging the gap between what the human eye perceives, and what the digital camera can actually capture.

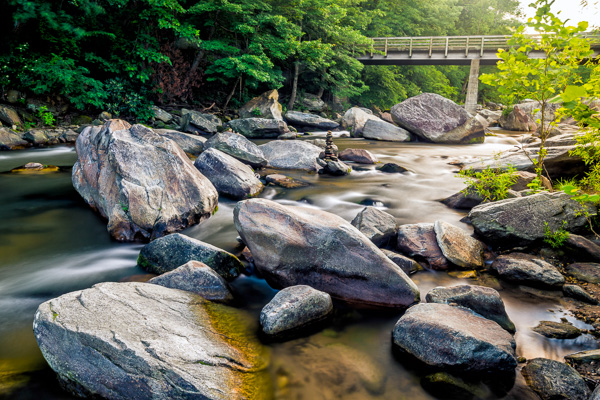
    NaturalLookingHDR Photo 1

    Montreal, Canada – HDR processed, five exposures, tripod.

    Think of HDR as a sophisticated, software based, ND (Neutral Density) filter. Instead of placing it in front of the lens at the moment of capturing photos, HDR allows you to accomplish it in post-processing. It sounds practical and convenient, right? There is no need for extra equipment and you can work on extending the dynamic range of the scene without rush, at your own pace, in the comfort of your home.

    NaturalLookingHDR Photo 2

    Montreal, Canada – HDR processed, three exposures, hand-held.

    Why is HDR photography getting such bad press lately?

    I believe that the main reason for this is the misconception in defining what HDR actually is. Somehow, there is a notion, that HDR is a new style in photography, which is completely false. HDR is not a style or genre; it is a technique of post-processing. It is a tool. The way the final photo looks is absolutely up to you, as you have full control over the entire process.

    There are many different tools and techniques for creating HDR photographs and each one has its own advantages and limitations. If you are going for a surrealistic, edgy look in your images, Photomatix is your best friend.

    But, if you are like me and your main goal is to achieve images that are as natural as possible and reflect the best aspects of the original scene, I definitely have a solution for you – one that I’ve successfully used for years and love.

    On my blog, dedicated to travel and landscape photography (see my bio below for a link), you can find a detailed breakdown of my shooting and processing techniques for almost every photograph. In most cases where I used this technique, it is not easy to tell if the photo was processed as HDR unless you read the description. They look that natural.

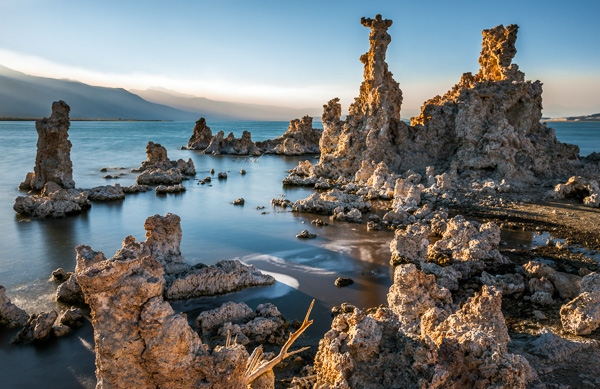
    NaturalLookingHDR Photo 3

    Big Sur, California – HDR processed, three exposures, tripod.

    The technique is somewhat underappreciated, but it is very powerful and easy to master. The beauty of it is that you do not have to learn additional software and there is no learning curve. You use familiar and powerful Adobe tools, Lightroom and Photoshop, and nothing else.

    NaturalLookingHDR Photo 4

    Cayo Coco beach, Cuba – HDR processed, three exposures, tripod.

    This technique leverages the power of 32-bit processing in Photoshop HDR Pro, the module of Photoshop that was established in version CS3.

    Below is the infographic that illustrates the schematic view of the entire process, from the time you take the photo to the moment you are ready to save the final image.

    NaturalLookingHDR Photo 5

    The Technique

    1. Bracketing Photographs

    Before you can start processing photos for HDR you need to take a series of bracketed shots with different exposure values. Normally, you take between three and five shots in each series but, in extreme lighting conditions (example: shooting directly into the sun), you might need to take anywhere from seven to even nine shots.

    Ideally, you take multiple shots on a tripod but, since Photoshop has an extremely effective alignment tool, it is possible to take hand-held photos and let Photoshop align them.

    2. Lightroom: Preprocessing

    This is very simple step that should not take longer than one to two minutes. Import photos into Lightroom and only apply the following adjustments in the LENS CORRECTIONS panel:

    • Enable Profile Corrections. Lightroom detects the model of your lens and applies corrections to fix any type of distortions.
    • Remove Chromatic Aberration. Lightroom automatically cleans the edges in your photographs.

    3. Photoshop: Tone Mapping

    This is an almost completely automated process and should not take longer than two minutes.

    In Lightroom, select the bracketed photos that you want to merge to HDR. Right click (option click on Mac) and go to Edit In > Merge to HDR Pro in Photoshop.
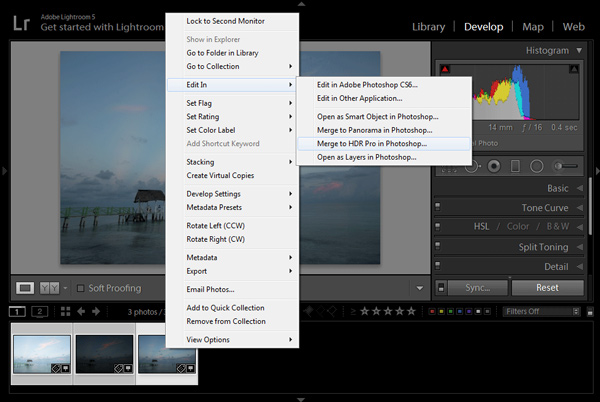
    NaturalLookingHDR Photo 6

    Your bracketed photos will open in Photoshop and will be placed on separate layers. Immediately, the complex algorithm will be applied in order to align the layers. This comes in handy if you took the photos hand-held, without a tripod.

    Next, the HDR Pro interface is triggered. All you have to do here is select the tone mapping mode. Opt for the 32-bit option to ensure that you preserve as much information as possible from the original images. Click OK.

    NaturalLookingHDR Photo 7HDR Pro will merge the bracketed photos into a new 32-bit image and open it in Photoshop’s main interface. The tone mapping is complete. All you have to do now is save the document (File > Save). The new HDR image will be saved and automatically imported back into Lightroom. You can find it next to the original bracketed photos.

    4. Lightroom: Main Processing

    This is the most exciting step. You edit the newly tone mapped HDR image with enormous bit depth (32-bit) to give it the desired look and feel you want. Use standard Lightroom workflow to achieve your artistic vision.

    Here is the photograph I took in Cuba and processed using this technique. Below the photograph, you can find a screenshot of the Lightroom interface with all of the adjustments I performed in order to achieve the final look.
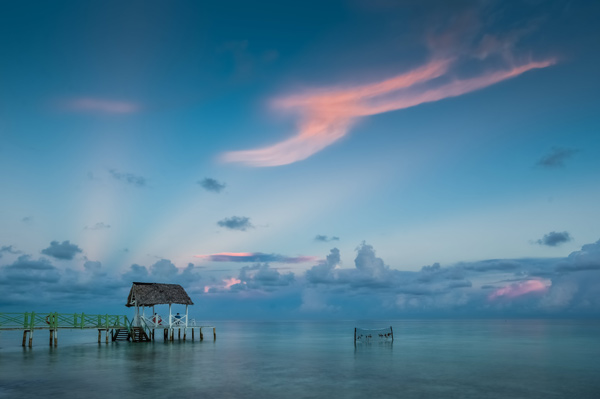
    NaturalLookingHDR Photo 8

    Cayo Santa Maria, Cuba – HDR processed, three exposures, tripod.
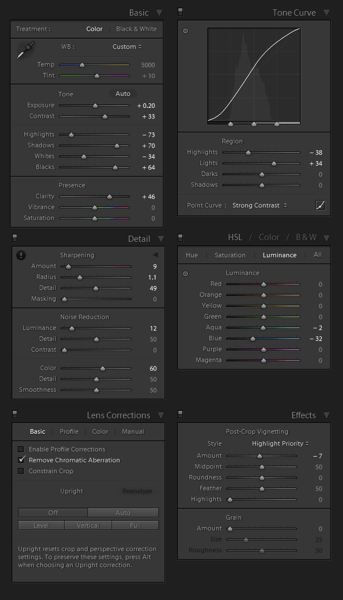
    NaturalLookingHDR Photo 9

    At this point, HDR processing is done. If you are happy with the way your photo looks, you can save it as a JPEG directly from Lightroom (“Export” in Lightroom).

    5. Photoshop: Final Touches (Optional Step)

    In some cases, HDR photos require additional edits, such as selective sharpening, noise reduction and HDR artifacts cleaning. Photoshop is your best friend for selective editing.

    Select the HDR photo in Lightroom, right click and select Edit > Edit in Adobe Photoshop. In Photoshop, do what is necessary to improve your final photo. In the majority of cases, all you will need is to reduce noise and nothing else.

    That is it. This is how you achieve natural looking HDR images in five easy steps or less.
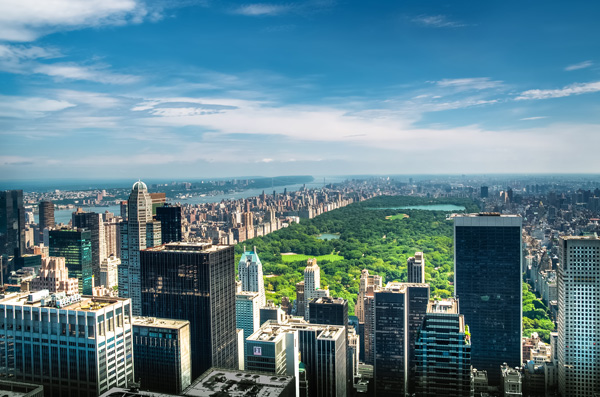
    NaturalLookingHDR Photo 10

    Manhattan, New York – HDR processed, three exposures, hand-held.

    PROS of 32-bit HDR processing in Photoshop HDR Pro

    • It does not require stand-alone HDR software
    • The learning curve is minimal
    • Tone mapping and editing are completely two separate processes and it is easy to achieve a natural look
    • This technique takes advantage of 32-bit editing

    CONS of 32-bit HDR processing in Photoshop HDR Pro

    • In some cases when there are multiple moving objects in the scene (trees, leaves, water), it can cause artifacts that require additional cleaning.

    Have you tried this method before? How do you process your HDR images? Please share in the comments below.

    googletag.cmd.push(function() {
    tablet_slots.push( googletag.defineSlot( “/1005424/_dPSv4_tab-all-article-bottom_(300×250)”, [300, 250], “pb-ad-78623” ).addService( googletag.pubads() ) ); } );

    googletag.cmd.push(function() {
    mobile_slots.push( googletag.defineSlot( “/1005424/_dPSv4_mob-all-article-bottom_(300×250)”, [300, 250], “pb-ad-78158” ).addService( googletag.pubads() ) ); } );

    The post Natural Looking HDR in Photoshop and Lightroom in 5 Easy Steps by Viktor Elizarov appeared first on Digital Photography School.
    Digital Photography School

  • Shoot for the Light – Improve Your Composition

    JB 1134 Edit

    JB 2111

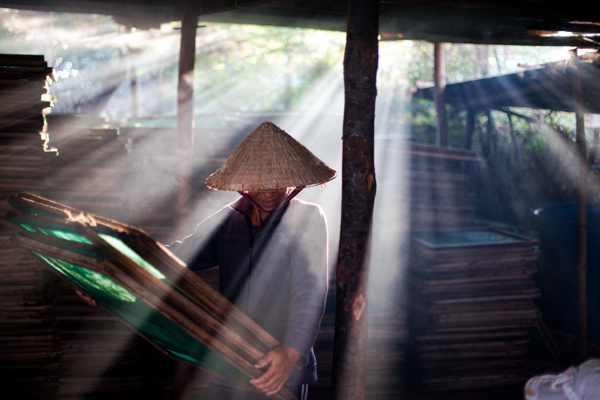
    Here is one of my most valuable tips. The one I will offer to someone who comes to me, complaining that after 20 years of taking photos they can’t get out of their usual compositions, and want to get into a new level of creativity.

    It may sound like something you have heard before. Yes, photography is all about light, and if there is a good light then there is a good photo.

    But no, I am talking about something more specific.

    JB 2548

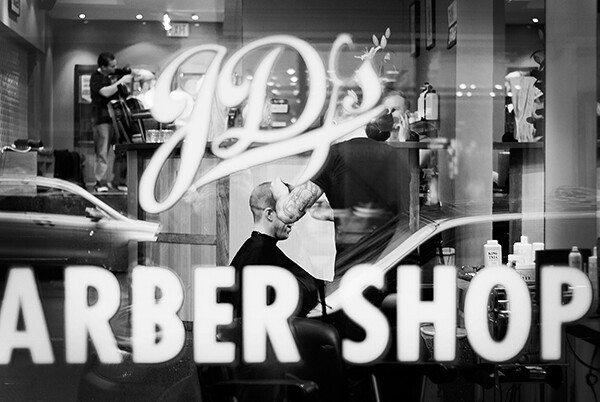
    Please note that I have always focused my photography, and my articles on travel photography, on people. So when reading this article, please think people photography (which also includes street photography).

    In travel photography, most people tend to look for a good subject to photograph. Of course that means that this subject should be “sitting” in an appropriate light, with a good catchy background, something not too distracting. The problem with this approach, is that you might end up taking the same kind of compositions again and again. Framing your subject on the side, rule of thirds, looking into the photo, etc. As much as these are nice photos, you may feel the need to develop your creativity and come up with something different.

    JB 1174

    JB 2352

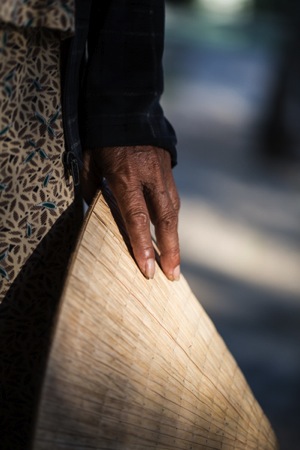
    What I am telling you, is to completely not focus your attention on your subject. After all, your subject does not matter (unless you happen to meet the new “Afghan girl” of Steve McCurry, or the girl with green eyes of David Lazaar). No, believe me, as someone living in Vietnam: one old lady with a pointy hat looks the same as another old lady with a pointy hat.

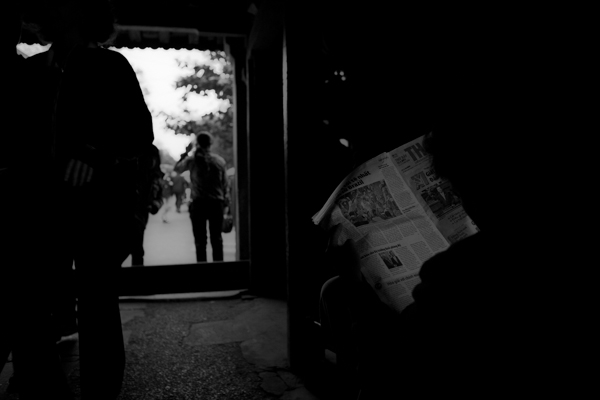
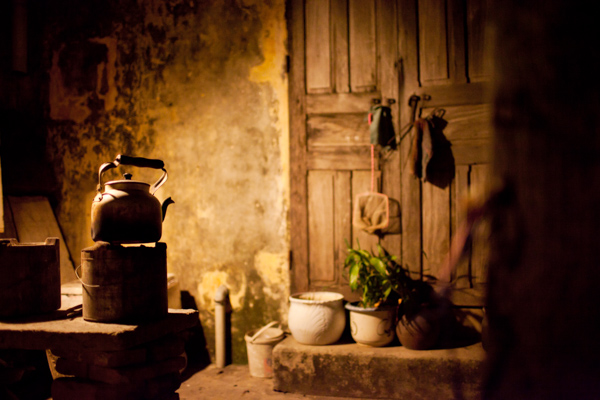
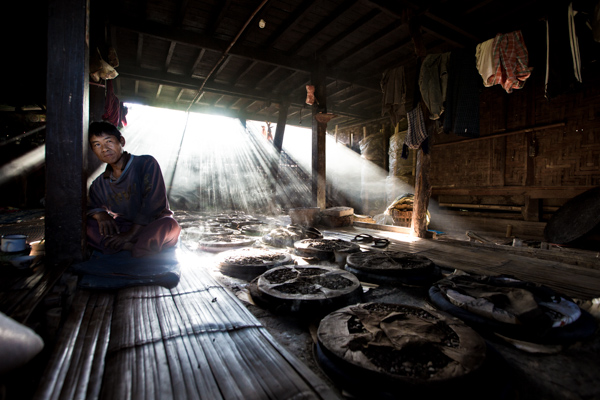
    Instead of that, try and focus your entire attention on the light around you. Not the beautiful sunset light in the whole sky, but the little spots of golden light right there, on the floor next to you. Yes, can you see them? Well, there is your next photo my friend.

    Yes, I hear you already, “What do you mean shooting light?! And what is my subject, what am I telling a story about?”. Well – now your job is to patiently wait for the right subject to walk into that light. But remember? Shoot the light.

    JB 6808

    IMG 6354

    In the same way as we say “fill your frame” in photography. Keep things simple, only include elements which are relevant to the story you are telling. You can fill your frame with that sumptuous golden light you found on the floor. And that is what is going to lead you to a completely new level in composition and creativity. Because you are only shooting that piece of light, you are going to crop your subjects in way you would never have dared before. You are going to break all the rules you have carefully been following until now, and create something new.

    IMG 3204

    It will surely be beautiful, as your light will be stunning. You may miss a lot of photos, as you have to get used to getting that close to things and people in a light that can be quite full of contrasts and colors. But with time and a bit of practice, things will start to take shape. You will get used to such new ways of composing your image, and your results will become sharper over time. Until you are getting comfortable with this new idea, and start re-creating your templates that will allow you to be fast and efficient and not miss your images.

    EJB 1426 IMG 1761

    “Heresy!!!” I can already hear. Sorry? Which book are you talking about? Look at the results you are going to achieve with this technique, and tell me if does not make you think in a complete new way, bringing completely new styles of images. If you don’t like it, well go and try something different. But surely you would have learned something out of it.

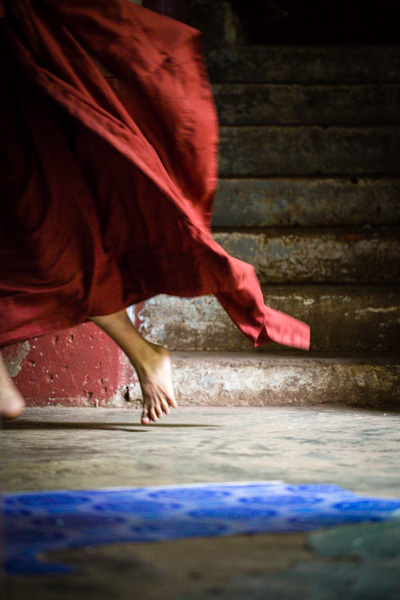
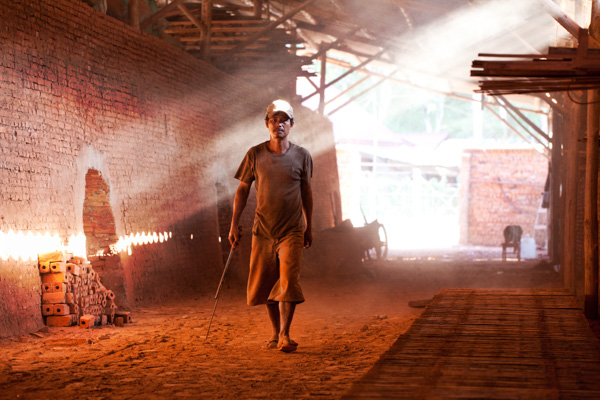
    Last year, while running a photo workshop in Myanmar, I managed to capture this image using this exact technique. I could see the light on the floor, and the beautiful blue color next to it. I also knew that this monastery was quite busy, and if I waited long enough someone would walk into my frame.

    EJB 1515

    One of my students and I laid down on the floor. I switched from Aperture mode to Manual (making sure I would have the right exposure, as the situation had very strong contrasts). I did compose the photo, exactly the way I wanted to have it, and I waited. Surely, after half a minute, some novices went down the stairs. They did spot us, and feeling a little shy to be photographed, they ran through the corridor, laughing out loud.

    Click – Click – Click

    I did not expect them to run in the first place so my shutter speed was right enough to freeze my hand shakes, or someone walking. But it gave some blur to the novice’s robe, and I liked the shot even more like that. After all, most new things that were created on our planet are the result of accidents!

    Go ahead, give it a try!

    EJB 1830 IMG 8352

    JB 6091

    IMG 6605

    IMG 4331

    IMG 9911

    googletag.cmd.push(function() {
    tablet_slots.push( googletag.defineSlot( “/1005424/_dPSv4_tab-all-article-bottom_(300×250)”, [300, 250], “pb-ad-78623” ).addService( googletag.pubads() ) ); } );

    googletag.cmd.push(function() {
    mobile_slots.push( googletag.defineSlot( “/1005424/_dPSv4_mob-all-article-bottom_(300×250)”, [300, 250], “pb-ad-78158” ).addService( googletag.pubads() ) ); } );

    The post Shoot for the Light – Improve Your Composition by Etienne Bossot appeared first on Digital Photography School.


    Digital Photography School

  • 6 Ways to Use Shutter Speed Creatively

    In many ways, shutter speed is an inaccurate term. I read an article a few years ago and the photographer referred to shutter speed as shutter time. The logic was spot on. A shutter always opens or closes at the same “speed”. The key value is how long the shutter stays open, hence shutter time. On Canon cameras the shutter speed function (shutter priority) on the mode dial is abbreviated to Tv, which stands for “Time Value”, and is a more accurate description of what this article is about. I am going to refer to shutter time as opposed to shutter speed, it sounds crazy, but it will make more sense. The reason this definition is important is because, we are going to be looking at how you can use the time that the shutter is open (and gathering light onto the sensor) creatively.

    Waiting for an image to unfold requires patience

    In a sense, shutter time is a bit like time travel. You camera’s shutter can open and shut in 1/8000th of a second. Think about that. Take one second, divide it by 8000 and one of those units is the time your shutter was open. That is very quick. On the other end of the spectrum, you can shoot super long exposures of 20 or 30 minutes. That means the shutter stays open for that length of time. Again, amazing. Think of all that light falling onto the sensor during that time, and the images that can be created doing so.

    The shutter time becomes more than simply a moment in time, it could be a split second (literally) or a few seconds. The resulting image will capture and freeze the moment or, with a longer shutter time, there will be blurred movement. This is the fun part of photography. In many ways, your camera can “see” events that happen which you cannot. The camera can capture a frozen moment and suspend your subject in that moment forever, this is like magic. The compelling images are amazing to see and are reasonably easy to make, so let’s take a look at a few of them and see how they are done.

    6 Ways to Use Shutter Speed Creatively

    1. Freezing the moment

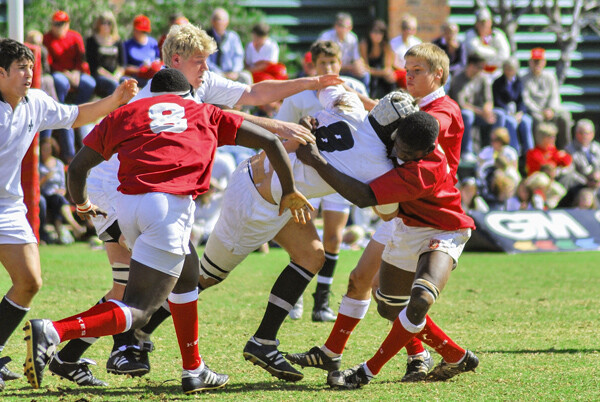
    These are the images we all know about; ones that have captured a frozen moment in time. Normally these are sports images, the winning goal, or the knockout punch connecting. They are intriguing to most people and are compelling because we can’t freeze the moment in our eyes. We see a moving, continuous rendition of the events happening in front of us. You have seen “slo-mo” shots of the winning goal; the frozen moment image is that equivalent.

    These images take a bit of practice to get right. Lets assume for a moment, you are photographing a soccer match. It is great to get action shots, but you will want to get any shots of the teams scoring goals. You will then need to have the correct lens. In sports photography, it will be a pretty long zoom or telephoto lens. Most sports photographers will use 400mm and longer. You will also need to keep your camera steady. A tripod in these cases is somewhat impractical as you need to be able to move the camera quickly and easily to follow the game. A monopod is normally what works best.

    freeze action 2

    Depending on the lighting conditions you need to make sure you have a shutter time that captures the players in mid-action. You also need to take the lighting into consideration. If you are shooting in an outdoor arena, the natural light may be sufficient, but if you are in an indoor arena, you might need to be more aware of your exposure. In that case, you may need to push your ISO up high enough to allow you to freeze your subject. In most sports 1/1500th of a second is the starting point for freezing action. In very fast sports like ice hockey, soccer, rugby and so on, you may need to be shooting at even faster speeds than that. This is how you set up the shots.

    Technique

    How to do it: Set your aperture to an aperture setting of f/2.8 or f/4.5. This will allow for a quicker shutter time, which will in turn freeze the action. If you are shooting a sporting event in the sunlight, you may need to have your shutter time set to 1/1500 or faster. If this is still not freezing the action, make the shutter time even quicker. Try and anticipate the action and release the shutter at the moment you think it will happen. Be aware that your focus will need to be spot on. With a wide aperture, you run the risk of misfocusing and missing a shot. I once heard a sports photographer say this ” If you see the goal in your viewfinder, you missed the shot”. When you do get that shot though, it will be worth it.

    2. The decisive moment

    Henri Cartier-Bresson coined the phrase, “The Decisive Moment”. Do a google image search on Cartier-Bresson and the decisive moment, you will see many of his great images. He was well known as a street and people photographer, and he believed that you need to choose the precise moment when something happens to hit the shutter release. As you can imagine, this is not easy. Sometimes this might mean you need quick reflexes. Freeze actionMost of the time, it requires patience. He would often set up the shot, get the framing right and then wait. You don’t want to wait for hours, but be patient, sit there for 20 or 30 minutes and watch the scene. Take note of how people are moving into, and out of your frame. When time is right, or the perfect subject (person, vehicle, animal, whatever you choose) moves into the best position, release your shutter at that moment. This will take practice and more than a few shots to get it right, but when you do, you will be ecstatic. The shot will look candid, but you will know what it took to get that image. Many people assume Cartier-Bresson’s images were simply shot quickly from the hip, but much of the time they were planned and he waited patiently for the decisive moment.

    Technique

    How to do it: You need to think of a scene you would like to capture, visualize it. You may want to capture the comings and goings at a coffee shop in your city. You may want to have someone with a red coat sitting outside, sipping coffee. You should then set up and frame your shot, then sit there until the scene unfolds. Someone with a yellow jacket may sit down, which might work too. So be flexible, but be patient, sooner or later the shot will unfold.

    3. Abstract and creative blur

    As I said earlier, shutter time is a bit like time travel. You can capture an infinitesimally small slice of a moment, and in other cases you can capture seconds, or even minutes. When the shutter is open, light is coming through your lens and falling onto the cameras sensor. If you allow this to happen for a long enough time, some part of your image will blur. Sometimes blur in an image is unwanted. This happens when your shutter time is too long, your camera moves unintentionally, and the image is ruined.

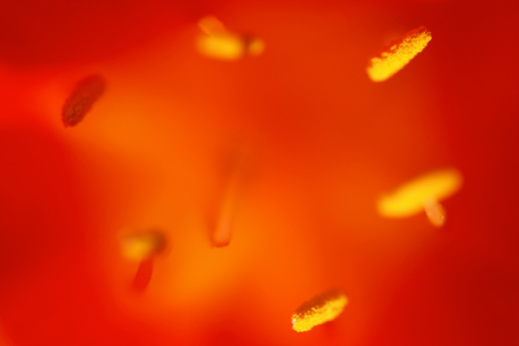
    A close up image of a flower, shallow depth of field blurs the background, but the yellow stamens are in focus

    A close-up image of a flower, shallow depth of field blurs the background, but the yellow stamens are in focus.

    The kind of blur I am talking about here is intentional blur. This technique can be used to make slightly, or completely, abstract images, depending on the shutter time. The longer the shutter time, the more movement there is, and the more blur you will see. Blurring can be the result of your subject moving, you moving the camera, or both. If your subject is moving and the camera moves, the blur can be very dynamic. If your camera is on a tripod and the subject moves, this creates a sense of speed.

    Technique

    How to do it: Set your aperture to f/5.6 or higher (smaller opening). Attempt this in low light conditions, just before and just after sunset. Set your shutter time to 1/10th of a second or longer. Release the shutter and move the camera quickly from left to right. You can rotate the camera, move it up and down, or even just shake it in your hand while the shutter is open. In this technique, you will be moving the camera and the scene could have moving elements in it too (i.e. a car or a bus could be driving past, or people could be walking in the scene). The results will be random and unusual, but with practice, you can create some pretty compelling abstract images.

    Camera swirl, this image was made by rotating the camera anti-clockwise while the shutter was open

    Camera swirl, this image was made by rotating the camera anti-clockwise while the shutter was open

    4. Low light exposures

    The goal in low light exposures is to have the scene in focus, and only one part in the scene moving. This is particularly interesting at night when you get light trails from a vehicle driving through your scene. You can do this in the early evening or evening if it has become dark. These images are compelling because the light trails from the vehicle seem to hang magically in the air while the vehicle itself is invisible. Another great time to shoot longer exposures is during the blue hour; the 20 to 30 minutes of soft blue light that fills the sky after the sun has set. This is a great time to do longer exposures too as the sky will look blue and your subject (a city or a landscape scene) will be well lit.

    Technique

    How to do it: Set your camera up on your tripod. Select an aperture setting of f/8 to f/11. Set your shutter time to expose correctly for the scene. Depending on the light your shutter time could be anywhere from 1/10th of a second to three or four seconds. As it gets darker, your shutter time will need to increase. Set yourself up in a position where something will be moving – cars, boats or even people can work well for this. Take a few shots to see how it is all working and make any adjustments. The important technique here is timing. If you want to get a shot with the car lights streaming through your shot, time it so that you release the shutter as the car is in the best place in your scene, similar to the decisive moment.

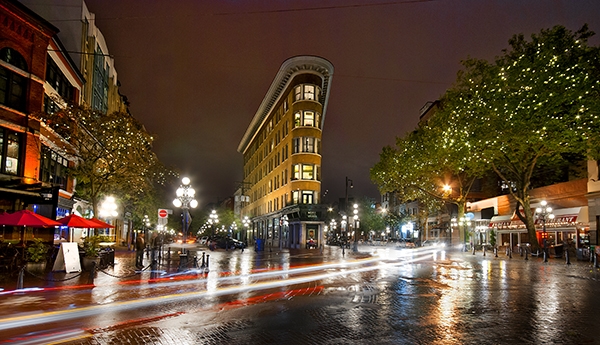
    This scene works well because the light trails add some dynamic interest to the image

    This scene works well because the light trails add some dynamic interest to the image

    5. Long exposures

    As the name suggests, these are longer shutter times. In some cases, they may be 20-30 seconds long, but for some really interesting images, you will want keep the shutter open for 15-20 minutes. Long exposures require the use of a 10 stop Neutral Density filter. This filter will block out the light sufficiently to allow you to open your shutter for long periods of time. The results can be amazing. You can use the ND filter in the day to make your shutter time longer. “Why would I want to do that?”, you might ask. You might have a scene with a windmill in it and you want to blur the movement of the windmill as it rotates. You might also want to create a seascape scene where the waves look silky and smooth. In these cases, an ND filter will be very useful.

    Technique

    Long exp 2

    ISO 100, f/11, just under 13 minute exposure.

    How to do it: Set up your camera on a tripod. Set your aperture to anywhere between f/11 and f/16. In these images, you will want to have an exposure time of 15-30 seconds and longer. You will need a cable release to go beyond 30 seconds on your exposure. You want a lot of movement in the scene, whether it is light trails or clouds moving across the sky. The longer you have the shutter open, the more surreal the image will become.

    If you have an ND filter, set up your shot first, use autofocus to get everything in focus, then switch your camera to manual focus. The reason is, once you put the ND filter on your lens, the scene will become very dark. If your camera is on autofocus, it may struggle to find a focal point. If that happens, your lens will “hunt” for something to focus on and you won’t be able to get the shot, or it may be out of focus. So, once you have focused your image, switch to manual focus and mount the ND filter onto your lens to make the shot. Be aware, long exposure photography can really eat up battery life, so carry spare batteries if you have them, especially on cold winter evenings!

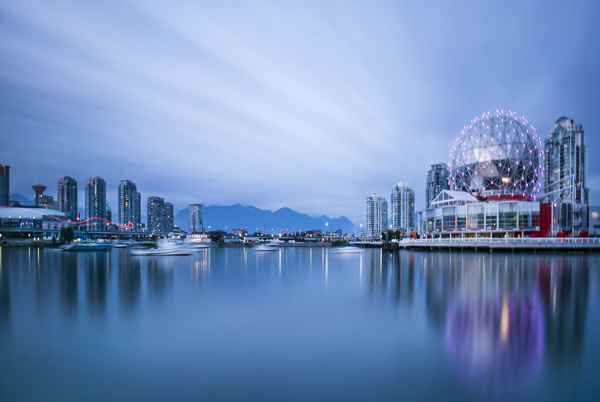
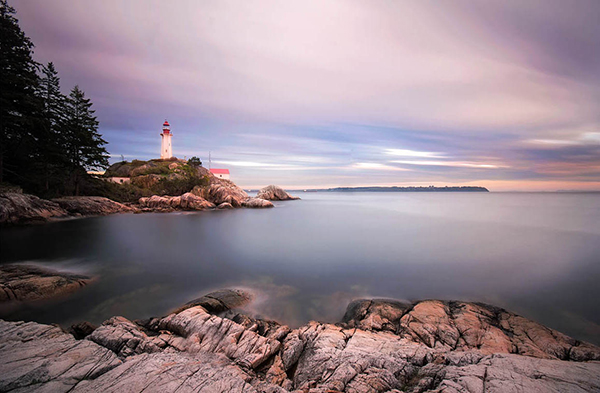
    This image was exposed for 4 minutes, which softened the water and the clouds

    This image was exposed for four minutes, which softened the water and the clouds

    6. Panning

    This technique, when done correctly, can produce amazing results, but it’s not easy. Panning is when you focus on a subject that is moving, and you move your camera in a horizontal plane with them. During that movement, you will release the shutter. Your exposure time will depend on the subject and the light, but in this technique you don’t want to freeze the action, you want to suggest movement. A longer shutter time is preferable, so you may be shooting at 1/30th or slower. To pan effectively, you will need to practice a few shots, here are some pointers.

    Technique

    How to do it: Firstly, stand with a wider stance than normal. When you pan with your subject, move your body from the hips up. Timing is key, release the shutter when you think the subject is in a good position in the frame. Follow through, don’t stop the movement when you release the shutter, keep moving with your subject (and at the same speed as the subject) until the shutter closes (think golf swing).

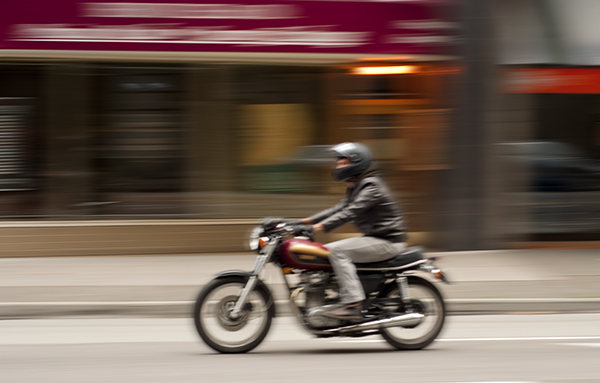
    A panning shot creates a very unique sense of movement

    A panning shot creates a very unique sense of movement.

    The next step is to go out there and get these shots. I would recommend you make an effort to try at least 20 to 30 shots of each of these techniques. Play with the settings, see what works and what doesn’t. Let me know what you think and maybe even put some of the results in the comments, lets see what you get.

    googletag.cmd.push(function() {
    tablet_slots.push( googletag.defineSlot( “/1005424/_dPSv4_tab-all-article-bottom_(300×250)”, [300, 250], “pb-ad-78623” ).addService( googletag.pubads() ) ); } );

    googletag.cmd.push(function() {
    mobile_slots.push( googletag.defineSlot( “/1005424/_dPSv4_mob-all-article-bottom_(300×250)”, [300, 250], “pb-ad-78158” ).addService( googletag.pubads() ) ); } );

    The post 6 Ways to Use Shutter Speed Creatively by Barry J Brady appeared first on Digital Photography School.


    Digital Photography School

  • Landscape Photography Tips & Tricks: Getting the Big Picture

    Of all the different types of photography, capturing images of landscapes is one of the most popular.   The compulsion to capture breathtaking images of sweeping vistas, crystal shorelines and towering mountains comes on especially strong whenever people travel to new places. You’ve probably noticed this whenever some of your friends go on vacations. Their Facebook walls become flooded with Continue Reading

    The post Landscape Photography Tips & Tricks: Getting the Big Picture appeared first on Photodoto.


    Photodoto

  • 3 Simple Ways to Take Better Photos on Your Next Trip

    I love to travel. To me, nothing compares to living on the road and waking up to new places every day. All the different photographs I’ve made during my journeys are the most rewarding part of it all.

    Making photos while traveling or on vacation has a special quality because you’re seeing your subjects often for the first time. Travel also presents unique challenges, though – unfamiliar landscape, climate, and culture can easily throw you off. However, it is those very things that can also make beautiful, one-of-a-kind photographs!

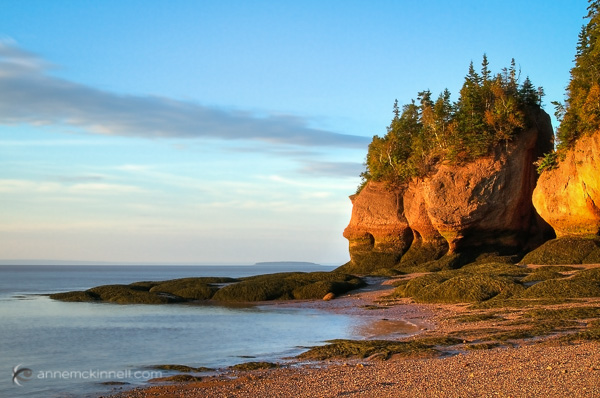
    Bay of Fundy, New Brunswick

    Bay of Fundy, New Brunswick

    When travelling to new places, you want to create photos that express the way you feel about the place. You also want to make unique images that are unlike anyone else’s. The sense of wonder you feel when seeing beautiful places for the first time can easily translate into the images that you make with these three simple tips to help you take better photos.

    1. Plan, plan, plan

    Once you decide where you’re going, read up on the area and educate yourself about the place and what kind of conditions you can expect. What will the weather be like? Are there any special events taking place? Will the flowers be blooming? If you’re traveling internationally, is there a language barrier? If so, try to learn a few key words and carry a phrase book with you. No matter where in the world you go, locals are always more helpful when you make an effort to speak to them in their own language – even if it’s just a few words.

    Find out what else is around that you might be able to see during your visit. If you’re photographing nature, you can find great locations by studying maps. Photography websites and forums are full of advice and examples of interesting places to shoot. Learning about the location’s history and culture will also help direct you to unique and interesting subjects.

    Sanibel Island, Florida

    Sanibel Island, Florida

    Find out as much as you can about the places and subjects you’ll be photographing, so you can prepare for them. For instance, if you’re going to be shooting in the desert, near the ocean, or in very cold, wet, or humid environments, you’ll know to bring protective gear to shield your camera from damage caused by moisture, salt, and sand. If you expect temperatures lower than -10c or higher than 40c, extra batteries will be needed as they drain quickly at extreme temperatures. You might consider renting a particular type of lens that is perfect for your subject like a super-telephoto or a tilt-shift. You’ll also need to know what sort of clothes to wear for the weather.

    Big Bend National Park, Texas

    Big Bend National Park, Texas

    2. Don’t let your gear drag you down

    No matter where you’re headed, there are some things you’ll need no matter what. When packing your gear, make a checklist to ensure you don’t forget anything important. It should include:

    1. Your main camera
    2. A backup camera
    3. A normal focal length lens (around ~50mm)
    4. A long focal length lens (~100mm or more)
    5. A wide-angle lens (~35mm or less)
    6. Your favourite, most-used lens
    7. A polarizing filter
    8. A battery charger
    9. Spare batteries and memory cards, and a place to backup images (computer, external drive, the cloud)
    10. A lens cloth and/or air blower to keep your equipment clean
    11. A comfortable camera bag – preferably one that doesn’t stand out as a camera bag to avoid making yourself a target for thieves.
    12. A good, sturdy, but lightweight tripod. Many manufacturers such as Manfrotto, Giottos, and Benro (among others) make special travel tripods that are made of strong, light carbon fibre and fold up into a small carrying case.
    Strathcona Provincial Park, British Columbia

    Strathcona Provincial Park, British Columbia

    Be selective with your packing. Don’t bring things you probably won’t use because camera bags can get very heavy, very fast. Use lightweight luggage and never check your camera bag, since checked luggage can be mishandled or lost. If you are flying, check the size and weight restrictions of carry-on luggage so you don’t get an unwelcome surprise at the airport. If you leave your home country, purchase travel insurance that will cover your precious equipment from loss, damage, or theft while abroad.

    3. Seek the unique

    When traveling, try to avoid the mass-marketed tours and biggest attractions. Not only are they full of people that get in the way of your shot, but they’re also full of people getting almost the exact same photos that you are. Instead, search for places that are beautiful but overlooked. You may be able to find this information online, but the best way is to be open and talk directly to the people who live there – start with your hotel staff, be friendly, and ask locals where the most beautiful places are that most people don’t see.

    Goblin Valley State Park, Utah

    Goblin Valley State Park, Utah

    This can even start when booking your accommodations – instead of staying in a generic chain hotel, look for places with more character such as cabins, villas, or bed and breakfasts. Or, if you’re like me, you can find an RV site right in the midst of the beauty to call home base. This way, the place you spend the most time can present its own photographic opportunities.

    Remember to give yourself time to experience the place before you start photographing. Give yourself a chance to find out what is special about the place first, and then try to convey that in your images. If you are photographing something common like a famous monument or national park, try to find a new perspective.

    Joshua Tree National Park, California

    Joshua Tree National Park, California

    It’s easy to become overwhelmed by the exotic nature of new places. But always remember that good light is a photographer’s best friend. A new place may look fascinating to you in the middle of the day, but it will look magical during good light.

    googletag.cmd.push(function() {
    tablet_slots.push( googletag.defineSlot( “/1005424/_dPSv4_tab-all-article-bottom_(300×250)”, [300, 250], “pb-ad-78623” ).addService( googletag.pubads() ) ); } );

    googletag.cmd.push(function() {
    mobile_slots.push( googletag.defineSlot( “/1005424/_dPSv4_mob-all-article-bottom_(300×250)”, [300, 250], “pb-ad-78158” ).addService( googletag.pubads() ) ); } );

    The post 3 Simple Ways to Take Better Photos on Your Next Trip by Anne McKinnell appeared first on Digital Photography School.

    Digital Photography School

  • Geotagging Photos in Lightroom in 4 Easy Steps

    For travel photography, geotagging your photos has become fundamental. By geotagging your images, you’ll not only be able to remember the locations once you are back home, but also it will help on searches. If you intend to sell your photos at any time, adding the metadata pertaining to the location into the file is going to improve searches and make your photograph easier to find on the web.

    Geotagging is a rather simple process and there are a couple different ways to do it. At the simplest level, you simply attach a GPS data-logger to your camera and the location will be recorded into the EXIF of the photo at the time you take it. That’s it. Now if you own multiple bodies, then you’ll need a different GPS device for each of them.

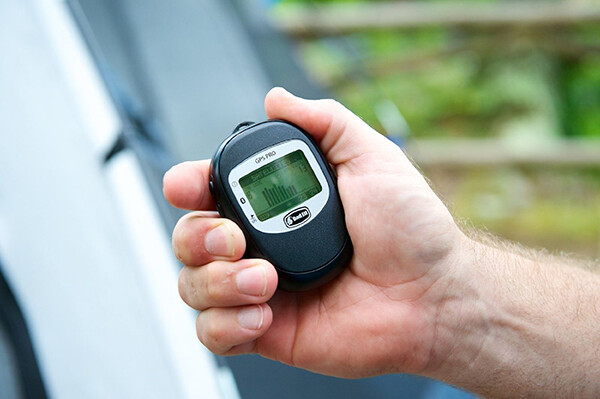
    Bad_ElF_Geo_Tracker

    The other option you have is to get an independent GPS tracker to record the data and then pair it with the photos. As I always carry at least two camera bodies, this is option I utilize. I have tried a couple of loggers and ended up with the Bad Elf 2200 GPS Pro. It is small, convenient and pro-rated, and it can be paired with up to five devices at the same time via Bluetooth. Of course there are other options on the market; all you need is to be sure that you’ll be able to obtain and export the recorded tracks from the device.

    Working with Lightroom

    Something that’s important before you start: to avoid headaches, is to always wise to check your camera clock. It should be set to the actual local time zone in which you are shooting, as once you import the data, Lightroom will try to synchronize the time of the EXIF data from the camera with the time of the recorded data from the GPS logger. If you forget to do this, there is a way to correct it later, but it will be much more seamless if you do it beforehand.

    Once you do that, the process is fairly simple and can be done with the following steps.

    1) Obtain your GPS file

    Export the GPS data from your logger in the format .gpx. This is the standard for these type of files; save them as they can be useful for other applications as well in the future. As an example, in this recent post I have included a detailed map of my trek to illustrate a day in the field.

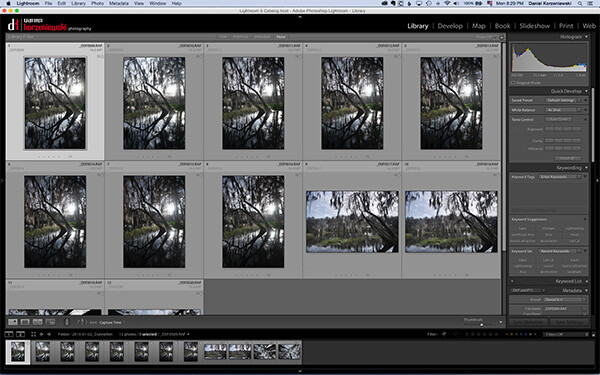
    2) Import your files into Lightroom

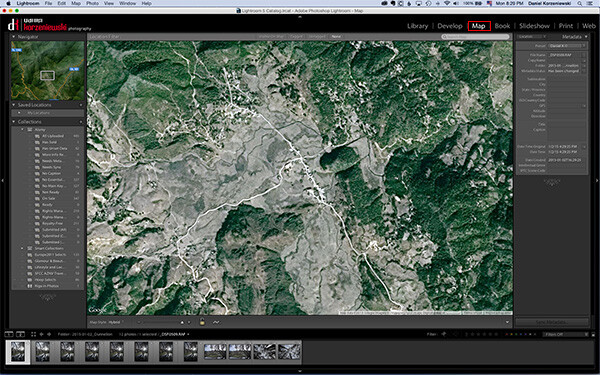
    Import your files into Lightroom as you normally do and then go to the Map Module.

    Import_Photos

    Go_to_Map_Module

    3) Load your tracklog file

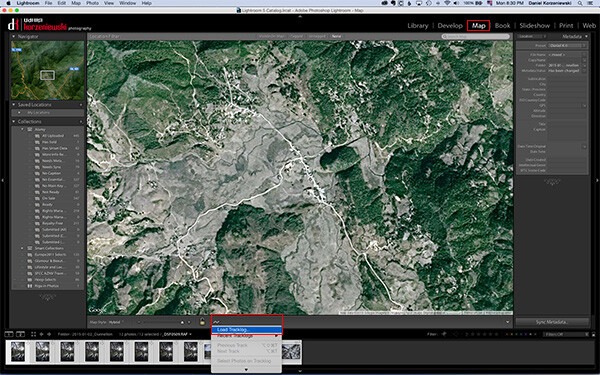
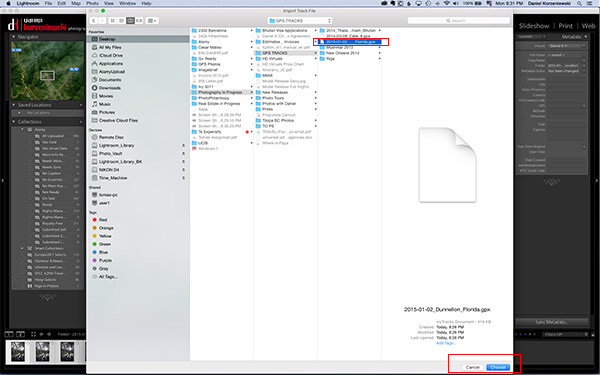
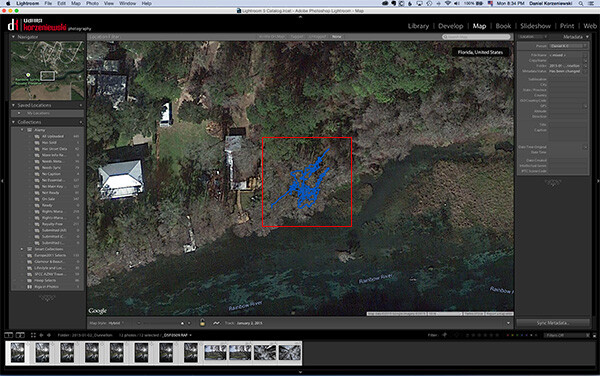
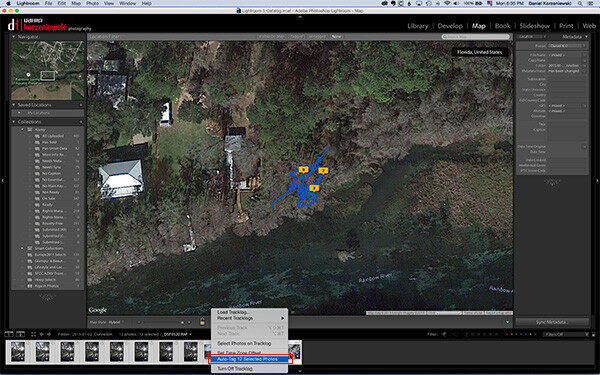
    Select all the photos you want to add the GPS information to. This one is a bit tricky – you need to click on a menu down at the bottom close to the icon with the lock. From there, select “Load Tracklog” and navigate to the menu where you saved the file previously.

    Load_Tracklog

    Select_your_Track

    4) Tag the photos with the GPS information

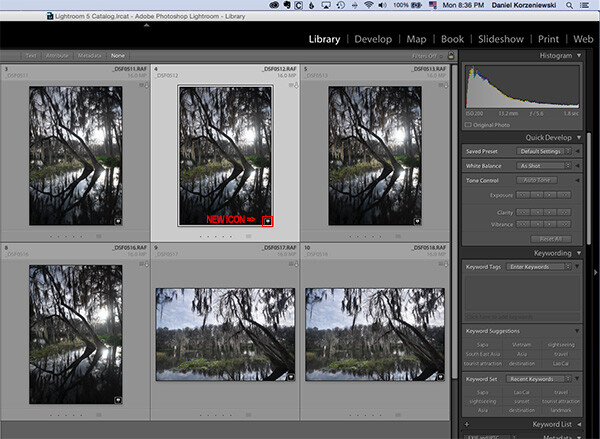
    As soon as you import the file, you’ll see the track loaded into the map. Go to the same menu and select “Auto-Tag XXX Selected Photos.” That’s it – that should do it, and now you’ll also see a bubble over the track that indicates where the photos were taken. At this point the GPS coordinates have already been recorded in Lightroom.

    Track_Loaded

    Auto_Tag_Photos

    GPS_Icon_Added

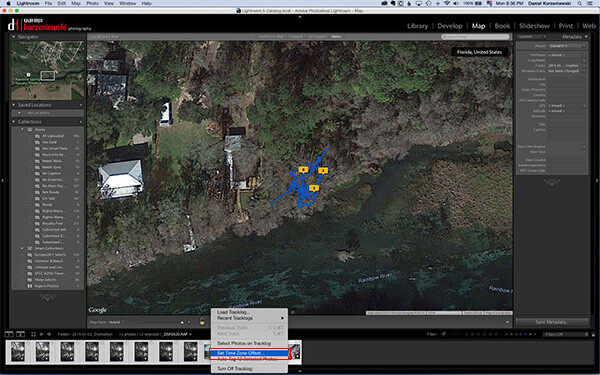
    If for any reason you forgot to put the correct time on the camera, you can now adjust it by going to  “Set Time Zone Offset” from the same menu you were working.

    Set_Time_Offset

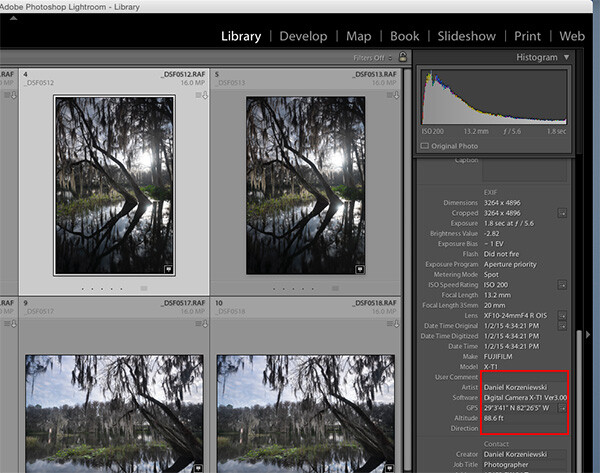
    You can take a look at the photos’ meta data and you’ll find the exact GPS coordinates along with location information. As you can see, this process takes only a minute or two to complete and it is fairly easy.

    GPS_Data_LR

    If you are not already tagging your photos, I hope you can incorporate the process into your workflow soon. I believe it will be important in the long run and you’ll never forget again where that photo was taken, especially in unfamiliar places.

    googletag.cmd.push(function() {
    tablet_slots.push( googletag.defineSlot( “/1005424/_dPSv4_tab-all-article-bottom_(300×250)”, [300, 250], “pb-ad-78623” ).addService( googletag.pubads() ) ); } );

    googletag.cmd.push(function() {
    mobile_slots.push( googletag.defineSlot( “/1005424/_dPSv4_mob-all-article-bottom_(300×250)”, [300, 250], “pb-ad-78158” ).addService( googletag.pubads() ) ); } );

    The post Geotagging Photos in Lightroom in 4 Easy Steps by Daniel Korzeniewski appeared first on Digital Photography School.

    Digital Photography School

  • Writer’s Favorite Lens: 50mm f/1.8

    Picking a favorite lens can be tricky, because there are aspects of a variety of lenses that I like. Sometimes I like to use zoom lenses, sometimes prime lenses, and other times specialty lenses like macro or ultra-wide-angle. But despite the variety of options available, at the end of the day I keep coming back to one particular lens as my pick of the litter. The lens that gets the job done no matter what situation I’m in, the one that consistently produces outstanding results more than any other, is my trusty Nikon 50mm f/1.8G. It’s a workhorse that has survived rain, cold, and even being dropped on a concrete garage floor. It’s incredible versatility is why I like to recommend it to photographers – especially those new to the craft who want to expand beyond their kit lens.

    yucca

    Value and versatility

    When I was first exploring digital photography several years ago, I was enticed by the zooming function of a kit lens and could not understand why anyone would want a lens with a fixed focal length. It seemed quite limiting, and since I was just getting my feet wet I did not understand why I would spend over $ 200 on a non-zooming lens when I could spend less than half that on one that covered a greater variety of focal lengths. The price, I thought, made the lens a waste of money. But nevertheless I listened to the advice of my friends Ryan and Kevin and skipped the kit lens entirely, opting instead to shoot only with the Nikon 50mm f/1.8 on my newly-acquired D200. And my, oh my, what a difference that made.

    Despite what might seem like a high price tag for new photographers, this lens is quite inexpensive compared to many of its counterparts. Because its focal length is not especially wide, but not all that tight, it can be used in an astonishing variety of situations even on a crop-sensor camera. In fact, the only time I have found myself reaching for a wider lens is when I am shooting multiple people indoors. If I’m using my “Nifty Fifty” during these situations I have to either stand clear across the room or at the other end of the hallway to fit my subjects in the shot.

    Other than that it works great for nature, architecture, animal, and especially portrait photography. I have done several portrait sessions with nothing but this 50mm lens, and it produces solid results if you want close-ups with beautiful blurry backgrounds or even whole group shots. While other lenses like the 85mm f/1.8 or 35mm f/1.8 are ideal for tighter or wider shots, this one lens can cover a greater variety of your photographic needs like almost nothing else. The price might seem a bit steep, but it will certainly pay off over time.

    portrait

    If you’re on a limited budget and want to take nice portraits, look no further than a 50mm lens.

    Features

    At first glance it might not seem like a non-zooming lens would have much in the way of features, and this particular one doesn’t even have image stabilization that is found on some cheaper kit lenses! But the more I used this lens, the more I realized how many features it did have, and how much they impacted my photography.

    For instance, this lens has two focusing modes: Automatic/Manual and Manual. Because I use back-button focusing on my camera, the A/M mode on the 50mm f/1.8 means I don’t have to press any buttons or change any options if I want to quickly shift between Automatic and Manual focusing. On many other lenses I would need to fiddle with a switch on the lens itself in order to change this option. That might not seem like much of a hassle, but I have been in many situations in which I needed to quickly change from Automatic to Manual focusing and back. Not having to flip a switch every time has been an incredible time saver, and resulted in much better photos with much less frustration on my part.

    droplet

    Being able to switch easily between manual and automatic focus allowed me to get this shot of a precariously-perched water droplet.

    Another key feature of this lens is its overall size. While a big zoom lens might seem tempting, and indeed they are certainly useful in a variety of situations, I like the compact size of this lens because it makes it ideal for tossing in a camera bag or carrying around for a day of casual shooting. It only protrudes a few inches from the camera, rendering it quite inconspicuous in a crowd of people. Though it is not ideal for street photography on a crop sensor body, it has allowed me to get plenty of candid shots in a variety of situations because it was simply easy to carry around on my camera.

    guitar

    While it is a bit on the tight-angle end for casual street photography, the 50mm lens on a crop sensor body can still deliver outstanding results.

    Finally, there are a few features of the actual construction of the lens that elevate this lens as my favorite. One of the round glass elements inside the lens is aspherical, which significantly reduces some of the optical oddities caused by a defect called “chromatic aberration” that crops up on photos from time to time. This helps ensure that the photos I take using this lens are tack-sharp and have less of the strange color fringes that can show up on the edges of various elements of a picture.

    It helps you learn

    tower-flare

    Learning to work within the constraints of this lens helped me understand so much more about photography than I would have otherwise.

    Noted speaker Martin Villeneuve said that “constraints can actually boost creativity,” and this has certainly been my experience with this non-zooming 50mm lens. Shooting exclusively with it for over a year helped me learn far more about photography than I ever would have otherwise. Its wide aperture unlocked creative photographic opportunities that I would have never experienced with a kit lens Also, the inability to zoom forced me to become more invested in the situations I was photographing, as well as seek out new angles from which to shoot them. This has helped me learn how to use available light much better because I rarely needed to use the on-camera flash or external speedlights, and it helped me understand how the various elements of exposure worked in tandem because there was so much room to experiment with such wide aperture values.

    bike

    Even in the pouring rain, this lens has never let me down.

    To take the idea of working within limits a step further, and help me continually experiment with photography, I started a blog called Weekly Fifty where I post one image each week that was taken with this 50mm lens. After almost two years of doing this I feel like I am just scratching the surface of what it has to offer! Whether you are a new photographer looking for an addition to your gear bag, or a seasoned professional who wants to push new creative boundaries, you can’t go wrong with this simple but powerful piece of glass.

    Do you use a 50mm lens? Post your thoughts about it in the comments below, or share any other favorite lenses you might have as well.

    googletag.cmd.push(function() {
    tablet_slots.push( googletag.defineSlot( “/1005424/_dPSv4_tab-all-article-bottom_(300×250)”, [300, 250], “pb-ad-78623” ).addService( googletag.pubads() ) ); } );

    googletag.cmd.push(function() {
    mobile_slots.push( googletag.defineSlot( “/1005424/_dPSv4_mob-all-article-bottom_(300×250)”, [300, 250], “pb-ad-78158” ).addService( googletag.pubads() ) ); } );

    The post Writer’s Favorite Lens: 50mm f/1.8 by Simon Ringsmuth appeared first on Digital Photography School.

    Digital Photography School

  • Natural Style Newborn Photos: The Way I Like to Remember Them

    246

    Why natural lifestyle newborn photography?

    There are lots of different styles of photography when it comes to capturing a newborn baby. Some people love to use lots of props, and introduce many fun things into every photo. Some are experts at posing the baby in unique and whimsical positions.

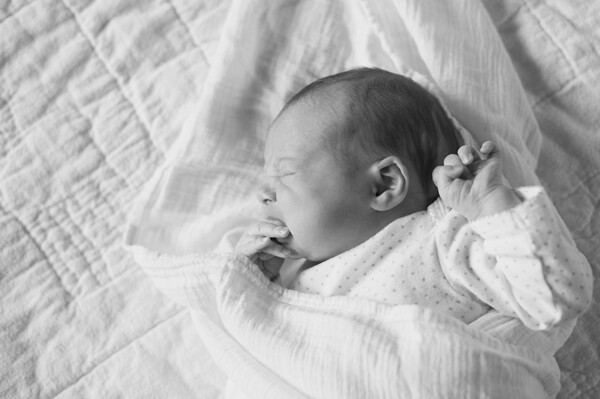
    Although I can appreciate all the different styles, I prefer to capture a newborn baby the way that I remember my three newborns. My kids are almost all grown up now, and it’s hard to remember exactly what they were like when they were brand new. Every once in awhile, I have sweet memories of how they were once upon a time. The sweet smell of a newborn’s head. The skinny knees stretching out. The reflex grasp of those tiny fingers. The perfect little toes and wrinkly feet. The million different expressions that could keep me entertained for hours. The soft cheek, and even the peeling skin that inevitably showed up for a little while.

    These are the things I remember. These are the memories I cherish. These are the moments I try to preserve with my camera with natural newborn photos.

    187

    Keep it real

    One of the wonderful things about photographing babies more naturally, is that you can let so many ideas of perfection go. If your baby loves a pacifier, photograph him with a pacifier. If she’s having a fussy day, grab a few crying photos. It’s okay, because it’s life. Real life. We’re not trying to create an illusion that the baby is something other than who he is, that very moment.

    Be patient and flexible when photographing newborns, and leave lots of time to stop for feeding, burping, or changing a diaper. If your goal is to just capture baby as she is, you don’t have to be as worried about getting a whole session in within the two week old time period. It’s okay if baby isn’t quite as moldable if you aren’t trying to mold them into anything in particular. Since we’re just keeping it real, you can be more relaxed. Shoot another day if the first day you try just doesn’t work out. Also, you don’t have to stress out about keeping the baby sleepy the whole time. If he’s asleep, photograph him that way. If she’s wide awake, capture those eyes. It doesn’t matter.

    167

    Get the details

    I love to photograph little details. I can’t hold a newborn without pulling her socks off to have a peek at her feet. That means that I can’t photograph a newborn without getting a few shots of those perfect little baby feet, either. Find the little details you love, and capture them. Feet, hands, ears, knees, hair; everything is cuter in miniature. It’s a good idea to capture hands and feet with mom or dad’s hands holding them too, because it will help the parents remember exactly how small they were.

    Don’t wait for a perfect expression. Those wrinkly foreheads, big yawns, hungry mouths, pouty lips, and even those sad cries can be perfect photo opportunities. Baby faces are fascinating!

    171

    Shoot wide open

    I like to use a pretty wide aperture when I photograph these details. If you can shoot at around f/2, give or take, those details will be the star of the photo. You won’t be distracted by other things, and the part you want to highlight will look especially sharp. Shooting wide open is a good idea when you are capturing other newborn moments, like baby’s bath, putting socks or a hat on, swaddling, or anything that you want the focus to be on or a particular action.

    Be careful when you are shooting with a depth of field this shallow that your focus is EXACTLY where you want it, and that you don’t move after you lock in your focus. A slight movement from you or the baby could put your photo completely out of focus, and ruin what you are trying to achieve.

    For more help shooting indoors with a wide aperture, you can read my article on Indoor Portraits Using Natural Light.

    180bw

    Capture baby’s world

    You might want to get some photos of your sweet newborn in her carefully decorated crib or nursery. If there’s a rocking chair that he loves to be held in, photograph mom or dad rocking the baby. One of my favorite memories with my babies was getting them out of their crib in the morning, or after nap time. They always seemed so happy to see me, and they looked so sweet and small in those big cribs. I wish I had photos to help me remember those times in better detail. Think of baby’s little world, and photograph him in the places he spends a lot of time in.

    You could also take photos of the little things that are part of life with a baby, without the baby in the photo. Stacks of diapers, rubber ducks, teeny shoes, bottles, pacifiers, etc. can be photographed to remember what life was like when your house was overtaken by baby things.

    169

    Show the love

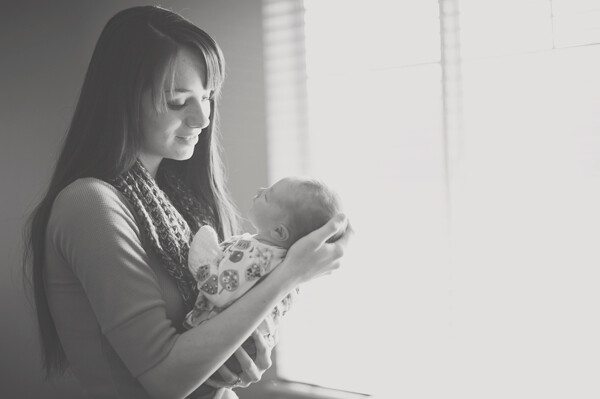
    Don’t forget to capture how the rest of the family feels about the new baby. Photograph sister’s look of adoration. Photograph brother’s fascination with baby’s little toes. Photograph mom’s absolute love for her tiny new being. Photograph dad’s proud protectiveness, and contrasting rough, big hands.

    177

    Sometimes the relationships the family has with the new baby are my very favorite thing to photograph. The love and bonding that happens so quickly with a new baby in the house is an amazing thing, and those special moments are so important to preserve.

    Be careful with young siblings that you keep the newborn safe as you are photographing them. You can capture their natural reactions to the baby while still keeping the baby safe. Let them sit near their little brother or sister if they’re too young to hold the baby. They can pat him, or lightly kiss him on the head. If you have a young child hold the baby, make sure someone is standing right outside the frame to take the baby as soon as little sister is “done”, because sometimes that can happen very suddenly.

    188bw

    If you’ve always thought that baby photos had to be perfectly posed and creatively propped, give lifestyle newborn photography a chance. Try photographing a new baby swaddled in a blanket. See if you can capture a bunch of funny expressions, or capture “a day in the life” of the newborn. You may decide that these natural, real life photos are your favorite after all.

    googletag.cmd.push(function() {
    tablet_slots.push( googletag.defineSlot( “/1005424/_dPSv4_tab-all-article-bottom_(300×250)”, [300, 250], “pb-ad-78623” ).addService( googletag.pubads() ) ); } );

    googletag.cmd.push(function() {
    mobile_slots.push( googletag.defineSlot( “/1005424/_dPSv4_mob-all-article-bottom_(300×250)”, [300, 250], “pb-ad-78158” ).addService( googletag.pubads() ) ); } );

    The post Natural Style Newborn Photos: The Way I Like to Remember Them by Melinda Smith appeared first on Digital Photography School.

    Digital Photography School

  • Why I Switched From LEE Filters to Formatt-Hitech for Landscape Photography

    A hard graduated neutral density filter worked great here to darken the sky.

    A hard graduated neutral density filter worked great here to darken the sky.

    There are three types of photographers in the world; those that try to get it right in camera, those that simply rely on post-processing, and those who believe that both mindsets together lead to the best possible outcome. I try to always keep the mindset of that third type. If I can get everything right in camera (and save minutes or even hours in post) I will. I also have always loved post-processing and the art of making an image come to life. When shooting landscapes, you are more often than not at the mercy of mother nature. You can certainly schedule your time wisely and shoot at the best times of day but that doesn’t always mean that you’ll be able to capture everything in camera, as it is.

    I’ve been using filters in one way or another for the better part of four years now. I started off with those bloody screw in filters (my gosh were those a pain in the rear). I remember very vividly just how frustrating it was to need a separate filter for each and every lens. I also remember how long it took to get to a scene, set up my tripod, look at the scene, decide I needed a filter, realize the filter I needed doesn’t fit the lens I had on, switch lenses, get the filter out of its case, screw it on, refocus and then finally take a shot.

    I used a my Formatt-Hitech 105mm circular polarizer here to remove glare from the rocks and water. The images without the filter were virtually unusable.

    I used a my Formatt-Hitech 105mm circular polarizer here to remove glare from the rocks and water. The images without the filter were virtually unusable.

    My brief stint with LEE Filters

    After giving up on the screw-in filters, I eventually discovered the LEE Filter system. Those LEE filters are dang near impossible to get your hands on. I had to put my name on a waiting list at a camera store just to get the foundation system to attach the filters to my lenses. I then had to buy my filters on eBay and pay over retail to get them. My absolute favorite filter from LEE was (and still is) the Big Stopper. The Big Stopper is a 10 stop neutral density filter that will slow your shutter speeds down by…well…10 stops. This is a long exposure filter that is meant to slow time down drastically. You can easily get one to two minute exposures in broad daylight. The problem with the Big Stopper is that it’s a glass filter. This means that you have to be very careful with it and any time it’s on your person, you have to be extra cautious.

    This 2 minute exposure caused the hundreds of tourists in the scene to disappear completely! © James Brandon

    This two minute exposure caused the hundreds of tourists in the scene to disappear completely! © James Brandon

    So what went wrong with LEE? Well, I’ll tell you…

    Back in 2013, I was in California and was traveling up the coast from San Luis Obispo to San Francisco with my buddy Brian Matiash. We made it up to Big Sur and were trying to get down to Pfeiffer Beach for sunset. As we made our way up Highway 1, we pulled over to photograph Big Creek Bridge. I decided to put my Big Stopper to good use and started grabbing some long exposures of the bridge with the waves crashing against the shore below. I got a few shots where I was standing but soon decided to switch lenses and try something else. When I’m out in the field and need to switch lenses, I always point my camera down to the ground so that minimal dust will get into the censor during the swap. I pointed the camera down toward the ground (while still on the tripod) and then reached for my filter pouch to take off my Big Stopper before changing lenses. That’s when it happened. I felt a big thud against my shoe and then heard the terrible sound of glass hitting the gravel beneath my feet. Ugh…

    It turns out the LEE filter holder can’t support the weight of a heavy Big Stopper. I’m not sure if this is a design flaw or what, but it certainly seems like oversight to me. With LEE filters (just like Formatt-Hitech) you have to screw an adaptor onto the lens you’re using (I just leave these adaptors screwed on most of the time). The filter holder then clips onto the adaptor via a pull pin on one side. This pull pin is angled away from the lens to match the shape of the ring adaptor. Because of the angle of this pull pin, you can actually just pull the filter holder off of the adaptor with surprisingly little force. Of course this will never happen if your camera is pointed out toward the horizon, but who among us never points their camera down? I got lucky that day because the filter hit my shoe first before hitting the ground. It didn’t bust the entire filter but one of the corners did however get a big chunk taken out of it.

    My introduction to Formatt-Hitech

    Colby Brown has been a friend of mine for a couple years now. I met him during the very, very early days of Google+ when a group of five or six of us would do hangouts almost daily. I have had the pleasure of watching his career virtually explode over this time and was really excited to see him land a signature edition filter kit with Formatt-Hitech. I’ll be the first to admit, I was pretty skeptical about trying any other type of filter besides LEE. Still to this day, I love my Big Stopper. However, that “event” in Big Sur really left me uneasy and nervous about using the LEE holder. So when Colby offered to send me his kit to review, I said what the heck, let’s see how it stacks up (see what I did there?) against LEE.

    Unboxing

    Don’t worry, I’m not posting one of those monotonous unboxing videos where I show you how the filters were packaged or how much paperwork is included. I’m including this section because of one thing; when I pulled the Formatt-Hitech filter holder out of the box, I knew instantly that it was better than LEE. It just feels better. It’s aluminum instead of plastic for one, but on top of that – the filter holder has a fastening screw to attach to the adapter ring instead of the little notched pull tab that’s on the LEE system. At first I wasn’t really sure this would be any better because, after all, you’re essentially just tightening the filter holder onto the adapter ring with a single screw. As it turns out though, the filter holder fits very snuggly onto the adapter ring, so when you tighten the screw the filters aren’t going anywhere. It takes a very strong push to cause it to budge at all, and no amount of filters will ever weigh that much. The LEE, on the other hand, requires surprisingly little force (see the video above).

    Quality between LEE and Formatt-Hitech

    The Colby Brown Signature Edition Landscape Filter Kit comes with basically everything you need to get started and stay satisfied using filters in the field for a very long time. I went all out and got the 100mm Premier Kit which comes with two graduated ND filters, a 6 Stop ND filter, the aluminum filter holder and to top it all off, a 105mm circular polarizer. Everything in the kit is extremely high quality and I use the filters on virtually every photo trip I take.

    In all honesty, there isn’t a massive difference in the quality of images that come from either filter. Some will disagree with me on this of course. The LEE Big Stopper puts out a very obvious blue color cast in your images while Formatt-Hitechs new Firecrest filters put out virtually zero color cast. I’m actually quite fond of that blue/cool color cast though and have left it in several of my images to some extent. It’s also very easy to correct with a simple white balance adjustment so I’ve never considered it a huge deal.

    I used my Formatt-Hitech 105mm Circular Polarizer for this shot as well to remove the glare from the rocks in the foreground.

    I used my Formatt-Hitech 105mm Circular Polarizer for this shot to remove the glare from the rocks in the foreground.

    Where Formatt-Hitech wins

    There are three main areas where Formatt-Hitech Filters excel and where LEE falls short.

    1. The first of those areas is the one I already covered; a superior filter holding system constructed of durable aluminum and a tightening mechanism that won’t fail in the field when pointed at a downward angle.
    2. The second area where Formatt-Hitech wins is availability. The simply produce and ship enough filters so photographers like you and me don’t have to be put on waiting lists, or pay over retail to acquire their products.
    3. The third reason Formatt-Hitech takes the cake is that they continue to push to boundaries of what filters can do. They continue to innovate and advance. Their new line of Firecrest filters can stop down a scene by up to 16 stops! That means you could shoot in broad daylight at f/8, ISO 100 and a shutter speed of 1/1000th of a second and as soon as you slide that filter on, you’re shutter speed will drop all the way down to 1 minute. That’s insane!
    Here I used my 10 stop neutral density filter to slow the shutter speed way down. This was a 25 second exposure taken before sunset. The clouds coming over the Sierras in the background is actually smoke from the rim fire that occurred back in 2013.

    Here I used my 10 stop neutral density filter to slow the shutter speed way down. This was a 25 second exposure taken before sunset. The clouds coming over the Sierras in the background is actually smoke from the rim fire that occurred back in 2013.

    Conclusion

    Both LEE and Formatt-Hitech make great filters (although Formatt-Hitech has a slight edge in my opinion). However, the fact that I simply can’t trust the filter holder from LEE was enough to make me look at other options. Sure, I could have just stuck with LEE filters and got a new filter holder system, but I like to be all in with the brands I associate with in the industry. The failure of the LEE system caused me to look into Formatt-Hitechs options and when I did, I was pleasantly surprised to find a superior company making superior products. I’m not sponsored by Formatt-Hitech, I just honestly believe their products are top notch. Let me know if you have any questions below.

    googletag.cmd.push(function() {
    tablet_slots.push( googletag.defineSlot( “/1005424/_dPSv4_tab-all-article-bottom_(300×250)”, [300, 250], “pb-ad-78623” ).addService( googletag.pubads() ) ); } );

    googletag.cmd.push(function() {
    mobile_slots.push( googletag.defineSlot( “/1005424/_dPSv4_mob-all-article-bottom_(300×250)”, [300, 250], “pb-ad-78158” ).addService( googletag.pubads() ) ); } );

    The post Why I Switched From LEE Filters to Formatt-Hitech for Landscape Photography by James Brandon appeared first on Digital Photography School.

    Digital Photography School

  • 20+ Free Lightroom Presets to Make Your Images Pop

    Speeding up your post processing workflow will help you to increase productivity and spend more time on shooting. For Lightroom users, making use of developed presets can be a great way to reduce the amount of time you spend in Lightroom. When it comes to Lightroom presets, you can create your own or use the ones created by others. There Continue Reading
    The post 20+ Free Lightroom Presets to Make Your Images Pop appeared first on Photodoto.


    Photodoto