Category: Photography

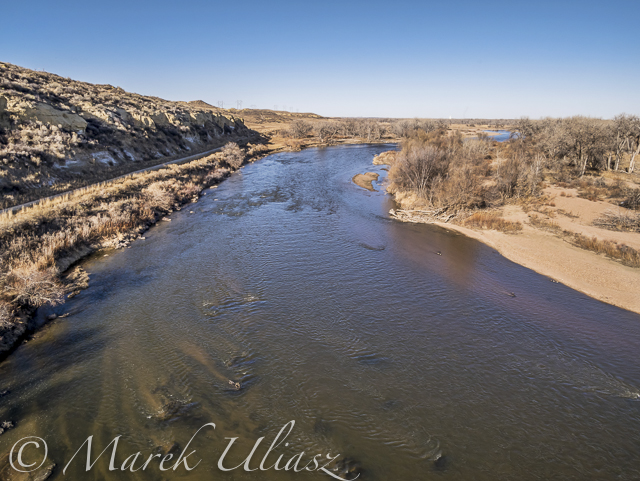
  • Aerial View of South Platte River at Wildcat Mound below Platteville

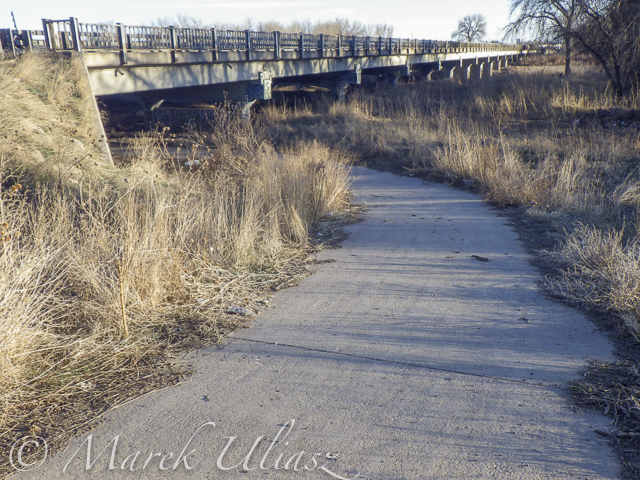
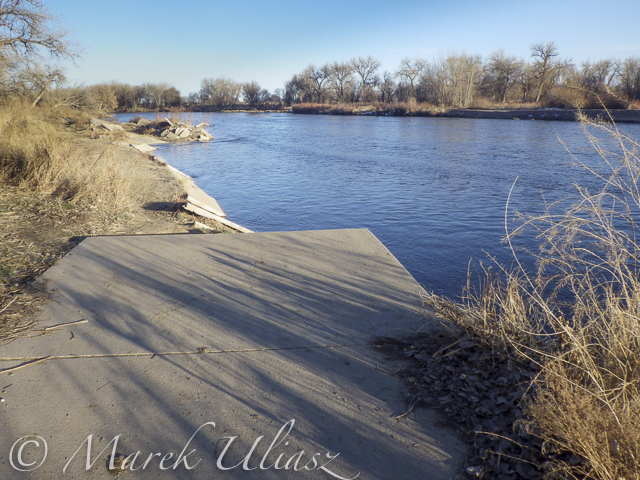
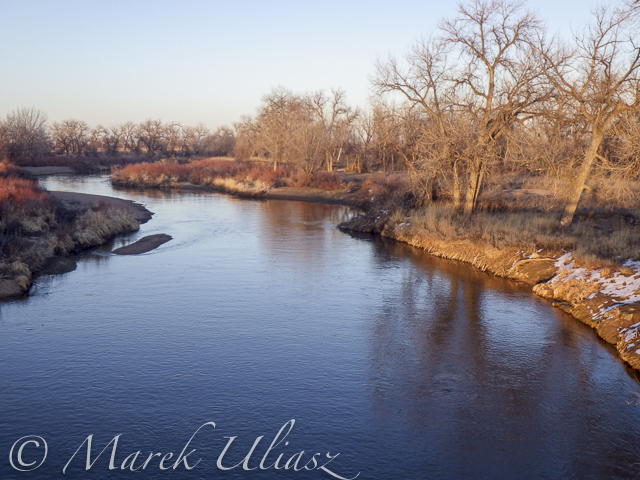
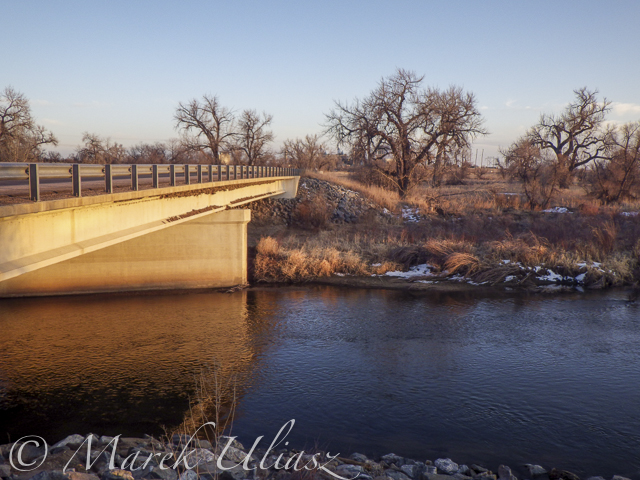
    A stretch of the South Platte River along Wildcat Mound below confluence with St Vrain Creek is my favorite river section for paddling. It can be accesswd from the county road 19.5 bridge on the St Vrain Creek (north of the power station). River access is relatively easy without a need to climb any fences. From here you have 1 mile of paddling to the confluence. This may be a start of a longer downriver trip or just downstream/upstream workout. The St Vrain current is pretty mild and you can easily paddle upstream. The South Platte is, in turn, much faster with some shallows and even little rock gardens (easy to navigate). It is more interesting for paddling downstream and more challenging for paddling upstream than the river section below Evans.

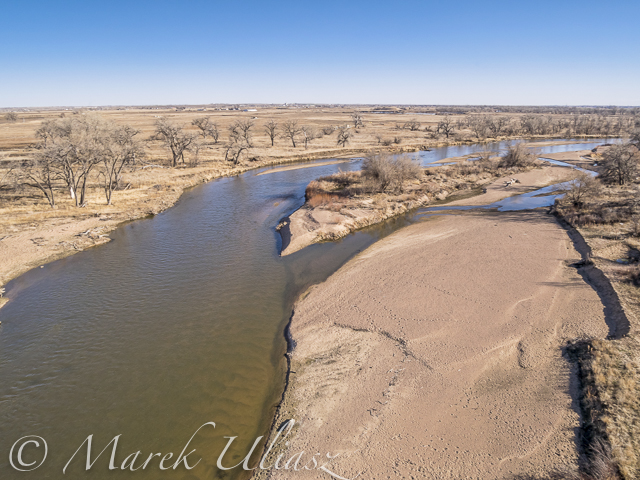
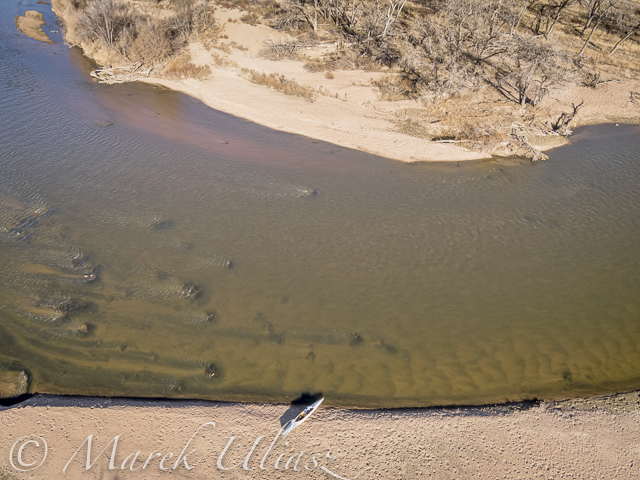
    During my last trip (March 10, 2015) I shot some aerial pictures of the river at Wildcat Mound from a low flying drone. This place is about 1 mile below confluence. There is a shallow rapid just below the confluence. It gave a very good workout when I was paddling back upstream. River flow was ~120 cfs at St Vrain Cr and ~400cfs on South Platte at Ft Lupton (several diversion dams upstream).

    For comparison you can check pictures from my packrafting trip in June, 2011. The 2013 flooding cleared all previous log jams on the St Vrain. You can still see these huge cottonwood trees in the water, but they do not block the river.

    South Platte River aerial view

    South Platte River at Wildcat Mound looking up stream

    South Platte River aerial view

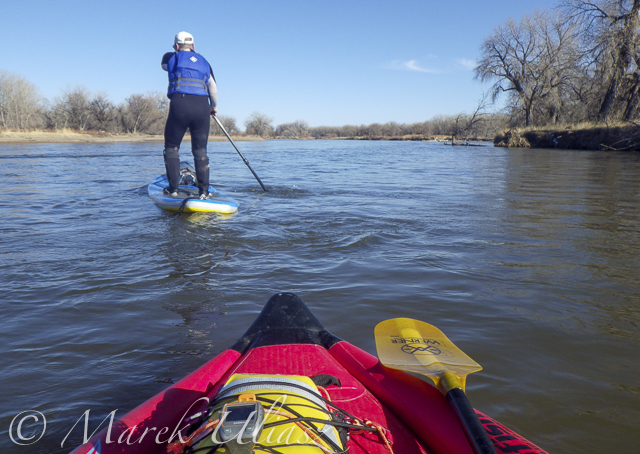
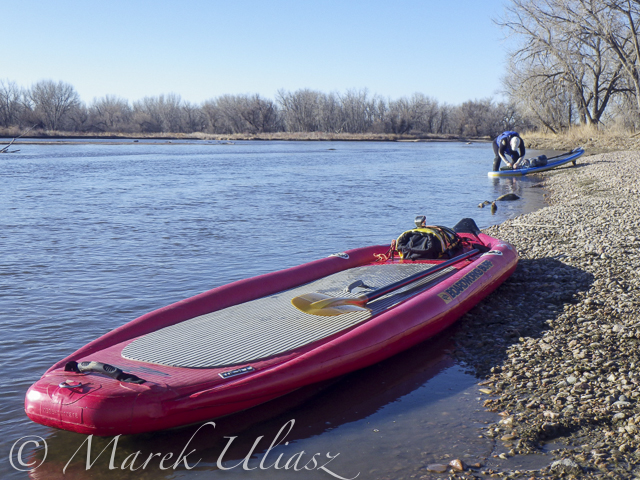
    South Platte River with Sea Wind canoe

    South Platte River aerial view

    South Platte River at Wildcat Mound with a little rock garden looking down stream

    Related posts:
    Paddling SUP on South Platte River from Kersey to Kuner
    Opening 2015 Paddling Season on the South Platte River
    South Platte River below Denver – GPS/photo river guide


    paddling with a camera

  • How to Make the Most of Hard Light with Black and White Photography

    Black & white photography

    The quality of light is an important aspect of successful photography – good photographers spend hours chasing the most suitable light for the type of photography they do. That usually means working at the beginning or the end of the day, when the sun is low in the sky and the light has many beautiful qualities.

    But what about the middle of the day? Many photographers avoid shooting in direct sunlight in this period, especially in summer, because the light is so hard and strong. You can’t use it for portraits (unless you use flash, which is the subject for another article) or find a place in the shade for your model. It’s nearly impossible to use it for landscapes, because they always look so much better in the softer light, characteristic of the the day’s end.

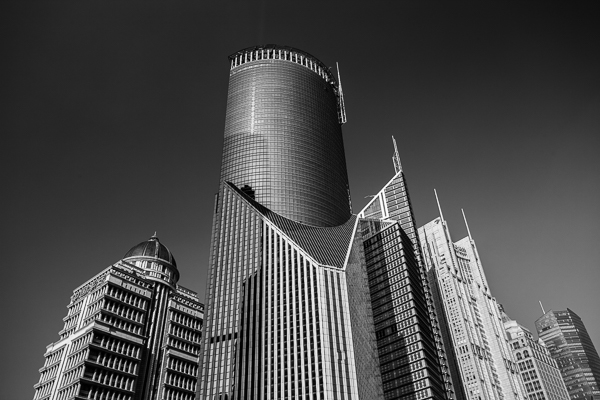
    Perhaps the problem is not so much bad light, but a poor match of light to subject. So the question becomes, is there a subject that you can successfully shoot in strong, midday light? I believe there is. I like to use this part of the day for photographing a subject comprised of strong lines and graphic shapes – architecture.

    Black & white photography

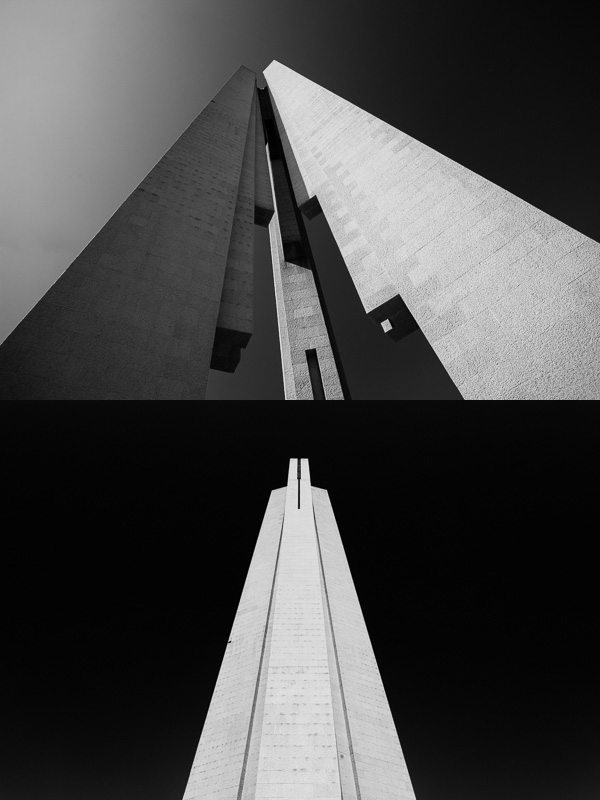
    Two photos of the same structure (Monument to the People’s Heroes in Shanghai) taken moments apart. In both cases I was exploring the shape of the structure against the blue sky, shooting with a wide-angle lens from ground level looking up. The first image concentrates on shape and line. The second is more abstract. I used a polarizing filter to darken the sky, and photographed the sunlit monument against it for maximum tonal contrast.

    This may seem a little strange because buildings are often best photographed during the golden hour, but there is no reason why you can’t shoot during the middle of the day as well. The only drawback is that colour photos of buildings taken at this time of the day, often with a deep blue sky in the background, are usually not very exciting.

    But switch to black and white photography and it’s a different story. Without colour, and the strong distraction of a deep blue sky, the photographic possibilities change entirely. Suddenly you’re not looking at the colour of a scene. Instead you’re exploring line, shape, texture, form and shadow. Then, take those photos into Lightroom and there’s all kinds of wonderful, creative things you can do in post-processing to enhance the image.

    Black & white photography

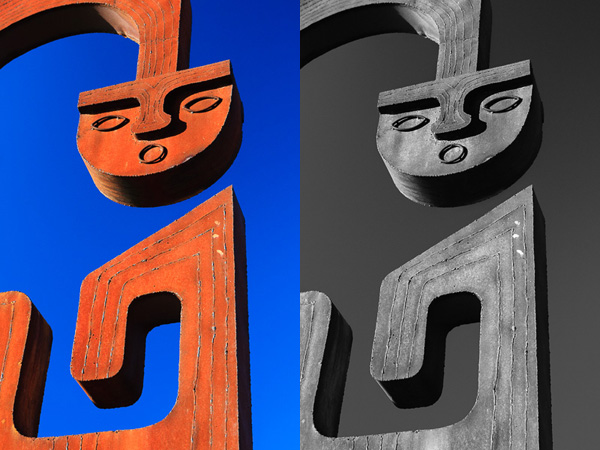
    Details like this sculpture can work very well in midday light as the hard shadows suit the material it is constructed from. I enhanced the black and white version of this photo in Lightroom by using an Adjustment Brush to increase Clarity and Contrast on the metal surfaces in the image.

    Learning to see in black and white takes time, but there are a couple of things you can do that will help.

    The first is to shoot in your camera’s black and white mode, but with image quality set to Raw. When you play back your image on the camera’s LCD screen it is displayed in black and white, yet because you are using Raw you have the full colour file to work with in Lightroom or Photoshop.

    You will probably find it useful to spend some time looking at your photos on the camera’s LCD screen during the shoot to see how the colour scene in front of you translates to monochrome. As you gain experience you will need to do this less and less, but it can be incredibly helpful the first few times you try.

    If you have a camera with an electronic viewfinder, the camera displays the scene in black and white in the viewfinder. This is even more useful because you don’t have to visualize how the colours in the scene will convert to black and white. The camera does it for you and you can concentrate on creating beautiful compositions.

    The second is to use a polarizing filter to turn the already blue sky an even darker shade of blue. This can look fantastic in black and white. If you enable the red filter setting in the camera’s black and white mode options it will make the blue sky darker yet, and it may even turn black. Position a sunlit, light-toned, building in front of that dark sky and you have some amazing tonal contrast and the basis for a dramatic black and white architectural study.

    Black & white photography

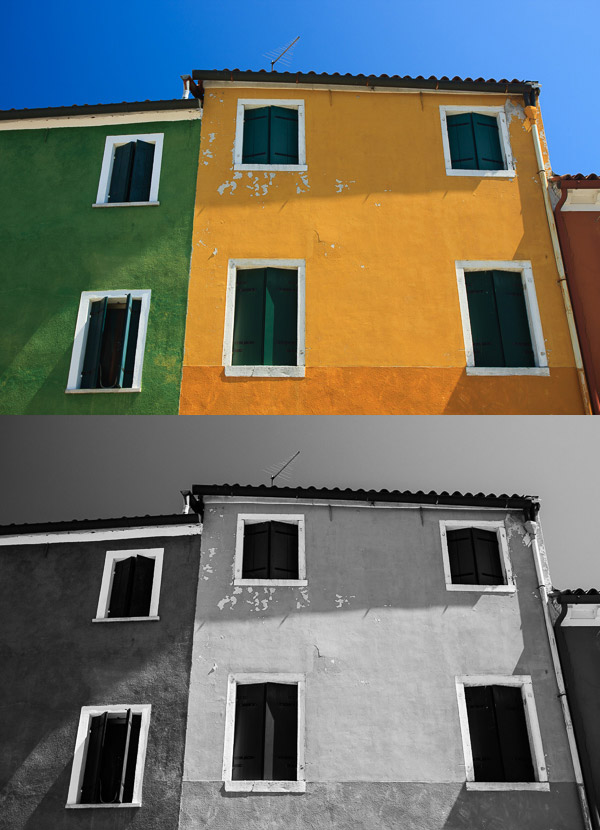
    It is easy to be seduced by colour, especially when presented by colour buildings such as these ones in Burano, Italy. This photo was taken around midday, but because the sun was overheard it cast a raking light over the front surface of the buildings, bringing out the textures in the wall. I increased Clarity in Lightroom to emphasize the texture in the black and white conversion.

    I’ve concentrated on photographing buildings in this article, but I’d like to hear what other subjects you shoot during the middle of the day. Please let us know in the comments.

    Black & white photography

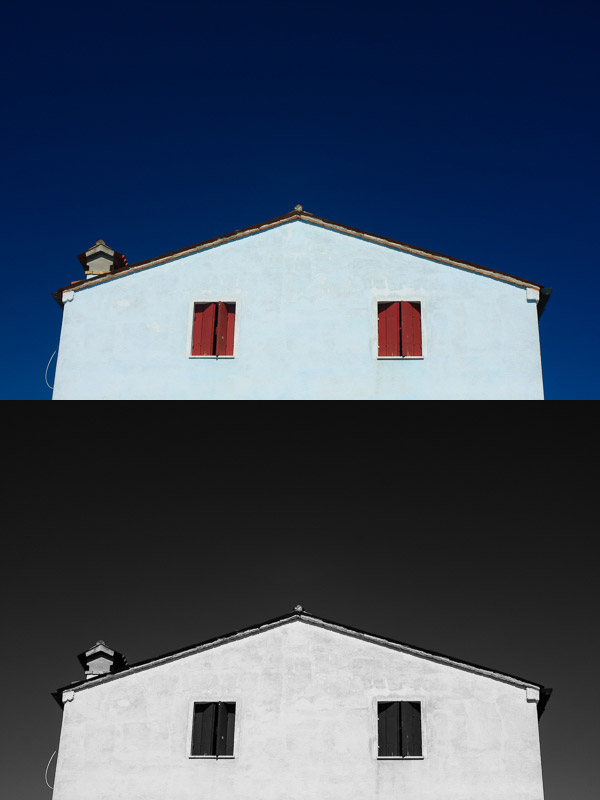
    This photo, also taken in Burano, is a study of the shape of the house against the deep blue sky (emphasized by a polarizing filter). The symmetry of the house is broken by the chimney on the left.


    The Mastering Lightroom Collection

    Mastering Lightroom ebooksMy Mastering Lightroom ebooks will help you get the most out of Lightroom 4 and Lightroom 5. They cover every aspect of the software from the Library module through to creating beautiful images in the Develop module. Click the link to learn more or buy.

    googletag.cmd.push(function() {
    tablet_slots.push( googletag.defineSlot( “/1005424/_dPSv4_tab-all-article-bottom_(300×250)”, [300, 250], “pb-ad-78623” ).addService( googletag.pubads() ) ); } );

    googletag.cmd.push(function() {
    mobile_slots.push( googletag.defineSlot( “/1005424/_dPSv4_mob-all-article-bottom_(300×250)”, [300, 250], “pb-ad-78158” ).addService( googletag.pubads() ) ); } );

    The post How to Make the Most of Hard Light with Black and White Photography by Andrew S. Gibson appeared first on Digital Photography School.


    Digital Photography School

  • Sunshine: My Favorite Light Source

    w170

    I’m a minimalist gal when it comes to most things, and photography equipment is no exception. I know that some people love equipment and gear; the more the better. But when I think about lugging lights, reflectors, and flashes around, my creativity takes a nosedive. My favorite light source, hands down, is the sun. In the words of John Denver, sunshine on my shoulder makes me happy!

    I’d love to share some dos (because who likes to be told what NOT to do?) to help you harness the power of the giant lamp in the sky. Hopefully you’ll gain a new appreciation for this natural light source, whether or not you hate lugging equipment around like I do.

    The sun is unique

    One thing I love about the sun is that it is never the same. Although having an unpredictable light source can be a big challenge, I love that every day, every shoot, every photo, is unique and special. I couldn’t recreate any given day’s exact lighting even if I wanted to. Some days everything works together like magic, and I call that a gift.

    DO pay attention to how the light falls on your subject’s face

    w500

    I see many amateur photographers take photos like the one above, with harsh light and shadows on the face. Most of the time they are paying more attention to a pretty background than the lighting. If the sunlight is very bright, such as midday, or early afternoon, this can be a big problem.

    Sunlight is a beautiful light source, but you have to work with it, and position your subject in the correct place, since try as you might, you’re not going to be able to move the sun (unless you want to wait a couple of hours, and let it move itself).

    DO try backlighting

    w152

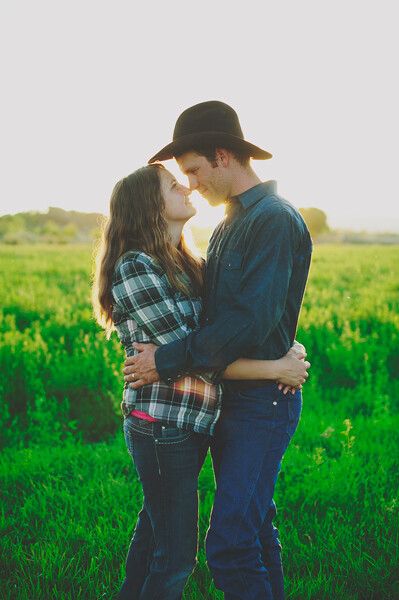
    This means that the sun is behind your subject, facing you. This method of using the sun is my absolute favorite, because it makes your subject just glow. There are a few things to keep in mind as you try backlighting:

    • DO use backlighting at any time of day. You get different effects backlighting with the sun in different positions. It’s an effective tool to use even when the light is harsh, since it softens the light on your subject’s face, and helps them not to squint. It’s also an ideal tool to use when the sun is low, golden, and gorgeous.
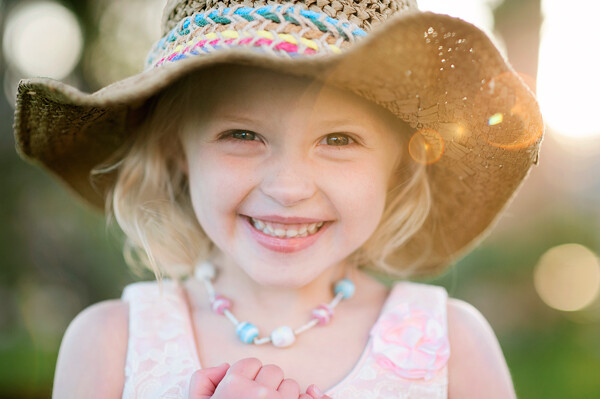
    • DO move yourself around. Slight differences in angles can make a big difference in the look you get. I like to have the sun behind and slightly to the side of my subject (as you can see in the photo above). If the sun is directly facing your camera, you may get flare in your lens that can totally wipe out your subject. You can get beautiful lens flare effects if you find a spot somewhere in between the two. Experiment to find exactly the look you are going for.

    w174

    • DO use poles, trunks, bushes, or whatever is there to manipulate the light to your advantage. If the sun is positioned behind leafy trees, you can create beautiful soft bokeh. The trees filter the light a bit so it isn’t so harsh, and you get beautiful warm, soft, lighting. You can position yourself where the sun is partially behind a trunk or pole off to the side, which will cut some of the harshness and glare in your lens. The trunk doesn’t need to be in your photo, it’s just working as an assistant for you.
    • DO pay attention to the clothes YOU are wearing. Try wearing light/white tops as the photographer, and avoid wearing bright colors. It may seem strange that it matters what the photographer is wearing, but when the sun is reflecting off your chest, it can cast colors onto your subject that you weren’t intending, and put odd colored highlights in their eyes.

    w162

    • DO use your subjects and your own body to work with the sun. You can position yourself so the sun is directly behind your subject, so your subject filters the light a bit and cuts the glare in your lens. This can create a beautiful glow, or a starburst effect. Sometimes if there is just a little too much glare on my lens, I hold my hand off to the side of my lens (not in the photo) and achieve just the amount of sun flare that I want, without all the washed out glare.

    DO experiment with the sun directly lighting your subject

    w198

    There are lots of great advantages to this type of lighting, including the beautiful sky captured in the photo. When you backlight, your sky is usually washed out in order to have your subjects properly exposed. You can add a sky in post-processing, but when you shoot with the sun behind you, and toward your subjects, you can expose for both at the same time. A few more tips for front lighting using the sun:

    • DO keep in mind that it is usually hard for people not to squint when they are looking into the sun. If it’s a particularly bright day, you may have to have your subjects looking away from the sun. Some people are extra sensitive to light, and you may not be able to use front lighting unless the sun is really low in the sky, almost ready to set. Squinting eyes aren’t very attractive, neither are watery eyes and scrunched up faces.

    w149

    • DO use front lighting when you want a dark background. If you position your subject near the opening of a shed or garage, the background will fall into darkness, since you have your exposure set for the bright subject in the front.
    • DO use front lighting for drama, and for high key photography, but be careful that you don’t lose too much dimension and end up with flat images.

    DO use the sun for beautiful portraits

    w167

    When the light is soft, either when it’s almost down, or with a few clouds over it, you can light your subject from the side to get dimension. You can get dramatic moody portraits, soft flattering portraits, fun happy portraits…the sky is the limit!

    DO become a light watcher

    I can’t talk to someone without noticing how the light falls on their face. I look at how shadows fall at different times of the day. I study the quality of the light constantly, and take photographs with my mind all day long. The more you know about how the sun works, and how you can work with the sun, the better your photos will get.

    Lastly – just one little don’t

    DON’T be discouraged if the sun is hiding behind clouds. If you’re lucky, they’re thin clouds, and you can still harness a bit of that magical sunny glow. If it’s overcast, just remember that you’re still using the sun as your light source, and be grateful for the ease of using the whole sky as a giant soft light. Don’t forget; in the words of Annie, the sun will come out tomorrow!

    googletag.cmd.push(function() {
    tablet_slots.push( googletag.defineSlot( “/1005424/_dPSv4_tab-all-article-bottom_(300×250)”, [300, 250], “pb-ad-78623” ).addService( googletag.pubads() ) ); } );

    googletag.cmd.push(function() {
    mobile_slots.push( googletag.defineSlot( “/1005424/_dPSv4_mob-all-article-bottom_(300×250)”, [300, 250], “pb-ad-78158” ).addService( googletag.pubads() ) ); } );

    The post Sunshine: My Favorite Light Source by Melinda Smith appeared first on Digital Photography School.


    Digital Photography School

  • Have Shutter, Will Travel: Some Considerations for Travel Photography

    Travel and photography could be considered a thing unto itself, kind of like macaroni and cheese or peas and carrots. Travel has a natural allure to photographers, promising unique views of life and existence that can only be experienced — and photographed — by throwing yourself into new worlds and meeting new people. While there’s something to be said for the Continue Reading

    The post Have Shutter, Will Travel: Some Considerations for Travel Photography appeared first on Photodoto.


    Photodoto

  • How to Correct Lens Distortion with the Adaptive Wide Angle Filter in Photoshop

    The issue

    When photographing subjects with a wide-angle lens, it’s pretty common for perspective problems to present themselves in the form of lines that should be straight, but appear curved and distorted. This is commonly referred to as barrel distortion, which occurs mostly in wide-angle lenses because the magnification of the image decreases the farther the subject is from the optical axis of the lens. In plain speech, it means that when looking through a wide-angle lens, anything that is at the edge of the frame will be prone to appearing curved.

    BEFORE-Adaptive Wide Angle

    Some lenses such as fisheyes take full advantage of barrel distortion by purposely capturing images that are heavily curved and spherical. However, there are times when other wide-angle lenses such as the Canon 16-35mm, or even mid-range zooms like the 24-70mm, might produce unwanted barrel distortion effects.

    The solution

    Perhaps the two easiest ways to correct this problem are to either use a tilt-shift lens or to change your perspective and zoom magnification while photographing the subject. But tilt-shift lenses are expensive, and sometimes, such as when photographing a large building, there aren’t a ton of different perspective options. In these cases, the easiest solution to correct correct lens distortion is to do so in post-processing using a unique tool in Photoshop known as the Adaptive Wide Angle filter.

    Introduced in PhotoShop CS6, the Adaptive Wide Angle filter removes lens distortions in one of two ways: it either automatically detects the camera and lens model using pre-programmed details to straighten the images, or you can manually set constraints to tell the it which areas of the photo need to be straightened. In this tutorial, I’ll walk you through the manual use of the Adaptive Wide Angle filter.

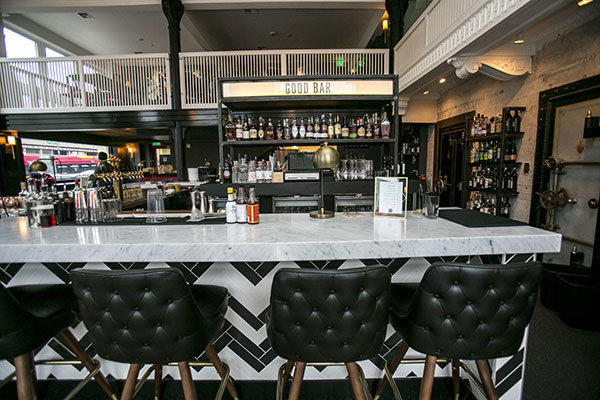
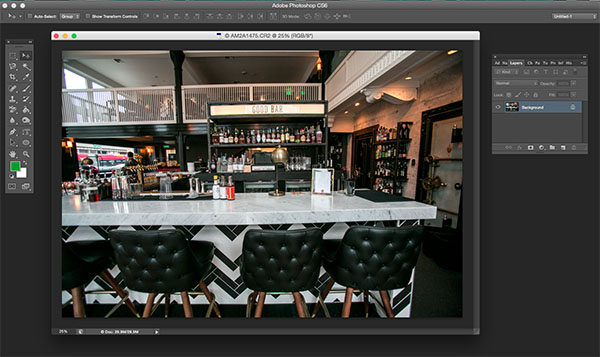
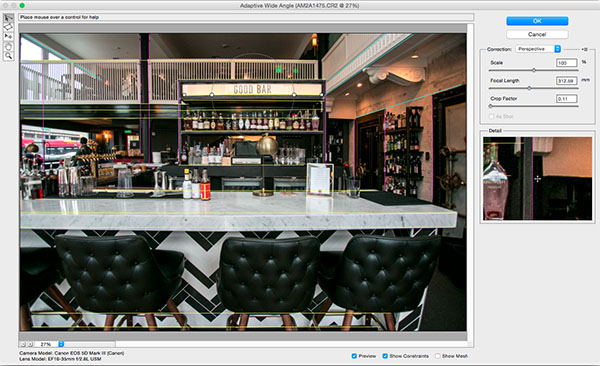
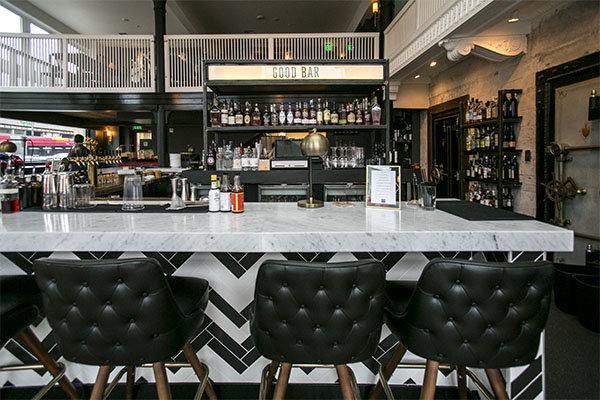
    The example below was photographed in a beautiful brand new bar and restaurant using a Canon 16-35mm f/2.8 at a focal length of 16mm. It was a tight space, so there wasn’t room to back up or shoot the bar from a higher angle, so the resulting image sees quite a few horizontal lines such as the upstairs white railings and granite countertop that clearly should be straight, but aren’t.

    Photoshop Adaptive wide angle filter correction

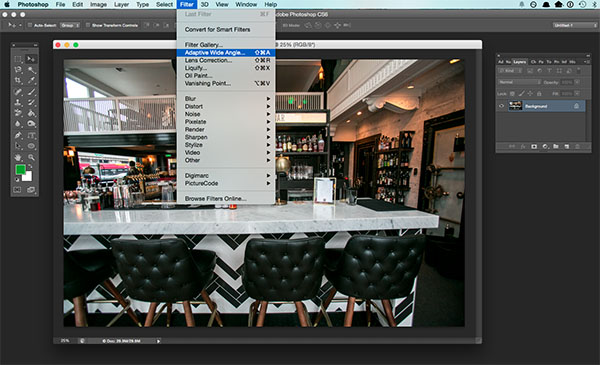
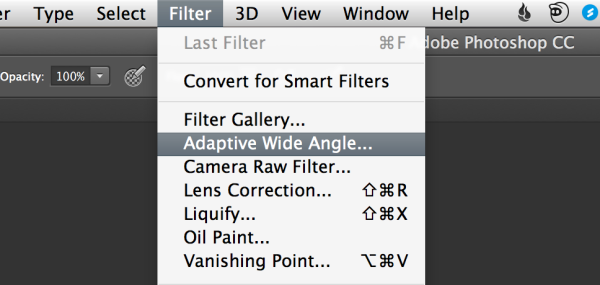
    To begin correcting these distortions, click on Filter in the upper drop down menu and select Adaptive Wide Angle Filter.

    Photoshop Adaptive wide angle filter correction

    Screen Shot 2015-02-25 at 5.18.00 PM

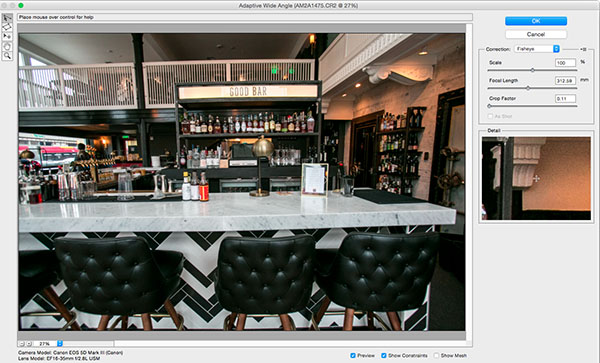
    A large dialogue box will then appear with a host of options (see below).

    Photoshop Adaptive wide angle filter correction

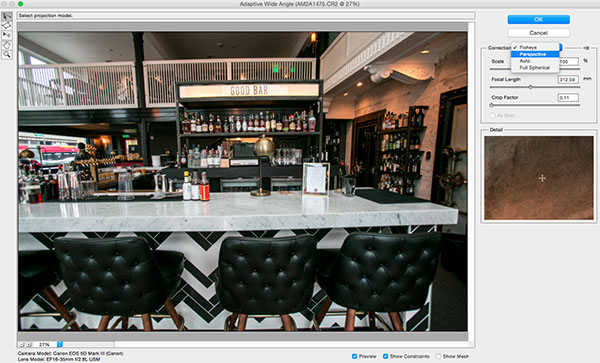
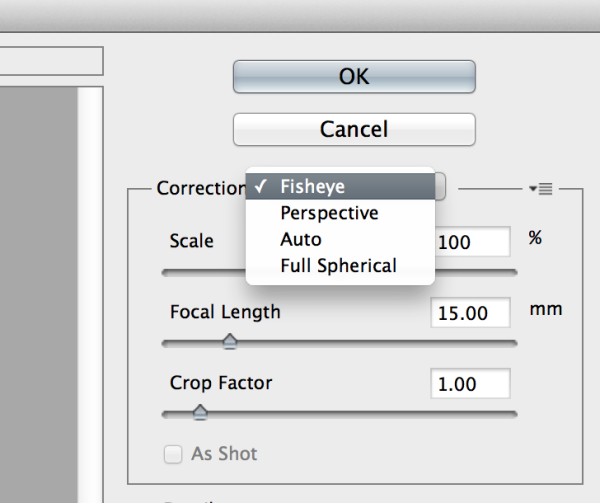
    Begin with the right hand panel and choose a correction type from the drop down menu. Typically, I start with Auto, which will attempt for an automatic correction based on lens detection.

    Photoshop Adaptive wide angle filter correction

    In this case, when I select Auto, another pop up window appears saying, “No matching lens profile found.” This means I need to manually adjust the image. Hit the OK button and turn your attention back to the box in the right hand corner.

    Screen Shot 2015-02-25 at 5.24.27 PM

    Besides Auto, the drop-down menu has three other options to choose from. If Auto doesn’t work, I’ll typically choose Perspective as my next correction type.

    • Fisheye will correct the aforementioned extreme curves that fisheye lenses purposely cause.
    • Perspective will target converging lines typically causes by the tilt and angle of the camera.
    • Panorama corrects for distortions caused by photo merging for panos.
    • Full Spherical corrects distortions in 360 panoramas shot with a 2:1 aspect ratio.

    Screen Shot 2015-02-25 at 5.20.23 PM

    Other options below the drop down menu include more settings that you can fiddle with to help correct distortions.

    • Scale: A value entered here will scale the image to best minimize the blank spots that may be present after the wide angle filter is applied.
    • Focal Length: Specify the focal length of the lens that created the image.
    • Crop Factor: This can be used in combination with Scale to minimize and compensate for blank areas produced by the filter.
    • As Shot: This box can be checked if your lens profile can be detected; if not, this option will be greyed out and you will need to manually specify the values of Scale, Focal Length, and Crop Factor.

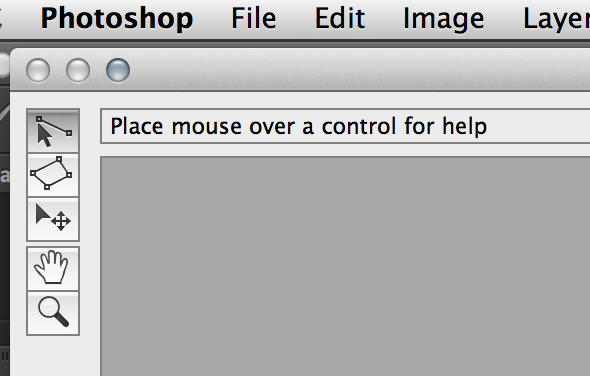
    Next, turn your attention to the little vertical toolbar in the top left corner. These are the tools you’ll use to define the constraints that indicate which lines in your image ought to be straight. The primary tools to be familiar with are the first two:

    Screen Shot 2015-02-25 at 5.27.14 PM

    • Constraint Tool: This tool is used to draw lines over the areas of the image that you wish to straighten. Simply click once to establish a desired starting point, and click again to close the line, holding down the shift key as well if you wish to add a constraint with a vertical or horizontal orientation.
    • Polygon Constraint Tool: This tool functions in the same way as the regular Constraint Tool except it allows you to draw a polygon instead of a single line.

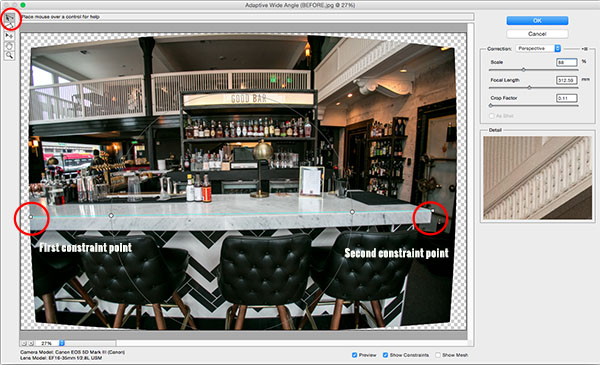
    For example, let’s look at the horizontal line of the granite countertop in the image below.

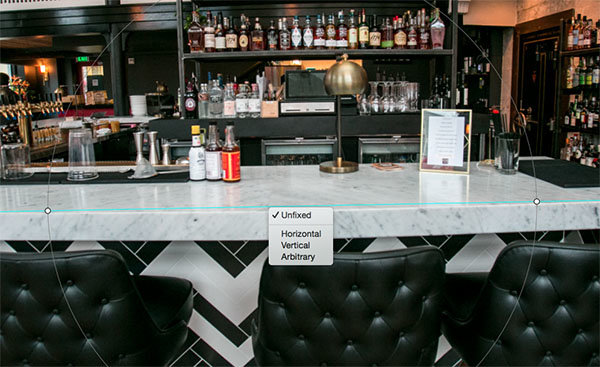
    Begin by clicking once on the left end of the line to set one constraint point, then click once on the right end of the countertop to close it. After you set the line, right-click on it and you’ll see a small menu appear allowing you to assign either a Horizontal, Vertical, or Arbitrary constraint to the line. The default constraint is Unfixed, but in this case we want to assign a Horizontal constraint to straighten the line width-wise. In order to automatically assign a constraint to a line, hold down the shift key while in the process of creating the line. In between the two constraint points, there will be a yellow line (if you held down the shift key) or a blue one if you didn’t, indicating where the straightening occurred.

    Photoshop adaptive wide angle filter

    Constraints Explanation

    You can set as many constraint lines as needed until your image is corrected to your satisfaction. Constraint lines typically should be vertical and/or horizontal. Some other tools in the toolbar that can help with this are the Move, Hand, and Zoom tools that allow you move the image around to make the adjustments needed. Additionally, there is the Magnification of the preview in the lower left corner that allows you to zoom in and help you see where to plant constraints.

    Photoshop Adaptive wide angle filter correction

    After you have corrected the image to your liking, hit the blue OK button to apply the filter.

    Photoshop adaptive wide angle filter

    BEFORE-Adaptive Wide Angle

    BEFORE

    After

    AFTER

    How do you correct distortion for your wide-angle images? Share in the comments section below.

    googletag.cmd.push(function() {
    tablet_slots.push( googletag.defineSlot( “/1005424/_dPSv4_tab-all-article-bottom_(300×250)”, [300, 250], “pb-ad-78623” ).addService( googletag.pubads() ) ); } );

    googletag.cmd.push(function() {
    mobile_slots.push( googletag.defineSlot( “/1005424/_dPSv4_mob-all-article-bottom_(300×250)”, [300, 250], “pb-ad-78158” ).addService( googletag.pubads() ) ); } );

    The post How to Correct Lens Distortion with the Adaptive Wide Angle Filter in Photoshop by Suzi Pratt appeared first on Digital Photography School.


    Digital Photography School

  • 10 Reasons to Ditch Your Softbox for a Light Panel

    So you want to create soft, beautiful light? One of the first light modifiers that comes to your mind is probably the tried and tested softbox. But, when it comes to versatility, are softboxes really worth the money? In this article, we are going to look at a viable contender to the age-old softbox – the light panel.

    Now, the goal of this article is not to bash softboxes, I personally have nothing against them. I own several and use them whenever I feel that they are the right tool for the job. However, my go-to light modifier for the majority of my photography is the light panel. Why? I am glad you asked. Here are 10 reasons why you should consider using a light panel instead of a softbox for your next shoot.
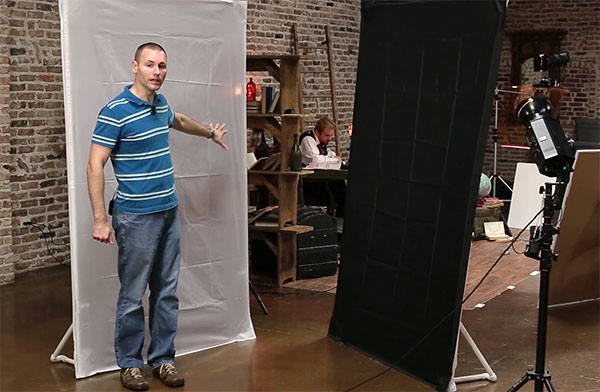
    Wide shot of two light panels

    Wide shot of two self-standing PVC light panels fitted with diffusion and black fabric. The diffusion fabric is used like a large softbox, while the black fabric is used to flag or block light.

    #1. They are inexpensive

    For under $ 50 you can create a self-standing light panel that is larger than softboxes costing more than $ 300!

    #2. They are easy to make

    You can make a basic panel frame and legs with nothing more than a hacksaw. However, a pair of PVC shears is a great investment and will make your job a lot easier.

    #3. Quickly change the size/quality of the light

    Moving the light closer or further from a panel fitted with diffusion fabric can quickly create a different size softbox effect (closer to the panel = smaller light/harder quality versus further from the panel = larger light/softer quality). Since the panel and light are separated, the panel becomes the source of illumination and can remain in the same stationary position, in relation to the subject, throughout the entirety of the shoot.

    #4. Easily change the shape of the light

    By clamping pieces of black fabric over a panel fitted with diffusion material, you can create light sources of different shapes. This is a great technique if you want to create a tall, thin stripbox effect, or if you only need to use a portion of the panel.

    #5. Different fabrics = different light modifiers

    While softboxes can be sort of a one-trick pony, light panels can easily be turned into flags (to block light) or reflectors, just by changing out the fabric. I love to add black material to my panels and use them as flags to shape the light. I also like to use opaque white fabric to reflect and bounce light. It makes a beautiful fill for both indoors and out.

    One of the coolest things you can do with light panels is harness the stray light from your strobe, to create multiple sources from one light. I oftentimes shoot through a diffused panel, then reflect some of the stray light back into the shadow side of the subject, using a second panel fitted with a white reflective material (as seen in the figures below).

    portrait of bride lit with light panels

    A bridal portrait primarily lit using two light panels
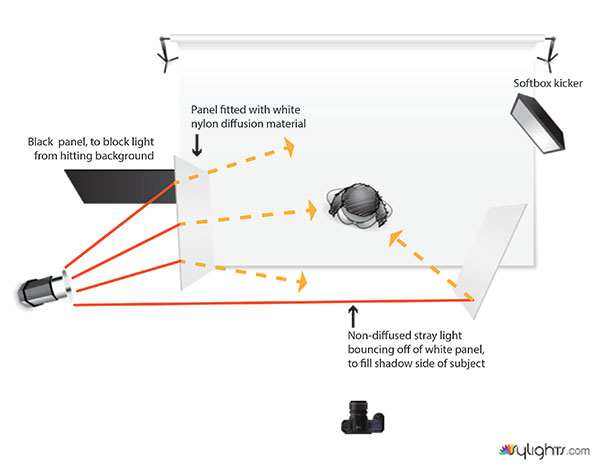
    diagram showing how to bounce stray light with light panels

    Using two panels to create a large soft key and fill from one light source. The white reflective panel was placed where stray, un-filtered, light was able to strike the front edge, which opened up the shadows more than if it were only allowed to bounce the light coming from the diffusion panel. A black panel was added to keep the light from spilling onto the background. It could have been removed, lighting the background and essentially filling the job of three lights (background, key and fill lights).

    #6. No speed rings required

    Speed rings can be such a hassle. After shelling out serious cash for a new softbox, the last thing you want to do is buy an adapter so you can actually use it. It can be a one-time cost, but if you ever change brands of lights you are most likely going to need a whole new set. Want to add a softbox to your speedlights? Well, you are going to need another type of speed ring adapter for that, too. With light panels, no matter the type of light source, all you have to do is place your light behind the panel and start shooting. Which brings me to #7 on our list.

    #7. Home Depot light friendly

    If you are just starting out and you want to try your hand at lighting with inexpensive Home Depot shop lights, then light panels are the best way to soften them. Stick multiple lights behind a panel fitted with diffusion fabric, or bounce them off a piece of white fabric to create a soft, bright, single source that can be used for photography or video. Now, all you will need is a good air conditioner to manage the heat!

    #8. Gelling made easy

    Have you ever tried to gel a softbox? It can be a tremendous waste of gel. Especially if your softbox is large. By shooting through a diffusion panel, you are able to attach a small square of gel to your strobes reflector, allowing you to purchase your gel in small sheets instead of giant rolls. For instance, at the time of this writing a 20×24” sheet of Rosco CTO gel cost roughly $ 7.50, as opposed to a 20”x25’ roll, which cost around $ 94.

    #9. Better reflections for your product photography

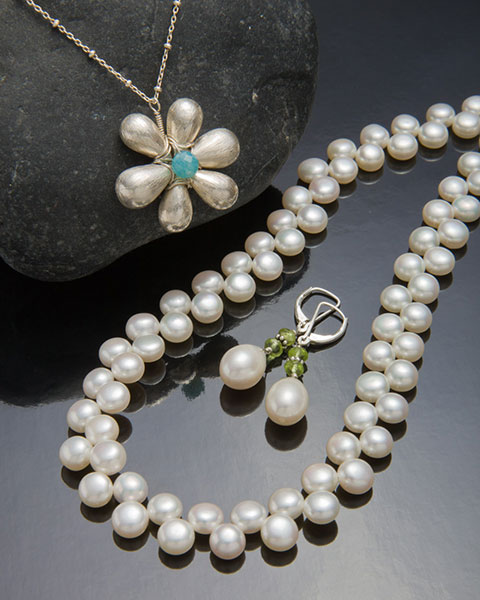
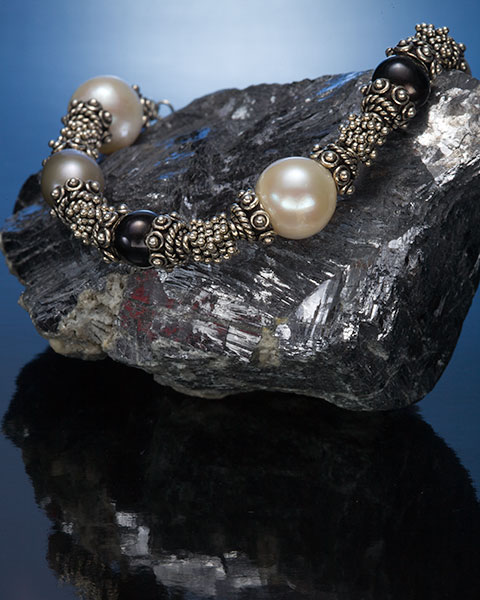
    Softboxes are made to distribute the light evenly over the face of the outer diffusion panel. Even with the inner baffle removed, the reflective interior creates a fairly even spread of light. When lighting reflective objects, this evenness can sometimes be a bad thing. Notice the gradated reflections in the two images below. This is the kind of reflection you will typically get when placing a light behind a light panel. Take note on how it adds contrast, depth and interest to the scene.  If these same images were lit using a softbox, the reflection would be an even tone, with no gradation or falloff.
    jewelry product shot using overhead light panel

    Light placed behind light panel creates gradated reflection in black reflective paper.
    jewelry product shot using a gelled strobe and light panel

    Another example of the pleasing gradation light panels reveal in reflective surfaces. The same reflective black paper from the first example is used, but the light has been gelled blue.

    #10. Portable walls

    Have you ever been out on a remote location where you have needed a changing area for your model? You can easily create a makeshift changing room by attaching three or four panels together using connector clips, then covering them with black fabric. If it is windy, throw some sandbags on the bottom of each panel to weigh them down, for good measure.

    I hope this article has given you a little more insight on how versatile and economic light panels can be.

    Many companies make and sell light panels. They are usually made from light-weight aluminum and are relatively inexpensive, compared to softboxes. However, you can save a lot of money by making your own frames out of PVC.

    In a future article I will:

    1. Show you how to create your own self-standing PVC light panel frames and accessories
    2. Offer helpful tips on making them stronger and easier to assemble
    3. Share some cheap fabric alternatives to use with your new frames

    Until then, go out, have fun, experiment and create something awesome!

    googletag.cmd.push(function() {
    tablet_slots.push( googletag.defineSlot( “/1005424/_dPSv4_tab-all-article-bottom_(300×250)”, [300, 250], “pb-ad-78623” ).addService( googletag.pubads() ) ); } );

    googletag.cmd.push(function() {
    mobile_slots.push( googletag.defineSlot( “/1005424/_dPSv4_mob-all-article-bottom_(300×250)”, [300, 250], “pb-ad-78158” ).addService( googletag.pubads() ) ); } );

    The post 10 Reasons to Ditch Your Softbox for a Light Panel by Joel Dryer appeared first on Digital Photography School.


    Digital Photography School
  • Five Places for Perfect Natural Portrait Lighting

    1 portrait lighting

    Wouldn’t it be great if you could get beautiful, natural-looking portraits without ever having to use flash?

    Well, perhaps you can. There are many different locations, often closer than you think, where you can find the right lighting for great looking portraits. Often they’re missed because we might not know where to look.

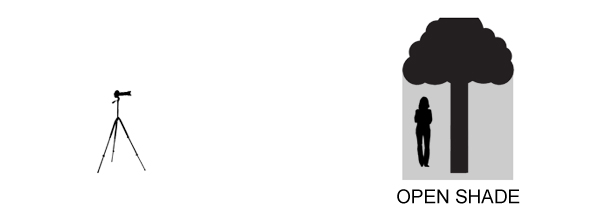
    Generally, your best strategy is to look for what is called Open Shade. Ideally, you are looking for a situation where the stronger overhead light is being blocked by a structure, either man-made or natural.

    2 open shade diagram

    There are a lot of variables to pay attention to, but with a little practice you begin to recognize good natural lighting situations that are right in front of you.

    1. Find a gazebo or front porch with a roof

    This is a particularly good technique for you to use when it’s sunny outside in the middle of the day, but it can work on overcast and rainy days as well.

    It’s often a bad idea to pose your subject out in the direct sun, particularly when it is up high in the ske. That kind of lighting can produce harsh shadows, as well as cause your subject to squint their eyes.

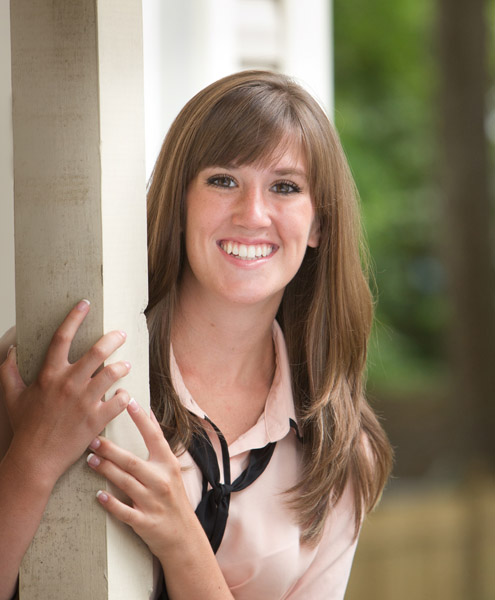
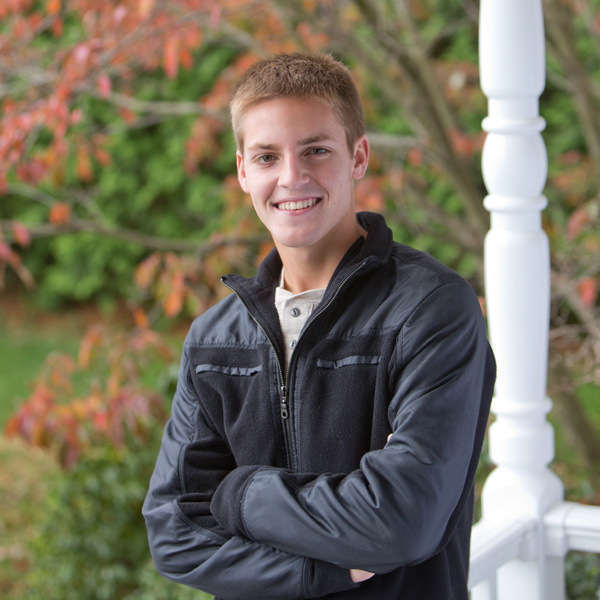
    I use the front porch location quite a bit when photographing high school seniors in the middle of the day. An overhang of any sort can block strong overhead light and allows your subject to be lit with the softer surrounding bounce lighting.

    3 front porch lighting

    In the case above, I also used a large white collapsible reflector, off to the right side, to provide additional fill-light with this handsome young man. A large aperture was used to help create an out of focus background.

    If you have no porch available you can get your model to help create a good lighting situation by using a prop like a wide-brimmed hat for a close-up head shot.

    2. Under an umbrella

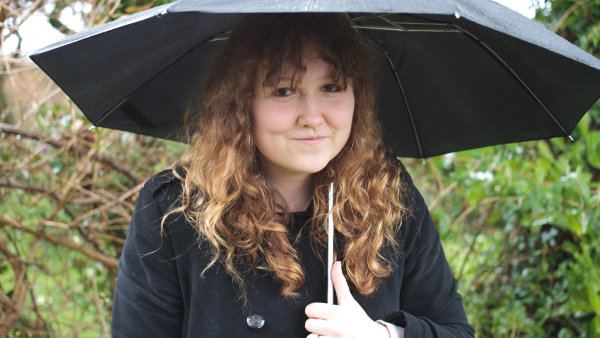
    Andrew Menage

    By Andrew Menage

    Using an umbrella can work well to protect your subject from both the rain, and overhead lighting. Note that the color of the umbrella will have a significant effect on the color of the light that is illuminating your subject. A black umbrella is neutral in color and will block almost all of the light from above.

    3. Near a window

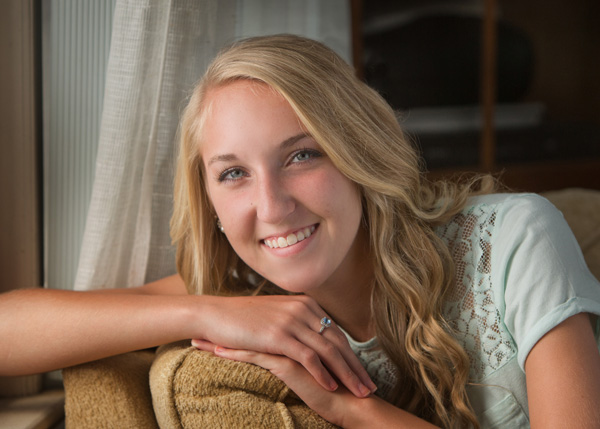
    Just because you may not be able to shoot outside doesn’t mean you still can’t use the outdoor light to create a natural looking portrait. There is a right way and a wrong way to do this.

    5 window lighting

    6 window lighting diagam

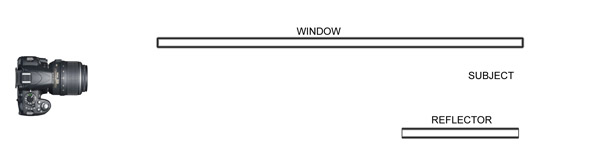
    Make sure that most of the window is forward of your subject. The larger the window, the softer the lighting. The reflector can be any light colored object that is fairly neutral in color. The closer it is to your subject, the more fill light it supplies.

    4. Find a bridge or an overpass

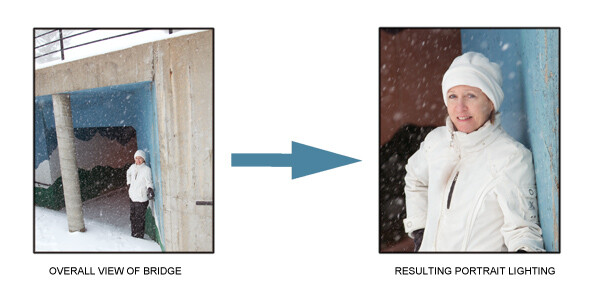
    If you shoot in a more urban setting, you’ll likely have bridges or overpasses in your area. The photo below was taken at the entrance to a pedestrian underpass. Not only did we get good portrait lighting, we also got the model out of the wind and snow.

    7 under bridge lighting

    One important thing to remember is to watch your background. Although I was generally happy with the pose and the lighting, I could have done a better job controlling the background in this portrait.

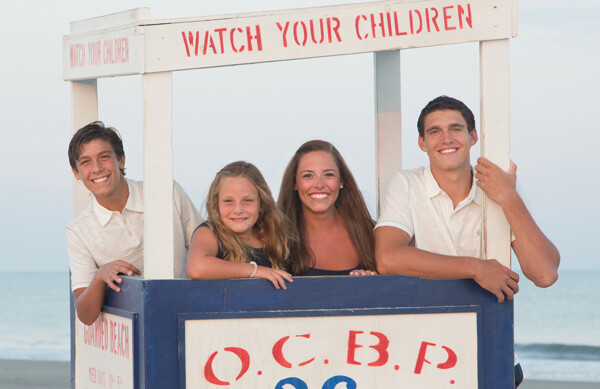
    5. Anywhere at sunset

    This is one time when you do want the sun in the face of your subject. You only have a few minutes of this sweet light when most, or all, of the sun has disappeared below the horizon.

    8 diffused portrait lighting sunset

    Direct sun can be too bright at the beginning of sunset. You may have to wait until just after sunset to get a softer look. In the beach photo above, the light was nicely diffused by a few clouds on the horizon between my subjects and the setting sun.

    More ways to find places with great natural portrait lighting

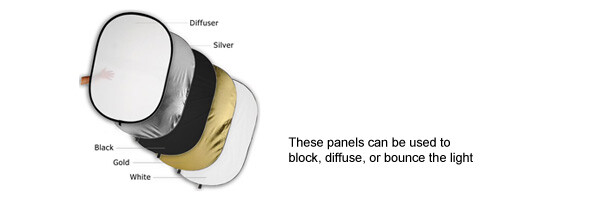
    Similar to the way you use an umbrella, you can create your own overhead roof by having an assistant hold a light blocker above your subject. This could be anything lightweight, a large piece of cardboard, or even one of the a collapsible, panels like the ones shown below.

    9 Photodiox diffusion panels

    There are two factors that dramatically effect how well this technique works.

    The first is how far back your subject is posed underneath the covering object. If you pose her too far back, you may not have enough light to get a nice photograph. If she is too far forward, you may get too much overhead lighting.

    Secondly, how high the shading object is above your subject’s head affects how the light will illuminate their features. The best way to master this technique is to play around and experiment.

    It’s always a great idea to shoot a few variations in several locations, and adjust exact placement of your subject. You’ll be able to learn a lot from your mistakes and your successes.

    googletag.cmd.push(function() {
    tablet_slots.push( googletag.defineSlot( “/1005424/_dPSv4_tab-all-article-bottom_(300×250)”, [300, 250], “pb-ad-78623” ).addService( googletag.pubads() ) ); } );

    googletag.cmd.push(function() {
    mobile_slots.push( googletag.defineSlot( “/1005424/_dPSv4_mob-all-article-bottom_(300×250)”, [300, 250], “pb-ad-78158” ).addService( googletag.pubads() ) ); } );

    The post Five Places for Perfect Natural Portrait Lighting by Bruce Lovelace appeared first on Digital Photography School.


    Digital Photography School
  • 4 Reasons Shooting at Sunrise and Sunset Will Help You Take Better Photos


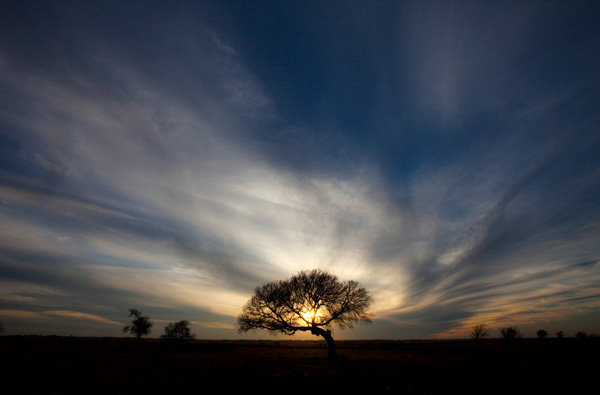
    Tree-2

    Perhaps the most important change you can make to improve your photography is to change the time of day you are shooting. It is as simple as that. Photos taken in the middle of the day all have problems that can be avoided if you photograph near sunrise or sunset. Photographers agree on very little, but they all seem to agree that the times around sunrise and sunset are the best for photography. In fact, many photographers go so far as to put their cameras away during the hours between 9 a.m. and 5 p.m.

    Getting up at dawn, or hanging around after sunset, is generally not convenient. It is no fun to get up well before sunrise, especially in the summer when sunrise comes early. But if you want to elevate your photography, that is how to do it.

    You may have heard all this before, but in this article I will explain why, and show you some of the reasons why sunrise and sunset can help you take better photos.

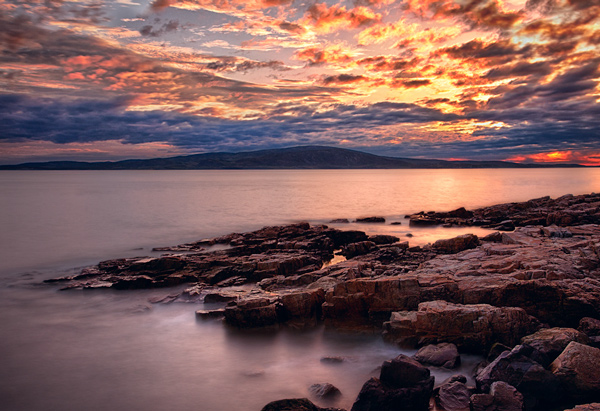
    Schoodic

    Reason #1: Avoid harsh contrast

    The bright light of the midday sun creates harsh shadows in your photography. Nearly every object within your view will create harsh shadows. Obviously large objects like trees and buildings create such shadows, but it goes at lot further. When photographing a person, for example, you will likely encounter harsh shadows on their faces. Even something as small as grass or leaves will leave unsightly black shadows in your pictures.

    Photographing near sunrise or sunset fixes this problem. At those times, the sun’s rays are coming from a more horizontal angle, which means that the rays have to pass through a lot more of the earth’s atmosphere before reaching you.  That makes the light more diffused.

    In addition, the times just before sunrise and after sunset don’t involve any direct rays at all. At those times you are dealing only with indirect rays of the sun. You will not have a problem with harsh shadows.


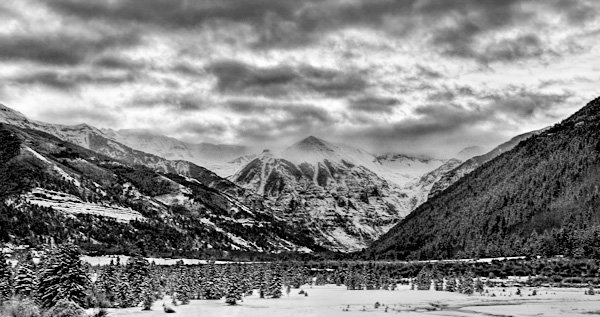
    Telluride-2

    Reason #2: Maintain tones within your camera’s dynamic range

    In all outdoor photography you have to cope with the problem that the sky is invariably brighter than the foreground. Sometimes it is much, much, brighter. If you meter light based on the brightest part of your camera’s view, which is inevitably the sky, the shadows in your picture will end up as pure black. Conversely, if you meter light based on the foreground or shadows in your camera’s view, the brighter portions of your picture will be overexposed or even blown out (pure white).

    For pictures taken during the middle of the day, this problem can be exacerbated. That is when the sky is at its brightest. If your foreground is not as bright, you are will have a problem where the scene is beyond the dynamic range of your camera.

    When photographing around sunrise or sunset the sky is not quite as bright as it is when the sun is high in the sky. This cuts down the dynamic range your camera has to capture, so it is possible to capture the entire scene in full detail.


    WesternLake-2

    Reason #3: Avoid the commonplace

    You simply cannot take a unique picture by photographing the same places, at the same time, from the same angles as everyone else. If you want your pictures to stand out from the crowd, you need to do something different. Photographing at sunrise and sunset goes part of the way in giving you that something different.

    Most people are used to seeing the world as it exists in the middle of the day, they are not used to seeing it at sunrise and sunset. A typical day will have 10 hours of midday lighting, but the sunrise and sunset last only a little while. Further, people often miss them entirely. People are usually sleeping at dawn, or if not, are getting ready for work and not focused on the sky.

    By photographing at sunrise and sunset, you are showing your viewers something they don’t see all the time. It avoids the commonplace. It will make your pictures more interesting to your viewers.

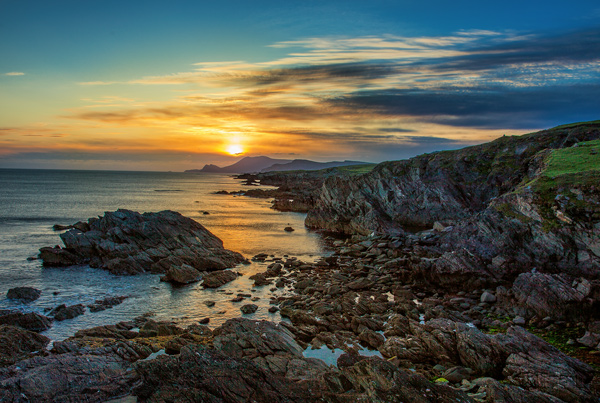
    Achill

    Reason #4: Capture the sky at its most vibrant

    People often go to scenic locations to watch the sunrise or the sunset. There is a reason for that: because those are the times when the sky is at its most dramatic. As a photographer, that is the sky that you want to capture.

    Skies at sunrise and sunset are full of color. The orange of the sun combines with the blue of the sky and creates interesting colors. When there are clouds in the picture as well, there can be a variety of different colors. Conversely, in the middle of the day, the sky is blue (if you are lucky, otherwise it is grey). By photographing at sunrise and sunset, you can capture those colors in your pictures. To make sure you are capturing the colors at their most vibrant, set your camera to meter off the sky and then underexpose a little bit.

    Marina-2


    Conclusion

    I hope this article explains the advantages of photographing around sunrise and sunset. It is one thing – and perhaps the only thing – that I can guarantee will improve your photography. But one final note to help you maximize the benefit, is that you should not arrive at your location at sunrise and/or leave at sunset. Rather, arrive about 45 minutes before sunrise and hang around at least that long after sunset. These periods when the sky is bright, but the sun is beyond the horizon, sometimes result in more dramatic images than the sunrise/sunset itself. I have often seen people pack up when the sun dips over the horizon, only to miss the most dramatic colors of the day.

    I would also encourage you to check out the importance of photographing at these times for yourself. The next time you are on your favorite photo sharing website, look at your most-liked photos. Make a quick note of how many of them were taken at sunrise or sunset. My bet is that it will be a lot of them.

    So if you want to take more dramatic and interesting photos, take them at sunrise or sunset. The good news is that it doesn’t cost you anything. You don’t have to buy any special gear. Yet this one change will make more difference than any new camera or lens.

    googletag.cmd.push(function() {
    tablet_slots.push( googletag.defineSlot( “/1005424/_dPSv4_tab-all-article-bottom_(300×250)”, [300, 250], “pb-ad-78623” ).addService( googletag.pubads() ) ); } );

    googletag.cmd.push(function() {
    mobile_slots.push( googletag.defineSlot( “/1005424/_dPSv4_mob-all-article-bottom_(300×250)”, [300, 250], “pb-ad-78158” ).addService( googletag.pubads() ) ); } );

    The post 4 Reasons Shooting at Sunrise and Sunset Will Help You Take Better Photos by Jim Hamel appeared first on Digital Photography School.


    Digital Photography School
  • Paddling SUP on South Platte River from Kersey to Kuner

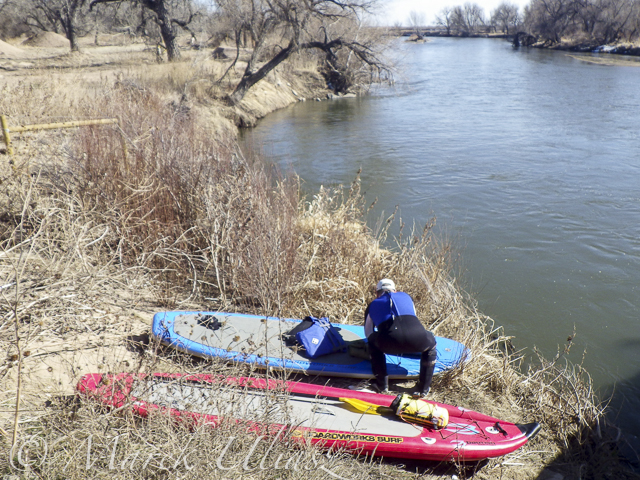
    March 8, 2015. A short, 7 mile, stand up paddling (SUP) trip on the South Platte River from Kersey to Kuner with Rob Bean and a company of goose, deer, and bald eagles. It was easy paddling with a good flow of 1100 cfs and beautiful warm weather. After, paddling I did some river scouting around Evans Riverside Park and further upstream.

    Rob’s pictures from this paddling on facebook.

    paddling SUP on South Platte River

    Launching our paddleboards below Kersey bridge next to water gauge station

    paddling SUP on South Platte River

    I paddled my Badfish SUP with a short fin and never touched the bottom. Rob paddled with a regular fin and had to step out of his board once or twice, but I believe it would be possible to avoid any shallows with a more careful navigation.

    paddling SUP on South Platte River

    Finishing our run at Kuner on left shore above the bridge

    paddling SUP on South Platte River

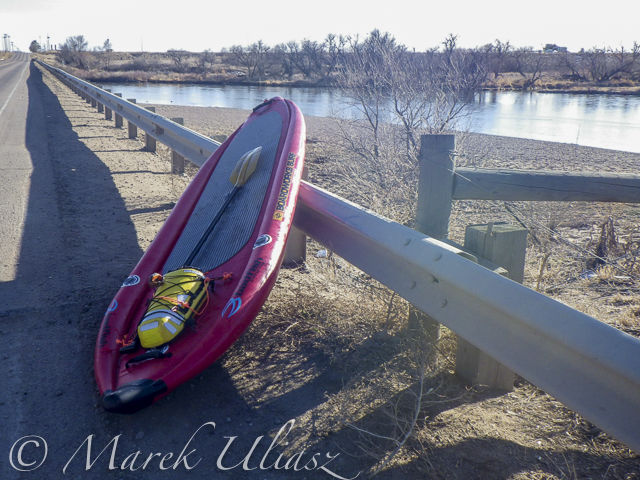
    A typical bridge river access on the South Platte.

    A part of Riverside Park at Evans reopened in September 2014 with entry from 42nd Street.  There is access to a small lake, but no access to the river.

    A part of Riverside Park at Evans reopened in September 2014 with entry from 42nd Street. There is access to a small lake, but no access to the river.

    Evans river access

    A bike trail going under hwy 85 bridge at Evans. Off road parking at the end of frontage road. The river access is not bad for the South Platte standards (no fences), but the under bridge scenery is pretty ugly.
    Bike trail destroyed by South Platte River flooding

    And, the bike trail ends just below the bridge. This is how probably the river shore looks further downstream at Riverside Park after the 2013 flooding.
    St Vrain Creek above  confluence with the South Platte River.

    Let’s move 16 miles upstream: St Vrain Creek at Wildcat about 1 mile before the confluence with the South Platte.

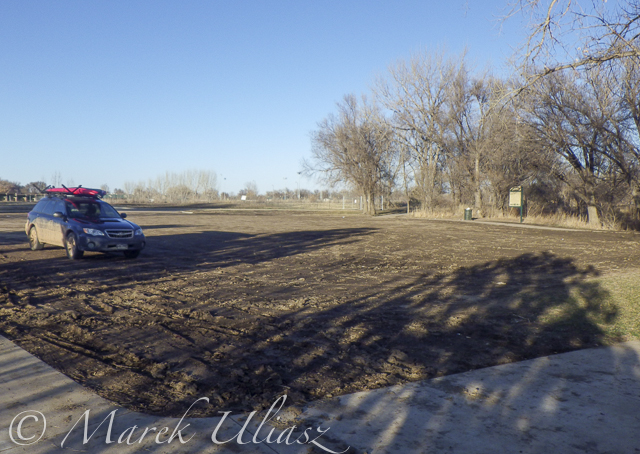
    Access to the river from the county road 19.5 looks more or less the same as before flooding. River flow ~200cfs. I started paddling trips here with flow as low as 90cfs.

    Access to the river from the county road 19.5 (no fences) looks more or less the same as before flooding. River flow ~200cfs. I have started paddling trips here with flow as low as 90cfs.

    Related posts:
    Opening 2015 Paddling Season on the South Platte River
    Scouting and Paddling the South Platte River after 2013 Flooding
    South Platte River below Denver – GPS/photo river guide


    paddling with a camera

  • 4 Lighting Effects You Can Create in Photoshop

    Title-image-green-energy

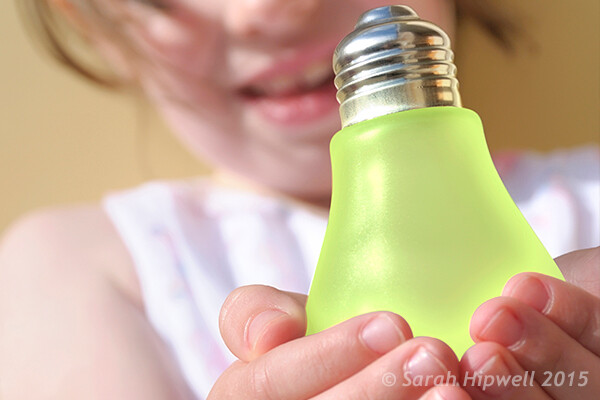
    Lighting Effects using Color Dodge Blend Mode in Photoshop.

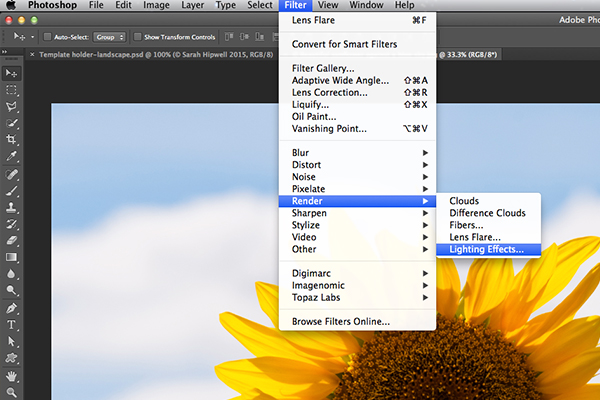
    There are numerous methods to creating lighting effects in Photoshop. I’m only going to cover four but they can be used in many ways. But first let’s take a look at a couple that are in the Filter gallery under Render in Photoshop (CS6 and CC). The first is Lighting Effects, which has been upgraded and is more powerful and easier to use than previous versions of Photoshop.

    Lighting-effects-filter

    How to access Lighting Effects in Photoshop CS6.

    The preview box has been replaced with a more sophisticated interface. You are presented with three different types of lighting effects in the Options Bar – Spot, Point and Infinite – and various presets to choose from. There is a Properties panel that customizes the look of the light that you want in terms of direction, placement, etc. This filter works on Smart Objects, so that you can work non-destructively. It is too comprehensive to go through all the aspects of this filter in this article. The best way to use it is simply open an image, experiment with the different options and see what you think.

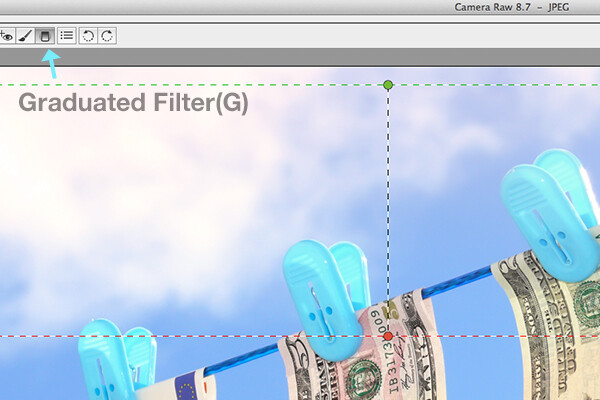
    Instead, I will show alternative techniques that I prefer to use in Photoshop and Adobe Camera Raw (ACR), some of which you may already be familiar with. I really like the Graduated Filter tool in ACR. This works in similar way to a Graduated Neutral Density filter on your camera. Landscape photographers use graduated filters so that they don’t overexpose the sky area. The dark bit on the ND is on top allowing less light in, as exposure is set for the foreground. You can achieve similar results using the Gradient Editor in Photoshop.

    Graduated-filter

    The Graduated Filter icon in Adobe Camera Raw.

    With your image opened in ACR, select the Graduated Filter tool. Drag over an area on your image where you want the effect to be applied. Adjust the slider options on the right – Exposure, Highlights etc., to either lighten or darken the area. You can also choose a color to add warmth or a cooler effect.

    snail

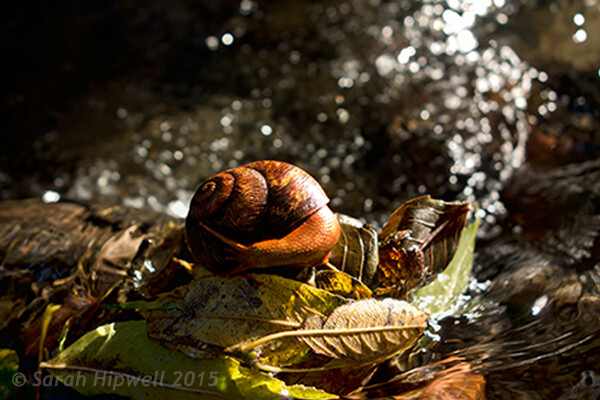
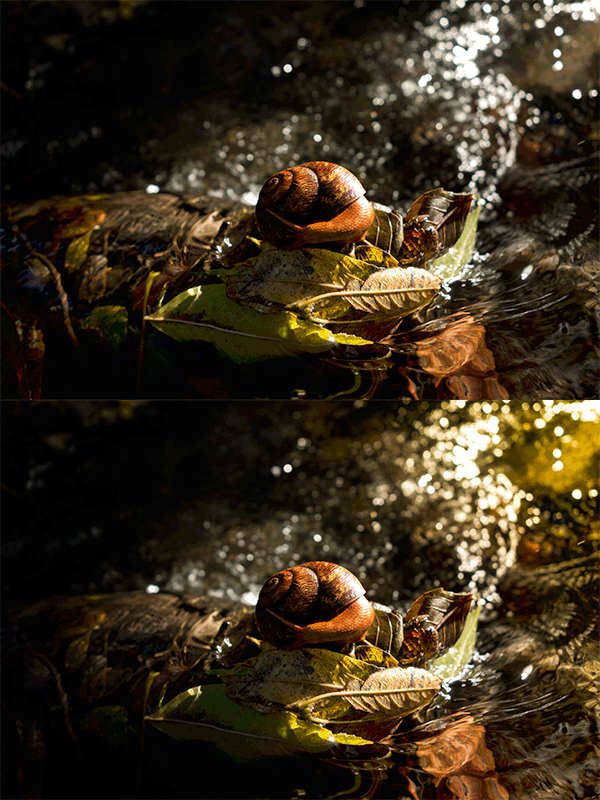
    This is the original image of a snail before the Graduated Filter has been applied.

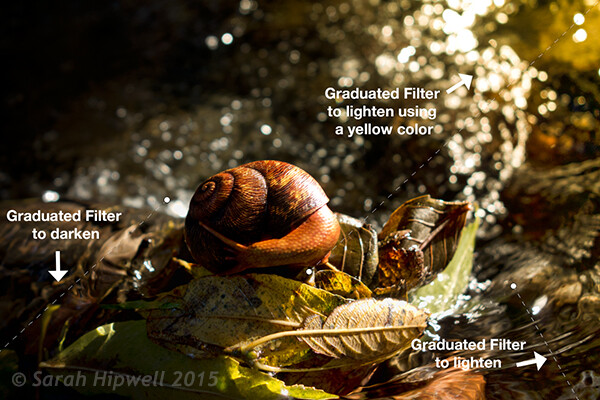
    In the image of the snail, I used the Graduated Filter in three different areas on the image. I wanted to add more warmth to the water, so I used a yellow color to create an impression of a sun dappled effect. The second area was to lighten a little more of the water eddy, bottom right of the photo. Finally the third spot, I wanted to simply darken the area directly behind the snail so that the viewer’s eye is drawn to the it. Although, these are subtle light effects, they can add more drama and even change the composition of a photo.

    Snail with Graduated Filter effects

    The snail image with the Graduated Filter applied in three different areas.

    Snail animated gif

    Animated GIF  to show before and after effect from the Graduated Filters effects.

    The Lens Flare, which is also found in the Filter gallery under Render, is a lighting effect that can be quite useful but you need to use it with care, using the less is more approach. For example in the image with the golf ball on the red tee below.

    golf-ball-lens-flare

    Lens Flare effect added to this image.

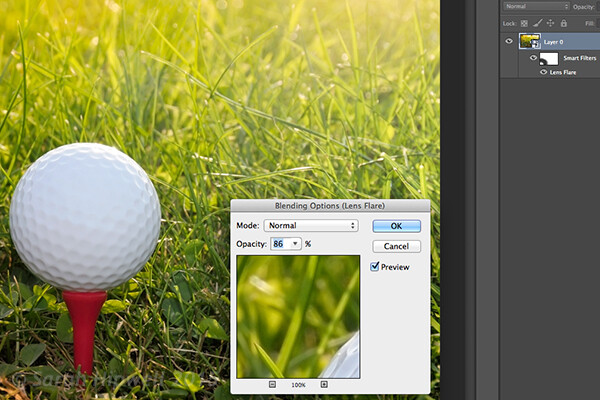
    I used the Graduated Filter in three areas, similar to the snail image. I added a magenta color tint on the grass, bottom left of the image to break up the green flat look. Adding a different color using the graduated Filter in this way gives the image more depth. I then added a Lens Flare effect to the top right and reduced the opacity so that the effect caught the tips of the blades of grass. Converting your image to a Smart Object first before applying the filter effect, makes it easier to make changes non-destructively. I was also able to mask out some of the effect that I felt was too strong.

    Animated gif of golf ball with Lens Flare

    Animated GIF of golf ball with Graduated Filter effects and Lens Flare.

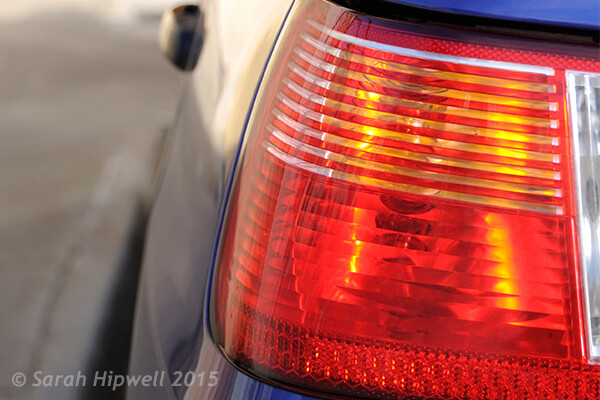
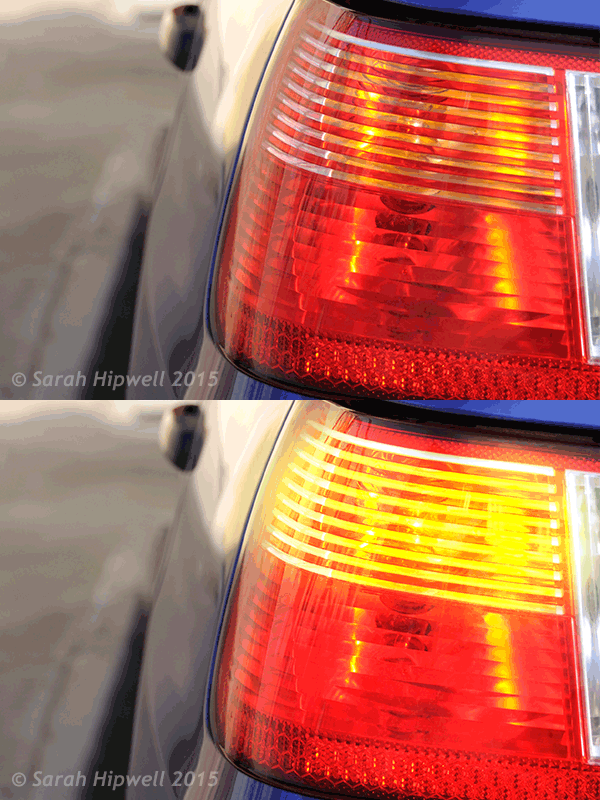
    This brings me onto the third technique, the Color Dodge blend mode. I wanted to create the effect that the rear lights were switched on in this image of a car (below). This is such an easy way of creating a lighting effect in Photoshop and the result is brilliant.

    First, create a new blank layer on top of the original image. Select a darker colour to the part of the image that you will be working on. For the lower section of the light, I used a dark red. Using the Brush tool set to soft, paint a small daub and then make it a bit bigger using the Free Transform tool.

    car tail light

    Rear taillights of a car.

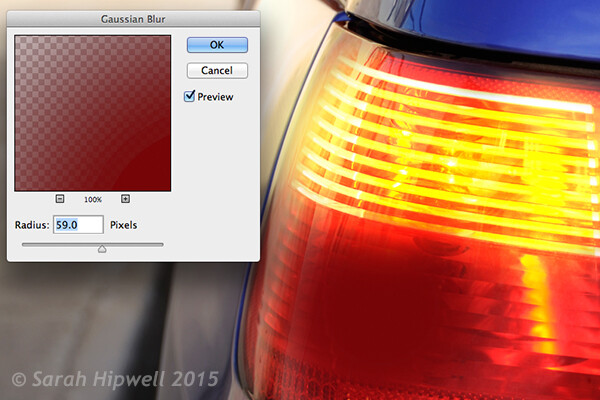
    Add some Gaussian Blur so that there is no ‘hotspot’ in the middle and the color looks uniform. Position this on a section of the light, change the blend mode to Color Dodge and reduce Fill, not Opacity, to achieve the desired effect. In this case, I reduced the Fill to 59%. I then duplicated this layer and moved it over to the right. You can reduce the size of the spot area if you feel the over spill is too much. So now I had the bottom tail light working. I repeated the same steps for the top section of the light. But I used a darker color yellow there.

    Color-dodge-gaussian-blur

    On a separate layer, paint a darker colour to the area intended and add Gaussian Blur.

    car tail lights flashing

    Animated GIF with flashing taillights using Color Dodge Blend Mode in Photoshop.

    The forth and final technique is similar to above. When you need to add a highlight(s) to an area of an image to bring out more detail, this technique and the one above can be used on any type of image. It is so easy, quick and very effective. In the photo of the grapes (below), I wanted to create highlights on the dark areas to make them stand out. Same as the above step, create a new blank layer on top of the image and using white as your color, paint a small daub. Make it bigger using the Free Transform tool and add some Gaussian blur. Change the blend mode to Overlay or Softlight, I generally use Softlight. Reduce the Opacity until you get the result that you want.

    grapes

    Animated GIF to show highlights on areas of some of the grapes, using Overlay/Softlight Blend Modes in Photoshop.

    Do you have any other tips for adding or creating lighting effects in Photoshop or another way? If so please share in the comments below.

    googletag.cmd.push(function() {
    tablet_slots.push( googletag.defineSlot( “/1005424/_dPSv4_tab-all-article-bottom_(300×250)”, [300, 250], “pb-ad-78623” ).addService( googletag.pubads() ) ); } );

    googletag.cmd.push(function() {
    mobile_slots.push( googletag.defineSlot( “/1005424/_dPSv4_mob-all-article-bottom_(300×250)”, [300, 250], “pb-ad-78158” ).addService( googletag.pubads() ) ); } );

    The post 4 Lighting Effects You Can Create in Photoshop by Sarah Hipwell appeared first on Digital Photography School.


    Digital Photography School