Category: Photography

  • How to Get More Natural Smiles in Child Photography

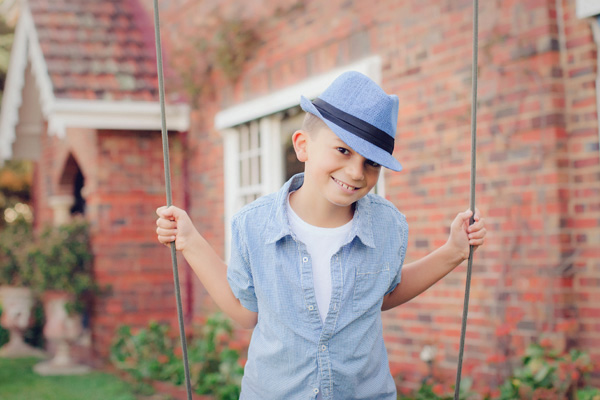
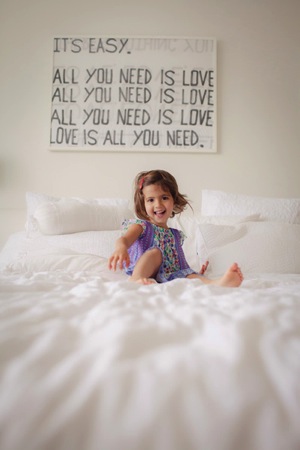
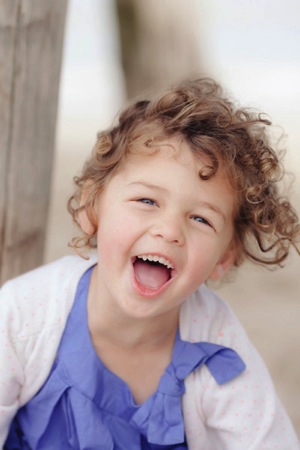
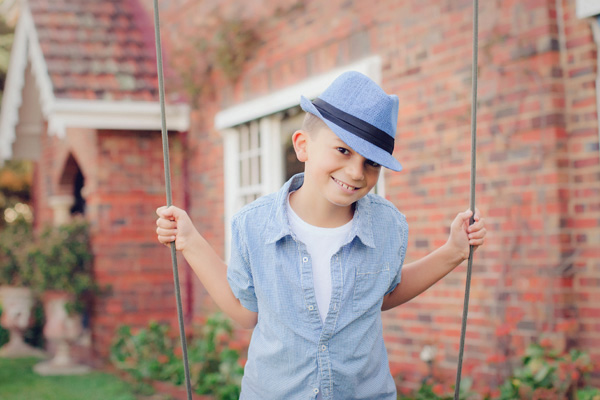
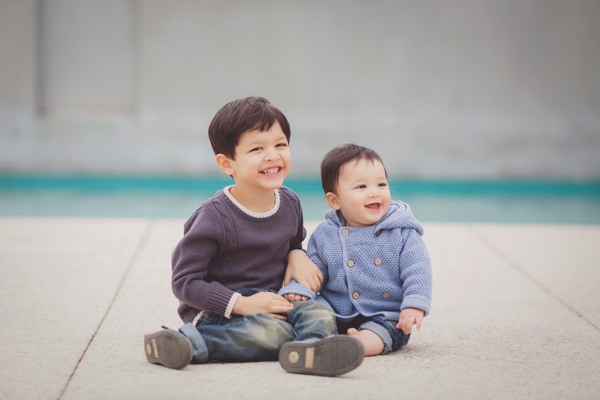
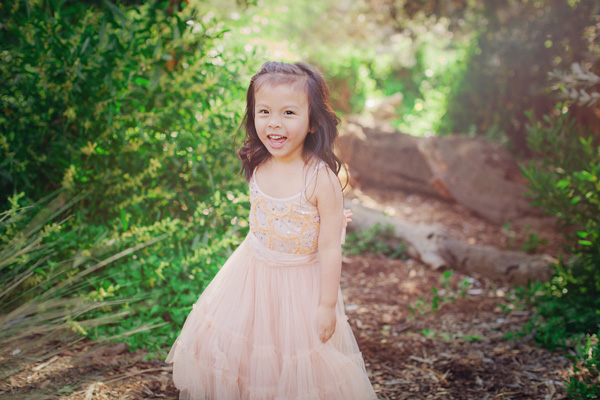
    A natural smile – the holy grail of child photography.

    Angie baxter 001

    A genuine, heartfelt smile is more than just turning up the corners of the mouth. A real smile radiates from your whole face, and particularly for children, is often felt with the whole body. Not only is a forced and fake smile easy to spot in photographs – we know that wearing a fake smile and having it photographed doesn’t feel too good at the time, and it doesn’t feel great for children either.

    So while we want to photograph a child’s beautiful smile, we also want them to enjoy the process of being photographed. And as the photographers, we want to have a good time photographing them too.

    Angie baxter 004 1

    There is so much to discover with children – all their favourites, their take on issues big and small, how they feel about themselves, their family and this funny old world. Children are cheeky, fun, creative, enthusiastic and curious – they are also clever and can tell when someone is not genuinely interested. So make sure your heart and intention is in the right place.

    If your small subject is feeling uncomfortable it will be impossible to garner a sincere smile. Placing emphasis on creating an honest connection with children so they feel at ease will lead to them sharing their best selves – most of the time.

    Angie baxter 006

    Following are four conversations that I love to have with kids that always result in joyous laughter and real smiles.

    #1 Discovering their favourite toy or character

    Favourite toys and security items are often important for small children. If your subject has a special toy (i.e. “Bunny”), I will use that as part of our conversation.

    • Does Bunny have a mouth?
    • Does Bunny have a belly button?
    • I wonder where Bunny sleeps. Does she sleep in this shoe? (holding up their shoe)
    • Hmm, does she sleep in the fridge?
    • I know, she must sleep in bed with Mummy and Daddy?

    Angie baxter 005 1

    or alternatively, Buzz Lightyear may be their favourite character.

    • Does Buzz Lightyear have Weetabix for breakfast?
    • Does Buzz go to school?
    • Does Daddy have Buzz Lightyear underpants?

    Closed-ended questions are great for this age group so they don’t have to think too hard and can just nod or shake their head, and smile and giggle along.

    #2 Animals

    Angie baxter 003 1

    Animals are something kids can easily relate to. I like to make the questions silly and fun.

    • If you could have any animal as a pet, what would it be?
    • What are all the things you know about this animal?
    • What would be a good name for this pet?
    • If you had a pet donkey, what would you name him?

    I play around with lots of animals for that last question – if you had a pet giraffe, or caterpillar, or hippopotamus. Choosing animals that are not usual pets.

    #3 When you grow up

    Angie baxter 004 1

    Conversations about jobs, growing up, and the work their parents do always get good reactions. Your questions can be light-hearted or more serious, depending on the child’s age and personality.

    For the more carefree child, I might start with:

    • When you grow up would you rather be a ballerina or a princess? (for boys)
    • When you grow up would you rather be a mum or a dad? (for girls)
    • When you grow up would rather be a frog or a snake?

    Angie baxter 007

    For an older, more serious child you can ask things like:

    • Who has the best job in the world?
    • What job would be the most boring job?
    • What does Dad do when he gets to work?
    • When you grow up, would you rather be a chef or a dancer? Or, a builder or a truck driver?

    It can be easier for kids if you give them an either/or question rather than just saying, “What do you want to be when you grow up?” Asking kids to think of a detailed answer on the spot can be a bit difficult for them.

    #4 Family rules

    Angie baxter 008 Angie baxter 009 1

    This is also a really fun conversation topic – particularly for the parents who are listening in.

    • If you were in charge of your family, where would you eat dinner every night?
    • If you had to set the bedtime, what time would you go to bed?
    • If you had to choose the family breakfast, what would you have?
    • Who is the boss of your family?”

    When photographing children, take your time and enjoy being with them. The time spent before you even pick up your camera is invaluable to gauge their personality – are they outgoing, reserved, tired, hyperactive, shy, giggly? Make intuitive decisions as to which conversation style will work best for each child. This gets easier with experience, so spend as much time with children as you can ,and fun conversations with them will soon become effortless.

    googletag.cmd.push(function() {
    tablet_slots.push( googletag.defineSlot( “/1005424/_dPSv4_tab-all-article-bottom_(300×250)”, [300, 250], “pb-ad-78623” ).addService( googletag.pubads() ) ); } );

    googletag.cmd.push(function() {
    mobile_slots.push( googletag.defineSlot( “/1005424/_dPSv4_mob-all-article-bottom_(300×250)”, [300, 250], “pb-ad-78158” ).addService( googletag.pubads() ) ); } );

    The post How to Get More Natural Smiles in Child Photography by Angie Baxter appeared first on Digital Photography School.


    Digital Photography School

  • Don’t Be Afraid of Manual Focus

    If you’re a beginner in the wonderful world of photography, if you’ve never used an older film camera, or a combination of both, you might be unfamiliar with the workings of manual focus. Even if you are, you may not have thought about how you would use it in real-world situations.

    Fortunately as DSLR owners, we have the best of both worlds between manual and automatic focusing; we have a choice as to how we decide the subject of our photo, and other points that aren’t as important. This is an advantage for you, and having a better understanding of the “other” focusing method will allow you more flexibility and leave you better prepared for a wider array of situations while in the field.

    seagrass

    But keep in mind, you’re not learning manual focus as a replacement for automatic focus, you’re learning it as a compliment.

    While modern DSLR’s and their lenses have varying degrees of complexity for automatically focusing on a specific point within a scene, film cameras before them relied on a manual system to focus. The photographer would turn the focusing ring on the lens until the subject was sharp, then snap the photo. When the modern AF (autofocus) systems came around, the camera became smart enough to identify the subject(s) or the more important part of the photo, and focus on that without much interaction from the user.

    You might think, why would I want to do it any other way? I can have the camera choose the most important thing to put into focus, or I can even manually select a focus point, and have it always focus there. What reason would I have to turn this system off completely and rely on myself?

    There are a few reasons, in fact, but first, let’s cover how to use manual focus in the first place.

    How to manually focus your camera

    To manually focus an AF-capable lens on a DSLR, first locate the mode switch on the lens. It is usually labelled “AF – MF”. Switch it to MF. After you’ve done that, the lens will be in manual mode, and pressing down the shutter release halfway will no longer engage the autofocus system.

    Find the focusing ring near the end of the lens. Twisting this ring will adjust focus, and you will immediately see the effects of this through the viewfinder, with different areas of the frame coming into, and going out of focus. Because your viewfinder isn’t a perfect representation of what your image will look like, you may need to use a couple of other tools to verify focus.

    The AF-MF switch is located on the lens itself if compatible.

    The AF-MF switch is located on the lens itself if compatible.

    Firstly, you can use the depth of field preview button. Almost all modern DSLR’s have this feature, and it allows you to get an idea of how your current aperture and focus will appear in the final image. If equipped, the button is usually next to the lens mount, although the exact placement might vary depending on your camera model; be sure to check your camera’s manual if you’re unsure of its location.

    When you press the button, the aperture will close down to its actual setting, so the preview image could darken a bit. This darkening will not be recorded on the actual image.

    An even better way to monitor your focus is by using the Live View feature of your camera, which gives you an accurate representation of what your camera sees on the LCD screen. After focusing, switch to Live View and zoom in to the area you’re focusing on (zoom the view, not the lens). You’ll be able to clearly see what is actually in focus, and what is not.

    So what shooting situations might benefit from the wonders of focusing like our forefathers?

    Macro photography

    When you’re shooting macro or close-up photography, you’re usually dealing with an extremely thin depth of field. At larger apertures, focusing is extremely important. Manual focus allows you to ensure that the most important part of your subject is crisp.

    When shooting subjects up close, focusing manually will give you tighter control.

    When shooting subjects up close, focusing manually will give you tighter control.

    Low-light situations

    As wonderful as autofocus is, it tends to falter a bit in low-light situations, the amount of which usually depends on the lens being used. You’ve undoubtably experienced times where the autofocus struggles to find a focal point, and leaves you with nothing more than a blurry preview through the viewfinder.

    Subjects captured in low light are notorious for muddling up autofocus systems; manual focus is the best way to solve the problem.

    Subjects captured in low-light are notorious for muddling up autofocus systems; manual focus is the best way to solve the problem.

    Focusing manually allows you to take the guesswork out of these situations (remember to use Live View to check it)

    Selective focus

    There are also times where you may prefer to control your focus for creative reasons. Shooting a model through a frame of trees, for example, or requiring the background of the photo to be in focus while the foreground is not.

    While modern autofocus system can usually get this right, manual focus allows you a level of control that’s hard to automate.

    A photo like this gives the autofocus system too many options to get the depth of field exactly right.

    A photo like this gives the autofocus system too many options to get the depth of field exactly right.

    Wide-angle shots

    When shooting with a wide-angle lens, particularly in landscape photography, your subjects can tend to be a larger objects shown on a smaller scale, such as trees, buildings, and other inanimate objects. In this situation, since they occupy a smaller area of the frame, controlling the focus of the shot on your own will usually yield better results.

    Smaller subjects in a wide-angle picture means more work for the autofocus system.

    Smaller subjects in a wide-angle picture means more work for the autofocus system.

    Panoramas

    When we take panoramic photos, or a set of photos stitched together in post-production, consistency throughout the shots is key in several areas, one of which is focus. Not ensuring your focus is consistent throughout the shots, along with other things such as lighting and white balance, can produce a disjointed result, failing to convince the viewer’s mind that they’re looking at one continuous photograph.

    When your camera is set to focus manually, you can be sure that the proper subjects are always sharp in a panoramic shot.

    When your camera is set to focus manually, you can be sure that the proper subjects are always sharp in a panoramic shot.

    Low contrast situations

    Autofocus on modern cameras work best when there is a higher level of contrast between the dark and light tones within an image. These systems tend to struggle when contrast in the frame is reduced, such as shooting a light-colored subject against a bright background.

    Low contrast is another situation that tends to confuse autofocus systems; your eyes can better differentiate between the subject and the background.

    Low contrast is another situation that tends to confuse autofocus systems; your eyes can better differentiate between the subject and the background.

    Since the human eye has a much higher dynamic range than the cameras you’re shooting with, you can manually choose the best focus in these situations.

    Give it a try!

    Although it may seem counterintuitive to disable systems on our cameras that are intended to make things easier, it may be just the thing to spark our creativity.

    A habit I always try to maintain is to visualize what settings I’ll need to use before I go out to shoot, and this is a good time to determine if the scenario I’m going to be presented with lends itself to turning my autofocus system off.

    At the end of the day, just keep in mind that there is no right way or wrong way. The “right way” is different for all of us. However, knowledge is power, and you can only benefit from knowing the ins and outs of how your camera works and what options are available to you.

    “There is only you and your camera. The limitations in your photography are in yourself, for what we see is what we are.” – Ernst Haas

    googletag.cmd.push(function() {
    tablet_slots.push( googletag.defineSlot( “/1005424/_dPSv4_tab-all-article-bottom_(300×250)”, [300, 250], “pb-ad-78623” ).addService( googletag.pubads() ) ); } );

    googletag.cmd.push(function() {
    mobile_slots.push( googletag.defineSlot( “/1005424/_dPSv4_mob-all-article-bottom_(300×250)”, [300, 250], “pb-ad-78158” ).addService( googletag.pubads() ) ); } );

    The post Don’t Be Afraid of Manual Focus by Tim Gilbreath appeared first on Digital Photography School.


    Digital Photography School

  • 10 Inspiring Photo Documentaries Worth Your Time

    As we try to find inspiration in our environment that fuels our desire and imagination as artists, we each develop our own style. Sometimes, you may find yourself feeling stuck creatively. Or you might be enthusiastic about taking photos but be unsure where to focus your energy and enthusiasm. If that’s the case, you might profit from a little history Continue Reading

    The post 10 Inspiring Photo Documentaries Worth Your Time appeared first on Photodoto.


    Photodoto

  • Back Button Focus: What is it and why should you try it?

    What operation on a camera could possibly be more simple than pressing the shutter button to take a picture? There’s not much to it, really –  you look through the viewfinder (or at the LCD screen on the back of the camera), press a button with your index finger, wait for the camera to focus, and voilà! You’ve got a photo.

    Well, as the popular saying goes, what if I told you there was a better way? Hidden deep within the settings of most cameras is a feature called Back Button Focusing, and enabling it can transform your approach to photography.

    A Brief History
    MinoltaMaxxum7000

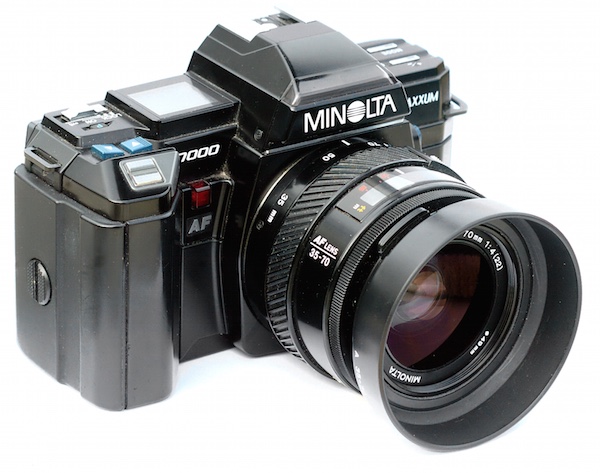
    The Minolta Maxxum 7000 was one of the first SLR cameras with autofocus capability in 1985.

    To understand what Back Button Focusing is, it’s important to know a little about the history of the autofocus function on your camera. Until the mid-1980s, there was no such thing as autofocus on consumer-level film cameras. You had to hold your camera up to your eye and either turn a ring on the outside of the lens or adjust what’s known as a rangefinder in the top-left corner. It required a great deal of patience and practice, and there are many photographers today that still swear by this method.

    In 1985 Minolta released the Maxxum 7000 which integrated the autofocus function into the shutter button, which seemed like a sensible choice because you would normally want to make sure the camera was focused before taking a photo. This implementation of autofocus worked well, but required a bit of maneuvering if the photographer wanted to focus on something other than what was in the center of the photo. To do that, he or she would have to aim the camera at the object to be in focus, carefully hold the shutter button down halfway to keep the focus locked while re-composing the shot, then pushing the button all the way when the picture was ready.

    This system remains in place on most cameras today, and it’s probably how your own camera operates. At this point you might be wondering why you should bother to change something that has worked perfectly well for the past 30 years.
    CanonEOS630

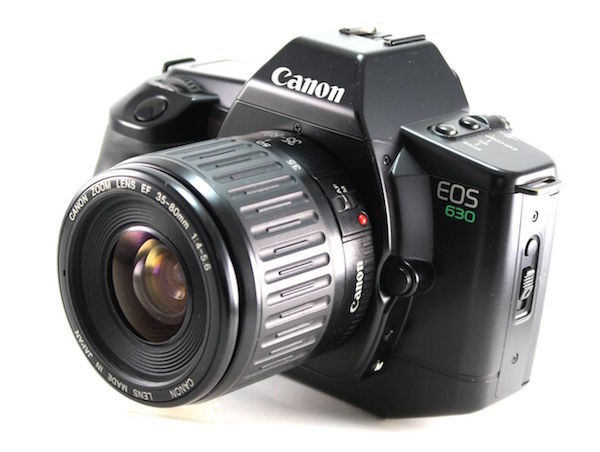
    Canon’s EOS 630 was the first camera to give users the option of using a separate button for focusing instead of the shutter button.

    The answer is because there really is a better way to focus your camera before you take a picture, and it was invented by Canon in 1989. On their EOS 630 camera they included an option within the camera’s custom settings menu to separate the actions of focusing and snapping the shutter. Users could tell the camera to use a separate button on the back of the camera to handle focusing duties, which left the shutter button to do one thing and one thing alone: take the picture. It was not an immediately obvious feature, and it never really caught on like Canon may have hoped, but the same capability is in every Canon DSLR today as well as virtually all cameras from other manufacturers like Nikon, Pentax, Sony, and the rest. If you have any sort of DSLR or mirrorless camera there is probably an option in your settings menu to enable Back Button Focus, and it’s something I highly recommend trying out.

    Back Button Focus requires your thumb to press a button on the back of your camera (hence the name) and your index finger to press the shutter, which does take a few days to get used to, but soon becomes second nature. All this begs the question – why should you re-learn how to do something as basic as focusing your camera when the shutter half-press works perfectly fine? The answer lies in the overall concept of giving more control back to you, the photographer.

    More Creative Freedom

    Cameras today have a dizzying array of autofocus points – those little dots or squares that light up in the viewfinder when you press the shutter button down halfway. You also have a ton of options in how you use these points. You can select an individual point, you can have the camera select what it thinks is the best one, you can tell your camera to use some of them in conjunction with one another, and many cameras have modes such as automatic face detection as well. To be honest, all these options works really well. But just know that by decoupling the act of focusing from the shutter button, and moving it to a separate button, you will be able to do a lot more with your photography than you may realize.
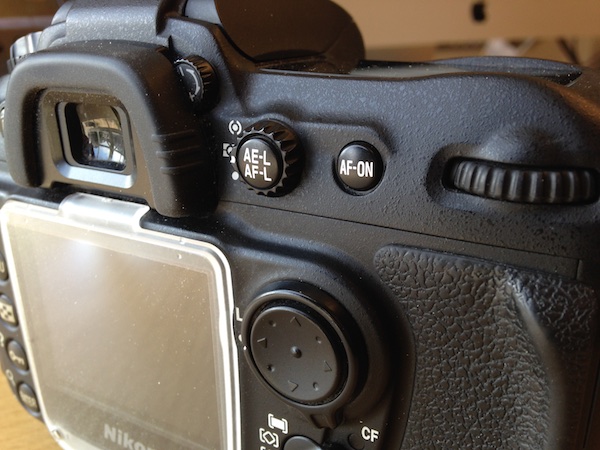
    NikonD200BackButton

    If your camera has an AF-ON button, you can use it to focus instead of the shutter button. If your camera does not have this button, you can usually adjust the camera’s settings to make another button such as AE-L/AF-L perform this function.

    By using a button on the back to focus, you will no longer have to hunt around for the specific autofocus point you want to use or wait for the camera to focus on what it thinks you want to before allowing you to take a picture. Trying to keep a moving subject in focus while deftly holding the shutter down halfway is a feat of dexterity that would keep Legolas himself at bay. This is easily remedied by using back button focus. With this method you can hold the back button down as long as you want, which keeps your camera continually focusing on your subject, until you are good and ready to snap a photo. This is incredibly useful when your subject is in motion, whether people, animals, mechanical objects, or simply a flower petal meandering across a meadow.

    One of my favorite cameras is the Nikon D7100, which has 51 autofocus points that cover almost the entire frame. For a while I used all of them, frantically shifting from one to the next as I adjusted each shot or tried to track a moving subject. It worked fairly well, especially in conjunction with Nikon’s 3D subject tracking algorithm (variants of that can be found in most cameras today) which did a good job of keeping my subject in focus whether it moved or I altered my perspective. But I found that I often messed up some critical shots because I was either too busy changing the autofocus point, or letting my camera decide what it thought should be in focus. Switching to back button focus remedied all of this, and helped me gets shots that would have been much more difficult otherwise.
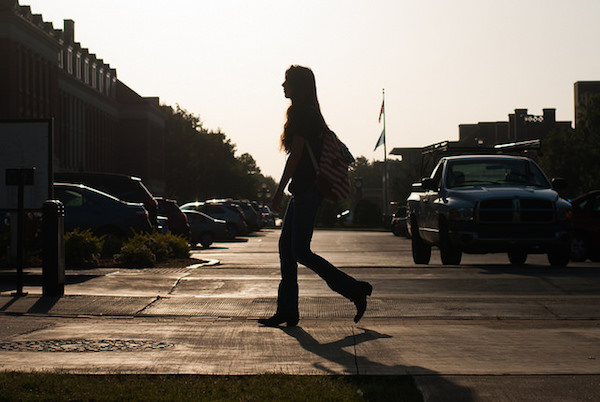
    To get this shot I used the back button to focus on a different passer-by, and then waited for others to come down the sidewalk. I was then free to snap photos no matter where people were in the frame, because the shutter button was not also refocusing the picture.

    To get this shot I used the back button to focus on a different passer-by, and then waited for others to come down the sidewalk. I was then free to snap photos no matter where people were in the frame, because the shutter button was not also refocusing the picture.

    By using the back button to focus I will often just utilize the center focus point to get my subject in focus, and then release my thumb from the button while re-composing to frame the subject. It’s much faster than hunting for a specific autofocus point, and allows me to take the photo at the exact instant I want -not when the camera thinks the subject is in focus. This focus-and-recompose technique works great for a variety of situations, but there are certainly times when I like to utilize one of the built-in AF points. When that happens I just go through the motion of selecting one and then taking a picture like normal while using the back button to focus. In essence, using the back button to focus simply gives me more options when taking a photo, which allows me to think more about the pictures I’m taking instead of fiddling with the camera.
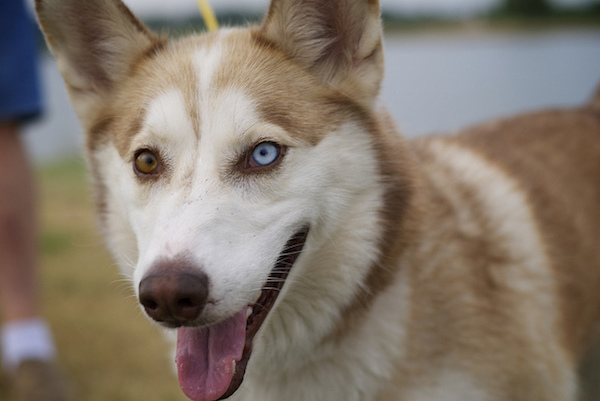
    I was able to snap a few photos of this husky by holding my thumb down on the back button to continually adjust the focus, and pressing the shutter to snap photos whenever I wanted.

    I was able to snap a few photos of this husky by holding my thumb down on the back button to continually adjust the focus, and pressing the shutter to snap photos whenever I wanted.

    Taking the Power Back

    Most cameras have a few common focusing modes: Single, Continuous, and Manual. In Single mode, the camera focuses once and then won’t re-focus again until after you take a picture. This is how many photographers use the focus-and-recompose method without using the back button, and it works fine in a variety of situations. The Continuous method forces your camera to constantly adjust focus while your finger is held down on the shutter button, and doesn’t stop until you snap a photo. Manual, as its name implies, leaves all the focusing duties to the photographer who must adjust a ring on the lens in order to nail the focus without any assistance from the camera. All three of these methods have their uses, and you will often encounter situations in which you need to switch from one to the other (for example, switching quickly from Single to Continuous). Doing this requires digging through menus or flipping a dial on your camera, and it can be a bit of a pain.

    Using the back button combines all three focusing modes, giving an incredible amount of power and control to the photographer:

    Manual: Take your thumb off the back button and focus by rotating your lens barrel. (Note: do not do this if your lens doesn’t have a “M/A” focus setting. If it is in fully autofocus you will be forcing the gears)

    Single: Press your thumb on the back button until your camera is in focus, and then lift your thumb up to keep the focus locked until you press the button again.

    Continuous: Hold your thumb on the back button as long as you want, forcing your camera to continually adjust the focus until you take a picture. (Note: you must be using Continuous focus mode for this to work).
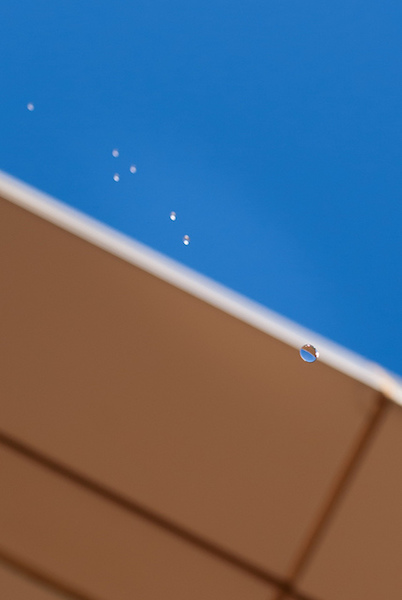
    Nailing this shot of falling water drops required a lot of switching between automatic and manual focus, and would have been virtually impossible if the shutter button was used for focusing instead of the back button.

    Nailing this shot of falling water drops required a lot of switching between automatic and manual focus, and would have been virtually impossible if the shutter button was used for focusing instead of the back button.

    You can effortlessly switch between all three methods without doing anything at all except moving your thumb away from the back button, which means you can spend far more of your effort on things like composition and framing, instead of digging through menus on your camera.

    Finally, one of the most overlooked benefits of using the back button to focus is that it frees up your shutter half-press to do other functions like lock the exposure. You will have to enable this option using your camera’s settings menu, and you might not use it on every shot, but it’s yet another tool in your photographic arsenal that can help you get better photos. When your subject is in danger of being over or underexposed, you can quickly point your camera at something else to get a better exposure, press the shutter button down halfway to lock the shutter/aperture/ISO values, and then recompose to get the image you want. This trick, combined with back button focusing, has saved my proverbial bacon more times than I can count. Normally this exposure-locking function is handled by its own dedicated button, but I have found it to be far more useful to use the exposure-lock button for locking focus and the shutter for locking exposure – effectively reversing the default behaviours of both buttons, but making your camera much more versatile in the process.

    All this talk of button-switching and extra finger-pressing might seem inordinately confusing, but it’s much easier than it sounds. Though it might seem counterintuitive at first the more you use the back button to focus the more it will make sense and help you unlock new creative possibilities with your camera.

    If you can’t figure out how to set it up on your camera, try and quick YouTube search for “setting up back button focus on a _________” and fill in your camera model.

    Do you like to use back button focus? What other tricks do you have up your sleeve to help you get better photos? Leave your feedback in the comments section below.

    googletag.cmd.push(function() {
    tablet_slots.push( googletag.defineSlot( “/1005424/_dPSv4_tab-all-article-bottom_(300×250)”, [300, 250], “pb-ad-78623” ).addService( googletag.pubads() ) ); } );

    googletag.cmd.push(function() {
    mobile_slots.push( googletag.defineSlot( “/1005424/_dPSv4_mob-all-article-bottom_(300×250)”, [300, 250], “pb-ad-78158” ).addService( googletag.pubads() ) ); } );

    The post Back Button Focus: What is it and why should you try it? by Simon Ringsmuth appeared first on Digital Photography School.


    Digital Photography School

  • How to Retouch a Portrait with the Adjustment Brush in Lightroom

    Portrait retouching Lightroom

    You have probably seen several portrait retouching programs advertised in magazines or online, and wondered if they were worth buying. The answer is no. I have tried out quite a few, and the truth is that the Soften Skin preset in Lightroom does just as good a job as any of them. For most photographers Lightroom’s retouching tools all are you will ever need. For high end retouching purposes you can go to Photoshop.

    It’s worthwhile taking some time to think about your personal approach to portrait retouching. Some photographers seem to like the airbrushed, almost plastic look of heavy processing. It’s a style you see used a lot in commercial photography or movie posters.

    Others will go for a more natural effect, and use the retouching tools with a light touch. That’s definitely my approach, and it fits with my preference for natural light and for creating portraits that capture character.

    Either way,the Adjustment Brush in Lightroom can accommodate your needs.

    Retouching portraits of women

    When retouching portraits of women it is conventional to use a skin smoothing technique to make the portrait look more flattering. There are exceptions of course, sometimes skin smoothing is not necessary, especially if your model has good skin and you shoot in soft light, or use a wide aperture to throw some of the face out of focus.

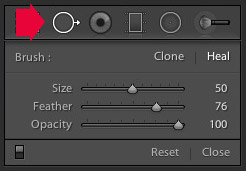
    Portrait retouching LightroomThe first step in portrait retouching is to remove any blemishes with the Spot Removal tool. To do so, click on the Spot Removal tool icon to activate it, adjust the size of the  brush with the square bracket keys on the keyboard, and click on the spot you want to remove.

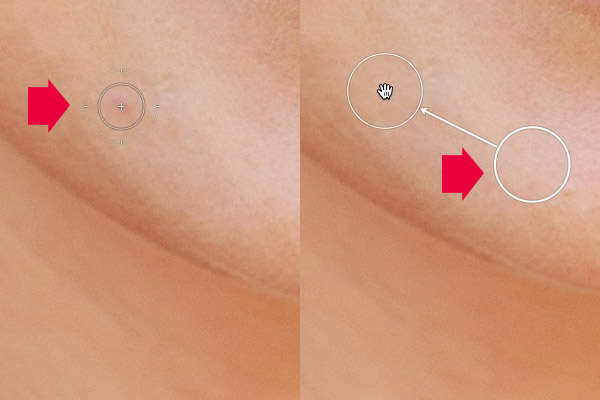
    Lightroom automatically selects another area of the portrait to sample from, healing the blemish. Sometimes Lightroom won’t select the most appropriate area – in this case you can click on the circle representing the sample and move it to a more suitable location.

    Portrait retouching Lightroom

    Click on a blemish with the Spot Removal tool (left). In this case Lightroom’s healing algorithm worked perfectly, but if it doesn’t then click on the circle representing the sampled area and move it to a location where the skin matches the tone and texture of the area to be healed (right).

    Adjustment Brush adjustments

    Now it’s time to look closely at the portrait and decide what other retouching is required. It’s important that you have already made the required adjustments to tone and contrast in the Basic panel before you get to this stage. Increasing Contrast and Clarity, for example, will emphasize skin texture, wrinkles and blemishes. On the other hand, you can move the Exposure or Highlights sliders right to brighten the skin, making wrinkles and skin texture less obvious. Retouching with the Adjustment Brush should be left until last, so you know what you’re working with.

    I like to start with the area underneath the model’s eyes. The skin here is thinner than the rest of the face which is why people get dark patches there. There may also be wrinkles, and some people have a strong crease along the lower eyelid.

    The idea is not to eliminate these completely (unless you’re going for the heavily retouched, airbrushed look) but to minimize them. They’re a natural part of the skin’s texture and it will look unnatural if they are not there.

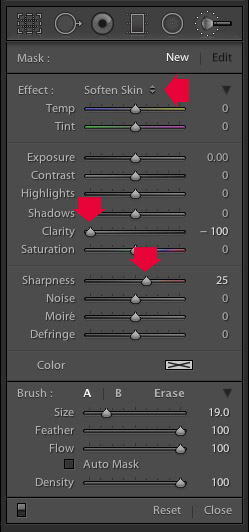
    Portrait retouching LightroomClick on the Adjustment Brush icon to activate it. Select the Soften Skin preset from the Effect menu. Lightroom sets Clarity to -100 and Sharpness to +25. Make sure Feather, Flow and Density are set to 100, use the square bracket keys on the keyboard to adjust the size of the brush and paint over the areas under the eyes. The Soften Skin preset blurs the area that you paint in with the brush.

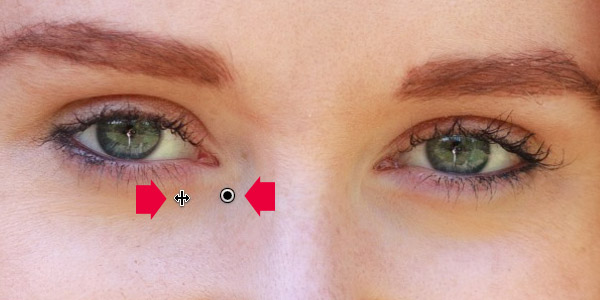
    If the effect is too strong, hover the mouse over the Adjustment Brush pin (a grey circle with a black dot in the middle) until a double arrow icon appears (below). Hold the left mouse button down and move the mouse left. Lightroom reduces the value of the Clarity and Sharpness sliders, effectively lessening the strength of the Soften Skin preset. Stop when it looks about right. You can also reduce shadows by moving the Shadows slider (in the Adjustment Brush sliders) to the right. Every portrait is different so you have to adjust the effect by eye.

    Portrait retouching Lightroom

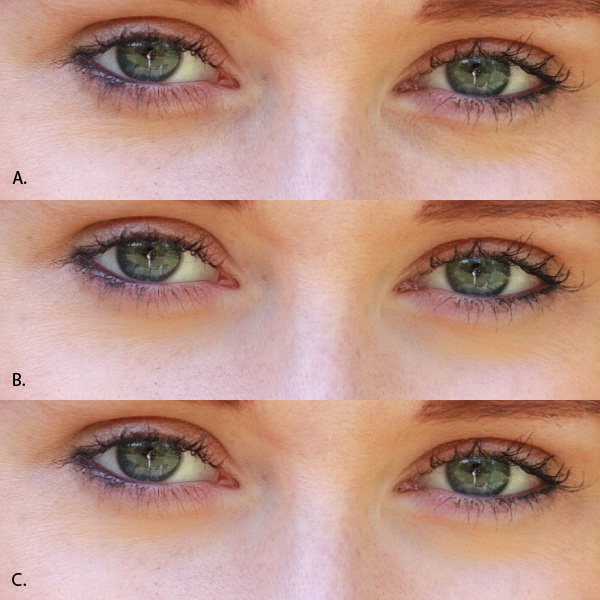
    These are the results.

    Portrait retouching Lightroom

    A. Original, unretouched portrait.
    B. Retouched, with Soften Skin preset at full strength.
    C. Retouched, with strength of Soften Skin preset reduced and Shadows slider moved to the right (subtle difference only).

    Enhancing eyes

    You can also use the Adjustment Brush tool to enhance your model’s eyes. This is useful if the eyes are dark due to the lighting. Be careful of overdoing this effect as it may not look natural.

    Click New at the top of the Adjustment Brush panel to create a new Adjustment Brush. Set Feather to around 50 and paint in the pupils of the model’s eyes. If you need to, press O (the letter) on the keyboard to see the masked area (it is displayed in red shown below).

    Portrait retouching Lightroom

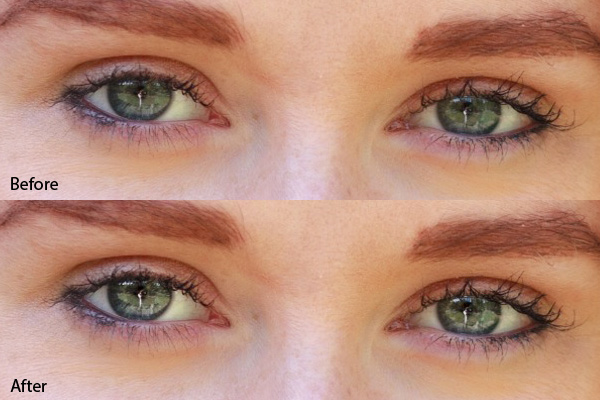
    Now set Exposure to around 0.50 and Clarity to 30. The effect will vary depending on the colour of your model’s pupils and the amount of light on them. It’s a good idea to zoom out and look at the entire portrait to see if the effect is too strong. You can see this adjustment on the model’s eyes below, which I think is about right.

    Portrait retouching Lightroom

    You can make the effect stronger or weaker on your photo using the technique described above. Hover over the Adjustment Brush pin until the double arrow icon appears, move the mouse left to make the effect weaker, and right to make it stronger (you can also just drag the sliders one by one to change the settings)

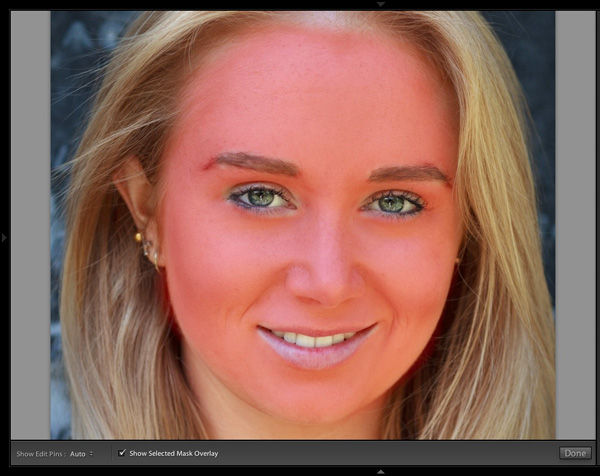
    The final step is to apply gentle skin softening to the rest of the face. Create another Adjustment Brush, set Feather to 100 and paint the entire face (use the O keyboard shortcut to display the red overlay). Then select Erase in the Adjustment brush panel, set Feather to 50 and erase the eyebrows, mouth and eyes. The idea is that you only want to soften the skin, not these parts of the face. It should look something like the mask below.

    Portrait retouching Lightroom

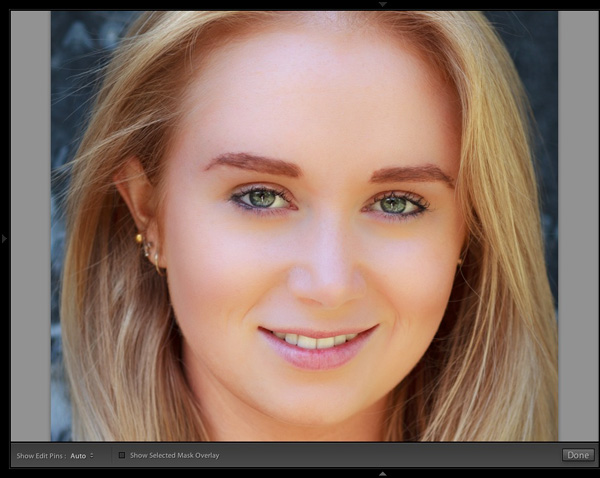
    Go to the Effect menu and select the Soften Skin preset. Press O to hide the mask overlay and you will see something like the screenshot below. Remember, this is the Soften Skin preset at maximum strength so it has a strong effect on the photo.

    Portrait retouching Lightroom

    Use the technique we learned earlier to reduce the strength of the effect. How far you go is up to you. I like to apply the Soften Skin preset subtly to retain as much skin texture as possible. Here’s the result with Clarity reduced to -20 and Sharpness to +5.

    Portrait retouching Lightroom

    This video shows how I retouched another portrait, using the Adjustment Brush tool to enhance the model’s eyes and facial hair.

    I’ve only touched on the number of ways you can use Adjustment Brushes in Lightroom for portrait retouching. What techniques do you use? Please let us know in the comments.


    The Mastering Lightroom Collection

    Mastering Lightroom ebooksMy Mastering Lightroom ebooks will help you get the most out of Lightroom 4 and Lightroom 5. They cover every aspect of the software from the Library module through to creating beautiful images in the Develop module. Click the link to learn more or buy.

    googletag.cmd.push(function() {
    tablet_slots.push( googletag.defineSlot( “/1005424/_dPSv4_tab-all-article-bottom_(300×250)”, [300, 250], “pb-ad-78623” ).addService( googletag.pubads() ) ); } );

    googletag.cmd.push(function() {
    mobile_slots.push( googletag.defineSlot( “/1005424/_dPSv4_mob-all-article-bottom_(300×250)”, [300, 250], “pb-ad-78158” ).addService( googletag.pubads() ) ); } );

    The post How to Retouch a Portrait with the Adjustment Brush in Lightroom by Andrew S. Gibson appeared first on Digital Photography School.


    Digital Photography School
  • Win One of FOUR Online Photography Courses from New York Institute of Photography

    Over the past few years here at dPS, we have run some of our most popular competitions with a very valued partner – the New York Institute of Photography – to give away to dPS readers handpicked photography courses.

    Due to popular demand, NYIP and dPS bring you yet another opportunity to win one of these valuable courses!

    NYIP logo440x232black In Post Top and Bottom

    For this competition, NYIP is giving away FOUR prizes

    Each will be won by a different dPS reader. Here’s what you could win:

    • Wedding Photography Course – $ 999 Value
    • Portrait Photography Course – $ 999 Value
    • Travel Photography Course – $ 999 Value
    • Photojournalism Course – $ 999 Value

    These are NYIP’s newest courses. They will teach you everything you need to know to take your skills to the next level in each category. These courses are all online. As a student you get access to videos and lesson materials prepared by experts in each field. You can access the course materials on any device, from anywhere in the world, and learn at your own pace.

    NYIP Graphic In Post

    How to Win

    To win this competition you’ll need to:

    • Visit each of the above four course information pages and choose which of the courses suits your needs best. Choose one that you’d like to win.
    • Leave a comment below and tell us which one you’d like to win and WHY you’d like to participate in the course. Please note: there is a limit of ONE entry per person.
    • Do this in the next 10 days and after March 13th, the team at NYIP will choose the best four answers – one for each course – and we will announce the winners in the following days.

    The deadline to enter is March 13th, Midnight PDT (GMT-7). Comments left after the deadline will not be considered.

    By best – we’re looking to see if you have an understanding of what the course offers and how it suits your needs, so you’ll need to check out the course pages to put yourself in the best position to win.

    There’s no need to write essay length comments to win, but we’re looking to hear what you like about the course and how it would help your development as a photographer.

    This competition is open to everyone around the world, no matter where you live, but there is only one entry per person.

    To enter, simply leave your comment below.

    Don’t forget to share this post with your friends and like NYIP on Facebook for special offers and announcements on all NYIP Courses

    NYIP logo440x232black  In Post Top and Bottom

    Learn more about NYIP’s online photography courses.

    Disclaimer: NYIP is a paid partner of dPS.

    googletag.cmd.push(function() {
    tablet_slots.push( googletag.defineSlot( “/1005424/_dPSv4_tab-all-article-bottom_(300×250)”, [300, 250], “pb-ad-78623” ).addService( googletag.pubads() ) ); } );

    googletag.cmd.push(function() {
    mobile_slots.push( googletag.defineSlot( “/1005424/_dPSv4_mob-all-article-bottom_(300×250)”, [300, 250], “pb-ad-78158” ).addService( googletag.pubads() ) ); } );

    The post Win One of FOUR Online Photography Courses from New York Institute of Photography by Darlene Hildebrandt appeared first on Digital Photography School.


    Digital Photography School
  • The Ultimate Guide to Buying a Tripod

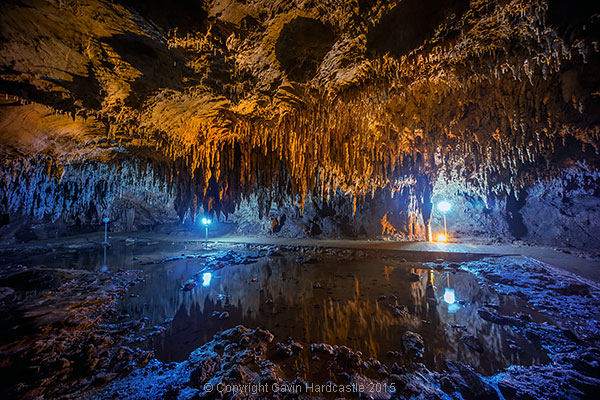
    You need a tripod for long exposures

    Picture the scene – Bangkok airport and I’m settling into seat 16H on my short Thai Airways flight to Siem Reap, Cambodia. The lovely hostess hands me a hot, scented towel as I shout ”Bollocks” while slapping myself firmly on the forehead.

    She gives me a justified look of disdain while I apologize for my outburst and then start begging her to contact Lost & Found as soon as possible. You see, I’d stupidly left my gorgeous carbon fibre, ball head tripod, in one of those plastic trays into which all airports now force you to empty your worldly goods before being forced through the X-Ray machine.

    I’d somehow managed to wander through Bangkok airport, grab a snack, check my email and then board the plane without even realizing I’d lost one of my most essential pieces of equipment. I blame it on the terror filled drive through downtown Bangkok the night before while trying to find our hotel, it was a late night.

    I realize I will never see that beloved tripod again.

    Night Photography requires a sturdy tripod

    So I touch down in Siem Reap, Cambodia and the first thing I do is go shopping for a tripod. Siem Reap has seen some major development over the years but it’s still a galactic black hole when it comes to tripod shopping.

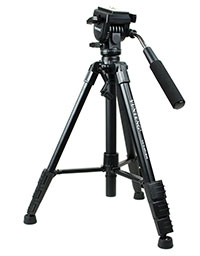
    The best I could find was a $ 45 Yunteng tripod with a plastic video panning tripod head that has one of those long handles that poke you in the eye every time you try to look through the viewfinder.

    It was like going back in time to the very first tripod I’d ever bought. The next four days of shooting were an exercise in rage management as it took me five times longer to set up my shots. If it hadn’t been for my ever present tuk-tuk driver and his calming influence, I would have bent that tripod over my knee and tossed it under the wheels of a bus for good measure.

    No wonder so many beginner photographers quit at the tripod using stage.

    A good tripod makes ALL the difference

    When buying a tripod, if you go for an El Cheapo one, two things will happen:

    1. You’ll spend so much time messing around getting your camera in position that by the time you’re ready to take the shot, you’ve already lost the will to live.
    2. You’ll realize that the $ 45 you spent could have gone towards a proper tripod that you now know you’ll have to buy anyway.

    I realize that for total beginners, spending around $ 400 on a tripod seems like a major financial commitment but I’ve seen so many of my workshop students struggle in frustration with shoddy tripods that it breaks my heart. When I lend them one of mine, it’s like a ray of sunshine for them. At that point they realize their cheap tripod is now junk.

    Long exposure - Why You Need a Good Tripod

    Speed is important

    You might think that if you’re using a tripod to hold your camera in place, that means you’ve got plenty of time to frame your shot. Sometimes that’s true but more often than not, the scene changes quickly, especially when you’re dealing with nature. Weather and wildlife won’t wait for you to get your tripod set up.

    Things to consider when buying a tripod and tripod head

    1 – How fast do the legs telescope?

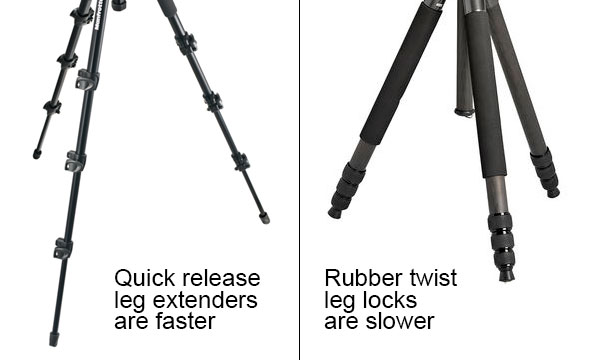
    I can’t stand those rubber twist leg locks that you have to loosen and then tighten. I much prefer quick release grips that flick open and quickly drop those tripod legs. Securing the extended legs requires a quick push of the thumb and you’re done. If your tripod has four telescopic extenders with threaded grips you’ll still be setting up your shot while I’m at the next shooting location.

    Tripod Comparison

    2 – How fast does the ball head adjust?

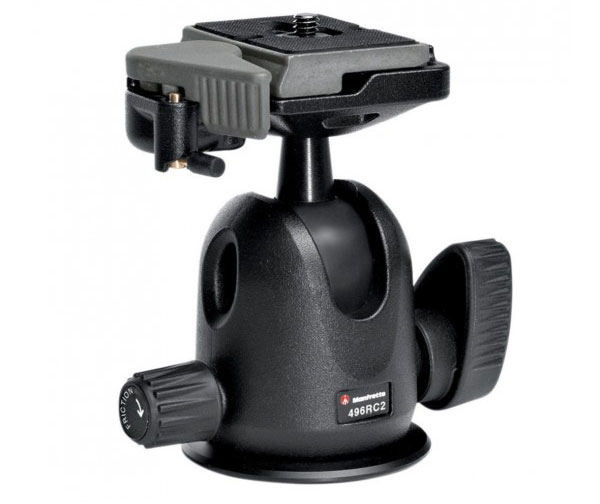
    Once your tripod is in place and secure, it’s time to position your camera. For me, the best ball heads are those that only require one lever to loosen and tighten. That means that with just two turns of the lever I can position my camera in exactly the right position.

    It’s also important to get a ball head that allows you to quickly switch between landscape and portrait aspect. A lot of cheapo tripods have those flippable mounts that you have to loosen first then tighten once in place. These are usually abysmal as you struggle to get just the right position and then the flimsy flippable part wobbles from the impact of just your breathing.

    Ball Head Tripod

    Manfrotto 496RC2 ball head


    3 – Easy quick release

    The thing that infuriated me the most with my temporary $ 45 Yunteng tripod was the quick release clip which mounts the camera on to the tripod head. I longed for my well oiled Manfrotto head with its trusty quick release clip.

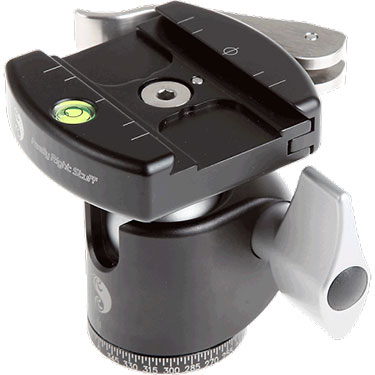
    Mounting the camera on the tripod head should be quick and easy. When shopping for a tripod, get the store clerk to demonstrate and then try it out yourself multiple times until you feel if it’s right for you. Some of the smoothest looking quick release plates I’ve seen are made by Really Right Stuff.

    Really Right Stuff Quick Release Plates

    4 – How heavy should my tripod be?

    This is a personal choice based on your exact needs, and how much you can carry. There’s always a trade-off between portability and sturdiness. Heavier tripods will laugh in the face of a strong wind, while super lightweight carbon fibre tripods will vibrate. You can always attach a rock filled bag to the central stem of your tripod to give it more stability in high winds.

    5 – How big should my tripod be?

    Again, this depends on your travel plans. Since my recent loss at Bangkok airport, I’m now considering buying a smaller tripod that will actually fit into my camera bag. A smaller tripod won’t be anywhere near as sturdy, but for the Siem Reap shoot it’s not as if I had to face high winds and extreme weather, so smaller would have been okay.

    Very tall photographers will most likely have to shop for tripods that cater to their height. Sure, you can always extend your tripod’s central column, but that’s always a last resort as you’ll find it induces major wobble from just your hand contact with the camera.

    6 – How much should I spend?

    Here’s another important thing to consider. If like me, you’re a bit of a Gormclops, don’t buy the best that you can afford. I abuse my tripods by shooting in the ocean, rivers, deserts and mountains. If I’m lucky, I’ll get two years out of a tripod (assuming I don’t leave it in the airport) so it just doesn’t make sense for me to spend big money when I can get a very capable tripod for under $ 400, that already comes with a good ball head.

    7 – Do I need a bubble level?Camera Bubble Level

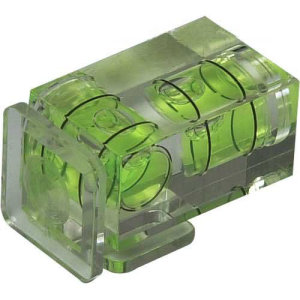
    Although not essential, it’s nice to have an accurate bubble level on the tripod stand itself, and one on the tripod head. If you’re lucky enough to have a digital level inside your camera (like my Sony A7R) you probably won’t use a bubble level much. If you have neither, you can always attach a bubble level to your cameras hot shoe attachment as pictured here (see photo right).

    Why do I even need a tripod?

    If you want tack sharp images (see my article on how to get super sharp landscape images) with the best possible image quality, accept that a tripod will become a part of your anatomy. For long exposures, a tripod is essential. If you shoot weddings, portraits, action and events, a tripod may just get in your way.

    Which brands should I buy?

    I’m not going to recommend one brand over another. I advise that you try out as many tripods and heads as you can. It’s fine to read reviews but you need to get hands on to decide which tripod and head combination works best for your needs. A specialist camera store should have a much wider choice of consumer and pro level tripods to choose from.

    Enough Yunteng Bashing

    Cheap Yunteng TripodTo be fair to Yunteng, I got the sturdiest tripod I believe it’s possible to find for a measly $ 45. It didn’t fall apart, was light, and in all honesty the tripod head was made for video, not stills. I got exactly what I paid for. I’ll keep it in my studio as a demonstration tool for showing people the difference between a $ 45 tripod and a $ 400 tripod.

    What features do you look for in a tripod? Do you have any horror stories or recommendations for our readers?

    googletag.cmd.push(function() {
    tablet_slots.push( googletag.defineSlot( “/1005424/_dPSv4_tab-all-article-bottom_(300×250)”, [300, 250], “pb-ad-78623” ).addService( googletag.pubads() ) ); } );

    googletag.cmd.push(function() {
    mobile_slots.push( googletag.defineSlot( “/1005424/_dPSv4_mob-all-article-bottom_(300×250)”, [300, 250], “pb-ad-78158” ).addService( googletag.pubads() ) ); } );

    The post The Ultimate Guide to Buying a Tripod by Gavin Hardcastle appeared first on Digital Photography School.


    Digital Photography School
  • Tips for Photographing Cars

    tips-photographing-cars-01

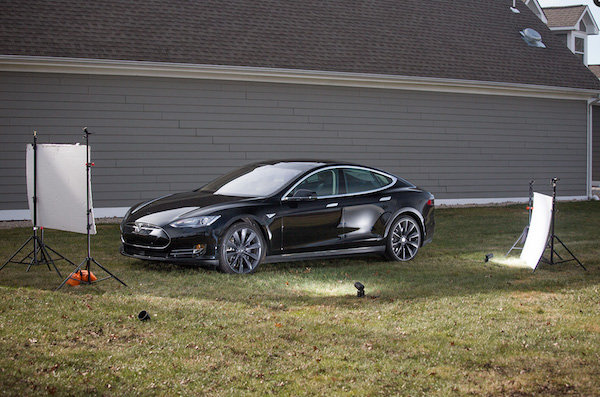
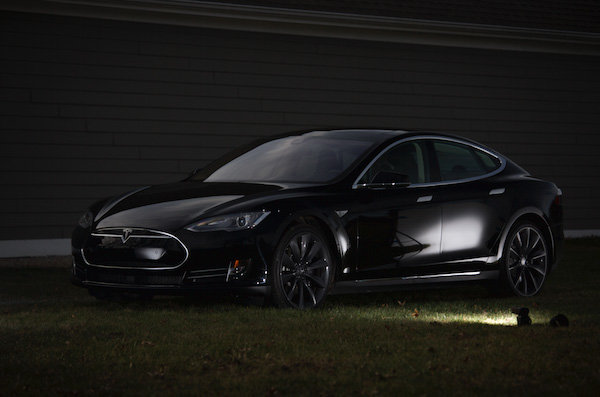
    The scene setup – by placing parking a car in the shade of a building on a sunny day, you can use the ambient light as your main light, illuminating the contours of the vehicle.

    Photographing reflective surfaces is no walk in the park. So, as you can imagine, photographing cars, which are essentially just giant reflective objects, is really difficult. It comes with all the same challenges, magnifies them, and adds the new wrinkle of your subject being too heavy to reposition easily. Sounds like fun, right? It can be, and it can still be pulled off without the use of a commercial studio, a giant cyclorama wall, or car-sized softboxes.

    Made in the Shade

    Take a look at the image above, you can see that I have a Tesla Model S set up in the shade of a building, on a sunny day. By positioning the car so that the ambient light illuminates the overall contours of the car and then placing lights in the shadow areas, it treats the ambient as the main light, and uses the surroundings to advantage, rather than fighting against them. This will minimize the frustration of trying to eliminate the ambient light, which would likely be an exercise in futility, especially when using small flashes.

    tips-photographing-cars-02

    The ambient light reading – by exposing for the highlights on the car’s windshield, I was able to determine which areas in which to add flash.

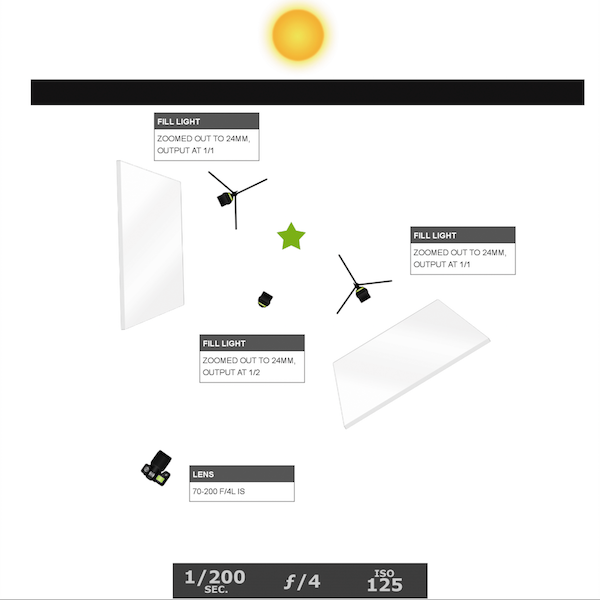
    Before setting up any lights it’s helpful to start by taking a test shot, getting an exposure of the car’s highlights, especially such as the windshield, which would typically be the brightest spots. This exposure will likely look pretty dark, not unlike the image above. It will allow you to see exactly what the ambient light is doing and whether you need to reposition the car to change the angles of the light falling on the car. This exposure will also help you to determine where to add your flashes. The diagram below shows the lighting diagram used for the Tesla shot.

    tips-photographing-cars-03

    The lighting diagram – after getting an exposure of the ambient light, I was able to determine where to best place my three speedlights.

    tips-photographing-cars-04

    The raw file – the shadow areas are filled in with accent lights, although some cleanup in post-processing was needed.

    I own three flashes, and I needed all of them for this shoot. When lighting reflective surfaces, you need a large, soft light source. To accomplish this, I brought several 40×60” white foam core panels with me, along with several light stands and sand bags. I set up two panels, one at each end of the car, securing them to light stands. I then aimed a full-powered flash into each panel. Since I couldn’t set up a third panel to light the middle of the car without blocking my view of it, I set my third flash on the ground, aiming it into the tire rim. The light placement was effective, although a bit of cleanup in post was still needed.

    tips-photographing-cars-05

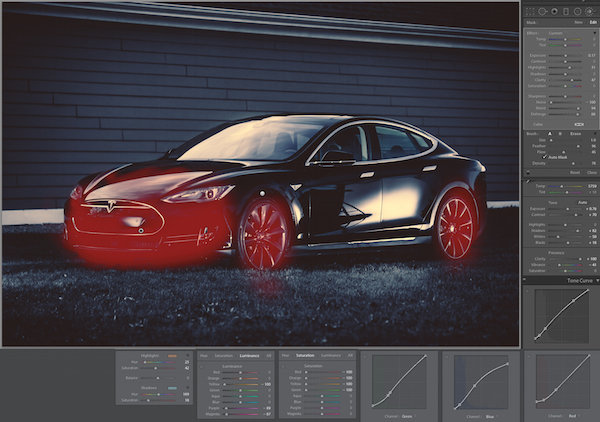
    The lightroom settings – I chose to desaturated the image, one color channel at a time (rather than toggling over to Black and White mode or lowering the global saturation) in an effort to retain the mood in the photo.

    The most obvious issue that needed taken care of was the unsightly reflection in the car door. Though the white panel served in lighting the contours of the side of the car, it left a garish reflection. Eliminating it required something a bit more powerful of a tool than the what Lightroom’s Spot Removal tool offered. Instead, I used Lightroom to color grade the image as well as bring up the highlights in a few areas, (see above). The red highlighted areas show where I painted in a brush adjustment, raising up the Exposure, Brightness, and Clarity sliders.

    I also chose to desaturate the image, since it was already essentially monochromatic, except for the grass. Note that I kept the file in Color mode, rather than toggling over to Black and White mode or lowering the global saturation, and opted to instead desaturate the individual color sliders in the HSL panel. This is because I wanted to preserve the dark, moodiness in the image, and for reasons I don’t didn’t quite understand, the overall brightness of the image increases when I toggle over to Black and White mode. I also used the Luminance sliders to control the highlight and shadow portions of the image. For example, by lowering the Yellow slider in the Luminance panel, I dimmed the highlights in the grass, which had yellow in it, and shifted the focus back to the car.

    tips-photographing-cars-06

    The final shot – once the image was color graded and minor spots had been removed, I opened up the file in Photoshop to remove the white-board reflections, specifically the white panels at the base of the building in the background and the edge of the roof, (Figure 6). If specialized cleanup is not your forte, it’s totally acceptable (if not recommended) that you send the file off to a retoucher to finish it up for you.

    Attention to Detail

    Tips photographing cars 07

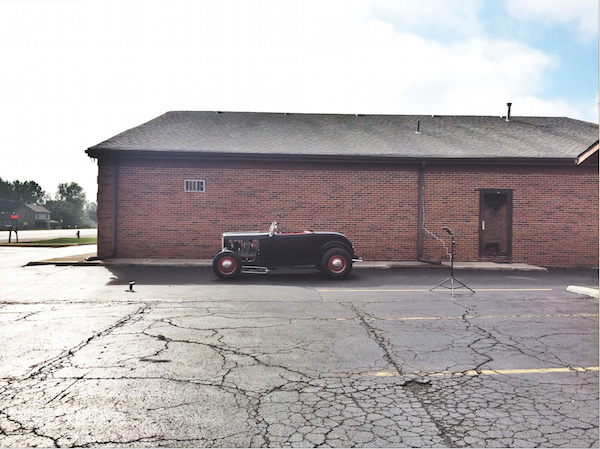
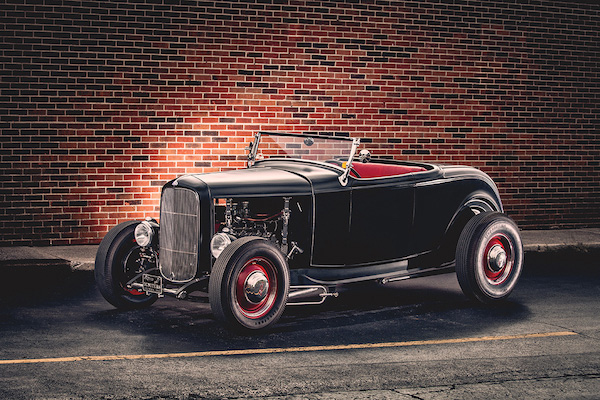
    The setup – I am not a car person. By that I mean that I couldn’t tell you one old hot rod from another. That said, I find them to be absolutely gorgeous objects to look at. So, when the owner of this beautiful machine led me back to the spot where his latest project sat, I got really excited when my eyes caught sight of the immaculately restored, 1932 Ford Roadster (I only know the name because he told me). The details were phenomenal. Though I knew nothing of its history, and didn’t even really care about driving it or even riding in it, I knew that I had to photograph it. The owner pulled out a vintage magazine photo of a similar car and asked if I could make a photo that looked like that. I smiled and said, “We can do better than that.”

    But first, the car needed to move. He had parked the car in front of a large, white door, in full view of the morning sun. This meant harsh, direct light, which was unflattering and boring. I quickly scanned the area, spotting a one-story brick building across the street, with a wall, still in the shade. I asked if he could drive the car over there, positioning it just inside the shade (see above).

    Tips photographing cars 08

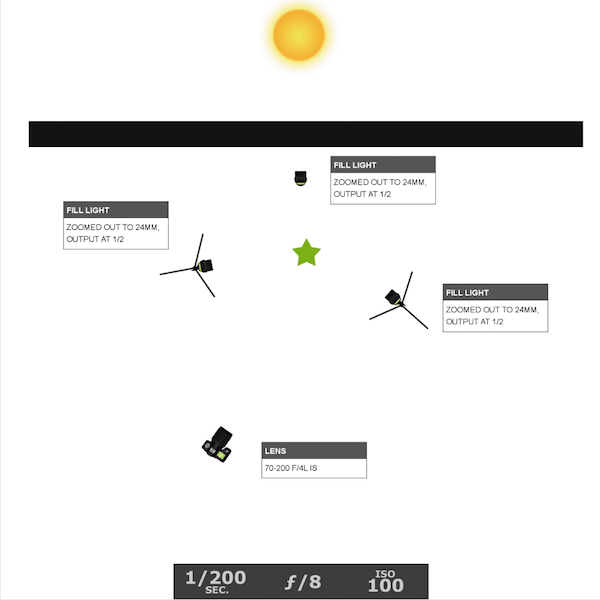
    The lighting diagram – similar to the previous Tesla scenario, I used two of my lights to illuminate the front, and back ends, of the car. This time, however, I placed my third light between the car and the back wall, creating a nice separation between them.

    Since I had come to the shoot prepared to photograph portraits and not cars, I didn’t have white panels to bounce light off of. I still only had three flashes that I could use to light an entire car. But just like the previous scenario, I used the ambient sunlight as the main light, adding accent lights to the front and back portions of the car. It helped that I had less car to light. This was a two-seater roadster, and thus was about three feet shorter than the Tesla. This meant that the back rear flash was able to light both tires this time, freeing up my third light to be placed between the car and the building behind it. That created a nice separation between the car and the wall. It also served to highlight the amazing detail of the open-air hood, which allowed you to see straight through to the wall (see below)

    Tips photographing cars 09

    The final shot – my favorite part is the open-air engine that allows you to see straight through to the back wall.

    Do you have any other tips for photographing cars? If you’ve tried it share your ideas. If you haven’t give it a try and share your images and any questions you may have.

    googletag.cmd.push(function() {
    tablet_slots.push( googletag.defineSlot( “/1005424/_dPSv4_tab-all-article-bottom_(300×250)”, [300, 250], “pb-ad-78623” ).addService( googletag.pubads() ) ); } );

    googletag.cmd.push(function() {
    mobile_slots.push( googletag.defineSlot( “/1005424/_dPSv4_mob-all-article-bottom_(300×250)”, [300, 250], “pb-ad-78158” ).addService( googletag.pubads() ) ); } );

    The post Tips for Photographing Cars by Nick Fancher appeared first on Digital Photography School.


    Digital Photography School

  • 10 Fresh Photography Business Articles to Help You Thrive in 2015

    Finally, spring came up and it’s a wonderful time of the year to start grow your business and improve yourself as a photographer. We do a little search to find the best fresh photography business articles from leading blogs which will help you to thrive in 2015. Here you’ll see 80 online and offline marketing strategies for photographers, the recipe Continue Reading

    The post 10 Fresh Photography Business Articles to Help You Thrive in 2015 appeared first on Photodoto.


    Photodoto

  • Turn your DSLR Camera into a Wildlife Camera Trap

    If you have an old DSLR camera lying around, you could be putting it to work as a camera trap for photographing wildlife.

    What is a camera trap?

    A camera trap is simply a camera that fires automatically when an animal is detected. All you need in order to turn your DSLR into a camera trap is a sensor that can detect animals, then trigger your camera. Once set up, a camera trap can be left for days or even weeks at a time. The longer you leave it, the greater your chances of capturing a shot of an elusive animal.

    Camera trap 1

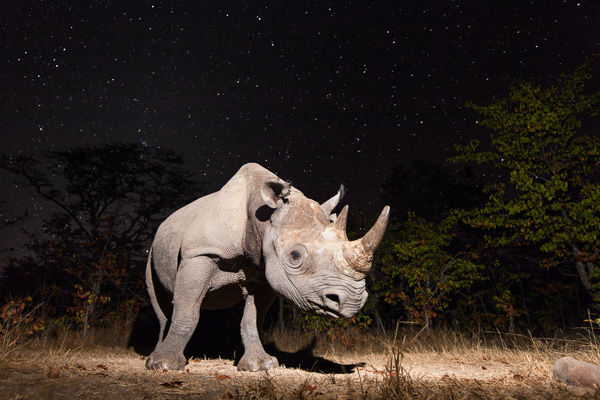
    Black rhino at night in Zambia. A 30 second exposure time captured the stars. The rhino was illuminated by a flash at the start. I left my camera in the clearing for a week to capture this shot.

    One of the main advantages of a camera trap is that you can take your time setting up off-camera flashes in order to achieve dramatically lit shots of nocturnal creatures. If you try to do this any other way, then the creature is likely to disappear well before you have finished setting up your lights!

    As a result of these benefits, camera traps have become a key tool for wildlife photographers aiming to photograph shy and nocturnal animals.

    So how do you set up a camera trap?

    First, dig out that old DSLR that you don’t use any more. I mostly use a Canon EOS 1Ds Mark III. Camera traps can get much closer to animals than a human holding a camera, so you can use a wide-angle lens. My preferred lens is a 17-40mm f/4 lens.

    Next, you need a way of detecting the animal and triggering your camera. If you are a handy, DIYer then you can do this by modifying a security device (I provide more information about how to do this on my website). The two most commonly used types of detector are beam-break and motion detectors.

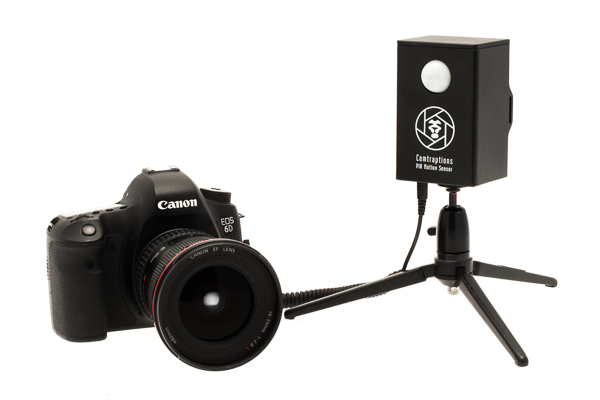
    My preferred method of detecting animals is to use a Passive Infrared (PIR) motion sensor. This is similar to the sensor used on automatic patio security lights. I like these because they don’t consume much power, so they can remain on standby for a long period of time. They are also very easy to set up – you just point them at the trigger zone and wait for the animal to show up.

    Camera trap 2

    A PIR Motion Sensor plugs in to your camera’s shutter release socket

    Now you have the camera and the trigger sorted, the next thing you need is a speedlight (flash), or two, so that you can capture nocturnal subjects.

    I recommend setting up one or more off-camera flashes, connected to your camera with a TTL flash cord. It is important to get the flashes away from the camera itself because this will reduce redeye and make the shadows look more natural.

    Camera trap 3

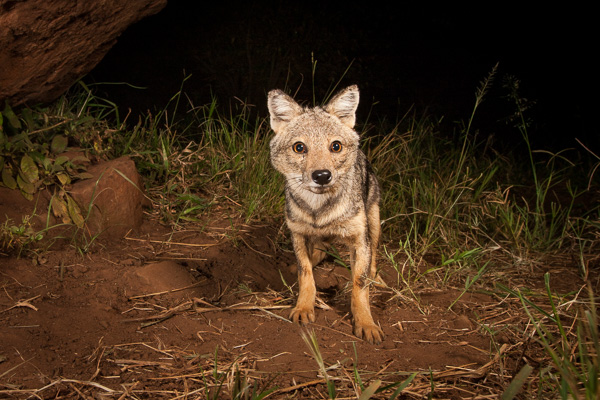
    Side-striped Jackal, Kidepo Valley, Uganda. This is an example of a dual flash setup, with a primary light source on the right and a fill flash on the left.

    I often just use one flash because I quite like dramatic shadows. However, sometimes, it is preferable to use a second flash to fill-in the shadows on the subject. If you want to get even fancier, you can also add more speedlights to illuminate the background.

    Camera settings

    The challenge with camera traps is that you don’t know when the animal will pass and therefore the camera and flashes need to be programmed so that the scene is attractively exposed in any lighting condition. Here are some general settings that I find work well in most situations.

    Use manual focus and either low speed burst or single shot mode. Set the camera to aperture priority mode with a reasonably small aperture to provide a large depth of field. This means, if the animal isn’t quite in the right position, you should still get a sharp shot.

    Camera trap 4

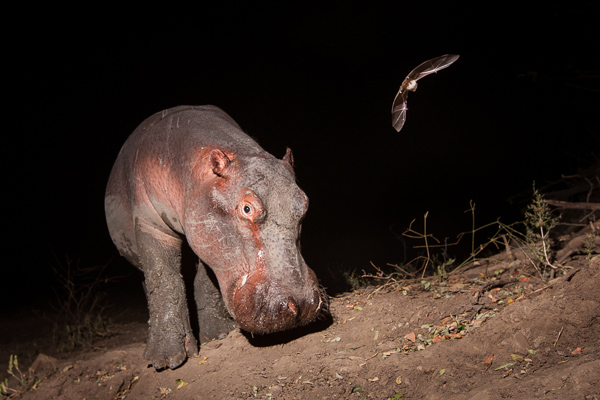
    A hippo and a bat in Zambia. This was a lucky shot where the bat happened to be flying around the hippo. A small aperture ensured both animals were in focus.

    Selecting aperture priority means that in darkness, the camera will select a long shutter speed. This means it will capture details in the background such as twilight colours in the sky, or even stars. However, if there is too much ambient light, then you may get ghosting when the animal moves. If ghosting is a problem for you then, limiting the shutter speed to one second or faster can help.

    If I am using a single flash then I will leave it in TTL mode so the camera automatically determines the flash output based on its metering. For a multiple flash setup, it is usually easier to set the flash outputs manually. With manual flash output and your camera in Av mode, you may need to under-expose your camera (using exposure compensation) by a stop so that daylight images don’t blow-out.

    Power considerations

    If you plan to leave you camera trap set up for more than a night, then battery life will be an issue. Make sure your camera is set to power off and that it can be woken by the sensor. I also recommend turning off the image preview to conserve battery. Your camera should now be able to last for many days, assuming it isn’t firing the whole time.

    Keeping your flashes powered is more challenging. Speedlights have a capacitor inside them which needs to be charged for the flash to fire. However, capacitors drain over time so flashes needs to constantly keep them topped up. If your flash isn’t set to sleep, then the batteries are likely to drain over the course of a single night. If your flashes are set to sleep then when you need them to fire, the capacitor may not have enough charge and so the flashes won’t be ready to fire immediately.

    There are three ways to deal with these issues:

    1. Disable your flash’s sleep function – your flash will always be ready to fire but you will probably have to change the batteries every day, or power them with an external power supply.
    2. Use a flash that holds its charge well, even when sleeping. The best I know of is the Nikon SB-28, which can sleep for many days and still have enough charge in the capacitor to fire instantly.
    3. Set your camera to continuous drive mode and let your flashes sleep. The first and second shots may be black, but eventually your flashes will charge and fire.

    If you are letting your flashes sleep, then you will need to connect them to your camera via a TTL cable. This allows your camera to wake the flashes. You will need long cords and a TTL splitter hub if you want to fire multiple speedlights.

    Positioning your camera trap

    Next you will need to find somewhere to set up your camera trap. The most productive places I have found are animal trails, particularly ones that cut through a difficult obstacle such as thick bush or a steep bank. I set my sensor up so that it covers a small section of the trail and then position the camera off to one side (so that it doesn’t block the animal’s path).

    Camera trap 5

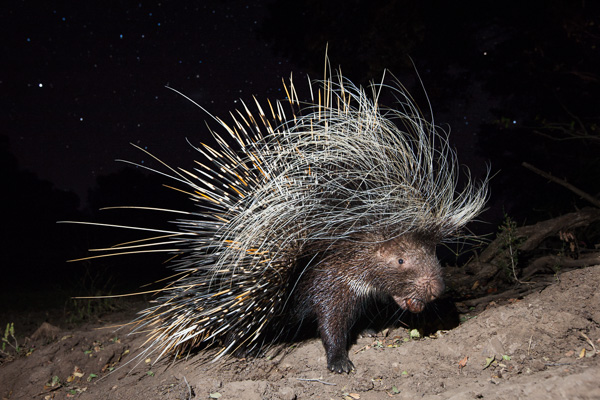
    A porcupine photographed in Zambia. My camera was positioned next to an animal trail that lead up a steep bank. It captured many creatures including this porcupine.

    The last thing to do is to camouflage, waterproof, and protect your equipment. Rain covers can be made from plastic sheeting. If you need protection from animals such as hyenas and lions then you will need to buy or build your own protective housing.

    Once everything is set up, I recommend leaving your camera trap as long as possible in order to maximize the chances of getting results. You may just need to visit it from time to time to change batteries and check your settings.

    I have created a series of videos that help illustrate the process of setting up a camera trap. You can watch the first video in this series below.

    If you want more wildlife related tips and articles try these:

    • Writer’s Favorite Wildlife Lens – Tamron 150-600mm
    • Why Manual Exposure is Better for Winter Wildlife Photography
    • Nature and Wildlife Photography Tips for Beginners
    • Top 5 Tips for Wildlife Photography
    • Guide to Attracting Critters to Your Garden for Backyard Wildlife Photography

    googletag.cmd.push(function() {
    tablet_slots.push( googletag.defineSlot( “/1005424/_dPSv4_tab-all-article-bottom_(300×250)”, [300, 250], “pb-ad-78623” ).addService( googletag.pubads() ) ); } );

    googletag.cmd.push(function() {
    mobile_slots.push( googletag.defineSlot( “/1005424/_dPSv4_mob-all-article-bottom_(300×250)”, [300, 250], “pb-ad-78158” ).addService( googletag.pubads() ) ); } );

    The post Turn your DSLR Camera into a Wildlife Camera Trap by William Burrard-Lucas appeared first on Digital Photography School.


    Digital Photography School