Category: Photography

  • 4 Photoshop Tools Every Photographer Should Know

    When it comes to photo-editing programs, one of the most popular among both amateur and professional photographers alike is Adobe Photoshop. While it can appear more complex than Lightroom, and certainly takes more time to learn all of its tricks, Photoshop offers four post-processing tools that come in handy for retouching images. These tools are pretty easy to locate and implement, and in this article I’ll show you how they work, specifically while retouching the image of the Space Needle in Seattle (below). I have the privilege of having this view from my home office, but the problem is that if I take a photo using anything but a telephoto lens, I get telephone pole remnants and wires in my otherwise pretty cityscape image.

    Here are the four Photoshop tools I use to retouch my Space Needle images. There are of course other ways to retouch this image to achieve the same or even better results, but these are quick and easy methods that also highlight essential Photoshop skills.

    5 basic photoshop tools for photographers

    Before we do anything to modify Photoshop images, the first thing to note is that within Photoshop, you can cause permanent changes to the pixels and details of your photos if you’re not careful. This is why you always want to make sure you are performing nondestructive editing so that you don’t overwrite the original image data.

    There are several ways to do this in PhotoShop. For the tools I’m about to show you, the best technique for nondestructive editing will be to work within an adjustment layer or retouch on a separate layer. You can create a new layer by clicking on the New Layer icon on the bottom of the Layers panel. Repeat this every time before you employ a new editing process on your image and be sure to double click on the layer and rename it to help you remember what editing process you did on that layer.

    5 basic photoshop tools for photographers

    1. Spot Healing Brush

    First of all, let’s tackle those thin, yet annoying, power lines in the upper left corner of the image. To start, we’ll use the Spot Healing Brush. One of three image healing tools that Photoshop offers, this brush creates a seamless repair to your image by replacing unwanted textures of the image with good textures from another area.

    5 basic photoshop tools for photographers

    To use it, head over to the Tools panel and select the Spot Healing Brush. It will be grouped together with other healing and patching tools. Be sure the Sample All Layers option is checked on the upper Options bar, as well as Content Aware (Photoshop versions CS5 or later) or Proximity Match (Photoshop CS4 or earlier). Next, zoom into the image’s problem area and click (or click and drag) on the areas you want to replace or heal. To adjust the size of the brush, press the left ([) and right (]) bracket keys on your keyboard. If you make a mistake, just hit Ctrl+Z (on Windows) or Command+Z (on Mac) to undo. In this example, I clicked and dragged the Spot Healing Brush across those thin power lines to erase them.

    In this example, I clicked and dragged the Spot Healing Brush across those thin power lines to erase them, which is the quickest way of using it. However, be careful when attempting to spot heal in large chunks particularly near high-contrast edges, since some areas can appear improperly blended. For the sake of accuracy, a more effective approach could be using the spot healing brush to heal smaller chunks of the image, rather than attempting to heal the entire area in one go.

    Other important settings to be mindful of are the Size and Hardness of the brush, which can be adjusted per the settings panel pictured below. Since the Healing Brush automatically blends pixels, it’s best to choose a higher Hardness value for best results.

    Cloning Tool Settings

    2. Clone Stamp Tool

    Another alternative way to getting rid of the power lines is to use another Photoshop essential: the Clone Stamp tool, which is used for pixel-to-pixel cloning. Like the Spot Healing Brush, this tool can be used to replace unwanted areas of an image, but unlike the Healing Brush, it won’t do automatic content-aware blending. The Clone Stamping is best used to duplicate an item or pattern, remove a brand logo, or remove power lines, which is what I’m going to do in this example.

    5 basic photoshop tools for photographers

    To use the Clone Stamp tool, first create a new layer and then select the Clone Stamp tool from the tool bar. This tool works similarly to the Spot Healing Brush, but before you begin clicking away, position your cursor over the area you want to clone from and Alt-click (on Windows) or Option-click (on Mac) to define and sample the source of the clone. Be sure to re-sample and re-define as many clone sources as needed to provide a seamless cloning result.

    Be sure to re-sample and re-define as many clone sources as needed to provide a seamless cloning result. To make sure the result appears realistic, it is important to zoom in and make sure the same pattern is not being cloned over and over again. Per the same settings as the Spot Healing Brush, be mindful of the Size and Hardness settings that you choose as these will determine how accurately the Cloning Tool samples and clones layers. When cloning an area with lots of patterns and details, it’s sometimes best to work with a low Hardness value and low cloning opacity for smoother results.

    3. Magic Wand

    Next, let’s get rid of the remnant of a telephone pole in the right hand side of the image. The easiest way to eliminate it would be a simple crop, but another way is to select and replace it using the Magic Wand Tool. This is one of Photoshop’s oldest selection tools and it causes many a photographer joy or suffering. The Magic Wand is incredibly easy to use, requiring just a click of its icon in the tool bar, followed by clicking on the area of the image that you want to select. Here’s where things can get complicated. The Magic Wand selects pixels based on tone and color, which means it has the tendency to select more areas of the image than you initially want. The simplest way to fix this is to play around with Tolerance in the Options bar. If the Magic Wand is selecting too much of an area, simply input a smaller value of Tolerance and then reselect the area.
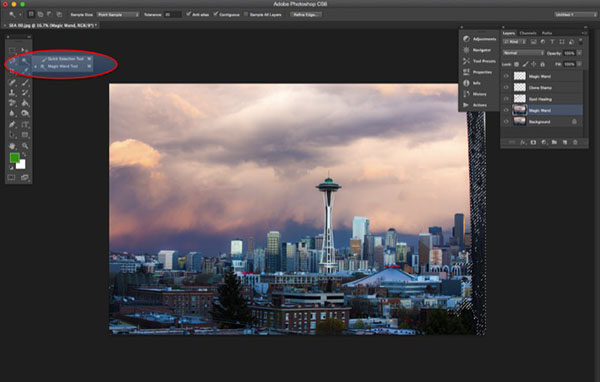
    5 basic photoshop tools for photographers

    4. Content-Aware Fill

    After the proper area of the telephone pole is selected, it’s time to fill in that area. Hit Shift+Delete on the keyboard, and the below pop-up box will appear. Make sure Content-Aware is selected, then press OK; Photoshop will then sample pixels in the surrounding area and fill in the selected area accordingly. The results may not be perfect, and this is where the aforementioned Spot Healing Brush and Clone Stamp tools can come in handy to make the filled in area more seamless.

    5 basic photoshop tools for photographers

    The final retouched image can be seen below. Using the Spot Healing Brush, Clone Stamp, Quick Selection and Content-Aware fill, the telephone lines in the upper left corner have been removed, as well as the remnant of the pole on the right-hand side.

    5 basic photoshop tools for photographers

    In this brief tutorial, I’ve introduced several very important tools that all photographers should be familiar with, but it’s also important to note that I haven’t explained every possible use of them. There are many other practical and creative ways to use these tools, and I encourage you to do further research to learn more about them. But for the sake of doing quick edits and getting familiar with the tools, these are approachable ways to get started.

    googletag.cmd.push(function() {
    tablet_slots.push( googletag.defineSlot( “/1005424/_dPSv4_tab-all-article-bottom_(300×250)”, [300, 250], “pb-ad-78623” ).addService( googletag.pubads() ) ); } );

    googletag.cmd.push(function() {
    mobile_slots.push( googletag.defineSlot( “/1005424/_dPSv4_mob-all-article-bottom_(300×250)”, [300, 250], “pb-ad-78158” ).addService( googletag.pubads() ) ); } );

    The post 4 Photoshop Tools Every Photographer Should Know by Suzi Pratt appeared first on Digital Photography School.
    Digital Photography School

  • Tips for Using Tilt-Shift Lenses for Correction and Creativity

    If you’ve ever wondered about the effects of using a tilt-shift lens this video with host Vincent Laforet will show you some of uses such as:

    • Correcting distortion caused by wide lenses and converging lines
    • Create stitched images without distortion
    • Creating miniature looking scenes by shifting the focus plane
    • Achieving maximum focus on your subject using shift

    Here are some of the Tilt-shift lenses mentioned in the video.

    Obviously these are specialty lenses and not everyone has a need for, or can afford them. But perhaps if you have the ability you may want to rent one and play around. Check with your local camera store or online with places like Borrow Lenses. Or you can try the less expensive Lens Baby for making some fun effects.

    Have you ever tried one out? Do you do the type of photography that requires a tilt-shift lens? Or is it a luxury for the wish list? Share your thoughts in the comments below.

    googletag.cmd.push(function() {
    tablet_slots.push( googletag.defineSlot( “/1005424/_dPSv4_tab-all-article-bottom_(300×250)”, [300, 250], “pb-ad-78623” ).addService( googletag.pubads() ) ); } );

    googletag.cmd.push(function() {
    mobile_slots.push( googletag.defineSlot( “/1005424/_dPSv4_mob-all-article-bottom_(300×250)”, [300, 250], “pb-ad-78158” ).addService( googletag.pubads() ) ); } );

    The post Tips for Using Tilt-Shift Lenses for Correction and Creativity by Darlene Hildebrandt appeared first on Digital Photography School.

    Digital Photography School

  • 4 Mistakes New Photographers Make and How to Avoid Them

    Cameras are complex machines and to get the most out of them you need to know how they work. When you’re a new photographer shooting with a sophisticated camera for the first time, the complexity can be overwhelming. There’s just so much to learn! Now that I’ve been shooting for more than ten years, it’s interesting to go back to my early days and see the mistakes I made.

    In this article we’ll have a look at four of my first DSLR photos and I’ll share what I know now that I wish I knew then, so hopefully you can learn from these mistakes.

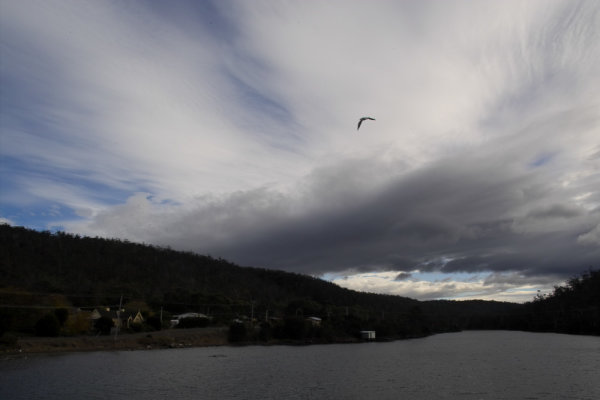
    Mistake #1 – not using exposure compensation

    1/250sec f10 ISO100

    1/250th of a second,  f/10, ISO100

    The camera’s exposure meter will try to make the exposure “middle grey”. Since the camera has no way to tell how bright the subject is, middle grey is a good average bet. But when the subject is much brighter or darker, like the sky in this photo, it ends up getting it wrong. Today if I see a shot like this on the back of my camera, I know why it is under exposed and will adjust it by dialling in some positive exposure compensation. That would have made the clouds much brighter, and brought out details in the dark tree-covered hillside.

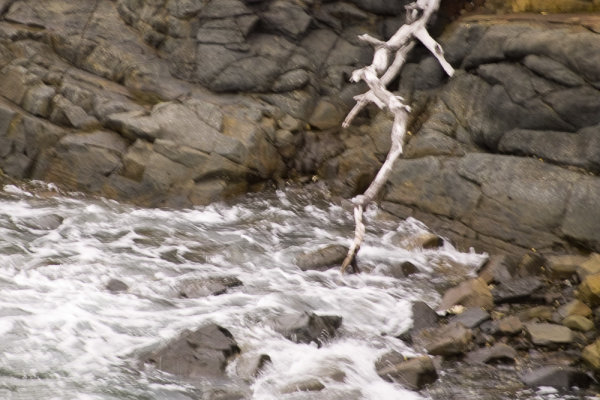
    Mistake #2 – afraid to increase the ISO

    1/30sec f5.6 ISO100

    1/30th,  f/5.6, ISO100

    Towards the end of an overcast day, we arrived at a rocky shoreline while on holiday. I liked the texture of the rock, the white dead tree branch, and churning water. However there wasn’t quite enough light. At this stage I didn’t even know how to change my ISO, but even if I had, I’d heard that increasing it made your photo noisy. This was certainly true, especially of DSLRs 10 years ago, but 1/30th of a second at 200mm focal length just wasn’t fast enough. As a result there’s enough camera shake to ruin the photo. Today, even if I was still shooting with the old Sigma SD10 I had then, I’d know that it’s better to increase your ISO to get a shorter shutter speed, even if it results in more visible noise. A noisy photo is better than a blurry one.

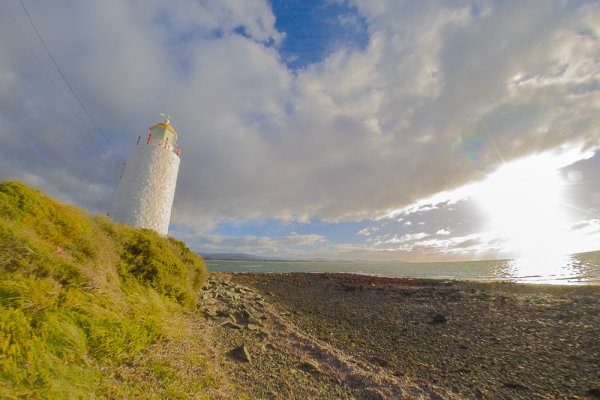
    Mistake #3 – not exposing for the highlights

    1/200sec f10 ISO100

    1/200th, f/10, ISO100

    If some parts of the image are very bright, such as the sky and clouds around the sun in this photo, they can be “clipped” by the camera. This means that there is more brightness than the sensor can differentiate, and as such, whole areas of the photo are rendered as white with no detail. Once part of a scene is clipped, nothing can bring that detail back, and it can ruin a shot. Clipped highlights are unattractive and draw the eye in a negative way. In high contrast situations it can be really tricky to capture detail in the highlights and shadows at the same time, but because they draw the eye so much, it’s preferable to preserve detail in the highlights.

    While the sun is always going to clip in a photo, preserving details in nearby clouds is possible. For this shot I should have dialled in some substantial negative exposure compensation. Even if this made the rest of the photo too under-exposed, because I was shooting in RAW, I’d still be able to bring out a lot of detail when processing the photo. That way only the sun would be clipped and the clouds and water would look much more natural.

    Mistake #4 – not controlling depth of field

    1/200sec f8 ISO100

    1/200th, f/8, ISO100

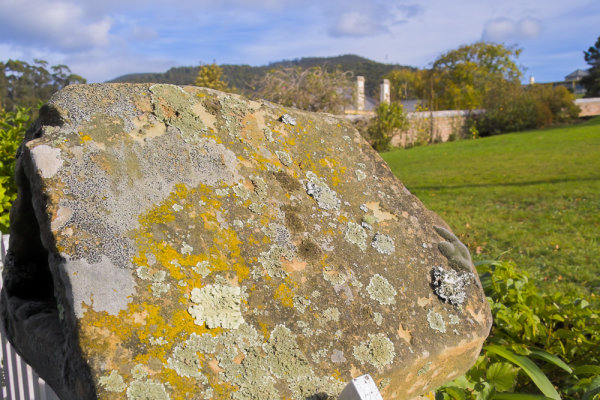
    I wanted to capture the gorgeous texture on this interesting rock, but still show enough of the background to give it context. The background however, is too in focus and ends up being a distraction, competing for attention with the rock, which should be the star of the photo. I was shooting in program mode (auto), and there was plenty of light. The camera realized this and chose an aperture of f/8. This was narrow enough to increase the depth of field so that the background wasn’t nearly blurry enough. If I was taking this shot today I would put the camera into aperture priority mode with the mode dial, and open the aperture wider. Possibly to its full width, which on this lens was only f/5.6. This would have blurred the background more, letting the rock get all the attention.

    If I could go back and tell myself something when I was starting out, I’d emphasize the importance of shooting as often as possible, not to worry about making mistakes, and keep looking to other photographers (both online and in person) as a source of inspiration and learning. Finally, I’d tell inexperienced me that you will never ever stop learning.

    How about you? What are the biggest things you learned (or are still learning about) to improve your photography?


    pnbvideo_box.pngNeil is so invested in helping others to become confident with their cameras that he has created dPS’s very first online video course Photo Nuts and Bolts. From shutter speed, to aperture and exposure, Neil explains clearly so that you can start shooting with confidence…

    googletag.cmd.push(function() {
    tablet_slots.push( googletag.defineSlot( “/1005424/_dPSv4_tab-all-article-bottom_(300×250)”, [300, 250], “pb-ad-78623” ).addService( googletag.pubads() ) ); } );

    googletag.cmd.push(function() {
    mobile_slots.push( googletag.defineSlot( “/1005424/_dPSv4_mob-all-article-bottom_(300×250)”, [300, 250], “pb-ad-78158” ).addService( googletag.pubads() ) ); } );

    The post 4 Mistakes New Photographers Make and How to Avoid Them by Neil Creek appeared first on Digital Photography School.


    Digital Photography School

  • The Best Way to Delete Photos From Your Memory Card

    When it comes to photography, we spend most of our time thinking about taking photos – lighting, composition, exposure, and posing. Then, once the photo is taken, we may start to think about post-processing, gently nudging the photo along until it becomes exactly what we’ve pictured in our mind’s eye. Once that’s accomplished, we do it all over again.

    MeredithClark6.jpg

    Back in high school and college, I shot film. I can vividly remember running out of film, and sometimes having to wait weeks until I was able to buy more. Our public high school relied heavily on donations of film, and sometimes when there wasn’t any left, our teacher would have us walk around campus with our pointer fingers and thumbs shaped into a rectangle, pretending to take photographs. Now that digital cameras are on the scene and we’re using memory cards in lieu of film, with the capability to erase images and write over them again, the number of photographs that we can take in any given week or month is nearly endless.

    You may have noticed that I said, “nearly” endless, and that’s because memory cards do have a lifespan, and will not last indefinitely. That said, there are a few things that we can do to maximize the lifespan of our memory cards, including making sure that we are deleting our photos off the memory card in the most efficient manner possible. This isn’t something that’s talked about all that often, but when it comes down to it, it is really simple:

    Less Desirable Ways to Delete

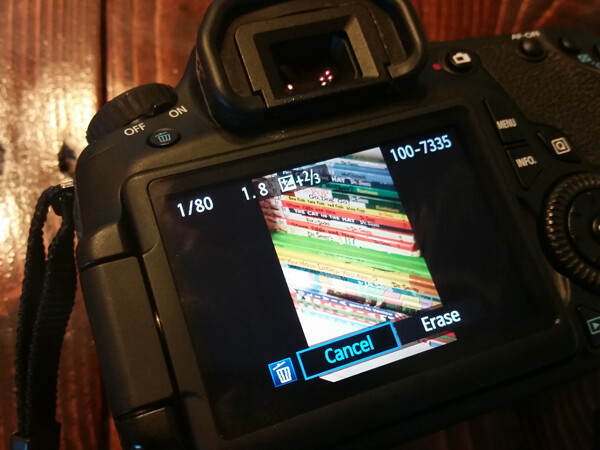
    Deleting each photo individually through the camera by using the “Delete” or Trashcan Button

    Del3

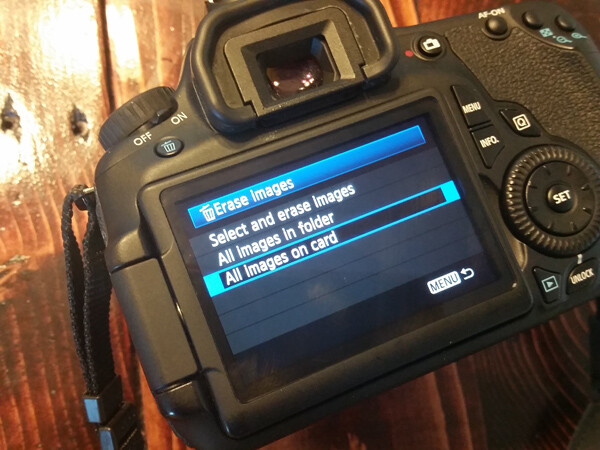
    Deleting all photos through the camera by using the “Delete All” option

    Del2

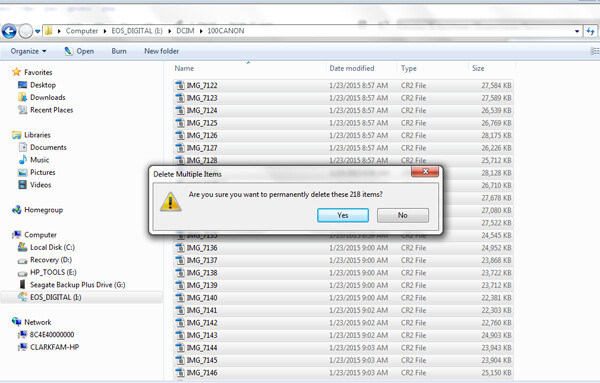
    Plugging the camera into the computer, and dragging photos into the computer’s recycle bin and/or allowing your import software to delete the files from the card once they’re uploaded.

    Del1

    Most Desirable Way to Delete

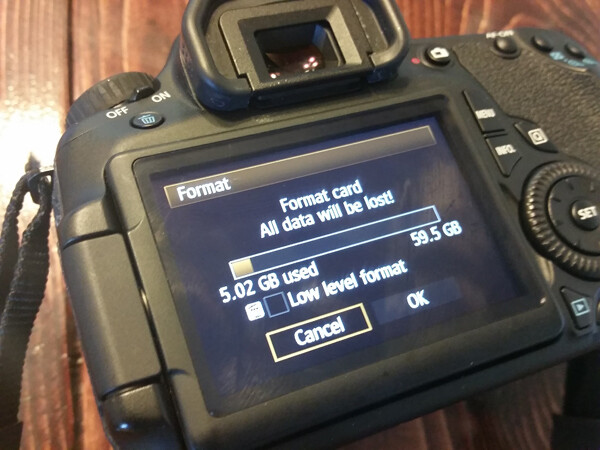
    Using your camera’s Format function

    Del4

    In the end, all of the  above methods work toward the same end, in that they remove the images from your card. However, the first three ways to delete are actually more taxing to the memory card than using the card’s Format function. I’ve heard it explained like this:

    Let’s pretend for a moment that your memory card has a shelf-life of 1,000 uses. Let’s say that you go out and take 500 photos, that’s 500 uses on your memory card. You then upload the photos to your computer, and then individually delete each photo using the delete button on your camera. Deleting each photo individually counts as another 500 uses on your card. So in all, you’ve just spent 1,000 uses of your memory card, leaving you with no uses left on that card.

    Now, let’s pretend that you’ve uploaded your 500 photos, but instead of deleting them with your delete button, you use your camera’s Format function. Formatting works in a different way than deleting, and only deletes the directory files rather than the images themselves. This then allows the images to be overwritten the next time you take a picture. Because of this, formatting only counts as ONE use of your memory card, regardless of how many photos you’re deleting. So, in the scenario above, you’d have used only 501 of your memory card’s uses, as opposed to 1,000 with deleting manually. Certainly,  memory cards available today will be able to handle far more than 1,000 uses, but the illustration still rings true – formatting your card causes less wear and tear on your memory card than other ways of deleting images.

    Additionally, because formatting only deletes the directory file instead of the images themselves, images on a card that has been formatted are typically much easier to recover (if needed) than those that are deleted manually, assuming that you did not overwrite them by taking more photos. Not a bad trick to have up your sleeve in case of emergencies, am I right?

    I’d also like to add that I have personally seen a difference in both buffering time of the card, and also a decrease in the amount of corrupted images/cards that I’ve come across since I’ve been formatting cards rather than deleting in some other way. I’m not sure whether there’s an actual scientific basis there, but it definitely seems related in my book, and it is now pretty rare that I delete even a single image in any way other than formatting.

    So, how often should you format? Some people like to wait until their card is totally full, and then format. Personally, I like to format my card before each new photo session. It just makes sense to me to start fresh each time, and be able to upload everything on the card to one location. This is really a matter of personal preference as far as I’m concerned. The one hard and fast suggestion that I do have when it comes to formatting cards is simply to be sure to format the card in whichever camera body you plan to use it in next.

    How do you typically delete images, and why?

    googletag.cmd.push(function() {
    tablet_slots.push( googletag.defineSlot( “/1005424/_dPSv4_tab-all-article-bottom_(300×250)”, [300, 250], “pb-ad-78623” ).addService( googletag.pubads() ) ); } );

    googletag.cmd.push(function() {
    mobile_slots.push( googletag.defineSlot( “/1005424/_dPSv4_mob-all-article-bottom_(300×250)”, [300, 250], “pb-ad-78158” ).addService( googletag.pubads() ) ); } );

    The post The Best Way to Delete Photos From Your Memory Card by Meredith Clark appeared first on Digital Photography School.


    Digital Photography School

  • Traveling Photographer_NYC has Posted

    For those of you following along with The Traveling Photographer series, Lynda has just posted the New York City episode.

    This is a city I have visited many times, so we tried to distill this visit down to a small collection of very cool photo experiences. I hope you like it.

    Lastly, NYC completes the series—for now, anyway. Whether or not it continues will be determined solely by how many views it gets. So thanks in advance for your support.

    -DH


    Strobist

  • Weekly Photography Challenge – Using a Small Aperture

    Time to try out your aperture range. Last week you were encouraged to shoot wide opened using a large aperture.

    Now you need to crank it the opposite direction and get some maximum depth of field in this weekly photography challenge of using a small aperture.

    Michael Chen

    By Michael Chen

    Weekly photography challenge

    First let’s define small aperture. Usually when photographers talk about a large aperture it’s in the f/1.8 to f/4 range. Small apertures would include f/11 and smaller (f/16-f/32). What that means is the lens is letting in less light due to the smaller opening – and it also means more of the scene is in sharp focus, or deep depth of field.

    You may need to use a tripod for this one as the small aperture consequently also means you’ll need to use a longer shutter speed. Keeping the ISO low will help you avoid noise as well and keep sharpness to the maximum.

    Here are a few more examples:

    Zman Z28

    By zman z28

    Michael Bohlander

    By Michael Bohlander

    Vasile Hurghis

    By Vasile Hurghis

    Photograph Lavender perspective by Peter Zelei on 500px

    Lavender perspective by Peter Zelei on 500px

    Share your small aperture images here:

    Simply upload your shot into the comment field (look for the little camera icon in the Disqus comments section) and they’ll get embedded for us all to see or if you’d prefer upload them to your favourite photo sharing site and leave the link to them. Show me your best images in this week’s challenge. Sometimes it takes a while for an image to appear so be patient and try not to post the same image twice.

    googletag.cmd.push(function() {
    tablet_slots.push( googletag.defineSlot( “/1005424/_dPSv4_tab-all-article-bottom_(300×250)”, [300, 250], “pb-ad-78623” ).addService( googletag.pubads() ) ); } );

    googletag.cmd.push(function() {
    mobile_slots.push( googletag.defineSlot( “/1005424/_dPSv4_mob-all-article-bottom_(300×250)”, [300, 250], “pb-ad-78158” ).addService( googletag.pubads() ) ); } );

    The post Weekly Photography Challenge – Using a Small Aperture by Darlene Hildebrandt appeared first on Digital Photography School.


    Digital Photography School

  • Gear Guide: The Ultimate Authority on What to Put in Camera Bag

    I remember my first time in a Real Professional Camera Store, Samy’s Camera, in Los Angeles. I had money to burn in my pocket so that I could buy the right equipment to be a Professional Photographer, but instead of being a kid in a candy store, I was a vegetarian in a hunting store. Nothing looked familiar. There were Continue Reading

    The post Gear Guide: The Ultimate Authority on What to Put in Camera Bag appeared first on Photodoto.


    Photodoto

  • 24 Uber Sharp Images with Huge Depth of Field to Focus Your Attention

    Over the last few weeks on dPS we’ve had some collections of images that demonstrate some of the basic photography principals. Last week it was using a large aperture for shallow depth of field. This time we’re going the other way and looking for images with a lot of depth of field, ones that utilize small apertures like f/16 or even smaller.

    These are usually images with a lot of depth and focus from near to far. Landscape photographers use this technique often as do, surprisingly, macro shooters. When you get up close the depth of field is really slim so you need that added focus from the smaller apertures (if not using focus stacking techniques).

    As a neat side effect if you include a light source like direct sunlight – smaller apertures will turn those into starbursts – a telltale sign you know a small aperture was used.

    So here are some images that exemplify maximum sharpness and large depth of field:

    Photograph True Grit by Sean Bagshaw on 500px

    True Grit by Sean Bagshaw on 500px

    Photograph Golden Gate In Chains by Robert Schmalle on 500px

    Golden Gate In Chains by Robert Schmalle on 500px

    Photograph From Above by Dylan Gehlken on 500px

    From Above by Dylan Gehlken on 500px

    Photograph Taillante by Gabriele Mannelli on 500px

    Taillante by Gabriele Mannelli on 500px

    Photograph Exuberance I by Julia Anna Gospodarou on 500px

    Exuberance I by Julia Anna Gospodarou on 500px

    Photograph Happy Holidays from the Bay Bridge by Aaron M on 500px

    Happy Holidays from the Bay Bridge by Aaron M on 500px

    Photograph Darkroot Grotto by Alex Noriega on 500px

    Darkroot Grotto by Alex Noriega on 500px

    Photograph Arch Angel Falls, Zion National Park by Don Smith on 500px

    Arch Angel Falls, Zion National Park by Don Smith on 500px

    Photograph Under the Bridge by Dariusz Klimczak on 500px

    Under the Bridge by Dariusz Klimczak on 500px

    Photograph Mr. Robber & Prey by Donald Jusa on 500px

    Mr. Robber & Prey by Donald Jusa on 500px

    Photograph Sitting on th</p>
<div class=

    Photograph f by Martin Brown on 500px

    f by Martin Brown on 500px

    Photograph Macro Snail by Enrico Salvati on 500px

    Macro Snail by Enrico Salvati on 500px

    Photograph rose by Guido Schulze on 500px

    rose by Guido Schulze on 500px

    Photograph Pipevine Swallowtail Butterfly Eggs by Douglass Moody on 500px

    Pipevine Swallowtail Butterfly Eggs by Douglass Moody on 500px

    Photograph canon 5d mark 2 by maxime  nadeau on 500px

    canon 5d mark 2 by maxime nadeau on 500px

    Photograph Gdansk by ?ukasz Derangowski on 500px

    Gdansk by ?ukasz Derangowski on 500px

    Photograph Portland Head Light by Joseph Rossbach on 500px

    Portland Head Light by Joseph Rossbach on 500px

    Photograph Only Three Left in Our Care... by Dana Allen on 500px

    Only Three Left in Our Care… by Dana Allen on 500px

    Photograph Crystalline Chamber by Justin Grimm on 500px

    Crystalline Chamber by Justin Grimm on 500px

    Photograph Keizersgracht - Amsterdam by Iván Maigua on 500px

    Keizersgracht – Amsterdam by Iván Maigua on 500px

    Photograph Winter Chapel Dobratsch 2159m by Reinhold Samonigg on 500px

    Winter Chapel Dobratsch 2159m by Reinhold Samonigg on 500px

    Photograph BMW 2002 by Ivan Barinov on 500px

    BMW 2002 by Ivan Barinov on 500px

    Photograph Echoes of Light by Adrian Borda on 500px

    Echoes of Light by Adrian Borda on 500px

    Photograph Highest Mountain In Indochina by Por Pathompat on 500px

    Highest Mountain In Indochina by Por Pathompat on 500px

    googletag.cmd.push(function() {
    tablet_slots.push( googletag.defineSlot( “/1005424/_dPSv4_tab-all-article-bottom_(300×250)”, [300, 250], “pb-ad-78623” ).addService( googletag.pubads() ) ); } );

    googletag.cmd.push(function() {
    mobile_slots.push( googletag.defineSlot( “/1005424/_dPSv4_mob-all-article-bottom_(300×250)”, [300, 250], “pb-ad-78158” ).addService( googletag.pubads() ) ); } );

    The post 24 Uber Sharp Images with Huge Depth of Field to Focus Your Attention by Darlene Hildebrandt appeared first on Digital Photography School.


    Digital Photography School

  • 5 Things You Should Know About Lightroom Before Starting

    So you just installed Lightroom, now what?

    You could spend some time just playing around and learning through doing, but if you’re looking for a nudge in the right direction here are a few simple concepts that I wish I’d thought about before starting my own Lightroom journey – hopefully it helps you! Five things you should know about Lightroom before you start:

    #1 Your organizational strategy

    organize-in-lightroomThis might not seem important at first, but Lightroom is an amazing organizer of your photographs if you choose to use it as one. So before you start haphazardly uploading photographs into your Lightroom catalog try to come up with some sort of basic organizational strategy first.
    Some ideas for organization include:

    Organizing by date, by location of shoot, or by specific events. Think about your style of photography and the subject matter you plan on shooting. For example a wedding photographer would probably want to organize by date/bride-groom name, where as a wildlife photographer may organize by location/animal.

    Lightroom has many different tools for organizing your photographs from colors, star rating and flags. You could for example use flags as a simple yes/no option to quickly cull images, while colors could be for various states of post production workflow (i.e. blue is for images that need to be processed and green is for images that are finalized and shouldn’t be touched).

    This might sound overwhelming at first, but if you get into this habit early on, it will simply become a part of your Lightroom workflow, and trust me an organized Lightroom library makes things a lot easier when you’re dealing with thousands of photographs.

    #2 How you want to import photos

    This is a simple question, but one that you should know the answer to before you get started with Lightroom. When you first open up the import dialog box you’ll be asked whether you want to Copy as DNG, Copy, Move, or Add. Knowing the difference between these four options will help you make the best choice for your workflow. So here’s the Cliff’s notes version:

    1. Copy as DNG – Converts the file type to Adobe’s .DNG format. Read all about Adobe’s DNG format here.
    2. Copy – Retains the original file type of your image (on your computer or memory card) and copies it to a new location on your computer or hard drive.
    3. Move – Moves the image from one place to another on your computer (or from the memory card).
    4. Add – Adds the image to a Lightroom catalog without moving its physical location on your computer or copying it.

    For a more detailed look at importing photographs in Lightroom check out: Quick Tip: Importing to Lightroom Made Easier

    #3 How to use the Lightroom Develop Module

    lightroom develop moduleNow that you’ve got your organizational strategy situated you’re starting to get into the fun stuff, before you go all hack and slash post-production on your first photograph it does help to learn some basic fundamentals. Here’s three quick points to get you started.
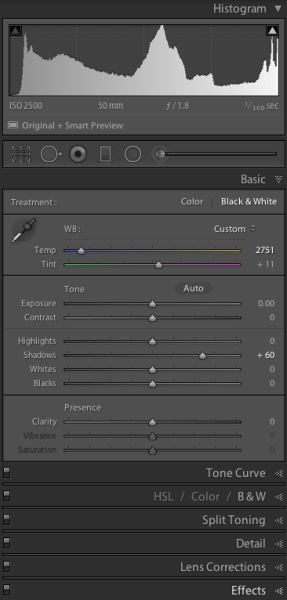
    1. Learn what the basic tab does – The basic tab is the workhorse of Lightroom it is what will bring your image to life. At a minimum master these five Lightroom sliders and you’ll be on the road to successful image processing.
    2. Learn the art of local adjustments – Once you’re comfortable with Lightroom’s basic tab you’ll probably want to move onto learning things like how to apply adjustment brushes, graduated filters and radial filters to your images. These tools function in much the same way as the sliders within the basic tab, however, they allow you to have more isolated and local control over your images.
    3. Learn the finishing touches – Finally within the develop module you’ll want to learn a bit about the finishing touches that Lightroom is capable of providing. Things like the clone/heal tool, sharpening, and noise reduction are a good place to start. You may also want to learn about how to remove chromatic aberrations and correct for lens distortion as well. These types of tools are subtle, but powerful, and really will bring the entire image together as a final printable work.

    #4 What are presets and how you should use them

    While you may be tempted to start with presets it’s better that you learn your basic tab and various other tools first – why? Simply because all presets are created from these settings so once you learn those settings not only will you know a lot about the presets you’re choosing, but you’ll also be able to create your own.

    When it comes to presets think of them as a starting point, not a finished product. Learn how to use them to speed up your workflow by creating your favorite looks within a preset, then applying what you know about the various sliders in the basic tab to fine tune the results.

    For more info on Lightroom presets: A Concise Guide to Lightroom Develop Presets

    #5 What your export settings should be

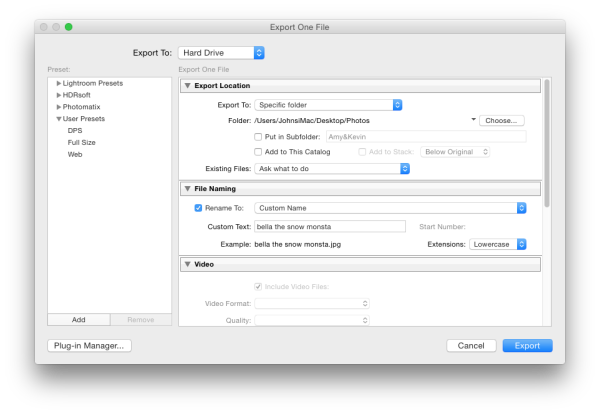
    Here you are, ready to export your first photograph from Lightroom, and just when you thought you had everything figured out, this screen pops up. What do you do now?

    Lightroom Export

    First you’ll want to remember that Lightroom doesn’t save your processed images, only the instructions of how to process them, that’s why you need to export (export = “save as”) a file out of Lightroom. This image is separate from the original camera RAW file, and as a result will need its own name, and place of organization.

    You’ll want to determine what file type and size you’re going to export, and whether or not you want Lightroom to automatically add a watermark to your photographs. These things are all going to be preferences for your own work and there’s no right or wrong way to go about doing it, but you should learn about the implications of each before you start exporting hundreds of photographs.

    What Else?

    What else would you tell someone who’s just getting their feet wet with Lightroom? Leave us a comment below and let us know!

    googletag.cmd.push(function() {
    tablet_slots.push( googletag.defineSlot( “/1005424/_dPSv4_tab-all-article-bottom_(300×250)”, [300, 250], “pb-ad-78623” ).addService( googletag.pubads() ) ); } );

    googletag.cmd.push(function() {
    mobile_slots.push( googletag.defineSlot( “/1005424/_dPSv4_mob-all-article-bottom_(300×250)”, [300, 250], “pb-ad-78158” ).addService( googletag.pubads() ) ); } );

    The post 5 Things You Should Know About Lightroom Before Starting by John Davenport appeared first on Digital Photography School.


    Digital Photography School

  • 7 Uncommon Tips for Winter Sunrise Photos Near Water

    DPS3

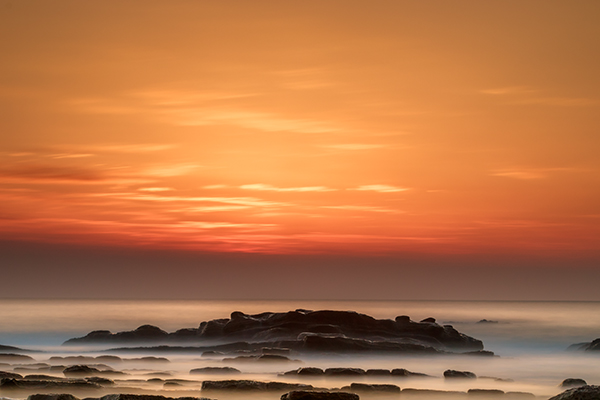
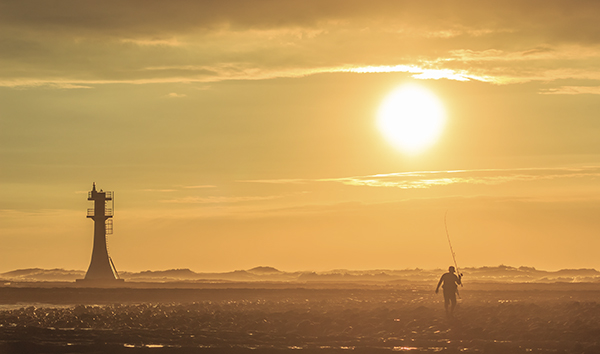
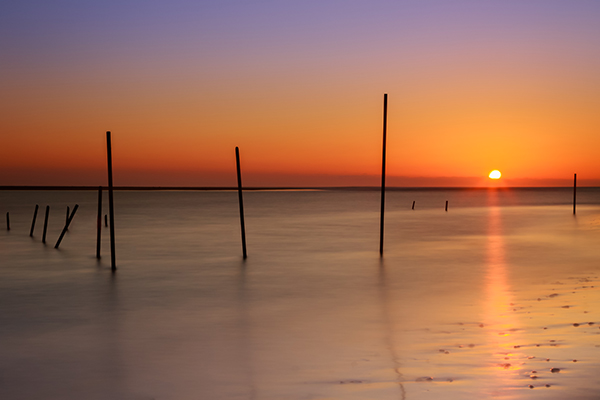
    There are few things in photography that people love more than dreamy sunrise shots full of bold oranges, big suns, washing waters, and burnt horizons. The dawn of a new day is a spiritually significant event as our past misdeeds of yesterday are forgotten under the promise of fresh beginnings. Sunrise also affords us some of the best light to work with in photography.

    However, if you live near the coast and you plan to get up early to take some sunrise shots that involve you being in or around rocks on the water’s edge, there are some key things you must remember, especially in the cold, winter months.

    1. Set the alarm earlier than you think.

    This is stage one. You’ve calculated that the sun rises at 6:00 a.m., you want to get there by 5:30 to set up, it takes you 10 minutes to get there, so you set the alarm for 5:10. But be honest, it never works like this does it? The alarm goes off at 5:10, it’s cold, you’re snug in bed, it’s dark outside, you were in the midst of a dream, and you roll back over. Missed sunrise. How often do you ever jump straight out of bed at 5:10 to take photos, in the midst of winter? By learning this mistake, I set the alarm for 4:40 then give myself three hits on the snooze button to take me to 5:10. It never fails (unless it’s cloudy!!)

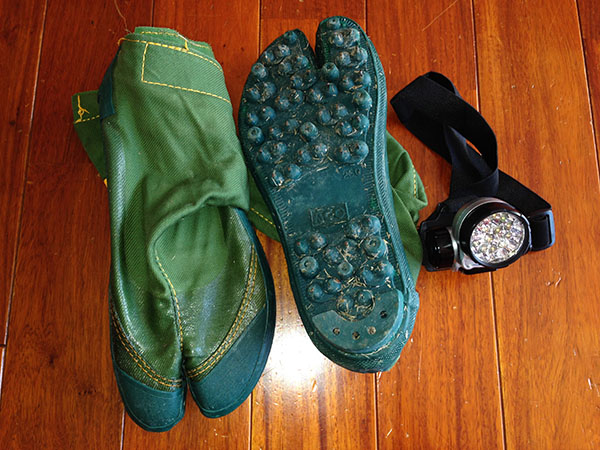
    2. Make sure you have shoes with spikes on the bottom.

    Think about it – you’re an avid photographer who has set up a kit to your liking with lenses, filters, batteries and your camera. You put it in your bag, put your shoes on, head to the wet, rocky location then bammo, you fall over on the freezing, slippery moss. Either you or your bag gets wet, and neither is a desired result. There’s nothing scarier than trying to keep your bag on your back and out of the water as you slip around the rocks on ill-equipped shoes.

    I have fisherman’s boots that cost $ 40. They have small metal spikes on the sole, perfect for getting across the rocks, and for scurrying to new locations quickly. They’re waterproof too. Alternatively, you could try the little clamp-ons that hikers use in icy conditions. They work well too, but your shoes will get cold and wet.

    3. Use a head torch (headlamp).

    The first time I brought mine I felt utterly ridiculous, like I was a miner heading down into the pits. Now, I wouldn’t dream of not having one. The convenience of having both hands free to see where you’re going, to open and close your bag, and set your camera up in the dark is without comparison. Especially if you are trying to get filters and holders attached to the ends of lenses.

    DPS5

    4. Have at least two lens cloths and other lens cleaners or pens.

    Imagine this scenario: you are changing your lens out on the rocks and you put your cleaning cloth down to free your hands. There is a little bit of residue on the rocks so when you pick up your cloth and started wiping the lens, it gets coated in a film of goo. You may be able to clean the lens with different parts of the cloth (depending on the type of rock goo!) but it will likely leave most of the cloth dirty. Therefore, you will be unable to clean other lenses later on when they inevitably get hit by sea-spray.

    How can I picture such a scenario? Sadly, I have lived it, and there is nothing worse than getting up early to a prime location, only to have your single cleaning cloth ruined before your shooting appetite has been satisfied, leaving you unable to do anything with other lenses that need cleaning. Now I always carry at least three cleaning implements in my bag.

    5. Study the tides.

    Ideally, you should know exactly what you want to shoot, so you can frame the shot before you go and know where the water will be. This is not always possible, but at least you should know what the tide will be at sunrise. You might go somewhere the day before and see a perfect shot in your head, only to return at dawn the next day and find those beautiful rocks covered in two metres of water. There’s no point setting the alarm for 4:40am if the subject you want in your shot is submerged like a sunken ship.

    DPS1

    6. Know where the sun rises. This may seem ridiculous – east you say! Well yeah, the sun rises in the east, but exactly where on the horizon will it rise for you? The angle changes every day. I once woke at 4:00 a.m. to get a shot in at sunrise only to realize after setting up that even my Sigma 10-20mm couldn’t get the sun and subject in my frame. East isn’t just east. Know exactly where the sun rises on the horizon in order to frame the shot you want.

    DPS2

    7. Mittens not gloves.

    In the wintertime, near the coast, you need something to cover your hands. But not gloves. Mittens are those cute, little gloves that have all the tops of the fingers cut off. The very reason you need mittens is to keep the tips of your fingers free to play with the camera and to get everything set up. This is very difficult with padded, woolly gloves on. Also, don’t make the mistake of buying woollen gloves, then cutting the tops off yourself. This leaves threads hanging that get longer and longer every day, and more and more annoying.

    DPS6

    The joy of getting those early morning shots makes a perfect start to the day. Follow these tips and all you’ll have to worry about is framing that perfect shot.

    googletag.cmd.push(function() {
    tablet_slots.push( googletag.defineSlot( “/1005424/_dPSv4_tab-all-article-bottom_(300×250)”, [300, 250], “pb-ad-78623” ).addService( googletag.pubads() ) ); } );

    googletag.cmd.push(function() {
    mobile_slots.push( googletag.defineSlot( “/1005424/_dPSv4_mob-all-article-bottom_(300×250)”, [300, 250], “pb-ad-78158” ).addService( googletag.pubads() ) ); } );

    The post 7 Uncommon Tips for Winter Sunrise Photos Near Water by Iain Stanley appeared first on Digital Photography School.


    Digital Photography School