Category: Photography

  • Top 10 Qualities of an Experienced Photographer You Should Look for

    Photography is without a doubt a very powerful form of artistic expression. Although Instagram can make us all feel like pros, pictures of food and posted selfies do not even come close to professional photographers’ portfolio. So today, let’s talk specifics and study top qualities which differentiate experienced photographers from the amateur crowd. The importance of professional presentation In such Continue Reading

    The post Top 10 Qualities of an Experienced Photographer You Should Look for appeared first on Photodoto.


    Photodoto

  • How to Shoot a Star Trails Selfie

    How I shot the star trails selfie

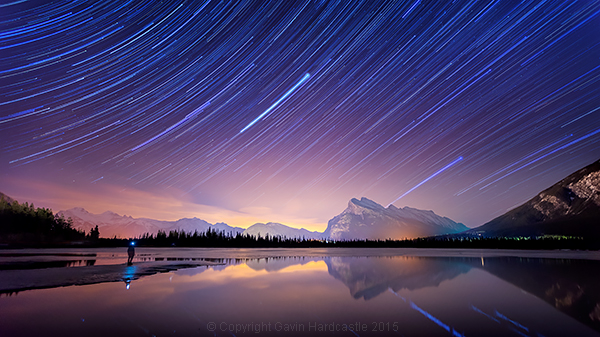
    There are times when planning and patience can result in a killer shot. This nighttime star trails selfie (above) that I captured in the Canadian Rockies was one of those times. I’d planned to shoot star trails over Mount Rundle and the town of Banff, Alberta while hopefully capturing reflections in Vermillion Lake, surrounded by melting ice.

    My initial vision was for a completely cloudless sky, but the small yet persistent low clouds ended up adding an ethereal quality to the shot I hadn’t expected.

    When I looked back at my first 30 second exposure, I knew right away that this shot had some potential. All I had to do was set things up properly and then play the waiting game.

    I’d like to share with you exactly how I shot and processed this image so that you too can try your hand at star trails, and maybe even a selfie like I did.

    Required Gear

    • A digital camera with and intervalometer app
    • A sturdy tripod

    Capturing the Shot

    Step 1 – Location and conditions

    In this case, my location was already set because I wanted Mount Rundle to be central in the composition. I needed a relatively clear night with good visibility of the stars. If it had been cloudy, I would have just stayed home. When planning a location, check the weather forecast and figure out which direction you’ll be facing to get an idea of the direction of the star trails. For more info on the movement of the earth and the direction of star trails read this article.

    I was shooting the sunset earlier that evening so I had a good idea of how things were going to turn out. Here’s the bonus shot I captured while waiting for the stars to arrive.
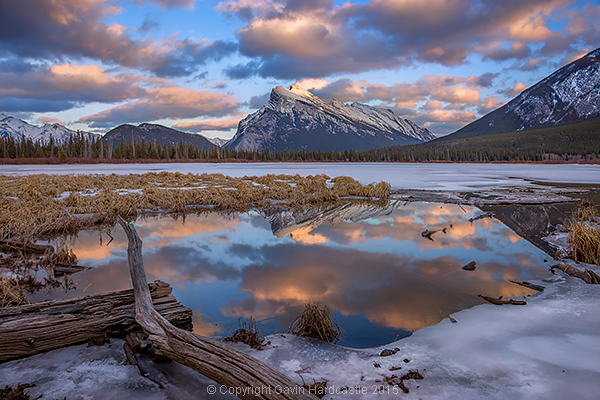
    Vermillion Lakes, Banff - Mirror World by Gavin Hardcastle

    Step 2 – Composing the shot

    Whenever I shoot star trails it’s important to remember that I’ll need roughly 60-70% of the frame dedicated to a sky that probably isn’t doing much. I can’t see the star trails until I’ve finished processing your images and that means I have to imagine the trails and frame the composition accordingly.

    Step 3 – Setting aperture, exposure and ISO

    Night photography demands that we use much higher ISO settings than we would during daylight hours. It’s how we increase the cameras sensitivity to light. With this shot I was able to get away with ISO 2000 because there was a lot of light pollution from the towns of Banff and Canmore.

    Using an aperture of f/2.8 meant that my lens was pulling in as much light as it could and with a 30 second exposure. I was happy with the brightness of the image, especially the stars.

    Here’s one of the RAW frames before processing. Even with the haze and light pollution from Banff I could see that the stars were plenty bright enough to capture trails. You can even see a couple of amorous geese in the shot just in the reflection of Mount Rundle.
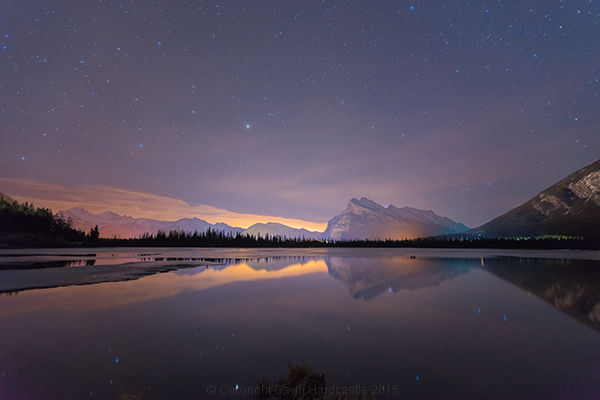
    Star Trails RAW frame

    Step 4 – Setting up my timelapse intervalometer

    I shoot with the Sony A7R camera which has a cool timelapse app. This basically works the same way as a hardware intervalometer which you can get for pretty much any DSLR. It works by taking continuous shots at an interval that I set. I tell the app/intervalometer to take 120 exposures, and that I want them all to be 30 seconds long. I don’t want any gap between shots so that means the camera immediately takes one shot after another with no rest period.

    When doing this, I make sure to switch off the cameras built-in noise reduction as this can mess up the timing of the intervalometer. In-camera noise reduction can take a long time to process so I don’t want my cameras memory buffer locked up and busy when it’s supposed to be taking the next exposure.

    I’ll also want to use the fastest memory card I can afford.
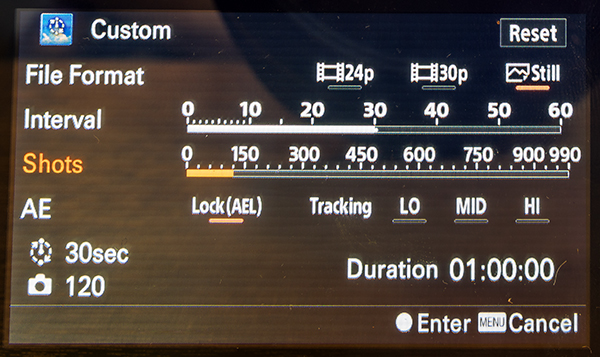
    Sony Play Timelapse App

    The Sony Timelapse App

    Canon DSLR users will be delighted to learn that Magic Lantern has an intervalometer for timelapse shooting.

    Step 5 – Final check and off we go

    Before I commence shooting a lengthy timelapse I’ll do a final check of focus, make sure I’ve got plenty of battery power left, lots of memory, and that the tripod is stable and not likely to move during shooting. I’ve learned the hard way that these things can ruin an otherwise perfectly executed timelapse.

    Step 6 – Begin shooting and ……. pose

    Once you’ve started your timelapse you’ve now got to come to terms with your boredom. I didn’t plan to do a selfie, I actually wandered into the frame of my shot because I was just looking around at stuff. If you do plan on doing a selfie, just be sure to stand in place long enough for at least one of the exposures to capture you. To be on the safe side, try and stay in position for a full minute.

    It might even be really cool if you stand in multiple positions to make it look like a crowd of identical models.
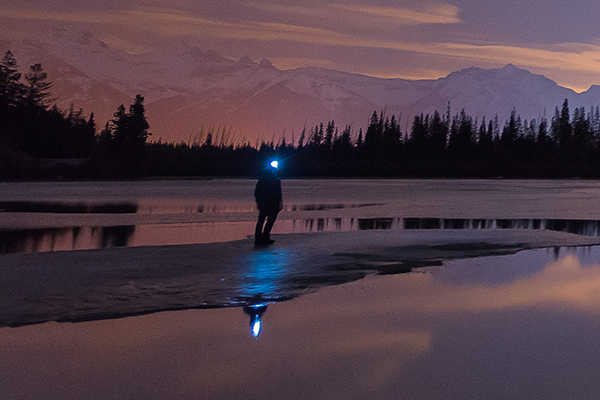
    Posing for a selfie in Banff

    Top Tip for shooting Star Trails or Timelapse

    I highly recommend bringing a second camera so that you can carry on shooting while your A camera is tied up shooting the star trails. Not only does this alleviate crushing boredom, but it’s also great practice. You do practice right?

    Step 7 – Check your shots before leaving

    Once my timelapse has finished, I check the images on the camera before packing up and leaving. I have my camera set to play my images as I spin the jog wheel, kind of like a flip book animation. It’s great for checking how the movement of the stars worked out and I’m always amazed at the things the camera picked up that I didn’t see. I had lots of frisky geese swimming in and out of my shots as they went about their noisy geese business.

    If I spot a disaster in the playback (let’s say a bug camped out on my lens) it’s time to start all over again. After an hour or so of waiting, I’ll be loath to start again, but sometimes you’ve just got to grin and bear it if you want that killer shot.

    Processing the Shots

    To process star trail images with this shooting technique, I used Adobe Bridge, Camera RAW and Photoshop.
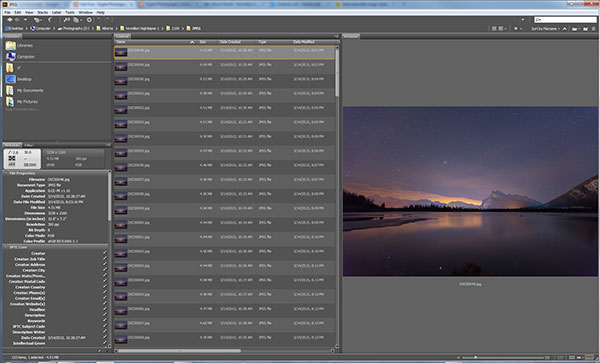
    Adobe Bridge lets us quickly preview our star trails timelapse.

    Adobe Bridge lets us quickly preview our star trails timelapse. Just hold down the bottom cursor key to flip through all of the frames and watch a rough animation.

    Step 1 – Tweak the RAW files

    In Adobe Bridge, I’ll select all 120 of my images, then right click and choose Open in Camera RAW. This loads the images into Adobe Camera RAW where I can reduce the noise, change the white balance and make any colour tweaks that I want. Here’s a list of what I tweaked.

    • Added sharpening
    • Changed White Balance to Auto
    • Added slight noise reduction
    • Increased Contrast
    • Boosted Shadows and Blacks
    • Increased Clarity and Vibrance
    • Reduced Highlights and Whites
    • Used Straighten Tool to fix horizon line

    When I’m finished tweaking, I hit Select All, then click Synchronize so that the tweaks I made to my first RAW file get applied to all 120 images. Next I hit the Done button to take me back to Adobe Bridge where I can now see those ACR tweaks applied to all 120 image thumbnails.
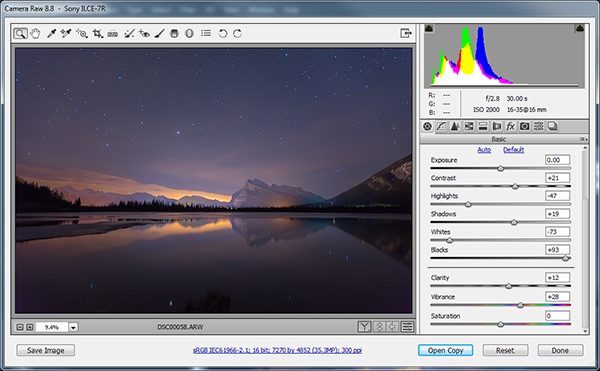
    Adobe Camera Raw for processing star trails in Photoshop

    I used Adobe Camera to make image corrections and then apply the same corrections to ALL of the frames.

    Step 2 – Save as low resolution JPGs

    This next step requires a lot of computer resources. My current PC only has 16 GB of RAM so I knew I’d have to make some low resolution versions of my RAW files in order to be able to load all 120 images into Photoshop layers. If I ever print this image, I’ll need to reprocess this image at full resolution which will require some major processing, but for web use I know I can get away with using smaller resolution JPEGS to create my final image.

    To do this, I select all of my newly tweaked RAW files in Adobe Bridge once again. I then right click and choose Open in Camera RAW. I hit Select All, then choose Save Images in the bottom left. This opens a dialog box where I can specify a location, file format and most importantly, image resolution and size.

    I choose JPEG and then specify a resolution of 72 pixels per inch and tell it to resize my images to a much smaller resolution that I know Photoshop can handle but will still look great for web use. Finally I click Save and go make some coffee while I wait for all 120 images to process.
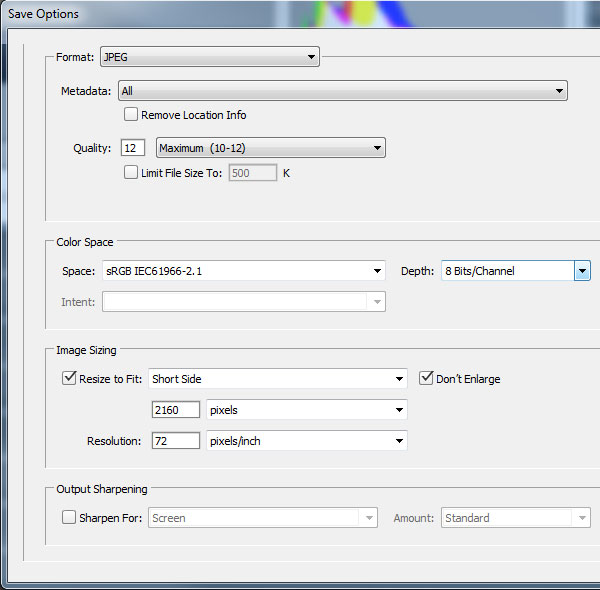
    Adobe Camera Raw Save Options

    Step 3 – Load the JPEGs into Photoshop layers

    Back in Adobe Bridge I navigate to where I saved my low resolution JPEGs. It’s best to export these to a separate folder to keep things to tidy. Once again, I select all my JPEGs and then choose Tools > Photoshop > Load Files into Photoshop Layers.

    This will take even longer than it took to export the JPEG’s so I’ll go downstairs and watch an episode of House of Cards.

    Step 4 – Can you feel the magic?

    This is where the magic happens and I finally get to see my star trails. With all of the 120 images loaded into Photoshop Layers, I go to the Layers panel to select ALL of my layers. This can be done by clicking on the top layer so that it’s highlighted in light blue, holding down shift and then clicking on the bottom layer – I need to scroll down to see all 120 layers.

    With my 120 layers selected, I now change the Layer Blend Mode to Lighten and BAM – Star Trails!

    Note: You could also use a free program like StarStax to put the trails together if you don’t have Photoshop.
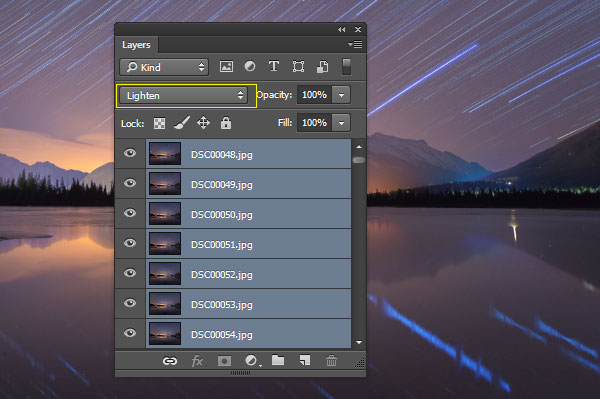
    Make Star Trails with the Lighten Blend Mode

    From this point on I can process the image with some final tweaks in Photoshop. To do that I’ll merge all layers down to one by pressing ctrl+E. Then I can change contrast, colour balance, crop, add a vignette and whatever else I think suites the composition.

    My finished star trails selfie is done and ready to share with the world. I hope you like it.

    How I shot and Processed a Star Trails Selfie

    Why don’t you give it a try?

    There is a much easier but somewhat less controlled method of getting a shot like this. Follow steps one to three and then simply use a remote shutter release while your camera is set to Bulb mode and take a very long exposure. You could leave the shutter open for an hour or two to capture the same effect. Just be careful that your lens doesn’t fog up while the camera heats up.

    You won’t have the same pinpoint control over each exposure with this simpler method, but it’s a great way to get into shooting star trails if you don’t have the time to go through all of these post processing steps.

    Editor’s note: caution – long exposures of this nature will cause your sensor to heat up potentially causing damage to it like stuck pixels or worse. Please do so at your own risk. 

    If you prefer the more long winded method that I used, you’ll get the maximum image quality possible and if you do decide to do some selfie modelling, you can pick the exact exposure that captures you at your best. In my case, it was the back of my head.

    googletag.cmd.push(function() {
    tablet_slots.push( googletag.defineSlot( “/1005424/_dPSv4_tab-all-article-bottom_(300×250)”, [300, 250], “pb-ad-78623” ).addService( googletag.pubads() ) ); } );

    googletag.cmd.push(function() {
    mobile_slots.push( googletag.defineSlot( “/1005424/_dPSv4_mob-all-article-bottom_(300×250)”, [300, 250], “pb-ad-78158” ).addService( googletag.pubads() ) ); } );

    The post How to Shoot a Star Trails Selfie by Gavin Hardcastle appeared first on Digital Photography School.


    Digital Photography School
  • 4 Things Commercial Photographers Need to Discuss with Their Small Business Clients

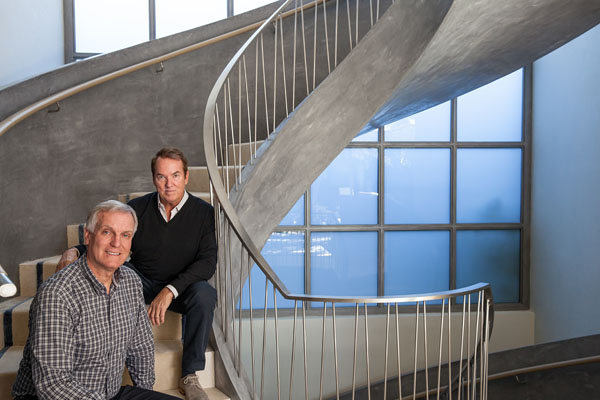
    Lead architects of a high-end design firm.

    Lead architects of a high-end design firm.

    Providing successful images for a business can be very rewarding, especially when it’s for a budding business that you get to witness growing. While all businesses, big and small, essentially have the same demands, a small business is most likely still learning how to work with various professionals and creating their processes as they go. Diving into a project with a small business can lead to lots of time and money being wasted if terms and project details are not discussed openly, early on. The following are some key factors to discuss with your small business client during an initial consultation so that conflicts can be avoided down the line:

    1. Brand

    Large family-run urban farm.

    Large family-run urban farm

    While we are hired in part because of the individual style that we have developed over time, a business’s brand is the first thing that needs to come across to their audience. When working with a small business especially, the branding should be clearly defined in order to be able to provide images that will be a great benefit to them. Do they have certain color palettes they work with? Are their graphics portraying a more formal brand, or a very casual brand? Are they nature-oriented, or do they work in traditional office spaces? What clientele are they catering to? All of these are questions that should be addressed in the initial consultations. A small business may still be developing their brand or creating a branding package, so without a brand to guide the images, there may be a need for updated photos once the brand is clearly defined. Expressing this to a client will not only help them understand that professional photography is an investment intended to last a long time, but it will also show them that you are keeping their best interest in mind for their long-term success.

    2. Budget

    Small businesses will typically have very low budgets, so the decision to invest in professional photography services will be a big one for them. Regardless of the cost for your services, there is likely to be very little (if any) wiggle room in their budget allowance. Being aware, and respectful, of the client’s budget restrictions will not only help ensure that there is less run-around in the planning stages, but it will also give the client more confidence that you are an ally. If you offer packages geared towards commercial work, consider having several options to select from, or to use as a kick-off for budget discussions. Often a custom quote is required depending on their specific needs, but some packages to give the client a ballpark idea of pricing can let them know what they can expect to spend.

    Independent financial advisor.

    Independent financial advisor

    3. Timeline

    Depending on how experienced your small business client is, their timeline for getting final images may not be very realistic. This is where it’s your job to educate clients on your process and, more importantly, on your specific ability to turn around jobs in a time crunch. Knowing their expectations about timing and delivery will be vital in creating a quote, coordinating any vendors (venue, props, assistants), and making sure that the client gets their images in time to use them.

    Do they require any extensive editing techniques or talent that requires outsourcing? Did they request a location or backdrop that requires reservations and a long wait for booking? Will they need models, and if so, do they have specifics in mind? Are they planning on using these images for a specific event, or marketing campaign that has a set date? Which leads to the final factor to keep in mind…

    Home-based food business products.

    Home-based food business products

    4. Usage

    Many folks will assume that if they hire you to take photos, they then get to keep the photos and do as they wish with them. In reality, commercial work is generally very specific about what usage is permitted. If they are planning to use the photos on a product label, do you get any royalty from that product sale? If they are hiring you because of a large print marketing campaign, can they then use the images in email campaigns several years down the line? Are you granting them use for a certain amount of time, or can they use these images forever? Once you turn over the images, are they allowed to do any alterations to them?

    While there is no one answer to these questions, be sure to discuss the planned use of these images and to clearly specify it in a contract. Both parties need to be in agreement with what is decided, and having this discussion up front will once again show your client that you value your work and intend to be completely open with them about terms.

    Owner of a co-working space.

    Owner of a co-working space

    Although there are many factors to discuss with your client at the beginning of a project, these four points will help get the basic information clarified, and get both parties on the same page. These discussion points will also go a long way to helping you create a quote for them that is accurate and all-inclusive; avoiding time-consuming confusion farther into the project.

    Do you have any additional points of conversation that are a must for initial client consultations? Please share in the comments below.

    googletag.cmd.push(function() {
    tablet_slots.push( googletag.defineSlot( “/1005424/_dPSv4_tab-all-article-bottom_(300×250)”, [300, 250], “pb-ad-78623” ).addService( googletag.pubads() ) ); } );

    googletag.cmd.push(function() {
    mobile_slots.push( googletag.defineSlot( “/1005424/_dPSv4_mob-all-article-bottom_(300×250)”, [300, 250], “pb-ad-78158” ).addService( googletag.pubads() ) ); } );

    The post 4 Things Commercial Photographers Need to Discuss with Their Small Business Clients by Natalia Robert appeared first on Digital Photography School.


    Digital Photography School

  • 3 Reasons to Disable Your Camera’s Auto-Review Function

    Whether you have an iPhone, a pocket camera, or a DSLR it’s likely that the first thing you do after taking a picture is peek at the back LCD screen to see how it turned out. Did you capture that flawless sunset glow? Is that flower petal perfectly in focus? Was everyone in the group photo smiling?

    The simple act of looking at the LCD screen seems so natural that we often don’t give it a second thought, and nearly every camera has this auto-review function turned on by default. Ironically, turning this off can have a can have a profound impact on your photography, and I’d like to share three reasons below you might want to disable it.

    kids-walking

    1. It makes you more confident

    I have been shooting without the auto-preview on my camera for a long time, but when I first made the decision to disable it I was kind of a nervous wreck.

    • How will I know if my shot turned out?
    • What if I didn’t get the exposure right?
    • Don’t people expect me to check to see if I got the photo?

    I asked myself all sorts of questions like that, while remaining determined to leave the auto-preview feature off, and much to my surprise these thoughts quickly faded. It’s a weird feeling to take a picture and not have it instantly show up on the back screen of your camera, and at first I found myself constantly clicking the Review button to check my photos anyway.

    duck

    Rather than checking my camera after each shot, I trusted my instincts and experience to get the photo right. This also made it possible for me to simply pay more attention to the duck and my surroundings.

    I soon found myself looking at my shots less and less, and instead relying on my knowledge of composition, framing, and a proper reading of my camera’s light meter to get the picture right from the beginning. I learned to pay more attention to my exposure settings like aperture, shutter speed, and ISO and started to trust my instincts as a photographer instead of snapping a few pics, checking the back screen, snapping a few more, checking again, and…well, you know the pattern. If you have seen the first Star Wars movie you might remember the end when Luke Skywalker switches off his targeting computer and decides to trust his instincts (or The Force) instead of relying on technological gimmicks, which is a bit like disabling the auto-review feature on your camera.

    Not having your pictures automatically appear after every shot might seem scary at first, but the less you rely on constantly checking to ensure you got things right, the more you will find yourself growing confident in your ability as a photographer. It’s similar to learning to ride a bike without training wheels, and the extra step of actually pressing the Review button requires just enough effort that you will probably stop doing that most of the time too. Fortunately if you do decide that you want to check your shots, they’re all just a button press away.

    I knew I would not be back at this location for at least a year, but I shot this using f/8 and a low ISO and never looked at the photo until I got home 400 miles later. The photo turned out precisely how I wanted.

    I knew I would not be back at this location for at least a year, but I shot this using f/8, 1/1500 second, ISO 280 and never looked at the photo until I got home 400 miles later. The picture turned out precisely how I wanted.

    2. It helps you be more present in the moment

    Have you ever had dinner with someone who was constantly checking his phone? Or been at a meeting where one person is clearly focused on texting her friend rather than talking to her coworkers? It’s obvious that these people were not engaged with what was going on around them, and their behaviour probably made you more than a little annoyed. Likewise, having the auto-preview enabled on your camera can turn you into the photographic equivalent of the chronic phone-checker; someone who is more interested in looking at his or her electronic gadget,s rather than being a part of the events around you.

    girl-smiling

    Because I was giving this girl my undivided attention instead of looking at the back of my camera, the two of us were able to just goof around and have fun, while also getting some good portraits.

    Consider this scenario: Your kids are playing with their cousins at the park, and you’ve brought your trusty DSLR along to document the afternoon. But you’ve got the auto-preview turned on, so after every shot you find yourself looking down at the LCD screen on your camera instead of watching the kids play and have fun together. It might not seem like a big deal, but to the little ones around you this constant shoot-check-shoot-check routine sends the message that your camera is more important than their swinging, sliding, or slipping around on the sand.

    Or maybe you’re out with your camera and tripod for an evening of landscape photography, but after each one you meticulously examine the rear LCD screen to see if you got it just right. Every second you spend poring over your pictures is a second you are not enjoying the sights and sounds of the scenery around you, and that time adds up.

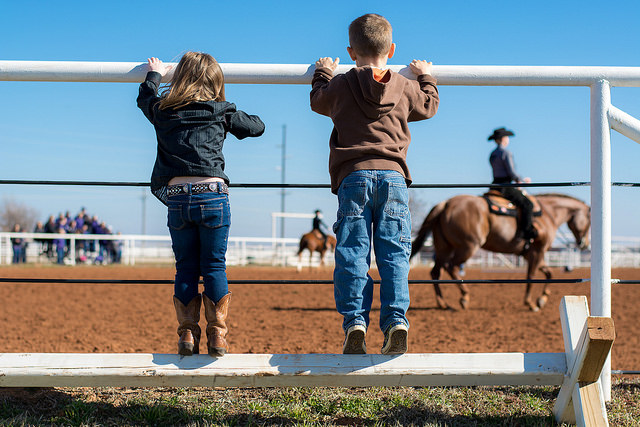
    kids-horses

    Watching these kids at a horse show was so much fun I did not want to spoil it by looking at my camera after every shot.

    By disabling the auto-preview you will learn to not only trust your instincts and build confidence in your abilities, but simply be more present in the world around you. You will find yourself worrying less about whether you got the perfect photo of your kids playing or snapped the ideal landscape, and instead start enjoying the squeals and screams of the children or feeling like a part of nature rather than an observer of it. Remember, you can still use the review button to check your shots! You will just learn to use it more intentionally rather than as the default.

    Surprisingly, a recent study suggests that people who are busy snapping pictures of a given event are less likely to remember details of the event than those who took no pictures at all. Although the researchers did not specifically investigate whether the effects of constantly peeking at the screen to look at photos had any affect on the outcome, I think it would be safe to conclude that doing so would serve to take you out of the moment even more than if you were just taking photos and not looking at the screen. Suffice to say, the seemingly harmless act of checking the rear LCD screen on your camera can have a greater impact than it might appear, and disabling the auto-preview is a good first step in helping you experience moments instead of just capturing photos of them.

    baby-flying

    By just having fun and not concentrating on whether I nailed the perfect shot, my brother and I were able to just have fun and enjoy the afternoon while we played with his son.

    3. It brings back the magic of shooting with film

    Do you remember the days of shooting film when you had to wait days, or even weeks, to see if your pictures turned out? The excitement of dropping off your rolls of film, the anticipation of getting them back, and the nervous elation as you saw your images come to life in your hands is something that has been all but lost in the modern era of instantaneous photography. Even though I can check the back of my camera as much as I want, I have found myself not reviewing my pictures at all until I pop my memory card into my computer many hours or even days after I’m done shooting. More than bringing back a bit of nostalgia, this process has made me a much more intentional shooter. I think carefully about the photographs I want and how to capture them, I spend time being present in the moment, and most of all I don’t worry so much about my photos. I get the shots I get, and if I find out a few days later that I did not nail a photo how I wanted to, I use it as inspiration and a learning opportunity.

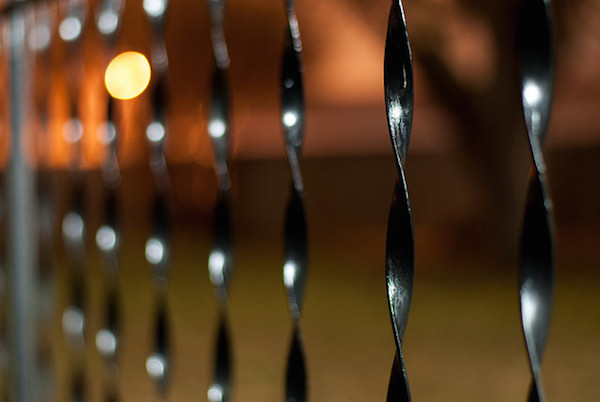
    fence

    This was one of those times when I did have to review every shot because my depth of field was so shallow that I had to be sure I was getting the right part of the fence in focus.

    I want to make clear that I don’t think you should stop using the LCD screen to review your shots altogether, especially if you are a professional, or semi-professional, who takes on photo jobs for money. It’s important to know when to review and when not to. If I’m doing a portrait session there are many times when I stop to check and look to see if I nailed the focus or the lighting worked out how I wanted it to. I’m not saying you should never look at the back of your camera to check your photos, but that you might want to reconsider whether you have the camera automatically show them each time you click the shutter.

    Of course, if you shoot mirrorless, or with any other camera that has an electronic viewfinder, much of this article is kind of a moot point. But, the overall lesson remains intact; don’t look at your photos so much when you’re taking them.

    What about your experience? Do you use the auto-preview, or have you disabled it? Leave your thoughts in the comment section below!

    googletag.cmd.push(function() {
    tablet_slots.push( googletag.defineSlot( “/1005424/_dPSv4_tab-all-article-bottom_(300×250)”, [300, 250], “pb-ad-78623” ).addService( googletag.pubads() ) ); } );

    googletag.cmd.push(function() {
    mobile_slots.push( googletag.defineSlot( “/1005424/_dPSv4_mob-all-article-bottom_(300×250)”, [300, 250], “pb-ad-78158” ).addService( googletag.pubads() ) ); } );

    The post 3 Reasons to Disable Your Camera’s Auto-Review Function by Simon Ringsmuth appeared first on Digital Photography School.


    Digital Photography School

  • Chromatic Aberration – What is it and How to Avoid it

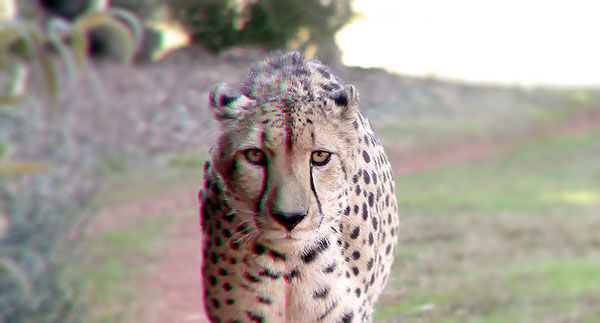
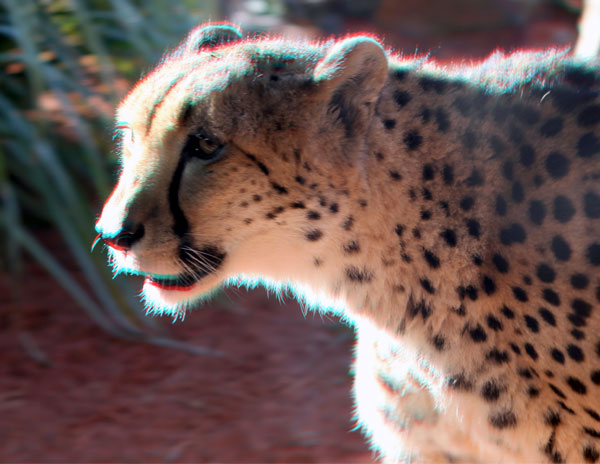
    OziRig Cheetah Chromatic Aberration

    In the photo above, you may notice that the colors on the left-hand side appear to be showing fringes of green and red along the sharp edges of the subject; this is what is called chromatic aberration.

    What is chromatic aberration?

    Chromatic aberration (also known as color fringing or dispersion) is a common problem in lenses which occurs when colors are incorrectly refracted (bent) by the lens, resulting in a mismatch at the focal point where the colors do not combine as they should.

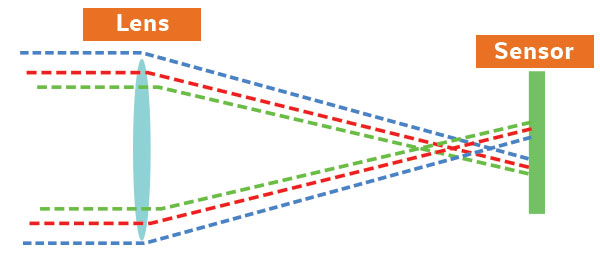
    To help understand this a bit better, remember that the focal plane is your sensor’s point of focus; where all the light from your lens should rejoin together to be correctly detected by your sensor. The thing is, depending on the construction of your lens, your chosen focal length, and even the aperture that you’ve used, certain wavelengths (colors) may arrive at points before or after where the focal plane sits.

    Ozirig ca dlsr illustration

    When this occurs, you end up with the telltale color fringing around edges in your photograph; and although you can remove low levels of chromatic aberration in Photoshop and Lightroom, the reality is that each extra moment you spend on touching up a photograph is one moment less you have to get something else done!

    OziRig Cheetah Chromatic Aberration Comparison

    Why does chromatic aberration occur?

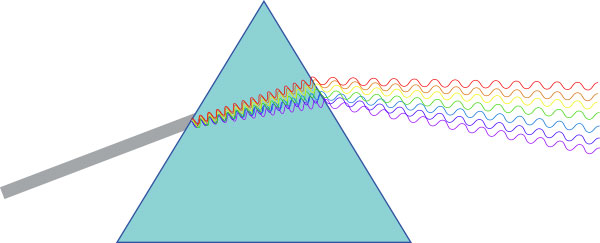
    Chromatic aberration happens because your lens acts as a prism; bending light depending on the various properties of the glass, and much like the triangle-shaped one made famous by Pink Floyd, colors passing through it are split at different angles.

    Ozirig ca prism diagram

    Remember that light is actually made up of several different wavelengths (colors). So, for your camera’s sensor to detect the combined color of light, your lens needs to make all wavelengths of that particular ray hit the exact same point on your sensor.

    This sounds simple, but you need to take into account the fact that various wavelengths (and thus various colors) will be striking your lens all at once and that each of these rays will behave slightly differently depending on the glass that it is passing through.

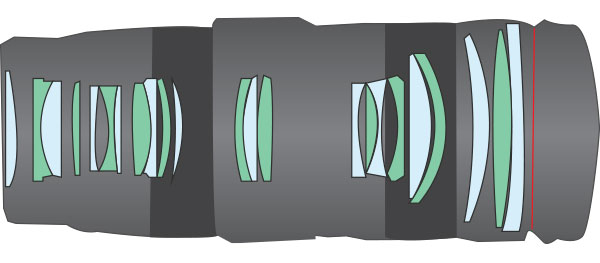
    The feat of engineering required to correctly align all of these different light rays is usually achieved by the manufacturer’s use of a lens array. In fact, if you were to pull your lens apart, it wouldn’t be surprising if you found upwards of 16 lens elements all designed to correct for various things along the light’s journey between your lens and your sensor.

    OziRig Lens Elements

    Unfortunately, this is also where chromatic aberration tends to rear its ugly head. Hidden within the design of these lens elements are defects – either in the glass or the design of the lens itself – which under specific conditions may cause your photos to exhibit this type of aberration.

    I’m not trying to say that you need to have a pro-level lens, in fact, the key point to keep in mind here is that all lenses suffer from chromatic aberration in one form or the other. What matters is whether or not your lens exhibits visible chromatic aberration, and whether in your particular case this is a deal-breaker or not.

    Avoiding chromatic aberration defects

    Chromatic aberration can actually be effectively removed in post-processing if you are shooting in RAW. However, good practice states that you should try and remove issues in-camera first, rather than creating more work down the line.

    The good news is that if you are stuck working with a lens that exhibits some form of visible chromatic aberration there are several easy-to-understand strategies which can help you to remove or minimize the visible effect of it in your photos.

    Avoid high contrast scenes

    OziRig CA Cheetah High Contrast

    Chromatic aberrations tend to flare up in high contrast scenes. Particularly guilty are shots against white backdrops, landscape shots against a bright sunrise, or, as in the example of this Cheetah, where the light source is behind the subject.

    This means that sometimes there’s nothing to do except try and reframe your shot. Swap your backdrop out to something which better matches your subject’s primary color, or wait for more favorable lighting conditions. If you absolutely must capture this shot as-is, then swap over to RAW and get your fingers ready for the possibility that you may need to do some touch-ups in post-production.

    Check your focal lengths

    OziRig Chromatic Aberration Focal Length

    Although it’s nice to have access to a wide range of focal lengths, the fact is that most zoom lenses will exhibit various aberrations at the shorter and longest extremes of their focal range. So being able to choose a different focal length will usually help to remove the issue of visible chromatic aberration.

    Likewise, using a zoom lens at a wide angle will usually introduce not just chromatic aberrations but various other defects in your image. Instead, consider choosing a prime wide angle lens to handle the job, or, perhaps more practical for your case, make a panorama at a focal length that does not exhibit the chromatic aberration issue and then join the photos in post-production for a flawless result.

    Stop down your aperture

    OziRig CA Aperture

    Although this will depend on the exact type of lens you are using, stopping down your aperture will usually help to play down the noticeable effects of most lens defects, including chromatic aberrations. Remember that you may need to consider dropping the shutter speed or boosting the ISO to compensate for the light loss if working in a non-studio setting.

    If you have access to lighting or flashes, then be sure to experiment with the effect of boosting and adding in extra light.

    Reframe your subject to the center of the image

    OziRig Rhino CA Recrop

    Chromatic aberrations tend to occur more frequently as you move further away from the center of the frame. This is generally as a result of the curvature of the lenses within the barrel. Therefore, being able to reframe your subject closer to the middle may help to reduce, or even completely eliminate, issues with chromatic aberration and other lens-based defects.

    This means that you may need to crop your image after shooting to achieve the desired frame, which may be an issue if you absolutely have to maintain every pixel in your photo. If, on the other hand, you are working with small prints, or digital distribution, then the differences between resolutions are not as noticeable until you step down significantly.

    So understanding chromatic aberration, how to avoid it, and what you can do about it will help you improve the final quality of your images. If you have any other tips or comments please share them below.

    googletag.cmd.push(function() {
    tablet_slots.push( googletag.defineSlot( “/1005424/_dPSv4_tab-all-article-bottom_(300×250)”, [300, 250], “pb-ad-78623” ).addService( googletag.pubads() ) ); } );

    googletag.cmd.push(function() {
    mobile_slots.push( googletag.defineSlot( “/1005424/_dPSv4_mob-all-article-bottom_(300×250)”, [300, 250], “pb-ad-78158” ).addService( googletag.pubads() ) ); } );

    The post Chromatic Aberration – What is it and How to Avoid it by Joshua Burke appeared first on Digital Photography School.


    Digital Photography School

  • The Latest Tech Trends in Real Estate Photography

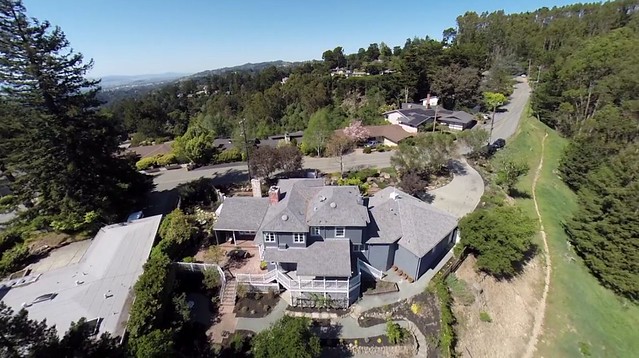
    6324 Castle Drive, Oakland, CA

    Earlier this week I was checking out a new listing that Kelly and Marvin Deal with Grubb Company here in Oakland, CA have up for a home for sale in the Oakland Hills. Kelly and Marvin helped mrsth and I buy our home in Piedmont a few years back and are excellent real estate agents if you are looking to buy or sell in the East Bay, especially near Piedmont or Oakland.

    In looking at the listing, I was struck by how sophisticated real estate photography is getting. I’d seen interactive home tours online before, but with the convergence of things like 360 degree cameras and drone photography, real estate photography seems to be moving to a whole new level. In this case they used drone cameras to get unique views of the property including dramatic aerial views showcasing the parklands around the property.

    They also used a company called Open Homes Photography who is using 360 cameras to build not just interactive walk through tours of properties, but can even convert these 360 degree views into custom floor plan and aerial type dollhouse views.

    Anyways, if you are doing real estate photography, check it out — and if you’re thinking of moving to Oakland, give Kelly and Marvin a call as well.

    With housing in San Francisco and the Peninsula going nuts with the recent tech boom, on a relative basis Oakland is much more affordable. We moved to the East Bay in 2001 and over the last decade I think Oakland especially has been growing into a wonderful place to live and work. Great new restaurants seem to be popping up daily, art and food and culture are thriving and BART makes it super easy to get to the City quickly.


    Thomas Hawk Digital Connection

  • Applying a Texture Overlay to Your Images to Create an Antique Look

    If you were to look at my computer you would find a folder called textures, and in that folder you would find hundreds of files. I take photos of things everywhere that I think will be good textures. I also make them, and try different things. You can do the same. Any time you see interesting textures in concrete, marble, or maybe cracked paint, take photos of them, add them to your folder for textures.

    There are numerous reasons for adding textures to your photos, and one of the best is to give your work an old or antique look. Lots of old photos have marks on them or the emulsion has stained. Photos were often not treated with preservation in mind and they have started to look textured.

    In this article we are going to look at how you can apply a texture overlay to your images to give them an aged look.

    1-lily-texture-original

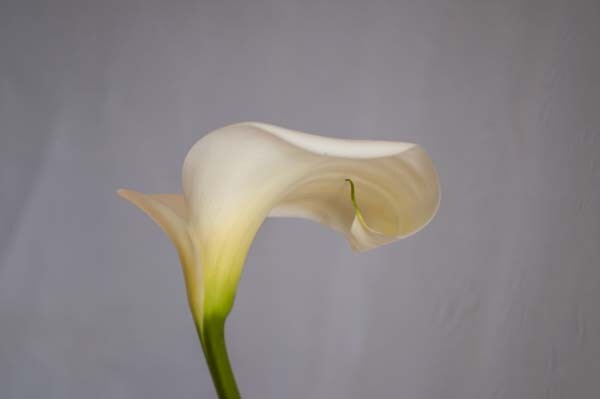
    We are going to work on the above image of the lily. It has had basic processing done to it in Adobe Camera Raw before being opened in Photoshop CC (2014).

    Cameras and lenses back in the day often didn’t produce super sharp images, so to start off we are going to make a duplicate layer of our image. I do this with the Ctrl+J, keyboard shortcut (Cmd+J on a Mac). There are other ways of doing this, such as; going to the menu at the top and choosing Layer, then clicking on Duplicate Layer, but I find the keyboard shortcut to be the easiest and quickest way.

    11-lily-texture-original

    10-lily-texture-original

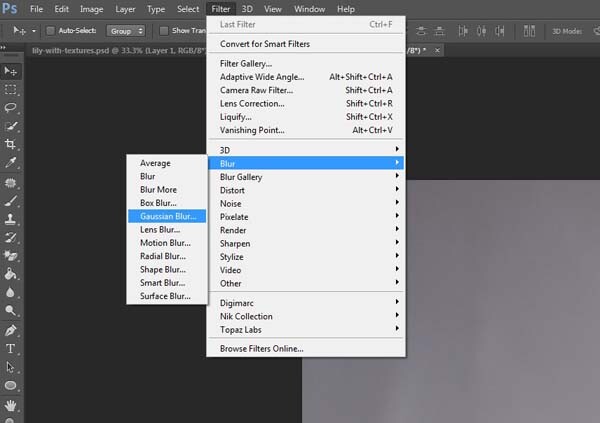
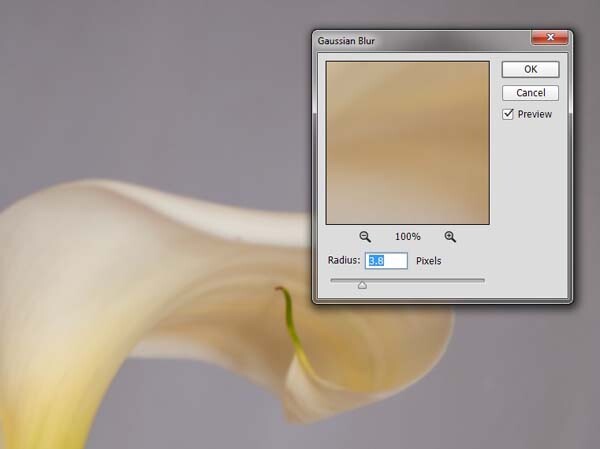
    Once you have that duplicate layer then go over to Filters and choose Blur, then Gaussian Blur as in the image above. You don’t want too much blur, or it will look like it is out of focus, and you don’t want too little or it will not be visible or obvious enough. I used 3.8 for the purpose of this image.

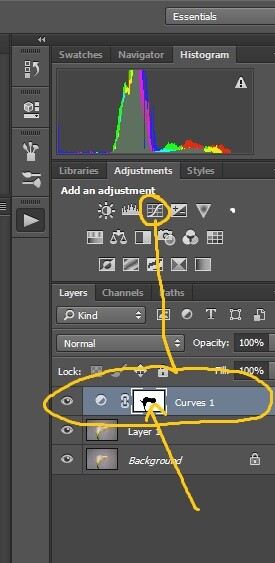
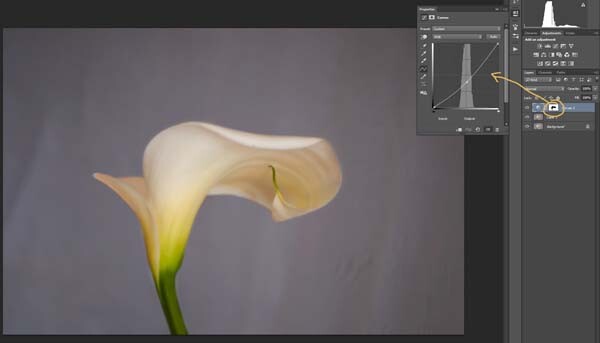
    Next, you want to try and separate the flower from the background, you can do this with curves. Open a curves adjustment layer and use it to darken the image overall. Then using the Brush tool (which is located on your tool bar in Photoshop) on the layer mask, remove the adjustment from the flower as follows.

    12-lily-texture-original

    3-lily-texture-original

    Click on the Brush tool, then set your foreground colour to black. It is the one with the two little squares at the bottom of the tool bar – the colour on top is the foreground color, the one on the bottom is the background color. Go to the curves layer you created in your layers panel and click on the white square in that layer (that is the mask), then go to your image and start brushing on the flower. You should see the flower getting lighter.

    Add a warmer color to your image

    Screen Shot 2015-04-13 at 11.52.55 AMNext you are going to change the colour of the highlights. You don’t have to do this, but it is a nice touch and it helps create a warmer feel to the image.

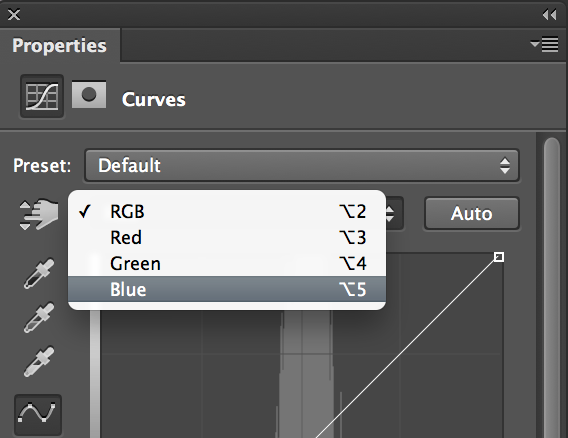
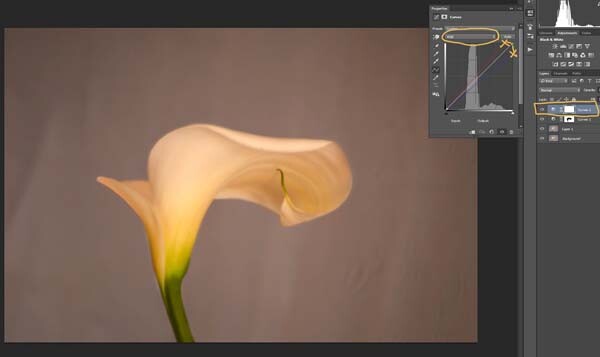
    Open another curves adjustment layer. At the top you should see a pull down menu that says RGB, click on that and choose Blue. Go to the curves line and up in the top right corner (the highlights) click on the dot in the corner and pull it down along the side line. Don’t go too far, but you should see the image turning yellow. Remember yellow is the opposite of blue.

    4-lily-texture-original

    Go back up to the curves window and click on red. You are going to do the same thing, except this time take the dot to the left and across the top. You don’t need to go very far.

    Adding the texture overlay

    Now it is time to find a texture overlay to put on top of your image. It is always going to be an individual thing and something that you need to work out. Here, I used a texture that I saw on the floor of a building in the city. I liked the cracked look of the floor so I took quite a few photos.

    5-lily-texture-original

    Open the texture file in Photoshop, then using the move tool (the first one at the top of the tool bar) click on the image and drag it over to the image you want to apply it to. You can copy and paste it as well, or use Place (which will add it as a SmartObject).

    If you buy textures, or get free ones off the internet, you will often find they are too small for your image. But don’t worry about it because you are going to be blending it into your image, so it doesn’t really matter.

    If you need to change the size of the texture overlay you can do this with the transform tool. You can find the Free Transform tool under the Edit button on the main menu across the top, where you found Layer and Filters. You can also the keyboard shortcut, Ctrl+T (Cmd+T on a Mac).  You will see a little grid go up around the texture so you can drag one of the corners to make it bigger, or smaller, depending on the size you require.  Press enter to apply the transform, or you can double click on it, or click on the move tool and press apply.

    Blending the texture into your image

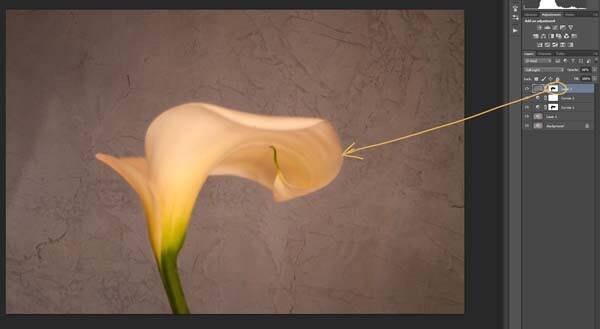
    You will need to blend the texture so you can see your image underneath. The layer blend mode options are at the top of the layers panel, it is another drop down menu. The default option is set to Normal, so look for that. There are many options, for this tutorial however, we are going to use Soft Light. Once you change it to that blend mode you should be able to see the texture and the image underneath.

    You can also change the opacity of the layer if you like as well. I usually change it slightly so the texture isn’t too strong. You can change the opacity in the window next to the options panel. Just make sure your texture layer is highlighted.

    6-lily-texture-original

    If you go to the bottom of the layers panel you will see a few things across the bottom.  If you click the rectangle one with the round hole in it you will give your layer a mask.  The mask means you can hide some of that layer from your image, like you did with the first curves layer.

    Again, get your brush tool, make sure the foreground colour is black and paint over the flower.  You are now making the texture look like it is just on the background.

    7-lily-texture-original

    Next we are going to apply a texture to the whole image. This time it is one that will make the image look grungy, and dirty. You can find textures that have marks on them that look like smudges and grease. The one in this tutorial was a polished cement wall outside.

    Add the texture to the image the same way you did the previous one. Blend it with the Soft Light Blend mode again. See how you feel about how the image looks, and if you decide it is too strong remember that the opacity can help make it less intense.

    Adding a tint to your image

    8-lily-texture-original

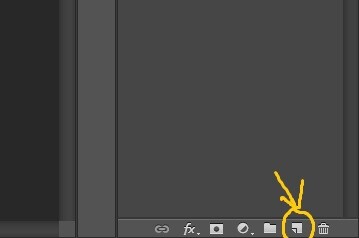
    You will need to add a new layer, one that is transparent. At the bottom of the layers panel where you found the layer mask, you should see next to the trash bin a white square with a corner folded over, that is the new layer icon (see below). Click on it.

    9-lily-texture-original

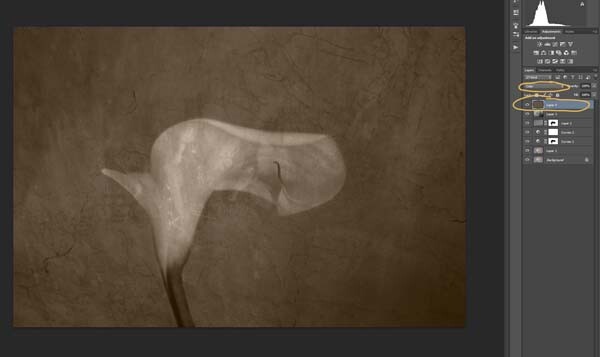
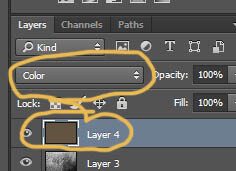
    Next go to the tool bar and find the Paint Bucket Tool. Then go to the foreground colour and click on it. A popup window should come up and you can choose a colour to give your image a new tone. I would recommend you choose a grey, for this demonstration a mid tone grey with a hint of orange was chosen.

    13-lily-texture-original

    Now go to your image and click on it. The new empty layer should be filled with the colour you chose, and your whole image should look like a solid colour. Go to the blending mode for the new layer and change it to Colour. Your image should be transformed to monochrome. If you change the opacity of that layer then some of the original colour will come through, but that is up to you.

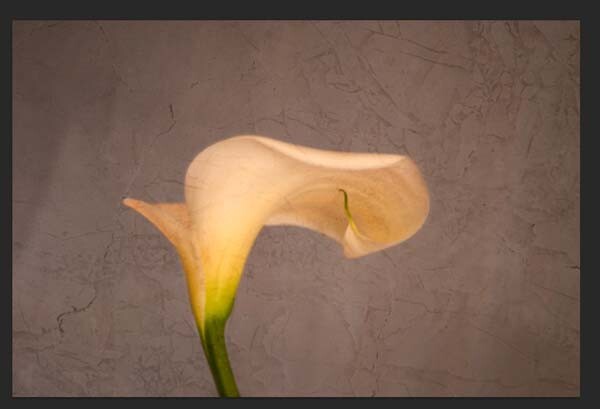
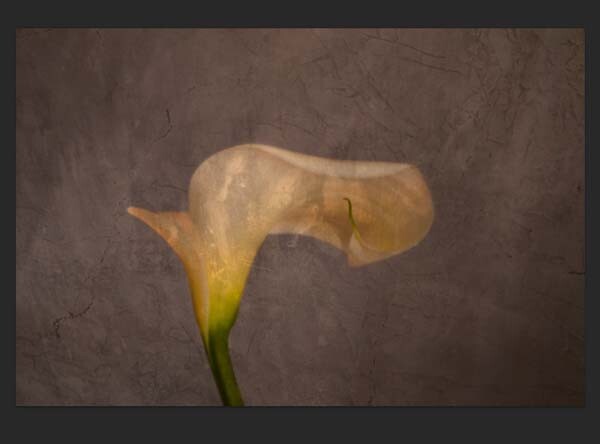
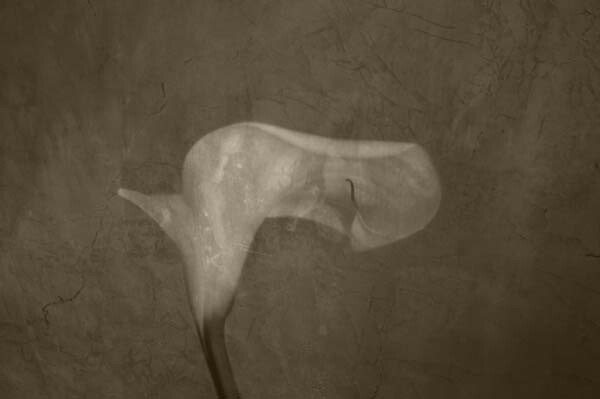
    Here is the final image.

    lily-with-textures

    There are lots of other things you can do, but that might be best left for another tutorial.

    If you prefer to watch this demonstrated you can check out the video below as I walk you through the same steps:

    Have you tried using textures before? Do you have any favorite textures or sites for finding them? Please share in the comments below.

    googletag.cmd.push(function() {
    tablet_slots.push( googletag.defineSlot( “/1005424/_dPSv4_tab-all-article-bottom_(300×250)”, [300, 250], “pb-ad-78623” ).addService( googletag.pubads() ) ); } );

    googletag.cmd.push(function() {
    mobile_slots.push( googletag.defineSlot( “/1005424/_dPSv4_mob-all-article-bottom_(300×250)”, [300, 250], “pb-ad-78158” ).addService( googletag.pubads() ) ); } );

    The post Applying a Texture Overlay to Your Images to Create an Antique Look by Leanne Cole appeared first on Digital Photography School.


    Digital Photography School

  • 28 Ethereal Images of Light Rays that Glow

    To photographers light is the most important thing above all else. It is the ultimate prize to come home with a photo with “good light”.

    One type of light that is truly ethereal is the phenomenon of rays of light. It is only possible for light rays to be visible in an image when certain atmospheric conditions exist; there must be some kind of particle suspended in the air for the light to bounce off such as dust, fog, or smoke.

    Here are 28 images of light rays that have a certain glow about them. Enjoy!

    Photograph Home by matt dinning on 500px

    Home by matt dinning on 500px

    Photograph Poland by Artur Magdziarz on 500px

    Poland by Artur Magdziarz on 500px

    Photograph Amazing Earth by Rick White on 500px

    Amazing Earth by Rick White on 500px

    Photograph The Valley of Light by Michael Shainblum on 500px

    The Valley of Light by Michael Shainblum on 500px

    Photograph A Journey to the Light by Rarindra Prakarsa on 500px

    A Journey to the Light by Rarindra Prakarsa on 500px

    Photograph Raging Light by Martin Kornmesser on 500px

    Raging Light by Martin Kornmesser on 500px

    Photograph Praying by La Mo on 500px

    Praying by La Mo on 500px

    Photograph The Cave by Tommy  Angelsen on 500px

    The Cave by Tommy Angelsen on 500px

    Photograph Dawning by Dylan Toh  & Marianne Lim on 500px

    Dawning by Dylan Toh & Marianne Lim on 500px

    Photograph heavenly autumn 7 by Bart Ceuppens on 500px

    heavenly autumn 7 by Bart Ceuppens on 500px

    Photograph Hold On Tight by Vichaya Pop on 500px

    Hold On Tight by Vichaya Pop on 500px

    Photograph Light shower by Martin Kornmesser on 500px

    Light shower by Martin Kornmesser on 500px

    Photograph Waiting for a New Life! by Mardy Suong Photography on 500px

    Waiting for a New Life! by Mardy Suong Photography on 500px

    Photograph Nori Othman by Mohammed Abdo on 500px

    Nori Othman by Mohammed Abdo on 500px

    Photograph Beams of Light by BP Chua  on 500px

    Beams of Light by BP Chua on 500px

    Photograph Peter's ray by Jarno Dijkstra on 500px

    Peter's ray by Jarno Dijkstra on 500px

    Photograph Better than Coffee by Tracey Harrison-Hill on 500px

    Better than Coffee by Tracey Harrison-Hill on 500px

    Photograph Upper Antelope Canyon by Victor Chen on 500px

    Upper Antelope Canyon by Victor Chen on 500px

    Photograph Descending by Thomas Conrad  on 500px

    Descending by Thomas Conrad on 500px

    Photograph Sunset With A Twist by Michael Shainblum on 500px

    Sunset With A Twist by Michael Shainblum on 500px

    Photograph Sonnenstrahlen im Wald by Leo Pöcksteiner on 500px

    Sonnenstrahlen im Wald by Leo Pöcksteiner on 500px

    Photograph The lake by Christian Wig on 500px

    The lake by Christian Wig on 500px

    Photograph morning by Alberto Melcangi on 500px

    morning by Alberto Melcangi on 500px

    Photograph Enveloping light by Stefan Andronache on 500px

    Enveloping light by Stefan Andronache on 500px

    Photograph Fresh Beginning by Scott Knox on 500px

    Fresh Beginning by Scott Knox on 500px

    Photograph Ray Of Light by Roland Guth on 500px

    Ray Of Light by Roland Guth on 500px

    Photograph Home is where the light is by Claudiu Guraliuc on 500px

    Home is where the light is by Claudiu Guraliuc on 500px

    Photograph Entrance by markus  on 500px

    Entrance by markus on 500px

    googletag.cmd.push(function() {
    tablet_slots.push( googletag.defineSlot( “/1005424/_dPSv4_tab-all-article-bottom_(300×250)”, [300, 250], “pb-ad-78623” ).addService( googletag.pubads() ) ); } );

    googletag.cmd.push(function() {
    mobile_slots.push( googletag.defineSlot( “/1005424/_dPSv4_mob-all-article-bottom_(300×250)”, [300, 250], “pb-ad-78158” ).addService( googletag.pubads() ) ); } );

    The post 28 Ethereal Images of Light Rays that Glow by Darlene Hildebrandt appeared first on Digital Photography School.


    Digital Photography School
  • Weekly Photography Challenge – Light Rays

    Rays of light are that golden egg photographers dream about, lust after, desire with all their heart. Earlier I shared a set of images that display a great example of rays of light.

    Geert Orye

    By Geert Orye

    Weekly Photography Challenge – Rays of Light

    So now it’s your turn to go out and replicate this type of photograph. You may think – that’s impossible how can I create that if it doesn’t already exist? Well there are some things you can do to help it along.

    • Look for a foggy day or condition
    • Go out to shoot in the early morning and look for mist that is laying low over the land with the sun coming through it
    • Find a dusty old dirt road and drive up and down it a few times, then get out and start shooting
    • Go to a historic site or museum and see if you can shoot inside some of the old musty buildings, look for light coming in the windows
    • Sheer curtains or blinds over a window can help too

    So get out and look for the light. Here are a few more examples:

    HuTDoG83

    By HuTDoG83

    Caruba

    By caruba

    Deepak

    By Deepak

    Alexander Kesselaar

    By Alexander Kesselaar

    Billy Wilson

    By Billy Wilson

    Chantrybee

    By chantrybee

    Lawrence OP

    By Lawrence OP

    Share your rays of light images here:

    Simply upload your shot into the comment field (look for the little camera icon in the Disqus comments section) and they’ll get embedded for us all to see or if you’d prefer upload them to your favourite photo sharing site and leave the link to them. Show me your best images in this week’s challenge. Sometimes it takes a while for an image to appear so be patient and try not to post the same image twice.

    googletag.cmd.push(function() {
    tablet_slots.push( googletag.defineSlot( “/1005424/_dPSv4_tab-all-article-bottom_(300×250)”, [300, 250], “pb-ad-78623” ).addService( googletag.pubads() ) ); } );

    googletag.cmd.push(function() {
    mobile_slots.push( googletag.defineSlot( “/1005424/_dPSv4_mob-all-article-bottom_(300×250)”, [300, 250], “pb-ad-78158” ).addService( googletag.pubads() ) ); } );

    The post Weekly Photography Challenge – Light Rays by Darlene Hildebrandt appeared first on Digital Photography School.


    Digital Photography School

  • Do Visual Push-Ups Everyday to Grow as a Photographer

    Please note that I do not know who originally coined the phrase “visual push-ups”. I have heard it used many times and find it very suitable to describe what we should all be practicing as often as possible with our camera.

    There is no better time to practice your photography than here and now. Don’t wait for the best light, the exotic vacation, or a new lens. Let’s be honest, the only way you’re going to become a better photographer, is by doing visual push-ups every day, and by challenging yourself continuously for as many years as you’ll be able to carry that camera around. Give yourself assignments often and never stop learning!

    ©Valerie Jardin-4

    One of my ongoing projects for several months was photographing beautiful smiles of strangers which resulted in a fun collection of smiles from all over the world. Here a shopkeeper in Melbourne, Australia.

    Are you a hobbyist photographer?

    You have the luxury of only needing to please yourself with your work. Make sure you do that. Click the shutter to move and inspire, not to impress.

    Do you work for clients?

    Pursuing personal projects is even more important. Remember the feeling of shooting for yourself only, without having to compromise between your vision and your client’s? However much you love being a pro photographer, you run the risk of losing the passion if you don’t take care of yourself and your creative needs.

    You don’t have time to shoot everyday?

    Yes you do! How much time do you spend on social media for example? Or sitting in front of the television? If you take only 15 minutes of that time and invest it in your photography daily, you will see the results. The best part is that you can do those visual push-ups at home, during your lunch break, or on the bus ride to work.

    Do you think this only applies to beginning photographers?

    Think again! I see so many seasoned photographers who are always shooting the same types of subjects, the same way. No matter what your skill level is, it’s always good to challenge yourself by getting out of your comfort zone to try new things.

    Do you think that posting different genres will look like you can’t focus on one thing?

    Wrong! On the contrary, it will prove that you are a well-rounded photographer. But, if you are trying to sell your services as a wedding shooter, your urbex images will be better posted on a separate page or gallery. Use common sense.

    ©Valerie Jardin-1

    Anything can become a subject and give you a challenge. Try to make art with everyday objects and difficult lighting situations.

     What type of photo projects should you work on?

    Anything will do, as long as you enjoy it. Remember, the point of the exercise is not to please others or get likes. It’s to please yourself, and yourself only. By all means, do share with the world and get that extra satisfaction and gratification if others like it too. But that should not be your priority.

    ©Valerie Jardin-5

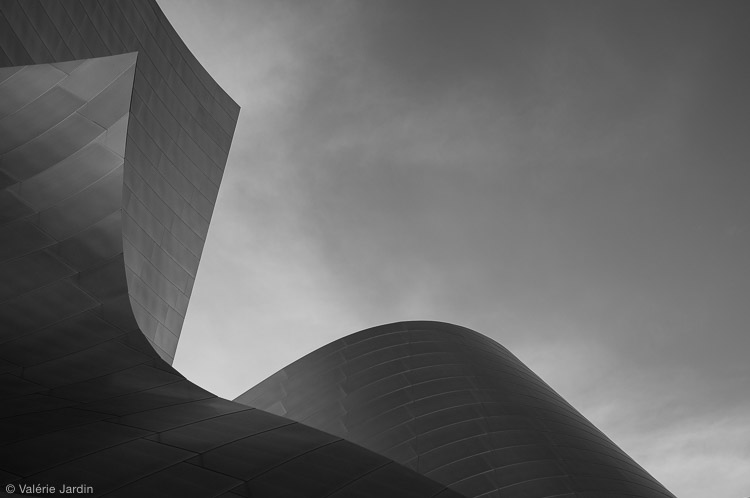
    Although I am better known for my street photography, I don’t want to limit myself to just one genre of photography, the world is too beautiful to miss other opportunities. I love photographing architectural abstracts for example.

    The sky is the limit!

    Photograph any ordinary objects around your house and make them look extraordinary. Read the local paper and find a story that you can document with your camera. Start a 52 week, a 365 project, or even a 100 strangers or a self portrait project but be aware of the pressure you are putting on yourself. Make sure it doesn’t become a chore which would be counter-productive to what you are trying to accomplish.

    Don’t worry too much about coming home with keepers every time you go out with your camera. There will be some good days, and there will be many not-so-good days. But one thing is certain; you will learn and grown every time you go out with your camera and do those visual push-ups.

    ©Valerie Jardin-3

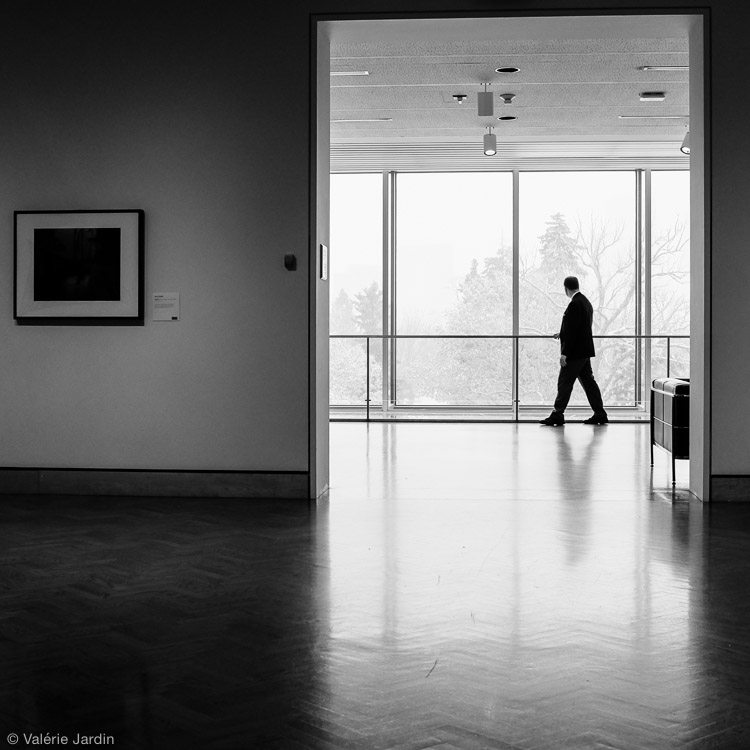
    During the long winter months I visit a lot of museums and Museum-Goers has become one of my on-going series.

    I always have two or three personal projects going at the same time, in different genres if possible. The point of the exercise is to explore new things and grow. Remember, that no matter what the subject or genre you choose to experiment with, you will benefit greatly from expending your creative vision.

    Doing those daily visual push-ups will be the best time invested in your photography. One day you will only have five minutes to photograph an ordinary object on the window sill in the early morning light. The next day you may have an hour with your camera during your lunch break. Every minute you spend working on your craft will help you find your photographic voice and expand your creative vision.

    ©Valerie Jardin-2

    Exercising your vision can take as little as a few seconds, and be as simple as photographing an object in your own house. This is part of my weekly self-assigned “Ordinary Objects are Beautiful” challenge.

    Do yourself a favor, get off the internet and grab your camera NOW!

    Please share with the dPS community which personal projects have made a real difference in your photography by adding a comment below.

    googletag.cmd.push(function() {
    tablet_slots.push( googletag.defineSlot( “/1005424/_dPSv4_tab-all-article-bottom_(300×250)”, [300, 250], “pb-ad-78623” ).addService( googletag.pubads() ) ); } );

    googletag.cmd.push(function() {
    mobile_slots.push( googletag.defineSlot( “/1005424/_dPSv4_mob-all-article-bottom_(300×250)”, [300, 250], “pb-ad-78158” ).addService( googletag.pubads() ) ); } );

    The post Do Visual Push-Ups Everyday to Grow as a Photographer by Valerie Jardin appeared first on Digital Photography School.


    Digital Photography School