Category: Photography

  • The Power of Keywording in Lightroom

    I have to admit, I did not know about keywords in Lightroom, or their powerful uses, until a couple of years ago. During one of Julieanne Kost’s tutorials, I heard the terms and saw it being used in a very practical sense – a way to add specific descriptors to images in a catalog. I was intrigued and the more I researched them, the more I realized what an amazing and awesome tool was available right at my finger tips.
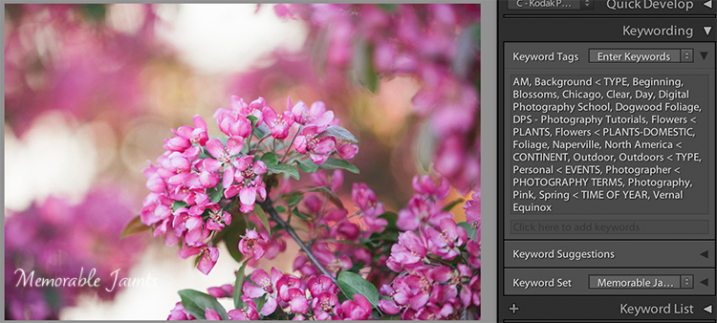
    Descriptive and Specific Keywords assigned to an image in Lightroom

    Descriptive and Specific Keywords assigned to an image in Lightroom

    In the simplest sense, Keywords in Lightroom are a way to describe key elements about a photograph. Just as the basic wikipedia definition of the term, keywords add description to an image and when used in conjunction with filters, are a great way to find specific images quickly in a large catalog. Keywords also provide a way for others to find your images on the web. Keywords get attached to images as part of the image metadata when an image is exported from Lightroom. These keywords in the metadata then act as an identifier and show up in internet searches when people search for certain words and phrases. If your images have your logo, watermark, or some other identifier, that is a another way for people to get exposed to your work.

    Keywords can be found in the Library module in Lightroom. There are three panels related to keywords – Keywording, Keyword Suggestions and Keyword List. Each of these can be expanded or collapsed using the triangle looking arrow (see below image).
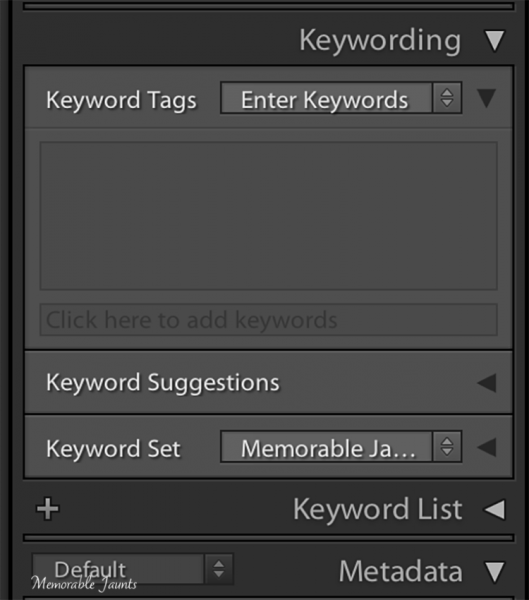
    Keyword Panel in Lightroom's Library Module

    Keyword Panel in Lightroom’s Library Module

    Keyword List

    Keyword List basically indexes all the keywords that you have setup in your catalog. To add a word to the Keyword List, click on the “+” symbol on the left hand side of the panel and a dialog box opens up. You can enter in the information (e.g. the name of the keyword, synonyms, etc.) and once you click okay, a keyword will be added to your list. Some of my keywords are Location, Time of Year, Seasons, Time of Day, Clients and Subjects.

    Within these parent keywords, I have child keywords like name of the client, the four seasons of the year, type of photography, etc. To add a child keyword to a parent keyword, select the parent keyword and then select the “+” symbol. The same dialog box opens up except this time the keyword will be added to the parent keyword. Depending on the image, I select the relevant keywords and they get added to the keyword metadata for that specific image.
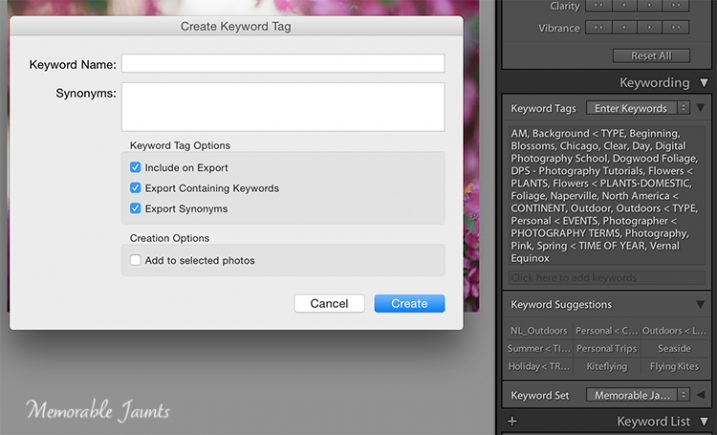
    DPS Article on Keywords in LR by Memorable Jaunts - Adding Keywords to the Keyword List

    Clicking on the “+” on the left of the Keyword List panel is a way to add new keywords and keyword categories.

    Keyword Set

    Keyword Set is a great way to setup a pre-qualified set of keywords. This is very helpful if you photograph different genres. I have three distinct set of keywords – Memorable Jaunts Wedding Photos, Memorable Jaunts Family Photos and Memorable Jaunts Outdoor Nature Photos. Each set has related keywords assigned to it. If I am working on a wedding gallery for a client, I can choose Wedding Photos and then have a shortlist of preassigned keywords to attach to specific images in that gallery. My wedding photos keyword set has words like bride, groom, candid, posed, family, wedding party, etc.

    Keyword Suggestions

    Keyword Suggestions are Lightroom’s way of anticipating what your keyword needs are. These suggestions are based on the latest, most frequently used keywords. If your keyword list is long like mine, you can use this to quickly assign keywords to images especially if you tend to work with similar type of images.
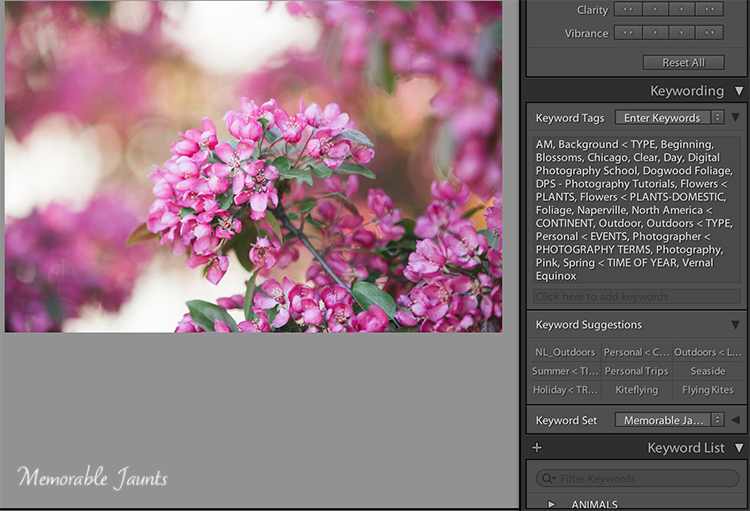
    DPS Article on Keywords in LR by Memorable Jaunts - Assigning Keywords to images

    Keywords Suggestions are based on the most recently used and frequently used keywords.

    Once you assign keywords to a particular image in a galley, you can use Sync Metadata and assign the same keywords to all the images within that gallery, especially if they are all along the same lines – same session, same people, and same genre.

    A few tips to keep in mind

    #1 – Keyword lists can grow very quickly

    It is important to take the time upfront to assign keywords to all images within your catalog. This makes sorting and filtering images based on specific keywords much easier.

    #2 – Try not to add keywords on the fly

    Ensure that keywords are always added using the appropriate hierarchy. For example, if you have four seasons – Fall, Summer, Winter and Spring under “Seasons” parent keyword group, resist the temptation to add Summer Equinox or Early Fall to a specific image without adding it to the “Seasons” parent keyword group. If you add a keyword that is not on the keyword list, Lightroom will add it as an orphaned keyword to your list. Soon you will have many adhoc keywords that don’t really belong to any specific category or group. Along the same lines, maintain your keywords – delete the keywords that you no longer use and no longer assign to any image.

    #3 – Keywords can also be imported and exported from Lightroom

    LR saves keywords as a txt document. What this means is that you can create your keyword list in a normal text editor, save the file as a “.txt” file and then import it into your catalog. You can also share your keywords list between computers, say your desktop at home and the laptop you use in the field.

    #4 – Create a base keyword of your name or the name of your business and assign that to all your images

    Remember that keywords gets stored as metadata information for images. This ensures that your name or business information is always present on each and every one of your images.

    Another powerful advantage of assigning keywords to your images is the ability to search or filter images in your catalog based on specific keywords. When you filter in Lightroom, choose the Text option and the drop-down box to select Keywords, then start entering specific keywords. Lightroom will start sorting images based on the keyword until you find all the image that have that corresponding keyword in their metadata.
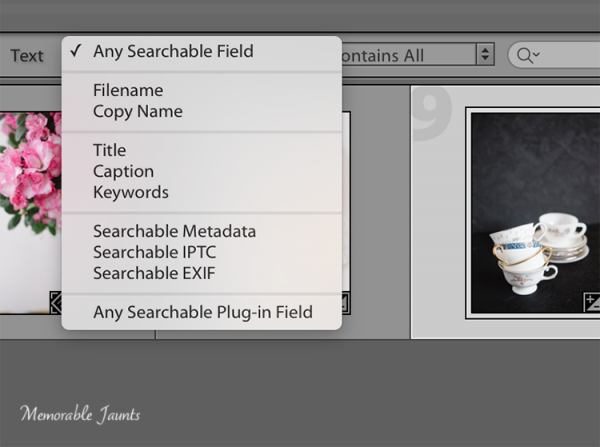
    DPS Article on Keywords in LR by Memorable Jaunts - Filering using keywords - Searchable by keyword

    Selecting Keywords as part of search criteria ensures the ability to get specific results based on exact keywords
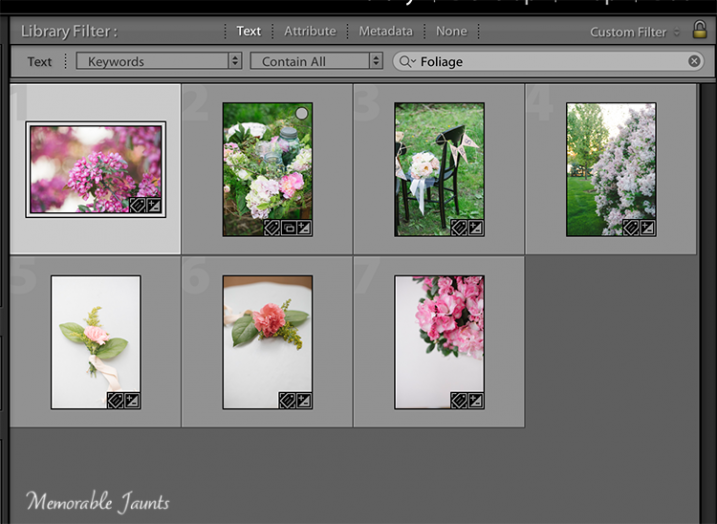
    DPS Article on Keywords in LR by Memorable Jaunts - Filering using keywords

    Using keywords to sort through all images in a catalog

    Regardless of whether your catalog is small or large, it is worth the time and the effort to assign appropriate and relevant keywords to all your images. This makes future management and maintenance of your catalog much easier and efficient.

    Tell us in the comments below how you use keywords?

    googletag.cmd.push(function() {
    tablet_slots.push( googletag.defineSlot( “/1005424/_dPSv4_tab-all-article-bottom_(300×250)”, [300, 250], “pb-ad-78623” ).addService( googletag.pubads() ) ); } );

    googletag.cmd.push(function() {
    mobile_slots.push( googletag.defineSlot( “/1005424/_dPSv4_mob-all-article-bottom_(300×250)”, [300, 250], “pb-ad-78158” ).addService( googletag.pubads() ) ); } );

    The post The Power of Keywording in Lightroom by Karthika Gupta appeared first on Digital Photography School.

    Digital Photography School

  • 5 Reasons You Should Learn Long Exposure Photography

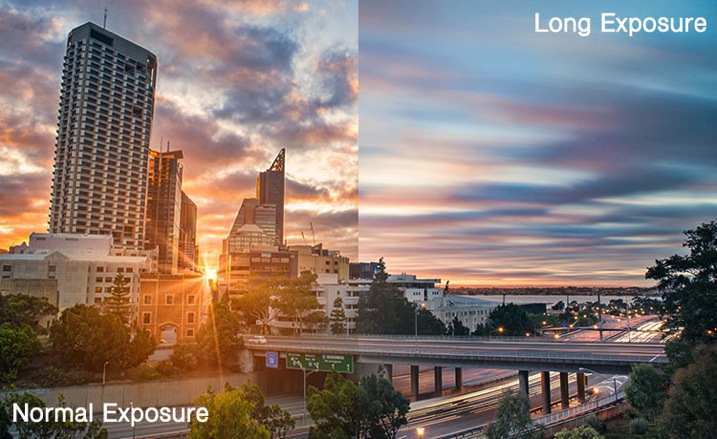
    Long exposure imagery is an interesting and highly satisfying technique of creating images. It requires you to use the manual mode or sometimes shutter priority mode to control your shutter speed.

    Normal vs Long exposure

    Shutter priority mode is marked on Nikon camera with ‘S’ and on Canon systems with ‘Tv’. They mean the exact same thing. When you switch to shutter priority mode you can select the shutter speed while the camera selects the appropriate aperture.

    Obviously if you need a bit more flexibility, you should use the manual mode, where both shutter speed and aperture value are in your control. That helps you to maintain a long shutter speed while also controlling the depth of field.

    At this point you would probably be asking yourself why you would need to shoot long exposure images. Wouldn’t shooting such exposures risk your images to be washed out? This is because there are some other tools and techniques involved in the process as well. Such as using ND filters or using exposure compensation to find the right aperture / shutter speed combination that allows sufficient light over a long period of time without risking a washed out image.

    So why should you learn how to shoot long exposure images?

    1. You can record an image over a long period of time.

    Something that evidently means an action is recorded as it unfurls in front of the camera. For example, clouds moving across the sky in a landscape image creates a beautiful blurred effect that gives the hint of time passage. The same thing happens when you shoot an image of a pier and the surf coming back and forth is recorded over a long period of time. The final result will be a beautiful misty look.

    2. You can make waterfalls become silky.

    Water fall

    If you love nature photography there are probably a million different subjects that you could shoot using the long exposure technique. Waterfalls are often shot using a slow shutter speed which basically results in a long blurred line of water and accentuates the overall surreal look of the image. I call this “silky waterfalls”.

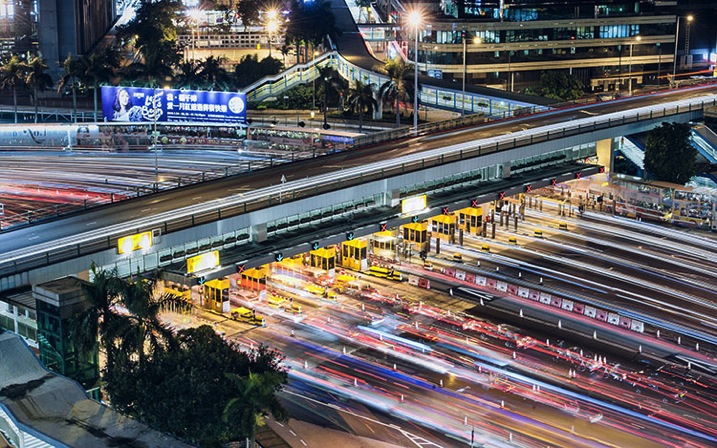
    3. You can capture trails of lights.

    Light trail

    Long exposure technique is perfect for night time photography as well. You can shoot star trails, light trails, light painting, or even fireworks. All of these subjects require a long shutter speed which allow the sensor to be exposed to the light movement. These topics, when doing right, can capture a beautiful pattern of light in the final image easily.

    4. You can make the annoying pedestrians disappear.

    There are certain unique perspectives to get if you are prepared to use the long exposure technique in broad daylight. It is not difficult, you will just need an ND filter. What I have in mind primarily is street photos. Let’s say you are photographing a busy street at noon. You want a look when nobody is around. On a busy street right in the middle of the day, it is seemingly an impossible task. Not if you know how to use an ND filer.

    A ten stop ND filter, something like a Lee big-stopper, is what you need. You can first meter for the scene, then attach the filter to the front of the lens. A ten-stop filter will allow you to use a shutter speed of up to 10 stops slower than what you metered initially, without the filter. That will make everybody simply disappear. If you do it the right way, what you will get in your image is a city completely devoid of people! Like a postapocalyptic
    scene, it will be an amazing image.

    5. You can easily create B&W fine art photographs.

    Another reason you would want to shoot long exposure photos is to enhance your black and white compositions. Black and white images are somehow more powerful than color images.

    Sydney bridge

    It is the contrast, the different shades of grey, ranging from pure white to pure black, the shapes, the forms, everything seems to appear more interesting. The greatest disadvantage of B&W images is that, well, they are devoid of color. That, however, is also the greatest advantage. Because without color, the essential aspects of composition and the underlying story comes to the forefront.

    Do you have any other compelling reasons to do long exposure photography? Please share in the comments below.

    googletag.cmd.push(function() {
    tablet_slots.push( googletag.defineSlot( “/1005424/_dPSv4_tab-all-article-bottom_(300×250)”, [300, 250], “pb-ad-78623” ).addService( googletag.pubads() ) ); } );

    googletag.cmd.push(function() {
    mobile_slots.push( googletag.defineSlot( “/1005424/_dPSv4_mob-all-article-bottom_(300×250)”, [300, 250], “pb-ad-78158” ).addService( googletag.pubads() ) ); } );

    The post 5 Reasons You Should Learn Long Exposure Photography by Kevin Choi appeared first on Digital Photography School.


    Digital Photography School

  • Gulf Photo Plus is Coming to the US

    I teach very infrequently now, at most just once or twice a year. That said, without fail I attend Gulf Photo Plus in Dubai every March.

    It’s a great event, with quality instructors and a fantastic group (family?) of people running it. But Dubai is a long way away, to be sure.

    So three years ago, we worked out a sort of “road version” of GPP. It’s a compressed, wall-to-wall weekend that brings a bit of GPP to another city each year. 2013 was in London. 2014 was in Singapore.

    And 2015 will be in Seattle, Washington in the US. And I am really happy about this. Yeah, it’s greater Seattle (in Bellevue). The GPP folks wanted a good, but not too big, venue for the weekend.

    The Particulars

    Date: Sept 19th and 20th
    Location: Seattle area
    Price: $ 399 (early bird)

    The presenters for 2015 are Joe McNally, Zack Arias, Greg Heisler and yours truly. It’s designed to be a firehose weekend, done in that way so people/parents/humans/etc. can efficiently work it to travel/work schedules. If GPP in Dubai is basically a 10-day (minimum) commitment, GPP’s Pop_UP events are something a driving-radius local can do without burning a single vacation day. And someone just about anywhere in the US or Canada can do it with a travel day tacked on at each end.

    Having seen the London one, I can tell you this: If I wasn’t speaking, I’d be going. (And ultimately, between you and me, it has always been my goal to make myself redundant for GPP Pop_UPs in various cities around the world and just attend.)

    To that end, if you are not in the US/Canada, you can also vote on where the next Pop_UP city will be. For that, and all of the info you need if you are considering going, hit the GPP Pop_UP website.

    Tickets are on sale now, and will be absolutely limited by the size of the venue. So if you are juggling air tix, etc. Best to jump on it while the variables are still in your favor.


    Strobist

  • The Bridal Portrait: Everything You Need to Know

    Everyone knows that a woman is the most beautiful she’ll ever be on her wedding day. She’s in love, and happy and excited about the wonderful day she’s about to have, and, if you did your job and insisted that she has a wedding planner, she’s stress free. The Bridal portrait is one of those shots that’s just as important Continue Reading

    The post The Bridal Portrait: Everything You Need to Know appeared first on Photodoto.


    Photodoto

  • Flickr Users Unable to Upload Photos All Weekend Long While Flickr Staffers Take the Weekend Off

    Flickr Weekend Upload Problems

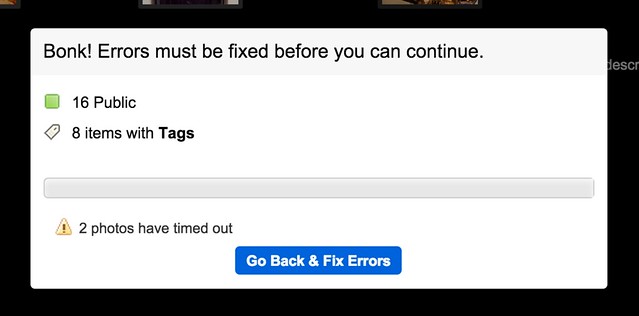
    Usually I publish photographs to Flickr twice a day, in the morning and in the evening — random batch of 16 photos in the a.m. and in the p.m. This morning I cannot upload a single photo. For the entire weekend I have not been able to batch upload to Flickr at all and have resorted to uploading photos one by one by one with consistent upload failure with each new attempt.

    If this were happening at Facebook, it would be the top story on Techmeme — but because it’s just Yahoo and Flickr, it doesn’t get that sort of attention.

    It’s not just me that this is happening to. The Flickr Help Forum has been littered with threads all weekend long where users are angry about not being able to upload photos to the site.

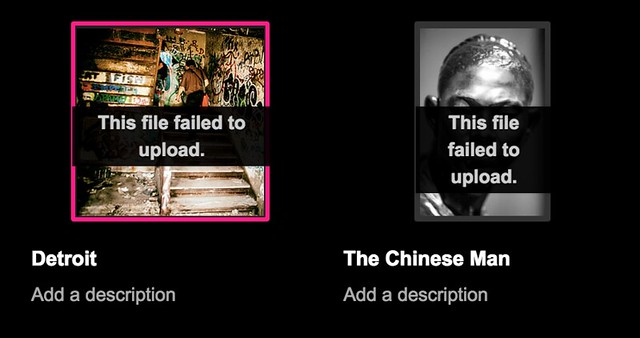
    Failed to Upload

    Cannot Upload Any Photos!
    Video upload problems
    Consistent upload failures and disconnect errors
    Very slow upload speed
    Uploadr gives error when attempting to Sign in
    UPLOAD Servers speed DOWN to 3 %(max)
    Can’t Upload Photos with Mac Yosemite
    Upload Problems
    Uploading not possible at 2/3 it stops
    [BUG] Upload speed
    Can’t upload

    These are all Flickr discussions in their help forum active over the course of the last 3 hours. If you go back further, you will find that for the entire weekend a large chunk of Flickr users have been able to upload images reliably to Flickr.

    Files Not Uploading

    While being unable to upload photos to a photo sharing site is a problem, to me the bigger problem is that at a company with Yahoo’s resources not a single Flickr staffer seems to be assigned to review their active and public help forum.

    While I get that Flickr staffers deserve a weekend off like everyone else, someone at Flickr should be assigned to the company’s very public help forum 24/7. An acknowledgement from staff that they are aware of the problem and working on it goes a long way — but to leave frustrated users twisting in the wind all weekend long just makes a bad situation that much worse.

    This uploading problem is a bad technical problem to deal with I’m sure, but basic customer service should be something that Flickr is capable of given the deep resources of Yahoo behind them. Flickr/Yahoo can and should do better.

    The only thing that in any way resembles any source of staff involvement comes from one of the help forum threads where a Flickr staffer who goes by the name “Alex” reportedly claims in response to a service inquiry that everything is fine on his end and that he’s able to upload 100 photos in under 5 seconds.

    Even when Flickr was at it’s peak, you cannot upload 100 photos in under 5 seconds. No service on the internet would do such a feat, not Google, not Facebook, nor any other site. The fact that this is allowed to stand as the closest thing to staff response is unfortunate.

    Flickr just rolled out a wonderful new version of Flickr this past week. Especially the weekend after a major new effort such as this, Flickr/Yahoo should be watching things closer and be much more responsive to their users. Hopefully Flickr doesn’t now let an entire Monday go by without acknowledging such a disruption to their service.


    Thomas Hawk Digital Connection

  • The Biggest Legal Mistake Photographers Make

    Whether photography is your bread and butter, or something that you’ve started out doing casually with machinations of eventually picking up a few paid gigs, you’ll want to acquaint yourself with a sexy little document we lawyers like to call, the Client Service Agreement (or CSA, for short).

    Lucas

    By Lucas

    CSAs are, as their name suggests, agreements that you, as a photographer, make with anyone who wants to pay you for your photography. Again, we’re not just talking to the professionals here. We’re also talking to those of you with your entry-level DSLRs shooting your friends’ weddings or head-shots on the occasional weekend. Food, selfies, and your niece’s birthday party might be the only things in front of your lens at the moment, but as your skills improve, so will recognition for your photography. It might not be long before folks start offering you money here and there for your work. When that moment comes, you want to be prepared to accept the gigs offered to you, while presenting yourself as a professional, and covering your rump in case things go wrong. How do you do that? You guessed it – with a CSA. It is a huge legal mistake photographers make not having a formal agreement or contract.

    Why we all need CSAs. Yes, even you, part-timer.

    Before we get into what a CSA should contain, let’s first take a brief trip down scenario lane so you get a good idea of what we mean about covering your tuckus in case things go wrong. If we lawyers know anything (and we don’t know much), it’s that everything’s all smiles and giggles until somebody’s wedding photos get lost in the cloud storage ether, or someone else demands a full refund because the head-shots you spent three hours shooting and imaging “just don’t look right.” Take it from us, whenever somebody is paying somebody else for a service, especially a service like photography where the outcome can be pretty subjective, things can get all Judge Judy real fast. People have certain expectations about the outcomes of products and services that they pay for (as they should), and unfortunately, sometimes those expectations are unreasonable. If you have your policies clearly set forth in a CSA, you’ll have something concrete to point to when someone comes complaining about the work that you produced, making unreasonable demands.

    But, CSAs aren’t just for governing complaints from unreasonable clients. CSAs also exist to inform your clients – at the get-go – of how your engagement as their photographer will proceed, and what they should expect from the relationship. By having a CSA in place, your client has some peace of mind in knowing when, how, and at what cost you will perform your services and deliver your product. Likewise, you have peace of mind knowing that you have a legal document to lean on if their payment is late, or you make a mistake, or a seagull makes off with your lens during a beach wedding shoot.

    Mirsasha

    By mirsasha

    Okay fine. We all need CSAs. But how do I make that happen?

    Now that we’ve scared you into getting a CSA (we lawyers feed on fear and gummy-bears, as you probably know), here’s a list of what a decent CSA should contain, so you can draft it yourself if need be. This is just a general list of the most important points, there may be other things relevant to you that aren’t included here. At a minimum, make sure you include this stuff. Because, as important as CSAs are, a crappy CSA can really cramp your style.

    • What happens when a client fails to show up at their appointment?
    • How many calls/emails/meetings with you can the client expect?
    • When and how will the photos be delivered?
    • When and how will the client pay you?
    • What happens if payment is late?
    • Will you provide hair and makeup?
    • What rights to the photos is the client purchasing?
    • What are the terms of the client’s license to use the photos?

    But what about all that legal gibberish?

    You know when you are asked to sign a contract, or some kind of release, and you skim through the top bits, then you get to the bottom part, where the words get long and tiny and sound like they were written four hundred years ago, so you just stop reading and sign the damn thing already? Well, all of that stuff – the stuff you never read – that’s called “boilerplate” and it’s actually a really important part of your CSA. The boilerplate bit is the bit that controls what happens when the parties to the agreement (that’s you and your client) disagree.

    Judit Klein

    By Judit Klein

    Important examples of boilerplate clauses include:

    • Limitation of Liability Clause, which limits the amount of liability you could have if an issue arises with your client. In other words, this is the bit that might keep you from having to pay crazy amounts of money if you lose a lawsuit.
    • Recovery of Litigation Expenses (aka Attorney’s Fees), which usually allows the winning party of a lawsuit to recover their attorney’s fees and other costs incurred to bring the lawsuit to enforce the agreement. In other words, as long as the judge is cool with it, the winner of the suit has their attorney’s fees paid by the loser. Which is awesome, because attorneys aren’t always cheap.
    • No Guarantees Clause, which states that you can’t guarantee a particular outcome (for those, “these photos just don’t look right” moments).
    • Transfer of Intellectual Property, which states how, and under what circumstances, the intellectual property is transferred from the service provider to the client (i.e. who owns the photos). This one is really important for photographers. Typically, you want to maintain ownership of your photos and merely grant your client a license to use the photos in limited ways (like display them in their home or on their website).
    • Entire Agreement; Modifications; and Waiver. This clause states that what is written in the contract is the entire agreement between the parties. So, whatever else you agreed with the client outside of the contract via email, in conversation, etc., doesn’t apply. This section also requires that any modifications to the agreement be done in writing.

    One other thing

    The terms of your CSA should be reasonable, and the way you deal with clients is an important part of building your reputation and your business. So, try to strike a balance between protecting yourself and respecting your time, and pleasing somewhat picky clients. It’s okay to go above and beyond what you’ve promised in your CSA from time to time (so long as it isn’t to the client’s detriment).

    P.S. What to do when you forget to bring a pen

    24oranges.nl

    By 24oranges.nl

    Here’s one last tip to make this CSA thing super easy: use HelloSign or a similar app to have all of your clients electronically sign your CSA. Electronic signatures are totally legit and they’ll help you get your agreements signed quickly by every single client.

    Now, go get your Client Service Agreement together. Your conscience (and your bank account) will thank you.

    Rachel Rodgers is a New Yorker, wife, mama to 2 toddlers and IP lawyer (not necessarily in that order) who works with creative professionals in her online-based law practice, Rachel Rodgers Law Office P.C. Rachel co-authored Legal Nunchucks: For Photographers, THE resource for making sure your photography business is protected, legit, and overflowing with moola. Download her FREE cheat sheet on the 10 most common legal mistakes that photographers make.

    googletag.cmd.push(function() {
    tablet_slots.push( googletag.defineSlot( “/1005424/_dPSv4_tab-all-article-bottom_(300×250)”, [300, 250], “pb-ad-78623” ).addService( googletag.pubads() ) ); } );

    googletag.cmd.push(function() {
    mobile_slots.push( googletag.defineSlot( “/1005424/_dPSv4_mob-all-article-bottom_(300×250)”, [300, 250], “pb-ad-78158” ).addService( googletag.pubads() ) ); } );

    The post The Biggest Legal Mistake Photographers Make by Rachel Rodgers appeared first on Digital Photography School.


    Digital Photography School

  • Review: Flashpoint Zoom Li-on Flash

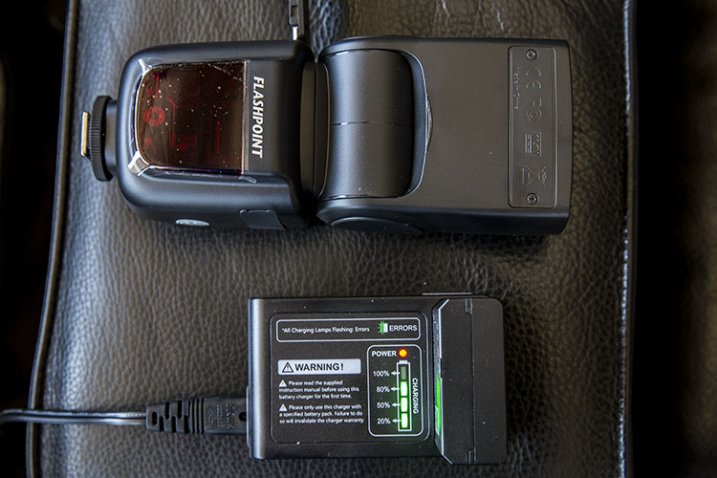
    01 Packaging

    Raise your hand if this sounds familiar: you’ve fallen in love with Speedlight flash photography, but you gripe at having to lug around lots of odds and ends for your remote triggers, not to mention boxes of backup AA batteries. Isn’t it time for flashes to catch up with DSLRs and be powered by rechargeable batteries, and have more discrete wireless triggers? It turns out that these features DO exist, but not with Speedlights made by major camera manufacturers.

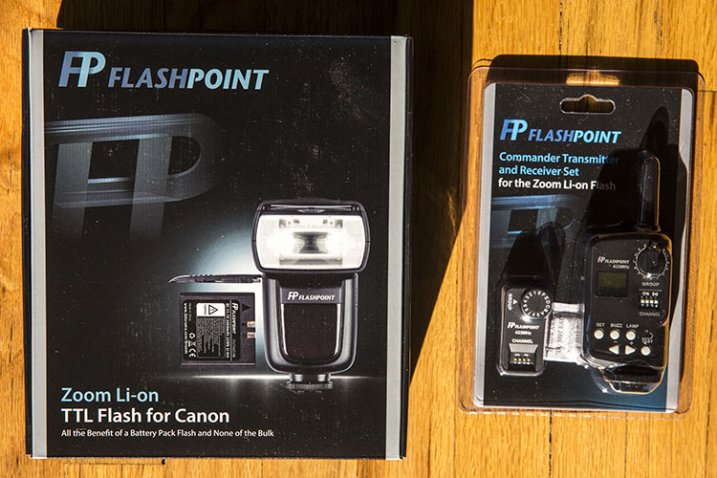
    Announced by Adorama earlier this year, the Flashpoint Zoom Li-on TTL Flash is a new and affordable system that has the key feature of being powered by a rechargeable Lithium Ion Polymer battery. This battery promises to power your flash longer than any other hot shoe mount Speedlight on the market, and it does so while keeping the flash unit at a relatively compact size. When paired with the Flashpoint Commander Transmitter and Receiver set, you have an intuitive, compact way of using the flash off-camera. Sound appealing? Read on for more specs and details.

    What’s in the Boxes

    02 In the Box

    To be clear, the flash unit and the commander (transmitter and receiver) are two separate items that are sold separately. You don’t need to have the Commander set to use the flash unit on its own.

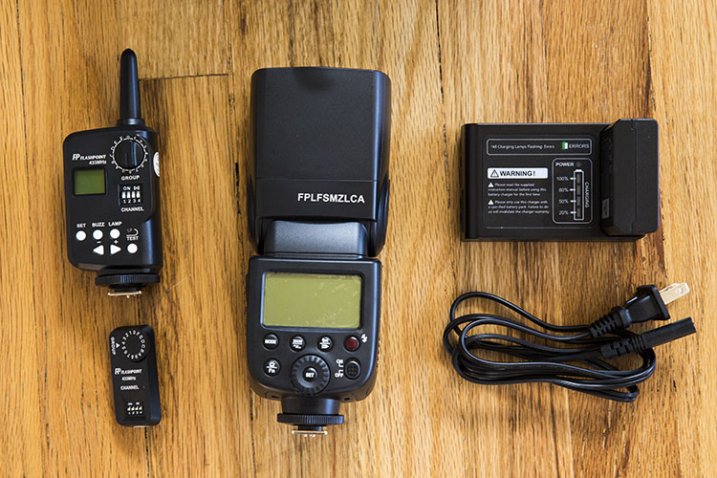
    The Zoom Li-on unit, made specific for either Canon or Nikon, arrives in a nicely packaged box containing:

    • (1) Flashpoint Zoom Li-On TTL flash unit
    • (1) Lithium Ion Polymer battery pack
    • (1) Battery charger with cable
    • (1) Protective case for flash with a mini-stand unit

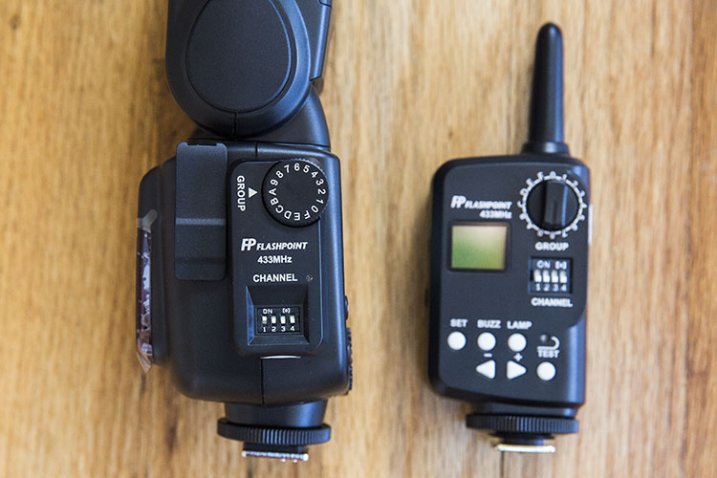
    The Flashpoint Commander set arrives with a rather large transmitter (it’s about the size of a Pocket Wizard), and a much smaller receiver (about the size of a thumb drive). The transmitter runs on a pair of AA batteries.

    Best Flash Feature: The Battery

    Boasting more power than any AA battery, the lithium ion battery is the standout feature of the Zoom Li-on unit. It packs 11.1 volts and 200mAh, and a fully charged battery delivers up to 350 full power shots, with a recycle time of less than 1.5 seconds. You’ll need 2.5 hours to fully charge the battery, but it will function just fine on partial charges. On the unit’s display, there is also a battery icon in the upper right corner that will indicate how much power your battery has left. For longer shoots, it’s recommended that you purchase an extra backup battery, since the flash unit can’t be powered by any other means.

    04 Charging

    Other Flash Features: Comparable to Most Major Speedlights

    Besides the rechargeable battery, the Zoom Li-on flash has all of the other functionality present in other Speedlights today. These features include standard TTL mode, Manual mode, Exposure Compensation, Front and Rear Curtain Sync, Laser Autofocus Assist, High-Speed Sync, group control, and Slave and Master optics, to name a few. This flash also has complete IR TTL control connectivity with Canon and Nikon flashes, meaning you don’t necessarily need to convert your entire Speedlight system. Other triggering modes for the flash include hotshoe, radio controller, 2.5mm sync port, and optical slave.

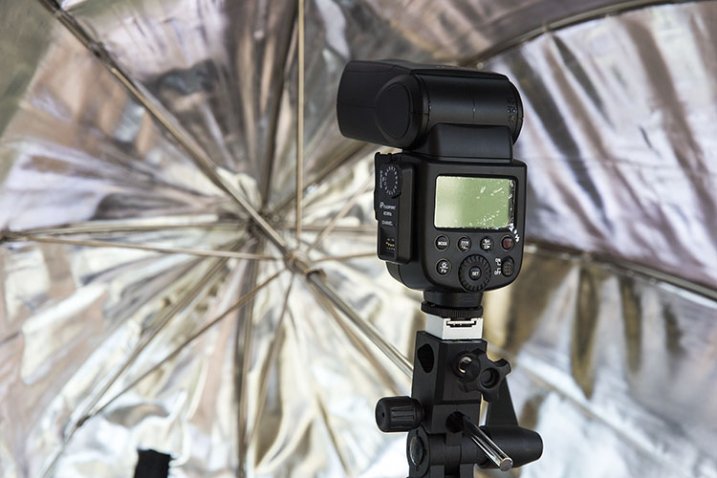
    The flash head has a built-in wide angle diffuser and white bounce card. It also rotates 180 degrees in any direction and tilts over 90 degrees. It can also automatically or manually zoom from 24-105mm. Basically, if you’re familiar with the Nikon SB-900 or Canon 580EXII, the Zoom Li-on flash is similar in size and layout of its controls. Thanks to my familiarity with Canon Speedlites, I was able to unbox the unit and set it up intuitively without referring to the included instruction manual.

    Flashpoint Commander Set: All About Convenience

    The accompanying Flashpoint Commander set enters a crowded market full of all kinds of remote trigger options, but their main advantages are, an affordable price point and lots of power, packed into relatively small units. Using this set, you can view and change your flash output and trigger your flash remotely from 150+ feet away. There are also 16 channels and 16 groups of control so that you can handle multiple units of remote lighting. The newest version of the transmitter also comes with a 3.5mm sync port, allowing for a direct cable connection to the PC socket of your camera.

    03 Details

    The transmitter is slightly larger than a single Pocket Wizard Plus III and it sits nicely in your camera’s hot shoe mount. Unlike most other trigger systems, the receiver looks nothing like the transmitter, consisting of a flat unit that simply plugs into the side of the Zoom Li-on flash. After syncing channels and groups via manual switches on the transmitter and receiver, that’s all you need to do to set it up.

    Two complaints: you’ll need slim fingernails or a tool to hit the switches on the channel sections of both units, and the group dials are a little too easy to turn, opening up room for possible syncing mistakes. On the whole, this Commander set is impressively compact and easy to set up, although you’ll want to keep an extra eye out for the tiny receiver as it seems very easy to misplace.

    05 Umbrella

    Flashpoint Zoom Li-On Flash and Commander Set in Practice

    To test out the flash unit, I worked put it through three separate scenarios: table top food photography, on-the-fly event photography, and a posed portrait session.

    For the food photography session below, the Zoom Li-On flash was paired with the transmitter and receiver and handheld to camera left. Shot in manual mode with no diffuser, the outcome was a soft, natural light that I’d expect from any speedlight.

    07 Example Food

    The on-the-fly event photography scenario was a quick red carpet photo op with Laila Ali. Fired in ETTL mode on-camera, the Zoom Li-on’s smooth rotating head feature plus fast recycle time came in extremely handy, and I was able to pull off the desired shots without turning to my Canon 580EXII, which I had mounted to a second body just in case.

    06 Example Laila

    Finally, the portrait session combined the Zoom Li-on flash, acting as the master, and a Canon 580EXII flash off-camera as the slave. Both flash units synced seamlessly, and thanks to similar control layouts, it was easy to figure out that the master/slave function on both units activates the same way (holding down the Zoom button).

    08 Example KA

    Overall, I declare the Zoom Li-on Flash a winner and a new staple to my camera bag thanks to its power, reliability, and the cost (and weight) savings of not having to haul tons of spare AA batteries. Are you inclined to give this flash a shot?

    You can find the Flashpoint Zoom Li-on Flash at Adorama or on Amazon.com.

    googletag.cmd.push(function() {
    tablet_slots.push( googletag.defineSlot( “/1005424/_dPSv4_tab-all-article-bottom_(300×250)”, [300, 250], “pb-ad-78623” ).addService( googletag.pubads() ) ); } );

    googletag.cmd.push(function() {
    mobile_slots.push( googletag.defineSlot( “/1005424/_dPSv4_mob-all-article-bottom_(300×250)”, [300, 250], “pb-ad-78158” ).addService( googletag.pubads() ) ); } );

    The post Review: Flashpoint Zoom Li-on Flash by Suzi Pratt appeared first on Digital Photography School.


    Digital Photography School

  • How to do More Unique Flower Photography

    Do you love to photograph flowers? Flowers are the most beautiful things to photograph. They have texture, color and come in wonderful shapes.

    MBeaty 2

    To create unique flower photography:

    • Use a 50mm or a telephoto lens.
    • Photograph with backlighting to enhance the transparency of the petals.
    • Choose camera angle carefully – photograph from below to obtain unusual shapes, photograph at eye-level to create a realistic look.
    • Get closer – try making an abstract
    • Look for great backgrounds – declutter the is using bokeh and a shallow depth of field.
    • Quality and color of light – photograph under diffused lighting, during the golden hour, or with the sun at an angle to enhance color, texture and depth.

    MBEATY 6

    About lenses

    A wide-angle lens will allow you to add more background and may distort a bit depending on the camera angle. You will have more details in your photograph. A 50mm or a short telephoto will allow you to show the flower with little environmental information. It will not distort the flower.

    Backlight it

    MBEATY Photo 1

    Use back lighting to enhance the petals. Some petals have a beautiful translucence. You will see the awesome veins and their designs. Shoot your photos of flowers towards the sky. If the sky is blue it will add a nice contrast and if it’s cloudy it will add drama to your photograph. Be aware that the sun needs to be on either side of your flower. The sun should not be pointing towards your camera or you will get a silhouette or lens flare.

    Choose your camera angle

    Photograph from below the flower and you will see unusual shapes. Many people forget to shoot from this position. It may not be the most comfortable one (you might find yourself flat on a pebbled ground) but it’s worth a try. You will find very original views and shapes from this viewpoint.

    MBEATY photo 7

    Change the camera position often. Photograph with the camera at eye level for a more realistic look and then photograph from above and below.

    When you find a flower, move around and look for a good angle. If the background has too many things going on you will need to change the camera height or the position.

    Get close – make an abstract

    Get close to the flower. Make your photograph about texture and color. Have you thought about how to extract and abstract your flower? Photograph parts of the flower with parts of background details. The closer you get the more abstract your image will become. You will eventually start to show lines or just color.

    MBEATY photo 4

    When you dissect an object, it will appear in a very different way than when you originally saw it. You will be showing your point of view. Your unique creativity will be taking over the composition. Study your flower and change its look with your framing.

    The Background

    Have you noticed that when the background looks good, everything will look good? This is why it’s a good idea for you to photograph with a large aperture. You will be able to soften up the background and make the composition exclusively about the flower.

    Make sure to declutter your background so that your flower will be the center of attention. You can declutter by using a shallow depth of field and by moving around until you find a suitable background. Use the stems and leaves to frame the flower. They will add an interesting design to your image.

    MBEATY photo 3

    A good way to declutter the background is to shoot with a large aperture. This means that you can use f/1.4, f/2.0, f/2.8, etc. Bokeh is also a great way to declutter the background. It will add a surreal look and make the flower stand out.

    If you who have a zoom lens with the largest aperture of f/4.0 or f/5.6: Set your lens to 50mm or 70mm. To blur the background nicely, the flower needs to be far away from the background. Make sure that you are close to the flower and the flower is at least three to five feet away from the background.

    If you are photographing with backlight it’s not crucial to have a blurry background because the sky will provide for the background.

    MBEATY  photo 2

    How to show texture

    Photograph when the sun is at a low angle to enhance texture. Late afternoon or early morning will provide for a good sun angle. You will obtain great texture when you photograph under diffused light. This can be in the shade, or on bright, but cloudy days. The diffused light will provide for even lighting and the textures and details of the flower will be enhanced.

    If you want to show the leaves and parts of the flower an f-stop of f/8 will be good.

    Light – quality and color

    The color of your flower will be subject to the quality of the light you are shooting under. You will like the effect that you get when you work under a nice soft and diffused light. The nuances of the colors will show up more. You will see more tone variations. Depth will be more visible. When you add that to the shallow depth of field technique, your flower will have an artistic and special look.

    MBEATY photo 5 Bad light and good light2

    Photograph during the golden hour (early morning and sunset) to achieve a lovely warm tone on your flower. This light is a soft light. It will show depth and dimension and give it a realistic look. It is best to have the sun coming from either side. It’s very flattering to the flower.

    The worst type of light is midday sunlight, and when the sun is hitting the subject directly (from the camera angle not the side). These two lights will make the flower look flat and the whole photograph will lack depth. Avoid midday sunlight and direct light.

    Do you have any additional tips for doing more unique flower photos? Please share in the comments below.

    googletag.cmd.push(function() {
    tablet_slots.push( googletag.defineSlot( “/1005424/_dPSv4_tab-all-article-bottom_(300×250)”, [300, 250], “pb-ad-78623” ).addService( googletag.pubads() ) ); } );

    googletag.cmd.push(function() {
    mobile_slots.push( googletag.defineSlot( “/1005424/_dPSv4_mob-all-article-bottom_(300×250)”, [300, 250], “pb-ad-78158” ).addService( googletag.pubads() ) ); } );

    The post How to do More Unique Flower Photography by Marguerite Beaty appeared first on Digital Photography School.

    Digital Photography School

  • Get Creative with Displacement Maps in Photoshop

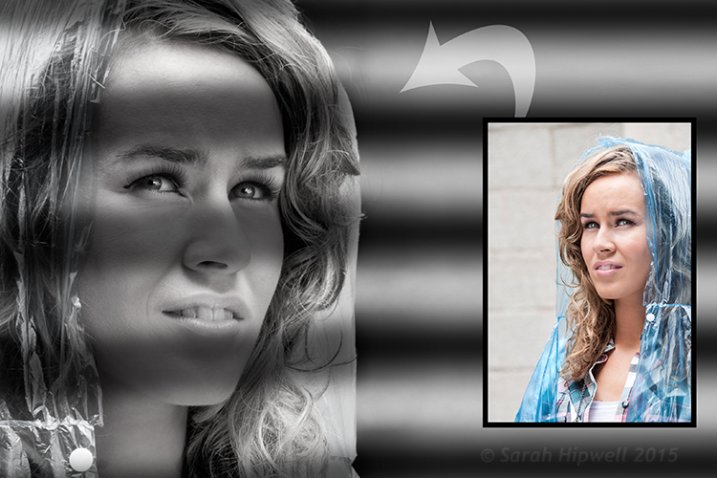
    Creating a film noir look with a displacement map in Photoshop.

    Creating a film noir look with a displacement map in Photoshop.

    What is a Displacement Map?

    If you are new to Photoshop, the mere mention of displacement maps can be daunting. The purpose of this article is to give you an introduction to them; guide you in easy-to-follow steps on how to generate simple grayscale displacement maps from an existing image, and show you how to effectively implement them using the Displace Filter in Photoshop.

    A displacement map is a grayscale version of the same image that you are working on, saved as a Photoshop (.PSD) file. This displacement map is then used to apply a texture to a flat graphic via the Displace filter, and it distorts the graphic to conform to the shape of the map. This gives the flat graphic, or 2D object, a more realistic 3D look. You may have seen images online where a texture is mapped onto someone’s face or a logo contoured onto a textured surface.

    Why use Displacement Maps?

    Displacement maps are a great way to map texture onto 2D objects, such as logos or text, add give depth and a 3D perspective. I hope to illustrate that displacement maps are not as daunting as they might appear, although, I do realize that this article may suit intermediate users of Photoshop rather than complete novices.

    How to implement a Displacement Map?

    Once a displacement map has been generated. You need to use the Displace filter to distort the 2D object, or flat graphic, onto the map. The Displace filter has been in Photoshop since version 2.0. It hasn’t changed much since then, however, it’s still a filter worth getting to know. It may appear to be a convoluted process to use, but when you have tried it a couple of times, it is straightforward. What it does is move the light pixels up and to the left and the dark pixels are moved down and to the right. This creates an illusion of depth through light. This is why your displacement map needs to be quite contrasty.

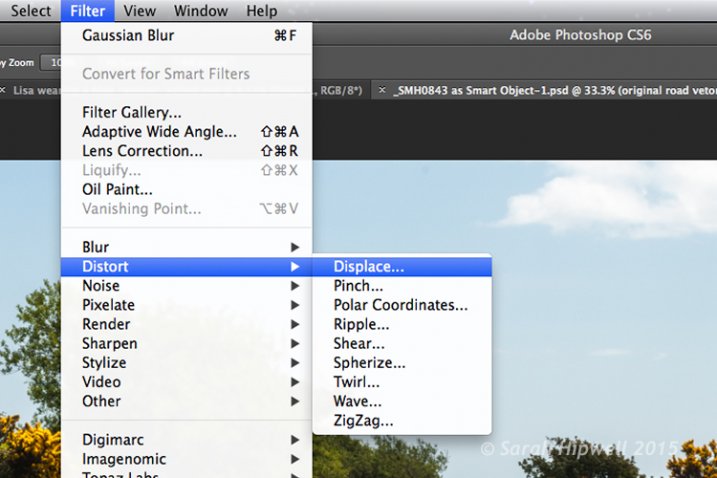
    Filter-Distort-Displace

    How to access the Distort filter in Photoshop.

    The first method I describe below shows you how to use a vector shape to create a road marking and map this onto a road surface. This process would be the same for applying logos or text on any textured background. In the other two examples, I describe how displacement maps can be used to create shadow effects. Let’s take a look.

    1. Adding a realistic road marking

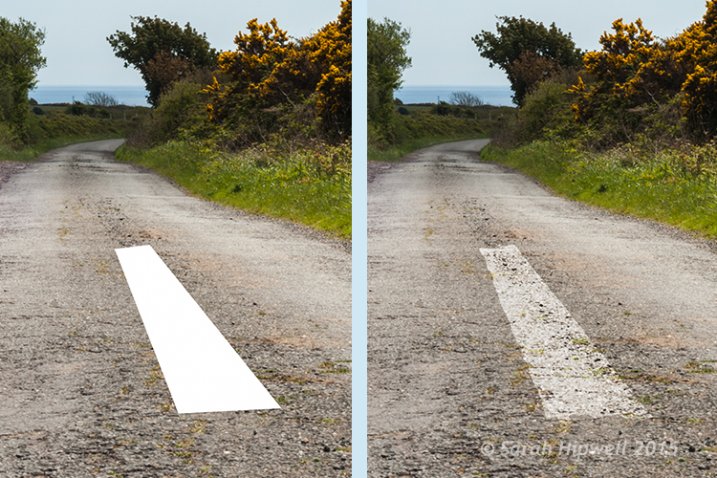
    Before-after-road-marking

    Before and after where the road marking has had a displacement map applied.

    Aim: To create a realistic road marking from a vector graphic.

    Let’s start with the base image of the road. The displacement grayscale map will be created from this image. The third image is the flat vector image of the road marking. I used the Polygonal Lasso Tool to draw a shape similar to a road marking and filled it with white. Convert this to a Smart Object, then hide this layer.

    Displacement map process:

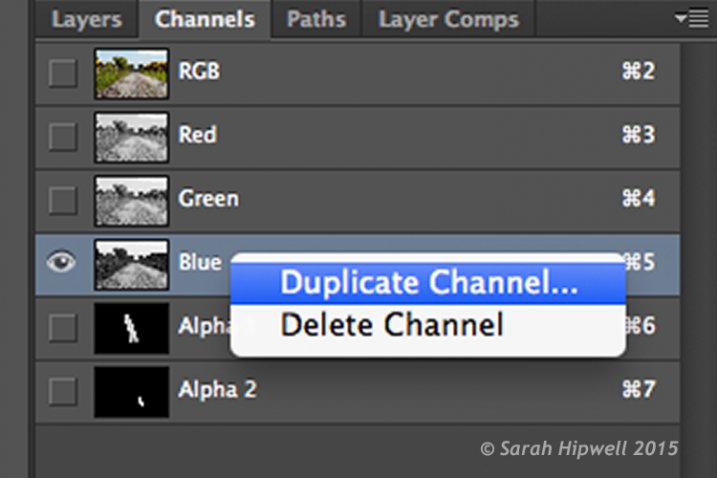
    Open your Channels panel and click on each of the red, green and blue channels to see which has the most contrast. In this example, I chose the Blue one. Click and Duplicate this channel.

    Duplicate-channel-panel

    Duplicating the blue channel to create a displacement map.

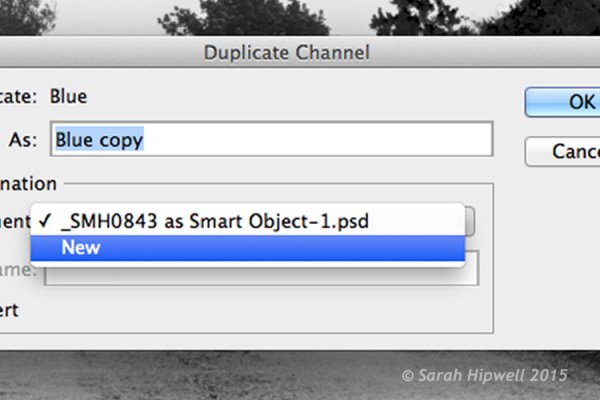
    This brings up another dialog box (see below). Where it says Document, click on the tab and choose New. Name this file Displace road or whatever you want and click OK.

    Duplicate-channel-new

    Clicking on the Document tab to select New to create a new document for a displacement map.

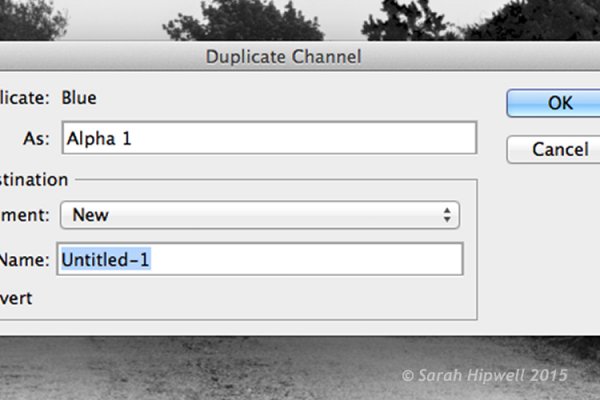
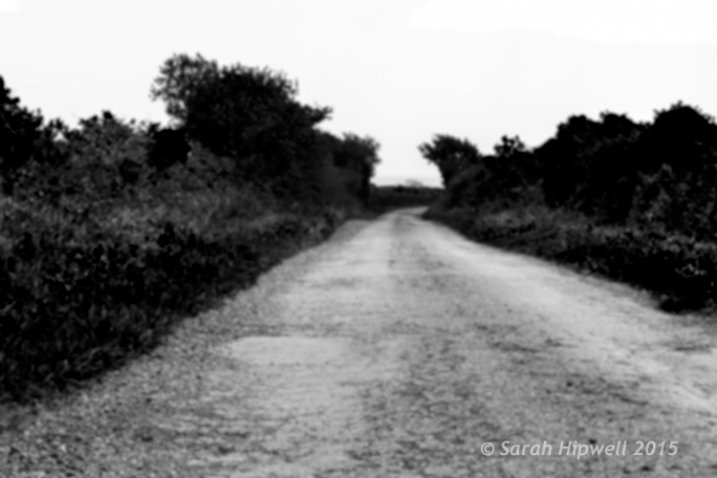
    This creates a new document with the layer named Alpha 1. Before you save this document out as a grayscale PSD (Photoshop) file. You need to add some more contrast, go Menu> Image>Adjustments >Levels, then add Gaussian Blur of 9.9 pixels. This will allow the edges of the road marking vector shape to hug the contours of the road, rather than have a jagged edge. Convert this image to Grayscale and save it out as Displace road.psd. Close this document.

    Duplicate-channel

    This dialog box appears directly after selecting New in the previous step.

    Displace-road

    A grayscale displacement map of the road image.

    Go back to the original document where we are still in the Channels panel and the blue channel is still highlighted. Click on the RGB layer, to bring back the image to colour.

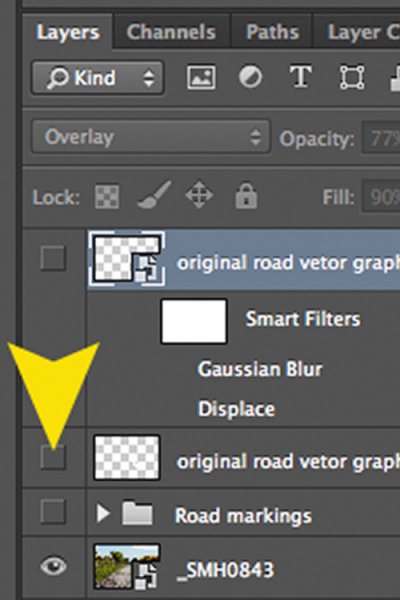
    In the Layers Panel (I normally have this nested beside the channels panel) click on the square to the left of the layer thumbnail to bring back the visibility of the road vector shape that I had drawn before making the displacement map. See image below.

    Layer-visibility

    With this layer highlighted, go up to Menu>Filter>Distort>Displace. A small dialog box appears. The amount of distortion that you apply will depend on the values that you enter in the Horizontal and Vertical scale boxes. It defaults to 10 in each box. These values represent percentages.

    The higher the values the greater the distortion. Experiment to see the desired effect that you want. When you convert your layers to Smart Objects, any adjustments that you make can be done easily and non-destructively. For this image, I chose 55 in the Horizontal scale and 80 for the Vertical one. I wanted more distortion on the road marking so that it would match the worn look of the road.

    At this point your image may look a bit odd, follow the next step to make it look more blended and realistic.

    Zoomed-in-road-marking

    Close-up of the road marking after the displacement map and final tweaks have been applied.

    Final tweaks: To give the road marking a more realistic look.

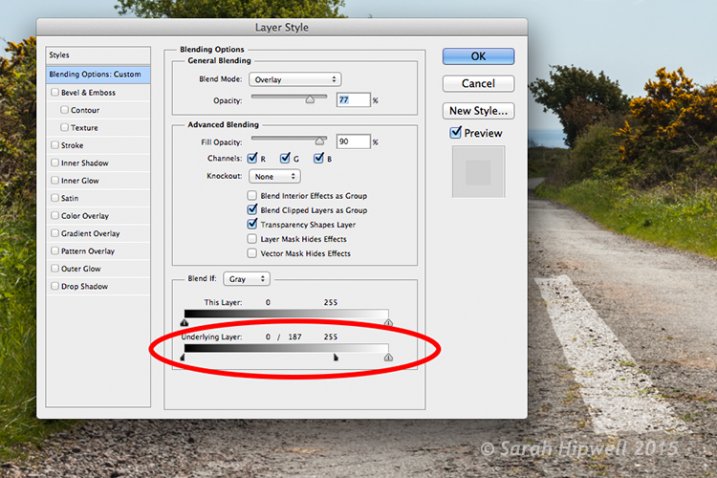
    I added Gaussian Blur of 4px to get rid of the ever so slightly pixelated edge on the shape. Double-click anywhere to the right of the layer to bring up the Layer Style box. I changed the Blend Mode to Overlay, reduced Opacity to 77% and Fill to 90%. In the Blend If section, I moved the black slider to 187 on the Underlying Layer.

    Tip. If you hold down the Alt/Option key when dragging the black or white sliders, this splits the slider arrow into two which makes the blend more smooth.

    Layer-style

    The black slider is split on the Underlying Layer in the Blending Options dialog box.

    2. Shadow Effects – Water

    Displace-in-water

    Displace-in-water-map-applied

    Before and after images showing the distortion on the word “Displace” when a displacement map has been applied.

    Aim: To create a realistic reflective shadow in water with text.

    I used the word “Displace” to show how a shadow in water can look quite effective and realistic. The displacement map I made for this image worked really well in distorting the text to wrap around the ripples of the water. I followed the same steps to generate the displacement as above but I applied a Gaussian Blur of 5.4px for this image.

    The values I added in the Displace dialog box for the Horizontal and Vertical scales were 80 respectively.

    For the final tweaks, I added Gaussian Blur of 10.1px. I changed the Blend Mode to Softlight, reduced Opacity to 78%, and Fill to 80%. In the Blend If section, I moved the black slider on the Underlying Layer to 148.

    Displace-in-water-final

    The word Displace distorted using a displacement map.

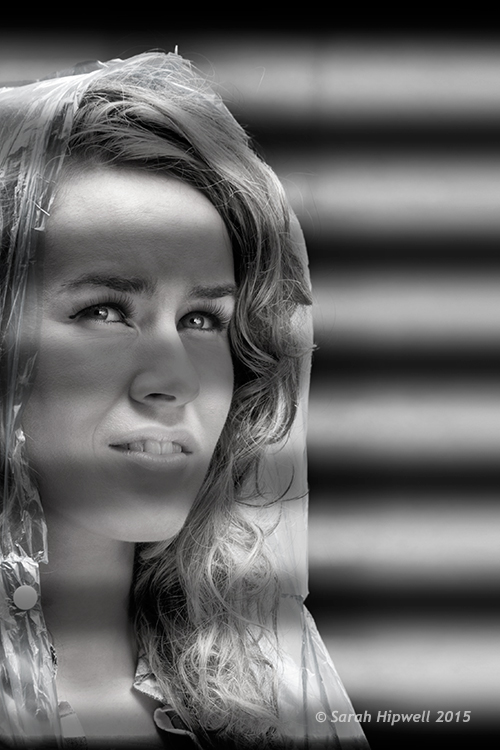
    2. Shadow Effects – Film Noir Look

    Woman-film-noir

    Using black horizontal lines and a displacement map to simulate light shining through window blinds.

    Aim: To create a film noir look or the effect of light coming through blinds.

    For this image I had to do more work in Photoshop to get the final look. The process to generate a displacement map is the same here as in the other examples. Just bear in mind that the blue channel is not the best choice for subjects as the skin tones look awful.

    I isolated the model from this image and put it on a separate layer with a layer mask. I added a Black and White adjustment layer, then created thick black horizontal lines using the Rectangular Marquee Tool to resemble window slats on a separate layer. Next, I duplicated that layer. I used one for the background layer and added a significant amount of Gaussian Blur. I then moved the other layer above the model with the layer mask. I wanted to angle the black lines (window blinds) across the model’s face. I did this using the Free Transform Tool.

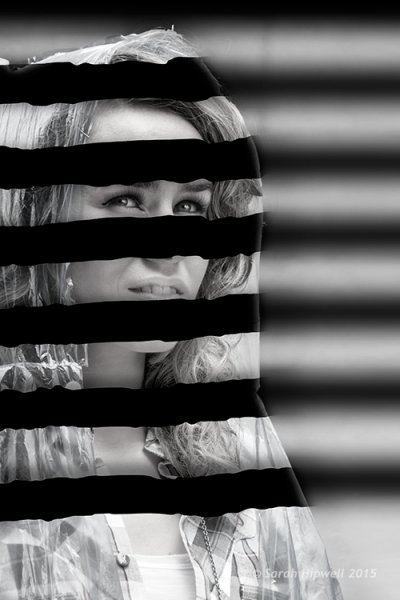
    Woman-black-lines-film-noir

    Black lines created using the Rectangular Marquee Tool.

    I made a displacement map and distorted the slats over the model’s face using 15 and 20 as the values for the Horizontal and Vertical scales.

    Woman-displacement-map-applied

    The black lines have been distorted via the Displace filter using a displacement map.

    This is only a brief description of the final tweaks: I applied a Gradient Overlay and some Burning to darken the left side of the model as the light source is coming from that directoin. I added Gaussian Blur of 28.9px and reduced Opacity to 40%.

    Tips

    • Blue is the worst channel to choose if you are making a displacement map where skin tones are involved.
    • The green channel usually shows the most contrast.
    • Make sure to use Gaussian Blur when generating displacement maps.
    • Displacements maps must be saved out as a grayscale .PSD file.

    I hope I have inspired you to start making displacement maps and use the Displace Filter if you have never tried it before.

    googletag.cmd.push(function() {
    tablet_slots.push( googletag.defineSlot( “/1005424/_dPSv4_tab-all-article-bottom_(300×250)”, [300, 250], “pb-ad-78623” ).addService( googletag.pubads() ) ); } );

    googletag.cmd.push(function() {
    mobile_slots.push( googletag.defineSlot( “/1005424/_dPSv4_mob-all-article-bottom_(300×250)”, [300, 250], “pb-ad-78158” ).addService( googletag.pubads() ) ); } );

    The post Get Creative with Displacement Maps in Photoshop by Sarah Hipwell appeared first on Digital Photography School.

    Digital Photography School

  • Springtime Paddling on Horsetooth Reservoir with Sea Wind Canoe

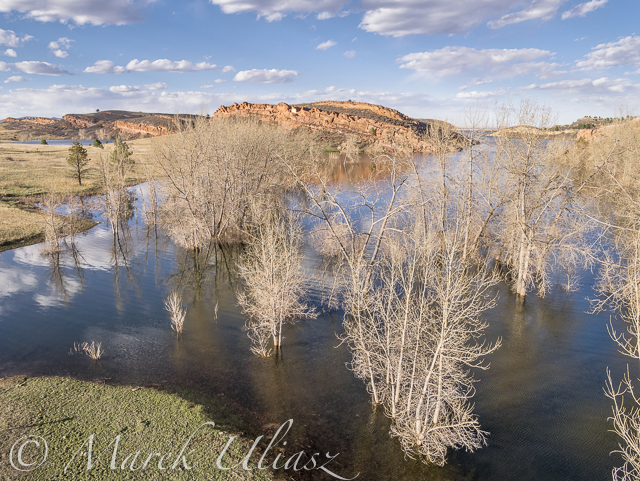
    I started my 2015 paddling season on Horsetooth Reservoir in early February, but my favorite time is springtime: a lot of fresh green, wild plums and other bushes in bloom, high water lever with submerged cottonwood trees and little power boat traffic. The reservoir is more than 98% full at this time (see reservoir data.
    Horsetooth Reservoir is 6 miles long, but I wonder how long would be a lap around the entire lake following closely the shore. 25+ miles? There is only one way to check it out. So far this year, I haven’t paddled more than 10 miles, always in Sea Wind canoe.

    There are several access spots to launch your kayak, canoe or SUP:
    1. South Bay – boat ramp
    2. Inlet Bay – boat ramp
    3. Satanka Bay – boat ramp
    4. Sunrise Area from the Centennial Road (closed during winter).
    5. North Eltuck Cove from the Lory State Park (trail access up to 0.25 mile at a low water)

    I am avoiding boat ramps during power boat season. Off season, I am often using one of the South Bay boat ramps. It’s possible to park on a beach close to water there. Right now, boat ramps are very short and a regular parking is really close to water. I use Sunrise Area next to swimming “beach” mostly during summer. The shore there is quite rocky and not protected from waves and boat wakes. Access point 1-4 require Larimer County Parks pass and 5 – Colorado State Park pass for your car. I used to carry my light Thunderbolt kayak from the Lory State park or tow Sea Wind on snow.

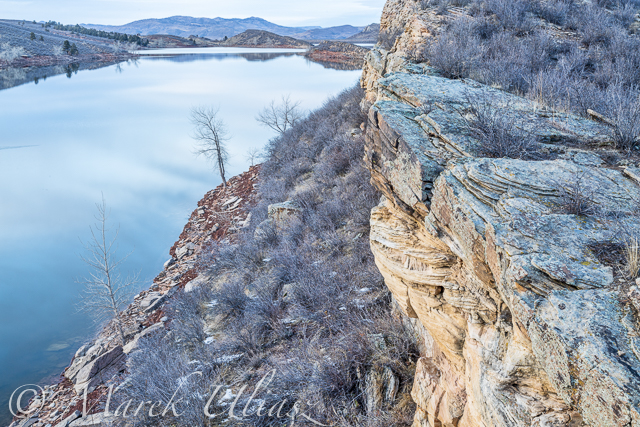
    winter dusk over Horsetooth Reservoir

    February 5, 2015: Winter dusk over Eltuck Cove looking towards Horsetooth Dam. CameraL Canon 5D M3.

    Aerial view of Horsetooth Reservoir

    March 30, 2015: Aerial view of the South Eltuck Cove. Camera: Panasonic Lumix GM1 on F550 Flaming Wheel drone.

    paddling Horsetooth Reservoir

    April 27, 2015: Paddling north along the west coast between South Bay and Dixon Cove. Camera: Sony A6000 with 16-50mm lens.

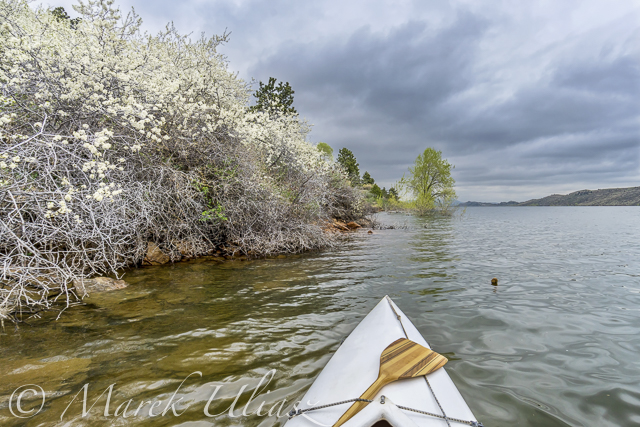
    May 1, 2015: Wild plums blooming.

    May 1, 2015: Wild plums blooming. Camera: Sony A6000 with 16-50mm lens.

    paddling Horsetooth Reservoir

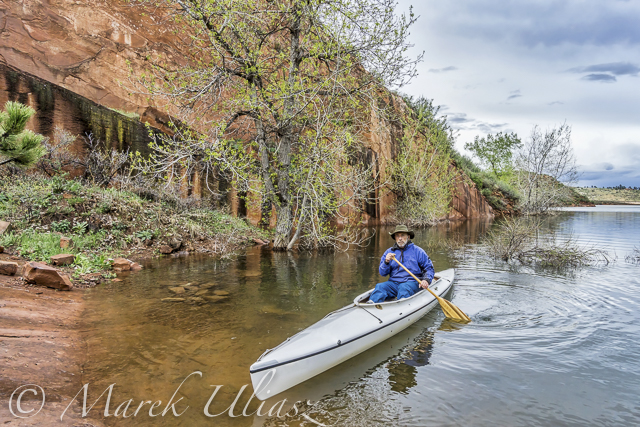
    May 6, 2015: Old sandstone quarry in Satanka Bay. Camera: Sony A6000 with 10-18mm lens.

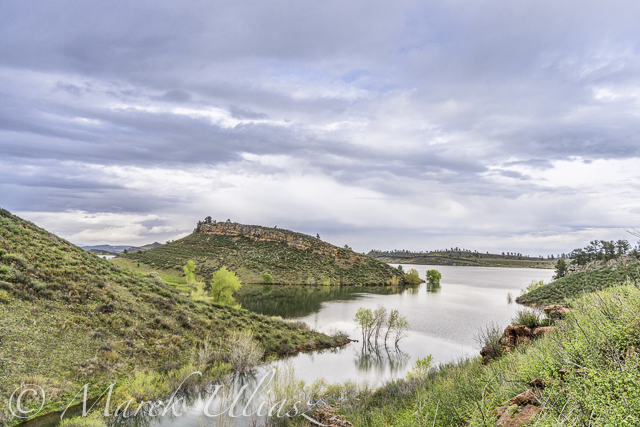
    May 6, 2015: Orchard Cove from the top of old road.

    May 6, 2015: Orchard Cove from the top of old road. Camera: Sony A6000 with 10-18mm lens.

    Related posts and resources:
    Horsetooth REservoir map
    Winter Season Paddling on Horsetooth Reservoir with Sea Wind Canoe
    Early Morning Paddling on the Horsetooth Reservoir
    Fisheye Lens Perspective for Paddling?


    paddling with a camera