Category: Photography

  • How to Isolate Your Subject in Lightroom

    One of my favourite portrait techniques is to isolate the model by using a short telephoto lens and a wide aperture. The idea is to throw the background out of focus and keep the subject sharp, so there is a clear distinction between the two. This creates beautiful bokeh and the illusion of depth.

    Isolating the subject in Lightroom

    Another way to isolate the model is to place them in the light, against a dark background that is in the shade. The opening photo (above) used this technique. I asked the model to pose in a doorway, and she is separated from the background because there’s no light illuminating the interior of the building.

    These techniques are very effective but sometimes the results won’t match what you visualized. It may be that the background isn’t quite as dark as you would like, or not out of focus enough. It may contain distracting colours or highlights. In these situations you can use Lightroom to give you a helping hand.

    Take the following photo as an example. The model is an artist who creates artwork from scrap metal. He is lit by daylight coming through open doors to camera left. I originally visualized the scene with the background going dark. Here’s what I was hoping for (the final result, after editing in Lightroom):

    Isolating the subject in Lightroom

    In the event however, that didn’t happen. The workshop was illuminated by lighting coming through skylights and a window at the rear. The blurred area on the left is the door to the workshop – included to add a sense of depth and to hide a white metal tank in the background. The door is outside, so it came out very bright compared to the interior.

    This is the photo, more or less straight out of the camera.

    Isolating the subject in Lightroom

    Quite a difference! Let’s look at some of the techniques I used to isolate the subject in Lightroom, and complete my original vision of the photo.

    • I added a Radial Filter and moved the Exposure slider left to darken the area around the subject. The Radial Filter is a very flexible tool as you can adjust the size and shape to match your subject.

      Isolating the subject in Lightroom

    • I used a Graduated Filter to darken the out of focus door. Now it doesn’t pull any attention away from the artist, who is the focal point of the photo. You can use Graduated Filters to darken any part of the background in the same way.

      Isolating the subject in Lightroom

    • Next I used the Adjustment Brush to darken some areas that weren’t covered by the Radial Filter. I painted in the area I wanted to adjust (shown by the red mask, below) and moved the Highlights and Shadows sliders left to make it darker. The Adjustment Brush tool is extremely useful for making local adjustments in areas that the Radial and Graduated Filters are unsuitable for.

      Isolating the subject in Lightroom

    • Finally I created another Adjustment Brush, painted over the model and moved the Clarity slider right. This made him look sharper by emphasizing the texture. It’s a technique that works better with men than with women as it affects skin texture, emphasizing wrinkles and other marks. A subtle touch is best. Here, increasing Clarity made the model’s skin brighter, so I moved the Highlights slider left to compensate.

      Isolating the subject in Lightroom

    Here’s a before and after comparison so you can see the difference that those four simple adjustments made.

    Isolating the subject in Lightroom

    I’ve also created a YouTube video that shows how I processed this photo in depth.

    You can also experiment with using the Adjustment Brush to select the background and making it softer by moving the Clarity slider left or desaturating it with the Saturation slider. Care is required with both techniques as they are easy to overdo – once again a subtle touch is best. They may come in useful when there are bright highlights or distracting colours in the background.

    Isolating the subject in Lightroom

    What techniques do you use to isolate the subject in Lightroom? Please let us know in the comments.


    The Mastering Lightroom Collection

    Mastering Lightroom ebooksMy Mastering Lightroom ebooks will help you get the most out of Lightroom 4 and Lightroom 5. They cover every aspect of the software from the Library module through to creating beautiful images in the Develop module. Click the link to learn more or buy.

    googletag.cmd.push(function() {
    tablet_slots.push( googletag.defineSlot( “/1005424/_dPSv4_tab-all-article-bottom_(300×250)”, [300, 250], “pb-ad-78623” ).addService( googletag.pubads() ) ); } );

    googletag.cmd.push(function() {
    mobile_slots.push( googletag.defineSlot( “/1005424/_dPSv4_mob-all-article-bottom_(300×250)”, [300, 250], “pb-ad-78158” ).addService( googletag.pubads() ) ); } );

    The post How to Isolate Your Subject in Lightroom by Andrew S. Gibson appeared first on Digital Photography School.


    Digital Photography School

  • Contest – Win a Tamron 16-300mm Di II VC PZD Macro All-In-One Zoom Lens

    ContestOver the last few years here at dPS, we’ve run very some very popular competitions with our partners to give away some of their great photographic products to lucky dPS readers.

    We are lucky enough to be able to do it again this week.

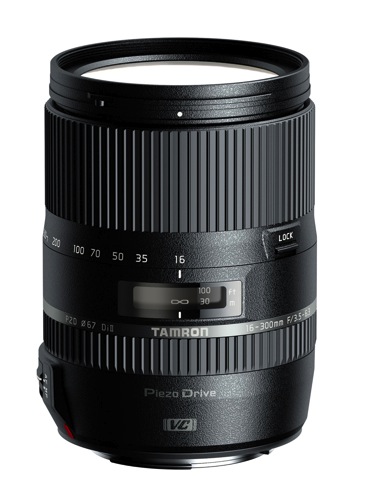
    For this contest, Tamron is giving away a Macro All-In-One Zoom Lens

    Tamron 16 300mm Di II VC PZD Macro 750

    Tamron 16-300mm Di II VC PZD Macro

    This prize is designed to help every level of photographer create BETTER pictures. Tamron is the world’s most awarded photographic lens line. Here’s what you, our dPS reader, could win:

    Tamron 16-300mm Di II VC PZD Macro – Retail Value $ 629
    For canon, Nikon or Sony small-sensor cameras.

    Learn a little more about Tamron here.

    How to Win

    To win this contest you need to:

    • Visit the lens information pages and learn more about the lens and its core use.
    • Leave a comment below and tell us WHY you’d like to win and HOW you would you utilize the lens. Please note: there is a limit of ONE entry per person.
    • Do this in the next 14 days and after May 20th, 2015, the team at dPS will choose the best answer and we will announce the winners in the following days.

    The deadline to enter is May 19, 2015, Midnight PDT. Comments left after that date and time will not be considered.

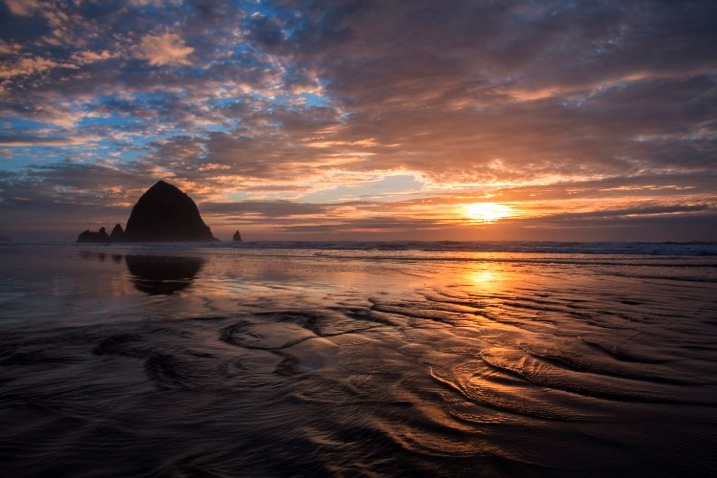
    Canon-Beach_ken-hubbard-resized.jpg

    Photo by Ken Hubbad

    By “best” – we’re looking for people who have an understanding of the lenses and how they will best suit their needs. So you’ll need to check out the product pages to put yourself in the best position to win.

    There’s no need to write essay length comments to win – but we’re looking to hear what you like about the lens and how it would help your development as a photographer.

    This competition is open to everyone, no matter where you live – but there is only one entry per person. To enter – simply leave your comment below.

    tamron-logo.jpg

    About Tamron

    Disclaimer: Tamron is a paid partner of dPS.

    googletag.cmd.push(function() {
    tablet_slots.push( googletag.defineSlot( “/1005424/_dPSv4_tab-all-article-bottom_(300×250)”, [300, 250], “pb-ad-78623” ).addService( googletag.pubads() ) ); } );

    googletag.cmd.push(function() {
    mobile_slots.push( googletag.defineSlot( “/1005424/_dPSv4_mob-all-article-bottom_(300×250)”, [300, 250], “pb-ad-78158” ).addService( googletag.pubads() ) ); } );

    The post Contest – Win a Tamron 16-300mm Di II VC PZD Macro All-In-One Zoom Lens by Darlene Hildebrandt appeared first on Digital Photography School.


    Digital Photography School

  • Composition and Learning to See

    How many times have you captured the perfect picture, only to download it and discover a rogue tree branch jutting into your frame from the side, or a random person’s head sneaking into your foreground? At one time or another, maybe even often, it’s happened to all of us – and it’s a bad habit that’s easy to repeat if we allow it. Let’s call this photo ailment of ours blind excitement; letting the excitement of our subject blind us to all other elements that are in our frame. Is there a cure? Absolutely.

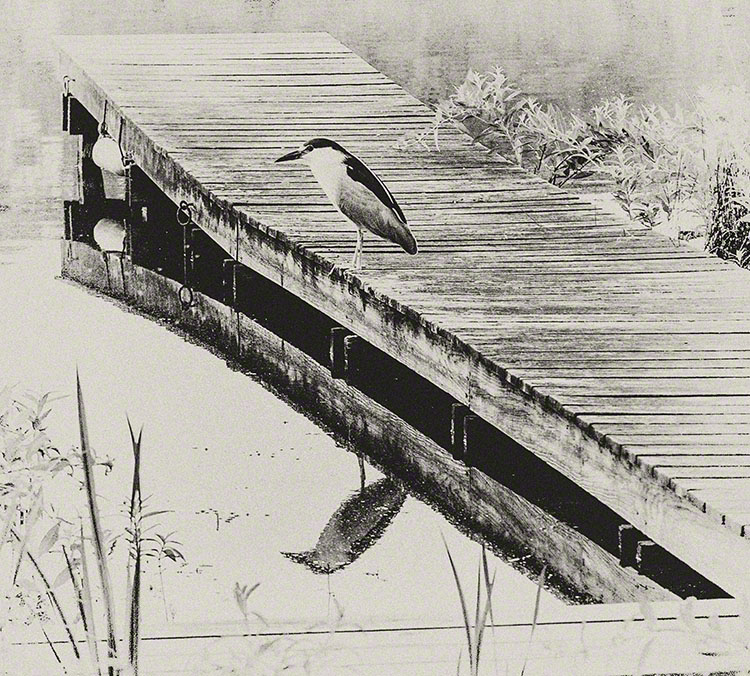
    “On The Dock” – There was a lot going on here, much to see and evaluate before pressing the shutter. Other birds, kayakers on the lake, and windblown reeds all played a role in my “seeing” this image the way I wanted to capture it.

    “On The Dock” – There was a lot going on here, much to see and evaluate before pressing the shutter. Other birds, kayakers on the lake, and windblown reeds all played a role in my “seeing” this image the way I wanted to capture it.

    Blind Excitement

    You know the feeling of looking through your viewfinder at that beautiful, rare subject that you have been waiting to capture, that’s all you see. Blind excitement, or being overcome by your subject, has kept you from seeing the other elements in your viewfinder; elements that very well may ruin your treasured image to be. You know that feeling, don’t you?

    One of the best tips that I ever received on creating artistic photography came years ago from a mentor helping me to hone my photographic skills. Keep it simple; eliminate all unnecessary elements in the image, take your time, and be sure to really see what you are shooting before pressing the shutter. That’s the tip. Simple, right? Sounds like a no brainer doesn’t it? Keep reading!

     “Beware The Serpent” – an example of being able to quickly and accurately see the whole frame and capture. The illusion of a “sea serpent “reaching for a female in background lasted but a moment.

    “Beware The Serpent” – an example of being able to quickly and accurately see the whole frame and capture. The illusion of a sea serpent reaching for a female in background lasted but a moment.

    Seeing…and Believing!

    It does takes some work learning to slow down, breaking the ol’ trigger finger on the shutter habit for you to truly see what’s in the frame – but with that tip my photography really did start to become art. I looked through the viewfinder and began to see things that I never noticed before; things that had added no value to my image, things that only served to detract from the intended message of my work. I slowed down and LOOKED through the viewfinder before pressing the shutter, I mean REALLY looked. I walked around and found better angles, lower and higher to shoot from that eliminated photo clutter. I was no longer blinded by the main subject of my frame, but now saw everything within it.

    It’s amazing what appears when you take the time to see! I had made a conscience decision to actually compose my photograph BEFORE pressing the shutter. Yes, I know…I, too, thought I was doing that all along, but surprise, surprise – I learned differently.

    A Boat or Two

    Baker Ashore Antigua 1

    Take a look at these two images taken in Antigua. The day was amazing, the sun, the surf, music, and colors of the Caribbean all filling my head and eyes – with blind excitement. The whole idea was to capture some island flavor for a client with the colorful boat sail, the sand, and the beautiful blue water of the Caribbean. I looked and pressed the shutter, but I didn’t see! I didn’t see the second boat sneaking in behind my subject – you see it now, don’t you? Image #2 is free of this distraction and makes a much better photograph; keep it simple and clean. When the full sail came around with all that color, my blind excitement pressed the shutter and that’s all I saw. Fortunately I had other opportunities this time, and got the shot – but that won’t always be the case!

    Baker Ashore Antigua 2

    On Second Thought

    I then began to review some of my older work scrutinizing each for the importance of the things in my images. “Wow, how could I have missed that?” was the phrase I found myself uttering more often than I care to admit. I couldn’t believe how many things I discovered stuck into my image from the edge, or lurking without value in the background. I was truly amazed at what I was now seeing. Why didn’t I see that in my frame before I took the shot? Answer: Because I didn’t know how to see.

    It’s always a great exercise to take some time and look at your work from a year ago, from three years ago, etc., and compare to your latest. I am always working at my photography. To see the difference in my work from several years ago is rewarding and it also acts to confirm that compared with today, I was flying half blind back then.

    See below, one of my photographs that garnered considerable attention and won multiple awards, including Best Seascape in a national exhibit. I think this is a good example of eliminating all unneeded elements in capturing the desired mood – calmness. Read what the gallery director wrote of my work Morning Calm:

    BobbyBaker Morning Calm

    The exhibition is showing four of Baker’s pieces, but my favorite is Morning Calm. This photograph shows how little is needed to create a beautiful and amazing image; and, while there is very little in this photograph, one can also say that there is so much in this photograph. There are so few physical elements…the horizon, a hill, a boat and its shadow. There is, of course, a lack of color. There is even a lack of shades of gray, being basically a black boat, a light gray backdrop, and a medium gray horizon and hill. But the photograph says so much with so little. The photograph has tremendous spirit and depth. It speaks…with silence. It surely says different things to different people, but, without question, this photograph speaks. A beautiful and amazing image.

    While there is so little in this photograph, one can say that there is so much in this photography. Exactly! What do you want your image to say? What are the elements in your frame acting to say in your desired overall message? If you don’t know, or they are sending the wrong message, something is amiss. It’s time to recompose, time to slow down and actually SEE what you are shooting.

    While Morning Calm leans towards the extreme of minimalism, you could say that I succeeded in capturing a message of calmness. That early, quiet, spectacular morning on Cape Cod when I captured this shot, I knew it would be special. I was excited looking at the subject, but I took my time, I looked at everything in my viewfinder, and positioned myself to be sure that none of the other boats would be in my frame. I waited to be sure no birds were flying in the space, absolutely still water, nothing but what I wanted my audience to see – and feel – when viewing Morning Calm. Click. I breathed and smiled, as I knew that I had learned to see and got the shot that I wanted. Knowing that you got the shot is such a great feeling, isn’t it?

    BobbyBaker AloneTogether

    In my image, Alone Together there are more elements in the frame than in Morning Calm; you have an angry sky, rocks and water sculpted sand. Here all the elements work together in supporting the subject (a person in thought contemplating a lone tree); they do not detract from the main subject, but add to the mood that will evoke thought and emotion from the viewer. One of the keys to creating this shot was to see, before pressing the shutter, that I needed a space between the subject’s head and the land; without this space the shot would have been ruined.

    To this day, I can still recall that cold February day on Cape Cod knowing that I needed to be sure the person’s head was clear of the land and adjusting my shooting angle to be certain I had that needed space. A couple of years earlier, I know that in my blind excitement to capture the shot (believe it or not, this was not posed) I would have just gone ahead and pressed the shutter only to be disappointed later when viewing in my studio and realizing the person was attached to the land at her head. Years of practicing how to see before pressing the shutter allowed me to act quickly in surveying what was in my frame, and keying on a most important must have compositional item, the space above the subject’s head – before the subject moved and/or learned I had arrived behind them.

    BobbyBaker_Shooting Star

    “Shooting Star” – most of my work is coastal. Not only do you need to be aware of intrusions into the frame (people, birds, etc.) you must also consider the potential of intruding on beach goers privacy by placing them in your frame unwanted! Also, parents are understandably super sensitive to anyone near their child with a camera. Don’t put yourself in that position by not seeing everything!

    Are you excited? Now look, and SEE!

    Take a good look at your work. Look at all the elements in your image. The next time you are out shooting, pause and REALLY look before pressing the shutter. Set yourself apart from the glut of shutter-happy shooters with well thought out, well seen, well composed photography. Trust me, this exercise of making yourself pause, look, and see, will make a BIG difference in your photography and with practice will become your way of composing before shooting.

    Now go make some art!

    All images in this article are © Bobby Baker Photography

    BobbyBaker_Rock Harbor Romp

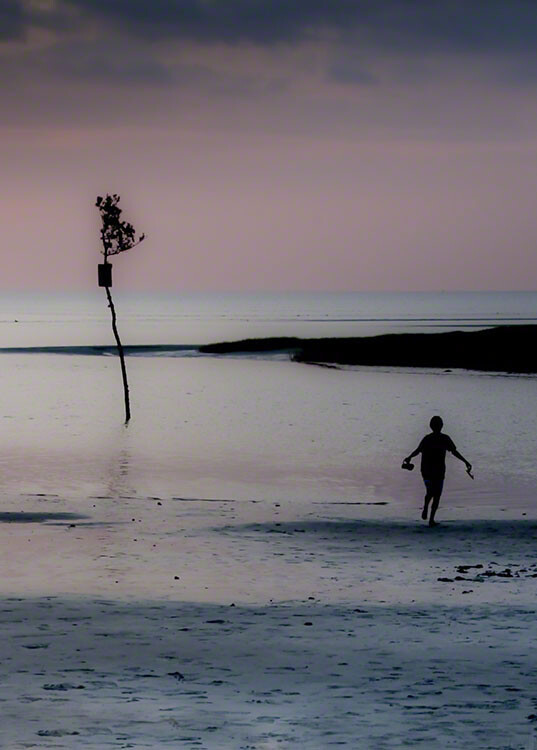
    “Rock Harbor Romp” – The isolated, silhouetted person was not created by cropping, rather by moving my camera to the left while framing the image. The girl’s friends are to the right side of the frame, and I was able to see that they would create clutter in the image if captured. The lone tree and lone girl act to balance each other in this image.

    googletag.cmd.push(function() {
    tablet_slots.push( googletag.defineSlot( “/1005424/_dPSv4_tab-all-article-bottom_(300×250)”, [300, 250], “pb-ad-78623” ).addService( googletag.pubads() ) ); } );

    googletag.cmd.push(function() {
    mobile_slots.push( googletag.defineSlot( “/1005424/_dPSv4_mob-all-article-bottom_(300×250)”, [300, 250], “pb-ad-78158” ).addService( googletag.pubads() ) ); } );

    The post Composition and Learning to See by Bobby Baker appeared first on Digital Photography School.


    Digital Photography School

  • How to See the Light for Portraits: A Quick Tip for Beginners

    Light1_2

    As a beginning photographer, one of the easiest ways to move from taking average snapshots to more professional looking portraits is to develop a good understanding of light. Harsh and uneven lighting can often be distracting and make the photograph look amateur, whereas even lighting allows the viewer to focus solely on the subject and is more visually appealing.

    Spending some time learning about the exposure triangle, the quality and direction of light is a great first step, something that I highly recommend to everyone. That said, even if you understand the theoretical aspects of light, it can still be difficult to walk into a park with your children, or clients, and know intuitively where to situate your subject for the best possible portrait lighting. So, I’d like to share one quick and easy trick that you can use to help you “see” the best light if you’re unsure of where to begin:

    The Circle Trick

    Step One:

    Have your subject stand facing you, at the appropriate distance for whatever focal length you’re using. Think of the two of you being like a clock, with you in the center tether position and your subject as the clock’s hour arm in the 12 o’clock position. Take a photo.

    In this instance, I was photographing my daughter in our backyard at about 6:30pm. My starting (12 o’clock) position was with the sun behind her.

    Step Two:

    Have your subject move to the three o’clock position. Pivot with them so that you continue to face each other. Take another photo.

    Now, I’ve moved her into the 3 o’clock position. You can see that if you’re looking at her, the sun is predominantly on the left side of the image.

    Step Three:

    Have your subject move to the 6 o’clock position. Again, pivot with them. Take another photo.

    Now, she’s moved into the six o’clock position, and is looking into the sun. You can see that’s going super well.

    Step Four:

    Have your subject move to the nine o’clock position. Continue to pivot with them, and take another photo.

    Finally we’ve moved into the nine o’clock position. As you’re looking at her, the light is primarily on the right side of her face.

    Step Five:

    Review the four photos that you’ve just taken, and decide which one offers the most appropriate lighting for the look you’re trying to achieve.

    Unless you’re shooting at high noon with the sun directly above you, you’ll probably notice that the lighting will vary dramatically between each of the four photos, with some being much more visually appealing than others. This gives you a great starting point to be able to visually “see” the light and quickly determine which direction you’d like your subject to be facing for your portraits (or in a large park, which general direction you may want to head for your session).

    Bonus Tip:

    If you notice pretty severe backlighting as in the photo for the 12 o’clock position above, and that is not the look you’re trying to achieve, try having your subject sit down!

    This image was taken in the exact same location as the “12 o’clock” image above, only with my daughter sitting on the ground instead of standing.

    Keep in mind that the circle trick works in the reverse as well, with your subject standing in the same location and you walking around them as the positions of the clock. Sometimes it’s easier for the photographer to do the bulk of the moving around rather than the subject. On the other hand, I spend a lot of time photographing elementary age children, and find that they really enjoy getting to be a special helper at the beginning of a photo shoot. Getting them engaged early on is a good way to help them to feel comfortable with me. In fact, even though I don’t actually need to use the circle trick anymore to be able to see the light, sometimes I still use it as a quick ice breaker at the beginning of sessions with younger children, showing them the four different photos at the end.

    For many people, understanding the quality and direction of light is something that’s learned practically – the more you practice, the more you’ll eventually begin to be able to “see” the light intuitively. This is one really simple (and quick!) way to begin to train your eye to begin to see light – so if lighting for portraits is something that you tend to struggle with, grab a friend and give it a try!

    googletag.cmd.push(function() {
    tablet_slots.push( googletag.defineSlot( “/1005424/_dPSv4_tab-all-article-bottom_(300×250)”, [300, 250], “pb-ad-78623” ).addService( googletag.pubads() ) ); } );

    googletag.cmd.push(function() {
    mobile_slots.push( googletag.defineSlot( “/1005424/_dPSv4_mob-all-article-bottom_(300×250)”, [300, 250], “pb-ad-78158” ).addService( googletag.pubads() ) ); } );

    The post How to See the Light for Portraits: A Quick Tip for Beginners by Meredith Clark appeared first on Digital Photography School.


    Digital Photography School

  • Wedding Couture: How to Shoot Brides

    Ok, I must admit, I’ve been shooting weddings for the past 22 years, but I can’t say that they’re my favourite thing to shoot. It’s a lot of pressure, there are a lot of emotions, my feet hurt at the end of the day, and I shoot pretty heavily, so it means a lot of work after the shoot, but Continue Reading

    The post Wedding Couture: How to Shoot Brides appeared first on Photodoto.


    Photodoto

  • 5 Reasons a Pro Photographer Sometimes Regrets That Decision

    Following your dream is not always easy. Actually, it’s never easy.

    To be frank, I think the only way you can achieve a dream goal is to leave yourself no other choice. You can’t say, for instance, “I’ll try this for a while and see how it goes.” because you’ll always find a reason (often a pretty good one) to give up and do something else. You have to be fully committed. That makes it easier decision-wise, because you literally leave yourself no other choice but to keep going forward. But the process itself is still very hard.

    dps4

    So, that’s what I did and now I take pictures for a living. I also write for magazines and for newspapers. Sometimes, I sell my images by themselves, but my articles I always sell with my photos. I’ve been doing it for a long time now, and I can’t imagine any other way to make a living. But that doesn’t mean it hasn’t been a struggle. Sometimes, when everything seems to be going against me, I have regrets about choosing photography for a career. Here they are, in no particular order.

    #1. Low Pay

    Photographers work hard, whether they shoot weddings, war zones or wallabies. But the pay is generally not great, which is just a polite way of saying it sucks. There are exceptions, of course, but they are, well, exceptions. So you work hard and are good at what you do, but you don’t make a lot of money. Your friends earn a lot more than you do, which is fine, but after a while it gives a numerical significance to how much you’ve sacrificed to be a photographer.


    Of course it’s possible to make a lot of money at photography, as Peter Lik will tell you, but if making money is a priority in your life, you’re far better off choosing a different career.

    Now, I know what you’re thinking. You’ve heard that before, and it’s not going to be a problem, you’re ready to live frugally. You say that now, but will you feel the same way in ten years?

    dps5

    #2. Inspiration

    While it’s definitely true that you should try to work at something you love, it has its consequences. The most obvious is that what you love becomes work. I have friends who shoot images just because they enjoy it and sometimes I think, “hmm, they seem to be having more fun at this than I am!”

    The truth is, taking pictures with the aim of selling them is different, most of the time, from taking pictures for the pure joy if it. A lot of people confuse the two things.

    It’s not that I love it any less, I don’t think, but sometimes it’s hard to keep up with the enthusiasm I see in amateur photographers. As much as I enjoy taking pictures — hey, I’m the one who decided to make a living out of it — I also like doing other things as well. I guess this is a way of saying that when you do the thing that you love for a living, you choose something else for a hobby.

    #3. Work Never Ends

    One of the great things about being a self-employed entrepreneur of sorts, is that if Monday the weather is great and a friend calls up and suggests a long lunch on a patio somewhere, at that moment you get to say, “Sure, sounds great!” Or perhaps, if you’re more disciplined than I am, you say, “Maybe next time, I really have to get some work done.” But the point is, you have the option. Freedom is pretty great.

    dps2

    Of course, it comes at a cost, because depending on how you look at it, you’re never truly free. You can draw the line between work and play wherever you like, yes, but that’s both a good thing and a bad thing. Because you’re never not working. I sometimes envy my friends who have regular Monday-to-Friday jobs because when I see them on the weekend, they’re truly off work. Not me.

    Also, vacations? Pretty much never. I go to a lot of great places, don’t get me wrong, but mostly on my own. I know this sounds like the stuff of dreams, but believe me, it’s still work. You go on an assignment somewhere and tell your friends you went to such-and-such destination, and all they think is “Ah, vacation.” But being in a vacation spot and actually being on vacation are two very different things. I get it, because vacations are awesome – I wish I could take one.

    #4. Loss of Creative Input

    Depending on the kind of photography you do, it can be hard to maintain a personal vision, or any creative input at all, really. I was once at the studio of a friend of mine, a commercial photographer who pulls in many big-time clients. I wasn’t involved in the shoot in any way, he just invited me over so I hung out and watched, scarfing down the free sushi when nobody was looking.

    The shoot was of a young couple who had found their dream home. It was going to be a full-page advertisement in magazines and newspapers. The art director was there, and he knew exactly what he wanted. He had a clipping of a photo taken by somebody else, gave it to my friend and essentially said, “Copy this. This is what we want exactly.”

    dps3

    This is an extreme example, but the point is, if you want to make money taking pictures, you shoot what other people want. At the very least, you shoot what other people want but in your style, and that’s the best-case scenario.

    That’s why a lot of photographers take lower-paying jobs that allow them more creative control. If not, there are times when you’re just a robot putting the camera where other people want it and pushing the button when they say so. Unless, that is, you’re a superstar commercial photographer, but if that’s the case, you’ve already paid your dues, I’m sure.

    I don’t usually have an art director over my shoulder telling me what to do, but I still submit my images to photo editors and designers, and they get to choose which ones get used, not me.

    #5. The Myth of Being Your Own Boss

    Some people who have regular jobs, whatever those are, tell me, “You are so lucky, you’re your own boss.”

    dps1

    Well I suppose I am, in a way, my own boss. But that depends on how you look at it. From my perspective, I have it a lot worse because I don’t have just one boss, I have many. Every one of my clients is my boss.

    I’ve been lucky in finding many great people to work with (for?) but I’ve had my share of nightmare clients, as well. Some of those people pay quite well, and although I’d sorely like to tell them to do something to themselves which is unprintable here, well, you know how it goes. Sometimes I have the courage to fire a well-paying client, and sometimes I don’t. But if you think that being a freelancer allows you to escape the unpleasantness of having to deal with certain bosses, think again.

    Thinking about turning pro? Here’s another good read on the topic from a different pro photographer’s perspective: 6 Things to Consider Before Becoming a Professional Photographer

    Mike Randolph has been a professional writer and photographer for more than 20 years. His photos have appeared in National Geographic publications as well as hundreds of others. For photo tips, techniques and gear talk, check out his travel photography blog.

    googletag.cmd.push(function() {
    tablet_slots.push( googletag.defineSlot( “/1005424/_dPSv4_tab-all-article-bottom_(300×250)”, [300, 250], “pb-ad-78623” ).addService( googletag.pubads() ) ); } );

    googletag.cmd.push(function() {
    mobile_slots.push( googletag.defineSlot( “/1005424/_dPSv4_mob-all-article-bottom_(300×250)”, [300, 250], “pb-ad-78158” ).addService( googletag.pubads() ) ); } );

    The post 5 Reasons a Pro Photographer Sometimes Regrets That Decision by Mike Randolph appeared first on Digital Photography School.


    Digital Photography School

  • Video Share – Travel Photography Hacks and Gear Tips

    In these two videos travel photographers Brendan van Son shares some of his hacks for travel photography gear – how to go lighter and spend less money.

    In this first one he offers eight photography hacks to help you while you’re out on the road:

    1. Welding glass as a neutral density filter
    2. Macro extension tubes instead of a macro lens
    3. 2x teleconverter to extend the range of your lenses
    4. Tripod/monopod combination (he mentions he uses one of the 3-Legged Thing models)
    5. Trigger Trap remote release
    6. Camera cap case
    7. WiFi EyeFi memory cards
    8. The Crop Sensor advantage

    Watch the whole video to see how you can use those tips to your advantage when travelling.

    In this second video he talks about different camera strap options and which is the best for travel photography.

    The strap he mentions is the Indigo Marble designer sling.

    Some other options are:

    • imo Camera Straps: Review – for a bit more fashionable and stylish strap.
    • Black Rapid RS-7 Camera Strap Review
    • Peak Design Capture Camera Clip v2 review
    • Preview of the Slide and Clutch Camera Carrying System from Peak Design
    • Spider Camera Holster Review

    Do you have any other tips for hacking your travel photography bag? Please share with us in the comments below. What goodies have you found?

    googletag.cmd.push(function() {
    tablet_slots.push( googletag.defineSlot( “/1005424/_dPSv4_tab-all-article-bottom_(300×250)”, [300, 250], “pb-ad-78623” ).addService( googletag.pubads() ) ); } );

    googletag.cmd.push(function() {
    mobile_slots.push( googletag.defineSlot( “/1005424/_dPSv4_mob-all-article-bottom_(300×250)”, [300, 250], “pb-ad-78158” ).addService( googletag.pubads() ) ); } );

    The post Video Share – Travel Photography Hacks and Gear Tips by Darlene Hildebrandt appeared first on Digital Photography School.


    Digital Photography School

  • The Future of Photography Websites – Understanding and Adapting to Trends

    Right off the bat, this is not an article about what background colors to use, what plugins to install, or other shallow web design fashion trends. Focusing blindly on bells and whistles (flat design, parallax scrolling, full-width page layouts) won’t actually make your photo website better. Sure, it might make it pretty, but it won’t necessarily be effective.

    Getting the bigger picture and understanding the WHY behind web design trends will make you better equipped to build a successful photography business.

    Having worked on over two hundred photography websites in the past few years, I’ve developed an eye for all the details that make up a great photo website and have recognized some important mindset shifts. My aim with this article is to give you a good overview of where the web design industry is heading (as it relates to photography websites), and how you can stay ahead of the curve.

    Focusing on trends that truly matter allows you to then provide real value to your audience.

    Change is inevitable

    Web design trends are just a result of an ever-changing landscape. That’s why building your photography website should not be considered a one-time effort. It’s your responsibility to keep an eye on the industry and adapt as you go along.

    So, what is driving all the web design changes in the photography industry, and what can you do about it?

    #1 – The sheer number of online users

    The web design world is rapidly evolving in order to manage the Internet boom:

    There were more than 3 billion (with a “b”) Internet users in 2014, representing 43% of the world’s population.

    So if you think the Internet has grown in recent years, we have yet to reach the tipping point. Not to mention how fast and easy it is to create a new basic photo website these days, instead of just being a content consumer. Everybody is getting online, which is the obvious cause of many web design changes.

    Let’s explore some strategies to differentiate your photo website and rise above the surface:

    a) Choose a niche

    When the market becomes over-saturated, you’re somewhat forced to specialize in a smaller niche and become an expert in it. Your target audience will be smaller, but you’ll also be a better fit for their needs.
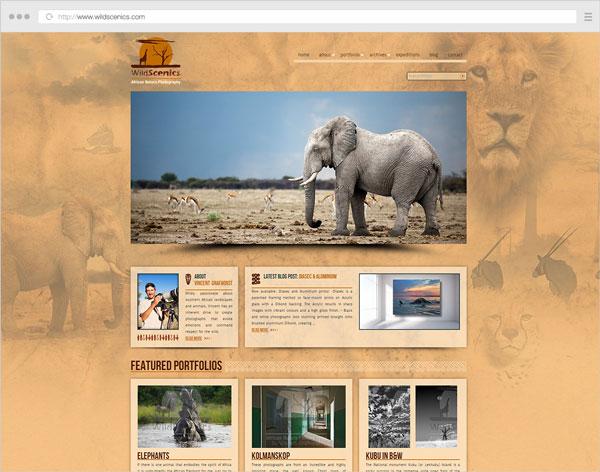
    Example 1 wildscenics

    Niching down can usually be done through:

    • The type of photography you specialize in (instead of being a jack-of-all-trades).
    • The physical area you cover (only accepting clients from a certain city).
    • How you promote yourself online (blogging, publications, events etc.)

    This also has a great impact on how you structure your website. Having a clear target audience in mind, allows you to craft your message and tailor your site’s landing pages better.

    If a first-time visitor comes to your site and is greeted with 10+ galleries from completely separate photography domains, (s)he might start exploring some of them, but will surely be a little confused and ask “What is this photographer actually good at?”.

    b) Differentiate yourself and show your personality

    Besides having great images (which should be a constant focus in your career), your website is an important way to showcase your personality. Just like you’re trying to craft a unique style in your photos, you should also infuse your style into the way you build your website.

    How do you do that?

    Your words have a lot of power. What you write (and the tone you write in) can make a lot of difference:

    • Using your sense of humor in blog posts and your About page (within reason).
    • Having a good self-portrait (did you nail the right facial expression?).
    • Describe your work/services in a friendly manner.
    • Write about your experiences in your own words, as if you’re talking to a friend using natural language. Forget about SEO for now.
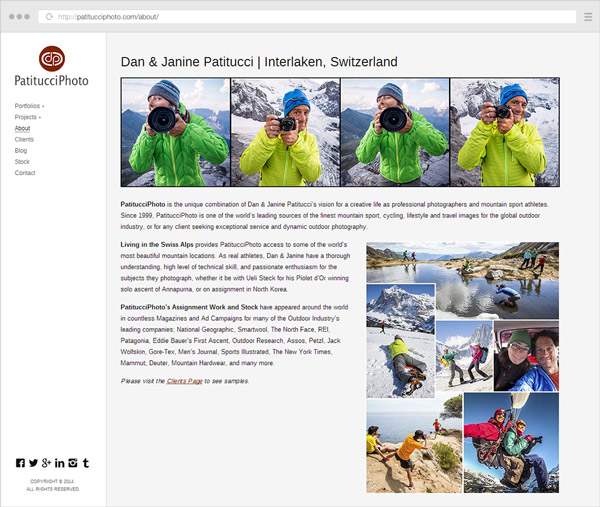
    Example 2 patitucciphoto

    Furthermore, it’s obviously not enough to use a great website template, thousands of other photographers might use the same one. The branding and design of your website are also important differentiators:

    • Defining who/what your audience is (to inform what site structure, colors and fonts to use).
    • Choosing whether to brand the site under your personal name or a business name.
    • The general mood created by the site (minimalist, strict and professional, very joyful, retro, dark and intriguing etc.)

    To dive deeper into how you can infuse personality into your website, look no further than this excellent article from Smashing Magazine: The Personality Layer.

    c) Use quality platforms and themes/templates

    Using free blogging platforms like blogger.com or wordpress.com (not to be confused with the self-hosted software from wordpress.org), you get what you pay for. I don’t want to sound harsh, because they’re useful to many people, but they’re targeted at beginners, so you also let out that impression when using them.

    Using the right platform (like wordpress.org for your blog and/or PhotoShelter, Smugmug, or Zenfolio for your portfolio or archive, to give a few examples) allows you to build your site under your own terms, with SEO advantages and more design flexibility. But then you also have to pay attention to the theme or template you’re using on these platforms. Choosing a weak one (and not even customizing it in any way) makes your site very similar to many other ones out there.

    Even if you’re not in the position to hire a professional web designer or developer, or you’re just starting out, it’s important to do a little research first and choose a strong theme as the foundation for your site.
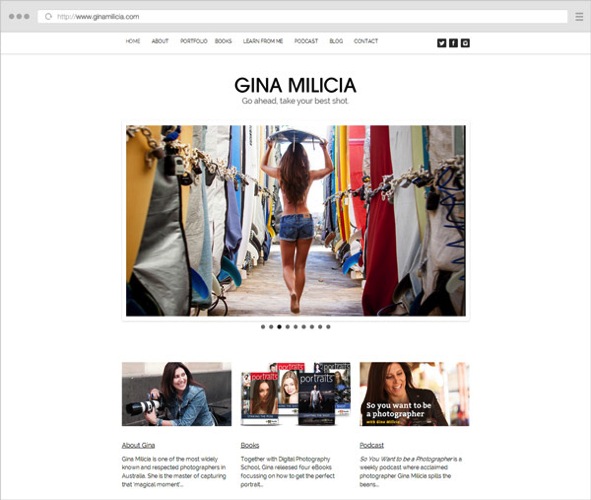
    Example 3 ginamilicia

    Website of our own Gina Milica – dPS writer and ebook author

    If using WordPress, one of the best places to look for quality themes is ThemeForest (this link automatically filters for the term “photography” in the WordPress category, sorted by bestsellers and does not use any referral code).

    Once you have a theme, it’s worth browsing the theme demo, reading its documentation, and getting acquainted with all the various layouts and options it has – they’re building blocks from which you can build your own WordPress-based website.

    d) Learn to prioritize and simplify your website

    You can tell a lot about a photographer’s personality from his website layout. Cluttered headers and overwhelming navigation can leave users confused and make them abandon the site (or at least browse to less important pages).
    By letting go of clutter and focusing on quality over quantity, you can provide a better browsing experience for your users:

    • Provide simpler (and fewer) navigation options. Try to keep menu items around five to seven choice at most.
    • Any new piece of content should replace an older one, instead of just being crammed in there with all the existing content.
    • Leave the header area distraction free (that means: no big blocks of text, client logos or obtrusive subscribe boxes). Just your logo (linking to the homepage), main navigation items and maybe a couple of social media links.
    • Forget about only placing content above the fold (in the first few hundred pixels from the top). People scroll a lot these days (if the content is worth it). So leave some breathing room (whitespace) between elements – it adds legibility and creates a more modern and elegant look.
    • Choose one or two accent colors for the site and go with them, consistently, throughout the site.
    • Question the purpose of every element on your site: Is it distracting people from the main content? Would it be better placed somewhere else? Do you enjoy seeing/using similar elements on other websites?

    Notice I did not mention minimalism in particular, or using the now-popular flat design elements. Prioritizing your content and focusing on a clean design are key ingredients to being more successful with your site.

    e) Focus on your audience

    Your photo website should obviously showcase your work and let your personality shine, but it shouldn’t be built around what YOU like (as the website owner). Instead, you should embark on the long process of defining your target audience and figuring out their likes and needs:

    • Read industry blogs (What shifts are there in the industry? What tools are popular these days?).
    • Get inspiration from other successful sites in your niche (How are other photographers writing to their audience?)
    • Continually get feedback from your readers/clients (Can you see some patterns in the contact messages you get from readers? Can you ask a few clients why they chose you?)
    • Understand the process a client goes through to find a photographer like you, and draw conclusions to inform your website copy and marketing efforts (Where do my target clients go looking for photographers? What are their most common questions and concerns?).
    • Think about what visitors on a page are most likely looking for, and make sure that’s front and center (Does a reader come to your About page to vaguely see if you’re passionate about photography, or in fact to quickly view your experience and location?)

    Answering questions like this should, in time, create a strong new mindset for building a site that’s useful and appealing to your audience. What a great place to mention this quote from marketing expert Seth Godin:

    “The only reason to build a website is to change someone. If you can’t tell me the change and you can’t tell me the someone, then you’re wasting your time.” – Seth Godin

    Example 4 jasonmyers

    2. High-speed internet is becoming the norm

    The spread of broadband connections and mobile networks are changing the way we browse websites. No longer are people expecting to wait too long for a page to load, or to sit and read very long texts (except maybe for long-form articles like this one).

    High-speed connections bring many benefits, but also impatience and superficiality (users not staying long enough on a site to dive deeper into a topic). This has a few important affects on the way you should build your online presence:

    a) Make your website fast, people expect that

    Google expects that too. Photography websites usually have a problem with site speed, due to the nature of the image-heavy pages which require more bandwidth and are slower to load. While using a quality hosting provider is obviously important, the three main performance factors are:

    • The quality of your theme or template (see notes above on this topic).
    • The content you add to the site – unless you’re selling prints or licenses, you should only upload lower-resolution images (at the size displayed by the template, usually no more than 800-1000 pixels on the longest side, maybe larger for home pages or slideshows). With some exceptions, JPG files at a 60-70% quality level is a good compromise (in order to keep file sizes low while maintaining acceptable image quality).
    • Page caching – using performance plugins like W3 Total Cache (and integrating with a CDN (Content Delivery Network) or enabling similar caching features on your platform) can greatly improve your site’s load speed.

    Quality content comes first, but a big chunk of users leave your site if it takes too long to load. As technologies advance, this performance expectation will only get stronger.
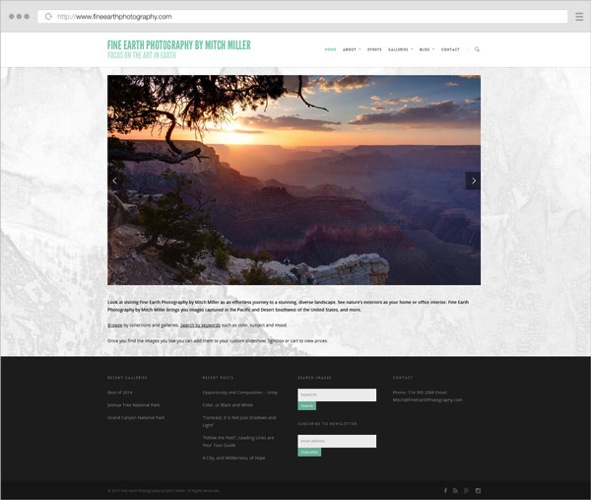
    Example 5 fineearthphotography

    b) Make your pages easy to skim through

    Make no mistake – with faster websites, users’ patience is also stretched thin. In this era of distractions and (false) multi-tasking, rarely do people sit for long periods of time on a single page. Even if they’re fond of your work, the social media feed in the other browser tab pulls them away from your site and back to their notifications. It is, therefore, important to create a smooth browsing experience:

    • Be brief – when writing blog posts or your biography text, try to stick to what matters and get to the point. Quality over quantity, again.
    • Showcase only your best images – having tens or hundreds of images in a slideshow will only dilute the visual impact, and you can’t really expect people to sit through all of it. Especially annoying are very similar variations of certain images. Unless it’s for a client project, show visitors a different thing, not the same subject shot from three different angles.
    • If you have many galleries, try grouping them into collections/categories. A user is more likely to choose from five categories and dive deeper into sub-galleries, instead of choosing from 30 galleries right from the start. It’s the jam experiment all over again.
    • Properly format your text – you can increase legibility by breaking texts into paragraphs with spacing, highlighting important sentences/words and using headlines and sub-headlines. Notice how this article is quite long, yet (hopefully) easy to skim through with all the sub-headlines and bullet points.

    c) Have a clear site navigation, people want to quickly jump from one thing to another

    Since people are so distracted these days, you might be thinking of grabbing their attention and making them stay on your site longer. But this can be done in both good and bad ways. You can either use annoying pop-ups and write bombastic words to trick them into staying, or you can instead create a clean and simple website that’s a joy to use.

    When you visit a website and can quickly find what you’re looking for, you’re a happy reader and more likely to go there again. Don’t you also feel the same way when shopping in a neatly organized store? Whereas on websites where you’re wasting time searching or navigating, your frustration level might prevent you from ever going there again.

    What are the main ways to create a great website experience, you ask?

    • Once again, simplify your navigation – I’m not saying to just have three or four menu items, because that might actually create even more work for the reader to dig out your other pages. Just try to place your important site areas in the navigation, and remove the rest. You can always link to your other less-important pages in other places.
    • Position the navigation consistently – people expect to find the menu in the same spot throughout the site. This is especially important for people with multiple/separate websites. When a visitor reaches your blog, can (s)he see the same menu items and in the same position? Or do they have to learn a new layout again? It’s not difficult, but it’s a hindrance.
    • Provide clear calls-to-action – when users reach the end of the page, where should they go next? Depending on the page, you can let them explore the main menu on their own, or you can guide their actions by having buttons linking to where you want them to browse next (or subscribe to something, or leave you a contact message).
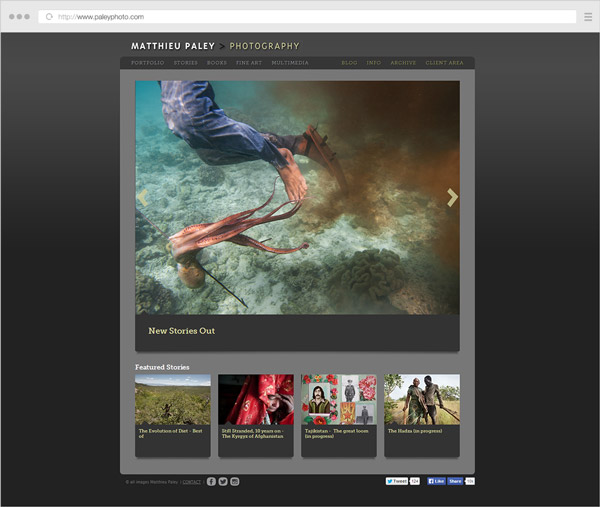
    Example 6 paleyphoto

    Conclusion

    The web design industry is evolving. It’s heading towards clarity and simplification, forced by the expanding number of websites out there.

    There are many other aspects to take into consideration (the rise of mobile devices, higher content consumption rates, new browsing habits, SEO and social media implications, and many more), but they’re the topic of a future article here on dPS.

    If you closely read all the points above, you’ll spot the common thread; helping your readers and always asking yourself how to make things better for them.

    Focusing more on the quality of your work and on providing an honest and friendly browsing experience to your readers can go a long way.

    googletag.cmd.push(function() {
    tablet_slots.push( googletag.defineSlot( “/1005424/_dPSv4_tab-all-article-bottom_(300×250)”, [300, 250], “pb-ad-78623” ).addService( googletag.pubads() ) ); } );

    googletag.cmd.push(function() {
    mobile_slots.push( googletag.defineSlot( “/1005424/_dPSv4_mob-all-article-bottom_(300×250)”, [300, 250], “pb-ad-78158” ).addService( googletag.pubads() ) ); } );

    The post The Future of Photography Websites – Understanding and Adapting to Trends by Alex Vita appeared first on Digital Photography School.


    Digital Photography School

  • Successfully Copy Photos from Your Memory Card to your Computer

    Before you can begin editing your photos you need to get them safely off your camera and onto your computer. Unfortunately this process is often hijacked by (well-meaning if misguided) software which purports to do the work for you but leaves you wondering just where your photos really are! So, to help you understand your options for getting your photos onto your computer, here’s what I recommend.

    First of all: Take Charge!

    The first thing to understand about getting photos from your camera card or camera onto your computer is that you’re in charge. Any application that opens and tries to grab your photos for you can be closed down. If it is not the application you want to use then do just that – close it.

    Now you can take charge and manage the process in a way that makes sense for you.

    Choose your application

    If you’re using Photoshop then you can use Bridge to import your photos. If you are using Lightroom then you can launch Lightroom and import your photos using it. If you don’t have either program, or if you prefer to manage the process yourself, you can do so using Finder on the Mac or Windows Explorer on a PC. I’ll cover this process first, then look at Bridge and Lightroom.

    Importing using Finder or Windows Explorer

    import-photos-using-Windows-1When attached to your computer, a camera or memory card works like any drive, so you can view its contents. You can also copy photos from the memory card onto your computer’s hard drive manually using Explorer or Finder.

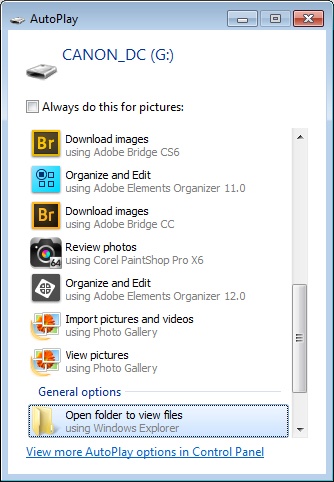
    On a PC, if the AutoPlay dialog appears when you insert your camera card or attach your camera, choose the Open Folder to View Files option.

    If the dialog doesn’t appear, simply launch Windows Explorer and select the drive that represents your camera or memory card.

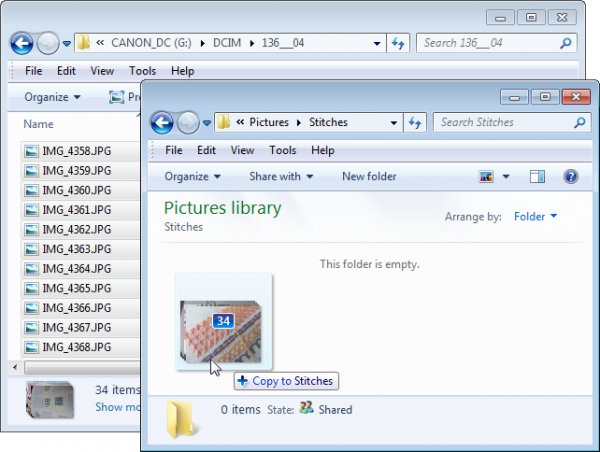
    Navigate to the folder that contains your photos – there may be multiple folders depending on how your camera stores images on the card. You can select the photos, then drag and drop them to the folder of your choice. It’s often easier if you first open the target folder in a second Windows Explorer window so you can drag from one to the other.

    import-photos-using-Windows-2

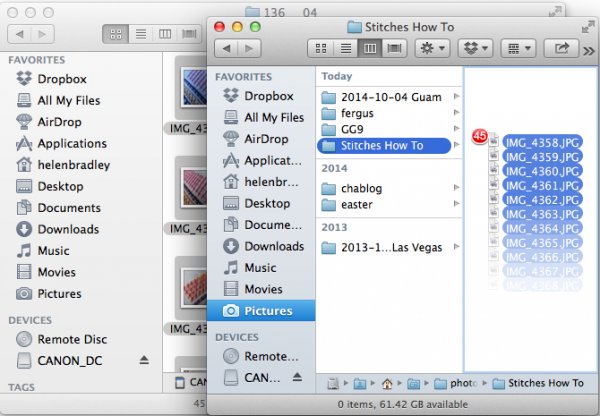
    The process is similar using Finder on the Mac. If iPhoto launches – stop it from downloading any photos and close it. Then you can drag photos from your camera card open in one Finder window, to a folder of your choice open in a second window.

    import-photos-using-finder-on-the-mac

    Importing Photos using Bridge

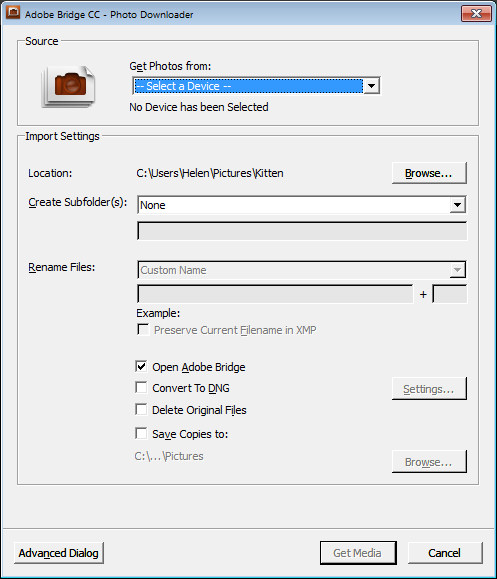
    If you are using Photoshop, launch Adobe Bridge and choose File > Get Photos from Camera. Click the button to open the Advanced Dialog.

    import-photos-using-bridge-1

    From the “Get Photos from” drop down list select the drive letter that corresponds to your camera or card.

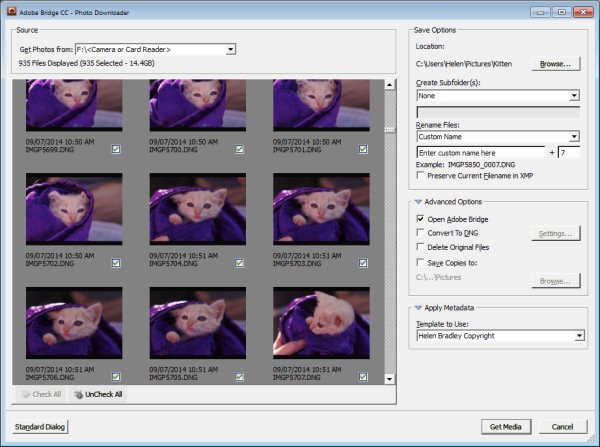
    import-photos-using-bridge-2

    You can now see and select the photos to import. This is one benefit of using Bridge over Windows Explorer – you will see thumbnail images of your raw files so you can see what you are importing.

    On the right of the dialog select the folder in which to place the images. Typically this will be inside your My Pictures folder on your computer but you can choose any location that makes sense to you. However, if you want to find your photos later, on it is essential that you pay attention to the choices you make here.

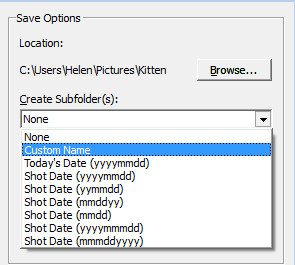
    import-photos-using-bridge-3Once you have selected the folder to import the images into, you can, if desired, select a subfolder. In this way you can group photos by shoot, date or something that makes sense to you.  Bridge will create the folder for you if it doesn’t exist, so choose an option from the Create Subfolder(s) list and, if required, type a name for it or choose the date to use – either the capture date or today’s date. If you don’t want to organize photos in a subfolder then click None.

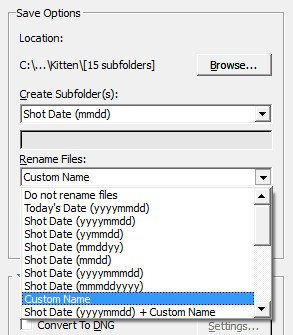
    import-photos-using-bridge-4You can also select to rename files on import, or not. Choose Do not rename files if you don’t want them renamed or alternatively select a naming convention from the list.

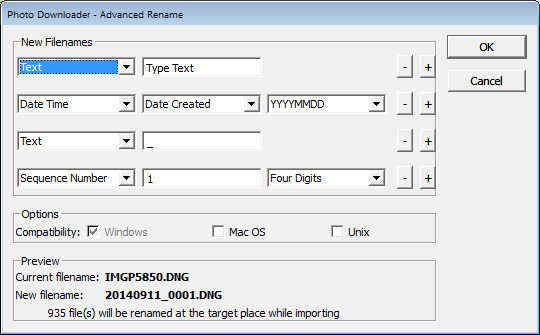
    If you have advanced naming requirements for which the dialog does not provide an appropriate choice, scroll to the bottom of the list and click Advanced Rename to open the Advanced Rename dialog where you can create quite complex naming conventions. Whatever choice you make check the entry just below the dialog where Bridge shows you an example of the naming convention in place so you can check to see if it is what you want.

    import-photos-using-bridge-5

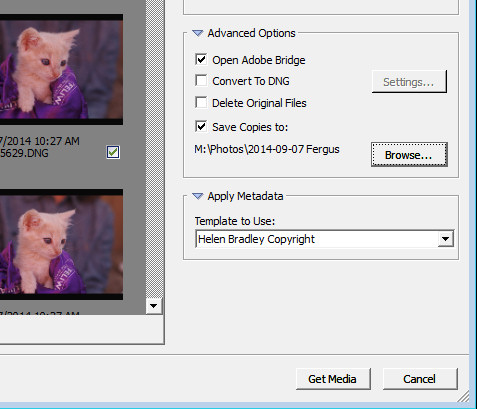
    In the Advanced Options area you can choose other options including Convert to DNG – which is handy if your camera captures in a manufacturer specific format such as CRW, NEF, PEF and so on, but you prefer to work with DNG files. Select this option and Bridge will do the conversion for you.

    You can also select Delete Original Files although this is not recommended. It’s best to make sure that the images are correctly copied onto your computer before the originals are deleted so I suggest you leave this option disabled.

    Bridge offers a backup option so it will make a copy of your photos on import. To do this, click the “Save Copies To:” checkbox and select an alternate location (such as an external drive) in which to save a copy of your photos.

    import-photos-using-bridge-6

    If you have a metadata template already created you can select this from the Apply Metadata drop down list.

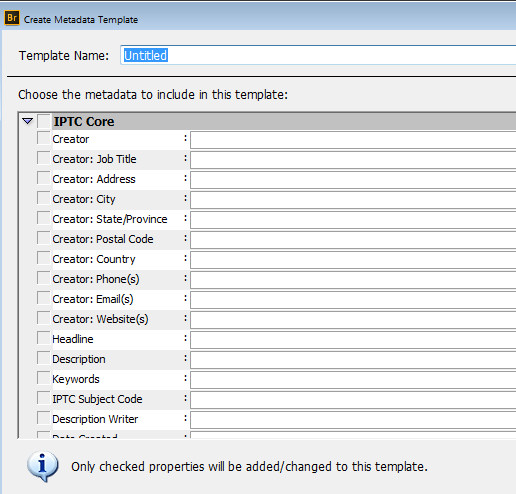
    In future you can create such a metadata template in Bridge by selecting Tools > Create Metadata Template. I suggest that you complete the IPTC Core Data for Creator as well as Copyright Notice, Copyright Status and Rights Usage Terms. Also complete the Type Of Source entry in the IPTC Extension group. When completed this will give you a good all round metadata preset to apply to all your images. For more information on IPTC Copyright Metadata check out this article: Lightroom: Add your IPTC metadata on Import.

    import-photos-using-bridge-7

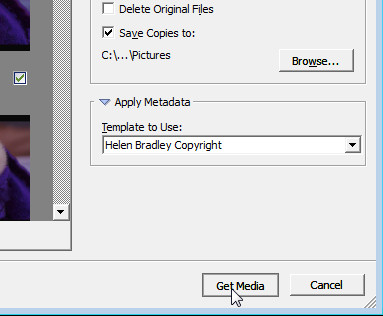
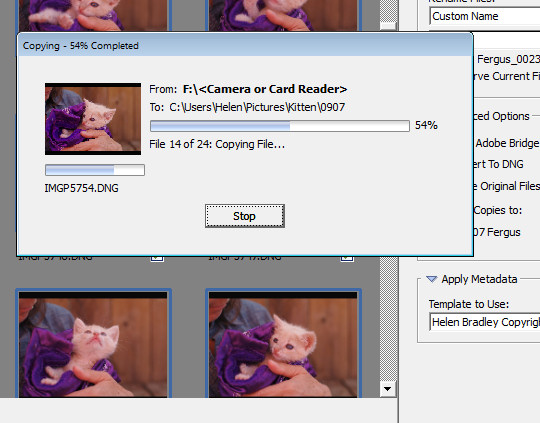
    When you have your import settings selected and configured to meet your needs click Get Media to import the images.

    import-photos-using-bridge-8

    You will see a dialog showing you the progress of the import process.

    import-photos-using-bridge-9

    Importing Photos using Lightroom

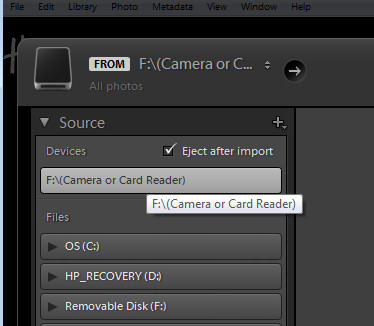
    If you’re using Lightroom then it is the obvious choice for managing the process of importing photos from your camera or memory card. From the Library module click Import, then select the source in the top left corner of the Import dialog.

    import-photos-using-lightroom-1

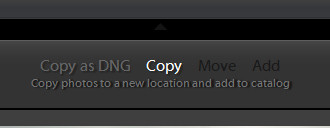
    Across the top of the screen you will see only two choices, Copy as DNG and Copy. This reflects the fact that you’re importing images from a camera card or camera – the options Move and Add are not available for this process (if you do see Move and Add as available options, it appears that Lightroom isn’t recognizing your camera or camera card correctly and even though they may be available you should not use either of these choices).

    import-photos-using-lightroom-2

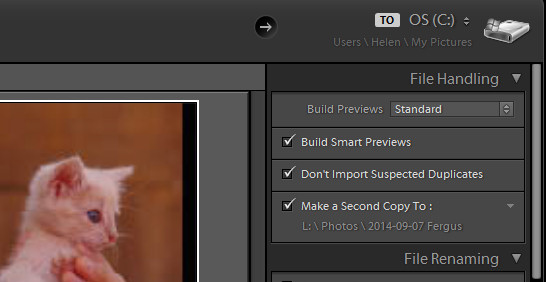
    Next, open the File Handling panel on the right of the screen and select the kind of preview to create – Standard is a good choice. You can choose Build Smart Previews or not (if you’re unsure, check Build Smart Previews).

    Checking Don’t Import Suspected Duplicates will ensure that Lightroom doesn’t import images again, that you’ve already previously imported. This is one feature available in Lightroom which is not also available in Bridge.

    In Lightroom you can also choose to make a backup by making a second copy of your photos to an alternate location as you import them.

    import-photos-using-lightroom-3

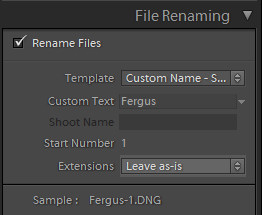
    File Renaming panel allows you to rename images on import – you can select from a range of naming templates and even create your own. Here I’ve chosen to use the Custom Name – Sequence template so I’ve typed the Custom name and the sequence is set to start at 1:

    import-photos-using-lightroom-4

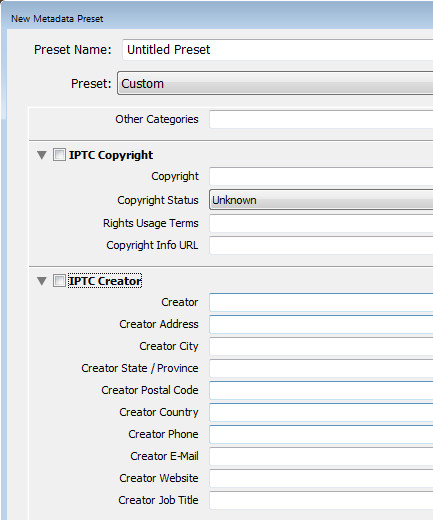
    The Apply During Import panel has an option for applying metadata to the image upon import. Unlike Bridge the drop down list for Metadata presets also includes an option New which you can use to create your own metadata preset. I suggest you complete the IPTC Copyright and IPTC Creator details, and in the IPTC Extension Administrative select Original digital capture from a real live scene from the Digital Source Type drop down list. Type a name for the preset and from the Present drop down list click Save current settings as new preset.

    import-photos-using-lightroom-5

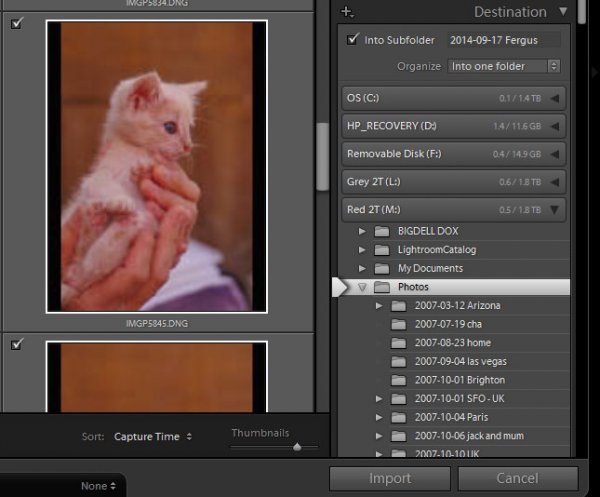
    In the Destination panel you’ll need to select the location into which the images are to be copied. If you’re copying them to your hard drive then typically you’ll select your C drive, then your My Pictures folder which should be in your Users area.

    If you save your images to an external drive then select the external drive and the folder into which the images should be imported.

    If the folder does not exist you can create a subfolder on import by selecting the Into Subfolder checkbox and type a name for the folder that Lightroom should create to import the images into.

    import-photos-using-lightroom-6

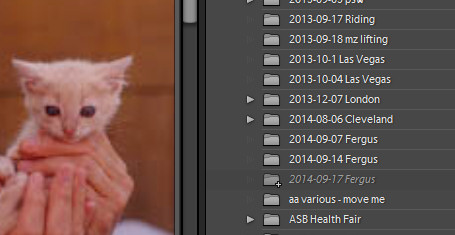
    From the Organize drop down list you can select to put the images into this folder (Into one Folder) or to organize them by date. Whichever choice you make you can see a preview of what’s going to happen in the folder list, allowing you to check and make sure that everything is going to be imported and arranged to your requirements before you go ahead and complete the import process.

    import-photos-using-lightroom-7

    When you’re ready to import the images click Import.

    Whatever process you choose to use for getting images off your camera card onto your computer the acid test for whether it is a good system or not will be if you can find your images later on. Also be aware that it’s advisable to make a backup copy of your images in case your computer is stolen, damaged or your hard disk crashes. For this reason a backup on a removable external drive is a sensible choice.

    Having an import routine that you understand, and can reliably execute, is a necessary first step for any photographer. The worst possible scenario is to have copied your images from your camera card to your computer and erased them from your card, only to discover that you cannot find the images. It’s a scenario that way too many users have encountered – don’t let it happen to you!

    Find a video version of this blog post here:

    Do you have any other copy and import tips? Please share in the comments below.

    googletag.cmd.push(function() {
    tablet_slots.push( googletag.defineSlot( “/1005424/_dPSv4_tab-all-article-bottom_(300×250)”, [300, 250], “pb-ad-78623” ).addService( googletag.pubads() ) ); } );

    googletag.cmd.push(function() {
    mobile_slots.push( googletag.defineSlot( “/1005424/_dPSv4_mob-all-article-bottom_(300×250)”, [300, 250], “pb-ad-78158” ).addService( googletag.pubads() ) ); } );

    The post Successfully Copy Photos from Your Memory Card to your Computer by Helen Bradley appeared first on Digital Photography School.


    Digital Photography School

  • Weekly Photography Challenge – Ocean Waves

    There is something about the ocean that is mesmerizing. Check out these images to see some of the power of the sea.

    William Warby

    By William Warby

    Weekly Photography Challenge – Ocean Waves

    This week it is your turn to go photograph the ocean. If you do not live near the sea find a body of water you can use as substitute and get creative. A large lake or reservoir could do the trick.

    Use some different techniques such as varied exposure times. See this for more tips on photographing the waves. Play with your composition to create a unique result.

    Neville Nel

    By Neville Nel

    Bill Devlin

    By Bill Devlin

    Aristocrats-hat

    By Aristocrats-hat

    Susanne Nilsson

    By Susanne Nilsson

    Share your ocean images here:

    Simply upload your shot into the comment field (look for the little camera icon in the Disqus comments section) and they’ll get embedded for us all to see or if you’d prefer upload them to your favourite photo sharing site and leave the link to them. Show me your best images in this week’s challenge. Sometimes it takes a while for an image to appear so be patient and try not to post the same image twice.

    Kris Williams

    By Kris Williams

    Steve Corey

    By Steve Corey

    googletag.cmd.push(function() {
    tablet_slots.push( googletag.defineSlot( “/1005424/_dPSv4_tab-all-article-bottom_(300×250)”, [300, 250], “pb-ad-78623” ).addService( googletag.pubads() ) ); } );

    googletag.cmd.push(function() {
    mobile_slots.push( googletag.defineSlot( “/1005424/_dPSv4_mob-all-article-bottom_(300×250)”, [300, 250], “pb-ad-78158” ).addService( googletag.pubads() ) ); } );

    The post Weekly Photography Challenge – Ocean Waves by Darlene Hildebrandt appeared first on Digital Photography School.


    Digital Photography School