Category: Photography

  • 4 Tips for Doing Photography on a Budget

    Several times in the past few months people have asked me how to get into photography without spending a lot of money. I must admit the idea of emptying your wallet to get all the camera bodies, lenses, flashes, tripods, and other gear you need to do some serious photography can seem quite daunting, it certainly was for me when I first got bitten by the photography bug.

    The good news is you don’t really need the latest, greatest, and most expensive gear to make some stunning images thanks to the magic of modern technology. In many cases all you need to do some serious picture-taking is the camera you probably already have with you: your smartphone. However as good as modern mobiles can be, they do have some serious limitations (particularly due to their small image sensors) like limited low-light capabilities, and non-zooming lenses. If you really want to up your game and take advantage of the bigger image sensors, larger lens selection, and incredible accessories available for DSLR or mirrorless camera without breaking the bank – here are a few options to get you started.
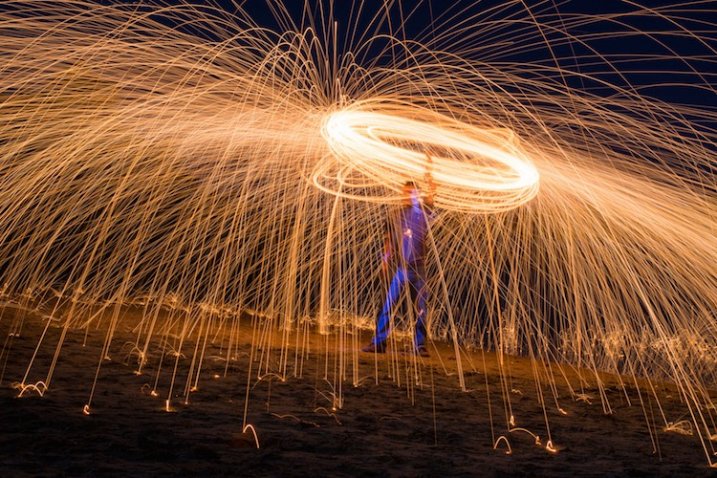
    photographing-on-budget-beach-sparks

    You don’t need a lot of money to take pictures like this. A basic camera and some creativity will do just fine.

    1. Buy used gear

    New cameras sure are nice, and I can certainly understand the desire to have a model with the most megapixels, best image sensor, highest ISO, fastest autofocus, and coolest bells and whistles. But, before you rush off to drop hundreds or thousands of dollars on a brand new model though, consider this – every picture you have ever seen was taken with a camera older than one you can buy today.

    Think of the most famous photographs in history: A man facing down a row of tanks in Tiananmen Square. Muhammad Ali standing triumphant over a defeated Sonny Liston. The 1984 National Geographic photograph of a young woman from Afghanistan. These were all taken on film cameras, with capabilities outmatched in almost every possible way by even the cheapest digital camera today. Certainly new cameras make the act of taking pictures easier in many ways with bright screens, easy-to-use controls, and a host of other features designed to help you get the hang of your hobby. But if you’re pressed for cash buying an older, used camera can be just as good.

    photographing-on-budget-cottonwood-borer

    Photo of a cottonwood borer beetle taken with my old Nikon D200 that is far less capable than any new DSLR on the market today.

    To put my money where my mouth is, I take most of the pictures on my weekly 50mm photo blog not with my new Nikon D7100, but with my ten-year-old Nikon D200, which can be found used online for a fraction of what a brand new camera costs today. It’s only 10 megapixels, and doesn’t have features like wi-fi, a tilting screen, or even the ability to use live view – but it allows me to take beautiful images and that’s often the only thing that matters.

    Buying a camera just a few years old can save you significant amounts of money while giving you a high-tech photographic instrument that your photographic forebears from decades gone by would only have dreamed about. Older cameras like the Canon Rebel T2i, the Nikon D80, Olympus PEN E-P2 and many others don’t stack up to modern cameras when you look at marks on a checklist of features, but all of them are capable of producing amazing images, and can be purchased used for much cheaper than any new camera today. This applies to more than just camera bodies, and you can find very good prices on accessories like lenses, flashes, tripods, and other equipment too.

    My brother took this shot with a ten-year-old DSLR and a macro lens he found when cleaning out his basement.

    My brother took this shot with a ten-year-old DSLR and a macro lens he found when cleaning out his basement.

    I prefer buying used equipment from sites that offer some type of warranty or trade-in period if you decide you don’t like what you receive. Two of my favorites in the United States are KEH.com and Adorama Used. Other sellers like B&H offer used cameras, and you can often buy refurbished equipment directly from camera manufacturers that even come with a warranty. Some photographers I know get a lot of high quality gear for cheap on sites like eBay and Craigslist as well. Be forewarned that sites like these often make no guarantees as to the quality of what you are buying, but as long as you are careful you can find some good deals.

    For some buying tips read: How to buy used camera gear 

    2. Make your own gear

    If you’re like me you may find yourself scrolling through websites, or flipping through catalogs, dreaming of all the camera gear that you don’t have, mostly because so much of it is too expensive. While many common photography accessories can be purchased used, you can actually make your own versions for almost no money at all. These won’t stand up the the daily rigors of a professional photography environment, but most offer similar functionality as their full-priced name-brand counterparts for far less cash. From do-it-yourself tripods to homemade lighting kits, the internet is brimming with articles, videos, and tutorials for enterprising photographers looking to fashion their own equipment to save a buck or two. The end result might look the same as a professional product, but you may be quite surprised at what you can come up with to expand your photographic horizons with a bit of searching and a willingness to try making things by yourself.

    Read these dPS articles for some DIY projects:

    • Creating Effective DIY Studio Lighting With Household Items
    • 5 DIY Hacks to Have in Your Camera Bag
    • How to Make a DIY Light Panel or Scrim
    • DIY Light Modifier You Can Do With Savage Translum Material
    • DIY How to Build and Use a Reflector to Take Better Portraits
    • How to Make An Inexpensive Light Tent – DIY

    As an example, here’s a photo of a toy train I took with my son one morning before I left for work. It required no special equipment, and took about 10 minutes to set up.

    A toy train, seen in a whole new light.

    A toy train, seen in a whole new light.

    You might think a photo like this would require an expensive camera, a fancy studio, and a lot of costly lighting rigs, but in truth it was quite the opposite. I shot this using my trusty D200 on our dining room table with a bit of aluminum foil taped to a board.

    No fancy lighting or expensive equipment required.

    No fancy lighting or expensive equipment required.

    This is only one case scenario out of thousands, and just goes to show that a bit of out-of-the-box thinking, and some creativity, can net incredible results without requiring a trip to the bank. While spending money on additional gear and equipment can certainly boost your capabilities as a photographer, this is just one way to take you skills to the next level without breaking the bank.

    3. Learn to use the equipment you already have

    Recently I was talking about cameras with a fellow photography enthusiast who was a bit frustrated with his DSLR. He wanted to shoot in Aperture Priority but have his camera also take care of setting not just the shutter speed but the ISO as well. As he told me about the new camera he was thinking about buying and pondering how he could save enough money to get it. I asked if I could look through his camera menus a bit. A minute later I found that his camera did indeed have an Auto ISO setting which did exactly what he was hoping, and saved him hundreds of dollars right there on the spot.

    This is only the most recent example of a phenomenon I have encountered many times; the camera you already have can probably do a lot more than you realize. If you’ve never sat down and read the manual for your camera, you might be in for a pleasant surprise when you find out how much it can actually do. You can almost always find online tutorials dealing with your specific camera with a bit of internet searching.

    The equipment I used to shoot this was not expensive (a $ 100 pocket camera) but I did have to learn about lighting, posing, focal lengths, background compression, and other aspects of photography.

    If you want to seriously enhance your photography skills without buying a single piece of new gear, one of the best routes you can take is to learn from others. Most cities have photography clubs where members meet regularly to teach workshops, share tips, or just gather to talk about their favorite hobby with fellow like-minded individuals. Often these groups and clubs require nothing of new members except a passion for photography. Those that do charge a fee usually keep it reasonable and have a good motive for doing so; membership dues give the group access to better facilities, early sneak peeks at new equipment, or even a notable guest speaker.

    If you don’t have one of these groups in your area there are plenty of online forums as well, such as the ones right here at Digital Photography School. Joining a community, whether face-to-face or online, is a fantastic way to learn more about the capabilities of your gear, teach yourself about the principles of photography, and make personal connections that can help you when you need it. No new equipment is required – just a willingness to meet people, stretch yourself, and try something new.

    4. Get out and shoot photos!

    This might sound a bit silly, which is why I’m leaving this until the very end. I often have conversation with people who want to improve their photography skills but think they can only do it by spending money. One of the best ways to improve as a photographer is to actually go out and take pictures, and if  you already have a camera this requires spending no money at all.

    It’s easy to think that buying a new camera, lens, flash, tripod, or camera bag will inspire you to get your creative juices flowing and take better pictures, but after a while all that gear will usually start collecting dust just like the camera equipment you already have. Whether you have a mobile phone, a pocket camera, or a full-fledged DLSR or mirrorless model, you are in possession of equipment that is light years beyond what your forebears had only a few decades ago. The secret to improving your photography is not about spending even more money on an ever-growing cache of equipment, but simply taking what you already have, going out into the world, and using it.

    Capturing the beauty of nature with an old and relatively cheap iPhone 5.

    Capturing the beauty of nature with an old and relatively cheap iPhone 5.

    What about you? What are some of your favorite low-budget tips for improving your photography? Share your thoughts in the comments below.

    googletag.cmd.push(function() {
    tablet_slots.push( googletag.defineSlot( “/1005424/_dPSv4_tab-all-article-bottom_(300×250)”, [300, 250], “pb-ad-78623” ).addService( googletag.pubads() ) ); } );

    googletag.cmd.push(function() {
    mobile_slots.push( googletag.defineSlot( “/1005424/_dPSv4_mob-all-article-bottom_(300×250)”, [300, 250], “pb-ad-78158” ).addService( googletag.pubads() ) ); } );

    The post 4 Tips for Doing Photography on a Budget by Simon Ringsmuth appeared first on Digital Photography School.

    Digital Photography School

  • Allen & Company Media Conference, 2015 — Sun Valley, ID

    Tesla and SpaceX CEO, and Solar City Chairman, Elon Musk, Sun Valley Idaho, Allen & Company Conference, July 2015

    I published I set of 247 billionaires and media moguls from last week’s Allen & Company Media Conference in Sun Valley, Idaho. You can see the entire set here.


    Thomas Hawk Digital Connection

  • What is Fine Art Photography and How to Do it?

    Digital photography has changed the way people take photos, and how many are taking them. Anyone with a camera can be a photographer these days, and many of those want to be professional photographers or artists, though they can be the both. All over the internet there is a rise of those who are calling themselves Fine Art Photographers; so maybe it is time to look into what they are and how they are different to the usual photographers.

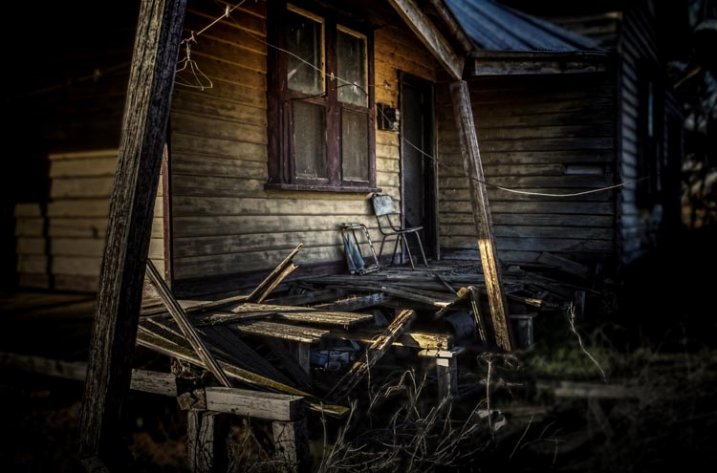
    Below is what I consider to be one of my fine art images.

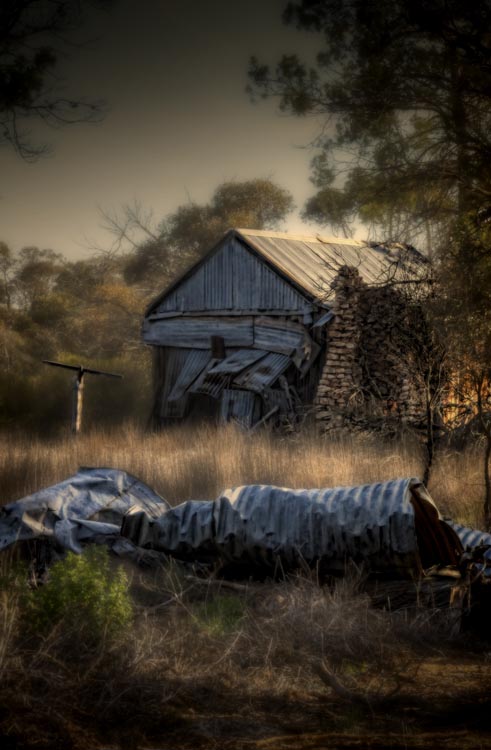
    Fine Art Photography 5

    Home built in the 30s and then abandoned only a few years ago.

    I have lots of images that may be art, but they are not what I would call fine art photographs.

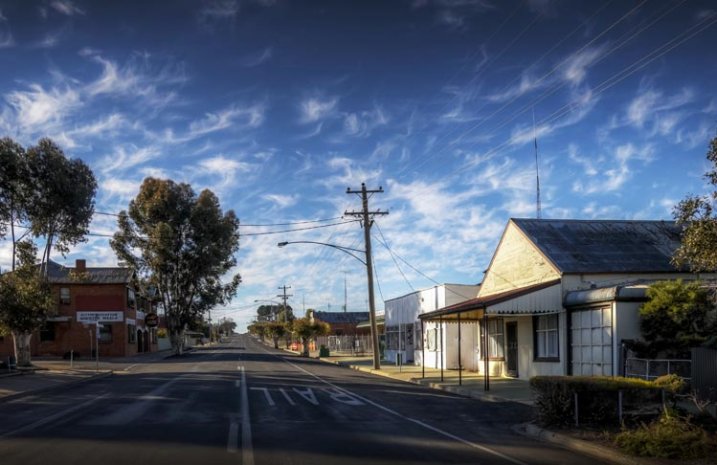
    Fine Art Photography

    The main street of a small town in Australia.

    Both images would look nice framed and hanging on a wall, but if what you are trying to achieve is fine art, then only the first one would really fit that category.

    Recently I heard a photographer online saying that you could go wacky on an image, add a weird curving blur, then call it fine art. That doesn’t make an image artistic, that just makes it silly.

    There doesn’t seem to be a definitive explanation or definition for what Fine Art Photography is, but there do appear to be things that help define what it is.

    When I was doing my fine art degree, part of what was required was to take turns putting our work up on the wall for critique. During these sessions we talked about techniques, what was working, and what wasn’t. We would also discuss the ideas behind the work and where we wanted to go with it.

    On top of those we had individual tutorials with lecturers to help us discuss our ideas and how to achieve them. The idea was to get a plan together of how to go about doing the work, what we could use to support it, and looking at other artists that did similar work to see how they conveyed their ideas. These were invaluable, in that they helped us work out what we were doing and the direction we needed to go.

    Fine Art Photography 3

    Consumerism, everything becoming obsolete.

    Artists Vision

    Before work can become fine art the artist has to have a vision of what they think their work will look like.

    An Idea

    Fine art is about an idea, a message, or an emotion. The artist has something that they want to have conveyed in their work.

    That idea or message may be something small, a single word such as abandon, or it may be a whole statement, like exploring the way the moon affects the tides. It is a start. It is like a hypothesis.

    Technique

    The work you create to demonstrate your vision and ideas has to have a consistency to it. When all the work is together it has to have similarities. Often artists will use the same medium and techniques for each idea.

    Body of Work

    In the end there has to be a body of work that shows your ideas, subjects and techniques. If you were to get your images into a gallery there would need to be a uniformity to them all.

    Artist Statement

    Finally you would most likely need an artist statement. A short explanation of what the work is about, why you created it and how.

    When you go to a gallery you might look at the work and wonder what it is about, so you look for the artist statement. It will help you figure out what the artists intentions were, the reasons why, and how they created that work.

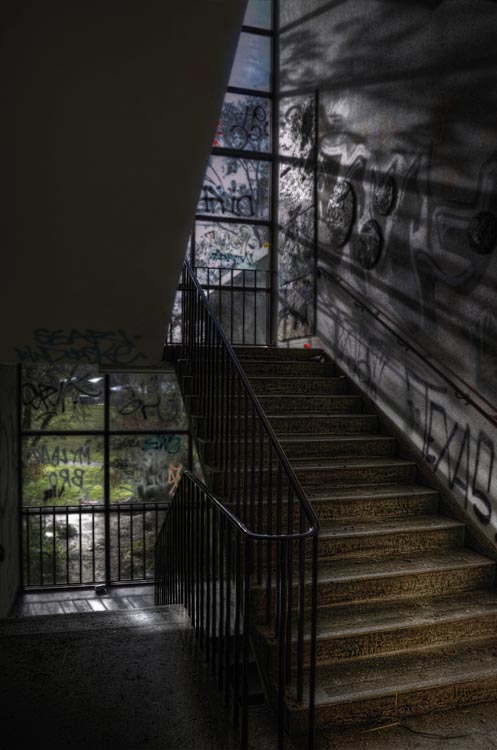
    Fine Art Photography 8

    An high school that has been closed a while the vandals have taken over, but the light still comes through the windows.

    So you want to be a Fine Art Photographer?

    You don’t need to have a degree in fine arts to be a fine art photographer, but you do need to think carefully about your work and what you want to achieve with it.

    Getting your edeas together

    Brainstorming is a great idea, sitting down and just writing ideas down.

    • What topics do you feel passionate about?
    • What messages do you want to convey?
    • What subjects do you like to photograph?
    • What techniques are you interested in?

    Just write and don’t take too much notice of what you are writing, it is about getting your thoughts down on paper. It might not make any sense at first, but as you work through your ideas it will start to do so.

    Fine Art Photography 4

    Brain storming the idea of consumerism. It doesn’t always make sense, but it is about getting your ideas down.

    Once it is done you should have the bare essentials for what you want your work to be about. You might decide to disregard a lot of it, but there should be enough there to help you work out what you want to do, and which direction you want to go.

    Deciding on your topic

    Topics can be anything. They don’t have to be heavy topics like ones that are really political, or socially conscientious. I used consumerism, as I’ve had a couple of exhibitions that were based on that concept, and the idea that we were turning our homes into massive rubbish (garbage) bins.

    Working out your message, or the motivation behind it, can be a little bit more difficult. Perhaps for something like consumerism you might want to explore the impact it has on the environment, or what is going to happen to all the goods that we keep buying.

    Finding the subject for your photos

    What is your subject matter going to be? Would you photograph rubbish piles? Maybe look directly at the different brands, and all the different products they come out with. What your images are going to be of, is just as important, and should link to your topic or message.

    Fine Art Photography 6

    Once a home, built over a hundred years ago, now left, the outside crumbling and grass trying to cover it over.

    Working out your technique

    The technique isn’t so important, it just has to be the same for all the images. You can experiment to start with, to help you work it out, but once you have what you want then your body of work has to all be similar. You are looking to create a cohesive portfolio that will look great, and connect together when on display.

    Creating your body of work

    You should make as much work as you can. If you are planning an exhibition, then you need to know now much work you will need for it. When it is all done there are going to be pieces that simply won’t work and you will be better off leaving them out. It is difficult to work out what is best for an exhibition, and just because you made it doesn’t mean it belongs.

    Your Artist Statement

    Finally you need to write that artist statement. It needs to be written in what they call artspeak, or language that fits in with the art world. It has to sound good. If you are applying to galleries then your artist statement is what they are going to take notice of, just as much as your work.

    Here is an example of one written about work around the theme of abandon:

    It is human nature to sculpture and contour the environment into shapes and forms that we find pleasing. We live in these buildings, work in them, and find entertainment and nourishment in them. We spend time in rooms designed to help us learn through many stages of our lives. When the buildings can no longer be maintained they fall into decay quickly. My work is looking at the rate of decay and how similar it is to the human condition. How easily we can fall into the same sort of decay when we are no longer being cared for. Through photographs of old, and recently abandoned buildings, I want to explore the metaphor of the human condition with the deserted buildings.

    I just made this short statement up, but I hope it gives you an idea of what an artist statement is like. If you do a google search you will find many places that can help you write one. You will also be able to find examples of them to see what other artists are doing, and how they are creating their work.

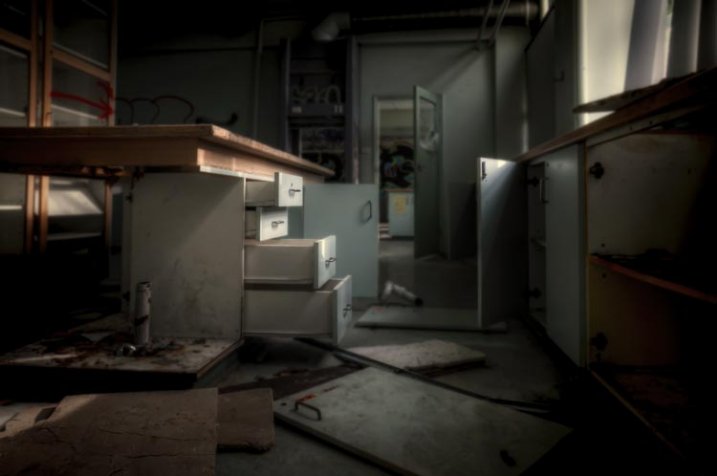
    Fine Art Photography 9

    The old science room in the closed school. Things are scattered and nothing makes sense.

    Finally

    The work should be about you, and what you are passionate about. Don’t worry about what other people think. If you know what your vision is, what your subject is, and how you want to create your work, then your statement should come easily and you will find yourself on a new path, an exciting one.

    If you are just making lovely images without any of the above, then chances are you aren’t creating fine art photographs. However, if you have a vision or message, and have ideas that you want to convey through your work then you are more likely to be creating fine art. Perhaps you should think about what you want your work to be about. It is also fine to just take photos because you enjoy it.

    googletag.cmd.push(function() {
    tablet_slots.push( googletag.defineSlot( “/1005424/_dPSv4_tab-all-article-bottom_(300×250)”, [300, 250], “pb-ad-78623” ).addService( googletag.pubads() ) ); } );

    googletag.cmd.push(function() {
    mobile_slots.push( googletag.defineSlot( “/1005424/_dPSv4_mob-all-article-bottom_(300×250)”, [300, 250], “pb-ad-78158” ).addService( googletag.pubads() ) ); } );

    The post What is Fine Art Photography and How to Do it? by Leanne Cole appeared first on Digital Photography School.


    Digital Photography School

  • How To Create Two of the Same Person in One Photograph Using Photoshop

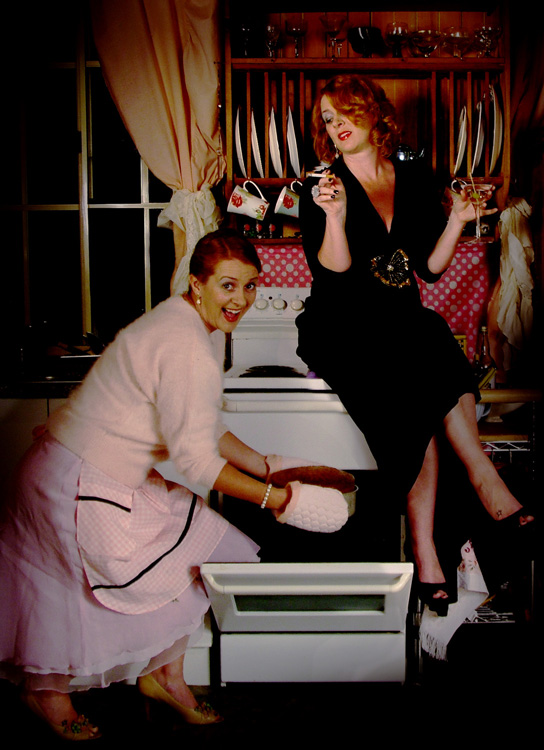
    This is a fun twist on portraiture that can often tell a bit more of a story about your subject, by allowing them to reveal two or more sides to their personality. It’s an old photography trick used in the days of the darkroom, and now with modern technology can be done in minutes with a few simple steps in Photoshop.

    First you are going to need two or more photographs of your subject, so find yourself a victim to experiment on, or try a self portrait. The main trick to this technique is to get things set up well in the shooting stage so everything goes smoothly when you go to edit.

    Getting Set Up to Shoot

    You’ll need to put your camera on a tripod. Your tripod position, lighting setup, your camera and its settings, all need to remain the same throughout the shooting session. Once you’re set up don’t move or twiddle anything, otherwise things can get a bit wobbly when you go to blend your final images.

    It is possible to do this with natural light, but you’ll have to work fast before the light changes too much. If you don’t have studio lighting you can try light painting or some of the other DIY lighting tips from my article Creating Effective Studio Lighting with Household Items

    Start with a simple set such as two chairs. To make it a bit more interesting, add something like a small table in between with a prop or two; your subject could be sharing a cup of tea or a glass of wine with themselves.

    portrait-photography-trick02

    Positioning your subject

    Once you have set your stage and are happy with how it looks through the viewfinder, bring in your subject to test out the lighting on them for both positions. Then you are ready to roll.

    Think about how the different versions of your subject will interact with each other. Will they be in conversation, raising a glass congratulating themselves on a portrait sitting job well done perhaps? In such a case it’s important to get their line of site correct to achieve the illusion of the subject looking at themselves.

    portrait-photography-trick03

    It is a good idea, when first attempting this, to ensure there is no overlap of the two versions of your subject, such as a stray foot, to save you any extra fiddling about in the editing stage. You can help to keep both versions separate by placing a small marker, such as a tiny bit of tape on the floor in the middle of your setup, so your subject knows where that invisible overlap line is located.

    For the shot below I had the female version lean on a rolled up towel to imitate the knee of the male version of herself. This gave a natural lean to her pose and helped create the illusion that she is actually leaning on the male version’s lap.

    portrait-photography-trick04

    Take as many shots as you and your portrait subject have the time and patience for. The more versions you have, the better chance of finding a perfect match in the editing stage. Try different facial expressions and poses for each version of your subject.

    Easy editing

    We are going to be working with layers here, but if that’s new to you don’t panic! It really is easier than you might think. Just follow the few steps below and you’ll be pulling a photographic rabbit out of a Photoshop hat in no time.

    • Open your favorite image of each version of your subject in Photoshop.
    • Make sure both images are the same size.
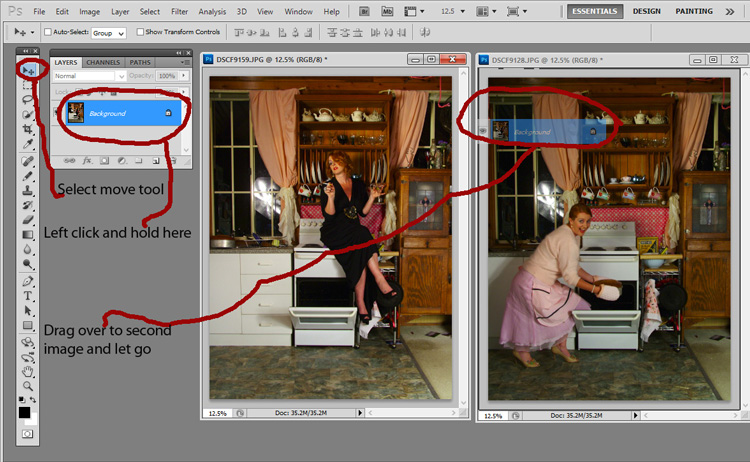
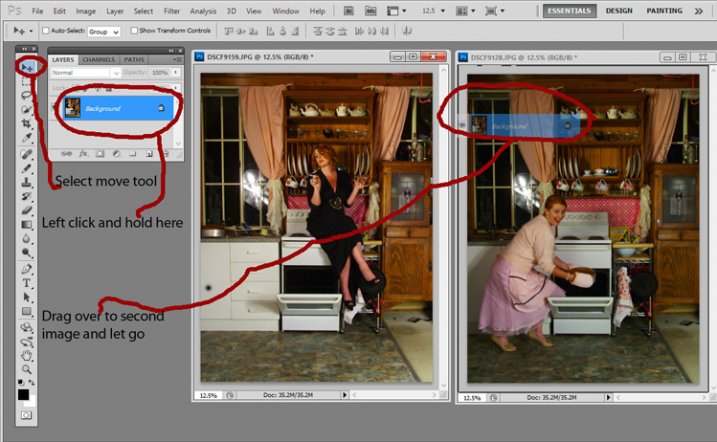
    • Using the Move Tool, click on the thumbnail of the first image in its Layers Palette, drag over the top of the second image and let go.
    • You now have both images on top of each other in the same file, seen as Background and Layer 1 in the Layers Palette (shown below).

    portrait-photography-trick05

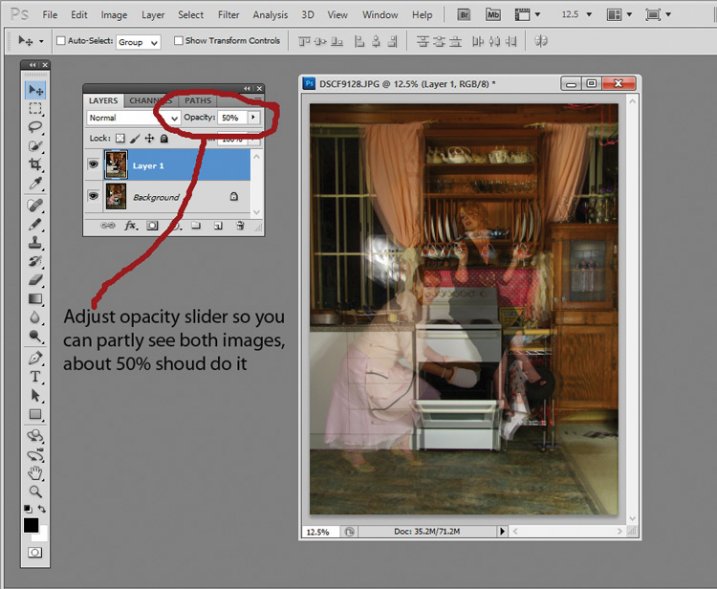
    • You’ll need to see both versions, so go to the Layers Palette and select the Layer 1 thumbnail.
    • Using the Opacity slider just above it, slide it around until you can see both images, about 50% usually works the best.

    If you haven’t moved anything about during shooting the images should line up perfectly. In which case, you’ve done the hardest part already, it’s smooth sailing from here.

    If your setup got bumped, you can probably still line things up well enough to work. Just use the Move Tool to slide around top image and try and get the best alignment. It helps to zoom in to check accuracy (you can also use Auto-Align Layers” in the edit menu but it may be fooled by the subject – but give it a try).

    portrait-photography-trick06

    Now the fun part

    • Select Layer 1 in the Layers Palette.
    • At the bottom of the Palette is a little square with a circle in it, commonly known as the Add Layer Mask button, or as I like to call it, the Where the Magic Happens button.
    • Click on it and a Layer Mask white box will appear next to the image thumbnail.

    It’s not sounding very magic so far, but hang in there.

    • The Background and Foreground Colour squares at the bottom of your Tools Pallette will need to be black on the top (foreground color).
    • Select a brush, set to zero hardness and get ready to make magic happen.
    • Set both Layer and Brush Opacity sliders to 100%.
    • Make sure that white Layer Mask thumbnail is still selected.
    • Start brushing and watch as the second version of your model magically appears, tada!

    portrait-photography-trick07

    Don’t worry if you go too far, and erase something more than you intended, if you do, you can just switch those little black and white boxes in the Tools Pallette with the tiny arrows (or press X on your keyboard) so white is on top, then brush back in to reverse the mistake (black conceals, white reveals).

    That’s it! All the tricky stuff done and dusted.

    Now you simply flatten the image. File> Flatten Image, and all that is left is to edit as you would any other photograph. For this image it was a crop here, a filter and color adjustment there, and erasing the umbrella light reflection in the window.

    portrait-photography-trick08

    This technique is something you can really play with, from building sets and getting creative with props, or simply using it to get more of a story from your portrait subject. Either way, it is great fun to try. If you do, please share your results in the comments. Happy experimenting.

    googletag.cmd.push(function() {
    tablet_slots.push( googletag.defineSlot( “/1005424/_dPSv4_tab-all-article-bottom_(300×250)”, [300, 250], “pb-ad-78623” ).addService( googletag.pubads() ) ); } );

    googletag.cmd.push(function() {
    mobile_slots.push( googletag.defineSlot( “/1005424/_dPSv4_mob-all-article-bottom_(300×250)”, [300, 250], “pb-ad-78158” ).addService( googletag.pubads() ) ); } );

    The post How To Create Two of the Same Person in One Photograph Using Photoshop by Lea Hawkins appeared first on Digital Photography School.

    Digital Photography School

  • The 5 Biggest Mistakes Newbie Car Photographers Make

    It’s true, we all make mistakes, that’s what makes us human, right? Well yes, but there are some mistakes that can, and should be avoided, when it comes to photography. In this article we will be talking about automotive photography in specific. You could be shooting cars for years but if you don’t fix your mistakes, how do you expect to get some great shots?

    These are the 5 biggest mistakes that car photographers make when first starting out. Don’t worry, I will tell you how to fix those mistakes so other car photographers stop calling you a newbie, and they might actually ask “HOW?”

    1. Not paying attention to the background

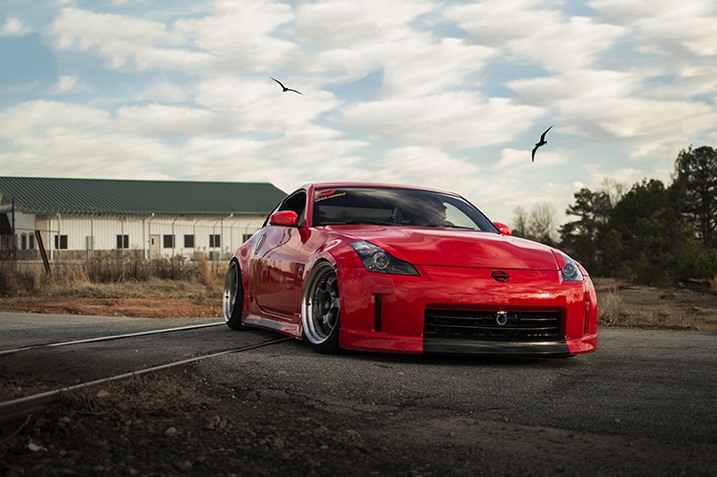
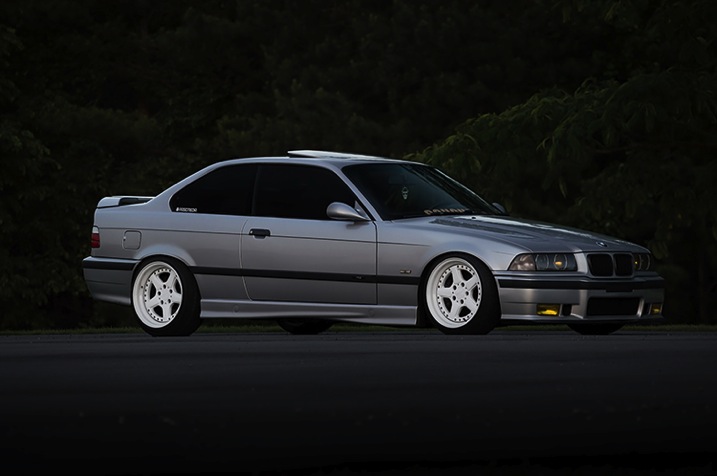
    IMAGE1

    This is a really big no no. If you are striving to be a professional photographer, or even if you’re just shooting for fun, you must pay attention to your surroundings. I have seen way too many pictures where a tree is growing out of a car, or there is trash on the ground, and other annoying little objects that take away from the focus of the car.

    If there is a tree in your way, move around. Walk around the car and find a better angle or even move the car if you have to, just make sure there isn’t anything growing out of top of the car. If there is trash on the ground, pick it up and move it (I recommend carrying gloves with you in case you have to deal with some nasty trash).

    If there is something that you just simply can’t avoid then don’t worry, you can still remove it in post-processing using the Clone Stamp Tool or Content-Aware fill, but use those as the last resort. You should try to get the best shot that you can in the camera so you don’t have to waste precious time cloning out all that stuff later.

    2. Not making sure the car is spotless

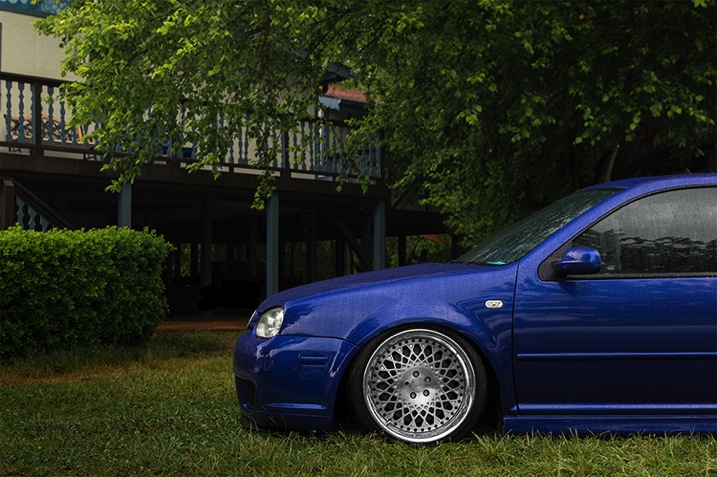
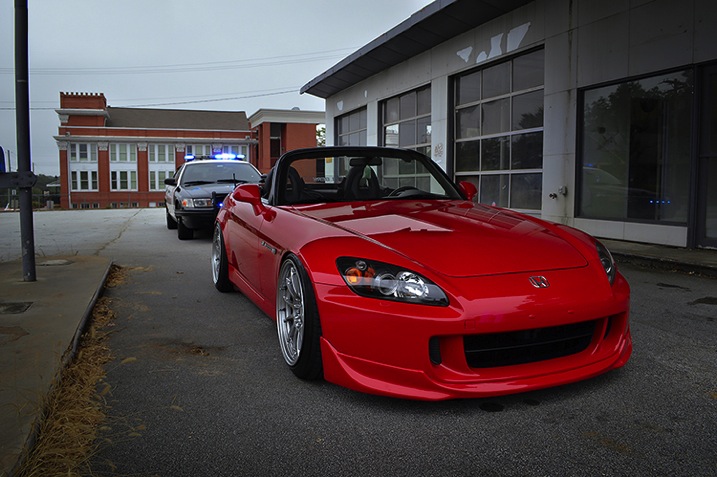
    If you’re an avid car photographer then you MUST carry a rag of some sort (preferably lint-free) that you can use to wipe any dirt off the car. Yes, you can take out little dirt specks in post-processing, but it will make your life much easier to just take care of it on the spot. It’s not hard to just take the rag and wipe down any dirty areas. This will not only make the car look better/cleaner, thus making your shots look that much more professional, but it will also save you time in post-processing so you can worry about more important stuff.

    IMAGE2

    3. Not having a circular polarizer

    When it comes to shooting cars, it’s like shooting into a mirror; EVERYTHING is reflected off the car. You don’t want that, especially if you have some annoying stuff going on back there like trees, other cars, etc.

    That’s where the handy circular polarizing filter comes into play. This will probably be one of your most used pieces of equipment, and should be the very first investment you make if you’re thinking about shooting cars.

    Everyone has mixed feelings about polarizers when doing other types of photography, but in car photography there’s no point in even talking or arguing about it, you NEED a circular polarizer. Just don’t buy a cheap one because they will only ruin your images, instead go for a well known B+W circular polarizer, that’s what I, and many other car photographers use, and I haven’t heard any complaints about it.

    What is a circular polarizer? Well, it’s basically a little filter that you screw onto the end of your lens, which you can then turn to block off reflections in any part of the frame. What’s cool about it is that you can take multiple shots with different reflection points by using a tripod and then just combining all the images in post-processing to get the best results. Just make sure you don’t go too far, you still want to keep some reflections to show the lines and curves of the car.

    IMAGE3

    4. Not using a tripod

    Speaking of tripods, you need one of those as well. Not just because of the reflections, but to get the cleanest and sharpest shots possible. If you’re like many beginner photographers you have a hard time keeping your hands steady, and it will take some time to master that. If you have a tripod, you can minimize camera shake, which in return, gives you the sharpest images.

    Another awesome reason to use a tripod is to do light painting at night. Simply set your exposure to a few seconds, walk around the car with a light source, and in minutes you will have a pretty sick looking shot of the car. Everything you painted over will be visible, and everything else will probably be dark, creating a pretty cool effect that you can’t do without a tripod.

    Taking multiple exposures can only be done with a tripod, unless you’re amazing at keeping your hands steady and in one position for multiple shots, which is pretty hard to do. Why would I take multiple exposures? Well, let’s say you take a picture and the car looks amazing, but your sky is blown out. Problem? No problem, if you have a tripod. Just take another shot but this time crank up the shutter speed so you can capture more detail in the sky (don’t worry about anything else for that shot). Now, since you have one image of the car perfectly lit, and another image of the sky looking beautiful you can combine those two in post-processing to get the best looking image, people will be curious how you did it so make sure you tell them. Share the knowledge.

    IMAGE4

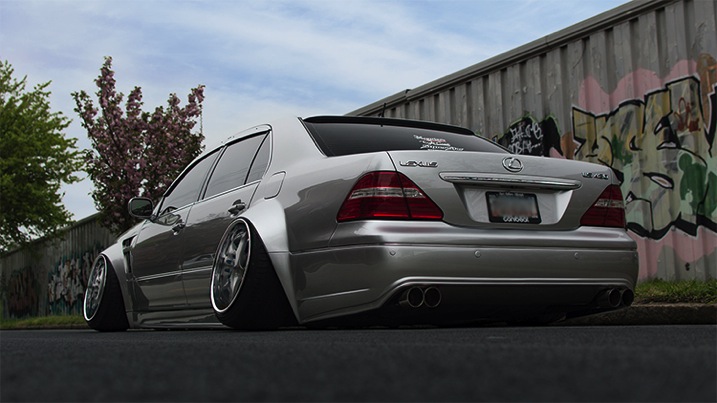
    5. Not getting down low for the best angles

    Have you ever seen an image where the car was shot at normal, eye level height? Can you say “boring”?! We all see cars from that point of view on a daily basis, so it gets pretty boring. If you want your shots to stand out, you must try different angles. Get down low, get up high, lay down, just make sure you move around and try different stances so you can get a better angle of the car.

    This can get dirty, so make sure you don’t wear your brand new pants and shirt. Don’t be afraid to get down on the ground and capture the car from down there, it will give it a more aggressive look. Who cares if you get dirty, at least your shot will look great.

    The best pictures I have seen are of those that are not taken at eye level, but are usually down lower than the normal person is willing to go. But you’re not normal, you’re a car photographer (we’re special).

    IMAGE5

    That’s all folks

    So, there you have it fellow photogs. The five biggest mistakes beginner car photographers make, and how to avoid them. You have been given ways to make your shots look much better – but you will not improve just by reading this, you must go out and shoot, shoot, shoot! The best way to improve your photography skills is to go out, take the skills you learned here, and put them to the test in the real world. But don’t leave without your rag, circular polarizer, and tripod!

    Do you have any other tips on shooting cars? Have any of these helped you get better at car photography? Please share in the comments below.

    googletag.cmd.push(function() {
    tablet_slots.push( googletag.defineSlot( “/1005424/_dPSv4_tab-all-article-bottom_(300×250)”, [300, 250], “pb-ad-78623” ).addService( googletag.pubads() ) ); } );

    googletag.cmd.push(function() {
    mobile_slots.push( googletag.defineSlot( “/1005424/_dPSv4_mob-all-article-bottom_(300×250)”, [300, 250], “pb-ad-78158” ).addService( googletag.pubads() ) ); } );

    The post The 5 Biggest Mistakes Newbie Car Photographers Make by Elvis Pasic appeared first on Digital Photography School.


    Digital Photography School

  • On Assignment: The Light You Don’t See

    This photo is 100% flash, 0% ambient. But it almost looks like the reverse. And for this portrait of soprano Robin Steitz, a timeless available-light look was what we were going for.

    But when you are working with flash (a single speedlight) and controlling your light (a scrounged “fill blanket” from the couch) you can keep the best of both worlds of strobe and ambient.

    Knock it Down, Build it Back Up

    The first thing we did was to get rid of everything that we didn’t want. In this case, our available light and everything in the background.

    Robin sat at our dining room table, is a ~100 yr old oak farm table. As such, it has a great patina and texture. And it creates a wonderful, simple environment for a portrait.

    But the background—a hall and a front door with windows—is distracting. So that went away first. Using a C-stand and arm, I hung a roll of 53″-wide Thunder Gray background paper. Thunder Gray has long been my favorite background paper for portraits—be they in color or B&W. It’s a versatile, deep neutral tone that you can do a lot with.

    And today, it takes my visually cluttered hall and turns it into… nothing. Maybe a wall? It just kinda disappears. Background solved.

    Now, let’s kill the ambient. Going to ISO 200 and my max sync speed (a rather slow 1/180th of a sec) on my Fuji X-E2 and kit zoom, I dialed down my aperture down to f/6.4. Which finished off my ambient light. Nice and black.

    The kit zoom is plenty sharp wide open (love that lens) but as a bonus will be even better in the middle of the aperture range. Most lenses are.

    So as of now we have a distilled blank slate. A background that disappears, and an ambient exposure that is pure black. Let’s build from there.

    I’m shooting black and white to make a quieter, more timeless photo. Something that could easily have been done in the 1970’s with a 35mm camera and a roll of Tri-X. And that is one of my favorite things about my Fujis. As well as they do color, their black and white looks like film right out of camera.

    Even better: turn on the built-in yellow filter setting (red is a bit much for me) and tweak the contrast curves (in camera) until the the B&W look is what you want. To an old-timer like me, it feels a lot like watching a print come up in the Dektol.
    __________

    Let’s Bring in Some Light

    We’re gonna light this with a single speedlight (an LP-180) and my favorite go-to soft mod (a 60″ Photek SoftLighter II).

    Using a second C-Stand and arm, the soft light source is floated top and center in front of Robin. And this is where perception meets reality.

    What you want: soft light bathing her from all around. Control over the shadows. A light that disappears.

    What you get: Soft light, but deep shadows. It’s soft, but it definitely looks “lit,” which ruins the feel of an available light B&W photo.

    Here’s the problem. That oak table is very dark, and is giving nothing back to the shadows. We need a big fill card… [looks around the living room] or… a white fill blanket.

    That’ll help.

    But it didn’t help. It just wasn’t getting enough energy from that flash, even though I had placed it on the table as close as possible—just out of the bottom of the frame.

    It was still all key light. Too much key, not enough fill.

    But we can solve both of those problems at one time by literally taking the light off of Robin, and pushing it down into the fill blanket. (Don’t laugh. I have used weirder things for fill.)

    And that was all it took. Not only do we get a better ratio, but we get total control over the ratio. The more you pull the light away from Robin (and push it down into the fill) the more the key light drops and the fill light rises.

    Yes, you are losing key light on your subject. But all you have to do to get the exposure back is to power up your strobe a little. No prob.

    Think of that light from the perspective of Robin’s face. It’s sort of a top/bottom clamshell, but not in the traditional beauty light sense. It’s more of a zone of top/bottom light that has a boundary to it. And she is emerging into the edge of it.

    So the light pushes into her features without really calling attention to itself. It is not even leaving a signature in her eyes.

    And that makes it look not lit. Even though it totally, 100% is lit.

    Which in turn makes it look even more like something made out of ambient light and Tri-X, back in the day.


    Strobist

  • How to Make a DIY Newborn Photography Background Stand

    Have you ever wondered how professional newborn photographers get their backdrops so smooth and wrinkle free? Are they Photoshop masters? Do they have a team of highly paid assistants pulling the fabric? No. The answer is a DIY backdrop stand that costs less than $ 20 and that you can make in less than 15 minutes.

    Image 9 1

    When I first started in the world of newborn photography I used the tools that I had available. I would use a traditional background stand to hold the back of my fabric backdrops. I would then ask my clients if I could borrow a vacuum, dining room chair or some other house hold object to clamp the side of my fabrics to. This, of course, was very unprofessional and delivered substandard results. I would find myself spending 30 minutes just editing the backdrop in Photoshop. I knew there had to be a better way. So, with a little imagination and $ 20 I saved myself countless hours of Photoshop madness. Now, besides some simple blemish removal and softening, the images are basically perfect, straight out of camera.

    Image 8

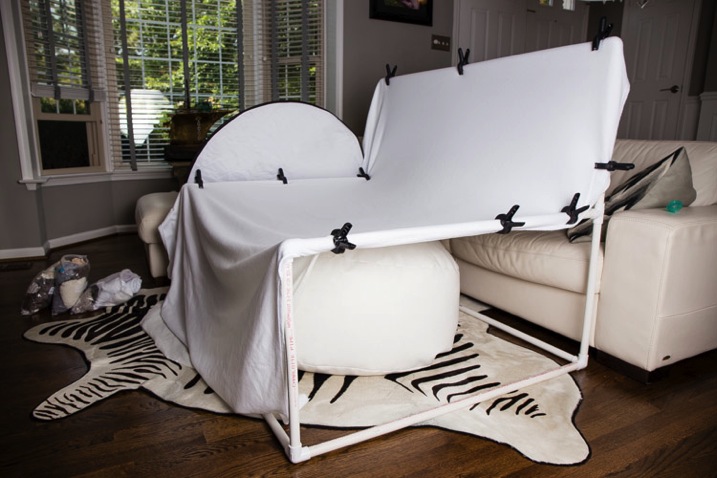
    This tutorial will teach you how to build a background stand that stretches your backdrop fabrics. This stand will help to eliminate wrinkles in your background fabric, and cut down on post-processing time. It will also help you present your newborn photography business in a more professional manner.

    Supplies needed

    What you will need:

    Image 1

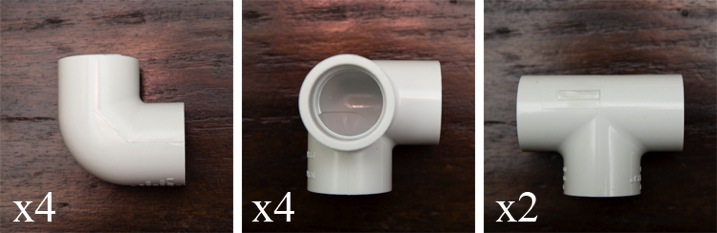
    All of the supplies should be readily available at your local hardware store. You will need to look in the plumbing section. All PVC fittings are Schedule 40.

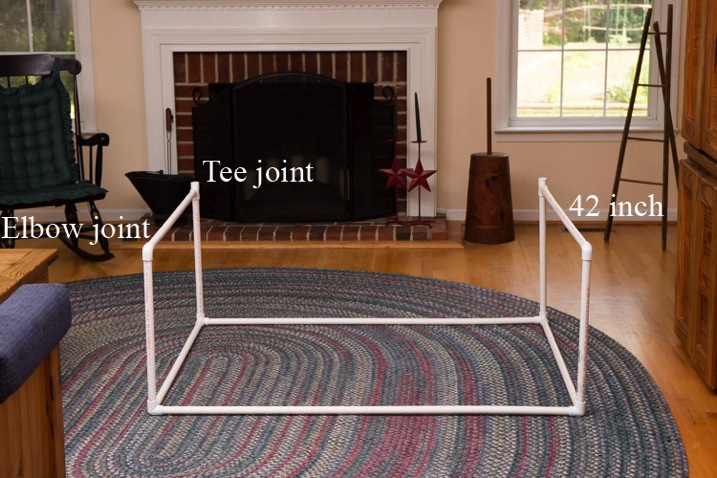
    • Four – 10 Foot lengths of 3/4 inch PVC pipe (SCH 40)
    • Four – 3/4 inch elbow joints
    • Four – 3/4 inch tee joints
    • Two – 3/4 inch 3-way joints

    Step 1. Cut the PVC pipes to the correct lengths

    You can use a PVC cutter, a miter saw, or a handsaw. I used a handsaw and was able to complete the entire stand in 15 minutes.

    Lengths needed:

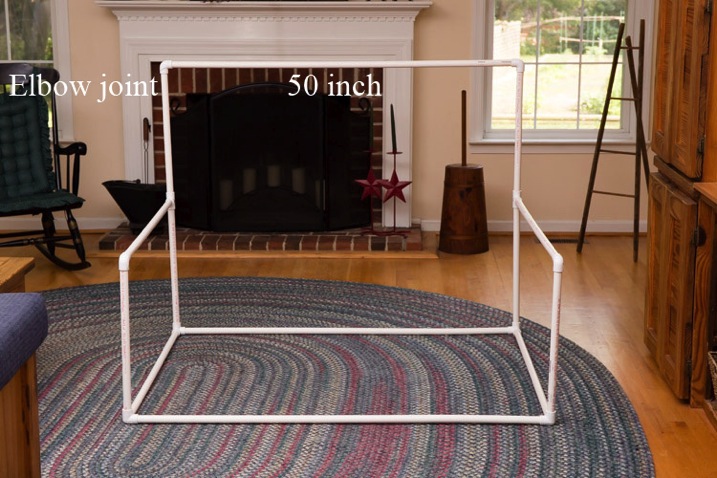
    • Three – 50 inch pieces
    • Four – 42inch pieces
    • Six – 20inch pieces

    Recommended cuts:

    • Pipe 1: 50 inches + 50 inches + 20 inches
    • Pipe 2: 50 inches + 42 inches + 20 inches (discard 8 inches)
    • Pipe 3: 42 inches + 42 inches + 20 inches (discard 16 inches)
    • Pipe 4: 42 inches + 20 inches + 20 inches + 20 inches (discard 18 inches)

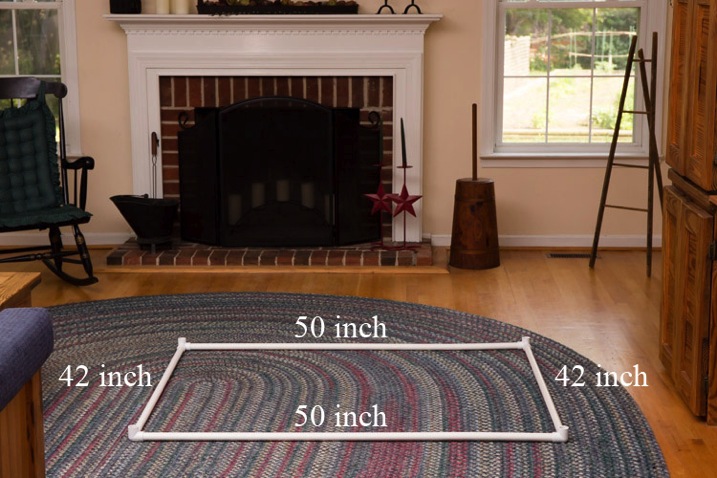
    Step 2. Connect the bottom frame

    Connect two 50″ pieces and two 42″ pieces with the four 3-way joints to make a rectangle.

    Image 2

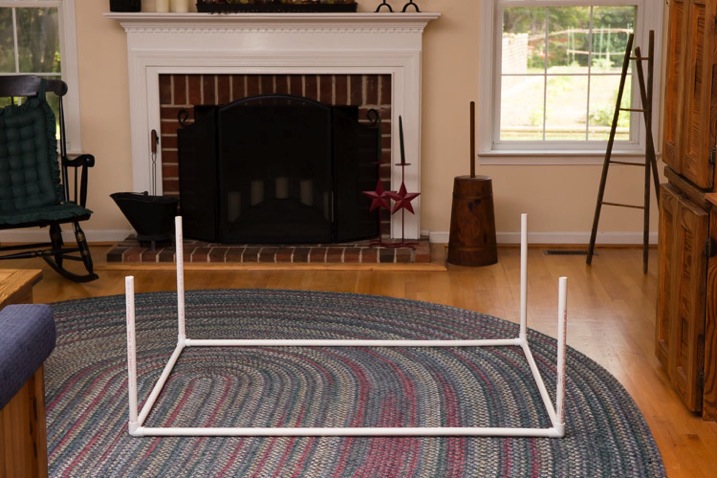
    Step 3. Add the vertical leg pieces

    Connect four of the 20inch pieces to the rectangle.

    Image 3

    Step 4. Connect the middle supports

    Connect a tee joint and an elbow joint to either end of a 42inch piece of PVC. Repeat. Connect these to the backdrop stand.

    Image 4

    Step 5. Connect the back support

    Connect two 20″ pieces to the back of the stand. Now connect the remaining 50″ piece to the top with two elbow joints. It should look like this at this stage (below).

    Image 5

    Step 6. Place a beanbag underneath

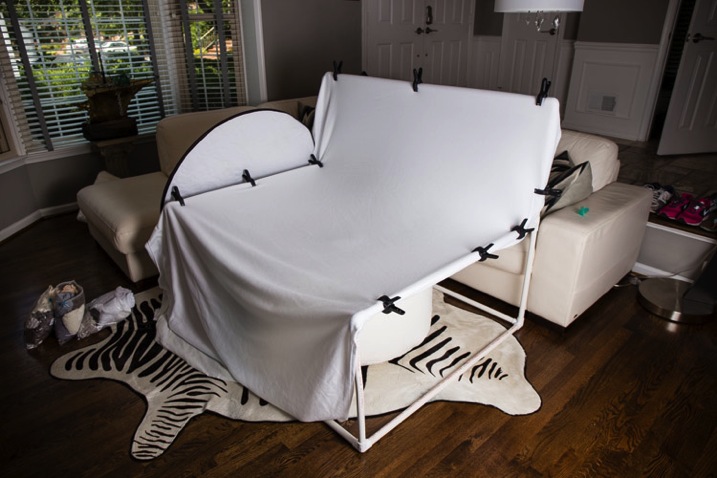
    Place your beanbag in the center of the stand, and you are ready to stretch your backdrop fabric.

    Image 6

    Here is a picture of the backdrop stand in use at a client’s home.

    Image 7

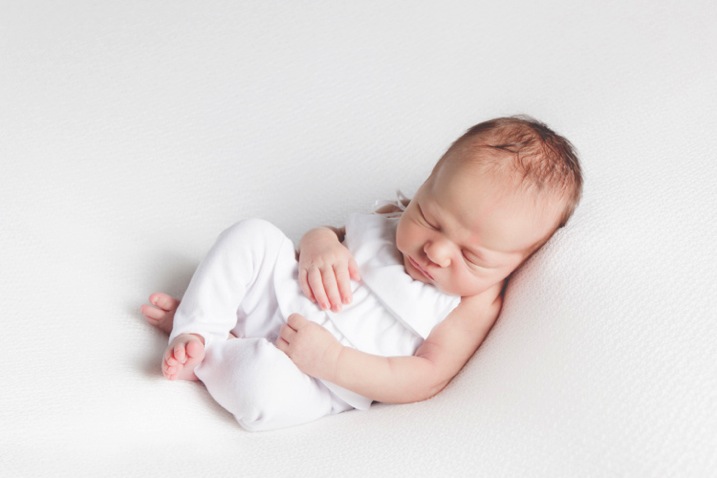
    Here is a final newborn image using the backdrop stand.

    Image 10 1

    This stand is purposely designed to be wide. This allows you to take those much needed angled pictures without losing your backdrop fabric. You may however, prefer to have a square backdrop stand. This would allow you to use a smaller area in your studio or client’s home. Just keep in mind that you will need to really watch your angles.

    Recommended lengths for a square backdrop stand:

    • Seven – 45inch pieces
    • Six – 20inch pieces

    NOTE: This stand is only to be used with a newborn posing beanbag placed under the center of the stand. The posing beanbag is what supports the newborn, not the fabric. NEVER leave a newborn baby unattended on the beanbag or on any prop. As a newborn photographer the safety of the newborn baby must be your top concern at all times.


    googletag.cmd.push(function() {
    tablet_slots.push( googletag.defineSlot( “/1005424/_dPSv4_tab-all-article-bottom_(300×250)”, [300, 250], “pb-ad-78623” ).addService( googletag.pubads() ) ); } );

    googletag.cmd.push(function() {
    mobile_slots.push( googletag.defineSlot( “/1005424/_dPSv4_mob-all-article-bottom_(300×250)”, [300, 250], “pb-ad-78158” ).addService( googletag.pubads() ) ); } );

    The post How to Make a DIY Newborn Photography Background Stand by Clifton Man appeared first on Digital Photography School.

    Digital Photography School

  • Weekly Photography Challenge – Beards

    Men with beards have become commonplace in my area. Guys without them are almost more noticeable than those with a beard. Have a look at this bunch of images of bearded guys as an example.

    Sergio Carbajo

    By Sergio Carbajo

    Weekly Photography Challenge – Beards

    This week’s challenge is just about having some fun with it. Go out and see if you can find some guys with beards and photograph them. If not, think outside the box – who or what else might have a beard?

    Marc Dalmulder

    By Marc Dalmulder

    Micolo J

    By Micolo J

    Neil Howard

    By Neil Howard

    Heather Buckley

    By heather buckley

    Aaron Morton

    By Aaron Morton

    Daniel Guy

    By Daniel Guy

    Share your images below:

    Simply upload your shot into the comment field (look for the little camera icon in the Disqus comments section) and they’ll get embedded for us all to see or if you’d prefer upload them to your favourite photo sharing site and leave the link to them. Show me your best images in this week’s challenge. Sometimes it takes a while for an image to appear so be patient and try not to post the same image twice.

    googletag.cmd.push(function() {
    tablet_slots.push( googletag.defineSlot( “/1005424/_dPSv4_tab-all-article-bottom_(300×250)”, [300, 250], “pb-ad-78623” ).addService( googletag.pubads() ) ); } );

    googletag.cmd.push(function() {
    mobile_slots.push( googletag.defineSlot( “/1005424/_dPSv4_mob-all-article-bottom_(300×250)”, [300, 250], “pb-ad-78158” ).addService( googletag.pubads() ) ); } );

    The post Weekly Photography Challenge – Beards by Darlene Hildebrandt appeared first on Digital Photography School.

    Digital Photography School

  • 27 Hairy Situations – People with Beards

    I don’t know if you’ve noticed this trend where you live, but here in my city it seems like every second guy has a beard. Not just a goatee but a full-on, full face beard.

    So I thought I’d see if I could find a set of images that captures this current trend in society. I thought it was just Portland (Oregon) with its hipsters, but it seems that it’s spread.

    Photograph kashmir by Mahmoud Yakut on 500px

    kashmir by Mahmoud Yakut on 500px

    Photograph - Bruce - by Rey Vladyc Mangouta on 500px

    – Bruce – by Rey Vladyc Mangouta on 500px

    Photograph Winter Skin by Juan García on 500px

    Winter Skin by Juan García on 500px

    Photograph mr. Unknown by Alexander Bootsman on 500px

    mr. Unknown by Alexander Bootsman on 500px

    Photograph Another Day in Paradise by Michael Steverson on 500px

    Another Day in Paradise by Michael Steverson on 500px

    Photograph *** by Mr. Vander on 500px

    *** by Mr. Vander on 500px

    Photograph Intense by Yesudeep Mangalapilly on 500px

    Intense by Yesudeep Mangalapilly on 500px

    Photograph ??????? by Jaroslav Monchak on 500px

    ??????? by Jaroslav Monchak on 500px

    Photograph Bow Tie by Joachim Bergauer on 500px

    Bow Tie by Joachim Bergauer on 500px

    Photograph Archer by Przemyslaw Koch on 500px

    Archer by Przemyslaw Koch on 500px

    Photograph Mehmet Haci by Ahmed  Mustafa on 500px

    Mehmet Haci by Ahmed Mustafa on 500px

    Photograph **** by Brian Ingram on 500px

    **** by Brian Ingram on 500px

    Photograph *** by Alexander Bootsman on 500px

    *** by Alexander Bootsman on 500px

    Photograph The beard it´s a trend by Alex Mihai C on 500px

    The beard it´s a trend by Alex Mihai C on 500px

    Photograph smoking Portrait by Javier Celado on 500px

    smoking Portrait by Javier Celado on 500px

    Photograph Senior man by Carles Barrios - Retoucher on 500px

    Senior man by Carles Barrios – Retoucher on 500px

    Photograph crazy photographer by Peter Zelei on 500px

    crazy photographer by Peter Zelei on 500px

    Photograph The Selfie by Andrea Mercatali on 500px

    The Selfie by Andrea Mercatali on 500px

    Photograph Santa Claus by Brian Powers on 500px

    Santa Claus by Brian Powers on 500px

    Photograph Old Sadhu by Arif  Kaser on 500px

    Old Sadhu by Arif Kaser on 500px

    Photograph Naga Baba by martin prihoda on 500px

    Naga Baba by martin prihoda on 500px

    Photograph sadhu 1 by Ertan Tiryaki on 500px

    sadhu 1 by Ertan Tiryaki on 500px

    Photograph Teacher! by Alexey Seredenin on 500px

    Teacher! by Alexey Seredenin on 500px

    Photograph The Thinker by Ladjánszki Máté on 500px

    The Thinker by Ladjánszki Máté on 500px

    Photograph old shepherd by Ciurba Alin on 500px

    old shepherd by Ciurba Alin on 500px

    Photograph Beyond the Shadows by Dénes Paragi on 500px

    Beyond the Shadows by Dénes Paragi on 500px

    Photograph Stanislav Liepa by Valentin Blokh on 500px

    Stanislav Liepa by Valentin Blokh on 500px

    googletag.cmd.push(function() {
    tablet_slots.push( googletag.defineSlot( “/1005424/_dPSv4_tab-all-article-bottom_(300×250)”, [300, 250], “pb-ad-78623” ).addService( googletag.pubads() ) ); } );

    googletag.cmd.push(function() {
    mobile_slots.push( googletag.defineSlot( “/1005424/_dPSv4_mob-all-article-bottom_(300×250)”, [300, 250], “pb-ad-78158” ).addService( googletag.pubads() ) ); } );

    The post 27 Hairy Situations – People with Beards by Darlene Hildebrandt appeared first on Digital Photography School.

    Digital Photography School

  • Get Inspired: Try Adding a Little Occultish Mystery to Your Photography

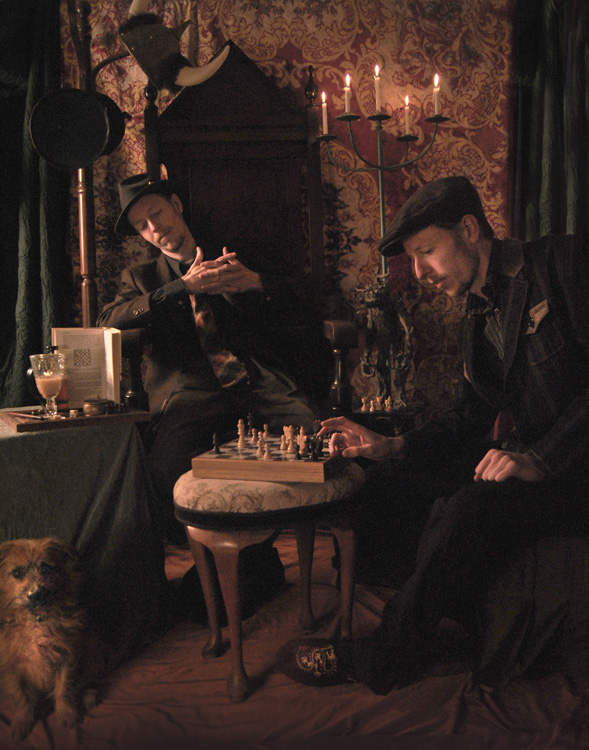
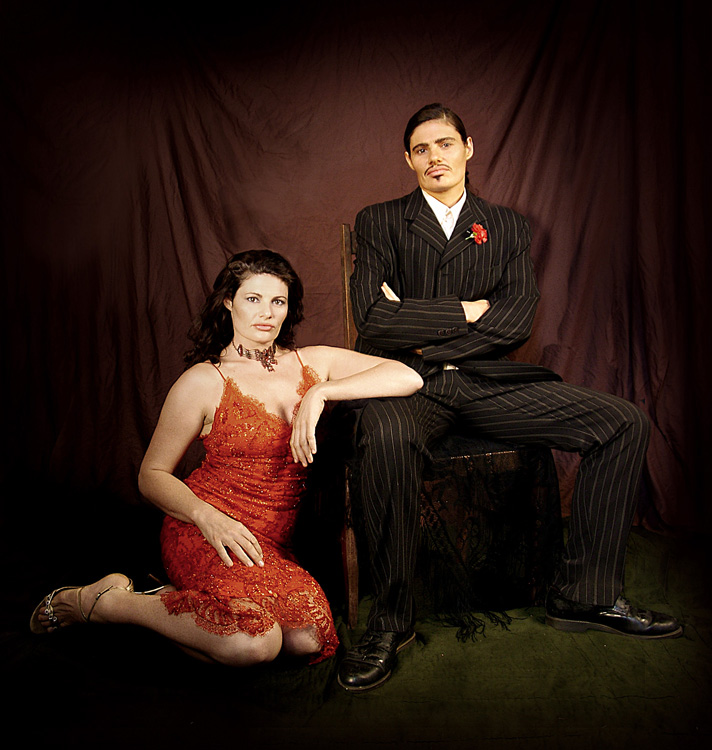
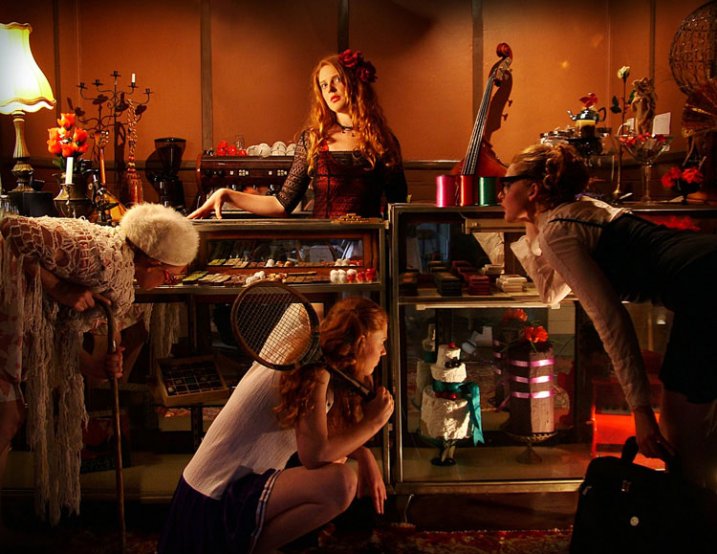
    It’s not unusual for photographers, both pro and amateur, to find themselves stuck in a creative rut. Nor is it uncommon for photographers to want to try something new. If you find yourself occupying your own rut, or if you’re just looking for some sort of new inspiration, consider trying some unconventional means. I’m not suggesting you try invoking some ancient Continue Reading

    The post Get Inspired: Try Adding a Little Occultish Mystery to Your Photography appeared first on Photodoto.


    Photodoto