Category: Photography

  • How to Make Creative Images with a $12 LED Light

    Photography is all about the light. As photographers, our aim is to capture and control the amount of light hitting the camera’s sensor to perfect a good photo.

    When photographers talk about light, you will hear terms mentioned such as ambient, which is natural light. Note this type of light is always changing, it doesn’t remain constant. Split, Rembrandt, and Butterfly are some of the classic lighting patterns used for portraiture in a studio setup.

    torch-shining--against-wall

    A LED torch with a paper snoot.

    One of my favorite basic setups when I shoot outdoors is when the day is overcast (dull), which makes the light act like one big soft diffuser. The ambient light provides my main source of light (key light) and I use a white, silver, or gold reflector to act as fill.

    This is in sharp contrast to shooting in a studio where artificial lights are used. The choice and range of lights will depend on whether you use flash or continuous lighting. The main advantage to this kind of setup is that you have complete control over the lighting, plus it doesn’t rain!

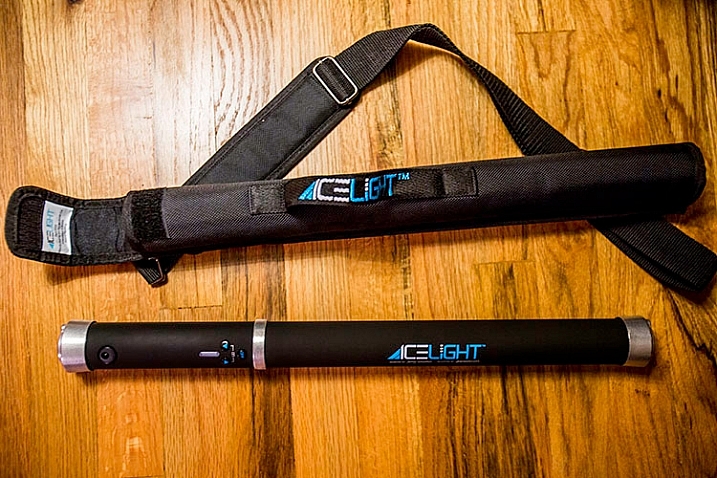
    The best method I find in learning about lighting, be it natural or artificial, is to experiment. Recently, I was flipping through a camera magazine when this product caught my eye – The Ice Light 2 by Westcott. It stood out for two reasons: The concept and the price. I really liked the Stars Wars light-sabre appeal to it. It’s different, and has that wow factor, as does the price. It’s not cheap.

    This is not a review of the Ice Light, but it did give me some inspiration for an idea. For less than $ 12.00 USD, I purchased this LED light which, surprisingly, has 140 lumen. I set myself a challenge to see how effective this light source could be when used for photography.

    Torch-in-hand

    A small but powerful LED torch light.

    How did I test it? I took some shots outdoors, as well as indoors, just to get some variety and scope to this project.

    For my initial shots, it was 10:30 p.m. at night, not quite dark, but dusky. I went to a little park near where I live, placed the torch horizontal in the grass, and had the toy plastic Gorilla in a grassy verge, roughly a couple of feet away. I had the aperture at f/2.5, the ISO at 400, and the shutter speed at 1/50th.

    Gorilla-in-grass

    A toy plastic gorilla in the grass.

    Nearer home and again outside, I place this Lego figure on a garden wooden chair with slats. I had the torch underneath standing vertically. Just by moving my camera rather than the light, I was able to get a bit of flare that really added drama to the shot.

    Lego-girl-figurine

    Cool Lego girl figure.

    Torch-under-chair

    I placed the torch upright under a garden chair with slats.

    Back indoors, I had my daughter hold the torch with paper wrapped around the end to form a snoot.

    torch-with-paper

    Using plain white printing paper wrapped around the torch to form a snoot.

    I got her to move the torch around until I was happy with the light. I really liked the catchlights. The camera settings were: Aperture f/4.5, shutter speed 1/30th, ISO at 800, the focal length was 44mm.

    Amy-faraway-look

    Interesting catchlights from the torch with a white paper snoot.

    Amy-reading-book

    The torch was placed in the centre of the book facing towards the camera.

    I had the idea brewing for some time of trying to get that shot lit from the inside of a tent; the one that is ubiquitous in great landscape shots. I had a lot of fun doing this shoot, and would highly recommend you try to do the same! The plan was to have my daughter inside and get a nice silhouette of her against the wall of the tent. It didn’t go to plan, which was fortunate for me.

    As a last resort, I got my plastic gorilla figurine and placed him inside the tent with the torch lying horizontal on the floor of the tent, only about 6 inches behind him. I was well chuffed (pleased) with the final result. It was even better than I had envisioned; especially as the gorilla is only 3.5 inches tall. I did have the camera on a tripod as it was dark. The settings were: ISO 800, aperture f/4, shutter speed 1/8th, and focal length was 40mm.

    gorilla

    Fun with a toy gorilla inside a tent with a torch.
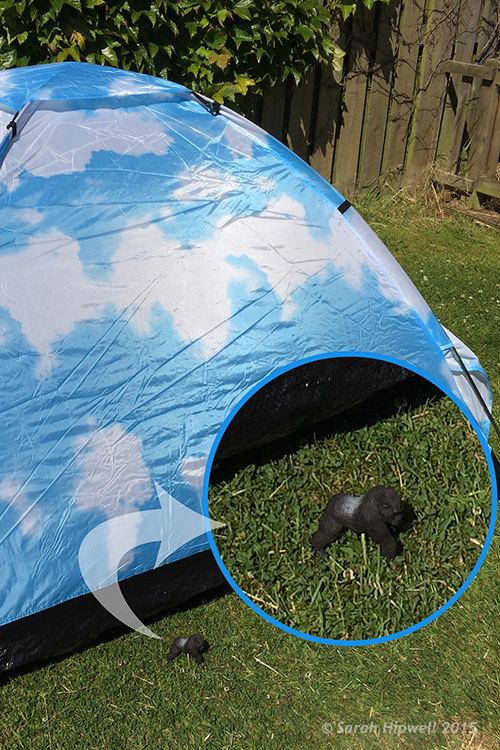
    Gorilla-scale-to-tent

    The gorilla is only 3 and half inches tall, small relative to the size of the tent.

    Conclusion

    To be honest, I wasn’t expecting this project to yield the results that it did. It has been the best $ 12.00USD that I’ve spent in a long time. It is now another must item to have in my camera bag.

    What non-photography light sources have you used in your photography? Please share in the comments below.

    googletag.cmd.push(function() {
    tablet_slots.push( googletag.defineSlot( “/1005424/_dPSv4_tab-all-article-bottom_(300×250)”, [300, 250], “pb-ad-78623” ).addService( googletag.pubads() ) ); } );

    googletag.cmd.push(function() {
    mobile_slots.push( googletag.defineSlot( “/1005424/_dPSv4_mob-all-article-bottom_(300×250)”, [300, 250], “pb-ad-78158” ).addService( googletag.pubads() ) ); } );

    The post How to Make Creative Images with a $ 12 LED Light by Sarah Hipwell appeared first on Digital Photography School.
    Digital Photography School

  • The Ice Light by Westcott – Product Review

    Having easy access to the right light at every photo shoot is essential to any photographer, and in this case made possible by the Ice Light. A portable and brightness adjustable, continuous LED light source, the Ice Light is a lightweight and simple on-demand lighting solution. If anything, its similar build to that of a light sabre, will almost always be a conversation starter between you and your photo subject. This review will discuss the pros and cons of the Ice Light, as well as some photo shoot scenarios where it shines the most.

    History of the Ice Light

    A relatively new product, the Ice Light was developed in 2012 by world-reowned photographer Jerry Ghionis and manufactured by Wescott. The Ice Light’s main attributes are its ability to transmit daylight-balanced LED lighting via a long, handheld device, and the fact that is is powered by a rechargeable battery. Despite its relatively simple function, the Ice Light was groundbreaking as the very first daylight-balanced, handheld LED light on the market. It has quickly become a favorite light source for on-the-go photographers and videographers.

    Ice-Light-Kit-b


    The Ice Light Specs

    The Ice Light’s long light bulb emits a perfect 5,200K color temperature through a frosted diffusion panel, helping your camera find the best white balance in the scene. With an outer encasing of aluminum, the Ice Light is durable, yet transportable. It stands about 24 inches long, weighs a mere 1.3 pounds, and it fits inside most regulation carry-on luggage. In fact, a slim carrying case is included with the light, making it easy to swing over one’s shoulder, or clip to a belt while on a photo shoot. The Ice Light has a very comfortable hand grip on one end, but also has mounting threads on both ends so it can be easily mounted to a tripod or light stand.

    Powered by a single rechargeable Lithium Ion battery, the Ice Light can run for up to 60 minutes at full power, and be fully charged up in about 2.5 hours. Battery packs are also available to boost battery life by an extra 5 hours. There are also some light modifier accessories available including tungsten gels and barn doors to further modify the light.

    Ice-Light-example-2b


    Best uses

    Given the Ice Light’s long shape, it can be likened to a rectangular strip light that operates according to the logic of the larger the light source is in relation to the photo subject, the softer the light will be.  As a result, the Ice Light really shines in these specific photography situations:

    Achieving dramatic lighting

    Due to the Ice Light’s long, narrow body, achieving a photo that is equally balanced with light requires at least two Ice Lights, or a single Ice Light and a reflector. However, if you’re aiming for a dramatically lit photo with lots of shadows, the Ice Light can give you just that!

    Ice-Light-Buttons-2


    When you don’t have a knowledgable photo assistant

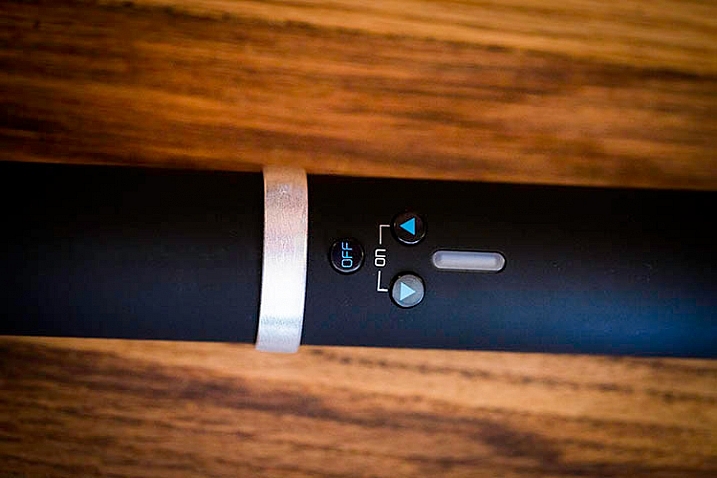
    If you consistently perform run-and-gun type of photography, or change locations frequently, you will likely be in need of an assistant to hold or set up your lights as you shoot. If you have a spur-of-the-moment need for lighting, the Ice Light’s easy-to-use interface makes it simple for anyone to operate. There are three simple buttons: an on/off switch, a button to increase light, and another to dim it. As a result, there’s less time required to futz around with light testing as you might have to with strobes, and you can use any Average Joe as a lighting assistant.

    When you need continuous lighting

    Another big advantage of the Ice Light is its ability to emit continuous lighting rather than strobes. This can be hugely beneficial for videographers or any other media specialists who need a constant, on-demand stream of daylight-balanced LED illumination.

    Ice-Light-example-1b


    Sold? Well, about that price…

    All in all, the Ice Light makes a compelling case to be a photographer’s new best friend. There is only one potential downside: the cost. A brand new Ice Light runs roughly $ 400, while its newer, upgraded version the Ice Light 2 is priced at $ 549. Both Ice Lights include a battery charger, power cords, plug converters, gel clips, and a carrying case. Still, the price may seem steep to some.

    Maybe try your own DIY solution – How to make creative images with a $ 12 LED light

    What are your thoughts on the Ice Light?

    Have you tried out an Ice Light? If so, would your recommend it to others?

    googletag.cmd.push(function() {
    tablet_slots.push( googletag.defineSlot( “/1005424/_dPSv4_tab-all-article-bottom_(300×250)”, [300, 250], “pb-ad-78623” ).addService( googletag.pubads() ) ); } );

    googletag.cmd.push(function() {
    mobile_slots.push( googletag.defineSlot( “/1005424/_dPSv4_mob-all-article-bottom_(300×250)”, [300, 250], “pb-ad-78158” ).addService( googletag.pubads() ) ); } );

    The post The Ice Light by Westcott – Product Review by Suzi Pratt appeared first on Digital Photography School.

    Digital Photography School

  • How to Trigger an Off-Camera Flash with the Pop-up Flash

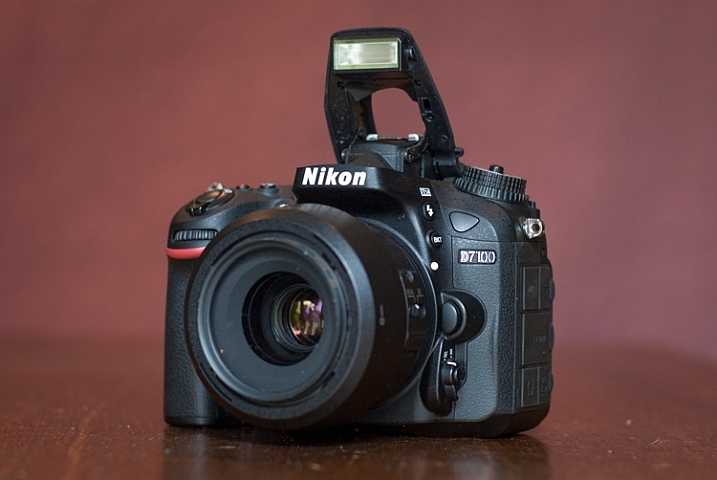
    If you have ever wanted to explore off-camera flash but don’t know where to start, I have some good news. Many consumer-grade cameras such as the Canon Rebel series and the Nikon D3000 and D5000 models have a fantastic feature that might be just what you are looking for.

    One challenge with off-camera flash is that you need a way to fire them at precisely the right moment. That usually means outfitting them with tiny little remote controls called triggers, that are tied into a transmitter unit affixed to the flash hot-shoe on your camera. When you want your off-camera flashes to activate, the transmitter sends a radio signal to them, and they go off at precisely the right time to give you the photo you want. Some triggers are inexpensive, while other, more customizable one,s will set you back hundreds of dollars. But, if you own one of the cheaper Canon or Nikon bodies, you already have a handy trigger built right in to your camera; the pop-up flash.

    trigger-off-camera-flash-popup-flash

    Your built-in flash can probably do a lot more than you might think.

    Several manufacturers have this feature built-in to their cameras, but since Canon and Nikon are the most popular, those are what I’m going to focus on in this article. Both types of cameras require you to change a few menu settings that may seem a bit confusing at first, but get easier with practice.

    Setup for Nikon cameras

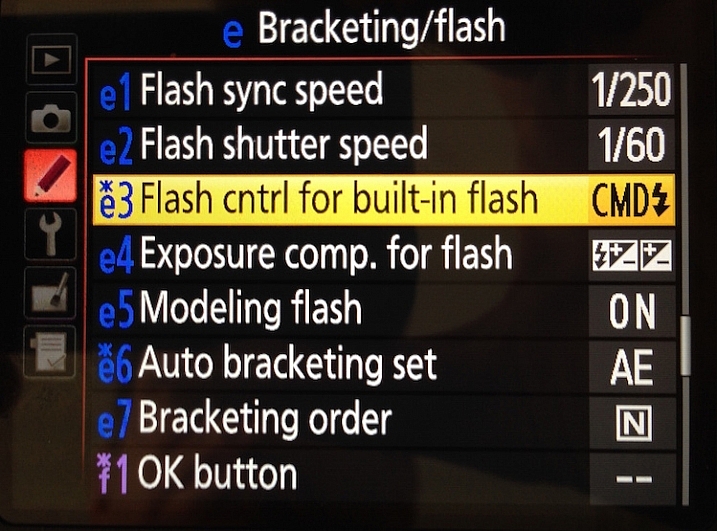
    On a Nikon camera the first thing you will need to do is set your internal flash to Commander mode. This means it will still fire a burst of light when you take a picture, as a way of communicating with your external flashes. You will see this when you take a picture, but don’t worry, this brief burst is not bright enough to have much of an impact on your photo. This quick flash instead serves as a signal to your external speedlights that they need to fire. To do this, press your camera’s Menu button, then choose Custom Setting Menu (Bracketing/Flash) and the “Flash control for built-in flash” option.

    trigger-off-camera-flash-nikon-menu-flash

    Select the “Flash control for built-in flash” option

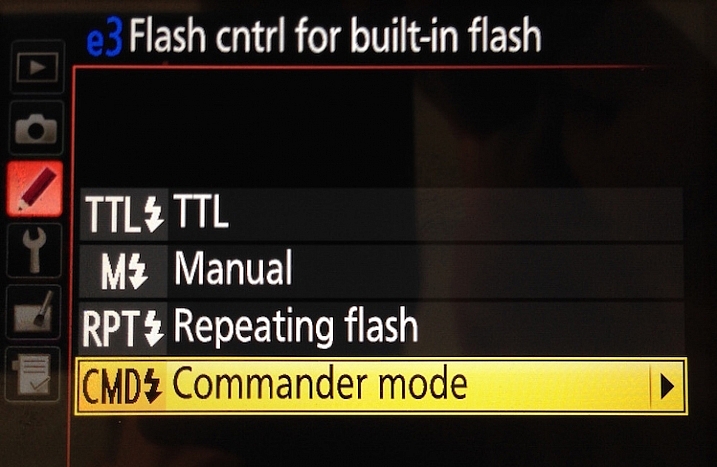
    The default value for the “Flash Control” option is “TTL,” which means that your built-in flash functions exactly how you normally expect, and has no control or interaction with any off-camera flashes. Change this value to “Commander mode” which will then allow you to use it to trigger external speedlights.

    trigger-off-camera-flash-nikon-menu-commander

    Next, select “Commander mode” – press the right button to get to the next menu below

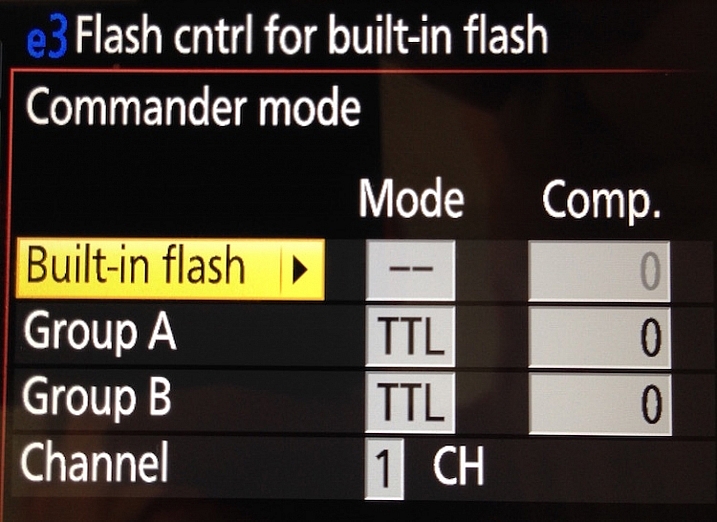
    The final menu looks a bit complicated, but you only need to change a few settings in order to get everything set up initially. Change the Built-in flash option to display two dashes (–) and leave the rest of the values as shown below; Group A TTL, Group B TTL, and Channel 1.

    trigger-off-camera-flash-nikon-menu-commander-control

    Change “Built-in flash” to “–” and you’re all set.

    You can do more complicated operations involving multiple flashes or even groups of flashes, but for a basic off-camera trigger setup not much else is required.

    Setup for Canon cameras

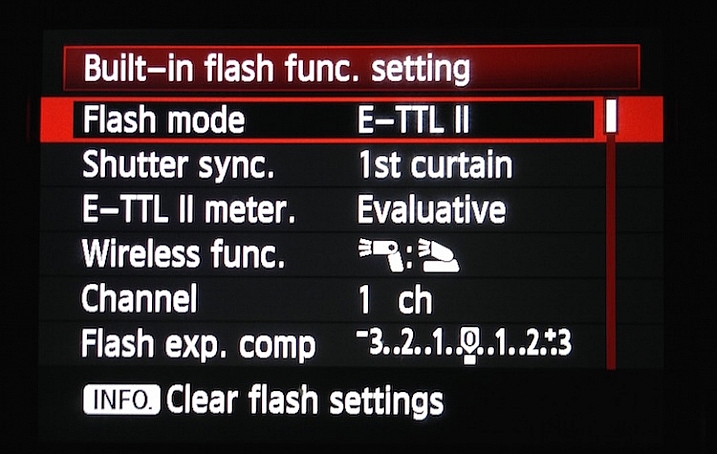
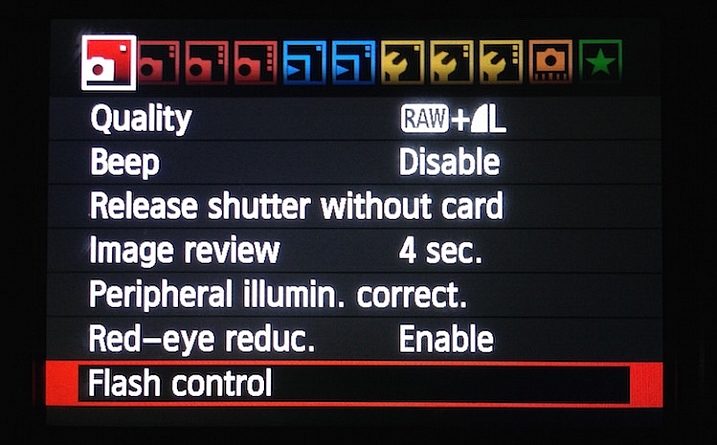
    If you have a Canon camera, the process is similar but involves a few different menus. Go to your main camera settings menu and choose Flash Control. Then select Built-in flash settings and choose the EasyWireless option. Make sure your channel is set to 1, and you’re ready to go. If you have a higher-end camera like a 60D you won’t see EasyWireless, so leave Flash mode as E-TTL II and change Wireless function to an image of two flashes with a colon between them. As with the Nikon settings there are other options you can change to customize how your external flashes behave, but this is enough to just get you started.

    trigger-off-camera-flash-canon-menu-flash

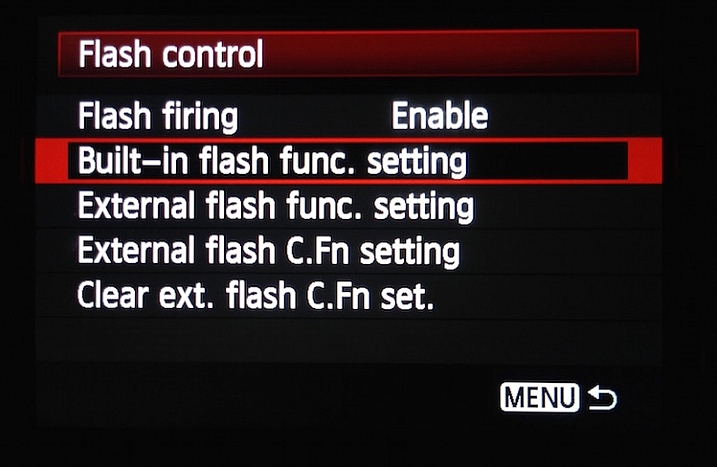
    On Canon cameras, start by choosing the Flash control menu.

    trigger-off-camera-flash-canon-menu-flash-control

    Next choose Built-in flash func. setting

    trigger-off-camera-flash-canon-menu-flash-settings

    Set Flash mode to E-TTL II, and then set Wireless func. to the icons displayed above. Alternatively, you can select EasyWireless if that appears as an option.

    Testing your setup

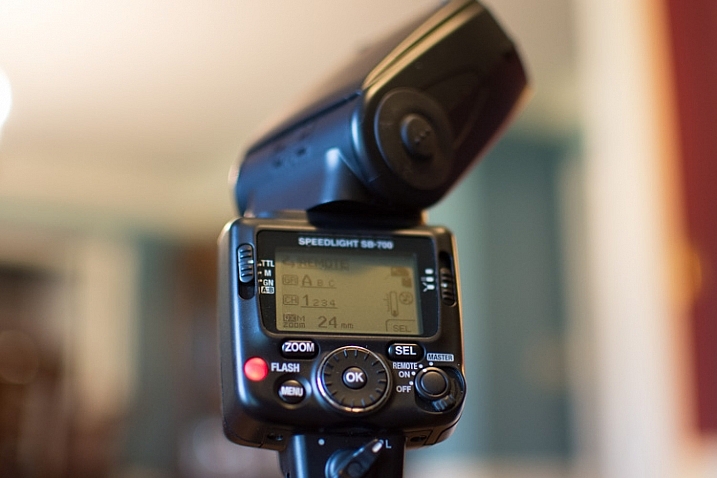
    Now that your camera is set up, all you need to do is put your flash in Remote (Nikon) or Slave (Canon) mode and make sure there is an unobstructed line of sight between the receiver on the speedlight, and the flash on your camera. Some speedlights allow you to twist the base so it faces a different direction than the flash itself which is useful if you want to get a little more creative with your lighting angles.

    Before you get too far into all this you should be aware of two caveats: Canon cameras can only control Canon flashes, and same with Nikon cameras and Nikon flashes. Also, most third-party flashes such as those made by companies like Yongnuo are not compatible with the on-camera remote trigger setup described here. To use those you will need to purchase a remote flash trigger, but since the flashes themselves are cheaper than their first-party counterparts you should have a bit of money leftover to buy a trigger setup.

    trigger-off-camera-flash-nikon-sb700

    Makesure your external flash is set to “Remote” (Nikon) or “Slave” (Canon). It should also be in the same Channel and Group as your camera, but if you have never changed these then the default values should work fine.

    As you get more experience with off-camera lighting you might find yourself wanting to expand your horizons with diffusers, colored gels, additional flashes, and more. But if you just want to get some basic experience with this technique, learning to use your built-in flash as a remote trigger is a fantastic way to get started.

    Have you tried using this method before? What has your experience been like, and what are some of your favorite off-camera flash tips? Leave your thoughts in the comments below.

    googletag.cmd.push(function() {
    tablet_slots.push( googletag.defineSlot( “/1005424/_dPSv4_tab-all-article-bottom_(300×250)”, [300, 250], “pb-ad-78623” ).addService( googletag.pubads() ) ); } );

    googletag.cmd.push(function() {
    mobile_slots.push( googletag.defineSlot( “/1005424/_dPSv4_mob-all-article-bottom_(300×250)”, [300, 250], “pb-ad-78158” ).addService( googletag.pubads() ) ); } );

    The post How to Trigger an Off-Camera Flash with the Pop-up Flash by Simon Ringsmuth appeared first on Digital Photography School.

    Digital Photography School

  • 3 Useful Photoshop Techniques for Making Images Exposure Corrections

    Title-correct-exposure

    Using a Curves Adjustment Layer with the Blend Mode set to Screen to correct exposure in Photoshop.

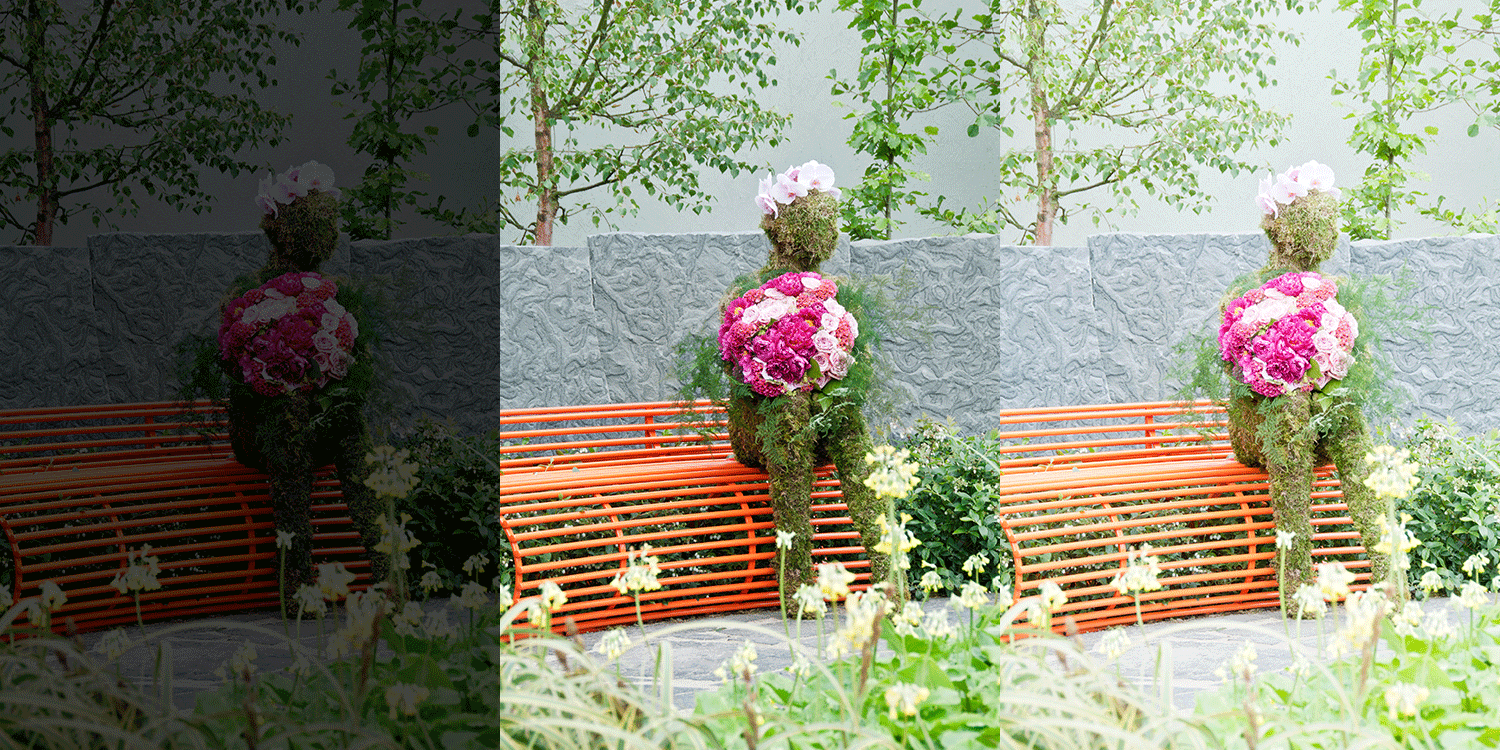
    In general, where images are too dark, this is referred to as underexposed. Conversely, images that are too light are overexposed. Photos taken on sunny days are prone to being overexposed.

    exposure

    An animated gif to illustrate a correct exposure, an underexposed shot and an overexposed one.

    In an ideal situation, the aim is to try and get the correct exposure in-camera. In doing so, less time will be spent in front of your computer post-processing.

    In this article, I will describe how to easily correct photos that are underexposed (photos that are too dark) and overexposed (photos that too light) using Adjustment Layers and Blend Modes in Photoshop. I will then describe how the Dodge and Burn tools work to target specific areas to brighten or darken your image.

    The following techniques are not new, but have been around for quite some time in Photoshop. The methods are still very effective, quick and easy to do.

    • Overexposed photos – Blend Mode: Screen with Curves Adjustment Layer.
    • Underexposed photos – Blend Mode: Multiply with Curves Adjustment layer.
    • Dodge & Burn tools – New Layer above the image filled with 50% gray – Blend Mode: Overlay/Softlight.

    Read:  The First 3 Photoshop Blend Modes You Need to Understand

    All of the images I used in this article are the jpegs straight out of the camera, completely unedited. I want to demonstrate how effective these techniques are when applied.

    Correcting Overexposed Images

    Becky-overexposed

    A typical washed-out look from an overexposed photo.

    As you can see, from the first overexposed shot. The subject has that washed-out look. The subject is overexposed by a stop and a half. I applied a Curves Adjustment Layer and changed the Blend Mode to Multiply. Straight away, the contrast of the image has dramatically increased.

    Becky-curves-multiply

    The result is quite dramatic when the Curves Adjustment Layer (with Multiply blend mode) has been applied, but there is a noticeable change in color shift.

    The Multiply Blend Mode can cause a shift in color, but this is easily remedied. To adjust the color balance, go to the Properties panel (CS6) and choose the channel you want by clicking on the menu left of the Auto button. In this case, the color was too cool, so I adjusted the three channels (Red, Green and Blue) to get the result I wanted.

    Becky-correct-exposure

    The color balance has now been modified by adjusting the red, green and blue channels in the the properties panel for the Curves layer.

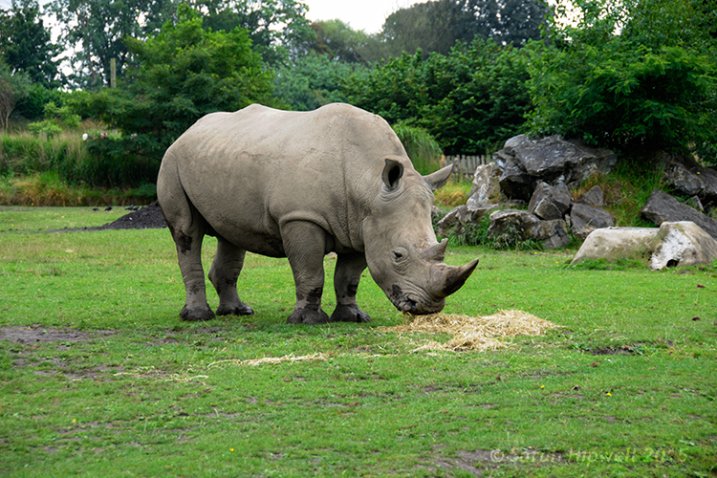
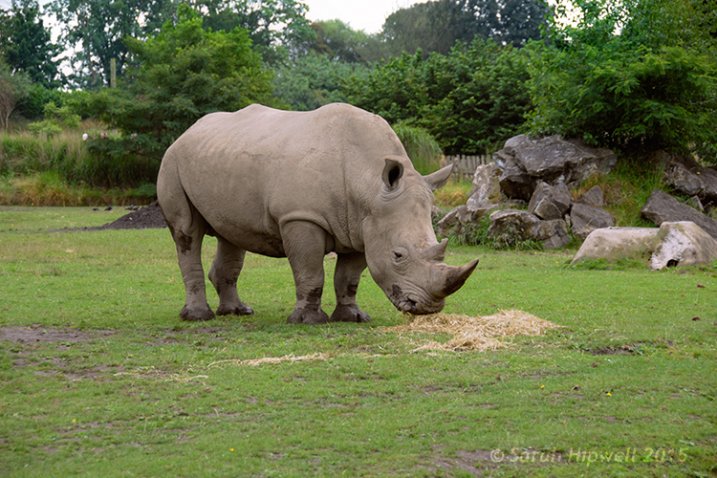
    In the image of the Rhino below, when I applied the adjustment layer and changed the Blend Mode to Multiply, the effect caused a color shift to green, and the intensity of the effect was too dramatic. I adjusted the color balance by choosing the green and red channels in the Properties panel. I then reduced the Opacity to 55% of the layer to further fine-tune the image.

    Rhino-underexposed

    Overexposed photo of a Rhino taken at Dublin Zoo.

    Rhino-curves-multiply

    A Curves Adjustment layer with the Blend Mode set to Multiply.

    Rhino-correct-exposure

    I reduced the Opacity of the Curves Adjustment Layer as the effect was too much. I then adjusted the color balance by tweaking the red, green and blue channels.

    Correcting Underexposed Images

    Underexposed shots are typical when working outdoors on sunny days. Usually, the background is properly exposed but your subject is silhouetted. Similarly, if the background is washed out but your mode/subject is exposed correctly.

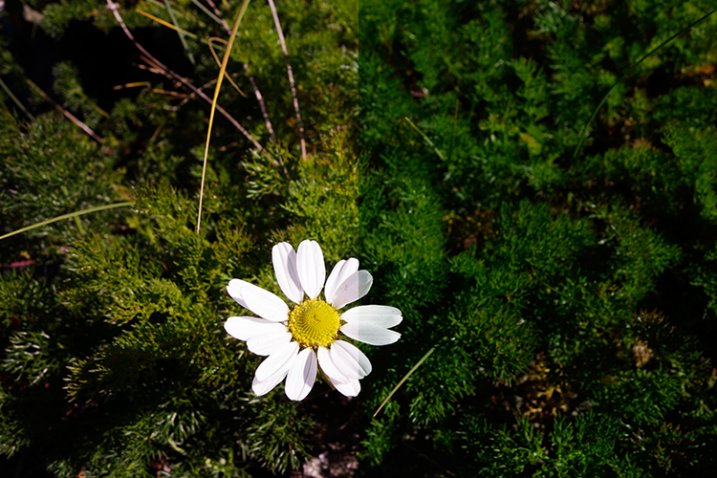
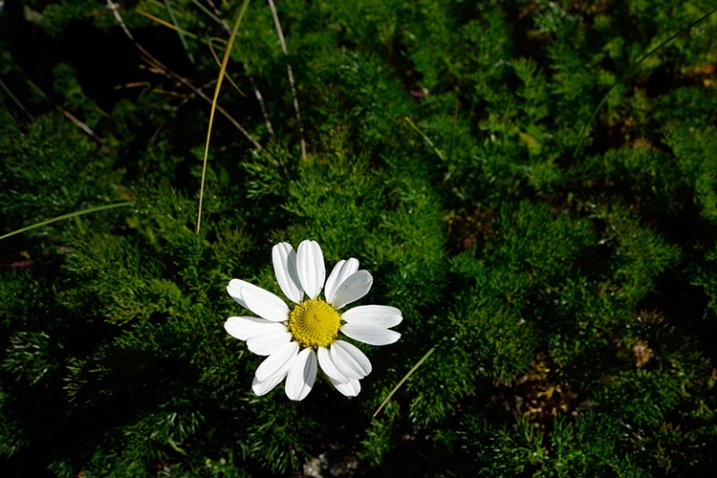
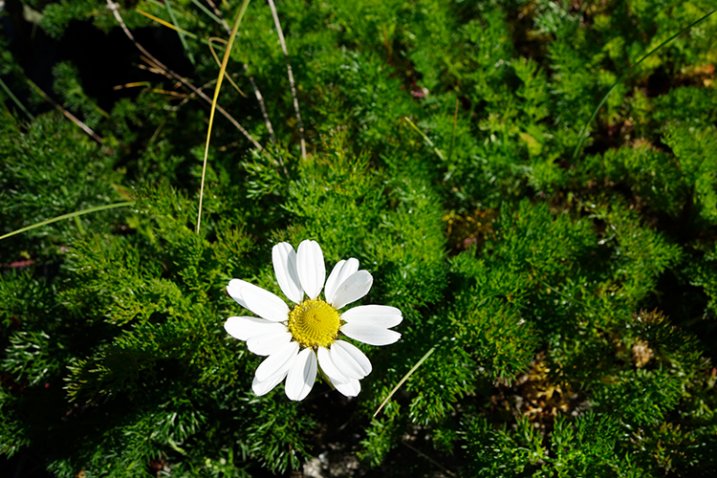
    For example, the photo of the flower was taken at the beach on a very sunny day. I focused and exposed for the flower, which meant the background was way too dark. I applied a Curves Adjustment Layer and changed the Blend Mode to Screen. The shadows became lighter, but I duplicated this layer again as I wanted more detail in the shadows. (In most cases, this effect of using the one Adjustment Layer is enough but if your photo is very washed out, or very dark, you may need to duplicate the Adjustment Layer and adjust the opacity accordingly.)

    flower-underexposed

    An underexposed flower in green foliage.

    I reduced the opacity of both layers and added a mask to bring back the highlights on the flower’s petals. Similar to the Multiply Blend Mode, the Screen Mode can cause a shift in color. In this instance, the photo had too much green. Similar to the photo above, I was able to adjust the color balance in the Properties panel and chose the green channel to modify the color balance.

    flower-curves-screen

    Two Curves Adjustment Layers were applied to this photo. I wanted to bring out more detail in the shadows.

    flower-changing-to-green-channel

    flower-input-output-sliders

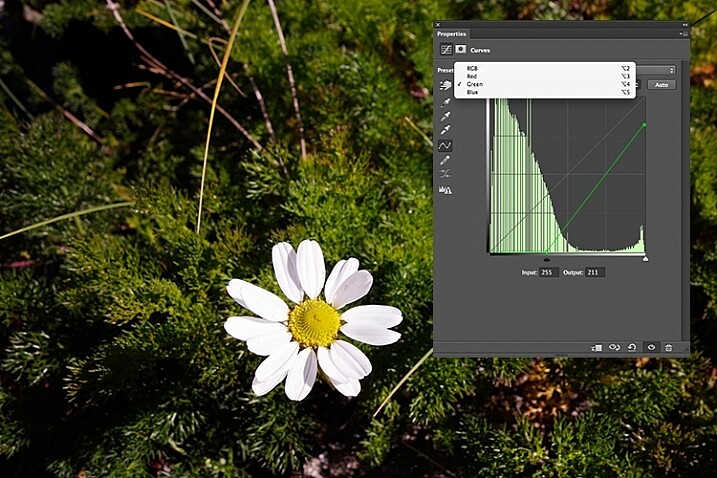
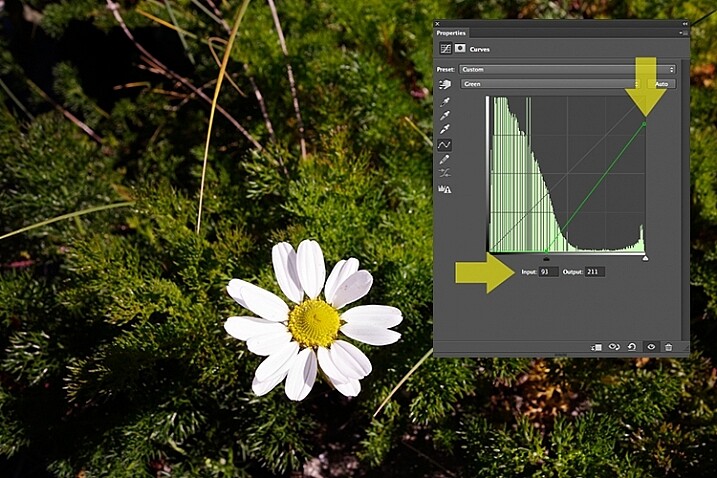
    By going into the different channels, it’s easier to target the specific colour that needs adjusting. In the image of the flower, I wanted to reduce the green colour. So by clicking on the top right point of the graph (output) and dragging it down. I then moved this Input slider to the right to bring in some magenta. As this an adjustment layer, you can play around with each of the colour channels and experiment using the input and Output sliders in an non-destructive way.

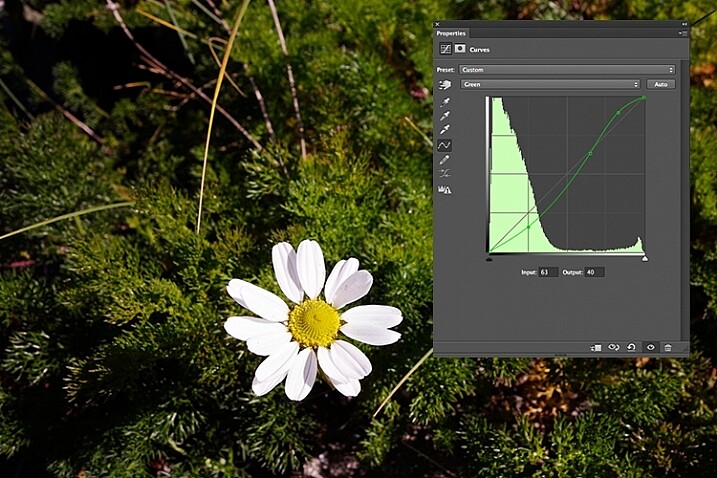
    flower-green-channel-S-curve

    A more accurate way would be to plot different points on the grid to get that classic S shape, which is what the Curves Adjustment is know for.

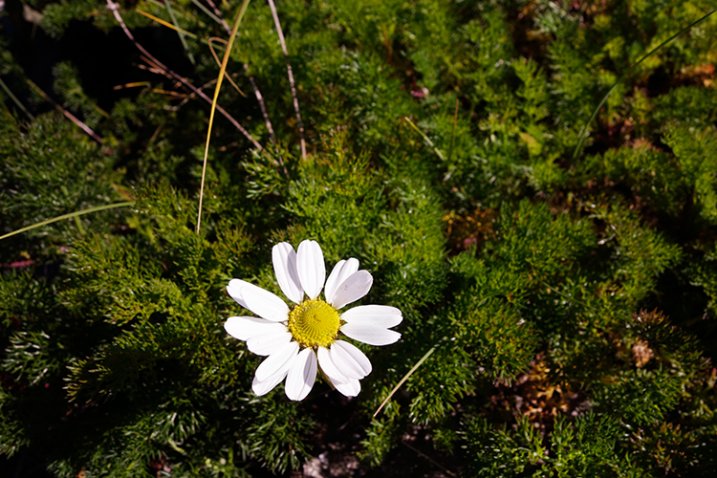
    flower-correct-exposure

    Opacity was reduced on each of the two Curves Adjustmnet layers. The green channel was adjusted to modify the color balance.

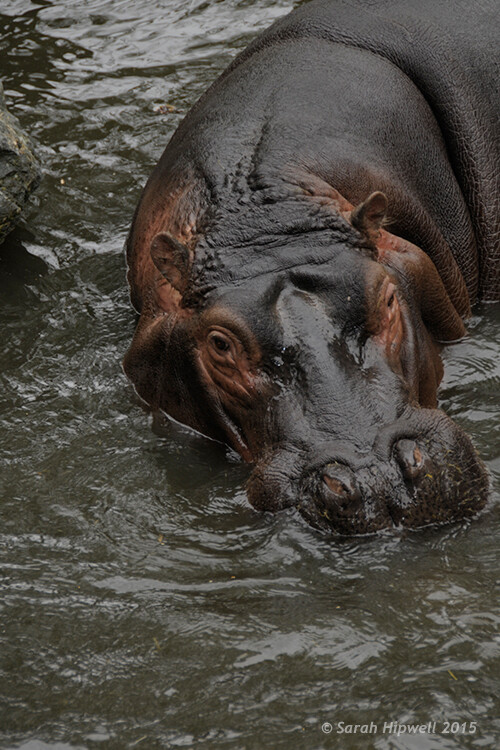
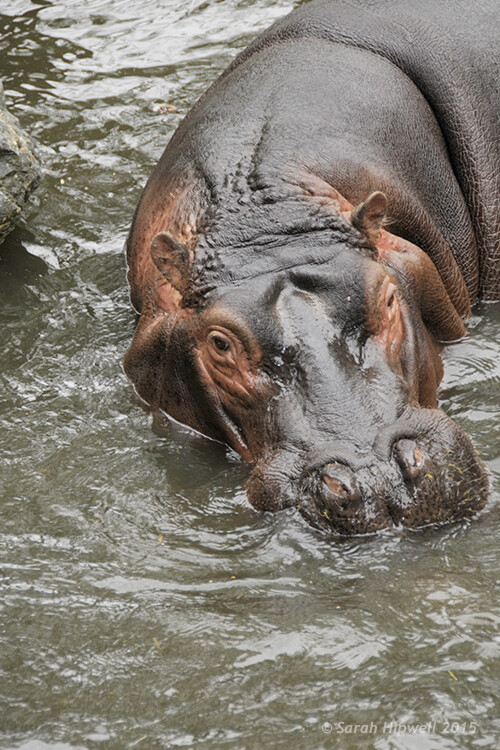
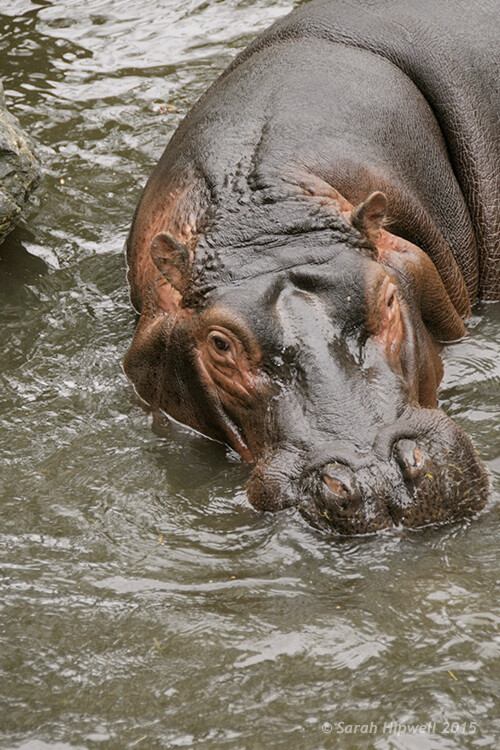
    The shot of the hippo below was taken at Dublin Zoo and the day was quite overcast. As before, I added a Curves Adjustment layer and changed the Blend Mode to Screen. I then adjusted the red, green and blue channels to correct the color balance. I reduced the opacity on the Adjustment Layer only slightly.

    Hippo-underexposed

    A underexposed shot of a hippopotamus taken at Dublin Zoo

    Hippo-curves-screen

    A Curves Adjustment layer with the Blend Mode set to Screen.

    The shot of the Hippo was taken at Dublin Zoo and the day was quite overcast. As before, I added a Curves Adjustment layer and changed the Blend Mode to Screen. I then adjusted the red, green and blue channels to correct the color balance. I reduced the opacity on the Adjustment Layer only slightly.

    Hippo-correct-exposure

    The Opacity was only slightly reduced for this image but the color balance again had to be adjusted in all the channels.

    So by using an adjustment layer and changing the Blend Mode to Multiply or Screen, overexposed and underexposed shots can be easily fixed in a few steps. But what if specific areas of your image only need the exposure corrected?

    Dodge and Burn

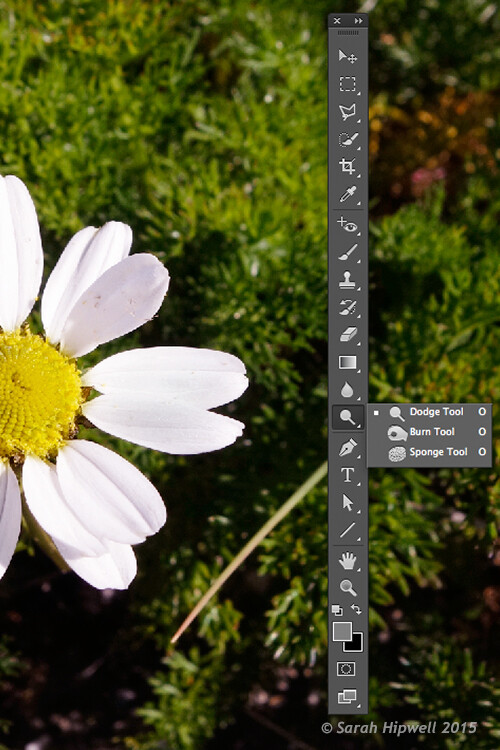
    The Dodge tool lightens and the Burn tool darkens specific areas of your photo. This is why the Dodge and Burn tools are really useful if you don’t need to apply a global exposure correction.

    I use these tools a lot in my workflow, it can create highlights in hair. When I shoot headshots, the eyes are important and the Dodge and Burn tools can also really enhance eyes and make them sparkle. Other forms or parts of the body can also be accentuated and given more depth by using these tools.

    However, the Dodge and Burn tools, if used directly on a image, work in a destructive way. So to use these tools non-destructively, you will need to create a new blank layer above the image that you are working on, fill it with 50% gray and change the Blend Mode to Overlay or Softlight.

    Dodge-Burn-tools

    Where to locate the Dodge and Burn tools in Photoshop.

    Before you begin, use a brush with the hardness set to soft (0-30). In the Tools Options Bar, make sure that you set the Range to Midtones, Exposure is set to low (8-10%) and that the Protect Tones is checked, as shown below.

    Midtones+Exposure+Protect-Tonespsd

    Set the Range to Midtones. Keep Exposure at a low setting. Make sure the Protect Tones box has been checked.

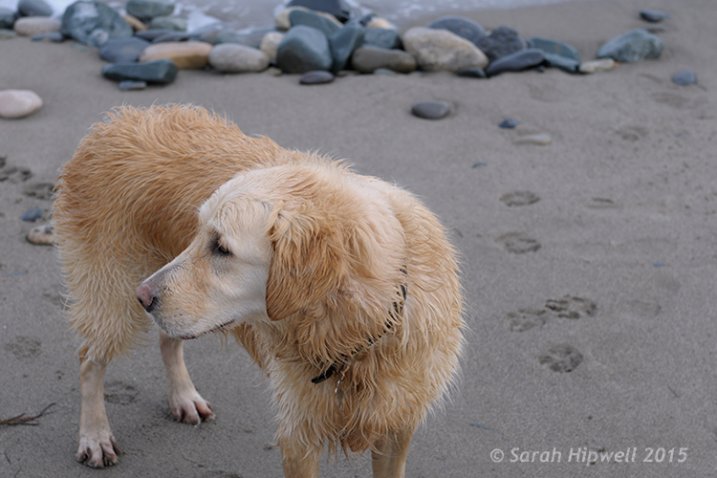
    dog

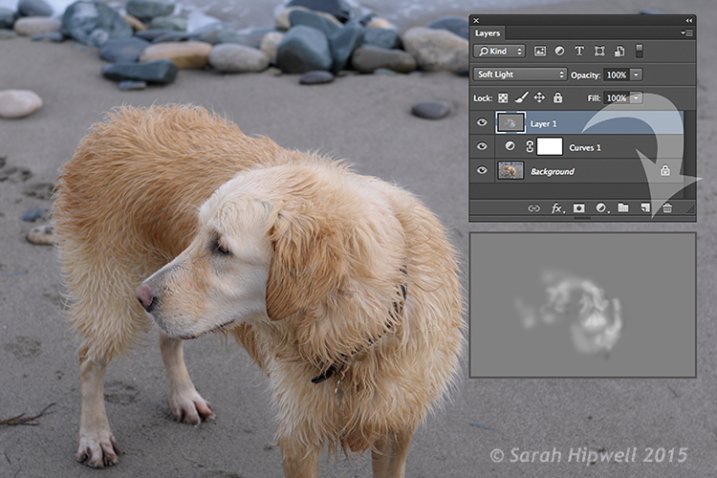
    In this photo of the dog, I want to create some highlights on the dog’s fur. Well, fur is like hair!

    Dog-dodge-burn

    You can see the difference in what a little dodging can do in this image of the dog with the photo above.

    If you feel that you have overdone either the Dodge or the Burn tool, just lower the opacity of the layer.

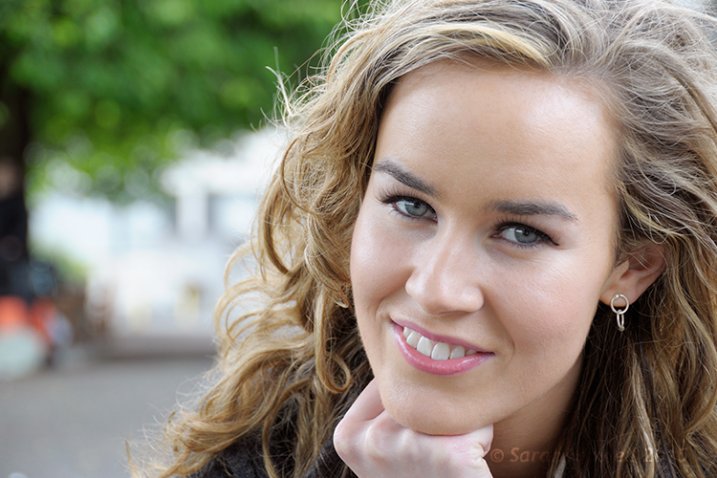
    Lisa

    Lisa, before any Dodging or Burning has been applied to the image.

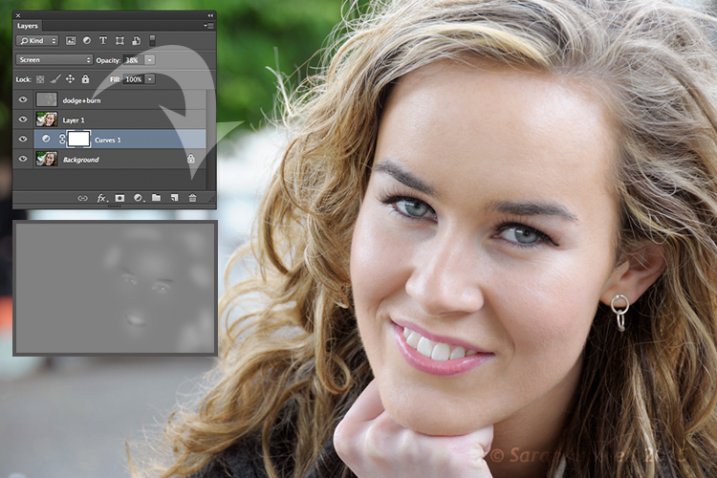
    Lisa-dodge-burn

    Just a little dodge and burn can make a difference to your photo.

    Even subtle differences can enhance your images. In this image of Lisa, I applied some dodging to her eyes, I used the Burn tool to emphasize her lips. I then added a bit more dodging to the face and hair.

    I hope you find these techniques useful? Maybe, you have some of your own? If so please share in the comments below.

    googletag.cmd.push(function() {
    tablet_slots.push( googletag.defineSlot( “/1005424/_dPSv4_tab-all-article-bottom_(300×250)”, [300, 250], “pb-ad-78623” ).addService( googletag.pubads() ) ); } );

    googletag.cmd.push(function() {
    mobile_slots.push( googletag.defineSlot( “/1005424/_dPSv4_mob-all-article-bottom_(300×250)”, [300, 250], “pb-ad-78158” ).addService( googletag.pubads() ) ); } );

    The post 3 Useful Photoshop Techniques for Making Images Exposure Corrections by Sarah Hipwell appeared first on Digital Photography School.

    Digital Photography School

  • Simple Yet Effective Marketing Efforts to Get New Clients (and Tools)

    After you have set up your business, made a business plan, created an attractive portfolio, and did a lot of other things, the most challenging part is still: “how to get clients”. What do you need to do to get the right people to see your website? How do you make them want to buy your services and products? These Continue Reading

    The post Simple Yet Effective Marketing Efforts to Get New Clients (and Tools) appeared first on Photodoto.


    Photodoto

  • 3 Steps to Professional Looking Headshots Using One Flash

    Ideally, every time we take photos of someone, there is a studio full of equipment at our disposal or wonderful sunlight that is perfectly diffused. This, however, is not reality. Usually, the sun is either too faint or too harsh. We don’t always have access to a studio, let alone one full of lighting gear that we can use. Sometimes, we also just don’t have the time to learn a new technique, rent more gear, or find the perfect location. Other times, the subject has very limited availability and locations. Still, we smile through the limitations and do our best to provide professional images every single time.

    Do you feel prepared to compensate for these different light conditions that you may be forced to work with, though?

    OneFlash-example4

    Natural light is always wonderful for any type of portrait, including headshots. Bouncing that natural light around with reflectors or just finding a bright shaded spot all work well. If you have a flash at your disposal, though, you can create even, or dramatic lighting to accommodate headshot needs.

    The following three tips will help you create headshots using only one flash to compensate for less-then-perfect lighting conditions:

    1. Diffuse, diffuse, diffuse!

    When using a flash, the last thing you usually want is for it to LOOK like you used a flash. To do this, you need to find ways to make the light disperse more, reducing any harsh look that it will otherwise produce. There are several ways to do this, and each on their own will help. Combining techniques works best, though.

    • Bounce it – If there’s a wall somewhere to your side, a ceiling within a couple of feet from you, or if you have a reflector of any kind, bounce it. Aim the flash towards the reflector so that it fills in shadows to compensate for any uneven lighting conditions.
    • Aim the flash behind you to help disperse the light –  This may sound counterintuitive, but aiming the flash BEHIND you helps to disperse the light quite a bit. It provides a front light on your subject, but much softer than would otherwise be if the flash were pointed directly at them.
    • Use a diffuser on the flash – Whether it’s a plastic cover, a fabric mini-softbox, a bendable reflector that attaches, or a homemade version of any of the above – a diffuser directly on your flash will instantly soften the light and allow you more versatile light on your subject.
    • Set zoom on flash to the widest setting possible – your flash can be set to adjust to match the angle of view of the focal length lens you are using. However, this can be manually adjusted regardless of the lens you are using. When the flash is set to 70mm, for example, the light will be more narrow and direct than when it is set to 24mm. While this alone doesn’t make a drastic difference, it is another tool to add for further light diffusion.
    Left - No flash. Right - Single flash, on-camera, turned to right of subject for fill light.

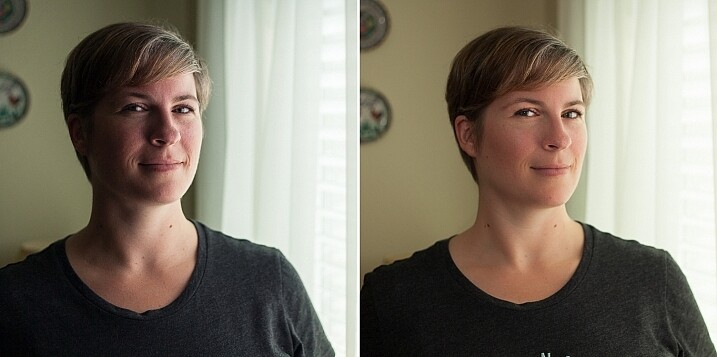
    Left – No flash. Right – Single flash, on-camera, turned to the right of the subject for fill light.

    In the before and after photos above, the left image shows the result using only natural light from the window. It’s beautiful light, but not always what you want.

    The right photo shows same location, same position, with a single flash used to fill in the shadows. The flash is on-camera and has a flash dome diffuser on it. It’s angled to left of photographer (right of subject) so that it will bounce off walls and ceiling, and manually set at 1/8th power.

    2. Use remote triggers

    If you have access to remote triggers, play with using the light to add drama or emotion. This alone will give you a studio look and can be done just about anywhere. Be sure that this type of look is appropriate for your subject’s needs, especially since it tends to have a very strong look. For example, the owner of a flower shop may want something that is more natural-looking and shows the outdoors or her shop, while the owner of a tech start-up may like the strong look of dramatic lighting. While each situation is different, a few options for flash placement are:

    • Directly behind client
    • At 45 degrees behind or in front of subject
    • Directly to side of subject
    Left - No flash. Right - manual mode, underexposed several stops, single flash towards right of subject.

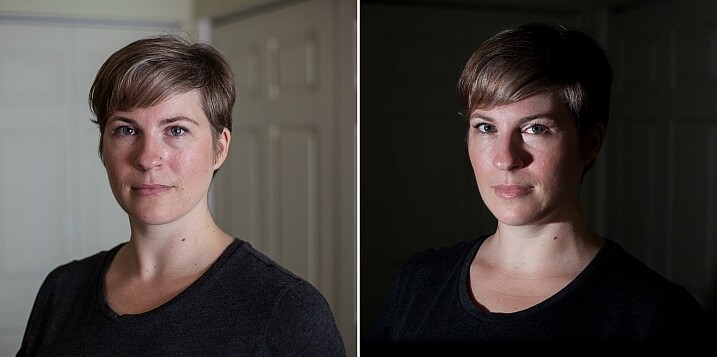
    Left – No flash. Right – manual mode, natural light underexposed several stops, single flash towards right of subject.

    The before and after photos above show how to use a single flash to create some dramatic headshots in any indoor situation. The left photo is properly exposing for the space, using natural light only. The photo on the right is manually controlled to greatly underexpose the natural light (so that the background disappears as much as possible), and then a single flash is placed towards right of subject to give concentrated and dramatic light.

    3. Manual flash mode

    While it is best to always use your flash on manual mode in order to have full control over the lighting, this is an often overlooked method. Manual mode on your flash will allow you to adjust the strength for any situation. Shooting indoors and bouncing the flash? Start your flash strength at 1/8 of full power and adjust from there. Shooting in full sun? Start at 1/2 strength and adjust down as needed. Need a soft bit of shadow to be filled while indoors? Set your flash strength to 1/16 and adjust from there. Note that you will get to know good starting points for different situations, but adjustments are always needed since every situation is unique.

    OneFlash-example6

    Left is using no flash, outdoors. Right photo is same position and location, using single flash on camera at 1/4th power.

    The before and after photos above show you can use a single flash to compensate for shadows in daylight. The left photo shows direct daylight and no flash. The photo on the right is at the same time, same position, same sun condition, but with a single flash at 1/4 power to help fill shadows.

    Regardless of what tools you have access to for each photo shoot, a big part of your job as photographers is to be able to adjust to any situation. While having lots of gear at your disposal is handy, it is not always necessary. Oftentimes, the gear you have on hand can do the job you need it to do; all it takes is some thinking outside of the box.

    Do you have ways that you create beautiful headshot or portrait lighting on-the-fly? Please share in the comments below.

    googletag.cmd.push(function() {
    tablet_slots.push( googletag.defineSlot( “/1005424/_dPSv4_tab-all-article-bottom_(300×250)”, [300, 250], “pb-ad-78623” ).addService( googletag.pubads() ) ); } );

    googletag.cmd.push(function() {
    mobile_slots.push( googletag.defineSlot( “/1005424/_dPSv4_mob-all-article-bottom_(300×250)”, [300, 250], “pb-ad-78158” ).addService( googletag.pubads() ) ); } );

    The post 3 Steps to Professional Looking Headshots Using One Flash by Natalia Robert appeared first on Digital Photography School.

    Digital Photography School

  • Improve Your Lighting Skills with a Trip to the Toy Store

    You’ve heard it before: Photography is seeing and capturing light. It’s absolutely true, but what’s the best way to learn how to see something that can be infinitely shaped, altered by both environmental factors, and through intentional manipulation? As with most things, there’s a hard way and an easier way.

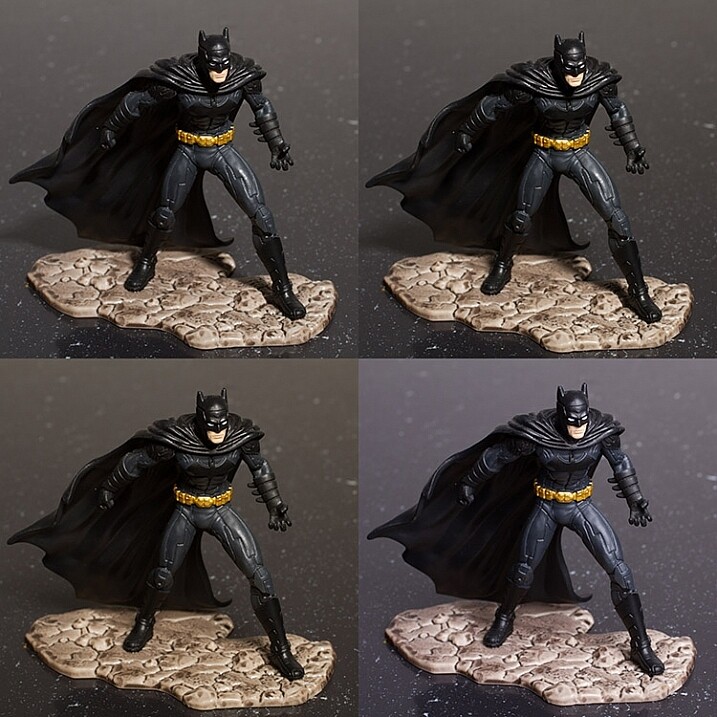
    Learn lighting with toys batman

    The hard way entails grabbing your camera and photographing everything you can, in every possible condition, and hoping everything clicks in one magic moment, thereby learning gradually through scattered experience. This works, but it can take an awful lot of time and practice before it leads to any real understanding of various lighting conditions.

    The easier method, that this article covers, involves a more structured and goal oriented approach. It can get you looking at light in new ways and push you to the top of the learning curve in a very short period of time.

    A trip to the toy store

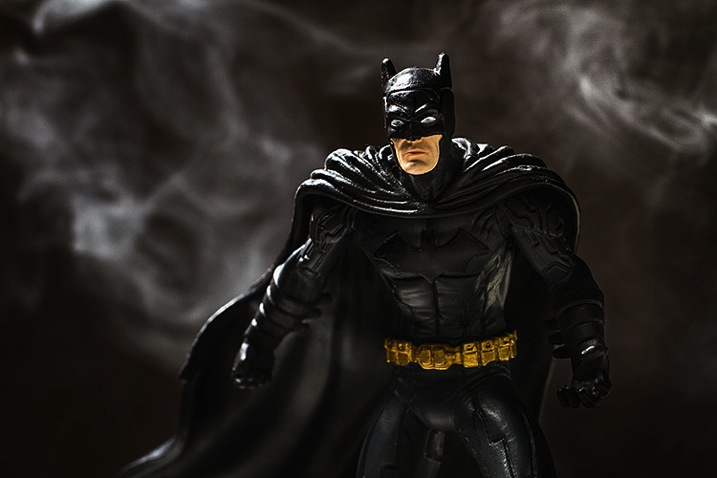
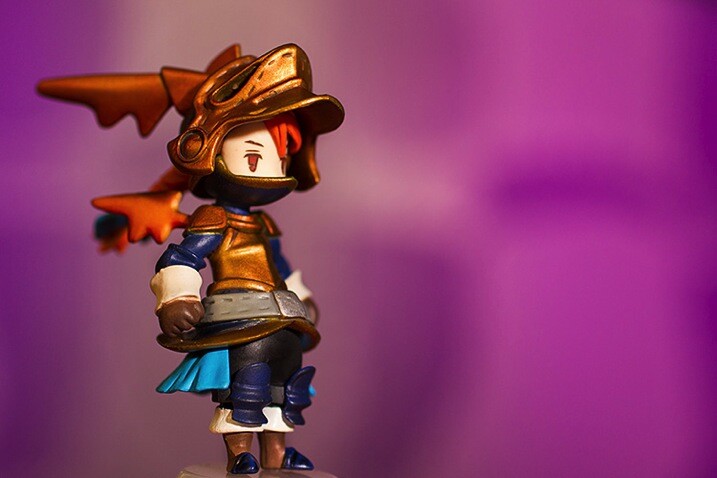
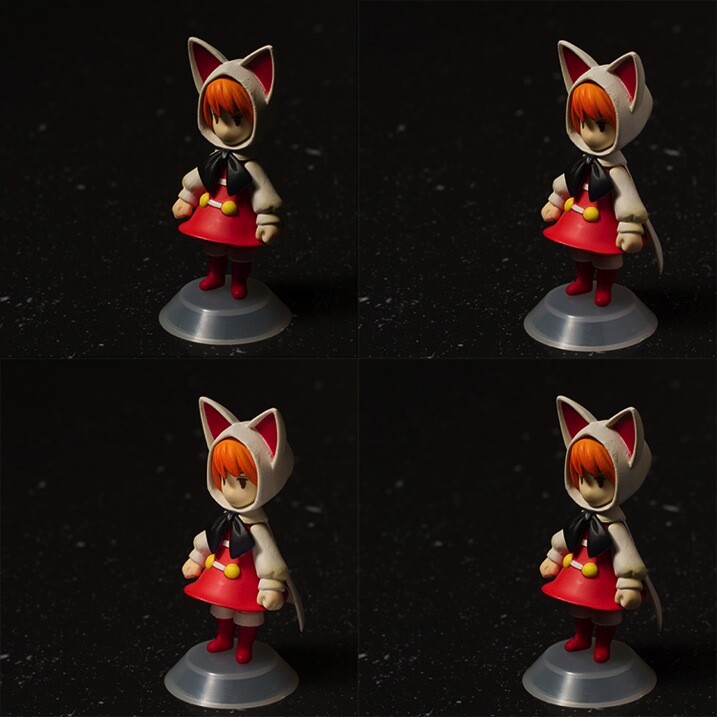
    Because of the studious nature of this exercise, it can seem far less exciting and adventurous than being out and about with your camera. To combat this, I propose using toys as your subjects. Aside from the quirkiness and fun this can add to the exercise, a lot of toys, particularly action figures, have insane amounts of fine details that will really show off any changes in lighting conditions.

    Learn lighting with toys ff 2859

    Another bonus of using toys for studying light is that if you use a character from a film or game that you know, you already have some idea of cinematic lighting schemes associated with that character, and you will quickly recognize some of them as you move through this process.

    What you need to start

    • A camera set on manual mode
    • A tripod
    • A toy
    • A light source (natural or artificial with a modifier of your choice)
    • A reflector
    • A notebook (not required, but taking notes on what works and what doesn’t work never hurts)
    • A macro lens for smaller toys is useful if you have one

    Note: I’m using studio strobes for this exercise out of personal preference and ease, as it’s easier to move a light source around a subject than it is to move a subject around a fixed light source such as a window. Strobes also allow you to keep the exposure constant, provided the distance from light source to subject doesn’t change.

    Also, please bear in mind that the intent of these exercises isn’t to create a final polished image. You’re simply watching and gaining experience with altering light. However, you can use the images you get from these exercises to build your own reference sheet for lighting effects for various light sources and modifiers.

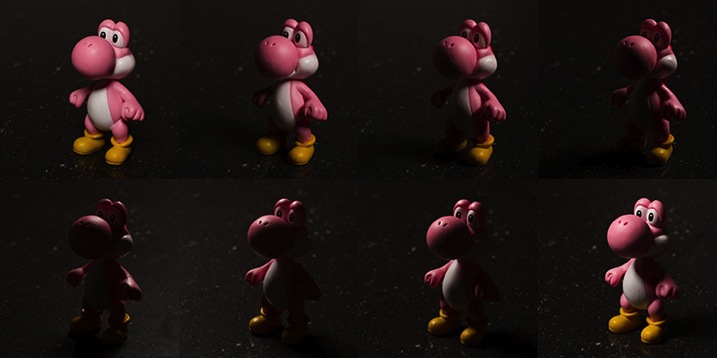
    Exercise one

    To start off, place your light source directly in front of your subject, pointed down at a 45 degree angle. Work out the correct exposure for your setup and dial it into your camera. These settings won’t change.

    Now take your first photo.

    Once that’s done, move your light source gradually around your subject, a little bit at a time, and take another photo at each angle. Repeat until you’ve come back to your starting position. Just make sure that your light source stays the same distance from the subject, while still pointed directly at it, each time you move it.

    What you’re looking for is a series of images that clearly show how the light is altering as it moves around the toy. You can use these images to study how the light records in a photograph from any of the positions.

    Learn lighting with toys yoshi 2795

    Exercise two

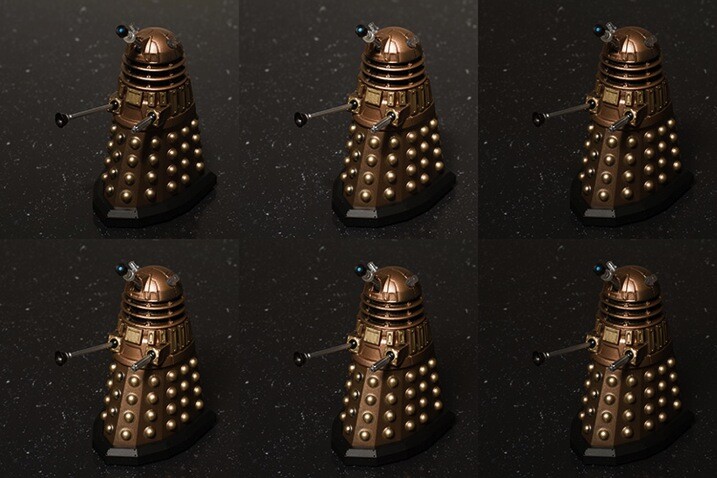
    For the second part of this task, start with your light source directly in front of your chosen subject and as high possible. Work out your exposure and take the first photo. This time, move your light source down a few inches, again keeping it pointed directly at your toy. Repeat this until you can’t lower your light source any further. Now, your exposure will probably change this time as your light source gets physically closer to your subject. It’s up to you if you want to calculate a new exposure for each interval.

    Learn lighting with toys dalek 2785

    Top Left: Highest position of the light source. Bottom Right: Lowest position of the light source.

    If you feel inclined, don’t be afraid to take the extra time and repeat this exercise once in each of the vertical positions as well. Doing so will only give you a more complete lighting reference in the end.

    Exercise three


    In this step, start with your light source as close to your subject as you can and place it at a 45 degree angle to camera right, pointed down at your subject. Once you have taken your first image, move it backward one foot.

    Changing the distance of your light source from your subject is going to alter your exposure settings. By moving it backward, you will have less light falling on your scene. Simply recalculate your exposure and take your second shot. Repeat this until you can’t move your light source any further back.

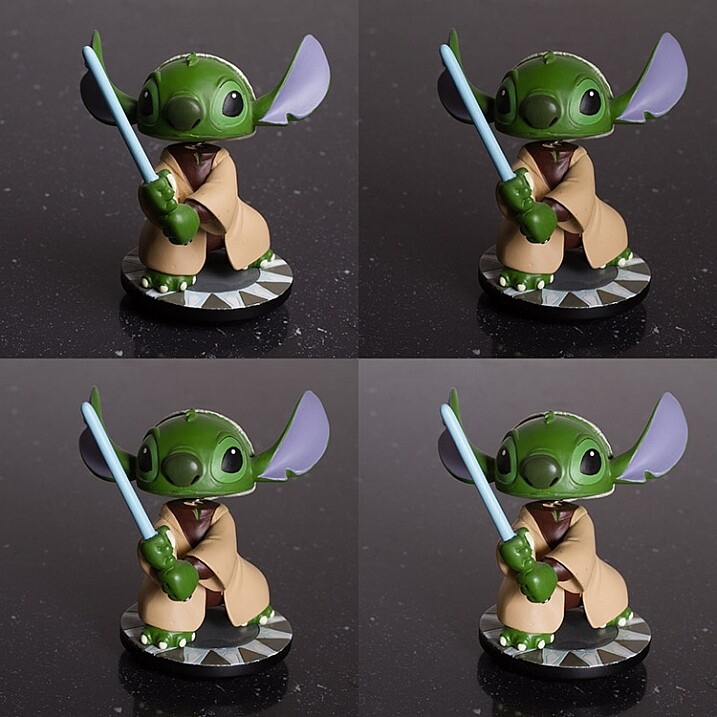
    What you should see as you do this is the light changing in quality. The closer your light source is to your subject, the softer the light. The further your light source from your subject, the harder the light. A lot people tend to have a personal preference on how they prefer their quality of light. Try to use this exercise and see if you can figure out yours.

    When you change your modifiers, you may start to notice a shift in the colour temperature as shown in the bottom right image of the example. No two modifiers will be the same in this regard, so it’s always good to know exactly what you’re getting when you use your equipment.

    learn-lighting-with-toys-yoda-2890

    Top Left: Softbox at 2′ (61cm) away
    Top Right: 4′ (1.2m) away
    Bottom Left: 6′ (1.8m) away
    Bottom Right: 8′ (2.4m) away

    Exercise four

    The next step is to start modifying your light; with a reflector in this case. Start with your light source pointed directly at your subject from camera left and above. Calculate your exposure and take a starting image with no modification.

    For the next image, put your reflector at camera right, parallel to your light source.

    Next, place it directly in front of your subject but as low down as you need to not block your lens and to keep it out of the frame.

    Finally, if you can, curve your reflector and hold it at camera right with the centre pointed at 45 degrees from your subject.

    Feel free to play around here and take photos with your reflector in as many positions as you can/want. The goal is to observe the changes it makes to the overall images. These changes can be extremely subtle so the more you can observe the better (more you will learn).

    Learn lighting with toys ff 2815

    Top Left: No reflector. Top Right: Reflector from the right. Bottom Left: Reflector from in front and below the subject. Bottom Right. Reflector curved around the front right corner.

    Exercise five

    If you have a light source that can be modified with grids or similar (or maybe a window with blinds) it might be advantageous to study the different effects these modifiers provide. If you have a selection of modifiers available, you can use this as an opportunity to study the differences between them in a no pressure environment.

    Like exercise one, your light source should be directly in front of your subject and pointed downward at a 45 degree angle. Start with no modifier at all and calculate your exposure and take your first image.

    Add each of your different modifiers (softboxes, umbrellas, beauty dishes, etc.) taking a photo at each step. With that, you should have a reference for each of the modifications you can make to a particular light source.

        Top Left: No modifier ( bare bulb)     Top Right: 60 degree reflector     Bottom Left: Beauty dish     Bottom Right: Softbox

    Top Left: No modifier ( bare bulb)
    Top Right: 60 degree reflector
    Bottom Left: Beauty dish
    Bottom Right: Softbox

    After-matter

    By going through these exercises, you will have lit a subject from a huge variety of angles, with a good variety of modifications. From this, you should already start to see which angles are flattering and which aren’t. You may have also spotted ones that have affinity with your own personal tastes.

    If you repeat the exercises with any new modifiers you get, as well as in natural lighting conditions at various times a day, then all of this should add together to quicken your understanding of light and how to apply it to your final images without a lengthy trial and error process. From here, you can start to automatically decide how to light or manipulate based on what you’ve learned.

    Of course, if you don’t like the idea of using toys, feel free to use food, flowers, people or anything that’s fun and interesting to you!

    googletag.cmd.push(function() {
    tablet_slots.push( googletag.defineSlot( “/1005424/_dPSv4_tab-all-article-bottom_(300×250)”, [300, 250], “pb-ad-78623” ).addService( googletag.pubads() ) ); } );

    googletag.cmd.push(function() {
    mobile_slots.push( googletag.defineSlot( “/1005424/_dPSv4_mob-all-article-bottom_(300×250)”, [300, 250], “pb-ad-78158” ).addService( googletag.pubads() ) ); } );

    The post Improve Your Lighting Skills with a Trip to the Toy Store by John McIntire appeared first on Digital Photography School.

    Digital Photography School

  • How to Make Unique Portraits Using Light Painting

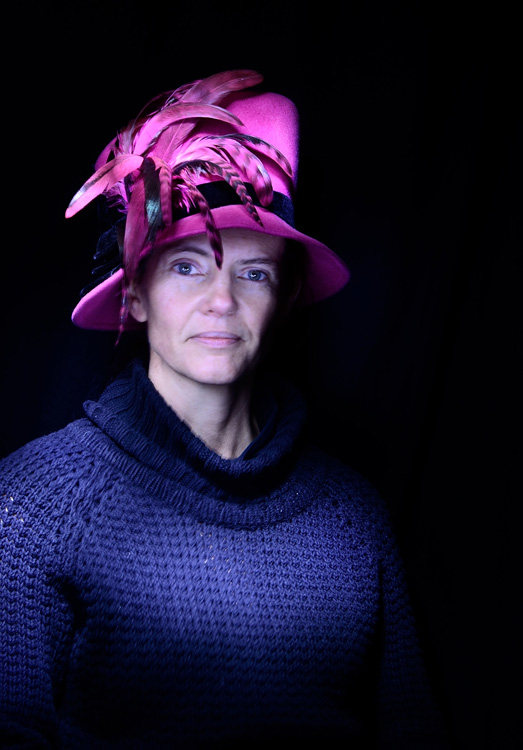
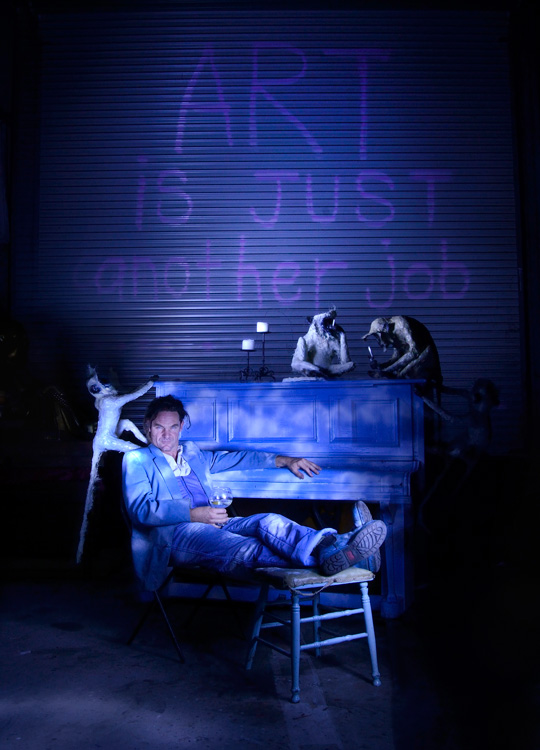
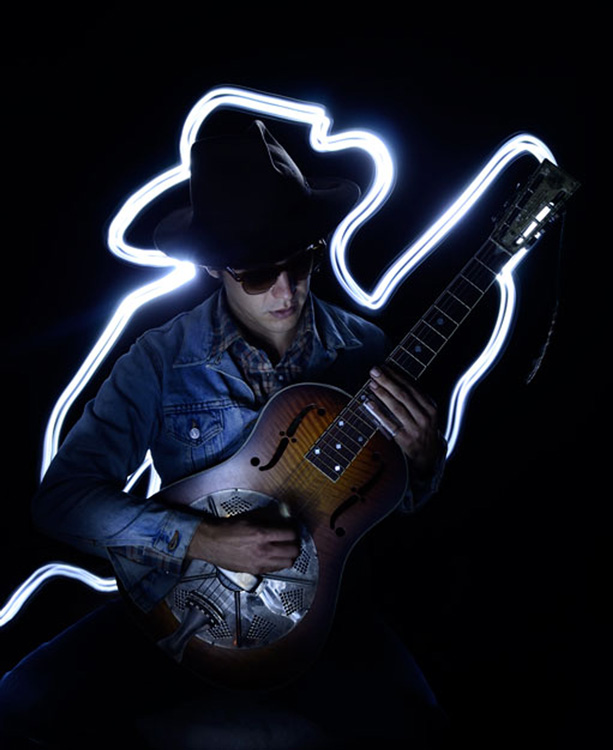
    Using the surprisingly simple technique of light painting you can create a wide variety of portrait styles using only a small flashlight as your light source. I should warn you though, light painting of all kinds can be highly addictive. Once you start, you may not be able to stop.

    Light painted portrait

    Light painted portrait

    One of the main things to understand with light painting is that the camera sensor only reads light, if there isn’t any light hitting the person shining the flashlight, they simply do not show up in the image. This allows you to move around in front of the camera while the shutter is open, and gives you ultimate control of what areas of your subject are lit. This is great for portraiture, especially in situations where you might have a complicated background, or one where you only want to light certain sections.

    light painting a portrait

    Below is a list of what you will need for any light painting, and a guide on how to use the technique specifically for portraiture. For a more detailed information on light painting have a look at this two part tutorial .

    What you will need:

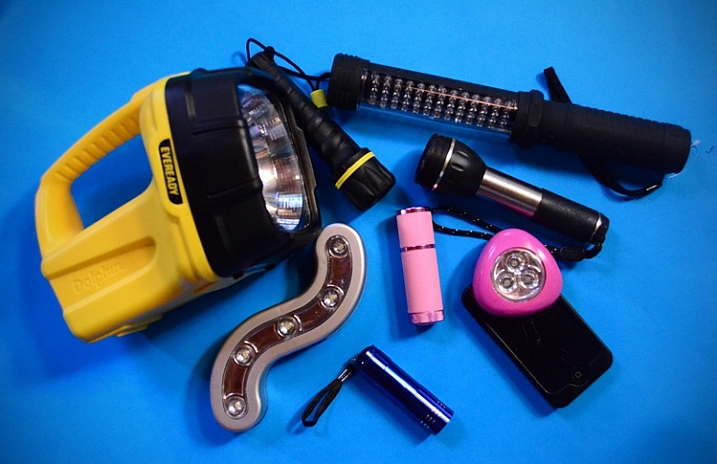
    A hand held light source. Any cheap flashlight or LED light will do, you can even use your mobile phone.

    Tools of the light painting trade

    Any small LED or flashlight will do, even your mobile phone.

    For light painting a portrait subject a directional beam of light is best, non-directional (or diffused) light will illuminate you as well. Different flashlights give off different types of light. Some have blue cast, which isn’t great for portraiture so you might want to experiment with your white balance, or add a warming filter in post-processing. You can also add color to your light source with cellophane (colored gels) or colored sheer fabric.

    Tripod and camera settings

    Light painting needs a long exposure, so you will need your camera set up on a tripod. Setting your shutter speed somewhere between 10 and 30 seconds is a good place to start, then play around from there. Your ISO should be at its lowest to avoid the grain (noise) caused by a long exposure.

    The cover of darkness

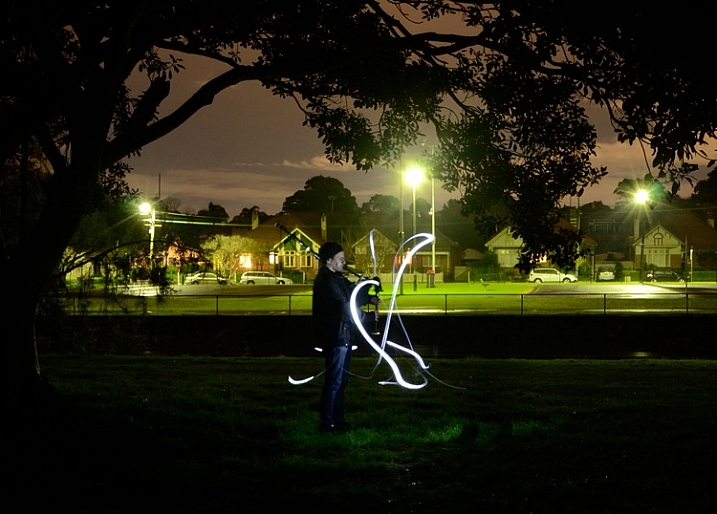
    You’ll need a completely dark room or studio, or you can shoot outside at night. If shooting outside, you’ll have to be careful of incidental light, such as street or car lights, overexposing your image. But these things can be used to your advantage in creating interesting backgrounds for your portrait subject.

    Light painting a portrait outdoors

    Light painting a portrait outdoors

    Ready, set, light paint

    Have your portrait subject in position and turn all lights out. Shine your light source on your portrait subject to help you get focus. You’ll want to focus on the face, so it’s possibly best to have your subject close their eyes before you shine your light directly into their face.

    Note: to keep the focus locked when you press the shutter button, you will either need to switch it to Manual Focus or use back button focus.

    Then click the shutter, and try not to trip over anything in the dark as you move in toward your subject. How close you get to your subject depends on your light source strength, how fast you move it, and the effect you are after. You’ll have to experiment, but for a small LED, a few inches from your subject is a good starting point. Keep the torch (flashlight) moving constantly, and pointed away from the lens.

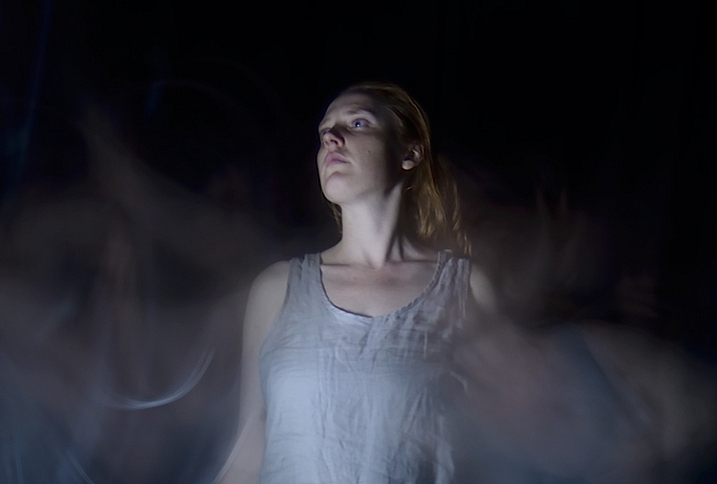
    Getting sharp images of people when you are using long exposures usually doesn’t work so well due to people’s inability to sit perfectly still. With light painting, you are only exposing a small part of them at a time, and only for a brief moment, so while it can be a bit tricky with fidgety subjects, for the most part you will be able to get sharp images. Sometimes a bit of motion blur can also be effective.

    Making the most of motion blur

    Making the most of motion blur

    Help your subject stay still during the exposure by letting them know when you release the shutter, and when you are about to shine your light on them. They’ll be in the dark, literally, so they won’t know what you are doing.

    Have them take a deep breath in and out just as, or after, you release the shutter. Don’t have them hold their breath, you don’t want them to look strained. Start your light painting with the face so they don’t have to hold their head still for your entire exposure.

    Letting your portrait subject have a look at your camera preview can help them to understand what you are trying to do. If they are unfamiliar with the technique, it can seem a bit odd, all this waving a torch in their face in the dark.

    You can set a flash to a slow sync so it fires off at the beginning of the exposure (or you can just set your flash to manual mode and fire it using the Test button), sharply lighting your subject, and then move in with your light source or have your model wave it around. Alternatively you can give a quick burst from a studio light.

    Slow flash sync combined with light painting

    While still technically a light painting portrait this method is more of portrait with some light painting added in as opposed to light painting the portrait subject themselves.

    It will probably take you and your portrait subject a few attempts to get the hang of it, but once you’ve got the general idea, and have tested out how your light source plays on your subject, you can then experiment. Below are some ideas to try out.

    Creating light trails

    Adding light trails

    Adding light trails

    To get trails of light, shine the torch directly at the lens as you move it. You can move it anywhere, including in front of your subject.

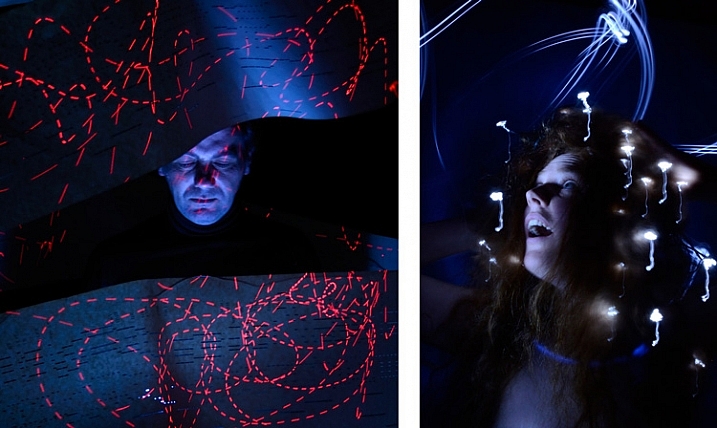
    Multiple sources of light

    portrait-light-painting08b

    In the first image above I’ve used a small LED light to paint the face, and a laser pointer for the red patterns. The laser pointer shines in very short bursts creating the broken lines. In the second image on the right, I put fairy lights in the model’s hair. The subtle movement as I light painted the rest of the model caused the fairy lights to take on the wiggly forms.

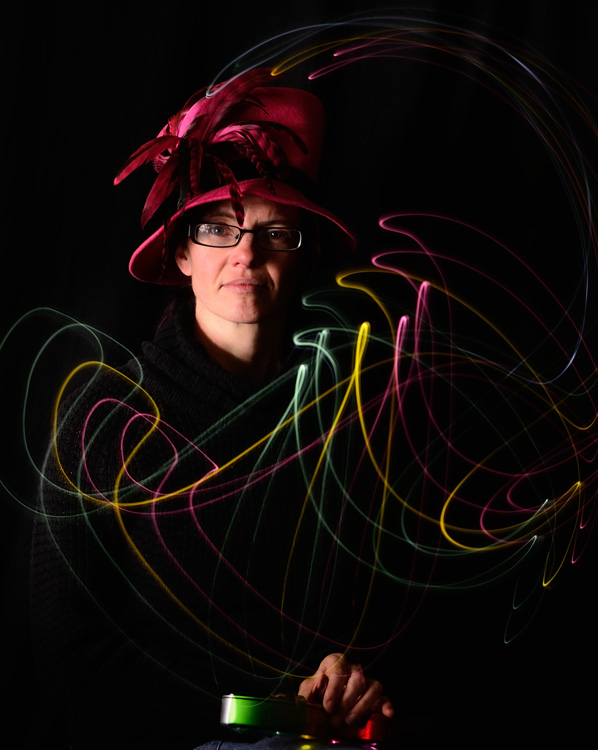
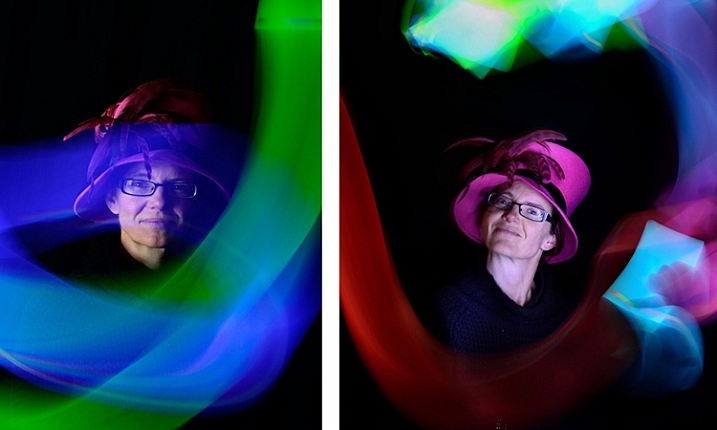
    Using an iPad or tablet

    portrait-light-painting09b

    For this effect I downloaded an app for my tablet that lit the screen with a solid block of bright color. The colors could be changed with a slider, so with a few attempts I managed to get coordinated enough to change the colors as I moved the tablet around the subject.

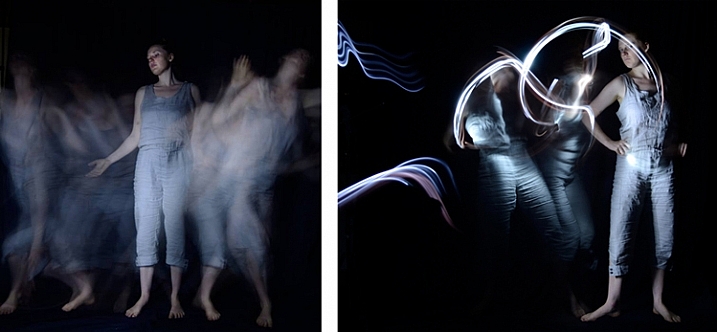
    Have fun with movement

    portrait-light-painting11b

    For both these images I shone the light over the model in one position, then had her move to the side and lit her again. As you can see, two fairly different effects using exactly the same process.

    I confess I am thoroughly addicted to light painting portraits. I love that no two shots are alike, there’s plenty of room for getting creative and having happy accidents. You can use it for many styles of portraiture, and it costs basically nothing in lighting gear. So what are you waiting for? Grab a flashlight and get started! Share your results in the comments below.

    googletag.cmd.push(function() {
    tablet_slots.push( googletag.defineSlot( “/1005424/_dPSv4_tab-all-article-bottom_(300×250)”, [300, 250], “pb-ad-78623” ).addService( googletag.pubads() ) ); } );

    googletag.cmd.push(function() {
    mobile_slots.push( googletag.defineSlot( “/1005424/_dPSv4_mob-all-article-bottom_(300×250)”, [300, 250], “pb-ad-78158” ).addService( googletag.pubads() ) ); } );

    The post How to Make Unique Portraits Using Light Painting by Lea Hawkins appeared first on Digital Photography School.

    Digital Photography School

  • 3 Steps to Easily and Realistically Change Hair Color in Photoshop

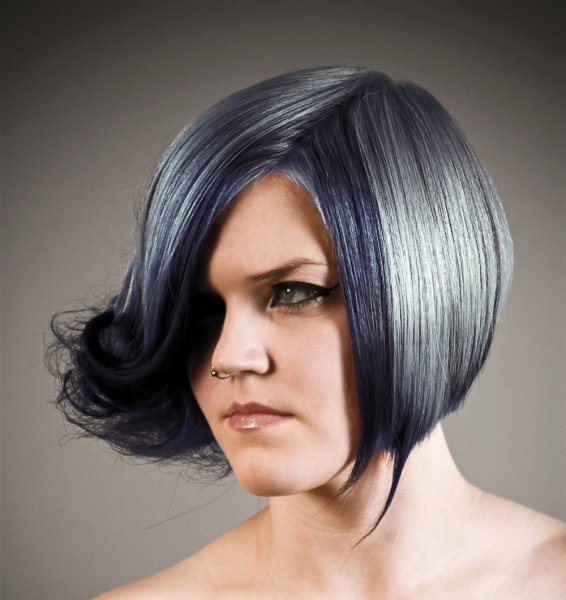
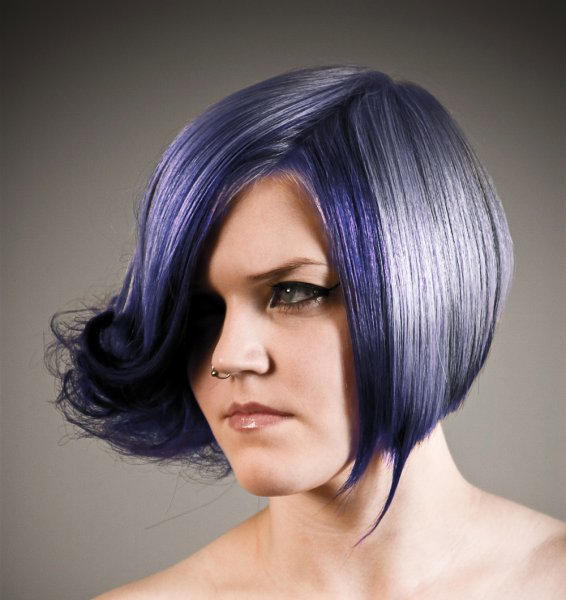
    For those who follow trends you’ll know there is a move to “metallic” hair colors for both men and women, and this is especially evident in fashion photography.

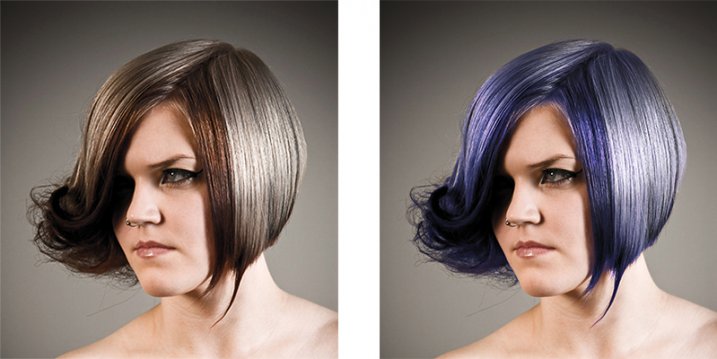
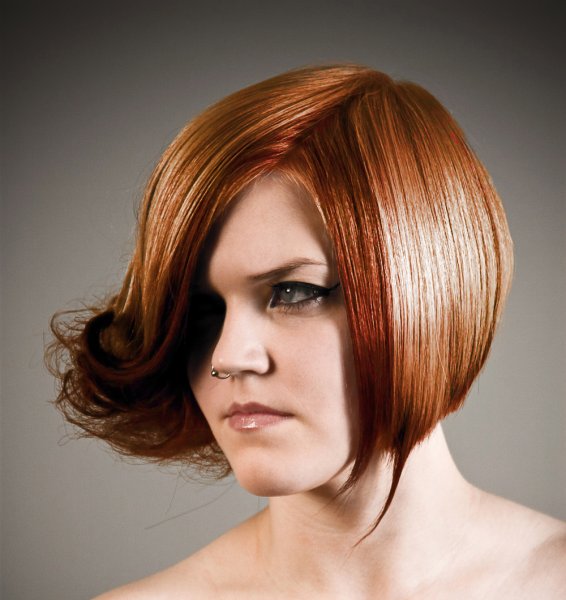
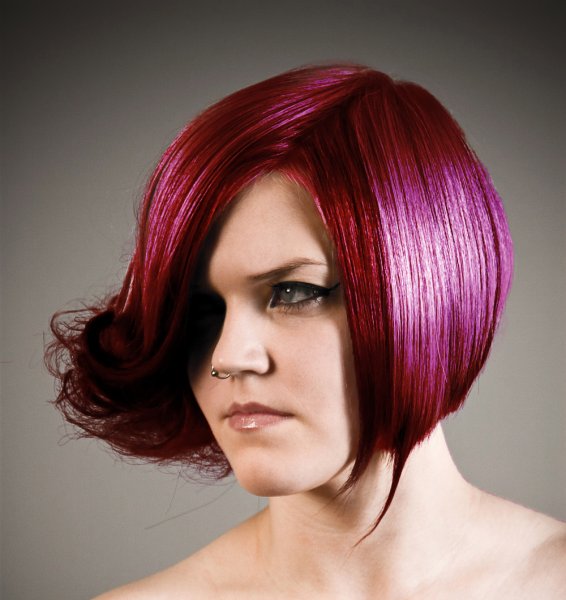
    From this, to this in 4 steps.

    From this, to this in 3 steps using Photoshop

    Whether you want to add extra pizzazz to a fashion shot, jazz up a promotional photo without having your models spend hours (and probably big bucks) at the salon, or to simply see what you’d look like with a different or metallic hair color –  this simple process will help you change the color of a subject’s hair color in a realistic way, with no frustration. You can even use this technique to create fantasy animals for your artistic digital manipulations, by changing the color of their fur with the same steps.

    Editing hair has often been a challenging process. Even with the most meticulous editing, the results were often unrealistic, and obvious as manipulations. This workflow changes all that.

    Step 1: Masking the Hair

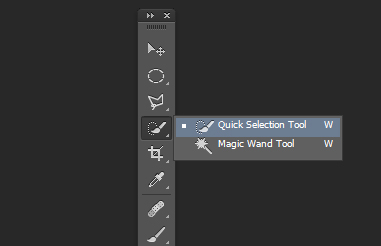
    Thankfully Photoshop’s Quick Select tool makes masking hair a breeze. Open the image you want to edit. Select the Quick Selection Tool from the tool palette.

    quickselect

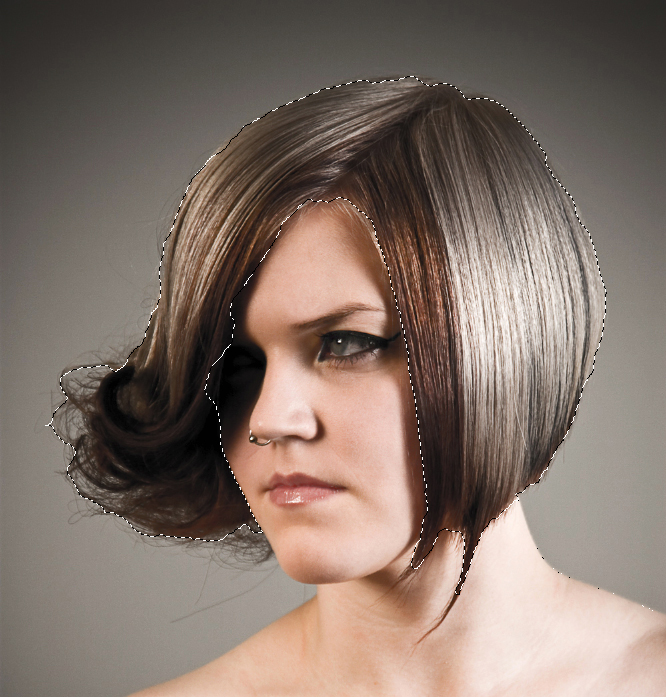
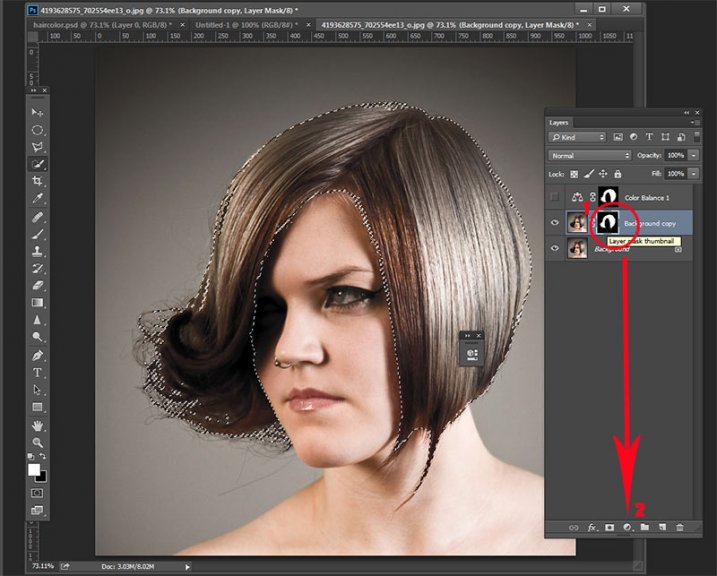
    Change the size of the brush by using the square brackets keys on the keyboard, you’ll find these next to the “P” on  most keyboards. Now select the hair using the selection brush – you’ll see the famous marching ants as you make your selection. If your selection extends too far use the CTRL key to subtract the selection.

    selection

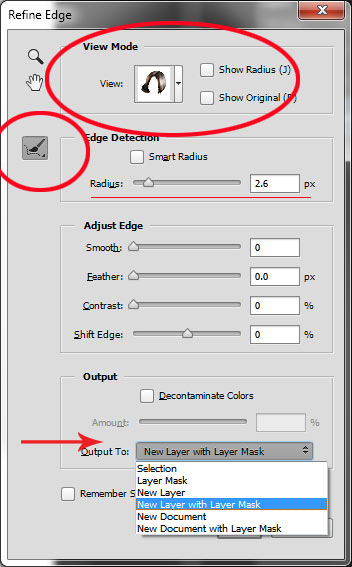
    When you have the hair selected, click on the Refine Selection button in the top context menu. This will allow you to soften the edges and add some transparency to the selection to make it very realistic. You’ll see a new palette pop up with some edge options to choose. First, select On White from the View Mode dropdown. This will enable you to see only the hair selection. Next select the Brush from the left hand side, and make the radius between 1.5 and 2.5, this will vary with your image. Now you can brush to bring back some of the transparency around the edges, especially where there are fine hairs such as the bottom left in this image.

    selection-tools

    Once you’ve refined the edges, go to the Output section and select New Layer with Layer Mask. This will output your refined edge selection on a new layer, which you’ll use in the next step.

    Step 2: Create your Color

    Here’s your opportunity to bring our your inner stylist. First, go over to the Layers Palette. Here, you’ll make a special Adjustment Layer using Color Balance adjustment. To do this first make sure that the layer mask thumbnail on your recently created layer is active. Don’t click on the thumbnail of the photo. What you’re doing here is telling the Adjustment Layer you’re creating, to ONLY affect the hair selection.

    Now CTR+click in the layer mask thumbnail to get the marching ants selection on your image. Next, at the bottom of your layers palette, click on the Adjustment Layers icon to create your new adjustment layer. From the pop-up  menu, choose Color Balance. You’ll now see your new adjustment layer called Color Balance, at the top of your stack.

    create-color-balance-layer-mask

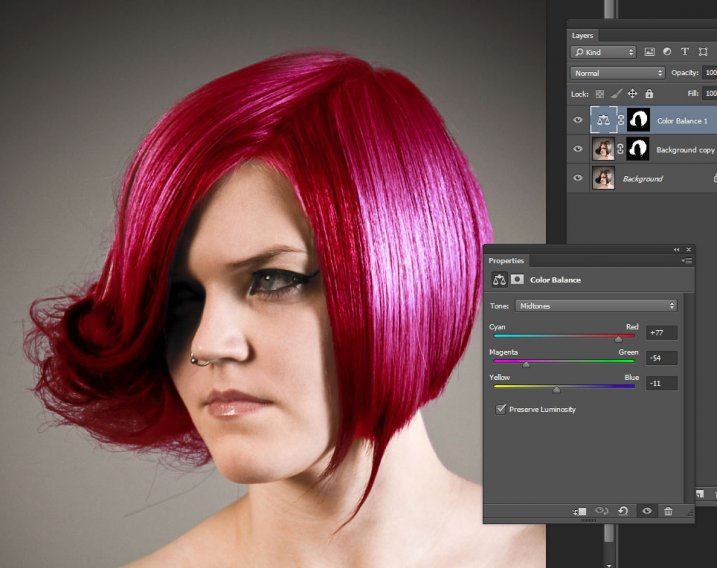
    Now make the Color Balance layer active by clicking on the scales icon thumbnail. This will bring up the color balance sliders where you can now create the color for your hair. Remember to also use the top drop-down in the slider pop-up to also adjust the highlight and shadow tones.

    color-balance

    You’re now ready to apply your color. Depending in whether you’re going for a bold and artistic look, or fashionable and metallic, your color choice will be made here in the color balance adjustment layer. Play around with changing all the colors, and note the results. In the final step you’ll be adjusting the intensity and the opacity of the color to make it look realistic, no matter what style you want to show.

    Step 3: Blend Modes and Opacity

    At this point, you’re ready for the fine detail adjustments to ensure your new hair color looks realistic, and not Photoshopped. All you need to do now is adjust the opacity and the blend modes of your color balance layer. T0 achieve the metallic look try blending mode HUE with an opacity of 75%.

    For bolder looks try SATURATION or SOFT LIGHT. Depending on what colors you’re using you can also achieve great looks with DARKEN and SCREEN.

    Stylistic Color

    Here we have four totally different looks. They are all from the same file and one adjustment layer, just by changing colors with color balance; and varying the intensity using opacity and blending modes.

    haircolor3 haircolor4 haircolor6 version

    Here’s the PSD file for you to practice with (zip format). Download it to your computer. Unzip and open the PSD in Photoshop.

    The original image is used under the Creative Commons license and is attributed to Looking Glass.

    googletag.cmd.push(function() {
    tablet_slots.push( googletag.defineSlot( “/1005424/_dPSv4_tab-all-article-bottom_(300×250)”, [300, 250], “pb-ad-78623” ).addService( googletag.pubads() ) ); } );

    googletag.cmd.push(function() {
    mobile_slots.push( googletag.defineSlot( “/1005424/_dPSv4_mob-all-article-bottom_(300×250)”, [300, 250], “pb-ad-78158” ).addService( googletag.pubads() ) ); } );

    The post 3 Steps to Easily and Realistically Change Hair Color in Photoshop by Alex Morrison appeared first on Digital Photography School.

    Digital Photography School

  • MotoCMS 3.0: The Best Option to Build a Photo Portfolio Website

    Photography and web design are going hand in hand. A good-looking website requires stylish photo content to attract audience, as well as to compete with other web pages. And as photography gains more popularity year by year, this rivalry becomes much fiercer. So, acquiring good looking, attractive, creatively different photo web page is a high-priority task for every photographer who Continue Reading
    The post MotoCMS 3.0: The Best Option to Build a Photo Portfolio Website appeared first on Photodoto.


    Photodoto