Category: Photography

  • Photographing in Black and White for a Day

    I love to set myself little exercises to stretch my photographic muscles. I thought I might share one that has been most beneficial to me, photographing a familiar place or subject you would normally do in color, in only in black and white for a day, with the aim of getting a new perspective that could prove helpful when you go back to color.
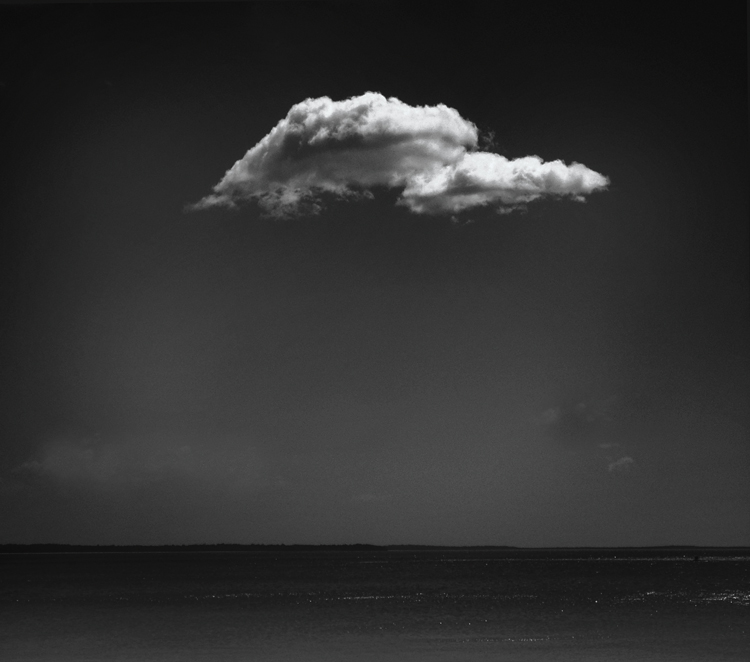
    black-and-white-photography-1

    This possibly doesn’t sound like much of a challenge, and won’t be if you shoot mainly in black and white already, but for those of us used to color, it can be a real challenge not to cheat by shooting in color and converting later, or quickly switch settings back to color every now and then. I confess to failing the challenge pretty much every time, but the exercise has proven fruitful regardless.

    Why black and white?

    Because once you take the color out of the picture your awareness of other compositional elements such as tone and contrast increase. It also makes you photograph differently and look at your subject in a different way.

    I first did this exercise some years ago during my regular walk along local beaches. It’s a stunning place with white sands and crystal blue water. You don’t have to be a fantastic photographer to capture a pretty image when surrounded by the beautiful colors of the water and the skies in this place.
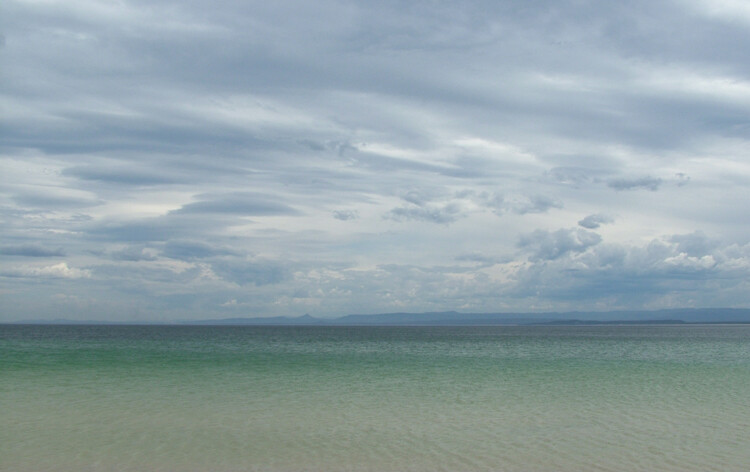
    Taking black and white photo's in a location you would normally shoot in color can help you to see things differently

    It’s really a challenge sticking to black and white when in a location like this, full of gorgeous colors.

    Once you challenge yourself to let go of the beauty of the colors in your usual color subjects your approach can change dramatically. It becomes more about tones, patterns, contrast and mood. You can end up photographing your regular subject entirely differently when you start to play more with shapes, patterns and designs you might otherwise not have noticed when color is involved.

    By doing this simple exercise both my beach subjects and compositions changed. Some images I would normally take that looked lovely in color looked washed out and a bit nothing, and vice versa, something that just didn’t look so wonderful no matter how many times I color photographed them, suddenly worked. Things like graininess became a bonus rather than something to avoid.
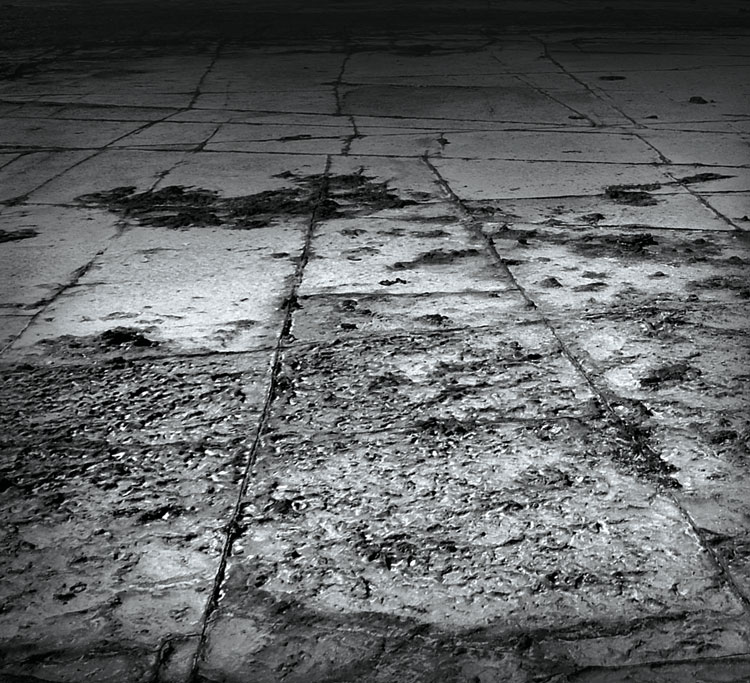
    Change your perspective by shooting your color subjects in black and white!

    I had photographed this rocky part of the local beach a few times as a landscape image, always included the area’s amazing colors. A day of black and white changed my perspective. This image and the first one in this article where later commissioned for a guitar duo’s album artwork. A surprising result from a simple exercise.

    Why a familiar place or subject?

    Because you will be less tempted to switch to color when you can always go back and shoot color next time. If you are constantly tempted to switch back, you will keep seeing and thinking in terms of color and the point of the exercise is to see your familiar subject differently and hopefully start seeing it in a way that will then help you out with your color photography.

    Whether you are a landscape, portrait or any other type of photographer it can be fun and beneficial to take a slightly more restricted approach. Much like a free form poet suddenly attempting a haiku, the limitations of the haiku format insist on a completely different attack requiring a stretching of creativity.

    You might not be keen to try it again but it can be a learning experience and you might just get a decent photograph out of the experience.
    For this article I tried the exercise again at another familiar place I have photographed many times. An artists studio where I often work on collaborations.
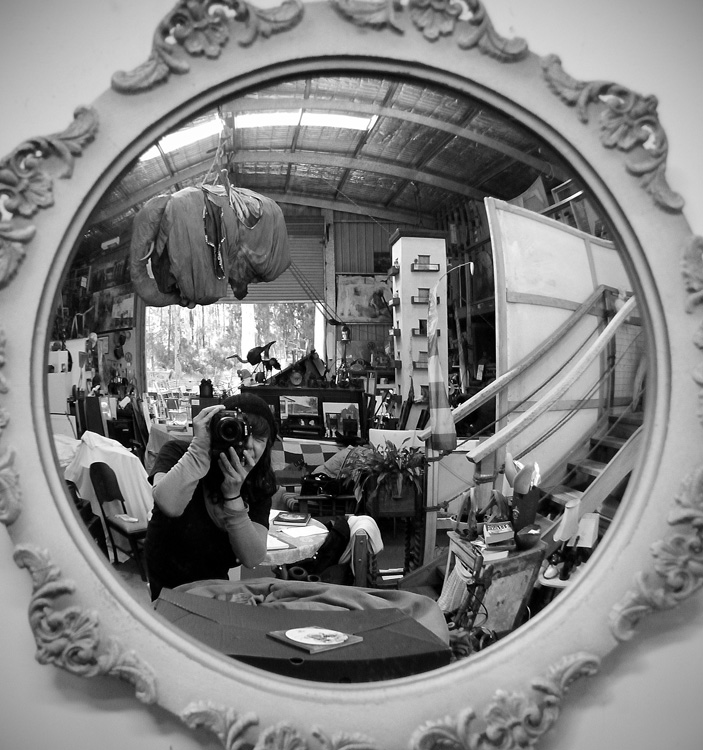
    Maybe try a day of black and white photography at a friend or family members place you visit regularly.

    It doesn’t matter where you try this exercise, just as long as it is a familiar place or subject so you can always go back and do color versions later after seeing it through a black and white perspective.

    An added benefit of shooting at this location being that the artist, Randall Sinnamon, is also an art teacher so I asked him for some tips on working in black and white.

    “Contrast is the balance between the extremes of black and white, with tone being the gradation of black and white, you use them both to create form. It’s the placement of these elements that creates your composition. If you get these things right then the picture works. It’s often good to have some larger shapes of light or dark in a composition.”
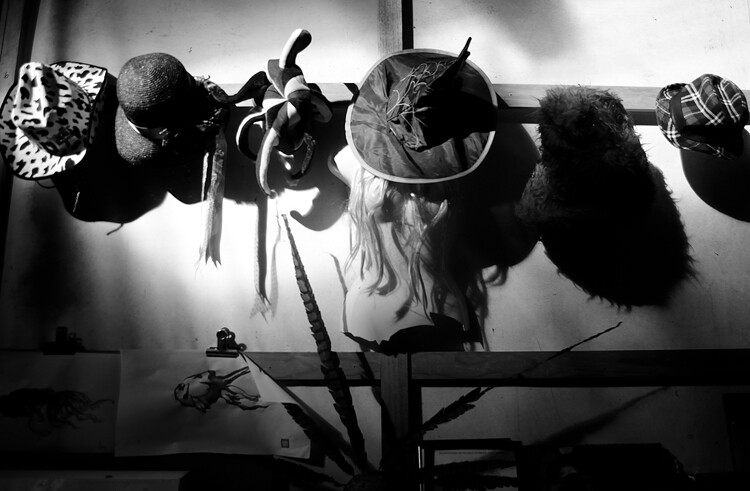
    tone and contrast , important to both painting and photography

    Photographing in black and white for a day can help you see tones and shapes better, which you can then apply to compositions in your color photography.

    “I often look at my paintings in the moonlight, the low light allows you to see the balance of shapes. You can also to this by squinting, or turning your image upside down. Considering I often work with charcoal and ink I tend to do a lot of black and white. It’s nice to just do a drawing and not worry about the color. Sometimes color can be an unnecessary complication. There is a lot of beauty in black and white, with so much color photography we still see a lot of black and white work, obviously there is something appealing about it. It simplifies things.”
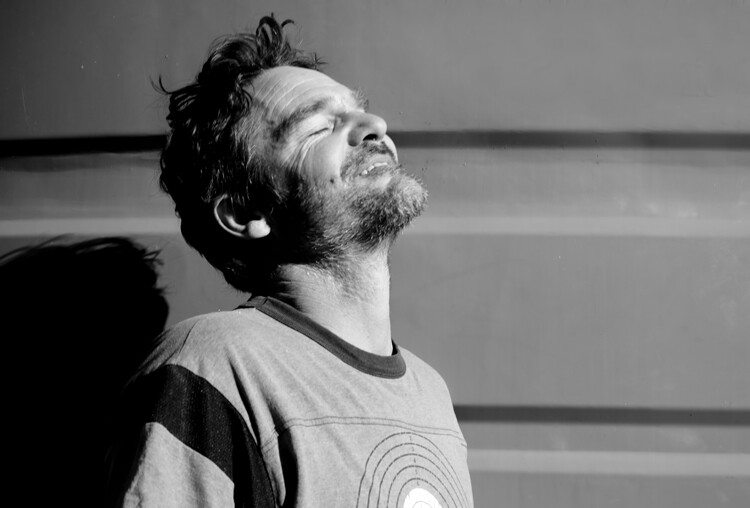
    Black and white can simplify things, and improve the mood of an image.

    Portrait of artist Randall Sinnamon. As he said, “Black and white simplifies things”. The colors in this image were distracting, they bounced around too much, where as in black and white it calmed things down and we are more able to focus on the mood, the joy of his smiling face in the sun.

    You might notice when trying this exercise that an image that can look like a busy mess in color can become elegant in black and white. Photographing outdoors in the middle of the day can work well too, we color photographers so often prefer the softer light of morning or evening, midday light can add harsh shadows or too much contrast, but black and white photography loves contrast. It also loves patterns and repetition.
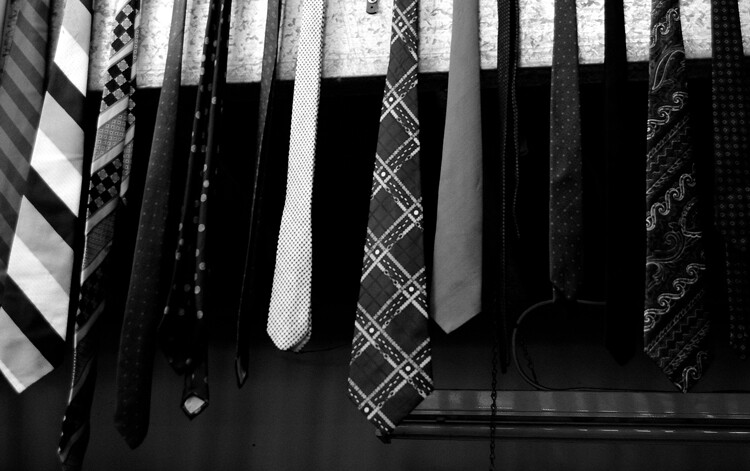
    Black and white photography works well with striking patterns and repetition .

    I’ve photographed this tie collection in the artists studio before in color, but this time without the distration of color, it became about the patterns and repetition and worked much better.

    Of course sometimes it just makes sense to photograph in color. But this exercise can help with working out what does and doesn’t work in either camera setting.
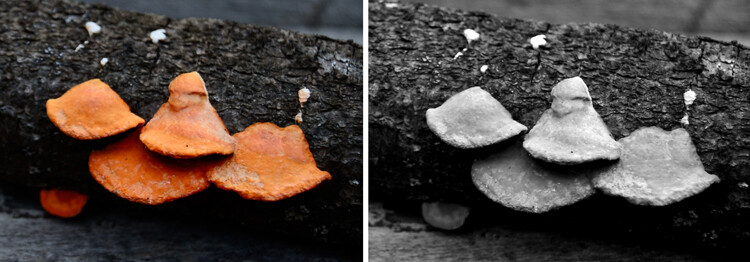
    Photographing in Black and white helps you with your compositions by not distracting you with color.

    I cheated. Again. I’d like to pretend it was for the purpose of this article, but really I couldn’t say no to that orange color. Yet when photographing this fungus outside the studio, the orange was distracting, and when I looked at the black and white version, I realized composition wise, things could have been better.

    So set your camera to black and white, and head out, or even photograph your own home or backyard. No cheating. OK, maybe a little cheating if the color is just too hard to resist. I wouldn’t want you to miss out on a brilliant shot. But do try to stick to it, keeping your eye out for situations with patterns, tones, shapes, contrasts without thinking about color can really make a difference to how you later compose your images. Remember this is just an exercise, you don’t have to get the perfect shot here, relax and enjoy the change. It’s as good as a holiday so they say.

    If you do try the exercise, please share you favorite results in the comments below. Or perhaps you have some other simple exercise idea you’ve tried that you would like to share with our readers.
    Happy photographing.

    googletag.cmd.push(function() {
    tablet_slots.push( googletag.defineSlot( “/1005424/_dPSv4_tab-all-article-bottom_(300×250)”, [300, 250], “pb-ad-78623” ).addService( googletag.pubads() ) ); } );

    googletag.cmd.push(function() {
    mobile_slots.push( googletag.defineSlot( “/1005424/_dPSv4_mob-all-article-bottom_(300×250)”, [300, 250], “pb-ad-78158” ).addService( googletag.pubads() ) ); } );

    The post Photographing in Black and White for a Day by Lea Hawkins appeared first on Digital Photography School.
    Digital Photography School

  • The Best Photography DIY Tips & Tutorials

    When it comes to your passion, there is nothing like a good trick. Being resourceful can bring you so much satisfaction, and don’t mind all the extra learning involved! You may think that photographers take their time to research equipment, patiently saving money from all their commissioned work (haha) and finally invest $ 80 on the new flash modifier in the market. The reality is that, Continue Reading

    The post The Best Photography DIY Tips & Tutorials appeared first on Photodoto.


    Photodoto

  • How to Transfer a Photo to Wood – Video Tutorial

    This is a good rainy day (or weekend) project for you to try at home. All you need is a print of your image (reversed, demonstrated in the video) on regular paper, a piece of wood, and a couple of other supplies (listed below the video).

    Step by step – transfer a photo to wood

    This video by SLR Coaching takes you through all the steps to print out your photo and get it transferred and applied to a piece of wood. He’s using pixlr.com to rotate and change the image, you can use that or your preferred photo editing software. If you don’t have Photoshop or Lightroom some other good free options include PicMonkey and Canva.

    The mediums he used for the transfer are:

    • Medium gel (you can get matte or glossy finish and can only use it on top of the image as well)
    • PVA glue (although he recommends using a varnish in the second video below – you can get it in matte or glossy finish, spray or paint it on. If you use the paint on and put it on a bit heavier you’ll get a texture on the surface like a painting.)
    • Block of wood (get one at your local hardware or craft store)

    Updated video with a few extra tips such as: best type of wood to get, coating the photo afterwards, and a few others.

    If you “have a go” as he says, share a photo of your completed project below.

    googletag.cmd.push(function() {
    tablet_slots.push( googletag.defineSlot( “/1005424/_dPSv4_tab-all-article-bottom_(300×250)”, [300, 250], “pb-ad-78623” ).addService( googletag.pubads() ) ); } );

    googletag.cmd.push(function() {
    mobile_slots.push( googletag.defineSlot( “/1005424/_dPSv4_mob-all-article-bottom_(300×250)”, [300, 250], “pb-ad-78158” ).addService( googletag.pubads() ) ); } );

    The post How to Transfer a Photo to Wood – Video Tutorial by Darlene Hildebrandt appeared first on Digital Photography School.

    Digital Photography School

  • How to Convert Images to Black and White and Add a Color Tint in Photoshop

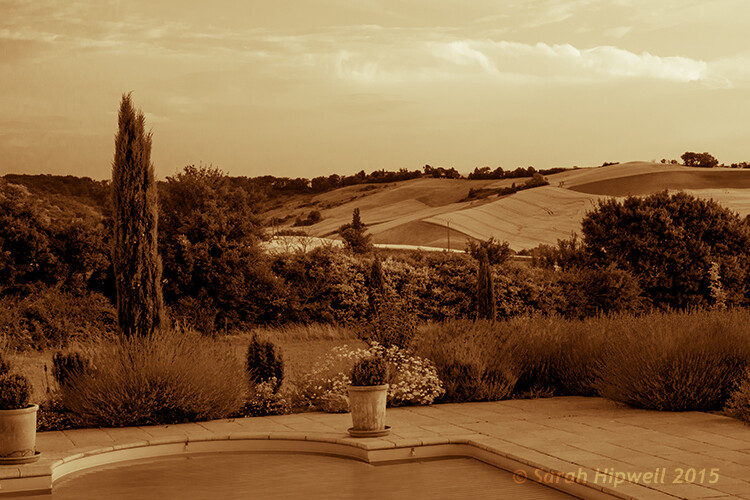
    Split-tone-ACR

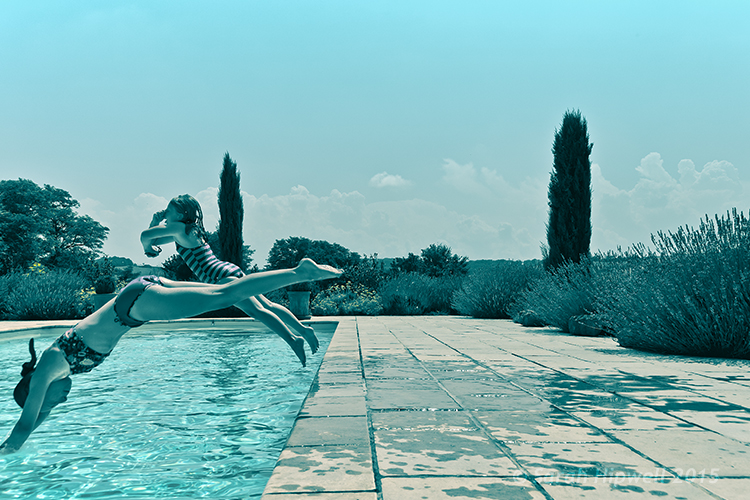
    Landscape scene in south of France using split-tone effect in ACR

    So why would you bother with black and white imagery when we live in a world full of color? There are many reasons why, but a simple answer is that a black and white image can be quite powerful.

    A close up of a man’s or woman’s face, heavily lined from age, photographed in black and white may elicit a stronger emotion than the same image in color. The viewer focuses in on the texture and contrast of the image.

    A heavy fog or mist over a landscape is much spookier in monochrome than in color. That’s why those old black and white movies are so good.

    Converting to Black and White in Photoshop

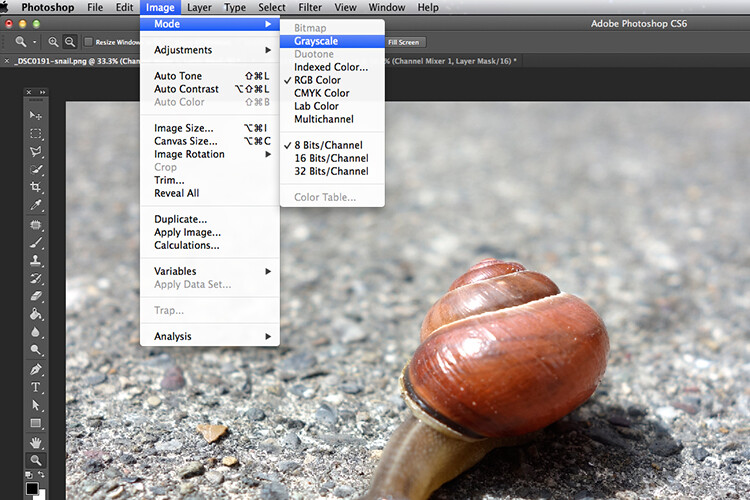
    Converting a color to black and white in Photoshop is a relatively easy task. Open the image that you want to convert to black and white. Choose from the Image Menu>Mode>Grayscale. A dialog box appears, asking you if you want to, “Discard color information?”. Click Discard, but I would not recommend this method. All the color information has now been lost.

    Snail-grayscale

    A simple way to converting a colour image to black and white in Photoshop, but not the recommended way.

    Channel Mixer

    Instead, I’m going to show you a more effective way for converting your images to black and white in Photoshop. I like to use the Channel Mixer method. In Photoshop, choose the Channel Mixer icon from the adjustments palette or you can choose Layer>New Adjustments>Channel Mixer and click OK.

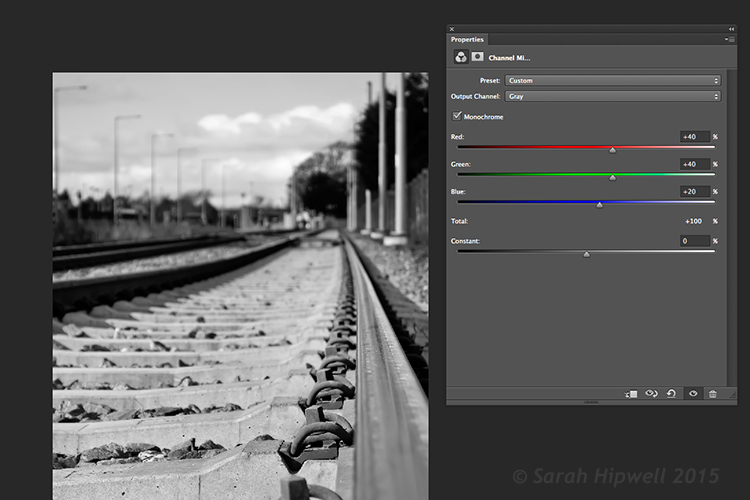
    There is a check box next to the word Monochrome, on the lower left side in the Channel Mixer box. When you click on that, your image will turn to grayscale. The default settings are Red 40%, Green 40% and Blue 20%. See screenshot below. However, this is where I like to make my own changes.

    Channel-mixer-default-settings

    Using the Channel Mixer to convert a color image to black and white. The default settings when you click on the Monochrome box are Red 40%, Green 40% and Blue 20%.

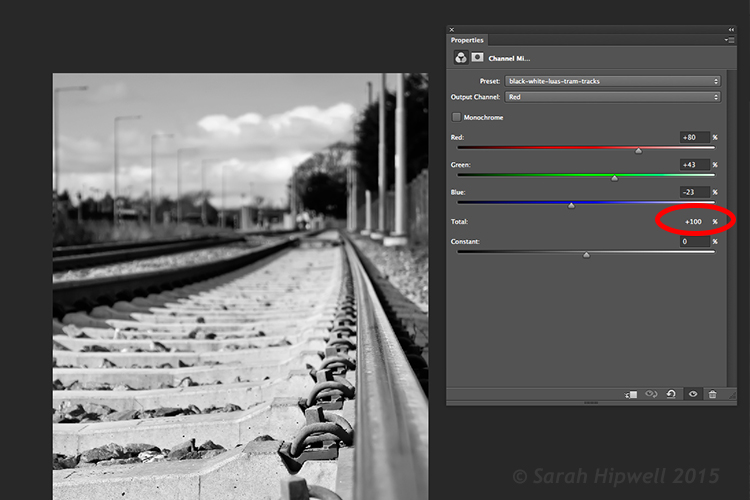
    The Red channel holds the most detail. The blue channel holds the most noise. The look that you’re after will depend on your choice. For this image, I moved the red slider to +80%, the green slider to +43% and the blue to -23%. The general rule of thumb is that the percentages should total to 100% (80+43-23=100).

    Channel-mixer-custom-settings

    The ability to adjust each of the Red, Green and Blue sliders gives you more control over how you want your grayscale image to look. Try and keep the percentage totals equal to 100%.

    Adding a Color Tint

    Next, let’s add some color to a black and white image, or rather a tint. Let’s start with a sepia tone, which is a reddish-brown color that gives those old vintage photos that classical look.

    Sepia

    Using the same image that you have just converted to black and white using the Channel Mixer – add another new adjustment layer, Color Balance. Similar to the Channel Mixer, choose Layer>New Adjustments>Color Balance

    Name this layer, Shadows. In the properties panel, click to the right where it says Tone, it defaults to Midtones but you have the option of two others, choose Shadows, as you only want the color to effect the shadows. Move the red slider over to 55%, then move the yellow slider to the left -40% to give the image that classic reddish brown look. See the animated gif below.

    Black-and-white sepia-tone

    Antique

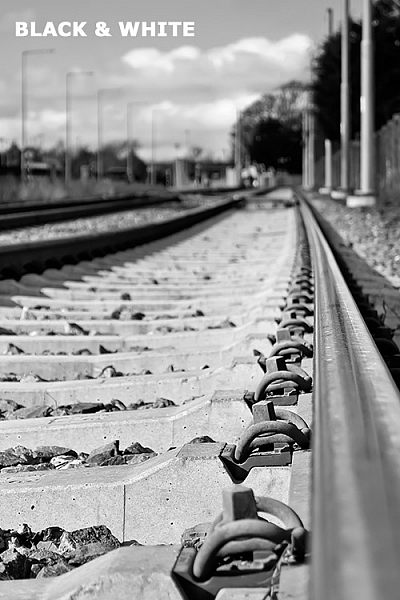
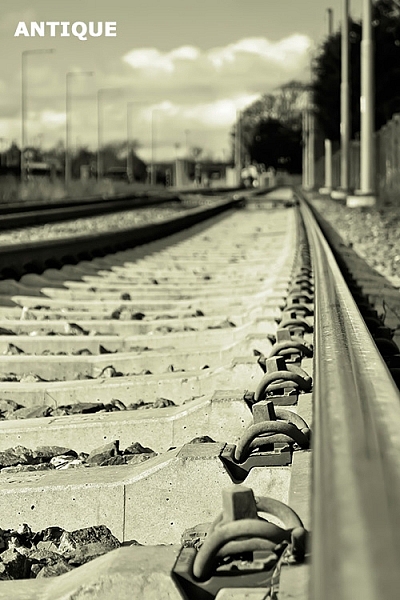
    Now if you want the color to affect only the highlights. First, turn off the layer visibility on the Shadows layer. Add another Color Balance layer, choose Layer>New Adjustments>Color Balance and name this one Highlights. Same as above, click to the right of Tone where it says Midtones and choose Highlights. Move the yellow slider to the left -55%. This gives the image an Antique look. See image below left.

    Antique tone split-tone

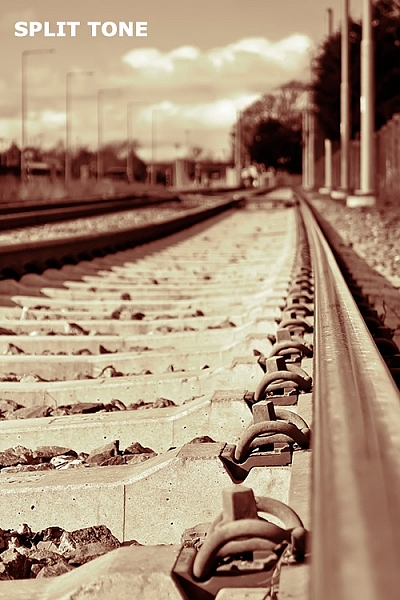
    Split toning

    Turn the visibility for the Shadows layer back on and you now have a split-tone look, as you have just added two different hues to the highlights and shadows. See image above right.

    Split toning in ACR

    To achieve this same effect in Adobe Camera Raw (ACR) it’s even easier. With your image open in ACR, having done the basic edits. Click the HSL/Grayscale tab, then check on the Convert to Grayscale box. Similar to the Channel Mixer adjustment layer in Photoshop the color sliders can be adjusted to make your own custom changes.

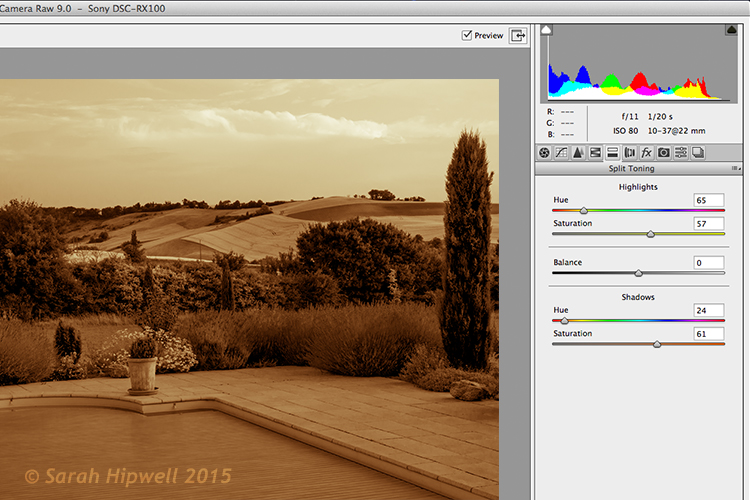
    Click the Split Toning tab. Move the Highlights Hue to yellow and the Saturation over to the middle to start. Move the Shadows Hue to a red tone, and the Saturation to the middle as well. Then adjust the Saturation for the Shadows (I used 61) and the Highlights (I used 57).

    Split-tone-ACR

    Editing an image using the Split Toning tab in ACR

    Gradient Map

    As with most techniques in Photoshop, there are many ways of achieving the same results. It comes down to preference, and most importantly, time. So here’s a really quick, and very effective way, to convert your color photo to black and white and add a sepia tone, or even a duotone.

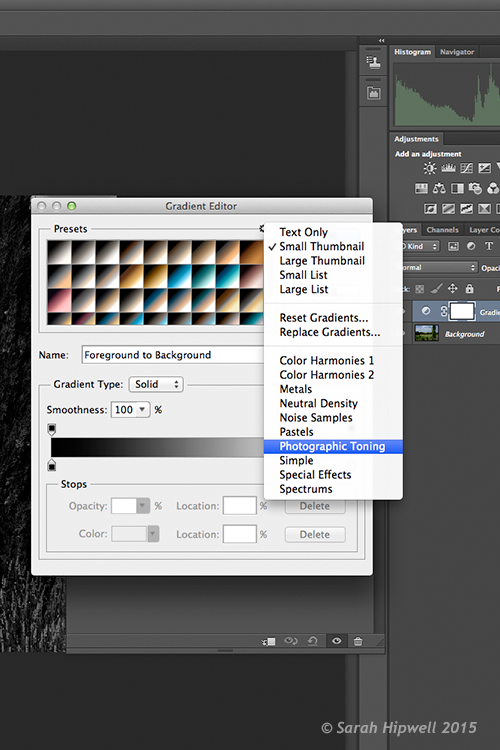
    Normally, I don’t bother or rave about the presets that come bundled with Photoshop. But in the Gradient Editor, I beg to differ. There is a set called Photographic Toning, which consists of 38 presets in total, and I think these do an amazing job! Here’s how I applied this duotone effect to this image.

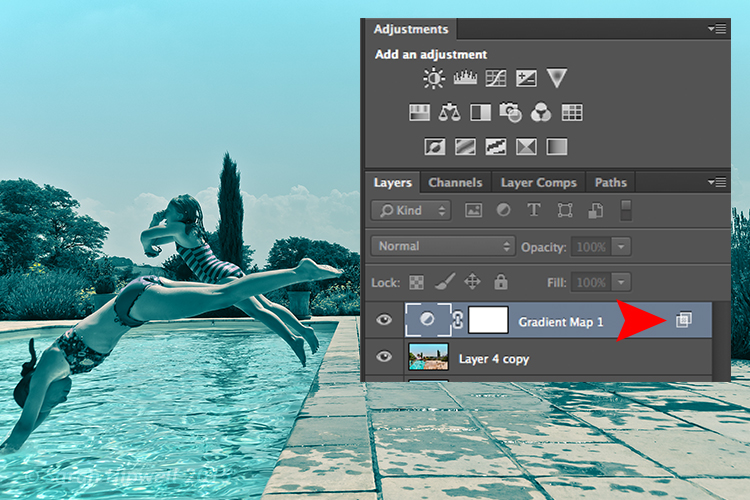
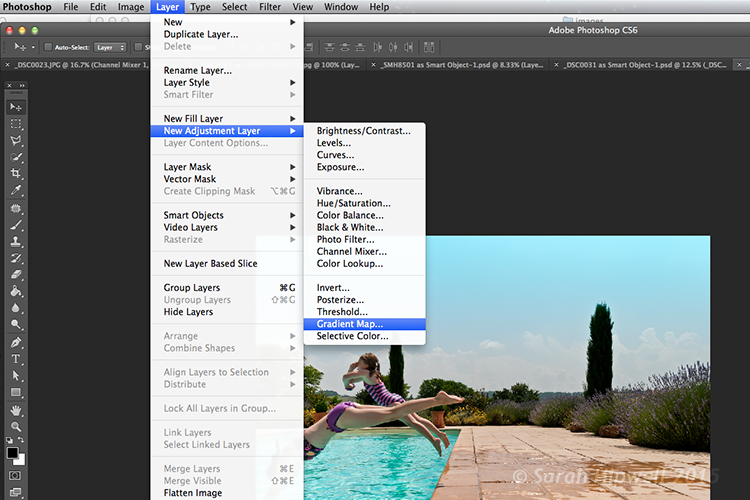
    Go to Layer>New Adjustment Layer>Gradient Map or you can click on the last icon in the bottom row of the Adjustments panel. Ensure your Foreground and Background colors are set to Black and White. This will apply the default gradient, which is foreground to background and turn your image to black and white.

    Layer-new-adjustment-layer-gradient-map

    How to add a Gradient Map as an adjustment layer in Photoshop

    Click on the gradient and the Gradient Editor menu appears. Click on the gear icon at the top right corner of the Presets section, and another pop-up menu appears. Photographic Toning is down near the bottom of the list. When you click on it, a dialog box appears asking you to replace the current default gradients with the ones that you are loading. Just click Ok.

    Gradient-editor-photographic-toning

    How to find the Photographic Toning presets in the Gradient Editor in Photoshop

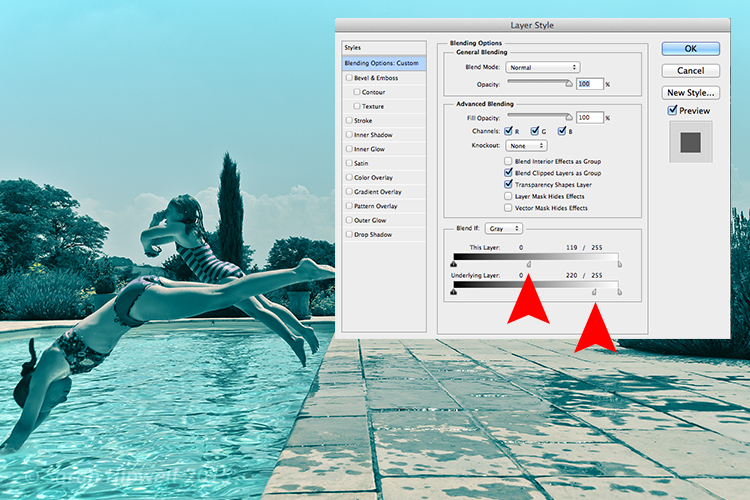
    I chose Blue2 (the sixteenth one) to give it this greenish, turquoise color. As with any adjustment layer, you can lower the opacity or change the blend mode, but in this case, I did a slight Blend-if on both layers. By right-clicking on the layer, this brings up the Layer Style pop-up menu with the different blending options.

    Layer-with-blending-options

    Blending-options-Blend-if

    Go down to the Blend-if section. You will see ‘This Layer’ and the ‘Underlying Layer’ . Both of these options have a white slider. Hold down the Alt key, which splits it into halves, and slide the left portion to the left (as shown above). This brings back some of the highlights to give the image a more cross-processed look. See image below.

    There is a great range of Sepia presets to choose from which are worth trying out too.

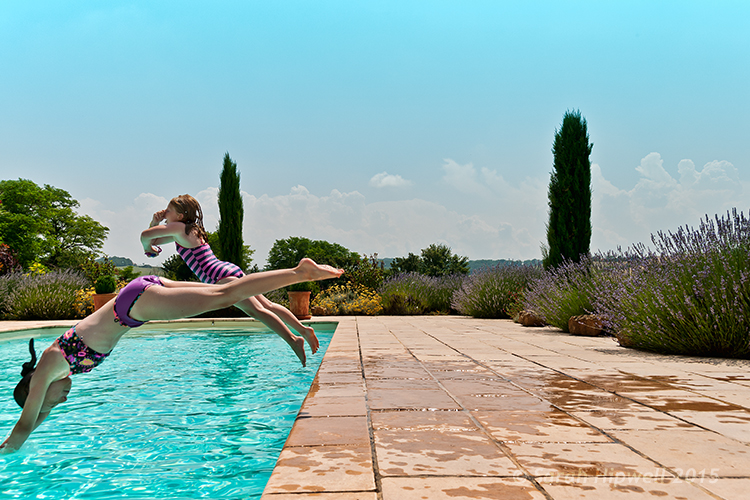
    Original-before-duotone

    Color image before I applied a duotone effect from one of the presets in the Gradient Editor in Photoshop

    Duotone

    ‘Blue2′ one of the presets in the Gradient Editor in Photoshop to give that ‘Duotone’ effect

    Have you converted your color photos to black and white? What techniques did you use? If so please share in the comments below.

    Editor’s Note: This is one of a series of articles this week featuring black and white photography tips. Look for earlier ones below and more daily over the next few days.

    • 5 Simple Ways to Create Expressive Photos in Black and White
    • Tips for Black and White Wildlife Photography
    • 7 Tips for Black and White Portrait Photography
    • 28 Images with Strong Black and White Compositions
    • Weekly Photography Challenge – Black and White Techniques
    • Tips for Black and White Wildlife Photography

    googletag.cmd.push(function() {
    tablet_slots.push( googletag.defineSlot( “/1005424/_dPSv4_tab-all-article-bottom_(300×250)”, [300, 250], “pb-ad-78623” ).addService( googletag.pubads() ) ); } );

    googletag.cmd.push(function() {
    mobile_slots.push( googletag.defineSlot( “/1005424/_dPSv4_mob-all-article-bottom_(300×250)”, [300, 250], “pb-ad-78158” ).addService( googletag.pubads() ) ); } );

    The post How to Convert Images to Black and White and Add a Color Tint in Photoshop by Sarah Hipwell appeared first on Digital Photography School.

    Digital Photography School

  • 28 Images with Strong Black and White Compositions

    This week on dPS it’s all about black and white photography. We are featuring a series of tips and articles around that topic. You can earlier ones below and more daily over the next few days.

    • 5 Simple Ways to Create Expressive Photos in Black and White
    • Tips for Black and White Wildlife Photography
    • 7 Tips for Black and White Portrait Photography

    Now, let’s take a look at some images that use this medium to their advantage in strong black and white compositions:

    Photograph The great migration by Nicole Cambré on 500px

    The great migration by Nicole Cambré on 500px

    Photograph Awoken Despair by Alexandre Deschaumes on 500px

    Awoken Despair by Alexandre Deschaumes on 500px

    Photograph Snowy Owl by Kevin Pepper on 500px

    Snowy Owl by Kevin Pepper on 500px

    Photograph Biorhythms (2011) by Nik Barte on 500px

    Biorhythms (2011) by Nik Barte on 500px

    Photograph Farewell, dear friend! by Victoria Ivanova on 500px

    Farewell, dear friend! by Victoria Ivanova on 500px

    Photograph Story_IV by ? DrakSpirit ?  on 500px

    Story_IV by ? DrakSpirit ? on 500px

    Photograph Silhouette by mahmood Al-jazea on 500px

    Silhouette by mahmood Al-jazea on 500px

    Photograph Magical forest by Damian Cyfka on 500px

    Magical forest by Damian Cyfka on 500px

    Photograph Hide by  PortraitsBySam on 500px

    Hide by PortraitsBySam on 500px

    Photograph Art of road surface 2 by Junichi Hakoyama on 500px

    Art of road surface 2 by Junichi Hakoyama on 500px

    Photograph Six Steps by Dave MacVicar on 500px

    Six Steps by Dave MacVicar on 500px

    Photograph Lone Tree by Phil Buckle on 500px

    Lone Tree by Phil Buckle on 500px

    Photograph K. by pkfruen  on 500px

    K. by pkfruen on 500px

    Photograph pray by Muhammad Berkati on 500px

    pray by Muhammad Berkati on 500px

    Photograph Street Noir by András Sümegi on 500px

    Street Noir by András Sümegi on 500px

    Photograph Cold morning by Junichi Hakoyama on 500px

    Cold morning by Junichi Hakoyama on 500px

    Photograph Parisian Morn by Cubz Cubbon on 500px

    Parisian Morn by Cubz Cubbon on 500px

    Photograph Onwards and upwards by Lex Schulte on 500px

    Onwards and upwards by Lex Schulte on 500px

    Photograph *** by Turgut Kirkgoz on 500px

    *** by Turgut Kirkgoz on 500px

    Photograph LoaD IN # by Guillaume Rio on 500px

    LoaD IN # by Guillaume Rio on 500px

    Photograph Blues by Pascal-Ludovic Saissi on 500px

    Blues by Pascal-Ludovic Saissi on 500px

    Photograph Glass B&W by jenrygraphy on 500px

    Glass B&W by jenrygraphy on 500px

    Photograph Capitolio by Liban Yusuf B&W on 500px

    Capitolio by Liban Yusuf B&W on 500px

    Photograph I won't forget my roots by Cimone  on 500px

    I won't forget my roots by Cimone on 500px

    Photograph The Eye by John Steven Fernandez on 500px

    The Eye by John Steven Fernandez on 500px

    Photograph La batalla by alfonso maseda varela on 500px

    La batalla by alfonso maseda varela on 500px

    Photograph HERBAL TEA by Acken Li on 500px

    HERBAL TEA by Acken Li on 500px

    Photograph Taj Mahal - India by Christophe Paquignon on 500px

    Taj Mahal – India by Christophe Paquignon on 500px

    googletag.cmd.push(function() {
    tablet_slots.push( googletag.defineSlot( “/1005424/_dPSv4_tab-all-article-bottom_(300×250)”, [300, 250], “pb-ad-78623” ).addService( googletag.pubads() ) ); } );

    googletag.cmd.push(function() {
    mobile_slots.push( googletag.defineSlot( “/1005424/_dPSv4_mob-all-article-bottom_(300×250)”, [300, 250], “pb-ad-78158” ).addService( googletag.pubads() ) ); } );

    The post 28 Images with Strong Black and White Compositions by Darlene Hildebrandt appeared first on Digital Photography School.


    Digital Photography School

  • Tips for Black and White Wildlife Photography

    South African photographer Heinrich van den Berg once said, “I believe that if black-and-white photography is done correctly, it can convey much more emotion and a deeper meaning than color ever could. It’s as if by subtracting color, the viewer is forced to add his own emotion to the images. Color photography is like a novel that spells everything out in detail, whereas black-and-white photography is like poetry—its strength isn’t in what’s said; it’s in what’s left out.”

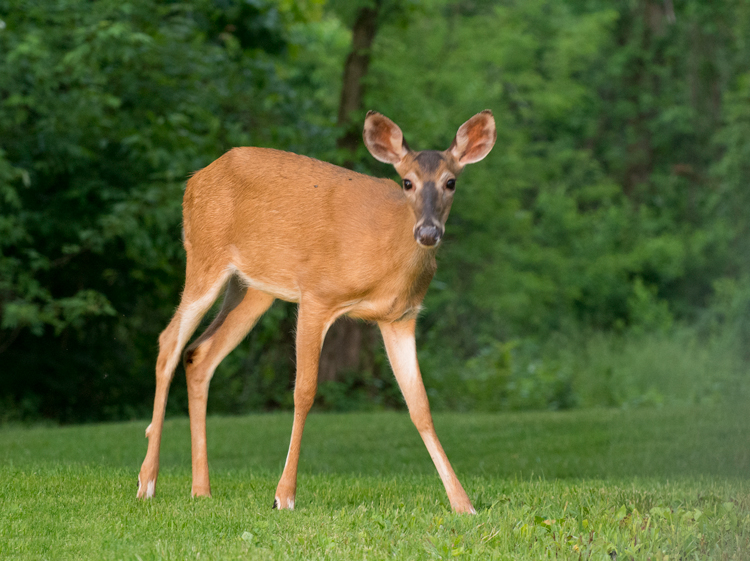
    Close your eyes for a moment and imagine a deer standing in a forest. Was the image you imagined in color? Most people will visualize the image in color. But are the colors necessary to produce an image of the deer? Let’s take a look at some advantages of wildlife photography in black and white.

    Deer image

    Original color image

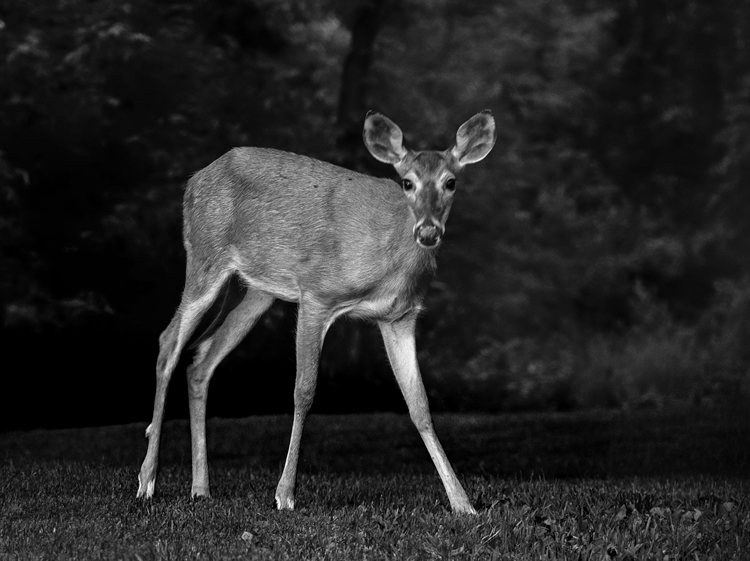
    Black and white deer

    The black and white processing in Nik Silver Efex Pro 2 in this image converted the green foliage into a dark background.  Now the emphasis is on the deer and the texture of its coat.

    Why Black and White?

    Color, though admirable, may be a distraction that interferes with the viewer’s ability to see the textures, lines, patterns, and contrasts within an image. Often your wildlife subjects are surrounded by lush green foliage and blue sky backgrounds, and in color photos, the trend is to saturate them. With black and white photos we take the attention away from those colors, and draw it to the wildlife subject. Colorful images may tell a story, while black and white can reveal a more emotional portrait of the wildlife. Color may show the actuality of a scene, black and white is a perception of the captured reality. Black and white can add drama to your wildlife images that color will hide from the viewer.

    It is important to note that not every image will make a great black and white one, some images and subjects will require color to make an impact. If color is the purpose of an image –  say, for instance, your subject is a red-headed wood pecker, then black and white may not work for that subject. Some photographers hold the opinion that an image lacking color is a good candidate for black and white conversion; however, even very colorful images may be hiding a dramatic black and white image.

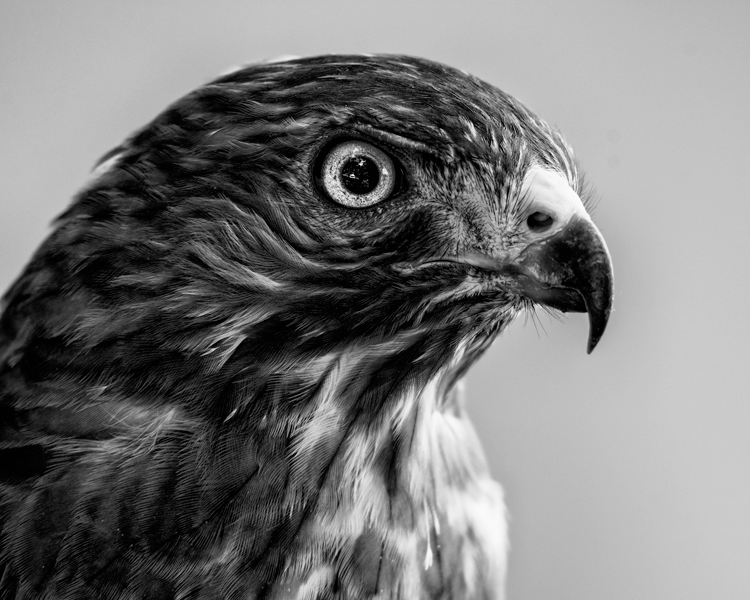
    Hawk Eye

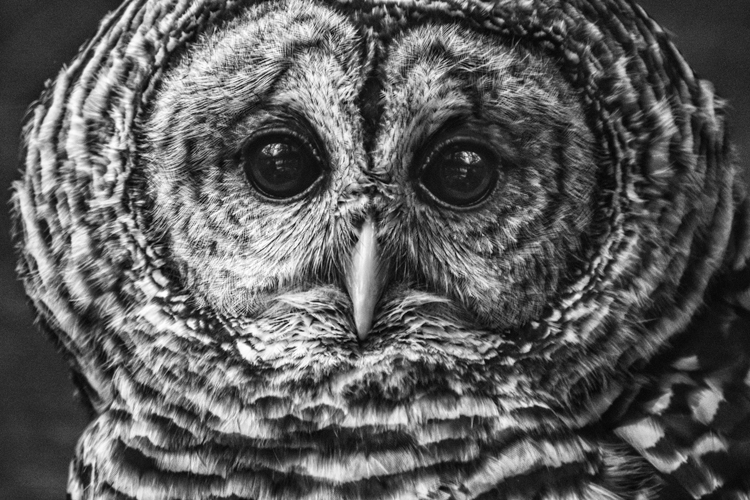
    The textures, lines and contrast of the feathers create a dramatic portrait of this Broad-winged Hawk.

    DSC_5418-Edit-Edit

    Shooting

    Without color, the key ingredients to shaping your image are light, composition, contrast, and tones. When photographing for black and white, lighting can transform an image. Black and white works well in all ranges of lighting conditions. Even the harsh midday sun, (difficult lighting for color shots) can products some fantastic results. How many times on a gloomy, rainy day have you grumbled about terrible lighting? Well, maybe for color photography it isn’t ideal, but the great thing about shooting for black and white results, is that even overcast days can produce some great images. It can allow you to capture the tones and textures of your wild animal subject, features which may be hidden in a color image, shot on a bright sunny day.

    Of course, the morning and evening glow hours are going to work great when the low angle of light brings out the textures and lines of wildlife. If you are just starting to develop your skills shooting for black and white wildlife, or you are having problems visualizing your images as you shoot, here is a helpful tip. Most DSLR cameras with allow you to set your picture style to monochrome when you are shooting in RAW. The preview will appear in black and white, but your RAW file will still contain all the image’s color information, that you can use later as you convert to black and white. Stripping out all the color from the preview will help you see the forms of the image without the distractions of color. Use this process to help train your eye to see in black and white.

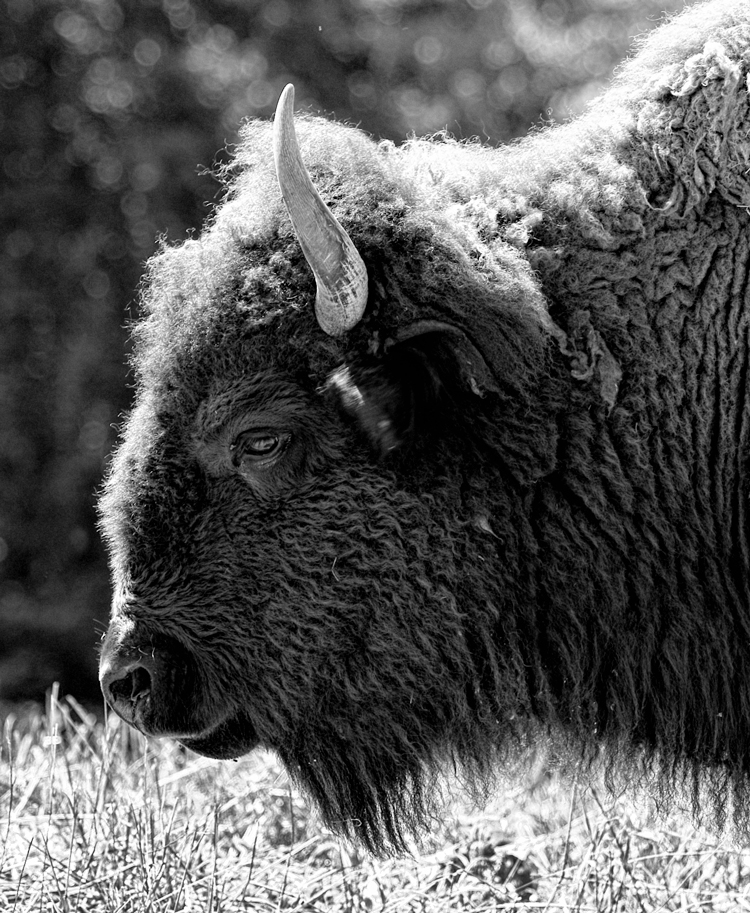
    Bison Portrait

    In this image, the harsh mid-day sun still produced a dramatically lit portrait of a Bison.

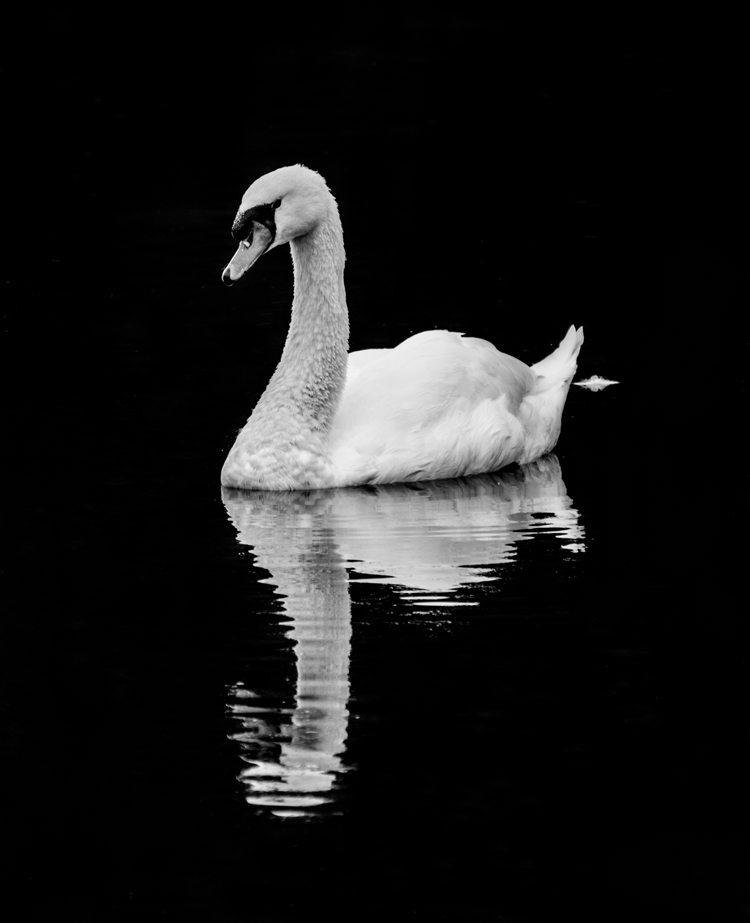
    Swan on the lake

    When exposing this image to keep the detail in the swan’s white feathers, the background was exposed to nearly black. Converting to black and white required very little processing.

    Composition

    Composition is even more important in black and white than in color. While a colorful image sometimes hides poor composition, black and white enhances and brings out the composition of your wildlife shot. Use shallow depth of field to isolate the subject, making a dramatic portrait and bringing out the textures of the fur or skin. Remember to use the KISS theory of composition. (Keep It Simple Silly)

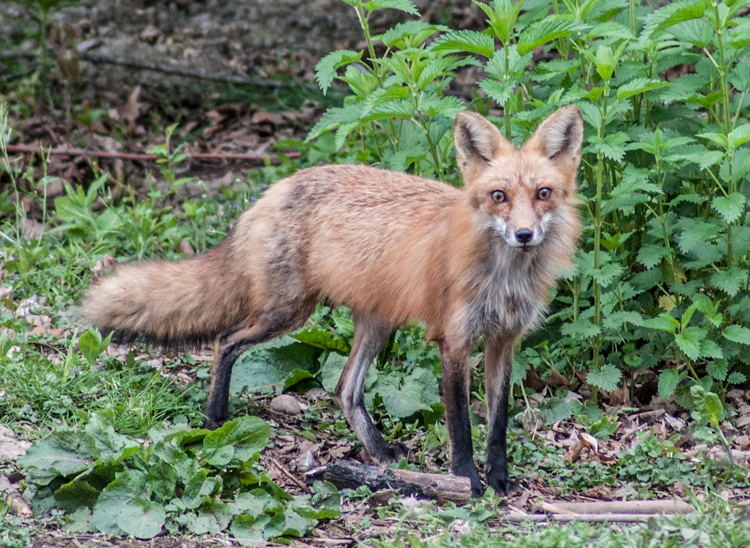
    Fox

    Original image

    black-white-wildlife-photography-fox-final

    Without the distractions of color this image becomes a moody and detailed portrait.

    Processing

    There are too many ways of converting images to black and white to mention them all. But Photoshop, Lightroom and Silver Efex Pro 2 are the three processing means I use the most. Whichever program you use for your conversion, you must learn to take control of the process. Instead of stripping the color out, use the tool in your editing program to turn colors into controlled shades of gray. Different processes applied may produce different emotional reactions to a single image.

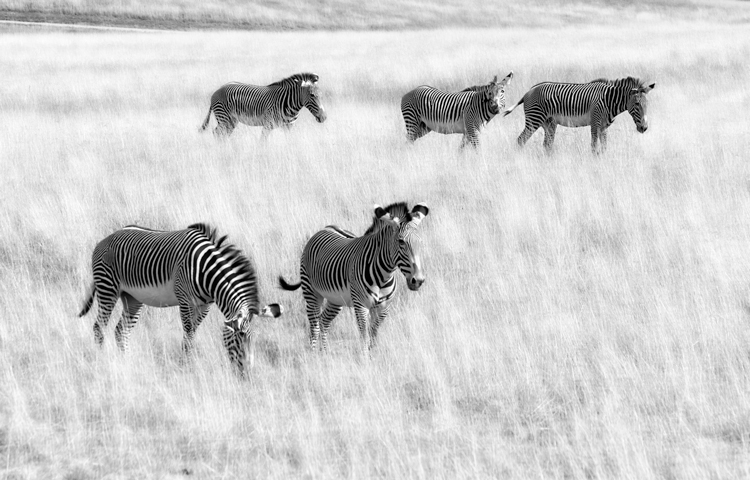
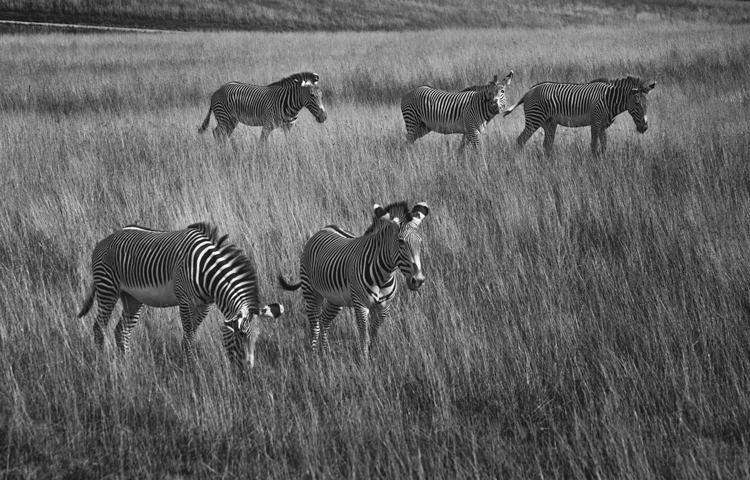
    As illustrated by the photo of the grazing zebras below, high-key processing creates a cheerful or upbeat image, while a low-key interpretation of the same image reveals a more somber or mysterious aspect to the image. Though a high-key image is very light, it should still have black areas; and conversely, a low-key image is mainly dark but should also contain some white areas.

    • Photoshop: Use a black and white adjustment layer to fine-tune how each color tone is converted to a shade of gray. This is a great starting point, but you may also want to adjust contrast, and dodge or burn areas to dramatize the subject. If you use Photoshop to convert your images to black and white, don’t be afraid to experiment. Never just use the Image Mode – Grayscale to convert your image, that is like “throwing away the baby with the bath water”! You will throw out too much useful color information that could be used to create the mood you are looking for in your image.
    • Lightroom: Using the black and white tab, similar to Photoshop, you can also adjust how each color tone is converted to shades of gray.
    • Nik Silver Efex Pro is a very powerful black and white software. One of its greatest features is the preset effects already preloaded into it. Use one of those presets as a starting point, and follow up with the powerful adjustment panel to really fine tune your images.
    High Key processing

    High-key processing in Lightroom creates a cheerful image of zebras grazing in a field. The same image was then opened in Photoshop and the layer was duplicated adding a motion blur.  The layer blend mode was changed to Overlay and a layer mask was added to keep the zebras from being blurred. This gives an artistic effect to the grass.

    Low Key Processing

    Low-Key processing in Lightroom creates a more mysterious effect.

    Conclusion

    The next time you are out photographing wildlife, look for opportunities to shoot black and white images. What wildlife do you like to photograph? Get out there and discover some stunning black and white wildlife opportunities!

    Editor’s Note: This is the second article in a week full of features on black and white photography. Look for 5 Simple Ways to Create Expressive Photos in Black and White earlier today and more daily over the next week.

    googletag.cmd.push(function() {
    tablet_slots.push( googletag.defineSlot( “/1005424/_dPSv4_tab-all-article-bottom_(300×250)”, [300, 250], “pb-ad-78623” ).addService( googletag.pubads() ) ); } );

    googletag.cmd.push(function() {
    mobile_slots.push( googletag.defineSlot( “/1005424/_dPSv4_mob-all-article-bottom_(300×250)”, [300, 250], “pb-ad-78158” ).addService( googletag.pubads() ) ); } );

    The post Tips for Black and White Wildlife Photography by Bruce Wunderlich appeared first on Digital Photography School.

    Digital Photography School

  • Flashpoint Ring Li-On Ringflash Review

    Adorama has been on a roll with its rechargeable lithium-ion battery powered flash units. Not long ago, they debuted the FlashPoint Zoom Speedlight, and now they have upped the ante with a monster 400ws ringflash. I recently got my hands on this ringflash and ran it through some tests to see how it would perform. Read on for some specs and details!

    Adorama Flashpoint Ring Li-on ring flash

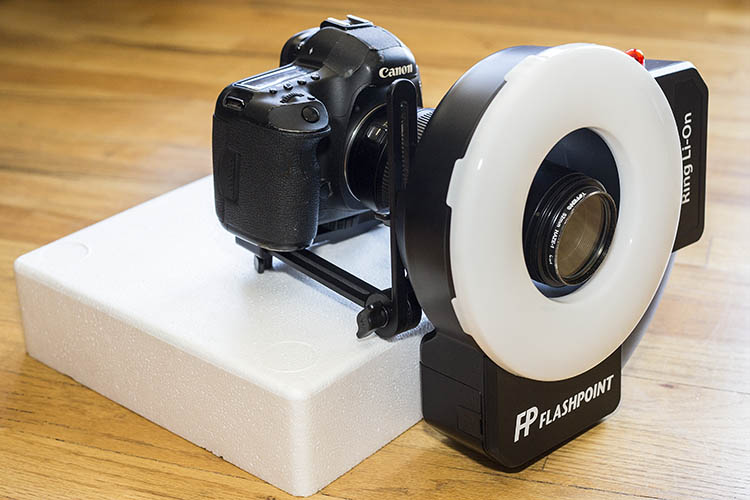
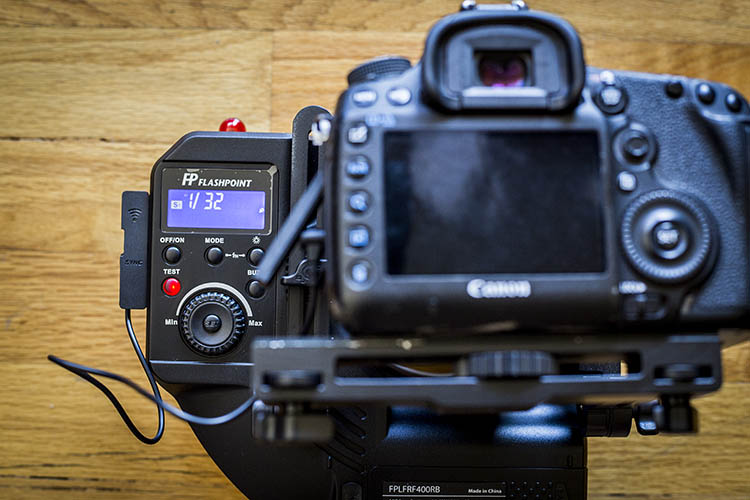
    Ring Li-on flash with Canon 5D Mark III and Canon 100mm f/2.8 macro lens attached.

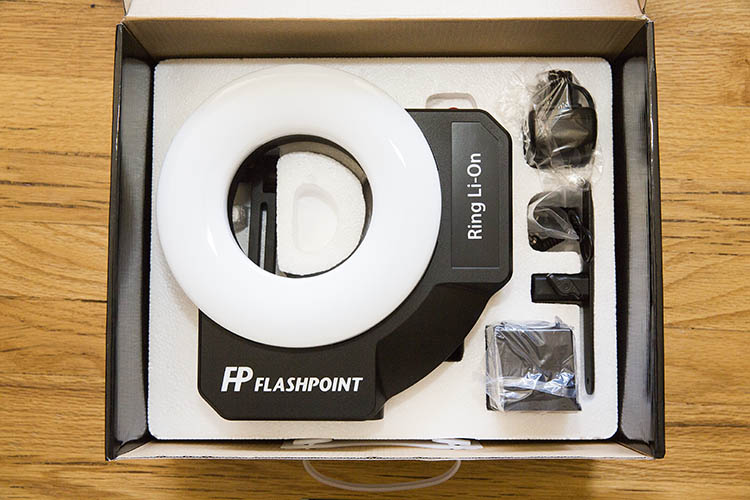
    What’s in the Box

    The first thing you’ll notice about this ringflash is its size, as indicated by the large box it arrives in. Included in the box are:

    • (1) FlashPoint Ring Li-On 400ws Ringflash with a Guide Number of 82
    • (1) Snap-on diffuser ring
    • (1) PC cable
    • (1) Rechargeable battery
    • (1) Battery charger
    • (1) Fully adjustable camera bracket with 1/4″ x 20 screw mount

    With the rechargeable battery, the flash weighs in at 3.1 pounds (1.4kg), and has dimensions of 8.9 x 9.1 x 2.8″. Due to its size, I found it was very difficult to use this flash in handheld mode, without using the included bracket to hold it in place with my camera, or on a tripod. As a result, the final product ends up weighing quite a bit. Even though it is fully transportable, I would not consider this setup to be the most compact and travel-friendly, especially since the flash doesn’t come with a carrying case. However, the easily affixed umbrella bracket and tripod mounting included with the flash make it a breeze to use this flash in a hands-free studio setup.

    Adorama Flashpoint Ring Li-on ring flash

    The flash can be triggered via the included PC cable with a 3.5mm jack, or remotely from a distance of 150+ feet away using the Flashpoint Commander set (sold separately). This means that the Flashpoint Ring Li-on Ringflash can be triggered by any camera that has a PC socket, adapter in a hot shoe, or connection to the wireless Flashpoint Commander system. The only possible limitation is  lens size. If you opt to shoot through the Ring Li-on flash, it must be done with a lens no larger than 3.5 inches in diameter, otherwise it won’t fit through the middle opening in the flash.

    Adorama Flashpoint Ring Li-on ring flash

    Features

    Despite its somewhat cumbersome size, one of the Ring Li-on’s best features is the 11.1V Lithium-ion cell battery with a 4500mAh capacity. This powerful battery can run the flash through about 450 full-power discharges, before needing a recharge. Additionally, the powerful battery also allows for the flash to perform with a solid guide number of 82 (feet at ISO 100), which is very rare among portable ringflashes.

    Flash output is very easily controlled via an intuitive, illuminated rear selection dial that clearly indicates battery levels, LED model/video lamp power, and flash modes of Manual, 2 Slave, and Stroboscopic. The flash’s power is adjustable in 1/3 stop increments from full power down to 1/128th power with a recycling time of between 0.5 seconds and 2.8 seconds on a fully charged battery. Flash duration averages between 1/300 to 1/20000 seconds depending on the power of the output.

    Another great feature of the Ring Li-on flash is the ability to emit constant 440 lux LED lighting with three level output settings for use as a modeling light or a video light, and it will even power-off automatically after a set period of time to conserve battery power.

    Adorama Flashpoint Ring Li-on ring flash

    Ring Li-on Flash in Practice

    For those of you unfamiliar with ringflashes, they tend to be favored among fashion and portrait photographers thanks to the ringed catchlights that are produced in the subject’s eyes. Macro photography shooters may also find ringflashes appealing since they produce virtually shadow-free lighting with even illumination. You may also have seen ringflashes used by medical and dental professionals, again because of the even lighting produced.

    In the portrait below, the Ring Li-on flash produces a look with very balanced lighting that is very soft on the shadows. The subject is evenly exposed, and we see the signature ring-shaped catchlight in his eyes.

    Adorama Flashpoint Ring Li-on ring flash

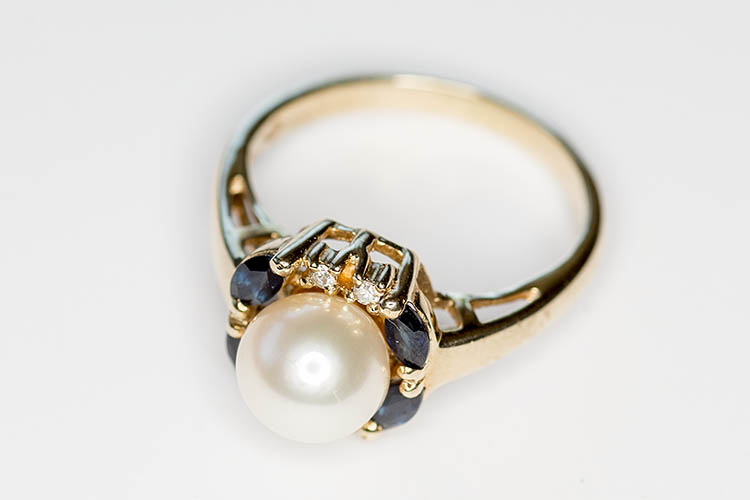
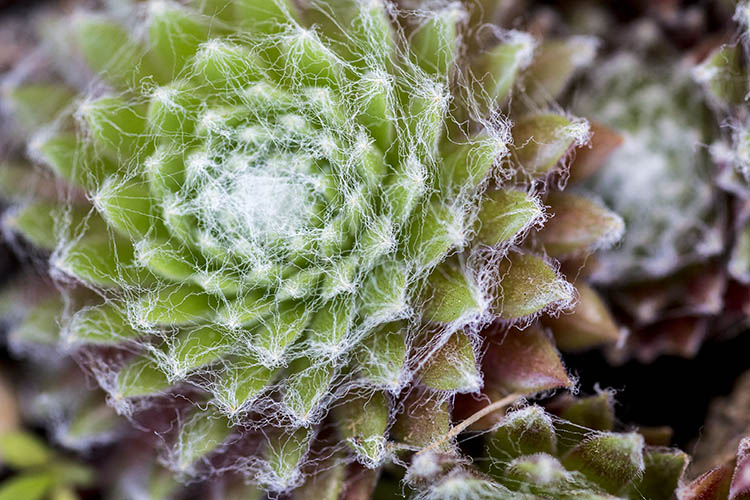
    The Ring Li-on flash also performs superbly when paired with a macro lens, although I strongly advise using the provided bracket to help stabilize your rig. Below, the Ring Li-on flash was used to photograph a family heirloom ring. Little to no shadow is detectable, and the ringflash’s catchlight is reflected in the pearl. In the final example, the Ring Li-on is used to take a macro photo of a succulent plant, thus providing even lighting with just a hint of a shadow even in this layered plant.

    Adorama Flashpoint Ring Li-on ring flash

    Adorama Flashpoint Ring Li-on ring flash

    Your Turn

    What’s your take on ringflashes? How do you incorporate them into your photography work, if at all?

    googletag.cmd.push(function() {
    tablet_slots.push( googletag.defineSlot( “/1005424/_dPSv4_tab-all-article-bottom_(300×250)”, [300, 250], “pb-ad-78623” ).addService( googletag.pubads() ) ); } );

    googletag.cmd.push(function() {
    mobile_slots.push( googletag.defineSlot( “/1005424/_dPSv4_mob-all-article-bottom_(300×250)”, [300, 250], “pb-ad-78158” ).addService( googletag.pubads() ) ); } );

    The post Flashpoint Ring Li-On Ringflash Review by Suzi Pratt appeared first on Digital Photography School.

    Digital Photography School

  • Weekly Photography Challenge – Black and White Techniques

    This week on dPS it’s all about black and white photography. We are featuring a series of tips and articles around that topic. You can earlier ones below and more daily over the next few days.

    • 5 Simple Ways to Create Expressive Photos in Black and White
    • Tips for Black and White Wildlife Photography
    • 7 Tips for Black and White Portrait Photography
    • 28 Images with Strong Black and White Compositions

    Photograph Happy Holidays! by Sam Assadi on 500px

    Happy Holidays! by Sam Assadi on 500px

    Photograph  One Railroader by Silvia S. on 500px

    One Railroader by Silvia S. on 500px

    Weekly photography challenge – black and white techniques

    Your challenge this week is to try out different black and white techniques. Try any or all of the following:

    • Shoot in b/w mode
    • High contrast lighting
    • Convert to b/w in Lightroom
    • Convert to b/w using Photoshop
    • Try out a black and white plugin
    • Try out some sepia tone or split toning
    • Do a b/w portrait, landscape, macro, night shots, street photography, or flowers
    • Try a b/w silhouette

    Photograph The essence of night by Liban Yusuf B&W on 500px

    The essence of night by Liban Yusuf B&W on 500px

    Photograph Venice Nostalgia by Csilla Zelko on 500px

    Venice Nostalgia by Csilla Zelko on 500px

    Photograph Time to go ... by Gaelle Lunven on 500px

    Time to go … by Gaelle Lunven on 500px

    Photograph The Last Ride by Rob Dweck on 500px

    The Last Ride by Rob Dweck on 500px

    Photograph Ways of Life by Eileen Hafke on 500px

    Ways of Life by Eileen Hafke on 500px

    Share your images below:

    Simply upload your shot into the comment field (look for the little camera icon in the Disqus comments section) and they’ll get embedded for us all to see or if you’d prefer upload them to your favourite photo sharing site and leave the link to them. Show me your best images in this week’s challenge. Sometimes it takes a while for an image to appear so be patient and try not to post the same image twice.

    googletag.cmd.push(function() {
    tablet_slots.push( googletag.defineSlot( “/1005424/_dPSv4_tab-all-article-bottom_(300×250)”, [300, 250], “pb-ad-78623” ).addService( googletag.pubads() ) ); } );

    googletag.cmd.push(function() {
    mobile_slots.push( googletag.defineSlot( “/1005424/_dPSv4_mob-all-article-bottom_(300×250)”, [300, 250], “pb-ad-78158” ).addService( googletag.pubads() ) ); } );

    The post Weekly Photography Challenge – Black and White Techniques by Darlene Hildebrandt appeared first on Digital Photography School.

    Digital Photography School

  • The Devil’s in the Details: Macro Photography for Beginners

    The world around us, that which we often consider mundane, if we consider it at all, is infinitely detailed. The carpet beneath your feet, the grass in your front yard and along the sidewalk you stroll down each day, the corners of your cupboard behind the cereal boxes, all of these places contain mind-boggling facets and edges and curves, if Continue Reading

    The post The Devil’s in the Details: Macro Photography for Beginners appeared first on Photodoto.


    Photodoto

  • 5 Simple Ways to Create Expressive Photos in Black and White

    Can you visualize the world around you in black and white? It’s not easy to do at first with an array bright colors competing for your attention. Look a little closer however, and you may recognize the broad potential for expressive imagery. Of course, not every situation lends itself to this artistic style. There are however, certain characteristics you can look for, to identify the best opportunities.

    1) Embrace High Contrast

    A subject with dark shadows and bright highlights would not be ideal for a color photograph. In fact, it’s one of the reasons techniques like HDR have become so popular. Yet, for black and white photography, this type of high contrast light can be extremely effective. The harsh mid-afternoon sun is no longer a detriment, but an enhancement. This is a major shift in the way one thinks about exposure. To help recognize these chances, look beyond what is immediately evident and pre-visualize the scene in grayscale. A scene you passed on, in color may prove quite dramatic in black and white.

    As is always the case in all good art, rules are meant to be broken. The same is true with black and white exposures. You have even more flexibility as shadows can be inky black, and highlights can clip the histogram while retaining the image’s visual appeal. To maximize the dynamic range of the camera, use the “ETTR” technique (expose to the right). Rather than a muddy exposure, you’ll enjoy the crisp contrast of the full tonal range.

    2) Simplify with Shape and Form

    In the absence of color, shapes and patterns become more pronounced. Lighter tones will stand out boldly when placed in front of a darker area. This is an effective way emphasize the important parts of a subject while minimizing distractions. To compose this way, think about the process of subtraction. What can you remove from the image that’s not essential to the story? As you simplify, the design of the photo will get stronger.

    Even something as simple as a shadow on the ground can be used creatively. To the human eye, detail is evident in the pavement, but with a camera they can be rendered as inky black. This may be a very different style of seeing for you. To practice, I recommend taking a photo hike in which you search for nothing but shadows. You may be pleasantly surprised by how many interesting shots you’ll find.

    3) Details Tell a Story

    It’s been said that a person’s eyes are the windows to their soul. Their character however, can often be revealed in their hands. In black and white, the subtle details that often go unnoticed become more evident. Wrinkles and texture, for example, benefit from a deeper more textured appearance. This method is especially effective when using flat or overhead light. Typically this direct light would be undesirable, but in grayscale it can be preferable to that of a softer, diffused quality light.

    4) Imagine a Mood

    Blue skies are often used to symbolize happiness. You’ll see this pattern in magazine ads, television commercials, and even movies. Black and white images however, are associated with a different variety of moods. The precise emotion is ultimately up to the viewer, but a few common themes include solitude, contemplation, and pensiveness. Photographers of all genres can work with these traits to effectively portray their vision.

    Use your imagination to visualize the mood you want an image to have. A great place to start is to study some of the masters. While Ansel Adams’ landscapes in black and white are very well known, go further in your research. For example, look at the emotion in Edward Weston’s famous “Pepper No. 30”. Another fine representation of this medium is “White Sands, New Mexico” by Ernst Haas. Of course the list goes on, but these are a good place to start. A visit to a local library will undoubtedly prove inspirational as you may discover work by artists you are not yet familiar with.

    5) Dark Spaces and Silhouettes

    Subjects that linger in darkness are sometimes more compelling than well-lit scenes. Using black and white photography, you have the ability to show the world in a completely different way. Instead of eliminating the shadowy areas, use them to your advantage. An empty space can actually be an effective method of composition. This type of artistic exposure is more edgy than a literal interpretation.

    Take a look through your own catalog of images. There will likely be a number of photos that could be quite dramatic as a black and white. As you convert them from color, experiment with different post production filters to see how it impacts the scene. For example, a blue filter may lighten the sky dramatically, whereas a yellow filter will make it darker. If you’re looking for even greater control, there are a number of excellent plugins available. One of my favorites is Exposure by Alien Skin as it offers nearly endless customization. More terrific options include software by Nik, Topaz, and OnOne.

    Editor’s Note: This is the first article in a week full of features on black and white photography. Look for another one later today and daily over the next week.

    googletag.cmd.push(function() {
    tablet_slots.push( googletag.defineSlot( “/1005424/_dPSv4_tab-all-article-bottom_(300×250)”, [300, 250], “pb-ad-78623” ).addService( googletag.pubads() ) ); } );

    googletag.cmd.push(function() {
    mobile_slots.push( googletag.defineSlot( “/1005424/_dPSv4_mob-all-article-bottom_(300×250)”, [300, 250], “pb-ad-78158” ).addService( googletag.pubads() ) ); } );

    The post 5 Simple Ways to Create Expressive Photos in Black and White by Chris Corradino appeared first on Digital Photography School.

    Digital Photography School