Category: Photography

  • Weekly Photography Challenge – Machines

    Earlier today I rounded up a collection of images of powerful machines here. Unless you live in a remote village far from civilization – chances are that machines are part of daily life in your area.

    Photograph One more cup of coffee by Yahav  on 500px

    One more cup of coffee by Yahav on 500px

    It could be a coffee machine in your kitchen or favorite barista shop, or a tractor in a field. Maybe there are cranes at a construction site on your way to work.

    Photograph Fordson Major - Overstrand by Simon Wrigglesworth on 500px

    Fordson Major – Overstrand by Simon Wrigglesworth on 500px

    Weekly photography challenge – machines

    Look around they’re everywhere, and it’s your job to find them and photography them this week.

    Photograph Harley davidson by ???????  ??????? on 500px

    Harley davidson by ??????? ??????? on 500px

    Photograph Foggy Sunrise by Richard Gottardo on 500px

    Foggy Sunrise by Richard Gottardo on 500px

    Photograph sewing machine by Ritam Paul Chowdhury on 500px

    sewing machine by Ritam Paul Chowdhury on 500px

    Photograph Retired sewing machine by JongYoung Kim on 500px

    Retired sewing machine by JongYoung Kim on 500px

    Share your images below:

    Simply upload your shot into the comment field (look for the little camera icon in the Disqus comments section) and they’ll get embedded for us all to see or if you’d prefer upload them to your favourite photo sharing site and leave the link to them. Show me your best images in this week’s challenge. Sometimes it takes a while for an image to appear so be patient and try not to post the same image twice.

    googletag.cmd.push(function() {
    tablet_slots.push( googletag.defineSlot( “/1005424/_dPSv4_tab-all-article-bottom_(300×250)”, [300, 250], “pb-ad-78623” ).addService( googletag.pubads() ) ); } );

    googletag.cmd.push(function() {
    mobile_slots.push( googletag.defineSlot( “/1005424/_dPSv4_mob-all-article-bottom_(300×250)”, [300, 250], “pb-ad-78158” ).addService( googletag.pubads() ) ); } );

    The post Weekly Photography Challenge – Machines by Darlene Hildebrandt appeared first on Digital Photography School.


    Digital Photography School

  • 10 Best Photos from the Summer Landscape Photo Contest – Pick the Winner Now!

    Our Summer Landscape Photo Contest is entering the final stage. HUGE THANKS to all the participants who uploaded their photos to our Flickr group pool. It’s great to know that so many talented and creative photographers read our blog. The contest jury had difficult time selecting only 10 photos from all the beautiful images submitted. But the finalists are picked and now only YOU decide Continue Reading

    The post 10 Best Photos from the Summer Landscape Photo Contest – Pick the Winner Now! appeared first on Photodoto.


    Photodoto

  • The What, Why, and How of Using Lightroom Export Presets

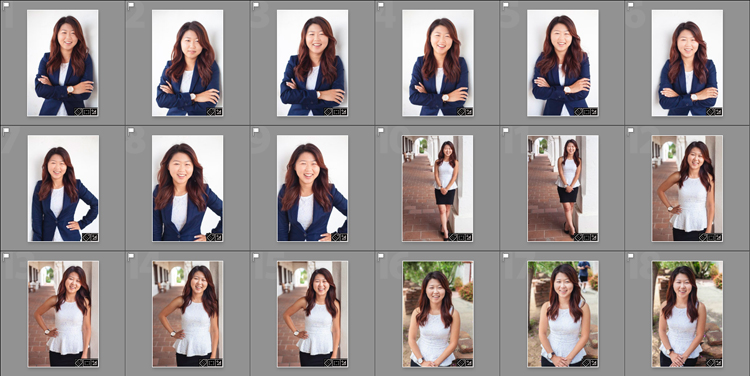
    ExportPresets-Header

    You’re probably quite familiar with Lightroom presets for editing photos, called Develop Presets. When was the last time you created your own Export Presets, though? These presets can help you speed up your workflow even more, by allowing you to save different export settings, for different needs. Let’s look at what they are, how they can help you in your workflow, and how to create your very own.

    What are export presets?

    Export presets are simply ones that tell Lightroom the parameters to follow when it exports your image files. Just like develop presets, they save you from applying the same settings repeatedly, only these are for exporting rather than editing.

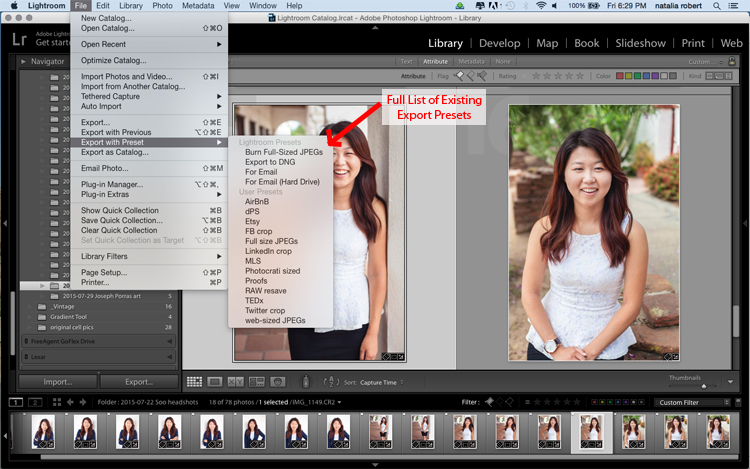
    To see the current presets you have loaded, go to the Library Module, select a sample photo, and click Export. A window will pop up with all your exporting options, including things like destination folder, image name, image size, and watermarking options. The left side of this box will have a list of what export presets are available for you. Alternatively, you can see the list of presets if you go to File -> Export with Preset and you’ll see the list pop up. That view, however, doesn’t show you the details of each preset.

    ExportPresets-Locate

    Why use export presets?

    This is all great, but how are they helpful to you? Let’s work through your general workflow and see how these presets can be beneficial. You import your fresh photos into Lightroom, then go into the Develop module to work your editing magic. Once you’re ready to finalize and export the final product, you click back into the Library module to export. You have loads of options for how you could export this photo, all depending on its intended use.

    Will the photo be used for social media? Then the size and resolution will be lower, and most likely you’ll want to add a watermark. Is this photo going to be printed and enlarged? Then you’ll want to make sure to give a large size and higher resolution to allow for enlargements. Is this photo going to be part of a set? Perhaps you want all the final photos to be labeled cohesively (for example: JonesFamilySession-1.jpg). Export presets allow you to set up parameters for each of these situations, saving you from having to remember settings and change them with each export. You can select multiple photos, click Export, and select the export preset that will then be applied to all photos in that export session.

    How to use export presets

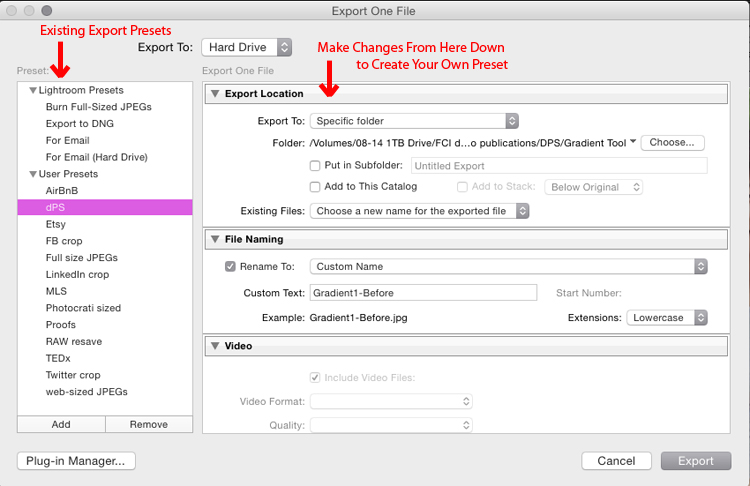
    Great! Export presets are awesome! Let’s talk about how you can create some for yourself. While in the Library module, click Export to get the exporting window to pop-up. Begin at the top with Export Location and choose all the settings to put the images where you want them for your current need. If you’re exporting to send someone proofs from a session, for example, you’ll want to pay attention the resolution, watermarking, and file naming so that they are ready to show to your client. Don’t be shy about clicking on pull-down menus or playing with various numbers – you can always click Cancel and start over.

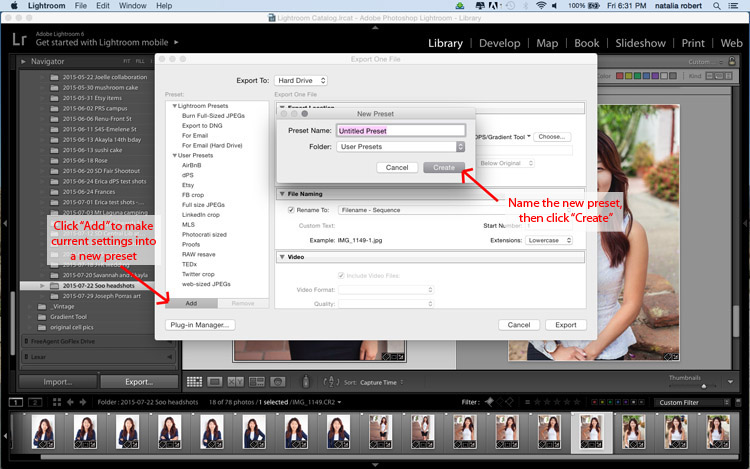
    You can also always delete a preset if it was not properly set up. Now that you have the options all set how you want them, look to the left column where it has the list of existing presets. In the bottom of this column there is an Add button. Click that and a new small window will pop-up for you to input the name. Here is where you will name this preset, so be sure to make it something simple and clear for your future use. You can name it anything as long as it doesn’t have the exact same name of another existing preset. For example, your preset for client proofs may simply be called Proofs.

    You can see that I have created a preset for images shown on Digital Photography School to fit the website requirements! Go through this process for each preset you want to create.

    ExportPresets-DialogueBox

    ExportPresets-New

    When you are ready to use one of these presets, select the photos to export, click Export, select the preset you want to use, and then click Export to complete! Note that you can modify these presets as you use them. For example, say I want to export a file with the same parameters as the Proofs preset, but I don’t want to watermark this one. I simply go to export, click on Proofs, then scroll down and modify the setting for the watermark. If this is a one-time use and I do not want to save this as a new preset, then I simply go ahead and click Export. If I decide I want this to be a new modified preset for me, then I would click Add after making my modifications, and name it something different (like: Proofs-clean).

    What happens if you make a mistake and save an export preset you no longer want? In the Library module, click to Export. When the window pops up, click once on the export preset you want to delete. When that preset is highlighted, the Remove button next to Add will become available. Click Remove and it’s gone! Note that there is no confirmation window that pops up for deleting the preset, so be sure that you do want to remove it completely before you do this.

    Do you have other exporting tips for speeding up your workflow and making life a bit easier? Please share in the comments below!

    googletag.cmd.push(function() {
    tablet_slots.push( googletag.defineSlot( “/1005424/_dPSv4_tab-all-article-bottom_(300×250)”, [300, 250], “pb-ad-78623” ).addService( googletag.pubads() ) ); } );

    googletag.cmd.push(function() {
    mobile_slots.push( googletag.defineSlot( “/1005424/_dPSv4_mob-all-article-bottom_(300×250)”, [300, 250], “pb-ad-78158” ).addService( googletag.pubads() ) ); } );

    The post The What, Why, and How of Using Lightroom Export Presets by Natalia Robert appeared first on Digital Photography School.


    Digital Photography School

  • Tips for Avoiding a Foggy Lens

    Foggy lens article - example of clear shot taken once lens cleared

    Taken at sunrise in the Florida Keys. Although this shot was okay, see below to see the similar shot taken a few minutes before with a foggy lens. I’m lucky I didn’t miss it entirely.

    Has this happened to you?

    • You are on vacation at the beach. You decide to photograph the sunrise or sunset, so you grab your camera from your hotel room and head out. You get to the perfect spot to shoot, and look through the viewfinder at the beautiful sunrise/sunset – only to find that the lens is completely fogged over. You wipe away the condensation from the front of the lens, but it instantly comes right back. Every time.
    • Or perhaps you’re in your car, and you spot something you want to photograph. You pull over, hop out and set up the shot – only to find the same thing. The lens is fogged over, and every time you wipe it away, it comes right back. You miss the shot.

    This happens all the time in coastal and tropical environments. Transferring the camera and lens from a cool, low-humidity location like your car or hotel room directly into a warmer, high-humidity environment causes condensation to form on the lens (on the front and back elements).

    Making the problem even worse is that these humid environments are likely where you like to go on vacation/holiday, and that is when you tend to take the most pictures. So that means this problem ruins a lot of shots. It has happened to me many, many times.

    Dealing with a Foggy Lens

    So how do you fix this problem? Well, once it happens, there is no fix. There are a few things you can try, which will be addressed at the end of the article, but you just have to keep wiping off your lens, and waiting for it to acclimate. This can take a while. Sometimes it just takes a few minutes for the lens to acclimatize and stop fogging over, but other times it can take half an hour.
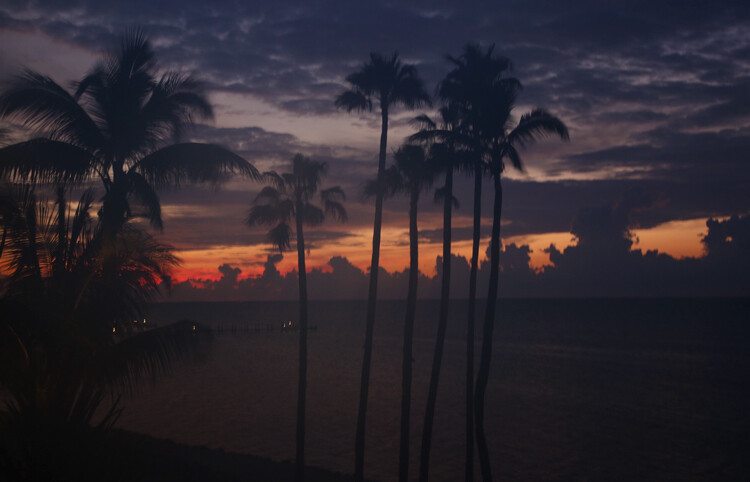
    Example of picture taken with lens fogged due to condensation

    Here is a similar shot to the one above, but this one was taken before the lens had a chance to acclimate to the warm, humid air outside my hotel.

    Since you cannot fix it once it happens, you have to avoid the problem in the first place. How do you do that? You have to let your camera or lens acclimate ahead of time.

    Obviously, you cannot just leave your camera bag laying around outside. You will need to let everything acclimate while keeping it safe. Here are some tips for decreasing the time necessary for your camera and lens to acclimate to the outside temperature and humidity while keeping it safe:

    1. Keep the camera outside (but in a safe place)

    If you have a secure hotel balcony, you might put your camera and lens out there to let them acclimate. You probably don’t want to leave them out there overnight though. Even putting aside any security concerns, the coastal environment is not friendly to electronics, and prolonged exposure isn’t great for your camera. You can, however, place the camera and lens out on the balcony or other secure place for a while, as you are preparing to go out. Leaving them outside for a half-hour or so ought to be sufficient.

    If you are getting up early to shoot a sunrise, for example, you might place your camera and primary lens out there immediately after you wake up, and let them acclimate while you are getting ready to go. That will give them some time to acclimate.

    2. Keep the camera in the trunk

    When you are driving around, or heading to a place you plan to photograph, keep your camera and lenses in the trunk of your car. That will keep them out of the air conditioning, and allow them to acclimate to the outside temperature and humidity.

    Sometimes, however, you want to keep your camera handy in case you come across a great shot. In that case, keep the AC off and roll the windows down. All you are doing is keeping your camera and lens out of the air conditioning so that they acclimate to the temperature and humidity outside.

    3. Get them out of the bag

    If you leave your camera and lens in a zipped-up camera bag, then the acclimation process will take exponentially longer. The camera bag, while certainly not air-tight, will prevent air flow and keep your camera and lens surrounded by cool, dry air. You don’t want that.

    Instead, when you are acclimatizing the camera and lens – whether that be on the hotel balcony, in the trunk of your car, or some other place – keep them outside the camera bag.
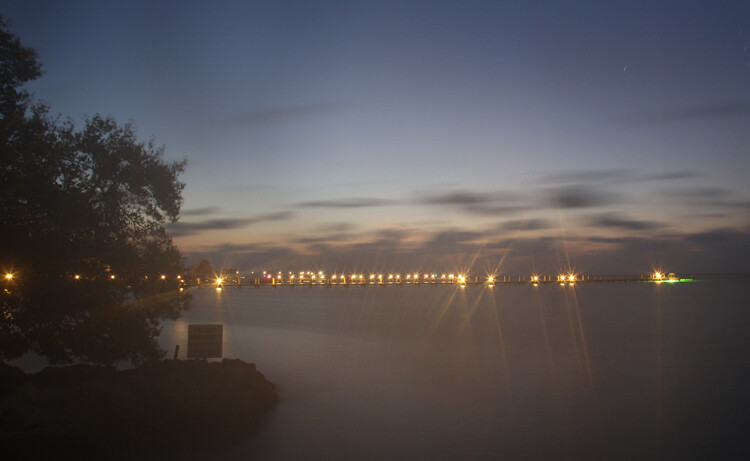
    Example of picture taken with lens fogged due to condensation.

    Here is another shot taken immediately upon exiting my cool, dry hotel and entering the warm, humid air along the coast in the Florida Keys.

    4. Remove the caps and filters

    The place where you are likely to have the biggest problem with condensation, is the front of your lens. Therefore, that is the part you should spend the most time and effort acclimating. In doing so, take off any filters or lens caps that are on your lenses. You don’t want a UV filter and a lens cap keeping the warmer, more humid air from getting to the front of your lens and acclimating it to the conditions outside.

    5. Keep a micro-fibre cloth handy

    Once the condensation happens, you just have to ride it out until your camera and lens acclimate. At the same time, you should periodically wipe off the front of the lens. That way you can see if the condensation is going to return. If you are not wiping it off periodically, you won’t know.

    In addition, if the situation is not too severe, you can wipe off the lens and then quickly snap off a shot or two before the lens starts fogging up again. That usually works after the acclimation process has been going on for a while.

    Keep a micro-fibre cloth handy for this process. If you don’t have one, you’re going to have to use whatever is available to wipe off your lens – like your shirt (and I’d like to scoff at this notion, but I’ve been forced to resort to that many times). Buy a couple of clip-on micro-fibre cloths that come in little pouches. You can just clip one to your camera strap and you’ll always have it handy. That will also keep you from having to dig through your bag to find one (they always go to the bottom in a hard-to-reach corner).

    6. Fix it in post-production?

    A picture with any significant fogginess due to condensation is a goner. You will not be able to save it.

    If the picture only has a minor amount of fogginess, however, there are some things you can do to try to clear it up. These are by no means sure-fire cures, but they will help a minor case of fogginess. Your first thought will probably be to increase the contrast and clarity in Lightroom or ACR. Those will work a little bit. A slightly stronger move is to take the photo into the LAB colorspace and perform the basic LAB color enhancement move. A fortunate side-effect of the color enhancement move is to remove a haze from the picture. Again, none of these tactics is a magic wand, but they can help.

    Foggy lens article - example of clear shot taken once the lens had acclimated

    So as to conclude on a positive note, here is a shot taken the same morning as the fogged picture above. The lens cleared in time to capture a great sunrise. Yet another reason to get there early!

    Conclusion

    Condensation is definitely a trap for the unwary. Light conditions change fast. Optimal conditions at sunrise and sunset are fleeting. You don’t want to be standing around waiting for the condensation on your lens to disappear and miss a shot.

    Take steps to avoid the problem and acclimate your camera and lens ahead of time, while at the same time keeping everything safe. Do this either ahead of time, or while you are en route. Then make sure you are wiping off the front of your lens periodically, it will keep you from missing shots when the light is optimal.

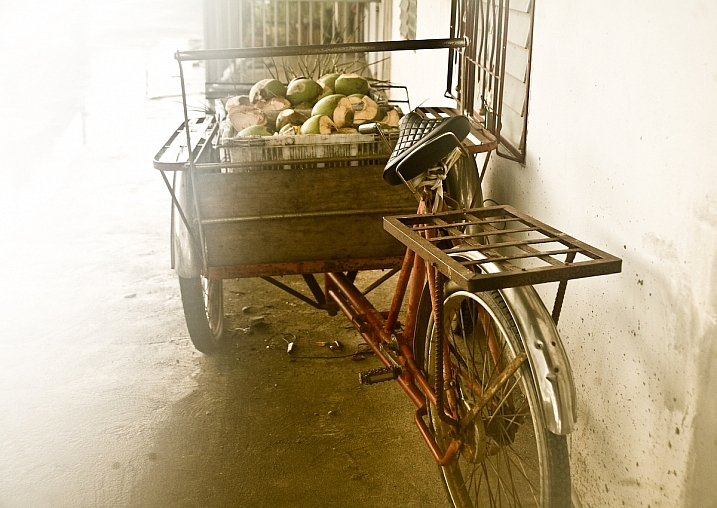
    Editor’s Note: I have encountered this situation many times. In Bangkok however I found that the image I took with the fog (below) had more feeling and impact than the ones I took after it cleared. So don’t stop shooting, you never know what you’ll get!
    Darlene Hildebrandt

    By Darlene Hildebrandt

    googletag.cmd.push(function() {
    tablet_slots.push( googletag.defineSlot( “/1005424/_dPSv4_tab-all-article-bottom_(300×250)”, [300, 250], “pb-ad-78623” ).addService( googletag.pubads() ) ); } );

    googletag.cmd.push(function() {
    mobile_slots.push( googletag.defineSlot( “/1005424/_dPSv4_mob-all-article-bottom_(300×250)”, [300, 250], “pb-ad-78158” ).addService( googletag.pubads() ) ); } );

    The post Tips for Avoiding a Foggy Lens by Jim Hamel appeared first on Digital Photography School.


    Digital Photography School

  • 5 Ways to Avoid Problems and Conquer Summer Photography

    I’m a big fan of summer. In fact, I dislike winter greatly, and my favorite season is spring. But summer is probably number two on my favorite season list. Summer is great because it’s not cold. But it can also be so hot that you may walk a couple steps during a hot and humid day and return drenched in sweat.

    Not cool, sun – not cool.

    15_June_05_NxNW2015__DSC5091.dng

    But in all seriousness, summer can be fantastic for photography because you can literally go out anytime with shorts and a t-shirt. In a way that’s liberating. In the winter you’re wearing layers upon layers; in the spring you may be wearing rain gear more often than not.

    With this all said, I want to share some things to avoid during summer, and ways to conquer those avoidances. With these tips, you can improve your summer photographs.

    1. Carry Less

    Quite often photographers carry so much gear when they’re out making photographs. But how much of that is really necessary?

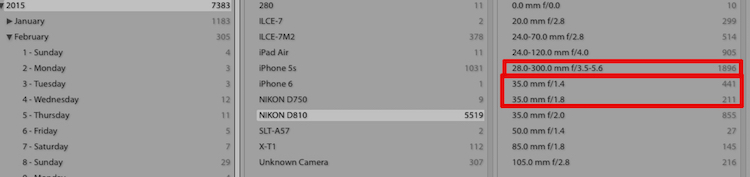
    Look at your Lightroom catalog by using the Metadata Library Filter. Filter by the past year or two, and see what lenses you use the most. You can also dig in deeper by using the Lightroom Dashboard website to determine your most common focal lengths.

    Lightroom Metadata

    The Lightroom Library Filter for Metadata

    Once you know which lenses you use the most, stick with those.

    For example, as I’m writing this I have my bag packed for a huge photowalk tomorrow in New York City. I’m only bringing my 35mm lens for most of the walk and the 28-300mm lens for distance. I could bring others, but why? I know from experience that I don’t need others for this type of event (photowalk).

    Carrying less means a lighter camera bag, which means less struggle in the heat.

    2. Wear Less

    I mentioned in the intro that in the summer you can wear less. On hot summer days I am outside photographing in shorts and a t-shirt. I might keep a Scottevest jacket with me (rolled in a ball in my bag) just in case it rains.

    I won’t be wearing flip-flop,s because those are horrible for standing or walking on for extended periods of time. But I will be wearing low-top sneakers made for walking. But before my sneakers are on, I will also have socks designed for hot temperatures, and walking. Arch support is extremely important, and in the summer if you don’t have proper sizing or support then your feet will feel it.

    Don’t forget a hat as well. The hot summer sun can easily cause sunburn. Usually I wear a simple hat, but if I’m traveling I keep my Tilley hat with me, which covers my ears and neck at the same time as my head.

    Tilley Hat

    Me in my Tilley hat. Photo by Joseph Hoetzl

    The hat’s brim is also very soft and flexible, so it doesn’t get in the way when you hold your camera up to your eye.

    3. Squint Less

    With the sun comes harsh light, strong light, and blinding light. The last thing you want is for photographs of people squinting. My suggestion for this problem is to avoid photographing in the direct sunlight, and instead, find a shaded area as there you still get a lot of light, but it’s diffused.

    portrait-direct-sunlight

    The other option is to still photograph in direct sunlight, but to add your own diffusion. Lastolite and many other companies make products perfect for that job.

    portrait-shade

    On your side of things (the photographer), wear sunglasses, and remove them as needed when looking through your camera’s viewfinder or at the LCD.

    4. Go Sunless

    The summer is an amazing season to photograph during sunrise or sunset. Don’t plan a photo session during the strongest sunlight, like noon. Instead wait until sunset like 7:00 or 8:00 P.M. The sunset can make a great backdrop, and can produce really fun golden light.

    If you are photographing portraits, then bring a reflector or flash to add some fill-light on your subjects.

    5. Let Less Light Into Your Camera

    The last tip is to let less light into your camera using neutral density filters. Sometimes the sun is just so harsh that your can’t get your camera’s settings where you want. By using a neutral density filter you can extend the shutter speed for landscape photos or moving objects, even in harsh sunlight.

    For portraits neutral density filters enable apertures like f/2.8 even in direct sunlight, because the filter is blocking light.

    Neutral Density - Long Exposure Mid Day

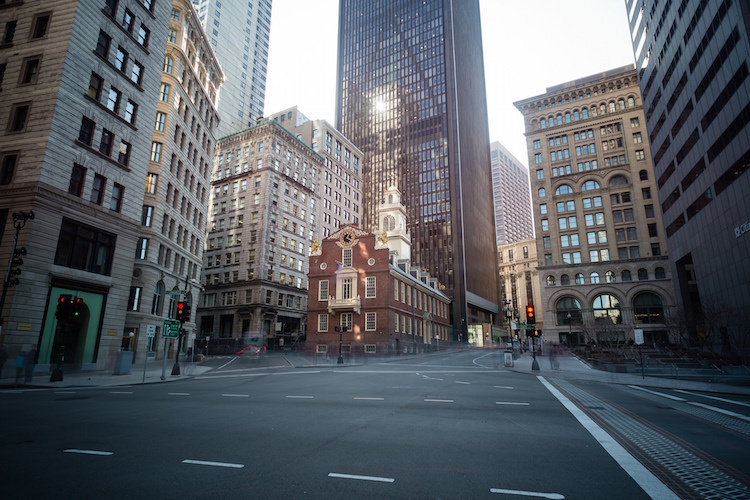
    A long exposure made just around noon on a hot day, made possible by using neutral density filters.

    I have now shared five ways for improving your summer photographs. Remember that if you are comfortable, then your photographs will improve. If you are overheated, then that worry, stress and discomfort will come through in your work.

    So get comfy and enjoy the rest of the summer weather.

    googletag.cmd.push(function() {
    tablet_slots.push( googletag.defineSlot( “/1005424/_dPSv4_tab-all-article-bottom_(300×250)”, [300, 250], “pb-ad-78623” ).addService( googletag.pubads() ) ); } );

    googletag.cmd.push(function() {
    mobile_slots.push( googletag.defineSlot( “/1005424/_dPSv4_mob-all-article-bottom_(300×250)”, [300, 250], “pb-ad-78158” ).addService( googletag.pubads() ) ); } );

    The post 5 Ways to Avoid Problems and Conquer Summer Photography by Scott Wyden Kivowitz appeared first on Digital Photography School.


    Digital Photography School

  • How to Create an Incredible Street Photography Project from A to Z

    With a camera in hand anyone can proclaim himself or herself a street photographer. However, urban imagery requires vision. Most street photographers operate in a spontaneous way, but if you take a closer look at their projects they all have a key-element at the heart of their work, an idea that drives them. Street photography translates into emotional reactions to Continue Reading

    The post How to Create an Incredible Street Photography Project from A to Z appeared first on Photodoto.


    Photodoto

  • How to Take Creative Landscape Shots using Intentional Camera Movement

    Many photographic situations rely on keeping your camera as still as possible during exposure for pin-sharp images. You may have practiced hard to develop a steady hand and you’ve probably used tripods, remote shutter releases or image stabilisation to reduce the risk of camera shake. But, is keeping your camera still always a good thing? Every now and again, why not throw caution to the wind, move your camera while the shutter is open, and explore the range of creative opportunities this offers you as a photographer.

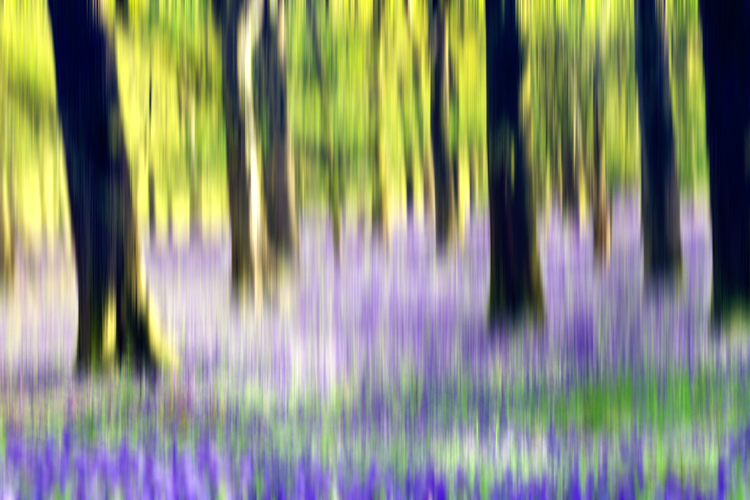
    Bluebellwoodsblur750

    What is Intentional Camera Movement and why use it?

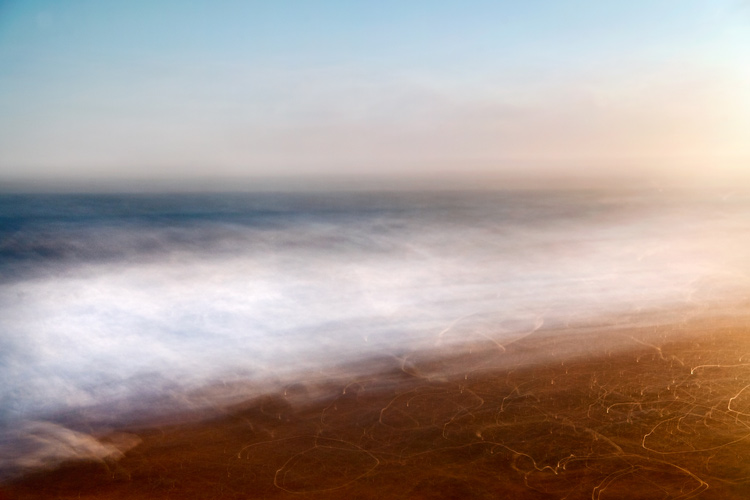
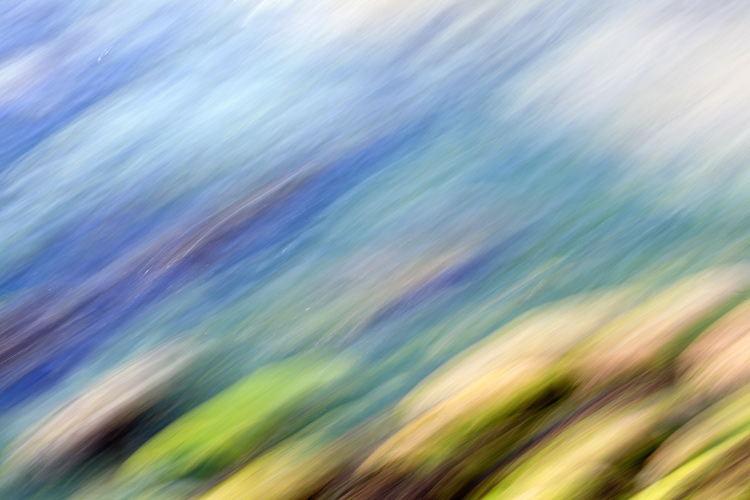
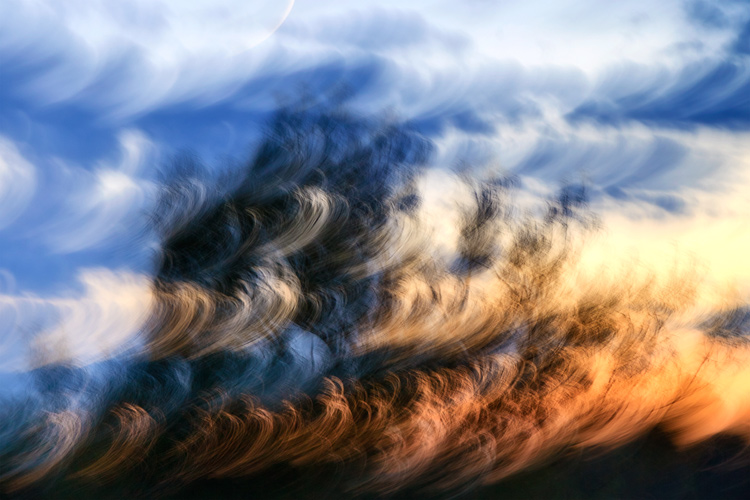
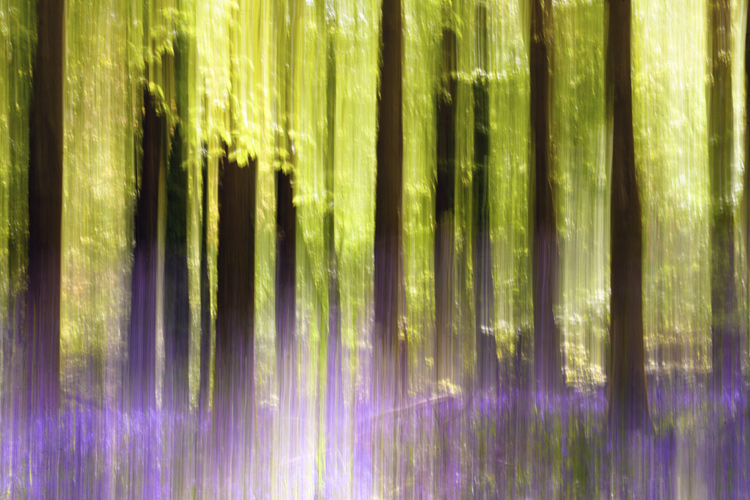
    Intentional Camera Movement (or ICM for short) is a photographic technique where the camera is moved as the image is being taken. One example is panning. The camera movement mimics that of a moving subject to keep the subject sharp and the background blurred. However, moving your camera during exposure can open up a lot more creative options for you to try out. In particular, ICM can be used to take some truly unique landscape shots. The technique can be exceptionally liberating and, by reducing the amount of sharp details in a landscape, it allows you to concentrate on lines, form and colour in your images. A scene that you may ordinarily consider too cluttered, might just come to life through ICM by letting you blend colours and shapes for an interesting abstract shot.

    One of the reasons that I have grown to love ICM is that it enables you to capture a landscape in a unique and personal way that cannot easily be reproduced. It can even breathe new life into overly familiar landscapes, letting you see and capture something new about a location you may have photographed many times before. If you are struggling to find inspiration for your next photographic project, or you want to get your creative juices flowing, this is a technique that you should try at least once. It is relatively easy to take some striking shots, you are sure to end up with a unique set of landscapes and it can also be a lot of fun.

    ICMburtonbshorejul15750

    Slow Shutter Speeds

    A key factor to get right when using ICM is the shutter speed. It needs to be long enough to capture significant motion blur; anything from 1/3 or 1/2 second exposure times, up to multi-second exposures. Because of these slow shutter speeds, shooting in low-light conditions is ideal for ICM. During the daytime, it may be harder to achieve the required shutter speeds even at the lowest ISO setting and the smallest aperture (highest f-stop number). You may need to use a polarizing filter, a neutral density (ND) filter, or a combination of both. Personally, I prefer to use a polarizing filter as a starting point as this helps to boost colours and cut down on reflections and glare. I will then add a 2-stop or a 4-stop ND filter if the shutter speed needs to be slowed down any further.

    When starting out with ICM, it may help to shoot in Shutter Priority mode. Set the shutter speed to around half a second to start, and turn the ISO to the lowest available setting on your camera. Once you have practiced at this shutter speed, you can then get longer exposure times by using a combination of low-light and/or filters. Focus manually and turn off the autofocus to prevent the camera searching for focus during exposure. Also, if you are using a lens that has image stabilization, remember to turn it off.

    RockpoolsportlandICM750

    Moving the Camera

    Once you have taken control of the shutter speed, how you move the camera is totally up to you. Get creative, there are no rules. You could move the camera vertically, horizontally, or diagonally – fast or slow. Alternatively, you could rotate the camera 360 degrees during exposure to create a spiral effect, or change the focal distance on a zoom lens during exposure to create a zoom effect. With practice, you can combine two or more of these movements to create something truly unique. The look and feel of your final images will be determined by the speed, direction, and smoothness of your chosen movements. If you wish, you can use a tripod to control the camera movement. This will help you to capture a smoother movement, which can be useful if you wish to retain a straight horizon line. I prefer to work hand-held when moving the camera, as it offers greater flexibility and provides more opportunities to experiment with different movements.

    Bold movements can sometimes be more effective as there is a risk that too subtle a movement may end up looking like camera shake in the final image. Waving your camera around may not come that naturally, and it may result in you getting some funny looks from amused onlookers, but the end results definitely can make it worthwhile.

    ICMwarehamtreesunset750

    What to Shoot

    A good place to begin using ICM in your landscape shots is to look for locations that offer striking colours, lines, or patterns. Woodland is a favourite ICM subject of mine, particularly during the spring and autumn seasons. Clean, parallel lines provided by the trees and vibrant colours of nature (provided by bluebells in the spring and fallen leaves in the autumn) lend themselves to a vertical camera movement. This can be from the top-down, or from the bottom-up and can be a quick or slow movement. It really just depends on the effect you wish to capture, and how experimental you want to be. Seascapes can be a good starting point for side-to-side camera movement, panning the camera in line with the horizon.

    Alternatively, in rougher waters, you could try to match the movement of your camera to the movement of the waves for an altogether different effect. Shooting at sunrise or sunset could provide you with a greater variety of colours to work with, and shooting city lights after dark can also offer a wide range of creative options.

    Once you have found a suitable location, you will probably find yourself taking multiple shots with various different movements. (I should warn you that this technique can sometimes be quite addictive, and you may find your memory cards filling up quite quickly!) You may find it useful to set your camera to shoot in Continuous Shooting Mode so that you can take a series of shots in quick succession, while moving the camera in a particular direction.

    Bluebellaction750

    Final Tips

    As with any type of photography, images created using this technique are not going to be to everybody’s taste. It is highly subjective and what works for you will not work for others. Just keep in mind basic principles of photography such as composition and exposure – these are still just as important. Also, while this technique will render much of the landscape abstract, you may find it helps to have at least one element of the landscape sharp, or recognizable in the final image.

    There is an element of trial-and-error when starting out with Intentional Camera Movement. You should soon find out what works for you and what doesn’t; this will help you to develop your own style. Don’t be too concerned if you do not get an effect you like right away – the technique can be quite hit-and-miss sometimes. Take a lot of shots, and don’t be too quick to delete shots that you feel haven’t quite worked out as you had hoped. There is a chance that, after a few days, you may take another look and see something that you like in there after all.

    One of the great things about this technique is that it is all about how you express yourself through photography – think of your camera as your paintbrush. Get creative, have fun, and start seeing landscapes in an exciting new way.

    RiverweedsICMblandford750

    I have included several of my attempts at ICM landscape shots. Please feel free to share your own in the comments section.

    googletag.cmd.push(function() {
    tablet_slots.push( googletag.defineSlot( “/1005424/_dPSv4_tab-all-article-bottom_(300×250)”, [300, 250], “pb-ad-78623” ).addService( googletag.pubads() ) ); } );

    googletag.cmd.push(function() {
    mobile_slots.push( googletag.defineSlot( “/1005424/_dPSv4_mob-all-article-bottom_(300×250)”, [300, 250], “pb-ad-78158” ).addService( googletag.pubads() ) ); } );

    The post How to Take Creative Landscape Shots using Intentional Camera Movement by Richard Beech appeared first on Digital Photography School.


    Digital Photography School

  • Color or Black and White for Street Photography?

    First, let’s assume that you are shooting with a digital camera and the choice of color or monochrome treatment can be made at the post-processing level. The decision of choosing color or black and white if you are shooting film is a different story, and requires a different frame of mind, as it is usually made before you leave the house.

    So, the questions is this: Is street photography better in color or black and white? There is no right or wrong answer to this question, it is definitely a personal preference. Some photographers only shoot in color, others prefer black and white for all their work. For my part, I let the subject dictate the choice and that decision is usually made before I press the shutter.

    Here is some of the reasoning behind that decision…

    Why black and white may be a better choice:

    B&W will work best if your subject already has a timeless look.

    B&W will work best if your subject already has a timeless look.

    You may like to use black and white for its timeless quality. If your subject also has a timeless look, a black and white processing will make your image stand the test of time, and often give it a more artistic look. This is even more true when no element in your frame dates your photograph (such as mobile phones, cars, etc.). Other times, the black and white processing will even help hide those elements.

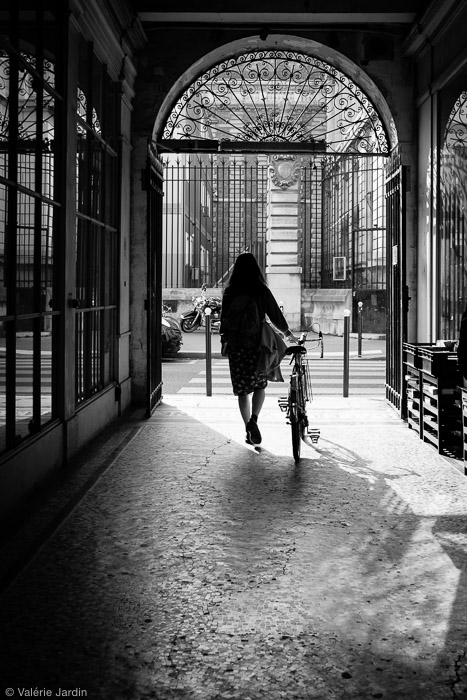
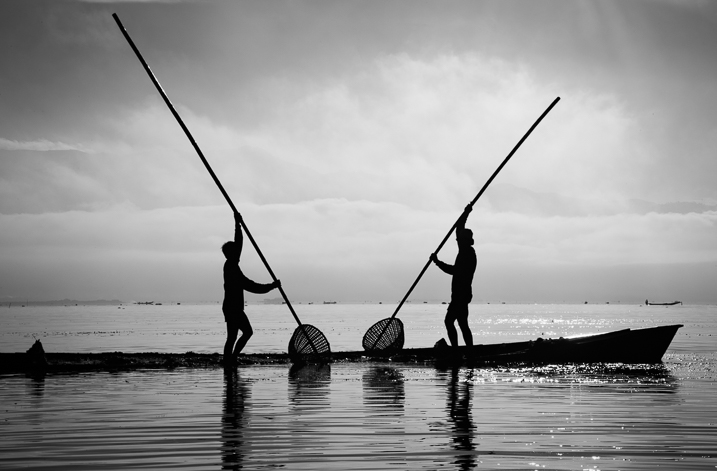
    Silhouette photographs are often stronger in black and white than in color. The human element featured should be well-defined, and there needs to be some separation to identify the shape of the body. Removing the color will help make your subject stand out more, especially if it is small in the frame. The eye will automatically be drawn to the human shape.

    B&W often works best when photographing silhouettes.

    B&W often works best when photographing silhouettes.

    There are also some strategic reasons to favor black and white over color. As street photographers we usually do not remove elements from the frame in post-processing. Our job is to record an authentic moment in time, that never happened before, and will never happen again. A skillful street photographer makes quick decisions, and is able to remove distracting elements from the frame by moving in closer and positioning him/herself correctly, before pressing the shutter. Most of us would not resort to using post-processing tools to remove objects. There are times when bright colorful elements such as stop signs, trash cans, or cars are inevitable, and will draw the attention away from the subject. By removing the color, you are able to bring the attention back to the human element.

    Compare these two images:

    In this frame the subject is interesting but your eye is immediately drawn to the red and blue street signs.

    In this frame the subject is interesting but your eye is drawn to the colors of the street signs.

    By removing the color distraction you have a much stronger image by bringing the attention right to your subject.

    By removing the color distraction it’s a much stronger image, bringing attention right to the subject.

    By shooting in RAW you retain all the color information in your file, which allows you to play with the color sliders in Lightroom and turn a distracting color into a light or dark grey tone to fine-tune your final image.

    There are other times when the color is amazing but also overpowering, and risks becoming the subject because the human element is lost in the chaos.

    Why color may work better:

    When is color preferred? The color can be an integral part of the story, which also means that a black and white conversation would take away the most important component of the image, and it would not make any sense.

    Here a B&W conversion would not make any sense and the subject would lose interest.

    Here a B&W conversion would not make any sense and the subject would lose interest.

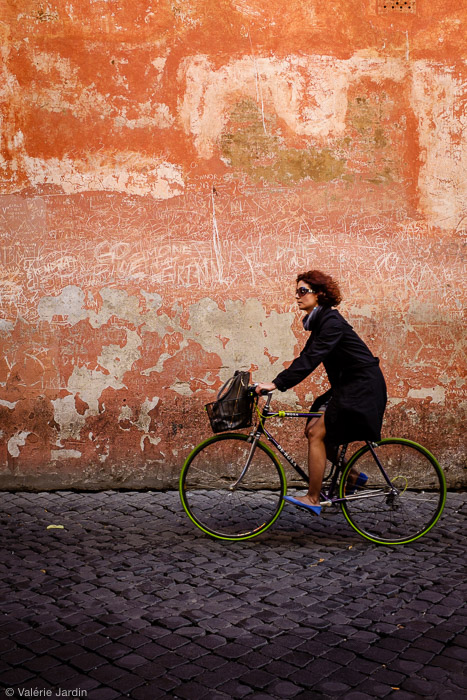
    Finding a great background, such as a textured wall or a colorful storefront, is a great way to anticipate a shot, by waiting for the right subject to enter your frame. It may be even more important to get the right subject in a color shot than in a black and white picture. Color harmony plays an important role in making, or breaking the image. Most importantly, color should not overpower your subject. It should be part of the story, not a distraction from it.

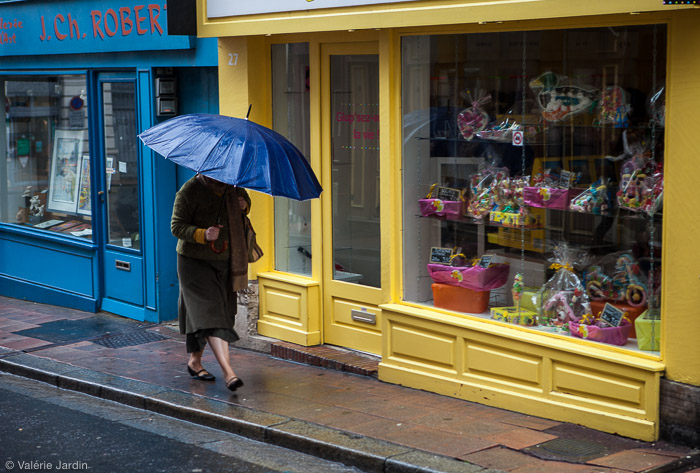
    Finding a textured colorful background and waiting for the right subject to enter your frame makes for a strong color street photograph. The green tires and blue shoes  completed the shot.

    Finding a textured colorful background and waiting for the right subject to enter your frame makes for a strong color street photograph. The green tires and blue shoes completed the shot.

    Color will also often give a sense of place or time in street photography. It will evoke the feeling of a season, for example, or the time of the day – from the warm glow of the golden hour, to the cool tones of the blue hour.

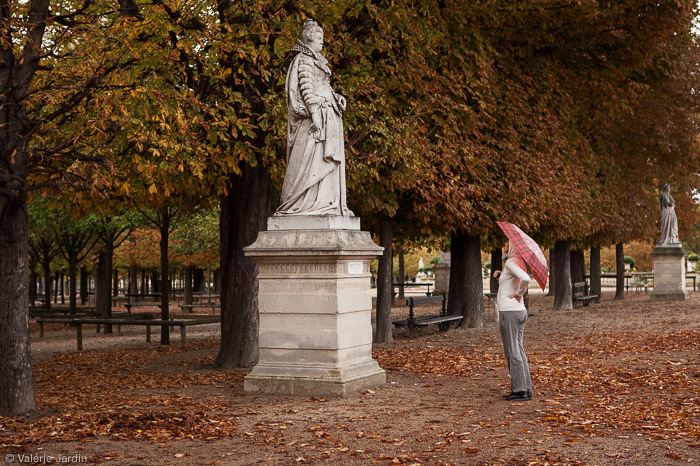
    Autumn in Paris would not be as well conveyed in a B&W photograph.

    Autumn in Paris would not be as well conveyed in a B&W photograph.

    Going out on a photo walk with a specific color in mind is also a fun way to approach street photography. You will be surprised at the creative ways you will see the world around you by focusing your vision on one color. Try it!

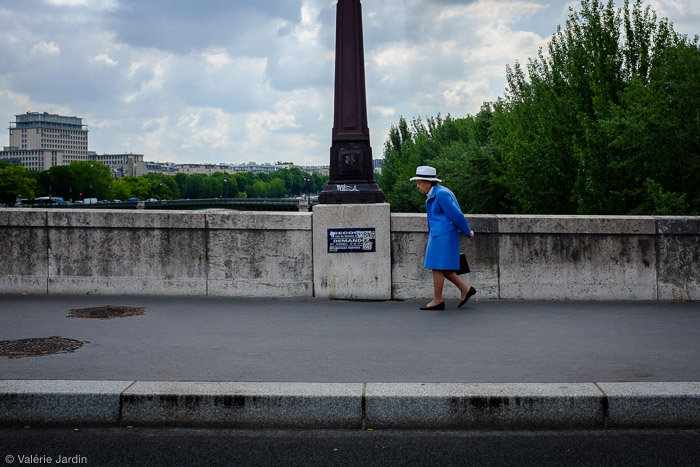
    Choosing a color theme then you are out on a photo walk can be a fun project. Here my color theme was blue!

    Choosing a color theme then you are out on a photo walk can be a fun project. Here my color theme was blue!

    Conclusion:

    Don’t forget that it’s your vision, and you are shooting street photography for yourself first. Don’t get stuck, try new things! If you always shoot in color, go out and train yourself to see in grayscale for a few days. If you favor black and white, take another look at the world around you and learn to appreciate and use the colors it has to offer. You may discover a whole new way to see, and you will undoubtedly grow in the process. Have fun!

    This short video about Color versus B&W is part of my Street Tips series called Hit the Streets with Valerie Jardin

    Editor’s Note: This is last of a series of articles this week featuring black and white photography tips. Look for earlier ones below.

    • 5 Simple Ways to Create Expressive Photos in Black and White
    • Tips for Black and White Wildlife Photography
    • 7 Tips for Black and White Portrait Photography
    • 28 Images with Strong Black and White Compositions
    • Weekly Photography Challenge – Black and White Techniques
    • Tips for Black and White Wildlife Photography
    • How to Convert Images to Black and White and Add a Color Tint in Photoshop
    • Shooting all Black and White for a Day to Improve Your Photographic Eye
    • Split Toning Black and White Images in Lightroom
    • Processing Black and White Photos with OnOne Perfect B&W

    googletag.cmd.push(function() {
    tablet_slots.push( googletag.defineSlot( “/1005424/_dPSv4_tab-all-article-bottom_(300×250)”, [300, 250], “pb-ad-78623” ).addService( googletag.pubads() ) ); } );

    googletag.cmd.push(function() {
    mobile_slots.push( googletag.defineSlot( “/1005424/_dPSv4_mob-all-article-bottom_(300×250)”, [300, 250], “pb-ad-78158” ).addService( googletag.pubads() ) ); } );

    The post Color or Black and White for Street Photography? by Valerie Jardin appeared first on Digital Photography School.


    Digital Photography School

  • Processing Black and White Photos with OnOne Perfect B&W

    Black and white photography is classy and powerful. When properly done, it can be enticing and dramatic. In fact, a great portion of fine art photography hanging in galleries is monochromatic. In the age of film, all it took was to load black and white film into your camera, but nowadays most digital camera sensors are recording images in color and with that, if you want to explore the black and white world, you’ll have to convert your images in the post-processing stage.

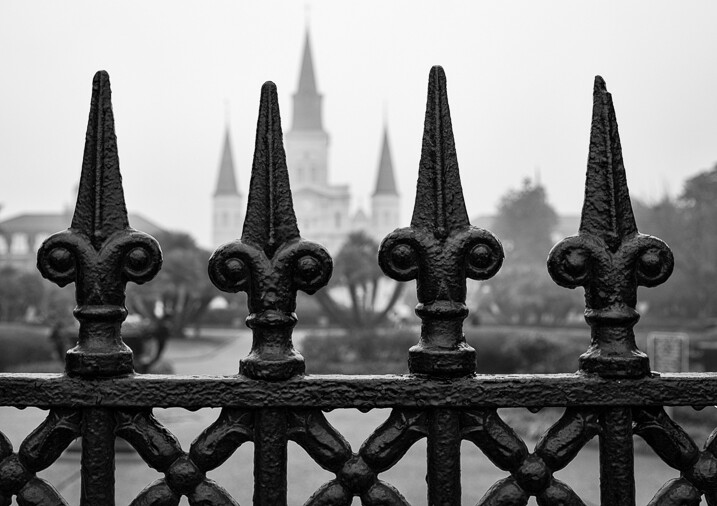
    Close up of iron fence around Jackson Square in New Orleans with the St. Louis Cathedral behind.

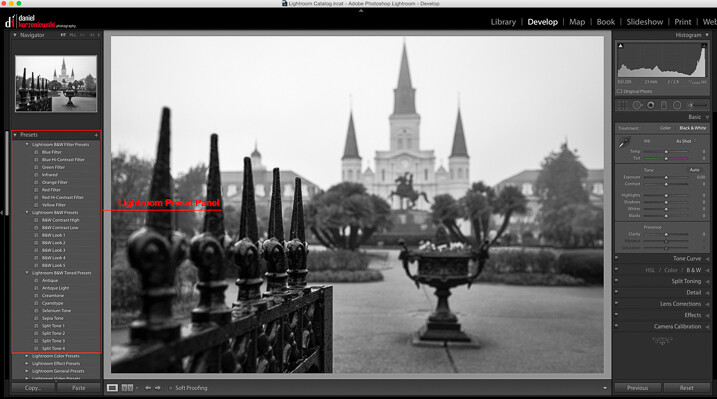
    When it comes to converting and processing photos to black and white, there are a number of options. If you are a Lightroom user, there is a black and white option within the Basic Develop panel as well as some presets that come preloaded. All you need to do is click on them, and tweak the sliders until you get the desired effect.

    Processing-black-white-photos-onone-perfect-bw-2

    There are also, of course, more sophisticated alternatives that could help make your work easier. Among those, Perfect B&W from OnOne Software is one of my favorite options. This application can be used as a plug-in with Adobe Photoshop, Lightroom, Photoshop Elements, Apple Aperture, or as a standalone app. OnOne offers a full set of applications called Perfect Photo Suite, Perfect B&W is included in it, but it can be also purchased separately as a standalone application.

    The idea behind this product is to help you to easily enhance your photos. There are controls to adjust tone, curves, color response via filters, and borders – and of course, it also comes with different types of presets. You’ll also be able to create your own presets and save them as well.

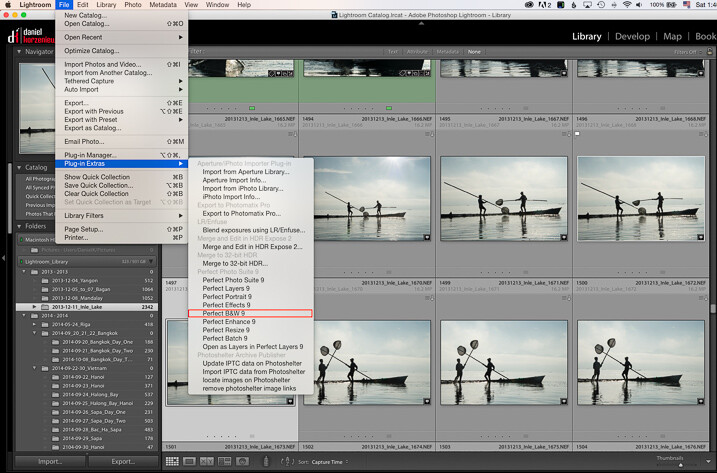
    As I am an Adobe Lightroom user, I’ll demonstrate some of the features of the product by opening it from there. To launch the application, you need to select an image from the Library or Develop Module and go to the File Menu, then select Plug-In Extras and navigate to Perfect B&W 9.

    Processing-black-white-photos-onone-perfect-bw-3

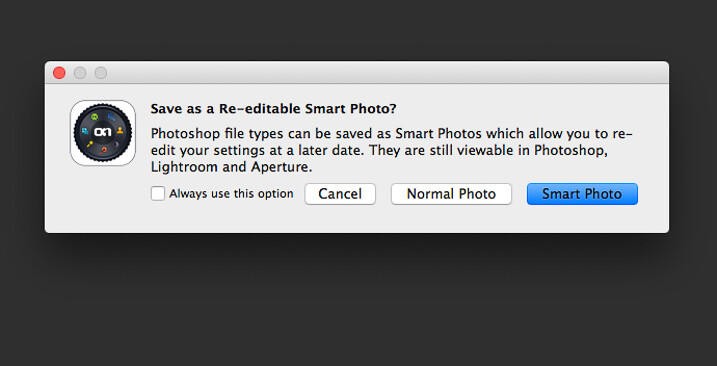
    One of features that you’ll probably like is the possibility to save all your changes as a Smart Photo. It means that even after your edits are done, you’ll be able to come later and redo your settings. This way, you are working in a nondestructive way. The application will pop up a dialog box when you launch it, asking if you want to edit in this work mode.

    Processing-black-white-photos-onone-perfect-bw-4

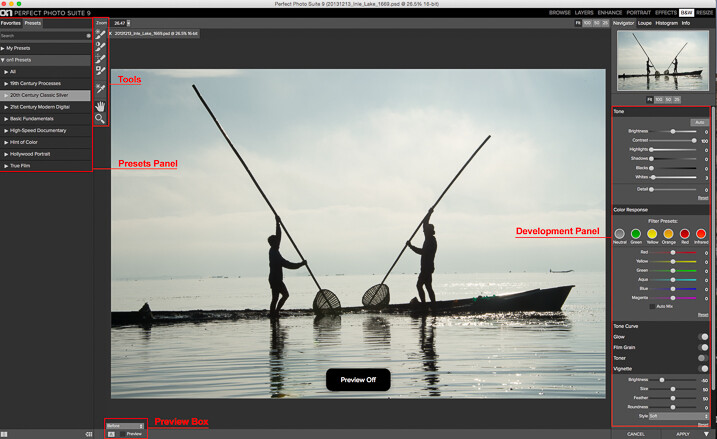
    Once the applications opens, the layout is similar to what you find inside Lightroom. The preset panel is on the left and the develop options are on the right. There is also a set of tools that let you selectively add more contrast, brightness, or even mask entire areas in case you want to do a selective color treatment.

    Processing-black-white-photos-onone-perfect-bw-5

    Once you are ready to work, you have the option to start by selecting the different presets, or just working with the sliders in the development panel. You need to be sure that you have selected the preview option at the bottom to see the effect on the image; you can toggle back and forth to show the before and after.

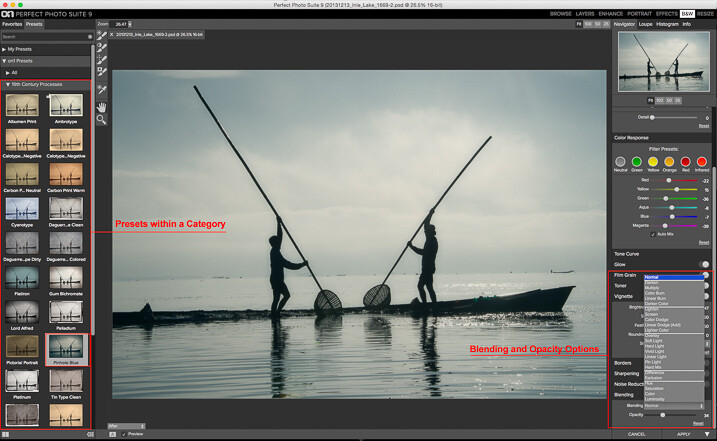
    My preferred way of working is to use one of the presets as a base or staring point, then modify it to my liking with the sliders. The presets are divided into eight categories, as follows:

    • 19th Century Processes
    • 20th Century Classic Silver
    • 21st Century Modern Digital
    • Basic Fundamentals
    • High Speed Documentary
    • Hint of Color
    • Hollywood Portrait
    • True Film

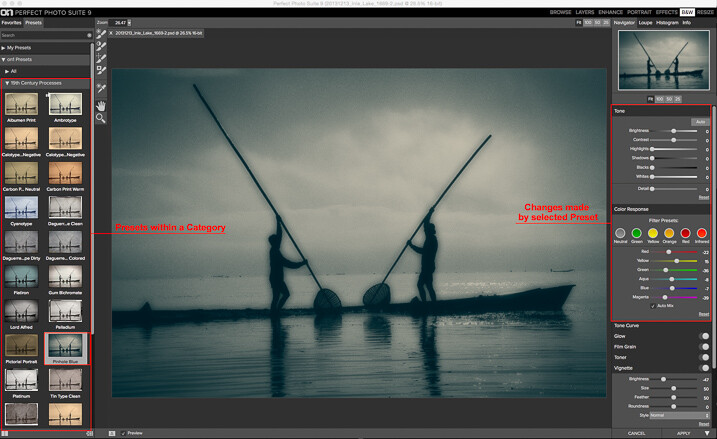
    The names are pretty much self-descriptive, and if you click on them, you’ll see all the presets within that category with previews on the side panel itself.

    Processing-black-white-photos-onone-perfect-bw-6

    As you can see in the image above, the application also allows for duotone images by combining the use of color filters, so you are totally flexible on the type of look you can create. For example, if I click the Pinhole Blue preset from the 19th Century Process, the software will create that effect, and you’ll see how some the sliders from the Develop Panel changed to create it.

    From there you can pretty much tweak the image any way you want, and there is also an option where you can select the blending mode, exactly the same way layers work in Photoshop. You can also drop the opacity for a more subtle effect. In the example below I reduced the opacity to 34 percent.

    Processing-black-white-photos-onone-perfect-bw-7

    The different old century presets are great to create all the vintage looks that are so popular today, with just a few clicks and without the need to know more complicated software.

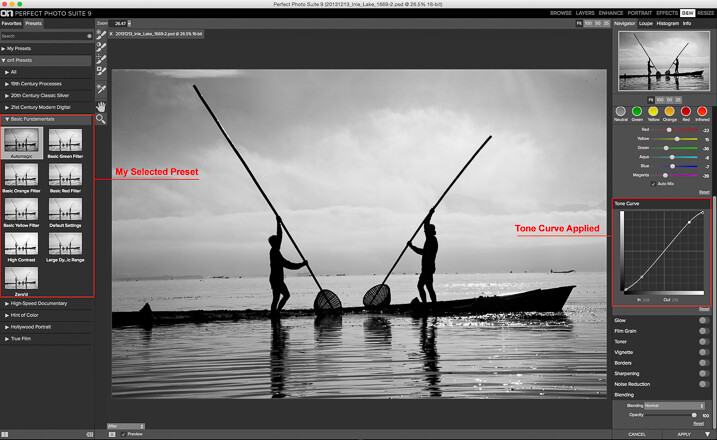
    For my final image, I selected Automatic from the Basic Fundamentals, then added contrast by adjusting the Tone Curve. I also moved the Detail slider to 15 so the ripple effect on the water was more noticeable; it also helped to add some drama to the sky.

    Processing-black-white-photos-onone-perfect-bw-8

    As I knew I wanted to re-crop the image, I didn’t add any other effect here, so I went back to Lightroom cropped the image, then added a vignette.

    Processing-black-white-photos-onone-perfect-bw-9

    OnOne Perfect B&W is a well-rounded application and a powerful tool for black and white conversions. I believe the best way to judge it is to give it a try. The good thing is that the company is offering a thirty-day trial, so it won’t cost you to play with it; moreover, you can download and test the full suite if you want. The regular price for the standalone application is $ 59.95 and the complete suite is $ 149.95. They can be downloaded straight from the OnOne website.

    Editor’s Note: This is second last of a series of articles this week featuring black and white photography tips. Look for earlier ones below and the last one later today.

    • 5 Simple Ways to Create Expressive Photos in Black and White
    • Tips for Black and White Wildlife Photography
    • 7 Tips for Black and White Portrait Photography
    • 28 Images with Strong Black and White Compositions
    • Weekly Photography Challenge – Black and White Techniques
    • Tips for Black and White Wildlife Photography
    • How to Convert Images to Black and White and Add a Color Tint in Photoshop
    • Shooting all Black and White for a Day to Improve Your Photographic Eye
    • Split Toning Black and White Images in Lightroom

    googletag.cmd.push(function() {
    tablet_slots.push( googletag.defineSlot( “/1005424/_dPSv4_tab-all-article-bottom_(300×250)”, [300, 250], “pb-ad-78623” ).addService( googletag.pubads() ) ); } );

    googletag.cmd.push(function() {
    mobile_slots.push( googletag.defineSlot( “/1005424/_dPSv4_mob-all-article-bottom_(300×250)”, [300, 250], “pb-ad-78158” ).addService( googletag.pubads() ) ); } );

    The post Processing Black and White Photos with OnOne Perfect B&W by Daniel Korzeniewski appeared first on Digital Photography School.


    Digital Photography School

  • Split Toning Black and White Images in Lightroom

    It can at times seem difficult to make our images unique, or at the very least more interesting. During our workflow we sometimes even discard photos because we feel they aren’t interesting, or that we have failed at an exposure or composition. What we often forget is that we can actually make our images stand out from the rest, and become less mundane, just by being slightly creative with our editing. Sometimes we can even go so far as to salvage an image that might otherwise have been introduced to the delete button. Just by using some powerful, yet simple, post-processing techniques we can discover hidden gems within our images.
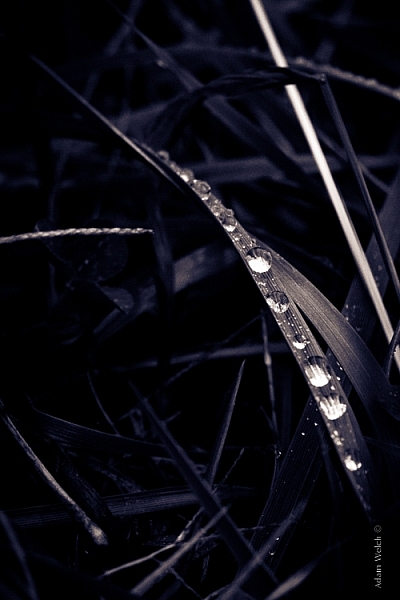
    Rain-on-Grass.jpgIntroducing split toning

    One such technique which can add uniqueness and strength to an image, is the process of split toning. Most likely, you have already viewed many images that were split toned, even if you didn’t know anything about it. Many of the vintage looking photographs, that seem to be trending at the moment, almost always employ split tone processing to some extent. That’s not to say that split tone images are something new, in reality, the situation is actually quite the opposite. Split toning has its roots in film photography and dark-room printing. Before we begin to learn just how easily you can convert your images to split tone, let’s first take a brief look at what split toned images are, and examine (even more briefly) a little bit of the history behind the process.

    What is split toning?

    Split toning is quite simply a process by which color tone is added to the highlight and shadow areas of an otherwise monochromatic photograph. Traditionally, the photo being processed with split tones begins its life as a black and white image capture. After the print has been fully made and developed, it is then introduced to other chemicals, which affect the image tones in different ways, depending on the relative compositions of the chemistry involved. In our world today, digital darkrooms now allow us to carry-over this technique of selective toning to our color prints. Color split tone images are quite possible and are often very pleasing. However, for our purposes here, we will keep the discussion limited to the process of using split toning as it relates to black and white photos exclusively.

    History of split toning

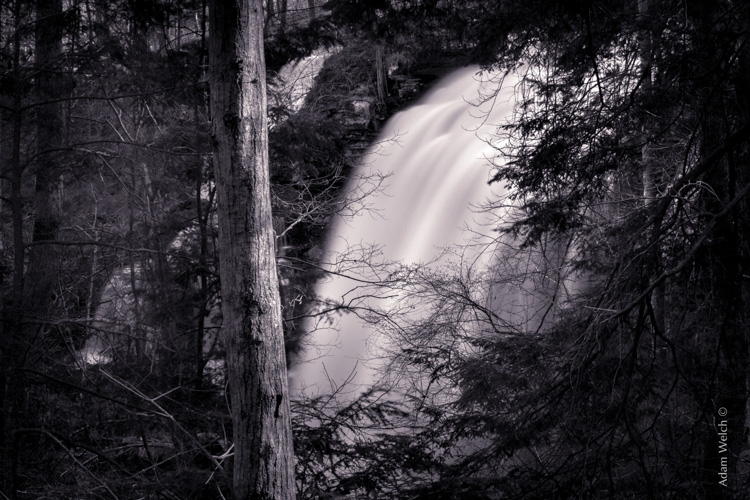
    Virgin Falls

    It all started with the birth of the photographic process itself in the mid 1800s. The images produced during that era of early experimentation into the medium were very delicate, and extremely susceptible to degradation from physical touch, atmospheric conditions, as well as exposure to light post-development. As photography evolved, the pioneers of the art found they needed a way to make their finished prints more durable and longer lasting. This lead to the introduction of toners in the darkroom printing process. Essentially, most toners replace the metallic silver present in the print with a more stable silver compound.

    The finished print tone of course depended on the type of toner used. A readily identifiable example of this is sepia tone. We’ve all seen them before; the warm and golden hues that look predominately old fashioned and can lend a sense of nostalgia to an image. Originally, sepia toned photographs were a result of a chemical process in the darkroom. The process involved treating the finished print with chemical compounds that converted the silver present into a silver compound called silver sulfide, which made for a much longer lasting finished print.

    The split toning processes came about by using different toning agents in different stages, in different proportions. A photographer might treat a photo with one type of toner and then stop the process at a desired stage, leaving only the highlights unreacted. Then, another and different type of toner might be introduced, which would react with the remaining silver present in the shadows left over from the previous treatment. Thusly, the tones visible within the image would be split – hence split toning.

    Roots

    Ansel Adams, one of the most influential photo makers of the our time, also employed the use of split toning in his masterworks. This in itself is quite interesting since Adam’s was a realist in all ways. Meaning that he promoted straight photography with minimal manipulations in the darkroom aside from his own adjustments, using mostly dodging and burning. Ansel choose primarily selenium based toning agents for his work, which added a very slight blue hue to the shadows of most of his prints. He called the color tones eggplant, and indeed the coolness of bluish blacks produced images that are still counted among some of the most magnificent examples of photographic art ever made.

    How to apply split toning in Lightroom

    Now that you have an understanding of what the split tone processing is all about, we can move on to the fun stuff. Let’s take a look at how you can easily make your black and white images really stand out using split toning feature in Adobe Lightroom 6 (the split toning feature is also available in other image processing software including LR CC, Photoshop and ACR).

    Let’s begin with a color image that we feel would benefit from being converted to black and white. Photos which transition well to black and white more often than not possess stark contrasts between the light and shadow areas, and have great texture within the subject matter.

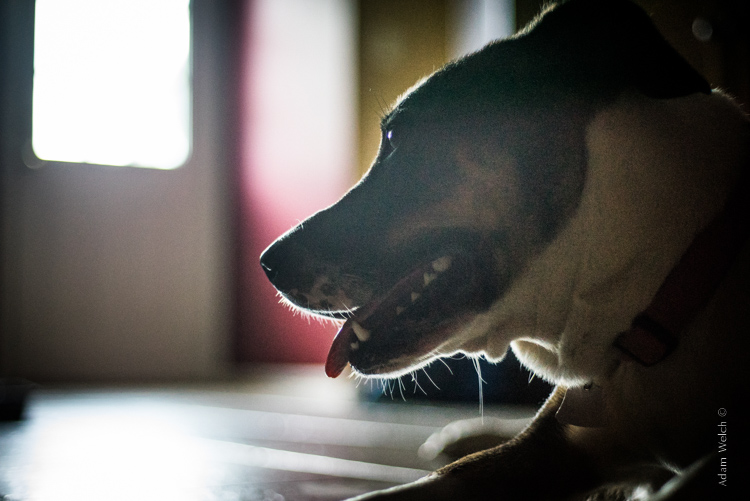
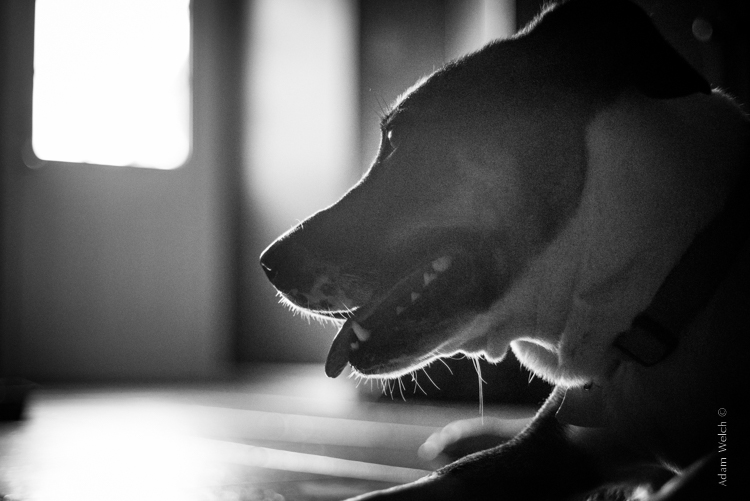
    This is quick snapshot of my dog Leia. The bright light coming through the door casts her profile nearly in silhouette and the high ISO made for a slightly grainy image, but really no remarkable color of which to speak. So I chose to convert it to black and white and use the grain in order to produce a gritty, and spontaneous look to the photo.

    Leia Original

    Original color image

    Leia Original BW

    This is the image after converting to black and white.

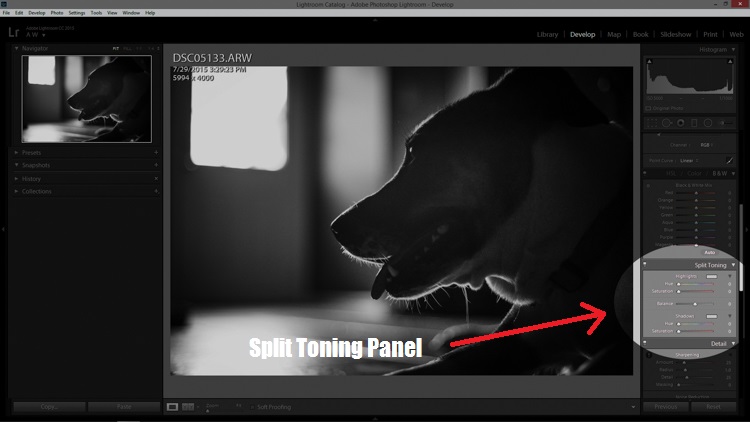
    But, I still wanted more than just a black and white photo, so I decided to apply some slight split toning. Here we have the same photo of Leia opened in LR 6. The Split Tone panel is highlighted.

    Split Tone Panel

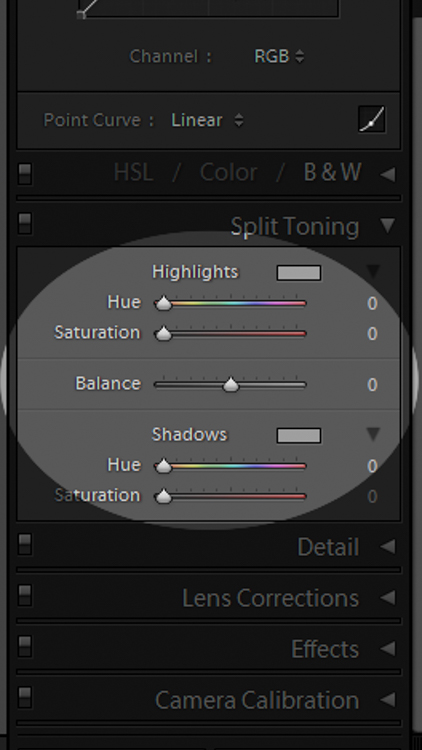
    You’ll see a few options for controlling the highlight and shadow tonality, along with a hue and saturation slider for each. There is also a balance slider. The balance slider controls how the color tones are applied in relation to one another.

    Split Tone Panel 2

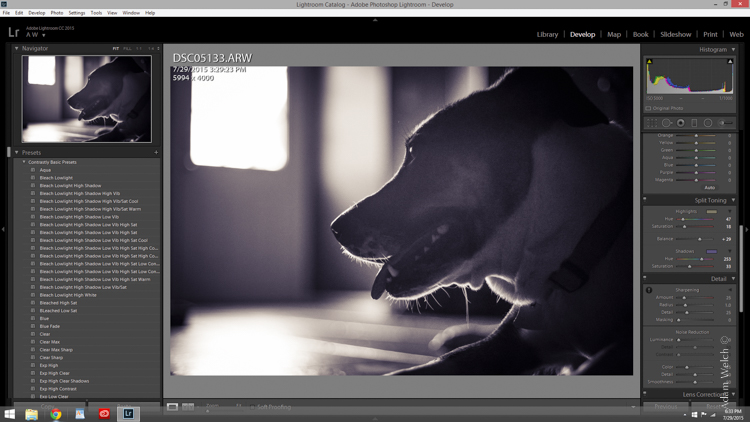
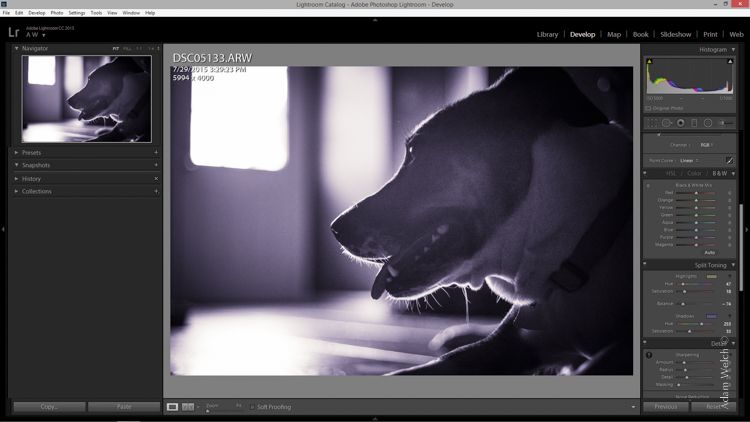
    I adjusted the tones to make the highlights into a yellow hue, while the shadows I changed to a bluish-purple. I simply kept adjusting each slider until I achieved the look I wanted for the image.

    Split Highlights

    Here is the edit with the balance slider favoring the highlights.

    Split Shadows

    Here we see it balanced to favor the shadows.

    Leia Split Tone

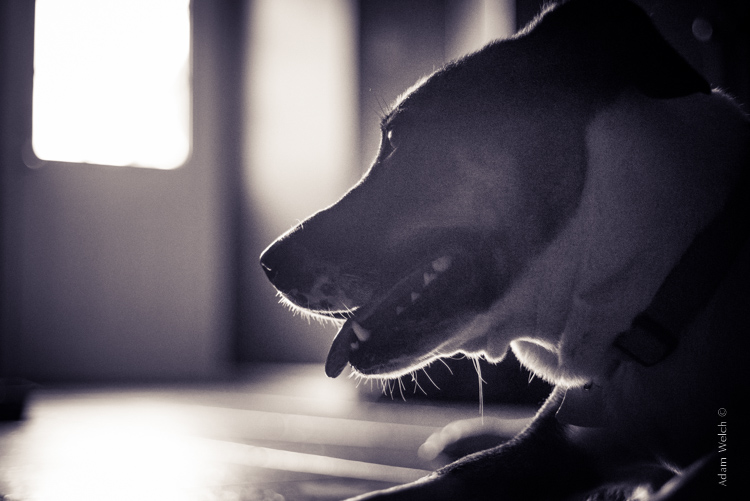
    Here is the finished image after split toning. From beginning to end the processing took less than five minutes.

    Applying split toning to your black and white photographs can be an easy way to move beyond merely converting your photo to black and white. It adds interest to your shot, and helps to make it stand out from the ordinary. Luckily, digital photography has given us enormous range to experiment with our images, apply edits, and see the effects in real-time.

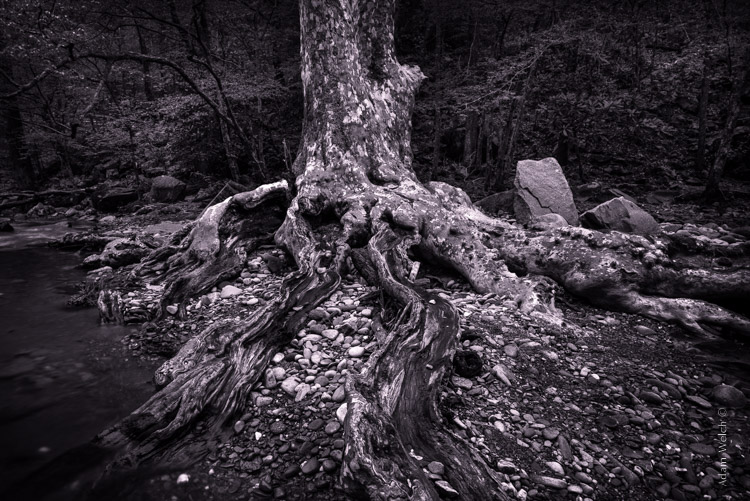
    Here is another example of an image which has been processed using split toning (see others throughout the article as well). Try some split tone processing techniques for yourself and see what your black and white photos can become!

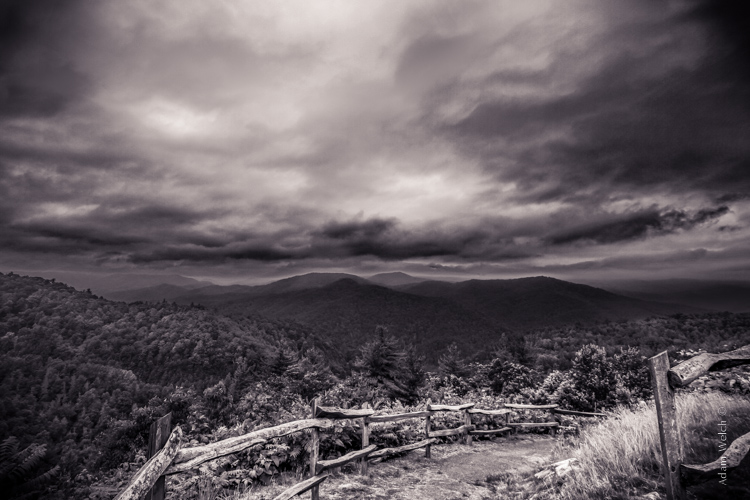
    Cataloochee Valley Overlook

    Editor’s Note: This is one of a series of articles this week featuring black and white photography tips. Look for earlier ones below and more daily over the next few days.

    • 5 Simple Ways to Create Expressive Photos in Black and White
    • Tips for Black and White Wildlife Photography
    • 7 Tips for Black and White Portrait Photography
    • 28 Images with Strong Black and White Compositions
    • Weekly Photography Challenge – Black and White Techniques
    • Tips for Black and White Wildlife Photography
    • How to Convert Images to Black and White and Add a Color Tint in Photoshop
    • Shooting all Black and White for a Day to Improve Your Photographic Eye

    googletag.cmd.push(function() {
    tablet_slots.push( googletag.defineSlot( “/1005424/_dPSv4_tab-all-article-bottom_(300×250)”, [300, 250], “pb-ad-78623” ).addService( googletag.pubads() ) ); } );

    googletag.cmd.push(function() {
    mobile_slots.push( googletag.defineSlot( “/1005424/_dPSv4_mob-all-article-bottom_(300×250)”, [300, 250], “pb-ad-78158” ).addService( googletag.pubads() ) ); } );

    The post Split Toning Black and White Images in Lightroom by Adam Welch appeared first on Digital Photography School.


    Digital Photography School