Category: Photography

  • How to Compose Brilliant Black and White Photos

    Composition in black and white photography

    Brilliant black and white photos are created in two steps. The second of these is post-processing, and is very important. But before you get to that stage, you have to learn how to see and compose photos in black and white. This is just as important as processing – it doesn’t matter how creative or clever you are in Lightroom or Photoshop, if the image is badly composed, or the subject just isn’t suitable for black and white, then you are going to struggle to make a half-way decent monochrome conversion, let alone a great one.

    I thought it would be interesting for you to look at some of my favourite black and white photos and learn why they work in terms of composition.

    Wooden boats – Puerto Aysen, Chile
    Composition in black and white photography

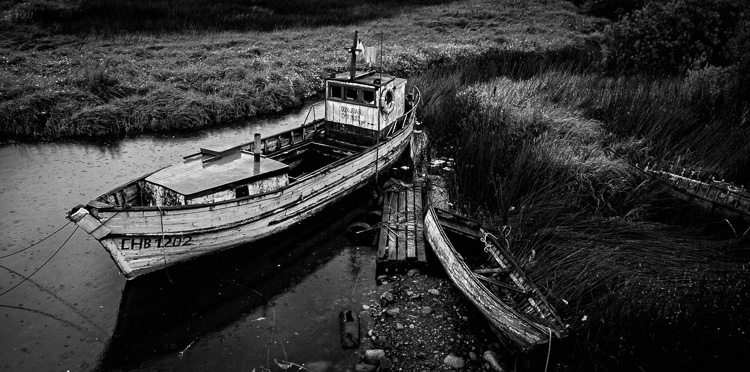
    Puerto Aysen is a small port town in south-west Chile. The weather is often cold and miserable, even in summer. It rains a lot. I was wandering around the outskirts of the town when I came across these old wooden boats. Initially I was attracted to the atmosphere of the scene – there was a soft rain, and in the original uncropped photo you can see the hills on the horizon fading through the drizzle. The scene worked in colour (see below), but in the post-processing stage I also realized that it would come out beautifully in monochrome.

    Composition in black and white photography

    The reasons the image works well in black and white are:

    • Tonal contrast: The boats are painted light tones and the background is mainly comprised of dark tones. The eye is naturally pulled to the largest boat in the scene which becomes the focal point of the photo.
    • Texture: The weathered surfaces of the boats and the grass are beautiful textures which tend to be more effective in black and white than colour. This image wouldn’t have worked nearly as well if the boats were brand new.
    • Lines: The position of the boats in the scene creates two diagonal lines. The first moves from the bottom left through to the top right, and the second line, formed by the rowboat, creates a second diagonal line that meets the first. Diagonal lines pull the viewer’s eye through the photo and help add a sense of movement to the composition.
    • Panoramic crop: I decided the hills in the distance were a distraction and cropped the photo to concentrate attention on the boats. This took place in post-processing and strengthened the composition by focusing attention on the boats.

    Chairman Mao watch – Shanghai, China

    Composition in black and white photography

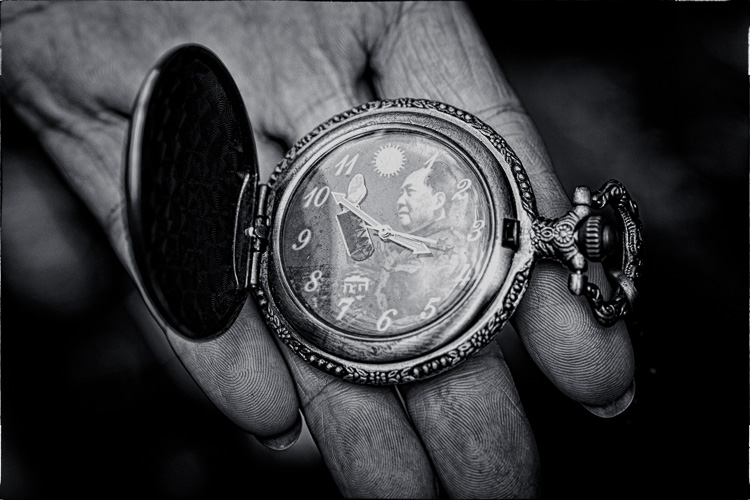
    I went to Dongtai Road antiques market in Shanghai, an open-air street market comprised of stalls and shops where you can buy a variety of genuine and fake antiques, plus kitsch ornaments and souvenirs. I found the watch that this vendor was offering quite amusing. I didn’t want to buy the watch, but I asked if I could take a photo. The answer was yes.

    Why the image works in black and white:

    • Strong use of shape: The watch face is a circle. It is placed in the centre of the composition and dominates it.
    • Lots of texture. The textures of the watch and the vendor’s hand are very strong.
    • Strong diagonal lines. The vendor’s fingers create lines that pull the viewer’s eye up from the bottom of the frame. I deliberately framed the photo so the fingers ran at an angle across the frame rather than parallel with the edges. This creates a more dynamic composition.
    • Simple composition. I moved in close to create a simple composition that emphasized shape, line and texture, the dominant elements of the photo. Another benefit of moving in close and using a wide aperture was that the background went out of focus, eliminating potential distractions.

    John – Wellington, New Zealand
    Composition in black and white photography

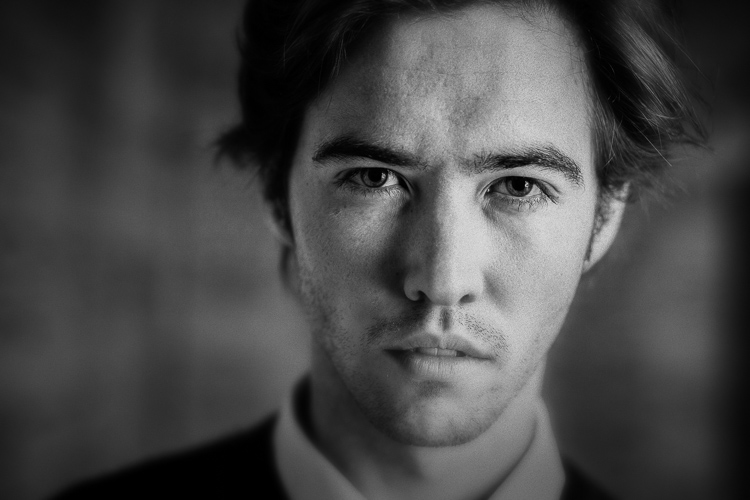
    I got in contact with John via Model Mayhem and we arranged a portrait shoot. The setup was simple – I used an 85mm lens (with a full-frame camera) and a wide aperture of f/2.8 to blur the background. The portrait is lit by natural light – John stood underneath an archway so the light fell from his left (camera right).

    Men can be great subjects for black and white portraits because there is no pressure to retouch skin. Black and white emphasizes texture – the texture of skin can be a beautiful thing that doesn’t (or perhaps shouldn’t) need retouching as often as some people think it does.

    Why this photo works in black and white:

    • Strong eye contact. The strength of this portrait is in the eye contact. John is gazing directly at the camera which creates a powerful connection with the viewer. His face is level with the camera so I could use a wide aperture to defocus the background, while keeping both eyes in sharp focus.
    • Texture. The texture of John’s skin, especially in the sharpest areas around his eyes, renders beautifully in black and white. The background is out of focus and lacks texture, and this sets up a contrast between the sharp areas of the model’s face and the heavily blurred background.
    • Tonal contrast. The model’s face is a lighter tone than the background. Light tones pull the eye, and the tonal contrast here (combined with the strong eye contact) establishes the model’s face as the focal point of the composition. The side lighting effect, created by asking the model to stand in an archway, means that one side of his face is lighter than the other. This creates depth, by revealing the shape of this face.

    Common themes

    Analyzing these photos is a simple exercise but it brings up several elements that work well in most black and white photos – texture, line, shape, tonal contrast, and simple composition. When you find a subject where these elements come together, you know you have the potential for a great black and white photo.

    What do you think is important for a brilliant black and white photo? Please let us know in the comments. I’m looking forward to hearing what you think.

    Editor’s Note: We recently ran a series of articles this week featuring black and white photography tips. Look for more on this topic below.

    • 5 Simple Ways to Create Expressive Photos in Black and White
    • Tips for Black and White Wildlife Photography
    • 7 Tips for Black and White Portrait Photography
    • 28 Images with Strong Black and White Compositions
    • Weekly Photography Challenge – Black and White Techniques
    • Tips for Black and White Wildlife Photography
    • How to Convert Images to Black and White and Add a Color Tint in Photoshop
    • Shooting all Black and White for a Day to Improve Your Photographic Eye
    • Split Toning Black and White Images in Lightroom
    • Processing Black and White Photos with OnOne Perfect B&W
    • Color or Black and White for Street Photography?

    Mastering Composition ebookMastering Composition

    My new ebook Mastering Composition will help you learn to see and compose photos better. It takes you on a journey beyond the rule of thirds, exploring the principles of composition you need to understand in order to make beautiful images.

    googletag.cmd.push(function() {
    tablet_slots.push( googletag.defineSlot( “/1005424/_dPSv4_tab-all-article-bottom_(300×250)”, [300, 250], “pb-ad-78623” ).addService( googletag.pubads() ) ); } );

    googletag.cmd.push(function() {
    mobile_slots.push( googletag.defineSlot( “/1005424/_dPSv4_mob-all-article-bottom_(300×250)”, [300, 250], “pb-ad-78158” ).addService( googletag.pubads() ) ); } );

    The post How to Compose Brilliant Black and White Photos by Andrew S. Gibson appeared first on Digital Photography School.

    Digital Photography School

  • Writer’s Favourite Lens – Nikon 24-70 mm F2.8

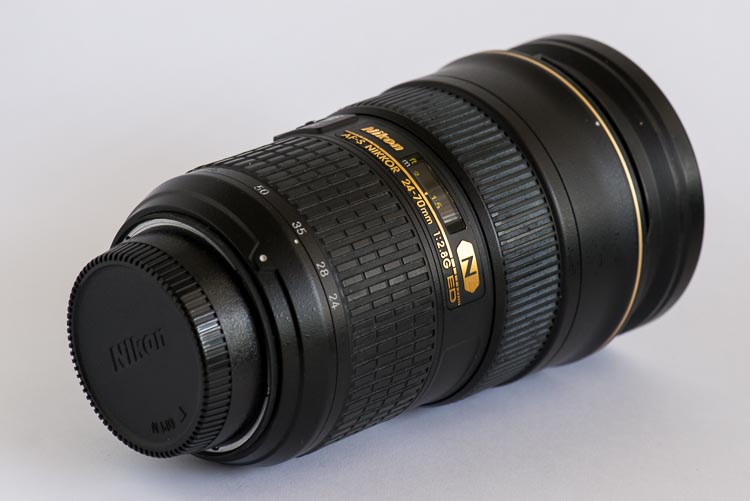
    I’ve had the Nikon 24-70 mm f/2.8 lens for about three years now, and it is by far my most used lens, and really my go-to when I am heading out to take photos. It is mid-range when it comes to focal length, but for shooting most landscapes and architecture, it is nearly always enough. It is not a cheap lens ($ 1749 USD without VR, $ 2396 with VR), but it was a special treat, one I have to thank subsidies for. One year after getting a special payout I was able to afford this lens, just.

    Nikon-24-70mm-favourite-lens-

    Nikon-24-70mm lens

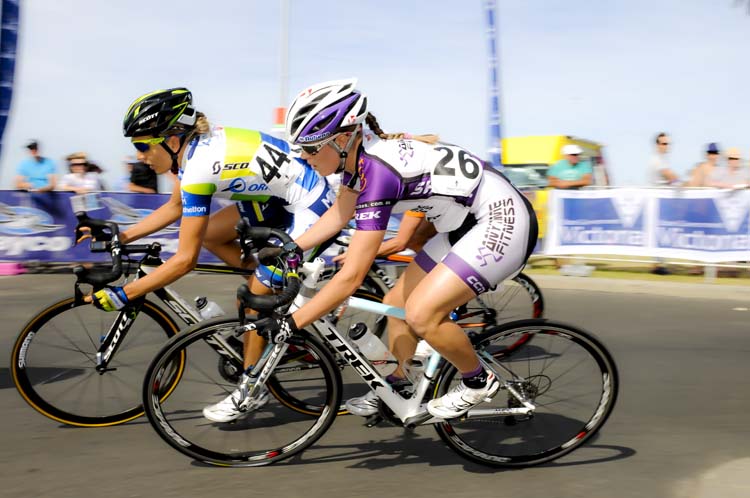
    When I got the lens I was shooting cycling, both on the road and the track, and I was looking for a better lens to use rather than the cheap one I bought when I first started. This one seemed perfect. A good shorter, wide angle, and the focal length was almost a perfect match for my 80-200mm. I also thought I was going to start doing portraits and it seemed like the ideal lens.

    favourite-lens-24-70mm-cole-0371

    Portrait style photography

    For personal reasons, I had to give up photographing cycling and never really got into portraits. It was something I never felt comfortable doing. I ended up concentrating more on architecture and landscape. This lens saw me through all that with its ability to be so versatile, I could really do anything with it.

    Pros:

    Lovely clear images

    You notice it, you really do. If you’ve been shooting with a cheap lens, the moment you start taking photos with one of this quality, you will see the difference. There was something about how clear the images were; they seemed to shine. There is a clarity with the images, and if you get great conditions to take photos, such as a good day and good light, then it really shows in the images.

    favourite-lens-24-70mm-cole-0366

    Bay Crits racing

    Fast lens

    With the widest aperture being f/2.8, you know you have a fast lens, which means it gives you more choices. With the cycling, it meant I didn’t have to go to such a high ISO to be able to get photos inside the velodrome. I could still get great images that didn’t have a lot of grain/noise.

    It is the same if you are doing astrophotography, as the f/2.8 means that you don’t need to have your ISO up as high, so you won’t get really grainy shots of the night sky.

    Good size

    The size works well for what I want, and what I am doing. I’m more of a wide angle person, but the extra length to 70mm is really fantastic, and gives me more options when I am out taking photos. It is, ultimately, the best of both worlds. I have the wide angle, but I can also zoom in a little bit.

    favourite-lens-24-70mm-cole-0372

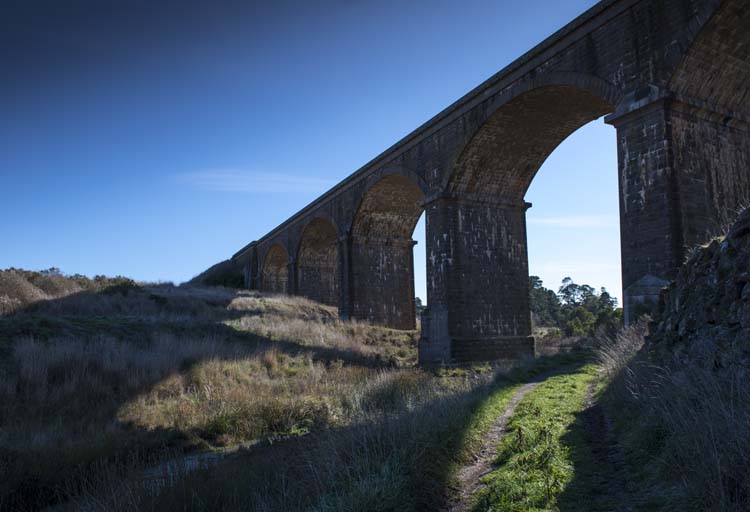
    Rail Viaduct Malmsbury

    Sometimes I wish it was a little longer, maybe to 100mm or 120mm, but it isn’t, so I have to compensate. I don’t often zoom right in on subjects, so it is rarely a problem.

    Fits filters

    Doing long exposures is something that I have spent a lot of time learning, and this lens is a great choice for this. The 77mm filter size means that I can use filters. I also have the 14-24mm lens, and not being able to put filters on that has been frustrating, but the 24-70mm still gives me the wide angle view, and the option of using filters.

    favourite-lens-24-70mm-cole-0368

    Long exposure of bay

    Can photograph things close-up

    One of the unexpected bonuses has been how close I can get to objects to take photos. Nowhere near as close as a macro, but very close nonetheless. It’s great when I’m out to be able to take close-up photos of objects that I see, like flowers, cakes, etc.

    favourite-lens-24-70mm-cole-0370

    Flowering gum

    Versatility

    This is one of those lenses that you know could photograph anything. I purchased the lens for portraits and cycling, but it soon became apparent that I could use it for almost anything I wanted to do. I now shoot landscapes and architecture primarily, and it has been great for doing both of those. The lens is very versatile, and I am confident that no matter what I need to shoot it will do a great job.

    favourite-lens-24-70mm-cole-0369

    Pier at bay

    Cons:

    Weight

    There is no doubt that it is a heavy lens, weighing in at 1.98 lbs. (900 g). Most people are shocked at how heavy it is when they pick it up alone, or with my camera attached. It isn’t something I notice anymore. I have been using heavy cameras for quite a few years and it is just normal now. When I was still photographing cycling events, I would use two cameras, one with the wide angle, and the other with a telephoto lens. People asked me how I carried it all, and I said the two cameras helped balance me. You just get used to it.

    If you are someone who has issues with their hands or arms, and find it hard to carry or use heavy objects, this wouldn’t be a good lens for you. You may find it too heavy to hold up to take photos. Don’t forget, it isn’t just about holding it up when shooting, it is also about carrying it around as well. I have to admit that often, at the end of the day, I’m very happy to put the camera down.

    Price

    It isn’t a cheap lens in any way, but quality always comes with a price tag. The lens is approximately USD $ 1800, but, if you are serious about your photography, it is worth it. I definitely think it was.

    Finally

    I wouldn’t go anywhere without my Nikon 24-70 mm f/2.8 now. It has been rained on, had the hot sun beaming on it, been sprayed with salt spray, it’s dirty, it’s well-used. You can be sure that it will always be in my camera bag, whether it is attached to my camera or not. I love using it, and am never disappointed with the images that I get from it.

    Do you have a favorite lens? Tell us. Read about some other dPS writer’s favorite lenses here:

    • Writer’s Favorite Lens: Olympus Zuiko 12-40mm f/2.8
    • Writer’s Favorite Wildlife Lens – Tamron 150-600mm
    • Writer’s Favorite Lens: 50mm f/1.8
    • Writer’s Favorite Lens – The Canon 24-105mm f/4
    • Writer’s Favorite Lens – the Canon 40mm Pancake Lens
    • Writer’s Favorite Lens – the Tamron 18-270mm

    googletag.cmd.push(function() {
    tablet_slots.push( googletag.defineSlot( “/1005424/_dPSv4_tab-all-article-bottom_(300×250)”, [300, 250], “pb-ad-78623” ).addService( googletag.pubads() ) ); } );

    googletag.cmd.push(function() {
    mobile_slots.push( googletag.defineSlot( “/1005424/_dPSv4_mob-all-article-bottom_(300×250)”, [300, 250], “pb-ad-78158” ).addService( googletag.pubads() ) ); } );

    The post Writer’s Favourite Lens – Nikon 24-70 mm F2.8 by Leanne Cole appeared first on Digital Photography School.

    Digital Photography School

  • Quick Lightroom Tip Using the Graduated Filter

    This video tip is courtesy of Anthony Morganti and shows us what you can do using the Graduated Filter tool in Lightroom. What if you’ve maxed out your basic adjustments and want to go farther? This little tip might do the trick for you, check it out:

    Learn more about using the Graduated Filter in LR here.

    A very cool tip, had you thought of that or done this before? Do you have any other Lightroom tips and tricks? Please share in the comments below.

    googletag.cmd.push(function() {
    tablet_slots.push( googletag.defineSlot( “/1005424/_dPSv4_tab-all-article-bottom_(300×250)”, [300, 250], “pb-ad-78623” ).addService( googletag.pubads() ) ); } );

    googletag.cmd.push(function() {
    mobile_slots.push( googletag.defineSlot( “/1005424/_dPSv4_mob-all-article-bottom_(300×250)”, [300, 250], “pb-ad-78158” ).addService( googletag.pubads() ) ); } );

    The post Quick Lightroom Tip Using the Graduated Filter by Darlene Hildebrandt appeared first on Digital Photography School.

    Digital Photography School

  • 27 Shimmering Fish Photos

    Fish are slippery, slimy and scaly.

    They can also be shiny, silvery, shimmery and photogenic.

    They come in many forms, shapes and sizes. Here are a few images captured by photographers of these interesting creatures:

    Photograph Deep-sea by TamĂĄs Balogh on 500px

    Deep-sea by TamĂĄs Balogh on 500px

    Photograph RGB fishing an improved version by Victoria Ivanova on 500px

    RGB fishing an improved version by Victoria Ivanova on 500px

    Photograph Seeks 6 differences by Jordi Gallego on 500px

    Seeks 6 differences by Jordi Gallego on 500px

    Photograph Habitat by Sedef ISIK on 500px

    Habitat by Sedef ISIK on 500px

    Photograph After fishing by taty-eremeeva on 500px

    After fishing by taty-eremeeva on 500px

    Photograph Dust...  (????...) by Vladimir Shipulin on 500px

    Dust… (????…) by Vladimir Shipulin on 500px

    Photograph After fishing by Svetlana Dikhtyareva  on 500px

    After fishing by Svetlana Dikhtyareva on 500px

    Photograph Fish..:) by Alla  Lora on 500px

    Fish..:) by Alla Lora on 500px

    Photograph pesce d'aprile d'autore by Sabrina Secco on 500px

    pesce d’aprile d’autore by Sabrina Secco on 500px

    Photograph Still life with fish and a lemon by Elena Eremina on 500px

    Still life with fish and a lemon by Elena Eremina on 500px

    Photograph Stone Fish by Kenichi HIGUCHI on 500px

    Stone Fish by Kenichi HIGUCHI on 500px

    Photograph The still life with fish by Felix Felix on 500px

    The still life with fish by Felix Felix on 500px

    Photograph Dancing in the water by Diana Amelina on 500px

    Dancing in the water by Diana Amelina on 500px

    Photograph It's just seems impossible, but nothing is impossible by Abhijith  on 500px

    It’s just seems impossible, but nothing is impossible by Abhijith on 500px

    Photograph The neighbour's glass is always bluer by Elad Shani on 500px

    The neighbour’s glass is always bluer by Elad Shani on 500px

    Photograph art of fish by reeve lim on 500px

    art of fish by reeve lim on 500px

    Photograph Red Fish by Masgareng Sucipto on 500px

    Red Fish by Masgareng Sucipto on 500px

    Photograph like a dead fish... by Catherine MacBride on 500px

    like a dead fish… by Catherine MacBride on 500px

    Photograph Fried tuna steak in black sesame with chopsticks by Kamil Zab?ocki on 500px

    Fried tuna steak in black sesame with chopsticks by Kamil Zab?ocki on 500px

    Photograph hunter and the hunted by Alexander Safonov on 500px

    hunter and the hunted by Alexander Safonov on 500px

    Photograph Lion Fish with Sunburst by Jonathan Lin on 500px

    Lion Fish with Sunburst by Jonathan Lin on 500px

    Photograph Show Time by Max Rinaldi on 500px

    Show Time by Max Rinaldi on 500px

    Photograph Einblicke bis tief in die Magengrube by Georg Scharf on 500px

    Einblicke bis tief in die Magengrube by Georg Scharf on 500px

    Photograph Good Days, Bad Days by Henrik Nilsson on 500px

    Good Days, Bad Days by Henrik Nilsson on 500px

    Photograph Beach Bum by Henrik Anker Bjerregaard  Lundh III on 500px

    Beach Bum by Henrik Anker Bjerregaard Lundh III on 500px

    Photograph Cat fishing by Marianna Armata on 500px

    Cat fishing by Marianna Armata on 500px

    While this is not a fish, this traditional Chinese fisherman catches them!

    Photograph Another Day in Paradise by Michael Steverson on 500px

    Another Day in Paradise by Michael Steverson on 500px

    googletag.cmd.push(function() {
    tablet_slots.push( googletag.defineSlot( “/1005424/_dPSv4_tab-all-article-bottom_(300×250)”, [300, 250], “pb-ad-78623” ).addService( googletag.pubads() ) ); } );

    googletag.cmd.push(function() {
    mobile_slots.push( googletag.defineSlot( “/1005424/_dPSv4_mob-all-article-bottom_(300×250)”, [300, 250], “pb-ad-78158” ).addService( googletag.pubads() ) ); } );

    The post 27 Shimmering Fish Photos by Darlene Hildebrandt appeared first on Digital Photography School.


    Digital Photography School

  • Weekly Photography Challenge – Fish

    Photographing seemingly unattractive objects like fish can be difficult – or maybe just a challenge.

    EPi.Longo

    By ePi.Longo

    Weekly Photography Challenge – Fish

    A hard photo subject can help you grow as a photographer, push you out of your comfort zone. So now’s a great time to practice. Find a fish (at the market, store, dead or alive – whatever you can come up with) and try photographing it to make a compelling image.

    J J

    By J J

    Jason Mrachina

    By Jason Mrachina

    Zoe

    By Zoe

    Share your images below:

    Simply upload your shot into the comment field (look for the little camera icon in the Disqus comments section) and they’ll get embedded for us all to see or if you’d prefer upload them to your favourite photo sharing site and leave the link to them. Show me your best images in this week’s challenge. Sometimes it takes a while for an image to appear so be patient and try not to post the same image twice.

    Matt

    By Matt

    Jacob  Spinks

    By Jacob Spinks

    googletag.cmd.push(function() {
    tablet_slots.push( googletag.defineSlot( “/1005424/_dPSv4_tab-all-article-bottom_(300×250)”, [300, 250], “pb-ad-78623” ).addService( googletag.pubads() ) ); } );

    googletag.cmd.push(function() {
    mobile_slots.push( googletag.defineSlot( “/1005424/_dPSv4_mob-all-article-bottom_(300×250)”, [300, 250], “pb-ad-78158” ).addService( googletag.pubads() ) ); } );

    The post Weekly Photography Challenge – Fish by Darlene Hildebrandt appeared first on Digital Photography School.

    Digital Photography School

  • 5 Ways to Change Your Composition For Better Photos

    If there is one thing in photography that every photographer can work on, it’s composition. Like many of the other techniques in photography, your composition will improve the more you practice. Very often, photographers seem to go to their comfort zone of the rule of thirds. I personally like the rule of thirds as a starting point, not every photograph however, needs to be composed on the rule of thirds. In fact, it is a good idea to shoot the same scene in a few different compositions, even depth of field can be used as a compositional tool.

    A good way to work on your composition is to start with the rule of thirds, then change it up, try a few different compositions and see how that works. The challenge is this, what other compositions can you use? Let’s take a look at some advanced compositional techniques that you can try out on your next shoot.

    1. Left to right

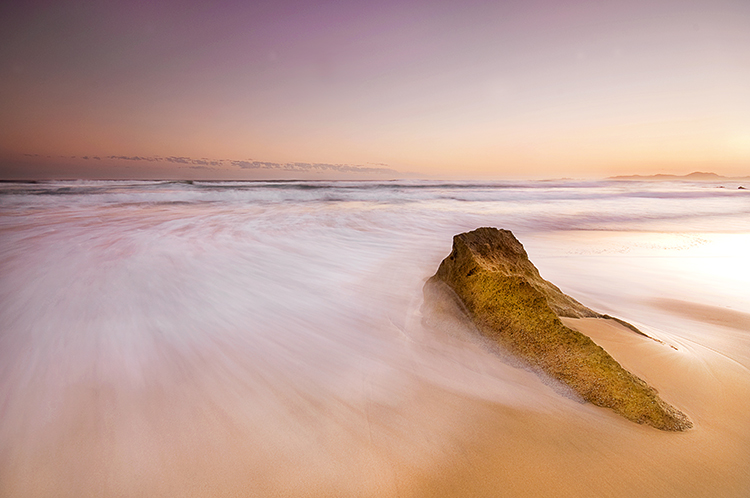
    The smooth curving water leads our eye to the rock on the right of the image

    The smooth curving water leads your eye to the rock on the right of the image

    In the western world, we read the words on a page from left to right. It is logical to think that when someone views your image, they will generally begin on the left side of the image, and move to the right. You can use this technique in a few ways.

    Firstly, you could place your subject on the right hand side of the frame with a leading line drawing the eye to your subject. The leading line could be a river, a road, or a railway track – it doesn’t really matter, all that it needs to do is allow the eye of the viewer a natural entry point, then lead them to the subject.

    Secondly, if you were shooting street photography, you might have a person in the frame on the left hand side, looking toward your subject on the right. You might even have a vehicle such as a car or a motorcycle, moving from left to right. These techniques will immediately draw the eye to the right side of your image.

    2. Use shapes – both seen and unseen

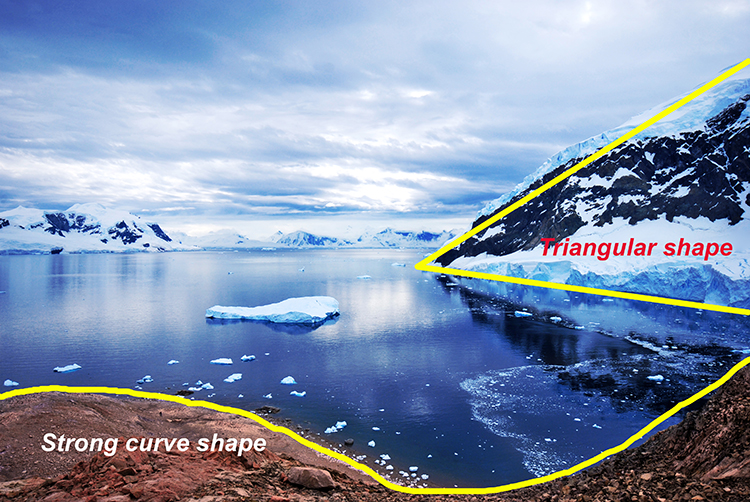
    In many images, there are hidden and visible shapes. Window frames are square or rectangular, doors are rectangles, and so on. Look for shapes in your images, look beyond what the actual object is and see its shape. You can also compose the scene to create a shape. Sand dunes can become triangular shapes, open fields can be green rectangles, so look for shapes in your scene and compose your image to include them.

    There are many shapes in each scene, use them to enhance your composition

    There are many shapes in each scene, use them to enhance your composition

    3. Use numbers – not literally!

    If you are shooting a scene with trees or leaves, or even a river with some exposed rocks, try and use odd numbers of things. Odd numbers tend to create a dynamic feel in your scene – three trees or rocks will feel more dynamic than two trees or four rocks. This also works well for groups of people. If you have a large group of say 12 people, try not to make three rows of four people, maybe have them pose in two rows, one with seven people and one with five. For people photography, you can also try and create a triangle shape with your subjects. Three people naturally creates a triangle, give it a try!

    Odd numbers work well in most images

    Odd numbers work well in most images

    4. Use negative space

    Negative space can really make an image interesting. Negative space is essentially blank space, but really, it helps to anchor your image. It provides really important information about the image. A blue sky can be used to create negative space. The blueness of the sky tells the viewer that it was a sunny day. Your blue sky may have one small cloud in it and that can make the negative space seem interesting.

    The blue sky and the hint of a cloud makes this negative space interesting

    The blue sky and the hint of a cloud makes this negative space interesting

    5. Framing

    Framing can be used very effectively to showcase your subject. You can use a window, a door, or even trees to frame a subject. The idea is to create a frame around the subject that does not distract from the subject, but causes the viewer to know immediately where to look.

    A tree, framed by an old wooden door.

    A tree, framed by an old wooden door.

    When you are looking at a scene for the first time, try some of these techniques, or try a combination of them. Shoot from different angles and move around your subject before settling on a composition. You will find that by looking at the scene in many different ways, you will unlock more creativity. Your best shot, may not be your first compositional choice. Composition is one of the more flexible tools in your creative toolbox. You don’t need any particular piece of equipment to change it, you simply need to move your camera around. Give it a try, load your results up in the comments!

    googletag.cmd.push(function() {
    tablet_slots.push( googletag.defineSlot( “/1005424/_dPSv4_tab-all-article-bottom_(300×250)”, [300, 250], “pb-ad-78623” ).addService( googletag.pubads() ) ); } );

    googletag.cmd.push(function() {
    mobile_slots.push( googletag.defineSlot( “/1005424/_dPSv4_mob-all-article-bottom_(300×250)”, [300, 250], “pb-ad-78158” ).addService( googletag.pubads() ) ); } );

    The post 5 Ways to Change Your Composition For Better Photos by Barry J Brady appeared first on Digital Photography School.


    Digital Photography School

  • 10 Common Mistakes in Long Exposure photography

    On all the 2015 Workshop I held here in Italy, I introduced a little game, where at the end of the workshop the attendees had to write down on a paper three mistakes that they used to make before taking the workshop. So I decided to collect all these lessons learned papers and make a list of the 10 most common errors in long exposure photography so you can learn from this also:

    FG 1

    Mistake #1 – Vibration reduction system is set to ON

    There are some lovely technologies that can help get much sharper images minimizing the blur caused by camera shake, which are extremely useful in low-light conditions where slow shutter speeds are required. Every brand calls this technology something different, but the aim is the same. They can be lens-based (like for Nikon and Canon cameras) or camera-based (like for Sony, Olympus and Pentax cameras), but at the end the result is that this vibration reduction can give you the same image quality up to four shutter speed stops slower than usual.

    They use some movement sensors to detect motion and try to compensate for it by moving an element group in the lens, or on the sensor itself.

    The point is that if the camera is on a sturdy tripod (and if you are shooting a long exposure, your camera is definitely on a tripod!), you shouldn’t expect any vibration. You may know this, but your camera doesn’t, so even if there is no movement, it can happen that this anti-vibration system tries to compensate anyway moving a lens group (or the sensor), and this will actually result in an introduction of a vibration (and blur) instead of a removal.

    So, if your camera is on a sturdy tripod, turn the anti vibration system to OFF!

    FG 2

    Mistake #2 – Forgetting to use Mirror Lock-up

    In a DSRL camera, light travels through the lens and is sent to the viewfinder by a mirror. When you press the shutter button, the mirror flips up so that the light goes directly onto the image sensor. This movement introduces a small vibration that will cause slight blurring in the photo.

    To avoid this vibration, you can activate the Mirror Lock-up function in your camera. After its activation, the first time you press the shutter button, your camera will lift the mirror; the second time it will open the shutter. If you wait a couple of seconds between the first and the second press, you will avoid the vibration!

    Yes, if you have a mirrorless camera, you can skip this advice!

    Mistake #3 – Not using a GND filter because they are expensive

    In some situation (in places where there is not a big difference in the exposure between different areas of the scene), just a Neutral Density filter can allow you to get the desired result. However, in many situation the light condition require the use of a Graduated Neutral Density filter to balance the exposure.

    If you are using a screw-on ND filter, you may believe that the only chance you have is to try to apply a GND filter in post-production – but you’d be wrong!

    FG 3

    You can just hold the filter with your hand in front of the lens. For a shot with a shutter speed up to few seconds, your only problem will be the correct alignment of the filter. For shots which are minutes long, even if your hand is not perfectly still, the final result will be more than great – try it if you don’t believe me. The holder is required if you want to use multiple filters together (or when you start having cramps in your hand).

    Mistake #4 – Setting the aperture to f/22 to increase the exposure time

    The rule was simple: if you decrease the aperture, you increase the exposure time.

    With this rule in mind, you may think that you can transform your 30 second exposure to a two minute exposure just moving from f/11 to f/22. Theoretically, you’re right. Unfortunately there is a physical phenomenon called optical diffraction that above f/16 is enough intense to ruin the sharpness of your image.

    If you are already at f/11 and you need a slower shutter speed, decrease ISO if possible or use a stronger filter.

    FG 4

    Mistake #5 – Forgetting to adjust the ISO

    ISO can be a powerful ally in a long exposure. Sometimes you forget the possibility of changing the ISO setting, and you only play with filters and aperture. Remember that every camera has a range of ISO where the output quality is almost the same. In high-end cameras this range is usually between ISO 50 and 200.

    This means that you have two stops to play with, and in a long exposure shoot, two stops mean minutes of exposure.

    Mistake #6 – Shooting like you’re in a studio

    FG 5

    When you shoot pictures at home or comfortably seated in a studio, no external agent can affect the quality of your image. But if you are perched on a rock in front of the sea, on a beautiful stormy day, quite soon your filters will be completely wet.

    Remember to fill your bag with cleaning cloths. A a thin layer of water on your outer filter will result in a high diffraction, and this will irremediably ruin your image. Never underestimate nature, even on a sunny day, the weather conditions can change very quickly.

    Mistake #7 – Choosing a low quality filter

    Every time you add a filter in front of your lens, you inevitably decrease the overall quality of the optical system. Yes, some well-known filter brands are quite expensive, but do you believe it is worth puttting a 5$ filter in front of a camera of thousand dollars? No, it isn’t – so focus on quality: fewer filters but better! You don’t need the whole set of density ranges for ND and GND filters. Try to understand which filters you will probably use more often, then remember that you have ISO and Aperture to play with to cover the gap between. Finally, remember that a lot of good quality filters are available at incredibly affordable prices. Check in advance for filter reviews on internet.

    FG 7

    Mistake #8 – Underestimating the wind

    When you take a long exposure shoot, you camera is exposed to possible external vibration agents for minutes. Even a wind gust of a few seconds can ruin your image. Invest on a sturdy tripod, and then set it firmly on the ground. If needed, hook an additional weight to the tripod to make it even sturdier and solid.

    Avoid using the tripod’s central column too – if you raise it up, you raise the center of gravity of the system and it will be less stable.

    Mistake #9 – Not covering the viewfinder

    You took a three minute exposure, and the preview is full of strange purple lines and halos. Why?

    It is because light, like water, loves to find a way – always.

    FG 9

    Your camera is intended to allow light through only from the hole in your lens, but unfortunately there are some other accesses that can potentially harm your images.

    The most common of them is the viewfinder. To avoid infiltration of light from it, cover it after composing the image. If your camera is not provided with a cap, you can even use some black tape. If you forgot the black tape, use a chewing gum. The typical result of viewfinder infiltration is a strange purple halo. Yes, if you have a mirrorless camera, you are also free of this issue!

    If you use slot-it filter system, another possible source is the gap between one filter to another (this is one of the reason why many photographers love screw-on filters). In this case, the best solution is to cover that gap with black tape. The typical result of filter infiltration is a vertical purple line on the opposite side of the sun.

    Finally, if you use a tilt-shift lens, or a lens adaptor, you may have an infiltration from the lens body. The best way to avoid this is to cover the lens with a black neck warmer.

    Mistake #10 – Believing the filter vendor

    FG 8

    When you buy a six stop ND filter, you expect that it has exactly the optical density to get a six stop reduction. Unfortunately, you are wrong. In my life I never found a filter with the exact intensity stated by the manufacturer. Of course, the difference usually is minimal, but remember that even œ stop of difference, in a long exposure means minutes of error.

    To avoid errors when you are on field, test it in advance by following these steps:

    • Choose a room in your home, turn on the lights and close the windows (you need a place where the lighting is perfectly constant).
    • Mount your camera on a tripod and take a photo of the room until you get a shot with a good histogram. Note down all the parameters (ISO/Aperture/Shutter speed) of the shot.
    • Mount the ND filter and compensate the shutter speed obtained before, according to the f-stop reduction introduced by the filter.
    • Take a picture with the ND filter.
    • Look at the histogram of the photo taken with the filter, and compare it to one taken without. If they are approximately superimposable (exactly the same), the filter intensity stated by the manufacturer is accurate. If the new histogram has shifted to the left, your filter has an intensity greater than that the one declared; if it is moved to the right, it has a lower intensity.
    • If the two histograms are not superimposable, take another shoot changing the shutter speed to obtain a histogram approximately similar to the one of the picture without the filter.

    FG 6When you have found the exact optical density, build your own shutter speed conversion table. Another possibility is the PhotoPills app for your iPhone, the only one that allows you to convert the shutter speed for non-standard f-stop reductions.

    That’s the ten mistakes to avoid when doing long exposure photography. Have you got any others you’ve made and learned along the way you’d like to share? Please do so in the comments below.

    googletag.cmd.push(function() {
    tablet_slots.push( googletag.defineSlot( “/1005424/_dPSv4_tab-all-article-bottom_(300×250)”, [300, 250], “pb-ad-78623” ).addService( googletag.pubads() ) ); } );

    googletag.cmd.push(function() {
    mobile_slots.push( googletag.defineSlot( “/1005424/_dPSv4_mob-all-article-bottom_(300×250)”, [300, 250], “pb-ad-78158” ).addService( googletag.pubads() ) ); } );

    The post 10 Common Mistakes in Long Exposure photography by Francesco Gola appeared first on Digital Photography School.


    Digital Photography School

  • How to Use Figure to Ground Art Theory in Photography

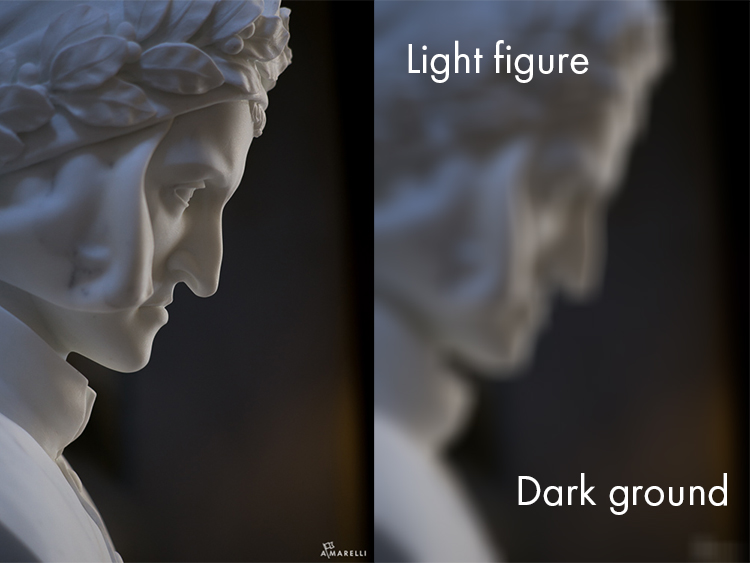
    1 Light figure on a dark ground

    Light figure on a dark ground, Florence, Italy © Adam Marelli

    What is figure to ground?

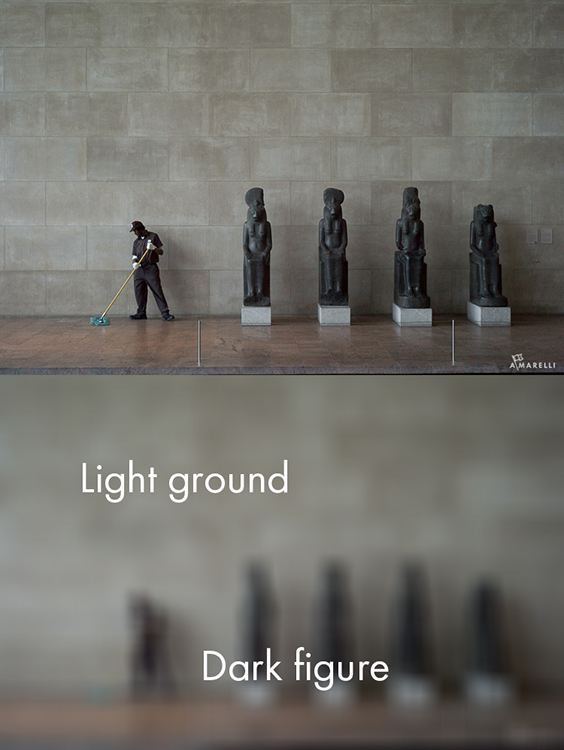
    Why can you recognize an amazing photograph but struggle to produce one? Sure there are better cameras, advanced lighting techniques, and endless theories on composition, but very often the root of the problem lies in a simple concept that is often missed. In three words, we can sum up almost every cover of Vogue, National Geographic, and the New York Times – Figure to ground.

    What is this term, what does it mean, and where does it come from? Figure to ground is one of the most important, and easily overlooked concepts, in photography. It’s not a rule, it’s not a law – it is a tool, and a very powerful tool at that. Once you learn it, it will become a part of every picture you take, no matter what type of camera you use.

    If you were ever curious to see masterful use of figure to ground, try revisiting the photographers you already love like Steve McCurry, Richard Avedon, or Henri Cartier-Bresson. They all use it, some more elegantly than others. Figure to ground acts like an anchor in a photograph, holding the viewer’s eye inside the frame.

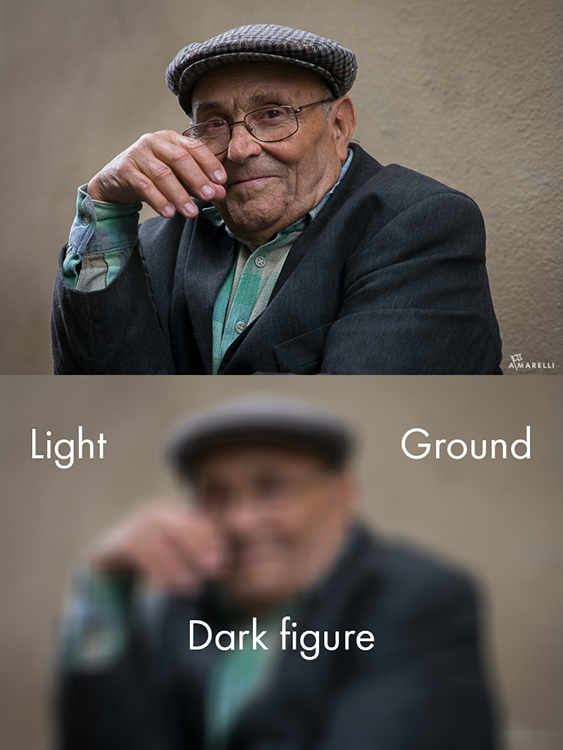
    2 Dark figure on a light ground

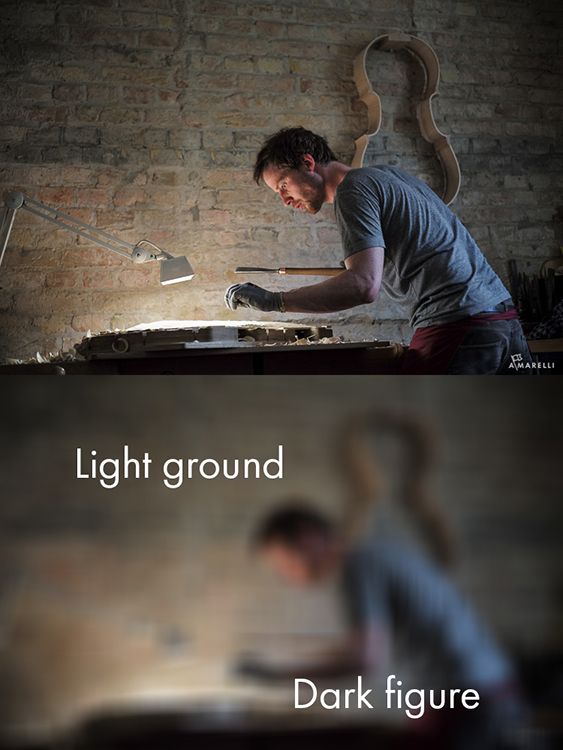
    Dark figure on a light ground, Florence, Italy © Adam Marelli

    It goes by many names

    Figure to ground has a multitude of names; subject to background, figure separation, foreground to background, and the list goes on. To simplify, figure to ground is the most descriptive and easiest to say, which is why artists have favored it for centuries.

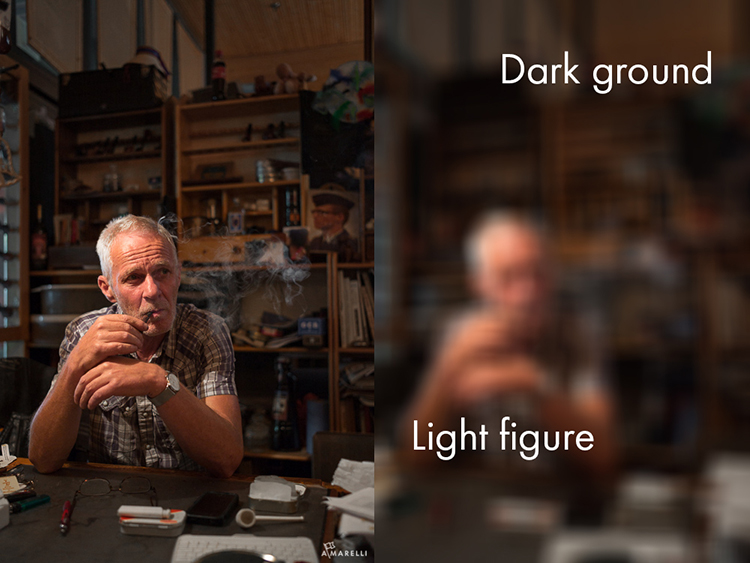
    3 Light figure on dark ground

    Light figure on dark ground, Berlin, Germany © Adam Marelli

    A starting point

    When it comes to describing visual tools in the written language, firm definitions are always a problem. Consider the following definition a starting point, not an immovable scientific definition.

    Figure to ground is the visual relationship between objects and the space they occupy. We live in a 3D world, but your photographs are a 2D translation. When the third dimension of depth disappears, you end up with a problem that has plagued artists since they started scrawling on cave walls, how do you create a picture of the 3D world with only two dimensions?

    Figure to ground allows your brain to determine shapes, sizes, distance and other optical illusions that exist in photography (it also applies to drawing, painting, and other 2D arts, but for this article the focus is on photography and how you can use it successfully).

    4 Dark figure on a light ground

    Dark figure on a light ground. Berlin, Germany © Adam Marelli

    Where did it come from?

    The idea of figure to ground comes from drawing and painting. It forms the basic grammar of the visual language. Think about it, how can you see a shape on a piece of paper? It is visible because it is a black line on a white page. Seems obvious right, but what is that phenomenon called? It is called figure to ground. Imagine if we wrote in white ink on white paper – everything would be invisible.

    The same thing applies to photographs. In order for your photograph to be legible, we must be able to see the object against the background. Artists have worked with this concept for centuries and developed elegant solutions to figure to ground as a deliberate, but subtle, technique for making pictures.

    5 Light figure on a dark ground

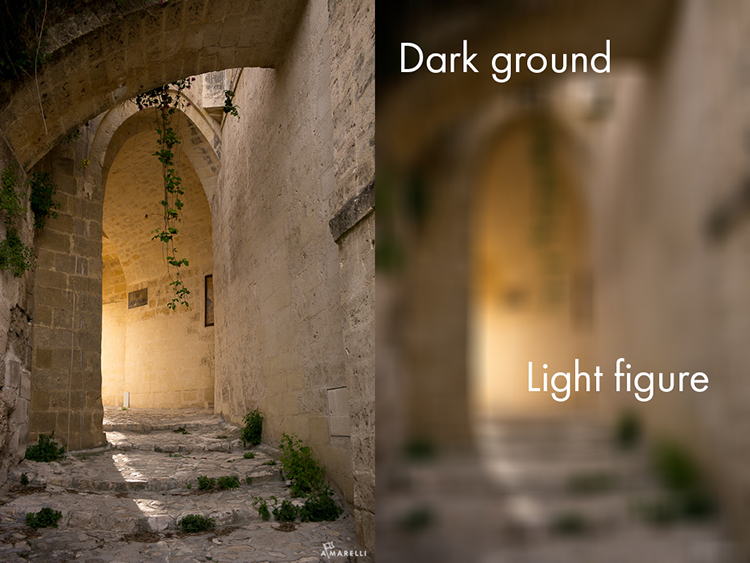
    Light figure on a dark ground, Matera, Italy © Adam Marelli

    How to practice it

    The first step in practicing figure to ground is to condition your eye by looking at good examples. If you want to be a great photographer, study master painters and how they use figure to ground. You can do this on the internet, in a book, or at a museum. Pick the one that is easiest for you.

    TECHNIQUE 1: The Book

    Pick up a book on a famous Renaissance artist, like DaVinci, Raphael, or Michelangelo. Setting aside whether you like their work or not, the way to use art to your advantage is to master the tools of successful artists, and apply them with your own unique touch. Lay a piece of tracing paper over the page and be sure to cover the whole picture. Can you still see the subject? If yes, there is good figure to ground. If the subject seems to disappear into the background then no, the figure to ground is weak.

    TECHNIQUE 2: The Museum

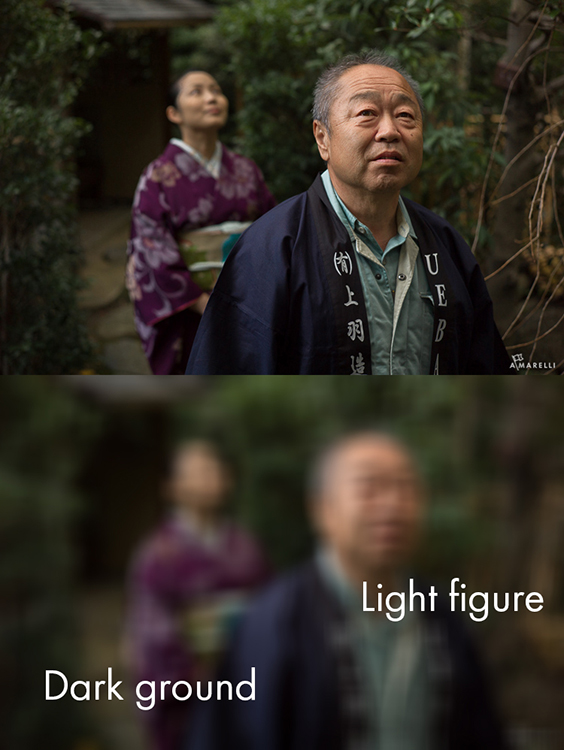
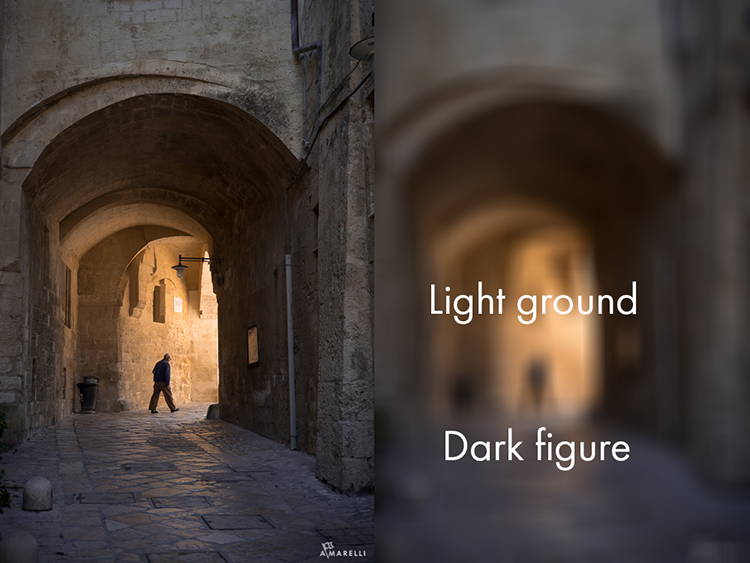
    If you wear glasses, this will be even easier. Go to a museum and find a painting. Following DaVinci’s advice on viewing distance, stand three times the height of the painting away from it (example: if the painting is five feet tall, stand 15 feet away). Now squint at the painting until it is all blurry, or simply remove your glasses. Can you still make out the major shapes in the painting. If yes, there is good figure to ground. If the subject seems to disappear into the background then no, the figure to ground is weak.

    6 Light figure on a dark ground

    Light figure on a dark ground. Kyoto, Japan © Adam Marelli-8

    TECHNIQUE 3: The Computer

    If you prefer to use technology, here is a technique you can do in Shotoshop. Pull a picture into Photoshop. Select Filter > Box Blur > set the pixels at 15 pts. You will end up with a blurry version of the picture. Can you still make out the major shapes in the painting? If yes, there is good figure to ground. If the subject seems to disappear into the background then no, the figure to ground is weak.

    TECHNIQUE 4: Your Photography

    Try any of the techniques above with your own photographs. If there is not strong figure to ground in your picture, play closer attention to the backgrounds when you shoot.

    Camouflage

    What if you never learn figure to ground, what will happen? Will it be impossible for you to ever make a good picture? No, of course not. But when you understand why some pictures work better than others, and what tools to use at the right time, you will enjoy photography much more. It relieves the anxiety of, “Will I get the shot?”. When you have a toolbox full of resources, it becomes easier to create consistently powerful pictures.

    If you would like to know what the opposite of figure to ground is, look no further than camouflage. Camouflage is designed to obscure objects in space. It is the direct opposite of figure to ground. If the goal is to blend in, then use camouflage – if the goal is to pop out, use figure to ground. It is your choice.

    7 Dark figure on a light ground

    Dark figure on a light ground. Matera, Italy © Adam Marelli

    Tools are not rules

    Photography is an artistic expression. It might be your break from everyday life, the pressures of work, or the hidden talent you want to explore. Whatever role photography plays for you, the idea to take away is that photography is not a rule book. BUT – and this is a big BUT, there are tools involved. You can use a tool the way it was intended and achieve amazing things, or you can spend your life using a chisel as a fork and wonder why eating is so painful.

    Think of your photography like a toolbox; it might have a hammer, a chisel, a screwdriver and a wrench. You might use more than one tool at a time, and all tools will not be used for every job. Your role as the photographer is to know how to use each tool at the appropriate time to reach the desired effect. Otherwise you might end up hammering screws and painting nails.

    8 Dark figure on a light ground

    Dark figure on a light ground. NYC, USA © Adam Marelli

    Developing subtlety

    Where do you go from here? Here’s an assignment that will be very helpful:

    1. Find 20 examples of figure to ground in paintings
    2. Find 20 examples of figure to ground in photography
    3. Go take 10 pictures of light figures on a dark ground
    4. Go take 10 pictures of dark figures on a light ground

    Once you practice this enough it will become like a reflex. Please share your comments and images below.

    googletag.cmd.push(function() {
    tablet_slots.push( googletag.defineSlot( “/1005424/_dPSv4_tab-all-article-bottom_(300×250)”, [300, 250], “pb-ad-78623” ).addService( googletag.pubads() ) ); } );

    googletag.cmd.push(function() {
    mobile_slots.push( googletag.defineSlot( “/1005424/_dPSv4_mob-all-article-bottom_(300×250)”, [300, 250], “pb-ad-78158” ).addService( googletag.pubads() ) ); } );

    The post How to Use Figure to Ground Art Theory in Photography by Adam Marelli appeared first on Digital Photography School.


    Digital Photography School

  • Why Every Photographer Should Use a Manual Focus Lens

    Your camera is smart. It has processors that are able to run algorithms, for near instantaneous adjustments to compensate for lighting conditions and changing environments. I’m a professional lens reviewer, and tend to complain if a lens/camera combination takes more than a split second to achieve accurate autofocus. But the reality is that most modern camera/lens combinations achieve accurate autofocus remarkably fast. Modern DSLRs can pretty much see in the dark, and still focus reasonably well with a near absence of light, and their performance at extremely high ISO settings is phenomenal.

    Yes, your camera is most certainly smarter than your father’s, but the question is, are you a smarter photographer than your father?

    Dustin Abbott DPS MF 15

    Could it be that the wizardry of modern processors, sensors, and autofocus motors (AF) cocoon modern photographers from what actually happens in the process of taking photos? And, in doing so keep us from having to learn some of the essential basics of photography that could make us better? Here is why I think every photographer should spend some time with a manual focus only lens.

    Aperture

    A press release for a modern lens will say something like, “Nine rounded aperture blades.” That means next to nothing to most modern photographers for one simple reason – they will never see those blades. All they will ever see is the glass within the barrel of their lens. The reason for this is simple: lenses with an automatic iris aperture (the camera sets the aperture electronically), focus with the lens wide open (aperture blades withdrawn), and only stop down to the chosen aperture in the split second when that the shot is taken. It is pretty amazing how quickly this all happens, when you stop and think about it.

    Most lenses produced for Canon EF mounts (excluding Samyang/Rokinon lenses along with a few non-mainstream models) have an auto iris aperture control. Even Zeiss manual focus lenses in Canon (ZE) mounts have automatic irises, and Samyang/Rokinon is retooling many of their lenses with AE versions with auto aperture control. Put simply, very few modern lenses in a Canon mount have an actual aperture ring. Nikon shooters get a few lenses with manual aperture rings (for some reason Zeiss lenses include one on Nikon [ZF] mounts.)

    Auto aperture iris control is great for convenience. Just twist the dial on your camera (often in third stop increments) and select the aperture you want, or even let the camera choose it for you in an auto mode. It’s quick and painless.

    The downside, of course, is that the actual significance of what is happening when that iris is opened wide or closed down is often lost upon modern photographers. We can talk about “stopping down” a lens or the advantage of a wide aperture prime, but until you have actually seen the difference in an aperture iris you won’t have a full sense of what that really means. Take a look at this series from the new Rokinon 50mm f/1.4.

    When you actually see that aperture closing down you really get a sense of the difference between the f-stops and how much more light gathering there actually is at wide apertures. This series starts at f/1.4 and goes to f/8 – see how much difference the aperture size makes in the amount of light entering the camera?

    Dustin Abbott DPS MF 8

    Dustin Abbott DPS MF 9

    Dustin Abbott DPS MF 10

    Dustin Abbott DPS MF 11

    Dustin Abbott DPS MF 12

    Dustin Abbott DPS MF 13

    Dustin Abbott DPS MF 14

    My wife is an intelligent woman. She even has a pretty decent eye as a photographer, and has taken some great photos. But despite having been married to a gear guy since 1997, and having a hundred or so lenses going in and out of our house, she still to this day often gets confused about aperture. It can be confusing, as the logic (due to the way that f-stops often get reported) is backwards. Bigger numbers mean smaller apertures -and that seems backwards. There is no mistaking this with a manual focus lens with a manual aperture ring – you can physically see the aperture iris shrinking as you stop the lens down (choose a smaller aperture size – larger f-stop, like f/11 etc).

    More photographers would get what aperture numbers really mean in terms of light gathering, if they physically saw the aperture blades close down or open in their lenses.

    Light Gathering

    Most cameras have a standard focusing screen, that does not show the true depth of field. This, added with the fact that the camera typically focuses with the lens wide opened, means that you often don’t get a sense of how much less light is available when the lens is stopped down (f/4-f/16, for example) or how much more is available at large apertures (f/1.2-f/2.8). Most DSLRs have a DOF (depth of field) preview button somewhere, but it is often in an obscure location and rarely gets used by many people. For this reason many photographers have never seen the true depth of field of any of their wide aperture lenses, or any other lens for that matters. This changes when you use a manual focus lens (particularly with a focus screen that shows true depth of field). More on this in a moment.

    Yes, it is a pain when the viewfinder is quite dark when you have a manual aperture lens mounted and stopped down to, say, f/8. That’s the reason that modern lenses and cameras don’t show you this in your viewfinder. But it also means that you aren’t being forced to learn what f/8 really means in terms of light gathering. You also don’t see how much more light is available, or how much more shallow the depth of field is with a large aperture. You don’t really think about your aperture setting at the time of capture, resulting in a loss of creativity because your mind isn’t forced to visualize what aperture means to the shot.

    But beyond this, manually selecting your aperture really helps you to mentally dial in the relationship between aperture and depth of field. The fact that you have to think about selecting the aperture, and see a difference in the viewfinder, in both the depth of field and the amount of light, helps you to realize how shallow depth of field shots (with a large aperture) and large depth of field shots (with a small aperture) are going to turn out. I have learned how to mentally visualize how depth of field is going to affect a scene so much more because of using manual aperture lenses. Here is a series from the Zeiss Planar T* 50mm f/1.4 lens. It starts at f/1.4, f/2, f/2.8, and then finally shows f/4. Notice the huge difference this makes to the degree in which the background is blurred.

    Dustin Abbott DPS MF 1

    Dustin Abbott DPS MF 2

    Dustin Abbott DPS MF 3

    Dustin Abbott DPS MF 4

    The large aperture shots are much more attractive, and give a better three dimensional effect to the image. You probably won’t always shoot with manual focus lenses, but using one will help train your brain to visualize your shots more effectively and artistically.

    Depth of Field and Focus

    It is quite a revelation to use a wide aperture, manual focus prime, with a focusing screen like an EG-S that shows true depth of field. At close to medium distances you can actually watch focus travel from one thing to another, and subjects pop into focus. It really helps you think about storytelling as a part of your imagery. When you think about what you want in focus, it means that you have become intentional about what you want your viewer to see.

    Many cameras have AF point spreads that are not wide enough to reach the edges of the frame. Manual focus lenses remove that limitation, and I am more likely to take an image with my subject in focus in an extreme corner when I use one. The rule of thirds for composition is a great starting tool, but sometimes rules are made to be broken. Take a look at this shot of a family games night. The cards are in the extreme bottom corner. Your eye goes there first, but then considers the whole out of focus scene beyond. Your brain allows you to mentally fill in the blanks, and image possibilities, rather than just a looking at a scene.

    Dustin Abbott DPS MF 7

    Many macro photographers have learned to choose to use manual focus at those very fine distances. It is often challenging to place an AF focus point right where you need it (particularly when using a tripod), but manually focusing allows you to simply focus until what you need to be in focus is sharp. I’ve heard a lot of people fuss over the focus speed of some macro lenses, including the amazing EF 100mm f/2.8L IS. All I can say is that you need to use a manual focus macro lens sometime. Using the Zeiss Makro-Planar in either a 50mm or 100mm focal length helps you to realize how much the macro range adds to the focus possibilities of such a lens. There are so many extra focus points! Using a manual focus macro lens will certainly help you appreciate the AF on macro lenses, and will also help you understand why the AF focus (distance) limiter switch is there and how to properly use it.

    Dustin Abbott DPS MF 6

    Dustin Abbott DPS MF 5

    Learning to focus with a manual focus lens will help your mind to understand how to better use autofocus lenses (particularly those with focus limiters).

    In Conclusion

    We live in a high-paced world. We want everything to be faster and easier. But great art is rarely created is rarely created in a rush. When I am shooting professional event work and weddings, I tend to use image stabilized, wide aperture, zoom lenses. They are big and heavy, but they are extremely flexible and deliver great results. I need speed in those situations, but some of my most creative shots in my catalogue have been taken with manual focus lenses. I slow down and become more creative. Some of my most critically acclaimed images have been taken with manual focus lenses, both inexpensive and expensive ones.

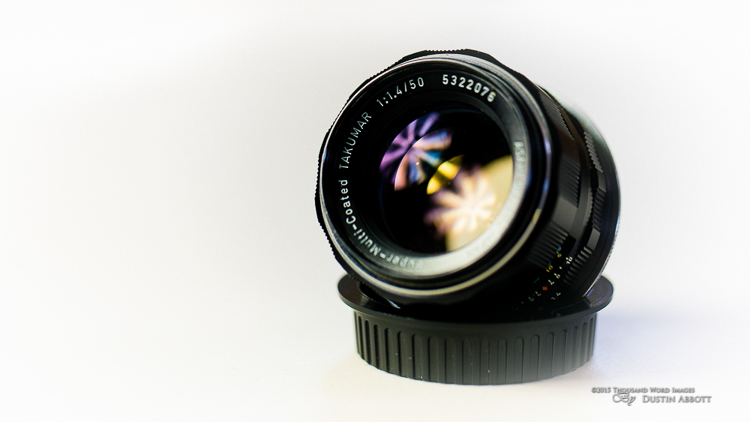
    If you have been guilty of doing most of your photography in a rush, do yourself a favor a get yourself a manual focus lens (even a cheap one). If you want a cheap option, grab yourself an SMC Takumar 55mm f/1.8, and an adapter to your mount of choice. You can probably get a lens and an adapter for under $ 100. It takes some amazing pictures, and will open a world of appreciation for some of the lenses from another era. It will probably also make you a better photographer.

    Even better is the SMC Takumar 50mm f/1.4, or if you want to use a value oriented modern manual focus lens, try one in your favorite focal length from Rokinon or Samyang (same thing, just rebranded lenses). You’ll find a number of reviews of different ones on my website. If you are willing to spend more and want the finest optics and image quality available, Carl Zeiss makes some of the best lenses period. They tend to be mostly manual focus, and I’ve had the privilege of using and reviewing many of them.

    Once you learn how to take good pictures with a manual lens, shooting with your modern gear will seem easier than ever, and you might even use it more creatively. These are just a few reasons why every photographer should spend some time with a manual focus only lens.

    googletag.cmd.push(function() {
    tablet_slots.push( googletag.defineSlot( “/1005424/_dPSv4_tab-all-article-bottom_(300×250)”, [300, 250], “pb-ad-78623” ).addService( googletag.pubads() ) ); } );

    googletag.cmd.push(function() {
    mobile_slots.push( googletag.defineSlot( “/1005424/_dPSv4_mob-all-article-bottom_(300×250)”, [300, 250], “pb-ad-78158” ).addService( googletag.pubads() ) ); } );

    The post Why Every Photographer Should Use a Manual Focus Lens by Dustin Abbott appeared first on Digital Photography School.


    Digital Photography School

  • The Winners of Summer Landscape Photo Contest

    In these sentimental late August days, we’re excited to announce the winners of the Summer Landscape Photography Contest. Thank you for your submissions and votes! So which photos has evoked most emotions in our jury members and readers? Who has won amazing prizes from Defrozo, Digital Photo Mentor, PhotoTraces and other respected sponsors? Let’s find it out right now! And Continue Reading

    The post The Winners of Summer Landscape Photo Contest appeared first on Photodoto.


    Photodoto