Category: Photography

  • Landscape Photography from the Side of the Road

    2-for-1 special

    As part of Landscape Photography Week here on dPS, we’re offering TWO for the price of ONE on our best-selling Living & Loving Landscape Photography ebooks!

    Click here to take advantage of this offer.


    For most people the idea of landscape photography means getting a good backpack that can carry everything, then hiking for miles to a destination. You need to be fit, and prepared for anything that might happen. You might have to camp, and sleep, out in the wilderness. It would be an adventure, and you get to photograph some areas that others never get to see.

    I don’t do that. Never have, and I can’t see it happening anytime in the near future. I don’t think there is anything wrong with it, but I would never do that on my own, especially not here in Australia. The hiking part would be okay, but, again, only if I had company. There are just so many other ways of doing landscape photography.
    cole-landscape-road-side-photography-0002

    The sun trying to break through the trees meant we had to find somewhere to stop and take some photos.

    One of those methods is car trunk photography, also known as roadside photography.

    It sounds easy right? It’s simply about doing photography that isn’t far from your car.
    cole-landscape-road-side-photography-0004

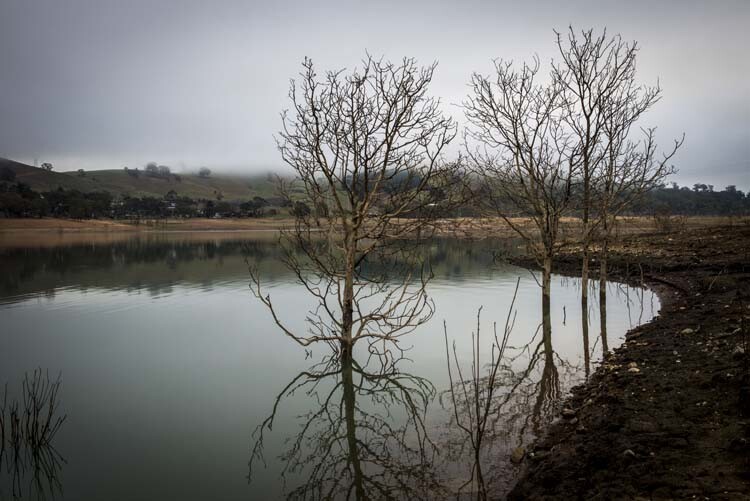
    Lake Eildon water level was down and these trees were reflected in the water beautifully, but we had to walk to get to them. We could still see the car in the distance.

    One of the most famous photographers of our time was well known for using his car to take photos, Ansel Adams. You likely have seen the photo of him on top of his car with his camera, setting up an image. Boards were put over his roof racks so he could stand up there with his big view camera. My car has roof racks, maybe I should consider doing the same.

    Moose Peterson is another photographer that loads up the trunk of his car with his full set of gear, and has a second bag to carry some of it around.  He has full knowledge that the car isn’t too far away if he needs to grab something.

    Gear

    One of the best advantages of doing this kind of photography is that you can take as much gear as you like with you. You aren’t restricted by how much you can carry, you can take everything you think you might need.
    cole-landscape-road-side-photography-0007

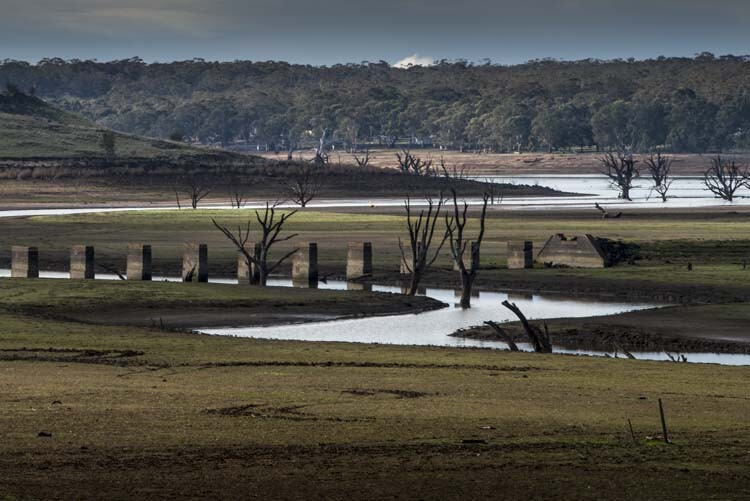
    The car was right behind me, I got out my zoom and took this shot of a dam showing an old bridge that had emerged as the dam water level went down.

    You may just have a compact camera and not a lot of photography gear, but you may also decide to take your umbrella, coat, scarf, gloves and hat, or other weather appropriate clothing. If it is hot take your sunscreen and sunhat, don’t be silly with the sun.

    But if you are doing this type of photography you will likely be using a DSLR or Mirrorless camera, and you might have a lot more to take with you. If you do have a lot of gear, it may be best to use two bags – one as the main bag to hold everything, usually the bigger one, and the second one to carry what you need for any particular place you stop.

    Once you get out and look around, you often find you don’t have the right lens, but as the car isn’t that far away you can go and change it easily. This also means you can take tripods, filters, monopods, anything that there might be a possibility of using. You just never know.
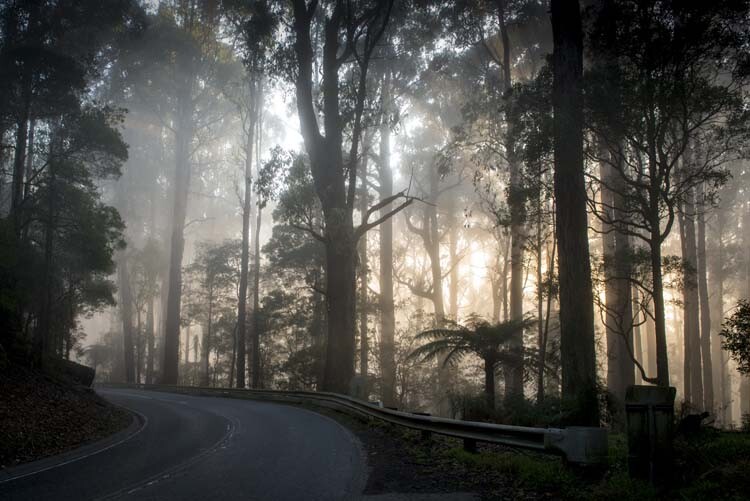
    cole-landscape-road-side-photography-0001

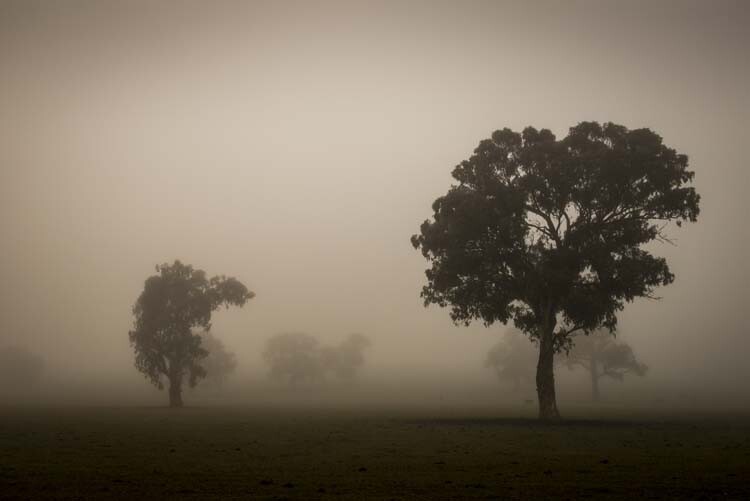
    A foggy morning along the road. Just pull over, take some photos and get back in the car before you get too cold.

    Safety

    It is all very well pulling up on the side of the road to do what you want to do, but you also have to make sure that it is safe as well. When you pull up, get right off the road and as you get out of your car, or back in again, look for cars or trucks that might be driving past so you don’t get hit.

    Look at the sides of the road before you pull off. Make sure the road is not wet and you won’t get stuck. Find out if there has been lots of rain. If you are in Australia in summer, be careful about long grass and snakes hiding in it.

    When you are moving away from the car, lock it. While someone might not steal the car they might take all the gear you have left inside. You need to take the normal precautions that you would take if leaving your car anywhere else.
    cole-landscape-road-side-photography-0006

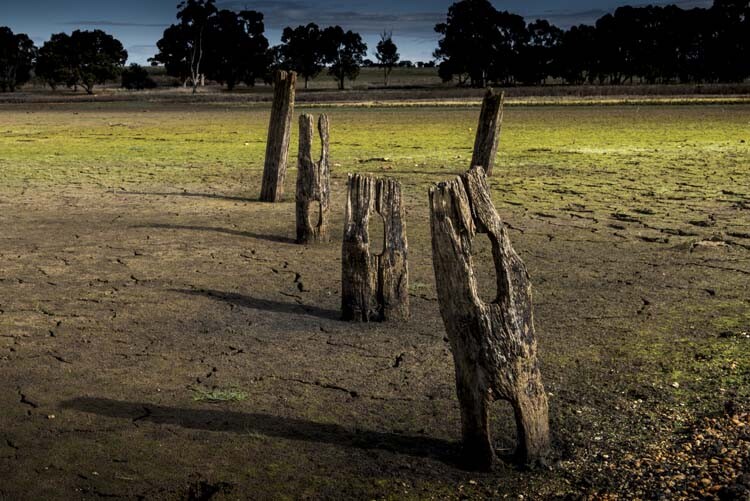
    We pulled into the side track, but then had to take a short walk to see these old fence posts in the dried out dam.

    Planning Your Trip

    It is something you can do on your own, or with others. You can do it on a day trip to somewhere, or go away for a few days exploring countrysides to see what you can find.

    The most common way is to pick a day with friends and then decide on a destination. Discuss what are you going to look for and where will you find it. You need to decide if you are going to do any small hikes. Roadside photography doesn’t mean you can’t leave your car on the side of the road while you explore somewhere close.
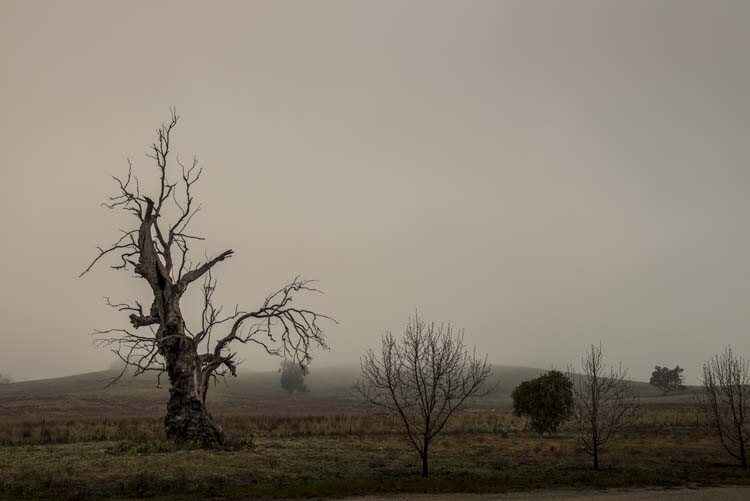
    cole-landscape-road-side-photography-0002

    Like a scene from a movie, fog, and a gnarly dead tree. We saw this going to Mansfield and on the way back knew we had to stop.

    There has to be a warning, while it is best to take roads that are not the normal route, so no freeways or highways, you can get very distracted. You might find that you want to stop constantly, and if you have a final destination it can mean that when you get there you don’t have enough time or light left to shoot.

    It is best to decide one way or the other if you are going to stop on the way. From experience, it is good to decide so you know how much time you will have when you get where you want to go. It can also be fun to drive aimlessly and stop at anything you find interesting along the way. You never know what you might find.

    Looking for a Subjects to Photograph

    One of the advantages of doing things on the roadside is that you aren’t trespassing, and in most cases, can’t get into trouble for photographing things you see over the fence. As long as you don’t go over the fence you should be fine. Sometimes you might find the person who owns the land and get permission to enter.

    cole-landscape-road-side-photography-0005

    I see this all the time, but it was the first time I was on the right road to photograph the old flour mill.

    There are lots of different things to take photos of, it depends on what you find interesting. There are the beautiful, big landscapes showing the scenery of the area, although one thing that many photographers look for are the old sheds or houses that have been abandoned, and are now falling apart. When you drive on the roads you can often see them, though sometimes you need a big zoom to get good photos.

    The coast can be great for this kind of photography too. You nearly always want to explore more than one area. So, with the smaller bag, you can go to one area, then drive to another.

    Don’t think that the only way to take landscape photos is to pack the bag and slog through lots of harsh land to get the ideal image. Do it from the luxury of your car, take a friend, and make a day of it.


    Here on dPS it is landscape week. You can see the previous ones listed below. Watch for a new article (or two) on landscape photography daily for the next week.

    • 6 Tips for Better Low-Light Landscape Photography
    • Landscape Photography and the Human Element
    • 5 Ways a Telephoto Lens Can Improve Your Landscape Photography

    googletag.cmd.push(function() {
    tablet_slots.push( googletag.defineSlot( “/1005424/_dPSv4_tab-all-article-bottom_(300×250)”, [300, 250], “pb-ad-78623” ).addService( googletag.pubads() ) ); } );

    googletag.cmd.push(function() {
    mobile_slots.push( googletag.defineSlot( “/1005424/_dPSv4_mob-all-article-bottom_(300×250)”, [300, 250], “pb-ad-78158” ).addService( googletag.pubads() ) ); } );

    The post Landscape Photography from the Side of the Road by Leanne Cole appeared first on Digital Photography School.
    Digital Photography School

  • 10 Keys to Choosing the Best Domain and Hosting for Photographers (+Free Giveaway!)

    You might have already found a website design of your dreams and even picked a platform to create it. But if you haven’t yet chosen a domain name and reliable hosting for your photo website, the job is not done. We have you covered, though. In this post you will find some essential tips on how to choose the best domain and hosting for the Continue Reading

    The post 10 Keys to Choosing the Best Domain and Hosting for Photographers (+Free Giveaway!) appeared first on Photodoto.


    Photodoto

  • Landscape Photography and the Human Element

    2-for-1 special

    As part of Landscape Photography Week here on dPS, we’re offering TWO for the price of ONE on our best-selling Living & Loving Landscape Photography ebooks!

    Click here to take advantage of this offer.


    When I think of landscape photography, my mind conjures up a towering mountain vista with a glowing tarn sprawled out in the foreground, or a tumbling torrent flanked by evergreens.

    It’s hard to not be drawn in by a great landscape image. After all, most of us yearn for wilderness or a connection to nature, especially in our electronics-dominated lifestyles. Of course the landscape that unfolds in front of us isn’t always the wilderness, on the contrary, sometimes it’s a concrete jungle.

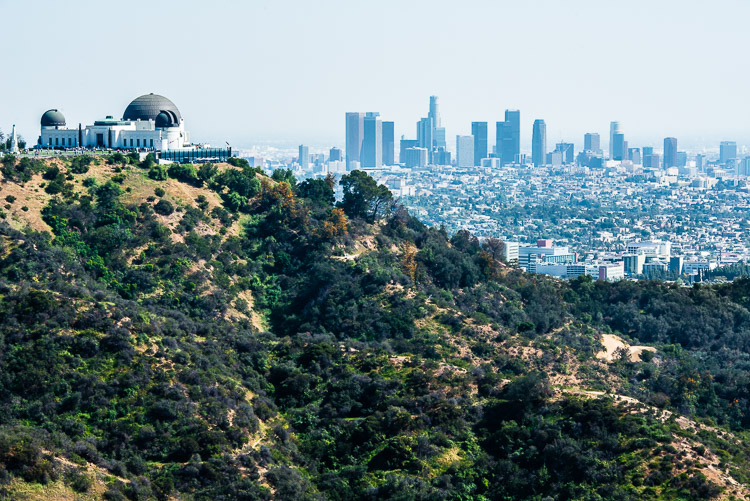
    The Los Angeles urban landscape

    Urban landscapes focus on the human element as the subject.

    What does it mean to have a human element in a landscape image? By definition landscape photography should be purely natural, but as is often the case with art, it is subjective and the lines delineating the rules are blurred.

    I find that sometimes adding a human element – whether it is a person or something that hints at the presence of people – can help humanize the image and bridge our connection to the story within. Every photo can tell a story if you open your mind and look into it deep enough. Even pictures of nature tell the tale of an eternity of geologic processes at work or the incredible diversity of life that has blossomed out of seemingly nothing.

    One thing about photographing the world, that I’ve learned over the years, is that many images offer more intrigue, or become more powerful by including a person. A landscape image can certainly evoke a host of emotions, but seeing another human being in the photo seems to help nudge us in a certain direction.

    A tiny person among a huge landscape can give you perspective and scale, while an expression or form can suggest a feeling of awe, contemplation, or any number of emotions.

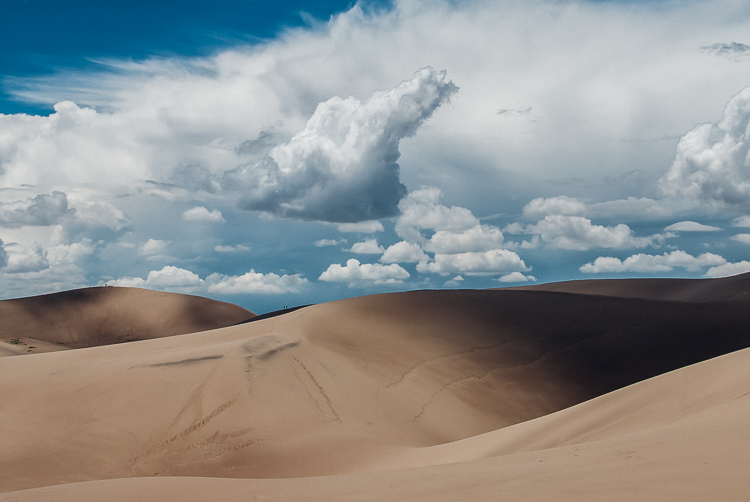
    People in a landscape photo for sense of scale

    They shouldn’t be the main subject of the image, but including people in a landscape photo can help provide a sense of scale.

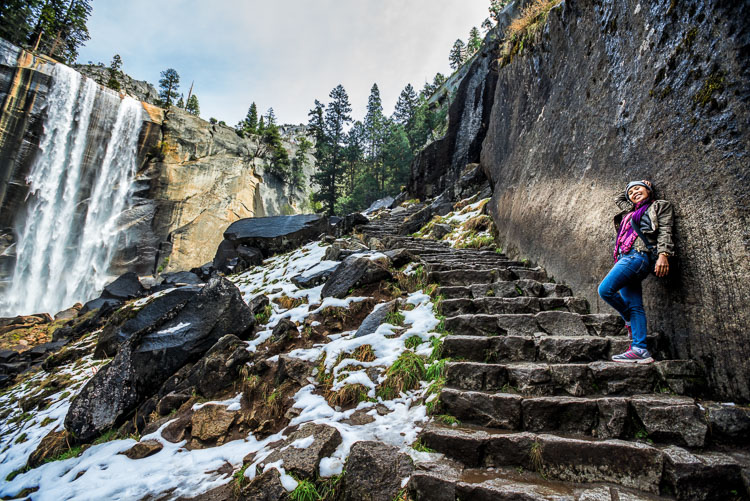
    This photo below of Vernal Falls in Yosemite Valley could have easily excluded people as well as the stairs – also a human element. This waterfall is visited by hundreds of people per day and has been photographed from a million angles. After reviewing my photos from this little excursion, I realized that I liked this one the best. I like seeing the steps which were obviously very difficult to construct. I picture workers toiling for weeks or months to build them decades ago. They also reveal the steep incline you must climb to get a good view. The girl’s posture and expression shows her relaxing after the climb and obviously happy with the reward.

    Lanscape including a person for balance and mood

    Photographic genre lines are often blurred, like this image which lies in the realm between a landscape image and an environmental portrait.

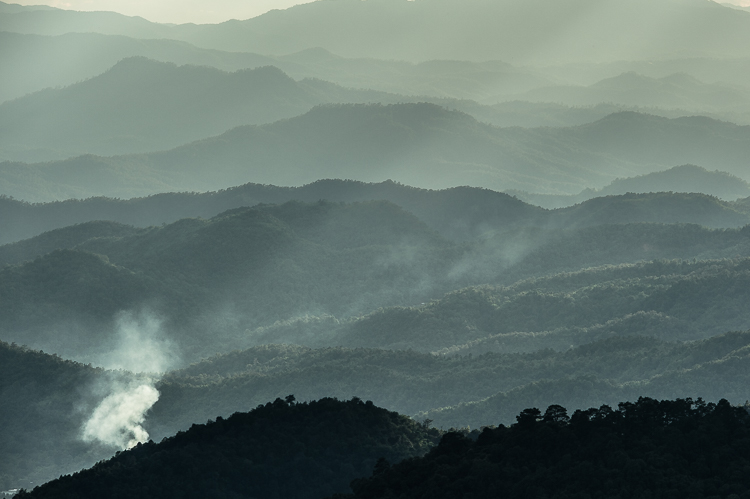
    Although this next photo doesn’t show people, it provides evidence that the mountains aren’t just empty wilderness. With just a small plume of smoke sneaking into the frame, you now have more than a dramatic vista of the late day sun trickling over these mountains in northern Thailand. Even though you don’t have all the details, you know there’s a story. Are there people camping in that spot? Is there a village? A wildfire just beginning?

    Smoke from a mountain village

    Sometimes simply hinting at the presence of people can add intrigue.

    The wisps of smoke also give another point of focus. Without it, whatever this photo has to offer is quickly recognizable with just a quick glance – a pretty pic of some rolling hills. In this case the human element adds intrigue and a bit of mystery.

    In the summer of 2012 Colorado was hot, dry, and on fire. Several fires torched mountainsides, as well as the houses perched on their slopes. There was a lot of smoke, and even some ash floating around. Later in the day, the low angle sun would illuminate the smoke and make it glow all sorts of colors, which simultaneously looked both beautiful and apocalyptic.

    I wandered out with camera in hand and found this lake, which I thought would be a nice elemental balance of water in the foreground with dry, burning hills behind, and that brilliant glowing reflection. It was a private lake with a barbed wire fence around it, which I included in some of the frames I shot.

    The human element adding symbolism

    The human element can be used to add symbolism.

    I found that the barbed wire helped accentuate that apocalyptic feeling while insinuating symbolism at the same time. That symbolism could be interpreted many ways. To me, I have studied some fire ecology and learned of the dangerous conditions we have created by suppressing wildfires for decades, and the barbed wire symbolized that maybe we should keep out of nature’s business.

    What do landscape photos mean to you? Do you prefer them devoid of any hint of human presence?


    Here on dPS this is landscape week – the first of several articles and tips was posted earlier today. You can see it here: 6 Tips for Better Low-Light Landscape Photography. Watch for a new article (or two) on landscape photography daily for the next week.

    googletag.cmd.push(function() {
    tablet_slots.push( googletag.defineSlot( “/1005424/_dPSv4_tab-all-article-bottom_(300×250)”, [300, 250], “pb-ad-78623” ).addService( googletag.pubads() ) ); } );

    googletag.cmd.push(function() {
    mobile_slots.push( googletag.defineSlot( “/1005424/_dPSv4_mob-all-article-bottom_(300×250)”, [300, 250], “pb-ad-78158” ).addService( googletag.pubads() ) ); } );

    The post Landscape Photography and the Human Element by Jeremie Schatz appeared first on Digital Photography School.

    Digital Photography School

  • 6 Tips for Better Low-Light Landscape Photography

    2-for-1 special

    As part of Landscape Photography Week here on dPS, we’re offering TWO for the price of ONE on our best-selling Living & Loving Landscape Photography ebooks!

    Click here to take advantage of this offer.


    A glorious sunset will always attract a crowd of photographers. Yet the moment the sun dips behind the horizon, it seems everyone departs in a hurry. What they don’t realize is how exceptional the scene can become at dusk and into the early evening. The hours following sunset are actually ideal for landscape photos. Of course, working in low light isn’t without its fair share of challenges.

    With these six tips though, it’s possible to extend the magic hour and continue creating stunning images long into the night.

    1) Compose Thoughtfully

    It’s easy to be mesmerized by the bold colors of dusk. Yet, the photographer who works to add more visual interest will ultimately create a better image. About a half hour before the sun sets, I start the search for a foreground element that will anchor my composition. This can be a field of flowers, a boulder, a tree, or even a man-made object. The idea is to add visual interest all the way through the frame. As you explore various options, be sure to try different perspectives including the view from the ground. By having this location worked out in advance, you’ll be ready to capture the peak moment of brilliance.

    2) Switch to Live View

    When autofocus struggles, Live View becomes an extremely helpful focusing aid. By switching to manual focus and magnifying the scene on the LCD, you have the ability to carefully micro-focus on whatever is important in your scene. At 5x and 10x magnification, you don’t have to solely rely on your eyesight, making focus easy to achieve. Remember, the enlarged view on your LCD is not representative of the actual focal length, or view the camera sees. Upon pressing the shutter, the entire scene will be captured in sharp detail. With this level of precision, I find this feature ideal for low-light photography.

    3) No Tripod? No Problem

    It’s true, a tripod is a landscape photographer’s best friend, especially in near darkness. Yet, there are definitely occasions where carrying one is just not possible. With a bit of ingenuity, you can still create a sharp photographs. The key is to set your camera to the two second timer. Compose your shot with the camera resting on a rock or bag and press the shutter release. The timer will count down for two seconds. This is enough time to eliminate any camera shake before firing. Using this technique, you can still use very long shutter speeds even without a tripod.

    4) Safety First

    In extremely low-light, small camera buttons and dials become difficult to see. A small flashlight, or even your smartphone can provide the proper amount of illumination. This also comes in handy for navigating dark trails and rocks. To keep it from getting lost, I prefer the key ring type that can be attached to a camera bag. While this seems like a common sense item, don’t underestimate its usefulness. Hiking back to your car after dusk can be dangerous without artificial light to lead the way.

    5) Cool Down the White Balance

    During the day, I often enjoy the warmer White Balance presets like Cloudy or Shade. Similar to a painter adding more yellow to their brush, these settings introduce a golden quality of light to a landscape. At dusk however, this can look artificial and overprocessed. To better match the cooler color temperature of low light situations, Auto White Balance is actually quite accurate. While I do work in RAW, I enjoy shooting in a white balance that best represents the scene. This provides a more complete understanding of how the image will look and allows me to make adjustments accordingly.

    6) Stay Just a Little Bit Longer

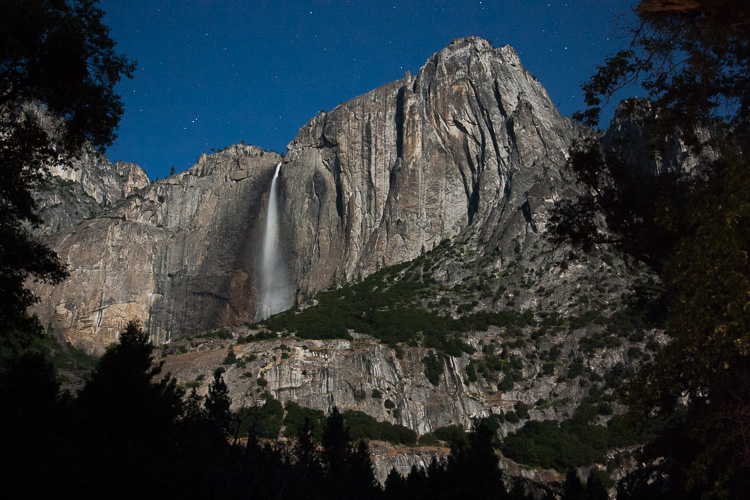
    Night photography can offer some spectacular opportunities, especially when the moon is full. You can check this beforehand using apps like the Photographer’s Ephemeris. In these low-light conditions, you will need to take some special steps to get the shot. First, a solid tripod is essential to prevent camera shake. In the mountains, winds can be strong, so opt for a sturdy set of legs. Even with the light of the moon, it was necessary to use a 15″ (fifteen second) exposure. Camera settings: ISO 400, F/4, 15 seconds at 17mm. This same location midday, was a completely different scene with idling buses, flocks of tourists, and harsh contrasty light.

    So how can you use these tips in your photography? Do you have any others to add? Please do so in the comments below.

    Editor’s note: This is the first of a series of articles we’re featuring here in a deep dive on landscape photography, this week on dPS. Watch for another later today and more daily. 

    googletag.cmd.push(function() {
    tablet_slots.push( googletag.defineSlot( “/1005424/_dPSv4_tab-all-article-bottom_(300×250)”, [300, 250], “pb-ad-78623” ).addService( googletag.pubads() ) ); } );

    googletag.cmd.push(function() {
    mobile_slots.push( googletag.defineSlot( “/1005424/_dPSv4_mob-all-article-bottom_(300×250)”, [300, 250], “pb-ad-78158” ).addService( googletag.pubads() ) ); } );

    The post 6 Tips for Better Low-Light Landscape Photography by Chris Corradino appeared first on Digital Photography School.


    Digital Photography School

  • How to Choose a Black and White Plug-In

    Best black and white plug-ins

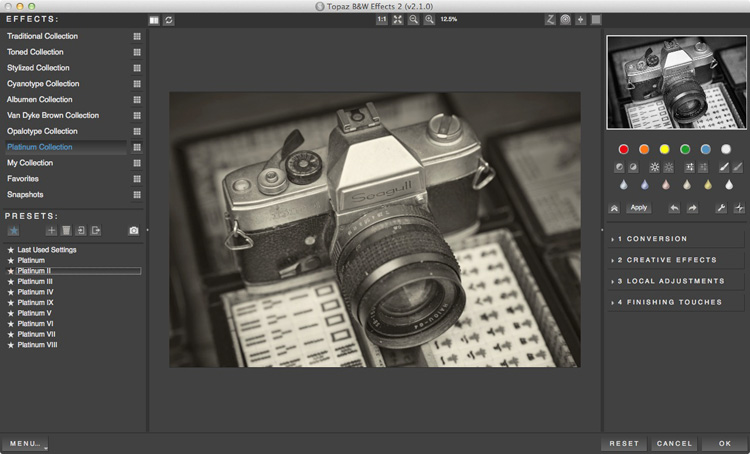
    Photo converted to black and white in Topaz B&W Effects 2.

    While Lightroom and Photoshop are sophisticated, advanced Raw converters and image editing programs, there are still many things that they don’t do as well as third party applications. One of these is converting photos to black and white. But, there are so many plug-ins available that it can be difficult to know which one to buy. This guide will help you decide.

    Why buy plug-ins?

    A common theme with black and white plug-ins is that they contain many more ways to emphasize texture than Lightroom and Photoshop. This is important with black and white, as texture is an important part of the composition. In Lightroom and ACR (Adobe Camera Raw) you can use the Clarity slider to emphasize texture, but it’s a blunt instrument compared to the options available in these plug-ins.

    Another feature of most of these plug-ins is that they come with an extensive set of presets that you can use as a starting point for your black and white conversion. Just browsing through the presets and seeing what you can do to your photos will inspire you.

    Some presets imitate old printing processes such as cyanotypes and wet plate photography. Others emulate black and white films, some of which are no longer available.

    Silver Efex Pro 2

    Best black and white plug-ins

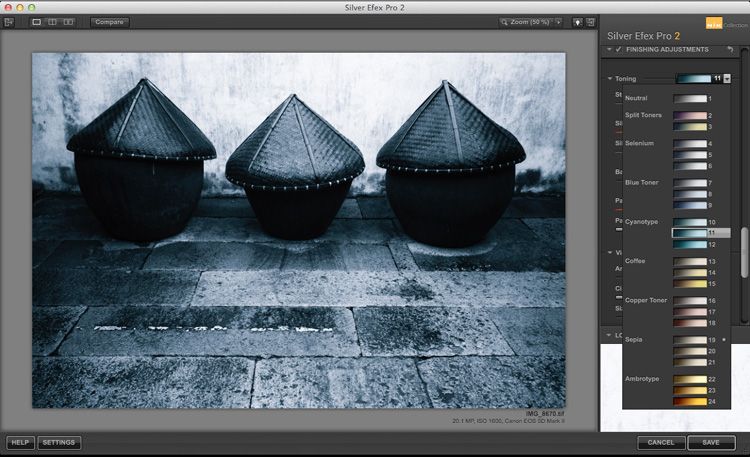
    Split toning in Silver Efex Pro 2.

    Silver Efex Pro 2 is made by Nik software and regarded by many photographers as the ultimate black and white conversion plug-in. You can buy Silver Efex Pro 2 along with the other applications in the Nik Software range in a bundle for $ 149. While you can’t buy Silver Efex Pro 2 as a stand-alone application, it also means that you get the rest of Nik software range included with it.

    Who is Silver Efex Pro 2 for?

    Silver Efex Pro 2 is for the professional, or advanced hobbyist photographer, who wants to take black and white processing to the ultimate level. If you are serious about black and white photography, you will love this plug-in.

    Reasons for buying Silver Efex Pro 2:

    • It has more options than Lightroom or Photoshop. There are more ways of adjusting tonal values, toning images, and adding borders. The Structure, Fine Structure, Dynamic Brightness and Soft Contrast sliders in Silver Efex Pro 2 provide a lot of ways to enhance texture, an important element of many black and white images.
    • It has a good workflow. The History in Silver Efex Pro 2 makes it easy to see where you’ve been and where you are going with your black and white conversion.
    • It comes with a number of good presets that help you obtain good black and white conversions right away.
    • It mimics black and white film grain. If you are interested in creating images that look like they were taken with film, Silver Efex Pro 2 lets you imitate the grain structure of 18 commonly used black and white films.
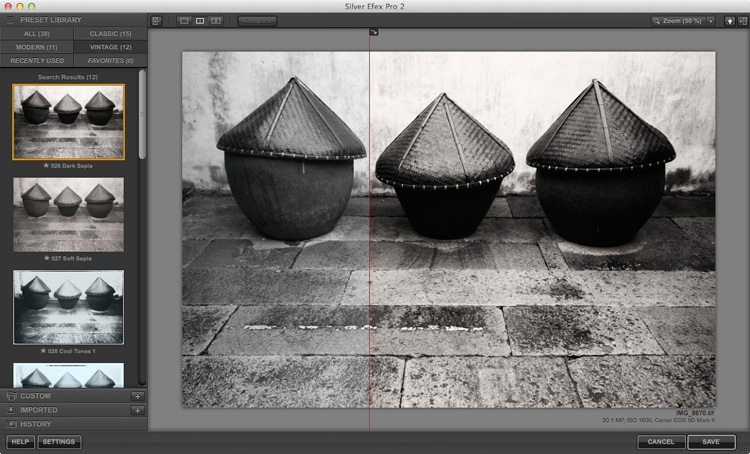
    • It has the standard Before and After view. It also has a Split View that I rather like. You can move the red dividing line to see more of one version or the other (see below). You can also zoom-in to view the differences in fine detail.

    Best black and white plug-ins

    Exposure

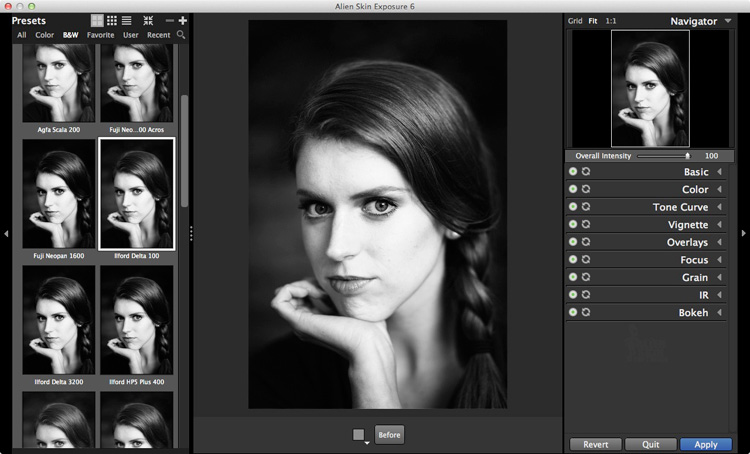
    Exposure by Alien Skin Software is a plug-in designed to give your digital photos an analog look. It comes with hundreds of black and white and colour presets that imitate the look of film and antique processes. Alien Skin Software are not merely imitating though – a lot of research has gone into replicating the grain structures of all the film types featured in their software. Where the film wasn’t available, they used photo archives.

    Best black and white plug-ins

    Just like Silver Efex Pro 2, the presets are a starting point, and tools are provided to make adjustments, including an Intensity slider that lets you fade the effects created by the plug-in. You can create and save your own presets for future use.

    Who is Exposure for?

    Exposure is for photographers who want to mix the look of analog photography, with the speed and convenience of digital. If you yearn to make your photos look like they were shot with film rather than a digital camera, then this is a good plug-in to use.

    Exposure is used by a lot of photographers to create effects that you can’t create in Lightroom, or would take a long time in Photoshop. While it seems mainly pitched at portrait, fashion and wedding photographers, you can apply the filters to virtually any type of photo. It’s a lot of fun to use.

    Reasons for buying Exposure:

    • It lets you emulate the look of black and white film. There are over 20 film presets (plus variations) that let you apply an analog look to your digital photos.
    • Exposure is for colour as well as black and white. While this isn’t a concern if you are only interested in the plug-in for black and white conversions, there are some beautiful colour presets and film emulations to use.
    • It lets you add creative borders, light leak effects and scratches to your photos.
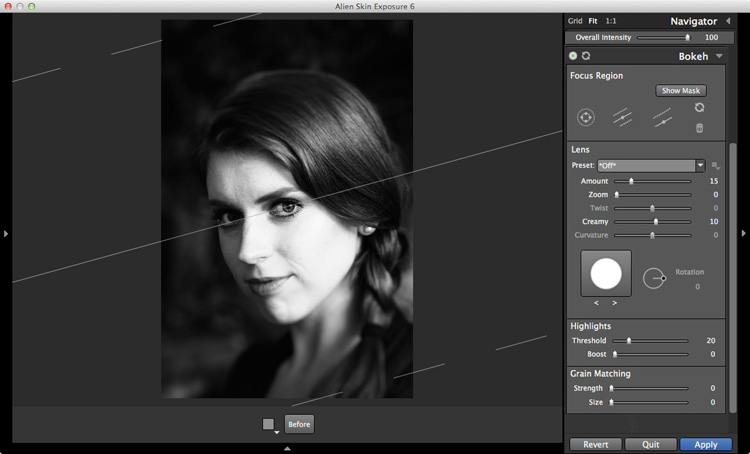
    • Exposure lets you add sophisticated lens blur effects to your images, emulating the look created by using specialist lenses such as tilt-shifts and Lensbaby optics (see bel0w).
    • It has an easy to use batch processing tool that makes processing multiple images very quick and easy.

    Best black and white plug-ins

    Perfect Black & White

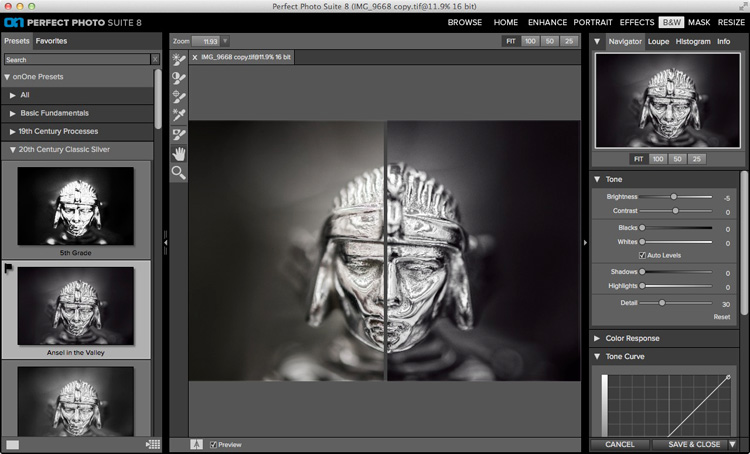
    Perfect Black & White comes as part of OnOne Software’s Perfect Photo Suite. There are six modules within the suite, giving you the use of the additional ones if you buy it.

    Another benefit of Perfect Photo Suite is that it comes with built-in layers. When you convert a photo to black and white it is placed on a layer with an Opacity slider that lets you merge it with the original colour image. While this feature is of limited use for black and white conversions, it may come in handy with the other programs included in the suite.

    Best black and white plug-ins

    Who is Perfect Black & White for?

    This software is ideal for the photographer who wants to experiment with black and white photography and take advantage of the other programs that come with the suite. You will only appreciate the power and potential of this software by using it and experimenting with all the tools.

    Reasons for buying Perfect Black & White:

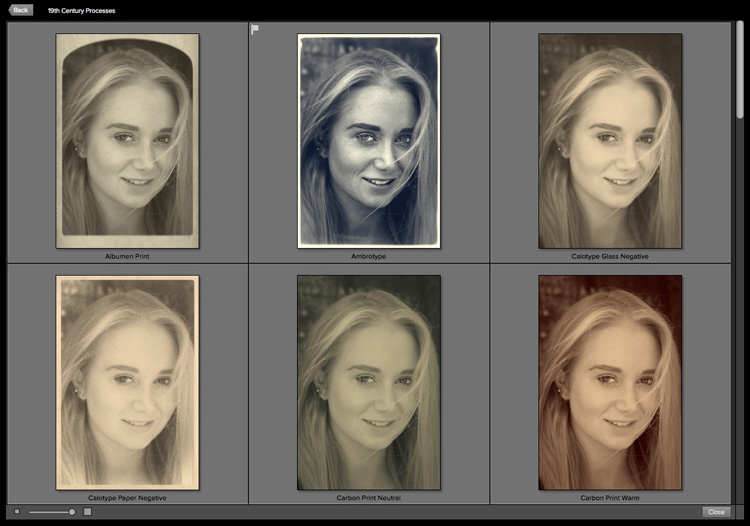
    • It has presets that emulate old photographic processes such as 19th century processes such as the Albumen Print and Ambrotype (see below).
    • There is a good selection of creative borders that you can add to your images.
    • The Sharpening options in it are more advanced than those in Lightroom and Photoshop. There are three types of sharpening to choose from: High Pass, Progressive and Unsharp Mask. High Pass is the most aggressive, while the others let you apply Sharpening in a more subtle fashion.
    • It works in conjunction with the other modules in Perfect Photo Suite. For example, you can use Perfect Portrait to retouch portraits before (or after) converting them to black and white. Or Perfect Resize to enlarge your photo files to a suitable size for making large prints. Or add textures to your photos using layers.
    Best black and white plug-ins

    Some of the antique process presets available in Perfect Black & White.

    B&W Effects 2

    B&W Effects 2 is a Lightroom plug-in made by Topaz Labs. The main strength of this plug-in is its strong collection of presets, many of which imitate old processes. There are over 200 to choose from, and many of them have an interesting look which you don’t get from the presets in the other plug-ins mentioned here.

    Best black and white plug-ins

    Who is B&W Effects 2 for?

    B&W Effects 2 is for photographers who want to take advantage of its extensive preset range as a basis for creative black and white conversions. The Snapshots feature gives you a history function that most of the other plug-ins lack, albeit one that you have to activate yourself by taking Snapshots at important points in the processing stage. B&W Effects 2 is also good at increasing detail in mid-tone areas and bringing out texture, an important part of a good black and white conversion.

    Reasons for buying B&W Effects 2:

    • Lots of presets for emulating old printing processes. Have you ever wanted to try out cyanotype, albumen, van dyke brown, opalotype or platinum printing? The cost and impracticality associated with these processes puts them out of reach of all but dedicated enthusiasts. But B&W Effects 2 has all these and more.
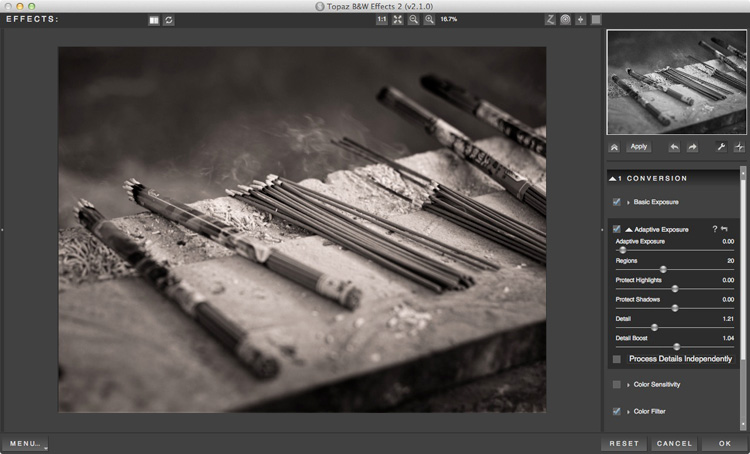
    • It uses Adaptive Exposure technology to add mid-tone contrast in a way that can’t be replicated in Lightroom or Photoshop. It works by analyzing the image, breaking it into regions and applying the adjustment to each region individually. The best way to appreciate what this tool can do is to try it out for yourself.
    • The Detail and Detail Boost sliders bring out details and texture, completing the work done by the Adaptive Exposure sliders. You’ll be amazed by how much detail and texture you can bring out with these sliders.

    Best black and white plug-ins

    DxO FilmPack

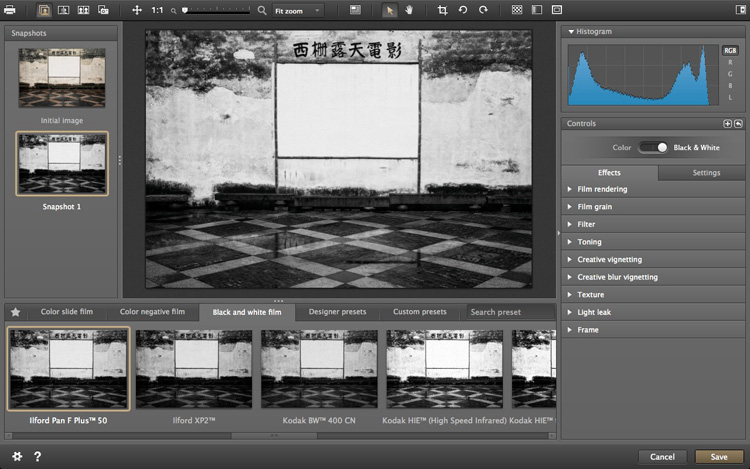
    All the plug-ins we’ve looked at so far include some sort of film simulation, but DxO have taken it a step further with their FilmPack plug-in. According to their website, DxO FilmPack lets you, “Perfectly reproduce the quality, style, colours, and grain of the most famous analog films.”

    Like Exposure, DxO FilmPack works in both colour and black and white.

    Best black and white plug-ins

    Who is DxO FilmPack for?

    DxO FilmPack is for photographers who want to process their digital images so that they look as if they were taken on film. But it goes further than that, and offers a variety of creative effects that you will find useful in creating emotive monochrome images.

    Reasons for buying DxO FilmPack:

    • Lots of film emulation presets, based on an analysis of the films themselves.
    • Features shared by most of the plug-ins listed here – the ability to add borders and textures, toning, light leaks effects and creative blur.

    Tonality Pro

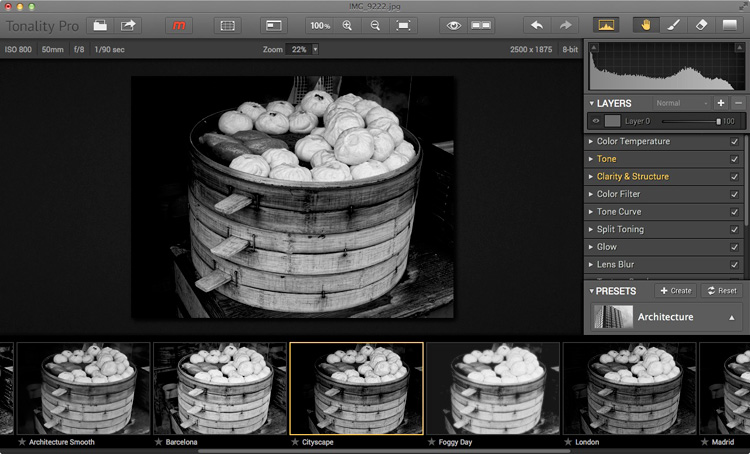
    MacPhun is a company that makes plug-ins for Apple Mac computers (sorry Windows users!). Tonality Pro is a relatively recent addition to its stable of software and even though it will only be of interest to some of our readers I’ve included it here because it is a very good piece of software.

    MacPhun’s aim with Tonality Pro was to create the best black and white plug-in available. I’ll leave it up to others to decided whether they have achieved that, but there’s no doubt it’s a powerful application with lots of useful tools for converting your photos to monochrome.

    best-black-white-plugins-10

    Reasons for buying Tonality Pro:

    • Tonality Pro has over 150 presets. There is also an Opacity slider that lets you control the strength of the preset, so you can make the effect as strong or subtle as you wish.
    • Tonality Pro has layers. None of the other presets mentioned here do, except for Perfect Black & White (and then not within the plug-in itself). Layers mean that you can apply an effect to your photo, then use brush mode to create a mask so the effect is applied selectively. Layers add a level of creative potential that allows you to use the plug-in’s tools with nearly unlimited freedom.
    • The clarity and structure tools help you emphasize texture and bring out detail in a way which simply isn’t possible in Lightroom or Photoshop.

    Your turn

    For me, one of the best things about plug-ins is that they give you a chance to play. They open up new ways of processing that you may not have considered before. Above all they are fun, give you chance to get creative, and find new ways of expressing yourself.

    So, here’s a challenge. Download the trial version of one of these plug-ins. Then have a play with some of your favourite images and see what you can do with them. Does the new software give you some creative options that you had never considered before? Let us know how you get on in the comments.


    Mastering Lightroom: Book Three – Black & White

    Masterlng Lightroom: Book Three – Black & White by Andrew S GibsonMy ebook Mastering Lightroom: Book Three – Black & White goes into the topic of black and white in depth. It explains everything you need to know to make dramatic and beautiful monochrome conversions in Lightroom, including how to use the most popular black and white plug-ins. Click the link to visit my website and learn more.

    googletag.cmd.push(function() {
    tablet_slots.push( googletag.defineSlot( “/1005424/_dPSv4_tab-all-article-bottom_(300×250)”, [300, 250], “pb-ad-78623” ).addService( googletag.pubads() ) ); } );

    googletag.cmd.push(function() {
    mobile_slots.push( googletag.defineSlot( “/1005424/_dPSv4_mob-all-article-bottom_(300×250)”, [300, 250], “pb-ad-78158” ).addService( googletag.pubads() ) ); } );

    The post How to Choose a Black and White Plug-In by Andrew S. Gibson appeared first on Digital Photography School.


    Digital Photography School

  • Sigma 35mm f/1.4 Art Lens Review

    When it comes to off-brand (or third party) camera gear, do you feel a bit skeptical? I was in the same boat for my entire photography career, choosing to invest exclusively in Nikon gear when I was a Nikon shooter, then all Canon when I switched over for the Canon 5D Mark III. “You get what you pay for” is what all of my photography colleagues would tell me, and I was an avid believer until this past summer when I invested in my first ever off-brand camera lens: the Sigma 35mm f/1.4.

    Dubbed Sigma’s true flagship lens, the 35mm f/1.4 debuted in 2012 as the very first addition to the Art category, in Sigma’s newly announced lens categories. This shiny prime lens entered a crowded market in which Canon, Nikon, and Sony all have competitive offers, but Sigma’s version comes in at a fraction of the price, which is one of its most attractive features. So in this case, does the adage, “you get what you pay for” truly apply?

    Sigma 35mm f/1.4 lens review

    Let me preface this article by stating that this is the very first 35mm prime lens that I’ve owned, so I cannot make true comparisons between Sigma’s lens and that of other manufacturers, but I took it through several test runs to see how it held up. These were my findings.

    Main Features

    Sigma’s 35mm fixed lens is equipped with a fast f/1.4 maximum, and f/16 minimum aperture. It has quiet, quick Hypersonic Motor (HSM) focusing with manual override and a 0.3m (one foot) minimum focal distance – no image stabilization is included. The lens has mounts for all major DSLR camera types including Canon, Nikon, Sony, and Pentax, and it works on both full frame and APS-C (crop sensor) cameras. Out of the box, the lens comes with front and rear caps, a lens hood and a warranty and instruction guide, all packaged within a nicely padded, zippered nylon case. Brand new, this lens retails for $ 899, significantly less than other versions made by Canon and Nikon, which run upwards of $ 1,300.

    Pros

    Fast, accurate autofocusing speed

    On the technical side of things, this lens performed impressively well. Even when shooting at f/1.4, all images produced by this lens were super sharp. Autofocusing speed was pretty fast and accurate, even when attempting to use this lens in an action setting like the concert below.

    Sigma 35mm f/1.4 lens review

    Little to no visible distortion

    After spending some time with the Canon 24mm f/2.8 prime lens that produces quite a bit of barrel distortion, I was pleasantly surprised to find that the Sigma 35mm has pretty much no visible distortion. Although bear in mind that lens distortion can be easily fixed in post production using Photoshop’s lens Correction filter (or Lightroom’s Lens Correction panel).

    Sigma 35mm f/1.4 lens review

    Cons

    Mostly plastic build

    Perhaps the first thing that struck me about this lens when I first interacted with it what its sleek, yet mostly plastic build. Compared to Canon and Nikon versions that are made of a mix of metal and plastic, this mostly plastic Sigma lens felt like it may not hold up very well in the long run. The Sigma seems to live up to its Art lens designation with the feeling that this lens would hold up better being used for artistic purposes, more so than run and gun type of shooting.

    Larger and heavier than Canon/Nikon equivalent

    Despite being made of mostly plastic, the Sigma also feels pretty heavy (23.5 oz./ 665g), and it is indeed slightly heavier than its Nikon (21.2 oz / 600g) and Canon (20.5 oz. / 580g) equivalents.

    Sigma 35mm f/1.4 lens review

    Overall Take

    While I loved capturing the world through a sharp 35mm prime lens, it was difficult to get over this lens’ size. The 35mm is known as a classic lens in photojournalism and street photography, and yet due to its size and plastic build, it was questionable if the Sigma 35mm f/1.4 could hold up well over time, especially in on-the-go style photography. As a result, I have to agree with my photography colleagues that you’d get what you pay for over time.

    Investing in the more expensive Canon 35mm f/1.4 would be worth the extra expense ($ 899 for the Sigma, $ 1479 for the Canon) just because the L lens designation ensures a higher quality, more durable lens. As an additional option, the slower Canon 35mm f/2 comes with image stabilization and is priced lower at $ 599.99, so that may be a better budget option. And a final, even cheaper alternative might be to add 5mm to the lens focal length by going for the Canon 40mm f/2.8 pancake lens, the smallest and cheapest ($ 149 USD) of them all.

    Basically, splurge for the Sigma 35mm f/1.4 and enjoy comparable, superior optics to the Canon and Nikon equivalents, but what you save in money might cost you later when testing the long-term durability of this lens.

    Sigma 35mm f/1.4 lens review

    googletag.cmd.push(function() {
    tablet_slots.push( googletag.defineSlot( “/1005424/_dPSv4_tab-all-article-bottom_(300×250)”, [300, 250], “pb-ad-78623” ).addService( googletag.pubads() ) ); } );

    googletag.cmd.push(function() {
    mobile_slots.push( googletag.defineSlot( “/1005424/_dPSv4_mob-all-article-bottom_(300×250)”, [300, 250], “pb-ad-78158” ).addService( googletag.pubads() ) ); } );

    The post Sigma 35mm f/1.4 Art Lens Review by Suzi Pratt appeared first on Digital Photography School.

    Digital Photography School

  • Tips for Depth of Field Control in Macro Photography

    Depth of field is the amount of distance between the nearest and farthest objects that appear in acceptably sharp focus in a photograph, it varies depending on camera type, aperture and focusing distance. If you are into photography you probably already know this and how critical it is when you photograph in macro distances.

    01

    This image was done with a 100mm macro lens with a life-size converter attached, at a distance of 4 inches to the object to achieve this type of magnification. The Depth of Field you see here is impossible to achieve, as there is no way to have the whole ring in focus with this focal length and this distance to the object.

    Here are a couple of test shots to show a comparison between an f/8 and an f/32 exposure of this image:

    02

    In this particular image f/8 would give you a very shallow Depth of Field, so if you would like to have more then f/32 would seem to be a better choice, right? But if you take a closer look, you will realize it is just not that easy.

    03

    The magnified image shows you that f/8 has shallow Depth of Field but, because it represents the sweet spot of this lens, it gives you great detail in the focused areas. On the other hand f/32 gives you more Depth of Field, but it lacks detail overall.

    This lack of detail is due to diffraction, that is the slight bending of light as it passes around the edge of an object giving the photographed image a soft focus effect. So, sharp focus and deep Depth of Field are impossible to achieve in this image due to optical limitations.

    A great work-around for these limitations is Focus Stacking (also known as Focal Plane Merging, Z-Stacking or Focus Blending), which combines images photographed with different focus distances into one final image with a greater Depth of Field.

    This technique is only possible if the camera, and all the elements on the image are perfectly still, so the use of a steady tripod is really important.

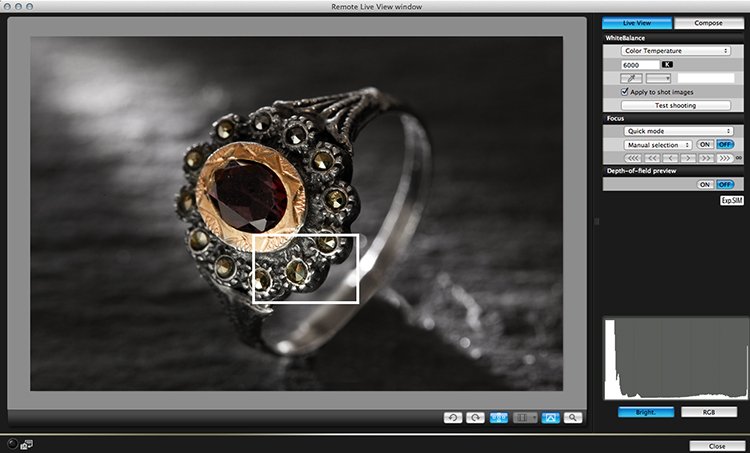
    Another important factor is to shoot, and focus without touching the camera. In this particular image the camera was tethered with a computer and a remote shooting app was used to focus the image.

    04

    The best way to capture these images is to start by focusing on the closest area first, then keep shooting, making sure you cover all the focusing length (move focus farther away from the camera with each successive shot). Just use the controls of your remote trigger and app to fine-tune the focus for each shot.

    The final number of shots depends on how detailed you want your image to be, but keep in mind that the more images you have, the harder it will be to process later on. This particular image was made with a merge of 21 images.

    05

    After the images are captured it’s time to process them. There are a lot of software options on the market for focus stacking; this image was edited with Adobe Photoshop CC. Here are the steps:

    1. Open Photoshop, go on File > Scripts > Load files into a stack
    2. Select all the pictures and turn on “attempt to automatically align layers”
    3. Select all your files in the layer panel on the right side
    4. Go to edit > Auto-Blend Layers and select “stack Images”

    You will end up with a stack of layers with associated masks that look something like this:

    06

    Each layer mask reveals the best of each focused part of the image, and they can also be manually adjusted for more controlled results. The final images are usually very impressive and allow you to achieve effects that would be impossible to reach any other way.

    googletag.cmd.push(function() {
    tablet_slots.push( googletag.defineSlot( “/1005424/_dPSv4_tab-all-article-bottom_(300×250)”, [300, 250], “pb-ad-78623” ).addService( googletag.pubads() ) ); } );

    googletag.cmd.push(function() {
    mobile_slots.push( googletag.defineSlot( “/1005424/_dPSv4_mob-all-article-bottom_(300×250)”, [300, 250], “pb-ad-78158” ).addService( googletag.pubads() ) ); } );

    The post Tips for Depth of Field Control in Macro Photography by Ivo Guimaraes appeared first on Digital Photography School.

    Digital Photography School

  • How to Build Relationships in Photography

    What’s the most important thing to maintain in any business? Confidence, market knowledge, technology? Sure, keep any one of those at the top of your list. But there’s also something else. Perhaps the most sought after and powerful asset you can ever hope to have when it comes to making yourself successful is – strong relationships.

    JD Hancock

    By JD Hancock

    That’s right, good relationships with those who you are seeking to do business with is the most most crucial aspect of any type of business venture. This is especially true when you become a photographer. No matter what kind: landscape, commercial, portrait, wedding, lunar, Martian. It is the cultivation of relationships with other people that will make or break you in this industry – and make no mistake, it is an industry.

    Gentlemen and ladies, before we begin, take a moment to congratulate yourselves on an accomplishment that is at the very least extraordinary. We, as photographers, are the jockeys of an art that has been melded with a science. We possess the skill to take time, hold it in our sometimes shaky hands, and pass it on to our clients to be forever held. We don’t just capture light, or moments, or events – we capture memory. Memories, that without us there to tend, would surely shift out of sight, and out of mind.

    Amanda Tipton

    By amanda tipton

    Now, back to what we’re here to discuss – why relationships are so important in photography. Thank goodness you’ve found this article on dPS if you don’t already know the answer to that question. The purpose of this writing is not to give you any ironclad formula of success. In fact, I feel I should remind you that you will most likely meet with more failure than success if you plan to become a photographer of any magnitude. It is our failures that teach us, that enable us to move forward, not our successes. So, if you’ve got the guts, keep reading.

    We are nothing on our own. True, I often make photographs that I never show (or intend) to show to anyone other than myself. I keep some places where I go to photograph secret, and return to them sometimes even without a camera. This is all well and good. Honestly, I usually advise such exercises because they often spark more creative thinking down the road. In this case, what I mean is that we cannot realistically be successful as photographers without the support of other people.

    Portrait photographers need subjects to sit. Wedding photographers need brides and grooms to direct their cameras. Epic landscapes pass from dawn to dusk in extraordinary light without a camera to capture them and put them on walls. What I’m saying here is that we cannot reach our own potential, both artistically and commercially, without some type of audience.

    Thomas Hawk

    By Thomas Hawk

    How do you get that audience? Well, that’s the difficult part of the photographic equation. The answer, fortunately, is fairly simple. Here are four steps to ensure you are doing your best to cultivate and maintain the relationships that will help you build and grow a career as a photographer.

    STEP ONE: Be nice

    When dealing with the public, and make no mistake, you WILL inherently have to deal the public, be sure to ALWAYS be polite. Even in the face of the most insulting and anger conjuring client – you must always be polite. Smile, be firm, and always remain true to yourself and your personal policies, but always be polite. This is where most new (and even experienced) photographers run into trouble. Overt politeness can go a long way in maintaining and building relationships with those who are willing to exchange money for your services. Learn to accept that you will have conflict, and that not everyone will like or appreciate your work. When you come to the realization that you don’t need to meet hostility with more hostility, you will be able to remain much calmer and relaxed. Remember, you are better at everything when you are relaxed and focused.

    Roberlan Borges

    By Roberlan Borges

    STEP TWO: Be humble

    Just as you will certainly run into those people who test your patience and civility, you will also encounter those who think you hung the moon. The bride who just can’t stop complimenting your work, or the Facebook friend that likes and comments on every single image you post. This is an unexpected accompaniment of being a well-liked photo maker. Train yourself to take a compliment with grace. Say thank you and don’t play out the situation more than it needs to be played. The key here is to stay humble. Of course, in the back of your mind you know when you make an exceptional image, or pull off a one in a million shot. That doesn’t mean that you have to be boastful or even worse, brag about your prowess. Take it from me, no client wants to deal with a photographer who is pompous or inflexible – well, most clients.

    Tanakawho

    By tanakawho

    STEP THREE: Be honest

    Hopefully, we all follow some ethical subscription be it in life or in our careers. As photographers, we must know what we can and cannot do, and in turn be honest about those facts. If your client requests you to cover a wedding and you don’t physically have the speedlights or lens to cover it, be honest. Never promise what you you can’t deliver, and most definitely don’t accept compensation for a job you’re not qualified to perform. Granted, the only way to learn is by doing. By all means, stretch your photographic legs and push the boundaries of your skills. However, always be mindful of your weaknesses, and when it comes down to it, you’ll know your limitations. Always be sure to let your employer be aware of what you can do. It will go a long way in building a lasting business relationship. That leads us to step four.

    Thinkpublic

    By thinkpublic

    STEP FOUR: Be willing to step outside your comfort zone

    This is perhaps the most difficult part to decipher as a fresh new photographer. When do you draw the line between expanding your skill and having no idea about what you’re doing? This can be troubling, yes. It can also be absolutely exciting. The bottom line, be willing to step outside of your comfort zone for your client. If it’s something you simply cannot do (and you will know), refer to the honesty principle above. That being said, most likely you are your own worst critic, and you can do more than you ever dreamed. So don’t be afraid to try something new. Your client will remember you as the photographer who was honest with them about your abilities, and communicated your willingness to try something unique.

    The Shopping Sherpa

    By The Shopping Sherpa

    It’s tough to start out in a new field. It’s extremely tough to be a new photo maker in a market saturated with photographers. Get the best gear you can afford. Learn as much as you can. Do as much as you can. At the same time, don’t forget that you are a provider in an industry that caters to the wants of others. As such, your success is dependant on the good graces of those with whom you do business. Be honest, humble, and competent. Be bold, but never be reckless. Build relationships with your clients based on mutual understanding, and I guarantee you be a more satisfied, and dare I say a more successful photographer.

    googletag.cmd.push(function() {
    tablet_slots.push( googletag.defineSlot( “/1005424/_dPSv4_tab-all-article-bottom_(300×250)”, [300, 250], “pb-ad-78623” ).addService( googletag.pubads() ) ); } );

    googletag.cmd.push(function() {
    mobile_slots.push( googletag.defineSlot( “/1005424/_dPSv4_mob-all-article-bottom_(300×250)”, [300, 250], “pb-ad-78158” ).addService( googletag.pubads() ) ); } );

    The post How to Build Relationships in Photography by Adam Welch appeared first on Digital Photography School.

    Digital Photography School

  • PhotoshopUser TV: Flame FX and Brushes – Episode 421

    This week on PUTV, Corey has a tip on using the flame generator. Pete dives a little deeper into brushes and gives you some helpful tips in using them.

    This Week’s Sponsors:

    Wacom | mpix | B&H Photo | Kelby Training | NAPP | onOne Software | Peachpit | Squarespace | Expo Imaging | Intel | Athentech

    Photoshop User TV Episode 421 is now playing!

    Download Episode 421
    (In order to download this file directly to your computer, right-click (Control-click on Mac) on the Download link and choose the Save As option.)

    Photoshop User TV

  • 2 Clumsy Mistakes To Avoid When Meeting With Potential Customers

    You recently received an inquiry from someone who really likes your work, is interested in hiring you for a shoot, and wants to meet in person (or on the phone) to discuss more details. Naturally, you’re pretty excited. The thought of booking an event is something that thrills all of us. Then, as soon as the meeting starts, the two cardinal sins of salesmanship rear their ugly heads. What are they?

    Talking too much and not listening enough.

    Two Clumsy Mistakes Banner

    Sure enough, once the prospect asks you a question, it’s as if you’ve suddenly been put in front of a classroom with the responsibility to lecture on photography for the next 25 minutes, flood gates thrown open. And because you want so badly to make the sale, you don’t leave anything out – linking your statements from one benefit to the next, emphasizing personal strengths, advantages, until you’ve suddenly dominated the conversation with what YOU wanted to say and talk about, not what THEY needed to hear.

    This is the first massive mistake, and is actually the primary cause for the second mistake. Whether you are just starting to charge for your photography services, or wanting to increase and grow your existing photography business, you cannot allow yourself to command the conversation. When you do this, you miss uncovering the real concerns of the client, what they really want in the end, and ultimately it makes them feel as though they weren’t really heard. Remember, it’s not about YOU – it’s about THEM.

    One way to turn this scenario around is to start asking them questions, turn the table. Get them talking about what their vision for the shoot is, what concerns they may have, how they view the end result. A great trick to get them to start talking is to say something like this, “____ (name), I’m fully prepared to discuss the event/project in detail with you, but first I want to get your perspective on it so that we can focus our time together on the things that interest you most.”

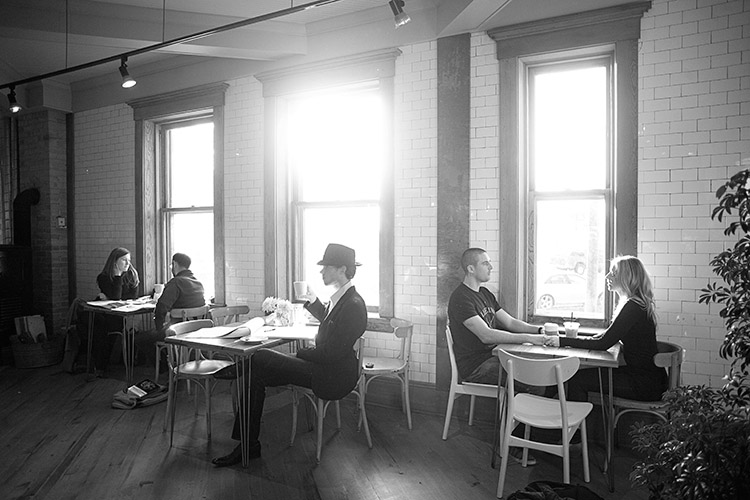
    Meeting Cafe

    By announcing that you’re prepared, you demonstrate your competence and responsibility – and by demonstrating your preparation, you build immediate credibility. Furthermore, by inviting your customer to articulate what’s most important to them, you recognize and validate their importance. In other words, it shows that you care about their thoughts and concerns, and that you want to work together to provide a solution that works for both of you.

    The next step is to keep them talking. Again, this is all about them, not you. An easy way to do this is to keep asking questions that are easy to answer such as:

    • Tell me more about
    • What else should I know about?
    • Could you please expand on..?

    It’s imperative that you uncover as many of their fears, concerns, wants, desires as you can. Consider asking questions like:

    • What worries you most about this?
    • I can tell that you are frustrated about that – how come?
    • You mentioned that you tried that in the past. Why didn’t it work so well that time? What could have been done differently?

    Meeting Consult

    The primary benefit of asking all these questions is to uncover what’s really important to them. This is the treasure chest, what they are really after. Once you know what’s most important to them, you can then frame your offer according to the specific desires of that client, which will skyrocket your chance of booking the shoot.

    But all of these questions are worth nothing – if you don’t listen to what they’re saying. There are four primary elements to Active Listening:

    1. Attentive body language (nod, make eye contact, smile, etc.)
    2. Verbal attends (uh-huh, okay, sure)
    3. Ask leading questions (open-ended questions that encourage them to talk more)
    4. Restating back to the person what they just said

    Meeting

    Active Listening is not simply waiting for your turn to talk, and it’s certainly not interrupting them to demonstrate that you already know what they’re talking about. Active Listening is nothing more than allowing the customer to completely share their story with you, then playing back that story to them asking for confirmation and clarification. “Is that right? Did I miss anything?”

    With any new skill, it takes time to get down pat. But this is something that will have an immediate effect on your ability to book more events because you are validating the concerns of your potential clients, and linking your services to their exact wants and goals.

    googletag.cmd.push(function() {
    tablet_slots.push( googletag.defineSlot( “/1005424/_dPSv4_tab-all-article-bottom_(300×250)”, [300, 250], “pb-ad-78623” ).addService( googletag.pubads() ) ); } );

    googletag.cmd.push(function() {
    mobile_slots.push( googletag.defineSlot( “/1005424/_dPSv4_mob-all-article-bottom_(300×250)”, [300, 250], “pb-ad-78158” ).addService( googletag.pubads() ) ); } );

    The post 2 Clumsy Mistakes To Avoid When Meeting With Potential Customers by Mark Thackeray appeared first on Digital Photography School.

    Digital Photography School