Category: Photography

  • 6 Tips to Get Started with Portraits

    591

    People fascinate me. I love the diversity in personality and expressions, and I love using my camera to capture all those personalities! People are by far my favorite subject to have in front of my camera.

    If you are new to photography and getting frustrated that you aren’t creating portraits like you hoped, I’m here to help! Let’s go through six tips to get started with portraits. You’ll be a pro before you know it.

    183

    1. Get yourself a 50mm lens

    Are there better lenses out there for portraits? Yes. But the 50mm is inexpensive, versatile and great to get started! Once you’ve gotten the hang of this lens, you’ll know what other lenses to invest in later and you’ll never regret having a 50mm prime lens in your bag. Your camera probably came with a kit lens that zooms in and out. The drawback of this lens is that you can’t open the aperture very wide.

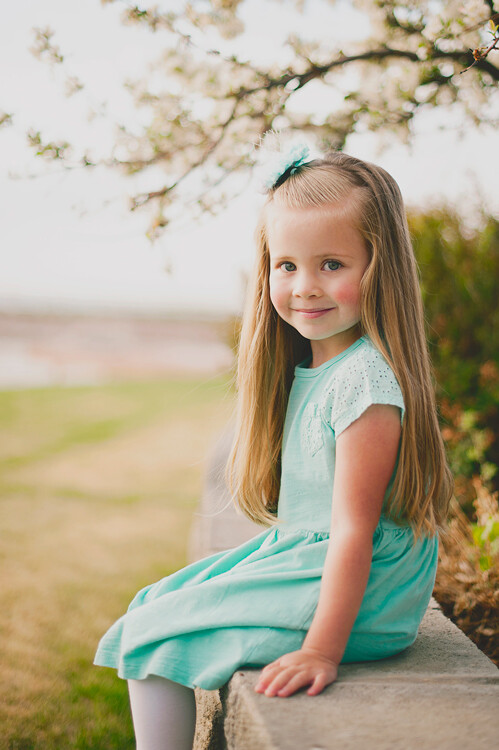
    Have you noticed portraits that have a creamy blurred background, and the subject just pops? This is achieved by setting the aperture on a very low number, usually between f/1.8 and f/2.8. Look at your kit lens. It probably can only go down to f/3.5, and if you zoom in your lowest aperture number is probably f/5.0. You could get the 50mm 1.4 or, if you’re really unsure about what you want, give the 50mm 1.8 a try. It’s the least expensive lens out there, but it will still give you a lot of bang for your buck. Trust me on this one! If I could only choose one lens to have in my bag for the rest of my life, it would be this one.
    187

    2. Focus on the Eyes

    Toggle your focus point of your camera until it’s right on the eyes; if your subject is close to you, put the focus point on one eye (if one eye is closer to you than the other, focus on that one). If you are still letting your camera automatically choose where to focus, change that in your settings now! Pull out that manual you hid away and put it to good use.

    If your subject’s eyes are in focus, it will be a much more compelling portrait. After all, the eyes are the window to the soul! If possible, try to position your subject so they have some catchlights (or sparkle) in their eyes.

    f164

    Be cautious when you are shooting really close portraits. You want to make sure that you have your aperture number high enough that everything you want to be in focus will be in focus. If you are really close to your subject and your aperture number is really low, like f/1.8, you may notice that the eyes are in focus, but the nose is not. Just bump up the aperture a little at a time until you get the look you are going for. When you are learning and experimenting, it’s helpful to zoom in on the preview on the back of your camera after you have taken the photo. Sometimes it may look like everything is in focus, but later when you upload it to your computer, you realize that it definitely was not in focus. If you can find this out WHILE you are shooting, you have a chance to correct things and learn at a faster rate.
    143

    3. Experiment with Distance and Orientation

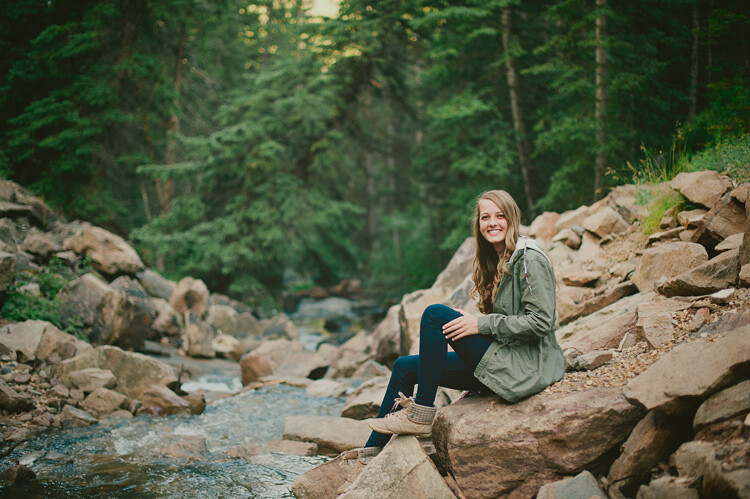
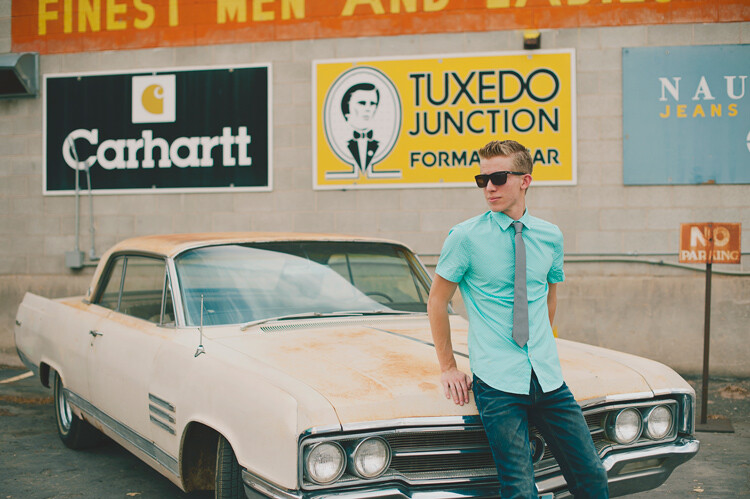
    Sometimes as beginners we might get stuck doing things always the same way, like needing to put the subject’s whole body into a portrait, or having the face fill up the frame. Neither is right nor wrong. The important thing is not to produce the exact same photo over and over.

    Try stepping back a bit and include the surroundings in your portrait. It might tell a great story about the person you are photographing. Then try getting really close. Now get even closer. Don’t worry about what grandma is going to say – it’s okay to cut off the top of someone’s head in a photo.

    You might notice that you almost always shoot vertically (portrait), or maybe you’re stuck shooting horizontally (landscape) all of the time. Don’t let yourself get in a rut! Try close-up portraits horizontally and try vertical portraits that take in lots of the surroundings (and vice versa).
    167

    4. Create a True Portrait

    We can stick anyone in front of a paint splattered backdrop, sit them on a stool, turn their shoulders at an angle, tell them to smile and call it a portrait. Or we can use our skills to make a portrait that truly shows who your subject is, and what they are about. I love the portraits that tell a true story about my subject because I know that I have captured something worth keeping.

    Try to get to know your subject a little bit and use that knowledge to create a portrait that anyone could look at and know a little bit about who that person is. You could do this with props, expression or posing. If they’re passionate about something, they may want it included in the photo with them. If he’s a person who smiles all the time, a serious portrait may not capture who he really is.

    Your job as the photographer is to make a portrait that will be treasured by everyone who knows your subject. They will know that you really caught who he is. It’s also your job to create a portrait that will be compelling to those who don’t know your subject. It should make them want to get to know him and let them know a little bit about who he is, even if they’ve never met.

    131

    5. Lighting First, Background Second

    Good light on your subject’s face is most important in a portrait. I look for good lighting before I look for a good background. The easiest lighting to work with for beginners is an overcast day (if that’s the way the cards fall that day) or shade. On an overcast day, try having your subject facing toward the light source. Even if it’s cloudy, often the direction you have your subject face will either illuminate their eyes or put their face in shadow. If you’re not sure which direction to have him face, just rotate until you have that aha! moment when the light is just right.

    You might find shade on the shady side of a building (subject facing out towards the light) or in the shade of trees, but if the light is patchy in the trees have your subject put her back towards the sun. You don’t want to have dappled light on her face, or half-shadow and half-sun. Try to have the light as even on her face as possible. Also, avoid having full sun on your subject’s face. This can cause harsh shadows and make it almost impossible for some not to squint their eyes.

    Expose for the face for portraits, even if it causes your background to not be exposed correctly. In a portrait, the person is obviously the most important part, so this makes sense.

    175


    6. Don’t Worry About the “Rules”

    It’s important to learn all you can about the rules of photography. Learn them, practice them, use them. Then be creative and have some fun without worrying too much about the rules. If you’re making a portrait, the eyes don’t have to be looking at the camera. The photo doesn’t always have to be divided into the rule of thirds. You don’t have to do what everyone else is doing, either. Be true to yourself and have fun with it! When you create a portrait of someone, it can be truly unique. Nobody else will be able to take that same photo in that same light with that same expression. Make sure it represents who you want to be as a photographer and make sure it represents the person you are creating a portrait for.

    Do you have questions about taking portraits? I’d be happy to answer everything I can in the comments. I’d also love to see your favorite portraits you’ve taken!

    156


    googletag.cmd.push(function() {
    tablet_slots.push( googletag.defineSlot( “/1005424/_dPSv4_tab-all-article-bottom_(300×250)”, [300, 250], “pb-ad-78623” ).addService( googletag.pubads() ) ); } );

    googletag.cmd.push(function() {
    mobile_slots.push( googletag.defineSlot( “/1005424/_dPSv4_mob-all-article-bottom_(300×250)”, [300, 250], “pb-ad-78158” ).addService( googletag.pubads() ) ); } );

    The post 6 Tips to Get Started with Portraits by Melinda Smith appeared first on Digital Photography School.
    Digital Photography School

  • How to take more Photography Gear through Airports

    Have you ever wondered how you can get more gear onto a plane without paying an excess baggage fee?
    We found this interesting video from photographer Peter Leong, a wedding photographer in Japan who travels regularly for overseas weddings, describing how he carries camera gear on board.

    Have you worn a photography vest before? What has your experience been when traveling with photography gear and taking it through airport security?

    googletag.cmd.push(function() {
    tablet_slots.push( googletag.defineSlot( “/1005424/_dPSv4_tab-all-article-bottom_(300×250)”, [300, 250], “pb-ad-78623” ).addService( googletag.pubads() ) ); } );

    googletag.cmd.push(function() {
    mobile_slots.push( googletag.defineSlot( “/1005424/_dPSv4_mob-all-article-bottom_(300×250)”, [300, 250], “pb-ad-78158” ).addService( googletag.pubads() ) ); } );

    The post How to take more Photography Gear through Airports by Darlene Hildebrandt appeared first on Digital Photography School.


    Digital Photography School

  • A Beginner’s Guide to Choosing Shooting Mode

    Even the most seasoned veteran photographer may use a pre-programmed mode occasionally in order to concentrate immediately on a shot rather than take the time to calculate exposure and miss the opportunity for the great image. But if you are a beginner at photography or want to advance your photography skills beyond the use of Auto mode, begin by adventuring away from the green box.

    When you are setting up your camera to capture an image, there are four basic results to consider: wide depth of field, shallow depth of field, motion blur or freeze motion. How do you know which mode to use to control these basics of photography? Let’s take a look.

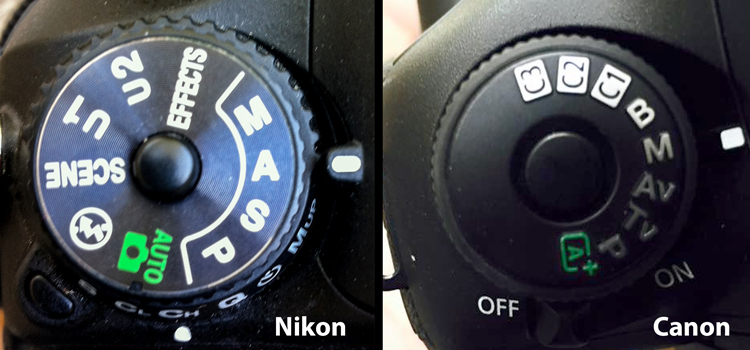
    Nikon-Canon-mode-dail

    Auto (Green box)

    In Auto mode, your camera will automatically set the shutter, aperture, ISO, white balance, and even the pop-up flash for you.

    Advantages: This is a great option for beginners with a digital camera – but don’t become dependent on it! Only use it until you learn to take control of your camera.

    Disadvantages: In certain lighting conditions the auto settings may produce undesirable images. For instance, a portrait that is heavily back-lit might just produce a silhouette. In low-light, you may end up with blurry and grainy images; also in low-light, the camera may choose to fire the flash to give more light and many camera models don’t provide a way to disable the flash if you don’t want it.

    When to use: Any time you want to use your camera just as a point and shoot camera, this is your mode.

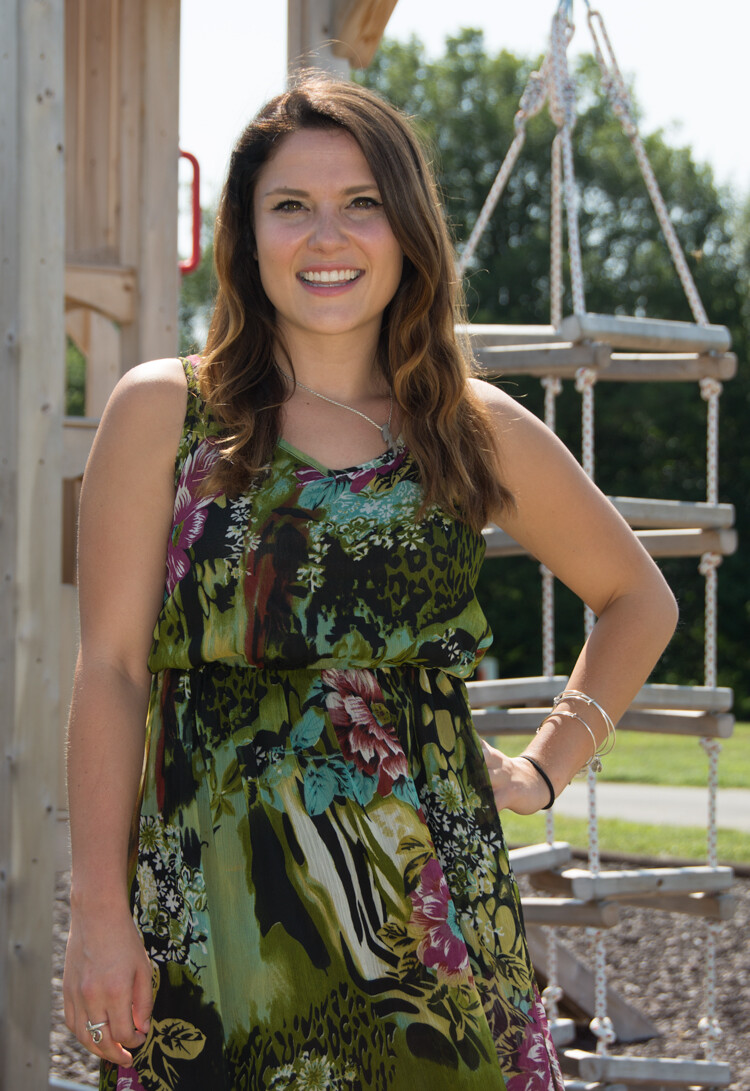
    This portrait was intentional shot into the sun in Auto Mode. While the camera did a decent job with exposure, it might be a 1/2 stop under exposed. Auto exposure settings choose by the camera are 1/250th of a second at f/6.3 with ISO of 100. while the shutter speed and ISO are good, a wider aperture would have lessened the DOF and made the background less distracting.

    This portrait was an intentional shot into the sun in Auto mode. While the camera did a decent job with exposure, it is a 1/2 stop under-exposed. The auto exposure settings chosen  are 1/250th of a second at f/6.3 with ISO of 100. While the shutter speed and ISO are acceptable, a wider aperture would have lessened the DOF and made the background less distracting.

    Program (P)

    In Program mode, your camera will automatically set the shutter speed and aperture, but will allow you to choose ISO, white balance, exposure compensation and flash options.

    Advantages: This is a great next step for a beginner who wants to take a little more control of their camera and improve their images.

    Disadvantages: As in Auto mode, certain lighting conditions may lead to unpredictable results, due to the partial automatic settings which leave some results to chance.

    When to use: Use this mode if you want to take a good first step to ultimately taking complete control of your camera’s options.

    Shutter Priority (TV – Canon) (S – Nikon)

    In Shutter Priority mode, you select the shutter speed and ISO and the camera will automatically choose the proper f-stop for what it determines to be the correct exposure.

    Advantages: Great for controlling freeze action and motion blurring of moving objects.

    Disadvantages: In this mode you have control of your shutter speed, so you must be careful that your camera can choose an f-stop to give you a proper exposure. The type of lens you have available to use comes into play here. Most cameras can shoot at a very fast shutter speeds, but if your lens doesn’t have a large enough aperture to match that shutter speed the resulting image will be under-exposed.  For example, if you are shooting with a shutter speed of 1/4000th of a second, and the proper exposure for the speed of the subject requires an f-stop of f/2.8, but the widest opening on your lens is f/3.5, the image will be under-exposed.

    When to use: Use this mode when you want to control the motion of the object you are photographing. Use a fast shutter speed if you want to freeze the motion or use a slow shutter speed if you want to blur the motion. This mode is also useful when using large mm lenses where you need to set a fast shutter speed to avoid blurred images due to camera shake.

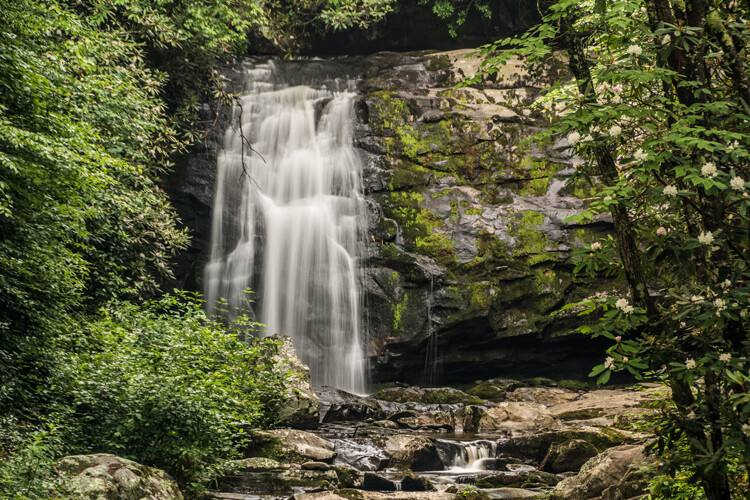
    Choosing shutter priority and setting shutter to 1/8th of a second to blur the water.

    Shutter priority with a shutter to 1/8th of a second was used to blur the fast moving water.

    Here are some suggested shutter speeds for Shutter Priority:

    • Freeze very fast motion – 1/3000th of a second
    • Athletes in motion – 1/500th to 1/1000th of a second
    • Birds in flight – 1/1000th to 1/2000th of a second
    • People walking – 1/250th of a second
    • Panning moving objects – 1/30th to 125th of a second
    • Blurring fast moving water – 1/8th of a second
    • Blurring slow moving water – 1/2 to 1 secondshutter

    Aperture Priority (AV – Canon) (A – Nikon)

    In Aperture Priority mode, you select the aperture and ISO and the camera will automatically choose the proper shutter speed for what it determines to be the correct exposure.

    Advantages: Other than Manual mode (next paragraph), Aperture Priority is the most popular shooting mode photographers use, mainly because it controls what is in focus in your image. And in most cases the item you have in focus is the element that will make or break the success of your image.

    Disadvantages: In low-light situations your camera may choose a very slow shutter speed that will produce a blurry image, either because of movement by the subject or camera shake.

    When to use: Use this mode when you want to control the Depth of Field (DOF) of your image. The larger the aperture the more light reaches your camera’s sensor and the shallower the DOF. Reversely, the smaller the aperture the less light reaches your camera sensor and the deeper the DOF. Beware that changing your aperture will also affect your shutter speed. More light from large apertures requires a faster shutter speed and less light from small apertures requires a slower shutter speed.

    Using Aperture Priority to set a larger aperture to increase DOF

    Aperture Priority to set a larger aperture to increase DOF.

    Here are some suggested f-stops for Aperture Priority:

    • Landscapes -f/8 or higher for more DOF
    • Portraits – Large aperture  (f/2.8) for shallow DOF to blur the background
    • Macro – f/8 or higher for more DOFaperture

    Manual (M)

    Manual mode allows you to change both the shutter speed and aperture settings independently from each other. No settings will be automatically set by the camera. Your camera’s built-in light meter will guide you on the exposure it determines to be correct, but you have complete control to adjust the shutter and aperture separately to get the exposure you determine to be correct for the image you are creating. Before you use the manual mode it is recommended that you have an understanding of the exposure triangle (shutter speed, aperture and ISO) and how each will affect your final image.

    Advantages: This mode gives you complete creative control of the image you are capturing.

    Disadvantages: While this mode has many creative advantages, you must be careful to always check the exposure with every image, especially when shooting in fast changing lighting conditions.

    When to use: After you have learned to use this mode and learned the effects and results of the settings and how they work together, you will use this mode almost every time.

    Here Manual mode was used to control the DOF and to use a slow shutter speed to blur the waterfalls.

    In Manual mode, a small aperture was used to control the DOF while also setting a slow shutter speed to blur the motion of the waterfall.

    Scene Modes

    Scene mode is very similar to Auto mode. You choose the scene you are shooting and the camera will choose settings for you optimized for that scenario. Different camera models may have different scene modes, but listed here are some of the most popular:

    • Sports – Camera will increase ISO and use a fast shutter speed to capture fast action.
    • Landscape – Camera will use a small aperture to maximize the DOF; flash may also be disabled.
    • Portrait – Camera will use a large aperture to  throw the background out of focus. Some models of cameras will also use face recognition in this mode.
    • Macro – Camera will choose small aperture to give as much DOF as possible.

    Advantages: As with the Program mode, these Scene modes are a beneficial starting point for beginners and will often give a better result than shooting in Auto mode.

    Disadvantages: While these settings can produce desirable images at times, the results may vary and will not be reliable.

    When to use: While these scene modes may be a step up from Auto mode for beginners, use these options as a starting point to learn your camera, understand its workings, and upgrade your photography skills.

    Aperture-Shutter


    So which mode is the best?

    It is completely up to you which mode you feel most comfortable using. But if you are using the Auto, Scene or Program modes and you want to improve your photography, learning how to set exposures using the exposure triangle of shutter, aperture and ISO will help you make the best possible choices to create better images.  The two most popular modes used by professional photographers are Manual and Aperture Priority. Remember, professionals were once beginners too. Enjoy your camera experiences, no matter which mode you choose!

    googletag.cmd.push(function() {
    tablet_slots.push( googletag.defineSlot( “/1005424/_dPSv4_tab-all-article-bottom_(300×250)”, [300, 250], “pb-ad-78623” ).addService( googletag.pubads() ) ); } );

    googletag.cmd.push(function() {
    mobile_slots.push( googletag.defineSlot( “/1005424/_dPSv4_mob-all-article-bottom_(300×250)”, [300, 250], “pb-ad-78158” ).addService( googletag.pubads() ) ); } );

    The post A Beginner’s Guide to Choosing Shooting Mode by Bruce Wunderlich appeared first on Digital Photography School.


    Digital Photography School

  • 10 Lightroom Tips for a Smoother Work Flow

    If photography has become an integral part of your existence, or is destined to be, chances are fair to good that you will find yourself staring longingly into the eyes of Lightroom like an insatiable lover. That might sound romantic, but in reality it is more like a hypnotic spell which can be difficult to break.

    Hypnotic trance

    It’s easy to squander away lots of time fumbling your way through Lightroom.

    However, when you find yourself in this situation, rest assured that it will hopefully be time well spent as it is an indispensable resource in your photographic arsenal. One of the keys to getting the most out of your Lightroom experience in a reasonable amount of time is to approach it like a dangerous animal – in small, carefully planned steps.

    Sure, you can just jump in blindly headfirst, but knowing what lies ahead can save you precious time and unnecessary pain (read=frustration).

    In this article, I’m going to lay out some of Lightroom’s features that I like to exploit to achieve my goals in a more direct and timely manner.

    1. Apply on Import Settings

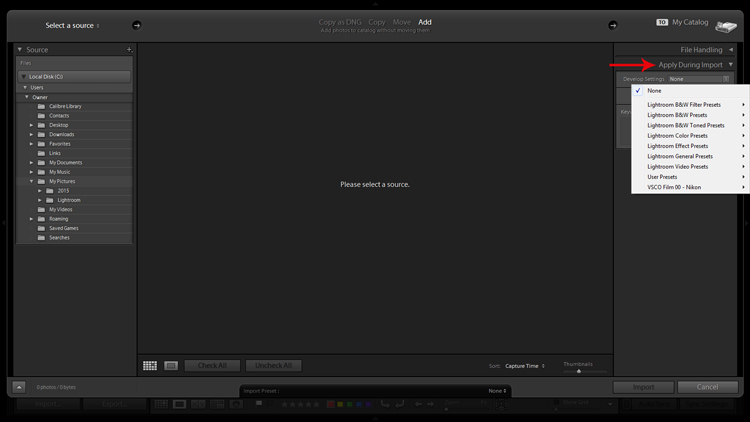
    You can save time early on in the process when first importing images into Lightroom by utilizing the Apply During Import feature.

    When you are in the Library module, the Import button will be live in the lower left corner. Clicking it reveals the Import window which is where you have the Apply During Import dropdown menu in the panel on the right.

    Apply on import screenshot

    Applying Develop presets on import is a good way to get a jumpstart on the the editing process.

    The Develop Settings dropdown provides access to your Develop module presets. If you haven’t created any, this will only be populated by Lightroom’s built-in preset options.

    This is a way to save you some clicks by allowing Lightroom to apply things like sharpening, saturation, color temperature, etc. (any settings savable within a preset) while it imports your new photos to your catalog.

    You are also presented with the opportunity to populate the Keywords box and apply common metadata like image location or copyright information. I recommend beginning an unwavering habit of adding keywords on Import and not procrastinating until later to it. You will thank yourself in a few years when you’re looking for a specific picture in your library of 20,000 images.

    2.Preview and Selection

    Once you have imported your latest batch of soon-to-be masterpieces it’s time to sort through and separate the wheat from the chaff.

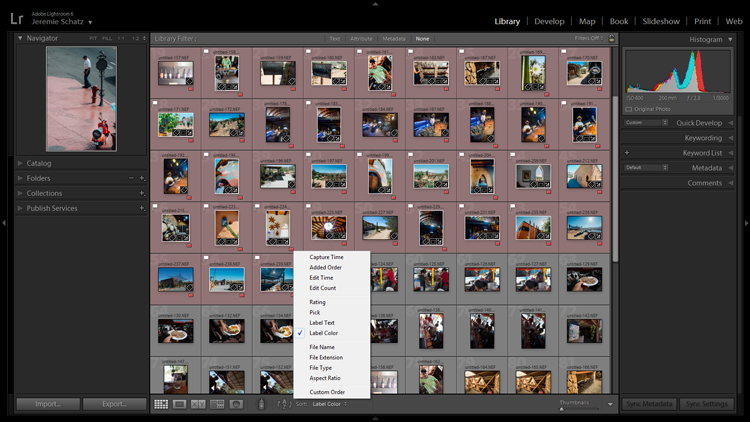
    There are a number of ways to go about this, but I prefer to start at the beginning, viewing images at full screen (keyboard shortcut F) and using the arrow keys to flip through. When I come across a potential keeper, I mark it by color. You can do this by clicking one of the four colors in the lower tool bar menu (while not in full screen mode) or using keyboard shortcuts 6-9 which correspond to the four colors (while in full screen mode). If the color labels are not visible, click on the arrow on the right side of the lower toolbar and click on Color Label.

    I have attached specific meanings to these colors. Red, for example, means that the photo is a potential candidate for editing after closer inspection.

    Screenshot of photos grouped by color label

    Color labels and flagging are convenient tools for sorting and locating images.

    After you sift through a batch of imported photos and have color coded them, you can then sort or filter by label color for quick selection or organizing. To do this, you must be in grid view in the Library module. In the upper Library Filter toolbar, you can click on Attribute and then click the desired color and Lightroom will group all photos with that label color at the top.

    If you just want to group together photos with the same color label without hiding all of the other images in that folder, you can click on Sort in the lower toolbar and select Label Color. After you have applied color labels and grouped them together, you now have a convenient way to delete unwanted images by clicking the first one, holding shift, clicking the last one (which will select the whole group) and then hitting delete.

    3.Use Keyboard Shortcuts for a Smoother Editing process

    As you spend more time using Lightroom, you will find that all of these little tricks which seem to save only trivial amounts of time/effort are compounded quickly.

    Keyboard shortcuts are one of those tricks. Don’t be selfish, share the carpal tunnel with your left hand too.

    At the very least, learn the keyboard shortcuts for the processes that you use most often.

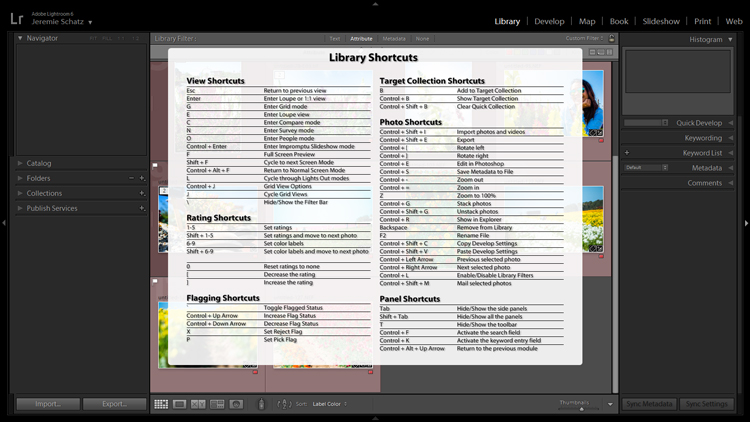
    Although I could list them all here, you really only need to know one: CTRL+/. This will open a pop-up window of some of the keyboard shortcuts for the respective module that is active.

    Screenshot of keyboard shortcut cheat sheet

    Pressing CTRL+/ brings up the keyboard shortcut cheat sheet for the module you are in.

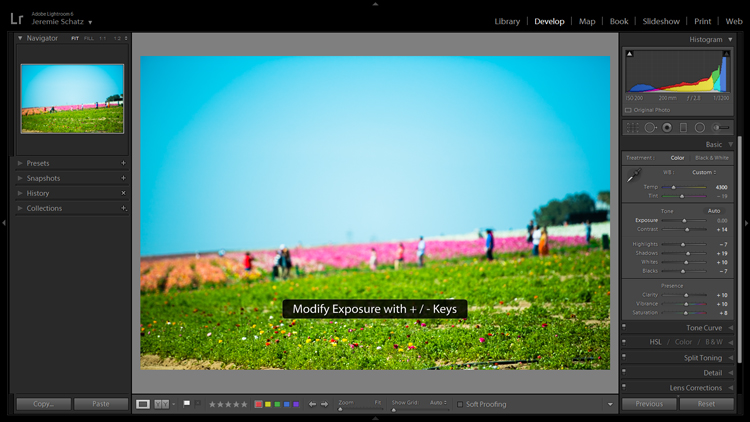
    Another little trick you may not be aware of can be found in the Develop module. Instead of clicking and dragging sliders, you can click on the name of an adjustment (click the word Exposure for example) and then use the (+) and (–) keys to move the slider in incremental amounts.

    Screenshot for develop adjustments

    Clicking on an editing action will activate it and using the + and – keys makes incremental adjustments.

    If you’re one who likes to work top to bottom, you can use the (,) and (.) keys to cycle through the adjustments in the active panel.

    4.Use the Target Adjustment Tool

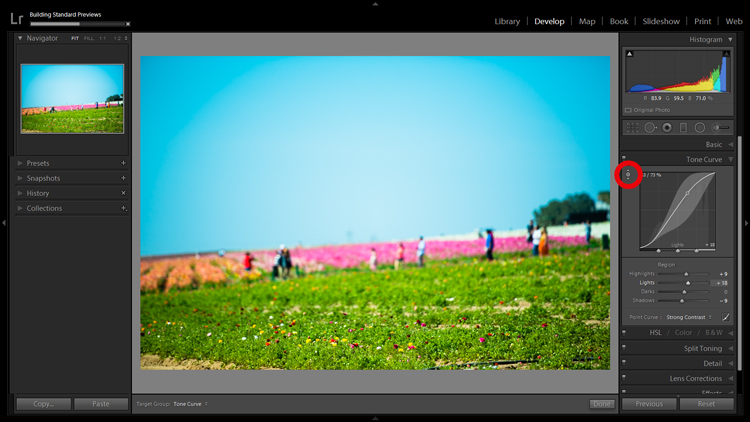
    You will find this handy little tool in the top left corner of the Tone Curve, HSL and B&W panels. The concept is that once you have clicked on the tool and activated it, click anywhere on your image, drag up or down and Lightroom will make the appropriate adjustments.

    Screenshot of the target adjustment tool

    Using the target adjustment tool takes some of the guesswork out of editing.

    If used in the Tone Curve panel, the tone you select will fall into one of the four quadrants the tone curve is divided into: highlights, lights, darks, shadows. Within the HSL panel, the tool is a little more intelligent and can be used to tweak combinations of the eight color sliders for hue, saturation and luminance. For example, if you click on some green grass and start dragging, the tool may move both the yellow and green slider to pinpoint the correct hues for adjustment.

    The B&W panel does the same as HSL except the adjustments are to the various shades of gray that the image has been converted in to.

    5.Create Virtual Copies to Compare Edits

    More than likely you are aware of the basic premise which Lightroom uses to edit your images. It’s simple: a tiny little file called a sidecar file (with the .xmp file extension) piggybacks onto your original image and keeps track of all the edits you’ve made to that image.

    Lightroom enables you to add some extra info to that .xmp file which allows you to make further edits on the virtual copy while maintaining the edits you’ve made thus far. This can be accomplished by choosing Photo>Create Virtual Copy (keyboard shortcut CTRL+’).

    Screenshot of image comparison

    Making virtual copies allows you to compare different edits of the same image side by side.

    Lightroom also allows boasts the Snapshot feature in the Develop panel on the left of your screen. A Snapshot basically bookmarks a specific spot in your edit history which you can revert the image back to.

    One approach can be to work through your editing process, make a virtual copy at some point and go for a different look with the copy. Then you can compare both edited images side-by-side to see which tickles your fancy. Virtual Copies can also be exported in the same way as the original. This is why I use Virtual Copies rather than Snapshots.

    6.Create Collections to Group Choice Images

    The Collections panel really warrants an entire article to itself as there are many features within it, but let’s discuss its most basic use, which is to create a grouping of images.

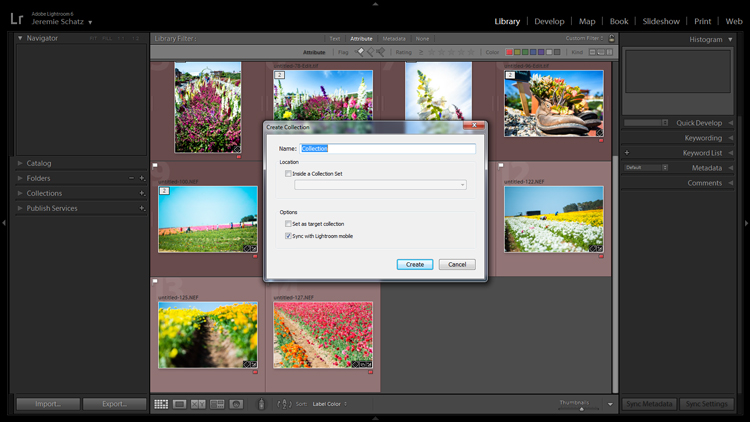
    There is a plus sign beside the Collections heading and clicking that launches a dropdown menu. The first choice is Create Collection and that’s where you should start. A dialog box will launch and you should name your collection and check the Set as target collection box.

    Screenshot of new collection dialog box

    Once a new collection is created, pressing B while any photo in your library is selected adds it to the target collection.

    Let’s say you embarked on a wild journey across Siberia and have a zillion photos in several folders. You could create a collection called Choice Siberia Pics, then add your favorite images to this collection to show off to friends in a slideshow. To add images to the collection, either right click and select Add to Target Collection or use keyboard shortcut B.

    One benefit of using collections is that you add photos easily from anywhere in your library, and Lightroom doesn’t actually make copies so no additional space is taken up on your computer’s memory.

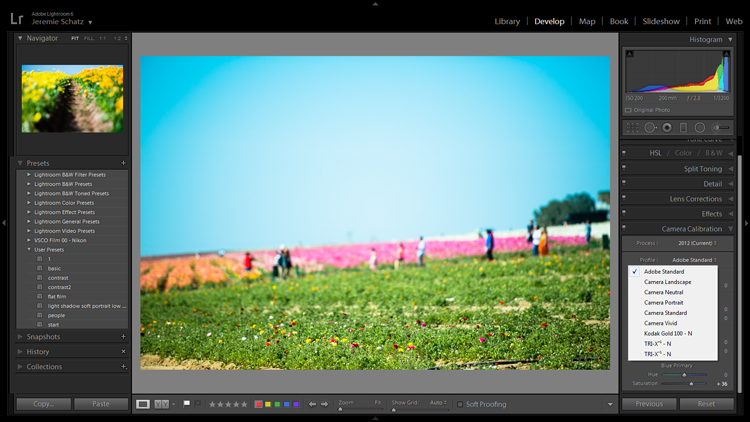
    7. Use Camera Calibration Profiles

    In the Develop module, the last choice on the right-hand menu is Camera Calibration. If this panel has been shrouded in mystery and, as such, you have pretended it doesn’t exist, it’s time to enter unchartered territory.

    What Camera Calibration profiles do is adjust your image to recreate, as closely as possible, whatever various picture profiles your camera may offer. If you are shooting in RAW and reviewing your photos in-camera, you are likely seeing a JPEG preview that the camera whipped up for you. When you import those RAW files, Lightroom ditches that JPEG and you get that unsharp, unprocessed dull-looking image.

    In Camera Calibration there is a Profile dropdown menu which offers up the same processing options that you will find in your camera. I shoot with a Nikon so Lightroom gives me the options of:

    -Adobe Standard
    -Camera Landscape
    -Camera Neutral
    -Camera Portrait
    -Camera Standard
    -Camera Vivid

    Camera calibration screenshot

    Camera calibration profiles offer the same settings found in many cameras.

    That first choice is Lightroom’s default. If you find one of these settings appealing and want to make it a default setting, you can hold down the Alt key and click the Set Default button at bottom right.

    8.Create Develop Presets for Common Settings

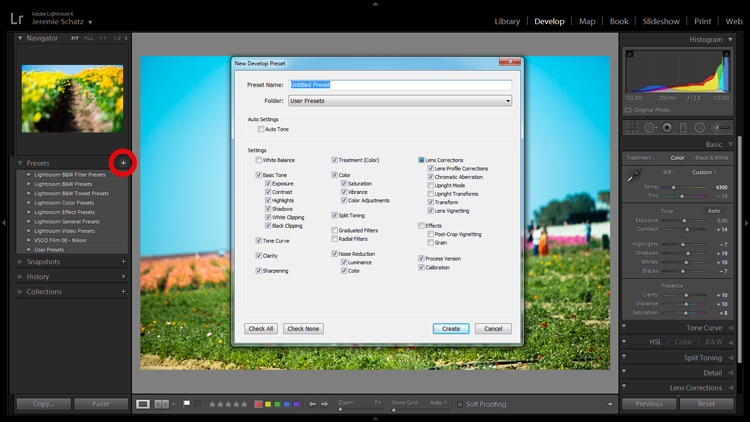
    In the Develop module, the first panel item on the left menu is Presets. This is pretty self-explanatory and Lightroom has some loaded in there to get you started.

    You can create your own presets for common edits you use. If you want to get started in creating your own presets, click the plus symbol next to Presets and take a peek at all of the attributes Lightroom allows you to save.

    Screenshot of develop presets dialog box

    Don’t mess around trying to match edits that you’ve made before – create presets for them along the way.

    Remember the Apply on import setting we talked about earlier? Any Develop presets you create can also be chosen to apply on import. Sure, you can always import a batch of photos, hit CNTL+A to select all of them and then choose one of your presets, but that will take some time for Lightroom to process and the idea here is to save yourself time and clicks.

    Develop presets are a great way of preserving complex edits or distinct styles which you may want to reproduce again. There is a bottomless well of preset bundles you can purchase online and even some free ones floating around out there on the interwebs if you don’t feel like making your own.

    9.Flag and Rate for Easy Sorting

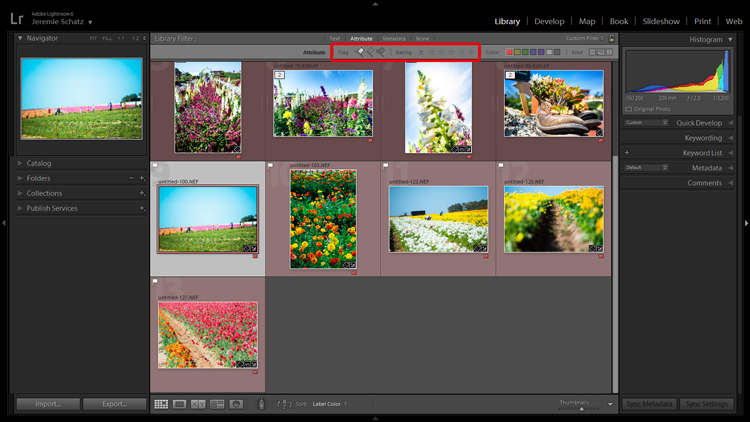
    In much the same way you can slap color labels on images in your library for identification and sorting purposes, so too are you able to take it a step farther by flagging and rating them.

    Flags (keyboard shortcut P, or U to unflag) show up as a flag which is displayed in the upper left corner of thumbnails when in grid view. I personally use flags as a thumbs which tells me that the photo is final and client-ready, ready for export or printing. There is also the option to use a reject flag (keyboard shortcut X). I don’t use these in my workflow, but you may find them more useful.

    Rating images is based on a five-star system. You can use the star system to put a value rating on images which can be used for filtering or whatever significance you place on them.

    Screenshot showing filter for flagged and rated photos

    Flagging and rating are ways you can identify certain images and easily locate them later.

    By this point you are probably seeing a clearer picture of Lightroom’s multi-layer system of organizing, archiving and locating images in your catalog. The more identifying markers you have on images in your library, the more specific you can be in narrowing down what you are looking for.

    If you are not an old-hand with Lightroom, all of this keywording, color coding and flagging might seem redundant and excessive, but as your library grows to unwieldy proportions you will be forever grateful that you formed these good habits early on.

    10.Stack Images for a Tidy Workspace

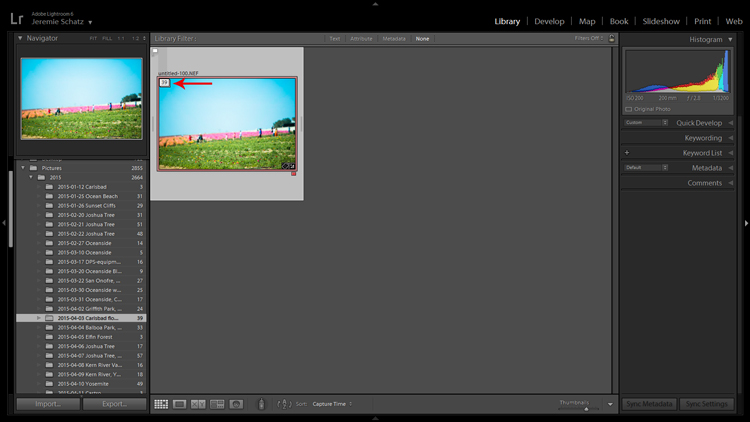
    If you shoot in RAW+JPEG, create virtual copies in Lightroom or use Photoshop or other plugins which make copies of your original images before editing, you may end up with several versions of similar images in your library. Same with you time-lapse shooters who don’t process the video in-camera.

    To keep your library looking clean and organized, consider using Lightroom’s stacking feature. Stacking is pretty versatile, allowing you to hide an entire folder behind one image if you wish.

    Screenshot of a stacked image folder

    Stacking enables you to easily hide groups of photos behind a cover image.

    The order which the images were displayed in grid view will be preserved after stacking with the active photo being on top.

    Once again, stacking can be used in conjunction with all of the previously mentioned identifying and organizing features.

    To stack, select the desired images (CTRL+A to select all, CNTRL+click to select non-contiguous images and CTRL+SHIFT to select a continuous string of images), right click on any of the selected images and hover over Stacking to reveal the sub-menu (keyboard shortcut CTRL+G).

    Conclusion

    I know there’s a distinct possibility that when you got into photography you didn’t envision spending so much time on your computer cursing Lightroom. However, if you haven’t already, you will have to come to terms with the fact that post-processing is a fact of modern photographic life.

    Lightroom and other editing software are tools and like tools for any other purpose, learning the various approaches to using them in the most efficient and productive way is crucial to furthering your craft.

    googletag.cmd.push(function() {
    tablet_slots.push( googletag.defineSlot( “/1005424/_dPSv4_tab-all-article-bottom_(300×250)”, [300, 250], “pb-ad-78623” ).addService( googletag.pubads() ) ); } );

    googletag.cmd.push(function() {
    mobile_slots.push( googletag.defineSlot( “/1005424/_dPSv4_mob-all-article-bottom_(300×250)”, [300, 250], “pb-ad-78158” ).addService( googletag.pubads() ) ); } );

    The post 10 Lightroom Tips for a Smoother Work Flow by Jeremie Schatz appeared first on Digital Photography School.


    Digital Photography School

  • How to Understand Depth of Field to Avoid Blurry Photos

    Last week we released our brand new course – Photo Nuts and Shots which is all about teaching the tools, techniques and thought processes for creative photography. It’s by on of our most popular ebook authors, Neil Creek and features over two hours of video teaching.

    We asked Neil to create this course as he has a natural knack of explaining technical concepts in a way that makes the intricacies of photography easy to understand.

    We’re so convinced that this course will help you that we want to share a couple of minutes from one of the modules about avoiding blurry images with you here today.

    Neil Creek runs through an additional 35 minutes of golden focus advice in this lesson – available in full when you purchase the course online today.

    Keep in mind that this is just one of ten creative photography lessons included in Photo Nuts and Shots.

    So you’ll not only discover practical tips and tricks for producing tack sharp photos, but get step-by-step guidance on:

    • Using light effectively
    • Avoiding and embracing lens flare
    • Composition techniques
    • Choosing creative exposure settings
    • Thinking flexibly on location
    • And much more!

    With Neil’s comprehensive demonstrations and easy-to-understand teaching style, it’s like having your very own professional photography mentor.

    All packaged in over two hours of streamable and downloadable video content for the terrific introductory price of USD $ 39. That’s 33% off!

    Don’t miss out – take the full course today.

    We’ve extended the 33% saving to our first course, Photo Nuts and Bolts, too (although you can certainly take one without the other). So both are USD $ 39 each, but for a limited time only. And you can rest assured that all of our video courses come with a 60-day money-back guarantee.   

    googletag.cmd.push(function() {
    tablet_slots.push( googletag.defineSlot( “/1005424/_dPSv4_tab-all-article-bottom_(300×250)”, [300, 250], “pb-ad-78623” ).addService( googletag.pubads() ) ); } );

    googletag.cmd.push(function() {
    mobile_slots.push( googletag.defineSlot( “/1005424/_dPSv4_mob-all-article-bottom_(300×250)”, [300, 250], “pb-ad-78158” ).addService( googletag.pubads() ) ); } );

    The post How to Understand Depth of Field to Avoid Blurry Photos by Darren Rowse appeared first on Digital Photography School.

    Digital Photography School

  • Portrait Photography Tips: Tapping The Tween Market

    Who’s fun, adorable, up for anything, happy, laughing, totally decisive, and the most undershot market on the planet? They’re the new Seniors… they’re Tweens! This summer I had the privilege of working with the 9-13 set quite a bit, and I absolutely loved it. As a group, tweens will try just about anything once, and it’s so much fun for Continue Reading

    The post Portrait Photography Tips: Tapping The Tween Market appeared first on Photodoto.


    Photodoto

  • Responsibilities of Landscape Photographers

    It is hardly questionable that landscape photography is both rewarding and fun. The whole process from planning and researching an outing, to making your way to a location during ideal conditions and, finally, producing a completed image of an exquisite vista can be so fulfilling it’s easy to see why it is such a popular genre.

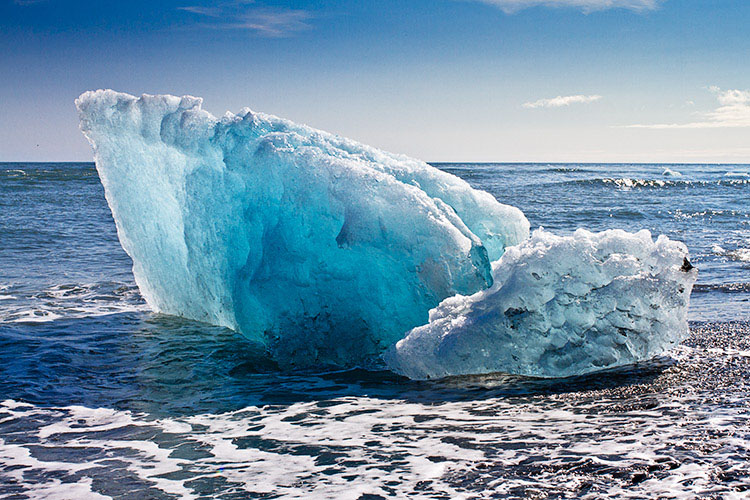
    Iceberg

    Unfortunately, there are costs to this popularity. Even though most landscape photographers do identify as environmentally-minded, the sheer number of visitors to some locations can cause adverse effects despite the best of intentions.

    There are a few things you can look out for and practices you can take up to help ensure that you nullify – or at least minimise – your environmental impact on your next photography trip.

    Watch your step

    Chances are you have heard the often-quoted, “Take only photographs, leave only footprints”. It’s a good starting point that simply means do not intentionally damage your surroundings and do not leave your litter. Sadly, it doesn’t go far enough.

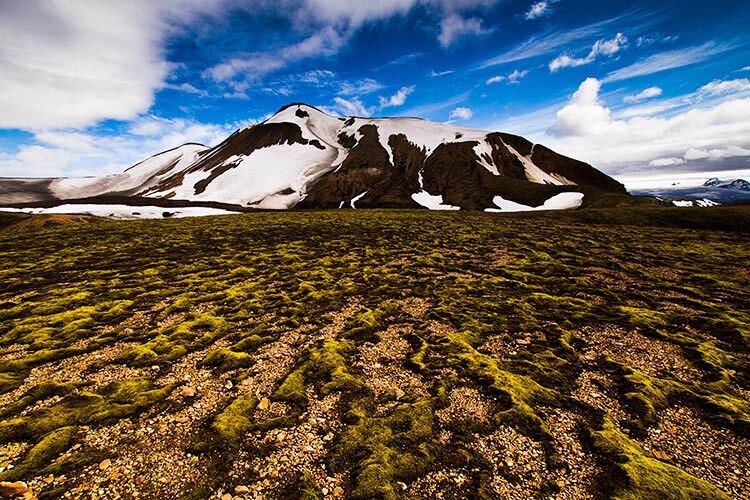
    Moss in Iceland takes decades to grow but moments to permanently destroy.

    Moss in Iceland takes decades to grow, but moments to permanently destroy.

    Many ecosystems are extremely fragile and footsteps alone can cause catastrophic damage. Take Iceland’s mossy lava fields: that moss can take many decades to grow, but it can only handle being stepped on two or three times before it’s destroyed permanently.

    There are countless other examples of fragility in the world, such as California’s Mono Lake and its Tufa formations. It is easy, however, to prevent this damage. Just adding a little bit of extra location research before you head out can reveal any extra care you should take to prevent any damage.

    If you’re traveling abroad and find that obtaining the relevant information is difficult, don’t be afraid to ask local people or officials. I once listened to an impassioned Icelandic warden rant about a tourist who drove a rented 4×4 and devastated about a quarter mile of moss just to stand at the edge of a lake for five minutes. Just ask around, they will probably be grateful for your concern and may even be able to turn you on to lesser-known opportunities.

    Follow local regulations

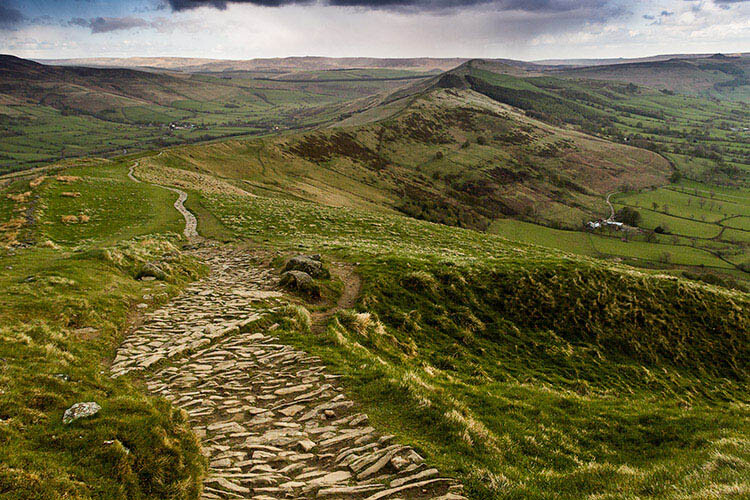
    In areas that you're required to stay on marked trails, the rule is usually to keep you safe.

    In areas you’re required to stay on marked trails, the rule is usually there to keep you safe.

    People failing to keep to required areas on marked hiking trails is one of the most commonly ignored regulations. Although taking a few steps off a trail can seem harmless enough, often those rules are put into place for safety reasons. Things like unstable terrain, sheer drop-offs and even wildlife can all cause danger to visitors.

    While it can be rationalised that using common sense should negate most danger, you should consider that most of these regulations will be the product of insurance policies. If, for the sake of photos, these regulations are seen to be constantly ignored then it isn’t much of a stretch to imagine future access to these areas being limited or restricted to photographers.

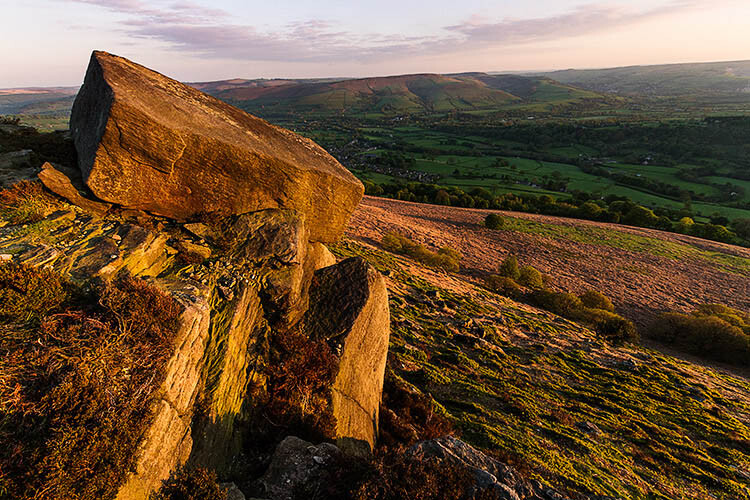
    Large rock formations, boulders and cliffs all pose a danger to hikers.

    Large rock formations, boulders and cliffs all pose a danger to hikers.

    Other concerns when it comes to local regulations involve the law as it relates to photography. While in most places you are well within your right to photograph whatever you see, that is not the case everywhere. Belgium and France are both examples of countries where Freedom of Panorama is limited in some way. For example, when the Eiffel Tower is lit up at night it is considered a copyrighted scene and images of it cannot be published without explicit consent.

    Now, a quick search on Flickr reveals a huge number of images of the Eiffel Tower at night and further research reveals that the regulation is primarily concerned with commercial usages. As such, this aspect may not seem extreme and probably will not cause any aggravation while you’re travelling, but you should still pre-empt any possible clashes with local authorities by thoroughly researching relevant laws in the country that you’ll be photographing in.

    Consideration of others

    Sheep worrying causes a significant loss of livestock annually and it can cause farmers to revoke access to their land.

    Sheep worrying causes a significant loss of livestock annually and it can cause farmers to revoke access to their land.

    Beyond legal and environmental implications, it is important to consider other people who are around you. Courtesy and tact go a long way towards this and will often prevent any conflict before there is even a need for resolution. Simple acts like working as quickly as possible to move out of a prime viewing spot in a crowded space and not blocking the passage of others are simple ways to help ensure that you’re not preventing someone else from enjoying a location. If in doubt, try to ask yourself if there’s any way you are being an imposition on others. If so, consider changing your behavior accordingly.

    An incident I witnessed at the popular Svartifoss waterfall in Iceland should drive this point home. The waterfall is at the end of a moderately steep half-kilometre trail. As it’s so short a distance, and the waterfall is so spectacular, it gets very crowded. The closest you can get to the waterfall is a rocky outcrop big enough to fit three or four people. To the left, it’s possible to stand in the stream.

    While a large crowd awaited their turn for the best views, a woman and her young daughter had commandeered a position in the stream. The girl was dressed in a leotard and was being directed by her mother to perform a variety of dance poses as the latter took photos on her phone. In the forty-five minutes they were doing this, it was obvious that the girl was extremely uncomfortable among the massive group of tourists, yet her mother’s only agitation was her daughter’s apprehension. With the tension between the pair and the presence of a young girl in a leotard dominating the only view of the waterfall, there was a palpable discomfort among the dozens of tourists.

    I don’t believe there is anything wrong with what they were trying to achieve, but the whole situation could have been vastly different with a bit of forward planning. Had they known what they were doing beforehand, and then gotten it done in a few altercation-free minutes, they could have achieved their results and the experience wouldn’t have been tainted for everyone else present.

    Conclusion

    Landscape photography is a great pursuit. The rewards to the photographer and their audiences are many, but certain behaviors can be detrimental for both the landscape and the people in it. For the most part, common sense and thorough research will steer you in the right direction.

    googletag.cmd.push(function() {
    tablet_slots.push( googletag.defineSlot( “/1005424/_dPSv4_tab-all-article-bottom_(300×250)”, [300, 250], “pb-ad-78623” ).addService( googletag.pubads() ) ); } );

    googletag.cmd.push(function() {
    mobile_slots.push( googletag.defineSlot( “/1005424/_dPSv4_mob-all-article-bottom_(300×250)”, [300, 250], “pb-ad-78158” ).addService( googletag.pubads() ) ); } );

    The post Responsibilities of Landscape Photographers by John McIntire appeared first on Digital Photography School.


    Digital Photography School

  • Easy Tips to Help Beginners Understand Composition

    Title-portrait-subject's-eye-above-the-horizon-line

    Place your subject to the right or left of centre. For portraits, the eyes should be above the centre line for a pleasant good composition.

    Composition is all about the balance of the elements in your photograph. This also includes colors tones and textures. This is what separates a snapshot from a great shot. If you want to achieve a good composition, you need to plan it out and see where each element is going to be placed before you take the shot.

    You may have heard photographers talk about seeing the shot in their head before they have actually taken the shot. It’s this ‘seeing’ that I’m going to describe in more detail. I’ll also demonstrate a few useful tips to train your eye in seeing or framing a scene with or without a camera, and in post-editing.

    A good composition in a photo will most likely have followed a compositional rule. These are very useful to know. I’ve chosen five of these principles to describe how they work. I prefer to call them principles or guides rather than rules. There are many more, but these five are a good place to start.

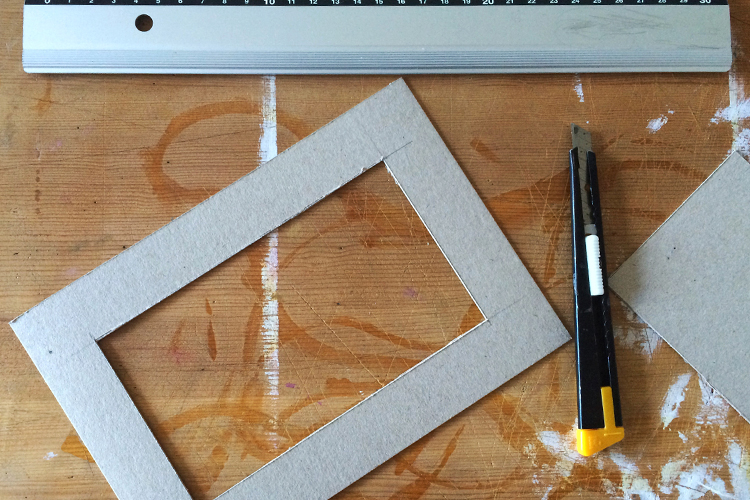
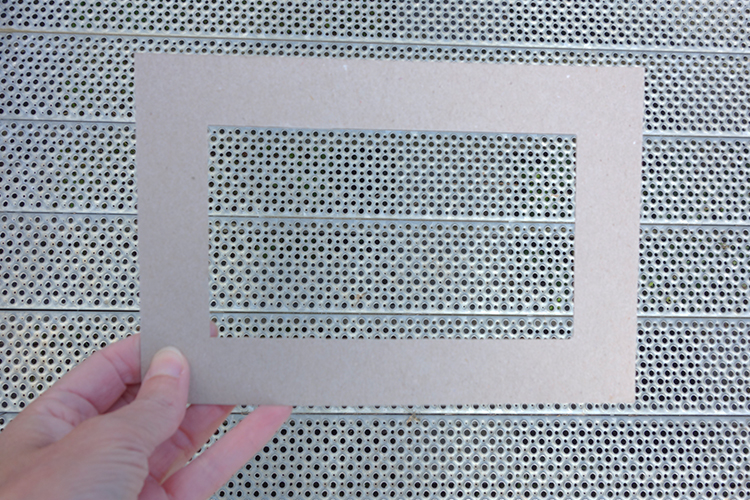
    cut-out-cardboard-frame

    Cut-out cardboard frame for training your eye to see.


    Let’s get back to seeing your shot or framing the scene. For this exercise, you won’t need a camera. You might get funny looks but bear with me. Choose any place, location that you want.

    Cut out a frame from cardboard or any material you want as long as it’s a rectangle. See above.

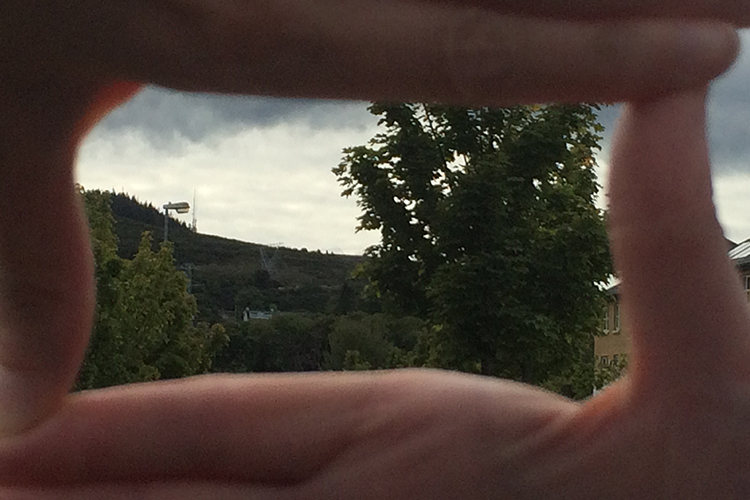
    You could equally use your hands, but I preferred using the cardboard frame.


    frame-the-scene-hands

    Framing your shot using hands.


    As you will see, the frame narrows your field of vision and helps to block out distractions and look for the main focal point, which is what the viewer’s eye is drawn to. I can’t emphasize enough that this simple exercise will help you train your eye to see better in terms of composition. Don’t forget to get down low and look up too.


    What-we-see

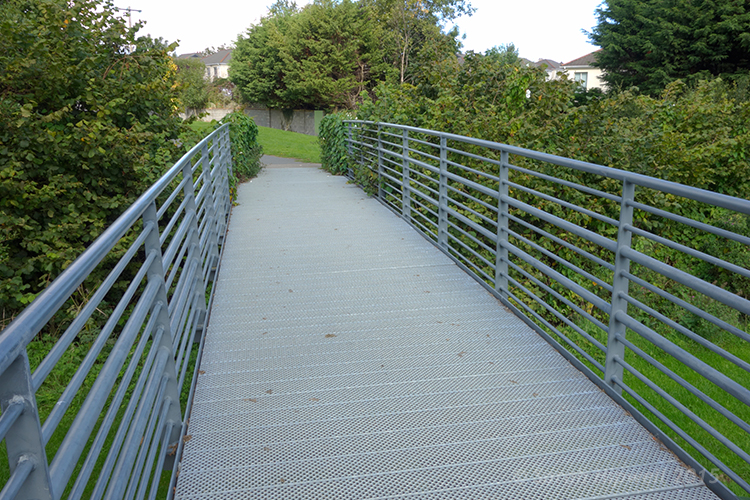
    Take this metal bridge, for example. Not a very interesting photo.


    framing-the-shot-bridge

    By using the cardboard frame to ‘see’ the potential for an interesting shot.


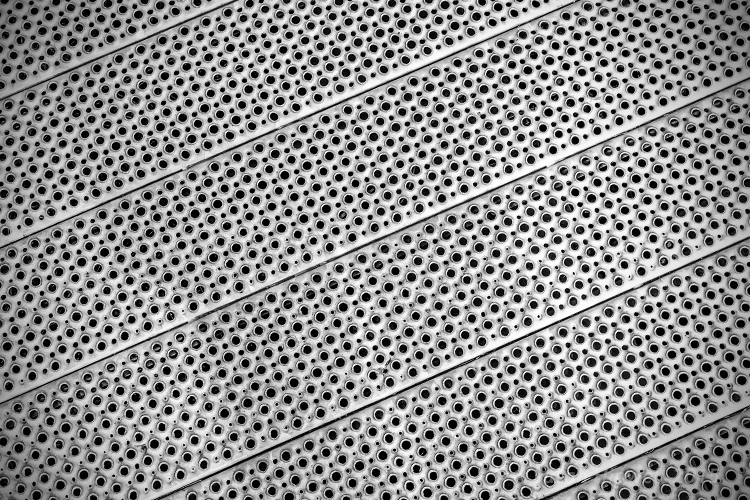
    final-image-how-we-see

    Bring it into your post-editing software and create an interesting texture shot.

    Another useful tip that I would highly recommend is a trip to your local art gallery to see great works of art. Not only is it visually pleasing, but you get the chance to study how these great artists used composition to great effect. So the next time that you happen to be in such a museum, observe and take note. Ask why you liked a particular painting? How were the elements in the painting arranged or placed? Where was the horizon line – a third up from the bottom? What about color and texture?

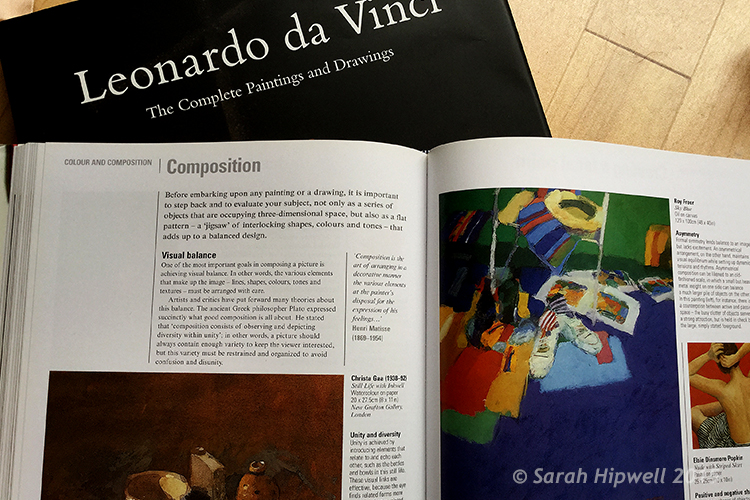
    Okay, what if you don’t live near an art gallery? Then maybe a visit to your local library could be an option? Libraries are such a wonderful resource. In the art section alone, you have great masters, such as Leonardo da Vinci, Rembrandt and so forth. And of course, the masters in the photography world such as Henri Cartier-Bresson and Ansel Adams, to name just a couple.

    Art-books

    Go to your local library for inspiration from the masters in the art world to see how they used composition in their works.


    Before you go and get your camera, let me explain the following five compositional principles I believe are a great starting point for beginners.

    Rule of Thirds

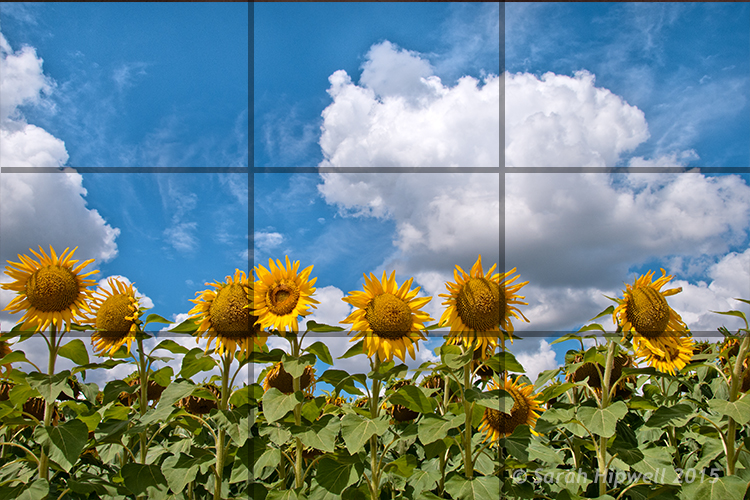
    You may have already heard of this one. This is an actual formula based on mathematical principles of harmony and proportion. It has been used by artists for centuries. So think of your photo with imaginary lines that are drawn dividing the image into thirds both horizontally and vertically. You place important elements of your composition where these lines intersect. Similar to a tic-tac-toe game.

    rule-of-thirds

    How the rule of thirds looks like. Where the lines intersect are the points in which to place your elements.

    Rule of Odds

    This may sound a bit odd (sorry, excuse the pun), but our brain looks for evenness and symmetry. So this principle asserts that having an odd number of objects in an image will be more interesting and, therefore, more pleasing. By having one or three elements is better than two.

    Rule-of-odds

    Odd numbers of elements are more pleasing and interesting than even ones.

    Lines

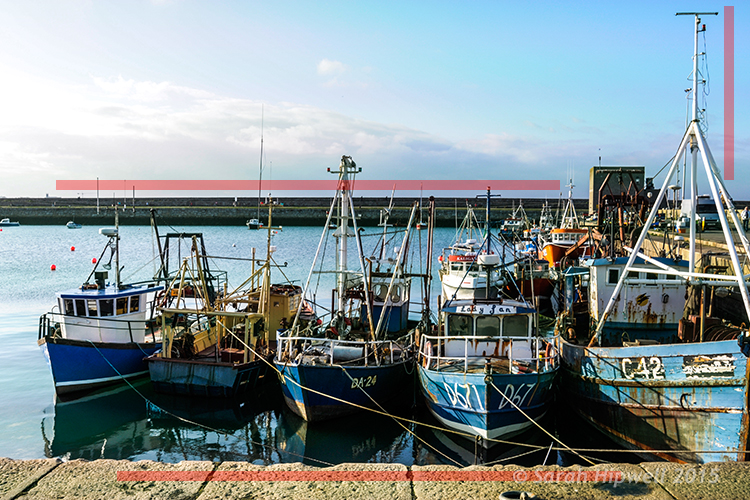
    Keep the horizontal lines level and the vertical lines straight. This is particularly important if you shoot landscapes, seascapes and cityscapes. Leading lines are also very effective for drawing the viewer to where the focal point is.

    lines-straight

    The red lines are to show the horizontal lines are even and the vertical lines are straight.

    Color and textures

    Color and textures are a great way to demonstrate good composition.

    Color-and-rule-of-thirds

    Here is an example of color and rule of thirds for this composition. Notice the curve elements.

    Negative space

    This is an abstract concept which describes the space around your subject, otherwise known as ‘white space’ that draws your eye to it. Basically like ‘sky’ or a blurred background that provides the main emphasis on the subject.
    Think of it in terms of letting your main subject or object breathe by giving it room.

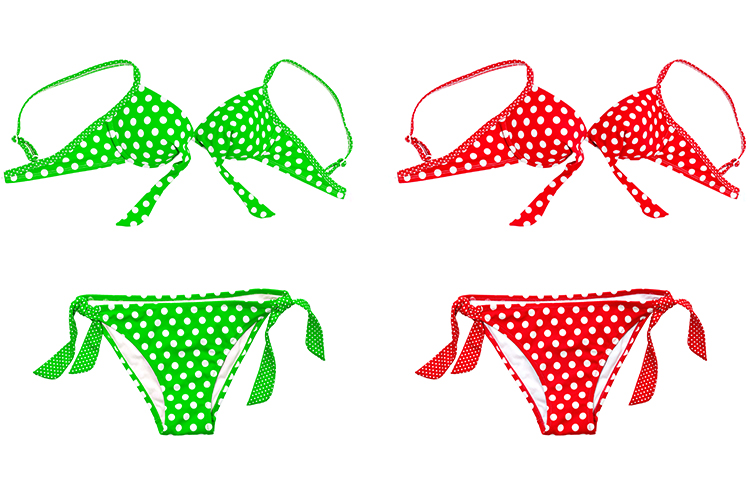
    As photography is about creativity, rules are not meant to be strictly adhered to. In the bikini photo, although I used two of them and they are symmetrical, I used color to contrast the elements and by not placing them in the centre gives the photo a more pleasing compositional effect.

    knowing-how-to-break-the-rules-color-as-composition

    Although I used two pairs of elements and I know that these are even, the color contrast and using the rule of thirds still makes this image a good composition.

    Right, let’s get the camera out. Most DSLR cameras have built-in grid lines and some have a virtual horizon or a spirit level. If your camera has none of these options, you can always add a leveling aid, such as a hot shoe-mounted spirit level or use the focusing points within the viewfinder.

    Use your tripod to help you frame your shot so that you get a good composition. Look through the viewfinder, see what elements are in the frame. Then take a look at the scene in front of you with both eyes, then go back to your viewfinder, recompose, then shoot.

    Practice will improve your understanding and shooting better compositions. Don’t expect to get it in one go. Give yourself time.

    Last, but not least, cropping your images in post-editing. Whether you use Camera Raw, Photoshop or Lightroom, cropping your photos will give you a better understanding of how the principles of composition apply.

    You can easily straighten crooked horizon lines by using the Crop Tool or get rid of barrel distortion in buildings using the Lens Correction filter in Photoshop. Or simply change the image dramatically from the one you shot originally. All of these edits can be done non-destructively, so you can crop to your hearts content!

    original-title-shot

    This is how the photo at top of this article was shot, yet when I cropped in tight on the model to the right, it gave me a different shot.

    To summarize, like any complex subject that goes beyond just one article, I hope I have illustrated some useful tips to show the importance of composition in your photography. Please share your comments below.

    googletag.cmd.push(function() {
    tablet_slots.push( googletag.defineSlot( “/1005424/_dPSv4_tab-all-article-bottom_(300×250)”, [300, 250], “pb-ad-78623” ).addService( googletag.pubads() ) ); } );

    googletag.cmd.push(function() {
    mobile_slots.push( googletag.defineSlot( “/1005424/_dPSv4_mob-all-article-bottom_(300×250)”, [300, 250], “pb-ad-78158” ).addService( googletag.pubads() ) ); } );

    The post Easy Tips to Help Beginners Understand Composition by Sarah Hipwell appeared first on Digital Photography School.


    Digital Photography School

  • 5 Reasons To Should Shoot Your Landscape Images in RAW

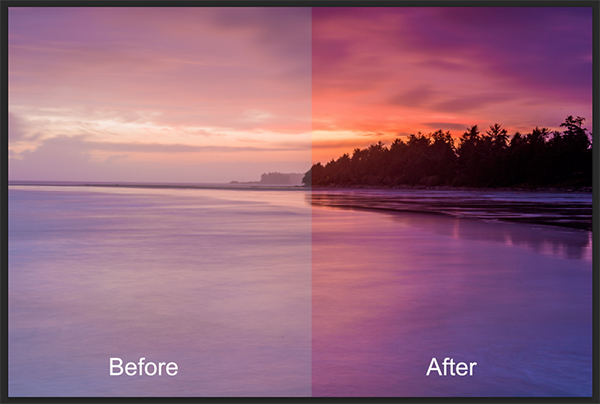
    Detail recovered from a RAW file, before and after

    Detail recovered from a RAW file, before and after.

    There is often a debate among photographers about shooting in RAW. Try it out – next time you are with a group of photographers, ask them who shoots in RAW. Better still, ask them why they don’t shoot in RAW. The conversation will become pretty interesting. When I first started photography, I was told that shooting in RAW was a waste of time and that I won’t need all that “information”. I was told it was better to shoot on JPEG as it saves space. Yes, RAW files are bigger, especially on a high-resolution camera, but is it true that we don’t need all that “information”? Over the past few years, I have done a fair amount of research into the RAW vs JPEG debate and I now shoot completely in RAW. Yes, my image files are MUCH bigger; yes, I need more space to store my images; yes, it does impact my image editing workflow. Is it worth it? A categorical yes. Here are five reasons why you should shoot your landscape images in RAW.

    1. Details

    RAW files are big because they don’t discard any image information that is captured in the scene. When you shoot on JPEG, the algorithm for JPEG determines which information is discarded and which is kept without changing the way the image looks. That is great for saving space on your memory card, but not so good if you intend to edit your images in Photoshop.

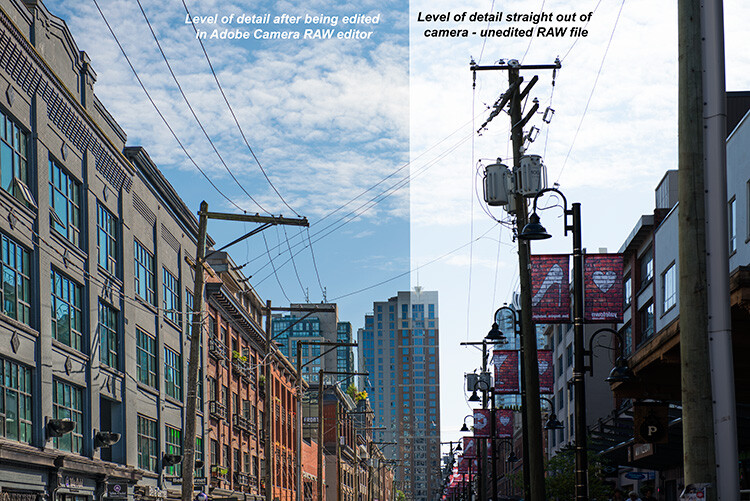
    The reality is that your camera can capture a significant amount of data if you shoot in RAW, which in turn gives you much more flexibility in Photoshop later. On average, a normal JPEG file will be between four and six megs per image. The same image shot on the same camera in 14-bit lossless RAW format will be 25 – 30mb, five times bigger. The reason is that there is much more information in a RAW file. That information is critical in post-production. You can get so much detail out of a RAW image, such as pulling back blown-out highlights and bringing back detail in the shadows that would be impossible to recover in JPEG format. This doesn’t mean you should be sloppy and not pay attention to your exposure. What it does mean is that in tricky lighting conditions, you will be able to get a shot that’s usable.

    Recovered details in a street scene, overall much more detail can be seen.

    Recovered details in a street scene, overall much more detail can be seen.

    2. Color

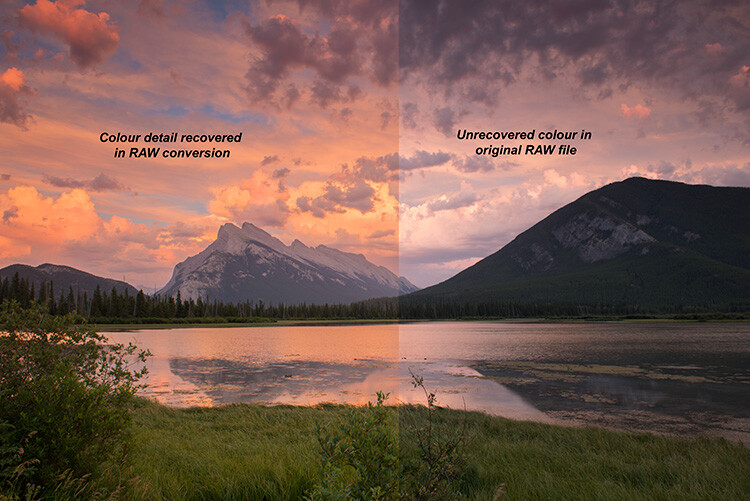
    We all shoot on color nowadays. If you don’t, you should, even if you are going to convert to black and white – but that’s for another post. Shooting in RAW means that you are saving as much color information as possible from the scene. This is really important in landscape photography, portrait photography, food photography and even street photography. The color in your scene can make the difference between a good image and a great image. By shooting in RAW, you will have all the color information possible. The important part of that is the subtle color. For example, the gradation in the sky will look better than it would on JPEG, even if you think that JPEG will be fine from a color perspective.  If you are shooting a landscape scene, you want to get as much color information as you can. RAW would be the format to do this. In Photoshop, the vibrance function will saturate the colors in your scene which are undersaturated and this can give your RAW file that subtle boost to make the image pop.

    Much more colour can be rendered from a RAW file

    Much more color can be rendered from a RAW file.

    3. Exposure

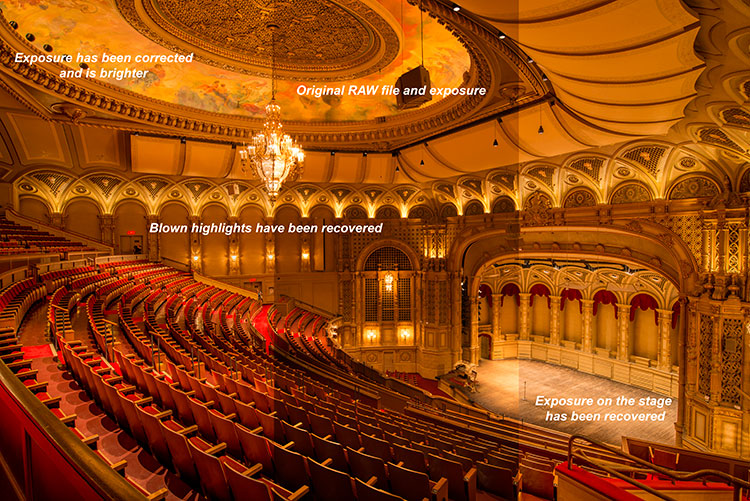
    The exposure in your scene should always be as good as you can get it in camera. In the past, most photographers would underexpose a little to make sure they didn’t blow out the highlights. In recent years, most photographers shooting in RAW have been exposing to the right (ETTR). The new generation of cameras have a really good dynamic range and are able to render details in the shadows and the highlights in one shot. This was not possible a few years ago. ETTR means that when you look at your photograph’s histogram, try and push it over to the right a little – in other words, overexpose it a little. The reason is because RAW can handle highlights in a scene really well and if your shadows are a little brighter there won’t be as much noise in the shadows. This is really a good technique to use in landscape photography and architectural photography. Your images will be cleaner and have very little noise in them. Once you adjust the image in Photoshop, you will have a well-exposed image across the dynamic range.

    Blown out highlights in this scene were brought down, but the overall exposure was brightened.

    Blown out highlights in this scene were brought down, but the overall exposure was brightened.

    4. Flexibility

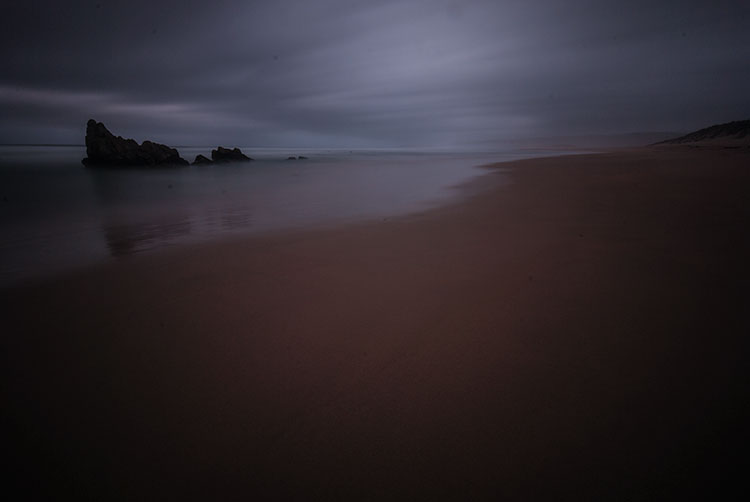
    The best part about RAW files are that they give you flexibility. If you shoot landscape images or street photography, you have a lot of information to work with and you can use that information to create the best possible image. Also, Photoshop is always improving their tools and functions. I have gone back and reworked older images: the RAW file had all the information and the new functions brought out the best of that scene. This has happened quite a few times, so don’t delete “throwaway” images so quickly. For this reason, I am also not a fan of chimping too much. Wait until you download the images to see what is worth keeping. Use RAW to give you as much flexibility as you can, even on older images.

    Original RAW file, the image was really dark from the use of an ND filter

    Original RAW file, the image was really dark from the use of an ND filter.


    The result of the above image after being edited in Adobe RAW converter

    The result of the above image after being edited in Adobe RAW converter.

    5. Quality

    Editing your RAW image is a two-step process. The first step is converting it in a RAW converter. (Lightroom converts RAW images, as does Photoshop and many other image editing products.) Once you have made the corrections and subtle adjustments in the RAW converter, then you can open the converted image in Lightroom or Photoshop. You will then be editing on the best quality image possible. Image quality is almost the “holy grail” of photography. If you ask any photographer what the most important thing is for any image, it will most likely boil down to image quality. To be clear, when I say image quality I include sharpness, noise, dynamic range, color, tone, chromatic aberration and so on. Anything that adds to the overall look and feel of the image. Your image quality will be fantastic if you work carefully in your RAW converter and edit well in Photoshop. You can get good image quality in JPEG too, but you will be able to squeeze that much more out of the image if you shot in RAW.


    Look at the quality and detail of the scene after being edited in Adobe Camera Raw converter

    Look at the quality and detail of the scene after being edited in Adobe Camera Raw converter.

    RAW is a great format to use if you plan on editing your images. If you shoot landscapes, fashion, food, architecture and even weddings you should be considering shooting in RAW. One caveat on using RAW for weddings – you don’t have to shoot the whole wedding in RAW, but shoot the important images or images where the light is tricky in RAW. That way you can be confident you have the shot and information you will need for editing later.

    RAW requires a different workflow for your image processing. If you don’t want to spend too much time editing, then maybe RAW will not work for you. The reality is RAW files are bigger, but that’s because they capture so much more information. If you are skeptical, give it a try. Shoot some scenes in RAW and try the Adobe RAW converter. Lightroom also works with RAW files. You might find that you have more details and information in your image than you thought.

    googletag.cmd.push(function() {
    tablet_slots.push( googletag.defineSlot( “/1005424/_dPSv4_tab-all-article-bottom_(300×250)”, [300, 250], “pb-ad-78623” ).addService( googletag.pubads() ) ); } );

    googletag.cmd.push(function() {
    mobile_slots.push( googletag.defineSlot( “/1005424/_dPSv4_mob-all-article-bottom_(300×250)”, [300, 250], “pb-ad-78158” ).addService( googletag.pubads() ) ); } );

    The post 5 Reasons To Should Shoot Your Landscape Images in RAW by Barry J Brady appeared first on Digital Photography School.

    Digital Photography School

  • Using the Histogram to Take Better Pictures

    You might have seen some articles here on Digital Photography School about using the histogram when editing pictures in Lightroom and Photoshop, but it can also be a very handy tool when you are out shooting images as well. Most cameras have the ability to show you the histogram when you review your photos on the rear LCD screen, and some even allow you to see a real-time histogram in Live View. While this might seem a bit intimidating at first, learning to use the histogram when out shooting pictures can have a dramatic impact on your photography and help you understand how to get the right exposure for the photos you are taking.

    histogram-sorority-bid-day

    Sorority Bid Day brought to you by the magical properties of the histogram.

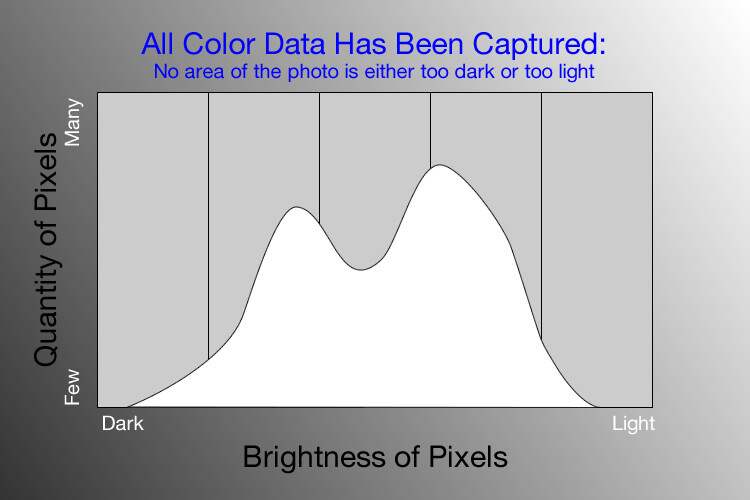
    In a nutshell, the histogram shows how much data is recorded for various Red, Green, and Blue color values in a picture. While you can usually see data for all three colors separated into discrete graphs, the one I find most useful for general shooting is the histogram that combines all three RGB values into one visual representation. A histogram shows how much data has been recorded across the tonal range of a photograph from very dark to very light. A spike in the graph means a lot more data has been recorded for those particular values of darkness or lightness, and a dip means that not much data has been saved. In general, a properly-exposed picture should have a histogram that looks something like this:

    histogram-example

    An example of a hypothetical histogram for a properly exposed photo.

    A histogram similar to this example would mean that most of the color data is concentrated in the middle: the greatest quantity of pixels is neither too dark nor too light. Most photos will have some darker pixels and some brighter pixels, but in general all the information captured by a camera’s image sensor should fall somewhere between the darkest of darks (i.e. very black) and the lightest of lights (i.e. very white). A histogram that is skewed to the right would indicate a picture that is a bit overexposed because most of the color data is on the lighter side, while a histogram with the curve on the left shows a picture that is underexposed. This is good information to have when using post-processing software because it shows you not only where the color data exists for a given picture, but also where any data has been clipped: that is, it does not exist and, therefore, cannot be edited. It’s also good information to have out in the field, such as in the following example:

    histogram-quidditch-overexposed

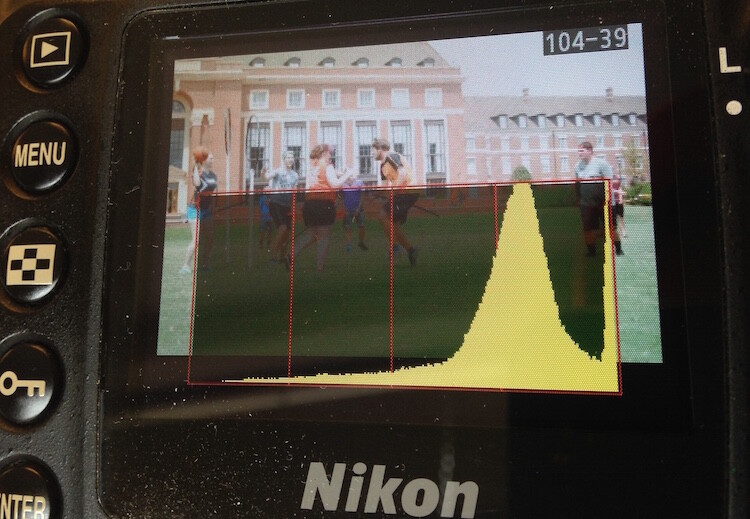
    Most cameras allow you to overlay the histogram on top of a given photo during playback, or as you shoot the photo when using Live View.

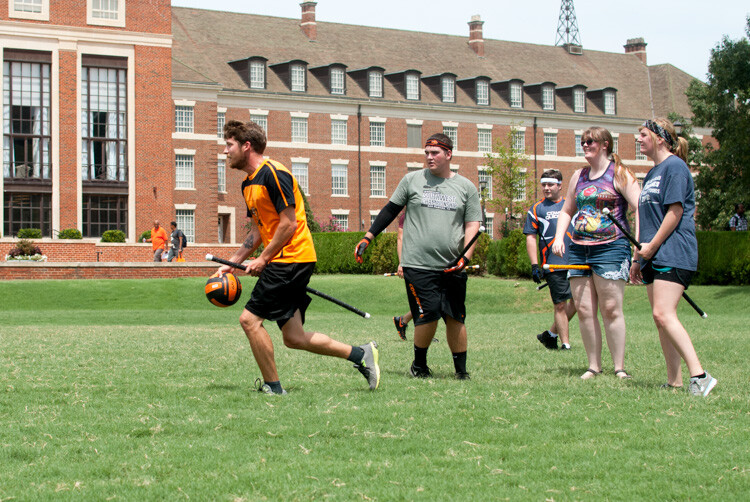
    I could tell right away that this picture of some college students playing Quidditch was a little overexposed, but looking at the histogram data right on my camera gave me additional information that helped me adjust my shooting on the spot. The large curve on the right-hand side tells me that most of the color information is concentrated on the lighter side, which is actually a good thing because more data is actually collected in the highlight portions of the image which can then be brought down later in a program like Lightroom. (This is a technique called expose to the right, which is a fantastic way to get a little more out of your photography if you are willing to put in a bit of time editing pictures on your computer.)

    The problem with this image, as you can see in the above histogram, is that the graph literally goes off the chart on the right-hand side. This means that some of the highlights have been clipped: there is no longer any data that can be recovered, and no matter what I do in Photoshop or Lightroom there are some portions of my image that show up as pure white and can’t be edited. An example histogram from a photo that is clipped on both the darkest and lightest areas would look like this:

    histogram-example

    After taking the first photo and realizing that some of the data would be lost due to clipping, I was able to adjust my exposure settings and get a much better image:

    histogram-quidditch-properly-exposed

    Quidditch isn’t only played at Hogwarts.

    The histogram for this picture was also concentrated a bit more to the right-hand side, but right after I shot it I was able to see that no data had been lost due to clipping. This didn’t help much in the immediate moment, but it meant that I had plenty of information to work with later when editing the picture in Lightroom. As another example, here’s a picture of a unique building on the Oklahoma State University campus:

    histogram-example-building-exterior

    The Noble Research Center on the campus of Oklahoma State University.

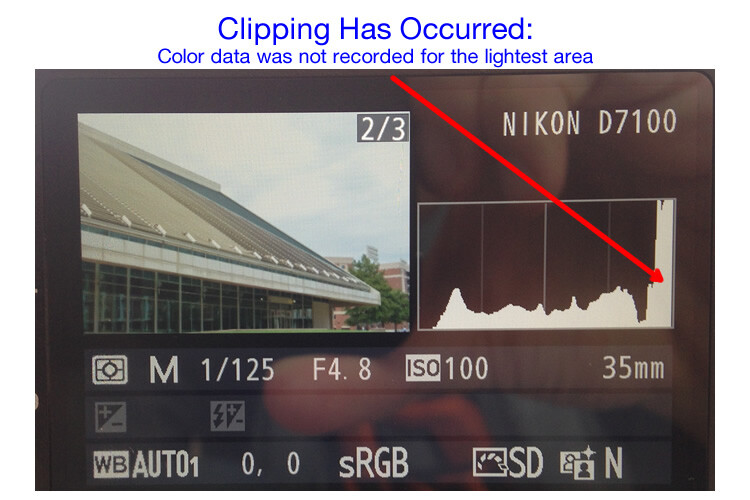
    When I looked at the back of my camera it seemed as though the photo was pretty good. The sky was a bit bright, but I thought everything would be just fine overall. This is similar to many situations I have been in when I thought I could tell simply by looking at the photo on my camera’s LCD screen if it was exposed properly, but a quick check of the histogram can yield much more information. Even though the above image seemed decent at first, the camera histogram told another story:

    histogram-example-noble-center-D7100

    The histogram for the above photo indicated severe clipping on the highlights, meaning some parts of the photo were so bright that I wouldn’t be able to fix it in Lightroom.

    Had I not looked at the histogram I would have never seen that a good chunk of the sky was clipped which meant there was no color data at all for the brightest portions of the photo. This would be a serious problem for my post-processing when I bring my pictures into Lightroom and adjust various parameters to get the image to look like I want. After looking at the histogram I re-adjusted my exposure settings and took another photo which had an improved balance of color data across the spectrum:

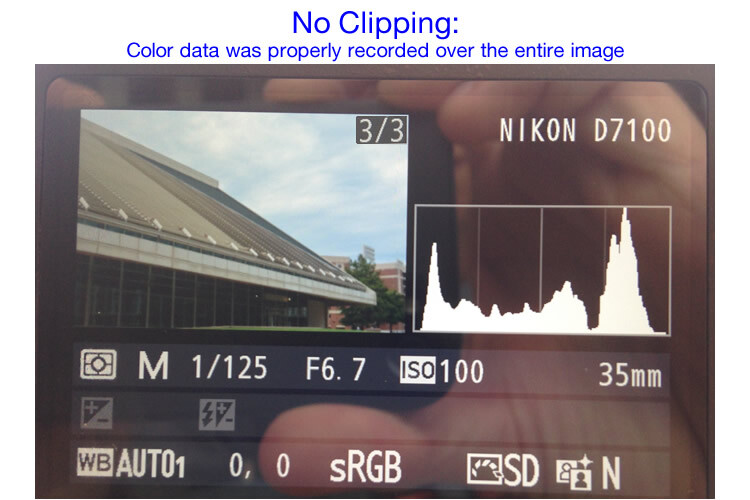
    histogram-example-noble-center-D7100-proper

    The same composition, but with different exposure settings that resulted in a better exposure with no clipped data.

    One curious aspect of this image is that while the sky is now properly exposed, the glass panels on the building appear to be too dark. Looking at the histogram you can see that while there is certainly a lot of data on the darker portions of the image (hence the spike on the left-hand side of the graph), no data has been lost due to clipping. This means I had a lot of flexibility to improve the image in Lightroom, which resulted in the following finished photograph:

    histogram-example-building-exterior-proper

    One nice thing about most mirrorless cameras, as well as some DSLRs when shooting in Live View, is their ability to give you a real-time indication of any areas of the image that will be over – or under – exposed. This is normally referred to as a zebra pattern and it essentially overlays a series of stripes over any portion of your image where data is going to be clipped. And remember, as I stated earlier, many cameras today have the ability to show you a live histogram that updates in real-time so you can see not only where the color data on your image is concentrated across the light/dark spectrum, but also alert you to any clipping that will happen when you take the photo.

    These are just a few examples of how the histogram can be useful when you’re out shooting photos, not just when you’re editing them on your computer. How do you use the histogram, and what other tips and tricks do you have to share about using it to enhance your photography? Leave your thoughts in the comments below.

    googletag.cmd.push(function() {
    tablet_slots.push( googletag.defineSlot( “/1005424/_dPSv4_tab-all-article-bottom_(300×250)”, [300, 250], “pb-ad-78623” ).addService( googletag.pubads() ) ); } );

    googletag.cmd.push(function() {
    mobile_slots.push( googletag.defineSlot( “/1005424/_dPSv4_mob-all-article-bottom_(300×250)”, [300, 250], “pb-ad-78158” ).addService( googletag.pubads() ) ); } );

    The post Using the Histogram to Take Better Pictures by Simon Ringsmuth appeared first on Digital Photography School.

    Digital Photography School