Category: Photography

  • How to do Landscape Panoramic Photography

    Have you ever been somewhere with a great view and taken a picture with your widest lens, but wished you had an even wider one that could capture the whole scene?

    That is how panoramic photography was born in the 1840s when the pioneer photographers started using Daguerreotype plates pieced together to form very wide-angle scenes.

    01


    This panoramic image showing San Francisco from Rincon Hill was photographed by Martin Behrmanx in 1851. It is believed that the panorama initially had 11 plates, but the original daguerreotypes no longer exists.

    An image showing a field of view greater than that of the human eye, about 160° by 75° or an aspect ratio of 2:1, or larger may be considered panoramic.

    Even thou there is specialized equipment for panoramic imaging, we still find ourselves using the same simple techniques of merging images together more than 150 years later, but now using digital cameras and photo merging software to achieve similar results.

    This is a simple and beginner’s approach on how to create a panoramic image like this one:

    02


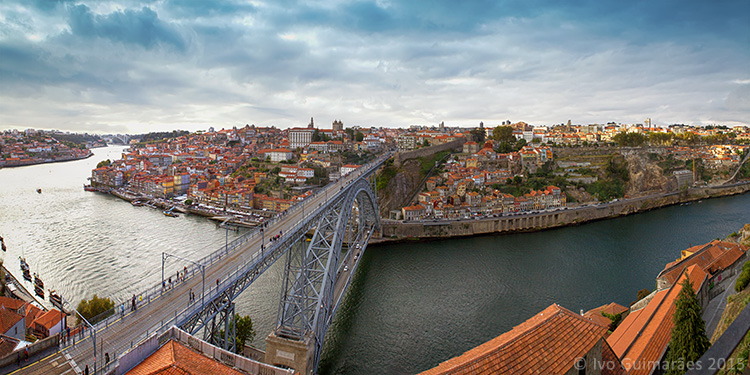
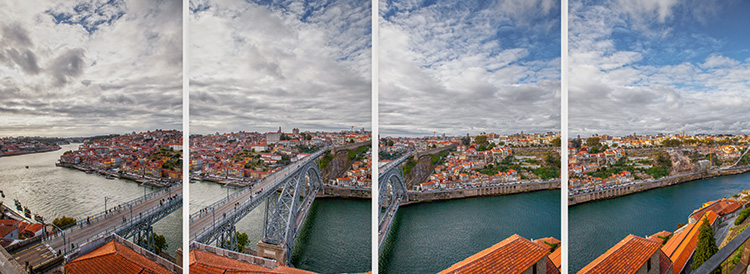
    This amazing view of The Dom Luís I Bridge in my hometown Oporto, Portugal, was created by merging four vertical images into a high-resolution panorama.

    03


    Shooting your panorama

    To make sure you get good results in you panorama merging, it’s important to use Manual settings in you camera and try to have similar exposure, focus and white balance in all your images.

    In this particular case, the images were photographed with a 20mm lens in a full frame camera body at f/16, 1/125th and ISO100. The focus was set to infinity and the white balance was set at 5500K.

    It’s also really important to have at least 30% overlapping between images so that the software can have enough pixels to merge and make the blending seamless.

    The more rigorous you are during the image exposure step, the more likely you are to have better results in your final image. The use of a tripod and a bubble level are recommended tools, but on a day with good light you might get away with handheld camera images, as long as you try to follow the horizon line or some reference points for the image overlapping.

    The number of images you need depends on the field of view you want to cover, but always try to photograph more area than you need so you can crop after the merging process. Portrait or vertical images are usually a better option because they give a better height and therefore higher resolution to the final image.

    Stitching your panorama

    As for the stitching process, here are the basic beginner steps in Adobe Photoshop, but keep in mind that there is a lot of software options for this kind of editing that can be taken further with vertical, 360º or multi-row stitching which are a lot more complicated.

    1. Open Photoshop
    2. File > Automate > Photomerge
    3. Browse and select the images for the panorama
    4. Click the “Auto” option in the Layout area
    5. Click the “Blend Images Together” option
    6. Click OK to start the stitching process

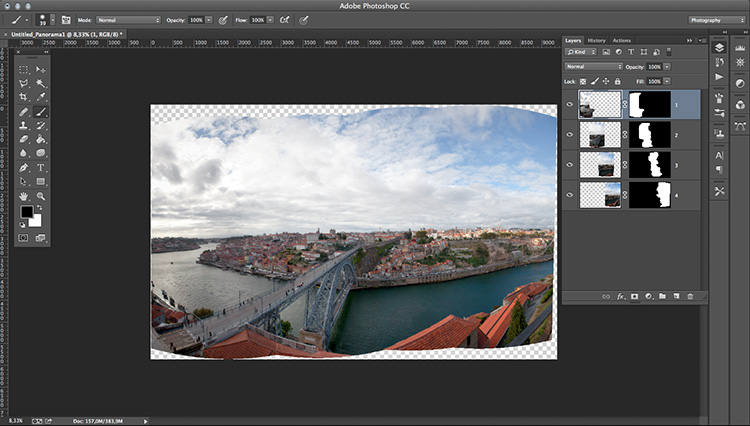
    You will end up with a final stitched image like this:

    04


    The layer masks are really helpful if you have moving objects, or difficult areas in your image that look weird after stitching and can be edited to enhance the blending.

    Now you can flatten the image and just choose the best crop area for your panorama.

    So, just add this technique to your bag of tricks and give it a try next time you spot a panoramic view.

    googletag.cmd.push(function() {
    tablet_slots.push( googletag.defineSlot( “/1005424/_dPSv4_tab-all-article-bottom_(300×250)”, [300, 250], “pb-ad-78623” ).addService( googletag.pubads() ) ); } );

    googletag.cmd.push(function() {
    mobile_slots.push( googletag.defineSlot( “/1005424/_dPSv4_mob-all-article-bottom_(300×250)”, [300, 250], “pb-ad-78158” ).addService( googletag.pubads() ) ); } );

    The post How to do Landscape Panoramic Photography by Ivo Guimaraes appeared first on Digital Photography School.


    Digital Photography School

  • Next Level Techniques for Advanced Beginners

    You’ve been bitten by the photography bug – it’s not an actual insect, but you know what I mean.

    Andreas.

    By Andreas.

    After the salesman pried that hard-earned money from your hands, you brought home that tantalizing-looking DSLR and your friends looked at it like it was a dangerous alien device, inquiring what all of those buttons, dials, and switches actually do.

    At the time you didn’t really even know what they did, but you did know that once you figured it out, some cryptic combination of clicking knobs, pushing buttons and twisting rings on that lens, you were going to produce some knock-out photos.

    Since then, you have spent eons of your life that you will never get back reading and researching on Digital Photography School, and highlighting juicy passages in your camera’s user manual (that last part might not be true). And guess what? It’s paid off!

    Now you know how aperture affects depth of field, how to use shutter speed to freeze or blur movement and that once mysterious acronym, ISO, finally means something to you. Looking back you now understand what it is like to be a beginner, and that realization alone has raised you to a new level.

    JD Hancock

    By JD Hancock

    What now? You are getting some shots you are proud of, have a pretty firm grasp of the fundamentals and are ready to take it to the next level. You are ready to learn some new techniques, emerge from survival mode and get out there and photograph with intention.

    Let’s take a look at some techniques that just might get you over that hump and give you the skills, knowledge and power to capture great photos consistently.

    Understanding and Using Aperture and Shutter Priority Modes

    These are features that the vast majority of DSLRs have, and even many point-and-shoot cameras on the market as well. Some purists may balk at the thought of using one of these “automatic” settings, but pro shooters have long ago learned the versatility and usefulness of these controls.
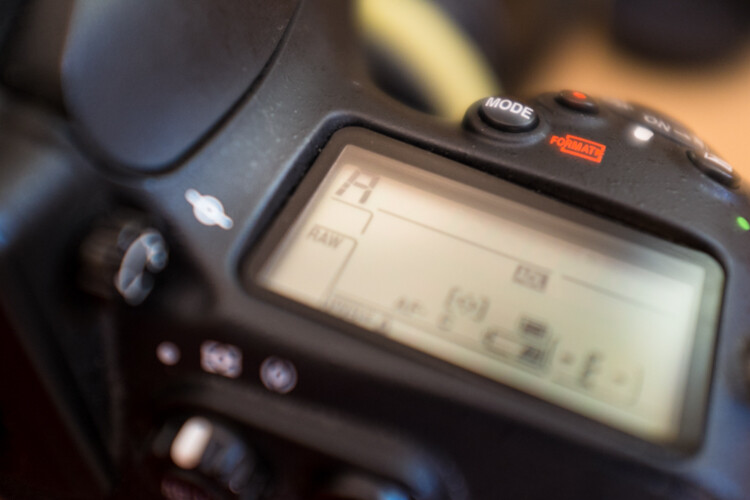
    Aperture priority settings

    Aperture priority gives you full control of aperture while your camera takes care of the rest.

    Although the various options for these settings may vary between manufacturers and camera models, the basic premise remains the same.

    As the name suggests, these settings are pseudo-automatic. However, unlike the Program (P) setting, which does allow a minute amount of influence from the shooter, Aperture and Shutter Priority modes let you set certain parameters that change automatically to compensate for other adjustments that you remain in control of.

    For instance, if your camera is set to Aperture Priority you retain the ability to adjust the Aperture to alter the depth of field as you see fit, and in conjunction with ISO, the camera will automatically choose the corresponding shutter speed for correct exposure. Many cameras give you the option to control ISO manually or let the camera adjust it for you.

    The Shutter Priority setting does what you would expect, allowing you to control the shutter speed while the camera does the heavy lifting of setting the appropriate aperture.
    Thomas Hawk

    By Thomas Hawk

    Some cameras offer the option to set limits on the extent of certain settings. For example, if you are shooting in aperture priority, you can set the camera so the shutter speed won’t drop below a predetermined speed or the ISO won’t exceed a maximum level.

    My camera is set to Aperture Priority more often than not – this is personal preference. I know my camera like the back of my hand, and can anticipate how all the settings correspond to one another, so I feel comfortable using this setting under most conditions. It is certainly important to be comfortable using your camera in Manual Mode, however, you are likely to find that once you become accustomed to Aperture or Shutter Priority modes, you will have enough control without having to spin dials as much. Priority modes also help prevent accidental changes which can result in improper exposure.

    Exposure Metering, Exposure Lock, and Exposure Compensation
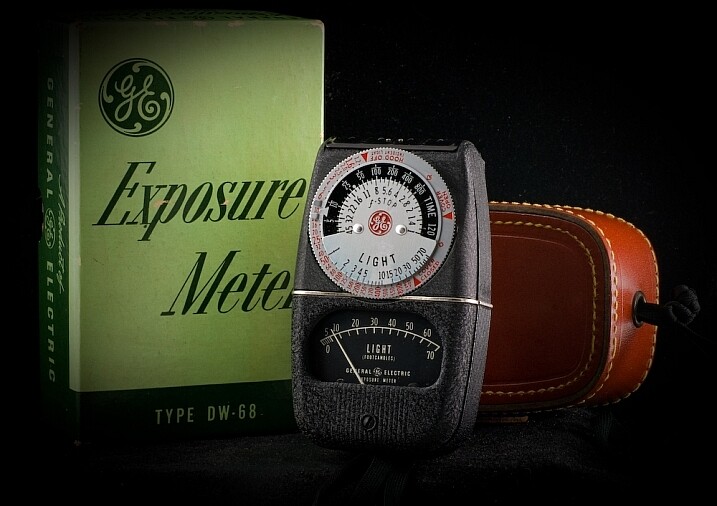
    A*J*P

    Vintage exposure meter – By A*J*P

    While we’re on the subject let’s look at some other ways that you can work with your camera to get proper exposures in all sorts of conditions.

    DSLRs give you a few different options as to how they meter and determine exposure for a given scene. The most common are spot, center-weighted and evaluative or matrix metering. Take a look at this handy cheat sheet that should help you wrap your mind around the concept.

    Fancy technicalities aside, what are the practical applications of these different settings?

    Spot metering

    Since spot metering bases exposure on the reading from a very small area of the image, it is a great choice if the subject of your composition is small and significantly lighter or darker than the rest of the image, so you can hone in on the correct exposure. This metering mode can be useful for small backlit subjects, as the light source shining directly at the camera will most often result in an underexposed subject. Keep in mind that regardless of the type of focus points you are using, spot metering will read only about a 4mm radius (depending on the camera) from the very center of the focus point.

    Center-weighted metering

    Center-weighted metering takes the whole frame into consideration, but puts more value towards the center of the focus points (somewhere in the 12mm range). This setting works great when your subject takes up a larger part of the frame, or the lighting is more even. Consider a close-up portrait where spot metering might be too specific if it reads a shadowed or highlighted area, but center-weighted would give you more of an average.

    Evaluative or Matrix metering

    The last of three main metering types, evaluative (Canon) or matrix (Nikon) metering, determines exposure in a more complex way by taking into account composition, tones, color and some cameras can even factor in the distance objects are from the camera to estimate what the main subject is. This system of metering works great for landscapes and wide angle shots.

    Many cameras are equipped with a dedicated exposure lock button or have customizable settings in order to delegate one. This is used when you want to take an exposure reading and hold it. If your subject fills a large part of the frame, the camera may do a good job at setting exposure. If the subject takes up only a small part of the frame, you can move in close to get an exposure reading, lock exposure and recompose the image.
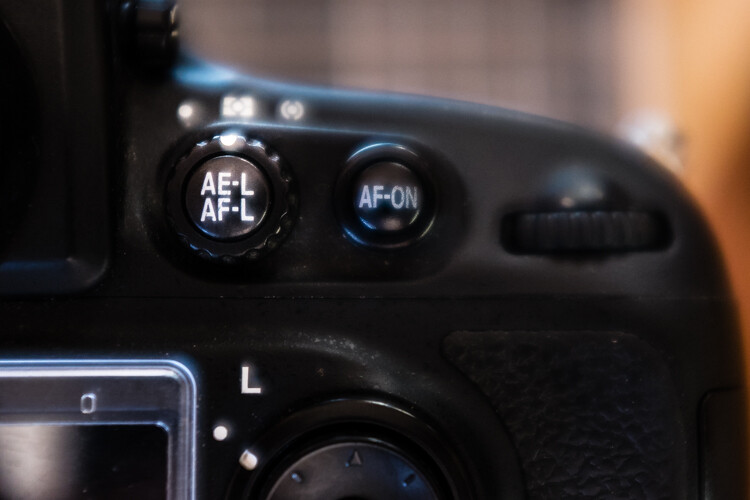
    Exposure/focus lock button

    Once you familiarize yourself with the exposure/focus lock button, you will be surprised how often you use it.

    Exposure compensation

    Exposure compensation allows you to over or underexpose the image manually. This is most useful while using automatic or semi-automatic settings like Aperture or Shutter Priority. In the example of a backlit portrait, many photographers prefer to overexpose the camera’s suggested exposure, knowing that the reading will be wrong because of the lighting. You could certainly change your exposure metering to try and secure a more accurate reading, but with experience you can easily predict how the camera’s exposure meter will react ,and use exposure lock or exposure compensation as a more direct, and one-off, route to proper exposure.

    Just keep in mind that the most challenging conditions for your camera’s exposure meter are high contrast situations, and with enough experience you will learn to “see” like your camera and easily be able to anticipate necessary compensations.

    Selecting Different Focus Settings

    To start with, there are two main categories of autofocus settings: Single and Continuous.

    Single (One Shot on Canon) is intended for stationary subjects. When the camera finds focus in single servo mode, it holds that focus point until the shutter is released or the autofocus is released and re-activated.

    However, single servo focusing can be very useful for action in certain applications. For example, one technique when shooting a moving, yet predictable subject, is to compose the image and lock focus on the spot where you know your subject will be, and wait for it to enter the frame (think panning).

    In continuous focus mode, your camera will continually refocus while the autofocus is engaged. This is the setting to use if your subject, or you and your camera, are on the move. In continuous mode, many cameras allow you to choose how many focus points are live. Say you are shooting a sporting event and there are a lot of players, you may want to use fewer focus points in order to single out your subject.

    Continuous servo autofocus

    Continuous servo focusing is best used to maintain focus on moving subjects – especially if they are moving towards or away from you.

    It’s also worth mentioning that just in case you haven’t figured it out already, you can move the focus points around the frame in the viewfinder with the multi-selector. This is key while trying to maintain a certain composition with a moving subject. Consider some basic compositional conventions such as the rule of thirds when setting your focus points for a shot.

    Confirm Focus by Previewing Images at 100%, In-camera

    As a digital photographer you are extremely fortunate to have access to a feature like this –film shooters didn’t/don’t have this luxury.

    The concept is simple: if you are unsure whether you nailed a sharp image, due to camera shake or shallow depth of field, zoom in to 100% and do a little pixel peeping for confirmation. Make a habit of doing this instead of ending up in front of your computer in disappointment at a great shot that’s not sharp.
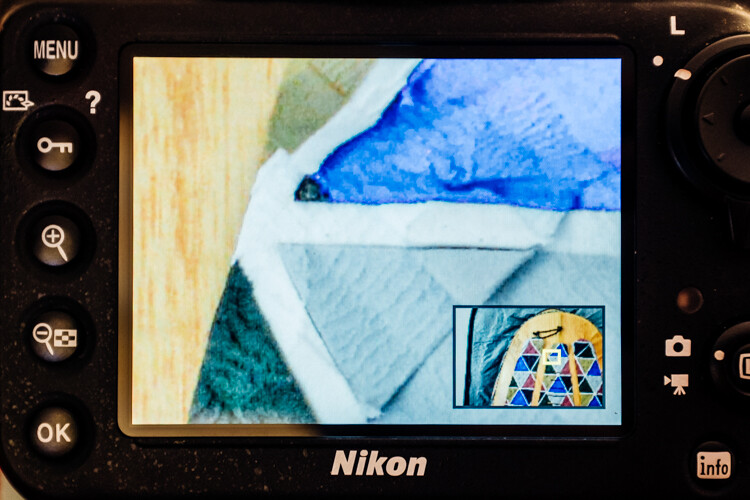
    Zoomed to 100% in camera

    Zooming to 100% is a quick way to confirm you have a sharp image.

    Some cameras (check your user’s manual to see if your camera supports this feature) allow you to customize a button which zooms directly to 100% for this purpose.

    Many cameras have a setting (sometimes called shutter release priority) which won’t allow a picture to be taken unless it recognizes that your focus point is actually in focus. Personally, I loathe this setting. I think it is better to take your chances and at least try to get the shot. Although the focus may not be spot on, you still may get a usable image.

    Conclusion

    These are just a few of the major technical considerations to keep in mind as you bravely forge ahead in your photographic pursuits.

    Every situation requires its own approach, and the more tricks you have up your sleeve, the more prepared you will be to nail the best shots. Keep your nose to the grindstone and embrace the challenge!

    Do you have any other tips for the advanced beginner? Please share in the comments below.

    googletag.cmd.push(function() {
    tablet_slots.push( googletag.defineSlot( “/1005424/_dPSv4_tab-all-article-bottom_(300×250)”, [300, 250], “pb-ad-78623” ).addService( googletag.pubads() ) ); } );

    googletag.cmd.push(function() {
    mobile_slots.push( googletag.defineSlot( “/1005424/_dPSv4_mob-all-article-bottom_(300×250)”, [300, 250], “pb-ad-78158” ).addService( googletag.pubads() ) ); } );

    The post Next Level Techniques for Advanced Beginners by Jeremie Schatz appeared first on Digital Photography School.


    Digital Photography School

  • Tips for Creating Original Images

    Years ago I shot an image for a competition that I was sure was a highly original piece of genius. Only to find out when looking at other entries, there seemed to be rather a lot of other highly original geniuses with exactly the same idea.

    To get further in competitions I realized I had to start thinking outside the box. So I developed a strategy for getting a bit more original with my photography. Here are some tips you may find helpful for coming up with unique ideas and for creating original images.

    Coming up with an idea

    If you don’t already have an idea to work from, you can pick one right now – be it the first item you see after reading this sentence, or google your town and see what comes up. For example, the first link might be to a local hairdresser, so your theme could be hair. Try this with some other keywords like; photography or art, or go completely random and google both hair plus the first item to your left.

    Send in the clowns

    A quote from musician Nick Cave explaining his song writing process:

    “Do you want to know how to write a song? Song writing is about counterpoint. Counterpoint is the key. Putting two disparate images beside each other and seeing which way the sparks fly. Like letting a small child in the same room as, I don’t know, a Mongolian psychopath or something, and just sitting back and seeing what happens. Then you send in a clown, say, on a tricycle and again you wait and you watch. And if that doesn’t do it, you shoot the clown.”

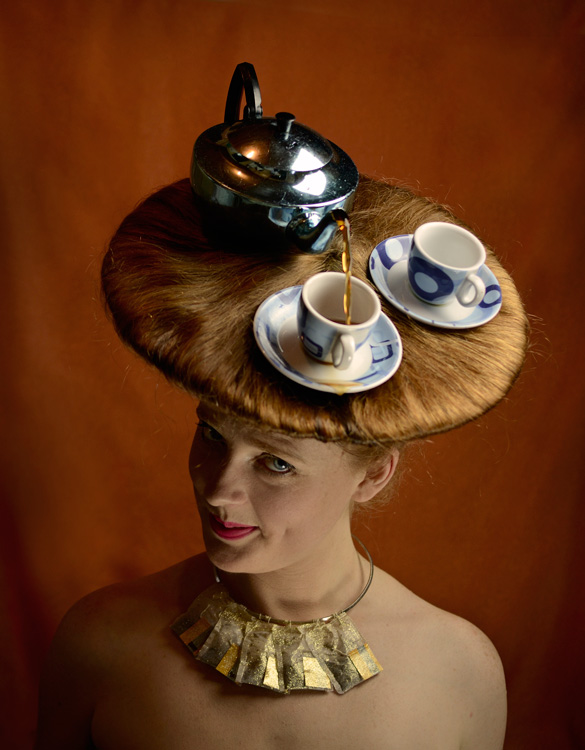
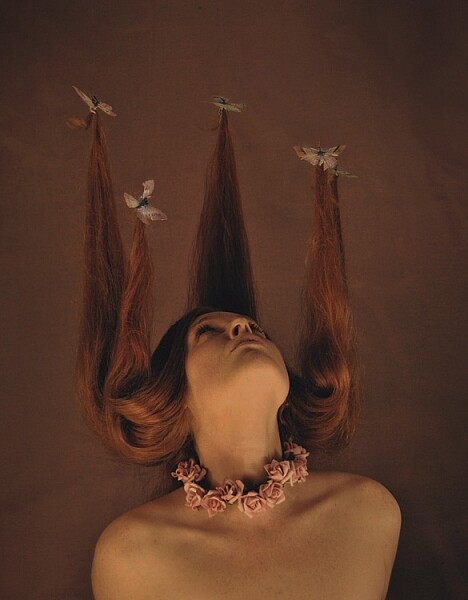
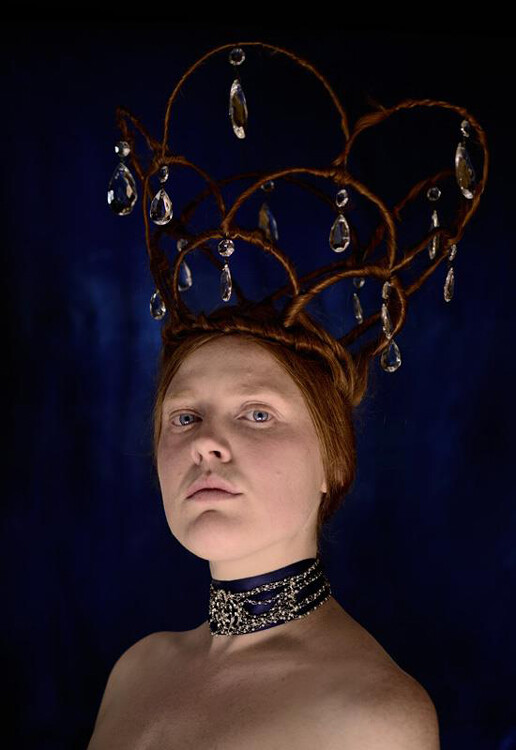
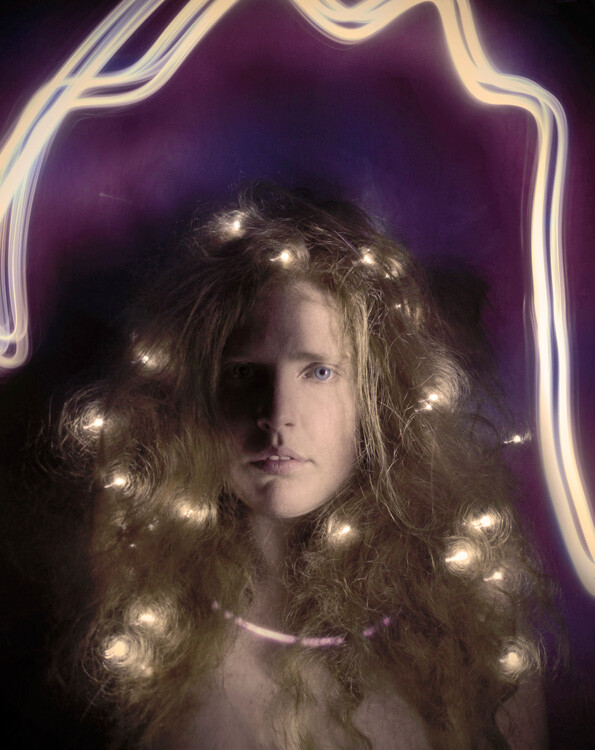
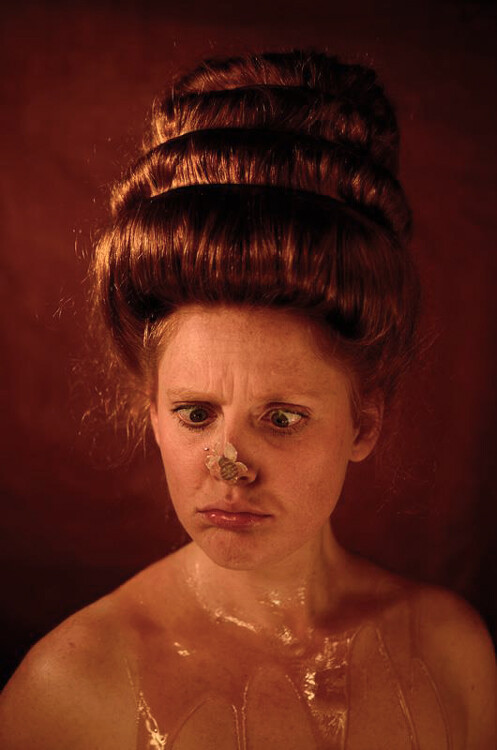
    Apply this to your photography. Your theme, that’s your small child. Add to that a certain style of photography, macro , high speed , light painting, that’s your Mongolian psychopath. Now send in the clown, perhaps this could be, as above, the first thing you see to your left, or something available to you that might not be available to other photographers like an awesome local location, unique props, or skills. In my case some mad crafty skills and a friend, with a lot of red hair, to model for me.

    An unusual prop is a good place to start when aiming for an original image.

    Combining other skills or hobbies (in this case my crafty skills) with your photography can help to create unique images. I made a crown out of coat hangers and wrapped the model’s hair around it. The jewels in the crown were some old chandelier parts I found at a market. Markets and thrift stores can be a good source for unusual items to inspire an original photograph.

    Think about what is available to you

    It’s all well and good to want to do a high-speed Kung Fu fighter action shot in low light, when all that is available to use is your mobile phone camera and your dog as the actor, and he has no Kung Fu training whatsoever. Not that it can’t be done, just saying, know your limits – then ignore them, or try to work around them.

    Go for a walk

    Even if you have a good idea, it’s a good idea to go for a walk.

    When you get home, write or sketch further ideas. They don’t have to be good, or fully thought through, just get them down on paper or computer. Make notes of anything that comes to mind, you can sort out what works later. Even if you think your first idea is the one, still try to stretch yourself to come up with at least five to 10 more. This may sound like a lot, but sometimes that is what it takes to get yourself thinking outside the box.

    If by then you don’t come up with anything original that you are excited about, go for another walk.

    Let it rest

    Creativity requires leisure, as they say. I am all for striking while the iron is hot, as they also say, but there is a lot to be said for allowing yourself to just mull over ideas for a while. Send in or shoot a few more clowns, see if you can improve the concept, or add a new element to really make it original.

    Research

    Google your idea or theme in an image search. This may not only inspire further ideas, but also allow you to check that any you’ve come up, with haven’t already been done a million times before.

    Be prepared to re-shoot

    Sometimes we can get caught up in an idea. I once went to great length with costume, setup and a bizarre concept, for a competition brief. After a lengthy photo session and editing, I realized the idea didn’t actually make any sense because the concept was too complicated. So I simplified the whole thing back down to basics, shot the clown as Mr. Cave advised, and the second attempt worked a treat. Going that extra mile to keep thinking and photographing, plus a willingness to let go of an idea you have worked hours on, will help you get to that truly original image in the end.

    Shoot a series

    This works on the same principle as coming up with 10 ideas in the sketching stage before you settle on one. Getting past your first inclinations, and pushing an idea, will get you outside your initial box. Photographing a series, forces you to take that a step further. When you are thinking about an idea over an extended period of time, over several shoots, you really give your creativity a work out. You may surprise yourself with what you come up with by your seventh photo shoot, based on your first concept.

    Collaborate

    Aristotle said; “The whole is greater than the sum of its parts”. Not all collaborations create equally, but when they work, something wonderful happens. The combination of two or more collaborators can create concepts and ideas that take you far beyond what you would have done on your own.

    Even something as simple as asking a portrait subject to bring in some props or personal items of their own, can change a photo shoot from ordinary to original.

    Go beyond the sunset

    This applies to any form of photography but I’ll use the ubiquitous sunset shot as an example.

    Basically what I am saying here is get out of your comfort zone, and take a different approach. Instead of the cliché sunset, try something new with it, be it learning different photographic method such as infrared photography, multiple or long exposures, light painting, or add a new element, some random item. Hair + sunset = a challenge, but it’s going to take you beyond the ordinary sunset photograph.

    An exercise to stretch your imagination

    Choose one of each from the two lists below, then try a few of the tips above, especially coming up with 10 possible photograph ideas. Then go have a hoot photographing the one you like best!

    Items:

    • Something from your refrigerator
    • A bottle
    • A piece of fabric
    • An item from your bathroom

    Camera method:

    • Long exposure
    • High shutter speed
    • Black and white
    • Low light

    An image from that list could be a low light shot (sunset) and a message in a bottle on the beach, not exactly an original concept. However, just because something has been done before, doesn’t mean you shouldn’t run with it, put your own mark on it, find an original way to show that story.

    Should you try the exercise, or any of the above tips, share your results in the comments, let’s have some fun with this!

    googletag.cmd.push(function() {
    tablet_slots.push( googletag.defineSlot( “/1005424/_dPSv4_tab-all-article-bottom_(300×250)”, [300, 250], “pb-ad-78623” ).addService( googletag.pubads() ) ); } );

    googletag.cmd.push(function() {
    mobile_slots.push( googletag.defineSlot( “/1005424/_dPSv4_mob-all-article-bottom_(300×250)”, [300, 250], “pb-ad-78158” ).addService( googletag.pubads() ) ); } );

    The post Tips for Creating Original Images by Lea Hawkins appeared first on Digital Photography School.


    Digital Photography School
  • How to Import Photos into Lightroom

    If you are new to Lightroom, the first thing you need to do after installing the software, opening it up, and taking a look around is import some photos.

    As Lightroom is a database you can’t open photos in it the same way you can in Photoshop – instead, you have to import your photos before you can view, or process them. The import process adds photos to the Lightroom Catalog (Adobe’s name for the database that the program uses) and generates a preview of the image for you to view. Once imported, images stay in the Lightroom Catalog forever (or until you remove them from the Catalog yourself).

    The Lightroom modules

    Lightroom is modular software, there are seven of them: Library, Develop, Map, Book, Slideshow, Print and Web. You can only work in one module at any one time, but you can move around between them as often as you want.

    The Library module is the heart of the system. This is where you view photos, organize them into Collections and carry out searches. The Library module is your window to the Lightroom Catalog ,and all the information that it holds about your images.

    Importing and viewing photos happens entirely within the Library module.

    The Lightroom module layout

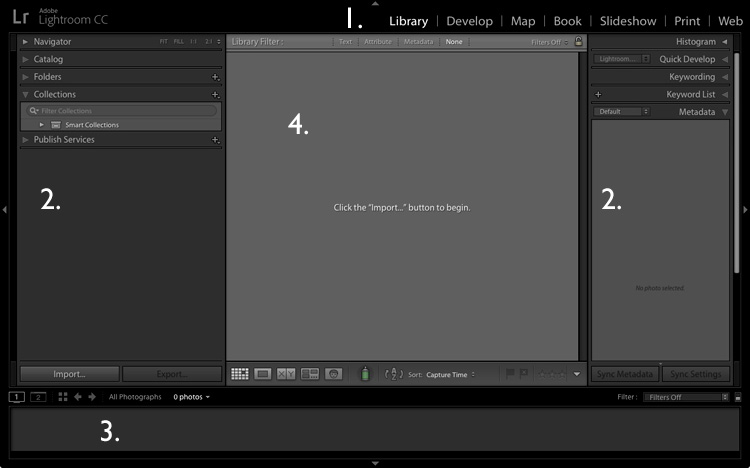
    The screenshot below shows the Library module layout. If you haven’t imported any photos into the Lightroom Catalog yet this is what it will look like.

    Importing photos into Lightroom

    1. Module selector
    2. Side panels
    3. Filmstrip
    4. Content area

    The screen is divided into four areas.

    1. The Module selector: This is the bar at the top that tells you which module you are in (in this case, the Library module). You can make it disappear by clicking the white arrow at the top of the screen, freeing up screen space.

    2. The left- and right-hand panels: These contain all the Library module tools. You can click the arrow on either side to make them disappear and reappear.

    3. The Filmstrip: Displays thumbnails in the currently selected Folders, Collections or search results. If there are no photos in your Catalog it will be blank. Click the white arrow at the bottom of the screen to show/hide it.

    4. The Content window: This is the central display area. After you have imported some photos into Lightroom you can view them here. If you hide all four side panels (use the keyboard shortcut Shift+Tab) it will fill your screen.

    Importing photos

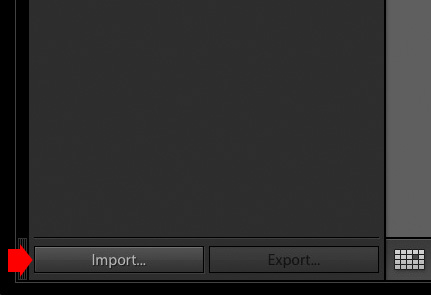
    To get started, free up some screen space by hiding the Module Picker, Filmstrip and right-hand panels. Click the Import button in the bottom left-corner of the left-hand panel.

    Importing photos into Lightroom

    If this is your first import you are likely to be importing your photos from your hard drive, but you can also import them directly from a memory card, or connected camera.

    It is best to import your photos one folder at a time, so you can organize them as you go along. It is more difficult if you import all your image files in one go. Plus, Lightroom will make you wait a long time while it carries out the import process!

    The Import window

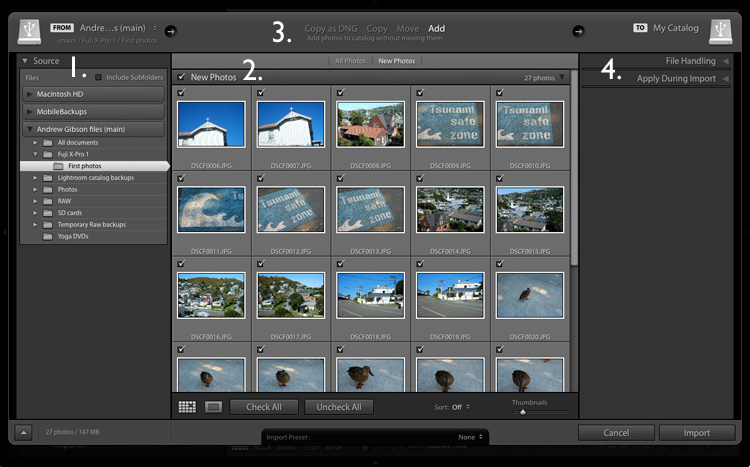
    When you click the Import button Lightroom takes you straight to the Import window. It is divided into four sections (marked below).

    Importing photos into Lightroom

    1. Source 
    2. Photo thumbnails
    3. Import options
    4. Destination

    1. Source (left panel): This is the folder(s) from which you are going to import the photos. You can navigate through all hard drives, cameras, or memory cards connected to your computer.

    2. Photo thumbnails (middle section): Here Lightroom displays thumbnails of the photos in the selected source folder or folders. The photos are ticked to show that Lightroom will import them into the Catalog when you press the Import button (you can untick any that you don’t want to import).

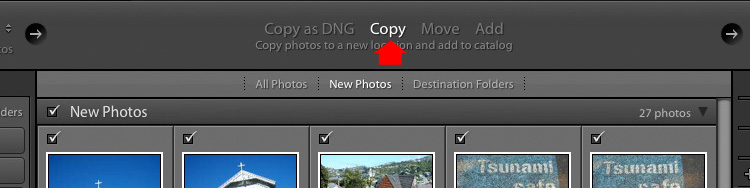
    3. Four import options which tell Lightroom what to do with the photos (top middle): They are:

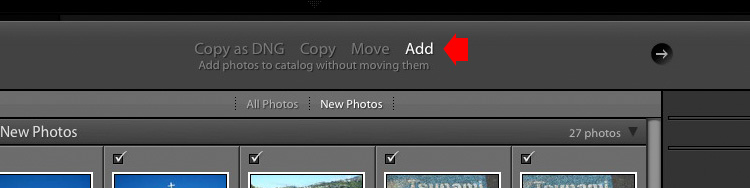
    • Copy as DNG: When you select this option Lightroom converts your Raw files to Adobe’s DNG format (non-Raw formats such as JPEG and TIFF are not converted). This is the most time consuming option as Lightroom has to first copy your photos then convert them to a new format. Make Lightroom Faster by Using DNG explains the advantages of the DNG format. If you’re new to Lightroom leave this option alone for the moment, as it’s for more advanced users.
    • Copy: Lightroom copies your files from their current location to a new one, without changing the file format. This is ideal for importing photos from a memory card, as it leaves the original files intact on the card.
    • Move: Lightroom moves your files from their current location to a new one, without changing the file format. However, it does delete the original files after they have been moved. This is ideal when you want to move photo files from one folder to another on a hard drive.
    • Add: Lightroom imports your photos into the Catalog, without moving or copying them from their current location. Select this option if you are importing photos from your hard drive and don’t want to change their location.

    4. Destination (right panel): This is where you tell Lightroom what to do with the photos (and where to put them) during the import process. If you select the Add option you will see two panels here (File Handling and Apply During Import). If you select Copy as DNG, Copy, or Move, Lightroom also displays the File Renaming and Destination panels.

    Putting it together

    Ready to import your first photos into Lightroom? These are my recommended settings – you can start with these and adjust the workflow to suit your needs as you become more comfortable with Lightroom’s settings.

    1. Navigate to the folder containing your photo files on the left and select the Add option from the top.

    Importing photos into Lightroom

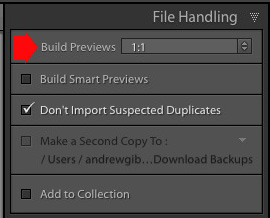
    2. On the right open the File Handling panel (click on the heading to open and close panels) and set Build Previews to 1:1.

    Importing photos into Lightroom

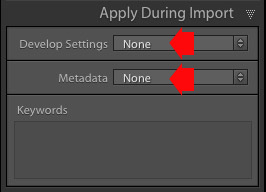
    3. Open the Apply During Import panel and set Develop Settings and Metadata to None. The idea is to keep your first import simple – you can learn how to use Develop Presets and Metadata presets later (this article How to Create Your Own Lightroom Presets will get you started).

    Importing photos into Lightroom

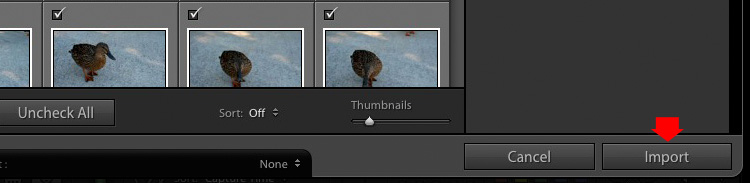
    4. Click the Import button (bottom right). Lightroom returns to the Library module and starts the import process. It takes Lightroom a while to build the 1:1 previews, but the wait is worth it, as it makes viewing them in the Library module much quicker.

    Importing photos into Lightroom

    Once Lightroom has imported your photos, you can view them in the Library module. These articles Making Sense of Lightroom’s Grid View and The Hidden Secrets of Lightroom 5’s Loupe View (yes it applies to Lightroom 6 and Lightroom CC too) will get you started.

    Importing photos from a memory card

    Once you’ve carried out your first import, at some stage you will want to import photos directly from a memory card into Lightroom. There are a couple of extra steps in this process. Start by selecting Copy (instead of Add) at the top of the Import window.

    Importing photos into Lightroom

    Set the File Handling and Apply During Import panel settings as above. Ignore the File Renaming panel (another advanced topic).

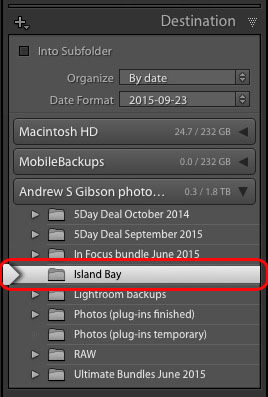
    In the Destination panel, select the folder where you would like to save the imported images (you can create a new folder by right-clicking on an existing one and selecting Create New Folder). The selected destination folder is marked in white.

    Importing photos into Lightroom

    Click the Import button when you’re ready.

    After the import

    It’s important to understand that the import process doesn’t physically add your photo files to the Lightroom Catalog. The Catalog contains previews of your photos, plus information about them, including the location where they are saved. The photo files themselves remain on your hard drive.

    The next task is to organize your newly imported photos. I’ll show you how to do that in a future article.

    Do you have any questions regarding this process? Please let me know in the comments.


    Mastering Lightroom Book One: The Library Module

    Mastering Lightroom ebookMy latest ebook Mastering Lightroom Book One: The Library Module (second edition) is a complete guide to using Lightroom’s Library module to import, organise and search your photo files. You’ll learn how to tame your growing photo collection using Collections and Collection Sets, and how to save time so you can spend more time in the Develop module processing your photos.

    googletag.cmd.push(function() {
    tablet_slots.push( googletag.defineSlot( “/1005424/_dPSv4_tab-all-article-bottom_(300×250)”, [300, 250], “pb-ad-78623” ).addService( googletag.pubads() ) ); } );

    googletag.cmd.push(function() {
    mobile_slots.push( googletag.defineSlot( “/1005424/_dPSv4_mob-all-article-bottom_(300×250)”, [300, 250], “pb-ad-78158” ).addService( googletag.pubads() ) ); } );

    The post How to Import Photos into Lightroom by Andrew S. Gibson appeared first on Digital Photography School.


    Digital Photography School
  • Review: Westcott Rapid Box 10×24? Strip Light

    One of the best, and easiest ways, to modify your studio lighting is to use a soft box. There’s nothing like a soft box when it comes to providing soft, diffused light, for any style of photography. But among the chief concerns of soft boxes is their size, especially when shooting on location. Enter, Westcott!

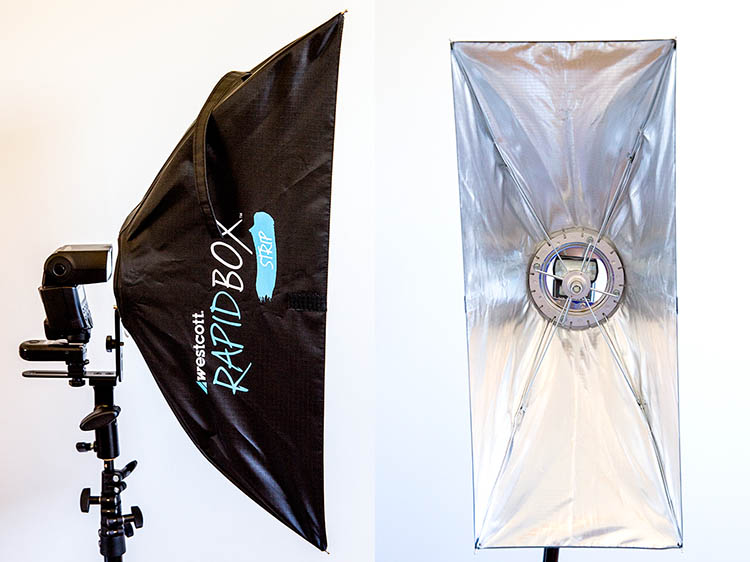
    The legendary lighting brand, probably best known for their solid Apollo Orb soft boxes, has a slimmed down lighting solution known as the Westcott Rapid Box series. Available as an octabox, strip light, or the mega 32″ octabox duo, the members of the Rapid Box series are solidly built, very compact, and compatible with most speedlight flash units. This particular review is of the Westcott Rapid Box 10×24″ strip light.

    Westcott Rapid Box Strip Light product review

    What’s in the Box

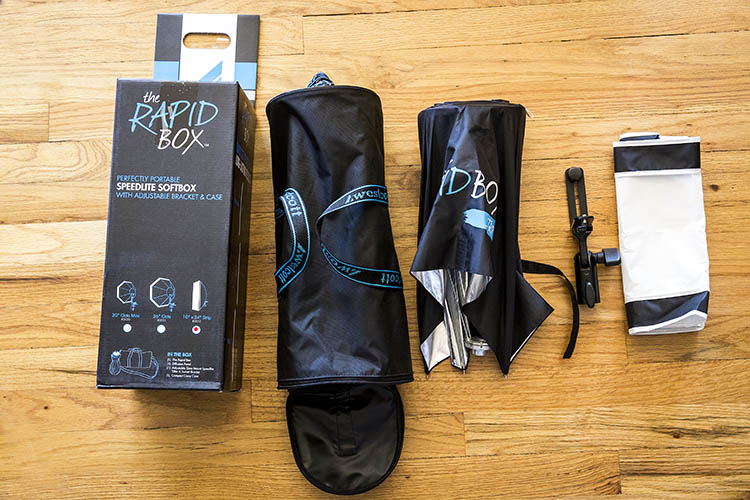
    The Westcott Rapid Box 10×24″ Strip Light arrives in a beautifully packaged box and comes with:

    • A 10 x 24″ narrow rectangular Rapid Box modifier
    • A Height and depth adjustable aluminum hotshoe-mount tilt/swivel bracket
    • A diffusion panel
    • Compact carrying case with shoulder strap

    All pieces of the product are constructed of durable, high-quality material, that is also very lightweight. The modifier opens and closes like an umbrella, and has a reflective silver interior. Even the one stop diffusion panel is made of the same high-quality material as all of Westcott’s other current soft boxes. You don’t need any extra rods or adapter rings to set up the Rapid Box. The only extra parts you’ll need are a light stand and hot-shoe mounted flash, and you’re good to go!

    Westcott Rapid Box Strip Light product review

    Gear Used

    Since the speedlight mount is held in place by the adjustable bracket outside of the soft box, the Rapid Box is compatible with just about any hot-shoe flash and any speedlight radio triggers or sync cords. For this product review test, I used the Rapid Box 10×24″ Strip light, Manfrotto Nano light stand, Canon 430 EXII flash, and a Yongnuo RF-603 II wireless flash trigger. Everything was compatible, and was easy to assemble and sync.

    Why a Strip Light?

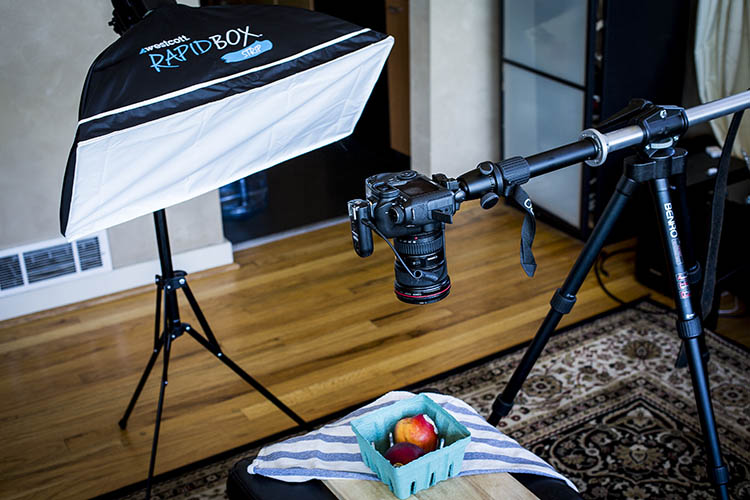
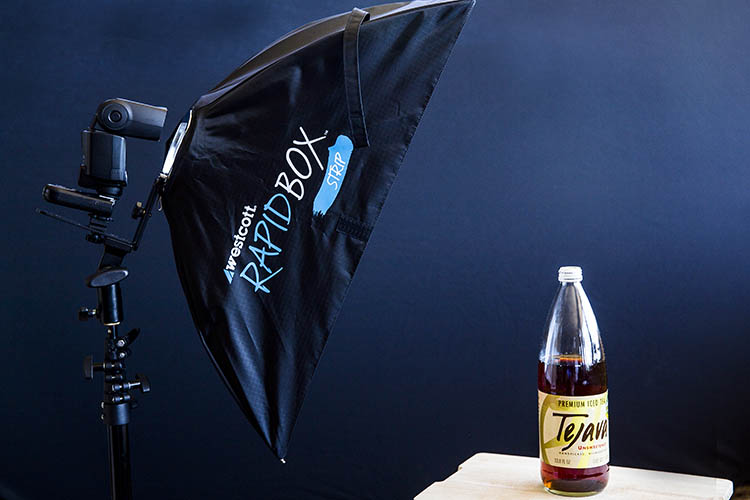
    Given the fact that Westcott offers both a 26″ and 20″ octabox, choosing the narrower strip light may seem like an odd choice. But with the Rapid Box Strip’s narrower 10 x 24″ frame, this modifier’s shape makes it a perfect for lighting subjects in tight spaces, such as food photography in a small restaurant. Speaking of food photos, the strip light’s long shape can also help create a long, elegant strip on objects with reflective surfaces such as wine bottles. When paired with other lights, the strip light also lends itself to use as a back light, hair light, or rim light to help separate the subject from the background.

    Westcott Rapid Box Strip Light product review

    Con: Semi-Complicated Setup

    Unless you are already familiar with Rapid Boxes, the initial setup work might be slightly more complicated than expected. Despite the lack of moving parts, there may be some difficulty figuring out how to set up the aluminum bracket, which feels so solid and tight that it’s not intuitive how to adjust it to fit the hot-shoe mounted flash. The initial set up time took me about 45 minutes toying with all the pieces before understanding how they fit together. However, with practice, I found that setup could be completed in under five minutes.

    Westcott Rapid Box Strip Light product review

    Pro: Beautiful, Flexible Lighting

    Once you get over the initial hurdle of figuring out how the Rapid Box functions, it starts to live up to its name and is a speedy, flexible, lighting modifier. Lightweight and especially compact as it is a strip box, this little 20-inch light performed particularly well for on-the-go portraits and on-location restaurant shoots, when shooting in notoriously tight dining room spaces. The image quality was superb, likely thanks to the Rapid Box’s solid silver interior which adds a bit more of a kick when the flash is fired.

    Westcott Rapid Box Strip Light product review

    IMG_9798-750px


    Westcott Rapid Box strip light review

    Conclusion

    As an on-the-go photographer, I have yet to find a more compact lighting modifier than this handy Rapid Box strip box. Even though initial set up can be a pain, I wouldn’t hesitate to stick this strip box into any of my travel photography kits, and rely on it for shooting on the road or in tight spaces.

    googletag.cmd.push(function() {
    tablet_slots.push( googletag.defineSlot( “/1005424/_dPSv4_tab-all-article-bottom_(300×250)”, [300, 250], “pb-ad-78623” ).addService( googletag.pubads() ) ); } );

    googletag.cmd.push(function() {
    mobile_slots.push( googletag.defineSlot( “/1005424/_dPSv4_mob-all-article-bottom_(300×250)”, [300, 250], “pb-ad-78158” ).addService( googletag.pubads() ) ); } );

    The post Review: Westcott Rapid Box 10×24″ Strip Light by Suzi Pratt appeared first on Digital Photography School.


    Digital Photography School
  • Weekly Photography Challenge – Red

    Color is a great tool in the art of composition. Using strong colors like red can make for powerful images, when done well.

    Don2g

    By don2g

    Sebastian Rieger

    By Sebastian Rieger

    Weekly photography challenge – red

    This week is your chance to find something red and create a composition around it.

    Peter Kaminski

    By Peter Kaminski

    Gonzalo Iza

    By Gonzalo Iza

    HannaPritchett

    By HannaPritchett

    Share your images below:

    Simply upload your shot into the comment field (look for the little camera icon in the Disqus comments section) and they’ll get embedded for us all to see or if you’d prefer upload them to your favourite photo sharing site and leave the link to them. Show me your best images in this week’s challenge. Sometimes it takes a while for an image to appear so be patient and try not to post the same image twice.

    googletag.cmd.push(function() {
    tablet_slots.push( googletag.defineSlot( “/1005424/_dPSv4_tab-all-article-bottom_(300×250)”, [300, 250], “pb-ad-78623” ).addService( googletag.pubads() ) ); } );

    googletag.cmd.push(function() {
    mobile_slots.push( googletag.defineSlot( “/1005424/_dPSv4_mob-all-article-bottom_(300×250)”, [300, 250], “pb-ad-78158” ).addService( googletag.pubads() ) ); } );

    The post Weekly Photography Challenge – Red by Darlene Hildebrandt appeared first on Digital Photography School.


    Digital Photography School
  • 27 Hot Images that Incorporate the Color Red

    Fall in the northern hemisphere can be very colorful and bright. Red is everywhere, look around you. Using this color in composition can be tricky. Here are 27 images that do it successfully:

    Shadi Samawi

    By Shadi Samawi

    Moyan Brenn

    By Moyan Brenn

    Smilla4

    By smilla4

    Riccardo Cuppini

    By Riccardo Cuppini

    Richard Clark (Digimist)

    By Richard Clark (Digimist)

    Darwin Bell

    By darwin Bell

    ELKayPics

    By eLKayPics

    Oli4.D

    By Oli4.D

    SantaRosa OLD SKOOL

    By SantaRosa OLD SKOOL

    Darwin Bell

    By darwin Bell

    Lenchensmama.

    By lenchensmama.

    Darwin Bell

    By darwin Bell

    Photophilde

    By photophilde

    Sonny Abesamis

    By Sonny Abesamis

    Susanne Nilsson

    By Susanne Nilsson

    S Vivek

    By S Vivek

    Darwin Bell

    By darwin Bell

    K2D2vaca

    By K2D2vaca

    Karol Franks

    By Karol Franks

    Ed Suominen

    By Ed Suominen

    Thomas Hawk

    By Thomas Hawk

    Bruce Irschick

    By Bruce Irschick

    Katmary

    By katmary

    Rob.

    By Rob.

    Lulu Lovering

    By Lulu Lovering

    Ziva

    By Ziva & Amir

    Peter Roome

    By Peter Roome

    googletag.cmd.push(function() {
    tablet_slots.push( googletag.defineSlot( “/1005424/_dPSv4_tab-all-article-bottom_(300×250)”, [300, 250], “pb-ad-78623” ).addService( googletag.pubads() ) ); } );

    googletag.cmd.push(function() {
    mobile_slots.push( googletag.defineSlot( “/1005424/_dPSv4_mob-all-article-bottom_(300×250)”, [300, 250], “pb-ad-78158” ).addService( googletag.pubads() ) ); } );

    The post 27 Hot Images that Incorporate the Color Red by Darlene Hildebrandt appeared first on Digital Photography School.


    Digital Photography School
  • Start Making Photographs to Become a Better Photographer

    If you are an avid reader of this site, most likely you are a photography enthusiast wanting to learn more and advance your craft. If you really care about doing so, it is time to stop taking snapshots and start making photographs to become a better photographer.

    Taking versus making can be a question of semantics; that’s why I prefer to call it snapshot versus photograph. But beyond semantics, in my humble opinion, you graduate as a photographer the moment you start making photos instead of taking them, regardless of the results. But wait, regardless of the results? Well, not really. Of course, you want great photos. What I mean by that is that you’ll progress in your craft the moment you start thinking about your photos, your vision, and how to reflect it with your image. The results could be bad or good, but you are thinking as a photographer. When you start thinking as a photographer, the results will come, sooner or later.

    New Orleans Skyline

    So what’s the difference? Taking a photo is the result of an impulsive reaction; you just press the shutter because you are there and you shoot it. Taking a photo is just snapping what you see. Instead, making a photograph is a process. When you make a photo, you are creating something from your vision. You are constructing it, and you are putting what comes from you in it.

    The process of making a photo can take different periods of time. For some, it is a longer, thoughtful process, and for others it is a just a moment. For a National Geographic photographer, making a photo can take months; there is a lot of planning, research and being there just to get the right image that makes the cover of the magazine. For a street photographer, making a photo is totally different; they only have a split second to get it right without the luxury of setting up. But, there are other things they can control, like location, time of the day for best light, and so on.

    I am telling you that you graduate as a photographer when you start making photographs because, for most us, enjoying the creative process is what makes us different from the rest. It does not matter if you are an enthusiast, serious amateur, or pro – we all enjoy it. Sure, learning how to expose, compose and post-process is important, but it’s something you can learn with enough practice and attention. That’s the technical aspect of photography, and when you master the basics, there will be always something new learn. But besides that, it comes with the freedom to stop thinking about aperture/depth of field and ISO/noise, and focus more on the photos you want to create.

    Making a photograph will also help you to cut the clutter. When I first started to go on travel photography trips, I used to come back home with thousands of photos that were taken in just a span of a couple of days. That made the selection process a daunting task. First, who really wants to see thousands of photos? Second, is there any meaning in them? When you take the time to plan a more thoughtful photograph, you cut the clutter because often you’ll shoot less, but come out with better content.

    Happy woman in Taung Tho Market Inle Lake

    Last, I want to leave you with a couple of examples, starting with the opening picture of this article. I was going to be in New Orleans only for a long weekend and one the things I wanted to photograph was the skyline of the city. So, I started my research ahead of time to find the best spot to do it. I only had three nights in the city and as I wanted to shoot during the blue hour, I really didn’t have the chance of messing it up. Once I knew where I was going to make my photo from, it was all a matter of arriving there in time to set up and wait for the right moment. So besides finding the location and arriving early to set up, I also had the right tools with me to make it happen. I knew I wanted to include the Crescent Connection Bridge, so I brought a wide angle lens. I knew that it was going to be a long exposure, not only because of the time, but also because I wanted a smooth reflection over the Mississippi River, so I also brought a tripod and a neutral density filter to make a long exposure.

    Sometimes making a photo also means finding an interesting subject, and trying to learn more from them by staying for a while, instead of grabbing a shot and moving. I found this amazing woman for this photo (above) from the Taung Tho Market of Inle Lake in Myanmar. I sat there taking pictures of her for a while, and I remember she pretended I was not there until I told my guide to tell her that she was beautiful. Her reaction was priceless and that made the photo.

    Monk in the Punakha Dzong

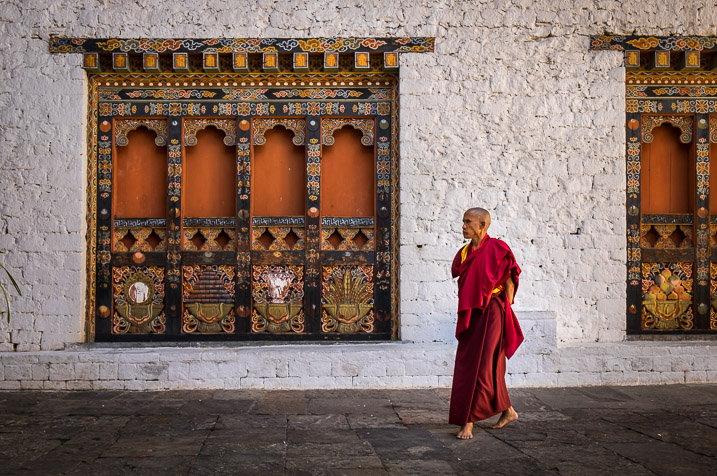
    Other times, making a photo means waiting for something interesting to happen if you are in the right place. For the Bhutanese monk above, I found myself on a big patio surrounded by typical and colorful windows that I wanted to photograph, while I was visiting one of the many monasteries. But I needed something else besides the windows. Because I had seen them earlier, I knew that another monk would walk across my frame sooner or later, so I carefully composed my photo and waited until this one walked by.

    There you have it. As you can see, there are different meanings and ways to create photos, and not just take them. But the most important thing is for you to understand that you can be a better photographer by making photos instead of just taking them. Plan and enjoy the process, and results will follow. By the way, if you are already making photos, why don’t you share one with us in the comments below with a short caption on how you made it and why.

    googletag.cmd.push(function() {
    tablet_slots.push( googletag.defineSlot( “/1005424/_dPSv4_tab-all-article-bottom_(300×250)”, [300, 250], “pb-ad-78623” ).addService( googletag.pubads() ) ); } );

    googletag.cmd.push(function() {
    mobile_slots.push( googletag.defineSlot( “/1005424/_dPSv4_mob-all-article-bottom_(300×250)”, [300, 250], “pb-ad-78158” ).addService( googletag.pubads() ) ); } );

    The post Start Making Photographs to Become a Better Photographer by Daniel Korzeniewski appeared first on Digital Photography School.


    Digital Photography School
  • A Brief Introduction to Lightroom

    A Brief Introduction to Lightroom

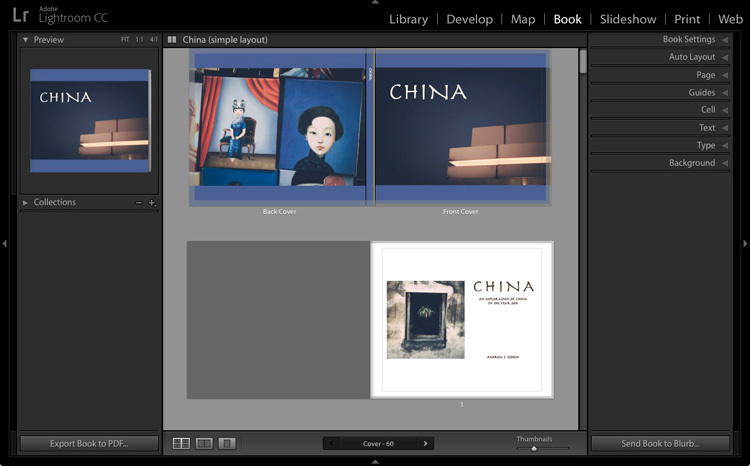
    Lightroom’s Book module lets you create photo books to publish using Blurb’s print on demand printing service.

    Since the first version was released over eight years ago, Lightroom has become the go-to software for many photographers, both hobbyist and professional. But if you’re new to Lightroom you may be wondering exactly what it does, what you would use it for, and how it differs from other well known programs like Photoshop.

    What is Lightroom?

    Lightroom is part Raw converter, part photo processor (yes, you can edit JPEG and TIFF files in Lightroom too), and part photo organizer. The latter task is often referred to as digital asset management (or DAM for short).

    The key thing to understand about Lightroom is that it is a workflow application. It is designed to take care of your photos from the moment you copy them from your camera’s memory card, to your computer’s hard drive. Once in Lightroom you can process photos, add them to a map to show where they were taken, create a photo book or slide show, print them or export them to other programs for further processing.

    This is why Lightroom is so useful, and so popular. It becomes the centre of your workflow, and while it is powerful enough to be used independently, it also integrates seamlessly with programs like Photoshop. You can use Lightroom by itself, or in partnership with other programs.

    A Brief Introduction to Lightroom

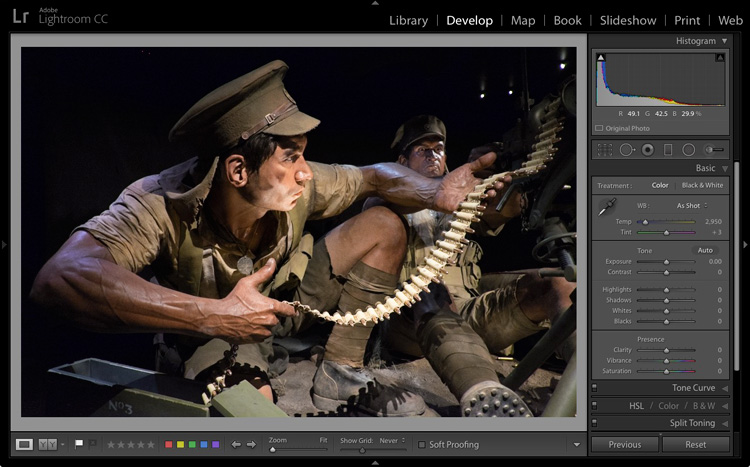
    The Lightroom Develop module. This is where you process your JPEG, TIFF or Raw files.

    The Lightroom Catalog

    At the heart of Lightroom is the Catalog – a database that contains a preview of every photo that you have imported into the program, a record of each photo’s metadata (including processing) plus the location where it is stored on your hard drive.

    It is important to note that the Catalog doesn’t contain the photos themselves, just information about them. Your photo files are always saved on a hard drive, even if you use Lightroom CC (Creative Cloud).

    A Brief Introduction to Lightroom

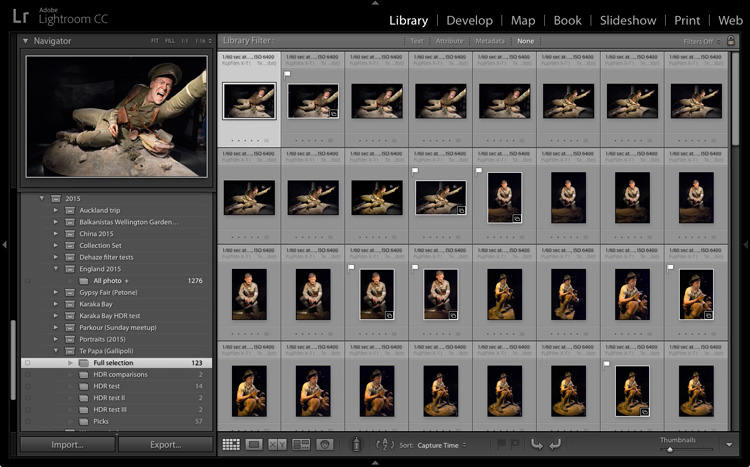
    The Lightroom Library module. This is where you view, organize, and search photos. It is the heart of Lightroom and arguably its most important module.

    The database advantage

    Because Lightroom is a database, it gives you several advantages over programs like Photoshop.

    1. It saves you hard drive space

    Lots of it. When you process a Raw file in Lightroom, the edits you make are saved in the Lightroom Catalog as a series of text commands which take up very little space.

    When you process a Raw file in Photoshop, you have to convert it to a 16 bit TIFF or PSD file first (yes, you can use JPEG instead but the other formats give better image quality). TIFF and PSD (and even JPEG) files take up much more space than the text commands in the Lightroom Catalog do.

    The end result is that, over time, you save hundreds of gigabytes of storage space, making it much easier to manage your growing photo collection.

    Note that this benefit is diminished if you are in the habit of exporting photos to Photoshop or plug-ins for processing. That shouldn’t stop you from using those applications (although it is good practice to see if you can do something in Lightroom first) nor should it put you off using Lightroom.

    2. Lightroom lets you see all your photos in one place

    Provided you import all your photos into a single Catalog (it is possible to have multiple Catalogs in Lightroom but this is for advanced users only) you can view any of your photos using Lightroom’s Library module.

    3. Lightroom lets you search your photos

    Lightroom is a database, which is designed to collect, organize and search information.

    Would you like to find all your photos taken with a particular camera or lens? That’s easy in Lightroom. How about all portraits taken with the aperture set to f/2.8? That takes a little more work as it relies on accurate keywording, but it’s entirely possible. Or what about all photos of a specific person taken in 2012? Easy with the face detection tool in Lightroom 6 and Lightroom CC.

    A brief introduction to Lightroom

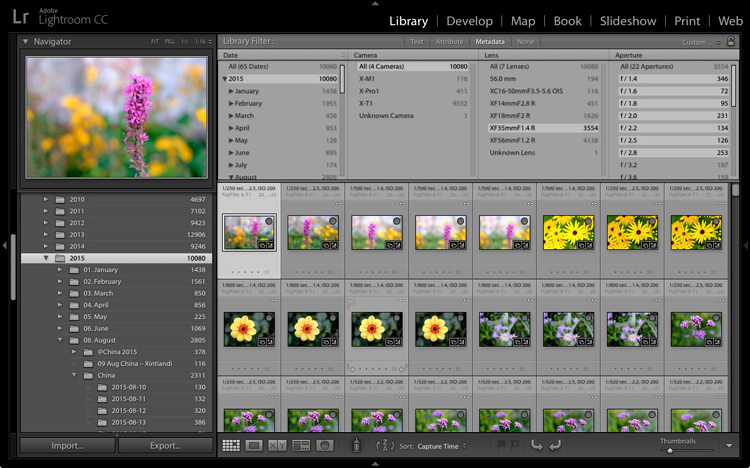
    In this example I used Lightroom’s Library module to find all photos taken in 2015 with my Fujinon 35mm lens at an aperture of f/2.8 or greater.

    4. Lightroom lets your organize your photos how you want

    The problem with storing images in folders is that you can only save a photo in one location. Let’s say you took some photos of a friend called Sarah, in London, in July 2015 (maybe you were at Wimbledon). When you copy those files to your hard drive, you can only save them in one folder (which may be called Sarah, or London, or something entirely different).

    Lightroom Collections

    One of Lightroom’s key features is Collections. A Collection is like a virtual folder. You can call a Collection whatever you want, add as many photos as you like, and add photos to as many Collections as you need.

    Using the above example, once you have imported your photos of Sarah into the Lightroom Catalog, you can add them to multiple Collections. For example, you may have one Collection that contains all your photos of Sarah, another with all your photos of London, and another with all the photos taken in July 2015.

    It’s a simplified example, but the advantages of Collections become more apparent the more you use them. In short, they give you the flexibility to organize your images in a way that suits you.

    A brief introduction to Lightroom

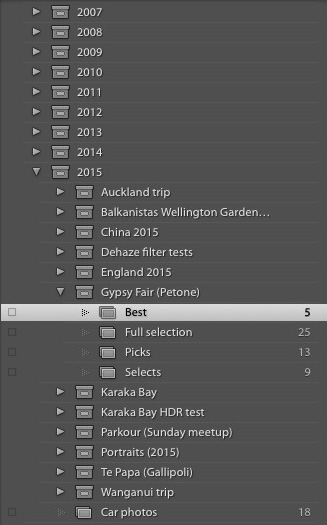
    This is how I organize my photos using Collections. There is a separate Collection Set for each year. Each of those contains Collection Sets and Collections organizing photos by topic.

    Lightroom versus Photoshop

    Does that mean you should use Lightroom exclusively and forget about programs like Photoshop? Not at all. There are plenty of things that you can do in Photoshop (not to mention all the other plug-ins and editing programs that you can buy) that you can’t in Lightroom.

    Many photographers use the two in conjunction. This is encouraged by Adobe with its Creative Photography Plan, which includes both Photoshop and Lightroom, along with Lightroom mobile and Lightroom web.

    If you are new to Lightroom your first task is to import some photos into it so you can work on them. I’ll show you how to do that in my next article.

    If you were unsure about what Lightroom is and what photographers use it for, then I hope this article has helped. Do you have any questions? Please ask in the comments and I’ll do my best to help.


    The Mastering Lightroom CollectionMastering Lightroom ebooks

    My Mastering Lightroom ebooks will help you get the most out of Lightroom. They cover every aspect of the software from the Library module through to creating beautiful images in the Develop module. Click the link to learn more or buy.

    googletag.cmd.push(function() {
    tablet_slots.push( googletag.defineSlot( “/1005424/_dPSv4_tab-all-article-bottom_(300×250)”, [300, 250], “pb-ad-78623” ).addService( googletag.pubads() ) ); } );

    googletag.cmd.push(function() {
    mobile_slots.push( googletag.defineSlot( “/1005424/_dPSv4_mob-all-article-bottom_(300×250)”, [300, 250], “pb-ad-78158” ).addService( googletag.pubads() ) ); } );

    The post A Brief Introduction to Lightroom by Andrew S. Gibson appeared first on Digital Photography School.


    Digital Photography School
  • Making Sense of Exposure

    When I first started out in photography I had a tough time wrapping my head around one of its most fundamental concepts: exposure. I learned everything I could about things like aperture, light, shutter speed, highlights, shadows and dynamic range, but all these were planets orbiting a central sun called exposure and I couldn’t nail down exactly what that meant. I heard terms like “expose for the highlights” and “try to get a good exposure” sandwiched between people talking about “double exposure” and “long exposure” and my head was swimming. I figured things out eventually, but it took trial and error and cries for help to my fellow photographers (not to mention a lot of online research and books). So, then, let me help other aspiring image-makers learn a thing or two by making sense of exposure.

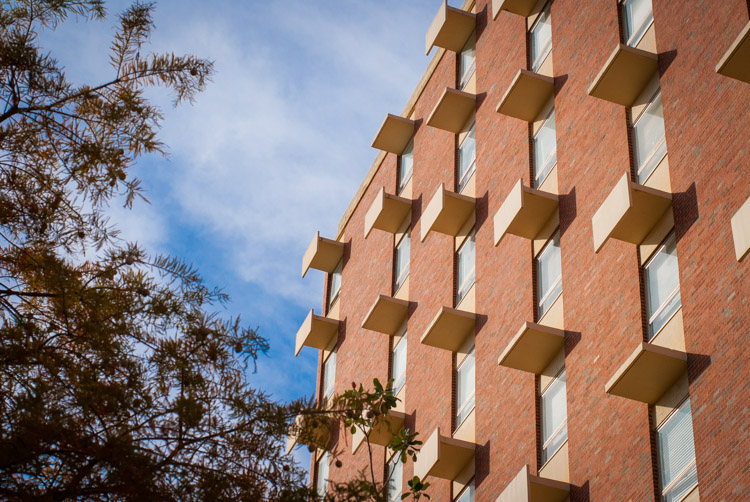
    what-is-exposure-building

    A properly exposed architecture photo.

    Here’s the most basic, but informative, definition I can offer of exposure: it’s how bright or dark your photograph is. If a photo is too bright, it’s considered to be overexposed. Too dark, and it’s underexposed. But the Goldilocks-approved version of almost any picture is what’s known as a proper exposure – it’s neither too dark nor too light. All other bits aside, when people talk about getting a properly-exposed image, or tweaking camera settings to get a good exposure, all it really means is getting an image that’s not too bright or not too dark.
    what-is-exposure-birthday

    The bright sunlight made getting a proper exposure a bit tricky, but understanding how it works helped me get the photo I was looking for.

    Sounds simple, right? It is, and yet it’s much more because photography is not just about getting things to be neither too bright or too dark. It’s up to you as a photographer to know not only how to get an image that’s properly exposed but how to adjust your camera’s settings to get the exposure you want. You might look at a given scene and decide that you want things to be a bit too bright or too dark, or you would really like some of the darker areas of the image to show up brighter, or you want to get a picture of something in broad daylight that’s normally too bright for your camera to deal with. Or perhaps you like images with extremely dark and light areas and you want to purposely create a sense of contrast while also maintaining a certain type of exposure. In Auto mode your camera will almost always try to get what it thinks is a properly-exposed image, but if you can work up the courage to try Aperture Priority, Shutter Priority, or even Manual mode you can start to control the various parameters that combine to make an image and, thus, get the precise type of exposure you want – not what your camera thinks you want.

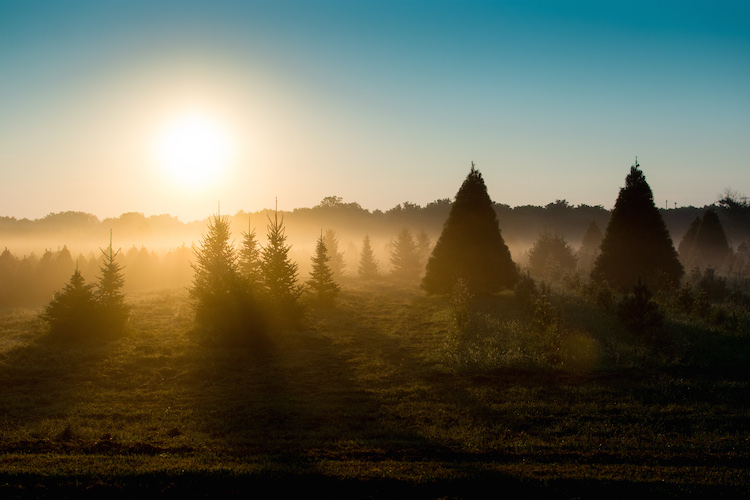
    what-is-exposure-trees-sunrise

    Knowing how to adjust my exposure was critical to capturing this image. My camera’s Auto function would have left me with an unusable photo.

    So how do these other elements affect exposure, and what can you do to manipulate them to get the exposure you want? This is a simple breakdown of the three most important things you need to know:

    Aperture: The size of the opening in your camera lens that lets light pass through to the image sensor. A larger aperture will let more light pass through, while a smaller one will not let much light pass through.

    Shutter Speed: How long the curtains in front of the image sensor are open. A longer shutter speed will let more light pass through, while a shorter shutter speed will not let much light pass through.

    ISO: How sensitive your image sensor is to light. Lower ISO values mean your camera is not very sensitive to light, which means a proper exposure requires either a longer shutter speed, a wider aperture, or both. High ISO values mean your camera is very sensitive to light, which means a proper exposure requires either a shorter shutter speed, smaller aperture, or both.

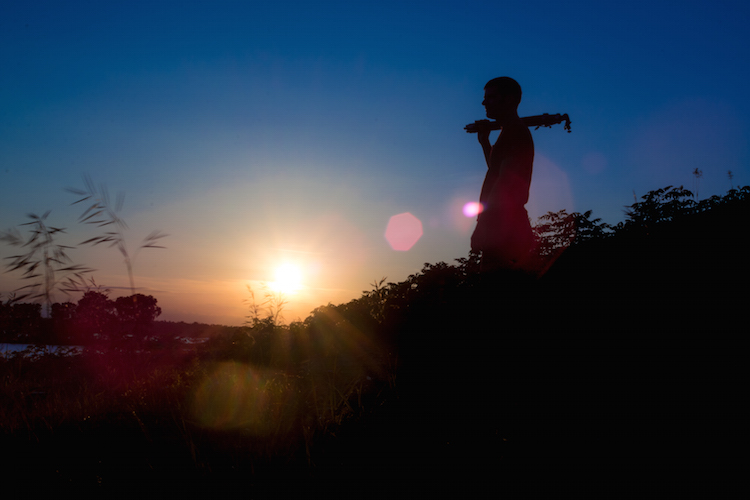
    what-is-exposure-silhouette

    In this shot, I used a special light-blocking tool called a neutral density filter in order to get the desired exposure.

    What does all this mean in practice, and how can you adjust these elements to get the exposure you want? To illustrate a few basic principles, here are some photos that show what can be done to manipulate your camera in order to get the proper exposure (combination of light and dark) that you want.

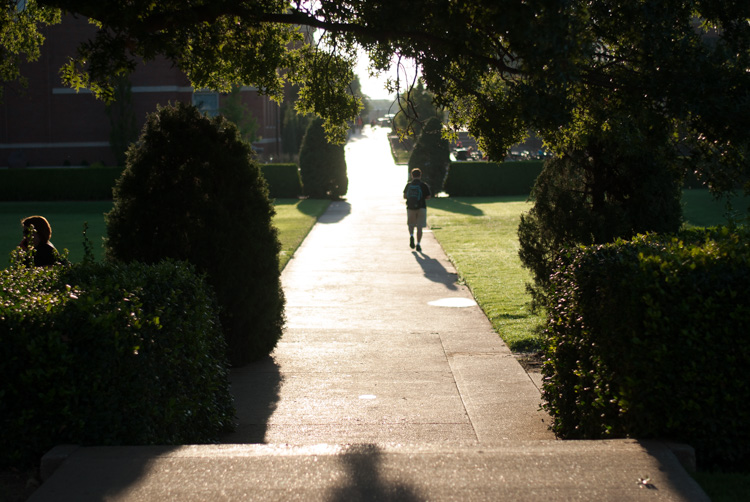
    This first picture has a proper exposure: there’s some bright areas, some dark areas, and a mix of both in various sections of the photo.

    what-is-exposure-even

    Early morning on campus with a good overall exposure. 50mm, ISO 100, f/4.0, 1/2000 second.

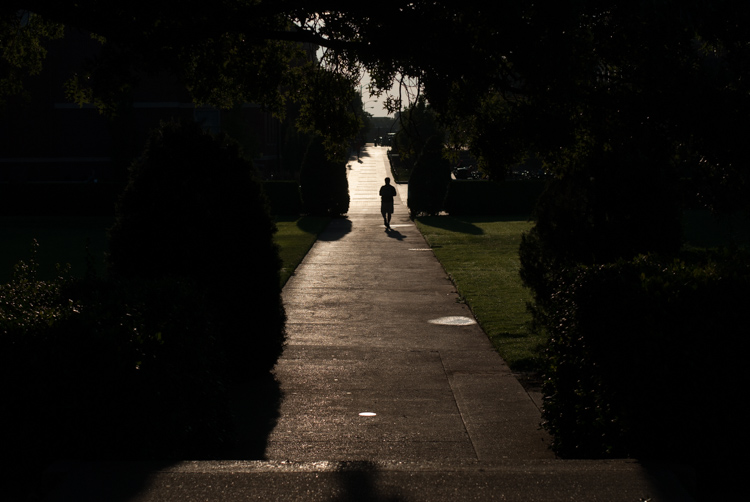
    Now take a look at the next one, which has been exposed for the highlights. This means I wanted to take the bright areas of the picture, specifically the sidewalk as it recedes to the horizon, and make that part be properly exposed. To do this, I had to decrease my shutter speed quite a bit, which meant that only a little bit of light was captured. Since there was so much light shining on the sidewalk, a little bit was all I needed. You’ll notice that the result illustrates a bit of a trade-off: the very bright portions of the  image are now more properly balanced and you can make out a lot more detail in the sidewalk, but the darker portions are now really dark and you can’t see much of anything.

    what-is-exposure-highlights

    The same scene, exposed for the highlights. 50mm, ISO 100,f/4.0, 1/5000 second.

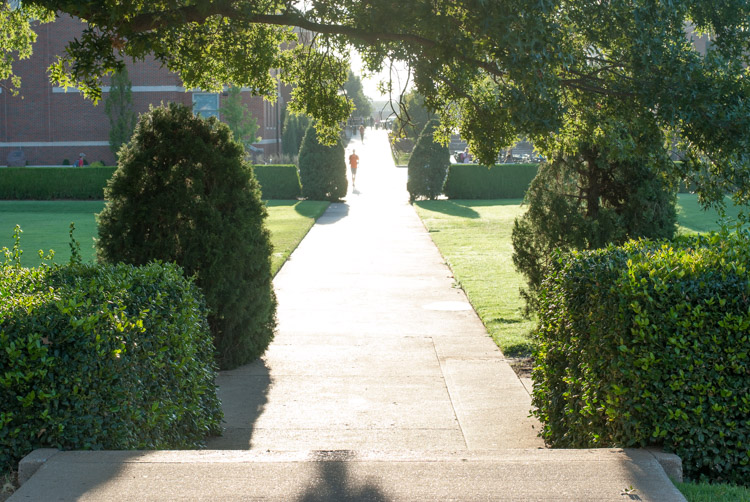
    I also took a photo of the same scene but exposed for the shadows. Since the dark areas of a given composition are not reflecting much light, you’ll need to find a way of capturing as much of it as possible. In this case, I chose to use a much longer shutter speed in order to let in much more light. Once again, you can see an immediate trade-off: the dark areas are much more colorful, but the bright areas are way too bright. If I wanted to emphasize the trees, shrubs and other greenery this is one way to do that, even though it would come at the expense of some of the color and detail on the sidewalk.

    what-is-exposure-shadows

    The same scene, exposed for the shadows. 50mm, ISO 100,f/6.7, 1/90 second.

    If you want to try altering the exposure of a given photograph the simplest way is to use your camera’s exposure compensation function to quickly over – or under – expose your composition. Alternatively, you can manually adjust the parameters like Aperture, Shutter Speed and ISO to get the desired result. If you want to get really creative you can use different metering modes on your camera (spot, center-weighted, average, etc.) to adjust how your camera takes various sources of light into account in order to get the exposure you are looking for.

    As a side note, you might have heard about a technique called HDR which stands for High Dynamic Range, and involves taking multiple exposures of the same scene and combining them on your computer using a program like Photoshop. This means you get the best of all worlds: properly exposed highlights and shadows along with a good overall balance of color throughout the image. It’s just another tool in your kit that you can utilize to get the exact image you are going for, which is why understanding exposure is so critical to photography. By knowing what it is and how to control the exposure of a scene to get the picture to turn out how you want, you can take more control over your pictures and start making creative decisions instead of leaving things up to your camera.

    I hope this article clears up some confusion you might have about the subject of exposure, as it’s the kind of piece I wish I had in front of me several years ago. Do you still have questions about what exposure is all about? What are your favorite tips and tricks to deal with exposure? Leave your thoughts in the comments below.

    googletag.cmd.push(function() {
    tablet_slots.push( googletag.defineSlot( “/1005424/_dPSv4_tab-all-article-bottom_(300×250)”, [300, 250], “pb-ad-78623” ).addService( googletag.pubads() ) ); } );

    googletag.cmd.push(function() {
    mobile_slots.push( googletag.defineSlot( “/1005424/_dPSv4_mob-all-article-bottom_(300×250)”, [300, 250], “pb-ad-78158” ).addService( googletag.pubads() ) ); } );

    The post Making Sense of Exposure by Simon Ringsmuth appeared first on Digital Photography School.


    Digital Photography School