Category: Photography

  • 26 Expressive Images of Hands

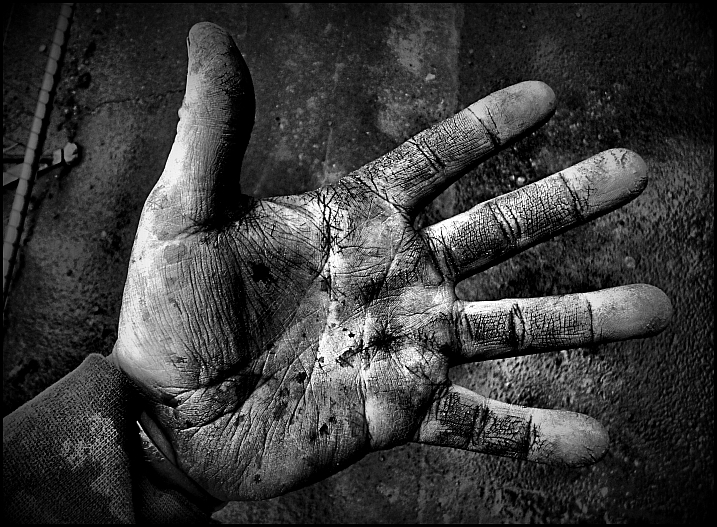
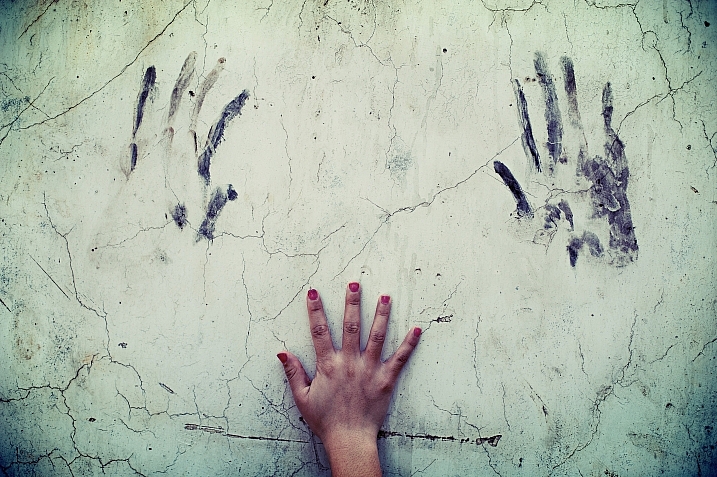
    It is said that the eyes are the windows to the soul, but hands can be very expressive as well.

    Let’s take a look at this set of images of different hands and see what they say, what story do they each tell?

    Victoria Bjorkman

    By Victoria Bjorkman

    Khadija Dawn Carryl

    By Khadija Dawn Carryl

    Peter Lee

    By Peter Lee

    Alex Berger

    By Alex Berger

    Bill Gracey

    By Bill Gracey

    Riccardo Romano

    By Riccardo Romano

    Jun Aviles

    By Jun Aviles

    Craig Sunter

    By Craig Sunter

    Le Vent Le Cri

    By le vent le cri

    Jonathan Kos-Read

    By Jonathan Kos-Read

    Marjan Lazarevski

    By Marjan Lazarevski

    Toni Blay

    By Toni Blay

    Son Of Groucho

    By Son of Groucho

    Rob.

    By Rob.

    Kasia

    By Kasia

    Victor Bezrukov

    By Victor Bezrukov

    Chiara Cremaschi

    By Chiara Cremaschi

    ArTeTeTrA

    By ArTeTeTrA

    Mark Spearman

    By Mark Spearman

    Hamed Parham

    By Hamed Parham

    Serge Klk

    By Serge klk

    Jason Devaun

    By Jason Devaun

    Thomas Szynkiewicz

    By Thomas Szynkiewicz

    Strep72

    By Strep72

    Toru Watanabe

    By Toru Watanabe

    Ricardo Machado

    By Ricardo Machado

    googletag.cmd.push(function() {
    tablet_slots.push( googletag.defineSlot( “/1005424/_dPSv4_tab-all-article-bottom_(300×250)”, [300, 250], “pb-ad-78623” ).addService( googletag.pubads() ) ); } );

    googletag.cmd.push(function() {
    mobile_slots.push( googletag.defineSlot( “/1005424/_dPSv4_mob-all-article-bottom_(300×250)”, [300, 250], “pb-ad-78158” ).addService( googletag.pubads() ) ); } );

    The post 26 Expressive Images of Hands by Darlene Hildebrandt appeared first on Digital Photography School.


    Digital Photography School

  • Weekly Photography Challenge – Hands

    Hands can be just as expressive as the face sometimes, as these images show.

    Weekly Photography Challenge – Hands


    Elisabetta Orlacchio

    By Elisabetta Orlacchio

    This week it’s your turn to photograph hands. Human or otherwise – it’s your choice. Find some expressive ones and use good lighting, and compositional techniques to create some great images.

    Bill Gracey

    By Bill Gracey

    Lucio Zandonati

    By lucio zandonati

    Johnson D

    By Johnson d

    Jessie Jacobson

    By Jessie Jacobson

    Giovanni

    By Giovanni

    Romanlily

    By romanlily

    Sharada Prasad CS

    By Sharada Prasad CS

    Share your images below:

    Simply upload your shot into the comment field (look for the little camera icon in the Disqus comments section) and they’ll get embedded for us all to see or if you’d prefer upload them to your favourite photo sharing site and leave the link to them. Show me your best images in this week’s challenge. Sometimes it takes a while for an image to appear so be patient and try not to post the same image twice.

    googletag.cmd.push(function() {
    tablet_slots.push( googletag.defineSlot( “/1005424/_dPSv4_tab-all-article-bottom_(300×250)”, [300, 250], “pb-ad-78623” ).addService( googletag.pubads() ) ); } );

    googletag.cmd.push(function() {
    mobile_slots.push( googletag.defineSlot( “/1005424/_dPSv4_mob-all-article-bottom_(300×250)”, [300, 250], “pb-ad-78158” ).addService( googletag.pubads() ) ); } );

    The post Weekly Photography Challenge – Hands by Darlene Hildebrandt appeared first on Digital Photography School.


    Digital Photography School

  • PhotoshopUser TV: Style Blur and Pinching Pennies – Episode 424

    This week on PSUTV, Corey has a tip on using style blur. Pete shows an design trick on pinching pennies.

    This Week’s Sponsors:

    Wacom | mpix | B&H Photo | Kelby Training | NAPP | onOne Software | Peachpit | Squarespace | Expo Imaging | Intel | Athentech

    Photoshop User TV Episode 424 is now playing!

    Download Episode 424
    (In order to download this file directly to your computer, right-click (Control-click on Mac) on the Download link and choose the Save As option.)

    Photoshop User TV

  • 3 Fun Ways to Enhance Your Landscape Images in Photoshop

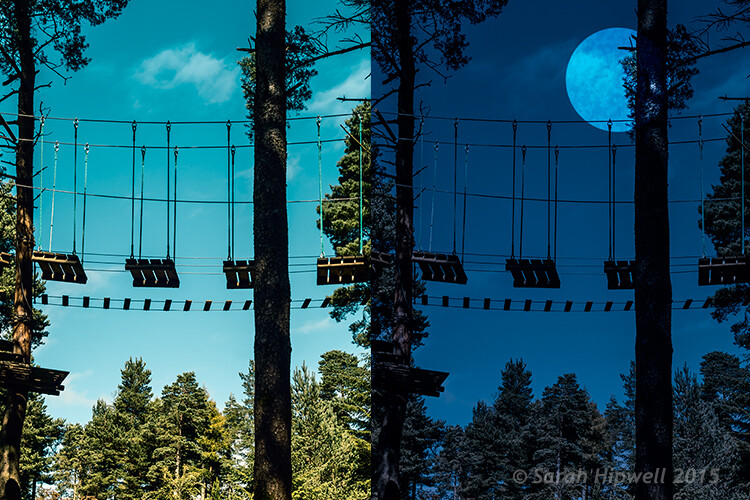
    title-day-moonlight

    Turning Day into Night using Color Lookup and easy-to-do moon in Photoshop.

    As the theme for this month is on landscape photography, I thought I would share three fun ways to add features to your landscape images that already come embedded in Photoshop as presets. Let’s take a look at the first one.

    #1 The Rainbow

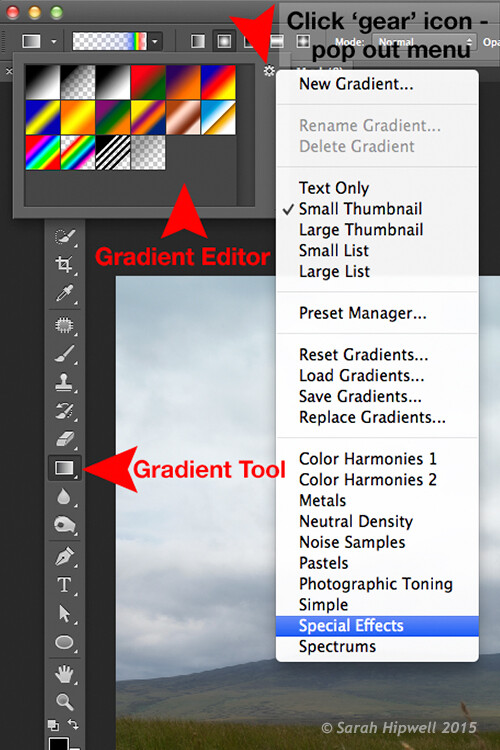
    Open an image that you want to add the rainbow to. Click on the Gradient tool, then click on the Gradient box in the Options bar to bring up the Gradient Editor dialog box.

    Click on the gear icon at the top right corner of the Presets section and another pop-up menu appears. Choose Special Effects near the bottom of the list. When you click on it, a dialog box appears asking you to replace the current default gradients with the ones that you are loading. Click Ok. It contains only five presets, the last one being Russell’s rainbow is the one I’m going to use. Click ok, then go back up to the Options bar and click on Radial Gradient.

    Gradient-editor-pop-out-menu-special-effects

    The rainbow preset is in the Gradient Editor under Special Effects.

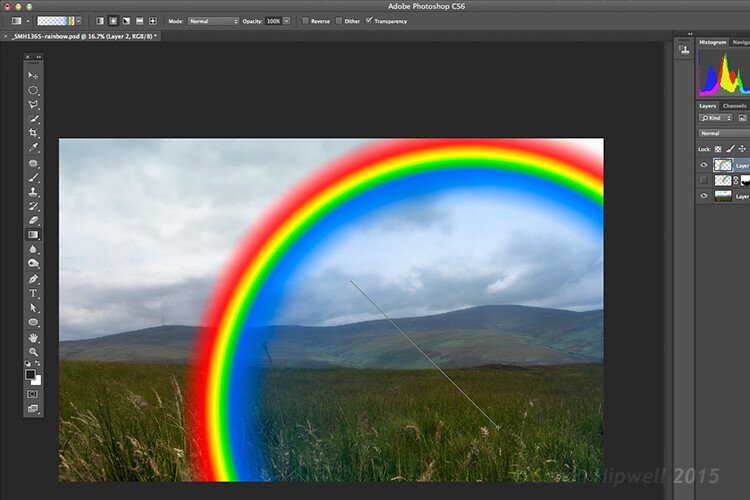
    Make sure you have a new layer over the image that you are using. Start at the bottom of the image and drag upwards at a 45 degree angle and release. Depending on the size of the rainbow that you want, you can press CMD Z to undo and restart again (see image below). At first, it looks way too extreme and unrealistic, but using the free transform tool (CMD+T), resize and rotate and place it into position.

    Creating-rainbow-using-rainbow-effect

    With Russell’s rainbow preset selected and the gradient changed to radial. Click on a low part of the image and drag upwards at an angle to create the rainbow.

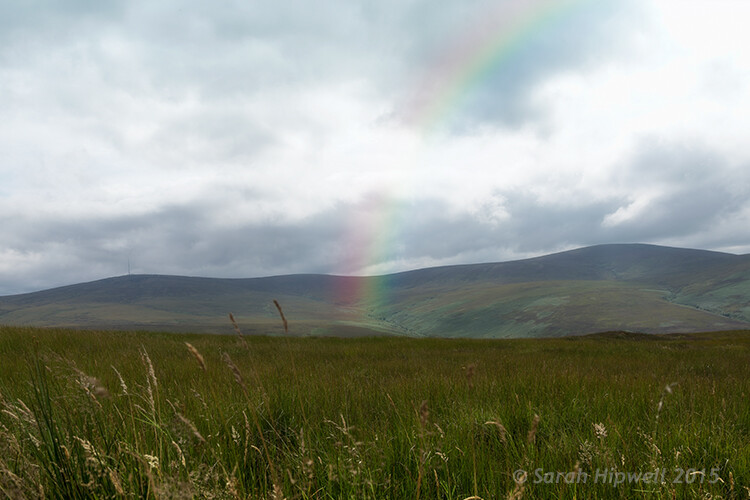
    Change the layer blend mode to Screen. You can see the rainbow appears behind and in front of the clouds. Add a layer mask and with a big soft brush, soften the end of the rainbow where it hits the ground. I also converted the layer to a Smart Object and applied a Gaussian Blur. I then Lowered the Fill and Opacity to get an almost translucent effect. Voila, a real simple but effective rainbow.

    mountain-view

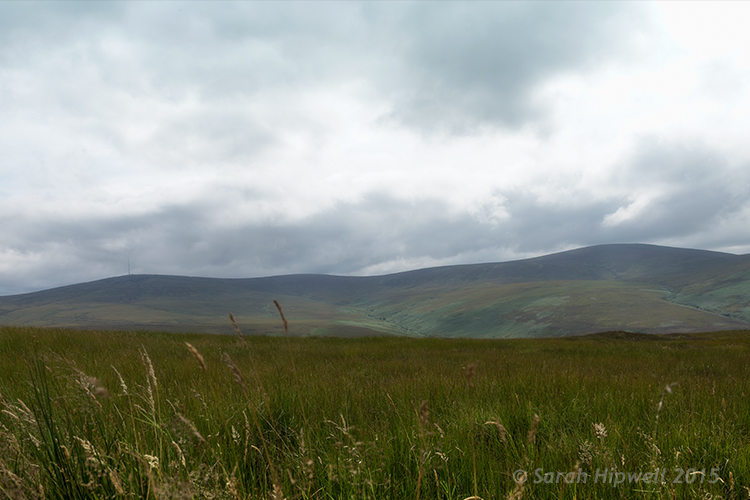
    The original image without the rainbow.

    mountain-view-rainbow

    The rainbow effect added to the image.

    Rainbows happen when sunlight and rain combine in a very specific way. And this brings me to the next preset…

    #2 Rain

    This particular preset is not as effective as the other two. I think a custom rain brush would be better, nevertheless, it does an okay job.

    Depending on the image that you use, it is better to have an image with clouds rather than a clear blue sky. I desaturated this image by using a hue/saturation adjustment layer and I also added a vignette to give it more drama.

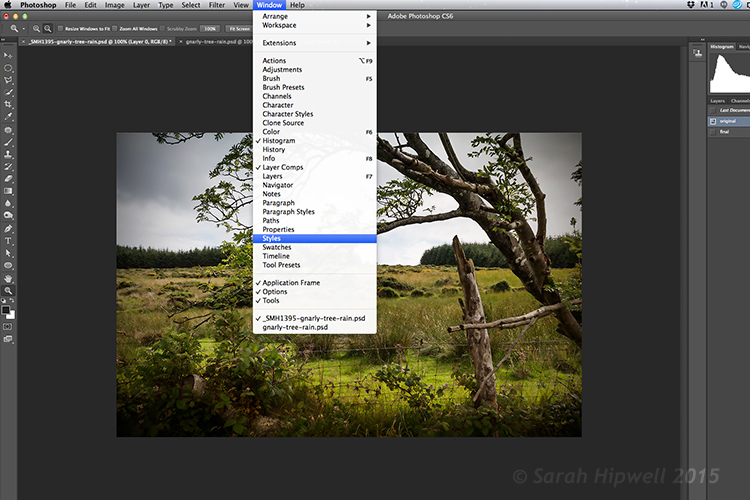
    If you go up to Window in the menu bar and open up the Styles panel, or the Adjustments panel has a Styles tab to its right. Over to the far right corner is an arrow, click on this icon and a pop out menu appears. Choose Image Effects from near the bottom. Similar to the Gradient Editor, a dialog box appears asking you to, “Replace current styles with the styles from Image Effects?” Click Ok. The Rain style is down near the bottom.

    Window-Styles

    The Styles Panel is located under Window in the Menu bar.

    arrow-icon-styles-panel

    You’ll see this arrow icon to the far right corner of the Styles Panel. Click on tit and a pop-out menu appears (right).

    pop-out-menu-styles-image-effects

    This is the pop-out menu. The rain preset is located in the Image Effects.

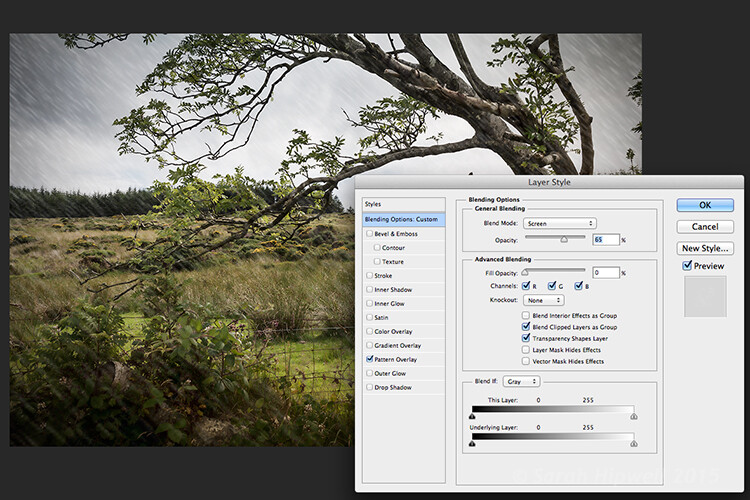
    But first, create a new layer over the image that you have opened. Name this layer, Background rain. Fill it with 50% gray. Now click on the rain style. It creates a Pattern Overlay. At first, you just see small white diagonal slashes against a gray background. Change the blend mode to Screen. Then click anywhere to the right of this gray layer to bring up the Blending Options Layer Style dialog box. All you need to do here is bring the Fill opacity under Advanced Blending down to zero. Click Ok. Now you see just the the rain, the gray color is gone.

    Layer-style-blending-options

    This is the Layer Style Blending Options dialog box where you set the Fill Opacity to zero to get rid of the gray background. You could also reduce the Fill Opacity in the Layers panel.

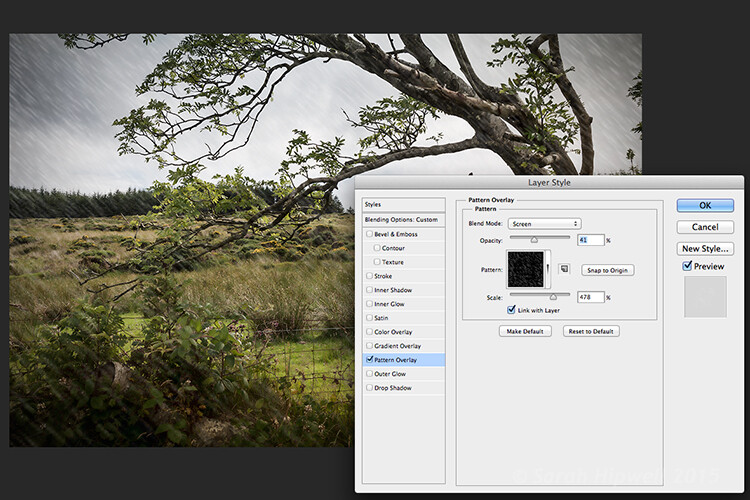
    You need to alter the size of the rain, it needs to be smaller as if it’s in the background. Double-click just underneath the layer where it says Effects>Pattern Overlay, this brings up the Pattern Overlay Layer Style dialog box. As you move the scale slider to the right or left, you can see the rain increasing or decreasing in size. I chose 207% and reduced the opacity to 52%. Click Ok. I added a layer mask, and with gradient tool, I masked away the rain at the bottom (you can equally use a soft brush to mask instead). I reduced the Opacity on this layer to 85%.

    Layer-style-pattern-overlay

    This is the Pattern Overlay where you can adjust the size of the rain by using the scale slider, and its opacity, quick and easily.

    I created another layer and named this Foreground rain. I repeated the same steps as above but I changed the scale of the rain. I wanted the rain to appear bigger. So again double click on the Effects>Pattern Overlay to open the Pattern Overlay Layer Style dialog box. Increase the scale to 478% and reduce the opacity to 41%. Click Ok. I then reduced the Opacity on this layer to 65%. This gives the rain a bit more depth and adds a more realistic effect.

    field

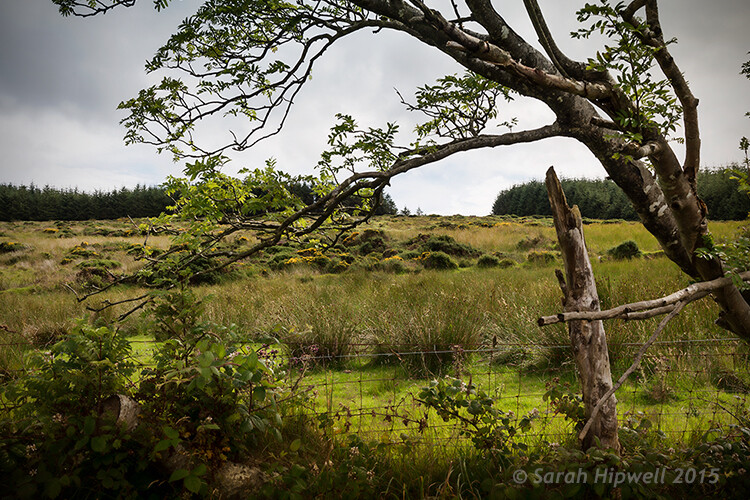
    Original image taken with no rain.

    Rain-in-field

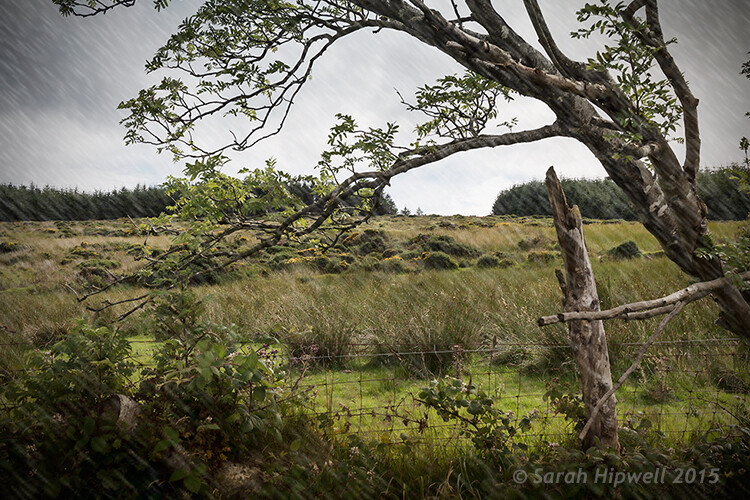
    Rain applied using the rain preset in the Styles panel. I also desaturated and added a vignette to the image before adding the rain.

    #3 Day to Night

    Now for the third effect. This is a really quick and easy way to turn a photo from day into night with a preset already in Photoshop (CS6). Go up to Layer>New Adjustment Layer>Color Lookup. Where it says 3DLUT File, click on the tab beside it and a pop-up menu with different effects appears, scroll down to Moonlight.3DL. These presets are known as lookup tables, or LUTs, they’re mainly found in the film industry.

    For added effect, I’m going to add a moon. Create a new layer, Go to your eclipse tool and hold down the Shift key and draw a circle, roughly 200px. Fill it with white. Deselect (CMD+D). Go up to Filter>Filter Gallery>Artistic>Sponge. Choose the Brush tool set to: Size 7, Definition 3 and Smoothness 5. Click Ok. Move the moon near the top of the tree. I reduced the size a little by using the Free Transform Tool (CMD+T). Change the blend mode to overlay. Duplicate this layer and reduce the Opacity to 55%. See image below.

    title-day-moonlight

    I hope you enjoyed these fun and quick techniques using these presets found in Photoshop. Do you use presets or other plugins? Please share in the comments below.

    googletag.cmd.push(function() {
    tablet_slots.push( googletag.defineSlot( “/1005424/_dPSv4_tab-all-article-bottom_(300×250)”, [300, 250], “pb-ad-78623” ).addService( googletag.pubads() ) ); } );

    googletag.cmd.push(function() {
    mobile_slots.push( googletag.defineSlot( “/1005424/_dPSv4_mob-all-article-bottom_(300×250)”, [300, 250], “pb-ad-78158” ).addService( googletag.pubads() ) ); } );

    The post 3 Fun Ways to Enhance Your Landscape Images in Photoshop by Sarah Hipwell appeared first on Digital Photography School.


    Digital Photography School

  • Finding Balance Between Photography and Friends When Travelling

    If there is one common thing that gets photographers fired up and excited, it’s the prospect of travel. Just like most other artists, you need your creative fire stoked and it’s hard to beat a walkabout to some exotic foreign land (or even a Cow Safari).

    The new surroundings, different cultures, or new experiences are the perfect excuse to charge your batteries, clean your lenses and format those memory cards (you do format your cards before you use them, right?).
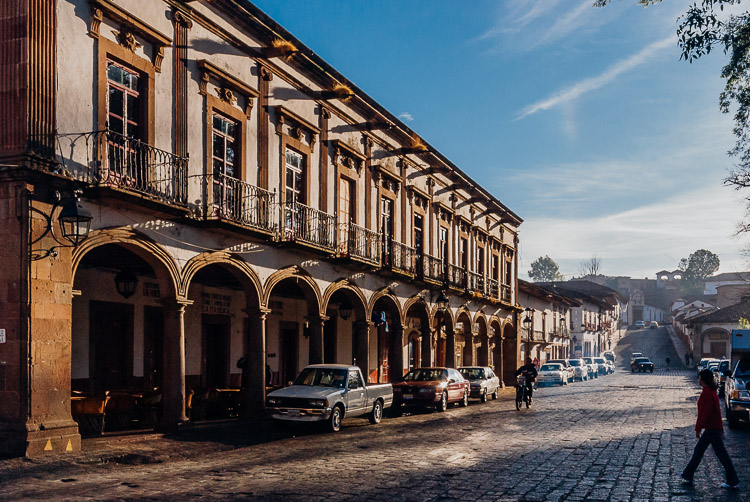
    Colonial architecture in a historical Mexican town

    Exotic lands just might be the ideal catalyst to get the creative juices flowing.

    If you’re wandering out into the world solo, you have full photographic freedom to choose where you go and how much time you spend there. However, you may often find yourself with accompaniment on these excursions in the form of friends, your significant other, or family. The more obsessive of a shutterbug you become, the more challenges you are going to face, in order to strike a balance between being selfish for your own passions, and trying to appease everyone.

    I can’t tell you how many times I’ve wandered off into the photographic zone, and inadvertently ignored my traveling companion. Once I realize, I glance around thinking they probably abandoned me, only to see them half asleep on a bench or standing hands on hips, not looking happy.

    If your travel partner (s) are as psyched about photography as you are, read no further, you have it made. Unfortunately this isn’t usually the case so we need to muster up some diplomacy to keep things running smooth.

    The trade-off

    While traveling, whether with a significant other or friends, one method that will help you reach that middle ground is to make a conscious effort to take photos of them along the trip, in exchange for you being able to wander around a little more, or spend some extra time shooting. Of course this doesn’t necessarily have to be a spoken exchange, but often it will just work out this way.
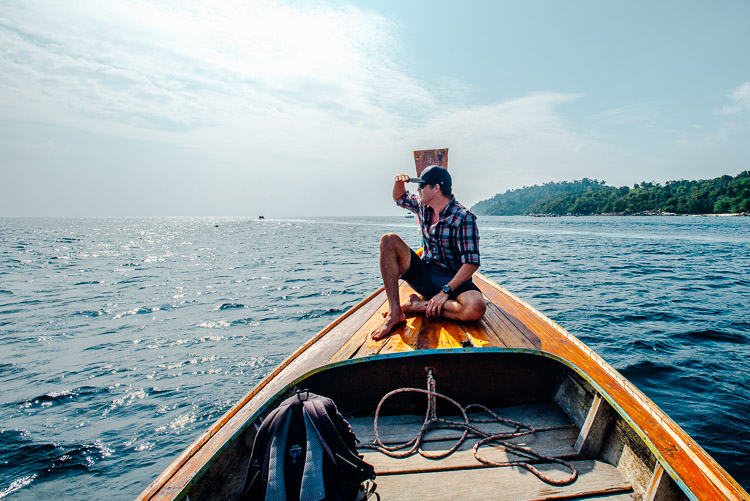
    Capture photos of traveling companions

    Capturing some fun shots of your traveling companions goes a long way towards striking the balance between photography and sharing the experience.

    To make this work well, you need to actually put some time, effort, and thought into the shots. You can’t just snap a quick shot of them by the doors of an old church, then spend an hour on various compositions of the doors themselves. Get a remote flash and use it off-camera to get some nice lighting and flattering portraits. Have them pose in interesting positions and underexpose some shots to create cool silhouettes.

    The concept is to not only get some memorable shots of them in the exciting places you’re traveling to, but to engage them in your process, and make them feel like they’re not traveling alone.

    Careful planning

    Although a big part of traveling is embracing surprises and the discovery of new things, a little diligence in planning can help you get the shots you want without sacrificing your relationships.
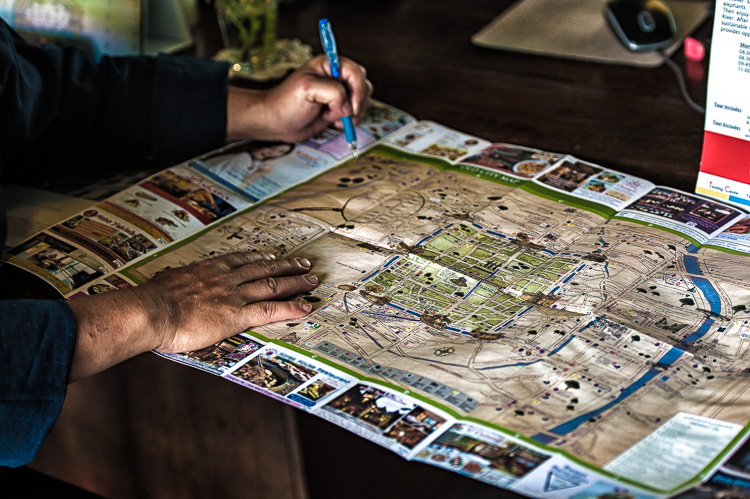
    Using a city map to plan the day

    A little forethought and planning can help make adventures run smoother.

    If you think ahead about the places you want to photograph and when the light will be best, you can work up an itinerary that can flow more smoothly without waiting around for the light. Want a sunset shot on the coast or golden hour light for that cityscape panorama? Think about planning for dinner on the water, and showing up a little early or find a rooftop bar for a drink.

    There are apps that can help you with this planning such as Stuck On Earth or even Google Earth.

    Breathing room

    While traveling or going on vacation with others can be a blast, there’s nothing wrong with splitting up sometimes. Especially on long trips, it can be a strain on relationships to spend every waking moment together, and a couple hours of solo-exploring can be a nice respite.
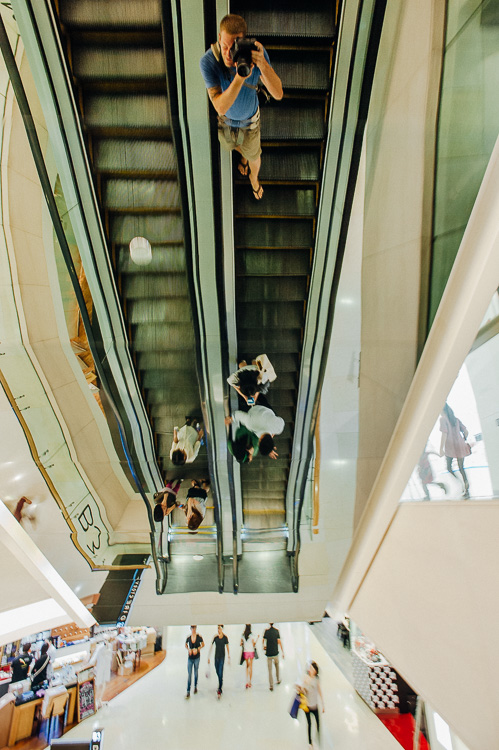
    Solo adventure

    A few hours of splitting up to pursue varying interests can work wonders.

    Again, if you can figure out how to plan this ahead of time, all the better. Maybe there is some cool architecture near a shopping mall or an outdoor market that can provide activities for all involved.

    Go with the flow

    Then there is, of course, the path of least resistance. If you are willing to sacrifice the time-consuming or contrived shots, you can always wing it and see what happens. This is also the default position you might find yourself in anyways – after all, plans are made to be broken.

    This approach can also be a good exercise in picking up your pace, and developing a keener eye. Maybe this entails ditching the tripod at the hotel, and venturing out with only one lens (tragic, I know). Be resourceful instead; find a firm surface and use the self-timer for dark shots, and use a zoom lens or challenge yourself to rely on a fixed focal length lens for your compositions.

    Life is all about compromises. It’s important to keep in mind that not everyone shares the same passions, and you should do your best to try and see the situation through your travel partners’ eyes.

    “Learn the wisdom of compromise, for it is better to bend a little than to break.”

    googletag.cmd.push(function() {
    tablet_slots.push( googletag.defineSlot( “/1005424/_dPSv4_tab-all-article-bottom_(300×250)”, [300, 250], “pb-ad-78623” ).addService( googletag.pubads() ) ); } );

    googletag.cmd.push(function() {
    mobile_slots.push( googletag.defineSlot( “/1005424/_dPSv4_mob-all-article-bottom_(300×250)”, [300, 250], “pb-ad-78158” ).addService( googletag.pubads() ) ); } );

    The post Finding Balance Between Photography and Friends When Travelling by Jeremie Schatz appeared first on Digital Photography School.


    Digital Photography School
  • Wish you could take Amazing Photos? Now you can with our Brand New Course

    Wish you could take amazing photos with that camera that rarely comes out of Auto Mode?? Now you can.

    With our brand new photography course – presented on video – Photo Nuts and Shots.

    It’s a follow up to the incredibly popular Photo Nuts and Bolts course released earlier this year and complements our best-selling ebook of the same name (and author, Neil Creek).

    If you already know your way around your camera but want to gain real skills that you’ll use in every shot you take, then this creative photography course is for you.

    And for a limited time, it’s available at the special introductory price of just USD $ 39 – which is a saving of 33%.?

    What you’ll learn

    In 10 easy-to-understand video lessons, Neil reveals the tools, techniques and thought processes for producing amazing photos:

    • Learn to harness light to convey emotion
    • Understand the impact of great composition and how to achieve it
    • Take the sharpest possible photos
    • Discover how to adapt your camera’s exposure to get the shot you want
    • Master the concepts of shot perception, planning and execution – in any setting
    • Know when to break the rules for creative effect
    • Tap into your creativity to be the best photographer you can be
    • Because the videos are streamable and downloadable, you can go through at your own pace and in any order.

    And the best part is that Neil’s teaching is practical and immediately actionable, so you’re guaranteed to see an instant improvement in the quality of your shots.

    Take a look…

    For a quick video preview, or to find out more, head here and check out the full details of this great new course.

    Great photography CAN be learned – and Photo Nuts and Shots will show you how.

    So get your camera ready and take this all-new dPS course today/

    googletag.cmd.push(function() {
    tablet_slots.push( googletag.defineSlot( “/1005424/_dPSv4_tab-all-article-bottom_(300×250)”, [300, 250], “pb-ad-78623” ).addService( googletag.pubads() ) ); } );

    googletag.cmd.push(function() {
    mobile_slots.push( googletag.defineSlot( “/1005424/_dPSv4_mob-all-article-bottom_(300×250)”, [300, 250], “pb-ad-78158” ).addService( googletag.pubads() ) ); } );

    The post Wish you could take Amazing Photos? Now you can with our Brand New Course by Darren Rowse appeared first on Digital Photography School.


    Digital Photography School

  • Image Size and Resolution Explained for Print and Onscreen

    One of the most confusing things for a new photographer is understanding image size, resolution, and printing. I’ll try and explain what these things mean, and how to make the best choices depending on what you want to do with your photos.

    Megapixels and photo size

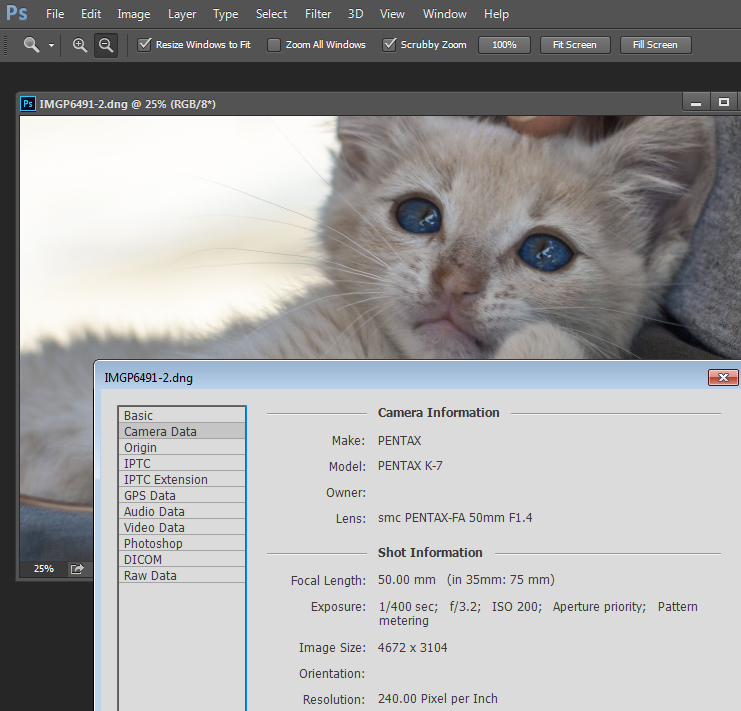
    Find information about a photo using File > File Info

    As a photographer you will already have confronted the term megapixel when you first purchased your camera. While technically a megapixel is equal to 1,048,576 pixels, in reality, camera manufacturers round this number to 1,000,000 when stating how large an image the camera will capture.

    So, my camera, for example, is stated to capture 14.6 megapixel images which is around 14,600,000 pixels per image (14.6 x 1,000,000). This information tells you nothing about the actual pixel dimensions of the image – it only tells you the total number of pixels that comprise the image.

    My camera, like most dSLRs, captures images with an aspect ratio of 1.5. So the ratio comparing the number of pixels along the long edge of the image, to the short edge is 3:2. Each full size raw image is 4672 x 3104 pixels in dimension. So, by multiplying the number of pixels along the width by those of the height (4672 x 3104 = 14,501,888) we get the actual number of pixels in the image. You and I might call this 14.5 MP but the camera manufacturer rounds this up and calls it a 14.6 MP camera.

    You can check the width and height of an image using your photo editing software. In Photoshop, with the image open, choose File > File Info > Camera Data. The image above shows this information dialogue box.

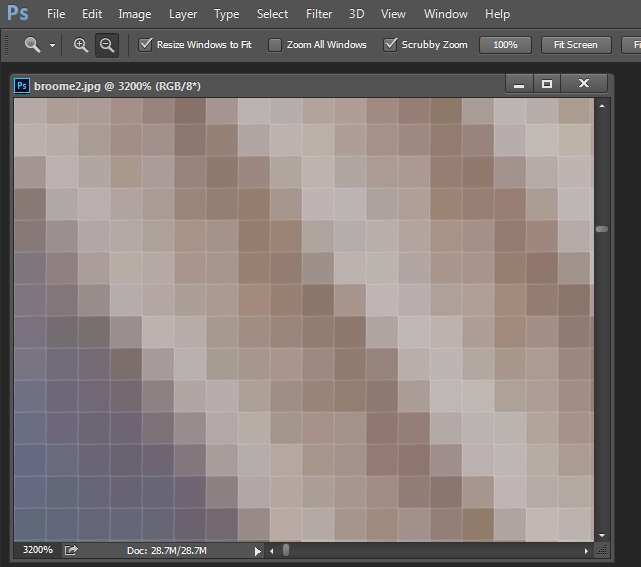
    A pixel itself is a single picture element, and for our purposes it’s the smallest element that your photo can be divided into. A pixel can be only one color, and a photograph is made up of a grid of thousands of pixels, each of varying colors that together make up your image. You can see these pixels if you open a photo inside a photo editing program and zoom in until you see single blocks of color (like below). Each of these is a pixel.

    An image of pixels in a photo

    Why size is important when printing

    When you’re printing an image you may encounter the term ppi or pixels per inch. Most printing services, and indeed your own printer, will require a certain density of pixels in the image (ppi) to be able to render an print that looks good, with smooth color transitions so you can’t see each individual pixel. Typical printing ppi values range from 150 to 300 ppi, although some high-end magazines may require images which are 1200 ppi.

    So, for example, if you want to print an image 4 x 6 inches at 300 ppi, then you need a file that has at least 4 x 300 (1200) pixels along its short side and 6 x 300 (1800) pixels on the long side. So, it needs to be at least 1200 x 1800 pixels in size.

    To print an 8 x 10 inches at 300 ppi use the same math – multiply the printed image width and height in inches each by 300 pixels. The result is 2,400 x 3,000 pixels, which is the size image you need to print an 8 x 10 at 300 ppi.

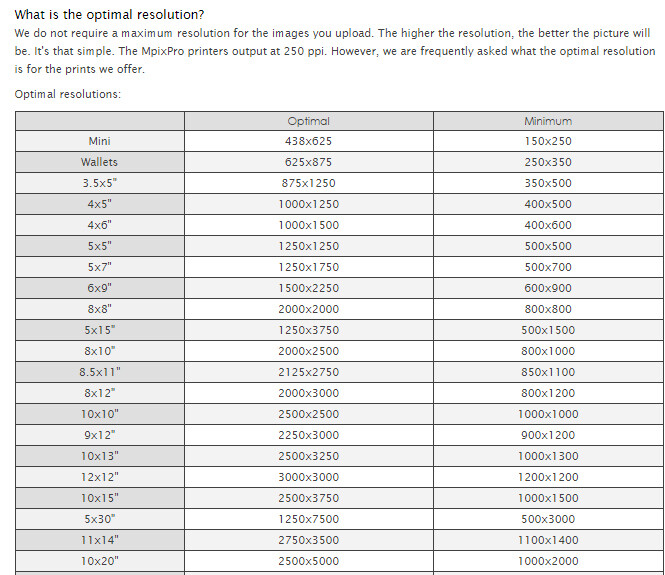
    When cropping and sizing an image for printing, you’ll need to know what ppi the image should be – your printer manual or the printing service should be able to tell you this. This is a screenshot from the MpixPro.com website showing their Optimal and Minimum image sizes for standard print sizes. Their printer outputs at 250 ppi (but can handle 100 ppi images) – other services may differ – so always check before preparing your images:

    Print size required for MpixPro printing

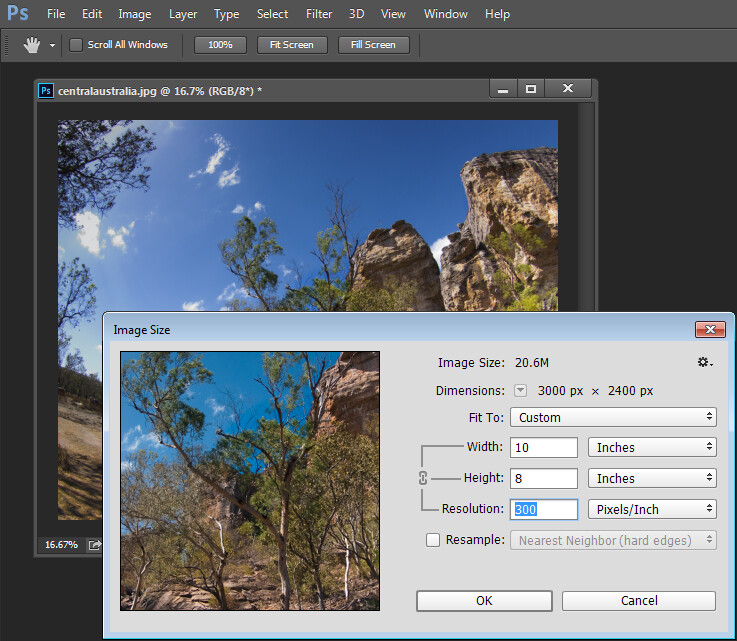
    Use the crop or resize feature in your software to size the image to the desired width and height, and the ppi resolution. Here an image cropped to a size of 3000 x 2400 pixels is being adjusted from 72 ppi to 300 ppi in preparation for printing at 300 ppi. There is no resampling required as the image is already the correct dimension and only the resolution requires adjusting.

    Adjusting resolution in a photo without resampling it

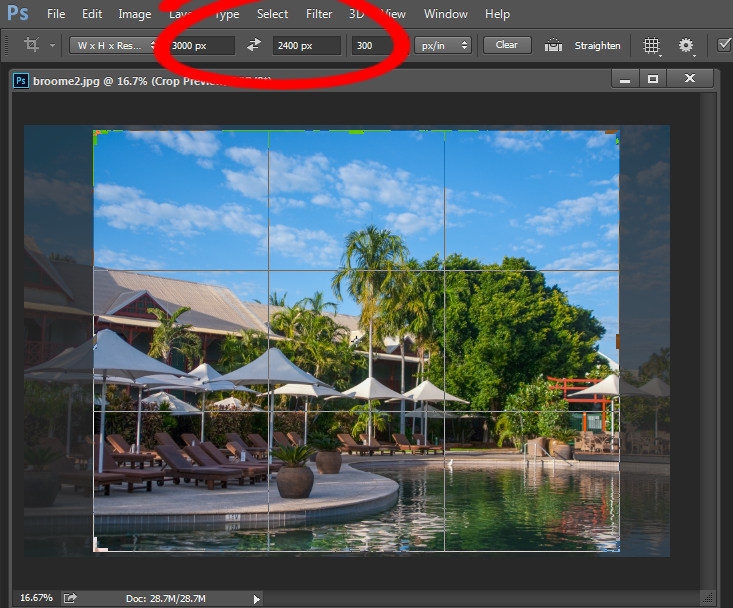
    Photoshop, like other applications, will also crop an image to a fixed size and resolution if you type these value into the tool options bar when you have the Crop tool selected (see below). If your image is smaller than the typed dimensions then the image will be enlarged using the default resampling method as it is cropped. While it isn’t generally advisable to enlarge images – provided the image is already close in size to the desired size, enlarging it a little bit generally won’t cause a noticeable loss of quality.

    Crop an image in Photoshop setting size and resolution

    Sizing for screen

    When it comes to displaying images on the screen you need far less pixels than you do for printing. This is because the density of pixels on the screen is far less than what is required for printing. So, for example a typical monitor is 1920 by 1080 pixels in size so, to fill the monitor you only need an image that is 1920 by 1080 pixels in size. That’s about the same size image you need for a 4 x 6 print at 300 ppi, yet this size image displays perfectly on a 23 inch diagonal monitor.

    googletag.cmd.push(function() {
    tablet_slots.push( googletag.defineSlot( “/1005424/_dPSv4_tab-all-article-bottom_(300×250)”, [300, 250], “pb-ad-78623” ).addService( googletag.pubads() ) ); } );

    googletag.cmd.push(function() {
    mobile_slots.push( googletag.defineSlot( “/1005424/_dPSv4_mob-all-article-bottom_(300×250)”, [300, 250], “pb-ad-78158” ).addService( googletag.pubads() ) ); } );

    The post Image Size and Resolution Explained for Print and Onscreen by Helen Bradley appeared first on Digital Photography School.


    Digital Photography School
  • On Assignment: Studio in the Wild

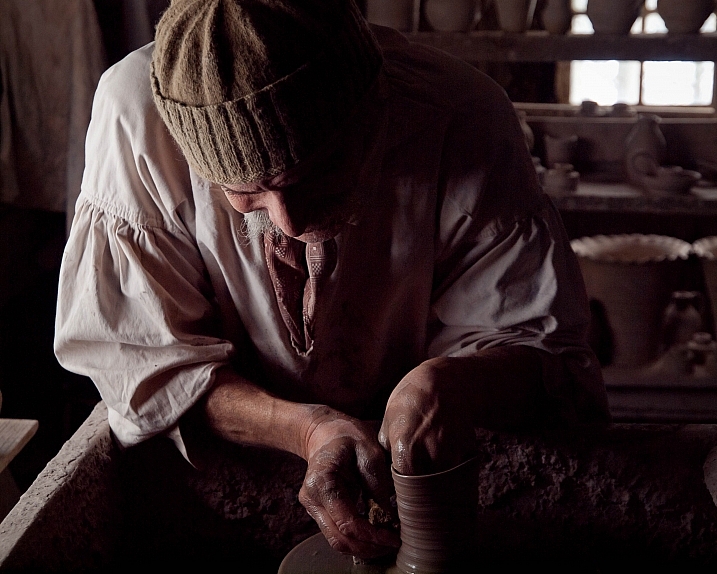
    Photos ©Jonny Armstrong

    Jonny Armstrong is a photographer who is used to the idea of being stood up. In fact, in his field of work it happens most of the time. A research scientist, his work includes photographing lit portraits of wild animals in their natural habitats.

    Read more »
    Strobist

  • 3 Posing Tips for Young Siblings

    posing-young-siblings-1

    Have you ever tried to pose an elementary-age set of siblings, only to have one or more of them dissolve into a crying mess before you’re able to capture a single frame? When it comes to posing young siblings, I’ve discovered that things run more smoothly when I take a slightly more relaxed approach to posing, and I’ve compiled a few posing tips that will hopefully help you capture meaningful photos of young sibling groups a little more easily.

    1. Get them close together

    posing-young-siblings-2

    Over the past few years, I’ve noticed that when I’m photographing groups of siblings, the favorite images are almost always ones in which the kids are closer together than they might usually sit, or stand, in day-to-day life. So now I usually begin every session that involves young siblings by asking them to hug each other, or put their arms around each other. If one sibling is very young, I have them sit down with the younger sibling on the older one’s lap. It’s a simple direction, but one that young children understand, and it really makes a big impact.

    These images are most often family favorites, and are usually the ones that I see gracing Christmas cards and photo canvases in their living room. Most parents usually request at least one photo of both kids looking at the camera and smiling, and this is also where I most often try to fulfill that request.

    posing-young-siblings-3

    However, as a mom I can tell you without a doubt that the amount of time that elementary age siblings will stay this close together before they start bickering or crying is usually pretty limited, and it’s in your best interest as a photographer to have them move on to something different before they totally dissolve into chaos. So, get them close, and then pay attention – if you notice that either sibling starts getting a little aggressive with their love, and starts squeezing the other sibling’s waist or neck, it’s time to move on to something else.

    2. Give them something to do

    posing-young-siblings-4

    Once it’s time to move on from hugging, I usually give the kids a small instruction that will keep them close together, but will also keep their hands occupied at the same time. For example, in the above photo I asked my girls to stand back-to-back, and hold hands. This kept them close physically, but also prevented some of the aggressive tickling that was starting to happen just before the photo was taken. I also often ask kids to stand facing me and hold hands, which achieves the same effect, and seems to be a favorite among parents as well.

    posing-young-siblings-5

    Another thing to try is to have the kids lay down. I usually keep a few quilts in the back of my car for this exact purpose, and you would be surprised how quickly this simple suggestion can calm rambunctious kids down and allow them (and you) to refocus. Once they’re laying down, try asking them to look up at you, hold hands, close their eyes, give each other butterfly kisses, or to touch their noses together. Again, pay attention to both the subtle, and not-so-subtle, cues that either child may be giving that they are ready to move on to something new.

    3. Let them be themselves

    posing-young-siblings-6

    As nice as it is to have a perfect photo of everyone looking at the camera and smiling, I also know that some of my favorite images of my own girls are the ones in which their personalities really shine through. So, give the kids you’re photographing an opportunity to show you their personalities as well! Ask them to sing for you. Ask them to pose like their favorite superhero or princess. Tell them a knock-knock joke, then ask them to tell you one. I’ve yet to meet a kid who wasn’t totally game to give me a silly face, and usually the most genuine smiles and laughs quickly follow the silliest of photos.

    posing-young-siblings-7

    You can also combine tips 2 and 3 – give them a small suggestion like “sit on the ground with your feet touching each other”, and then sit back and watch the way that they interact with each other naturally. Hand them each a flower or a leaf, and ask them to tell you a story about it. These are great opportunities to capture images that are more candid, while still allowing you as the photographer to have a bit of control in terms of posing.

    Sometimes, I cycle through some variation of these tips two or three times in the course of a session, and I’ve found that the variety is really helpful in preventing the kids from getting restless and bored. Overall, the key to posing young siblings is realizing that you simply can’t approach posing in the same way that you would with senior portraits or formal wedding portraits. Elementary age kids simply won’t hold a pose that they find to be the slightest bit awkward or uncomfortable, no matter how good it might look. Instead, give young siblings gentle direction that allows them to relax and be themselves, and watch their little personalities shine!

    googletag.cmd.push(function() {
    tablet_slots.push( googletag.defineSlot( “/1005424/_dPSv4_tab-all-article-bottom_(300×250)”, [300, 250], “pb-ad-78623” ).addService( googletag.pubads() ) ); } );

    googletag.cmd.push(function() {
    mobile_slots.push( googletag.defineSlot( “/1005424/_dPSv4_mob-all-article-bottom_(300×250)”, [300, 250], “pb-ad-78158” ).addService( googletag.pubads() ) ); } );

    The post 3 Posing Tips for Young Siblings by Meredith Clark appeared first on Digital Photography School.


    Digital Photography School

  • PhotoshopUser TV: Using Styles and 3D Model Import – Episode 422
    This week on PUTV, Pete has a tip on using styles and Corey talks about importing a 3D model and using it for your project in Photoshop.

    This Week’s Sponsors:

    Wacom | mpix | B&H Photo | Kelby Training | NAPP | onOne Software | Peachpit | Squarespace | Expo Imaging | Intel | Athentech

    Photoshop User TV Episode 422 is now playing!

    Download Episode 422
    (In order to download this file directly to your computer, right-click (Control-click on Mac) on the Download link and choose the Save As option.)

    Photoshop User TV