Category: Photography

  • PhotoshopUser TV: Masking Text Effect and Cyborg – Episode 423

    This week on PSUTV, Corey shows a masking text effect and Pete has a cool tip on making a cyborg.

    This Week’s Sponsors:

    Wacom | mpix | B&H Photo | Kelby Training | NAPP | onOne Software | Peachpit | Squarespace | Expo Imaging | Intel | Athentech

    Photoshop User TV Episode 423 is now playing!

    Download Episode 423
    (In order to download this file directly to your computer, right-click (Control-click on Mac) on the Download link and choose the Save As option.)

    Photoshop User TV

  • Portrait Pro v12 Studio Max Editing Software Review

    V12-boxshot-750pxWorking mostly in fine art portraits I’ve never felt the need to try a retouching program.  I like to keep a natural look, using Photoshop only for any minor retouching needed. I had looked into a retouching program briefly, but after clicking on a few sites I never got further than looking at the before and after samples. I always preferred the natural before image to the over processed, plastic looking after images. I want my subjects to look like themselves, in their best light of course, but not like some barbie doll cyborg with lifeless eyes.

    When our Digital Photography School editor offered a free download of Portrait-Pro 12 Studio Max to test out and possibly review I figured this was a perfect opportunity to see if this kind of thing is something that a cynic like me, I might actually find useful.

    Getting started

    The download and install were super easy, off to a good start. There are instructional videos, tutorials, a forum, a support page, and a manual to download on the website. All good things, but I’m not one for instructions and just opened the program with a test image.

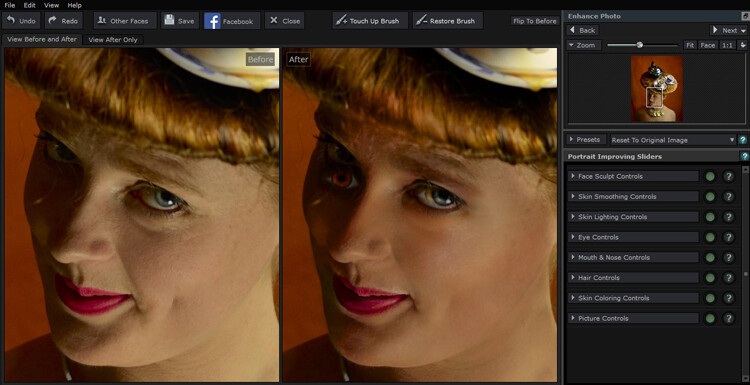
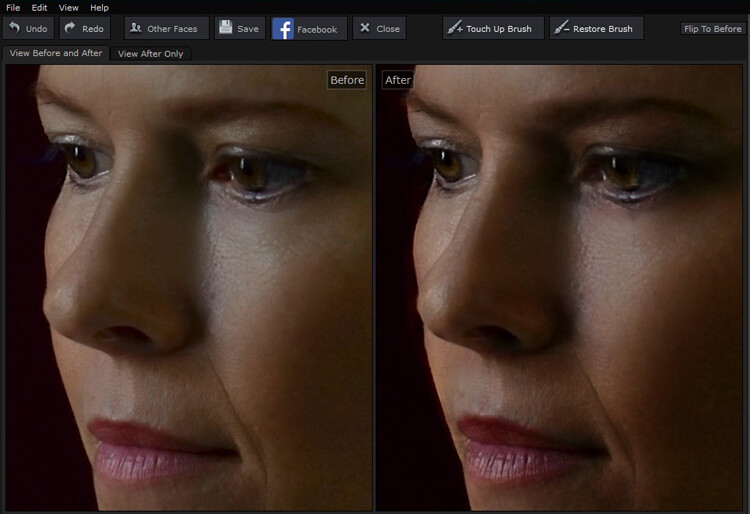
    Portrait Pro did its thing and opened the before and its auto processed after image. It came up with an interesting eye situation and I thought, oh dear, this is not good.

    My first attempt , not so great.

    My first test image didn’t go so well, if I was going for a Picasso look, this would be great, but it wasn’t exactly what I was after.

    Second attempt

    Rather than succumb to instructions I tried another image. This one had the correct number of eyes, so I started playing around. The simple interface, and pop up instructions made it easy to just jump right in. I tested out the sliders and their effects, then went to town. It was pretty fun, with a bit of practice I eventually turned my blonde, brown-eyed, no make-up friend into a saucy red lipped, blue eyed, red head vixen with an uncanny resemblance to pop star Kylie Minogue.

    I won’t show you the results, because the before shot was a not exactly flattering lighting test, when I say not flattering, a beautiful woman looked more like a potato than herself, and I would like to keep the friendship. I did show my friend both images and she really liked the after shot.

    That had me thinking this program certainly has potential. I had only been mucking about and I turned an unusable portrait shot into something the subject of the portrait really liked.

    Testing on a tough shot

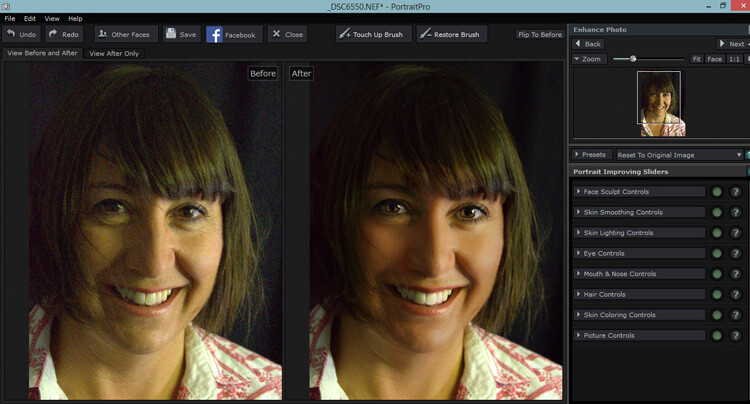
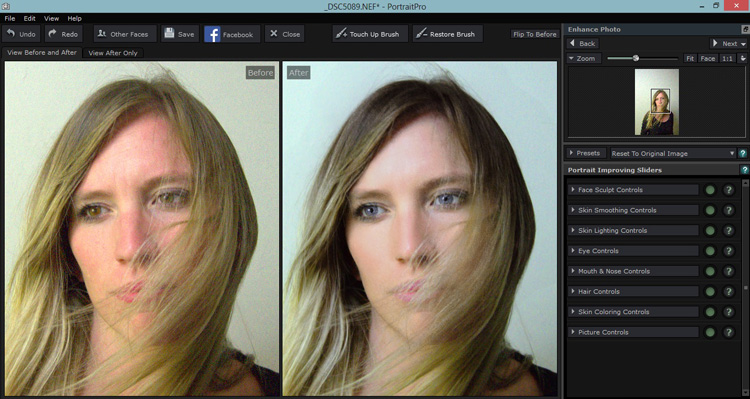
    So I decided to put the program through its paces with a poorly lit, overly grainy, weirdly white balanced shot of a dear friend who looks lovely no matter how terribly I might light her. Portrait Pro popped up with the auto version, it gave her quite the tan and sparkly, but kinda spooky eyes.

    The auto edit can make for spooky eyes

    Portrait Pro helps out by offering up an auto edited version to work from.

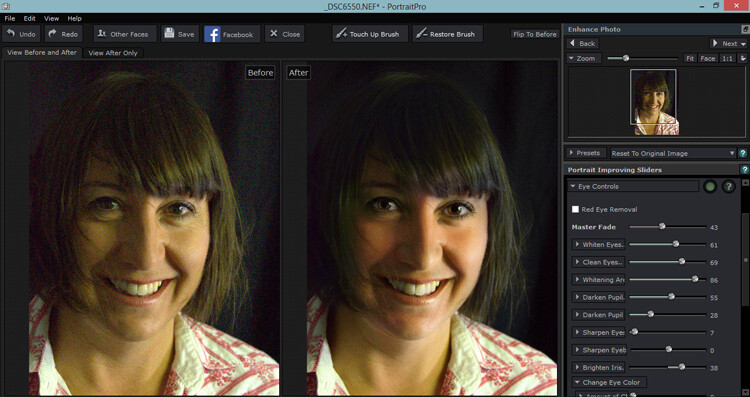
    But this where the easy to use sliders come in. You can adjust how much the skin is smoothed, colored, alter lighting, or how much cyborg look you want in the eyes. I was pleased to see you could just use this program subtlety. I could do a fair bit of gentle retouching, even on this poorly photographed shot that I either would have been unable to, wouldn’t have been bothered to, or taken for ever to do in Photoshop.

    Much less spooky looking with less slider action.

    Pulling back the sliders to get a more natural look.

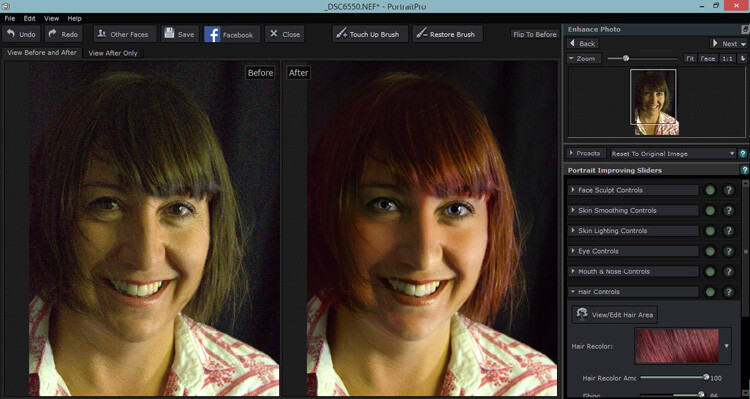
    Of course after that I couldn’t help myself with pushing it a bit further.

    The sliders can also smooth, lighten,add shine to hair.

    It was super fun playing around with the hair/eye color adjusters. I can see this being handy for some of my more surreal fine art images. After showing this version to my friend, she is now considering this new hair color!

    Testing on a saleable shot

    I was pretty impressed that I could pull something out of a rejected shot with this program, but what about a shot I would use? Would it be subtle enough to be useful for my regular work? Turns out yes, the sliders make it possible to add very slight retouching, and still maintain the natural look of the portrait.

    Subtle is best in my books. I like to see wrinkles and pores!

    While Portrait Pro can smooth out wrinkles and pores, it can also be used very subtly without loosing the natural look of your subject.

    After playing with some faces, I thought all well and good but now the neck looks weird and the face and body don’t match, but turns out you can adjust those too. You can also batch process with the Studio Max version and work directly with Raw files.

    I was pretty much sold on the program by this point, but I had a free version, would I actually pay for it? I was pretty surprised to see that it sells for around A$ 100, depending on which version you choose. For that price, I absolutely would buy it, even as a photographer who likes to keep programs to a minimum, and doesn’t like to fork out for new ones.

    Any issues?

    My only issues were finding the face alignment tool a bit tricky on some images, but then again, I still haven’t actually read the instructions. That was the only issue I had with the program itself, I took a slight offence with the promotional line “Slimmer subjects result in happier clients and more revenue“ in reference to the program’s ability to change face and body shape.

    I’m sure that is true, but do we as photographers, really want to make money out of peoples insecurities? To edit distracting parts of a photograph and improve lighting flaws, sure, but to pander to the illusion of perfection created by modern media, not so much. I’d prefer my subjects to see themselves in their portrait as they are and still like what they see with the only retouching being to fix faults in my camera work, not in them. Portrait Pro can do both.

    I have no doubt I will continue to use this program, both in my fine art and regular portraits. It will clearly save some editing time and in some cases does a better job that I would in Photoshop. I particularly liked the ability to adjust the lighting and skin tones. I’m even inclined to read the instructions and check out a few tutorials to really get to know the program. In fact I wish I had found it sooner.

    Having fun with eye color!

    My favorite part of this program was how much fun I had playing with it and how easy it was to use straight away, with impressive results even on not so great original images.

    I can’t compare Portrait Pro to any other retouching programs, but as someone who has been against them in general and preferred to stick to Photoshop, I’m converted. It’s simple and fun to use, you have a lot of control of the subtlety with the sliders and it produces great time saving results. It’s a thumbs up from me.

    How do you feel about retouching? Would you use a program like this? Have you ever tried a program like this? Tell us about your experiences and results.

    googletag.cmd.push(function() {
    tablet_slots.push( googletag.defineSlot( “/1005424/_dPSv4_tab-all-article-bottom_(300×250)”, [300, 250], “pb-ad-78623” ).addService( googletag.pubads() ) ); } );

    googletag.cmd.push(function() {
    mobile_slots.push( googletag.defineSlot( “/1005424/_dPSv4_mob-all-article-bottom_(300×250)”, [300, 250], “pb-ad-78158” ).addService( googletag.pubads() ) ); } );

    The post Portrait Pro v12 Studio Max Editing Software Review by Lea Hawkins appeared first on Digital Photography School.


    Digital Photography School

  • How to Prevent and Solve a Photography Gear Disaster?

    What could possibly go wrong?

    Let me be your fall guy here. I’ve been shooting for 25 years, and I’m completely human. I’m also not the most careful person.

    I’ve left a SLR in a drybag that unfortunately collected water, then sat soaking for a week. I’ve had a camera slide off the top of a car (like a coffee cup – but much, much worse) then go bouncing across three lanes of traffic. Miraculously, the camera and its lens survived! I’ve opened my car door and had my DSLR fall only 1.5 feet and break off the lens at the mount. My main 28-300mm L lens has gone into the shop twice as the fabric in the locking collar has worn out. I left a lens behind during a hike, and it was gone when I went back for it. I’ve had camera errors while shooting a wedding, and my main desktop computer has been stolen.
    Marcus_jb1973

    By marcus_jb1973

    Bad things happen sometimes. Sometimes it’s your fault, sometimes it’s not.

    In this article I want to help you prepare for the the worst case scenarios for camera and lens care. I want to get you thinking about disasters before they happen and also give some advice on what to do when things go awry. Then at the end I’d love to hear your own tales, especially if they are helpful to other photographers.

    We will cover cameras and lens mishaps, such as:

    • Theft
    • Lost or missing gear
    • Dropped
    • Moisture incursion
    • Corrupted/error message

    What to do before things go wrong

    There are steps you can take just in case things go wrong.

    Insure it

    Pictures Of Money

    By Pictures of Money

    Whether it’s for business or pleasure, if your camera gear is valuable to you, consider insuring it. For professional photographers this should be a no-brainer, but often those in the freelance realm aren’t bringing in huge paychecks, so they skimp by and avoid insurance. Don’t!

    For non-professionals, check with your renter’s or homeowner’s insurance to see if your gear is covered. You might find there is a limit for electronics, but you can always pony up a few extra dollars to ensure all your gear is insured. Also check your auto policy to see if gear left inside a car is covered (while remembering to always lock your gear in your trunk!), it often is not.

    Register it

    GotCredit

    By GotCredit

    This is another part of the process many skip. Registering your gear with the manufacturer helps them update you if something should be found wrong with your equipment. We hear about food recalls on the nightly news because they have huge impacts. But did you hear about the Canon Powershot eyecup recall (14,000 units) in 2014 or the Nikon 1 NIKKOR VR 10-30mm recall in 2015?

    These kind of recalls don’t make big news and often don’t even make the photo blogs.

    Claim it

    LensTag is a free service you should consider using to track your gear. The online service allows you to enter camera gear to their database, verify it with a photo of the serial number and search for stolen gear before you buy. We have an article here on dPS that explains the service in more detail Lenstag: a World Without Camera Theft.

    In the UK there is a service called Immobilise.com which works in a similar fashion; log your items on the site before they are stolen, alert the service when something goes missing, cross your fingers. This service seems more robust and is checked by police in the UK. You can register more than cameras here as well.

    Tag it

    Tagging your equipment with contact information is helpful for having your goods returned when they go missing accidentally. I accidentally left a camera on a log on a trail many decades ago and the next day someone had turned it in to the park ranger’s office. Good people do exist! Give them a hand.

    Avery, the label company, has a number of options for inkjet and laser printer. For instance, their 6570 label is meant to stay on permanently and can be cut to a useful size. This is a good option, though not perfect, for inkjet printers while the 6576 labels work better on a laserjet printer. You might want to write your information in permanent marker, but know that it will fade and need replacing.

    Write it down

    Ana C.

    By Ana C.

    This tip is the most common sense, but I feel it needs repeating. Grab a piece of paper and an old fashioned pencil and simply write down the serial numbers for your gear. Then store it in a safe place. Saving this info online is also handy, via services like Dropbox or Evernote, or email it to yourself, so it can be retrieved from any computer if you are away from home.

    What to do after things go wrong

    Theft

    When I realized my Mac had been stolen during a break-in to my house, my stomach churned to the point of almost throwing up. Luckily, my camera was with me at the time. If it was stolen, I was prepared in a way I wasn’t for my computer. I have my camera serial numbers written down and in electronic form that I can retrieve from anywhere online (while noting it’s pretty easy for astute thieves to scrap off serial numbers).

    The first step after a theft is to report it. Whether it is a break-in at home or a snatch and run in a foreign city, any insurance company will typically desire a police report with higher value items.

    If you are keen on recovering your gear, don’t trust to the police alone to find it; start looking! In the US places liked Craigslist or eBay are popular choices for thieves looking to offload gear. Pawn shops are another option, but searching them all, depending on where you live, can be time consuming.

    You might also want to try services like StolenCameraFinder.com or CameraTrace.com. I have not used either service so I can not vouch for them, but they both have the ability to search for your camera’s serial number (see section about writing down this info). CameraTrace also sells those permanent stickers I talked about earlier to make a reunion with your gear easier.

    Missing

    Sometime we are our own worst enemy and we misplace things, expensive things. If you never do, then you can skip this section.

    Patrice-photographiste

    By patrice-photographiste

    For everyone else, the obvious thing to do is to retrace your steps. Believe that there are good Samaritans out there (there are!) who want to get you back together with your camera or lens.

    If you visited shops, ask the employees if they have seen a camera. The best way for you to get back together with your gear is to let others know you are looking. Leave a card with your contact information everywhere you might have left your gear.

    You can also try other online services like CameraFound.com, which will warm your heart when you see how many people are actually trying to help others retrieve their camera or phone equipment. It lists over 1000 found cameras even in far flung locations like Oman and Kazakhstan.

    Breaks

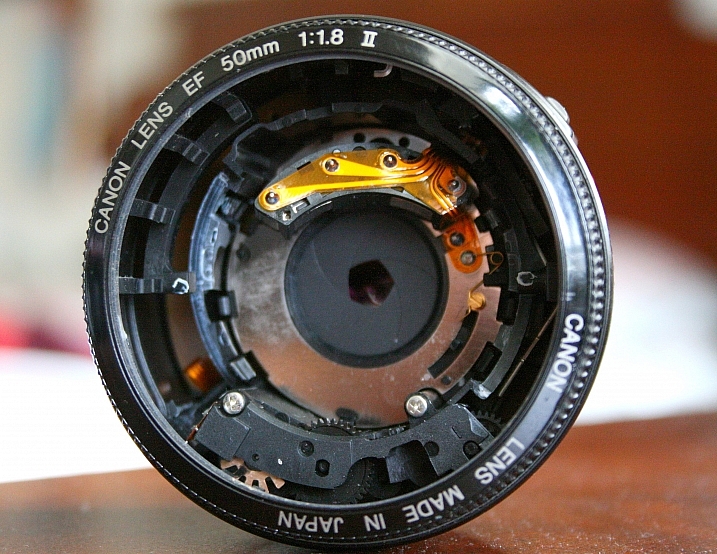
    Watching my camera fall out the passenger door, in slow motion, had me cringing before it hit the cement floor of my garage. I had reached over to open the door for someone and didn’t see the camera precariously wedged between the seat and the door.

    This was a Canon L series lens and I thought I was out $ 1200 to buy a replacement. With a break this bad (the lens snapped off the mounting ring that holds it to the camera body) and no experience with repair shops, I thought I was out of luck.
    Richard Masoner / Cyclelicious

    By Richard Masoner / Cyclelicious

    Many major manufacturers provide free estimates for repairs but you will be on the hook for shipping costs. Ask around at local camera clubs as well to see if there is a trusted local repair shop in your area. They can often save you some money, but make sure they are authorized by your manufacturer. My point is to not despair; get a quote first.

    I was happy that the repair for my lens was only $ 200. Spending $ 200 still sucked, but it meant I was back in business, and didn’t need to drop $ 1200 on a new lens because of my own stupidity.

    You might want to ask around to see if there is a reputable local repair shop other owners use. I know in Seattle there is such a store, and they can tell you the moment you walk in if your camera is salvageable or a goner. They can often be cheaper than a repair from your manufacturer.

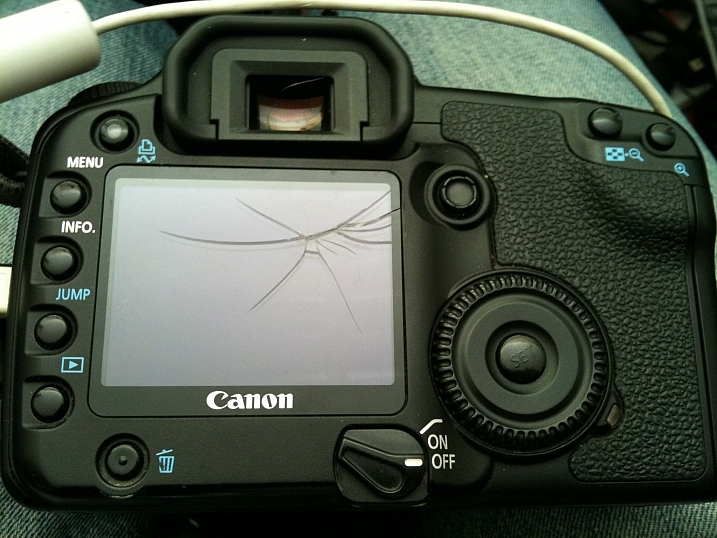
    Also, things like cracked LCD covers can be replaced for relatively little money. If the LCD itself is broken, giving you weird colors and streaks, then it’s time to get it repaired. Adventurous photographers have replaced their own LCDs with success, but if you have any doubt, pay a pro to do it.

    Moisture incursion

    It’s no joke that moisture and electronics make horrible friends. The electronics always get the worst of it, but there are some things you can do to possibly limit or stop damage.

    First, shut everything off! Take out the batteries too. Damage to electronics from water happens when the water acts as a connector between two items inside your camera, which normally won’t share power. The power from one circuit uses the water as an excellent conduit to move wherever the water touches. This is the classic short circuit that we think of that smells of melting wires and plastic. In worst cases, things can catch fire.

    Limit those chances by shutting everything down, and taking out the batteries, until you are 100% sure the inside of your components are bone dry. This can takes days or sometimes weeks.
    Kevin Baird

    By Kevin Baird

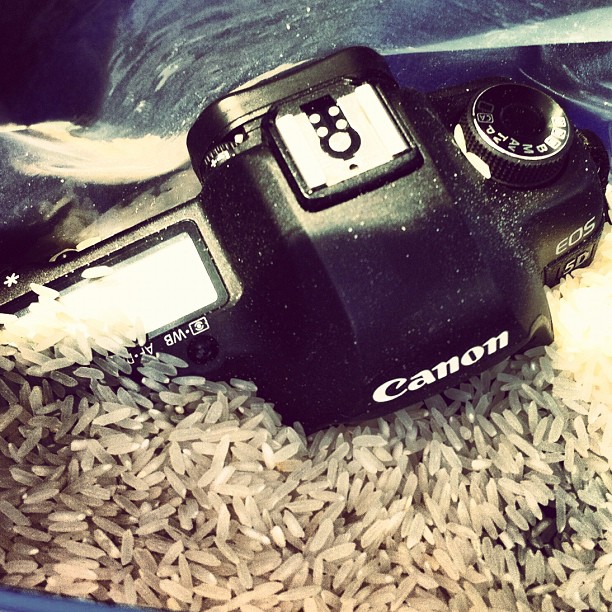
    To dry out equipment on your own, go for a slow fix. Using a hair dryer may work for something like a memory card, but not for a whole DSLR. A time tested method is to use something that naturally absorbs water, like rice or the desiccant packs that come with new shoes. You want to make the new host hungry for the water inside the camera instead of just from the atmosphere itself, so put your camera, and soaked parts, together with the rice or absorbent items inside a ziplock bag large enough to hold them all.

    Lenses can be tricky as water might leave a film behind on elements inside as they dry. If after a thorough drying, the quality seems affected, it’s time for the lens to get a professional cleaning.

    My personal advice with salt water is to not mess around with home fixes and get the camera in to a reputable repair shop or manufacturer as soon as possible. When salt water dries it leaves behind the salt, and that can corrode your camera’s innards a year from now without you realizing it.

    Corruption or error messages

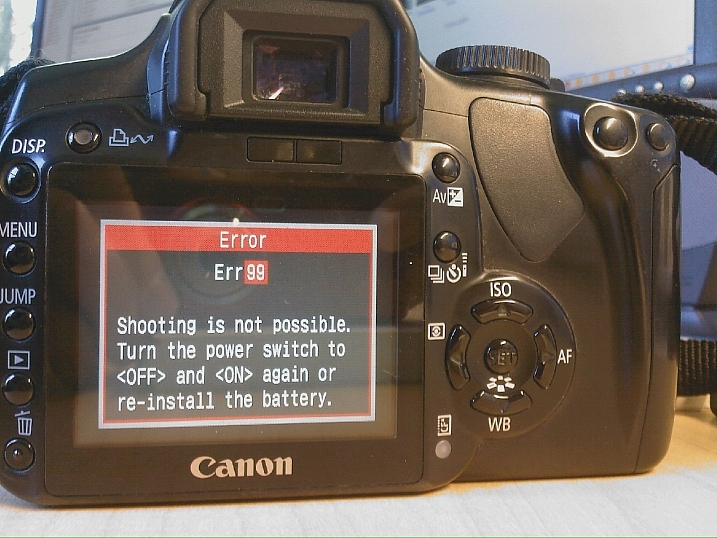
    “Err 99” pops up on your camera. What do you do? Freaking out seems like a good option. But better than that these days, is simply googling the error.
    Kate Sumbler

    By Kate Sumbler

    I can’t cover all the errors for all cameras, but I have run into these situations about four times in my 14 years of owning digital cameras. They are nerve-wracking  to say the least.

    The first steps are always, 1) Breathe slowly. 2) Power off the camera if it appears any image writing activity is done. 3) Remove the battery (ies) and wait a minute before putting them back in.

    Some errors dictate sending your camera in to the manufacturer. Some are cleared by the steps above when your camera simply stumbles over its own circuitry. Google is your friend and will list many remedies. Read forum threads to get a feel if certain suggestions cured other people’s similar issues.

    Conclusion

    I hope the tips here have helped you start thinking about disasters before they happen in order to lessen their impact. And if things do go south in a hurry, take action as soon as you can to get your gear back in working shape.

    Most importantly, I’ve seen a lot of camera and lens gear mishaps, but I haven’t seen them all. I’d like to hear about problems you have had, and what you did to fix them if you think the information might help other readers.

    googletag.cmd.push(function() {
    tablet_slots.push( googletag.defineSlot( “/1005424/_dPSv4_tab-all-article-bottom_(300×250)”, [300, 250], “pb-ad-78623” ).addService( googletag.pubads() ) ); } );

    googletag.cmd.push(function() {
    mobile_slots.push( googletag.defineSlot( “/1005424/_dPSv4_mob-all-article-bottom_(300×250)”, [300, 250], “pb-ad-78158” ).addService( googletag.pubads() ) ); } );

    The post How to Prevent and Solve a Photography Gear Disaster? by Peter West Carey appeared first on Digital Photography School.


    Digital Photography School

  • 5 Tips to Take Your Landscape Photography from Good to Great

    The beauty of the scenery in Antarctica

    The beauty of the scenery in Antarctica

    Landscape photography is one of the most favoured genres of photography. It also happens to be the one genre that is not easy to master. The reason is simple, to become really good at landscape photography, you need to spend hours trying to master it. Most photographers are not able to dedicate that amount of time, so it becomes frustrating. Many photographers end up being disappointed with their images, but there are few things that you can do to make sure you get better results, in a short space of time.

    1. Foreground interest

    This is a common tip, but one that makes a lot of sense. Having a subject in the foreground, anchors the image. It tells the viewer where to look first and once they have looked at that, their eye will explore the rest of the image.

    You can place your foreground subject anywhere in the lower third of your image, but it might be a good idea to put it more to the left side of the frame. This is not a rule (I really don’t believe there are any rules in photography), but rather a suggestion. We read text from left to right, so if your foreground interest is on the left hand side, it makes it feel easy for the viewer to interact with the image. The foreground interest could be anything, a piece of driftwood, a rock, a tree, anything that works for the scene.

    Foreground interest anchors a scene

    Foreground interest anchors a scene

    2. Color in your scene

    Your image will have inherent color based on the time of day and subject you are shooting. If you are shooting a forest, your scene might be predominantly green, if you are doing a seascape, there may be lots of blue because of the colour of the water.

    Be aware of the colour in your scene and work with the opposite colors on the visual colour wheel. As an example, there are three primary colors that your camera sees, they are: Red, Green and Blue. The additive colors (opposite colors) are Cyan, Magenta and Yellow. To be clear, Cyan is the opposite color to Red, Magenta is the opposite to Green and Yellow is the opposite to blue. These opposing colors can work well in a scene, particularly yellow and blue.

    Look at the colors in your scene and decide what you want to emphasize. To make sure you have great colours to work with, you will want to shoot during the golden hours and emphasize the warm colors.

    Rich colours will enhance the drama in your image

    Rich colors will enhance the drama in your image

    3. White Balance

    When you are shooting landscapes, you will want to be shooting at golden hour, or the blue hour. These are the times of day when the light works really well for dramatic landscape shots. In the golden hours, the light will be warm tones of yellow, orange, or red. Check your white balance setting when you are shooting at this time. If your camera is set to Auto White Balance, it will cancel out much of the warm tones in your image as it tries to neutralize any color casts you may have in your scene.

    If the golden hour light is really strong in your scene, Auto White Balance will make the scene look really bland and colorless. Try and shoot on Daylight White Balance instead. That way, the camera will be capturing the light as it truly is in the scene. You could even turn your white balance to cloudy or shade to enhance the warm tones even more. Use this settings as a creative tool, it can really make a good impact on your image.

    Use white balance creatively, this image was shot using shade white balance

    Use white balance creatively, this image was shot using the Shade preset.

    4. Movement

    Some of the best landscape images have some form of movement in them. The movement can be caused by water, wind, or both. Subjects that work well with movement are rivers, waterfalls, seascapes and even stars. A long exposure image of the sea with water looking all silky and wispy is ethereal, and adds drama to the image. We don’t see this smooth silky water naturally with our eyes, it is only possible with the camera. The results are often very appealing, and it gives a serenity to the scene that is almost magical. You will need a tripod to get this right, you will also need to use a longer exposure of a few seconds. Timing is also important, particularly with seascapes. You may have to time the shot for when the water comes rushing over the rocks, or up the beach. That way, the image will be filled with silky streaks of water and it will look amazing.

    Movement in water can make a scene look dramatic

    5. Less is more

    Landscape images become more dramatic if there is a very clear subject in them. If you are unsure about what should be included in your scene, ask yourself this question as you look around the scene, “Does that rock, tree, river, etc., add to the scene or not?” If you think it is not adding to your scene, remove it. Even if you are unsure, remove it and take a shot to see how the image looks. In many images, less is more. If you have less items in your scene, there is less to distract the eye, there is less that can make the scene confusing, so give it a try. Set up a shot, take a photo and then start minimizing the distracting elements.

    Sometimes, less is more

    Try these five tips and share your results in the comments below. Do you have any other tips to add?

    googletag.cmd.push(function() {
    tablet_slots.push( googletag.defineSlot( “/1005424/_dPSv4_tab-all-article-bottom_(300×250)”, [300, 250], “pb-ad-78623” ).addService( googletag.pubads() ) ); } );

    googletag.cmd.push(function() {
    mobile_slots.push( googletag.defineSlot( “/1005424/_dPSv4_mob-all-article-bottom_(300×250)”, [300, 250], “pb-ad-78158” ).addService( googletag.pubads() ) ); } );

    The post 5 Tips to Take Your Landscape Photography from Good to Great by Barry J Brady appeared first on Digital Photography School.


    Digital Photography School

  • Maximizing Depth of Field Without Diffraction

    So you are out shooting and you want to capture the full scene in front of you – all the way from what is directly in front of you to the background way off in the distance. You know you need a really large depth of field, and you know what you need to do to get it.

    You reach for the camera’s aperture control and crank it down all the way to f/22 (or f/32 if your lens allows). That will maximize your depth of field and have your picture looking sharp from front to back.

    Or will it?

    What is Diffraction?

    There is a phenomena in photography called diffraction that has an adverse effect on your pictures, and sets in when you use smaller apertures. What is diffraction? Let me explain.

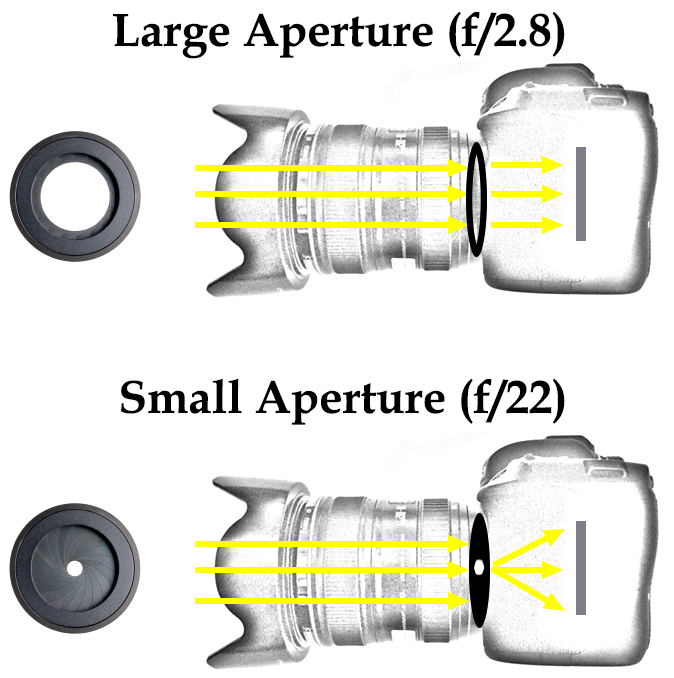
    As you are probably aware, the aperture of a lens is the opening in the rear part of the lens that lets light into the camera. The body of the lens consists of optical elements that direct light toward the rear of the lens. When you use a large aperture, light freely moves through the optical elements and then through the aperture. When the aperture is very small, however, essentially the light has to bend to make its way through the aperture. That bending of light causes the waves to interfere with each other. The following graphic illustrates how this works:

    Diagram showing how light enters the camera through the lens and results in diffraction at small aperture settings

    What’s the result of this to your photography? In a word: softness.

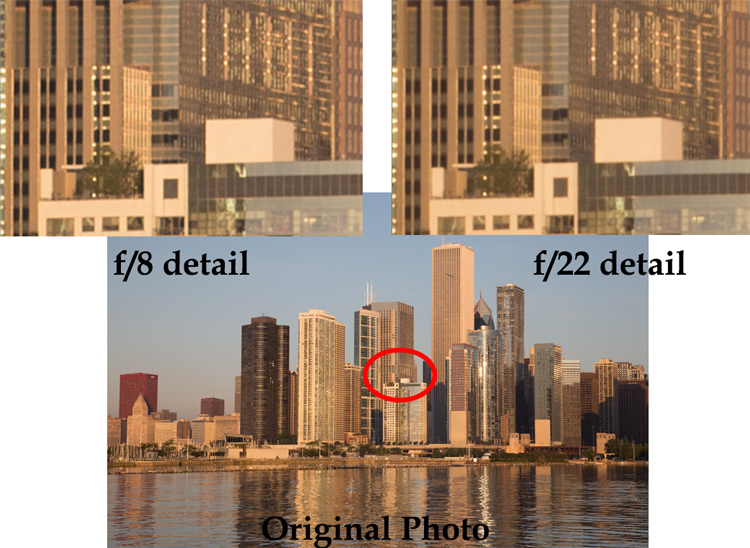
    A picture shot at f/22 will not be quite as sharp as one shot with an aperture that is a bit larger. Here is an example of detail from two photos, which are identical except that one was shot at f/8 and the other at f/22:

    Example of photos taken with large and small apertures to show the effect of diffraction when using a small aperture on your lens

    You can probably see that the f/8 detail is sharper than the f/22 detail.

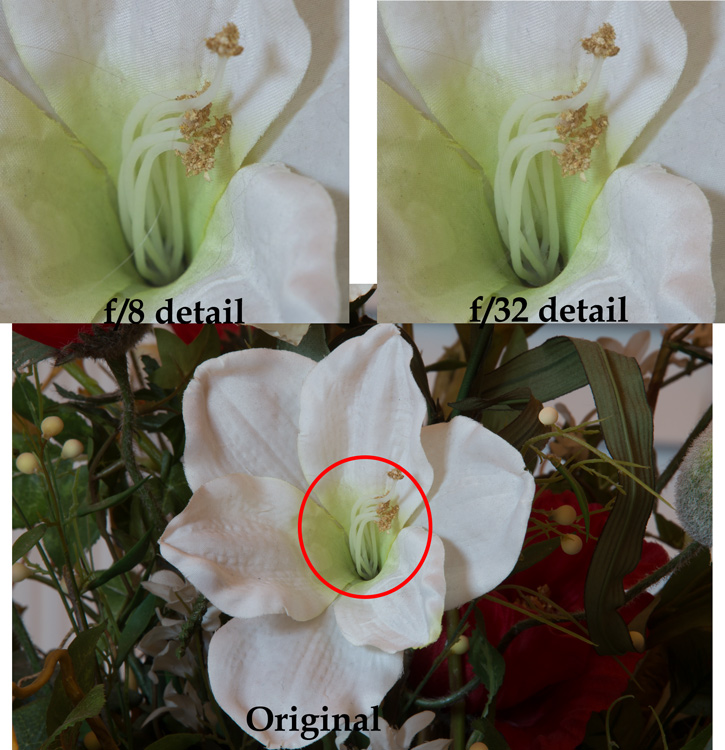
    The example above was shot outdoors with a 24-105 mm f/4 lens (my favorite). To see this application in other contexts, I also created another example, this time shooting indoors with a 70-200 mm f/2.8 lens with a minimum aperture of f/32.

    Example of photos taken with large and small apertures to show the effect of diffraction when using a small aperture on your lens

    Again, the f/8 detail is sharper than that shot with the smallest aperture.

    By looking at these examples, you can see that diffraction is not just theory, it has real affect on your photos.

    Using the Sharpest Aperture

    Okay, so now you see that diffraction is a real phenomenon, and you want to avoid it. What is the smallest aperture you should use? And what is the best aperture setting? Unfortunately, there is no one perfect answer. It depends on the lens. As a result, you should test your lens(es) to determine the aperture (or range of apertures) at which they work best (also known as the lens’ sweet spot).

    To do so, just take the exact same picture at each aperture setting (in 1-stop increments). Be sure to use a tripod so your picture is exactly the same. In addition, make sure you are increasing (making longer) your shutter speed by an equal amount every time you change your aperture so that your exposure stays the same. After you have taken the pictures, load them onto your computer, zoom-in on each, and compare.

    If you don’t want to test your lens and just want a quick rule of thumb for avoiding the effects of diffraction, generally avoid using an aperture smaller than f/11 or f/16. Most experts consider this range something of a maximum. In addition, the sharpest aperture on most lenses will be about f/5.6 – f/8, or about 1-2 stops smaller than its wide open aperture setting. When possible, default to using an aperture in this range.

    Maximizing Depth of Field with Larger Apertures

    You may find yourself wondering how to get a large depth of field without using a very small aperture. Keep in mind that you don’t always need to use the smallest aperture that your lens offers, to get a sufficient depth of field. If you are shooting outdoors, which is generally where you will want a small aperture and maximum depth of field, you should become acquainted with the subject of hyperfocal distance.

    Despite its complex-sounding name, hyperfocal distance is just a measure of how close you can focus and still keep the background of your image acceptably sharp. You don’t necessarily need to use the smallest aperture possible, particularly when you are shooting wide-angle. For example, if you are using a full-frame camera with a 20mm lens, even using an aperture of f/8 will keep everything sharp from 5.5 feet in front of you, all the way to infinity!

    This shows that you don’t always need to use an aperture like f/22. Get acquainted with hyperfocal distance (or keep a hyperfocal distance chart handy) to see how large you can make your aperture, yet still maximize depth of field.

    Focus Stacking

    Sometimes, however, you need to break out the heavy artillery and make sure everything – from what is right in front of you all the way to infinity – is in focus. To do that, use a technique called focus stacking.

    To focus stack what you do is, take multiple pictures of the exact same thing at your lens’s sharpest aperture setting. Again, you should test your lenses to see what the sharpest setting is for each lens, but if you don’t know it will usually be in the range of f/5.6 – f/8.0. Set your lens to manual focus, and set the focus point on the closest part of the image (nearest part you want in sharp focus). Take the first shot, then repeat the process, gradually setting the focus point further and further away with each shot, until you are focused at infinity. Usually 3-5 shots will cover the entire range of the scene.

    When you get your photos in your computer, you will combine the photos in Photoshop to create one file using the sharpest parts of each picture. There are a few different ways to do this:

    • Automatic: Use the Photomerge function to load your photos into Photoshop (File > Automate > Photomerge) and combine the images, making sure that the box to “blend images together” is checked. Photoshop will combine the images into one file and (usually) use the sharpest portions of each image.
    • Partial: You can also load the images as separate layers to one file in Photoshop, align your layers (Edit > Auto-Align Layers), and then have Photoshop automatically blend the layers (Edit > Auto-Blend).
    • Manually: Finally, you can do the process manually if you want complete control over it. Load the images as layers to the same file align the layers. To blend the photos, add a layer mask to the top layer (Layer > Layer Mask > Reveal All) and use a black brush to mask away everything except the sharpest point of that picture. Then merge down that layer (Layer > Merge Down) and repeat the process for each layer. This method will obviously take more time than the first two options above.

    At the end of this process, you will have combined the layers such that the sharpest portion of each one is showing. The photo will be 100% sharp from front to back – with no effects of diffraction.

    Application to Your Photography

    You should be aware of diffraction, but don’t let it scare you away from using the aperture that you need. In particular, there is still a place for shooting with very small apertures. The effects of diffraction – while real – are not that great, and keep in mind that the examples set forth above showing the effects of diffraction were zoomed way in. If we look at the original pictures, can you tell which one was shot at the smaller aperture?

    Full photos showing limited effect of diffraction

    Can you see any diffraction here? In the top row, the picture to the left was shot at f/22 and the one to the right was shot at f/8. In the bottom row, the picture to the left was shot at f/8 and the one to the right was shot at f/32.

    Can you see the diffraction in the images above? I can’t.

    Worrying about diffraction should be reserved for those times you are dead set on absolute maximum image quality, or you know you are going to display a large version of the picture. Otherwise, you can still shoot with small apertures and you will likely not notice the difference. In other words, there is still a place for f/22 in this world.

    However, on those occasions where it does matter, use a slightly larger aperture. Know your lens’ sweet spot and use that setting. Be familiar with the hyperfocal distance involved and see if you can keep the entire picture sharp at the larger aperture. Where you cannot, use focus stacking, this will ensure the sharpest pictures possible.

    googletag.cmd.push(function() {
    tablet_slots.push( googletag.defineSlot( “/1005424/_dPSv4_tab-all-article-bottom_(300×250)”, [300, 250], “pb-ad-78623” ).addService( googletag.pubads() ) ); } );

    googletag.cmd.push(function() {
    mobile_slots.push( googletag.defineSlot( “/1005424/_dPSv4_mob-all-article-bottom_(300×250)”, [300, 250], “pb-ad-78158” ).addService( googletag.pubads() ) ); } );

    The post Maximizing Depth of Field Without Diffraction by Jim Hamel appeared first on Digital Photography School.


    Digital Photography School

  • 7 Tips for Better Commercial Food Photography

    Earlier this summer, I was awarded a dream photo shoot to photograph chocolate chip cookies for my local grocery store. What sounded like a simple job at first, ended up being more challenging than expected, and in this article, I’ll walk through the process of approaching a commercial food photo shoot for a real client, with seven key tips to keep in mind.

    Select your gear

    One of your best friends in food photography is a macro lens, as it lets you zoom-in and capture small details and perspectives, that your client’s camera phone can’t. In a day where just about everyone has the ability to take pretty good food photos with their cell phone, it’s important to always create photos that your client couldn’t easily capture themselves using low level gear. Personally, I always photograph food with two camera bodies (a Canon 5D Mark III and Canon 6D) and two lenses (24-70mm f/2.8 and a 100mm f/2.8 macro lens).

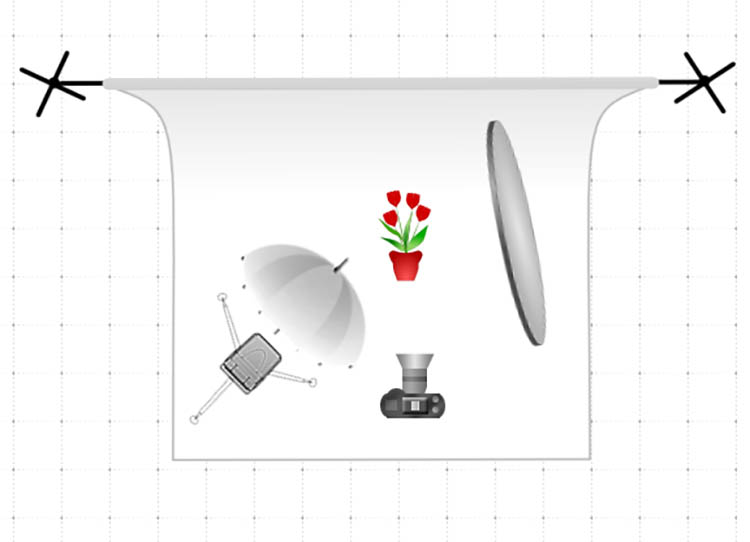
    Lighting-wise, you can easily use reflectors and natural lighting if it’s at your disposal, but I prefer a simple and cheap off-camera flash setup consisting of a Canon 580 EXII Speedlight flash, Yongnuo wireless flash triggers, a simple lighting stand, and a shoot through umbrella. My lighting setup is in the diagram below.

    Food photography tips

    Depending on what kind of food photography quality you’re aiming for, it may also be wise to invest in a food stylist. In this case, I did not use one, but started to wish I did at certain key moments, which I’ll address later.

    Set up the shot

    Generally speaking, food photography can be done just about anywhere, but you should always check with your client to see if they have a preference of shooting on site in a particular location, or if they want you to conduct the shoot in your space. In this case, the latter scenario applied. Since the photo style we were going for would be pretty cropped and zoomed in, I didn’t need a fancy kitchen or dining room setup. But I would need a variety of surfaces and props to enhance those heavily cropped images.

    Tip #1: Understand the client’s photo needs

    There tend to be two main scenarios when it comes to food photography. Sometimes the client will have a menu of dishes prepared and you need to shoot as many as possible in a given time frame, OR the client has one particular dish or menu item that they want highlighted. This assignment falls into the latter category, as the whole point was to take images of one particular item: an extraordinary large chocolate chip cookie, dubbed “The Cookie.”

    My local grocery store had spent a year experimenting in the kitchen to come up with a recipe for a gigantic chocolate chip cookie, and they needed photos of the product to help with promotional marketing. These photos in particular had a very specific purpose of being blown up into large decals and posters, that would be plastered on walls and windows throughout the store, so the highest resolution photos would be needed.

    Food photography tips

    Tip #2: Research with Pinterest

    After understanding the client’s basic photo needs, I always conduct research on Pinterest to get inspired and visually identify patterns among other similar photo shoots. While many clients encourage photographers to add their own twist or dose of creativity, it’s also a good idea to have a sense of traditional ways that others have executed similar photo shoots, in case your client ends up wanting a more traditional image. A quick search for “chocolate chip cookies” on Pinterest gave me a slew of ideas on different ideas to effectively photograph, “The Cookie.”

    Tip #3: Use a variety of surfaces

    Per the researched examples that I had found, plus my personal approach to food photography, I set out to shoot these cookies using three main surfaces: a ceramic plate on a granite countertop, a wooden cutting board, and the white paper napkins and packaging that came with each cookie. The purpose was to offer the client a variety of surfaces and textures to choose from, in addition to a variety of implied settings in which “The Cookie” might be consumed.

    Food photography tips

    Tip #4: Incorporate people and action into the scene

    The next photographic approach I took involved having a human model interact with my photo subject. Incorporating a human element, either by simply including a body part such as a hand holding the cookie, or a partially eaten cookie, gives the photo subject a sense of purpose and utility that the client might find helpful. It also adds a sense of scale – important to show the size of “The Cookie”.

    Food photography tips

    Tip #5: Use ingredients and pairings

    Pretty much every food has a logical pairing, such as white wine and fish, beer and burgers, and milk and cookies. Instead of just focusing on one component, why not set the scene by introducing a natural pairing to the photo subject? This not only sets the scene, but it can also help provide scale, in this case showing how large “The Cookie” is compared to a glass of milk.

    Food photography tips

    Tip #6: Be open to feedback and further collaboration

    After going through the above scenarios, and putting together a first batch of photos for client feedback, I was a bit surprised when they replied saying, “These are great, but not quite fitting our ideal vision.” Luckily, I asked for feedback early in the shoot and was able to collaborate further with the client to hone in on what they were actually looking for, which were photos more to the tune of this:

    Food photography tips

    While the client’s initial instructions were to produce a variety of photos of the cookie, like the ones I first delivered, it took an extra conversation with them to realize that there were two main points they really wanted to illustrate:

    1. Size mattered: Since “The Cookie” was truly large, similar in size to that of a DVD, we really needed to emphasize its huge size.
    2. Have to see the goo: The selling point of “The Cookie” is the super gooey melted chocolate center of each cookie.

    With these two points really emphasized, the resulting images ended up being purely macro shots, but the challenge was capturing the gooey melted chocolate centers. This is when a food stylist probably would have come in handy, but through trial and error, I was able to use my oven and microwave to re-create the melted chocolate look in my own kitchen.

    Tip #7: Find the finished product and document it!

    Whenever you perform photography services for a client, make every effort to get your hands on the final product that has your photo(s) in use. Having proof of your published photos is excellent for building your portfolio and credibility as a photographer, not to mention it just feels really good to see your images blown up on the side of a building.

    Food photography tips

    The final product: my photos used in decals on the side of a building.

    Conclusion

    Do you have any other tips or approaches for tackling commercial food photography jobs? Let me know in the comments below!

    googletag.cmd.push(function() {
    tablet_slots.push( googletag.defineSlot( “/1005424/_dPSv4_tab-all-article-bottom_(300×250)”, [300, 250], “pb-ad-78623” ).addService( googletag.pubads() ) ); } );

    googletag.cmd.push(function() {
    mobile_slots.push( googletag.defineSlot( “/1005424/_dPSv4_mob-all-article-bottom_(300×250)”, [300, 250], “pb-ad-78158” ).addService( googletag.pubads() ) ); } );

    The post 7 Tips for Better Commercial Food Photography by Suzi Pratt appeared first on Digital Photography School.


    Digital Photography School

  • How to Clean Your Camera Sensor and Lenses

    It’s important to take good care of your camera gear and an occasional cleaning is in order. You want to make sure you are using the right tools for the job and proceed gently.

    In this first video see how to clean your lens elements to make sure you have nice sharp images:

    In this second one see some techniques for remove dust from inside your camera and on the sensor.

    For more information if you do want to use the kits to clean your sensor, read: How to Clean Your Camera Sensor in 3 Easy Steps

    googletag.cmd.push(function() {
    tablet_slots.push( googletag.defineSlot( “/1005424/_dPSv4_tab-all-article-bottom_(300×250)”, [300, 250], “pb-ad-78623” ).addService( googletag.pubads() ) ); } );

    googletag.cmd.push(function() {
    mobile_slots.push( googletag.defineSlot( “/1005424/_dPSv4_mob-all-article-bottom_(300×250)”, [300, 250], “pb-ad-78158” ).addService( googletag.pubads() ) ); } );

    The post How to Clean Your Camera Sensor and Lenses by Darlene Hildebrandt appeared first on Digital Photography School.


    Digital Photography School

  • 5 Practical Lightroom Tips for Newbies

    One of Lightroom’s most important assets is also its Achilles Heel. It is such a powerful program that many of its useful features can take a long time to discover, and are often hidden beneath a blanket of keyboard shortcuts and obscure menus.

    When I first started learning Lightroom I was already a longtime user of Apple’s image processing program Aperture, and for a while after making the switch I was overwhelmed by the sheer number of options available. With so many menus, buttons, and sliders at my fingertips I thought there was no way I would ever be able to make sense of them all. After much experimenting, online searching, and good old-fashioned trial and error, I have figured out a workflow that suits my needs; the same holds true for most photographers. You may not use every single feature and option available to you in Lightroom, but the key is to find the tools that work for you and learn to master them.

    five-lightroom-tips-for-beginners-sunrise

    Adjusting the RAW file to arrive at this final image took a while, but was a lot easier thanks to some simple tips and tricks described below.

    That being said, here are five of the most practical, useful features that I use on a daily basis. Try them out and they may greatly enhance your own experience with Lightroom as well.

    1. Create import presets

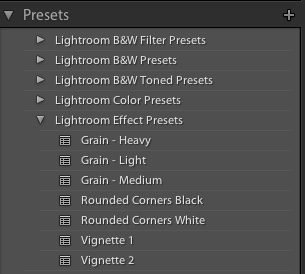
    five-lightroom-tips-for-beginners-PresetsYou probably already know that Lightroom contains dozens of presets to get you started when editing your photos, which can be quite handy when you need a quick adjustment or effect such as Aged Photo, Bleach Bypass, or any number of black and white conversions. These presets are not special filters like what you might find in Instagram or other such image-sharing programs, but in fact are pre-made manipulations of the various sliders and controls available to you in the Develop module. The Cold Tone filter, for example, is a collection of saved values for the White Balance, Tone, and Presence adjustments in the Basic Develop pane.
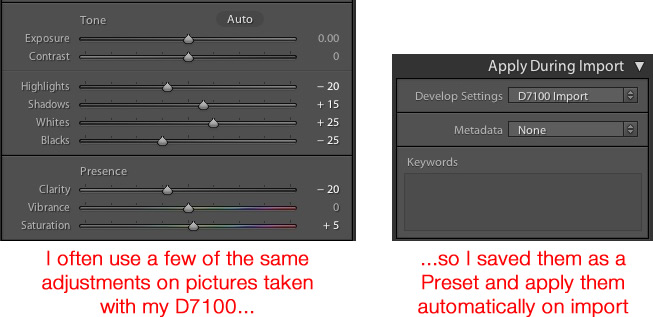
    You might also be aware that you can create your own presets by adjusting any of the Develop parameters and then choosing New Preset from the Edit menu. But you can extend this functionality a step further by automatically applying a given preset, even one you create yourself, to all your pictures upon import. This is incredibly useful if you have a given set of values that you like to use as a starting point. Rather than making similar adjustments to things like Highlights, Shadows, and Clarity for every image you can simply apply default values to every picture you import. To do this, use the Apply During Impor” pane in the Import dialog, and select any of Lightroom’s existing Presets or one that you have made on your own.

    five-lightroom-tips-for-beginners-D7100-Import-Preset

    As an example of how this can be useful, I often found myself applying similar adjustments to every picture that I took with my Nikon D7100 because I was not happy with Lightroom’s interpolation of my RAW files. This became somewhat time-consuming, so I saved my common adjustments as a Preset called, D7100 Import. Now every time I import photos from my D7100 memory card, I apply that Preset. I have a unique Preset saved for each of my cameras, and applying these settings on import has saved me untold hours and a great deal of frustration. It’s a fantastically useful feature that could greatly improve your own workflow as well.

    2. Use number keys to fine-tune adjustments in the Develop Module

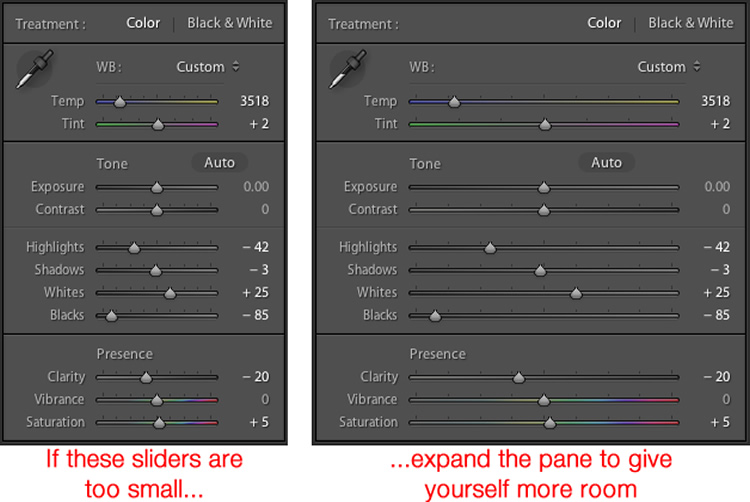
    When working in the Develop module it can be a bit tricky to get the exact values you want by manually moving the sliders. One way to fix this is to give yourself a bit more real estate by hovering your cursor over the left side of the panes and dragging until the panels are much wider.

    five-lightroom-tips-for-beginners-develop-sliders

    Another handy trick is to use the arrow keys to adjust the number values in very small increments. For example, click on the White Balance numerical value, and press the Up or Down arrow keys to change it in increments of 10. Or highlight Clarity and press Up or Down to change it in increments of 1. For greater adjustments, hold down the Shift key while you press Up or Down, which will alter White Balance in increments of 200, Clarity in increments of 10, and so on.

    3. Customize the Develop Module

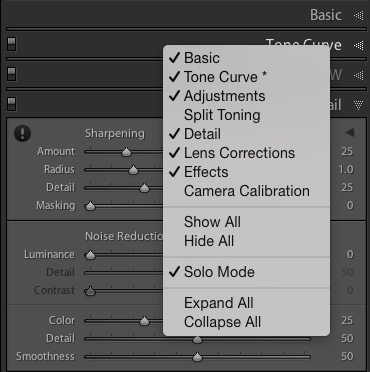
    If you’re like me, you may have been overwhelmed at the massive number of options in the Develop module, but thankfully there is a way to tame this beast by right-clicking anywhere in the adjustment panels. Doing so brings up a menu that allows you to disable the adjustments you don’t want so you have a cleaner and less cluttered working environment, and don’t waste time clicking on features you never use.

    five-lightroom-tips-for-beginners-hide-panels

    One especially useful element of this right-click menu is called Solo Mode, which is a way to de-clutter the Develop module even more by collapsing all the panels except the one you are currently using. I used to waste all sorts of time scrolling up and down through the various open panels, expanding or collapsing them to get to the one I really wanted. But by using Solo mode every time I click on a new panel, the other one I was using is automatically shrunk to just its title. This one little feature has single-handedly saved me not just a lot of time, but a great deal of headache medicine as well.

    4. Create Smart Collections to automatically sort photos in the Library Module

    Lightroom’s Library module is a great way to help you keep your images organized. You can create virtual folders called Collections (e.g. Ceremony, Reception, and Speeches for a wedding) that can even be placed inside of Collection Sets (e.g. Smith-Miller Wedding).

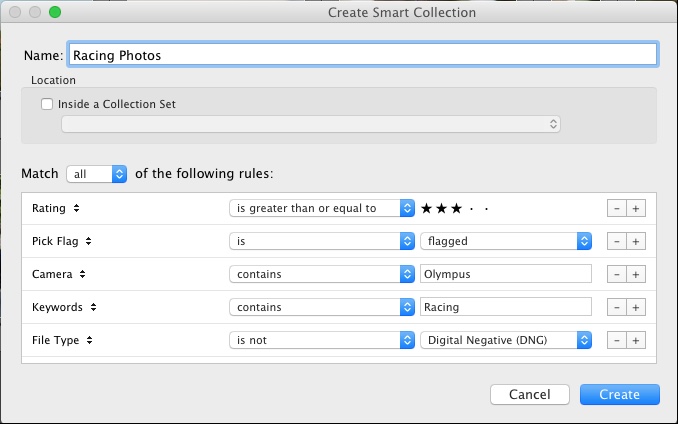
    But what I find even more useful is the Smart Collections feature which allows you to dynamically organize your images, based on any number of conditions you specify. To create a Smart Collection, choose New Smart Collection from the Library menu and specify the parameters you want to use. Any picture that meets these criteria, at any point in your editing process, will automatically be placed inside the virtual folder you have just created.

    five-lightroom-tips-for-beginners-smart-collection

    In the above example I have created a Smart Collection that automatically sorts through all my photos, including any that I import after the Smart Collection is created, that meet specific criteria. Using Smart Collections are a great way to enhance your organization process, and help you sort through your images to focus on the ones you really want to work with.

    5. Hold down the Option/Alt key when adjusting Develop sliders

    The effects of many of the adjustments in the Develop module are self-evident; increase the Exposure and your image will get lighter. Increase the Saturation and your photo will lose a bit of color. But what about the adjustments that are not so easy to see? One particular set of sliders I use all the time is under Sharpening in the Detail pane, but the exact effects of the Radius, Detail, and Masking are sometimes difficult to see. This problem can be solved by holding down the Alt/Option key when moving almost any slider in the Develop module, which will show you a realtime display of exactly what is happening when you make the adjustment.

    five-lightroom-tips-for-beginners-pastry

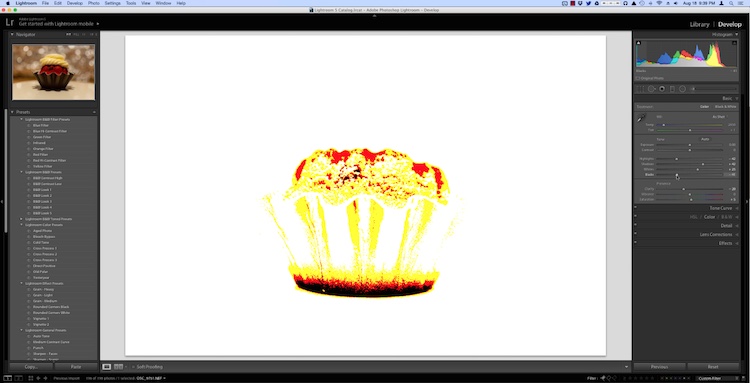
    As I was editing this photo I needed to make some adjustments such as dialing down the Black levels, but I didn’t want to go so far so as to make any part of the image completely black. (That is, I did not want to clip anything in the picture.) By holding down the Option key as I adjusted the Black slider I was able to see a realtime display of what areas of the image were being affected:

    five-lightroom-tips-for-beginners-pastry-option-key

    In the above image the bottom of the pastry has become completely black, which means it cannot get any darker while the red areas will soon become entirely black if I continue to move the slider to the left. The yellow areas are being affected, but not so much just yet that I am losing my color data. This works for almost every adjustment slider in the Develop module, and can greatly assist you in making sure you are doing the edits precisely how you mean to.

    These five Lightroom tips and tricks have been a major boon to me as I have worked with the program over the years, what about you? What are your favorite aspects of Lightroom that you find particularly handy? Or do you have any hidden gems that others might not know about? Leave your thoughts in the comments below.

    googletag.cmd.push(function() {
    tablet_slots.push( googletag.defineSlot( “/1005424/_dPSv4_tab-all-article-bottom_(300×250)”, [300, 250], “pb-ad-78623” ).addService( googletag.pubads() ) ); } );

    googletag.cmd.push(function() {
    mobile_slots.push( googletag.defineSlot( “/1005424/_dPSv4_mob-all-article-bottom_(300×250)”, [300, 250], “pb-ad-78158” ).addService( googletag.pubads() ) ); } );

    The post 5 Practical Lightroom Tips for Newbies by Simon Ringsmuth appeared first on Digital Photography School.


    Digital Photography School

  • 6 Phrases to Help you Learn Photography Faster

    5 simple photography tricks for accurate shots

    Learning all the ins and outs of photography is a never ending challenge. For some, the technical side of photography seems more difficult to understand. Others feel they are challenged by the creative side of understanding composition and light. When learning any new skill, the understanding of fundamentals is always most important. The complexity of settings, along with endless creative options is what makes photography so challenging. That’s where these six sayings come in. These simple phrases will bring you back to the basics, helping you to create quality images quickly, allowing for more time to experiment creatively.

    1. ISO: Set it first – change it last

    Set it and forget it until you have to remember.

    Many people get confused by the purpose of ISO, and how to use it when controlling light. Unlike the other two big settings (aperture and shutter speed) when used properly, ISO gives your photograph the ability to be more sensitive to the available light. When you are setting your ISO, remember to choose a setting based on the amount of available light you happen to have in your scene. Don’t set it because the shot you took before was too dark and you want to brighten the exposure.

    ISO - Set if first. Change it last.

    ISO 2500, f/1.8 at 1/125th of a second

    Every time you enter a scene, before you take a shot, ask yourself, what kind of light is there?

    Here are some starting ISO settings, adjust as necessary for your scene:

    • Bright sunny day: ISO 100-200
    • Shade/clouds: ISO 400-800
    • Indoors: ISO 800-1600
    • Little/no light: ISO 1600 and up

    Don’t forget the negative side of ISO. Most camera models go above 1600 ISO now. However, if you choose 1600, or higher, you will most probably see noise (digital grain) in your image. There are many post-production techniques to remove noise, but it’s always best to capture your best shot in the camera. Consider this when choosing a higher ISO in dimly lit areas.

    2. Set an intention

    Both shutter speed and aperture measure and control how much light the camera takes in. But they each also have a creative aspect that must be considered when choosing your settings. Knowing their distinct qualities, and creating an intention when you shoot, are two extremely important fundamentals of photography.

    Set an Intention

    ISO 200, f/4.0 at 1/5000th

    Ask yourself, “What is my purpose?” Why are you taking that photo? Be clear on what you want to capture. Give yourself a moment to set an intention or two, then keep it in mind the whole time. Once you have figured out your main purpose, you can use that to choose which setting you will set first. As aperture affects the depth of field and shutter speed affects movement, which aspect is more important for creating the image you want?

    Let’s take a look at two more awesome phrases to easily remember the different purposes of aperture and shutter speed.

    3. Shutter speed: fast freezes – slow shows

    Shutter speed is all about capturing (or not capturing) motion. When you want to show movement in the photograph, use a slower shutter speed. If a subject is moving and you want to freeze that movement, use a higher (faster) shutter speed. The faster the subject is moving, the higher your shutter speed must be to freeze them/it.

    Quick Tip: Do not hand hold and shoot below 1/60th of a second. You are a vibrating creature, you are always moving. At about 1/60th of a second, the camera might capture the movement (called camera shake) you create just by pressing the shutter button.

    Shutter Speed

    Image #1 (left): ISO 1000, f9.0, 1/20th
    Image #2 (right): ISO 1000, f/4.0, 1/125th

    Here are some starting points to freeze moving subjects. Start here and adjust as necessary:

    • Moving cars: 1/4000th of a second or faster
    • People running: 1/1000th or faster
    • Kids playing: 1/500th or above
    • Person sitting still: 1/100th or faster
    • Still object: 1/60th or faster
    • Night scene: (tripod) 1/60th or slower

    4. Aperture: High number = more in focus. Low number = less in focus

    This setting is all about depth of field, the distance between the front and back of a focal plane. The focal plane is determined by the spot where you tell your camera to focus. The higher the f-number, the larger the distance of that plane. This means, more depth of the scene is within the focal plane, thus it is in sharper focus. The opposite is also true. The lower the f-number, the smaller the distance between the front and the back of the focal plane and less is in focus.

    If you want everything in the photo to be fully in focus you will need to choose a higher f-number. If you want to create a shallow depth of field bringing only one part into focus, you will use a smaller f-number.

    Aperture Photography Trick

    Image #1 (left): ISO 160, f/11.0, 1/400th
    Image #2 (right): ISO 160, f/1.8, 1/4000th

    Here are some aperture starting points, same as before, adjust as necessary:

    • Close-ups or detail shots: f/2.8 or lower (larger)
    • Portraits: (one person) f/1.8 – f/5.6
    • Groups: (2 or more) f/5.6 – f/8.0
    • Local scene: (less distance) f/8.0 – f/11
    • Landscape: (more distance) f/11 – f/22

    5. Frame your finder

    Witness your scene through your viewfinder, as you allow your eye to examine every inch of what you can see through the lens. Look from top left, across and down to the right. What is in each corner? Notice the edges of the frame. When examining everything you see, slightly move your camera around as you prepare for finding the best version (framing) of this shot. This will give you a greater sense of what you do, or do not want to be in the shot. You will notice if you have cut something off, or added something into the shot you do not want.

    When you make a habit of always re-framing your viewfinder as you are shooting, you will gain a greater sense of awareness, allowing for more shots from other vantage points you hadn’t considered before. Even more importantly, as you practice this, every shot you take will be closer to what you want to capture in the first shot you take.

    Frame your finder

    See what is in every inch of your frame before snapping the shutter!

    6. Count your clicks

    Once you have your desired exposure based on the purpose of what you are capturing, you can choose to change your purpose (capture a different effect) by going up or down the range of either aperture or shutter Speed. To make sure you keep a proper exposure like you had before (assuming you are shooting in Manual Mode), just count your clicks. If you click six times in one direction on shutter speed (because now you want to show motion), you will need to click six times in the other direction for aperture to keep a proper exposure.

    For example: When photographing a birthday party, you may go from focusing on close-ups and details, to kids running around, to capturing a sunset. In this case, the first intention is creating a shallow depth of field to capture a non-moving object. Set your aperture to a low f-number. Using your meter, now set your shutter speed for correct exposure and snap away. ISO will already be set because that’s the first trick to remember.

    Now it is time to capture the kids running around. You will  switch focus from aperture to shutter Speed. To make sure you freeze their movement (no one likes a photo of a blurry kid), you will change your shutter speed to 1/1000th of second.

    Photography tricks

    But wait! Before you start moving the dial, remember to count how many clicks you are going. If you clicked down four times to get to 1/1000th of a second, then you will click UP four times using your aperture dial. Now your exposure will be the same, but you quickly changed your settings to creatively capture something entirely different. Note: if you are using Aperture or Shutter Priority modes the camera will do this adjustment for you automatically.

    There you have it

    The best thing you can do now is turn these tricks into habits by jotting down these simple phrases and stuffing them in your camera bag. Next time you are ready to shoot, read over them once or twice before you begin. As you practice using these tricks in order to become more accurate and efficient behind the lens you will create more stunning eye-catching photographs of any subject you choose to capture.

    Do you have any other cool phrases that you say to yourself when you are shooting? If you know any other great tricks that are easy to remember and simple to understand, let us know in the comments section below. Together, it will be fun to build a compilation of great photography learning quotes!

    googletag.cmd.push(function() {
    tablet_slots.push( googletag.defineSlot( “/1005424/_dPSv4_tab-all-article-bottom_(300×250)”, [300, 250], “pb-ad-78623” ).addService( googletag.pubads() ) ); } );

    googletag.cmd.push(function() {
    mobile_slots.push( googletag.defineSlot( “/1005424/_dPSv4_mob-all-article-bottom_(300×250)”, [300, 250], “pb-ad-78158” ).addService( googletag.pubads() ) ); } );

    The post 6 Phrases to Help you Learn Photography Faster by Danielle Werner appeared first on Digital Photography School.


    Digital Photography School

  • Weekly Photography Challenge – Backlighting

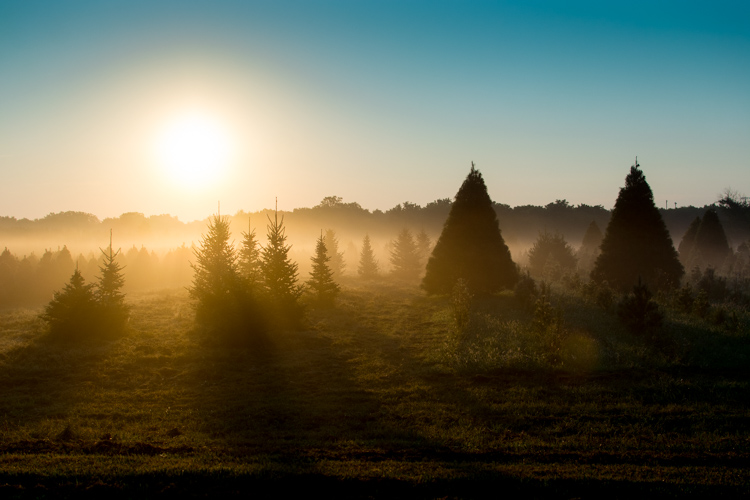
    Check out these examples of images that have backlighting. Take a good look and get some ideas. Now it’s your turn.

    Weekly Photography Challenge – Backlighting

    This week’s challenge is to look for the light, particularly how it is hitting your subject. Backlight occurs when the light is coming from behind your subject, aimed back towards the camera. It works really on transparent objects like leaves and flowers.

    The Guy With The Yellow Bike

    By The Guy With The Yellow Bike

    Bill Gracey

    By Bill Gracey

    Julie Kertesz

    By Julie Kertesz

    Look for things that allow the light to come through them, show their color. Or look for light that outlines the subject as in a rim light.

    Bill Gracey

    By Bill Gracey

    Adam Hilliker

    By Adam Hilliker

    Dwight Sipler

    By Dwight Sipler

    Tambako The Jaguar

    By Tambako The Jaguar

    GollyGforce - Living My Worst Nightmare

    By GollyGforce – Living My Worst Nightmare

    Share your images below:

    Simply upload your shot into the comment field (look for the little camera icon in the Disqus comments section) and they’ll get embedded for us all to see or if you’d prefer upload them to your favourite photo sharing site and leave the link to them. Show me your best images in this week’s challenge. Sometimes it takes a while for an image to appear so be patient and try not to post the same image twice.

    googletag.cmd.push(function() {
    tablet_slots.push( googletag.defineSlot( “/1005424/_dPSv4_tab-all-article-bottom_(300×250)”, [300, 250], “pb-ad-78623” ).addService( googletag.pubads() ) ); } );

    googletag.cmd.push(function() {
    mobile_slots.push( googletag.defineSlot( “/1005424/_dPSv4_mob-all-article-bottom_(300×250)”, [300, 250], “pb-ad-78158” ).addService( googletag.pubads() ) ); } );

    The post Weekly Photography Challenge – Backlighting by Darlene Hildebrandt appeared first on Digital Photography School.


    Digital Photography School