Category: Photography

  • How to Find Inspiration Photographing Locations Near Home

    Everywhere you look there are thousands of images depicting beautiful places in the world. How many times have you thought to yourself, “I wish I could travel so I could take the same photographs?” The reality is that most of those photos were taken by people who live close to the locations, or have the ability to travel there multiple times.

    It is a statement that you hear from many photographers. It may be true, but the truth is most of us live in wonderfully rich photographic areas. The problem is that you see it every day, so it no longer seems interesting.

    leanne-cole-photographing-home-008

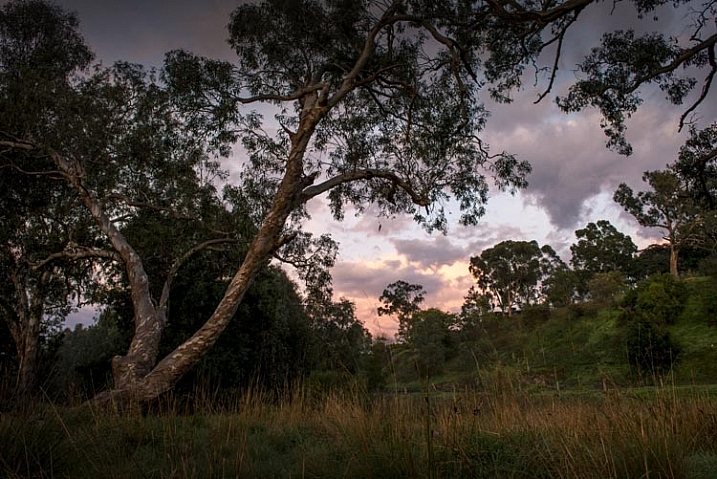
    Knowing that a storm is coming, then being able to get to a good location quickly, is an advantage when you photograph near where you live.

    What would you recommend to a visitor

    If another photographer was coming to your area and wanted to know places to go, what would you recommend? Think about what someone else might be interested in, that is a way you can photograph it. Try to look at your area from another point of view.

    How to find something to shoot

    There has to be something unique or different about where you are located. Look at the history of your town or area. See if you can find out about an event that happened where you can visit the place. Use the history as your motivation for photography. Google the area around you, and see what you can find.

    Think about interesting buildings, ones that are abandoned or still in use. There may be some interesting landmarks that can help tell a story. Perhaps there was an industry there that no longer exists.

    For example, suppose in your area the local hospital started as a home for incurables. Then the land was given to the city for a permanent hospital. How has that hospital shaped the town? Is the original hospital still there? Has the hospital gone, but now something else is in its place?

    There is always the possibility that nothing has ever happened. Maybe your location is devoid of that, and in which case you could photograph the normality of it. What makes it boring? What does the main street look like? Is there anything interesting there at all? There will always be something.

    leanne-cole-photographing-home-001

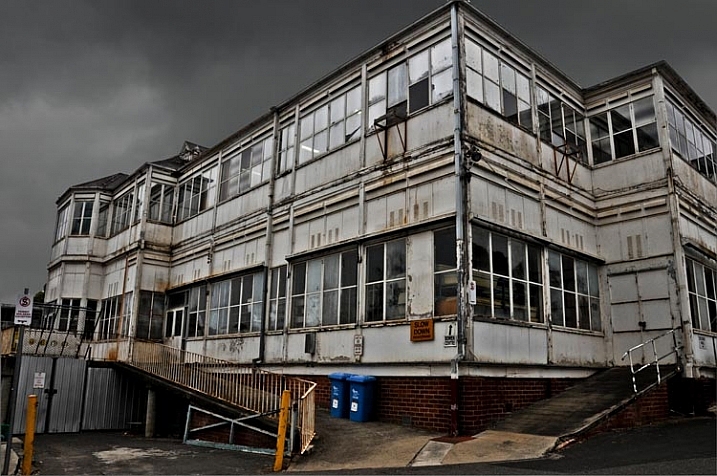
    An older part of the Austin Hospital in Heidelberg.

    How far are you willing to travel?

    Mark a circle on a map of where you would be willing to travel to in a day. For instance, you might be prepared to travel at least two hours to get somewhere. Perhaps time isn’t on your side, and you can only travel 15 minutes in any direction. That becomes your zone, and the area you are going to photograph.

    My area is two hours, or around that. I will travel somewhere for the day and take photos. I will go back to the same areas. There is a lot that is within that area near where I live.

    Find the story

    Perhaps instead of finding individual images of the place you might be better off trying to do a whole story on it. Find the story of the area. What makes it important to the people who live there? Why have they stayed? Why do you live there?

    The answers to all these questions will help you find the story, and can inform your photography.

    leanne-cole-photographing-home-002

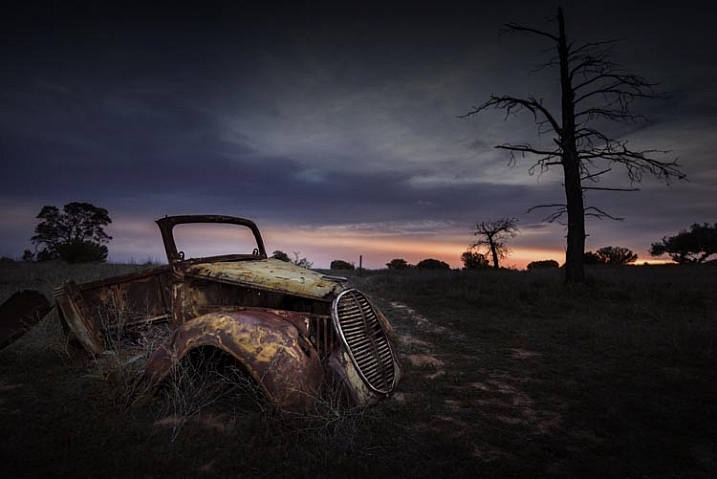
    An old car left to rust in the Mallee.

    Advantages

    When you photograph where you live, you have nothing but all the advantages:

    1 – You can take photos at the best time of day

    One definite advantage you have over visitors to your area, is that you can work out when the best time to photograph that spot. Then, you can go back as many times as you need.

    If it is very close, you can get up early and see if it is worthwhile going there for a sunrise. Perhaps in the afternoon you can see if there are clouds in the sky, which might make it a good opportunity to get a sunset. You will be able to look out the window and figure out when you want to go.

    Most people have to hope that the one time they go, the conditions will be perfect for what they want to photograph. You know how often that happens.

    leanne-cole-photographing-home-003

    Getting sunrises is easier when you can wake up and go down the road to capture it.

    2 – Experiment with different techniques

    You can try a lot different techniques to take photos. You can go home and see what you have, then go back and experiment with other angles or conditions another time. You can try more experimental types of photography, that other people who only have one opportunity to go there, might not want to try.

    Every time you go, try to shoot it that spot a different way.

    leanne-cole-photographing-home-004

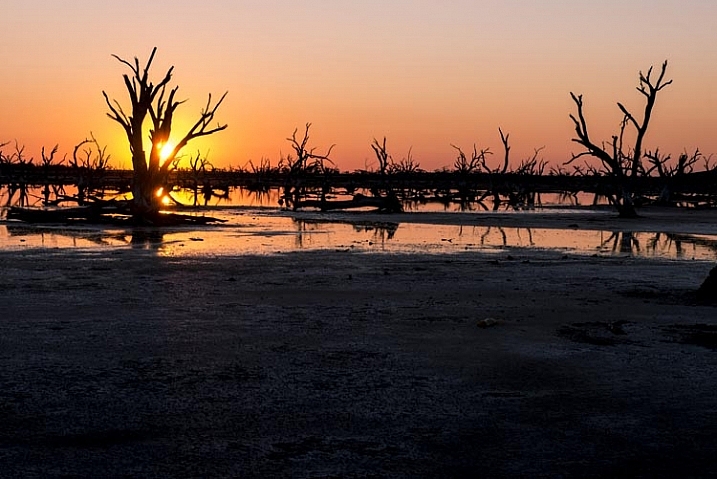
    Sunset over a salt pan in the Mallee. Being able to get back to the same spot to get the best photos is a bonus.

    3 – Visiting the location multiple times

    How often have you gone somewhere, put your photos on the computer when you got home and thought, “I wish I had noticed that tree” or something else on the side of the image? Maybe you wished you could have taken it at a different angle.

    If you live there, that will never be a problem for you again. You can visit that spot as many times as you like, to get exactly the photos that you want.

    leanne-cole-photographing-home-005

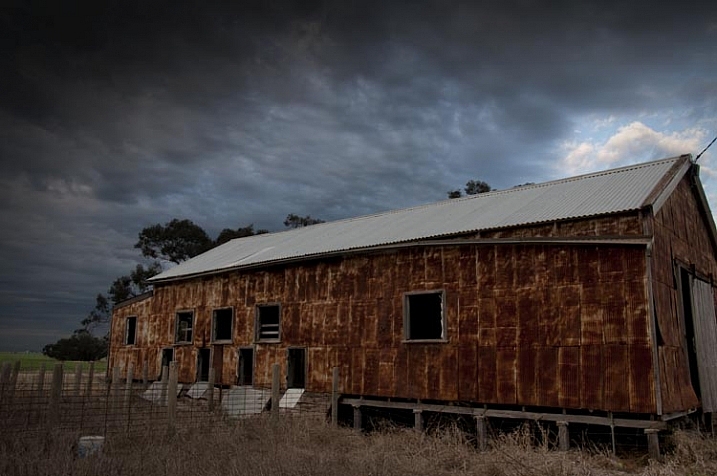
    Old towns can have great buildings that have just been left, like an old shearing shed make from kerosene tins.

    4 – Have access to local knowledge

    Visiting any places where you might only go once, you have to be content with information from the internet, or with what you see when you get there. However, when you live in an area, you can talk to people you know, who may be able to introduce you to others. If they know you are interested in the local area and taking photos, then you might find people coming to you, to tell you about places that you didn’t know existed.

    Disadvantages

    Are there really any disadvantages? Perhaps the fact that you aren’t going anywhere exotic to take photos, unless you already live somewhere like that.

    When you decide to photograph the area you live in, you get all the advantages that so many others don’t have for that place. It is up to you to make the most of it. Some examples:

    A Mallee Town of not much consequence

    Take a small town in North West Victoria (Australia) where my mother lives. I go up there to visit all the time. According to the locals there is nothing there. But when I drive around, I see shops that are now empty, or a train station that has closed, and stopped being used many years ago. There are things that give hints to a time past, that was industrious. The town had a past where it was bigger, where those stores were open for business.

    It would be easy to agree with the locals that there is nothing there, but that would be a mistake. The story is there in those closed buildings and what is left of the town. As a photographer you can then show what is happening there.

    leanne-cole-photographing-home-007

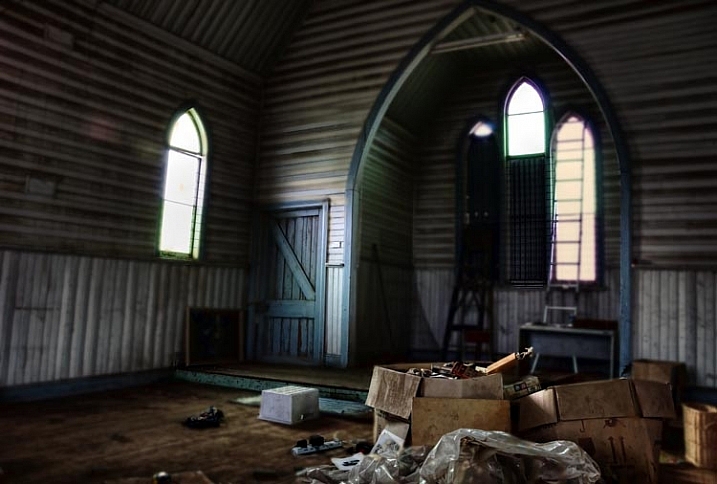
    Getting to know locals in towns can give you access to buildings, like this old church in a Mallee town.

    Finding the history of where you live

    For many years I always travelled to other places, in the city, or in the state of Victoria, to take photos because I was convinced that what was around me was boring. Who would be interested in what’s here?

    I started to realize that this area has a rich art history. Some famous Australian artists have painted this area, and perhaps that was where I needed to start looking. Once I started looking with different eyes, a lot of new places started to open up to me. This area has some great parks. It is quite old so there are ancient homes, hospitals, cemeteries. Now I photograph it all the time.

    leanne-cole-photographing-home-006

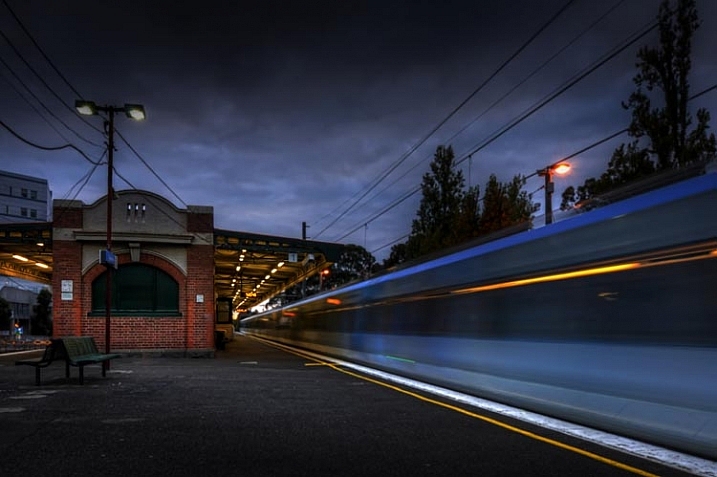
    Knowing the local train station and timetable, can be great for getting to the station at a good time to take photos.

    When you photograph somewhere you live or a place you travel to often, you really get so many wonderful opportunities.

    Many photographers dream of travelling to other places and photographing the world, but sometimes your best subject is right outside your door or within a stone’s throw of where you live. You just need to get out there and see what you can find.

    Please share your local photography finds and your images in the comments below.

    googletag.cmd.push(function() {
    tablet_slots.push( googletag.defineSlot( “/1005424/_dPSv4_tab-all-article-bottom_(300×250)”, [300, 250], “pb-ad-78623” ).addService( googletag.pubads() ) ); } );

    googletag.cmd.push(function() {
    mobile_slots.push( googletag.defineSlot( “/1005424/_dPSv4_mob-all-article-bottom_(300×250)”, [300, 250], “pb-ad-78158” ).addService( googletag.pubads() ) ); } );

    The post How to Find Inspiration Photographing Locations Near Home by Leanne Cole appeared first on Digital Photography School.


    Digital Photography School

  • 3 Reasons to Have Your Own Portrait Taken

    I teach a six-week class at Oklahoma State University called “Preparing Online Instructors” which is designed to give faculty who have never taught internet-based classes, a solid foundation upon which they can build a successful online course. The class is delivered mostly online, and structured much like any other: it has quizzes, homework assignments, and required online discussions. One of the goals for my class is to put college instructors in the role of a student, so they get to experience an online class firsthand. This gives them a better understanding of the needs and challenges that any normal college student might face when taking online classes.

    In the most recent offering of this POI course one of the participants, who is a tenured professor with decades of teaching experience under his belt, remarked at how strange it was to once again have homework and quizzes. “I haven’t taken a class like this in almost 30 years,” he said to me at the end of our third week, “And I think I finally understand why my students have so much trouble meeting due dates.” As photographers it’s essential that we take the same approach from time to time: put down our cameras and experience what it’s like to be on the other side for a change.

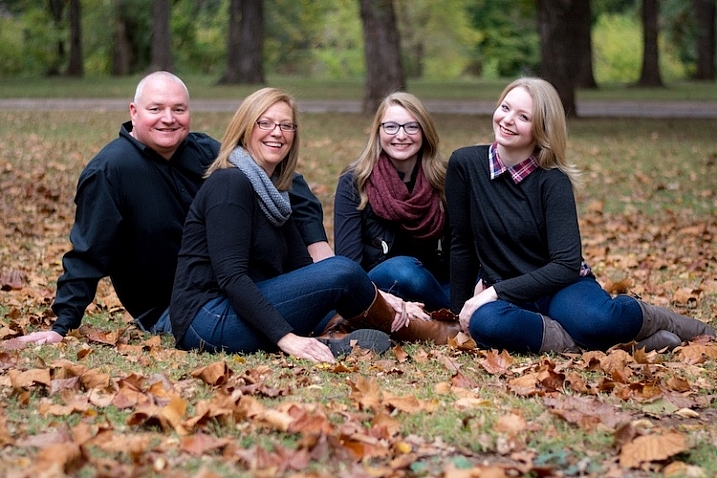
    have-your-photo-taken-family-leaves

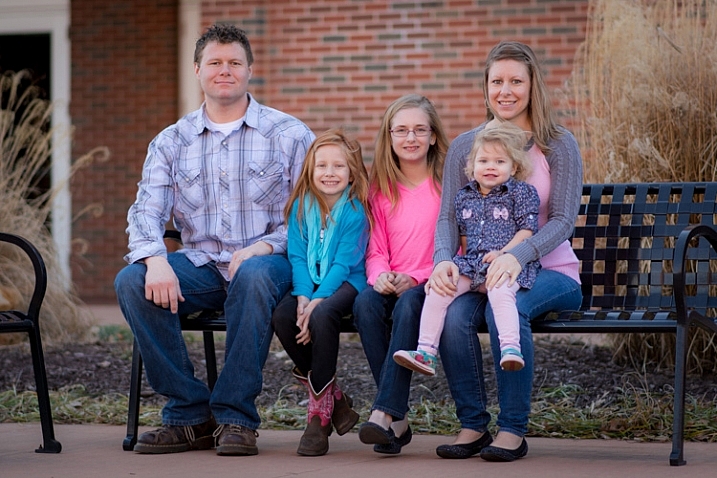
    A few weeks ago my wife and I had a friend of ours take some photos of our family, and it was a nice opportunity to remove my photographer’s hat, and just go along for the ride as a person being photographed. We had a fantastic time, and along the way I realized a few things that have not only helped me, but I believe would benefit you and many other photographers as well.

    #1 It helps you understand your clients’ perspective

    Most of the time we photographers see things from our own side, and when we go to a photography session we look at things that are important to us; lighting, backgrounds, props, camera gear, and so on. When our clients show up, we’re often in full photographer mode telling people what to do, where to look, how to pose, and generally asking them to meet our needs. Switching things around and allowing yourself to be photographed helps you see all these things in an entirely different perspective—one that could make all the difference in your own work.

    have-your-photo-taken-family-bench

    Having photos taken with my own kids gave me a whole new appreciation for what this family must have gone through before I took their pictures.

    When we went out to our recent family session I realized there was a whole lot going on behind the scenes before we even met up with our photographer, and even though I was aware of this intrinsically, I had never actually experienced it firsthand. My wife and I bought new shirts for ourselves and our two little boys, we all got haircuts, and there were all sorts of last-minute hassles from diaper changes to shoe switches. When we arrived on location with our photographer we were frazzled, our boys were anxious, and we desperately tried to keep all the clothes clean just long enough for some pictures that were bound for our Christmas card.

    have-your-photo-taken-baby-blanket

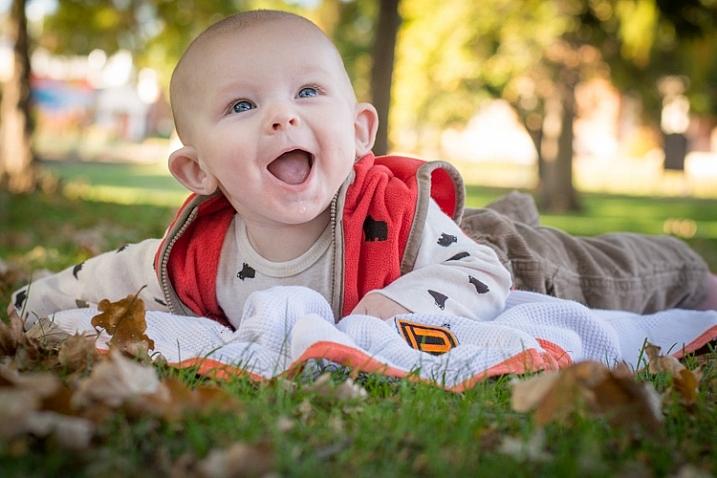
    Knowing what it took to get my own kids prepared for a photo session, I can only imagine what this baby’s parents must have gone through to get him ready.

    Normally when I take photos I don’t pause to consider everything my subjects may have gone through leading up to the shoot, and if people arrive late, or seem like they are not paying attention, I can get a little frustrated (though I try to never let it show). However, after putting myself in the role of a client, I have a new appreciation for just how hectic things can be, and have tried to loosen up much more ever since.

    If someone seems distracted, maybe there’s a good reason. If parents seem exasperated with their kids, maybe they spent hours before the shoot trying to get everyone to put on their nice clothes, or even, if there are toddlers, put on any clothes at all. There’s a lot going on in the lives of our clients, and if we don’t take time to be in that role ourselves from time to time, it can cause us to lose touch with reality and get stuck with photography tunnel vision. Even though it might seem counterintuitive to suggest that one of the best ways to improve as a photographer is to stop taking pictures and let yourself be photographed, I certainly found this to be the case for me.

    have-your-photo-taken-senior-hat

    Watching a photographer take pictures of my four-year-old helped give me new ideas for taking photos of high school seniors.

    It helps you understand other photographers’ perspective

    When I’m doing a photo session I’m often thinking about technical details; where the light is coming from, whether I will need to manipulate light with reflectors or strobes, what exposure settings will produce the results I want, and so on. I, of course, make sure to smile and interact with my subjects too, and all this makes for a tricky combination. Having my own photos taken helped me understand all this much more than I ever have before, and has helped me see my own role as a photographer in a new way.

    have-your-photo-taken-baby-basket

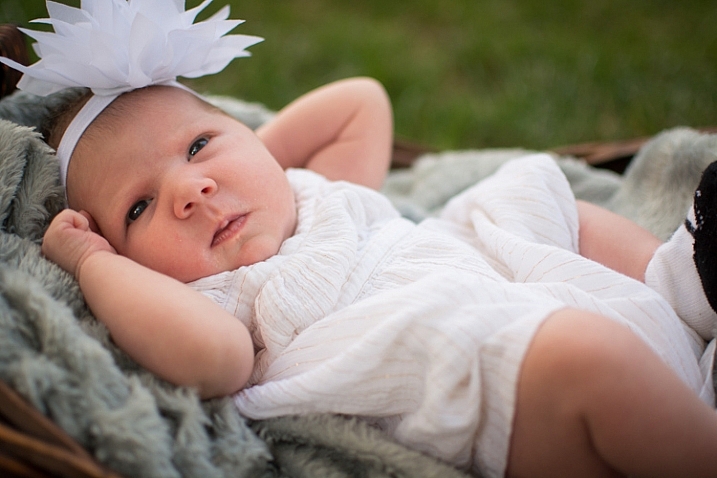
    The woman who took our pictures was a consummate professional. She was friendly, she spent time with our kids, she suggested fun poses but gave us plenty of leeway to have our own input, and she even brought her own daughter to help get our kids to smile. I honestly don’t know how she did all this, because we spent much of the session coralling our boys who were more interested in getting their new jeans dirty, than having their pictures taken (although she did get plenty of fun candid shots when that happened).

    Being on the other side of the lens helped me have a new understanding of what a good photographer needs to do in order for a session to go smoothly, and helped me see some glaring flaws in my own technique that need to be addressed. I learned from our session that I need to be more patient, while also being more confident. I appreciated when our photographer told us where to go, what to do, how to pose, and do other sorts of things that I sometimes have trouble saying. I wanted our photographer to take charge, and that’s precisely what she did. She walked a good line between friendly and firm, while also paying attention to the setting and the the technical aspects of her camera gear.

    It’s one thing to experience this from your own perspective, but letting your guard down and allowing yourself to be photographed can help you not just appreciate the role of photographer but find ways to improve your own skills.

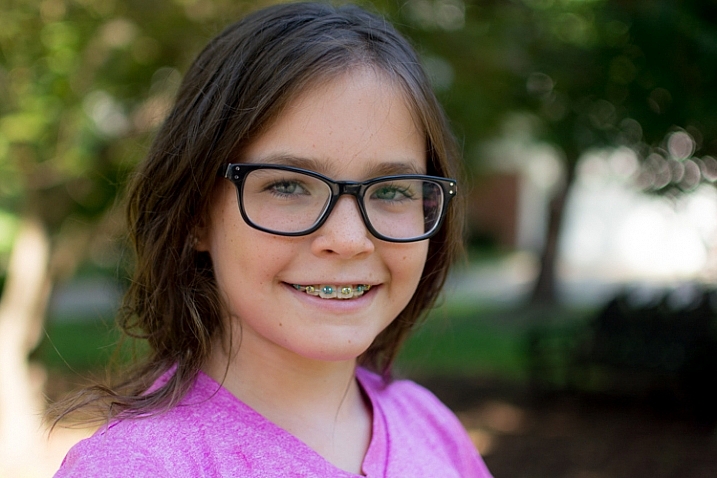
    have-your-photo-taken-fourth-grader

    It gives you new ideas for photographs

    Like any good photographer I like to study the work of others, from portrait artists like DaVinci and Rembrandt, to the landscapes of Ansel Adams and modern masters like Steve McCurry. Learning from other practitioners is one of the best ways you can grow. Even just browsing through Instagram or Flickr often helps inspire me, and give me new ideas for my own photography. But nothing was quite like getting our own pictures taken by a professional photographer.

    We had our photo session at a park on the south side of town that is one of my favorite places to shoot. I know what I like in terms of setting, lighting, and background, and while I am quite pleased with the images I bring back from my own shoots I was surprised at what our photographer was able to get from the exact same location. She had vastly different ideas for our pictures than I would have ever come up with on my own, and seeing her go through the mental and physical process of creating our pictures gave me all sorts of new ideas for my own photography.

    I often get inspiration from other pictures, and enjoy watching tutorials online where people discuss how they got certain shots, but being part of the creative process as the subject instead of the photographer put all this in a whole new light. I came back from our session full of new ideas to try the next time I go there, or anywhere else, to take photos.

    have-your-photo-taken-high-school

    It’s kind of ironic that one of the best ways to improve as a photographer is to put down your camera and let someone else do all the work, but I am so glad I had this experience and wish I had done it a lot sooner. It’s not always easy or even possible to do this sort of thing. For example, if you are a wedding photographer but are already married, you probably won’t get to go through the experience of being the bride or groom being photographed. If there is a way, though, I highly recommend making it happen, and at the very least you should end up with some nice pictures of yourself and your family

    Just like some of the professors who take my class at OSU, I found myself learning so much more than I ever would have realized, simply by putting myself in someone else’s shoes.

    What about you—what are some things you have learned from being photographed? What are some of your favorite pictures that illustrate how you have grown? Leave your thoughts and any examples in the comments below.

    googletag.cmd.push(function() {
    tablet_slots.push( googletag.defineSlot( “/1005424/_dPSv4_tab-all-article-bottom_(300×250)”, [300, 250], “pb-ad-78623” ).addService( googletag.pubads() ) ); } );

    googletag.cmd.push(function() {
    mobile_slots.push( googletag.defineSlot( “/1005424/_dPSv4_mob-all-article-bottom_(300×250)”, [300, 250], “pb-ad-78158” ).addService( googletag.pubads() ) ); } );

    The post 3 Reasons to Have Your Own Portrait Taken by Simon Ringsmuth appeared first on Digital Photography School.


    Digital Photography School

  • Low-Key Lighting for Dramatic Portraits

    Becky-in-witch-outfit

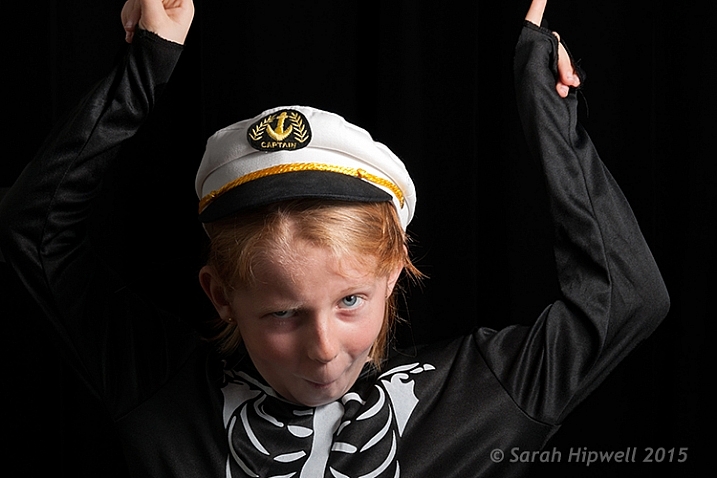
    Young girl dressed up for Halloween. Low-key portrait using one speedlight, against a typical black background.

    I dare say that nothing is quite like the effect of low-key lighting to show drama in an image. So what does low-key lighting mean in terms of photography? A good definition is found here.

    Low-key lighting often uses only one key light, optionally controlled with a fill light or a simple reflector.

    The term “low-key” is used in cinematography to refer to any scene with a high lighting ratio, especially if there is a predominance of shadowy areas. It tends to heighten the sense of alienation felt by the viewer, hence is commonly used in film noir and horror genres.

    To simplify the term further, low-key lighting focuses on the shadows by using usually one light source. Therefore, shadows are now the primary element of the composition.

    What you should know about low-key lighting

    The nice thing about low-key lighting is that it’s quite experimental. There are no hard and fast rules that you need to adhere to. You can vary the position, and the distance, of the one light source more to the front or side of the subject, depending on how much contrast you want your model to have. Or ask the subject to turn more into light source or away from it. Here are a few more guidelines:

    • A black seamless background is the classic low-key look.
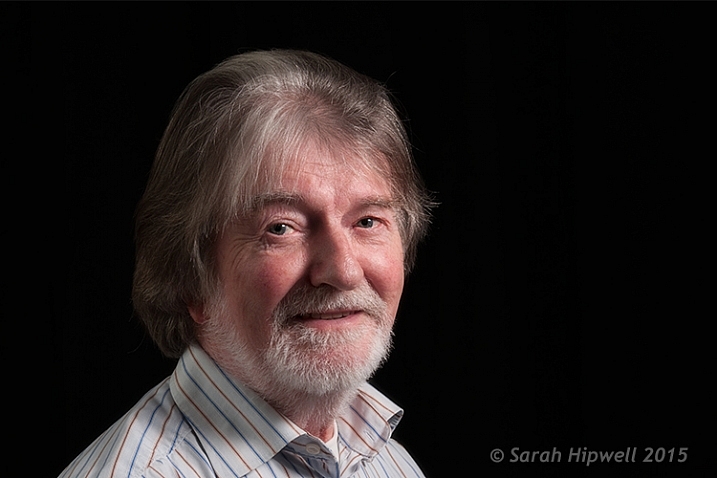
    • As this type of lighting is quite strong and contrasty, it’s probably suited for the very young, who in general have flawless skin and subjects (seniors 65+) where the emphasis is on the character of the person. For people who don’t have great skin, this type of lighting won’t be the most flattering.
    • You can move the light more to the front and use a reflector to control the light and act as a fill.
    • Creates drama and mystery to your portraits.
    • This type of lighting is probably not best to do wedding portraits!
    • Keep ISO low to 100/200 so that ambient light doesn’t reach the sensor. This will keep the quality of images high by reducing noise.
    • Set your flash to manual and start on a low setting of 1/8th power.
    • Use a small aperture setting of f/8 and upwards (f/11 and smaller).
    • Keep the shutter speed at 1/125 second or higher (not to exceed the native sync-speed of your camera).
    senior model low key lighting

    A senior model poses with his body turned more towards the light source to provide less extreme shadows while emphasizing the model’s facial character.

    Senior-model

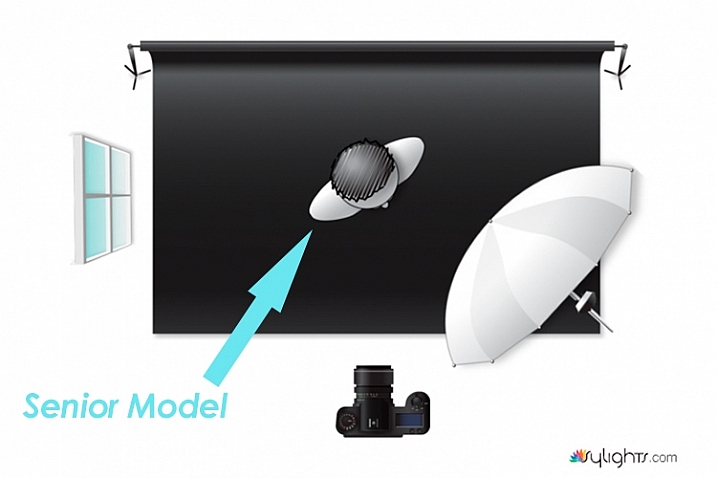
    Lighting diagram to show the position of the model in relation to the light source.

    Young girl low key photography in Halloween costume

    In this particular shot, I wanted more shadow on the model’s right side to give more drama to the shot.

    Lighting diagram low key photography

    Keeping the light source in the same position, I got the model to look directly at the camera.

    What’s involved in a low-key setup?

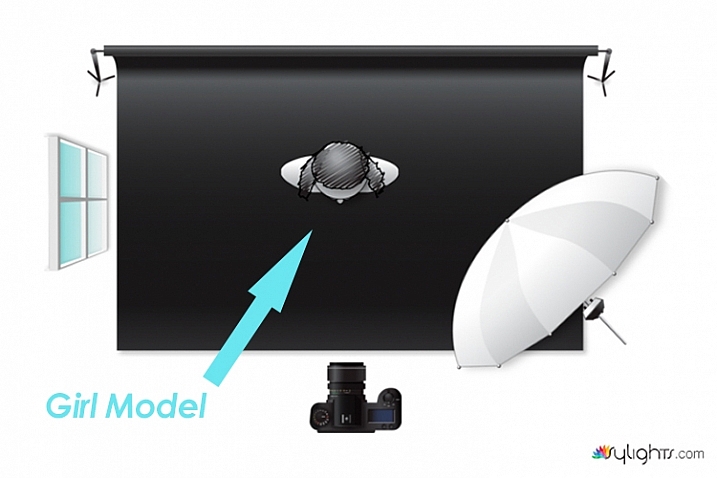
    You may be surprised, but this type of setup doesn’t require a proper studio. You can do a low-key portrait in a relatively small area, or anywhere in fact. This setup requires the minimal of gear:

    • A camera and lens (whatever lens is your choice for portraits)
    • One speedlight
    • One lightstand
    • One light modifier (a shoot through umbrella is a great and inexpensive modifier that acts like a softbox)
    • A subject or model, or willing participant
    • Preferably a black background. See my DIY solution below.

    Low-key low cost

    I am a great believer in practicing what I preach. So I came up with a DIY solution for shooting a low-key setup, using a black shower curtain, in your own home. It is inexpensive, and doesn’t require a lot of time to implement.

    First item was the black background

    • I sourced a black shower curtain for less than $ 10USD. Size L180, W180cm. It also comes with plastic rings. Don’t worry that the curtain doesn’t reach the floor. Remember, this is for portraits only. I already had a telescopic white shower rail.
    • 1 ½inch in diameter x 10ft. length of white PVC tubing will do equally well. It works out at $ 2.10 from Home Depot. I would cut this down to 8ft.
    • One pair of White Command Cord Clips that cost from $ 3 to $ 5. These clips have a self-adhesive backing and can stick to most surfaces. So they are easy to put up, and are also removable. They can hold up to 900g or 2 lbs.

    So that is your background sorted. The shower curtain, when taken out of the packaging, has obvious pleats. Don’t worry about these. This is easily sorted in post-production.

    As I really enjoyed using this DIY method. I have left the Cord Clips up on the wall in my kitchen. They are relatively discreet. I intend to use this setup again. It is so simple and a perfect solution if you can’t get to your studio, or if you don’t have one!

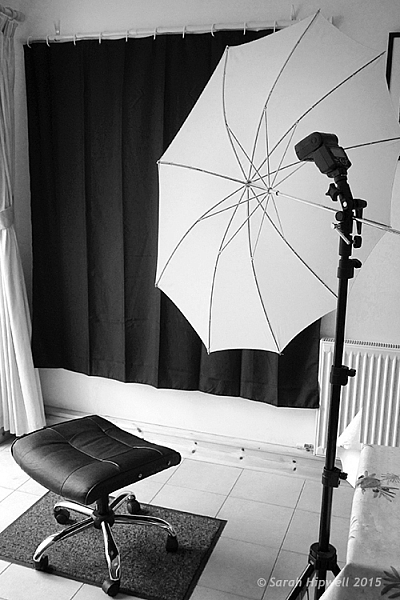
    Black-shower-curtain-setup

    A DIY low-key solution that you can set up at home.

    Post-production to get rid of pleats or wrinkles

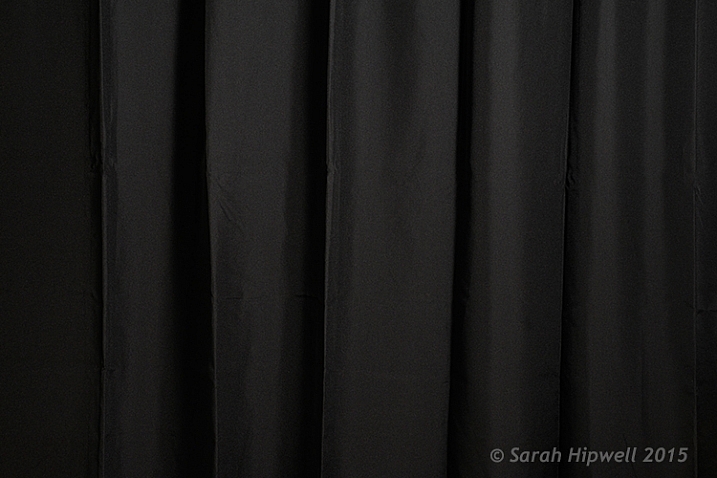
    You don’t want any light to hit the black background, this is called contamination. Plus you want the black background to be texture, and wrinkle free. In some of my shots, the pleats were a little obvious in the background.

    black-shower-curtain

    Black shower curtain with pleats visible.

    Getting rid of them was relatively easy. In Adobe Camera Raw (ACR), I adjusted the Shadows and Blacks sliders,
    until I had a wrinkle free black background. However, as this is a global adjustment, you may need to an Add Adjustment Brush to areas on the subject to bring back some detail.

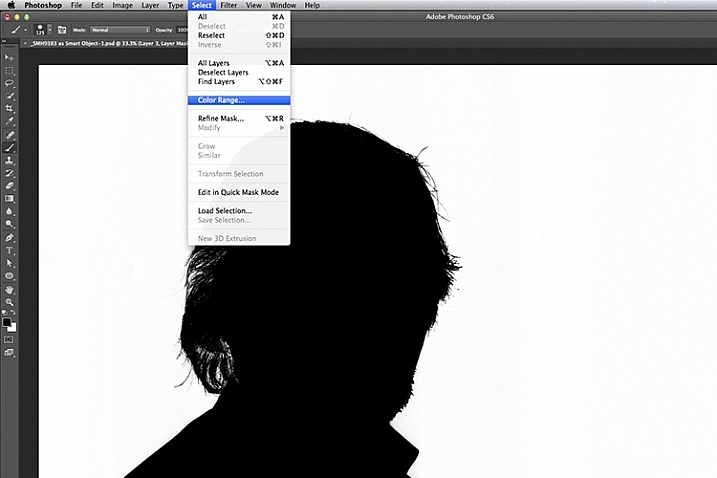
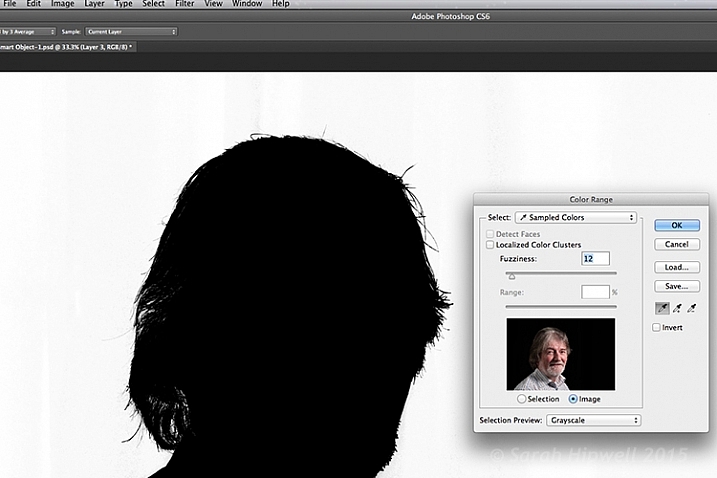
    Another alternative in Photoshop, is to apply a mask to isolate the subject. For the image of the senior man, I used Select>Color Range rather than using the Quick Selection tool or the Refine Mask tool. The Color Range is a color-based selection tool which was ideal in this case, as my subject was much lighter than the background making selection relatively easy. A few clicks on the background and I had a near perfect mask, except where the two eyes were. I applied the mask and filled in areas that were needed in black with the brush tool.

    color-range

    Choosing the Color Range under Select in Photoshop to create a mask.

    I then applied a Levels Adjustment layer, and moved the black slider ever so slightly to the right, until the background was completely black.

    color-range-dialog-box

    The Color Range dialog box.

    Of course shooting lo-key isn’t restricted to indoors, nor do you need a black background. You can achieve similar effects outside. Check out this great video on the topic of creating an invisible black background to portraits using the same techniques.

    Caution: You may possibly experience lots of fun shooting low-key! So let’s see your examples in the comments below.

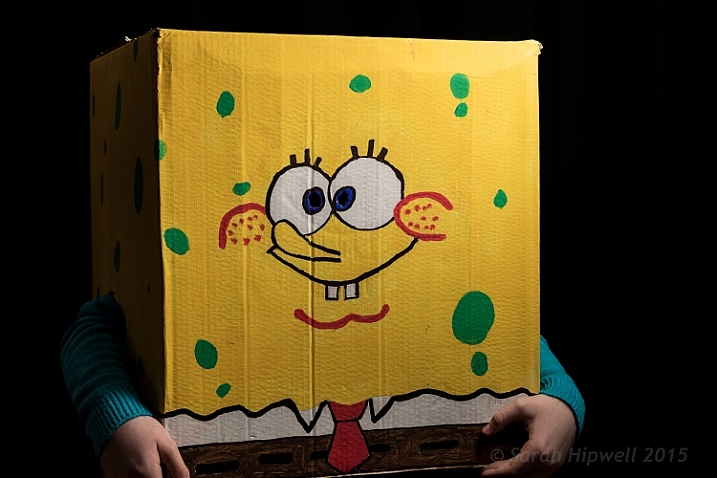
    Sponge-Bob-costume

    My daughter’s friend dressed for Halloween as Sponge Bob.

    googletag.cmd.push(function() {
    tablet_slots.push( googletag.defineSlot( “/1005424/_dPSv4_tab-all-article-bottom_(300×250)”, [300, 250], “pb-ad-78623” ).addService( googletag.pubads() ) ); } );

    googletag.cmd.push(function() {
    mobile_slots.push( googletag.defineSlot( “/1005424/_dPSv4_mob-all-article-bottom_(300×250)”, [300, 250], “pb-ad-78158” ).addService( googletag.pubads() ) ); } );

    The post Low-Key Lighting for Dramatic Portraits by Sarah Hipwell appeared first on Digital Photography School.


    Digital Photography School

  • 5 Holiday Photography Ideas to Shoot More and Get Less Stress

    Ahhh, the Holidays, that time of year when everyone is happy and feeling great. Tensions are low, everyone is totally relaxed, and since there’s so much copious free time, everyone wants to get their family pictures taken. Well, that statement might be a little bit off, but I have to say, I love shooting holiday pictures. Just in case the Continue Reading

    The post 5 Holiday Photography Ideas to Shoot More and Get Less Stress appeared first on Photodoto.


    Photodoto

  • Make it Snow with Pure Photoshop Actions Winter Wonderland Set

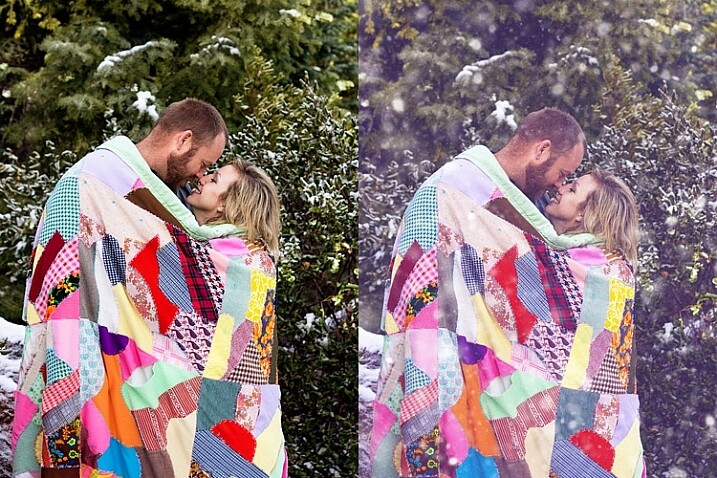
    winter-wonderland-action-1

    When it comes to post-processing, photographers definitely have opinions about Photoshop Action sets. Some photographers love them, others consider them cheating. For me personally, Actions are most valuable when they either (a) make the editing that I would do by hand more efficient and/or (b) offer something unique and fun that may be outside my normal editing style, but fits a particular session.

    In this case, the Winter Wonderland Action Set by Pure Photoshop Actions (available for Photoshop CS and above, and Elements 6-11 for $ 25 regular price) fits a bit of both those criteria. It’s not something that I use every day, but it really is a fun action set to have on hand during the winter months!

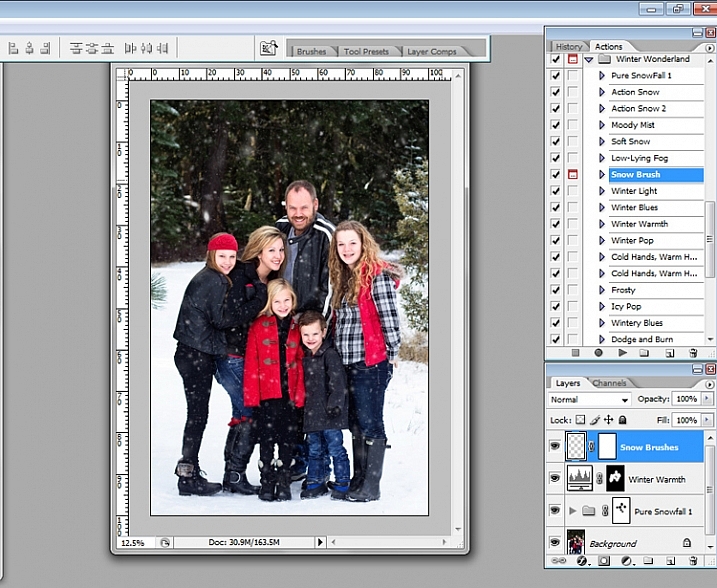
    Essentially, the Winter Wonderland Action Set allows you to add snow with one click during post-processing. It includes several different kinds of snow, fog, and mist that can add a little something extra to your winter images. It also offers some tints and adjustments that allow you to tweak the final images towards your normal style of editing, whether you lean towards natural and clean, or a faded vintage look.

    winter-wonderland-action-2

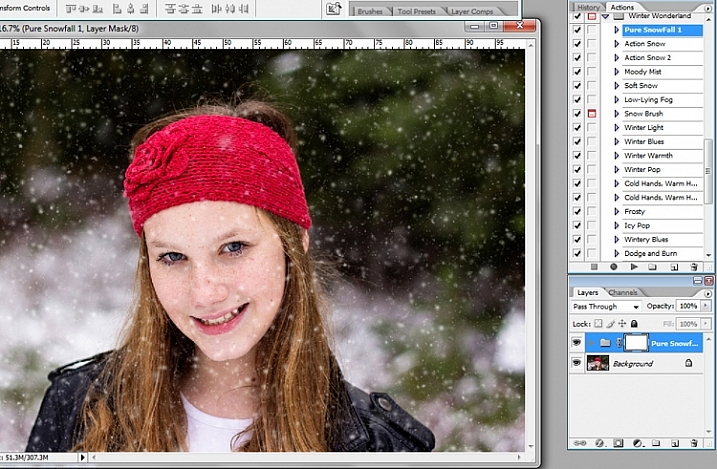
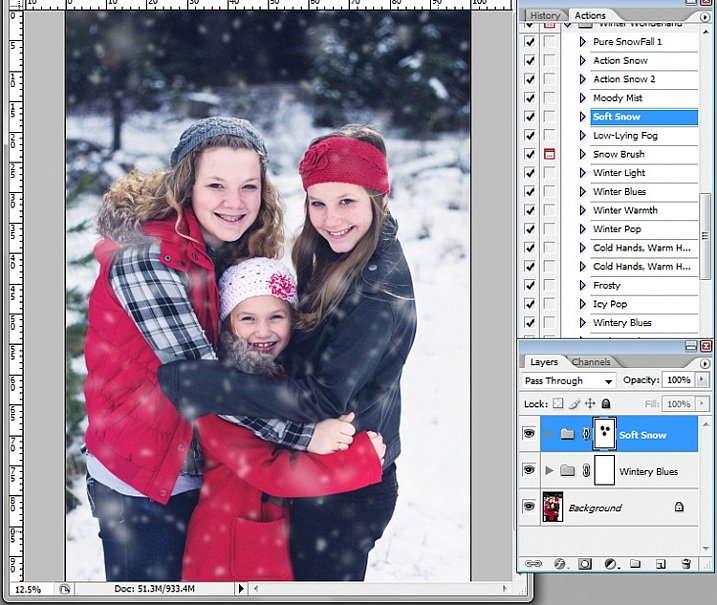
    The first thing that I should mention, right off the bat, is that some of these actions run very slowly. The “Pure Snowfall 1” action in particular always seems to take several minutes to run. On the other hand, the “Soft Snow” action runs quickly every time. That said, even with “Pure Snowfall 1” taking several minutes to run, it’s still much faster than adding in individual snowflakes by hand, so it’s a win in my book.

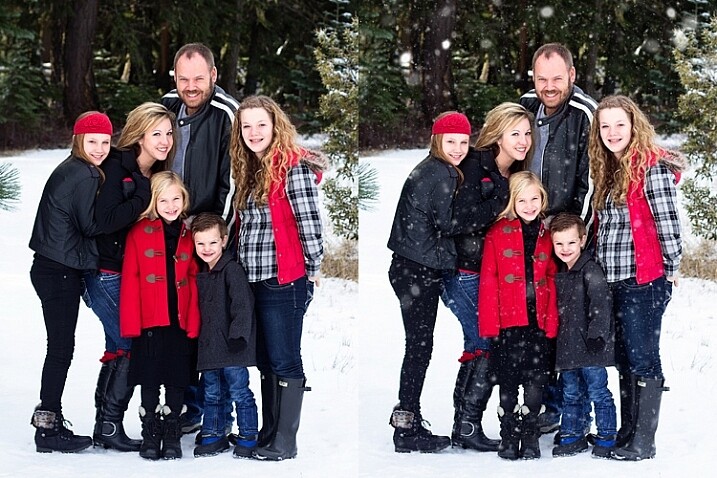
    Original image on the left, final image using PPA Winter Wonderland on the right.

    Original image on the left, final image using PPA Winter Wonderland on the right.

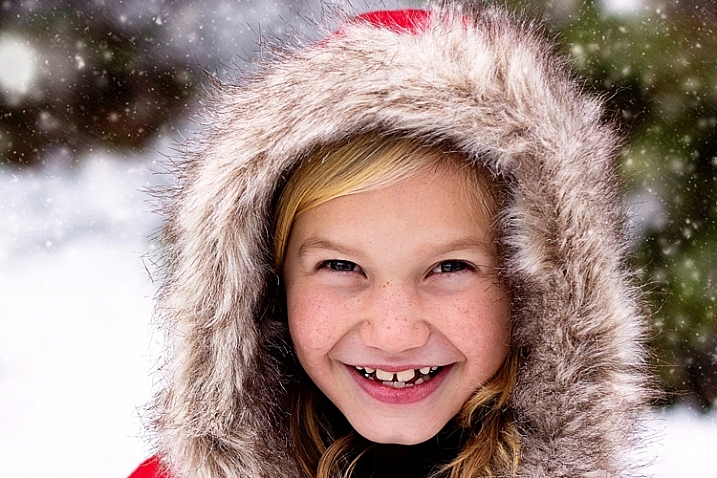
    As with most action sets, you should be prepared to tweak Winter Wonderland to fit your particular image. Winter Wonderland adds masks to most of the actions after they’ve run, and I find that I use them quite often. The most common tweak that I make to the Winter Wonderland set is to remove the added snowflakes from the subject’s eyes, nose, and mouth. I prefer the “snow” to look as natural as possible, so I do tend to leave the snowflakes around the hairline, and sometimes even on the cheeks.

    winter-wonderland-action-4

    The actions in this set tend to do a pretty good job of varying the size of the snowflakes in order to give a more realistic foreground and background, but there is also a snowflake brush included with the set, which allows you to pick the overall size of snowflake you want, and then scatters additional snowflakes in that size randomly over the image.

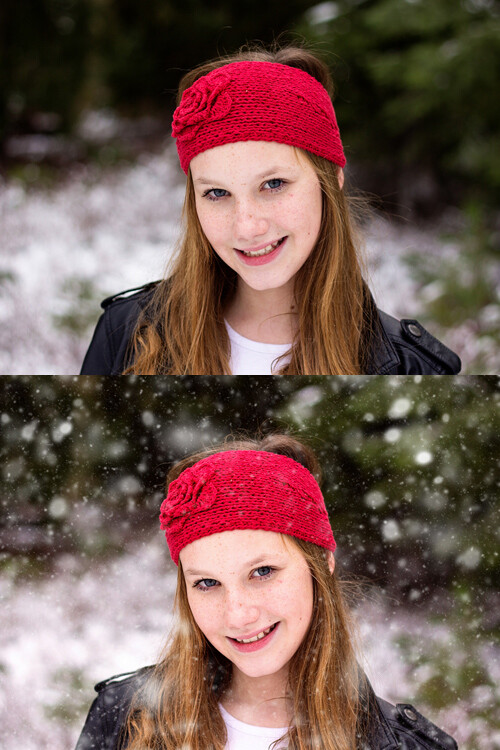
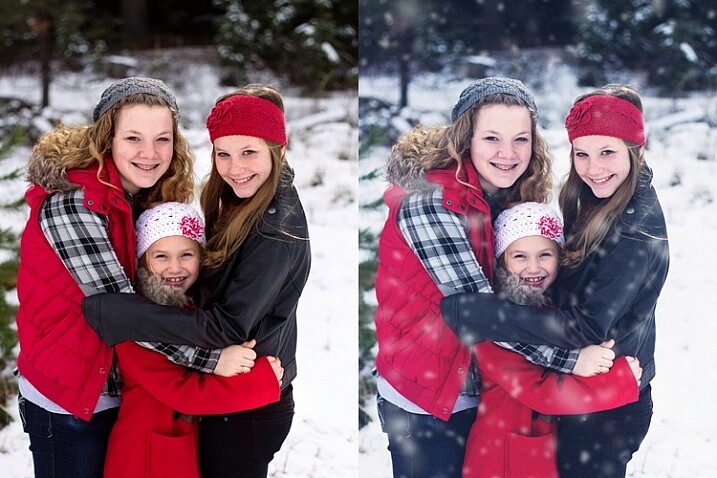
    Original image on top, final image edited with PPA Winter Wonderland on the bottom.

    Original image on top, final image edited with PPA Winter Wonderland on the bottom.

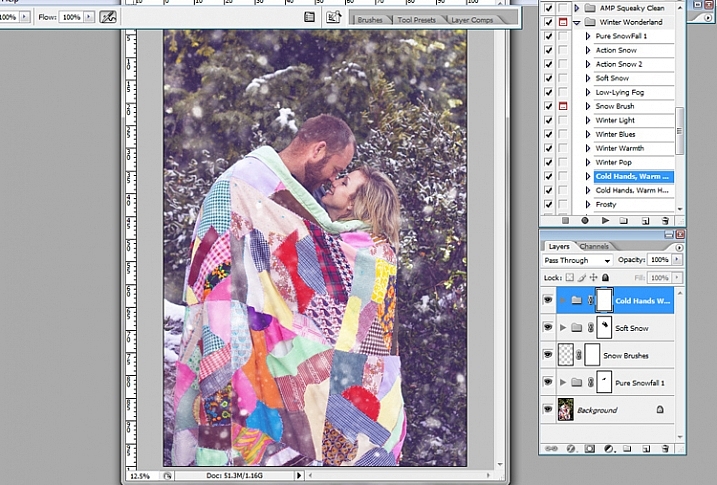
    My editing style tends to be pretty clean, so that is about where I usually stop with this action set. However, the set also includes a number of actions that allow you to achieve a subtle vintage feel to your final images, and I’ve also enjoyed testing those options out as well.

    winter-wonderland-action-6

    Original image on the left, final image edited with PPA Winter Wonderland on the right.

    Original image on the left, final image edited with PPA Winter Wonderland on the right.

    When I use the Winter Wonderland action set, my ultimate goal is that if I were to post the image on Facebook, the majority of my client pool would not readily be able to tell that the snow was added in post-processing. Of course, some of my photographer friends are likely to be familiar with this particular action set, and others may be familiar enough with Photoshop to know that something’s up, but my hope is to create images that look natural enough that they could easily pass as being real. So, in order to accomplish that goal, one of the key pieces is to only use images in which your model is dressed appropriately for snow, and there could feasibly actually be snow in that location.

    This particular set of images is my favorite set that I’ve ever edited with Winter Wonderland, and I think that’s due in large part to the fact that there was actually snow on the ground during our session. So, it’s not too much of a leap for a casual viewer to see snow on the ground, and find it feasible that snow could be falling at the same time. On the other hand, if I were to run this same action set on an image taken at sunset during the summer months, it would likely look ridiculous…which would really only work if you’re going for a super campy “Christmas in July” themed session.

    winter-wonderland-action-9

    winter-wonderland-action-10

    Original image on the left, final edited image with PPA Winter Wonderland on the right.

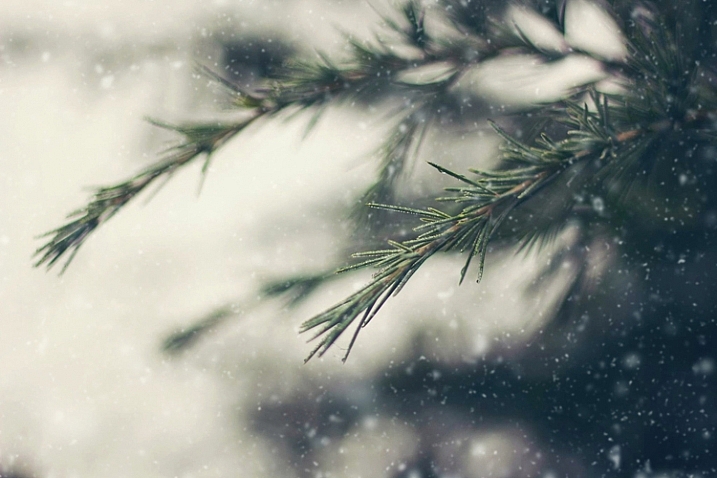
    Although I’ve seen Winter Wonderland marketed almost exclusively towards photographers doing portraits or family photography, don’t underestimate this set for landscape and nature images as well. As long as the content, and coloring of your landscape or nature image, would be appropriate for a photograph taken in the winter, there’s no reason not to give it a try!

    winter-wonderland-action-8

    Just for the record, I purchased the Winter Wonderland Action Set on my own, and Pure Photoshop Actions has no idea that I’m writing this article. I have just enjoyed the Winter Wonderland set quite a bit, and thought that it was worth sharing (and reasonable price at $ 25) as we head into the winter months in the northern hemisphere.

    Have you tried the Winter Wonderland Action Set? If so, what did you think? If not, is there an image you’re eager to try it on?

    googletag.cmd.push(function() {
    tablet_slots.push( googletag.defineSlot( “/1005424/_dPSv4_tab-all-article-bottom_(300×250)”, [300, 250], “pb-ad-78623” ).addService( googletag.pubads() ) ); } );

    googletag.cmd.push(function() {
    mobile_slots.push( googletag.defineSlot( “/1005424/_dPSv4_mob-all-article-bottom_(300×250)”, [300, 250], “pb-ad-78158” ).addService( googletag.pubads() ) ); } );

    The post Make it Snow with Pure Photoshop Actions Winter Wonderland Set by Meredith Clark appeared first on Digital Photography School.


    Digital Photography School

  • How to Use Foreground to Create Depth in Your Images

    One of the biggest hurdles in photography is the fact that our majestic three-dimensional scene is rendered into a mere two-dimensional image, and the physical depth that we experience in real life is lost. To resurrect this spacious feeling, we can create the illusion of depth where there is none, by using strong elements in the foreground.

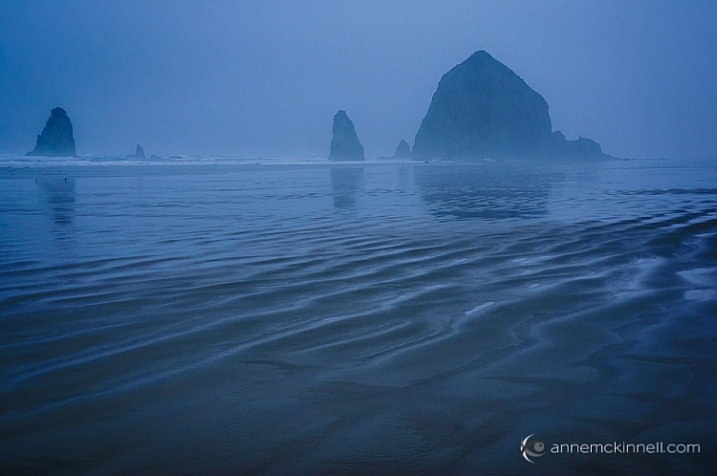
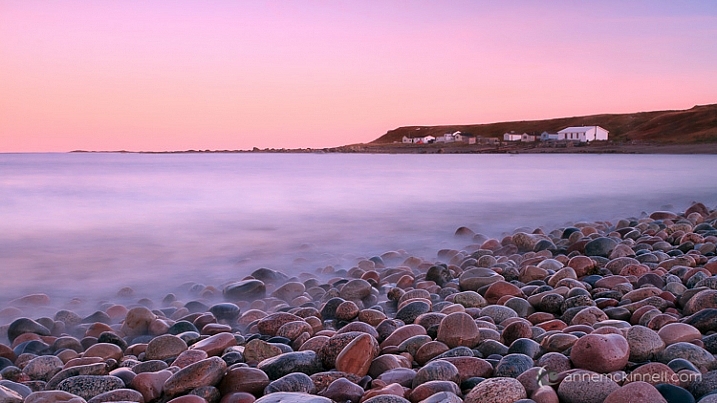
    Cannon Beach, Oregon, by Anne McKinnell

    When we make a photograph, our natural urge is to get a clear shot of the main subject, without other objects getting between it and the lens. That’s exactly what makes foreground elements so powerful though – they’re unexpected, and sometimes even counter-intuitive. Like any other compositional element, they create shapes, lines, and patterns that lead the viewer’s eye through the image and can be used to enhance its visual impact.

    What is the foreground?

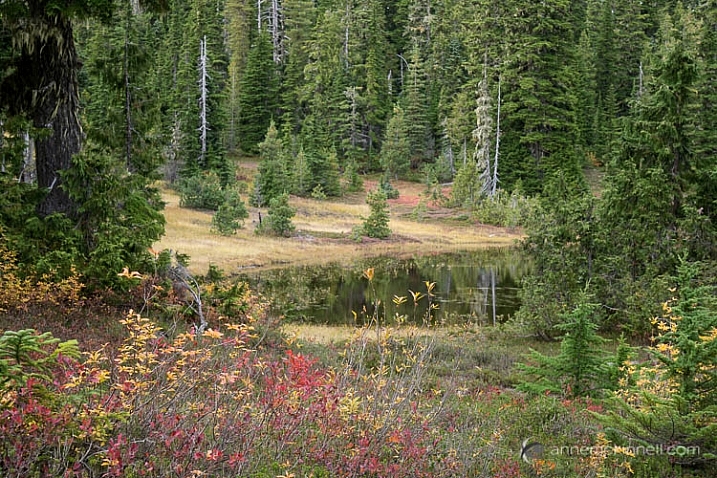
    When you are working with a grand vista landscape scene, you can often divide it into three sections: the foreground, mid-ground, and background. For example, the scene below contains some colorful shrubs in the foreground, a pond in the mid-ground, and trees in the background.

    Paradise Meadows by Anne McKinnell

    The foreground, mid-ground, and background areas are not at fixed distances, but are understood relative to each other. The foreground consists of anything that lies between you and your subject, which is typically considered to be in the mid-ground (but not always). The background is made up of everything behind the subject.

    You can think of a photograph like a stage: you have the upstage – that’s the background. It gives setting and context to what happens below it. Center stage is the mid-ground, where the bulk of the action takes place. But downstage – the foreground – is the closest to the audience, and therefore the most intimate part. It is capable of whispering to them and luring them into the action. It is the most easily seen and heard, and therefore understood, and can reveal the finer details of the story.

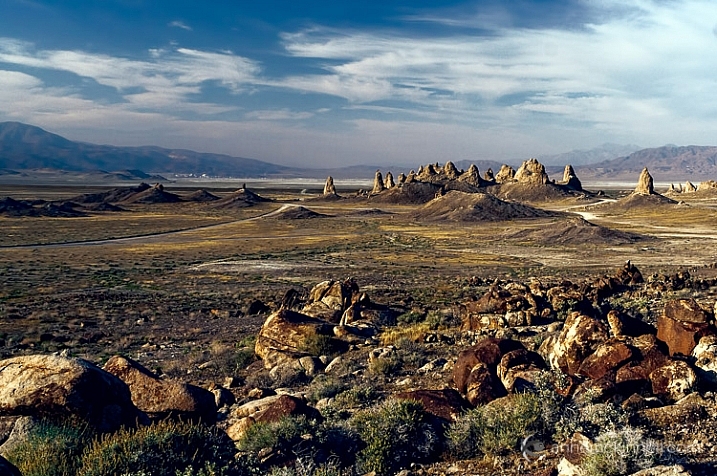
    Trona Pinnacles, California, by Anne McKinnell

    Not all photographs have three sections though, some just have a foreground and a background, and some have no depth at all.

    How is the foreground used?

    The foreground should contain some key point of interest, such as a human figure, a tree, a boat, some flowers, rocks, or anything else that is comparatively near to you. Composing in this way evokes depth, and gives your image the illusion of that missing third dimension.

    Green Point, Newfoundland, by Anne McKinnell

    When you’re composing a photo and you feel that it’s looking a little too flat, placing something in the foreground can instantly add a sense of depth. Exactly how this is done depends entirely on your subject, and on your own creative decisions. This can mean physically adding something to your scene, if you are able to. But most of the time, you’ll be looking for objects in the surrounding area that would make an interesting foreground, and changing your perspective – either by moving your camera higher, lower, or to one side – to incorporate those elements inside of the frame.

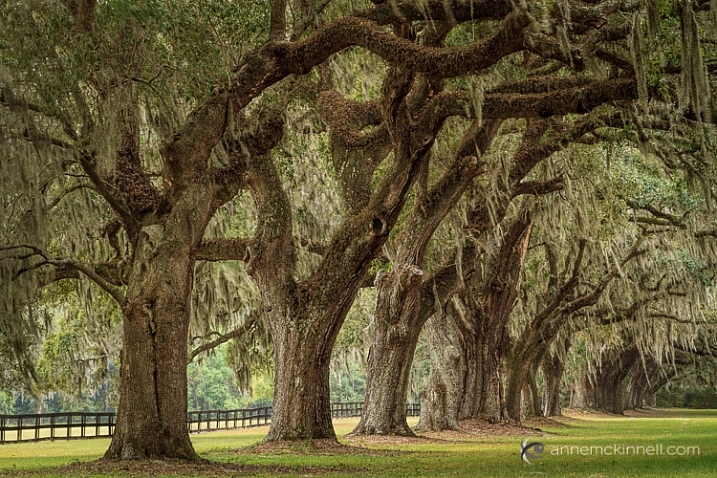
    For example, imagine a group of oak trees in a field, all standing in a row. If you photograph them head-on, they’ll all look more or less identical – their size, distance, and focus will be the same, and the composition will likely be a flat, static one. However, if you change your perspective and shoot them from one side, everything changes. One becomes closer, and therefore larger, while the others shrink in comparison. When a viewer sees this image, their eyes will immediately fall on the tree in the foreground first, and the implied line created by the row will pull their gaze inwards towards the other trees. Suddenly, the composition has depth!

    Boone Hall Plantation, South Carolina, by Anne McKinnelll

    Likewise, you could change your perspective by lowering your camera angle to incorporate rocks, flowers, or anything else that is on the ground, into your image. This use of foreground will provide a point for the viewer’s eye to enter the image, and any lines created in the foreground will direct their eye into the image.

    Like any other compositional element, the foreground is only helpful if it adds to the impact of the image. If it doesn’t help tell the story, or worse yet, if it distracts the eye, then it isn’t working as a benefit to your image. Your foreground should be an important part of the scene, and not something distracting. Look for things that point towards the focal point in some way.

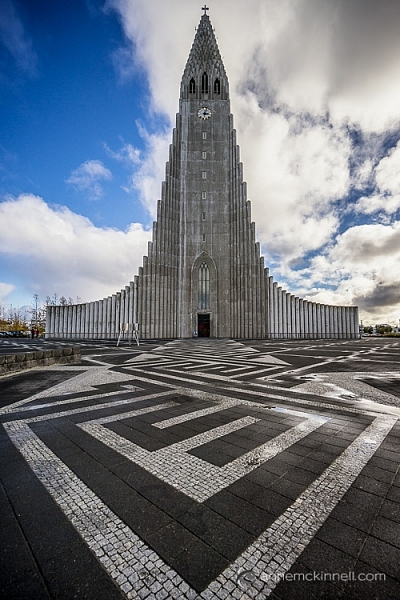
    Hallgrimskirkja, Reykjavik, Iceland, by Anne McKinnell

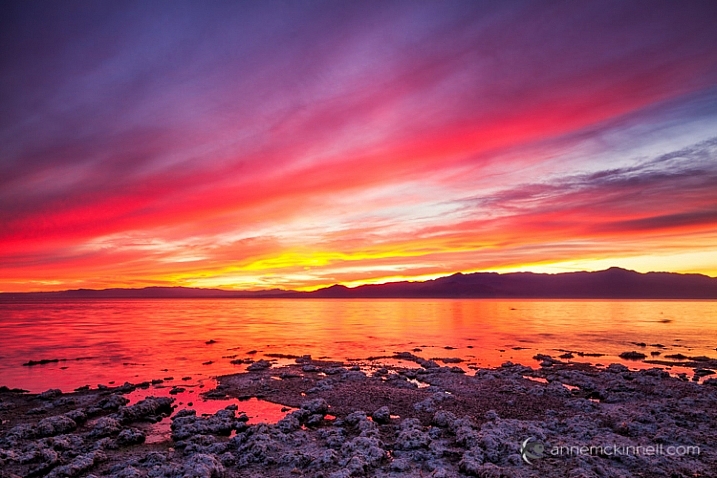
    Foreground elements can even be made of simple shapes and lines. In some cases, your foreground elements may be nothing but shapes and lines, like the paint on a stretch of road, the waves on the ocean’s shore, or the shadows cast across a wind-swept desert. Anything that forms a line towards your subject is especially effective. These are known as leading lines.

    Similarly, a wall that stretches into the picture from the foreground will carry the eye along with it. The corners of your frame are especially strong points, and anything that leads inwards from them will have a particular impact. Textures are another compositional tool that can make for an interesting foreground.

    Salton Sea, California, by Anne McKinnell

    Arranging your composition so that there are interesting elements in front of your main subject is a very effective compositional tool that can evoke depth, by giving your image the illusion of the missing third dimension.


    This week on dPS we’re featuring a series of articles about composition. Many different elements and ways to compose images for more impact. Check out the ones we’ve done so far:

    • Using Framing for More Effective Compositions
    • 7 Tips to Improve Your Skyline Photos
    • 33 Images that Exemplify Compositional Elements
    • Weekly Photography Challenge – Composition Craziness
    • How to Take Control of Aperture and Create Stronger Photos
    • How Cropping in Post-Production Can Improve Composition
    • Good Crop Bad Crop – How to Crop Portraits
    • How to use Focal Length and Background Compression to Enhance Your Photos

    googletag.cmd.push(function() {
    tablet_slots.push( googletag.defineSlot( “/1005424/_dPSv4_tab-all-article-bottom_(300×250)”, [300, 250], “pb-ad-78623” ).addService( googletag.pubads() ) ); } );

    googletag.cmd.push(function() {
    mobile_slots.push( googletag.defineSlot( “/1005424/_dPSv4_mob-all-article-bottom_(300×250)”, [300, 250], “pb-ad-78158” ).addService( googletag.pubads() ) ); } );

    The post How to Use Foreground to Create Depth in Your Images by Anne McKinnell appeared first on Digital Photography School.


    Digital Photography School

  • How to Photograph the Holidays: Download your Free Guide Today

    With the end of 2015 and the holiday period approaching, we know that many dPS readers find themselves with cameras in hand more than any other time of year.

    The holidays come with so many wonderful photographic opportunities – and we don’t want you to miss a single one!

    So we have a special gift for dPS newsletter subscribers…

    A free dPS mini-guide – How to Photograph the Holidays!

    Cover w flyouts

    This 15-page downloadable PDF guide is filled with 12 practical tips and a fantastic printable checklist. It’s all about helping you discover how to capture the magic of the holidays and create memorable images that you’ll cherish for years to come.

    A special thanks to our friends Lauren and Rob at Photography Concentrate for creating this download.

    It’s completely free for all our subscribers as a thank you for being a valued part of our community.

    To receive it, you can subscribe to our newsletter here. You’ll receive an email shortly after asking you to confirm your subscription, and on doing that, you’ll be taken to a page where you can download the guide and printable checklist.

    We hope you find this little gift as useful as we do and that it helps you capture the joy and fun of the holidays.

    googletag.cmd.push(function() {
    tablet_slots.push( googletag.defineSlot( “/1005424/_dPSv4_tab-all-article-bottom_(300×250)”, [300, 250], “pb-ad-78623” ).addService( googletag.pubads() ) ); } );

    googletag.cmd.push(function() {
    mobile_slots.push( googletag.defineSlot( “/1005424/_dPSv4_mob-all-article-bottom_(300×250)”, [300, 250], “pb-ad-78158” ).addService( googletag.pubads() ) ); } );

    The post How to Photograph the Holidays: Download your Free Guide Today by Darren Rowse appeared first on Digital Photography School.


    Digital Photography School

  • How to use Focal Length and Background Compression to Enhance Your Photos

    One of the most common uses for zoom lenses is, as their name suggests, to zoom in on objects that are far away. These lenses are fantastic for getting close-up views of nature, architecture, wildlife, or anything else that might be little more than a speck to the naked human eye.

    Some cameras like the Nikon Coolpix P900 let you get a close-up view of objects a few miles away. While this flexibility might seem like a rather tempting proposition for getting close to objects without physically moving yourself, there is another often-overlooked benefit of zoom lenses when taking portraits or other types of pictures with one clear subject in front of a vast spread of scenery – background compression. Understanding how this works, and how you can manipulate it, can transform your approach to portrait photography and give your pictures the type of visual boost that you might have always wanted, but never knew how to achieve.

    background-compression-senior-photo

    The basic idea with background compression is that you can take photos of something relatively close to you, such as a high school senior as shown in the image above, and bring elements of the background closer as well. This gives a more constrained feeling to the overall composition, and helps focus the viewer on your subject while not only bringing the background in, but often blurring it at the same time.

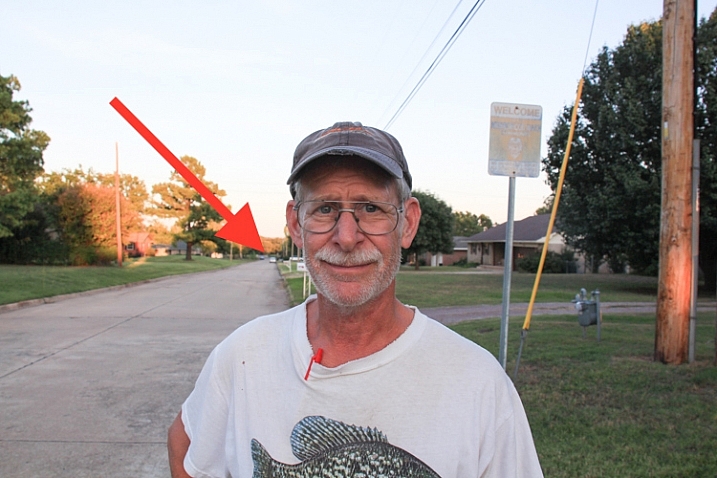
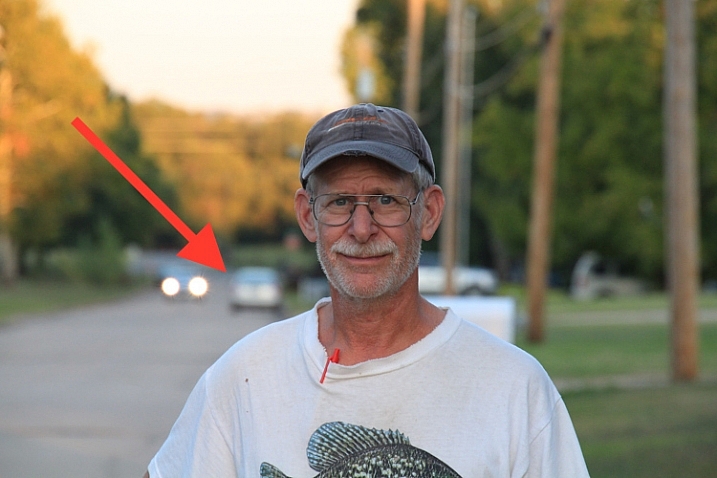
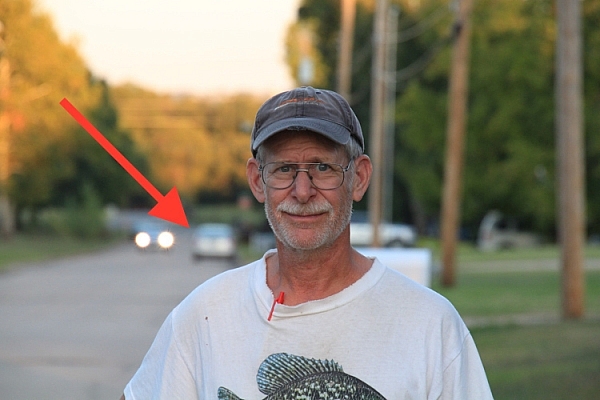
    As an illustration of how this works, here are several photos of my dad taken at different focal lengths. Notice how he is framed similarly in each shot, but the background changes dramatically as I adjust the zoom on my camera lens.

    18mm focal length, f/7.1, 1/80th of a second, ISO 100

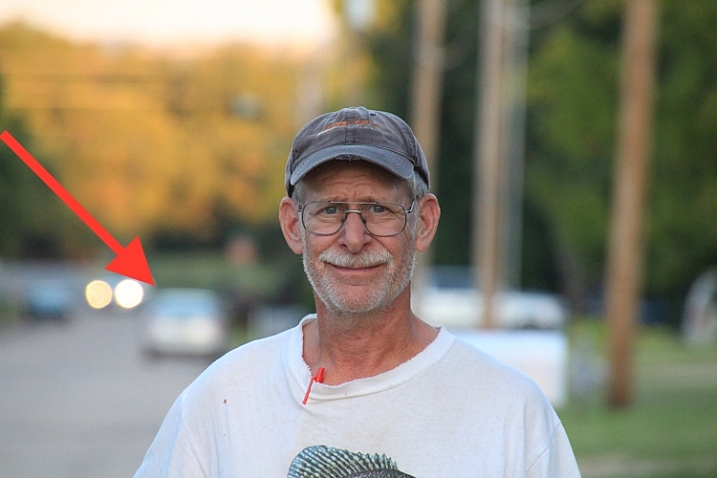
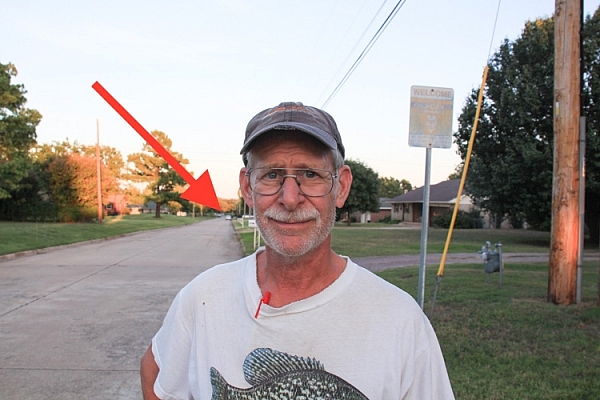
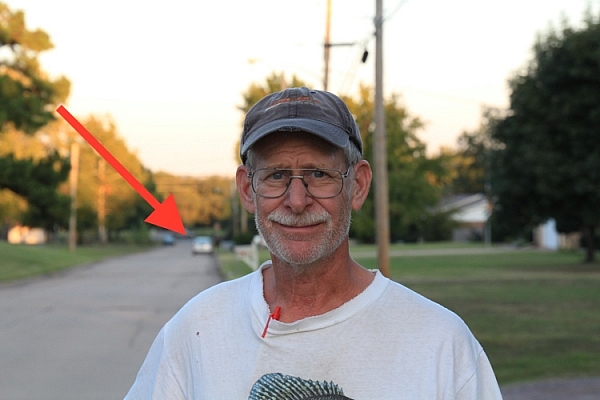
    I used an 18-270mm zoom lens to take these shots, and this first one (above) at 18mm shows my dad along with a massive background: utility poles, houses, trees, mailboxes, and all sorts of other elements make up the picture in addition to the subject. Take note of the car several hundred yards behind him, as indicated by the red arrow, and notice what happens as I change focal lengths, but keep my dad similarly framed.

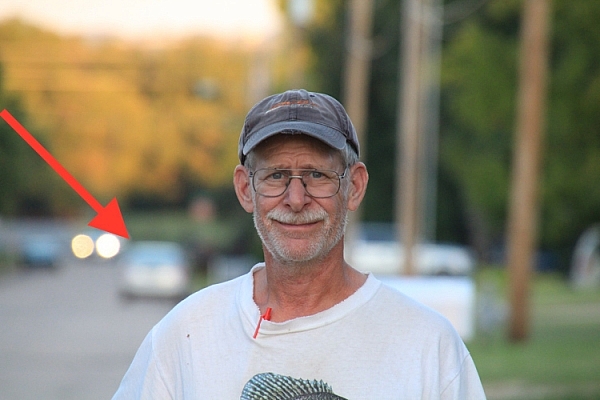
    18mm, f/7.1, 1/125 second, ISO 320

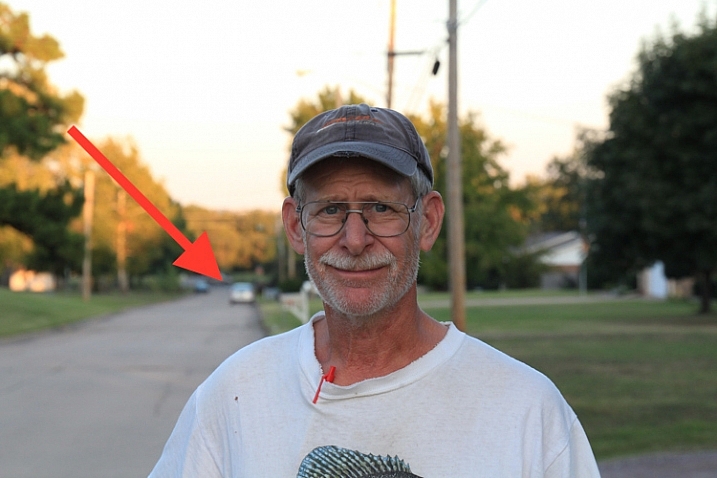
    70mm, f/7.1, 1/125 second, ISO 320

    Here you can already see several differences from the original image. The scene is now slightly claustrophobic with many of the elements along the perimeter of the original photo disappearing altogether. Mailboxes and utility poles have been brought closer, and notice how the same stationary automobile far in the distance has appeared to creep forward, and is now much larger. The background, in essence, is getting squeezed together or compressed.

    154mm, f/7.1, 1/250 second, ISO 800

    154mm, f/7.1, 1/250 second, ISO 800

    At 154mm the vehicle in the background seems significantly closer, and various other elements such as trees and utility poles are now filling almost the entire frame. As I zoom in, while keeping my dad consistently framed in the shot, even the distance between the individual utility poles seems to be shortened, which further enhances the overall feeling of compression. It’s not just that things appear closer, but that the distances between all the elements of the frame look much smaller as well. This can be a powerful, and extraordinarily useful way to compose a picture, and you don’t even need a fancy camera or lens to do it. Most pocket cameras have optical zooms that can be used to accomplish the same effect.

    270mm, f/7.1, 1/400 second, ISO 1600

    270mm, f/7.1, 1/400 second, ISO 1600

    In this final shot, the background elements virtually dominate the frame and almost overpower my subject. The vehicle just over his shoulder is about a quarter of a mile (0.4 km) away, though it appears as if it’s a mere stone’s throw behind him.

    Background compression can be a good or bad thing, depending on the type of picture you are taking. The key takeaway here is to know what it is, and how to utilize it to get the type of composition you are going for. The longer your focal length, the more you will be able to add this sense of compression to your background. But, it also helps if you have a great deal of distance between your subject and the elements behind it. If my dad were standing a few feet away from something, like a tree or a brick wall, there would be virtually no compression at all, even with a very long focal length.

    18mm, f/7.1, 1/80 second, ISO 100

    18mm lens

    18mm, f/7.1, 1/125 second, ISO 320

    70mm lens

    background-compression-dad-154mm-f71

    154mm lens

    background-compression-dad-270mm-f71

    270mm lens

    If the final example in the above series seems a bit extreme, here’s another set of images that show how background compression can be used effectively to enhance the overall composition, rather than overpower your subject.

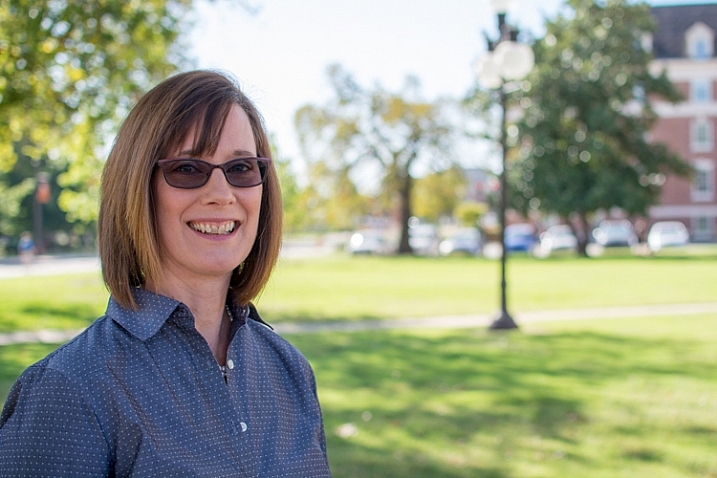
    35mm, f/2.8, 1/750 second, ISO 200

    35mm, f/2.8, 1/750 second, ISO 200

    This is a perfectly serviceable portrait, although I purposely left a bit too much space on the right-hand side in order to illustrate the compression concept. Shot at 35mm, with a wide aperture of f/2.8, the background is nice and blurry, the focus is clearly on the smiling woman, and the background is not too distracting or bothersome. However, re-taking the same picture with a longer focal length, leads to a much more pleasing picture all around.

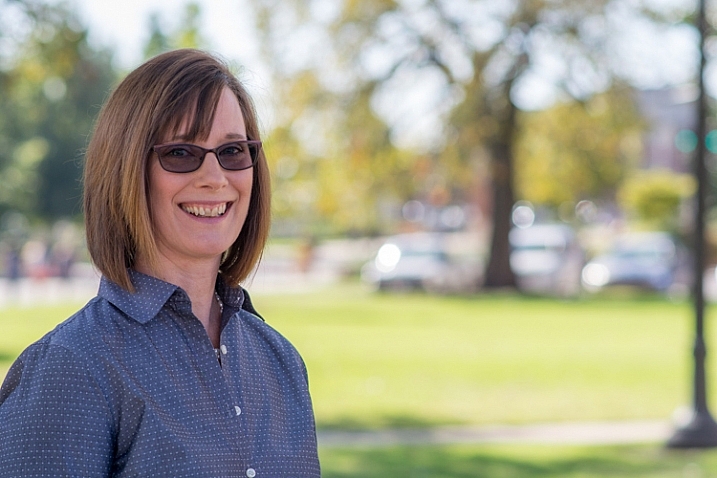
    85mm, f/2.8, 1/750 second, ISO 200

    85mm, f/2.8, 1/750 second, ISO 200

    The same compression shown in the first series of pictures is clearly evident here, though it is used to a much better overall effect. Even though the tree and cars create a background that is somewhat busy, shooting with a wide aperture blurred things out enough, that the focus is still clearly on the woman, while the background serves to add a bit of context to help put the overall composition in perspective.

    One final note about compression: it doesn’t just work for foreground elements too as you can see in the following pictures.

    35mm, f/11, 1/125 second, ISO 400

    35mm, f/11, 1/125 second, ISO 400

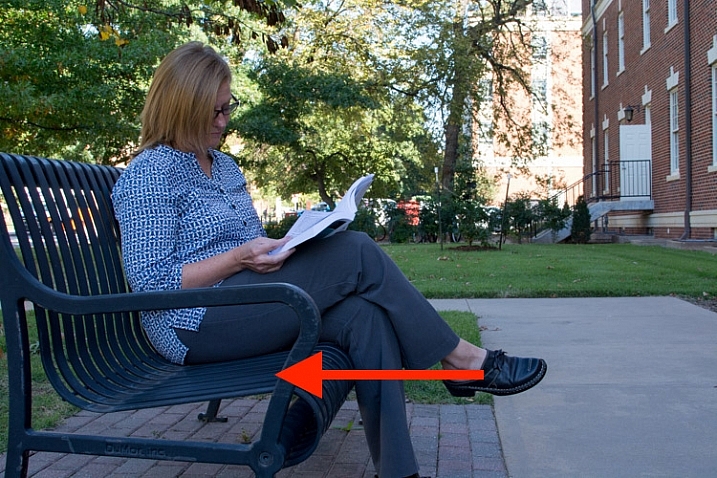
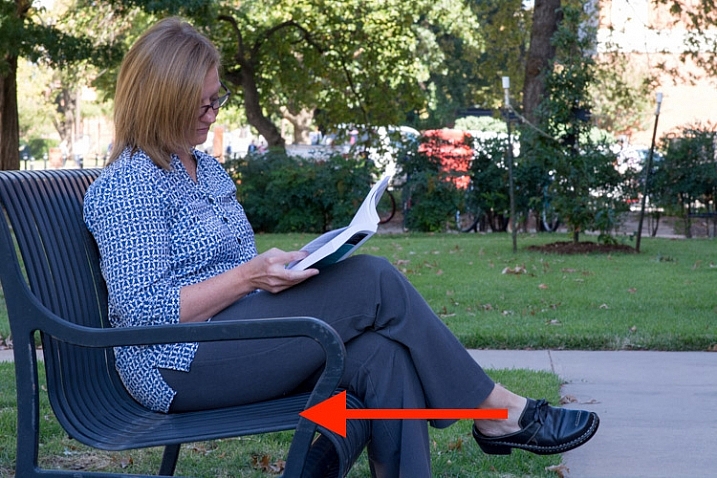
    I purposely shot this with a much smaller aperture in order to minimize the degree of background bokeh, lest compression be confused with blur. Notice how this woman is sitting squarely in the middle of the bench with plenty of room to her right, and about 50 yards (46 meters) between her, and the trees and cars in the background. Most of the picture is in focu,s which is a direct result of the small aperture.

    85mm, f/11, 1/90 second, ISO 400

    85mm, f/11, 1/90 second, ISO 400

    Here the foreground and background have both been brought nearer to the subject. The trees and cars behind her are much closer, while the bench appears to take up almost no room on the woman’s right side. It might as well be little more than a chair in this picture, and yet, this is merely an illusion created by using a longer focal length while keeping my subject framed appropriately. Most of the picture remains in focus due to the small aperture, and you can clearly see that background compression is not always synonymous with background blur.

    As one final example, here is the same woman, on the same bench, shot wide open at f/1.8 with my 85mm lens.

    85mm, f/1.8, 1/1000 second, ISO 400

    85mm, f/1.8, 1/1000 second, ISO 400

    The overall compositional elements remain the same in this final image as the two above, except that I moved myself physically closer to the subject, while shooting at a very wide aperture of f/1.8. The background is severely compressed, and quite blurry, which leads to a rather pleasing portrait.

    Background compression can be a bit tricky to understand, but if you play around with different focal lengths you should get the hang of it quickly. Then it’s just a matter of figuring out how to use it to your advantage to create the type of shot you want–especially when doing portraits.

    Have you tried using this technique in your own photography? What other tips do you have to share about creative uses for background and foreground compression? Leave your thoughts in the comments below, and feel free to share any example images you have as well.

    This week on dPS we’re featuring a series of articles about composition. Many different elements and ways to compose images for more impact. Check out the ones we’ve done so far:

    • Using Framing for More Effective Compositions
    • 7 Tips to Improve Your Skyline Photos
    • 33 Images that Exemplify Compositional Elements
    • Weekly Photography Challenge – Composition Craziness
    • How to Take Control of Aperture and Create Stronger Photos
    • How Cropping in Post-Production Can Improve Composition
    • Good Crop Bad Crop – How to Crop Portraits

    googletag.cmd.push(function() {
    tablet_slots.push( googletag.defineSlot( “/1005424/_dPSv4_tab-all-article-bottom_(300×250)”, [300, 250], “pb-ad-78623” ).addService( googletag.pubads() ) ); } );

    googletag.cmd.push(function() {
    mobile_slots.push( googletag.defineSlot( “/1005424/_dPSv4_mob-all-article-bottom_(300×250)”, [300, 250], “pb-ad-78158” ).addService( googletag.pubads() ) ); } );

    The post How to use Focal Length and Background Compression to Enhance Your Photos by Simon Ringsmuth appeared first on Digital Photography School.


    Digital Photography School

  • Sony A7RII Mirrorless Full Frame Camera Review

    Do you ever get the feeling you’re being played by the camera manufacturers? Sony appears to have no shame in regularly drip feeding its technology to consumers, eager for the next best thing in image quality.

    If you don’t mind your hot new camera becoming a dinosaur six months after you buy it, Sony is the camera brand for you. You see, Sony has been very crafty by releasing a wide range of new mirrorless cameras, in such a way that you’ll probably need more than one of them, if you want to avail yourself of their best features.

    The Sony A7RII Mirrorless Full Frame Body continues this money grabbing trend. The A7R was like the ultimate prototype, with a lot of usability problems, but it did produce gorgeous images. The next big hitter was the A7S with its amazing lowlight performance, and limited 4K video recording functionality (I say limited, because it cannot do internal 4K recording) .

    Enter the Sony A7RII – the next resolution monster from Sony.
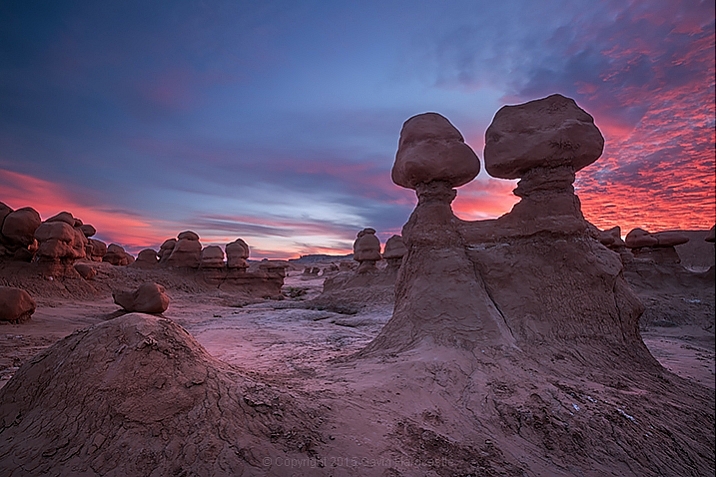
    Sony A7RII Review

    As you may know, I switched from Canon to the Sony A7R system as soon as it was launched, and overall I’m delighted with the results, even if the actual functionality of the camera can be painfully annoying at times.
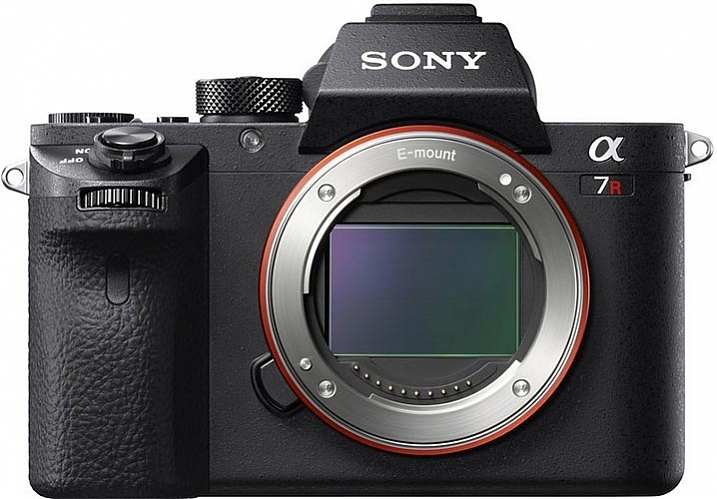
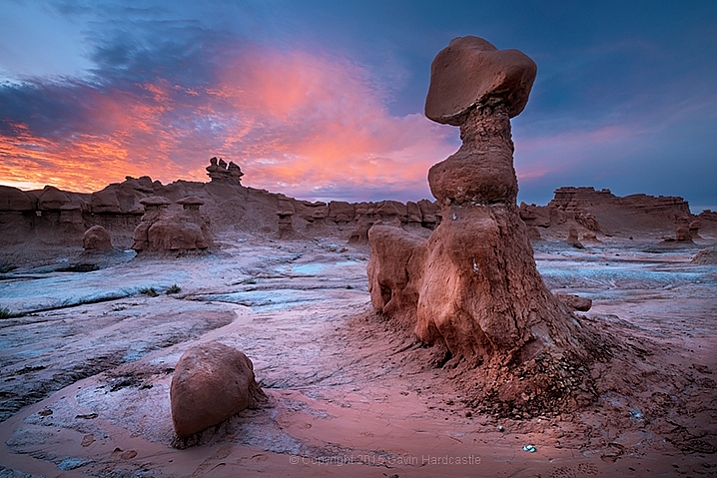
    Sony A7RII Review by Gavin Hardcastle

    Image courtesy of Sony

    For $ 4000 CDN ($ 3198 USD) the 42 Megapixel Sony A7RII packs a lot of firepower into a very small package, when you look at the specs. If your credit card is quivering in anticipation of buying this camera, there are a few things you might want to consider before throwing down your dollars.

    I’m going to approach the question of whether or not you should buy this camera based on the assumption that there are likely three types of buyer for this camera:

    1. Existing Sony A7R users considering the upgrade.
    2. DSLR users considering switching to the Dark Side.
    3. New camera buyers with no current investment in any system.
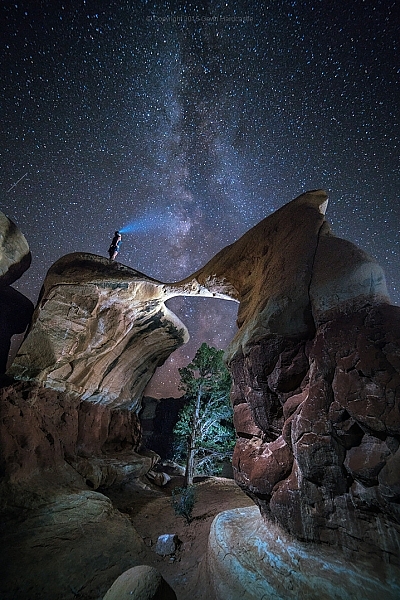
    Sony A7RII Review - Astrophotography, Gavin Hardcastle

    #1 – Existing Sony A7R users considering the upgrade

    If you already own the Sony A7R, here are four major reasons to shell out the big bucks for the upgrade:

    1. If you shoot a lot of handheld work and want the 5-axis image stabilization.
    2. You want to shoot 4K video (see below for my thoughts on that).
    3. You value the silent shutter for less vibration, and therefore sharper images.
    4. You value the new Eye Detect autofocus.

    If none of the features listed above have any great importance to your photography, you’re probably better off keeping your A7R, and spending your upgrade dollars on some of the stunning new Zeiss glass for E-Mount that’s available now, or coming out soon. The Batis and Loxia range of lenses are a force to be reckoned with. Also, realize, that based on Sony’s track record, there will probably be a Sony A7RIII on the shelves before you’ve filled your first memory card.

    But what about the extra megapixels?

    The difference between 36mp and 42mp is not that big a deal. In realistic terms, all it means is that you’ll be able to makes prints ever so slightly larger with the A7RII, and you’ll have a little bit more resolution to play with when cropping. To give you an idea of how big the difference is take a look at this comparison.

    Sony A7RII pixel dimensions vs A7R

    What about the Silent Shutter?

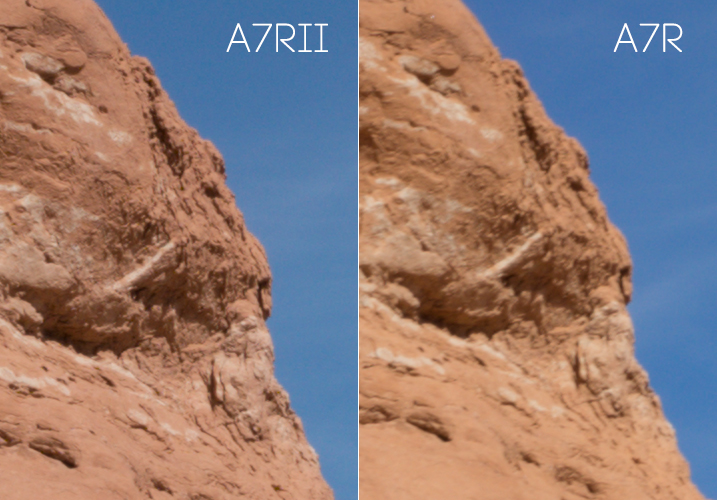
    I was very keen to discover how much of a sharpness improvement I could expect from the new silent shutter (and therefore vibration free) on the A7RII.

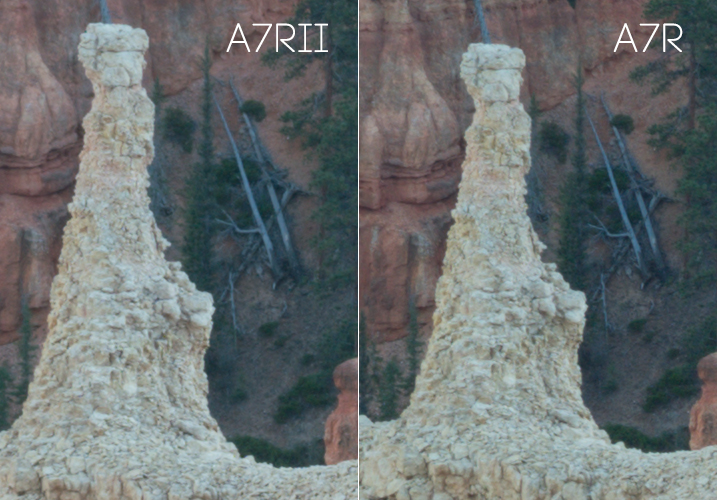
    Using the Zeiss Loxia f/2.8 35mm lens, I took the above shots on the A7RII and the A7R, with identical settings and focus point. The only difference was that the A7RII was set to silent shooting mode, and therefore didn’t suffer from the notorious shutter shock vibration of the A7R, which is something of a problem for fast exposures and when using telephoto lenses.

    The results were impressive. Zooming in to 100%, I can see a significantly sharper image produced by the A7RII, when shooting in bright daylight with fast shutter speeds.
    Sony A7RII Sharpness test

    Both shots used the Zeiss Loxia 35mm at f/11 with focus manually set at the same point. No sharpening was added in post- production.

    After the above comparison, I thought I’d do the same thing in low-light, with a long exposure, to see if the increase in sharpness was consistent.

    With this post sunset shot of Bryce Canyon, the sharpness increase on the A7RII is much less significant. Zoomed in to 100% I can barely see a slightly sharper image produced by the A7RII, but the difference is not as significant in low-light situations with long exposures. Once you add a little sharpening in Adobe Camera RAW there is no visible sharpness difference between the A7R and A7RII image when shooting long exposures in low-light.
    Sony A7RII Review - Resolution Comparison

    100% magnification. Both shot with Sony FE 55mm lens at f/11. No sharpening was added in post-production.

    It has better noise performance right?

    When I heard that the A7RII had much better noise performance than the A7R, I was pretty excited to see how it would fare with astrophotography.

    In my tests I could see hardly any improvement over the A7R when pushing the ISO up to 3200 during long exposures for astrophotography. Don’t get me wrong, the A7R was already pretty impressive at astrophotography when paired with good f/2.8 lenses. But, if you’re considering upgrading mainly for the supposed better noise performance, you may be setting yourself up for disappointment.
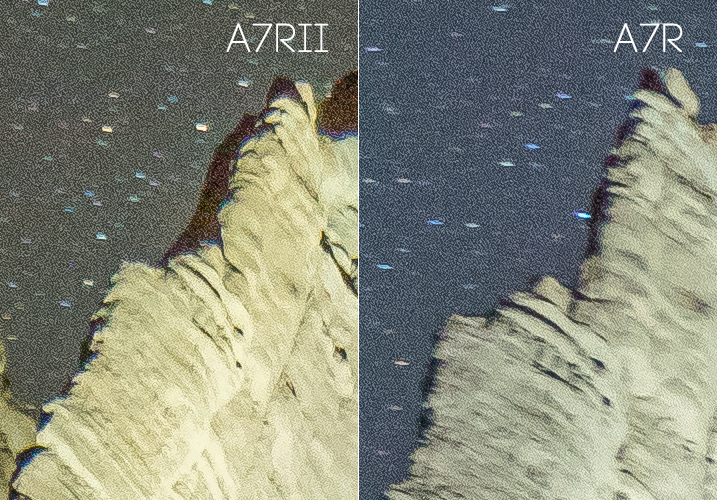
    The Sony A7RII for astrophotography

    What about the USB power option?

    If I wanted to carry around a brick all day I’d still be shooting with a DSLR.

    Granted this is a major improvement on the A7R which wouldn’t allow you to use the camera when connected to a USB power source, but I only ever use this feature when shooting a time-lapse sequence longer than the measly one hour provided by the feeble Sony batteries, which I pop like Tic Tacs.

    A better solution would be to provide longer lasting batteries. The A7RII has a bigger body than its previous version, so how about a bigger battery?

    What about dynamic range?

    In my tests I couldn’t see any improvement in dynamic range between the A7RII and the A7R in real use cases. By real use cases, I mean the limits by which you can recover shadow detail and highlight detail in your photos. It’s typical to deliberately underexpose your shots, so that you can recover the shadow detail when processing, and you won’t usually have to worry about blown out  highlights.
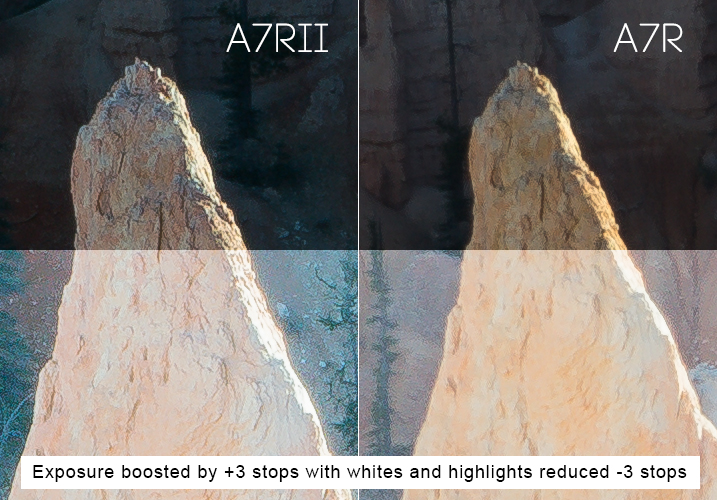
    Sony A7RII Review - Dynamic Range Test

    I deliberately underexposed these shots to avoid blown out highlights. I knew I could recover the shadow detail in post-production. Shown in the bottom half of the images, I increased the exposure by a ridiculous three stops in ACR, then reduced the Whites and Highlights sliders by three stops. I can see no noticeable difference in dynamic range between either camera, but the A7RII image is considerably sharper in this fast exposure as previously mentioned because of the silent shutter.

    I tried this many times with both the A7RII and the A7R, and my conclusion is that they both performed equally well. I’m sure there will be some scientific test that proves the A7RII has better dynamic range, but when it comes to what you’ll observe with your own eyes, I doubt you’ll see any noticeable difference between both cameras in most situations.

    If other users are observing better dynamic range in fast exposures, I wonder if what they’re seeing is actually the increase in sharpness on the A7RII, which simply records more detail than the A7R when shooting in silent shutter mode.
    Sony A7RII Review by Gavin Hardcastle with Example Images

    The 5-Axis Image Stabilization

    This is a very good feature. If you’re using adapted prime lenses with no vibration reduction, you’ll really see the benefit of this feature when shooting handheld in low-light, where otherwise trashed shots can end up being very usable.

    You’ll also be able to capture smoother handheld video with the image stabilization switched on, and with the additional Custom Function button on the camera body you can easily assign IS to that button, to save digging around in the menus to turn it on and off. This is a major improvement over the A7R.

    The menu system of Purgatory

    The one consistent gripe among all reviewers of the A7 series over the last couple of years has been the atrocious Sony menu system. They should have dealt with this issue long ago, but decided it wasn’t worth bothering on this upgrade.

    Sony doesn’t seem to use any sensible kind of logic as to where they place menu items. For example, you’d expect anything to do with Autofocus to be grouped in one menu – but no, it’s scattered all over the place as if deliberately trying to test your patience. Things like this are a real turn-off for professionals who don’t have the time to waste on menu digging.

    Get a grip Sony and sort this out! I’ll happily provide a much better layout for FREE if it means I no longer have to suffer the menu of misery.

    Much better autofocus

    Let’s be honest, the autofocus on the A7R is pretty lame, when compared to high-end DSLR cameras. If you’re seriously considering using the A7RII for portraiture the new Eye Detect autofocus function is a major attraction, and it works very well. If you primarily shoot landscapes this feature alone might not be worth the upgrade.
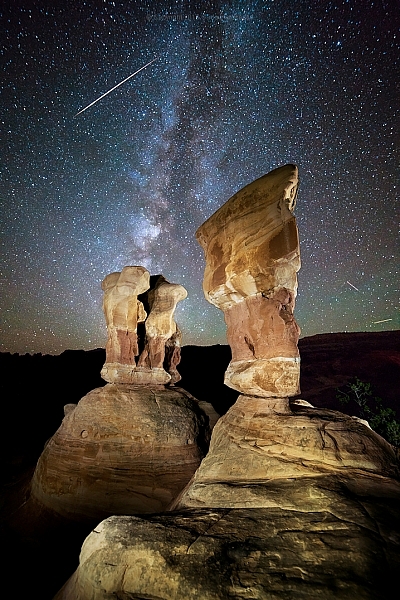
    Sony A7RII Image Examples for Astrophotography by Gavin Hardcastle

    It does 4K video right?

    Well – kind of. If you want full frame 4K video you’ll probably want to buy the A7SII instead, because the 4K full frame footage that I shot with the A7RII looks more like scaled up 1440p, and comes out looking pretty soft.

    You’ll get proper 4k image quality when shooting in the Super 35 mode, but you’re basically shooting in crop sensor mode, so you loose a major part of the frame to get that crisp 4K video quality. The other downside, is that the better looking Super 35 mode suffers from bad rolling shutter.

    Once again, this is another example of how Sony eeks out their technology across different camera models, ensuring that you have to buy more than one camera if you want all the coolest features. That being said, Sony is still offering better value than their competitors when it comes to how much bang you’re getting for your buck.

    Better color rendering?

    It’s been said that the A7RII produces better colors than the A7R, but I’ve yet to see any improvement from the test shots that I made. I’ve always been quite happy with colors produced by my A7R, but try as I might, I can’t see any difference (good or bad) in the colors produced by either camera. My examples above may show a slightly different color tone, but I’m putting that down to the time difference between shots while I got everything set up.
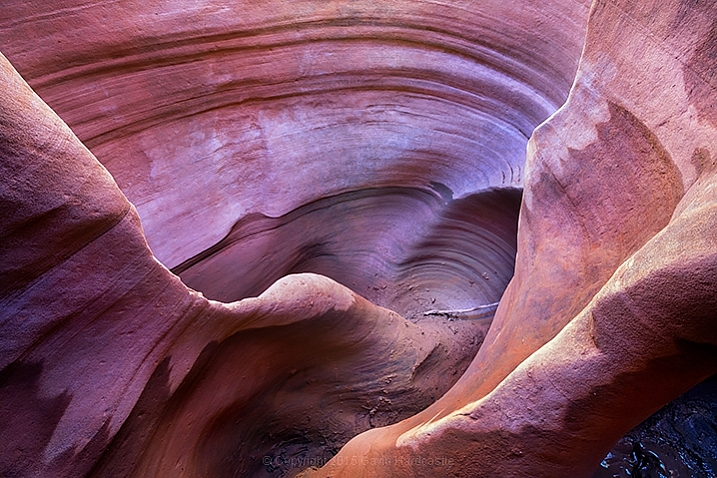
    Sony A7RII Review in Peek-a-Boo Canyon by Gavin Hardcastle

    Isn’t the EVF mind blowing?

    There’s been a lot of hype over the improved image quality on the EVF (Electronic View Finder) of the Sony A7RII, and while it’s definitely better than the A7R, it all amounts to nothing once you’ve punched in and magnified the image so that you can accurately set your focus manually.

    Sadly, the magnified image quality of the new EVF still looks like a bag of smashed crabs, and I didn’t find it to be any more usable than the A7R for that specific purpose. I tried viewing in both Normal, and High Quality modes, and my conclusion is that the new EVF doesn’t live up to all the hype. Sorry Sony Fanboys.

    Where you really notice the improved resolution of the EVF is during playback, and that can be very useful when you need to check the focus after shooting. This is something I do very often when working with poorly made Samyang lenses that have terrible build quality, but produce amazingly sharp images when focused correctly (especially for astrophotography). So, in that respect it’s great, but don’t for a second think that it’ll be any easier to set perfect focus using the EVF magnification.
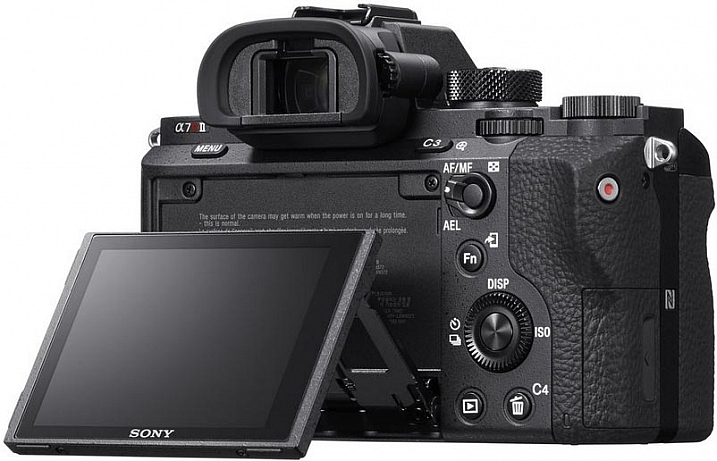
    Review of the Sony A7RII Digital Camera

    Image courtesy of Sony

    It’s bigger and heavier than the A7R

    The first thing I noticed as soon as I held the A7RII, was how much bigger and heavier it felt. While I liked the slightly larger size of the A7RII, I was none too happy about the added weight.

    One of the major attractions of mirrorless camera systems is their small size, and even with the added weight of carrying lots of spare batteries, it’s still a relief not to be lugging around a breeze-block (cinderblock) of a DSLR.

    If Sony could keep the same light weight to these cameras, but make them slightly larger and more ergonomically pleasing to the average hand size, I think they’ll win a lot of new business.

    #2 – DSLR users considering switching to the Dark Side

    If you’re considering jumping ship from another camera system, there are some things you need to consider before buying into the Sony brand. For most hobbyists these issues aren’t that big of a deal but for professionals these might be deal breakers.

    • No second memory card slots
    • Tedious and slow menu system induces violent tantrums
    • Slow response times when changing settings, writing to card, previewing and using apps
    • Battery life gives you a maximum of one hour of shooting
    • Small size is not comfortable for long periods shooting handheld unless you have tiny hands
    • Weather sealing is pathetic on the A7 series, don’t even test it

    Adapt your DSLR Glass
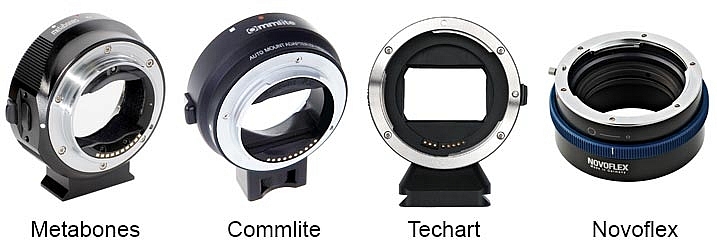
    Sony A7RII Lens Adapters

    On the plus side, there are now many choices of lens adapter available from different manufacturers, some of which can now handle aut focus. If you own a lot of expensive DSLR glass you’ll most likely be able to adapt it to the Sony E-Mount system. I’ve personally gone down this route but I’ve begun to gradually invest in native Zeiss glass for the Sony because the bulky size of the adapted DSLR lenses makes for a very uncomfortable experience and my camera bag needs to get smaller, not bigger.

    Is there really any competition?

    It’s pretty slim pickings in the DSLR camp if you need big megapixels. The Canon 5DSR offers more pixels but I’ve yet to see it produce better image quality than the A7RII, especially when it comes to low light shooting and ISO performance. The Nikon D810 is still the king of dynamic range in the DSLR world, but it falls behind the A7RII when it comes to accurate manual focusing using Live View, they don’t even have flip screens!

    None of the high end DSLR cameras currently records 4K video.

    If you’re outgrowing your current DSLR, or thinking of adding a second camera, that can produce superb images, the Sony A7RII is a logical choice if you can afford the asking price.

    3 – New camera buyers with no current investment in any system
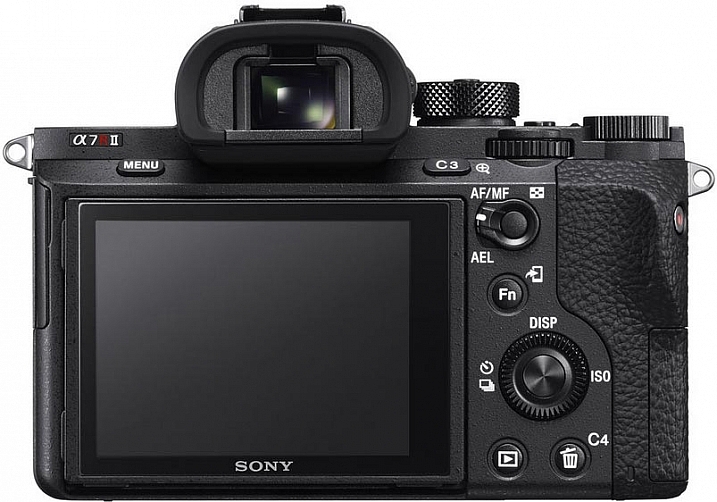
    Sony A7RII Camera Review by Gavin Hardcastle

    Image courtesy of Sony

    If you’re not already invested in any camera system and are thinking of splashing out in this camera, I can summarize the entire ethos of the Sony A7 series for you in one sentence.

    Image Quality Over Functionality. That’s what it’s all about. The Sony A7 series of cameras cannot compete with high end DSLR cameras in terms of functionality and reliability in high pressure shooting situations. But when it comes to sheer image quality, sharpness and low light performance, Sony crushes the competition with ruthless dominance.

    If you’re a landscape photographer there really is no competition in this price bracket. The Sony A7RII will produce spectacularly sharp and detailed images when paired with good quality lenses.

    What do you need from your camera?

    Your decision as to whether or not you should buy this camera depends entirely on your shooting style and requirements. Want to shoot weddings and sporting events where reliability is paramount? Buy a high end DSLR. Want to shoot stunning landscapes with the utmost clarity? It doesn’t get much better than the A7RII for the current asking price.

    But hold on – What about the A7R?

    If the $ 3200 USD price tag of the A7RII (body only) puts too much strain on your bank account, I would recommend that you seriously consider saving some money for Zeiss glass and look for a good used A7R. There should be quite a few Sony fanboys out there, selling off their now obsolete Sony A7Rs for peanuts. Snag one of those for a bargain price and you might still have money left over for a Zeiss Loxia 21mm f/2.8, and maybe even the Sony FE 55mm f/1.8 which are both excellent lenses.

    The attraction of top glass
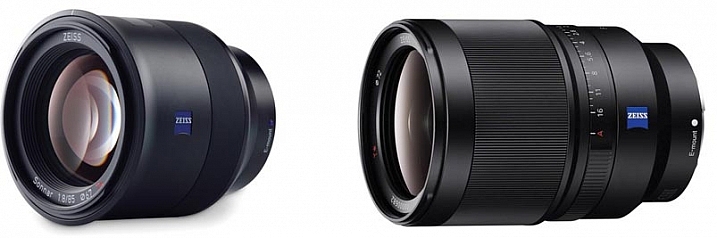
    The Zeiss Batis 85mm and Sony SEL35F14Z 35mm lenses

    Image courtesy of Zeiss

    When the Sony A7 range first came out there were hardly any native lenses to choose from. Now there are more and more high quality lenses from Sony and Zeiss that are so good, I can see some photographers buying into the A7 system simply to take advantage of lenses like the Zeiss Batis 85mm and Sony SEL35F14Z Distagon T FE 35mm f/1.4, which are quickly becoming legendary lenses.

    The Sony A7RII gets 4.5 stars
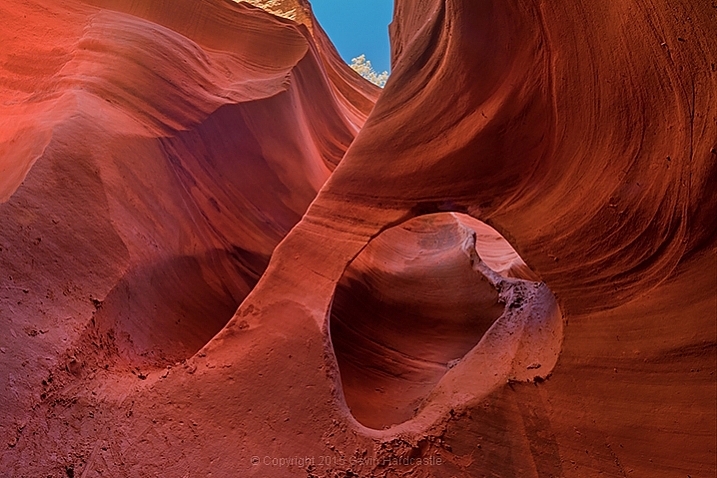
    Sony A7RII Test Shots and Review

    Why not 5 stars? In some ways Sony has listened to its users and fixed, or worked around, many of the issues voiced by A7R users. However the menu system is still atrocious, and the full frame 4K video is something of a let down.

    I would have placed more value on improved dynamic range over the extra few megapixels, and there has been zero improvement in battery life even though the A7RII is a larger camera than its predecessor.

    Maybe Sony will fix all of these issues in the A7RIII, and based on recent history, that camera should be in the shops before the next Star Wars sequel comes out.

    Special Note: All of the test shots created for the review were done before the latest firmware update which now allows the A7RII to shoot 14-bit uncompressed RAW files.

    googletag.cmd.push(function() {
    tablet_slots.push( googletag.defineSlot( “/1005424/_dPSv4_tab-all-article-bottom_(300×250)”, [300, 250], “pb-ad-78623” ).addService( googletag.pubads() ) ); } );

    googletag.cmd.push(function() {
    mobile_slots.push( googletag.defineSlot( “/1005424/_dPSv4_mob-all-article-bottom_(300×250)”, [300, 250], “pb-ad-78158” ).addService( googletag.pubads() ) ); } );

    The post Sony A7RII Mirrorless Full Frame Camera Review by Gavin Hardcastle appeared first on Digital Photography School.


    Digital Photography School
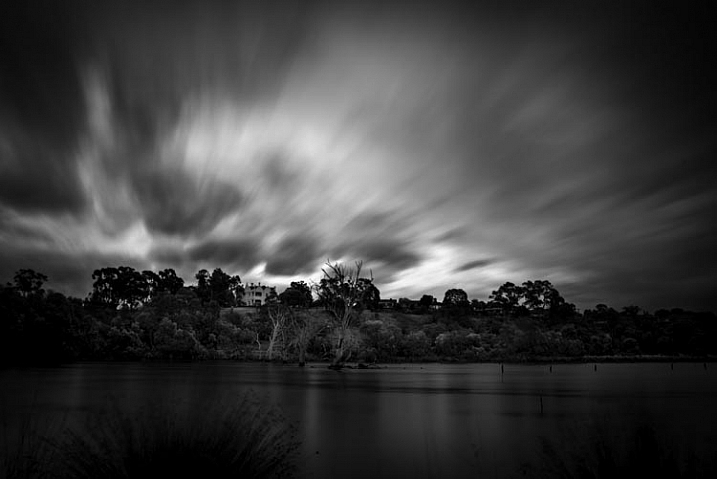
  • Starting 2015/16 Winter Paddling Season on South Platte River

    A middle of November. It’s time to start my winter paddling season. Of course, Horsetooth and other local lakes in Fort Collins are still open, so I can continue my summer style paddling. Nevertheless, I took the Sea Wind canoe, Pixel (aka water Corgi) and went for the first fall/winter paddling on the South Platte River.
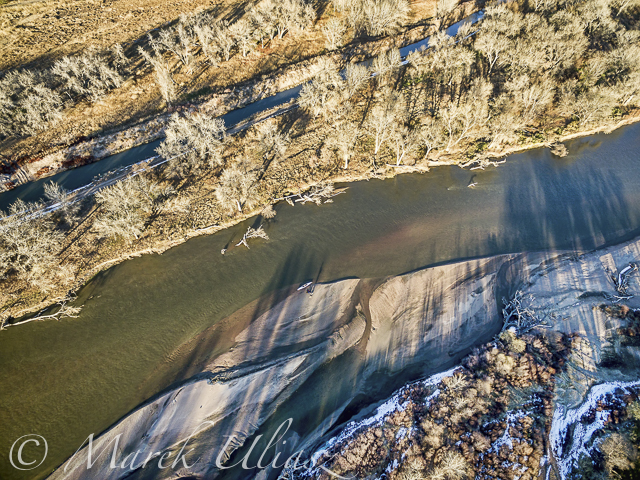
    We went to Masters and started to paddling upstream. However the dam just above Master bridge was closed and diverting water to Jackson Reservoir, so we paddled a couple miles downriver instead. Beautiful weather and a good flow of ~900cfs @ Weldona. Actually, I spent more time photographing than paddling.

    I am hoping to do more paddling on different sections of the South Platte River during the incoming winter season and, finally, update my river guide. Would you like to join me? The South Platte with a typical winter flow is just a wading river and suitable for safe paddling with any boat – kayak, canoe or SUP. Well, a paddleboard would require some experience and a short fin due to possible shallows. I don’t think that you need to dress for immersion, but I always take extra clothes for change.

    I am still sorting my blogs after migrating to a new server. If you encounter any problem or missing links please let me know.

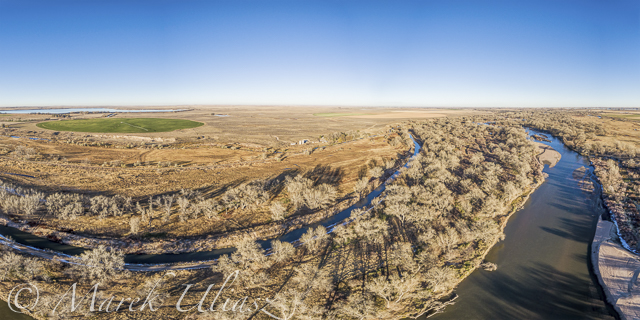
    aerial view of eastern Colorado landscape with South Platte River,  water channels, reservoirs and irrigated farmland

    South Platte River in eastern Colorado below Masters with Jackson Reservoir ditch, looking downstream

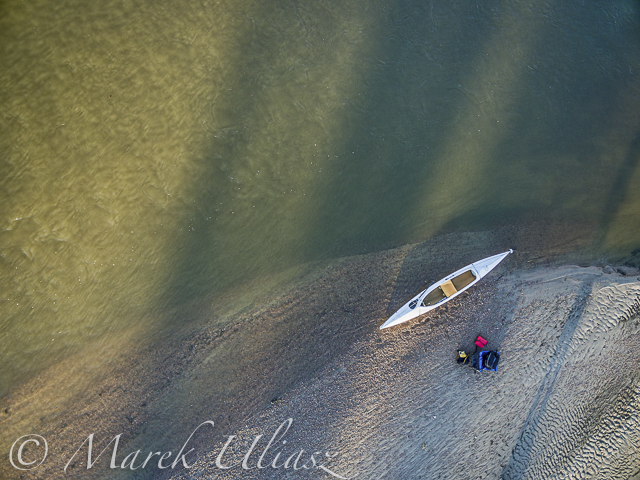
    aerial view of South Platte River in eastern Colorado with a canoe on sandbar, fall scenery

    Looking down from Phantom 3 drone. Can you see the Sea Wind canoe, me and Pixel?

    aerial view of expedition decked canoe on a sandbar, South Platte River in eastern Colorado

    Let’s look a little closer

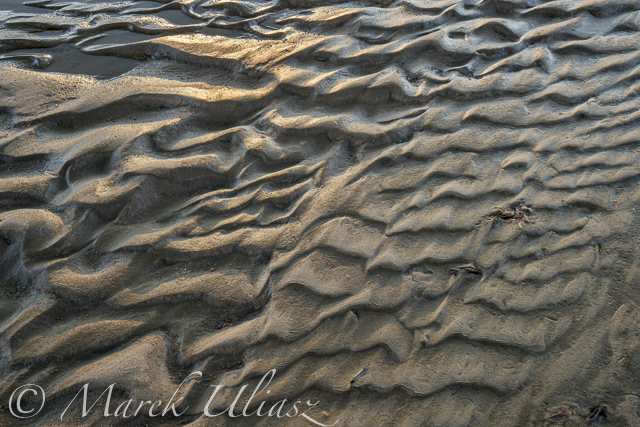
    river sandbar texture and pattern - South Platte RIver in eastern Colorado

    and, even closer

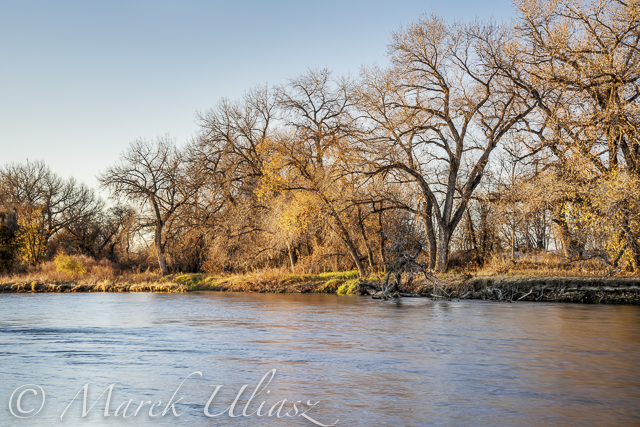
    South Platte River in eastern Colorado between Greeley and Fort Morgan, a typical fall or winter scenery

    A typical fall or winter scenery on the South Platte lit by the low setting sun


    paddling with a camera