Category: Photography

  • How to Photograph Reflective Surfaces

    Photographing reflective surfaces and objects is usually quite challenging, and can easily turn the work of the photographer into a frustrating task.

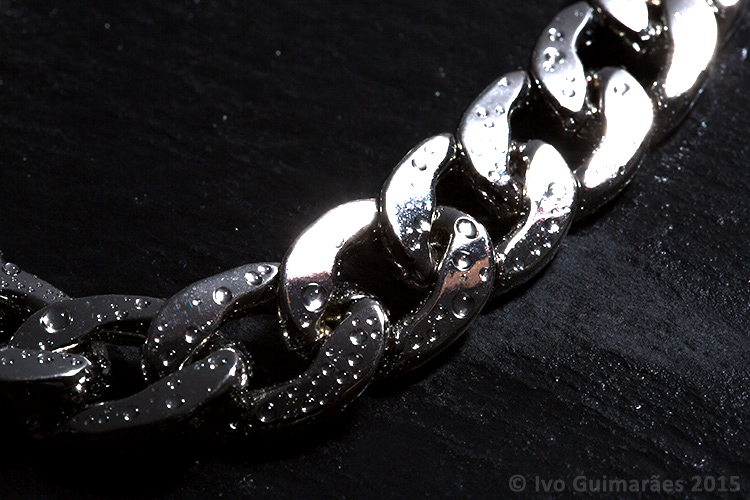
    Reflections are a hard to tame beast, but it gets easier to control if you know the rules. So, in this article I will show you how to create a high impact image with controlled reflections, like the one below, with a really simple, but highly effective, technique and using equipment you most certainly already own.

    01

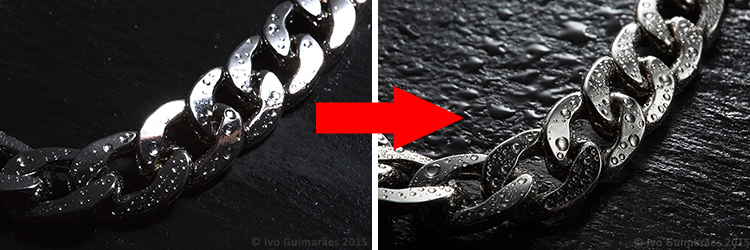
    A reflective surface acts like a mirror reflecting light, so if the light source of your image comes from the same direction as the camera, it causes specular highlights resulting in blown out spots without texture, and an overall poor looking image like the following one photographed with the flash mounted on camera.

    02

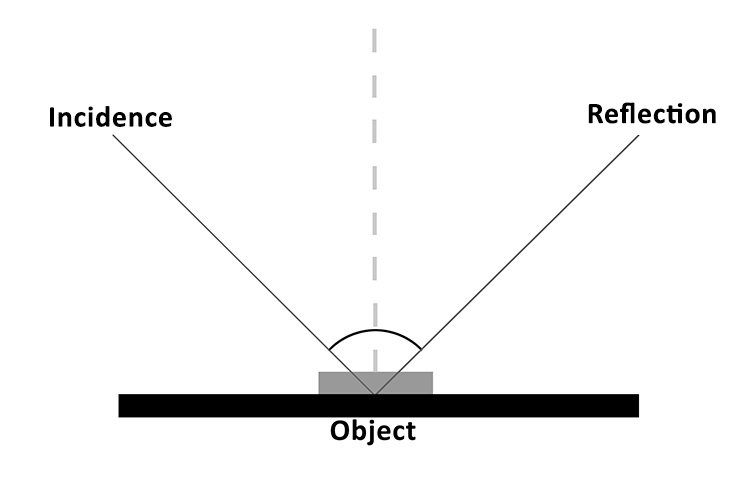
    It all comes down to the basic principles of light and the way it behaves, which is in fact very predictable. The law of reflection explains this phenomenon. If you project a ray of light on a flat reflective surface like a mirror, then the angle of incidence equals de angle of reflection, like the following diagram illustrates:

    03

    So, physics apart, what this really means is that if you are trying to photograph a reflective surface you should never light it from the same angle as the camera, otherwise you will only get light bouncing straight back at you (depending on the angle of the object).

    The trick here is to use a big light source, and position it in the same opposite angle of your camera, in relation to the photographed object (behind it).

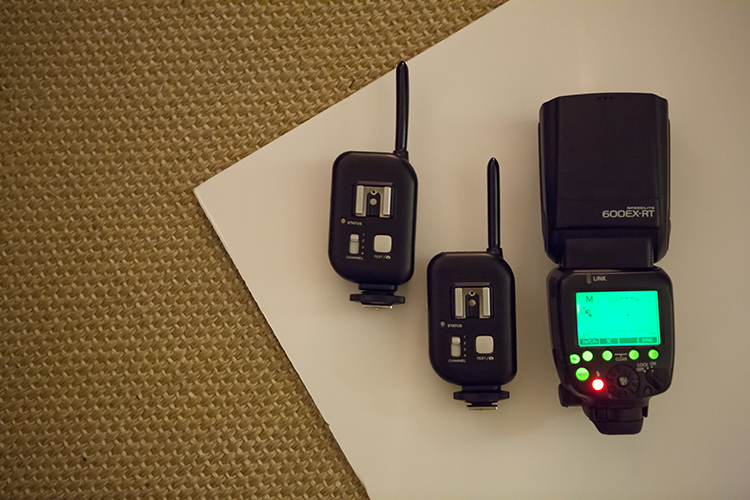
    You can do this with a studio flash head and a big softbox, but there is a much simpler and cheaper way of doing it. You just need some white cardboard, a flash, and trigger system to fire it off-camera.

    04

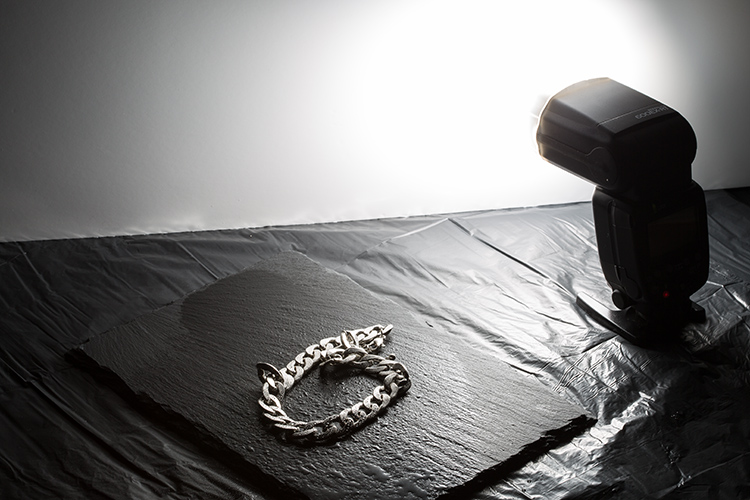
    Here is how you can use this lighting setup:

    05

    The light from the flash bounced off the cardboard is a much bigger light source, allowing you to control the reflections on your image, creating gradients that shape the object, and avoiding specular highlights. Notice it also creates texture on the rock background.

    06

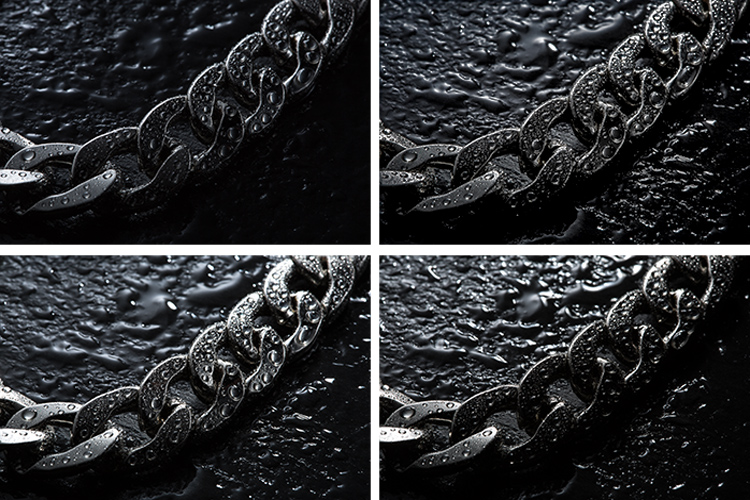
    This simple technique allows you to create a lot of different lighting effects in your image, depending how you position your flash, and angle the cardboard in relation to the photographed object, which also creates texture on the background stone and water drops.

    Here are some examples of light variations on this imag,e with just some small adjustments to the cardboard positioning.

    07

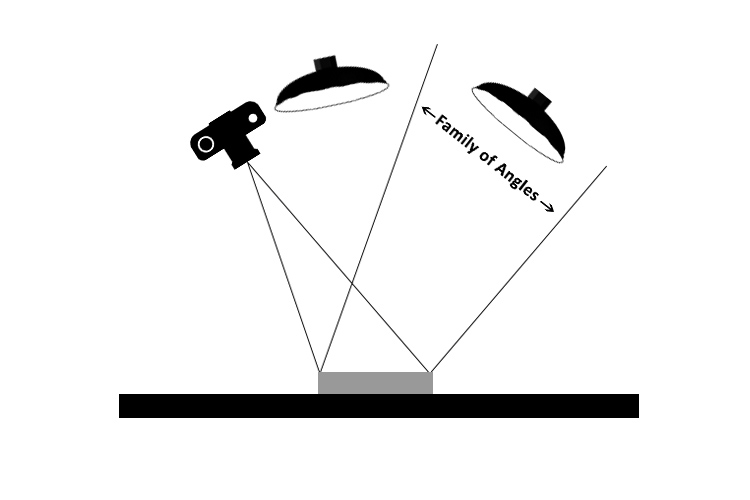
    Knowing that light rays will always bounce from a reflective surface, at the same angle at that at which they strike it, makes it possible to determine the best positioning for the camera and the light source, taking into consideration the family of angles as you can see in the next diagram.

    08

    The light positioned within the family of angles will produce a direct reflection and the light outside of the family of angles will not light a mirror-like subject at all, from the camera’s point of view.

    Even though the reflections on these images are not direct, but rather diffused reflections (which makes difficult to calculate the light angle as it is being bounced and dispersed in different directions) the family of angles can give you a good estimate of how to position your light in relation to the camera angle, in order to control the reflections in your image.

    All this technical information about light physics may seem overwhelming at first, but it will all make sense when you start playing around with it. So, give it at try, I’m sure you will get great images. Please share any questions and your images of reflective objects in the comments section below.

    googletag.cmd.push(function() {
    tablet_slots.push( googletag.defineSlot( “/1005424/_dPSv4_tab-all-article-bottom_(300×250)”, [300, 250], “pb-ad-78623” ).addService( googletag.pubads() ) ); } );

    googletag.cmd.push(function() {
    mobile_slots.push( googletag.defineSlot( “/1005424/_dPSv4_mob-all-article-bottom_(300×250)”, [300, 250], “pb-ad-78158” ).addService( googletag.pubads() ) ); } );

    The post How to Photograph Reflective Surfaces by Ivo Guimaraes appeared first on Digital Photography School.


    Digital Photography School

  • 5 Starter Steps to Batch Processing using Adobe Bridge

    Post-processing can be a minefield. Beginners especially can feel overwhelmed when confronted by amazing software, that can do almost anything, like Photoshop for example. However, everyone starts from somewhere, and not everything is terribly confusing. I am personally a fan of simplicity, when it comes to technology. Let me share with you a few simple steps on how to get started batch processing using Adobe Bridge.
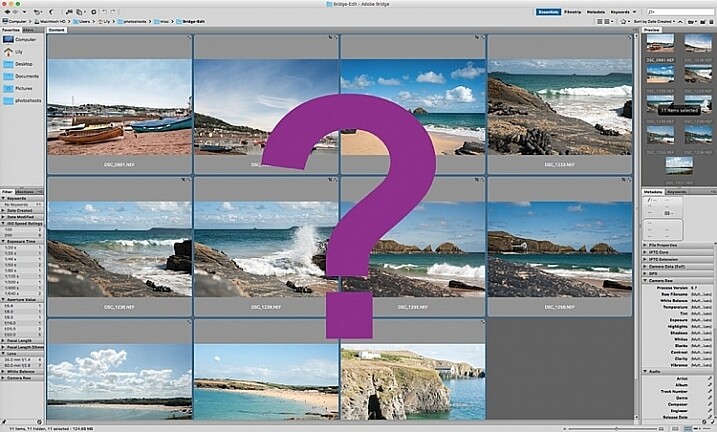
    what-is-adobe-bridge_WEB

    Editing in Bridge is super simple, and as easy as one – two – three. Open your file, edit your photo, save your file. I will walk you through it, and try to demystify the first step in post-processing, without touching Photoshop.

    What is Adobe Bridge?

    Bridge is part of Adobe’s Creative Suite, and is a media browsing application. It is an app that enables you to view your entire computer contents, manage and organize your digital files, and edit your photos without the need to import and file them in various catalogs elsewhere. For photographers specifically, Bridge simplifies the first step in the editing process, because within Bridge you can do the following easily, to name a few:

    1. Browse photos
    2. Rate photos
    3. Delete photos
    4. Rename, move, or copy multiple files at the press of a button
    5. Organize your files using various filters so you can perform your desired function in batches
    6. Watermark, copyright and manage metadata information
    batch-editing-adobe-bridge-photography-tutorial

    Adobe Camera Raw

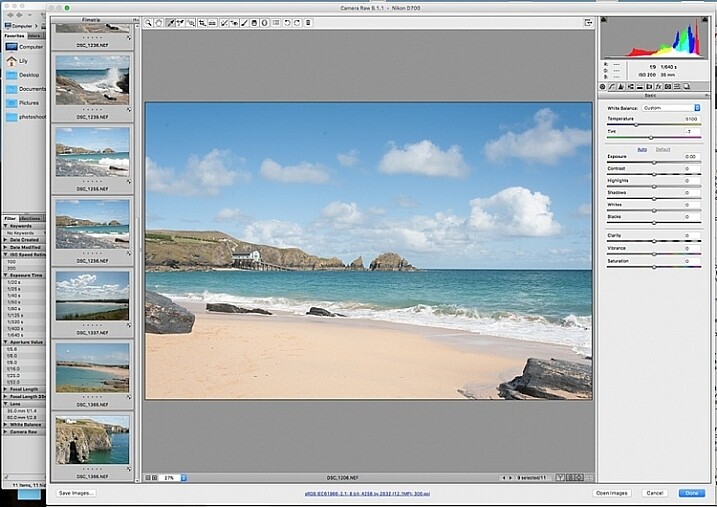
    To edit photographs in Bridge, you need to have Adobe Camera Raw, a powerful plug-in that allows you to edit and enhance any photo, including JPGS. RAW files however, can only be opened, and read, in Adobe Camera Raw.

    I would suggest that you shoot in RAW. Here is a good article about RAW vs JPGS which explains the benefit of shooting in RAW format. I shoot in RAW, and always edit from that format in Bridge, as my starting point. If you photograph in RAW, make sure you have downloaded Adobe Camera Raw, preferably the latest version, onto your computer before you can edit the files in Bridge.

    A first word

    This tutorial is a very basic suggested process of editing in Bridge, meant to aid your understanding if you have never used Bridge before. I do not claim it is the better way of editing nor the perfect way; it is one option, among many others available. Bridge is my personal preference over Lightroom, and I choose to use as much or as few of the functions in Bridge as I see fit for every image, or batch of images, that I edit. I like Bridge because, together with Adobe Camera Raw, it is straight-forward, hassle-free, and offers a non-destructive way of editing.

    Loading your images

    Before starting the batch processing, you need to load your images to a new folder on your computer.

    My suggestion would be to download your images from your memory card, directly onto your computer. In my opinion, this is the safest, and most direct way, to copy over images from your memory card to your computer, without having to go through various software that potentially could complicate the copying process. Keep it as simple as possible to try and eliminate any malfunctions or errors right at the start. Use an external USB card reader to load your images into your computer, if it doesn’t come with a built-in one.

    Put your images in a new folder clearly labeled so you know exactly where to find them. As an added step, when I copy a new set of images from a memory card on to my computer, I also immediately copy the same set to various external hard drives and cloud storage for back-up and safe-keeping. Always copy from the same memory card so you keep the transfer direct, and minimize potential errors. For example, if you copy your memory card images to a folder called Set A, do not then copy the images from Set A into another external hard drive folder; do not create this unnecessary step. Paste the same set of images from the memory card, directly where you want them stored on an external hard drive or on the cloud.

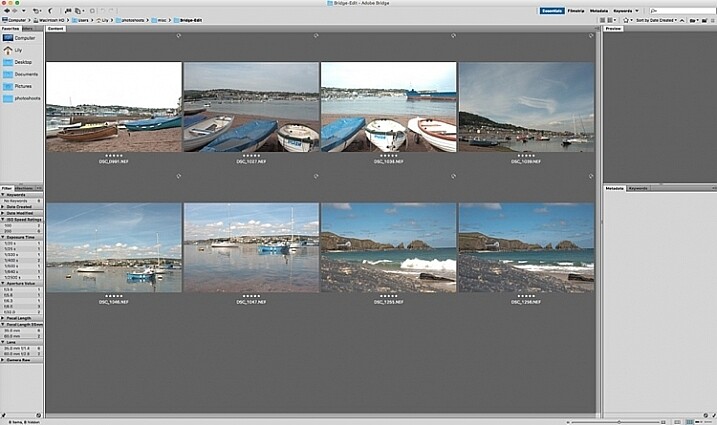
    Once your images are safely copied, open Bridge. You will need to be subscribed to Adobe CC to have access to this. Subscriptions are now very affordable, compared to previous years when you had to buy a license of the very expensive full Adobe Suite just to use one software.
     batch-editing-adobe-bridge-photography-tutorial

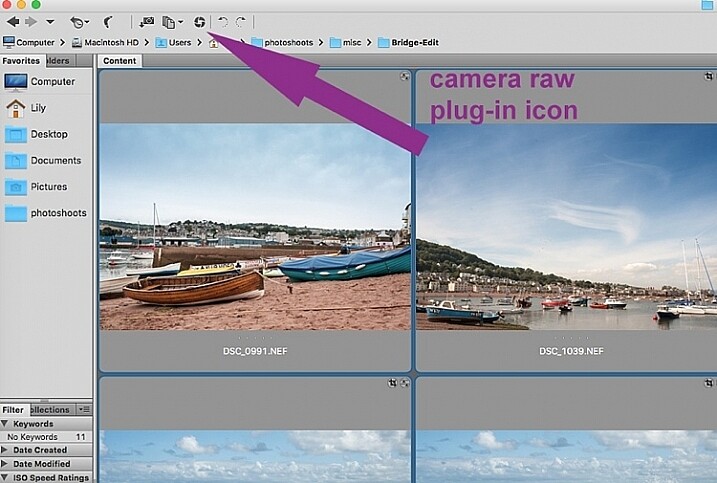
    You will see the contents of your computer on the left side navigation menu. Find your folder, click on it and your images will be displayed on the main window. RAW files will be displayed as CR2 or CRW files for Canon cameras, NEF files for Nikon cameras and DNG for some other cameras (each manufacturer has a proprietary raw file format).

    Select your RAW files, and open them by clicking the Camera Raw plug-in icon with the images selected.
     batch-editing-adobe-bridge-photography-tutorial

    As a RAW file is an unprocessed image containing all the information the camera sensor sees. It can appear very flat, and darker than what you may have seen on your camera’s LCD screen, which displays a JPG preview of your image, and as such has already been processed by the camera for preview purposes.

    An important note to consider when batch processing, is that it is most effective when used on images that are photographed using similar light and settings. The main thing to remember is that you are able to apply global edits in a few steps to multiple images, but the reality is that you may still have to tweak each image as appropriate before you save it.
    sync-settings_WEB

    Batch processing

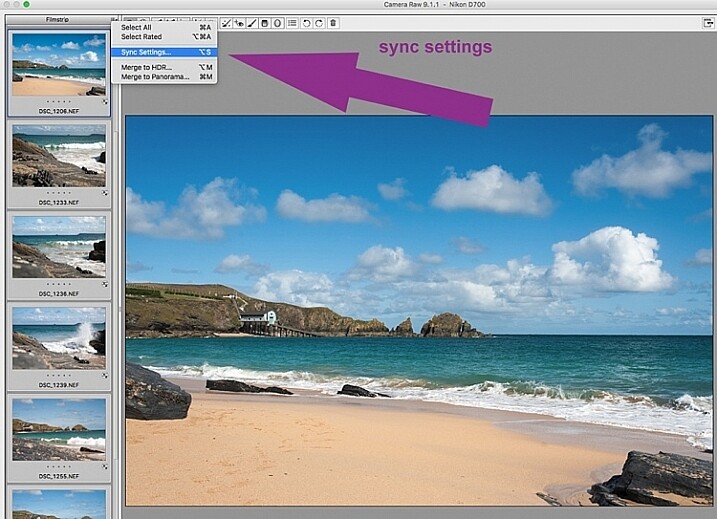
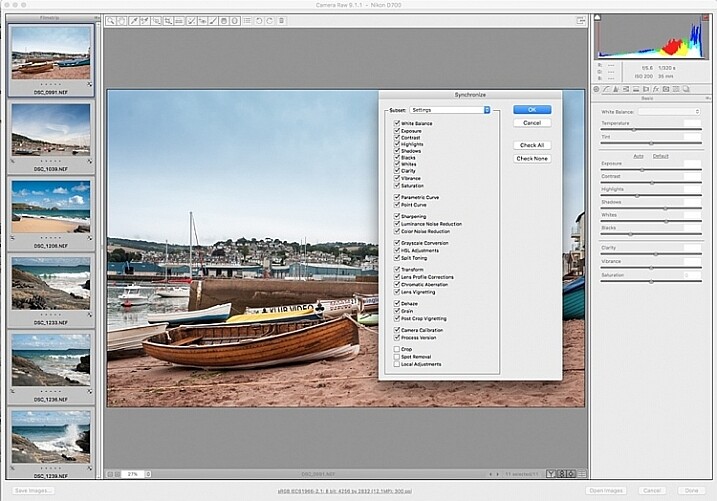
    There are two ways of applying edits in batches. Below I make reference to selecting all images using cmd/ctrl+a, and making your adjustments by applying them to the images simultaneously – that is one way. The second way is to synchronize edits. To do this, use one image with all the adjustments made, then select all other images and click the synchronize button to apply the same adjustments to the rest of them.
     batch-editing-adobe-bridge-photography-tutorial

    The idea behind batch editing is that you can apply a set of edits to multiple images, by only doing the adjustments once. To do this you can either select all the images you want to edit and make your adjustments while all the images are selected –  or you can edit one image first, followed by selecting all the images (making sure the edited image is the one highlighted with the blue box around it) then synchronizing the edits across all the images. A new window opens up with a series of boxes so you can check the settings you want to synchronize across the batch. I tend to uncheck the crop and local adjustments as those settings usually need to be specifically applied to each individual image.

    Here is a key point to bear in mind when synchronizing your settings across the batches: It is important to note that you only want to do this with global adjustments that you want applied to the entire batch, and do it at an early stage of editing. If you use the synchronize function at the end of your edits, when you may have made various local adjustments to each individual image, any synchronizing action done then will overwrite previous adjustments (depending on what you select in the Sync settings popup box).

    Step 1: Correct Lens Distortion and Chromatic Aberration
     batch-editing-adobe-bridge-photography-tutorial

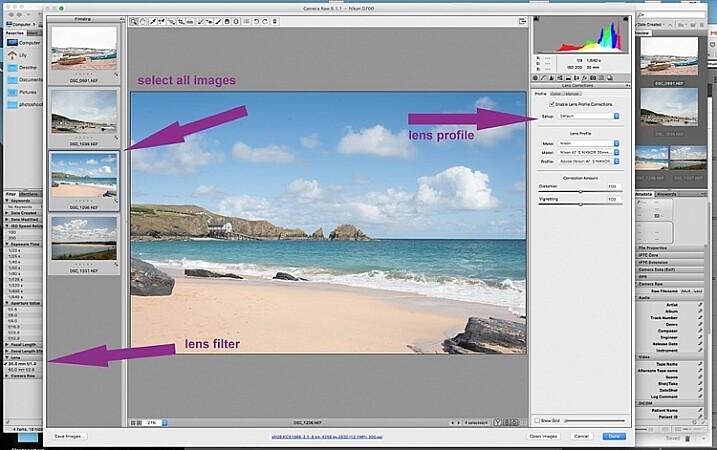
    On the left hand navigation filter, choose Lens. A dropdown menu of the lenses used appears. I correct distortion on all images photographed around the 50mm focal length and under. By clicking on the specific lens, you are filtering the set so that only images photographed with that lens are shown in the thumbnail window. Select all the images by clicking cmd/ctrl+a . With the images selected, click the camera lens icon to open the Camera Raw plug-in and window. Select the images again by clicking cmd/ctrl+a, and go to the Lens Correction tab on the right hand navigation panel. On the Profile tab click the box that enables lens correction and choose your camera and lens details from the drop down menus. If your lens isn’t in the list, alternatively you can do this manually using the sliders on the Manual tab. Click done and your changes will automatically be saved.

    Often with extreme lens distortions coupled, with straightening adjustments, you will need to crop your images. Type c (keyboard shortcut) and the crop box at the top will be highlighted. Hold down the crop icon to bring up the crop ratios. By doing this, your image will be constrained to the ratio you have chosenwhen you crop. Don’t forget to click done to save your changes.

    Do this for all the lenses for which you want the distortions corrected. If you are only editing a batch photographed using one lens profile, you do not need to click done just yet. You can keep making further edits before clicking done.

    Next correct any Chromatic Aberration. I only do this step if I know I have taken images in bright light using a very wide aperture such as f/2 or wider. The filtering and batch editing method is the same as above. However, I do this for each image individually at 100% view as each image would have various amounts of chromatic aberration and varyious color fringing.

    Step 2: Correct your White Balance
     batch-editing-adobe-bridge-photography-tutorial

    Once all the distortions on various lenses and focal lengths have been corrected, open your images again in the same way. Now you are ready to make batch edits.

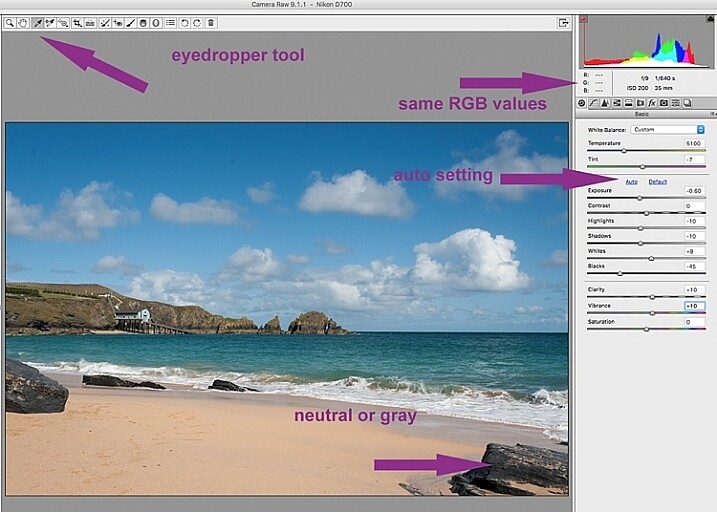
    Once in Camera Raw, select a set of images that have been photographed in the same, or similar light. With the images selected correct the White Balance using the eyedropper tool. You need to find a neutral area (gray, or white) to click the eyedropper tool on and aim to get the RGB numbers to read the same, as much as possible. That way you know you are getting the most neutral color in the image. You can also correct White Balance by eye if you are confident enough to differentiate color temperature, although this will be less accurate than going with the RGB values.

    You will notice that the White Balance changes on all the images you selected just by setting it on one image. Images that have been photographed in different light, or at varying times, will register a different White Balance. So, batch editing an entire set of images photographed in various places in this way, will produce irregular color results.

    A solution to this is to use a gray card and have this set when photographing, or set your color temperature in-camera. By doing this the White Balance will be consistent throughout your images, for that time and setting. Here is a useful article on how to set your white balance in camera using a gray card. For more information on white balance and color temperature click here.

    Step 3: Correct your exposure and make local adjustments
     batch-editing-adobe-bridge-photography-tutorial

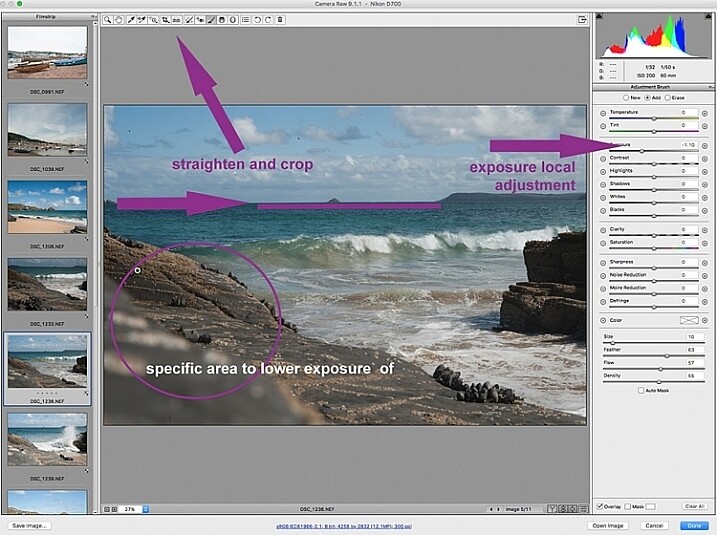
    You may want to click Auto first, to see what Camera Raw’s suggested edits are, then start making your adjustments from there. To batch process, it is important to select sets of images shot in the same setting and light to make the most of this editing function. Batch editing images that have settings in opposite extremes will very likely add to your editing time, as you will need to go back and correct all the other images, thereby doubling your editing process. This is just one of the benefits of shooting in Manual mode where you have full control of your camera settings, rather than the camera making the decisions for you. If you are considering switching to Manual mode, in case you are still shooting in any of the other modes, see: How to Learn Your Camera’s Light Meter and Master Manual Mode.
     batch-editing-adobe-bridge-photography-tutorial

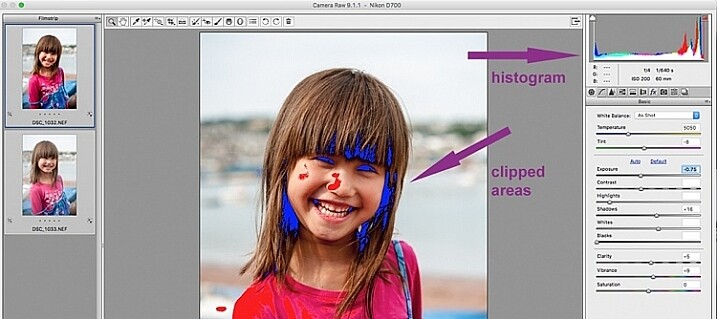
    When making adjustments, it is important to keep an eye on the histogram, which is the coloured graph displayed on the upper right hand corner of Camera Raw. The histogram tells you if there is clipping occurring in the dark and light areas of your image. Clipping simply means that there is no detail left in that area, as the tonal values have fallen outside the minimum and maximum brightness boundaries, where detail can be represented in the digital image.

    Type U and O together and the window will display any clipped bright areas in red. Type U and O together again to display clipped dark areas, and one more time to turn off the clipping warnings. You can then make adjustments by moving the sliders to eliminate the clipped areas. Remember to keep checking the histogram. You don’t want to clip either the blacks or the whites, you will see this on the histogram when the colours start climbing up on the left and right walls. Ideally you want the colours to be evenly distributed around the middle area until they are just touching the walls. Here is a link explaining: How to Read and Use Histograms.

    Local adjustments

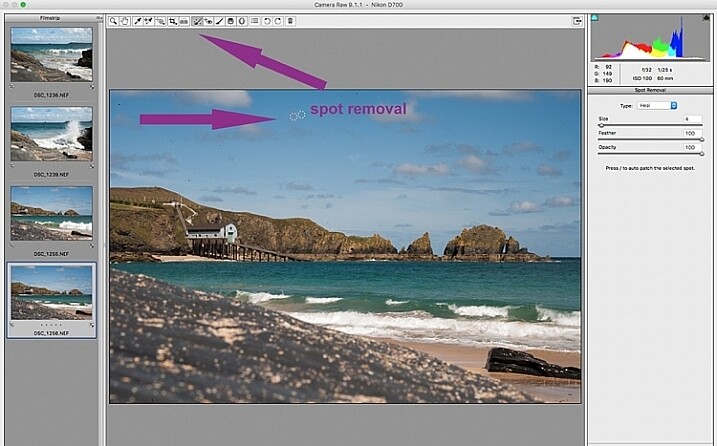
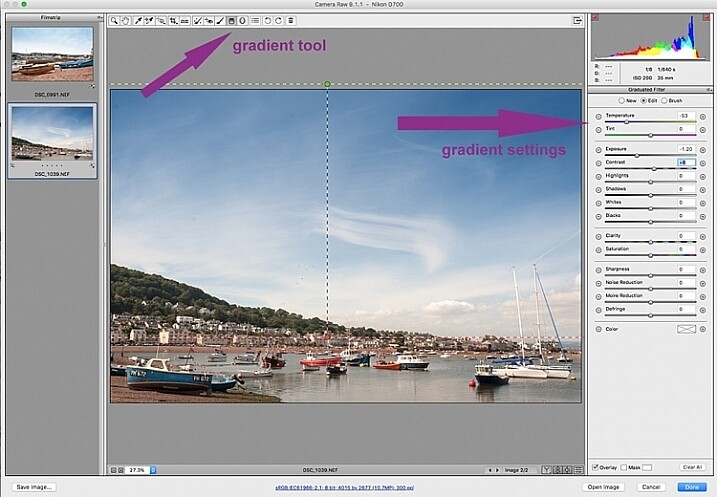
    There are useful tools that you can use in Camera Raw, but which will not be beneficial in batch editing such as: spot removal and healing, adding gradients, straightening and cropping. However, you can edit smaller sets within the opened big batch, with ease using the same process. Regardless of the number of images, you can select consecutive images you want to edit in smaller groups, and apply specific batch edits to those images only, such as cropping and other local adjustments.
     batch-editing-adobe-bridge-photography-tutorial

     batch-editing-adobe-bridge-photography-tutorial

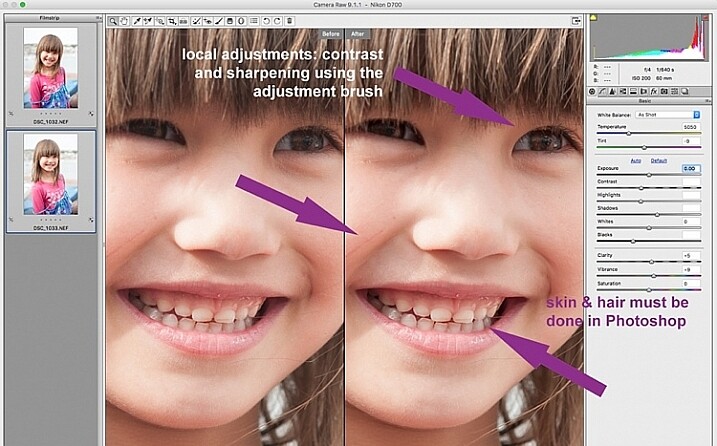
    While I find local adjustments very useful, for instance brightening or darkening selected areas, warming up and cooling down specific parts of an image, and all the tools available on the adjustment brush panel, these tools need to be applied to each image individually, as necessary. Bridge and Adobe Raw can only go so far. If more fine tuning, and intricate edits need doing, you will need to take the image into Photoshop or a similar software to do so.
     batch-editing-adobe-bridge-photography-tutorial

    Step 4: Remove Noise and Sharpen

    Adjusting the sliders to remove noise in an image is essential for all images, more so if you are shooting at a high ISO. Noise in a digital image is composed of the grainy look that you see, and the red, green, and blue spots that show through on the image, especially in the dark areas. The luminance slider fixes the grainy issue, and the color slider removes the dots, so move both sliders until you remove the noise.

    An image shot at a very high ISO such as ISO 8000 will need a different noise reduction value than an image shot at ISO 400. If this is the case with your set of images, you can go back and filter your images again as in Step 1, but using the ISO speed ratings this time, then proceed with batch editing. This process can be tricky, but is worth the extra step, especially when dealing with higher ISOs. It is essential to view the images at 100% when removing noise, so the effects of the sliders are visible. A word of caution: do not go overboard with the noise reduction and sharpening settings when doing global batch edits. The danger is that you may end up removal detail and color. The best way to ascertain the noise removal settings appropriate for an image, is to do it on every single image, due to the ISO and exposure variables which greatly determine the amount of noise in an image. But there is no reason why you can’t apply a gentle global noise reduction setting to your batch of images, and adjust from there individually as needed.

    It is always good practice to sharpen all your images, ready for output. Sharpening values vary according to the detail, and information in the image. You can apply your chosen sharpening values globally if you are confident that the values are gentle, and general enough for all the images in the batch. A little sharpening is better than nothing. Some images however, may need specific, more aggressive, sharpening values, and this is where you need to apply the appropriate value to each individual image. Similar to removing noise, the best practice is to custom sharpen each image one by one.
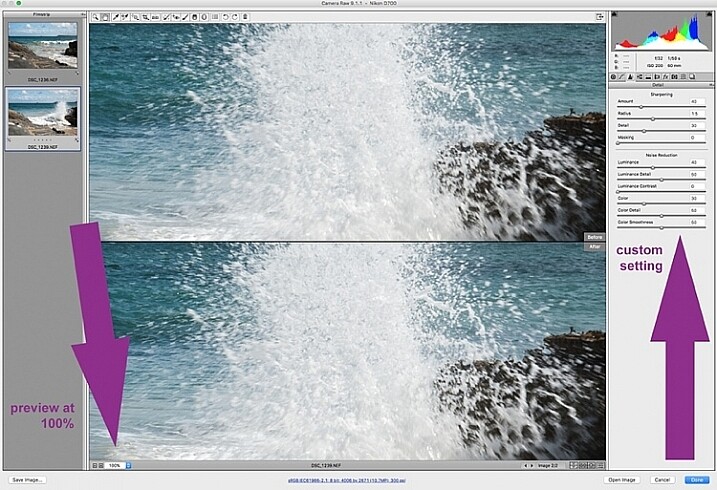
    sharpen_WEB

    Step 5: Save your images

    Once you have made global batch edits to your images, I suggest you go through them one at a time, in the same Camera Raw window, and make final local adjustments for each one. Type cmd+alt+p to toggle between before and after previews. There are a variety of preview formats, so play around with the options given, to choose your preferred format.

    Now it’s time to save your images. This is one of the features of using Bridge with Camera Raw that, for me, trumps all others. Select all your images again, and click the Save image button. A window opens up where you can specify where you want the images saved, or create a new folder for them. You specify the format you want them saved in, as well as quality. You name the files once only, and voila they are saved. Don’t forget to click the done button to store all your adjustments. If you close the window without doing so, all your adjustments will not be saved. Always make sure your images are in sRGB and are saved in sRGB color profile.

    Summary

    These are only very basic steps to get you started, Bridge and Adobe Camera Raw have so much more to offer. Play around, experiment for yourself, and find out how your workflow can be even more simplified. Editing in Bridge and Camera Raw does have its limitations, especially when it comes to fine edits on skin, and blemish and hair removals, but with their batch editing functionality, you can get you to a place where you’re ready for finer edits in Photoshop, much faster than opening each image in Photoshop as a starting point, and applying the same edits one at a time.
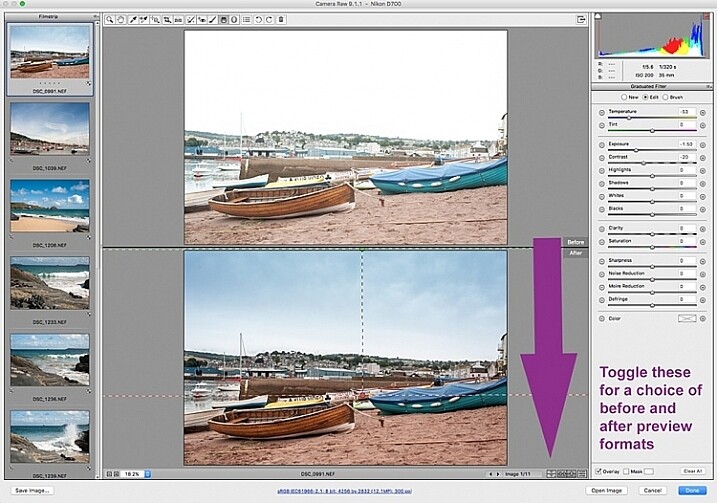
     batch-editing-adobe-bridge-photography-tutorial

    There you have it – a few simple tips for batch processing. By saving your images in a different format, you will have your new set of edited images, while your RAW files are safe in the original folder. When you open these RAW files again they will show the adjustments you have made, but you can reset at any time if you want to re-edit from scratch. Your edited images are now ready to be further edited in Photoshop, should you want to do more creative and artistic edits, or if there are more edits necessary like head swapping, skin blemishes and hair removal as mentioned above. Bridge and Camera Raw are only the beginning, they gives you a good clean edited image to build on.

    A last word

    Batch editing is not for every photographer, nor for every photograph. Neither is batch processing necessary for every photography job that comes your way. But it is an option that can be easily learned, and might just save your sanity one day when you need to edit thousands of images within a short time-frame.

    Here are the two images before and after editing in Bridge and Camera Raw.
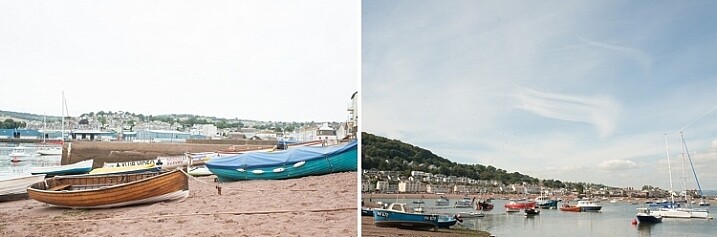
    landscape-after-before_WEB

    landscape-after_1_WEB

    landscape-after_WEB

    Do you have other smart tips to share when batch processing in Adobe Bridge?

    googletag.cmd.push(function() {
    tablet_slots.push( googletag.defineSlot( “/1005424/_dPSv4_tab-all-article-bottom_(300×250)”, [300, 250], “pb-ad-78623” ).addService( googletag.pubads() ) ); } );

    googletag.cmd.push(function() {
    mobile_slots.push( googletag.defineSlot( “/1005424/_dPSv4_mob-all-article-bottom_(300×250)”, [300, 250], “pb-ad-78158” ).addService( googletag.pubads() ) ); } );

    The post 5 Starter Steps to Batch Processing using Adobe Bridge by Lily Sawyer appeared first on Digital Photography School.


    Digital Photography School
  • Review of the Manfrotto 322RC2 Joystick Tripod Head

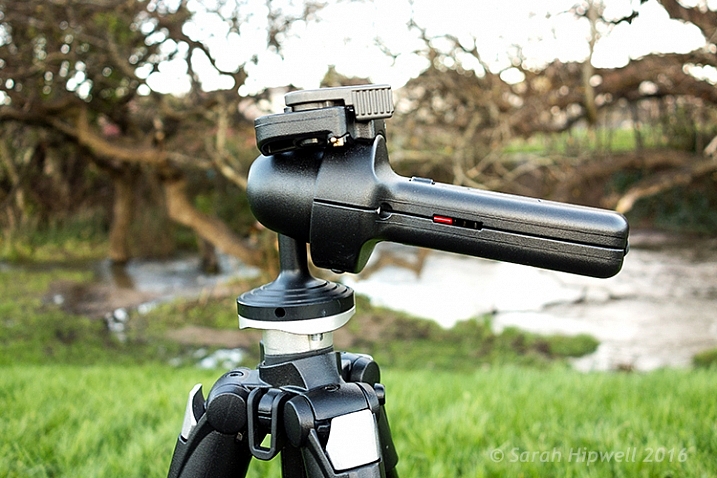
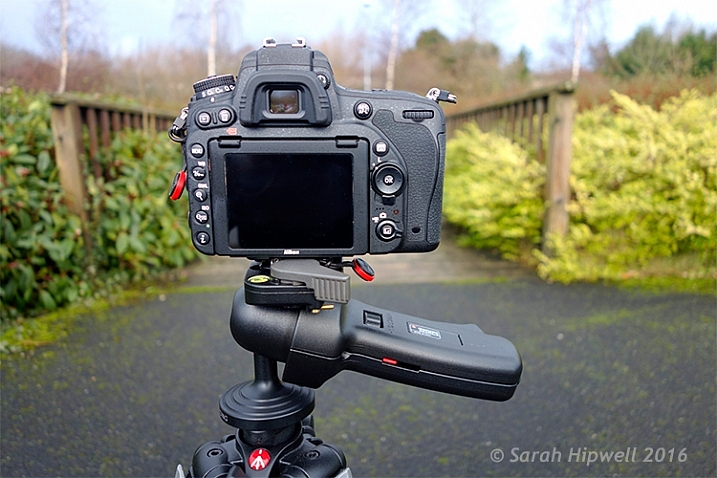
    Manfrotto-322RC2-Joystick-head-in-horizontal-position

    Manfrotto 322RC2 Joystick Tripod Head

    I don’t use my tripod extensively in the same way a landscape shooter does, but I do consider a tripod an essential part of a photographer’s arsenal.

    With regard to tripod heads, I have used a ball head for many years and they are extremely versatile. They’re very quick and easy to adjust. The most basic models having a single locking screw or lever; release it and you get a full range of pan, tilt, and swivel adjustments. Once you have the camera in position, you simply tighten the screw/lever to lock the head in place.

    I use my tripod essentially in the following ways:

    • When the shutter speed is too slow to hand hold my camera, and I want to get a tack sharp image (s), or shooting in low light conditions.
    • Framing the shot through the viewfinder and then taking in the scene with my eyes without having to hold my camera, or having it on me. I like to see the shot I want to to take, rather than take the shot that I see through the viewfinder.
    • Most simply to act as a perch for the camera, ready to go. I spend most of my time prepping the shot before taking it.

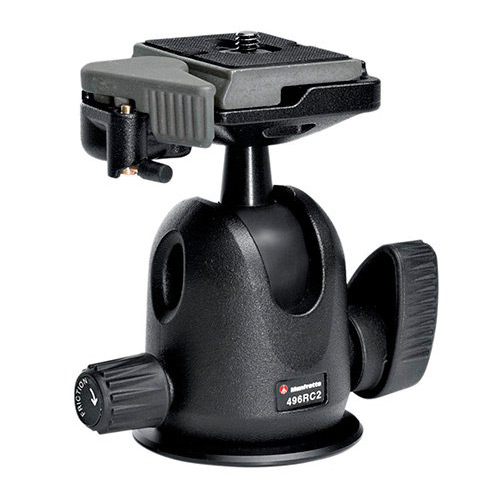
    The ball head that I used was the Manfrotto 486RC2 compact ball head which has now been discontinued and replaced by the 496RC2.

    Manfrotto-496RC2-Ball-Head-2

    Image courtesy of Manfrotto

    Over recent months, I have found this system of loosening the screw/lever on the ball head to make small adjustments frustrating, due to the weight of the camera and lens. I had to hold the camera with one hand and move the lever with the other. This was cumbersome at times, as the lever was sometimes too tight.

    This may sound fickle. But I like my gear to work efficiently, and for me not be conscious of it, or thwarted by it. I prefer to concentrate on the shot I am about to take.

    It was time for me to purchase a new head but I was undecided over whether to stick with the ball head type, or try a different style head altogether. Recently, I was working on a job in tandem with another photographer. He had the joystick type head on his tripod. I gave it a go, and found it it incredibly intuitive to use.
    Talk about being smitten. I just loved it. It turned out to be the Manfrotto 322RC2.

    Build

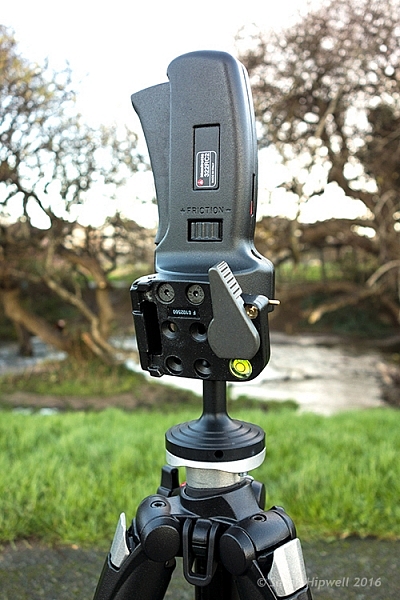
    Manfrotto-322RC2-Joystick-head-in-vertical-position

    The Manfrotto 322RC2 is built out of magnesium. It weighs 1.43 lbs (.70kg).

    The 322RC2 is made of magnesium, and is designed to keep the weight of your kit as close as possible to the tripod’s centre of gravity, by way of its reduced height. It weighs 1.43 pounds (.70kg), and while it’s not lightweight, it doesn’t feel heavy either, and the accompanying literature states that it can accommodate up to 11 lb. (5kg).

    Camera-in-horizontal-mode

    I have my Nikon D750 with the 24-120mm f/4G ED VR attached which is roughly 1.510kg (just over 3 lb.).

    Key Features

    Let’s take a closer look at the key features:

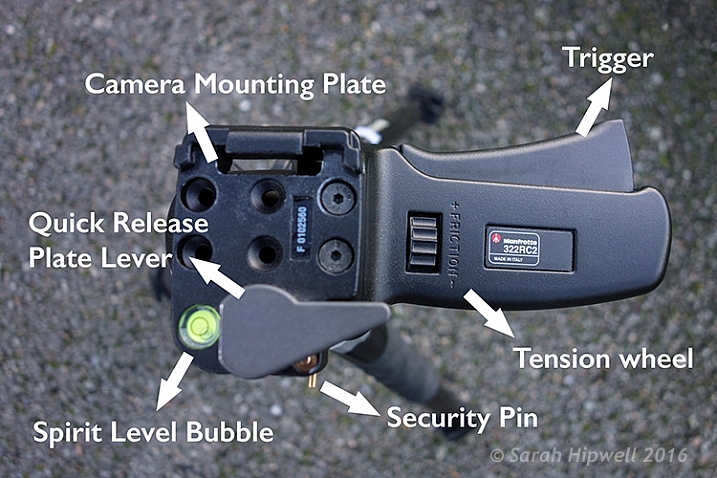
    • One single lever for quick control of all movements
    • Quick release plate with built-in secondary safety pin
    • Built-in bubble spirit level
    • Friction control, adjustable for different camera weights
    • Customizable for left or right handed use, in a vertical or horizontal position
    Top-view-of-322RC2-joystick-head

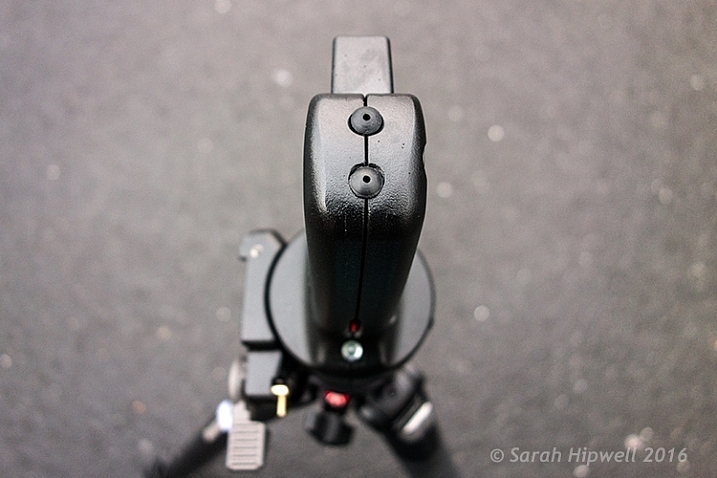
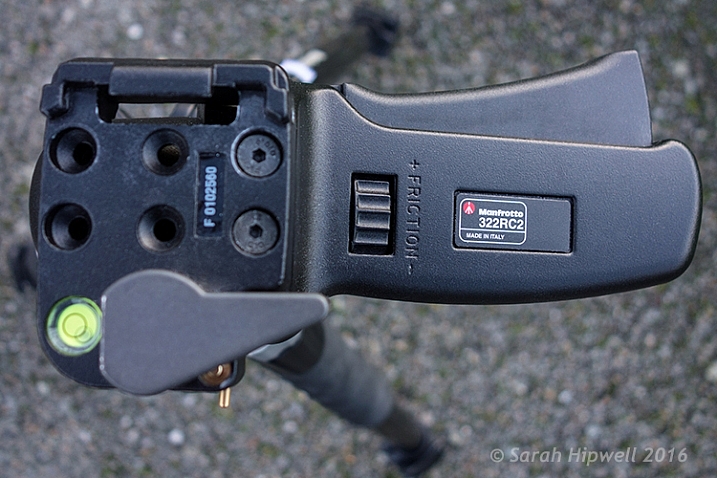
    Top view of the Manfrotto 322RC2. The trigger is big so that all your fingers rest against in when squeezing it.

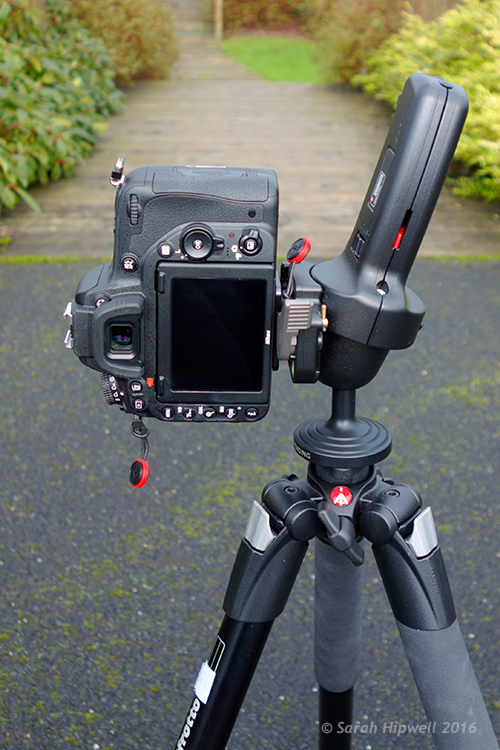
    Camera-in-vertical-mode

    Going from horizontal to vertical mode is so easy using this joystick head.

    Straight out of the box, I was able to attach the head to my tripod. It does come assembled for right-hand users, but the 200PL quick release plate assembly can be removed and positioned for left-handed use. Uniquely, it can also be placed on the top of the grip in a vertical position like the traditional 222 design, but when used in this position the maximum load reverts to 2.5 kg capacity.

    Where-the-200PL-assembly-plate-sits-on-the-grip-handle

    Top view of the end of the grip on the Manfrotto 322RC2, where you can attach the 200PL assembly plate, so that the camera sits on top, similar in deign of the 222 model by Manfrotto.

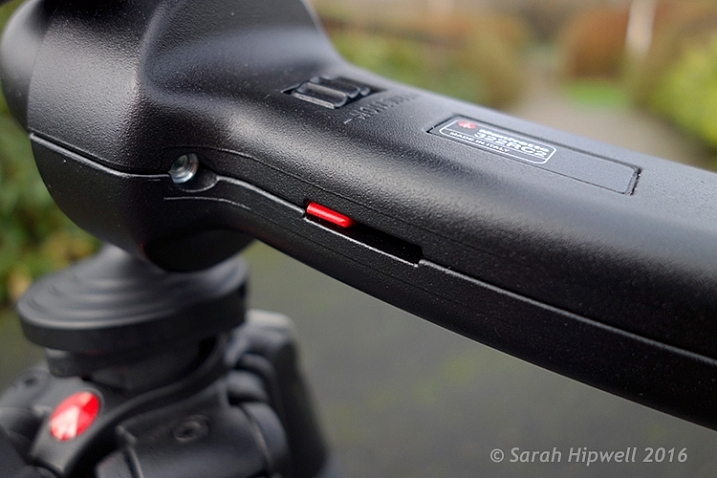
    I was able to adjust the friction wheel by turning it either to the right or left. I then placed my camera and lens onto the quick release plate, and made further adjustments allowing for the weight of both. This friction control wheel lets you regulate the power of the blocking mechanism to match the weight of your camera/lens, which is key to its design.

    close-up-of-tension-indicator

    The friction wheel scrolls to the right or left. The small red strip is the tension indicator which moves to the left or right as you adjust the friction wheel.

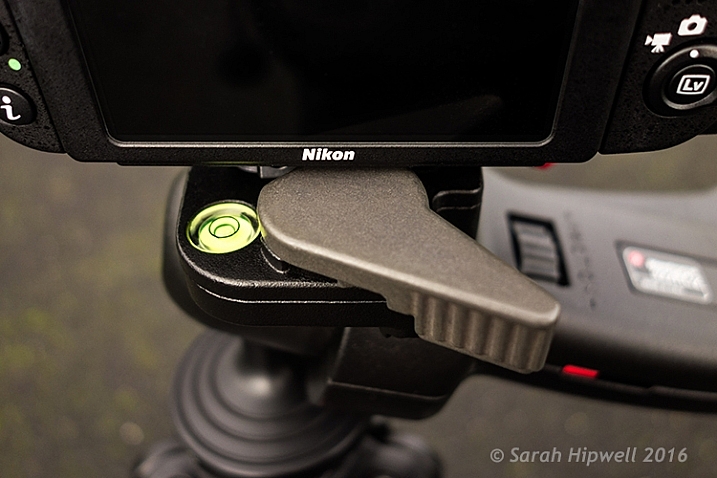
    The built-in bubble spirit level is a nice touch. There wasn’t one on the ball head, so this feature just makes orientating your camera, horizontally or vertically, quick and easy.

    Spirit-bubble

    The bubble spirit level is a handy feature, especially if you are adjusting your camera positions between landscape and portrait modes.

    Observations

    I’ve only had this joystick head a mere six weeks, so I can’t really comment on what the cons may be at this point. Obviously, this type of tripod head may not be to your liking, or suit your photography needs.

    Although, this tripod head isn’t lightweight, I feel the weight justifies what it will be holding, especially when you combine the weight of a DSLR body and a large zoom lens. That said, from my experience, I only wish I had come across it sooner. The two areas I find it most useful are:

    Title-Manfrotto-322RC2-Joystick-head

    • It is easy and intuitive to use
    • It offers very flexible camera positioning, using just one hand

    In fact, the more I use it, the more I like it. Maybe over time, I will encounter some negative aspects, one thing I noticed is that it doesn’t fit into my existing tripod case with the head attached. By placing the head in a vertical position, this adds another nine inches to the total length.

    I didn’t want to buy another dedicated camera tripod bag, as they can be expensive. So instead, I just bought a Hockey bag ($ 16.00) to store my tripod away when not in use, or to bring to location shoots. I now use my old tripod case for my small light stands and umbrellas.

    There isn’t an independent pan lock. This doesn’t bother me, but I can see this being a necessary feature for some photographers who shoot panoramas, and so forth.

    Conclusion

    I would definitely recommend this tripod head, but I think the best advice is to test it out first. This type of tripod head is a matter of personal choice. Plus, this head is not new on the market, so check around for deals.

    Disclaimer: I was not contacted or sponsored to test the above equipment. Opinions are purely by the author only.

    googletag.cmd.push(function() {
    tablet_slots.push( googletag.defineSlot( “/1005424/_dPSv4_tab-all-article-bottom_(300×250)”, [300, 250], “pb-ad-78623” ).addService( googletag.pubads() ) ); } );

    googletag.cmd.push(function() {
    mobile_slots.push( googletag.defineSlot( “/1005424/_dPSv4_mob-all-article-bottom_(300×250)”, [300, 250], “pb-ad-78158” ).addService( googletag.pubads() ) ); } );

    The post Review of the Manfrotto 322RC2 Joystick Tripod Head by Sarah Hipwell appeared first on Digital Photography School.


    Digital Photography School
  • Should you Study Photography at College or are There Better Options Now?

    If someone were to ask me whether it’s worth going to college or university to study for a degree in photography I would find that a difficult question to answer. I don’t think there is much value in studying photography at college, yet I don’t want to destroy anyone’s dreams (the good news is that there are plenty of other less expensive paths to a photography career).

    If you are thinking about studying photography at tertiary level, these are the two most important questions to ask:

    1. What will you learn during your course?
    2. How much will it cost you?
    photography education

    You can learn a lot about photography by going to Amazon and spending a few hundred dollars on photography books, or purchase ebooks like on offer here on dPS. I’ve learned far more from books than I ever did from my photography degree.

    What will you learn?

    The first is important because, incredible as it may seem, you may not actually learn much while taking a photography degree. I know this is true because I studied photography at what was supposedly the UK’s top photography college, only to find that the level of teaching was so low, that I made my way through the three year degree learning next to nothing.

    Let me give you an example. In our third year, the tutor gave a single one hour class per week. After a few weeks he gave up on doing that because only five or six students (out of a total of around 30) were turning up. The reason for the low turnout? Most of the others were so worried about writing the required thesis that they couldn’t concentrate on photography. And the reason they were so worried? The same tutor had spent weeks explaining how the thesis would be one of the most difficult things they had ever done, without giving any practical support or solutions to us.

    Another example (bear in mind that I took my course between 1996 and 1999). We had one computer between 90 students, with an out of date version of Photoshop installed on it. The college had identified digital photography as an important trend – yet didn’t support the students enough to learn it.

    GotCredit

    By GotCredit

    The truth is that degree courses are a tremendously inefficient way to learn. Whereas a typical working week is filled with 40 odd hours of work, a typical week in our course only had a few hours work. The rest of the time was wasted.

    Plus, you may have the additional living costs of moving to another part of the country to study, and the loss of income from not being able to work a full time job while you are at college.

    My theory is that our course was caught in bit of a time warp – the tutors probably came from an era when it was normal for arts courses to take a relaxed approach to education. University education was free in the UK at that time, and there was little concept of students paying for an education and expecting to receive value for money in return. Whether that has changed since then I have no way of knowing – I hope so.

    The world of education has changed tremendously since I was at college. You can go online and learn by reading the blogs of some of the top names in the business. You can buy books, ebooks and video courses for just about any aspect of photography you care to learn about. Computers are much cheaper, and almost every student would have one.

    You can also learn by taking workshops with some of the best photographers in your field. They may seem expensive, but it is a pittance in relation to the cost of obtaining a degree.

    photography education

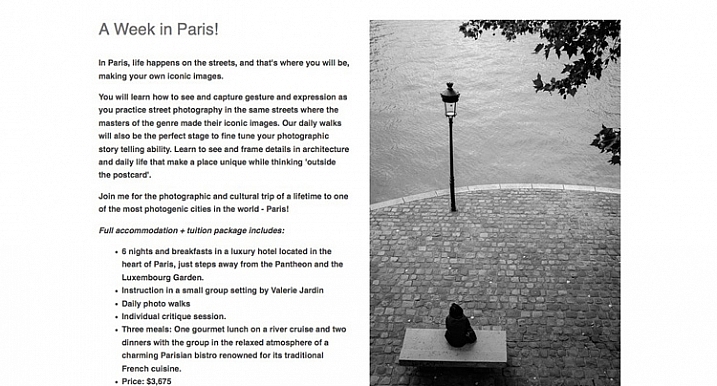
    dPS writer Valerie Jardin runs photography workshops in the United States, Australia and Europe.

    If you were going to study a photography degree today, the main question you have to ask is, what value does it give you over and above what you can learn from books, online resources, and workshops? Here are some ideas.

    Interaction with other photography students: If you struggle to find like-minded people to talk about photography with, then this may be an attraction.

    Industry experience: Does your course give you actual experience working in the area of photography that you want to get into?

    Industry contacts: Very important, as these contacts will help you when you leave college to embark on your career.

    Solid business training: Most photographers are self-employed, so it is essential to know the basics of self-employment and running a business. If your chosen course doesn’t teach these, then don’t even consider it. You won’t be prepared for the practical side of a career in photography.

    An understanding of the newer ways of earning money from photography: Do the tutors on your course understand the emerging world of the business of workshops, and creating ebooks and video courses to sell online? This is important because these are all ways you can bring income into your business. One day there may be more money to be made from teaching photography, than from doing commercial photography assignments, and you need to be ready for that possibility.

    The quality of your tutor:. Is there a highly regarded tutor at your college who can help you get started on your journey as a professional?

    Another important factor is that drive and determination, combined with some innate creative talent, good business sense, and a willingness to learn are the primary characteristics you need for a successful career in photography. How many of these are taught at college?

    photography education

    Digital Photography School has a fine selection of photography ebooks for you to learn from.

    How much will your course cost?

    How much will your photography course cost you to study? The answer varies widely because it depends on where you live, and where you’d like to study. Bear in mind that graduating from college with lots of debt is a financial handicap that may hold you back for many years to come. Don’t forget to factor in living costs, and loss of income, as well as the cost of the course itself.

    A good exercise is to calculate how much your course is going to cost you each week. Then, once you know how much you will learn during each week, you get a true idea of value.

    In my opinion, the only reason that you should get into debt for an education is if you are studying something such as medicine, engineering or law which holds the promise of a lucrative career path at the end of it.

    GotCredit

    By GotCredit

    Photography doesn’t have that lucrative career path. Some photographers make lots of money, some don’t. Lots of photography students (including some from my course) end up in careers other than photography. There are no guarantees in this business, and you need to be aware of that.

    In the book The Millionaire Next Door the authors take in-depth look at the characteristics of the typical American millionaire. Most of them leave school early, start a successful business, and build it up. Very few millionaires have a college education. Why? The years spent studying (and therefore not working or building up a business) and the debt built up during that time prevents most people, regardless of qualifications or earning potential, from building up enough income or assets to become millionaires.

    The solution

    If you have a burning desire to make a living from photography, then look at these learning opportunities first.

    • Books and ebooks
    • Video courses provided by photographers and organizations like Lynda.com

      photography education

      DPS has two video courses for photographers. There are countless others available online.

    • Workshops (half-day and full-day)
    • Longer workshops (two days to a fortnight)
    • Part-time courses provided by local schools and colleges
    • Online courses provided by organizations like the New York Institute of Photography (I have no experience of these courses and no idea whether they are any good, so do your research).

    All of these will be significantly less expensive than a photography degree, and can be carried out in your spare time while you have a full-time job.

    Another approach is to look for a job in the industry. While you might not immediately be able to get a position that you really want (such as an assistant for a prestigious advertising photographer) you may be able to work in a related position.

    For example, you might get a job working for a picture agency, a job as a receptionist in a portrait studio, a position working for a photography magazine, a job as a picture editor somewhere – you get the idea. There are lots of possibilities, and working as closely as you can to the area you want to end up will give you the opportunity to learn from established professionals and make the contacts you need to develop your career.

    Given my experiences I would never advise anyone to study photography at college or university. However, I appreciate that there must be courses that are far better than the one I took. If you had a positive experience studying photography at college I’d love to hear about it, please post your comments below and let’s discuss it.


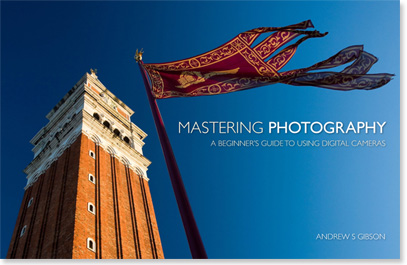
    Mastering Photography

    Mastering Photography ebook by Andrew S Gibson

    My ebook Mastering Photography: A Beginner’s Guide to Using Digital Cameras introduces you to photography and helps you make the most out of your digital camera. It’s aimed at beginners and will teach you how to take your camera off automatic and start creating the photos you see in your mind’s eye. Click the link to learn more or buy.

    googletag.cmd.push(function() {
    tablet_slots.push( googletag.defineSlot( “/1005424/_dPSv4_tab-all-article-bottom_(300×250)”, [300, 250], “pb-ad-78623” ).addService( googletag.pubads() ) ); } );

    googletag.cmd.push(function() {
    mobile_slots.push( googletag.defineSlot( “/1005424/_dPSv4_mob-all-article-bottom_(300×250)”, [300, 250], “pb-ad-78158” ).addService( googletag.pubads() ) ); } );

    The post Should you Study Photography at College or are There Better Options Now? by Andrew S. Gibson appeared first on Digital Photography School.


    Digital Photography School
  • Weekly Photography Challenge – Something Shiny

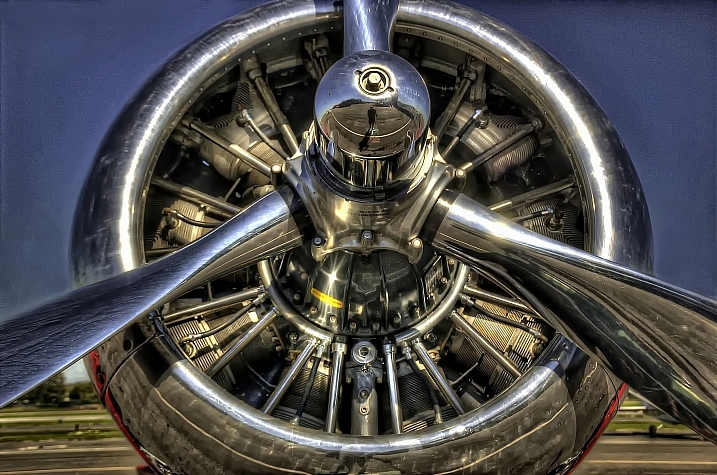
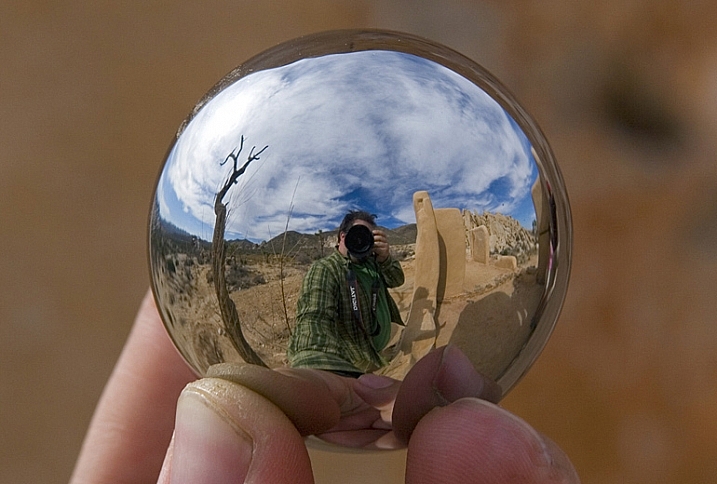
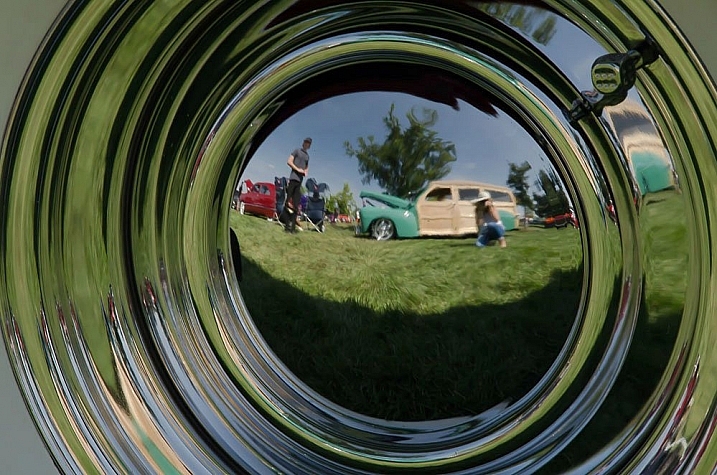
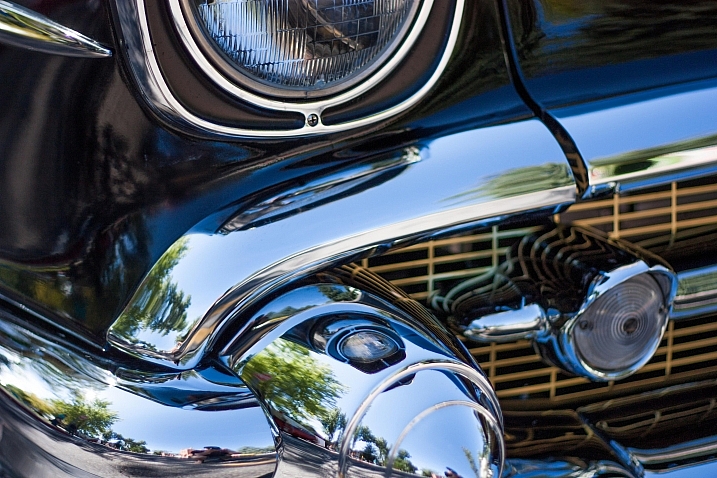
    Oooh shiny! Look at these images of shiny things and your eyes may glaze over.

    Jenny Downing

    By jenny downing

    Weekly photography challenge – something shiny

    What can you see near you that’s shiny? Look around, what do you see:

    • A crystal
    • Chrome
    • A watch
    • Jewelry
    • The sun

    Your job this week is to photograph something shiny, and make it stand out. Make sure it glistens and sparkles in your image. Lighting is key.

    Jennifer Donley

    By Jennifer Donley

    Marvin Chandra

    By Marvin Chandra

    William Warby

    By William Warby

    Jessica Merz

    By Jessica Merz

    Allie_Caulfield

    By Allie_Caulfield

    Share your images below:

    Simply upload your shot into the comment field (look for the little camera icon in the Disqus comments section) and they’ll get embedded for us all to see or if you’d prefer upload them to your favourite photo sharing site and leave the link to them. Show me your best images in this week’s challenge. Sometimes it takes a while for an image to appear so be patient and try not to post the same image twice.

    Darlene Hildebrandt

    By Darlene Hildebrandt

    Darlene Hildebrandt

    By Darlene Hildebrandt

    Darlene Hildebrandt

    By Darlene Hildebrandt

    Ville Miettinen

    By Ville Miettinen

    googletag.cmd.push(function() {
    tablet_slots.push( googletag.defineSlot( “/1005424/_dPSv4_tab-all-article-bottom_(300×250)”, [300, 250], “pb-ad-78623” ).addService( googletag.pubads() ) ); } );

    googletag.cmd.push(function() {
    mobile_slots.push( googletag.defineSlot( “/1005424/_dPSv4_mob-all-article-bottom_(300×250)”, [300, 250], “pb-ad-78158” ).addService( googletag.pubads() ) ); } );

    The post Weekly Photography Challenge – Something Shiny by Darlene Hildebrandt appeared first on Digital Photography School.


    Digital Photography School
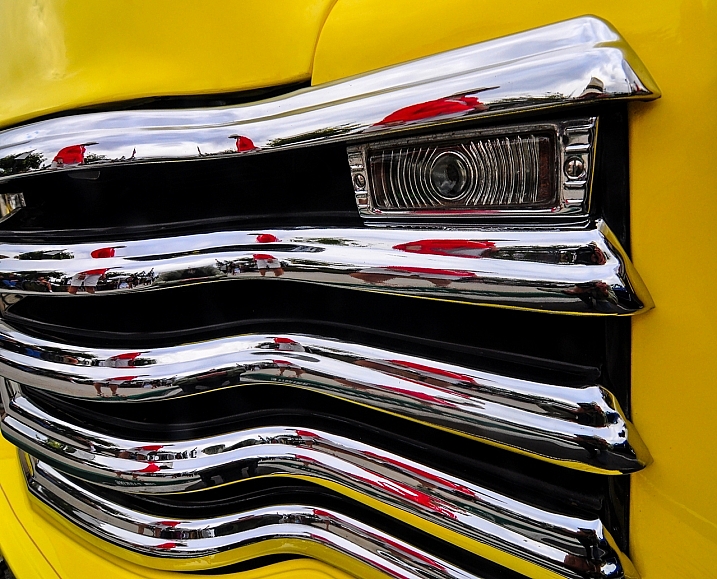
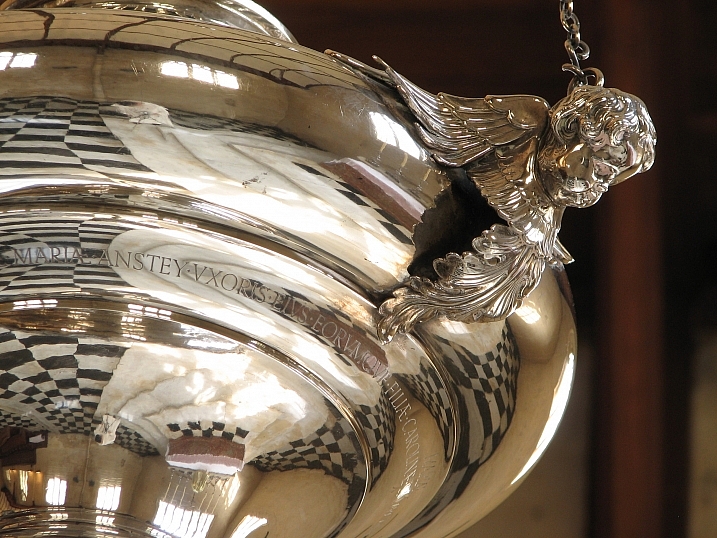
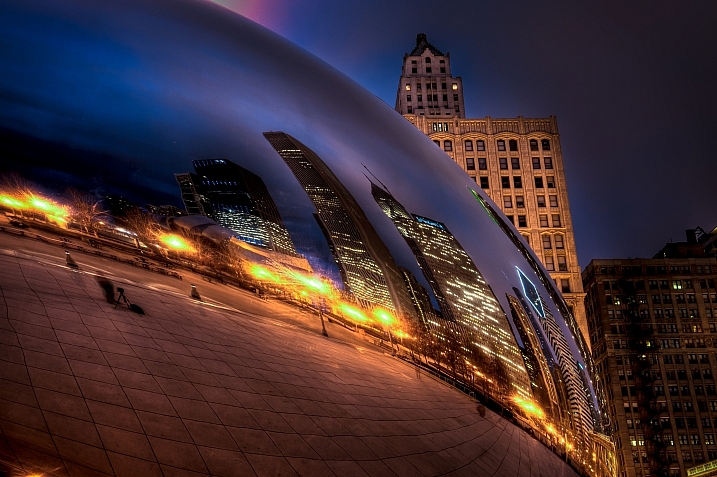
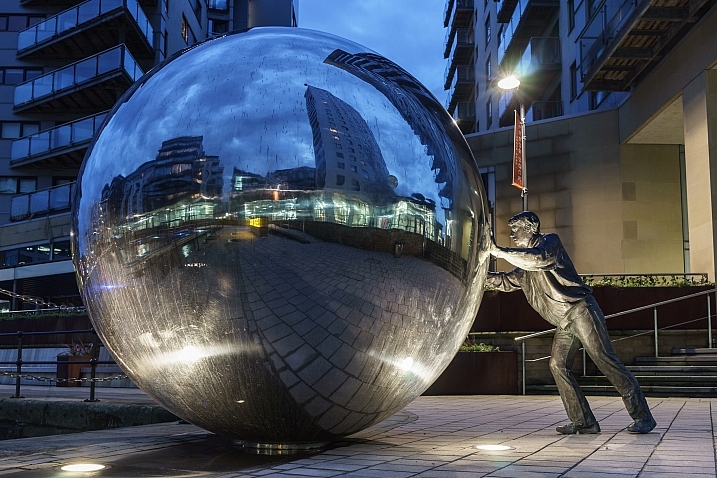
  • 29 Polished Images of Shiny Things

    I think as human beings we are all attracted to shiny things – oh look squirrel! Just kidding.

    But they go grab our eye. However, photographing them can be a bit trickier. You have to watch out for reflections, or maybe use them in your composition to your advantage. But you have to be intentional about it as a photographer.

    In these images I found of shiny things let’s see how some other photographers handled this tough subject:

    Darlene Hildebrandt

    By Darlene Hildebrandt (a selfie of mine from 2009!)

    Brian Burger

    By Brian Burger

    Bill Gracey

    By Bill Gracey

    Sean Molin

    By Sean Molin

    Lawrence OP

    By Lawrence OP

    Dave Wilson

    By Dave Wilson

    Kurt Bauschardt

    By Kurt Bauschardt

    Alan Newman - An1.uk

    By Alan Newman – an1.uk

    Neil  Kremer

    By Neil Kremer

    Kolby

    By Kolby

    Siggi Churchill

    By Siggi Churchill

    Cathy McCray

    By Cathy McCray

    Jon Matthies

    By Jon Matthies

    *Vintage Fairytale*

    By *Vintage Fairytale*

    Killerturnip

    By killerturnip

    Kolby

    By Kolby

    Tiago

    By Tiago

    Darlene Hildebrandt

    By Darlene Hildebrandt

    > Mr.D Photography

    By > Mr.D Photography

    Thomas Hawk

    By Thomas Hawk

    Mark

    By Mark

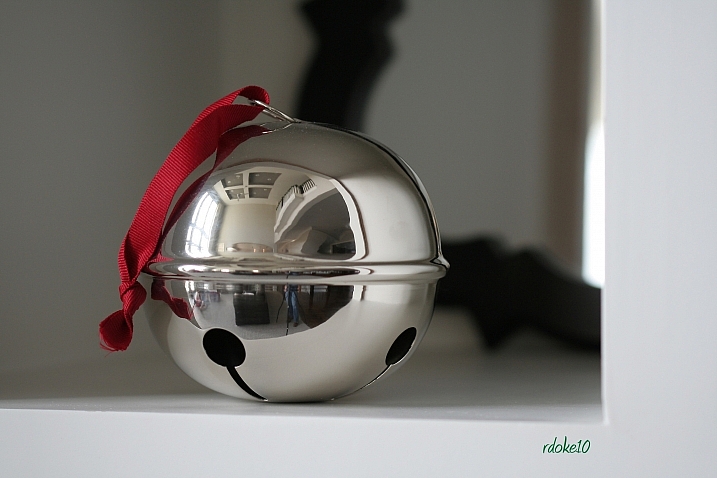
    Ron Doke

    By Ron Doke

    Nana B Agyei

    By Nana B Agyei

    Genna G

    By Genna G

    Philippa Willitts

    By Philippa Willitts

    Carlos

    By carlos

    Aleksey Gnilenkov

    By Aleksey Gnilenkov

    Fatima

    By Fatima

    Tobias S.

    By Tobias S.

    googletag.cmd.push(function() {
    tablet_slots.push( googletag.defineSlot( “/1005424/_dPSv4_tab-all-article-bottom_(300×250)”, [300, 250], “pb-ad-78623” ).addService( googletag.pubads() ) ); } );

    googletag.cmd.push(function() {
    mobile_slots.push( googletag.defineSlot( “/1005424/_dPSv4_mob-all-article-bottom_(300×250)”, [300, 250], “pb-ad-78158” ).addService( googletag.pubads() ) ); } );

    The post 29 Polished Images of Shiny Things by Darlene Hildebrandt appeared first on Digital Photography School.


    Digital Photography School
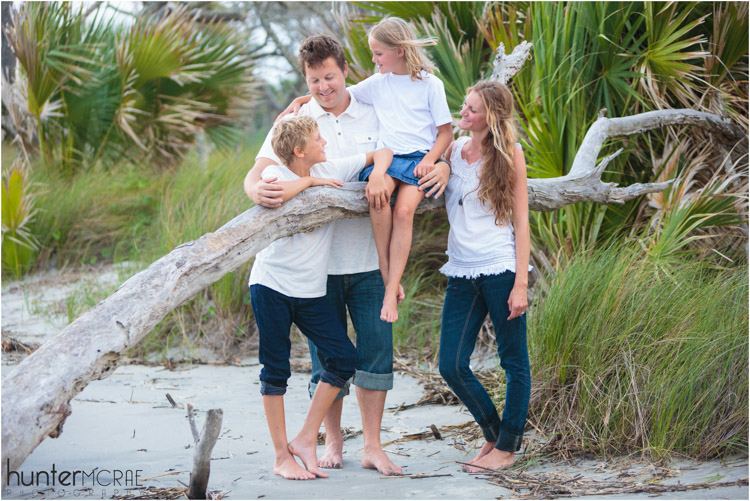
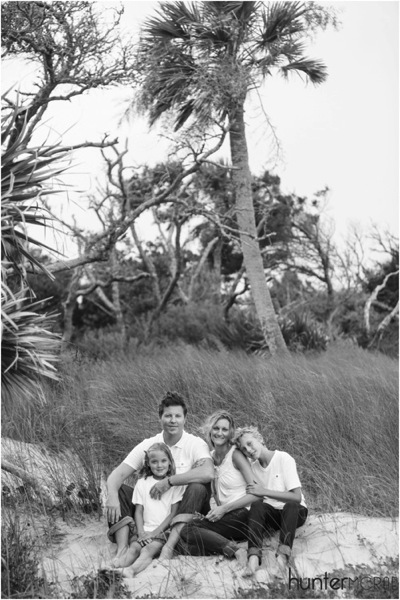
  • How to Find Good Locations for Family Portraits

    When you’re shooting a family portrait, about nine out of 10 times the client will ask, “Do you have a place you typically like to shoot?”

    We all do, of course, but if you take every portrait client to the same location, your portfolio will develop an undesirable, repetitive consistency. So, it’s important to thoroughly scout the area where you live and work, to build a list of go-to spots for any scenario, circumstance, and style.

    2015 12 26 0002

    Think about your city, and build a list of these places where you can shoot:

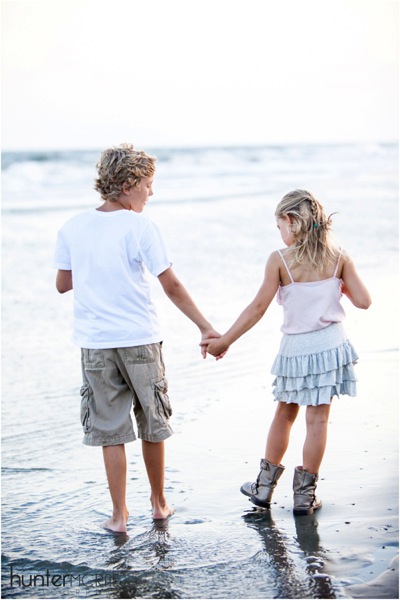
    • A field or shoreline with broad vistas to capture the aura and glow of twilight
    • A similar outdoor venue with features like tall grass or trees to provide backdrop
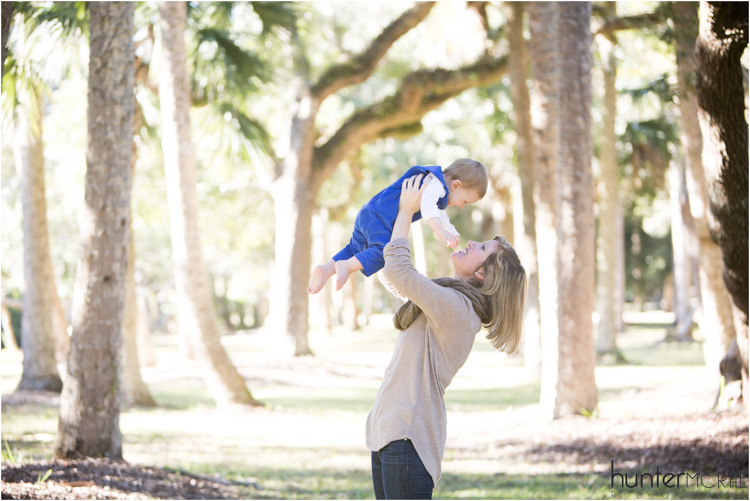
    • An outdoor area with full shade, appropriate for shooting midday
    • A covered outdoor space like a gazebo or covered porch, for shoots in inclement weather
    • An indoor space with high ceilings and lots of windows for natural light

    Because most family portrait sessions will include a variety of backdrops and poses, the perfect shooting location contains all of these elements. But that’s rare to find.

    Finally, make sure that you have the required permits, permissions, and licenses to shoot in your desired locations, whether they’re public or private (many municipalities require a business license to shoot in public places like parks and beaches).

    2015 12 26 0003

    Once you’ve built your list of go-to locations, you’re ready to schedule a session with a client. Here are the two scenarios that could play out:

    1 – The client has already chosen a location

    It’s surprisingly rare for a client to be dead set on a location, but sometimes there’s a family home, or a special place with memories where they’d like to be photographed. Or perhaps there’s extended family gathered together already, and they’d like to keep the photo shoot as easy as possible by having you come to them. If you’re shooting for next year’s holiday portrait or another special event, they may also choose a place that fits the theme, such as an evergreen forest or a snowy landscape.

    If you’re not familiar with the location, ask questions about it while confirming the shoot. You may discover that you need to bring extra equipment like lighting to fill in shadows, if they’re hoping for a family portrait underneath a moss-strewn oak tree at two o’clock in the afternoon.

    Likewise, indoor shots — such as people gathered around the fireplace or the Christmas tree, for example — may present difficulties with lighting that you’ll want to work out and be prepared for, prior to the actual shoot. When feasible, visit the site of any shoot before arriving for the actual job.

    2015 12 26 0005

    2 – The client is open to your location suggestions

    This is the more common scenario, where you pull out that list of locations you’ve already scouted.

    Start by getting a sense of the feeling the family wants to capture in their photos. If it’s a holiday family portrait, they may prefer a warm and rustic theme over something bright and urban, for example. Or they may want a look that’s relevant throughout the year.

    Timing will also have a lot of influence over your decision on where to shoot. When possible, schedule sessions for an hour, to an hour-and-a-half before sunset, giving you time to arrive and chat, get the family comfortable with your presence and style, and then be fully ready to capture beautiful, stunning portraits just when the changing light is at its peak.

    2015 12 26 0004

    Sunset (and sunrise) shoots

    For golden hour sessions, just after sunrise and before sunset, choose a location that ideally has both broad vistas, and objects of interest. For example, if you’re shooting on the beach, don’t just choose a spot with wide open beach (plus houses and passersby) – aim to find a section of beach with sand dunes, tall grass, driftwood, or even distant trees. These objects help frame the image and make it more interesting, without distracting from the subjects of the photograph. The same rules apply in a desert, lake, or city park scenario.

    Midday shoots on a sunny day

    The challenge with shooting at midday is shadows. You don’t want your subjects to squint in full sun, and you don’t want shadows from tree branches, or manmade obstructions, blocking portions of their faces. The key to shooting in midday on a sunny day is to put your subjects fully in the shade.

    2015 12 26 0006

    When a client wants to schedule midday, I often lean toward urban areas with architectural interest. If your city or town has a historic neighborhood, seek out alleyways, parks, cobblestone streets, or even sidewalks that are shaded at midday, but present a beautiful surrounding for subjects.

    Cloudy day shoots

    It’s a huge misconception that overcast days are bad for family portraits. Clients may be discouraged by the threat of rain, but encourage them with the news that even cloud coverage actually makes for beautiful outdoor shots — there’s no squinting and nice even light.

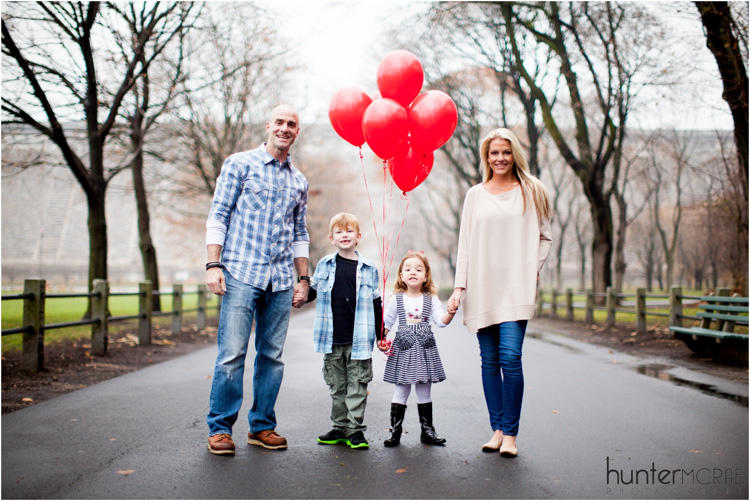
    But, if there’s no drama in the sky (dark clouds swirling on the horizon), an overcast day may be less exciting when shooting with broad vistas and open spaces. Turn to your surrounding objects (trees, historic buildings) to provide the intrigue in the photograph. Or bring in a pop of color with balloons or other props.

    2015 12 26 0007

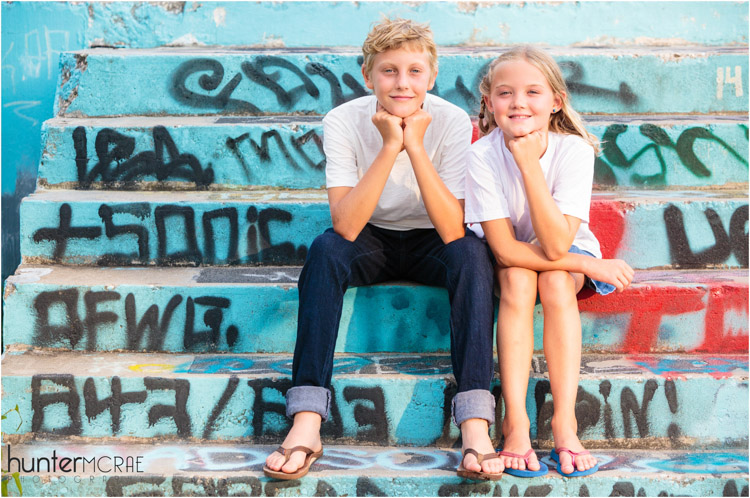
    On an overcast day, a local mural can actually make a perfect backdrop — just make sure your subjects wear muted tones (black, white, gray, beige) rather than colorful attire that might clash with the art.

    2015 12 26 0001

    Final tips and tricks

    Start by putting together your list of places. Keep the same principles in mind that helped you choose those spots, when giving feedback to a client on their suggested locations. In addition, make sure that wherever you decide to shoot won’t be crowded at the time you’re there — the last thing you want is a bunch of strangers in the background.

    Finally, be flexible. Not every shoot will be perfect, but it’s your job as the photographer to ensure that your clients have an enjoyable experience. Have confidence in your skills, and work around obstacles as they arise. If you are engaged and the subjects are happy, it’s possible to create gorgeous family portraits that your clients can share on cards, calendars, and gifts throughout the year.

    Do you have any other location scouting tips? Please share in the comments below.

    googletag.cmd.push(function() {
    tablet_slots.push( googletag.defineSlot( “/1005424/_dPSv4_tab-all-article-bottom_(300×250)”, [300, 250], “pb-ad-78623” ).addService( googletag.pubads() ) ); } );

    googletag.cmd.push(function() {
    mobile_slots.push( googletag.defineSlot( “/1005424/_dPSv4_mob-all-article-bottom_(300×250)”, [300, 250], “pb-ad-78158” ).addService( googletag.pubads() ) ); } );

    The post How to Find Good Locations for Family Portraits by Hunter McRae appeared first on Digital Photography School.


    Digital Photography School
  • Understanding the Focus and Recompose Technique

    Digital cameras have an array of squares or dots, that you see when you look through the viewfinder, which represent the points at which it is capable of focusing. Put your subject on top of one of those dots, press the shutter button, and you’ll get a nice sharp image….usually.

    But, sometimes your camera doesn’t light up the right dot, or your subject is out of the range of the focus points, or you want to select a specific point but you have trouble moving the buttons, knobs, and dials on your camera fast enough. If this sounds like you, or if you just want to check out a new way of using your camera, you might want to try the focus-and-recompose technique.

    focus-and-recompose-shoes

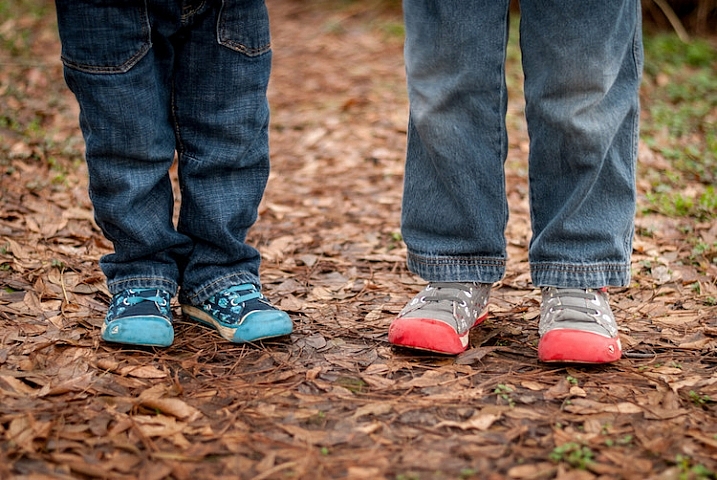
    Kids move around all the time, so rather than hunt for a specific focus point I used the center point to focus on their shoes and then instantly recomposed before snapping the photo.

    Every digital camera allows you several options when selecting which focus points to use such as:

    • Full automatic – Your camera decides which dot to use, and what should be in in focus, often based on what’s closest to the viewfinder.
    • Face Detect – Your camera looks at the scene to see if there are any faces and prioritizes those above all else. If there are multiple faces, it usually looks for the ones that are closest.
    • Single Point – You select one point to be in focus and your camera makes sure that one specific spot is sharp before taking the picture.

    There are other methods as well, but these are the most common, and all of them are quite effective but can also be a bit limiting. Automatic and Face Detect generally work fine but aren’t always accurate. If you want to select the focus point yourself you will usually have to turn a dial or press a joystick on the back of your camera, which can cost you precious seconds, and lead to some missed shots. Focus-and-recompose inverts the equation a bit, and instead of moving the focus point around you focus once, and then move your camera around to compose and get the shot you want.

    focus-and-recompose-squirrel

    Focus-and-recompose is a process wherein you select the focus point, often just one single dot or square in your viewfinder, and lock focus with a half-press of the shutter button. Then with a flick of your wrist you physically move your camera back and forth, or up and down just a bit, in order to recompose your shot will still keeping the focus where you locked it. It sounds a bit complicated, but once you get used to this technique it quickly becomes second nature, and is much faster than fiddling with buttons and dials to select a focus point every time.

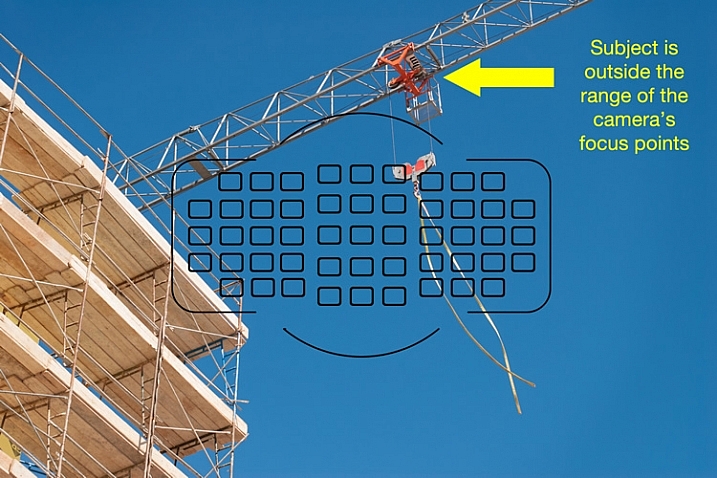
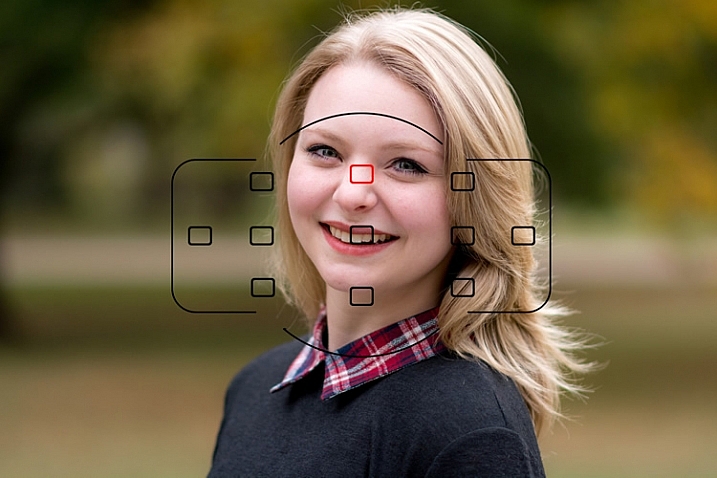
    In the following image I have overlaid an exact representation of all 51 focus points on my Nikon D750 camera. You will notice that the object on which I wanted to focus, the red pully mechanism on the crane arm, falls outside the focus points of my camera.

    focus-and-recompose-focus-points-crane

    If I had to rely solely on the focus points of my camera, I wouldn’t have been able to get the shot I wanted. However, the focus-and-recompose technique offered an easy solution. All I had to do was focus on the top pully, lock it with a button on my camera, and then recompose the shot by shifting my camera’s field of view down just a bit. By using this method I did not need to make an compromises, and I am pleased with the final image

    Even though some cameras offer a much broader spread of focus points that can reach to the very edge of the frame, it is time-consuming to select them, or shift from one to the next using the dials on your camera. Some cameras don’t have nearly the number of focus points as higher-end models, which can be a bit frustrating when your subject falls between two points, but focus-and-recompose can solve this issue as well. I don’t even use all 51 of my camera’s points, because it’s quicker to select one from only 11, as you can see in the image below, and then recompose as needed.

    focus-and-recompose-portrait

    It’s not always possible to get the focus precisely where you want it, if you let your camera do all the work for you.

    This portrait of a college sophomore (above) illustrates a big problem for traditional focusing methods, especially on cameras without a lot of focus points. In order to get the focus point precisely on her left eye where I wanted it, the only option using traditional methods would have been to scoot my camera’s field of view over a bit, which would have meant compromising what I wanted the shot to look like. Rather than sacrifice my artistic vision because of the limitations of my camera, I selected the top center point (highlighted in red), focused my camera on her eye, and then shifted my camera over just a bit to get the picture. Because I was only using 11 out of 51 possible focus points it was much quicker to select the one I wanted instead of repeatedly tap-tap-tapping on the dial on the back of my camera.

    focus-and-recompose-baby

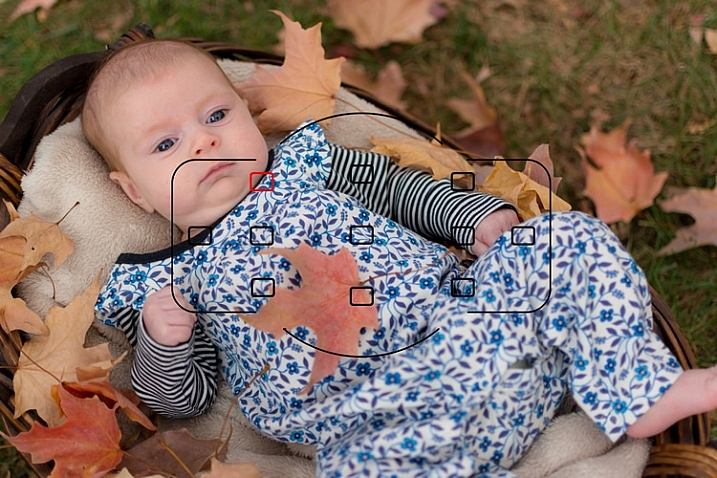
    This baby’s eyes were out of the reach of my focusing area so I used the top-left square to lock focus and then recomposed to get the shot I wanted.

    There are some important limitations to know about this method, and it does not work for every type of photographic situation. Most cameras have a few different autofocus modes such as single (the camera focuses once and doesn’t refocus until you shoot a picture) and continuous (the camera refocuses continually until you take a shot). If you shoot static subjects, such as landscapes and architecture, you can leave your camera in single mode, in which focus-and-recompose works quite well.

    However if you shoot things that are always on the move such as families, kids, sports, autos, or animals, you will get better results using continuous focusing. This makes focus-and-recompose tricky because as soon as you move your camera to re-frame your shot, the focusing point moves too. In these instances I usually just leave my camera in continuous focusing mode while I move myself around to get the picture I want, since the subject has usually moved by the time I would normally lock focus, and recompose the shot.

    One of the trickiest aspects of focus-and-recompose involves the physical action of holding the shutter button halfway down with your finger, while you reframe your shot. Fortunately you can solve this if you use the back button focus, technique which decouples the action of focusing, from that of actually taking a picture. Moving to back button focus, along with using focus-and-recompose, has entirely transformed my approach to photography, and made me a lot more nimble and versatile as a photographer.

    focus-and-recompose-tesla

    I used focus-and-recompose to nail focus precisely on the Tesla “T” logo.

    One other thing to note about focus-and-recompose is that the center focusing points on most cameras are typically more sensitive than those along the outer edge of the frame, and are thus able to get more a more accurate focus, especially in dim light. If you use the outer focusing points, your pictures might not always be as sharp as they could be, but if you focus with the center point and then recompose your shot you will likely get more keepers. Of course this is not recommended for macro photography or other applications where your depth of field is razor thin, since any tiny movement of the camera will dramatically alter your picture, but for most other situations it can be a huge benefit.

    What about you? Have you tried this technique or do you have other focusing tips to share? Leave your thoughts in the comments below!

    googletag.cmd.push(function() {
    tablet_slots.push( googletag.defineSlot( “/1005424/_dPSv4_tab-all-article-bottom_(300×250)”, [300, 250], “pb-ad-78623” ).addService( googletag.pubads() ) ); } );

    googletag.cmd.push(function() {
    mobile_slots.push( googletag.defineSlot( “/1005424/_dPSv4_mob-all-article-bottom_(300×250)”, [300, 250], “pb-ad-78158” ).addService( googletag.pubads() ) ); } );

    The post Understanding the Focus and Recompose Technique by Simon Ringsmuth appeared first on Digital Photography School.


    Digital Photography School
  • Why Taking Pictures of Your Pets Will Help Make You a Better Photographer

    If you have a pet, it may stand to reason that you already point your camera at it a fair amount. Why not? Pets, whether they are cats, dogs, or even chinchillas, tend to be photogenic. Beyond that, as a photographer, your pet is a subject you already share a strong emotional bond with, so it’s only natural to take a few snapshots along the way.

    pet-photography-to-improve-camera-skills-9914

    As a photographic genre, pet photography can go well beyond that of the simple snapshot. If you start to dissect the various disciplines it requires, you may notice that it involves a broader spectrum of skill sets than many other kinds of photography. From lighting, to camera control, to managing a difficult subject, photographing your pets can help you learn, and reinforce a great deal of camera craft that can be transferred across many other genres.

    The important factor here is that your subject, your pet, is generally far more accessible to practice with than other subjects, such as people.

    Even if you think pet photography isn’t something you’re ultimately interested in, this article is intended to demonstrate the skills and disciplines you can hone on pets, and then transfer effortlessly to other genres.

    Camera craft

    pet-photography-to-improve-camera-skills-8431

    If you’re new to photography, this is the most important point. Things like aperture, shutter speed, and ISO all need relentless practice and reinforcement when you’re learning your way around the camera. Sure, you could just use an apple on a table, but having a moving subject will force you to act quicker, and make decisions on the fly. This kind of mastery over your camera will allow you to react faster to any changes in your subject, and will allow you to catch many images you may otherwise have missed while fiddling with the dials.

    Camera on hand

    One of the most given pieces of advice to photographers is to always have your camera with you. It’s good advice, but it’s not easy to implement. By dedicating yourself to photographing your pets, you’ll already be taking a step in the right direction. This is especially true if you have a dog that you walk regularly. Just make sure the camera goes with you on your walks, and you’ll be ready for any opportunity that presents itself, including ones that don’t involve your pet.

    As a bonus, dog walking is an excellent excuse to be out during golden hour every day.

    Patience

    pet-photography-to-improve-camera-skills-9944

    Photographing pets is hard. This difficulty has nothing at all to do with any technical skills with the camera. Animals tend to be impatient, disinterested, distractible, and sometimes skittish. With the exception of reasonably well-trained dogs, you will probably have a hard time getting most other animals to do what you need. Just imagine trying to give an iguana commands.

    The key here is patience. Often you will have to wait frustratingly long periods of time before a shot presents itself. By understanding this, you can focus your energy on the shot when it does appear, rather than the time leading up to it. It is also usually better to wait for something natural to happen, than to force something artificial.

    This kind of patience can take a while to develop, but it is a high value skill that transfers well across the photographic disciplines. Your wildlife photography, portraits (especially child portraits), street photography, and sports photography would all benefit from this trait.

    Unpredictability

    pet-photography-to-improve-camera-skills-0113

    Animals are unpredictable. This is great news if you’re trying to hone your skills. Leveraging that unpredictability as a learning tool will allow you to react to different situations much faster. This could be as simple as pumping up the ISO without thinking about it, or even swapping lenses in seconds without a thought.

    The best part is that it’s this unpredictability that often leads to the most interesting photos, or at least the funniest.

    Lighting

    Whether it’s natural or artificial, lighting is probably the most complex and multifaceted of the photographic skill sets. While not difficult, there is a lot to it, and it takes a significant amount of time to learn, and then master.

    With a pet, you have constant access to a test subject for any new lighting technique you want to try. If something isn’t right, you can take your time and alter things as you need, without having to worry about taking up someone else’s time.

    pet-photography-to-improve-camera-skills-0795

    Individual lighting techniques tend to work as well with animals as they do with people. Once you have a setup the way you want it, often all you will need to do to switch to a human subject, is raise the lights up. If you’re using natural light, you wouldn’t even need to do that.

    In the end

    There is a lot of contention out there about whether or not photographers should share photos of their pets. That’s up to you, nobody else. Share them or not, as long as you’re putting the hours in and getting the experience, that’s all that matters.

    Hopefully you can see how dedicating time to photographing your pets can help you to improve a broad set of skills simultaneously. By removing accessibility issues and keeping costs minimal (a bag of treats is a cost, right?) you can ramp up the time you spend practicing, and reach the top of the learning curve in no time.

    If nothing else, can spending some extra time with your pet be a bad thing?

    googletag.cmd.push(function() {
    tablet_slots.push( googletag.defineSlot( “/1005424/_dPSv4_tab-all-article-bottom_(300×250)”, [300, 250], “pb-ad-78623” ).addService( googletag.pubads() ) ); } );

    googletag.cmd.push(function() {
    mobile_slots.push( googletag.defineSlot( “/1005424/_dPSv4_mob-all-article-bottom_(300×250)”, [300, 250], “pb-ad-78158” ).addService( googletag.pubads() ) ); } );

    The post Why Taking Pictures of Your Pets Will Help Make You a Better Photographer by John McIntire appeared first on Digital Photography School.


    Digital Photography School
  • Fast Flash for Portrait Perfection: 25% Off our New Flash Photography eBook

    NewImageWho said flash portraits had to be complicated?

    With our brand new ebook, Fast FLASH for Portrait Perfection by Gina Milicia, they don’t have to be!

    A five-time dPS ebook author, Gina has been using flash lighting in her portraits for over 25 years – photographing a-list celebrities, heads of state… even royalty.

    Now in this practical how-to guide, she’s sharing all her best flash secrets, tips and techniques.
    She’s really held nothing back!

    Created specifically to take away the guesswork when it comes to flash photography, this practical ebook will give you the skills and confidence you need to create AMAZING portrait images.

    Learn more about Fast FLASH here.

    Is this flash photography ebook for you?

    Yes! If you:

    • Want to learn all there is to know about flash, from one of the world’s best portrait photographers
    • Don’t want to get bogged down with technical explanations
    • Are looking to develop your own unique portrait lighting style
    • Want to understand what gear to use (and what not to use), no matter your budget
    • Want to greatly improve the quality of your portrait images, whether you’re a beginner, enthusiast or pro

    There are loads of examples included, too. All shot by Gina using mostly budget lighting kits (but with studio-quality results that you can achieve as well!).

    Grab a Copy and Save 25% Today

    To celebrate the launch of this brand new Flash Photography eBook you can pick it up today for a limited time 25% off discount. Normally $ 19.99 USD today it is yours for just $ 14.99 USD.

    Pick up your copy of Fast FLASH here.

    googletag.cmd.push(function() {
    tablet_slots.push( googletag.defineSlot( “/1005424/_dPSv4_tab-all-article-bottom_(300×250)”, [300, 250], “pb-ad-78623” ).addService( googletag.pubads() ) ); } );

    googletag.cmd.push(function() {
    mobile_slots.push( googletag.defineSlot( “/1005424/_dPSv4_mob-all-article-bottom_(300×250)”, [300, 250], “pb-ad-78158” ).addService( googletag.pubads() ) ); } );

    The post Fast Flash for Portrait Perfection: 25% Off our New Flash Photography eBook by Darren Rowse appeared first on Digital Photography School.


    Digital Photography School