Category: Photography

  • How to Create Strong Compositions Using Color Contrast

    Color contrast and composition

    When I wrote about making dramatic images using shadow and contrast, a reader rightly pointed out that a couple of my photos were also good examples of color contrast.

    This is interesting because it shows how two photographers can look at the same scene, and see different things. In those examples I saw textures, shadows, and tonal contrast, and instinctively converted them to black and white. But another photographer might place more importance on the strong colors, and make them the centre point of the composition.

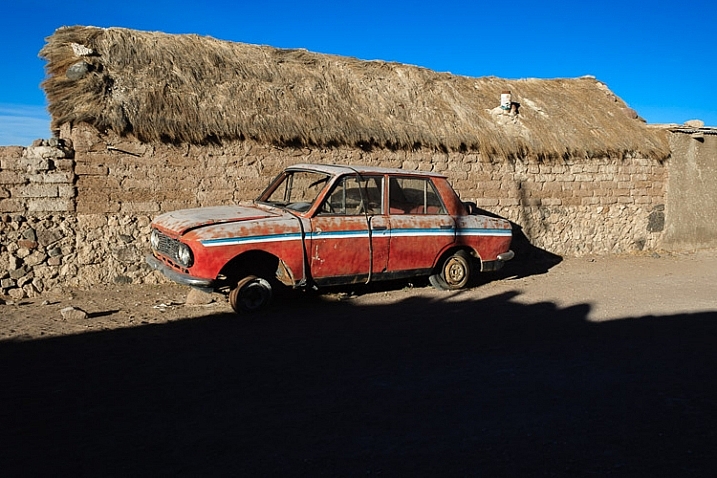
    Here’s the first of those images. The color contrast here is between the orange car and the blue sky.

    Color contrast and composition

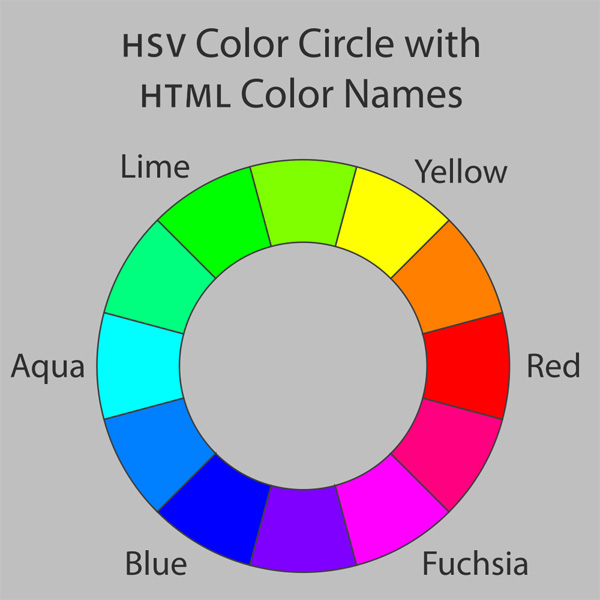
    If you look at a color wheel, used by artists and graphic designers to show the relationships between colors, you will see that orange and blue are on nearly opposite sides. They are said to be complementary colors (as opposed to analogous colors, which are close to, or next to each other on the wheel).

    Color wheel

    Diagram by Wikipedia contributor Jacobolus

    Using contrasting colors in a composition nearly always results in a strong image. The key is to keep the composition simple, and not to overwhelm it with too many hues.

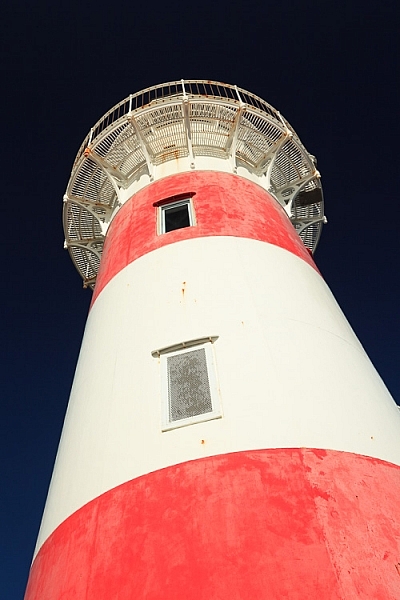
    Here are a couple more examples. The first shows dramatic red stripes on a lighthouse against a dark blue sky (I used a polarizing filter to intensify the colors). Red and blue are also nearly opposite on the color wheel.

    Color contrast and composition

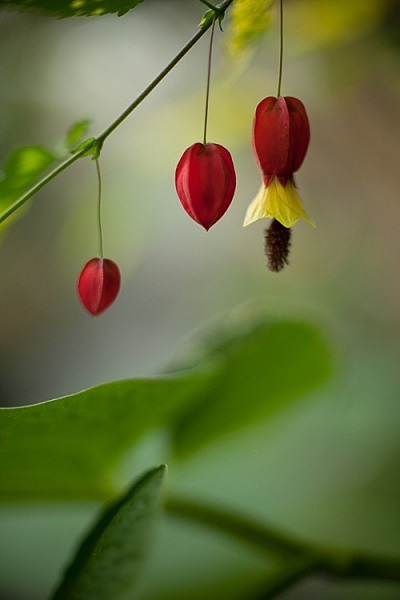
    The second shows red flowers, against a green background.

    Color contrast and composition

    These three color combinations – orange/blue, red/blue, red/green – occur a lot in both natural and man-made environments.

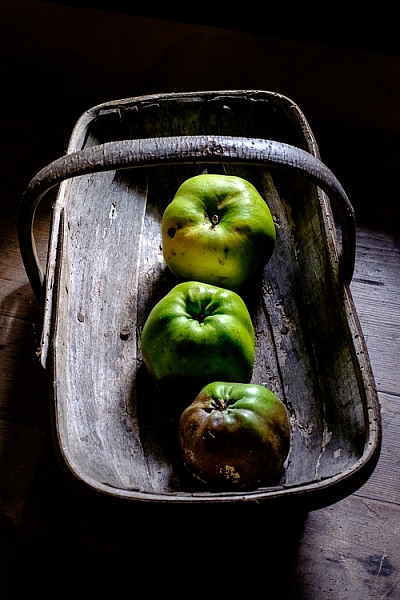
    Below is the second photo from the earlier article, mentioned above. It uses a different type of color contrast. The green apples are displayed against a grey background. The lack of color in the background makes the green of the apples seem more intense than it is in reality.

    Color contrast and composition

    This technique of placing a colored object against a dark or neutral background is another that you can use over and over. It’s very effective. Here are two more examples.

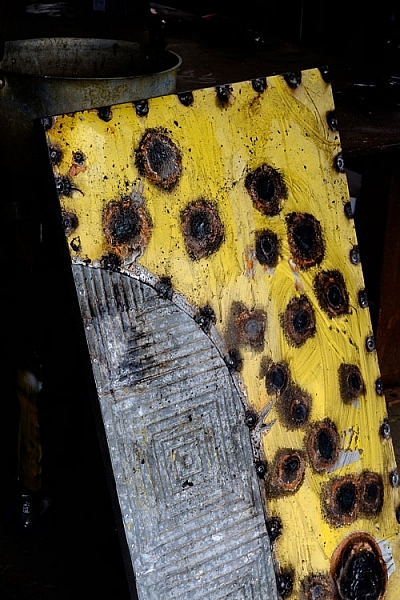
    The first shows a work created by artist Chris Meek. The grey background emphasises the yellow paintwork, the only strong color in the image.

    Color contrast and composition

    Image used with the permission of the artist

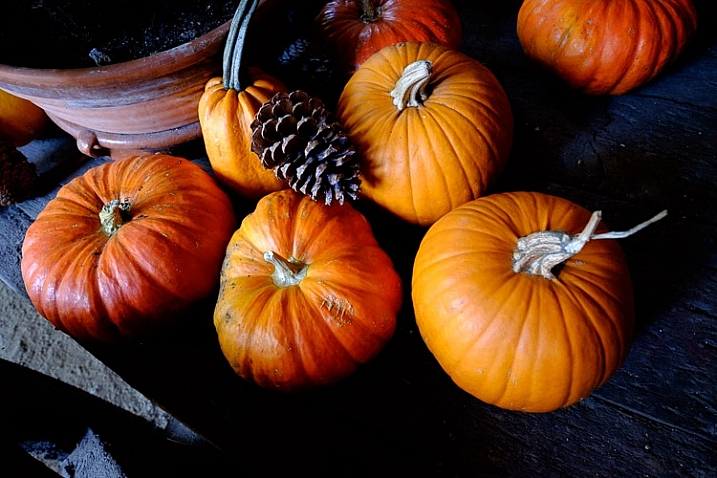
    The second shows a display of pumpkins. The dark grey background emphasizes the intensity of the orange hues.

    Color contrast and composition

    The key here again is to keep the composition simple. Imagine each of the previous examples with a splash of red in the image somewhere. The red would pull your attention away from the dominant colors, and diminish the impact of the composition.

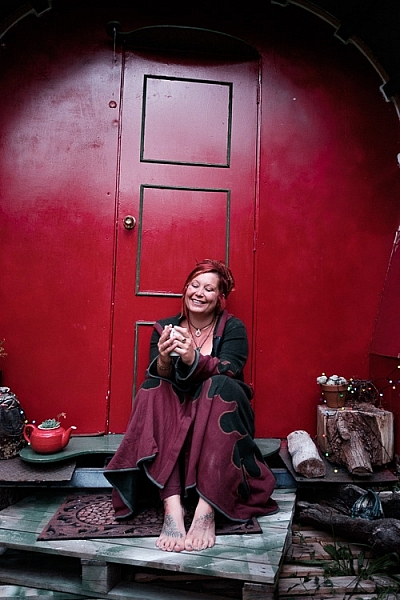
    Another approach to using color contrast is to look for scenes with a limited color palette. Here’s an example – the image below is a portrait of a friend of mine, sitting in front of a gypsy caravan, that she made herself. The image is full of color, but they are mostly shades of two different hues – red and green, which we know are near opposites on the color wheel.

    Color contrast and composition

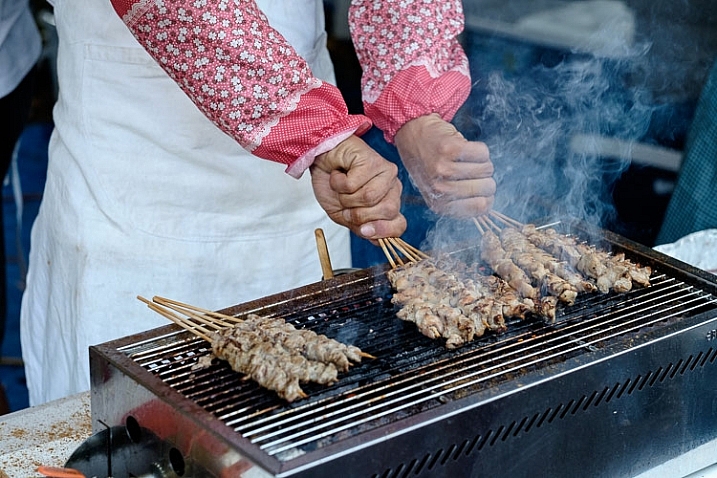
    Here’s another example. It’s a colorful image, but again there are two dominant hues – blue and red. The incongruity of the plastic sleeves the chef is using to protect his arms, combines with the color contrast to make a strong composition. The colours are more muted than the earlier examples with this color combination, but it still works.

    Color contrast and composition

    The images in this article have several things in common: strong use of color (in different ways), simple composition (simplicity often equals strength in design), and good observational skills.

    It is is one thing to analyze these things in photos, it is another to train yourself to see them. To do so, you really have to think about the scene in front of you. What colors do you see? Does the light suit the subject? How can you simplify the composition to make those colors stronger? If you can figure out the answers to these questions, your images will be stronger.

    Do you have any questions about color contrast, or any photos to show us? Please let us know in the comments below.


    Mastering Composition

    Mastering Composition ebook by Andrew S. GibsonMy ebook Mastering Composition will help you learn to see and compose photos better. It takes you on a journey beyond the rule of thirds, exploring the principles of composition you need to understand in order to make beautiful images. You’ll also learn how to use colour to create photos like the ones in this article. Click the link to learn more or buy.

    googletag.cmd.push(function() {
    tablet_slots.push( googletag.defineSlot( “/1005424/_dPSv4_tab-all-article-bottom_(300×250)”, [300, 250], “pb-ad-78623” ).addService( googletag.pubads() ) ); } );

    googletag.cmd.push(function() {
    mobile_slots.push( googletag.defineSlot( “/1005424/_dPSv4_mob-all-article-bottom_(300×250)”, [300, 250], “pb-ad-78158” ).addService( googletag.pubads() ) ); } );

    The post How to Create Strong Compositions Using Color Contrast by Andrew S. Gibson appeared first on Digital Photography School.


    Digital Photography School

  • Game Changers: How to Take Your Photography to the Next Level

    The other day, one of the students I was mentoring asked me a really interesting question, “How do I take my photography to the next level?” The conversation that followed was the inspiration for this article.

    Photograph subjects and experiences that you love, in a way that is unique to you

    Air 39

    “The artist sees what others only catch a glimpse of.” – Leonardo da Vinci

    When you photograph the things you love, you will always be excited and inspired. If you are excited and inspired by something, you are naturally going to want to spend more time doing it. The more time you spend doing something, the better you become at it.

    I spent the first half of my career focusing on fashion photography, because I thought that was what I should be doing. I was okay as a fashion shooter, but to be 100 percent honest, I never really got the whole fashion world, and it didn’t consume me like it does the best fashion photographers in the world. The photographers who excel in this genre live and breathe fashion; some of them are fashion.

    It wasn’t until I started to focus more on portraits, and travel lifestyle photography, that I really fell head over heels in love with photography. I’d finally found my “thing”! I could happily shoot portraits or travel lifestyle images all day long. I felt energized, and on a high after each shoot. I was always exhausted after shooting fashion.

    Are you photographing the things you really love? Is this work making you feel excited and energized, or depleted and flat?

    The way we see and experience life is something that is unique to each of us. If you want to take your photography to the next level, focus on photographing the things that matter to you, in your own world, and in a way that is unique to you. This is the one thing that will set you apart from all the other photographers.

    Passion, not perfection

    Contender final 1

    If passion and perfection had an arm wrestle, passion would win every time. Why? Because the thing that makes photography great, is the way it makes us feel. If there is no passion in an image, and it doesn’t inspire a reaction, then it’s just a snapshot.

    If you want to take your work to the next level, show your passion for your work.

    Given a choice to shoot a photo that was technically brilliant, sharp, correctly exposed, and perfectly composed, yet void of emotion – or an image that was a bit rough around the edges, slightly soft, grainy, with a few blown highlights but captured the feeling – I would choose the latter every time.

    Don’t just focus on what something looks like, focus on how it feels.

    Technique, not gear

    Gear 05

    Michael Schumacher is the best F1 driver in history. If he were to challenge me to a race, and I drove a Ferrari and he drove a 1981 Toyota Corolla, he would still win. Why?

    Schumacher is a master, who has spent years driving. He knows how to drive fast, and take corners at high speed, without rolling the car. He would probably lap me three times before I’d even had a chance to get out of third gear. In the wrong hands, the best gear in the world is useless, if you don’t know how to drive it.

    So many photographers get hung up on the notion that having the right gear will make them better photographers. While it’s true that the right gear will give you a better quality image, it’s not going to guarantee that you will be a better photographer.

    Instead of worrying about the gear, focus on the technique. It’s what you do every day that makes you great; not what you use every day. Dedicating as few as thirty minutes a day to your photography, every day, will do more to improve your skills and develop your style than owning all the high end gear in the world.

    Learn to peel potatoes before you cook a soufflé

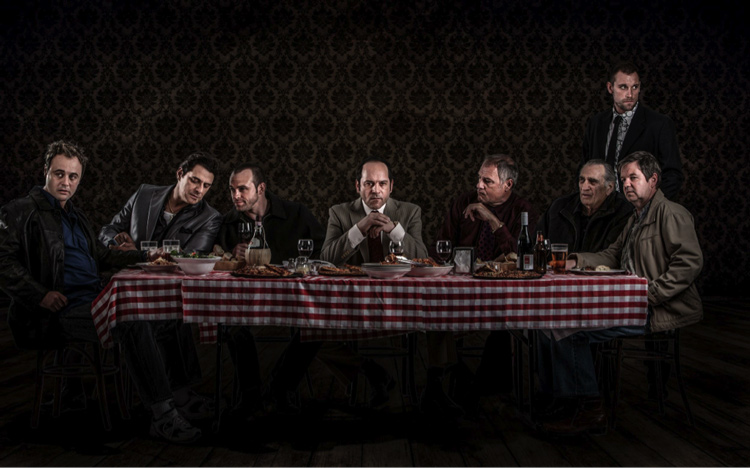
    Last supper

    Fat Tony & Co/Nine Network Australia

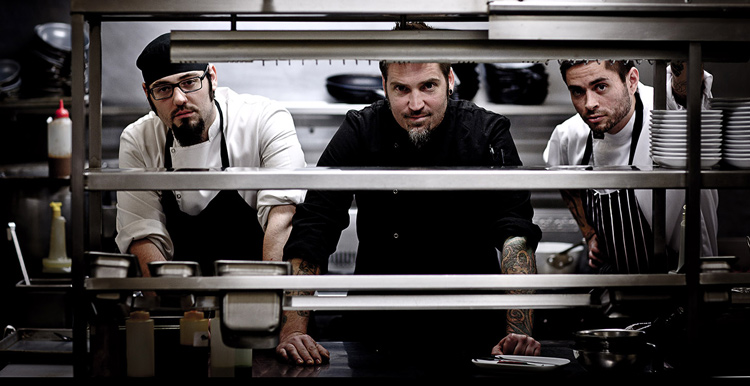
    During the first few years that I was building my photography business, I had a night job working as a cook in an Italian restaurant. When you train to become a cook, you must master a task before you are allowed to move on to the next one. The first task each apprentice cook must master is peeling potatoes. Then they move on to the salads, entrees, pasta, steaks, and seafood. The last thing I was taught to cook was one of the most technically difficult dishes, the soufflé.

    The photographer who attempts a complicated studio shoot right after buying his or her first camera, is like the apprentice cook who walks into a kitchen and insists on cooking a soufflé on their first day.

    Taking a stepped approach to learning, will take your photography to the next level much faster than trying to learn it all at once. Many photographers will try complicated shooting or lighting styles, then become frustrated because their images are not working out the way they had hoped.

    Master peeling potatoes first. It’s definitely a game changer!

    FOG11FS 166

    Ask for help

    Putting their work out there, is something that many photographers struggle with. Yet, seeking and implementing constructive criticism is one of the fastest ways to take your photography up a few notches.

    The fear of ridicule or criticism prevents some from sharing their work. This is really sad, because many of the fears people may have are imagined. FEAR is an acronym for False Evidence Appearing Real, it’s our mind trying to keep us small. When you create beautiful art, and you don’t share it with the world, you deny so many people the opportunity to experience beauty.

    If you are ever in doubt, take Mother Nature as an example of best practices for artists. Every day she puts her work out there – sunset, sunrise, storms, sunshine, and rainbows. Some are absolutely spectacular. Other times, her art can be mediocre, yet she puts her work out there every day for us to enjoy.

    Other ways you can ask for help:

    • Join a photography group
    • Find a mentor
    • Attend a workshop where your work can be critiqued by an expert whose work you respect

    Confidence

    Ecove Hyde15 2977

    “Whether you think you can, or you think you can’t–you’re right.” Henry Ford

    You can read books, take courses, and listen to podcasts until the cows come home. But if you don’t have self-confidence, it will be very difficult to take your work to the next level.

    Confidence is knowing that you’ve done the hard work and put in the hours, and can now turn up and nail the shot.

    Many photographers and artists really struggle with confidence. It may be due to old programming from a lifetime of being told they weren’t good enough, of having the people they spend the most time with not offering enough support, or a hundred other reasons, all of which undermine a person’s self-esteem.

    Look for ways to improve your self-confidence. Spend more time with people who value and respect what you do. Find ways you can get rid of destructive self-talk.

    The good news is that self-confidence can be trained, just like a muscle in the gym. Gaining self-confidence and self-belief is, by far, a major game changer. It will help take your photography to the next level.

    Do you have a strategy that I might have missed? What techniques have you used to take your work to the next level? I’d love to hear your thoughts.

    All images: Copyright Gina Milicia


    fastflash_bookIf you want to learn more about using flash for creating portraits, pick up Gina’s brand new dPS ebook: Fast Flash for Portrait Perfection. Now on sale for an introductory price for a limited time only.

    googletag.cmd.push(function() {
    tablet_slots.push( googletag.defineSlot( “/1005424/_dPSv4_tab-all-article-bottom_(300×250)”, [300, 250], “pb-ad-78623” ).addService( googletag.pubads() ) ); } );

    googletag.cmd.push(function() {
    mobile_slots.push( googletag.defineSlot( “/1005424/_dPSv4_mob-all-article-bottom_(300×250)”, [300, 250], “pb-ad-78158” ).addService( googletag.pubads() ) ); } );

    The post Game Changers: How to Take Your Photography to the Next Level by Gina Milicia appeared first on Digital Photography School.


    Digital Photography School

  • 8 Tips to Help Make People Comfortable for Their Portrait Session

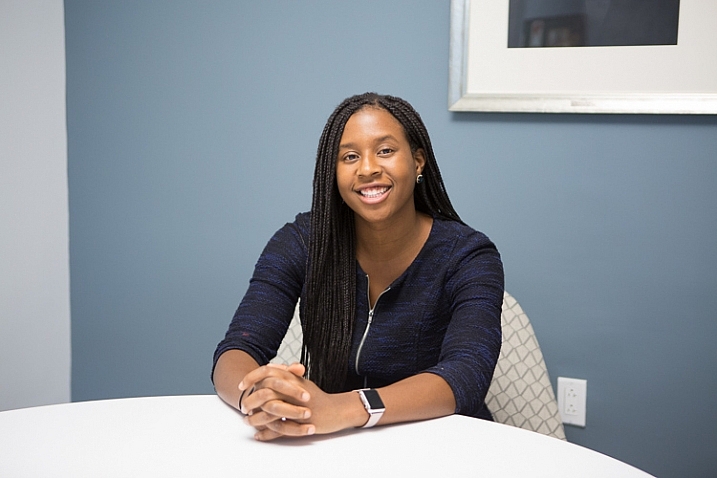
    Portrait photography is an incredibly complex subject to master. You have to worry about a variety of technical matters, including your lighting, location, time with subject, color temperatures, and your composition. In many situations you will be moving around an environment quickly and changing your lighting on the fly. It is a lot to pay attention to, and coordinate at the same time.

    Business Portrait Session

    On top of all of this, you must figure out how to make, and keep, your subject comfortable throughout the entire session. No matter how much is going right or wrong, or what is going through your head, your primary attention must always be on your subject.

    Keeping the subject comfortable and natural is an art form in itself. Obviously, it’s not always possible. Some subjects will be impossible to get through to no matter what, but most of them will rise to the occasion if you can foster the right environment. There are many different ways that portrait sessions can vary, but here is how I like to approach photographing my portrait subjects.

    1. Assess the subject’s personality

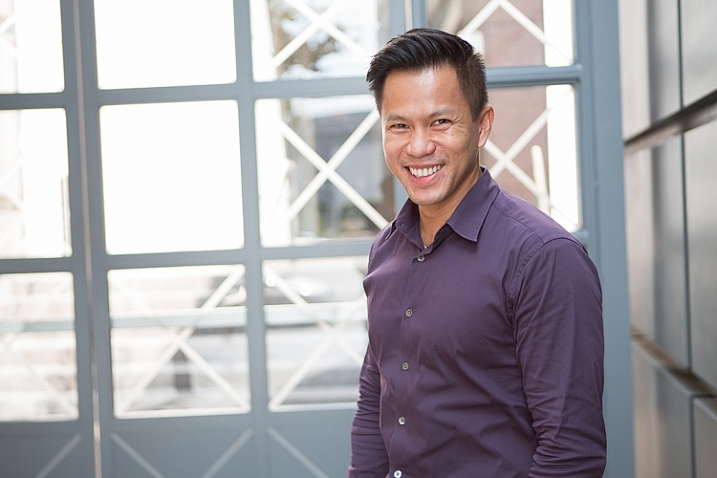
    Each subject will have a different relationship with the camera. Some will have done this before, and will be all business. Some will be extroverted and will love the attention. Some will be uncomfortable at first, but will open up easily after a little time together.
    Business Portrait Session

    The toughest group are subjects that come in incredibly uncomfortable and stiff, to them you are worse than the dentist. Seriously, there are many people that would much rather go to the dentist than to be photographed by you. These subjects will be the toughest to work with because they, “know I look terrible in front of the camera.” They know this because they know how uncomfortable they get, but they only get uncomfortable because they know they photograph badly. This is a catch 22 that you will have to scratch and claw your way out of, so to speak.

    Is your subject extroverted or introverted? Do they like to joke and talk, or are they more reserved. Are they in the middle of a busy day, or do they seem more relaxed. Do they give you a stiff smile? These are all cues that you can pick up on, to help you figure out the best way to get through to them. The better you can understand your subjects, the better you will be able to get them to enjoy working with you, and to eventually feel comfortable with you and the camera.

    2. Talk with your subject before the session

    Whenever possible, when you first meet your subject, introduce yourself first. Ask them how their day is going to get them talking, then tell them about what you will be doing together. Many subjects will have no idea what to do, or what is about to happen, and will become stiff, nervous, and awkward.

    Business Portrait Session

    Explain how the session will go, and what you would like them to do. Maybe tell them that you are looking for natural images, casual smiles, and comfortable poses. Let them know that you will tell them what to do over the course of the session, but also mention that if they have ideas that they should bring them up. Is there a way that they feel comfortable standing? Tell them to speak up. Do they want to try something? Tell them to speak up. The best shoots are ones that turn into a collaboration between the photographer and the subject.

    3. Help them pose, then change it often

    Tell the subject that you will do some posing but that you also want them to stand in a way that is comfortable for them. You can have your subjects play a part in the posing (a few will be bad at this, but most will be good). Ask them, “How would you naturally stand or lean here?” Give them a couple suggestions of what to do by demonstrating a pose. If necessary, put a few example images on your phone or tablet to show them. Keep them moving. Ask them to slightly change their pose every few shots. This will keep them fluid and comfortable, instead of stiff and standing still.

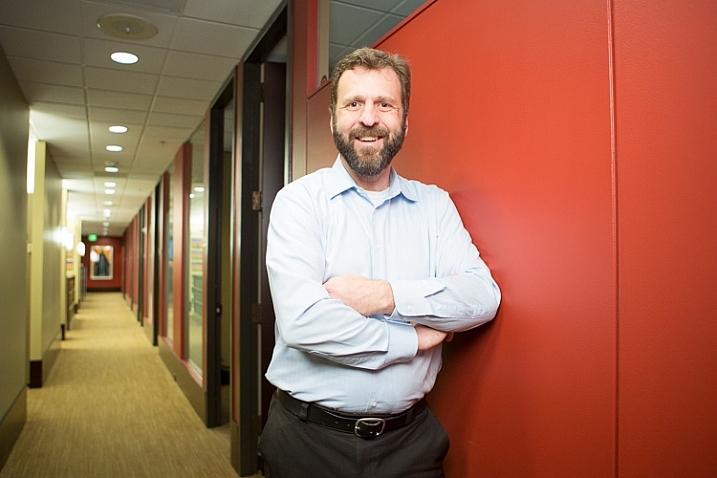
    The hands are just as important as the body pose, if not more so. If the subject’s hands feel comfortable, there is a good chance the rest of them will fall into place. Some subjects can get very stiff with the hands if you don’t give them direction. Do you want the hands in front of them, in their pockets, or crossed arms? I usually start by giving these suggestions, and asking them to place their hands in a way that they would normally stand. This often yields a very comfortable pose. Then when I have exhausted that, I will ask them to cross their arms to break them into another comfortable pose, then go from there.

    DPS_business_portraiture_2

    Changing the pose at the right times is a very important tool. The second your subject starts to look uncomfortable, get them to do something different. Change their hands or their stance. Move them to another location. Every time you break the stiffness is another chance for them to reset themselves into a comfortable pose.

    4. Tell them what they are doing right

    If your subject is doing something right, tell them! Give them positive reinforcement. Never tell them they look awkward, or they will freeze up even more. I constantly say some variation of, “This looks great” or a more specific compliment. The positivity just keeps things flowing and going in the right direction.

    If you like someone’s smile, let them know that. They will instantly feel good, and it will help them recreate that look when you need it. For a few people, when you say something like that, it will kill their natural smile. Pay attention for these people, and obviously stop saying that to them, but for many this will help them recreate that look constantly as you need it. You can say, “Give me that smile from before.” Then if they have trouble doing it, plead and beg them for it in a funny way so they feel comfortable again.
    Business Portrait Session

    You can tell subjects not to do specific things, but be careful with how you do that as it can kill your momentum. Instead of saying, “Your hands don’t look right,” say, “I think your hands might be a little better this way.” Even your constructive comments can be made in a positive way.

    5. Have conversational topics and jokes prepared

    Ask lots of questions of the subjects that do not seem to be in a rush. For the ones that need to run out of there, you can only do so much. Even for these people, I will ask a couple simple questions at the beginning, such as, “Are you from New York” or “How has your day been.” Just these alone will give them a chance to talk, and you can go from there. For most people who are not in a rush, I will go a lot further and try to hone in on a topic that of of interested to them. I find that a good conversation over the course of a session, can make the whole session much more comfortable. The more you get them talking, the more they can break out of their shell. At the very least, they will like you.

    Business Portrait Session

    You do not need to write knock-knock jokes, but think of some funny things ahead of time to talk about, or to use in situations where you are desperate. When a subject begins a session by telling me how much they hate being photographed, I try to say something like, “Well you’re going to hate me then.” A dentist joke will work as well. I then comfortably tell them that they are in good hands, and not to worry. A quick and funny comeback for something like this will make them feel like you are prepared.

    Sometimes when I need a smile, I will tell a subject to give me their most uncomfortable smile. This is only in certain moments though. I will never, ever tell the subject directly that they look uncomfortable. That is a road you do not want to go down, but I will make a joke about a stiff smile before they start trying to smile to make a point, and to make it a little humorous.

    Have them smile with their whole body. Show them the difference between a smile just with their mouth, and then one with their entire face and body. There’s a big difference between the two, and framing it in this way can explain to them what they should be doing. The shutter click is such a finite moment that it helps if they think of the session as one long video where they are moving into their smiles, and not just turning them on suddenly.

    DPS_business_portraiture_3

    Often you will have to make slight tweaks to the way a subject is posing. Having a subject put their chin up slightly can be a very good way of getting rid of a double chin, but it also ruins the spontaneity of the moment. The same thing goes when posing people in a chair. Sometimes, the most flattering way to sit is the most awkward. When I have to do any of this, after I will say something like, “Now look natural.” Just the idea of how stiff they are once you do these poses, mixed with that comment, has the frequent effect of relaxing them and bringing out a smile, even with their chin up.

    Besides that, I will have conversational topics that I try to bring up on the fly when needed, such as current events, sports, or random stories that I can think of.

    6. Use the strengths of your personality to your advantage
    Business Portrait Session

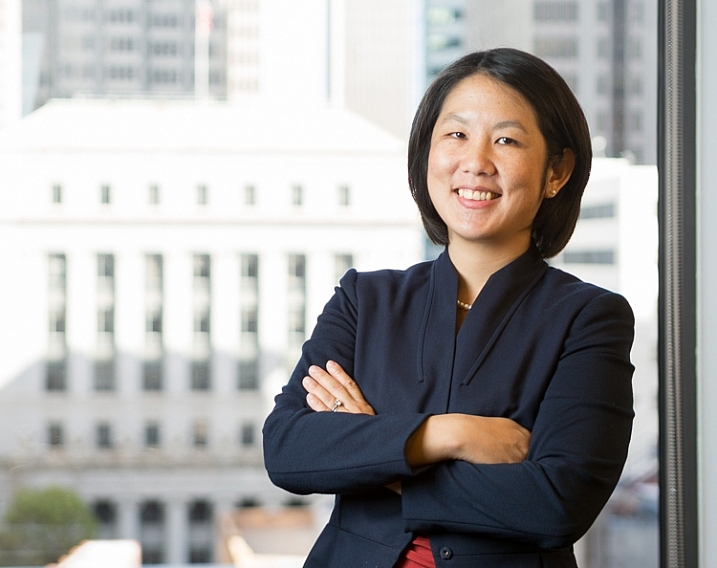
    Are you an extrovert that can charm and joke with anyone? Then you should have an easier time getting your subjects to laugh and open up, but at the same time you will need to be careful not to overdo it. By talking too much, and commanding the attention in the session, you risk stopping the subject from having their own personality show through. All your images can end up looking the same, as they are the expressions of your subjects laughing at your jokes or comments. If this is naturally you, make yourself ask questions, and stop and listen a little bit more. Making them laugh is fantastic, but it is also different from creating an environment where they feel comfortable enough to open up to you.

    Are you an introvert who gets uncomfortable trying to joke and talk with subjects that you have just met for the first time? This can actually be an advantage when you play your cards right, but this is a situation where gaining experience working with people is necessary. In this case, your advantage is your ability to listen and react. Ask your subjects questions, then play off what they say. Pay more attention to their emotions. Get them talking about interesting things that they are passionate about; have them open up that way.
    Business Portrait Session

    Still be confident and explain what you are doing, but play a more reactive role. Watch videos of other portrait photographers, both the talkative and the quieter ones, and pay attention to what they say to help you improve. Work on funny things to say that you will have in your pocket when you need them, as this will be your initial disadvantage. You will need to work more at first to be good at all of this, but after enough experience, the advantages can swing back in your favor due to your adept listening ability.

    7. Don’t show them the images while you are shooting

    Sometimes subjects will insist on seeing the images, and you will have no choice, but I always try to get out of having to show the subject the images until the end. I will often say that we can look at the images after, as a way to put them off. Having the subject look at a photo of themselves, especially if they seem self-conscious, can ruin their ability to feel comfortable later on in the session. In addition, two out of 10 shots are usually good anyway and the other eight will never see the light of day. But if they are looking at the back of that camera they will sure as heck see those eight!

    Business Portrait Session

    For the most uncomfortable subjects, often there is no chance that the photos at the very beginning will be that good. You are just going through the motions as you are trying to make them comfortable over the course of the session. There are not that many situations where the subject seeing the photo is better, unless the subject seems very comfortable from the start.

    8. Know that you can’t win them all

    You will probably lose a few. You can only do the best with what your subject gives you. Portrait photography can be stressful so always keep that in mind. You can only work with what the subject is able to give you. Do your best for all your subjecs and push and spend more time with the ones that are having trouble, but let’s be frank, some subjects are just better that others.

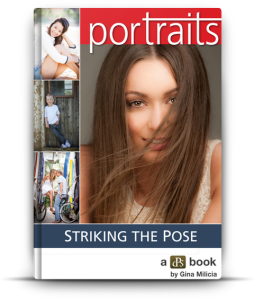
    fastflash_bookStrikingThePose2If you want to learn more about portrait posing and working with people, pick up one of the dPS ebooks by Gina Milicia Portraits: Striking the Pose (left) or her brand new one called: Fast Flash for Portrait Perfection (right).

    googletag.cmd.push(function() {
    tablet_slots.push( googletag.defineSlot( “/1005424/_dPSv4_tab-all-article-bottom_(300×250)”, [300, 250], “pb-ad-78623” ).addService( googletag.pubads() ) ); } );

    googletag.cmd.push(function() {
    mobile_slots.push( googletag.defineSlot( “/1005424/_dPSv4_mob-all-article-bottom_(300×250)”, [300, 250], “pb-ad-78158” ).addService( googletag.pubads() ) ); } );

    The post 8 Tips to Help Make People Comfortable for Their Portrait Session by James Maher appeared first on Digital Photography School.


    Digital Photography School
  • Dylan Goldby and the Art of Adoption Photography

    Dylan Goldby shoots large projects for major clients. He is a Nikon Ambassador and a staff writer for F-Stoppers. He has held the title of photo editor for Groove Magazine and is the go to shooter for a multitude of international publications. As if these resume showstoppers aren’t enough, the Australian is the co-founder of Flash Light Expeditions, an endeavor Continue Reading

    The post Dylan Goldby and the Art of Adoption Photography appeared first on Photodoto.


    Photodoto

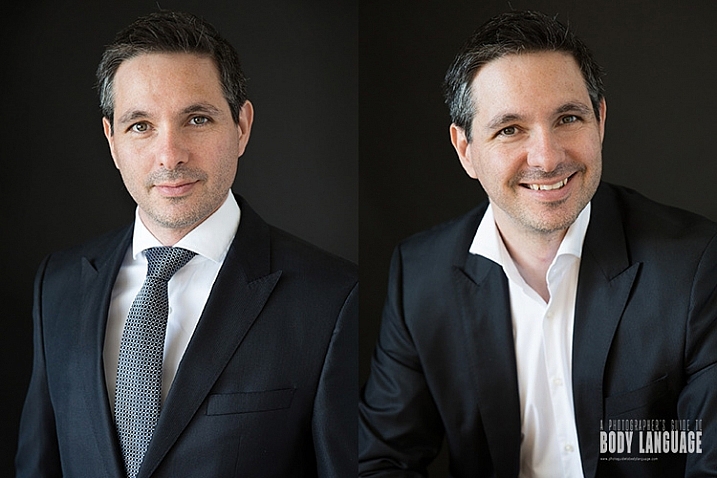
  • How to Avoid Fake Smiles in Your People Photography

    DPSarticledee_cover750

    A genuine smile is one of the most attractive expressions of the human face, and as photographers, we love them because they brighten up our pictures with warmth, and create connection.

    When you look at it on a body language level, you discover that a genuine smile informs others that we are:

    • A friend, not a foe
    • Happy
    • In a good place mentally.

    It’s a universal safety and happiness cue that we recognize on an instinctive level. It draws people in, and creates a sense of positive connection with the person in your image.

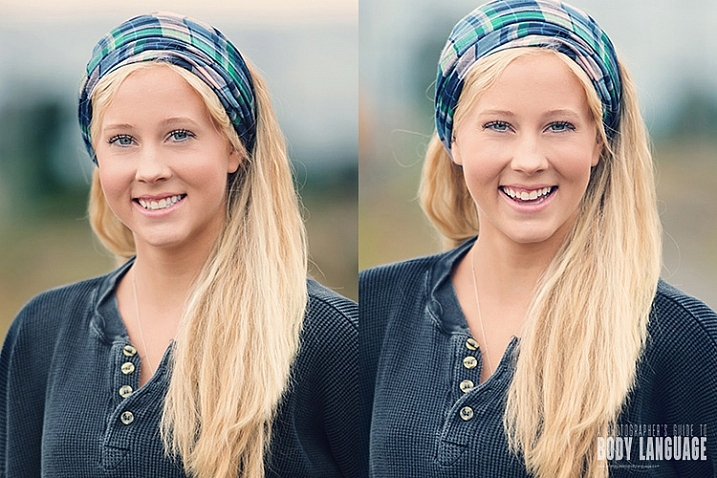
    I’ve been talking so far about a genuine smile, because a smile can also be deceiving. We humans have developed the ability to fake smile when we want to pretend that we’re happy or friendly, even when we’re not… and this happens a lot in front of the camera.

    DPSarticledee_danimontage_750

    Let’s face it, standing in front of a lens is not the most happiness inducing moment in most of our lives. To many people, this is actually really uncomfortable, but yet you are asking them to smile, which often ends up looking tense and fake.

    What a fake or tense smile says about the person in the image, is that they are not being honest, that they are uncomfortable, or even submissive.

    People will fake a smile to appease others, when:

    • They are nervous or uncomfortable
    • Showing submission
    • Being polite (when someone cracks a really bad joke for example)

    No matter the reason, a fake smile will give off a low-power impression of the person in the image.

    So what’s the difference between genuine and a fake smile?

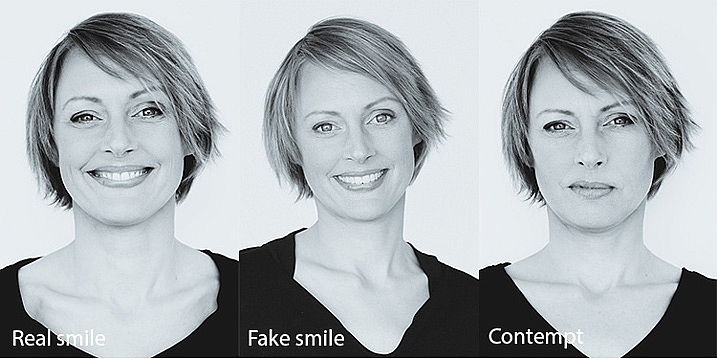
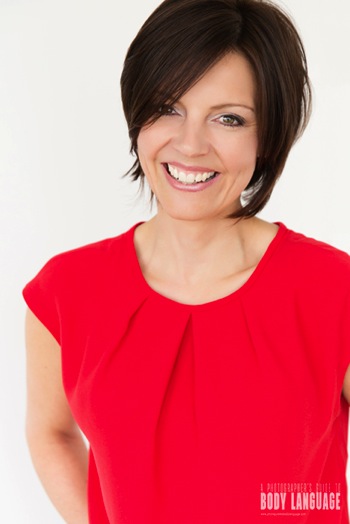
    • A genuine smile is visible mainly in the eyes. Smiling eyes are relaxed, with raised cheeks, and a nice tension appearing on the side of the eyes. The mouth can be anywhere from slightly raised or wide open, but it’s the eye action (not the mouth) that communicates the honesty of a smile.
    • A fake smile on the other hand, will have no, or very little, eye engagement. The mouth smile can still be very wide, but you will not see any action in the upper cheek and eye areas. It looks more like a grin, than a smile.
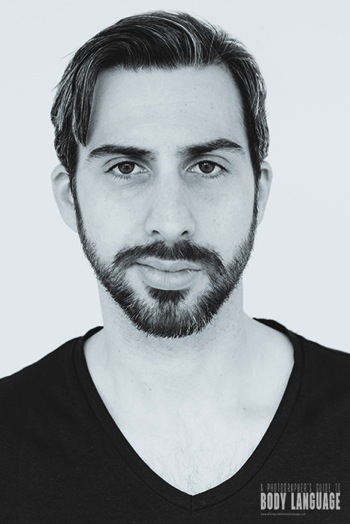
    • The expression of contempt is often mistaken for a smile. The most obvious sign of disdain is a one sided smile, with the lip slightly pulled up.

    DPSarticledee_smilesmontage_750b

    How to get a real smile? Don’t say cheese!

    As a portrait photographer, your job is not only to make a beautiful image, but also to be the director of the shoot, helping your subject relax into the right emotion. If your subject is uncomfortable, you’ll most certainly end up with a fake smile or worse, an expression of contempt, and lose the warmth and honesty that comes from a genuine smile.

    It has become a habit for many photographers to shout out, “Say cheese!!!” to get someone to smile in front of the camera. But this method usually ends up with embarrassed grins, or fake smiles, instead of genuine ones.

    So what should you do instead?

    It’s impossible to fake a feeling (unless you’re a sociopath) and the only way you can get your subject to genuinely smile is to help them connect with a real feeling of happiness. Asking them to think of something, or someone, they love allows them to connect with a genuine feeling of happiness, and you’ll see their cheeks raise and create a beautiful honest smile within seconds. As soon as you see it, let them know so they can feel it for themselves, and reproduce it. I ask my clients to give me a keyword for what they just felt and I use that for the rest of the shoot.

    If they can’t think of anything, you can tell them a funny story, or a joke, and that can work really well, but can be a two edged sword if the joke falls flat and makes the situation very awkward instead.

    Smiles are also a very useful barometer of your clients comfort level. If they can’t seem to relax and connect with a happy thought, it’s a good time to check your own body language and see if you are sending off stress, or discomfort, cues that they are mirroring back to you.

    Differences between men and women

    DPSarticledee contemptmale

    Contempt

    DPSarticledee femalesmilerapport

    Genuine smile

    Smiling is recognized universally as a sign of happiness and safety, by both women and men, but there are a few differences:

    • For women, smiling is a way of creating rapport and a sign of appeasement, but to men a smile can come across as submissive.
    • Men smile less often, and less widely than women.
    • Women are attracted more to photos of men smiling, but men prefer more serious photos of other men.

    When coaching your client on the image selection, it’s important to know the usage they are going to make of their photos. A man needing a photo for a dating website would probably have more success with a smiling photo than a serious one. But if he’s looking for a job in a male dominated workplace, then he’d probably be better off choosing a more serious one for his LinkedIn profile.

    DPSarticledee_rehmontage_750

    I hope you have found these tips useful and I look forward to hearing about your own experiences with genuine and fake smiles. Please leave your comments below.

    googletag.cmd.push(function() {
    tablet_slots.push( googletag.defineSlot( “/1005424/_dPSv4_tab-all-article-bottom_(300×250)”, [300, 250], “pb-ad-78623” ).addService( googletag.pubads() ) ); } );

    googletag.cmd.push(function() {
    mobile_slots.push( googletag.defineSlot( “/1005424/_dPSv4_mob-all-article-bottom_(300×250)”, [300, 250], “pb-ad-78158” ).addService( googletag.pubads() ) ); } );

    The post How to Avoid Fake Smiles in Your People Photography by Dee Libine appeared first on Digital Photography School.


    Digital Photography School
  • How To Find Your Lens’ Sweet Spot: A Beginner’s Guide to Sharper Images

    Are you tired of blurry images?

    It’s time to learn how to capture sharper images by finding your lens’ sweet spot. This will give you more confidence, save time, and help you take better photos.

    In this article you’ll learn:

    • How to find your lens’ sweet spot (for sharper images)
    • Why you should shoot in Aperture Priority mode (and how to use it)
    • How to perform a test to get your sharpest image every time
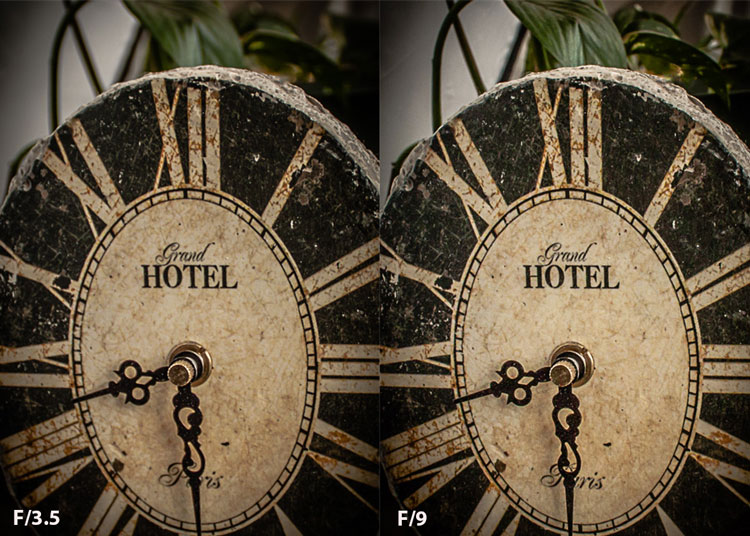
    • How important is your lens’ sweet spot? Notice the difference

    Mid range aperture sharper than wide open

    In the above images of the clock, the one on the right is sharper. Look closely at the words and at the leaves behind the clock. The f/9 image is sharper throughout because it was shot in my lens’ sweet spot. The f/3.5 one was not.

    First, take a look at your lens

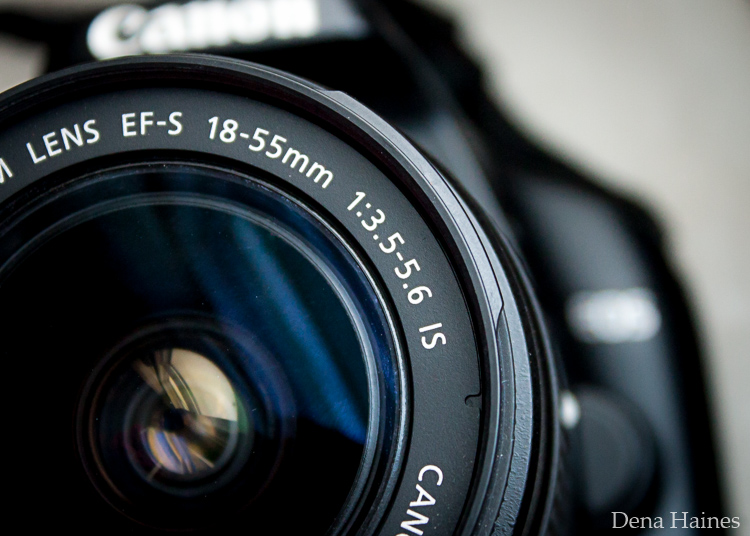
    In this beginner’s guide, we’ll use an entry level zoom lens as our example. Most kit lenses (the basic lens that comes with a DSLR) generally shoot their sharpest at the mid-range aperture settings. To determine the mid-range of your lens, you’ll need to know its widest (or maximum) aperture setting. It is located on the side, or end, of the lens and will look something like this 1:3.5-5.6.

    For example, here it is on my Canon 18-55mm zoom lens.

    Lens aperture range

    This means that when my lens is zoomed all the way out, its widest aperture is f/3.5. When zoomed all the way in, its widest aperture is f/5.6.

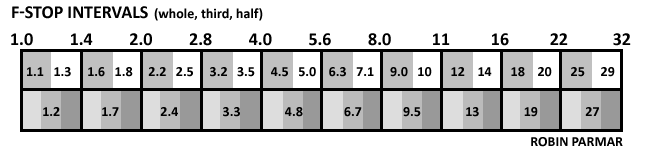
    The rule to finding that mid-range sweet spot, is to count up two full f-stops (aperture settings are called f-stops) from the widest aperture. On my lens, the widest aperture is f/3.5. Two full stops from there would bring me to a sweet spot of around f/7.

    Use this chart to count your f-stops

    Robin Parmar

    By Robin Parmar

    There is some wiggle room in the mid-range, so anything from f/7 to f/10 will capture a sharp image. Once you know the mid-range of your lens, you can do an easy test to get your sharpest image. To perform the test you’ll need to shoot in Aperture Priority mode.

    Take control with Aperture Priority Mode

    Shooting in Aperture Priority allows you to choose the aperture setting you want, which gives you more creative control than Automatic mode. By controlling the aperture setting, it’s much easier to get a sharp image, and because your camera still chooses the ISO (if you are set to Auto ISO) and shutter speed automatically, it’s very easy to use.

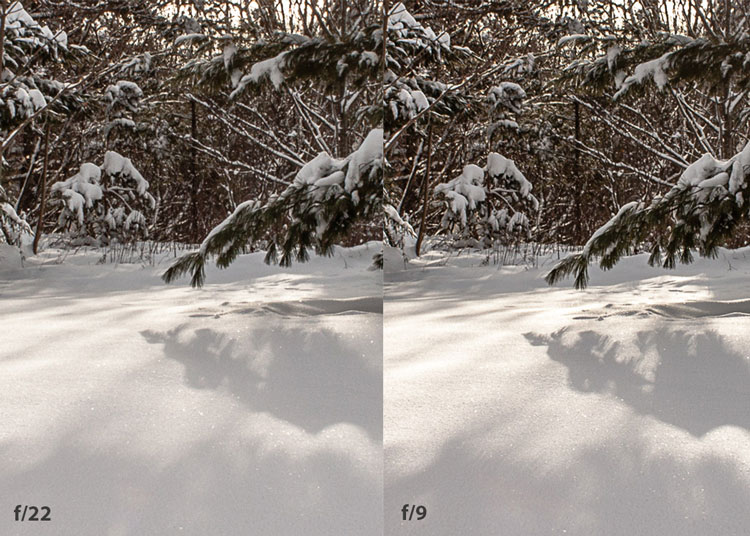
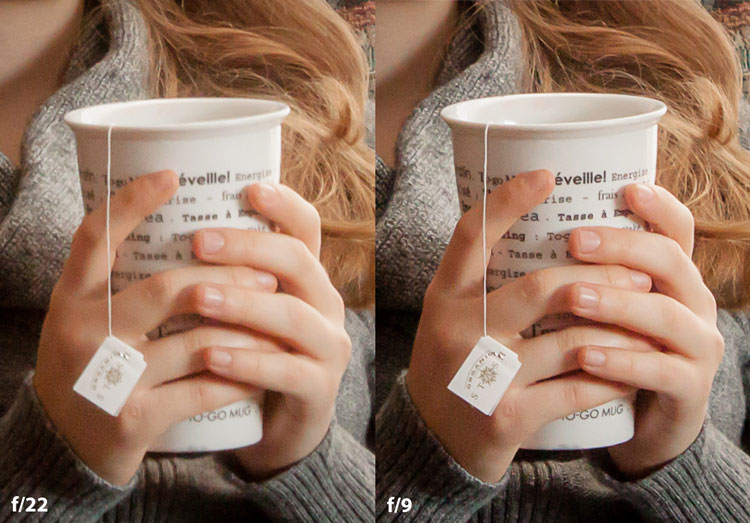
    You’ve probably heard that apertures like f/16 and f/22 are best for keeping everything in focus. While that can be true, focus does not always equal overall sharpness. Choosing a mid-range aperture will give you sharper images throughout. You can improve them even further by reducing camera shake with a tripod and a remote shutter release (or your camera’s self-timer).

    Here’s an example of how shooting in your lens’ sweet spot will give you sharper images.

    Sharp images shot in lens sweet spot

    Mid range f stop sharper than small f stop

    In the above split-image, the f/9 image is sharper than the f/22 one. The needles and shadows are not as soft or blurry as in the f/22 shot (look at the crispness and sparkles in the snow too).

    Switching from Automatic to Aperture Priority Mode

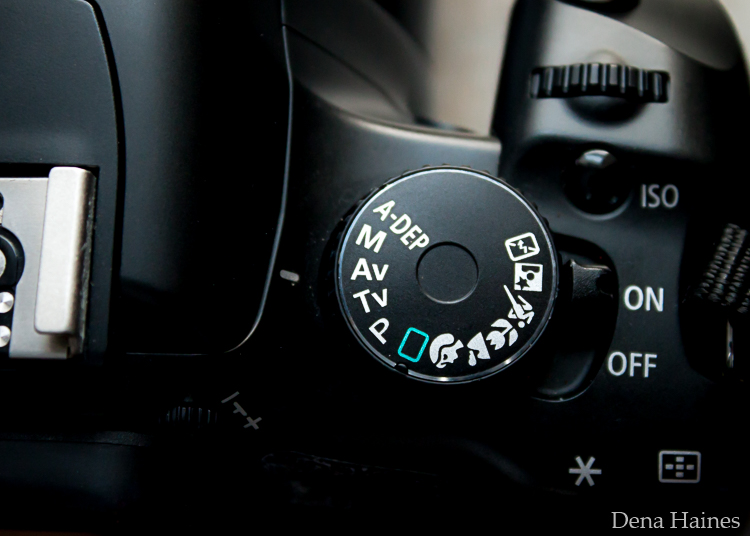
    To take your camera out of Automatic and put it in Aperture Priority, just turn the large Mode Dial to Aperture Priority. This is what that looks like on my Canon (on Nikon and other brans look for the A).

    Aperture priority on canon mode dial

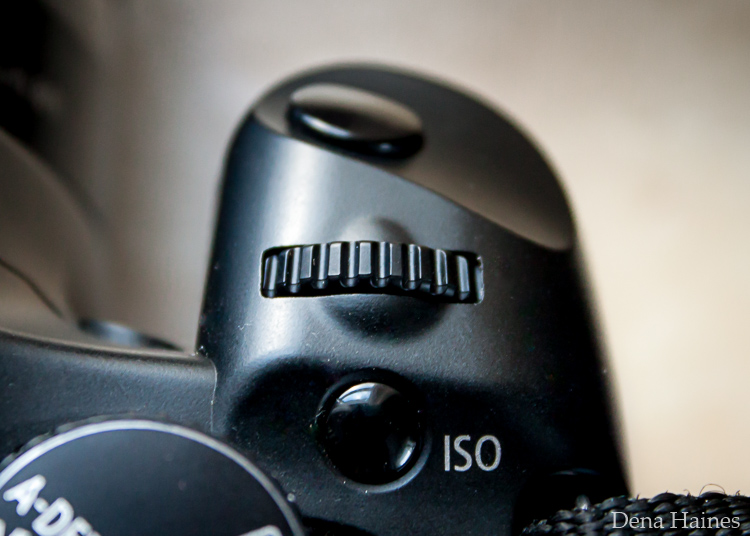
    Automatic mode is the green rectangle; Aperture Priority mode is the Av (or A on a Nikon). Once your camera is in Aperture Priority mode, turn the smaller Main Dial (shown here on the top of my Canon) to choose your f-stop.

    Main dial canon

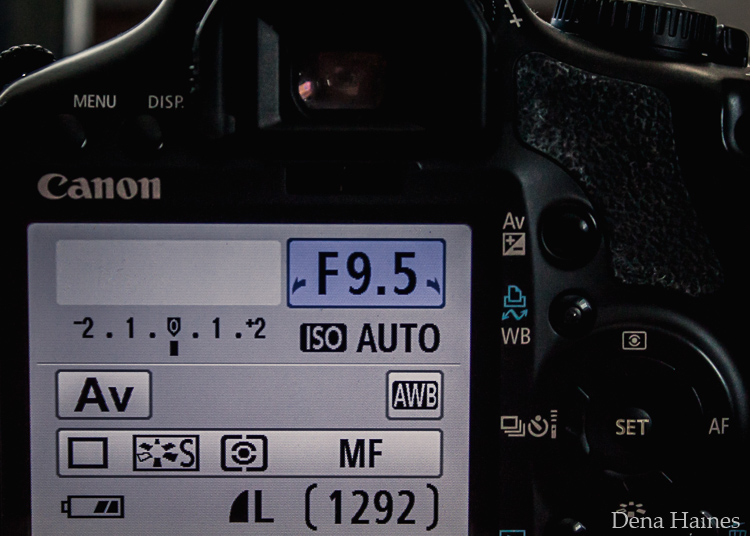
    As you turn that dial, you’ll see the f-number changing on your screen. In the next picture, it’s set to f/9.5.

    Aperture setting on canon LCD screen

    Perform a Lens Sweet Spot Test

    Once you have your camera set up on a tripod, performing a sweet spot test only takes a couple of minutes. To begin, put your camera in Aperture Priority mode, then compose your shot and take a photo at varying apertures. Start out with the widest, then click that main dial a couple of times (to the right) and take another. Keep doing that until you’ve taken seven or eight photos.

    Upload your photos to your computer and zoom in on them. You’ll quickly see which aperture settings gave you the sharpest overall image.

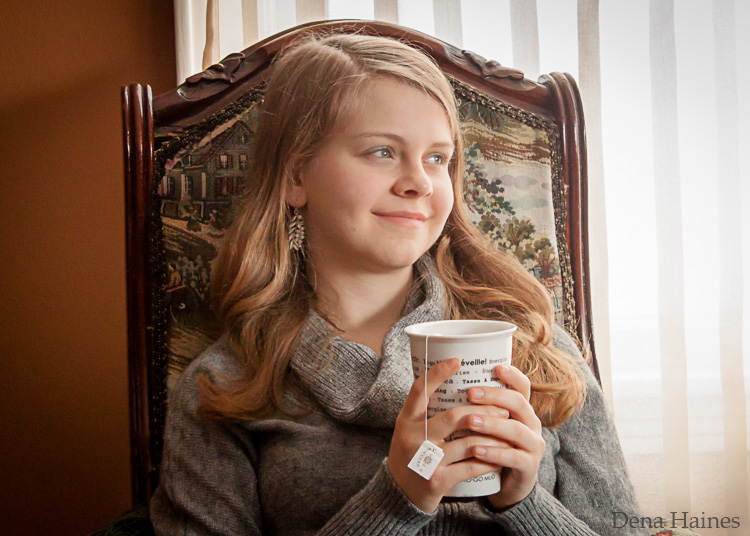
    This next photo of my daughter was shot using natural light. Shooting in my lens’ sweet spot gave me a pretty sharp image, even in this low light setting.

    Mid range aperture sharp image low light

    Find your lens sweet spot for sharper images

    The close up of the mugs shows the advantage of shooting in the lens’ sweet spot. Whenever you want to make sure you get the sharpest capture possible, take a shot at each mid-range setting f/7, f/8, f/9, and f/10.

    Getting Your Sharpest Images

    Now that you know your lens’ sweet spot, it’s time to practice. I hope you’re as pleased with the results as I’ve been!

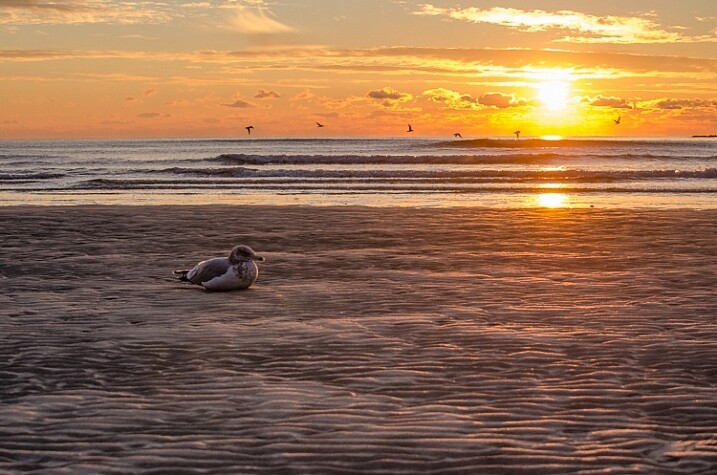
    Mid range aperture for sharper images

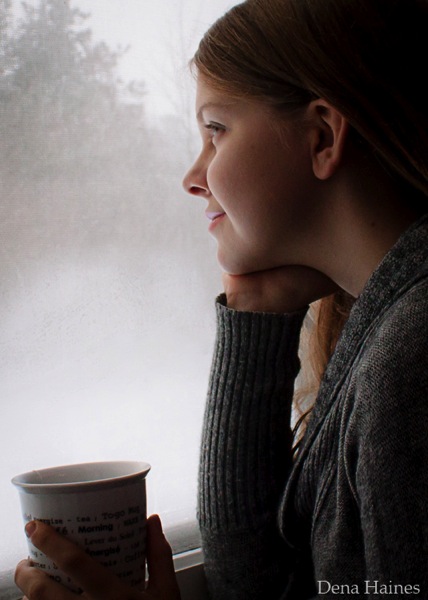
    I love shooting in natural light, and learning how to capture sharper images in low light has made me so much happier with my photos.

    Tips for capturing your sharpest images:

    • Shoot in Aperture Priority mode
    • Choose a mid-range aperture (usually f/7 to f/10)
    • Use a tripod and a remote shutter release (or your camera’s self-timer) to reduce camera shake
    • Take a series of shots at f/7 through f/10 when a sharp capture is especially important

    But don’t stop here. Keep playing with settings in Aperture priority mode. It’s awesome to get images that are sharp throughout, but there’s a lot more to aperture than that.

    Learn more about aperture and depth of field here.

    Do you have any lens sweet spot tips to share? Please do so by commenting below.

    googletag.cmd.push(function() {
    tablet_slots.push( googletag.defineSlot( “/1005424/_dPSv4_tab-all-article-bottom_(300×250)”, [300, 250], “pb-ad-78623” ).addService( googletag.pubads() ) ); } );

    googletag.cmd.push(function() {
    mobile_slots.push( googletag.defineSlot( “/1005424/_dPSv4_mob-all-article-bottom_(300×250)”, [300, 250], “pb-ad-78158” ).addService( googletag.pubads() ) ); } );

    The post How To Find Your Lens’ Sweet Spot: A Beginner’s Guide to Sharper Images by Dena Haines appeared first on Digital Photography School.


    Digital Photography School
  • How to Size Images for Online Sharing

    Whether you’re running a photography business, or sharing your photography on the web with friends, it’s important to know how to properly size your images for various uses. Generally speaking the smallest size you can share, while still retaining enough quality for the viewer to appreciate the photograph, is what you’ll want to aim for, but let’s dive into this with a bit more detail.

    First rule – use the sRGB Color Space for anything going on the web

    Before you even think about sizing an image for the web, you’re going to need to make sure that you’re using the correct color space. The web is standardized on the sRGB color space, which means that if you want your photography to appear accurately across the web, that’s the color space you need to use when you save your image.

    Take a look at this side by side comparison of the same photograph, saved directly from Lightroom, using the sRGB color space versus the AdobeRGB color space.

    sRGB

    sRGB

    AdobeRGB-750

    AdobeRGB

    You’ll notice that the AdobeRGB color space appears slightly more muted in terms of color and it has a slightly more greenish tint when compared to the sRGB image.

    Second rule – Smaller size over image quality

    Even in this world of high resolution monitors, it’s still the best practice to use smaller sizes when sharing images on the web.

    Here at dPS, images in the articles are sized to be 750 pixels on their longest side at an overall size of around 200kb. The reason you want to reduce the size of your images for use on the web is primarily to improve the user experience for your readers. The more data a webpage has to load, the longer it will take for the reader to be able to see content.

    Social media and dedicated portfolio sites, like Smugmug or Zenfolio, are the exception to this rule as they have optimized their backends to handle large image files when necessary, and actually require the full size image for printing purposes.

    How to size your images?

    Knowing why to size your images is only the first piece to the puzzle, now it’s time to learn how to size your images. This article will show you two ways to size images, one with Lightroom and another with Photoshop, as they are the two most commonly used pieces of software among dPS readers.

    How to size an image in Lightroom

    The best thing to do with Lightroom is to set up an export preset specific for your needs. Once this preset is set up, all you’ll have to do is select it, and everything will be done for you.

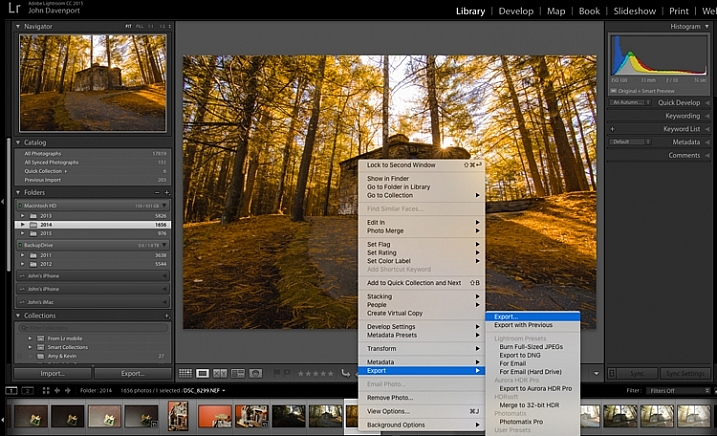
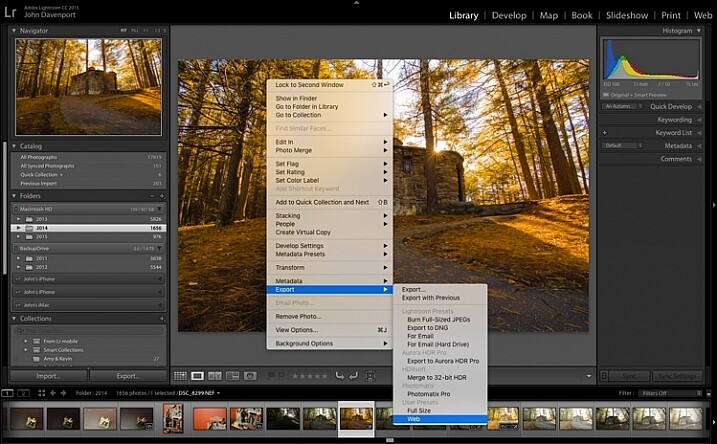
    Step 1: Select any photograph and right click. Navigate to Export and select Export from the fly out menu.

    export-images-lightroom

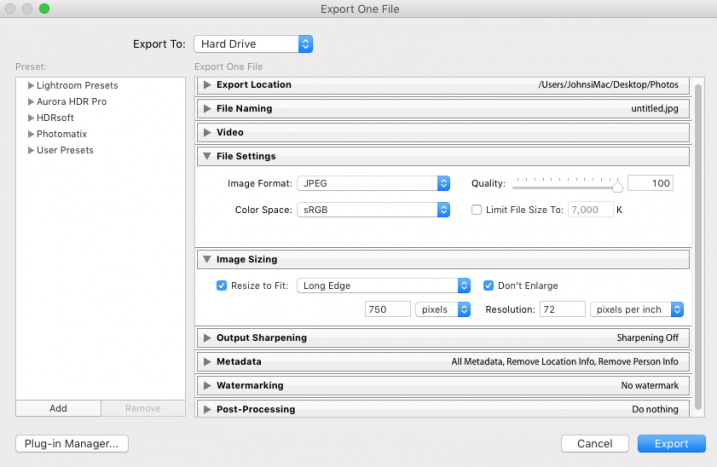
    Step 2: In the box that opens, after selecting your Export Location and File Naming options, you’ll want to navigate to the File Settings and Image Sizing sections.

    In the File Settings Section: Make sure that Image Format is set to JPEG, and that Color Space is sRGB. You can choose to limit the file to a specific siz,e if this matters to you, but know that too much size reduction can result in noticeable quality loss of an image.

    sizing-images-with-lightroom

    In the Image Sizing Section: You’ll want to check “Resize to Fit” and make sure that the drop down is set to Long Edge. Check the box “Don’t Enlarge” which will mean that any time you export an image smaller than your “Long Edge” setting, it won’t stretch the to fit that dimension. Finally, you’ll need to pick what size you want your image to be – here it’s set to 750px and 72 pixels per inch which is what we use at dPS.

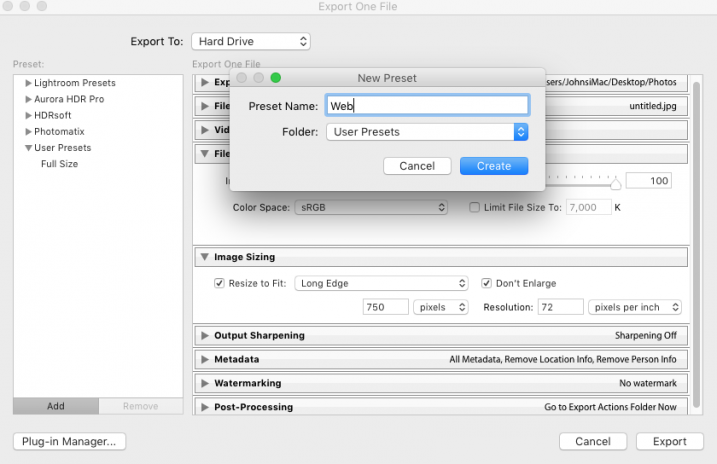
    To save this as a preset that you can use over and over again, click on the “Add” button in the lower left corner, and name your preset when the dialogue box opens.

    sizing-images-with-lightroom2

    Now, whenever you want to export a photograph to the web, all you have to do is right click on the image you wish to export, and navigate to the preset you’ve just created. Super easy!

    export-images-lr2
    How to size images with Photoshop

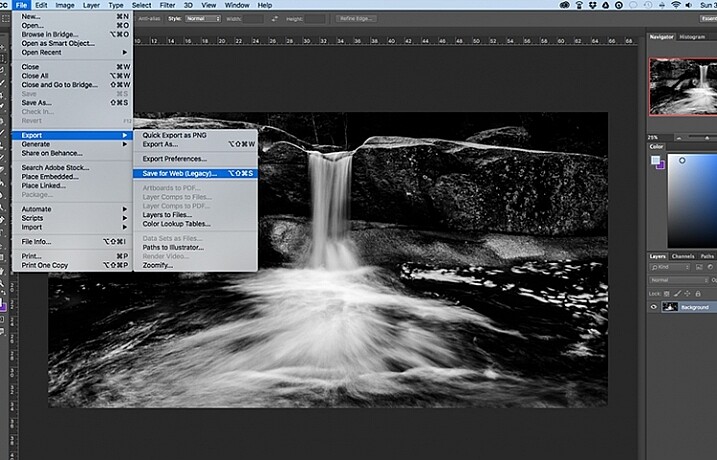
    When you want to save your images for the web with Photoshop, the best option is to use Photoshop’s “Save for Web” tool. This will let you choose from various file types (in most cases you’ll want JPEG), and also allow you to convert the image to the all important sRGB color space.

    photoshopsaveforweb

    To find the Save for Web option you’ll want to navigate to File > Export > Save for Web

    Once you select this option a new window will open, providing you with a number of options for exporting your image from Photoshop. Here you’ll want to make sure that “Convert to sRGB” is checked, and that your file format is set to JPEG. Sizing can be done by picking a width or height, and as long as the two are connected with the link symbol, Photoshop will calculate the other’s value based on the one you input and maintain the image proportions accurately.

    The most important part about saving photographs for use on the web is getting the color space correct, and realizing that people browsing photographs on the web are often doing so on smaller screens, with limited time on their hands. Fast load times not only improve your user’s experience, but they also will reflect favorably on Google’s search engine’s algorithm which is used to determine if your content is worthy of being shown to people searching Google for answers.

    How do you size your images for online use? Please share in the comments below.

    googletag.cmd.push(function() {
    tablet_slots.push( googletag.defineSlot( “/1005424/_dPSv4_tab-all-article-bottom_(300×250)”, [300, 250], “pb-ad-78623” ).addService( googletag.pubads() ) ); } );

    googletag.cmd.push(function() {
    mobile_slots.push( googletag.defineSlot( “/1005424/_dPSv4_mob-all-article-bottom_(300×250)”, [300, 250], “pb-ad-78158” ).addService( googletag.pubads() ) ); } );

    The post How to Size Images for Online Sharing by John Davenport appeared first on Digital Photography School.


    Digital Photography School
  • 10 Ways That Understanding Your Camera Leads to Better Images

    Perhaps you’ve heard this one before, or said even it yourself: I could take great pictures too, if I had your camera. But saying pictures are great because of the camera is like saying Michael Jordan was great because of his shoes. Sure, the camera determines an image’s resolution, but give a $ 7,000 camera to a toddler and you’ll have Continue Reading

    The post 10 Ways That Understanding Your Camera Leads to Better Images appeared first on Photodoto.


    Photodoto

  • How to Create Dynamic Images with an LED as Your Only Light Source

    With a limited budget it’s easy to feel limited by your gear (or lack of gear I should say) but with time, and experimentation, you can discover ways to use the gear you have now, to make compelling images. In this tutorial you will be given a few pointers on how you can use just one LED light to make beautiful and dynamic images.

    Equipment

    For this tutorial you will need:

    Intro image 1

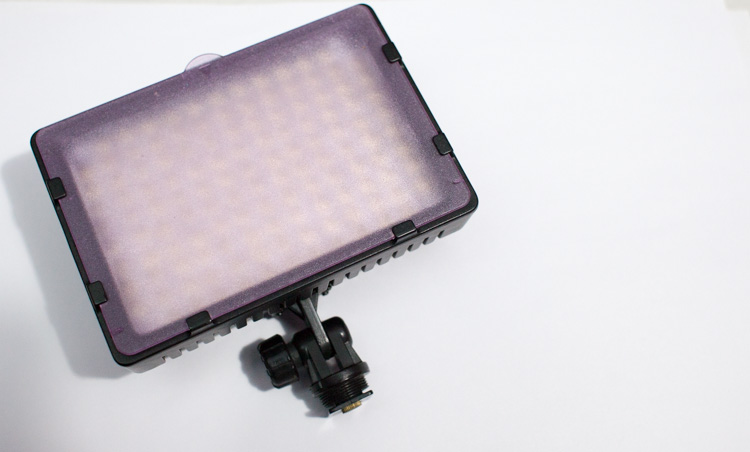
    • An LED light. The light used here is a Neewer CN-126 LED Video Light which was bought on Amazon for under $ 35.
    • A DLSR – Canon, Sony, or any other brand is suitable. I used a Canon 5D Mark II.
    • A tripod or stable surface.

    Direct light

    Let’s start with the easiest setup: Placing your LED light directly on top of your camera, or on a light stand directly in front of your subject, may seem fairly basic. On its own, it can create a standard, flatly, lit image, which may not seem very exciting to your viewer. However, placing an item that has an interesting pattern or shape directly between your light and your subject can give a unique and creative result.

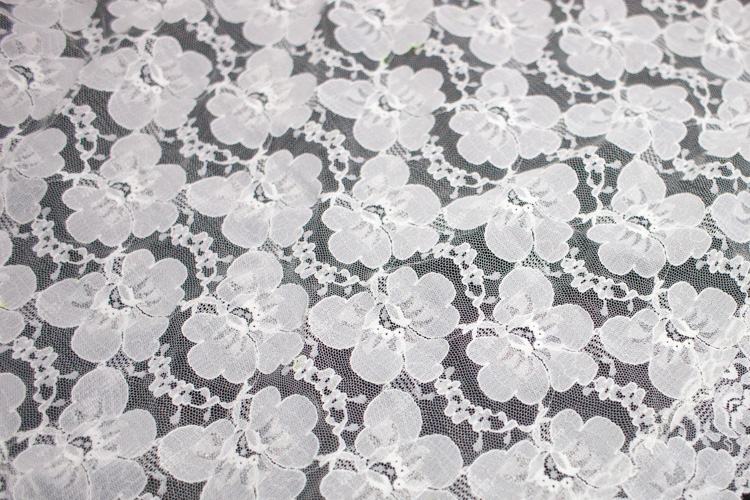
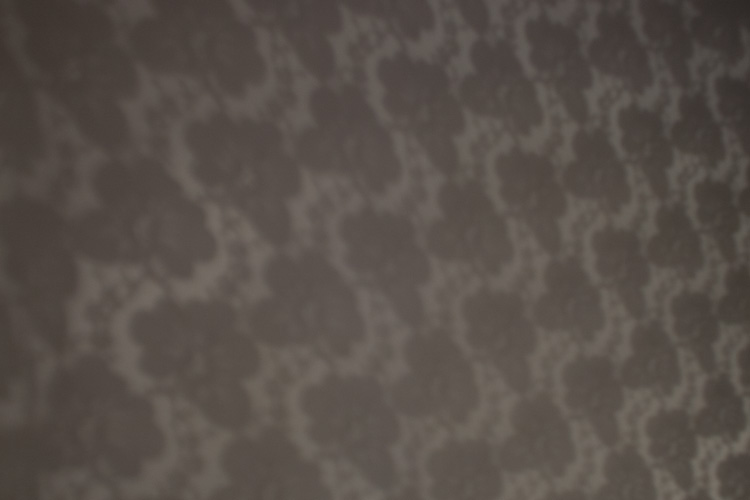
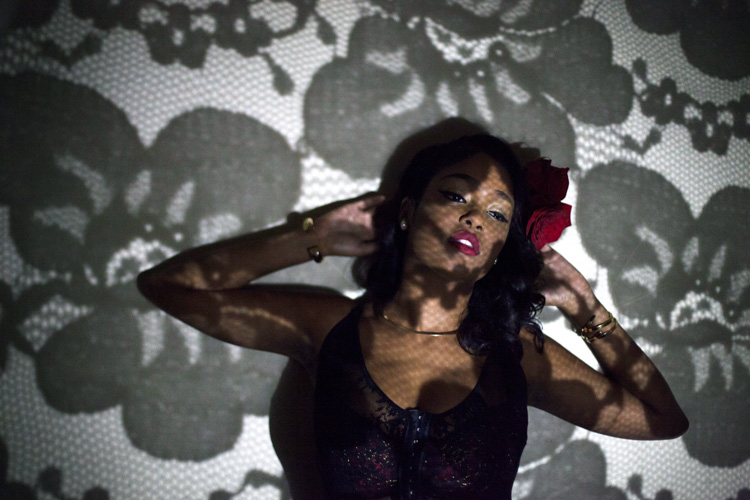
    You can, for example, place a lace tablecloth between your LED light and your model/subject. Playing around with the fabric’s distance from the light, causes the pattern’s shadow to change size, and sometimes even shape. Adjust the distance and placement of your fabric (or other item) until you find a combination that works for you.

    DL image 1

    DL image 2

    DL image 3

    For the image above, I used my 50mm lens with an ISO of 2000, and my exposure set manually with shutter speed at 1/50th and aperture at f/1.4. My LED light was adjusted to medium brightness.

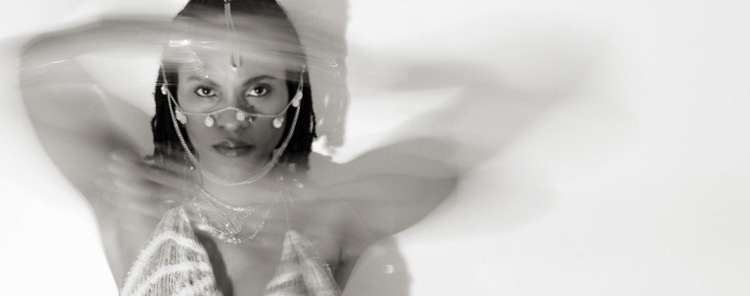
    You can also use movement to add interest to your image as shown below. A slow shutter speed along with quick movements can make your images a real conversation piece. Try experimenting with moving your body, or an object like a colourful scarf or umbrella in your image.

    DL image 4

    Side light

    Taking your LED off-camera, and placing it at an angle to your subject is another easy way to create a beautiful image with this simple setup. Keep your LED light setting between low and medium, and angle it at roughly 45 degrees from your subject, can give a nice soft light cascade across your image.

    SL image 1

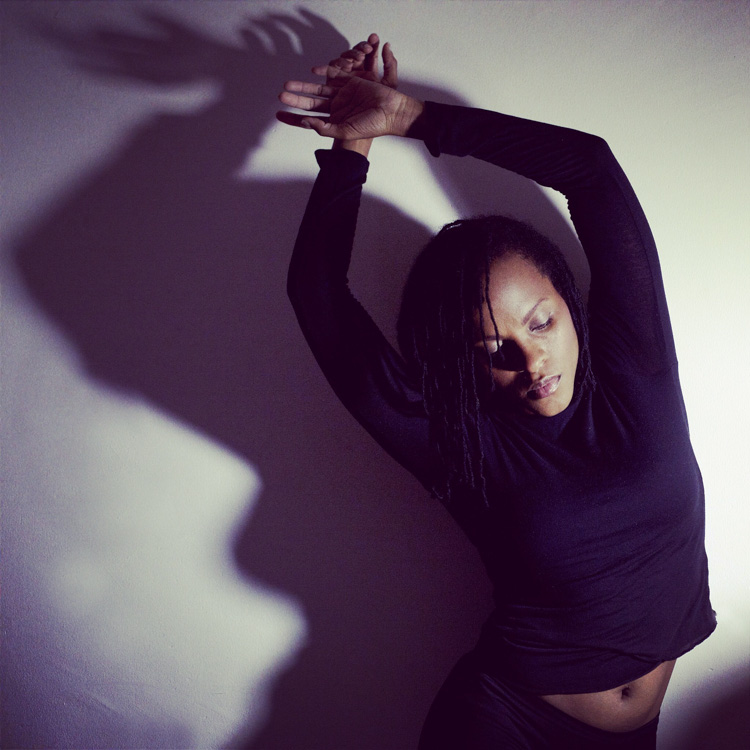
    If you try placing your LED light directly to the right, or left, of your subject, you will get a pretty cool effect as well. This placement creates an interesting shape in the natural shadow your subject makes. In the image below, the LED is propped up at eye level, on a bookshelf to my left. The angle of the light, coupled with a delicate pose, created an image that was both compelling, and visually interesting. Camera settings for this image were ISO 1600, f/3.2 and 1/160th of a second with a 50mm lens.

    SL image 2

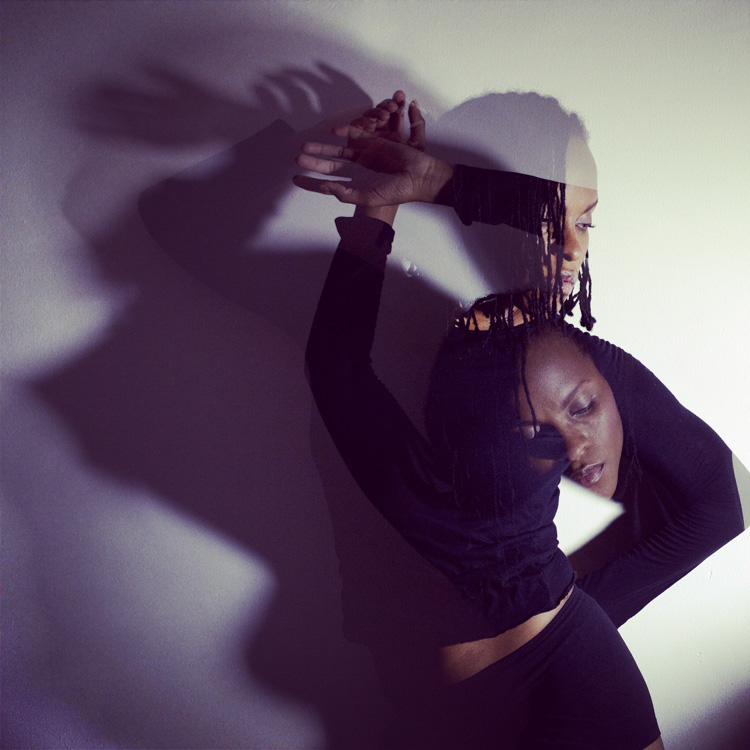
    Playing around with overlays and textures in Photoshop can further enhance your photo.

    SL image 3

    Backlight and overhead light

    For small objects you can do a simple backlight setup, using your LED light. If you place a sheet of white letter sized printing paper directly over your LED light, and place your subject directly on top of it, the result is pretty interesting. When using this method try to choose a subject that you think would have an interesting silhouette. You can also try items that are slightly translucent and may possibly glow when back lit. Try capturing your final image by shooting from an overhead angle, but don’t be afraid to experiment with other camera positions as well.

    BL image 1

    BL image 2

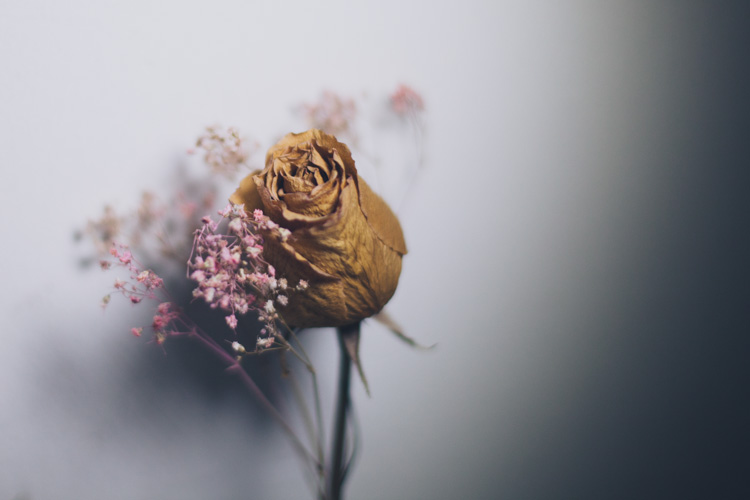
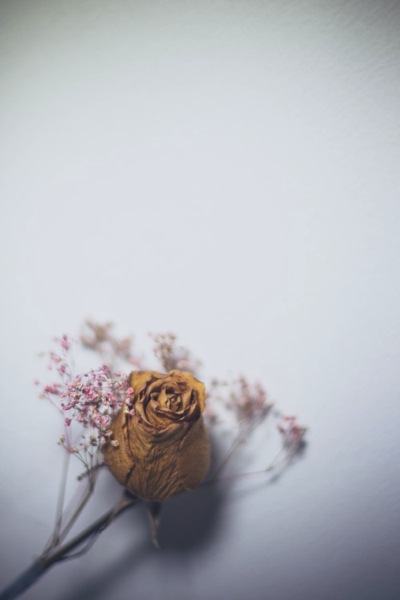
    Interesting images can also be created by putting your LED light directly above your subject. In the first image below, the light was angled slightly above the rose. This created a nice, softly angled, light effect that gave the rose a different dimension.

    OL image 1

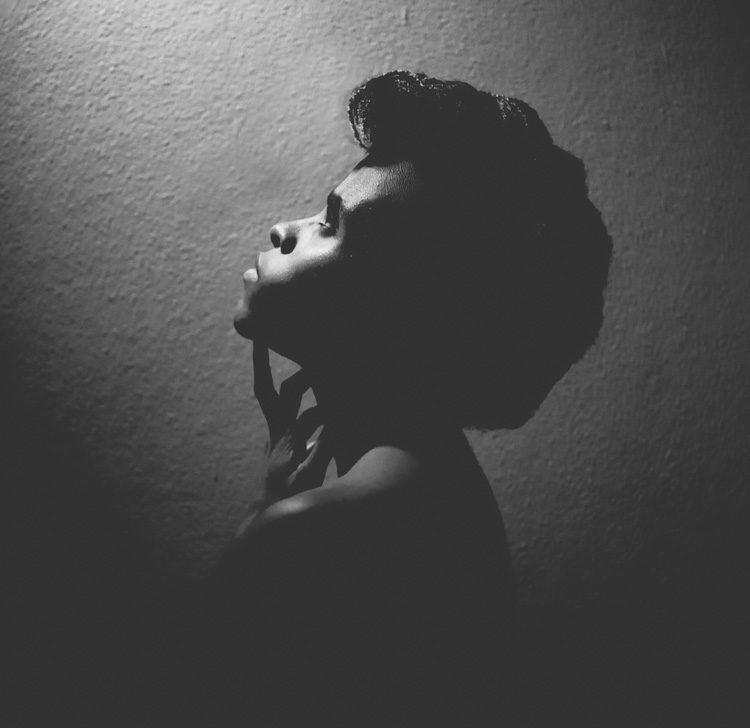
    Coupling the overhead LED placement with interesting poses gives really striking results. Posing your subject with their face turned upward, in the direction of the light, for example, creates some really nice shadows along the contours of the face. Some creative editing in Photoshop resulted in these final images.

    OL image 2

    OL image 3

    With this simple tool and a little imagination, you can create dynamic, visually appealing images for your portfolio. The key here is to experiment, play and have fun.

    Let me know other creative ways you have used an LED light to add interest to your photography in the comments below.

    googletag.cmd.push(function() {
    tablet_slots.push( googletag.defineSlot( “/1005424/_dPSv4_tab-all-article-bottom_(300×250)”, [300, 250], “pb-ad-78623” ).addService( googletag.pubads() ) ); } );

    googletag.cmd.push(function() {
    mobile_slots.push( googletag.defineSlot( “/1005424/_dPSv4_mob-all-article-bottom_(300×250)”, [300, 250], “pb-ad-78158” ).addService( googletag.pubads() ) ); } );

    The post How to Create Dynamic Images with an LED as Your Only Light Source by Tricia Bent appeared first on Digital Photography School.


    Digital Photography School
  • How Auto White Balance Can Hinder Your Photography

    You’ve likely heard that auto settings like auto exposure and autofocus aren’t fail-proof. They’re strong features, no doubt, and most photographers take advantage of them at least some, if not all, of the time. But the key to success with auto-anything is to make it work for you; that is, to understand its limitations, and know when it’s not going to give you the best results.

    If you’ve been a photographer for very long, you’ve likely run into the situation in which a very bright scene, a snowy landscape, for example, caused your camera’s auto exposure to significantly underexpose the shot, giving you murky gray snow instead of brilliant white. Likewise, a shot that was naturally dark, like a portrait of a black dog, might have been recorded too light, also resulting in unwanted gray or brown.

    In both of these cases, the auto exposure was tricked by the scene’s overall light or dark tone, and attempted to compensate for this problem by doing exactly what it’s designed to do: choose an exposure that will average out the tones in the scene. For many photographs, auto exposure does a fine job of selecting a correct exposure, for scenes when average is correct. The trouble is when a situation is not average. In those cases, it’s up to you, the photographer, to make the necessary adjustments.

    DJ ATM7 40 2

    DJ ATM7 40

    The exact same thing happens with your camera’s Auto White Balance, only in this case, the issue is not with light intensity, but with color.

    The Color of Light

    Not all light is the same; different types of light have different colors built-in to them. Daylight is basically white, while light from a sunrise or sunset has a red, orange, or pink cast to it (caused by the light being bent through deeper layers of atmosphere). Shade is usually a bit blue, as is snow, as both of these situations are receiving reflected blue light from the sky. Standard incandescent (tungsten) lightbulbs give off a strong yellow cast, while fluorescent lights, long the bane of photographers, can be anywhere from blue, to purple, to green.
    Your camera needs to know the color of the light so that it can accurately record the rest of the colors in the scene. With film, this White Balance” is built into the product (i.e., Daylight film and Tungsten film), but with digital cameras, we have the ability to change the White Balance on the fly. If you shoot a room illuminated only by tungsten light with your camera’s Daylight White Balance setting, the resulting photo will show incorrect colors that are skewed towards yellow (try it and see for yourself). You could also shoot an outdoor natural-light photo with the tungsten setting and get some simply awful blue images. But when these situations are shot with the correct White Balance selected, the colors in the photos should be spot-on accurate.

    The Auto White Balance Blues

    Your camera likely offers a handful of White Balance choices, settings like: Daylight, Cloudy, Shade, Flash, Tungsten, and Fluorescent. There is also, surprise, an Auto choice.

    Many beginning photographers tend to set their White Balance selection to Auto and leave it there. This mistake can be the cause of quite a few photographic problems. Like your auto exposure, Auto White Balance is pretty good. Especially when dealing with artificial light sources, the results of Auto can be very satisfactory. The trouble arises when a color cast is desirable, or when shooting a subject that is mostly one color.

    DJ CWG 3 11 E 2

    DJ CWG 3 11 E

    A great example is a classic sunrise or sunset scene. In this case, there can be quite a lot of red or orange light illuminating the scene. If you choose Auto White Balance for this shot, the camera will evaluate the scene and think, “Hey, something’s wrong! There’s a lot of red here! Better back off on the reds.” The problem is, you do NOT want your camera to correct for those colors. In this case, having a lot of red in the scene is correct according to the subject and your intention. Auto White Balance will probably deliver a sunset that has a much more bluish feel, not as dramatic, and not what the scene actually looked like.

    Another way Auto White Balance can be fooled is with objects that are mostly one color. A good example is flower photography. Suppose you’re photographing a large pink flower that fills the frame almost entirely. Auto White Balance will look at this shot and think, “Whoa, too much pink! Gotta back off on that.” Auto White Balance has no way of knowing if subject is truly that color, or if it’s the lighting. The only thing it can do is try to deliver what it perceives to be an average color balance for the image. In this case, the flower in the photo won’t appear the correct, vibrant pink that it was.

    DJ 776 9 2

    DJ 776 9

    Auto White Balance can even cause slight inaccuracies to everyday outdoor photos, often resulting in shots with just a bit too much purple than they should have (the result of Auto trying to over-compensate for green vegetation).

    Use Presets!

    So what’s the solution? Use those White Balance presets! Many photographers, including me, use the Daylight setting a great deal of the time, to help ensure accurate colors during all times of the day and in many weather conditions. The Shade and Flash presets can also be quite useful. If you’re shooting JPEG files, selecting the correct White Balance at the time of shooting is critical. But even if you shoot RAW files and have the (very useful) ability to adjust your White Balance in post-production, choosing the correct White Balance preset at the time of shooting can start your images off right, and save you plenty of time, and who doesn’t like that?

    Do you have any other stories or examples where Auto White Balance did you wrong? Please share in the comment below.

    googletag.cmd.push(function() {
    tablet_slots.push( googletag.defineSlot( “/1005424/_dPSv4_tab-all-article-bottom_(300×250)”, [300, 250], “pb-ad-78623” ).addService( googletag.pubads() ) ); } );

    googletag.cmd.push(function() {
    mobile_slots.push( googletag.defineSlot( “/1005424/_dPSv4_mob-all-article-bottom_(300×250)”, [300, 250], “pb-ad-78158” ).addService( googletag.pubads() ) ); } );

    The post How Auto White Balance Can Hinder Your Photography by Daniel Johnson appeared first on Digital Photography School.


    Digital Photography School