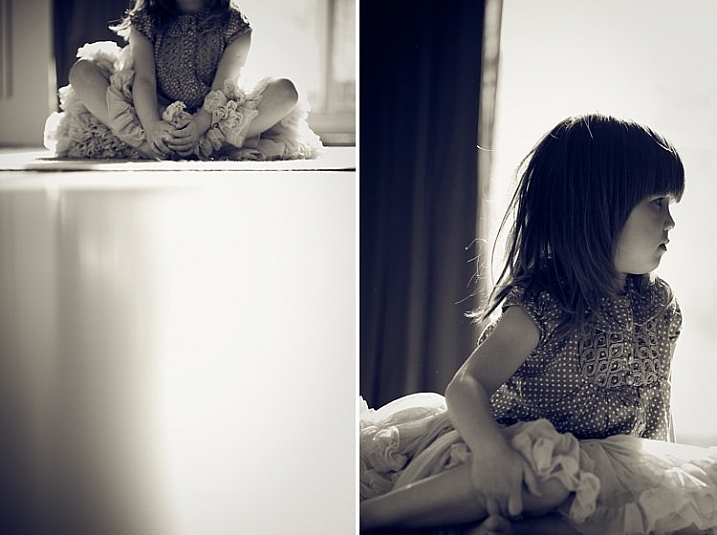
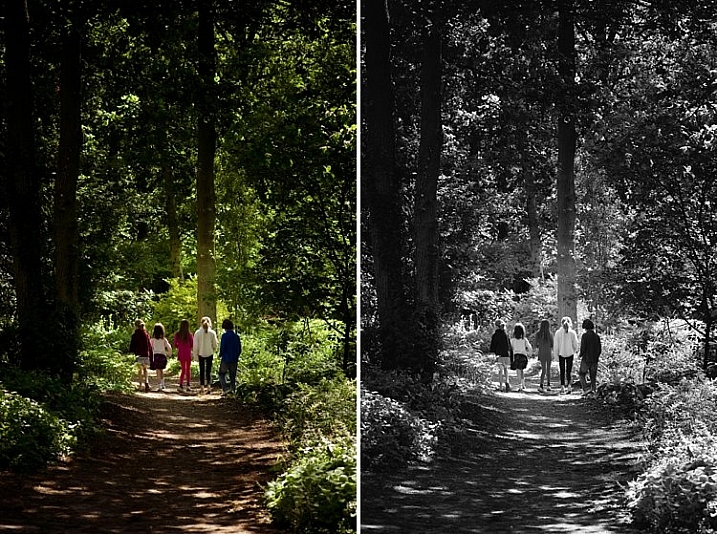
Category: Photography

  • An Exercise to Learn and Practice Shutter Speed at Home

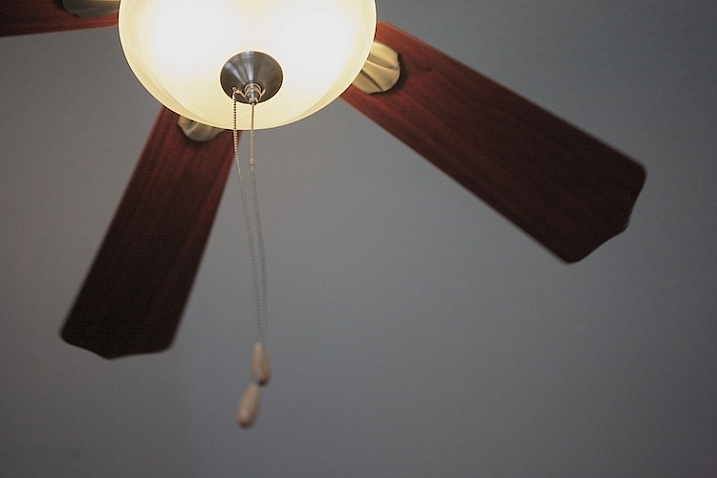
    Practice-shutter-speed-f11-1:60

    One of the most important choices you make when taking a photograph is deciding what shutter speed to use. The shutter speed controls how much light comes into your camera, and how motion is recorded.

    A faster shutter speed will freeze action and slower shutter speeds can create a blur. Both choices can produce great pictures. In this simple exercise that you can do at home with a ceiling fan, you will have the opportunity to practice setting your camera on different shutter speeds, and seeing how each affects motion in the image.

    It’s best to do this during the day when there is some ambient light in the room. You might choose to shoot this with the ceiling lamp on or off, either will work. Or you might try both ways to see which you like better.

    To get started, set your camera on shutter priority, or manual mode, and do a few test shots to check your exposure. Put your camera on a tripod for the most consistent results. I also chose to focus on the silver plate on the lamp of the ceiling fan to create consistency. It can be tricky in an exercise like this because your auto focus can get confused and focus on the ceiling, the blades, or the chain cord. (Note: you might try back button focus here, or use autofocus and then lock it or switch to manual).

    Practice shutter speed using a ceiling fan/

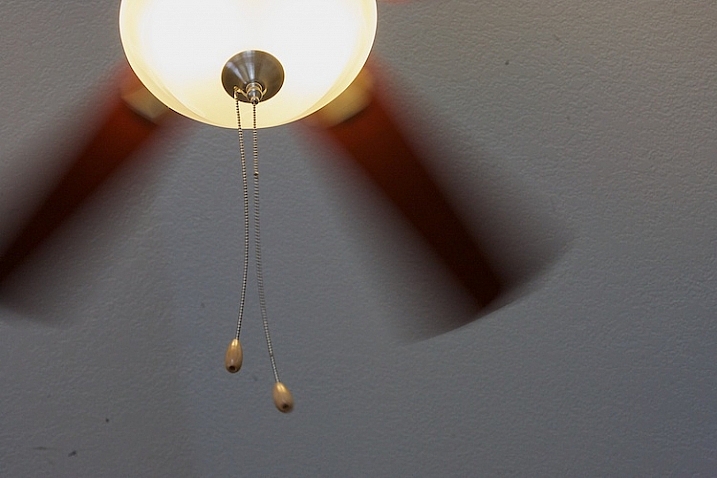
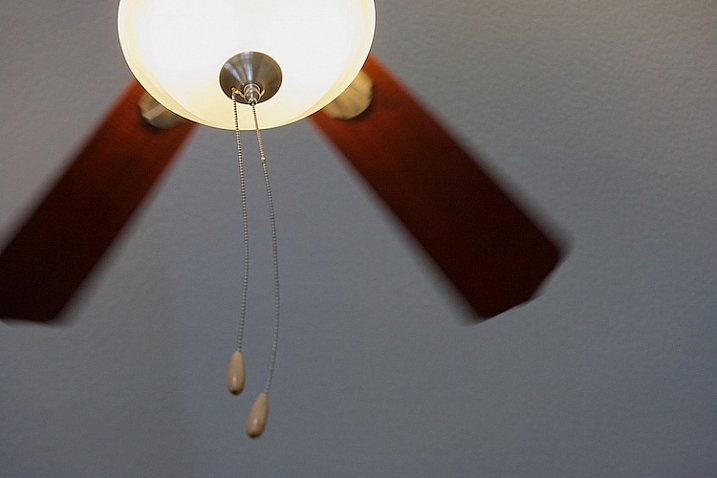
    f/8 at 1/125th, ISO 1600.

    Start your series at 1/125th of a second. Notice that I focused on the metal plate on the lamp, and how sharp it is. The blurring in the fan blades is caused by motion.  Also look at the chain. It’s sharp toward the lamp, but the focus gradually falls off as it gets toward the pulls.

    Now slow your shutter speed down to 1/60th, and see what happens. If you are shooting in manual mode, remember that when you change your shutter speed, you must also change your aperture or ISO too.

    Practice shutter speed using a ceiling fan/

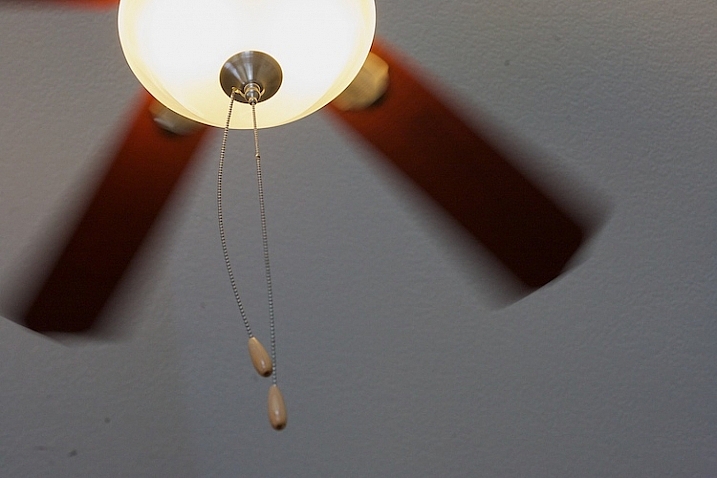
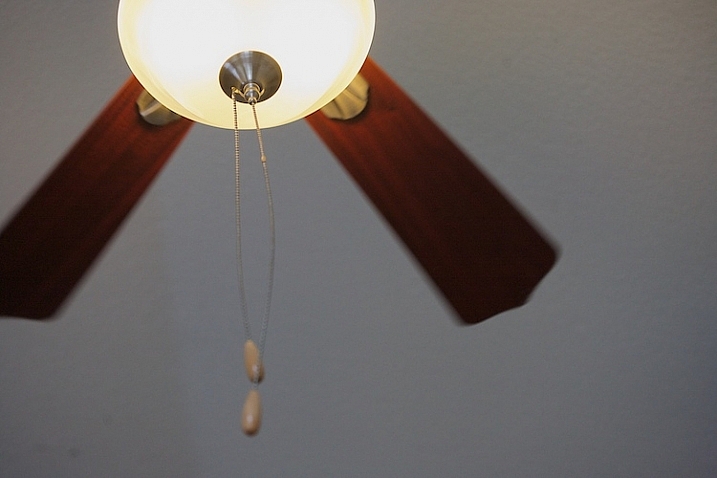
    f/11 at 1/60th, ISO 1600.

    Notice the blur in the blades at 1/60th. Next, look closely and you can also see that the pull chains show some movement. The depth of field is deeper as well, see how much is in focus between the metal plate on the lamp and the pulls.

    Now, slow it down a little bit more.

    Practice shutter speed using a ceiling fan/

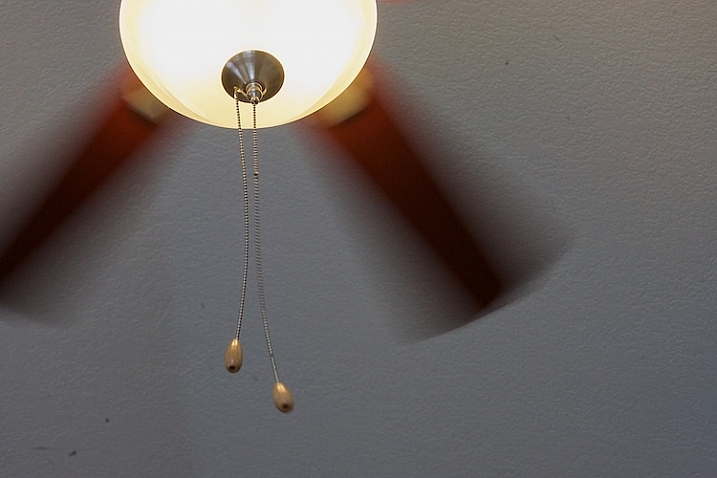
    f/13 at 1/40th, ISO 1600.

    What do you notice at 1/40th? The blades seem to be moving faster because of the blur, but nothing has changed with the fan. There is a greater depth of field also, much of the pull chain is in focus now.

    Let’s slow it down even more.

    Practice shutter speed using a ceiling fan/

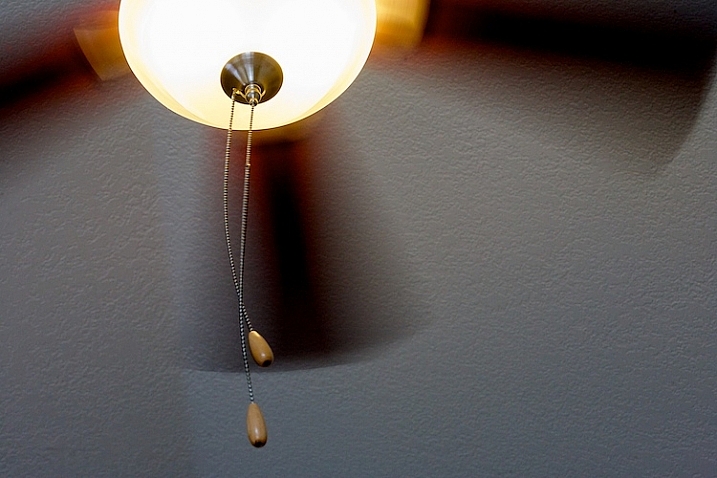
    f/20 at 1/4, ISO 1600.

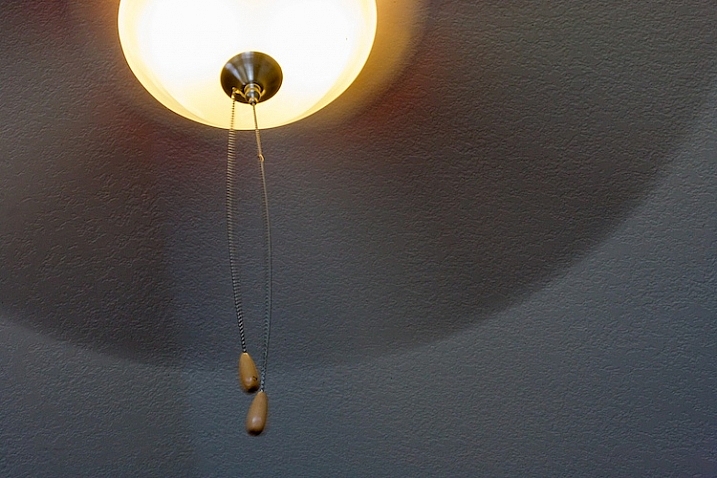
    Now, at 1/20th, the blades have taken on a new look and the chain is more in focus. Let’s slow it down a little more and see what happens.

    Practice shutter speed using a ceiling fan/

    f/32 at 1/8th, ISO 1600.

    At 1/8th of a second, the blades are almost indistinguishable, and note that the metal plate is not as sharp as in the other photos. Ceiling fans are seldom perfectly still when the fans are moving and you can see slight movement in the metal plate.

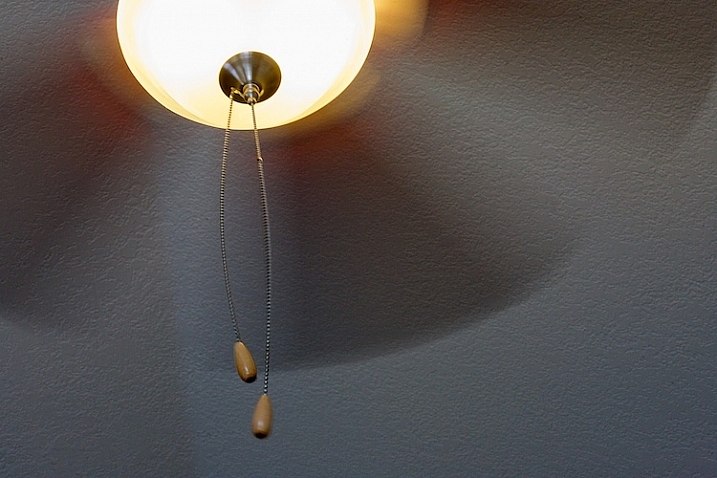
    Now, let’s go back and speed things up. Try a shutter speed of 1/250th and see what happens.

    Practice shutter speed using a ceiling fan/

    f/5.6 at 1/250th, ISO 1600.

    Compare this to the first image, which was shot at 1/125th of a second. You can see that the blades still have motion, and notice the difference in the depth of field. At f/5.6, the chain is considerably more out of focus than at f/32.

    Next, change your shutter speed to 1/500th.

    Practice shutter speed using a ceiling fan/

    f/4 at 1/500th, ISO 1600.

    At 1/500th, the fan blades show motion. Now try 1/1000th.

    Practice shutter speed using a ceiling fan/

    f/2.8 at 1/1000th, ISO 1600.

    At 1/1000th of a second, the fan blades are frozen. It’s almost as if the fan isn’t turning. Notice the difference in the depth of field. The pull chain is out of focus due to the narrow depth of field at f/2.8.

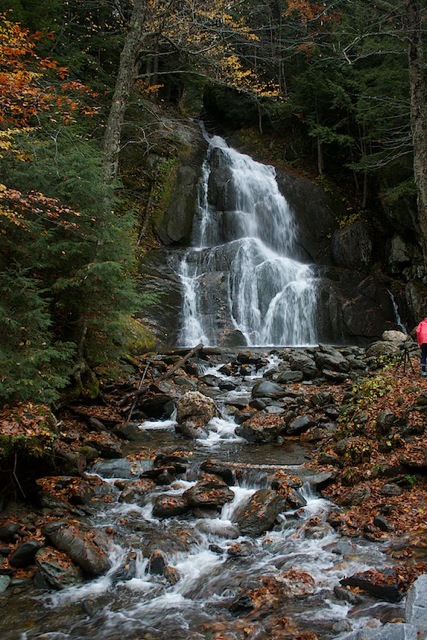
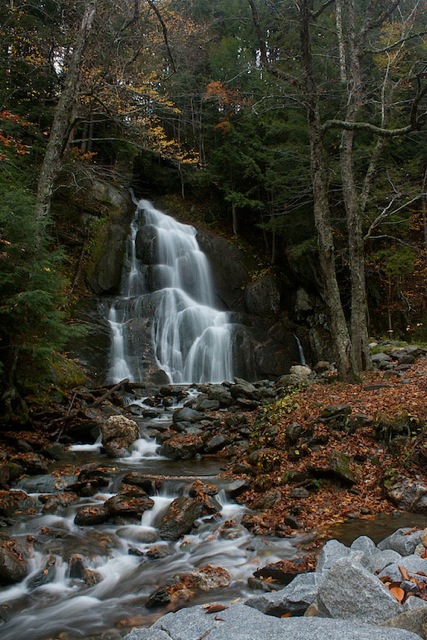
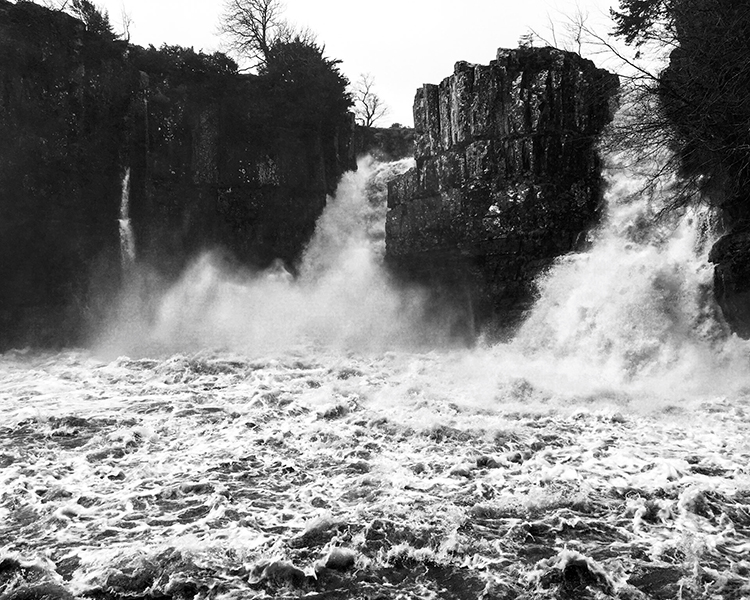
    Here are a couple of real world examples of how you might apply this to your photography:

    Shutter speed 1/30th - the water is partly frozen.

    Shutter speed 1/30th – the water is partly frozen.

    Shutter speed 1/2 second the water becomes silky and smooth

    Shutter speed 1/2 second the water becomes silky smooth

    You can also do this exercise by keeping your aperture consistent and changing your ISO. So what did you learn by doing this exercise? Give it a try and share your photos and what you learned below.

    googletag.cmd.push(function() {
    tablet_slots.push( googletag.defineSlot( “/1005424/_dPSv4_tab-all-article-bottom_(300×250)”, [300, 250], “pb-ad-78623” ).addService( googletag.pubads() ) ); } );

    googletag.cmd.push(function() {
    mobile_slots.push( googletag.defineSlot( “/1005424/_dPSv4_mob-all-article-bottom_(300×250)”, [300, 250], “pb-ad-78158” ).addService( googletag.pubads() ) ); } );

    The post An Exercise to Learn and Practice Shutter Speed at Home by Vickie Lewis appeared first on Digital Photography School.


    Digital Photography School

  • Transform Your Landscape Photography in a Click with our New Lightroom Presets (60% off Today)

    NewImageDo you take landscape photos? Are you a Lightroom* user? Do you need a little help to lift your landscape shots to the next level?

    Today we’re excited to announce the launch of our all new Adobe Lightroom® presets bundle: 101 Landscape Lightroom presets.

    With our new presets pack, transforming your landscape shots is a breeze.

    And for a limited time, the pack can be yours for the special introductory price of just USD $ 20 (that’s 60% off).

    Check them out here.

    In this massive pack of 101 presets you’ll get these 6 collections to suit all scenery seasons:

    • Spring / Summer collection
    • Fantastic Fall
    • Wonderous Winter
    • Stunning Black & Whites
    • Creative Horizons
    • Mono Toned
    • Plus you get a bonus Toolbox collection with 29 presets designed to be stackable for making simple adjustments.

    Created by professional landscape photographer Sarah Sisson (co author of our best selling eBooks Living Landscapes which is all about how to take great landscapes and Loving Landscapes which is a guide to post processing landscapes), she’s done all the hard work for you so you can get the perfect edit for every photo without the fuss.

    Simply apply the effect and adjust as desired… It’s that easy!

    You’ll save a whole heap of processing time, while giving your images an instant “pop”. See Sarah demonstrate in the video below.

    101 Landscape Lightroom Presets from Digital Photography School on Vimeo.

    Transform your photos in just one click. Pick up our 101 Landscape Lightroom Presets today – while we’re still offering it at the introductory price.

    *Please note: a copy of Adobe Lightroom is required to use these presets.

    Also: Haven’t used presets before? No worries. Full instructions are included in the pack.

    googletag.cmd.push(function() {
    tablet_slots.push( googletag.defineSlot( “/1005424/_dPSv4_tab-all-article-bottom_(300×250)”, [300, 250], “pb-ad-78623” ).addService( googletag.pubads() ) ); } );

    googletag.cmd.push(function() {
    mobile_slots.push( googletag.defineSlot( “/1005424/_dPSv4_mob-all-article-bottom_(300×250)”, [300, 250], “pb-ad-78158” ).addService( googletag.pubads() ) ); } );

    The post Transform Your Landscape Photography in a Click with our New Lightroom Presets (60% off Today) by Darren Rowse appeared first on Digital Photography School.


    Digital Photography School

  • How Using Your Smartphone Camera Can Help Improve Your Photography

    One of the triumphs of digital photography is that it has become accessible to more people, across more and more devices. Cameras are no longer standalone devices; as the technology allows the camera to be smaller and smaller, it can be built in to other devices that you may have on you more often than a dedicated camera, such as a smartphone. Cameras in smartphones, and other devices like tablets for example, are producing images of an increasingly higher standard. Their low-light performance is improving, and manufacturers are constantly improving upon the dynamic range, autofocus, and lens quality.

    Photographer Chase Jarvis said that, “The best camera is the one that’s with you” – so why not use your smartphone or tablet camera more often? There are restrictions on smartphone cameras over their DSLR or mirrorless camera brethren – their low light and AF performance still have quite a lot of catching up to do, the lenses cannot be changed, and you also have far less control over what settings (ISO, shutter speed, aperture) are used. But it is also these very restrictions that can help you improve your photography when you are using your DSLR, mirrorless, and even compact cameras.

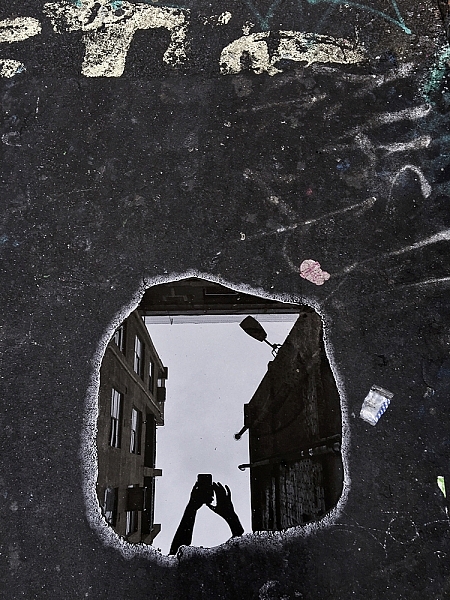
    Puddles, and other reflections, can make for interesting subjects.

    Puddles, and other reflections, can make for interesting subjects.

    So how can these restrictions help your photography? Simple, you have less to think about! You no longer have to worry if you have the correct settings dialled into get the exposure you want – you’re phone will work that out. You do have some say in the overall exposure; you can control how bright/dark the image turns out, but that’s it! Worried you don’t have the right lens for the photo you want? Too bad. With your phone you can’t change it, even if you wanted to. There’s another thing you don’t have to worry about.

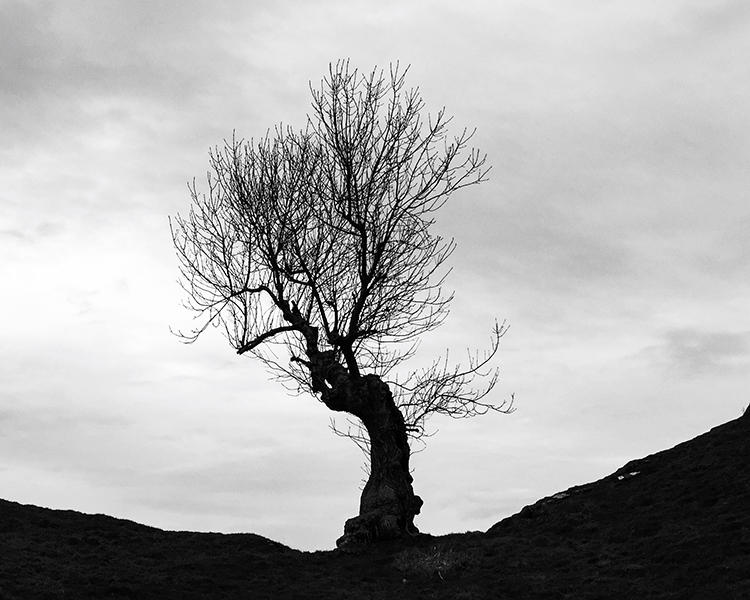
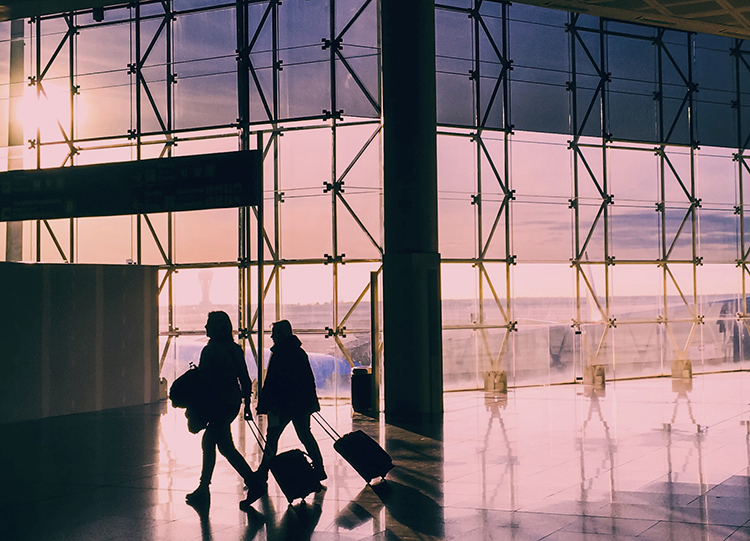
    You can’t control the camera settings. You can’t change your lens, and you generally have poor Autofocus (at least, poor continuous AF). So how can you take great photos with a smartphone? You need to think less about what you cannot control and more about what you can control. For example, no matter what camera you have, you can always control the composition. You can decide from which angle you take a photograph – will you take it down low, looking up or up high, looking down – and which direction you stand in relation to the light. Photographing toward the light can create stunning silhouettes, so looking for striking shapes will help here. You have full control over how close, or how far, from the subject you stand. You dictate what you include in the frame, and what you omit. All of these elements work to make images more interesting, and by removing the control over some of the more technical features as mentioned earlier, you now have more time to consider the compositional elements.

    Controlling Focus and Exposure

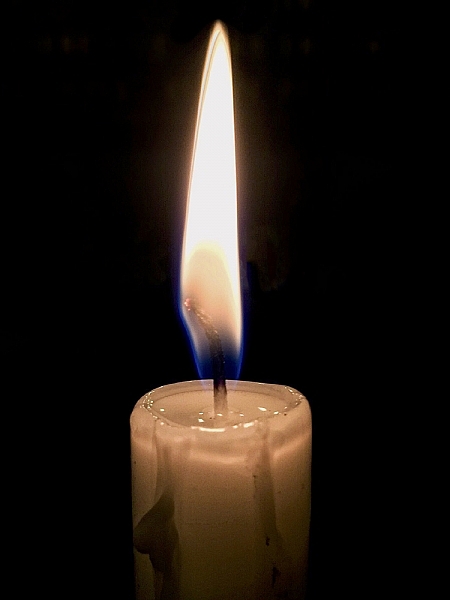
    Focussing and exposing on the candle has made the background go very dark. This works well to isolate the subject more.

    Focussing and exposing on the candle has made the background go very dark. This works well to isolate the subject more.

    Across most smartphones, touching the screen on the area you want in focus, will make the phone focus on that area. In addition, this is also where the phone will take its exposure reading. There are some camera apps available that will allow you to focus on one area and have the phone take its exposure reading elsewhere. You may also be able to increase or decrease the exposure of the image. How to do this will depend on the phone you are using, but for iPhone users, after tapping the screen to focus, sliding your finger up/down will alter the exposure compensation.

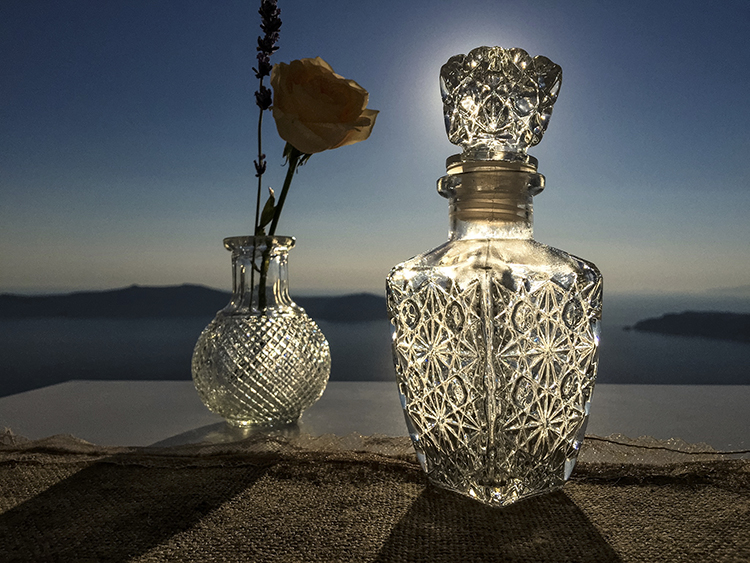
    Another image taken with the sun behind. This time, the light makes the bottle glow.

    Another image taken with the sun behind the subject. This time, the light makes the bottle glow.

    Creating Shallow Depth of Field

    Despite many newer smartphones having fast apertures (the iPhone 6 and 6s use an f/2.2 lens), their tiny sensor sizes make getting that nice creamy background bokeh a little more challenging, than with other cameras. If you’re unaware, generally the larger the sensor, the easier it is to create stunning bokeh. However, if you have a little understanding of depth of field, then you can create images from your smartphone with a blurry background. You can achieve this by reducing the distance between your subject and the phone, and increasing the distance from your subject to the background.

    Make Your Images Pop

    Post-processing is another tool that we have in our arsenal as photographers to make an image more striking. Introduce that to your phone photos. There is a plethora of apps available that give you varying levels of control with the post-processing phase.

    Some apps, like VSCO, have a vast range of filters that you can apply to images, and allow you to tweak areas, such as highlights and shadows, to get a different look. Other apps like Adobe’s Lightroom works much like the desktop variant, allowing to develop your images with a more natural touch. Photoshop and Photoshop fix (Note: it is called Photoshop Mix for Android) are both from Adobe and offer varied editing options that are fantastic at polishing up images in the final stages. Personally, I use Lightroom and Photoshop fix on my content now. However, in the past I used SnapSeed and found that to be great fun to use, too. It’s up to you which editing app you decide to employ, and how involved with it you become.

    Smartphone-17

    Again, looking for clean shapes to create a striking silhouette in an airport.

    Looking for clean shapes to create a striking silhouette in an airport.

    Other Tips to Consider

    • Take a lot of photos: Sometimes things happen fast. Don’t be afraid of taking a lot of photos. The perfect shot isn’t going to come with every single click. The trick is to take more photos than what you really need, then pick the best one from the bunch. If you do this, then you will have more to choose from, and a higher chance of getting one that stands out.
    • Learn how to see light and how it interacts with its environment: Light is the most important object in a photograph. It doesn’t matter what camera you’re using, how well you know how to use it, or how amazing your subject is; it all counts for nothing without light. You’ll often hear photographers talking about the Golden Hour, which is early in the morning and again in the evening when sun is lower, softer and the light is more directional.
    • If you’re photographing with the sun behind you, know how that will make your subject look. Do you want to light up their entire face, for example? Or do you want to shoot from the side? If you move so the sun is behind the subject, then consider photographing them silhouetted. If the light source is behind the subject, the foreground will always be darker than the background. The way you position your subject – or wait until the light is right for your subject – is how you make an image more creative and stand out.
    • Watch your background: Something that is often overlooked in an image is the background. A bad background can bring a great subject down. You need to think about your photo and what makes it interesting. If the subject you’re photographing is to be the only thing in the photo, then you should use a nice clean background, that isn’t going to draw away people’s attention from the main subject. However, backgrounds can also add to an image, and are great for environmental portraits.
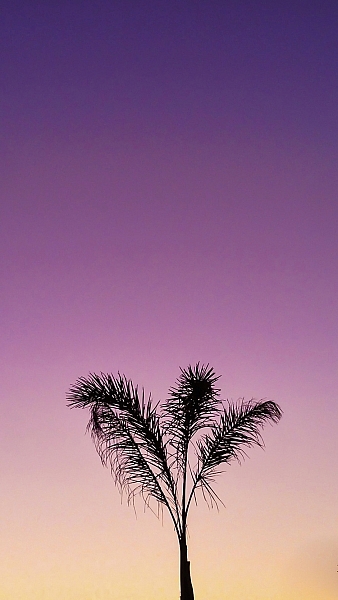
    I loved the peacefulness of the light here and the silhouette of the palm tree.

    I loved the peacefulness of the light here and the silhouette of the palm tree.

    Here, I photographed toward the light and decided to include the flag on the right to add a little more interest.

    Here, I photographed toward the light and decided to include the flag on the right to add a little more interest.

    Conclusion

    Whilst there are many limitations to using the camera in your smartphone, or indeed a tablet, it can help teach you how to work around limitations, and still create striking images. Their quality is clearly not going to be as high as a dedicated camera’s quality will be, however, it’s still a lot of fun to be able to capture a great image on a device with such limitations.

    Below are some more images that I have taken with my iPhone. Feel free to share some images you’ve taken on your smartphone or tablet in the comments below, as well as your favorite camera and processing apps.

    Smartphone-2

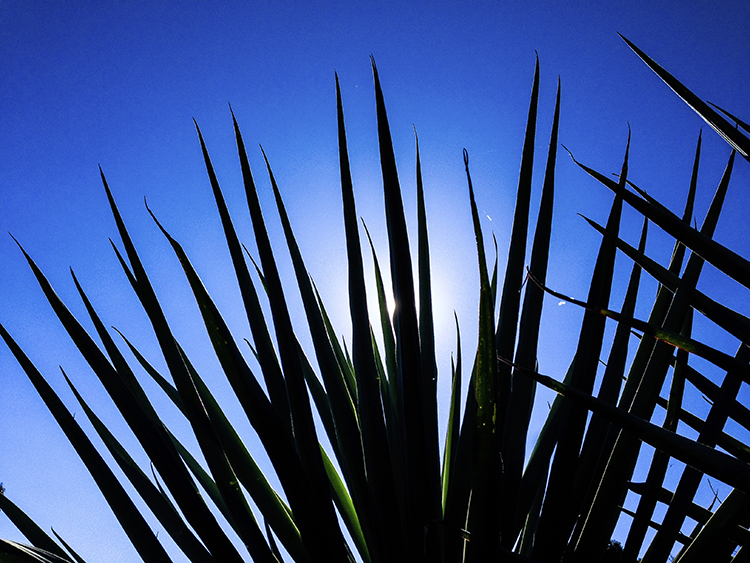
    I found the leaves of this plant to be quite striking. By photographing from a very low perspective, I was able to make my subject pop out more against a plain blue sky. The position of the sun also creates interest as the light kicks off edges.

    Smartphone-5

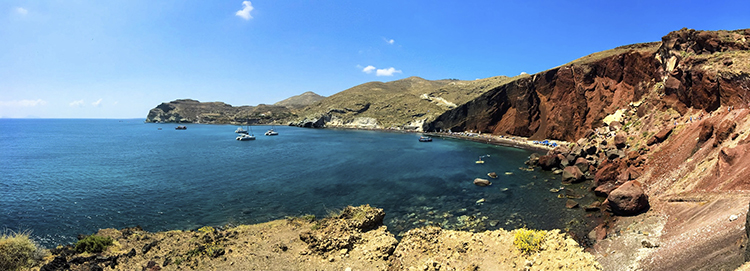
    The in-built panorama feature of my phone worked well to create this image.

    Smartphone-8

    Another image where the panorama mode worked quite well.

    Smartphone-9

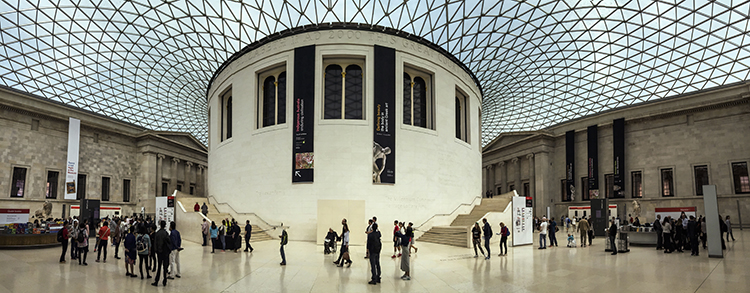
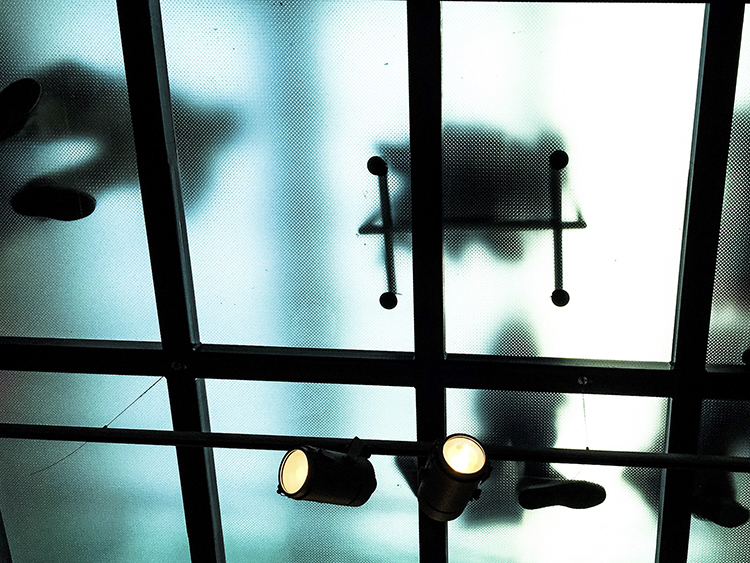
    Don’t be afraid to look up! In this image, the floor above me was frosted glass and made for some interesting shapes.

    Smartphone-10

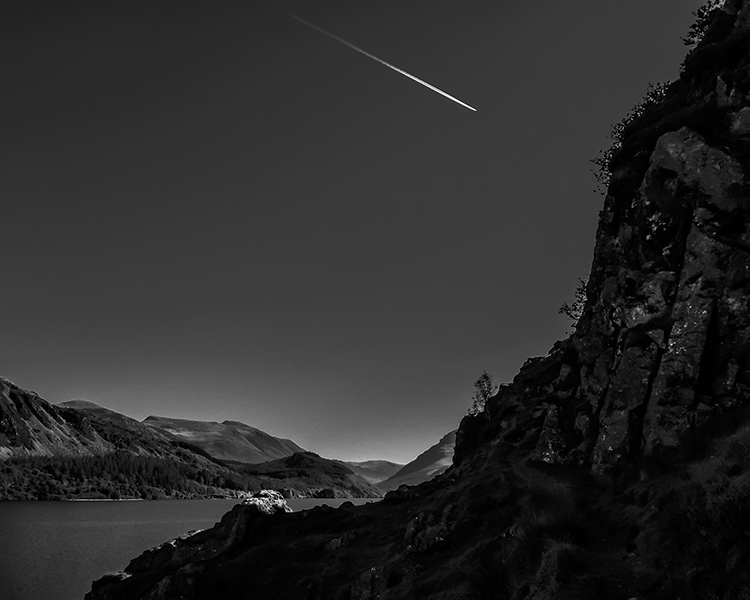
    Converting this image to black and white has given it an almost unearthly feel to it.

    Smartphone-12

    Photographed looking straight down. Simple images often work best not just with smartphones, but in photography in general.

    Smartphone-13

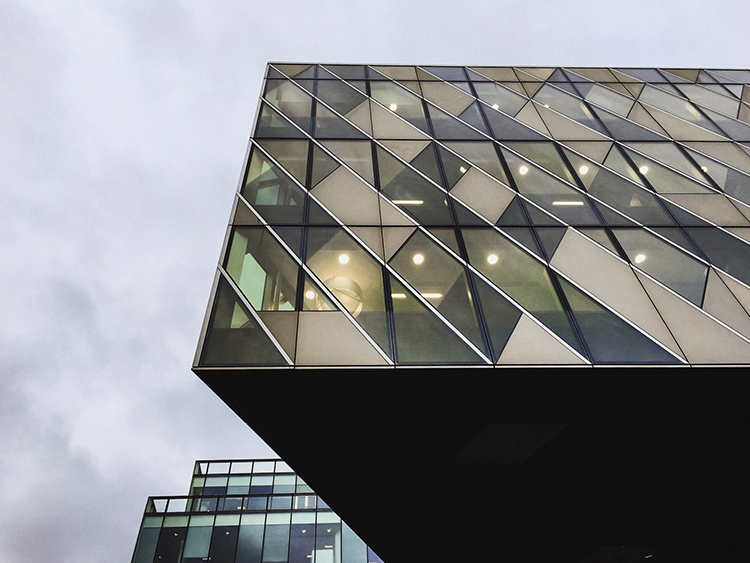
    The clean lines of these buildings create some interest.

    Smartphone-14

    Again, photographing down low I was able to show an every day scene from a different perspective.

    Smartphone-19

    The same principles used in this image will work very well on any camera. The road in this image creates a sense of depth.

    Smartphone-20

    The quality and direction of light help make this image. These are qualities you should always look for; no matter what camera you are using.

    Smartphone-18

    googletag.cmd.push(function() {
    tablet_slots.push( googletag.defineSlot( “/1005424/_dPSv4_tab-all-article-bottom_(300×250)”, [300, 250], “pb-ad-78623” ).addService( googletag.pubads() ) ); } );

    googletag.cmd.push(function() {
    mobile_slots.push( googletag.defineSlot( “/1005424/_dPSv4_mob-all-article-bottom_(300×250)”, [300, 250], “pb-ad-78158” ).addService( googletag.pubads() ) ); } );

    The post How Using Your Smartphone Camera Can Help Improve Your Photography by Daniel Smith appeared first on Digital Photography School.


    Digital Photography School

  • 8 Tips to Avoid Crowds at Popular Landscape Locations

    Photographing popular tourist destinations can at times be a great challenge. Hundreds of people are walking within your frame, and regardless of the direction you’re facin,g it’s nearly impossible to capture an image without people in it.

    1

    I often visit beautiful landscapes, many of which are popular among tourists, even though I prefer to shoot more unique locations, and enjoy photographing in quite areas where it’s nothing but nature and me. So when I visit extremely crowded landscapes, I get slightly stressed. But these touristic places are popular for a reason.

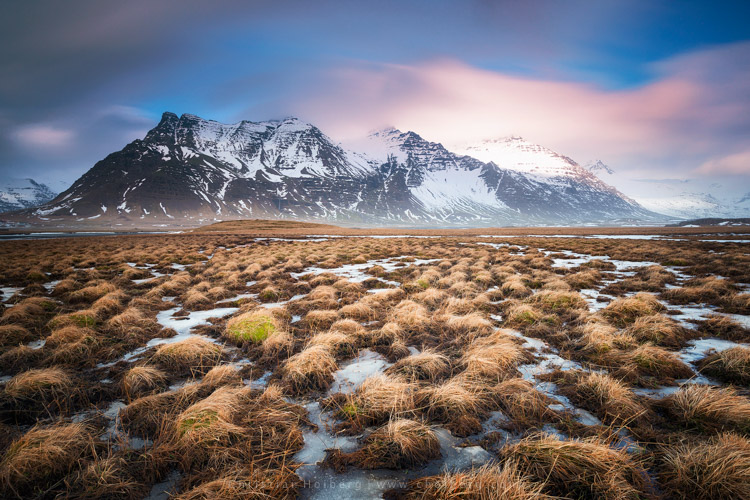
    When I visited the famous Svartifoss, Iceland a few weeks back, I left without taking more than a couple snapshots, most with my phone. Even though the roughly 40 minute long hike is considered challenging by some, I was amazed to see the amount of people gathered around the waterfall, not to mention the bunch of tripods placed all over. It seemed to be impossible to take the classic image with the river leading up towards the falls, as a group of tourists had occupied the entire place.

    Even though it might seem impossible to take professional looking landscape images from these places, there are ways to avoid the crowds and enjoy them alone. It all comes down to planning and prioritizing.

    1 – Choose the Hour Wisely

    If you’re into landscape photography you may already know that the best time to photograph is during the Golden Hour. This is the time of the day where the sun’s position in the sky is at the lowest, which creates a soft light ideal for photography.

    2

    2 – Wake Up Early

    Since many tourists aren’t dedicated photographers, most of them won’t be awake and out in nature for sunrise. Normally they prefer spending a couple extra hours in bed and having breakfast at the hotel.

    3

    This is a great advantage for us who wish to capture the beautiful landscapes in optimal light. It’s rare that you meet large crowds this early in the morning, but you may meet a fellow photographer or two. Usually most photographers, and non-photographers, that are up for sunrise try not to get in each other’s way.

    About one or two hours after sunrise, depending on what time of the year it is, the first busses filled with tourists begin to arrive. This gives you a lot of time to enjoy these places, and take the images that will be difficult to capture when it gets annoyingly crowded.

    3 – Enjoy the Sunset

    It’s no secret that it’s more normal to be awake for sunset than for than sunrise. Accordingly the crowd will be a larger during this hour, and if you’re photographing close to a large town it might even be very crowded. Since I’m a landscape photographer and this article is mainly focused on avoiding crowds at popular landscape destinations, I won’t get into cityscapes, etc.

    4

    What you will see when you are photographing landscapes during sunset is that most people present are fellow photographers. Most normal tourists tend to head back towards the town or hotel, for dinner or other activities.

    4 – Photograph the Night Sky

    If you haven’t photographed landscapes at night yet, I strongly recommend you try it. Be aware though, as it is highly addictive!

    Images captured during the night can often be quite different than what you normally see from these touristic locations, since the majority of people prefer to sleep at this time. I would say the lack of sleep is part of a landscape photographer’s life (for both beginners and professionals).

    5

    Another benefit of photographing at night is that you might witness certain astrological events, such as meteorite showers, or the northern lights in the northern hemisphere. Be sure to bring something warm to drink as it may get chilly throughout the night.

    5 – Choose the Month Strategically

    I know that getting vacation days outside the normal holidays might not be possible for everyone, and some locations are definitely best to visit during certain times of the year. But, visiting during low-season is the best method to avoid the crowds.

    6

    If you want to photograph events such as the Tulip Festival in the PSNW (Washington/Oregon), or the Cherry Blossom in Japan, you have to visit during a specific time of the year, and most likely it’s going to be crowded with both photographers and tourists. While the tips above still will be beneficial, you will most likely not be at these places alone.

    However, if you’re not photographing a specific event, visiting during low season can be a great choice. Not only will you avoid the biggest crowds, you may also be rewarded with some unique scenery and weather.

    7

    I’ve visited Iceland during low season a couple times, and the results have been great. Yes, it has been challenging with the harsh weather but when the light is good, it’s GOOD!

    6 – When the Crowds Won’t Leave

    But what if you’re not able to go during low season, sunrise, or sunset? What if there is still a large crowd even during these times? Should you just give up and head back home? Of course not! There’s always a solution, so don’t worry.

    7 – Use a Neutral Density Filter

    While I won’t get too into the technical aspects of Neutral Density Filters, they allow you to use a longer shutter speed. By placing the dark piece of glass in front of your lens, you need a longer shutter speed to get the correct amount of light to reach the camera sensor. Just be sure to bring a tripod, I doubt you will be able to hold your camera completely still for several seconds or minutes.

    8

    Why it’s Beneficial to use an ND Filter at Crowded Locations

    When you are using a long shutter speed, all motion within the frame will become blurred. The longer your shutter speed is, the less visible people will be. In fact, if you set the shutter speed to a couple minutes, you may even completely remove all people from your image.

    8 – Stack Multiple Images

    Stacking multiple images is another method to remove crowds from your pictures. This is a little more advanced than using an ND Filter, and requires that you have an image editing software such as Adobe Photoshop. Let’s do this step by step:

    1. Take a set of images from the exact same position. Ideally you should use a tripod so that the frame is the same on each image. Try to take 20-25 images with an interval of roughly 20 seconds. Having this interval will allow people to move a little between each shot.
    2. Import the images to your computer.
    3. Open Photoshop
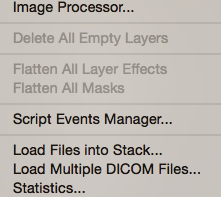
    4. Click File > Scripts > Statistics
    5. Choose Median as your Stack Mode in the box that appears, and check the box for “Attempt to Automatically Align Source Images”.
    6. Go to YouTube and watch funny videos until Photoshop is done processing…
    7. When the image is done, zoom in to 100% and look for any spots where the script wasn’t able to do a perfect job. If you find such spots select the Spot Removal Tool and carefully heal these places.

    9

    This is a great technique to remove people from your images. My experience is that the script works well on 99% of images, and even on the remaining 1% it does a decent job.

    Final Words

    I think most of us have experienced being frustrated due to the large crowds more than once. Personally I think it’s important to remain respectful to both fellow photographers and other tourists when we are at these popular places. Sometimes all you need is a little patience.

    10

    On another note, the best way to avoid the crowds is to go somewhere less known. I know it’s scary for many to go explore new locations, as you already know how beautiful the popular spots are, but the best images are often taken at less known locations.

    What do you do when photographing these popular locations?

    googletag.cmd.push(function() {
    tablet_slots.push( googletag.defineSlot( “/1005424/_dPSv4_tab-all-article-bottom_(300×250)”, [300, 250], “pb-ad-78623” ).addService( googletag.pubads() ) ); } );

    googletag.cmd.push(function() {
    mobile_slots.push( googletag.defineSlot( “/1005424/_dPSv4_mob-all-article-bottom_(300×250)”, [300, 250], “pb-ad-78158” ).addService( googletag.pubads() ) ); } );

    The post 8 Tips to Avoid Crowds at Popular Landscape Locations by Christian Hoiberg appeared first on Digital Photography School.


    Digital Photography School

  • How to Create Compelling Wide-Angle Portraits Using One Off-Camera Flash

    What are your most memorable moments as a photographer? As a travel photographer, my short list of stand-out moments include wandering alone in Namibia’s dead tree forest, photographing sunbeams from the top of a cliff in China, and capturing the Aurora Borealis on the coast of Iceland.

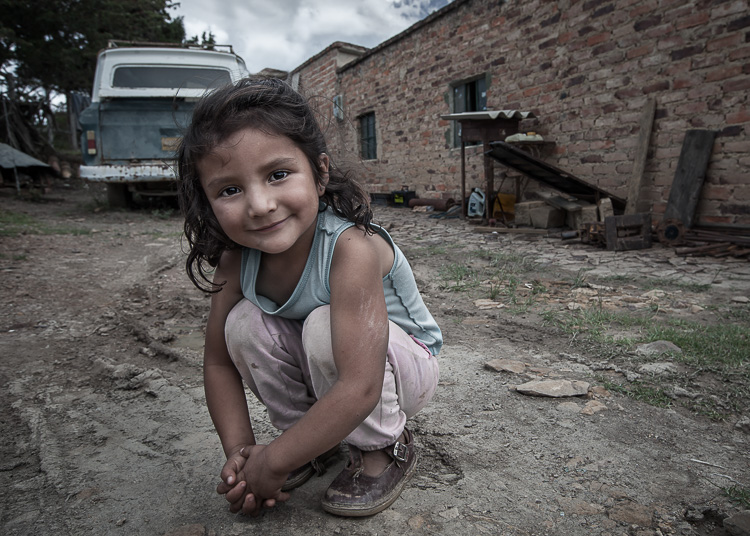
    1 Colombian Girl

    However, a year ago all of those amazing locations and moments were trumped by spending 30 minutes photographing a little girl outside her home near Villa de Leyva, Colombia (pictured above). This was the first time the girl had her portrait taken, let alone by a foreigner. With all the confidence of an experienced model, she literally stole the show that day. I believe the session is an important memory for her and instantly became my top moment photographing to date.

    Ironically, two years ago I would not have even bothered taking this picture. I was focused on landscape and outdoor travel scenes. Also, if I’m honest with myself, I was somewhat intimidated by using artificial lighting and working with people as subjects. In April of 2014, I gave environmental portraiture a shot and have never looked back. It is now an important focus of my work.

    This article will provide some guidance on how you can create images like the ones you see here, using a wide-angle lens and just one off-camera flash. But first, let me let you in on a little secret – it’s not that difficult.

    Getting things right in camera is the important first step, which is the focus of this article. Processing your images is equally important, but I’ll cover that in a future article. So, let me start by providing you with the core techniques, then get into equipment and settings.

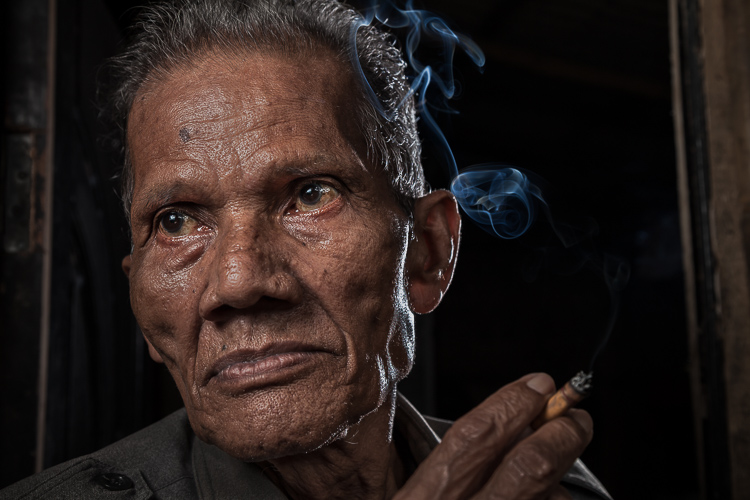
    2 Smoking Guy

    Use a (Relatively) Wide-Angle Lens

    Lens choice is critically important in portraiture. Most portrait photographers reach for their 85mm or 105mm lens when heading out on a shoot. These focal lengths give a nice, realistic look to the subjects. However, I find myself drawn to portraits that have a surreal look to them, and include extra context that helps tell a story. Also, wide-angle lenses require you to shoot close to your subject, which also brings your viewer into the scene.

    So, the first step is to leave your 85mm or 105mm in the bag, and grab a wide-angle lens. Most of the portraits you see here were created at 24mm using a full frame camera (use a 16mm for the same view if your camera has a cropped sensor). For me, this focal length is the perfect blend of reality and distortion. If you shoot much wider, elements closer to the lens, such as arms and hands, look too big or elongated. Also, wider focal lengths mean a much bigger background, which is usually not desirable.

    3 Dockworker Ships

    Choose a Compelling Subject

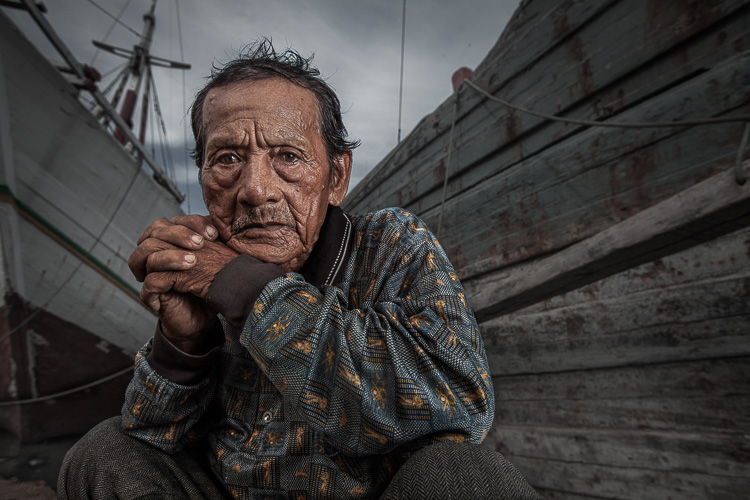
    Your subject is paramount. The Indonesian dockworker above is amazing. I spent 20 minutes photographing this guy and really had a difficult time choosing the best image. On the other hand, you could spend all day photographing me on the same dock, in front of the same ships, and have nothing but tossers at the end of the day.

    I look for people that have experienced life. The ideal subject has a particular interesting quality about him or her, that makes them stand out from the rest. However, my subjects also have an everyday person quality about them. Finding subjects can be challenging, especially if you live in the suburbs of Chicago, like I do. I am a travel photographer and usually find my subjects in rural areas overseas. However, there are great subjects everywhere.

    Clothing is critically important. If your 90-year old rural villager is wearing a hat that says, “I Love New York”, then you will want to politely ask him to take it off, or at least turn it around for the picture. The point is, don’t let out-of-context clothing ruin or weaken your shot.
    4 Smiley Guy

    Choose a Complementary Background

    Your image is only as strong as the weakest part of it, which is often the background. This is because, as photographer Jim Zuckerman puts it, “The world is a compositional mess”. There are two important qualities you want out of your background:

    First, at the very least, your background must be non-distracting. Although you can easily isolate your subject with a longer focal length, the background becomes a major consideration with wide-angle portraits. Beginner, and even intermediate photographers, can overlook even some obvious distractions in the background. You have probably seen them before: trees that look like they are growing out of the subject’s head, patchy spots of bright light in the scene, colorful objects, straight lines and geometric shapes. You essentially don’t want anything that competes with your subject for attention.

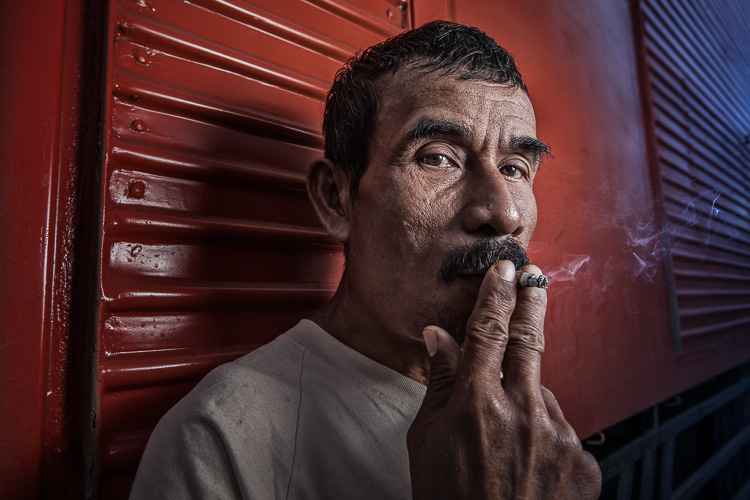
    The image of the Indonesian dockworker below is non-distracting, but not much more. He is essentially standing in front of a shipping container, so this image won’t win any awards for its background. Nevertheless, it is still a good picture because of the strength of the subject.

    5 Dockworker Container

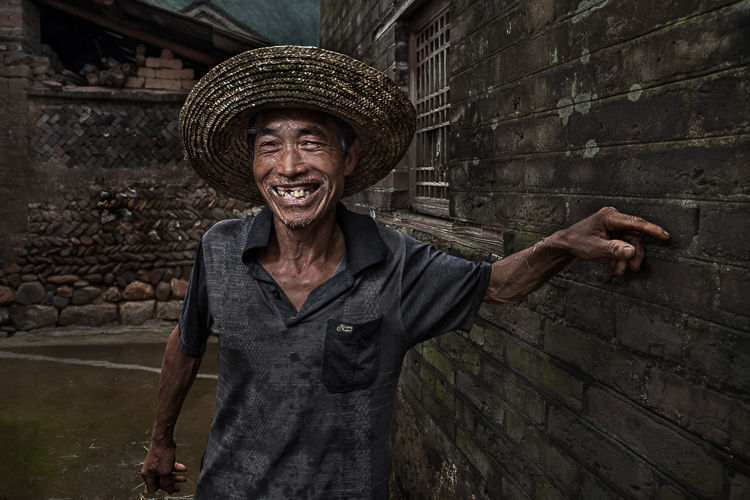
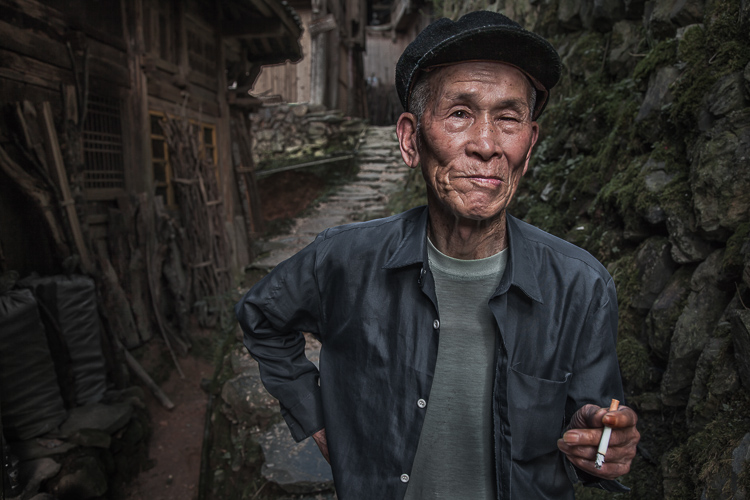
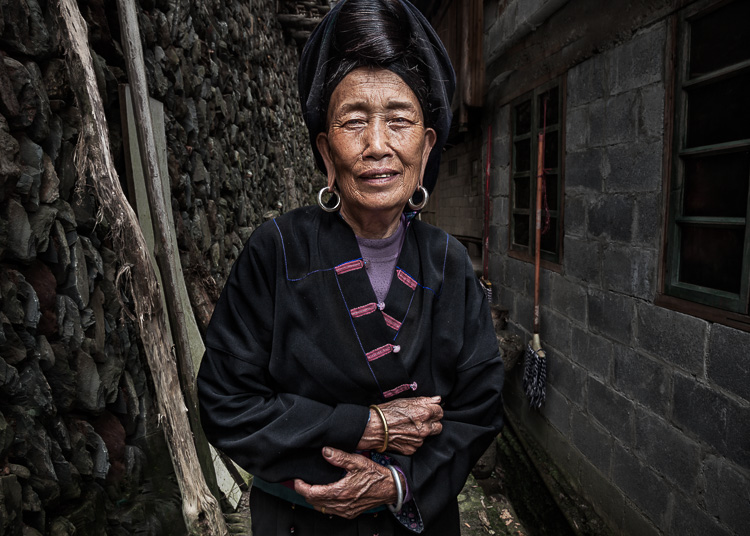
    Second, whenever possible, include a background that complements your subject by providing a context. I’ve shot many images with simple non-distracting backgrounds. But, my favorite pictures are those with a background that tells a story about the subject. This is why I love shooting in places like rural China and Indonesia. These countries have many ancient villages that provide opportunities for amazing backgrounds, such as in the image below.

    6 Chinese Guy Hat

    I like to keep all evidence of modernity out of the background. I don’t like plastic stuff in my pictures. I don’t include modern looking buildings or cars. Instead, I prefer rural areas with weather-beaten buildings. Of course, this all depends on what you are after. The important thing is that the background complements the subject and does not distract from it.

    Shoot in the Right Lighting Conditions

    Because the majority of the background is not lit by the flash, many of the same outdoor photography lighting principles hold true, even if a flash is being used. Try shooting either early or late in the day (when the sun is low in the sky) or in overcast conditions. I actually prefer overcast conditions, but still shoot relatively early or late in the day.

    Put Your Subjects at Ease

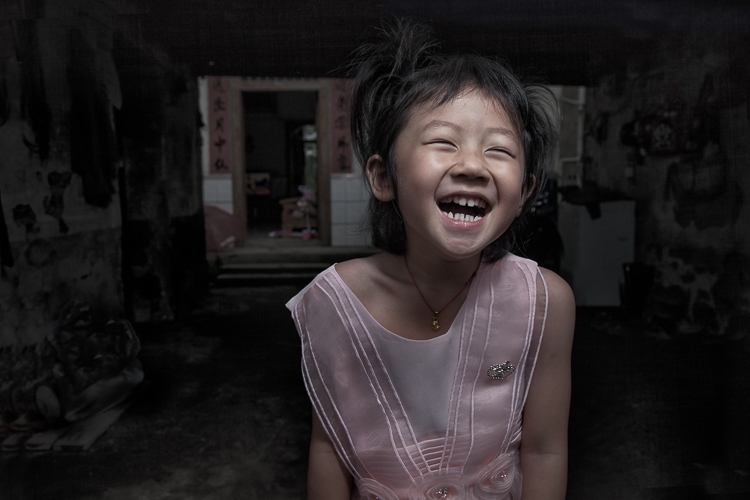
    I don’t hire models, so some subjects work well and others not as well. What you want to avoid is a picture of your subject standing flat-footed, straight up and down, and holding a fake smile.

    To help avoid this, it is a good idea to start your session by gaining their interest and confidence. If you have some images you’ve shot and processed, show them to give him or her an idea of what you are looking for, and hopefully peak their interest. This should communicate immediately that you are not looking for them to just stand there and smile. It should also show that the posing expectations will be basic.

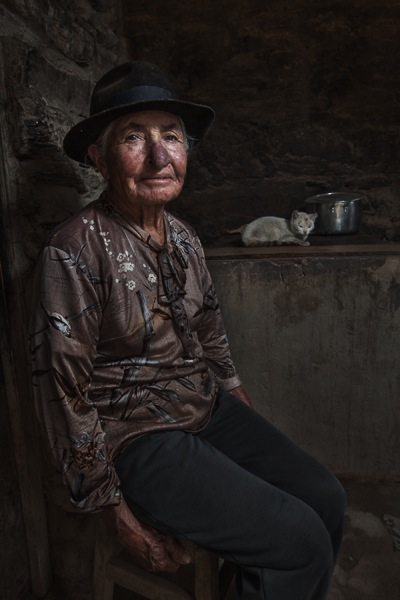
    7 Colombian Lady Cat

    Posing and Composition

    Because I am shooting wide, I get quite close to my subjects and warn them ahead of time about this. For me, the eyes are a critically important part of the picture and must be very sharp. I focus on the closest eye, and re-focus frequently as I move around the subject slightly.

    I generally ask him or her to look directly at the camera and not to smile, although not always. I then start moving slightly left or right, asking them to keep their head still and just follow the camera with their eyes. I usually shoot from slightly below eye level. I have them stand or sit at an angle to the camera. If the subject is standing, I have them put their weight on the back foot.

    I like to include the subject’s hands in the composition. With a wide-angle lens, their hands in the foreground will look large, so try to strike a balance with the hands being prominent, but not too large. You can do this by simply positioning the hands closer to or farther away from the lens relative to their body.

    8 Chinese Girl Laughing

    Equipment and Settings

    The Camera

    Your camera should be equipped with an internal or external flash trigger to control your off-camera flash. Here is how I set things up:

    • Start by leaving your flash or trigger initially turned off.
    • Set your camera to manual mode.
    • If the session is outdoors, I try for settings of ISO 100, f/7.1 and a shutter speed of around 1/160. You can adjust your f-stop and shutter speed to your preference, but keep in mind that you cannot go faster than your camera’s maximum flash sync speed.
    • Make the necessary adjustments to slightly underexpose the background by 1/3 to 2/3 stop. I usually start by adjusting shutter speed, but go no slower than 1/60 and no faster than 1/160. If necessary, I will then adjust my f-stop to f/5.6 at the widest. Then, and only then, will I start bumping up the ISO.
    • If you are indoors, you need to start with a higher ISO as a first step, and then make your adjustments to shutter speed and f-stop in the same manner.

    9 Chinese Woman

    Lighting

    For 90% of my portraits, I use a single off-camera flash, diffused with an umbrella or softbox. The most important rule with flash is “don’t ruin your shot,” which is usually done by putting too much flash on your subject. Instead, you want to get a decent balance of natural and artificial light, so that the flash is undetectable to the untrained eye, but lights your subject brighter than the underexposed background.

    Now, turn your flash and trigger on:

    • Set your off-camera flash to manual mode.
    • I typically position the flash at a 45-degree angle to the subject, about 2-3 feet (slightly less than a meter) away, higher than their head, angled downward.
    • I usually start with 1/16 flash power when outdoors, and adjust from there until the subject stands out from the background, but does not look like they have been blasted with flash.

    Post-Processing

    You need to get things right in camera first. But, you will need to use a variety of post-processing techniques to get the effect you see in these images. I’ll coverthe techniques I use to process environmental portraits in a future article.

    Thank you for reading, please share your wide-angle portraits and questions in the comments below.

    googletag.cmd.push(function() {
    tablet_slots.push( googletag.defineSlot( “/1005424/_dPSv4_tab-all-article-bottom_(300×250)”, [300, 250], “pb-ad-78623” ).addService( googletag.pubads() ) ); } );

    googletag.cmd.push(function() {
    mobile_slots.push( googletag.defineSlot( “/1005424/_dPSv4_mob-all-article-bottom_(300×250)”, [300, 250], “pb-ad-78158” ).addService( googletag.pubads() ) ); } );

    The post How to Create Compelling Wide-Angle Portraits Using One Off-Camera Flash by Ken Koskela appeared first on Digital Photography School.


    Digital Photography School

  • 4 Tips for Pre-Visualizing – Look Before You Shoot

    For a limited time only at Snapndeals, May 10-24th only get 33% OFF Timeless Portraits & Natural Light Black & White Portraiture, a 2-eBook Bundle by Wayne Radford.

    Pre-visualizing is an art form, that I believe, is not taught enough these days. It is the foundation for an artist or photographer to establish lighting, background, foreground elements, composition, and harmony. You need to establish all this before lifting a camera to your eye. Let’s look at some techniques and tips for pre-visualizing.

    1 – BACKGROUND

    Are there any distracting elements behind the subject that draw your eye away, e.g., bright hotspots such as sun coming through trees, strong geometric shapes, or bright colours. If these are a problem, move the subject or camera position around to avoid or minimize their effect.

    PHOTO 1

    2 – FOREGROUND

    Can you use any foreground elements to help create framing – examples would be rocks or foliage. Even getting down very low to blur the foreground will create a framing effect.

    3 – COMPOSITION

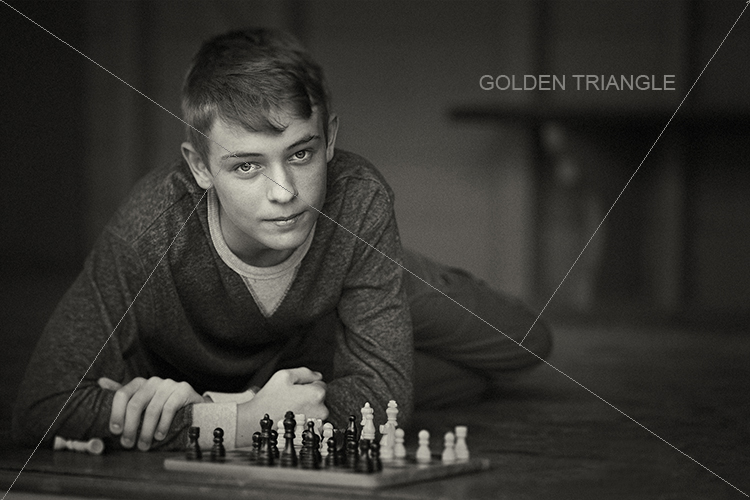
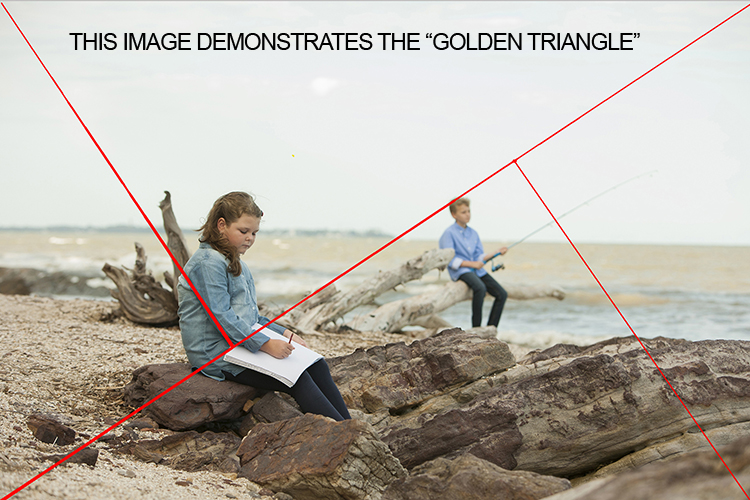
    Look around for shapes and perspectives that create more interest and lead your viewer around the scene. Example: I like to use the Golden Triangle instead of the Rule of Thirds, so I’m looking for elements that balance with that in mind. There is a sample below and you can read: Divine Composition With Fibonacci’s Ratio (The Rule of Thirds on Steroids) for more comprehensive information. Of course, it’s built-in as part of the cropping tools of Photoshop CS6 (and LR) and later, but I suggest learning to see this way before post-production adjustments.

    4 – HARMONY

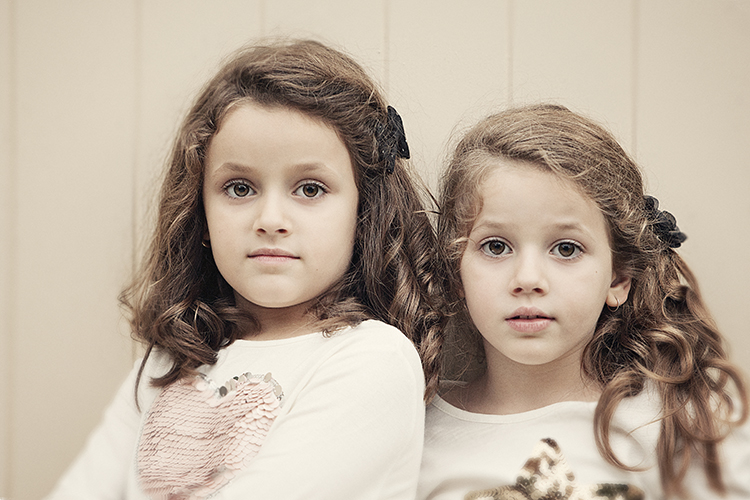
    This one is the most overlooked aspects of composition. I want my subject’s face to stand out, so I generally choose backgrounds that are complimentary to their clothing for colour, and depth of tone for black and white. Also, try minimizing any additional colours in the background that clash with the subject. Yes it sounds complex, so I’ve added some study examples to make it easier. (clothing colour selection is also important, but that’s a subject of its own for another day). Next time you watch a movie, look at the colour coordination of clothing and scenes.

    PHOTO 1

    I chose an old painted door as the background for these two girls as it had the same hues (colour tones) as their clothing and skin. Look at your subject’s clothing colours, and then find a background tone that will compliment it. This will make them stand out from the background and not create a distracting colour contrast. An example would be if the background were green or blue.

    The simpler, less cluttered backgrounds work best, especially when the colour tones harmonize. Keep the subject at least a meter or more away from the background, and use a wide aperture of f/1.2-2.8 to create a shallow depth of field.

    PHOTO 2

    Be careful that the subject doesn’t blend into the background. In this study I first looked for the light direction, then looked at the background colour and tone. It was a yellow painted wall which normally would record brighter than his face, but as it was undercover in shade, it rendered quite dark. Looking at his clothing colours I knew that there would be separation that could be controlled in Photoshop without any problem, if necessary. Again distance from subject to background, combined with an f/2.8 aperture setting, creates a lot of background blur which allows the subject to pop. Note, there are no distracting background elements.

    PHOTO 3

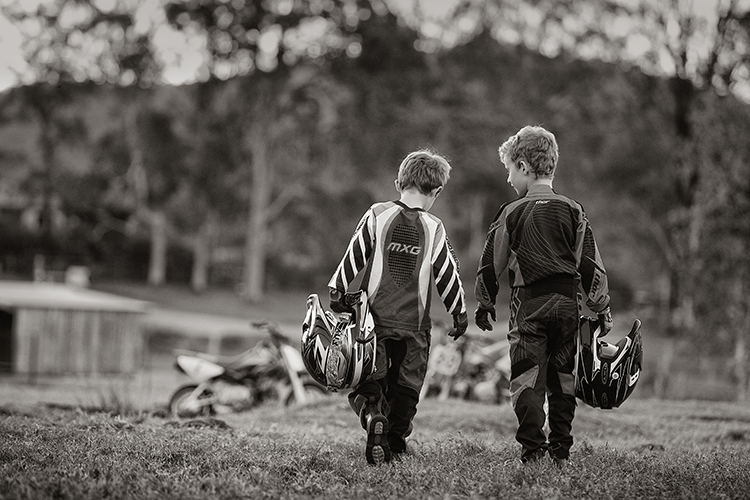
    When searching for suitable locations, you may find lots of distracting objects and textures that will make your image busy. This is when pre-visualizing where the camera and subject should be placed, and what you want to be included in the background should be used.

    In this image of the two boys, I noted that the trees and shed were too cluttered and distracting. By placing the boys a good distance from the shed and trees, and again setting the lens to create a shallow depth of field, (f/2.8 70-200mm lens) I was able to achieve good subject to background separation. The bikes were important to the story, so I placed them in the background to give the boys a direction to walk. Also, note the rim lighting on their hair gives extra separation.

    PHOTO 4

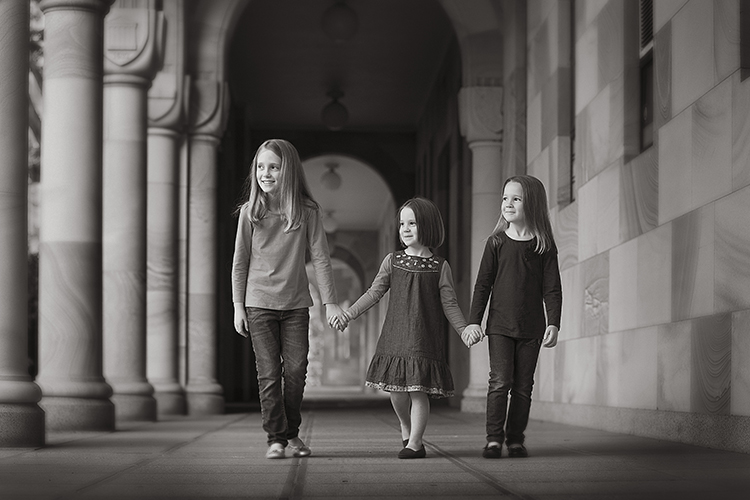
    Pre- visualizing this scene is an easy one for a trained eye – find the light, look at the background. Here you can see the light wrapping around the columns, creating graduated shadows, and a diminishing background that gives depth to the overall image. In this study, the light is cross-lighting them at 90 degrees to their bodies, so turning their faces to the light creates modelling on their faces, which adds shape to their faces.

    The background almost has a 3D look in the way it diminishes. Column over column, and arches layering over each other, creates great depth.

    The following study is an example of how I try to pre-visualize a portrait session

    When I found this beach location (below), I was overloaded with ideas on how I was going to use it. This is the opposite to writers block, where you become void of ideas. Instead, you can be over excited with creative ideas and forget the basics that make a portrait work.

    The first consideration was the direction and quality of light. In this study the open sky (right hand side of the photo, over the ocean) was the main light. Note the sun was setting over a hill behind the children, so I am using the soft light provided by the open sky. While it is a fairly flat light and very soft, it provides enough cross lighting to enhance texture and shape in the clothing and rocks. Notice the small specular light, rim lighting her legs, and the shadows in her clothing. These are helpful indicators to the direction of light when it is flat.

    PHOTO 5

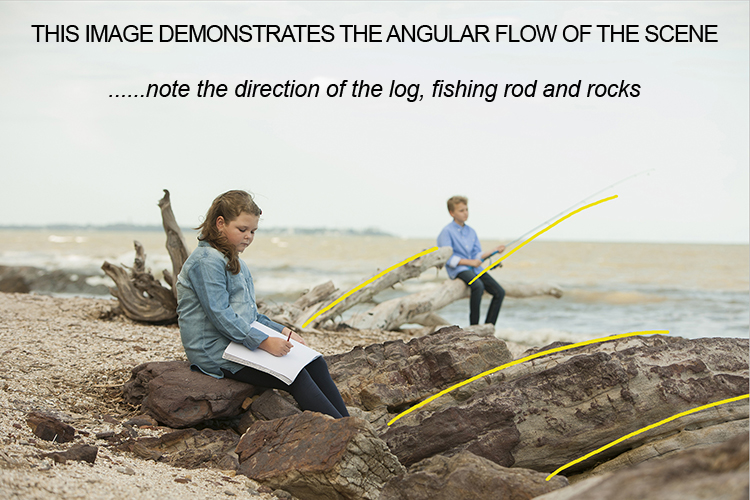
    The next consideration is the placement of the subjects in relationship to the light, and the natural props such as the rocks and driftwood. Those props are the things that get photographers excited, the challenge is how to use them creatively. Remember this is all done before lifting the camera to your eye – the art of pre-visualizing. I also noticed the angular shape in the rocks curving towards the ocean, this matched the angle of the driftwood.

    PHOTO 6

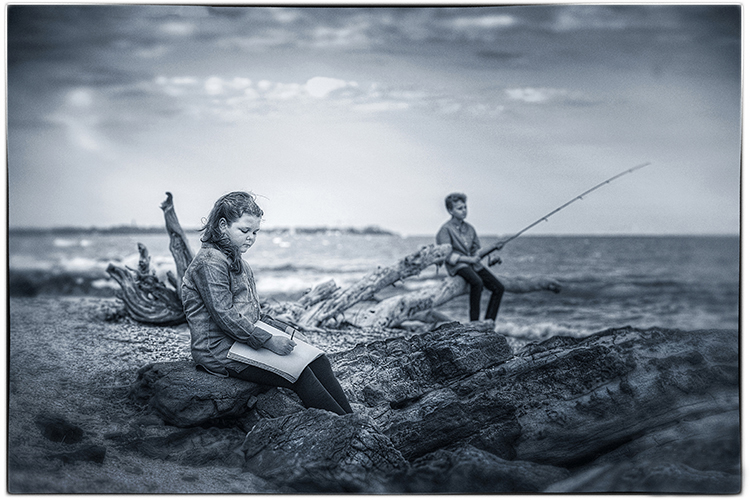
    The girl was placed on the most distant rock (also the flattest one for comfort) so the light was coming from her front left-hand side, creating some modelling to her clothes and face. It also allowed the image to read from left to right.

    The boy was placed on the driftwood, with his rod angled to match the driftwood branch beside him. It’s also a similar angle to the diagonal line running from top right to bottom left in the image. My only disappointment was the horizon line running through the girl’s head. It wasn’t possible to move the camera any lower, and raising the camera higher would have placed the boy’s head near the horizon line. Moving the girl wasn’t an option either due to the awkward shapes of the rocks. I was happy to leave it that way, as the shallow depth of field had created enough background blur to allow her to separate from the background.

    PHOTO 7

    Canon 5D + 70-200 f/2.8 IS lens – F4 @1/800th – ISO 400
    Hand-held at ground level
    Photoshop CS6 – Alien Skin Exposure 7

    When you learn the art of pre-visualizing, you will look at your work with greater satisfaction. You will know that you alone created the image to the best of your ability, using all the artistry skills of light and composition before even raising the camera to your eye. Not everything is created in the computer, I believe pre-visualizing is another tool in the journey of craftsmanship.

    For a limited time only at Snapndeals, May 10-24th only get 33% OFF Timeless Portraits & Natural Light Black & White Portraiture, a 2-eBook Bundle by Wayne Radford.

    googletag.cmd.push(function() {
    tablet_slots.push( googletag.defineSlot( “/1005424/_dPSv4_tab-all-article-bottom_(300×250)”, [300, 250], “pb-ad-78623” ).addService( googletag.pubads() ) ); } );

    googletag.cmd.push(function() {
    mobile_slots.push( googletag.defineSlot( “/1005424/_dPSv4_mob-all-article-bottom_(300×250)”, [300, 250], “pb-ad-78158” ).addService( googletag.pubads() ) ); } );

    The post 4 Tips for Pre-Visualizing – Look Before You Shoot by Wayne Radford appeared first on Digital Photography School.


    Digital Photography School

  • How to Add a Reflection in Photoshop

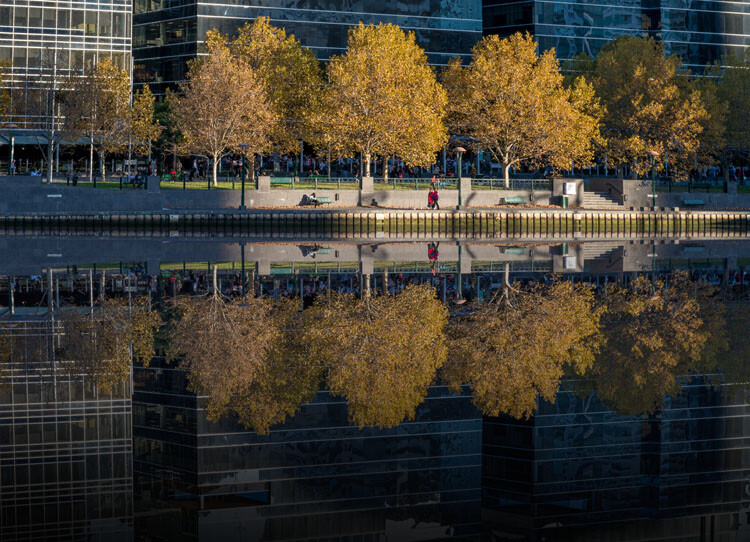
    There is one thing in photography that seems to be universally loved – reflections. They aren’t always easy to get, especially if water is involved. The wind only has to be blowing slightly to create ripples in the water, and you will lose the chance of a reflection.

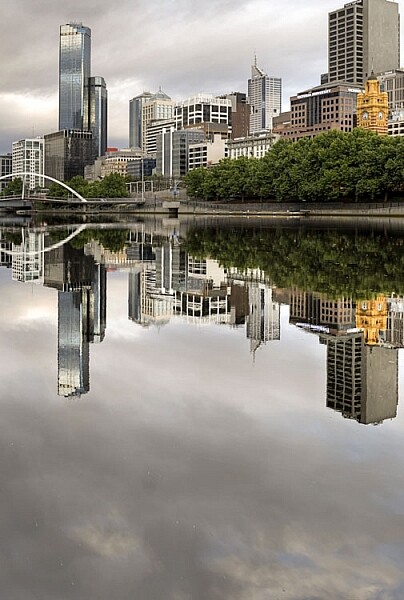
    Take the following image, a real reflection taken one morning just before it started raining on the Yarra River in Melbourne. It was almost perfect, but after repeated efforts to get something similar it has never happened again, well not for me.

    LeanneCole-reflections-18

    One of those magical times when the river was so still the reflection just happened.

    If you love that look, then there are ways to do it without having to wait for the perfect conditions. You can fake it in Photoshop, with the right image. Finding the right image is hard, especially when you start, but as you get more experienced at doing it you will find it easier to put reflections in other images.

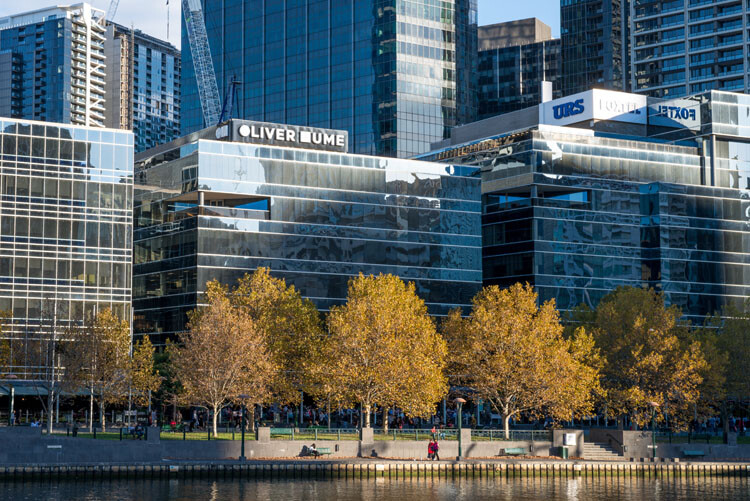
    Find an image that is straight on, like the following one.

    LeanneCole-reflections-14

    The basic image.

    Adding a reflection layer

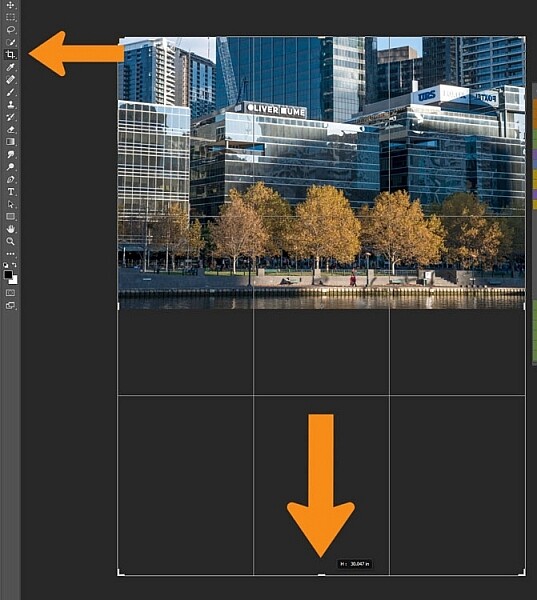
    Open the image in Adobe Photoshop, or any program that will allow you to work in layers. You could use Adobe Photoshop Elements or even GIMP to do this tutorial. Once the image has been opened in Photoshop, you will need to make it bigger to fit the reflection. You can do this by using the Crop tool.

    LeanneCole-reflections-1

    Extend the area of the image with the Crop Tool

    You can double the size of the original image, simply by dragging down the point at the bottom of the image using the Crop tool. If the overall size is too big, you can always crop it down once you are finished with the photo.

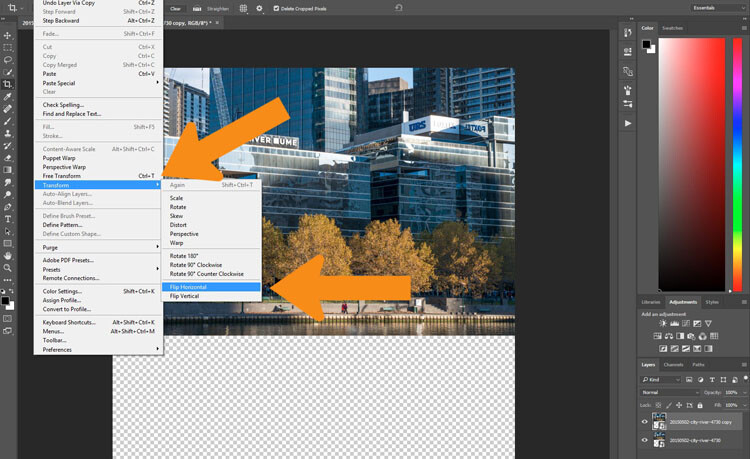
    Press Ctrl J to duplicate the original image to new layer, or go to the main menu at the top, to Layer > Duplicate. Go to Edit > Transform > Flip Vertical.

    LeanneCole-reflections-2

    Flip the duplicate image.

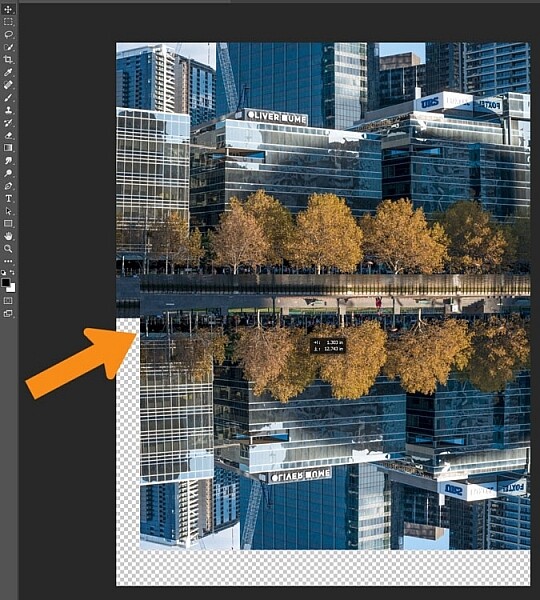
    If you do the vertical flip in the Image menu you will flip all layers, and for this you only want to flip the one layer. Select the Move tool, the first one in the tool bar on the left, the cross shape (keyboard shortcut is V). Click on the duplicate layer and move the image down, as in the following.

    LeanneCole-reflections-3

    Move the flipped vertical image down to where the reflection will begin.

    You will need to figure out where the image finishes, and the reflection will start. In the example image for this tutorial, the river edge has a wooden panel which seemed to be the perfect place to start the reflection. However, to do this you will need to erase or delete the water in the image.

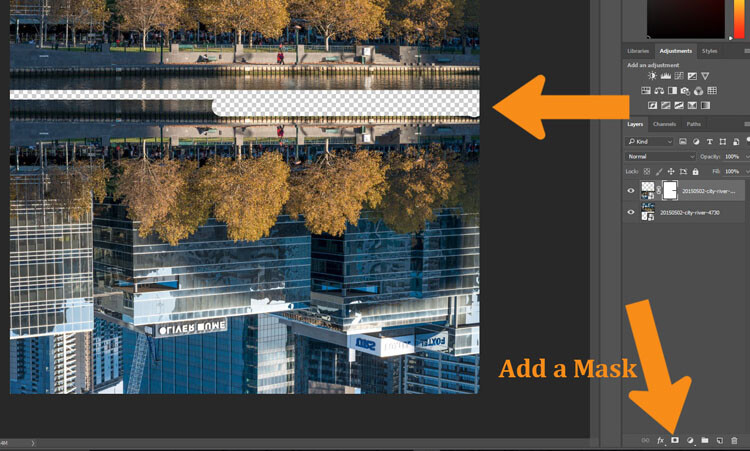
    You will need to add a mask to the flipped layer and click on the brush tool so you remove some of the image. You can add a mask by using the icon at the bottom of the layers panel or go to the Main Menu > Layer > Layer Mask > Reveal all.

    LeanneCole-reflections-4

    Remove or mask out part of the image that won’t be needed.

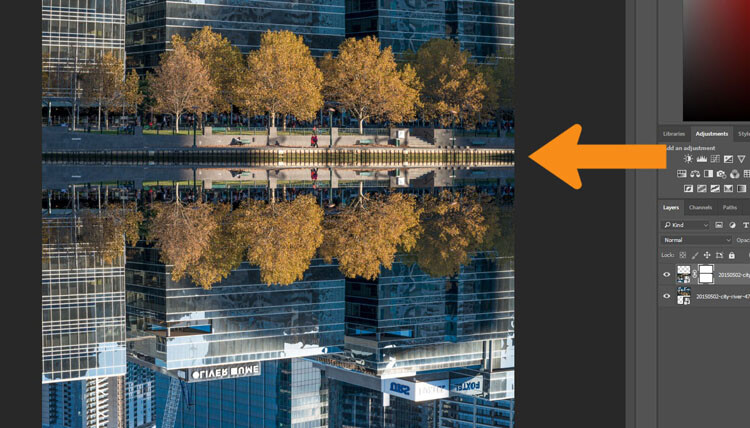
    Using the Move tool, shift your image up to meet the original, at the line between the image and the reflection.

    LeanneCole-reflections-5

    See where the reflection will begin.

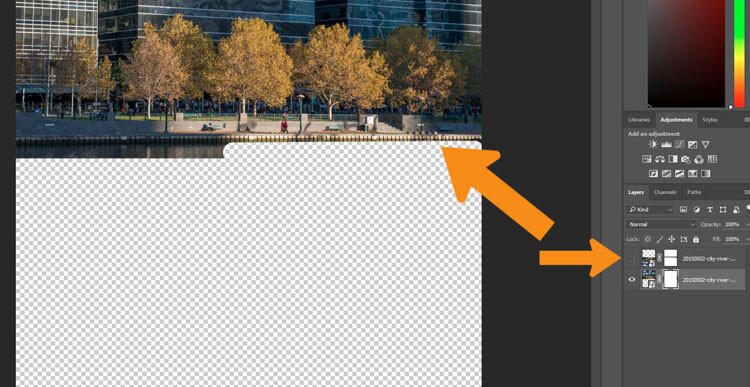
    You will need to remove the water, or the area underneath the reflection. To do this click the Eye next to the reflection layer so that you can no longer see it (turn off that layer). Add a layer mask to the original image and using your brush, hide those areas away as you did on the duplicate layer.

    LeanneCole-reflections-6

    On the original image, hide the area that is covered by the second photo.

    Turn the reflection layer on again. Now you will have a basic reflection, but you can take it a lot further than that.

    Refining your reflection

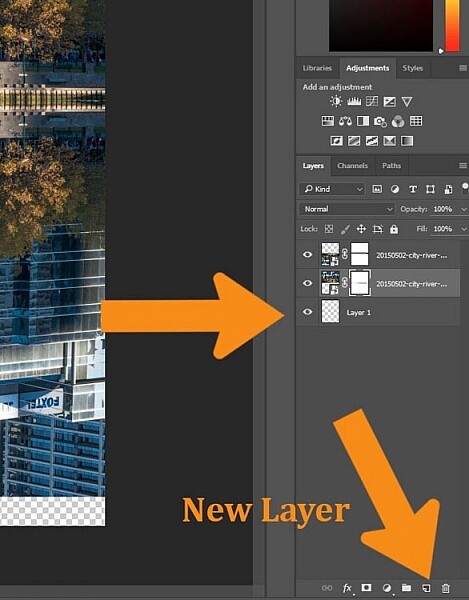
    Add a blank layer to your image, then drag it down to be the bottom layer. If you are unable to do that, it may be because the original image layer is locked and called the Background layer. To remove that, double click on the word Background, you should be able to change the name to something else. This will allow you to move the new blank layer to the bottom.

    LeanneCole-reflections-7

    Add the new layer at the bottom.

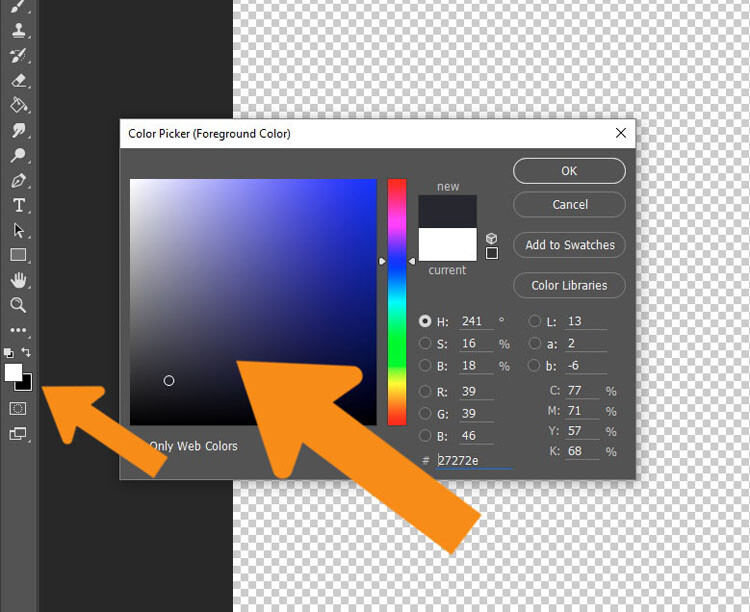
    Turn off two image layers so they disappear (click the eyeballs on each). Select the Paint Bucket Tool, it is with the gradient tool, right click and you will see the bucket tool.

    LeanneCole-reflections-8

    Select the Paint Bucket Tool and click on the foreground color.

    Click on the foreground and background color selectors and a window will pop up for you to select the background colour of your reflection. It is good to go with something dark, and a similar colour to your image.

    LeanneCole-reflections-9

    Select the color to go under the image.

    When you have chosen your color, fill the layer with it and turn the other two layers back on.

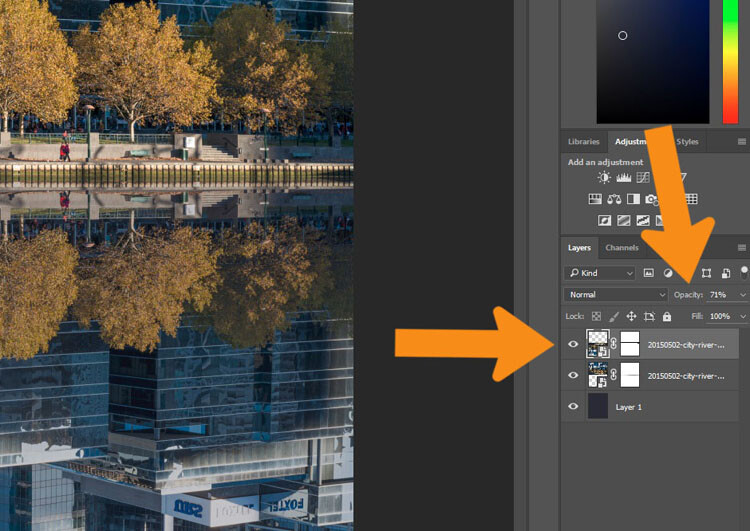
    Select the layer that is the reflection and go up to the Opacity Slider which is just above the layers panel. Turn the reflection layer opacity down a little. Just make it slightly less bright than the original. For this tutorial it was turned down to 71%.

    LeanneCole-reflections-10

    Change the opacity of the reflection.

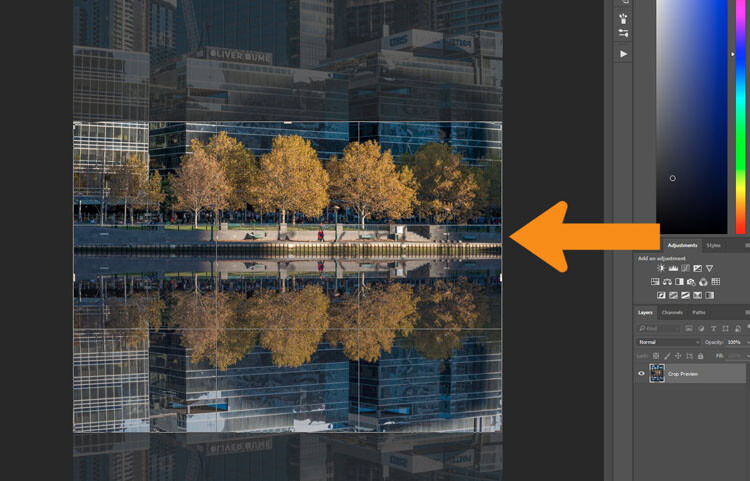
    Select the Crop tool so you can remove any part that is now no longer needed. You may also want to crop the image so it is doesn’t look like there is just one image on top of another.

    LeanneCole-reflections-11

    Select the crop tool to get the final image.

    Fade the reflection

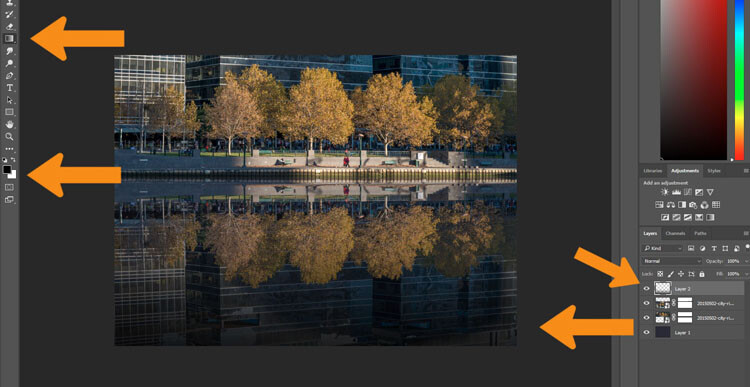
    For the final part, add one more blank layer, then select the gradient tool. Make sure that black is the foreground colour. Add some Gradient to the bottom of the image to help it blend in. If you are not getting the gradient to work so that you are getting the foreground to transparent, you will need to select that option in the tool options bar at the top under the main menu. You may also want to change the opacity of the tool to around 50%.

    LeanneCole-reflections-12

    Add a gradient to the bottom.

    Here is the final image.

    LeanneCole-reflections-13

    The final image

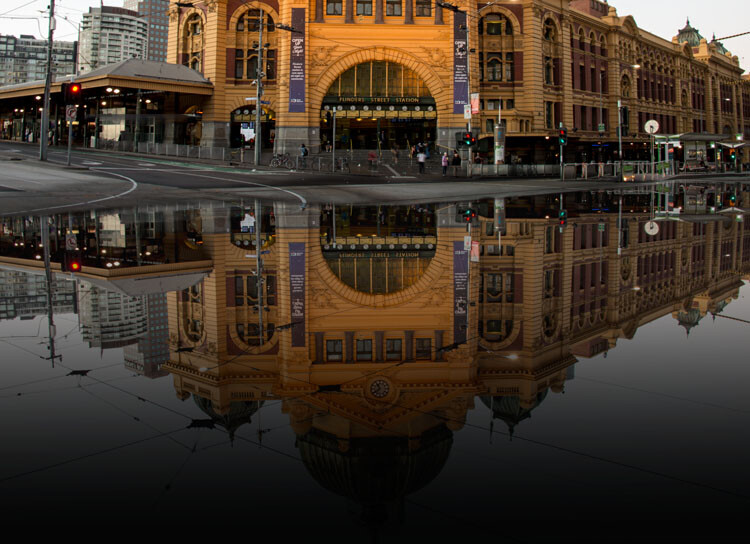
    This can be done for many things and you don’t have to have a body of water to do it. Here is an image of a train station in Melbourne where I have tried to make it look like the street is flooded.

    LeanneCole-reflections-16

    Flinders Street Station as though the street in front were flooding.

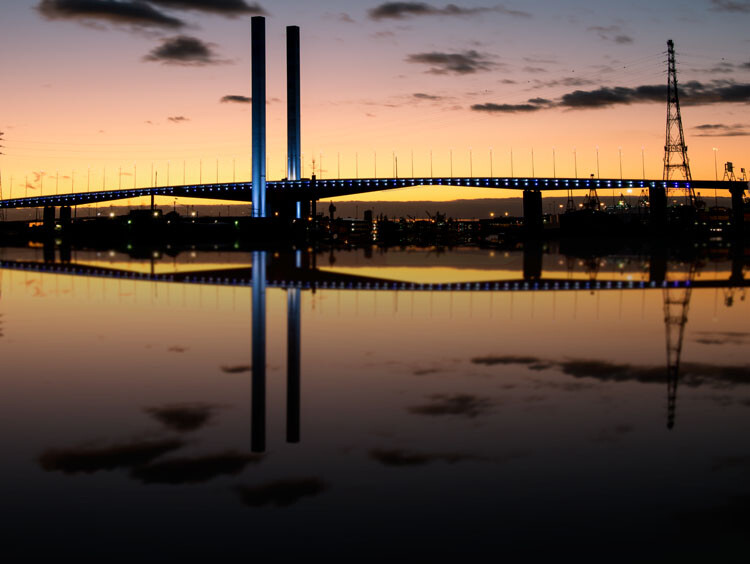
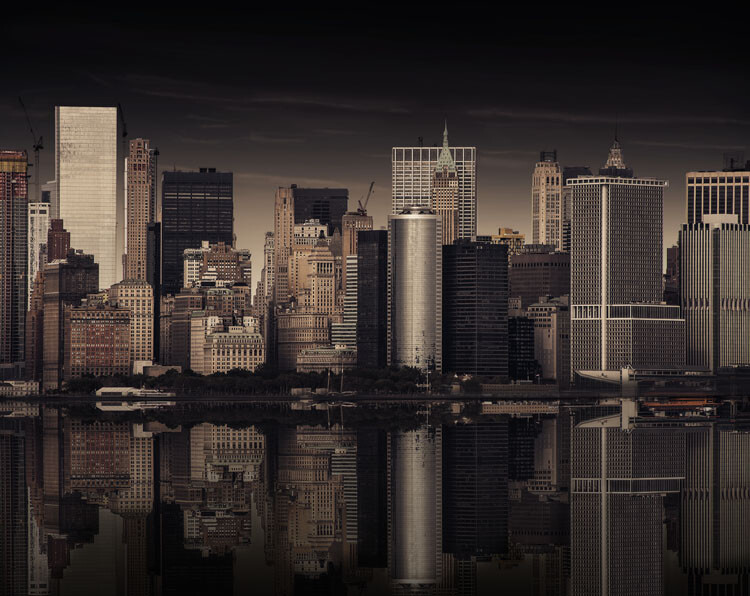
    Here are a couple of other images in different situations for you to look at and give you inspiration. Let your imagination go wild and see how else you can use this technique.

    LeanneCole-reflections-17

    Bolte Bridge at sunset with a reflection in the harbour.

    LeanneCole-reflections-15

    The New York skyline with reflection in the water.

    googletag.cmd.push(function() {
    tablet_slots.push( googletag.defineSlot( “/1005424/_dPSv4_tab-all-article-bottom_(300×250)”, [300, 250], “pb-ad-78623” ).addService( googletag.pubads() ) ); } );

    googletag.cmd.push(function() {
    mobile_slots.push( googletag.defineSlot( “/1005424/_dPSv4_mob-all-article-bottom_(300×250)”, [300, 250], “pb-ad-78158” ).addService( googletag.pubads() ) ); } );

    The post How to Add a Reflection in Photoshop by Leanne Cole appeared first on Digital Photography School.


    Digital Photography School

  • Win One of Three Lenses from Tamron – Enter the Sunshine Photography Contest

    Win one of THREE lenses from Tamron! Enter the “Sunshine” photography contest today.

    Win one of the following:

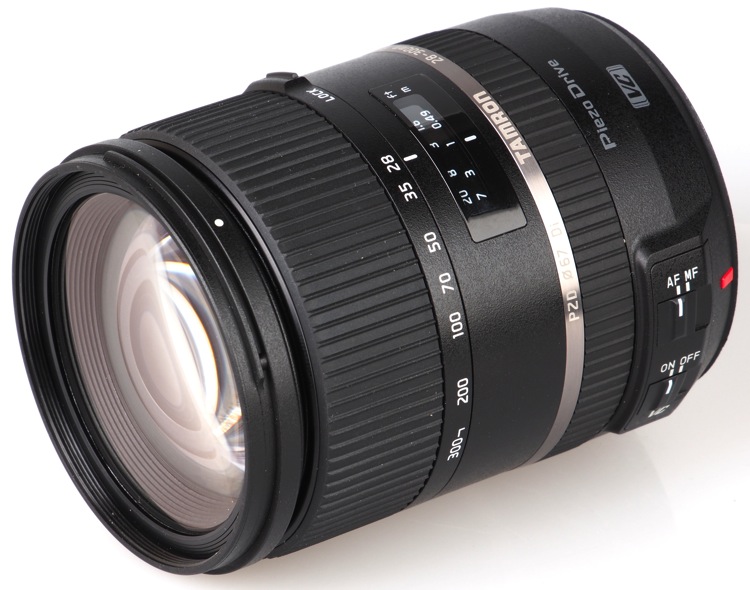
    • A Tamron 28-300mm Di VC PZD lens
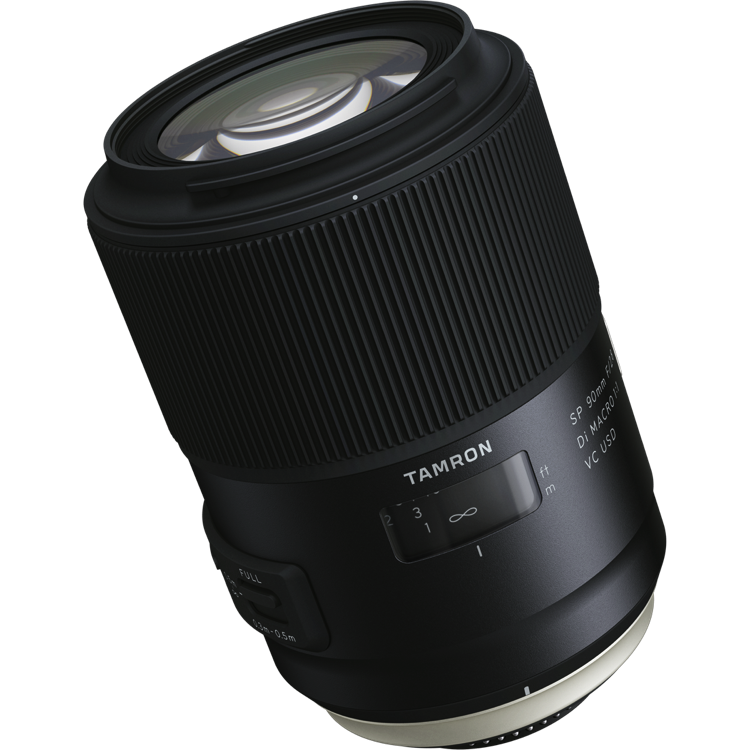
    • A Tamron SP 90mm F/2.8 Di VC USD lens
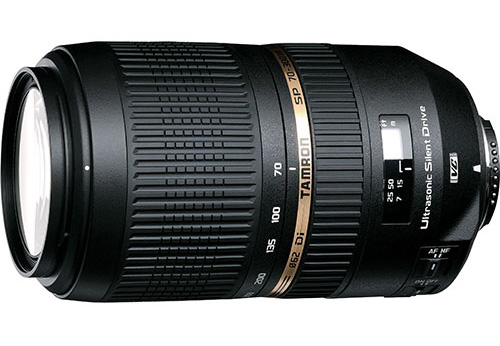
    • A Tamron SP 70-300mm Di VC USD lens

    Over the last few years here at dPS, we’ve run very some very popular competitions with our partners, to give away to lucky dPS readers some of their great photographic products. We are lucky enough to be able to do it again.

    For this contest, Tamron is giving away three lenses!

    These three unique prizes are designed to help every level of photographer create better pictures. Tamron is the world’s most awarded photographic lens line. Each will be won by a different dPS reader. Here’s what you could win:

    Our First Prize Winner will receive:

    A Tamron 28-300mm Di VC PZD (model A010) – $ 849 value, for canon, Nikon or Sony cameras.

    Tamron 28 300mm

    The Second Place Winner will receive:

    A Tamron SP 90mm F/2.8 Di VC USD Macro Lens (model F017-new) – $ 649 value, for canon, Nikon or Sony (without VC) cameras.

    Second Prize SP 90mm

    The Third Place Winner will receive:

    A Tamron SP 70-300mm Di VC USD Zoom Lens (model A005) – $ 449 value, for canon, Nikon or Sony cameras.


    Tamron-70-300

    Learn a little more about Tamron here: Tamron USA

    How to win

    To win this competition you’ll need to:

    • Visit the above lens information pages and learn more about the lens and its core use.
    • Post your sunshine photo, along with a few words on how you feel one of the above Tamron lenses would help your photography. It’s as easy as that!
    • Do this in the next 21 days and after June 1st, 2016, the team at dPS will choose the best three photos and we will announce the winners in the following days.
    • The deadline to enter is May 30th at 11:59pm PST (UTC-7). Photos and comments left after the deadline will not be considered.

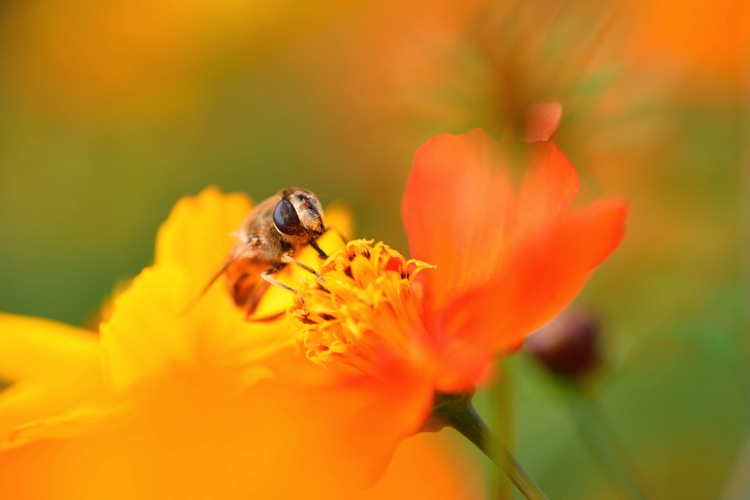
    Bee Image

    By best – we’re looking for people who have an understanding of photography, the role of lenses, and how they will best suit your needs. So you’ll need to check out the product pages to put yourself in the best position to win.

    There’s no need to write essay length comments to win – but we’re looking to hear what you like about the lens, and how it would help your development as a photographer. Don’t forget to include your favorite sunshine themed photo. We encourage you to have fun and be creative.

    This competition is open to everyone, no matter where you live – but there is only one entry per person. To enter – simply leave your photo and comment below.

    Tamron logo

    Disclaimer: Tamron is a paid partner of dPS

    googletag.cmd.push(function() {
    tablet_slots.push( googletag.defineSlot( “/1005424/_dPSv4_tab-all-article-bottom_(300×250)”, [300, 250], “pb-ad-78623” ).addService( googletag.pubads() ) ); } );

    googletag.cmd.push(function() {
    mobile_slots.push( googletag.defineSlot( “/1005424/_dPSv4_mob-all-article-bottom_(300×250)”, [300, 250], “pb-ad-78158” ).addService( googletag.pubads() ) ); } );

    The post Win One of Three Lenses from Tamron – Enter the Sunshine Photography Contest by Darlene Hildebrandt appeared first on Digital Photography School.


    Digital Photography School

  • 5 Reasons Why Converting to Black and White May Improve Your Image

    Photography styles are always down to personal taste, in my opinion. I respect that; people have different preferences, and in the same vein photographers can’t please everybody. This also applies to black and white photos, which will be the focus of this article. I have clients who absolutely do not like black and white images, and clients who want a full set of black and white conversions. Personally I give my clients at least 95% color photos and the rest are in black and white.

    reasons-to-convert-to-black-white-tips-photography

    But why convert to black and white? Is it ever necessary? When do I convert color images to black and white? Here are five reasons why I do black and white conversions on selected photos.

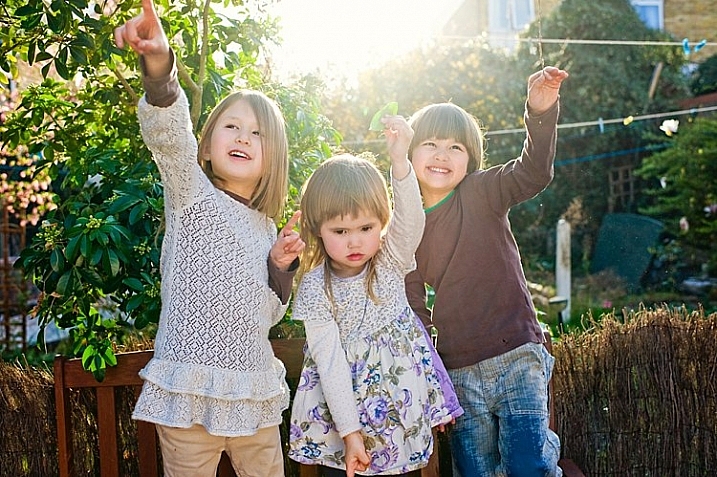
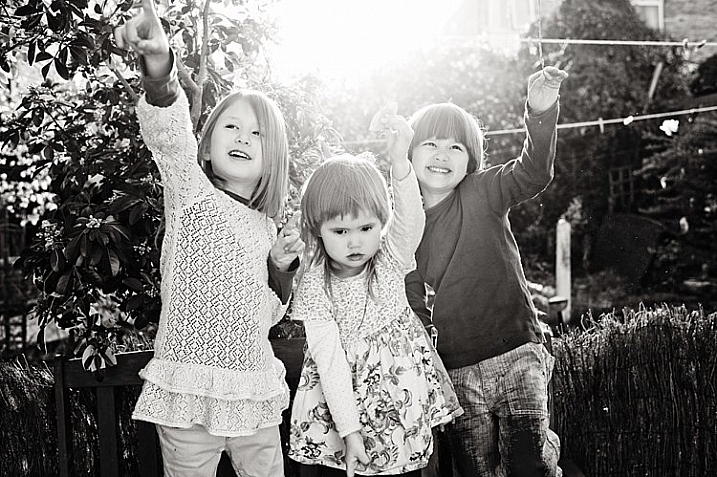
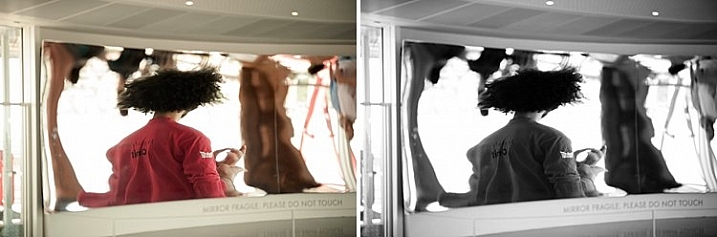
    #1 When the background is colorful and distracting

    When there are too many colorful things cluttering in the background and taking the focus away from the subject, if they are not intended to be there, they are more likely to be a distraction rather than an enhancement to the image. It may also be that you have no control over the location and cannot move things away to de-clutter. In the photo below, my intention was to shoot backlit, and this was the only possible spot in a small patio. Light was my priority, and I had no control over the neighbor’s garden. This was a personal snap of my kids and I was not going to spend ages photoshopping the clutter away. Black and white was the way to go.

    reasons-to-convert-to-black-white-tips-photography

    reasons-to-convert-to-black-white-tips-photography

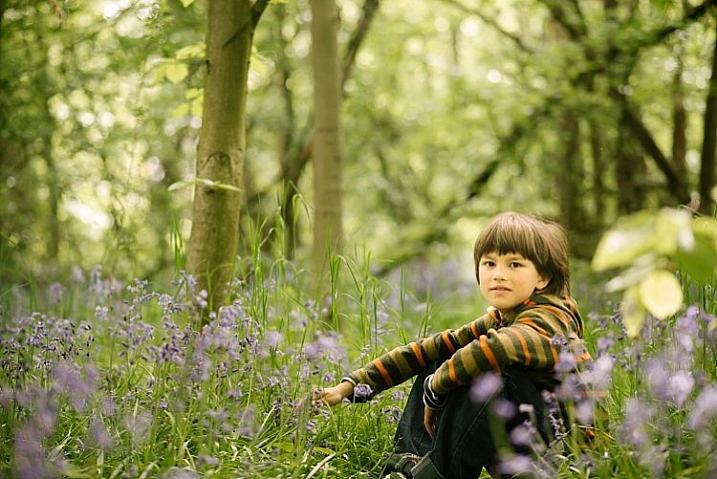
    #2 When colors in the photo or the subject’s clothing do not enhance the image

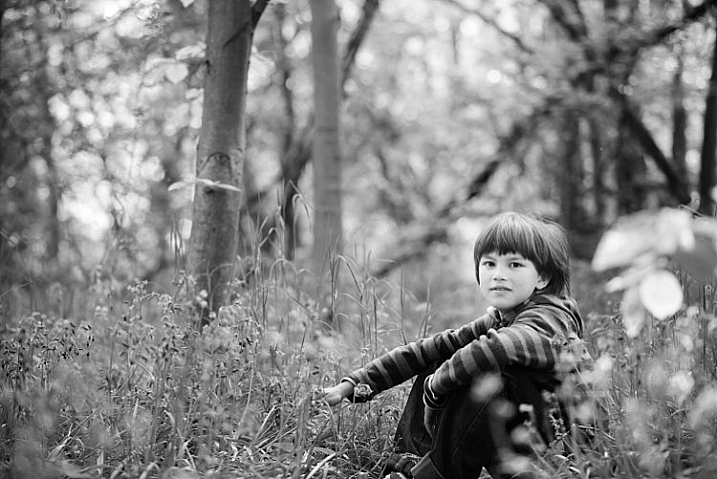
    Sometimes you just have to go with the flow. When you have children, you choose your battles. This photo was taken during a family walk looking at the bluebells. It was hard enough getting the kids out of the house in good time, let alone fighting over which outfits they want to wear. Clearly my son’s outfit does not remotely fit in with the tone of this image. Another hooray for black and white.

    If clients turn up during a photoshoot with outfits that are too bold or distracting, then you have the option of offering them a choice of color or black and white. Explain your reasons why you felt it was necessary to convert it, and show them the difference it makes on the impact of the image.

    reasons-to-convert-to-black-white-tips-photography

    reasons-to-convert-to-black-white-tips-photography

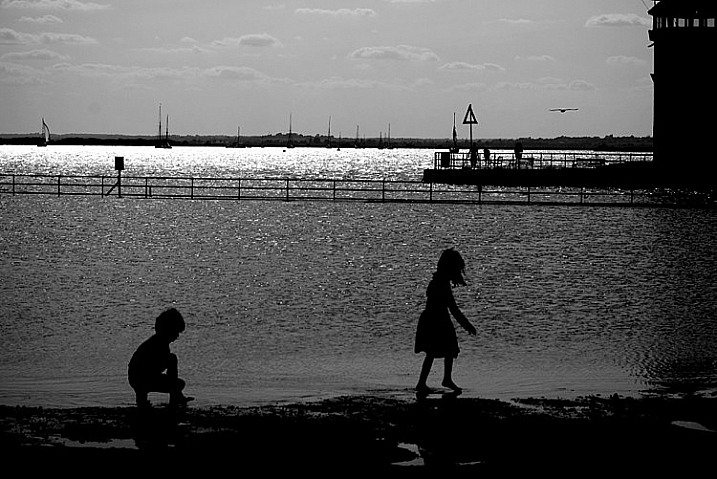
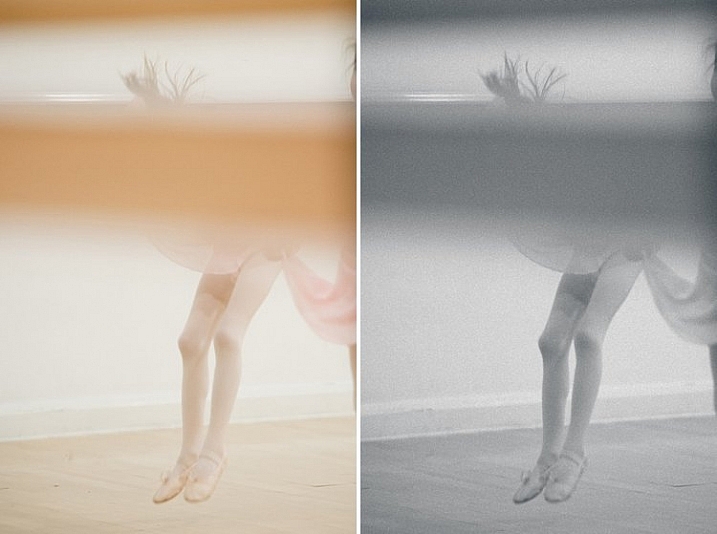
    #3 For artistic purposes like exaggerating contrasts and silhouettes

    There are no rules in photography when it comes to creative style. It’s all down to your personal taste and vision. Artistic license is a great thing. You can photograph with motion blur and activity blur in mind, or add grain for more creative effect or a film look. Converting to black and white is just one more creative tool at your disposal.

    reasons-to-convert-to-black-white-tips-photography

    reasons-to-convert-to-black-white-tips-photography

    #4 When black and white has more impact than color

    Sometimes a scene just looks blah. It’s muddy and the colors seems non-committal; they are neither here nor there, not standing out, nor serving a purpose. Trust your gut. When I see “muddy” I run to black and white. An example would be a photoshoot in a living room with cream walls, a cream settee, and the subjects are also wearing cream. You can bring out more contrast in a black and white image.

    At the other end of the spectrum, if the subject are wearing clashing colors that are too much, then converting to black and white turns the colors into varying values of gray, thus giving more cohesion to the overall look of the image.

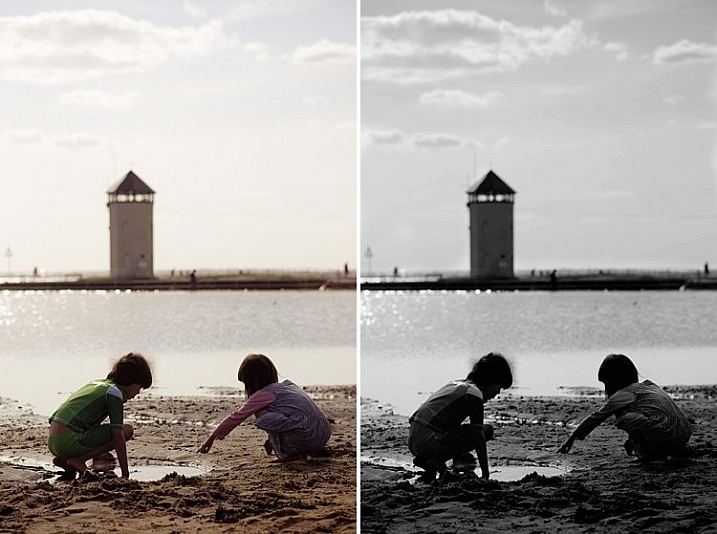
    In this snapshot of my kids below, I blew out the sky and wanted to bring some of the faint clouds back in. Apart from the muddy colors, it was easier to recover the blown out sky which would have looked very gray in a color image anyway.

    reasons-to-convert-to-black-white-tips-photography

    reasons-to-convert-to-black-white-tips-photography

    #5 When the image is too noisy in color

    Sometimes there are moments when your camera is not set correctly, and yet you see something you just have to capture in a split second, without having the chance to change your settings. The result would predictably be an underexposed image with unacceptable noise levels, or an overexposed image with plenty of highlights clipped. But the moment was priceless nonetheless. Black and white lessens the impact of the imperfection and makes the photo acceptable.

    Perhaps this is because we are used to seeing grain in old black and white photos, and accepting the nostalgia associated with such a photo could forgive such an error in today’s digital image. However, beware of making this as an excuse. It should be a last resort to save a photo that is priceless, but never as part of your normal workflow.

    reasons-to-convert-to-black-white-tips-photography

    The kids in the photo above were never still, always running in different directions. I looked back and suddenly saw them walking in a row down a shaded path. I took a few successive shots knowing full well it would be underexposed based on the settings of my previous shots. I anticipated they would suddenly disperse, which they did in a few seconds, so I fired away. From the shots I took within seconds of this happening, I chose the one where they had just walked through a sunlit part of the path. There was still visible noise even after editing, but it becomes a non-issue in black and white.

    How about you? Do you like black and white images? What reasons do you convert to black and white? Please share your thoughts in the comments below.

    googletag.cmd.push(function() {
    tablet_slots.push( googletag.defineSlot( “/1005424/_dPSv4_tab-all-article-bottom_(300×250)”, [300, 250], “pb-ad-78623” ).addService( googletag.pubads() ) ); } );

    googletag.cmd.push(function() {
    mobile_slots.push( googletag.defineSlot( “/1005424/_dPSv4_mob-all-article-bottom_(300×250)”, [300, 250], “pb-ad-78158” ).addService( googletag.pubads() ) ); } );

    The post 5 Reasons Why Converting to Black and White May Improve Your Image by Lily Sawyer appeared first on Digital Photography School.


    Digital Photography School

  • 4 Questions to Ask Yourself Before You Shoot to Help Improve Your Photography

    One of the nice things about mobile phones is that virtually all of them have cameras built in, which means almost anyone can be a photographer and has at their disposal quite an advanced piece of technology, capable of creating stunning images with the tap of a button. Some people prefer dedicated cameras like a DSLR or mirrorless model, and others like to carry a small point-and-shoot or even use good old-fashioned film. However, good photography has much less to do with the gear and is more about the person taking the image.

    With that in mind, here are four questions to ask yourself the next time you take out your camera and start snapping away. If you stop and think about these, it will help improve your photography and you will take better photos:

    1. What is the purpose of the picture?
    2. What do I want my viewers to see or feel?
    3. How can I use my surroundings to create the image I want?
    4. How can I control my camera to get the image I want?
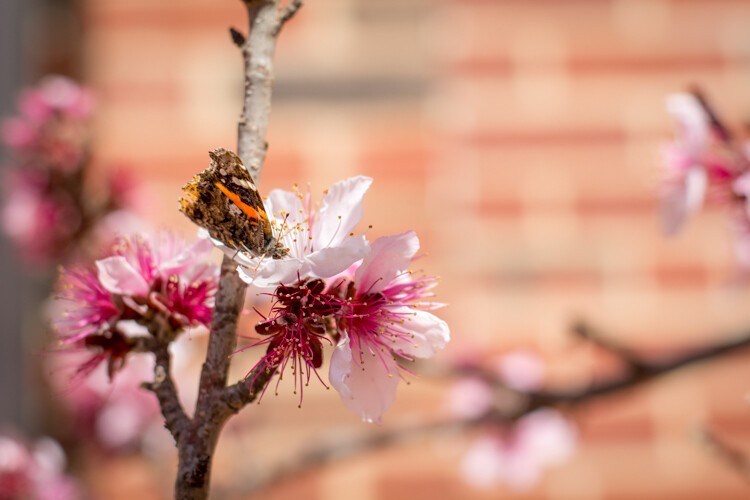
    five-questions-before-photos-butterfly-flower

    You could stop reading right now after seeing those questions and get to work on improving your photos, but I want to dig a little deeper into each one, to see how answering them can help you improve as a photographer and artist.

    1 – What is the purpose of the picture?

    Think back to the last time you sat scrolling through images on Instagram, Facebook, Flickr, or another image sharing site. Perhaps you just looked through some pictures at random, and maybe you even gave a precious few the much-coveted like, double-tap, or star rating. What was it about those photos that caught your eye and made you pause for a second or two? Recently a study carried out by Microsoft found that, thanks to smartphones and the rapid pace of our modern tech-infused lifestyles, people have an average attention span of only eight seconds. That’s shorter than a goldfish! A similar study carried out in the year 2000 found that attention spans then were roughly 12 seconds, which means things are only getting worse as we become more and more connected via technology.

    You might very well have a shorter attention span than this infant. And it's a good bet your audience does too.

    You might very well have a shorter attention span than this infant, and it’s a good bet your audience does too.

    This has profound implications for photographers because it means that in the already-crowded landscape of digital pictures, your photos are not only vying for attention among thousands or millions of other images, but you have even less time to grab the viewer’s attention than ever before. To combat this, you need to make it abundantly clear to your viewers just what precisely is the point, of any given picture you take. In other words, your photos should have a clear subject – whether it’s a person or people, a flower, a kitten, a plane, a train, or even an automobile.

    Look through your own pictures and ask yourself, “What’s the point?” If you can’t answer that question, then chances are that the photos won’t mean much to anyone else who sees them either. When I first got into photography I took all kinds of pictures of things that I thought might be interesting at the time, but looking back on them I honestly can’t tell you what is the purpose of many of those images. If I had taken the time to make sure the images had a clear purpose, instead of just pointing my camera at whatever I thought might look cool, I would have more important photos and much richer memories too.
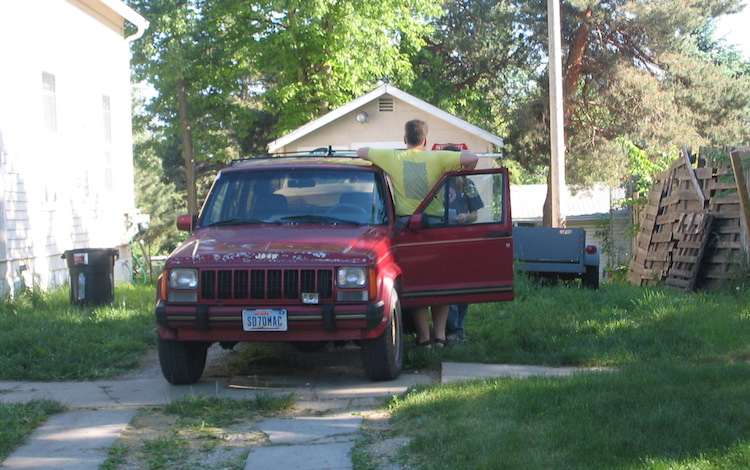
    I shot this photo about 10 years ago, and while I'm sure I had some kind of purpose I honestly can't remember what the point of it was supposed to be.

    I shot this photo about 10 years ago, and while I’m sure I had some kind of purpose, I honestly can’t remember what the point of it was supposed to be.

    2 – What do I want my viewers to see or feel?

    So now you have a clear subject in mind for your picture, and you’re all ready to snap the shutter on your DSLR, mirrorless, or even mobile phone. But wait, there’s more to consider before you start eating up that memory card, and flooding your favorite social networks with more photos. Now that you know what the purpose of your photo is, take the concept one step further and ask yourself what feelings, symbols, or other elements you want to impart on your viewers.

    Do you want them to feel happy, sad, curious, introspective, or nostalgic? Do you want to stir them up so as to take action for a particular cause? Do you want them to notice things other than what might be the main subject of the image, and spend time digesting and interpreting your photos to gain a deeper understanding of the world around them?
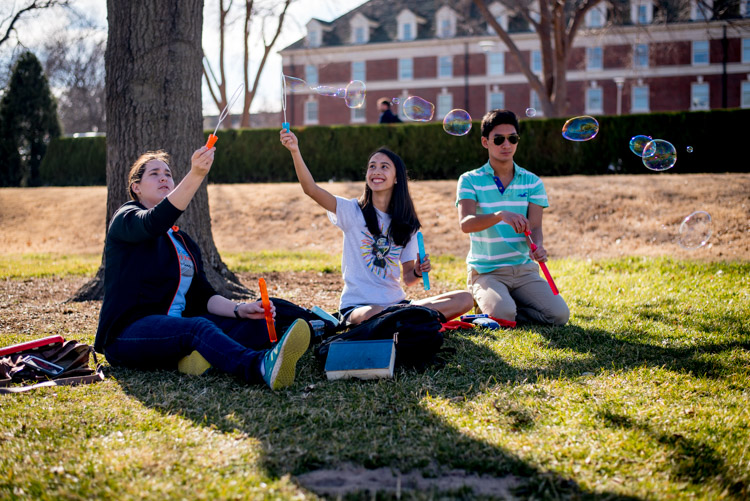
    five-questions-before-photos-bubbles

    I didn’t just want those who saw this picture to think “Oh, some students playing with bubbles.” I wanted people to smile and feel the same sense of delight as the girl in the middle.

    Humans are visual creatures, and as a photographer you are in the unique position of using a visual artistic medium to transmit thoughts and emotions. In this sense, photography is a form of one-way communication as you invite your viewers to engage with your images, and take something away from them. For example, here’s what might appear to be a rather mundane picture of a plastic duck:

    Is it a duck...or is it something more?

    Is it a duck…or is it something more?

    My goal in taking that picture was to have my viewers see more than just a basic rubber duckie. I specifically chose the time of day, angle of my camera, foreground and background elements, and exposure settings (i.e. f/1.8 aperture) to create this image, so that my viewers might see more than a kid’s bath toy. Perhaps they would think back to their own childhood, or maybe even invent a fantasy backstory for this duck standing guard at the edge of a precipice. It might seem like a simple image, but to me there was a lot more going on here, and by asking myself some deeper questions before I took the picture I got a better image as a result.

    The same lesson applies to photography in general, and you have a powerful image-capturing tool at your disposal, to not just make snapshots, but tell stories and communicate with your audience. Going through some of these questions might seem like a lot of work when all you want to do is just pull out your camera and snap a few photos. But, as you work on doing this more and more, it will soon become second nature and you will see a noticeable increase in the quality of even your most mundane images.

    This picture is just a quick snapshot that's not going to win any awards, but I shot it in such a way so as to provide context, invite the viewer to feel slightly squirmy, and hopefully see more than just the some kids in a room.

    This picture is just a quick snapshot that’s not going to win any awards, but I specifically took it in such a way so as to provide context, invite the viewer to feel slightly squirmy, and hopefully see more than just some kids in a room.

    3 – How can I use my surroundings to create a better photo?

    One of the easiest ways to create a more compelling, interesting, and visually appealing photograph is to take a few seconds and examine the context in which the picture is being taken. Then try to position yourself, your subject, or even just your camera in such a way as to create maximum visual impact, and help you get precisely the photo you are trying to capture.

    As an illustration of this take a look at the photo below. When I took it, I made several quick decisions with regard to my surrounds in order to get a better picture, than if I had just settled for a quick snapshot. As the child was walking down the street I followed from a short distance in order to get a photo of him, and adjusted my viewpoint so the sailboats would occupy the left side of the frame. I crouched down low to get a better angle, and positioned myself so that the boy’s head and shoulders were above the horizon and showing through a clear portion of sky instead of a tree or building. I also scooted over so the white paint line was leading towards the center of the picture, rather than off to the side. All this was done in a matter of seconds, since I knew this particular moment would be quite fleeting.
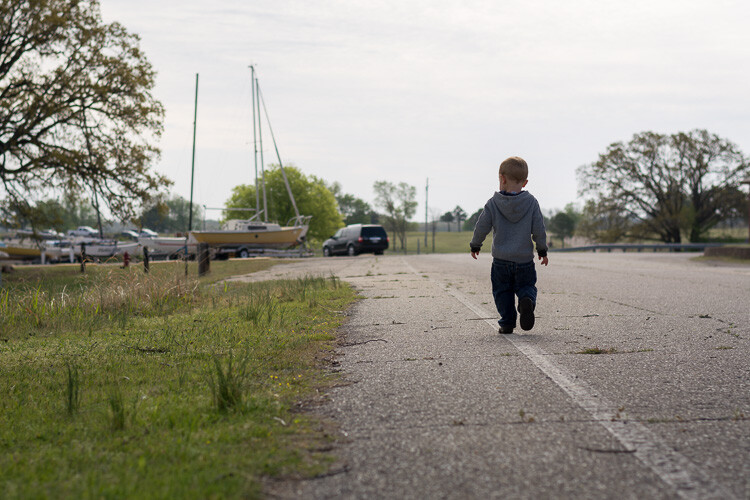
    five-questions-before-photos-marina

    The result is a picture that, in my opinion, is elevated several notches above what otherwise might be a quite ordinary picture of a kid walking down the street. It also provides clear answers to the two previous questions:

    1. What is the purpose of the picture? To show a child walking down the street.
    2. What do I want my viewers to see or feel? A bit of nostalgia, a connection to the boy, perhaps a bit of hopefulness for the future.

    Recently I had the privilege of photographing four generations of one family, so I chose a location that would evoke feelings of a certain time period and place my subjects in a very specific context. What you see below is the direct result of me choosing to use the environment to elevate the impact of the photo. In order to create a sense that the couple had a long and rich history together, I placed them a few meters in front of a white fence, with an old farmhouse occupying the top-left portion of the frame. I could have taken the picture from many other angles, with very different scenery around them, but what you see here is the result of a very specific artistic choice on my part, in order to get precisely the photo I wanted.
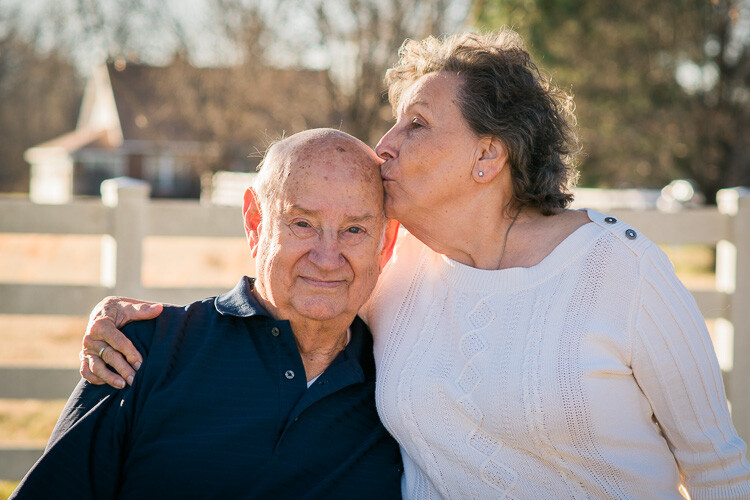
    five-questions-before-photos-couple-barn

    You can do the same thing, and it doesn’t require any special equipment or educational training. All you need is to keep your eyes open, examine the world around you when you take photographs, and use the environment to give your images a richer sense of time, place, and context.

    4 – How can I control my camera to get the image I want?

    Many people take great pictures without ever straying from the Auto option on their camera dial, and if you have a mobile phone or point-and-shoot you may not have any other options besides Auto. I know from personal experience how scary it can be to move away from Auto. For years I wondered why I would ever bother leaving that safe little green option when it did a pretty good job – especially since every time I ventured into another mode such as Aperture Priority, Shutter Priority, or (gasp!) full Manual, I never seemed to get the results I was looking for. What you may not realize if you stick with Auto, is that a whole new world of photography wonder is right in front of you, just waiting to be discovered if you can learn how to control your camera a bit more.
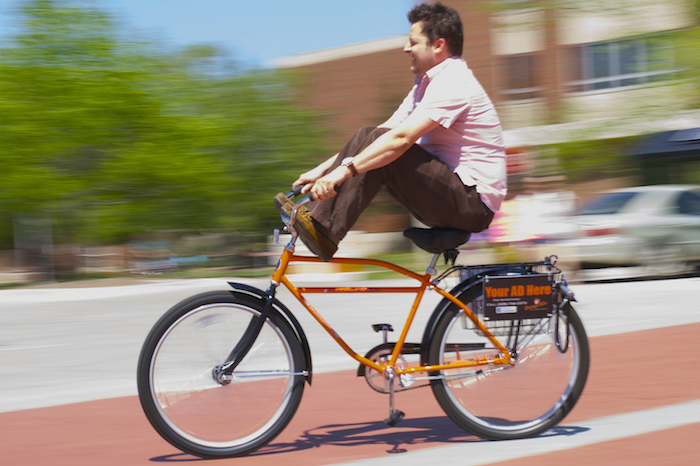
    It's virtually impossible to get pictures like this using the Auto mode.

    It’s virtually impossible to get pictures like this using the Auto mode.

    Learning to control the aperture of your lens, the shutter speed of your camera, and the ISO sensitivity of your image sensor can make all the difference between a forgettable snapshot, and a wall-worthy masterpiece. It takes a little while to learn the fundamentals, but once you get the hang of it you will find yourself asking technical questions in order to solve artistic problems. I am constantly pressing buttons and flipping dials when I take pictures (even if it’s just my kids in the back yard) so I can get exactly the image that’s in my head, and not the picture that my camera thinks I want to take.

    If this sounds hopelessly complicated, look down at the keyboard the next time you are at a computer. Remember when it took you agonizing minutes just to peck out a few words or sentences? Now you probably don’t look at the keyboard at all, and typing isn’t something you really think about anymore. You think of the words you want to appear onscreen, and your fingers naturally move to the right letters on the keys. The same thing happens with practice when you learn to use other modes on your camera, and your pictures will be much improved as a result. The bottom line is that if you, not your camera, decide which aperture, shutter speed, and ISO to use, you will get better pictures.
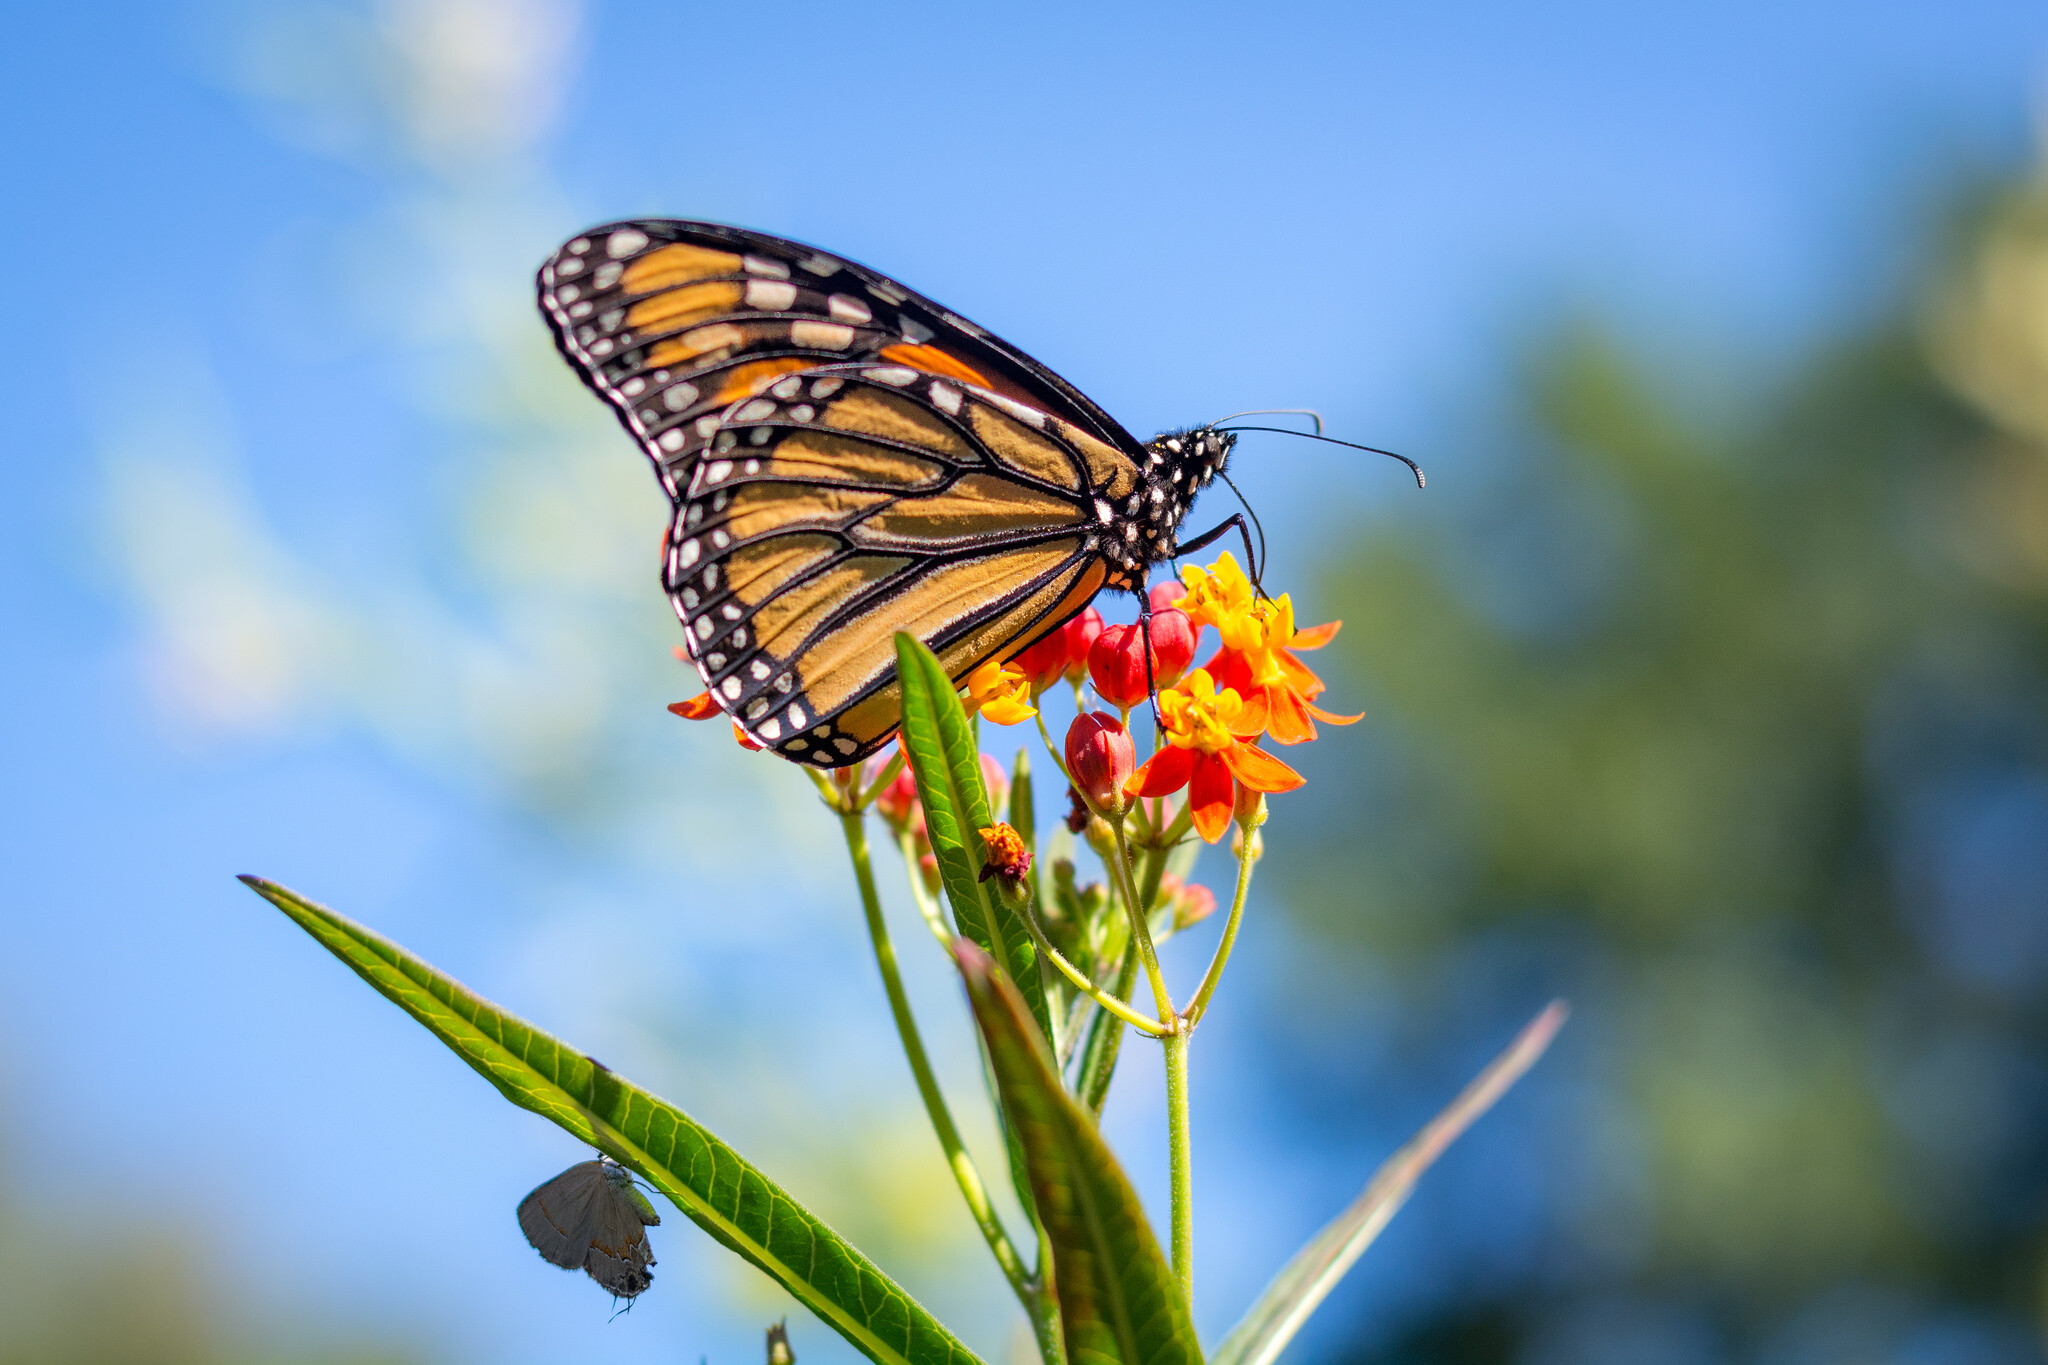
    five-questions-before-photos-butterfly

    Now that you have read my four questions, I’m curious to know your side of things too. Are there any tips you have found that work well for you to get better images? What are some of the best practices you have learned over the years? Share your thoughts in the comments below.

    googletag.cmd.push(function() {
    tablet_slots.push( googletag.defineSlot( “/1005424/_dPSv4_tab-all-article-bottom_(300×250)”, [300, 250], “pb-ad-78623” ).addService( googletag.pubads() ) ); } );

    googletag.cmd.push(function() {
    mobile_slots.push( googletag.defineSlot( “/1005424/_dPSv4_mob-all-article-bottom_(300×250)”, [300, 250], “pb-ad-78158” ).addService( googletag.pubads() ) ); } );

    The post 4 Questions to Ask Yourself Before You Shoot to Help Improve Your Photography by Simon Ringsmuth appeared first on Digital Photography School.


    Digital Photography School