Category: Photography

  • 5 Tips for Thinking Out of the Box to Inspire Your Photography at Home

    Have you ever felt like the inspiration well is running dry ?

    You carry your camera with you everywhere you go, day in and day out, but you just don’t see Kodak moments any more? If you know that feeling, than you must have been around shutters and lenses for some time now, and can’t wait to see something new.

    Wait no more! here are some ideas that will inspire you, and help you get rolling again.
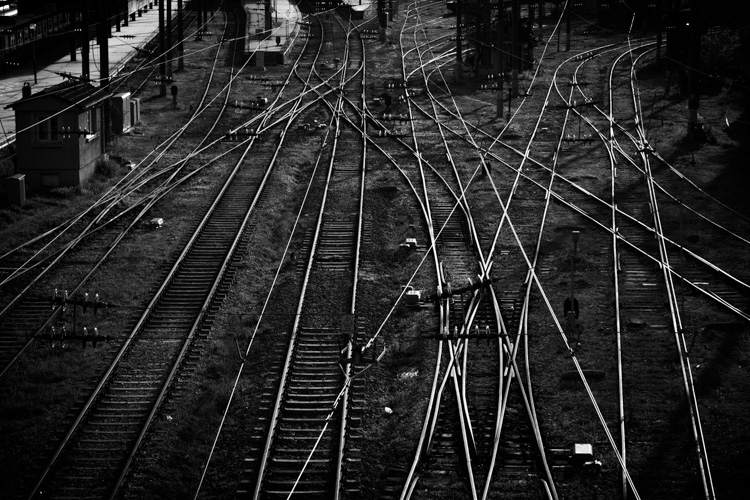
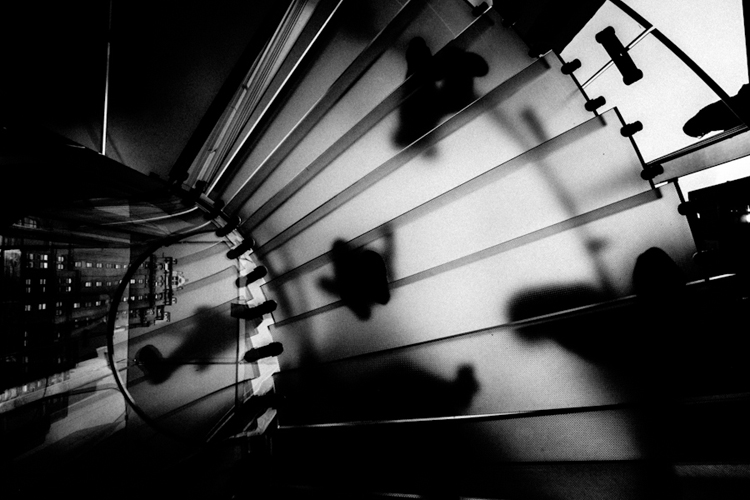
    Istanbul railway station

    1 – Understanding the box in order to think out of it

    Photography can be a very technical act; operating your camera in a scientific way, following exact rules that will bring the wanted results. Or it can be the act of an instant emotional reaction to the world, you see a moment and click, you grabbed just it before it’s gone forever, thinking can be done afterwards. Both ways are good and every photographer is captivated by a different mix of both.

    Thinking out of the box requires a box to begin. If you find yourself uninterested in doing things that you already know and have done, that is your box. Underneath it is the magic that made you grab the camera for the first time, the thing that got you excited when you held your eye to the viewfinder. On your first encounters with the camera you fell in love with a simple magic that the camera can do, it is now the time to go back to that magic and do it all over again.

    The hunt for an interesting texture photo while on a short brake from computer work, led me to this photo out of my studio’s window.
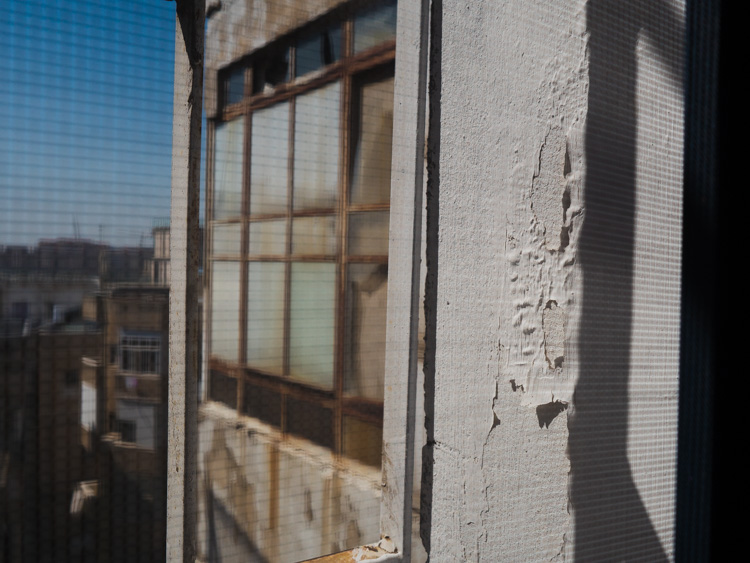
    texture out of the window at home

    2 – The routine dichotomy

    Routine is often thought to be a major enemy of creativity. You walk by the same corner every day for years, and you get used to it so much that you stop seeing its potential to make great photos. On the other hand, routine is the frame in which you create. Once you get used to the background noise, you can pay attention to the little changes in light, color, and small details that are never the same as the day before.

    Make routine your friend by focusing your attention on smaller details every time you walk by the same scene. Look out of your window at different hours of the day, over and over again until new details start popping up in your viewfinder.

    look for details out of your window

    3 – Shoot without a camera

    You may put the blame for the drought on your camera, and go look for the latest pixel beast to get you all excited again, or you can try something new, you can try seeing pictures without a camera.

    As you do things during your day, try to imagine what they would look like in different photos, with different focal lengths or different exposure values. You may also look at things through a paper cut frame. Hold the frame at a different distance from your eye to zoom in and out, think of your composition, and move on.

    Using your imagination instead of a camera will ignite a new spark in the way you see photography. Then, next time that you want to take a photo, you will see it before even having the camera up to your eye.
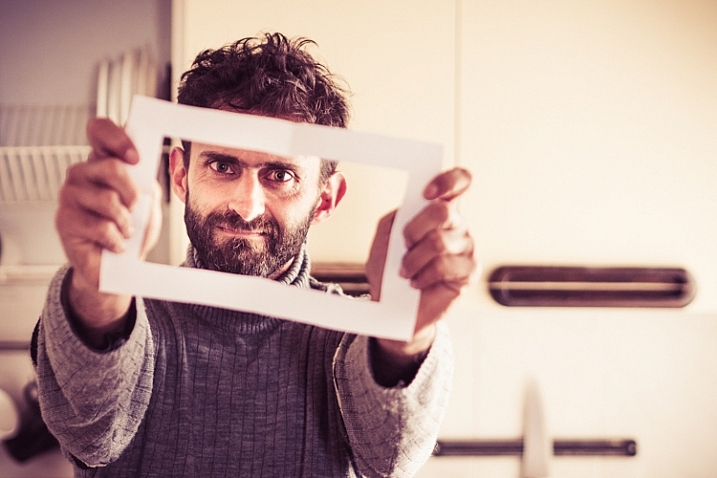
    think-out-of-the-box-photo

    4 – The Dead End

    Back in the days before smartphone and GPS, you had to find your way around when driving in a new place, and once you faced a dead end street, you had to u-turn and find a new way. That’s when you had to be creative and come up with an inventive solution. That leads to thinking out of the box.

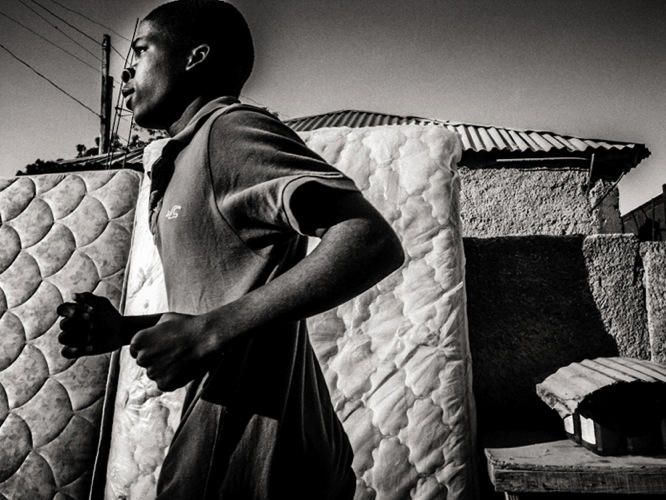
    That survival skill is still there and can be kicked in by defining small boundaries in which you photograph, limiting yourself to taking pictures in uncomfortable conditions. For example, do portraits with just a wide angle lens, or look for triangle shapes only with a telephoto lens. Creating dead ends for your photography will force you to find creative solutions, which will lead to new and exciting photographs of the same old world.
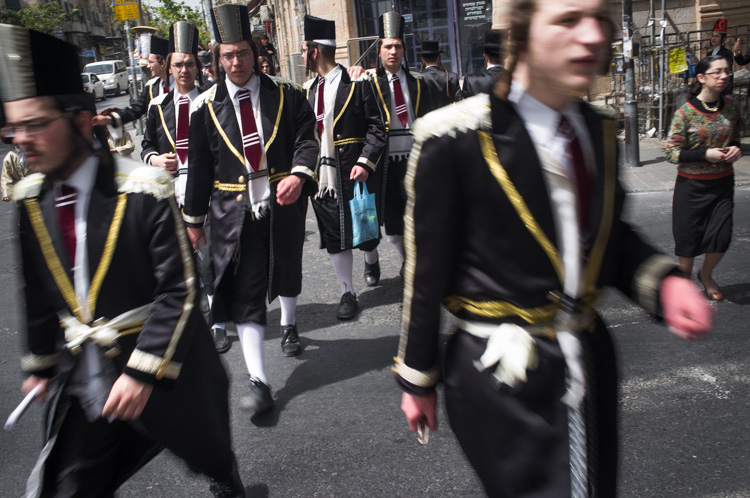
    The Fuji X100's fixed lens has made me cross the street to get closer to this group of boys and created a strong feeling of speed. Photo by Ouria Tadmor

    The Fuji X100’s fixed lens has made me cross the street to get closer to this group of boys and created a strong feeling of speed.

    5 – Experiment with home made light

    In your home there are many different light sources that would make a good starting point for a photo session, they can be the subject of your photo and the light source at the same time. When you start from the light source and challenge yourself to see where you can go with it, you challenge your creative mind to take a different path than the more common way of seeing something you want to photograph, and thinking how to light it. Mastering this thinking technique can be of use later when you might need to photograph a subject that is not talking to you, just go for the light.
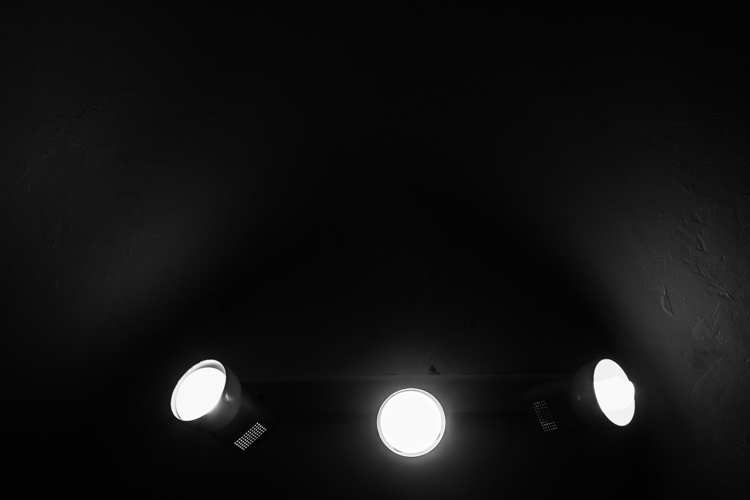
    Home lights as photo inspiration

    Conclusion

    It is not always possible to stay creative and inspired in photography, but the innovative side of your brain can be kept in shape by repeating these small exercises regularly, at home with any type of camera. Do so and you are promised to come home with better photos next time you go on a photographic vacation.

    googletag.cmd.push(function() {
    tablet_slots.push( googletag.defineSlot( “/1005424/_dPSv4_tab-all-article-bottom_(300×250)”, [300, 250], “pb-ad-78623” ).addService( googletag.pubads() ) ); } );

    googletag.cmd.push(function() {
    mobile_slots.push( googletag.defineSlot( “/1005424/_dPSv4_mob-all-article-bottom_(300×250)”, [300, 250], “pb-ad-78158” ).addService( googletag.pubads() ) ); } );

    The post 5 Tips for Thinking Out of the Box to Inspire Your Photography at Home by Ouria Tadmor appeared first on Digital Photography School.
    Digital Photography School

  • 5 Camera Bag Hacks to Help You Curb the Temptation of Buying More

    There has been quite a parade of camera bags launched on the market recently. Peak Design’s latest in their line of products with the Everyday Messenger Bag, achieved an incredible target on Kickstarter.

    Check out Simon Ringsmuth’s review of the bag. ThinkTank Photo followed with the Lily Deanne bag, in the same price league but targeted more for women. Another Kickstarter venture by Progo gear successfully launched their carry-on/camera backpack in January of this year.

    title

    5 Hacks to curb the temptation to buy another camera bag

    But, this article isn’t about reviewing yet another camera bag. Instead, it got me thinking no matter what camera bag that you may have, one fit doesn’t suit all. I’ll admit, I have a weakness for camera bags. There is such a vast array of camera bags on the market to suit every photographer’s needs. The types range from shoulder bags, backpacks, and rolling cases, to name just a few. However, when choosing a bag, the following factors should be considered:

    • Materials: I have a preference for man-made, hi-tech materials like ballistic nylon as opposed to natural fabrics, such as cotton or leather – simply because they are lighter and generally offer better water resistance.
    • Protection: Obviously, you want the best protection for your gear. This will mean a bag that has sufficient padding on the inside, and a material on the outside which protects against inclement weather. This can be the inherent material that the camera bag is made from, or a waterproof cover which you can pull over the bag if it rains.
    • Capacity: This will be very subjective to the type of photographer you are. A travel photographer’s gear and bag(s) will be in sharp contrast to a photographer on a fashion shoot in a studio.
    • Comfort: This is a very important factor. If you have to carry your bag at all, it should feel comfortable, and you shouldn’t really be aware of it. If you are, it’s a nuisance.

    I do like features on so many different bag, and I wish that the sum of all these features were all rolled into one bag. But I am asking a lot here. So I thought, rather than buying another bag, why not customize or hack a bag that you already own?

    Here’s my five hacks that may help you curb the temptation to go out to buy another camera bag – at least for now:

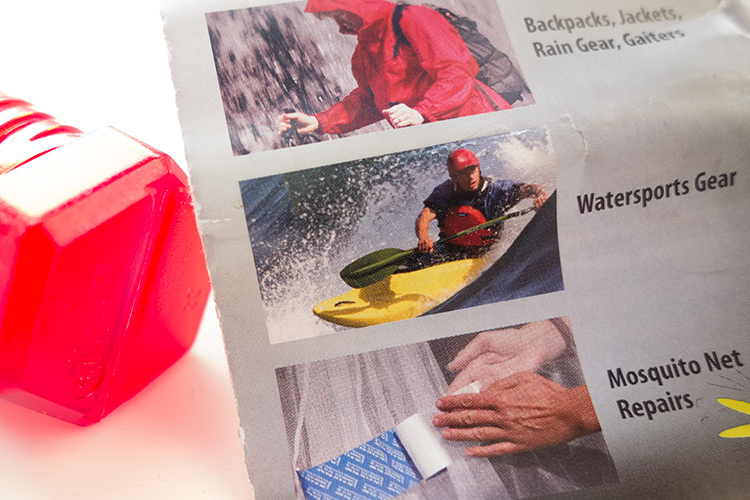
    #1 Tent repair tape

    The bottom of my camera bag isn’t really at all abrasion resistant, or waterproof. This was an initial concern for me when I was buying the bag. Most camera bags should, in my opinion, offer some degree of ruggedness to ensure the bottom of your camera bag will be protected for a number of years.

    However, in the end, I decided to buy it, as it ticked most of the boxes for the type of bag I wanted. I came up with my own solution to safeguard the underneath part of the bag for general wear and tear.

    Tent Repair Tape – found in most camping outdoor retail outlets.

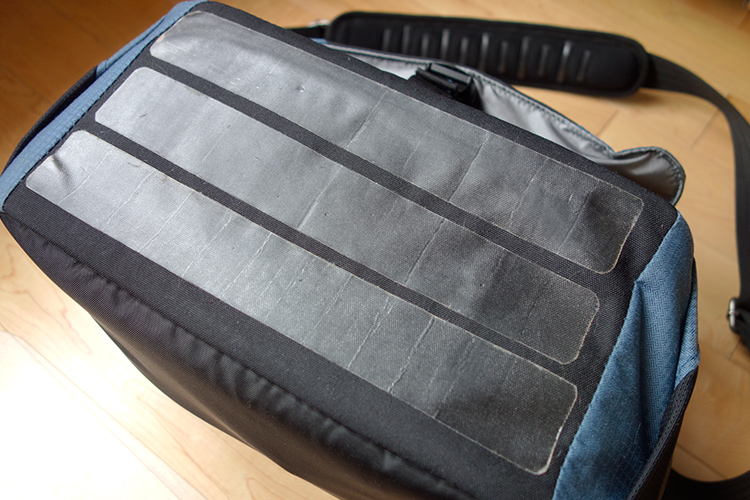
    I cut 3 strips of the tent repair tape to suit the dimensions of my camera bag.

    Cut strips of tent repair tape the same length as your bag and apply them length ways across the bottom. This tape is super strong and waterproof. I also added feet to the bottom, like you would see on most bags, not just camera bags. I have a neat way to add feet to the bottom of your bag, without taking away from the aesthetic look. See #5 below for more details.

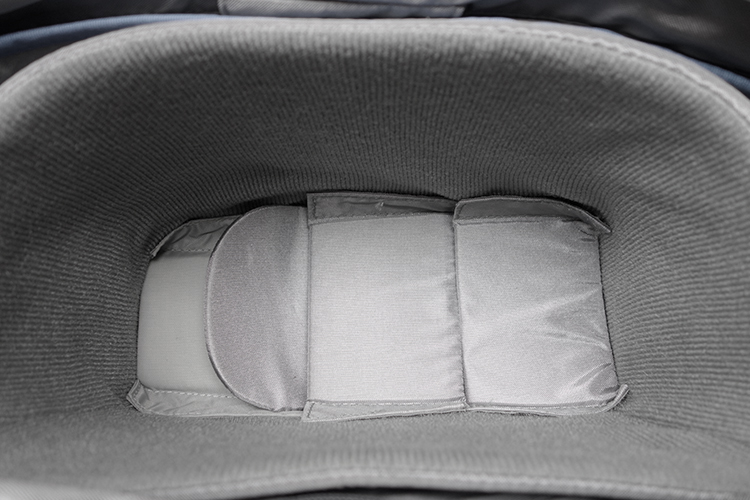
    Tip: By putting another layer of cell foam dividers flat across the inside bottom of your camera bag helps to give more padded protection. I seem to have gathered a collection of these over the years!

    Inside-padded-insert

    I added another layer of spare foam cell pads at the bottom of my already padded insert.

    #2 Carabiner Rings

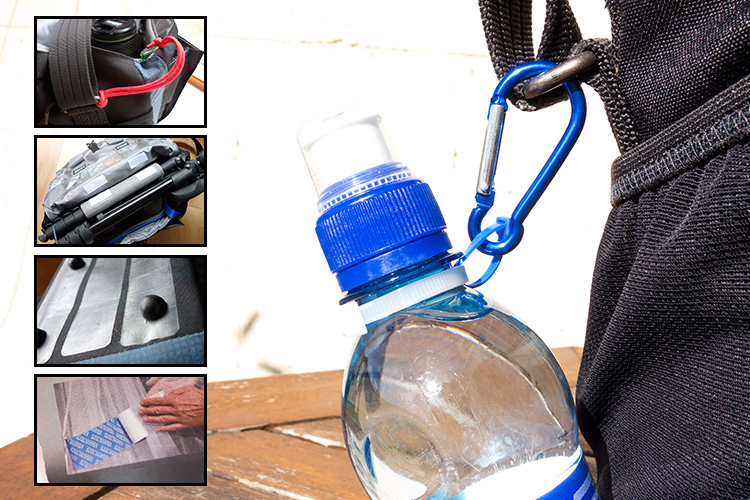
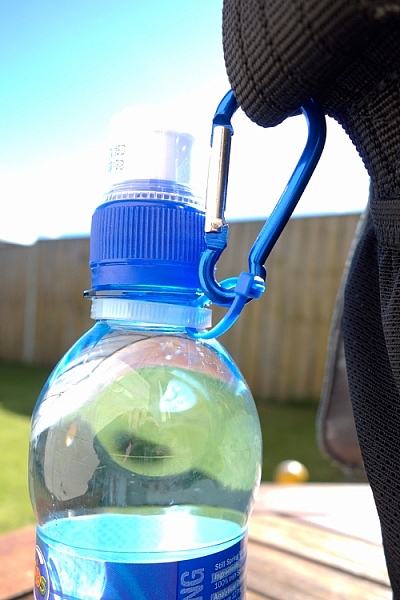
    These aluminium rings are so versatile for attaching extra accessories, that you simply can’t fit inside the bag. For example, side pockets are great for adding a flash gun or a drink bottle. But, what if your camera bag doesn’t have a side pocket?

    This solution should work for any type of drink bottle. You will need two cable ties, one longer than the other. Secure the longer one around the neck of the bottle and the smaller one acts as a ring to attach to the carabiner, which is then looped around one of the metal rings on the bag’s strap.

    carabiner-water-bottle

    Water bottle attached to the camera strap, via the metal ring using two cable ties.

    Tip: Water bottles can also serve as an extra weight to stabilize your tripod.

    #3 Paracord

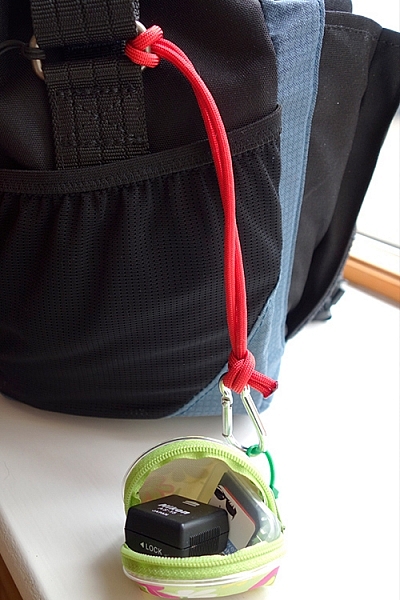
    I wish every camera bag would come with at least two key fob straps. Of course, I don’t use mine for keys. Key fob straps are great for attaching the likes of SD/CF memory card wallet holders or other items that you may need to hand, without looking like a badger who is burrowing out of his nest.

    My hotshoe adaptor and spare SD card attached to my paracord strap, which also doubles up as a wrist camera strap.

    My hotshoe adaptor and spare SD card attached to my paracord strap, which also doubles up as a wrist camera strap.

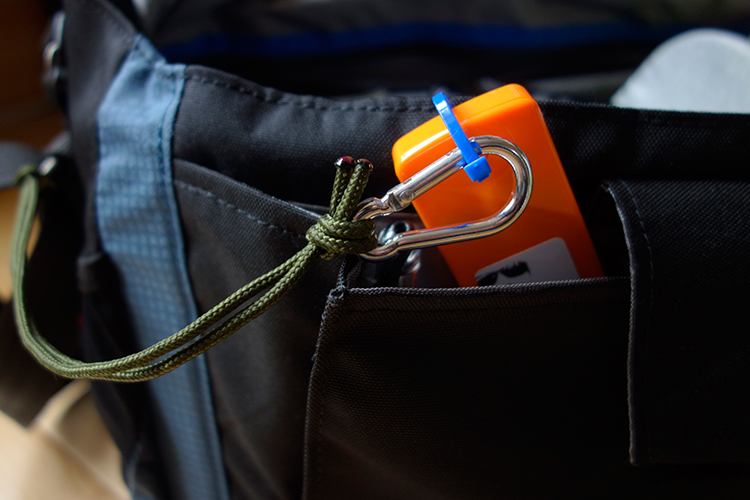
    This is a very simple method to add an extra key fob strap to any bag. Measure a length of a Paracord, in my case 27 inches. Tie both ends together. You will need to burn the ends of the cord, after the knot, to stop it from fraying. Loop one end around the bag’s strap ring on the outside and secure a plastic carabiner to the other end. See photo.

    I used a plastic carabiner, as I don’t particularly like metal rings inside my camera bag. I have my business cards secured in their holder, attached to the carabiner. These are quick and easy to hand. No foraging around in your bag for what seems like an age looking for them!

    A key fob strap made from paracord, using a plastic carabiner (even though it looks aluminum) attached to my business cards.

    Tip: This strap can also double up as a camera wrist strap. See my other article for this tip and other DIY hacks.

    #4 Insulation Foam Sleeves

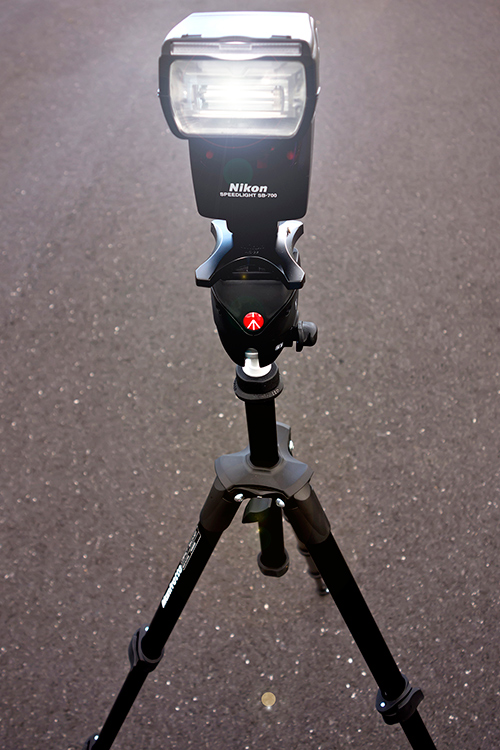
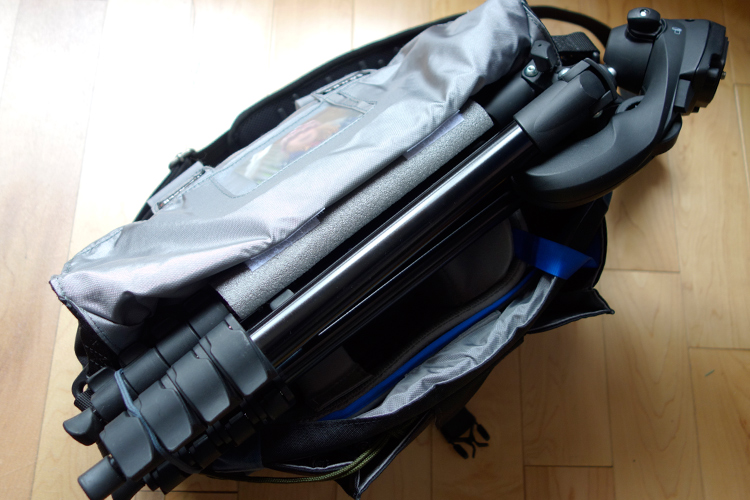
    I like the option to be able to carry my travel tripod with me, as it also doubles up as a light stand. But there isn’t a designated tripod holder on this type of bag. However, as it has a big front flap. I came up with this idea of using a foam insulation sleeve.

    My travel tripod which I also use as a light stand.

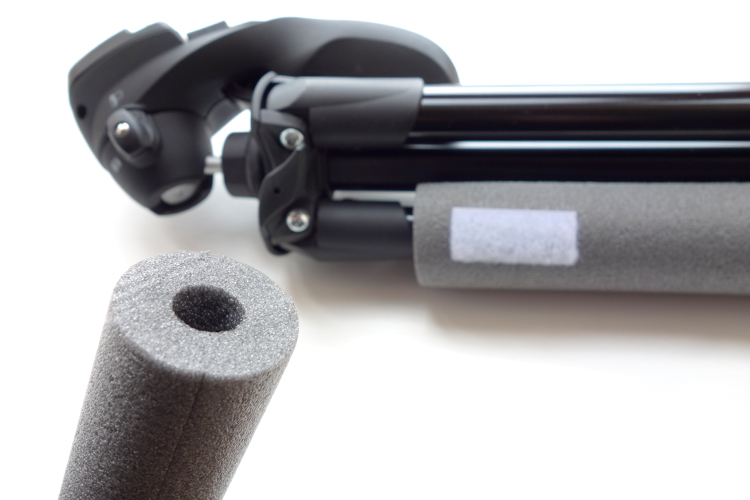
    These Economiser Polyethylene Pipe Insulation sleeves can be purchased at most DIY stores. Their function is to insulate heating pipes. I bought this 1/2″ Cosy Sleeve, 1 Metre length (3′ approx.) for less than $ 2.00 USD. It has a pre-cut slit down the length. To cut to the desired length is simple and quick.

    Foam insulation sleeve for heating pipes, found in DIY stores.

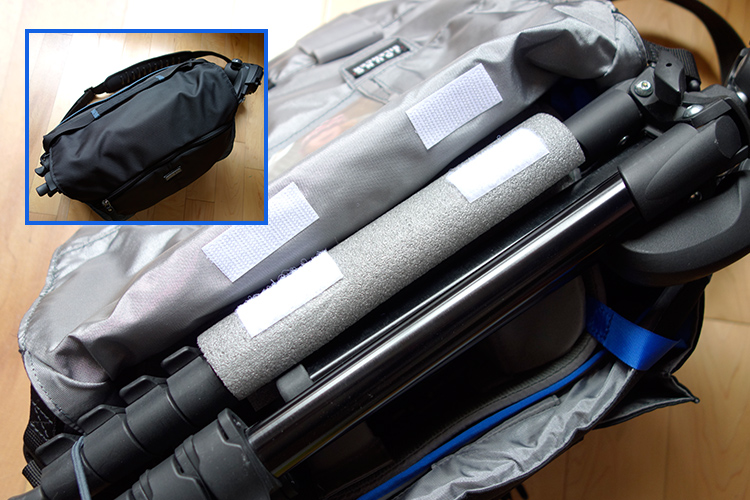
    Place the sleeve around one of the tripod legs. Cut two small strips of self-adhesive velcro strips and stick them onto the foam sleeve and then under the front flap of the bag. The tripod is resting on top of the removable padded insert. When the front flap is closed, the sleeve acts as a cushion to keep it place.

    Foam insulation sleeve attached to one of the tripods legs. Velcro adhesive strips are used to secure to the underneath part of the front flap.

    The tripod felt very secure, as it is resting on the inner padded insert, and when it is closed the sleeve acts as a cushion for a snug fit.

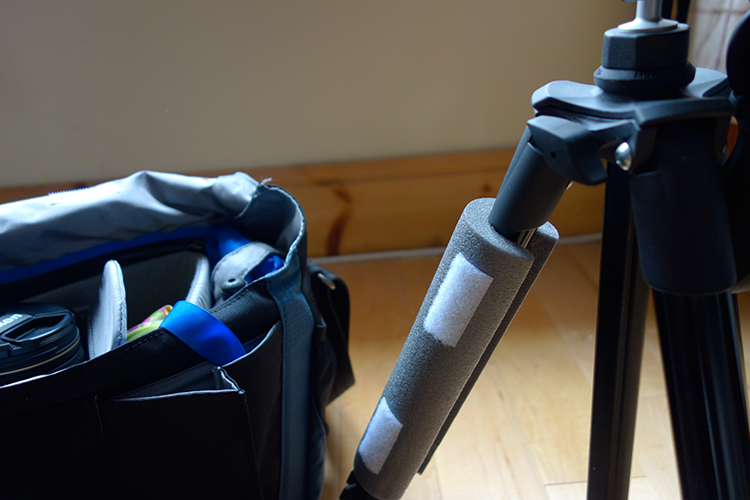
    Tip: the foam sleeve can also be left on the tripod while in use to act as a cover (nicer on fingers in cold weather).

    The foam sleeve can be left on the tripod when in use to act as a cover.

    #5 Sugru

    If you haven’t come across this product before, it’s simply brilliant, a DIYer’s dream. The company’s tagline is, “Mouldable glue that turns into rubber”. The methods or ways that it can be applied as fixes or hacks, are only limited to your own imagination.

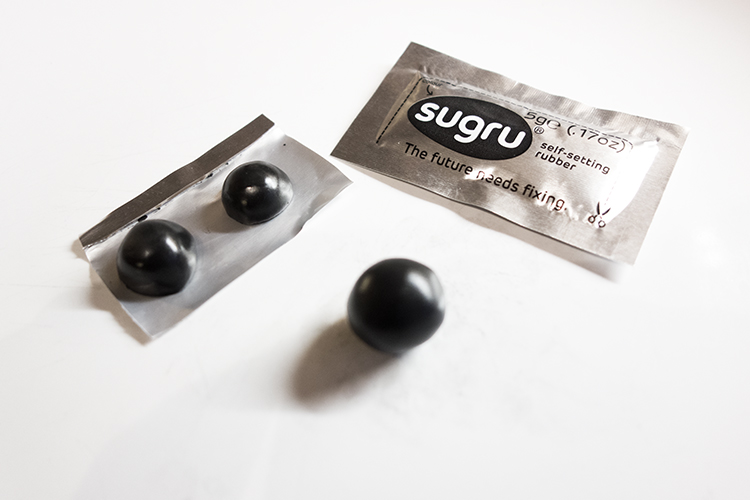
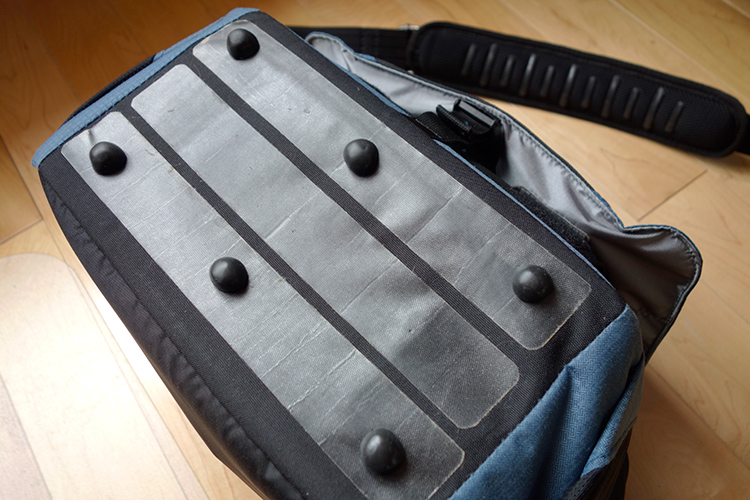
    You can create your own rubber feet for the bottom of your camera bag, to protect it against general wear and tear. I used a three pack ($ 13.50 for 3 packs) of pitch black Sugru to create these feet. Roll each one into a ball, and with a sharp kitchen knife, then cut each ball in half. Allow these to cure (set) for a day or two. In order to secure the feet to the bag, you will need some extra Sugru. (You can buy 8 packs for $ 22, which works out cheaper than 2 x 3 packs).

    Sugru-balls-rubber-feet

    Rubber feet moulded from Sugru, for underneath my camera bag as added protection.

    Sugru-rubber-feet-attached-to-bag

    The rubber feet attached to my camera bag along with the tent repair tape.

    Here’s another tip for using Sugru. If your camera bag strap has a cushion pad but no silicone strips to prevent it from sliding off your shoulder, or they have simply worn away, you can make your own by rolling out strips of Sugru and stick them firmly on to the pad.

    Do you any other camera bag hack ideas that you would like to share? Leave a comment below.

    Disclaimer: I was not approached or sponsored by any of the companies mentioned in this article. All opinions are by the author.

    googletag.cmd.push(function() {
    tablet_slots.push( googletag.defineSlot( “/1005424/_dPSv4_tab-all-article-bottom_(300×250)”, [300, 250], “pb-ad-78623” ).addService( googletag.pubads() ) ); } );

    googletag.cmd.push(function() {
    mobile_slots.push( googletag.defineSlot( “/1005424/_dPSv4_mob-all-article-bottom_(300×250)”, [300, 250], “pb-ad-78158” ).addService( googletag.pubads() ) ); } );

    The post 5 Camera Bag Hacks to Help You Curb the Temptation of Buying More by Sarah Hipwell appeared first on Digital Photography School.

    Digital Photography School

  • It’s not the camera you have – it’s what you do with it

    What you do camera 1

    One day, as I was looking up to the stars, a revelation came upon me. It got imprinted into me that my career should be in photography. That’s the story I’d like to tell myself about how I entered photography. The reality is that I stumbled unto photography quite by accident. I saw a friend of mine who had this very nice professional looking camera. Big, black, sexy, it was a Nikon D80.

    One faithful day I did the math while counting my money, and did a quick Craigslist search. My goodness! Looks like I could buy one! And that I did. But that was just the beginning. After being a Nikon shooter for a while, I started buying lenses, more and more.

    What you do camera 2

    I brought and sold cameras like crazy, my wife’s family had to ask if I was rich because it seemed like every month or so I would have a new camera. Thing was, I wasn’t rich by any stretch of the imagination, all I had was ebay: I sold some stuff, then bought some stuff, again and again.

    It got so bad that I bought a large format camera, two graflex backs, about a hundred pieces of film, then only shot about three frames before selling it. I even had a medium format camera at some point too, with a box full of medium format film of which I only shot like two rolls, and they are still undeveloped to this day.

    I’m not here to chronicle my old gear addiction, but to hopefully drive a simple point home that I’ve learned the hard way:

    It’s not what camera you have, it’s what you do with it.

    What you do camera 6 What you do camera 9

    Your camera matters

    But before going in, let’s get something out of the way. You’ve probably heard that your camera doesn’t matter, but let me share with you that I believe that yes, it does. I mean, of course your camera matters, how can it not? If you want to make images of birds and your camera doesn’t have a zoom, good luck trying to get close. It’s just a basic fact, all cameras are limited somehow, and because of these limits there are shots that you simply can’t get with certain cameras. Try low light with no flash on a smartphone and see what I mean.

    But who cares?

    But the thing is, it really doesn’t matter that your camera matters. It’s a tongue twister, I know. Not only are modern cameras good enough for pretty much any occasion, but mainly because you can either focus on what you can, or what you can’t, do with your camera. Focus on what you can’t do and you are signing yourself up for gear addiction, as there is ALWAYS something you can’t do with any camera.

    What you do camera 3

    That’s what got me to shell thousands of dollars in gear I never needed in the first place. My camera’s too big, my camera doesn’t look cool enough, or it doesn’t have a viewfinder, etc. I could find all the issues in the world when I needed to rationalize my next purchase. But, after spending thousands buying and selling hear, having used pretty much all of the formats and systems out there, I only have one thing to say – it’s not what camera you use, it’s what you do with it.

    I remember a friend’s wedding. My jaw dropped when I saw the images that their paid photographer produced. The shooter had a serious Canon kit, I think the 70-200mm f/2.8, the whole shabang, a really nice kit if you ask me.

    What you do camera 4

    But goodness gracious I can’t even describe the images. The images looked like a random person with their pre-smartphone phone shot them. They were the blandest of bland – then I realized that they were made on probably $ 3000 worth of gear, but the results were $ 3000 point and shoot images. I had my humble Ricoh GXR back then and got a few shots for myself. The couple thanked me and said, “If it wasn’t for you, we wouldn’t have any nice pictures.”

    I’ve seen point and shoot result from cameras worth thousands, and inversely, I’ve seen beautiful results from the humblest of cameras. I think it’s all about using your camera to its maximum potential, whatever that may be. What I realized too late (and it could have saved me lots of money) was that I could have made some nice images with whatever camera I had. From the most expensive one to the cheapest one. Between you and I, all of the images in this article were made with a discontinued, small sensor, pocket camera.

    What you do camera 5

    It’s something I’ve seen over and over again, not only in photography but in life in general. Like the people who only had $ 100 to their names and somehow ended up millionaires. It’s not the cards we have in life, it’s what we do with them. We all could be taller, prettier, whatever. But it’s about making the most of what you’ve got.

    I think the more you understand this principle, the more confidence you will get. I think many of us get confidence from owning a camera, like I did. But I think that confidence is better handled if it’s in your own abilities as a photographer. Something that you can prove to yourself by making the most of your current camera.

    What you do camera 7

    In short, your camera matters – but who cares? Great images are possible with any camera, because it’s not what camera you have, it’s what you do with it. I’ve proven it to myself, have you? Be yourself, stay focused and keep on shooting.

    What you do camera 8

    googletag.cmd.push(function() {
    tablet_slots.push( googletag.defineSlot( “/1005424/_dPSv4_tab-all-article-bottom_(300×250)”, [300, 250], “pb-ad-78623” ).addService( googletag.pubads() ) ); } );

    googletag.cmd.push(function() {
    mobile_slots.push( googletag.defineSlot( “/1005424/_dPSv4_mob-all-article-bottom_(300×250)”, [300, 250], “pb-ad-78158” ).addService( googletag.pubads() ) ); } );

    The post It’s not the camera you have – it’s what you do with it by Olivier Duong appeared first on Digital Photography School.

    Digital Photography School

  • 4 Steps to Make Your Images Pop in Lightroom

    In this article, I share with you the start of my post-processing workflow for pretty much all of the photos I take. I’m mostly using Lightroom for 90% of my post-processing and very rarely do I go into Photoshop for some extra stuff.

    Before we begin I must confess that I’m no post-processing master, nor do I know Lightroom inside and out, and I definitely don’t know Photoshop inside and out. But, as I learned, and I hope you will too, it turns out you don’t have to be a master in order to be able to bring your Raw photos to life. It can be done by just about anyone with just a few simple steps as I’m going to show you.

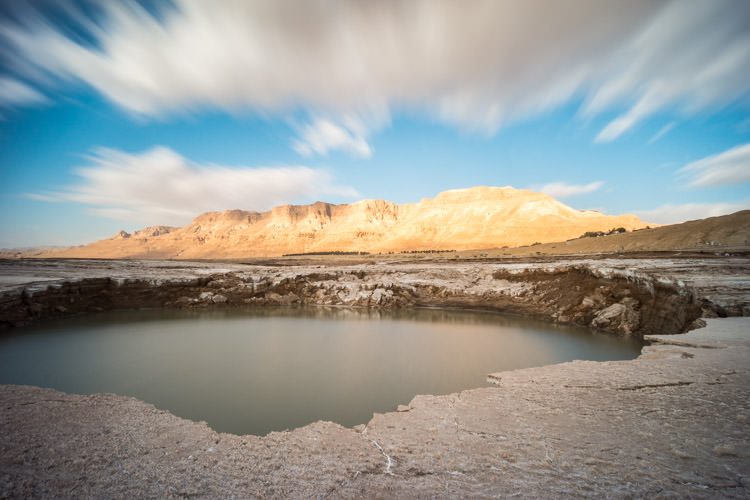
    8 Photobek Before
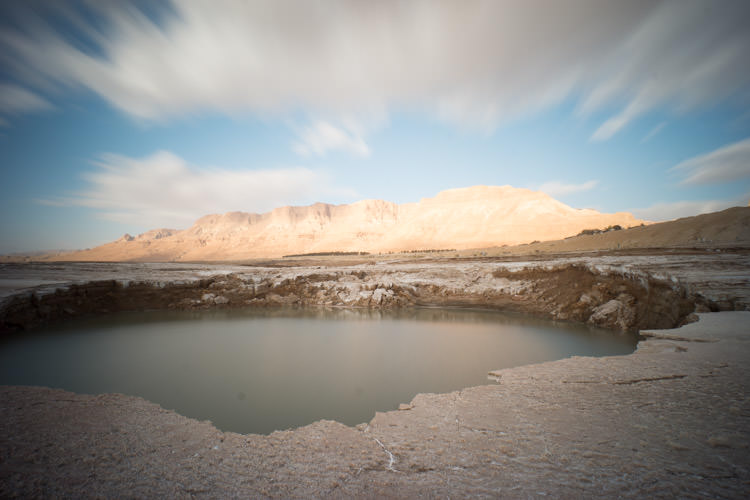
    Before we start, here is the image as taken straight out of camera.

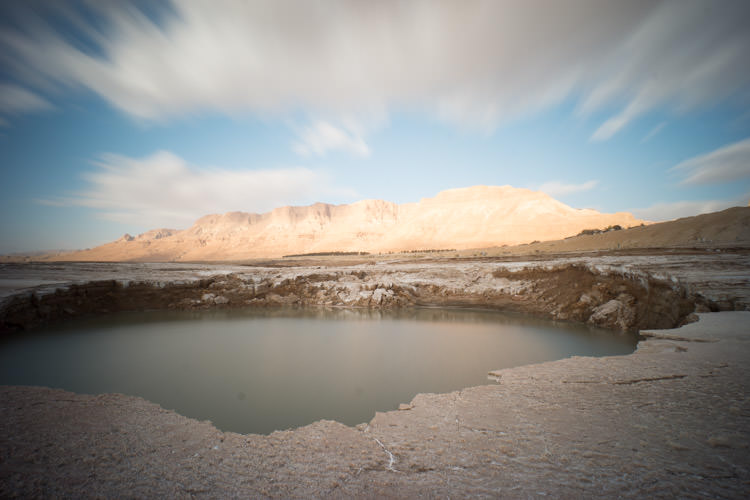
    The photo I’m going to use (above) for this tutorial is one that I took while on a Dead Sea Night and Sunrise Workshop. I didn’t really plan for this photo ahead of time, but it’s probably the best image I took during that workshop. It’s a photo of one of the biggest sinkholes in the Dead Sea area (one out of more than 5,000 and counting) and it’s an 89 second exposure, done with a 10 stop neutral density filter that allowed me to smooth the water inside the sinkhole, and stretch the clouds moving above.

    Now let’s make it POP!

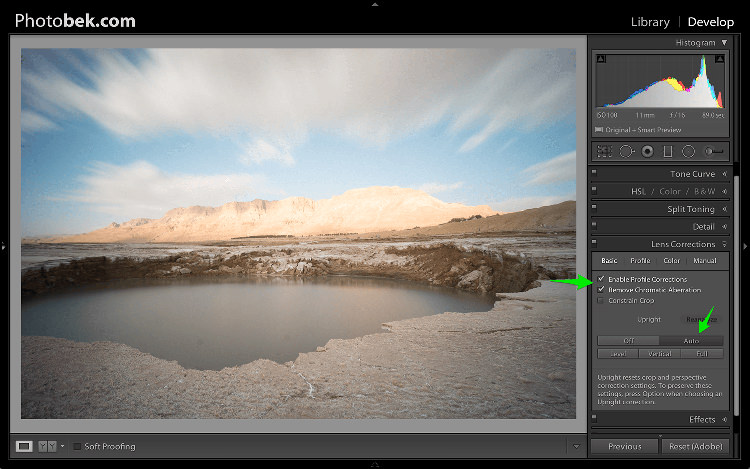
    1. Lens Corrections

    1 Photobek Lens Corrections

    The first thing I do is apply Lens Corrections. This specific photo was taken with a wide angle lens, and if you’re into landscape photography then a wide angle lens would be your go to lens 80% of the time, so fixing the distortion it creates is important.

    just go to the Lens Corrections Panel and mark the Enable Profile Corrections. Lightroom has profiles for plenty of lenses, and chances are that it will have one for the lens you are using. If not, make sure you update to the latest version of Lightroom as they keep adding support for new lenses as they are being released to the world.

    In some cases I decide to leave the photo as it is without doing the lens correction. It is just a matter of what seems or feels right for each specific photo.

    Under the Lens Corrections panel you can also correct perspective in your photo, so I always click on Auto and see how that affects the image. If it’s good, I keep it. If it’s off I undo it and align in manually, or rotate using the crop tool if necessary.

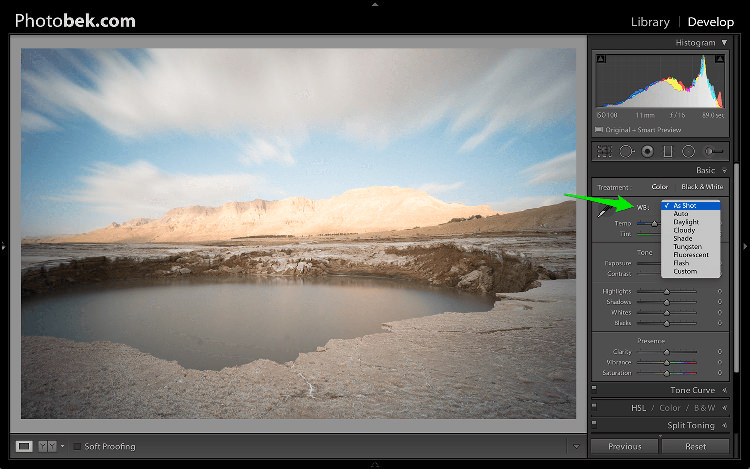
    2. White Balance

    2 Photobek White Balance

    Adjusting the White Balance comes second. Since I’m always shooting Raw (and if you’re not, then please start) I don’t really mess with White Balance while I’m shooting. Again, this is a matter of playing with the options in Lightroom to see what looks the best, and what makes the image as close to how it looked when I was out shooting.

    80% of the time I’m using either the Auto or As Shot options, and for this photo I kept it at As Shot.

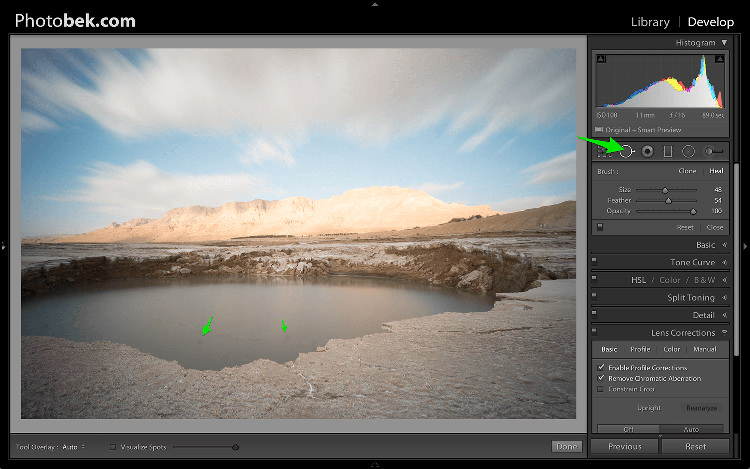
    3. Spot Removal

    3 Photobek Spot Removal 01

    Spot Removal is a MUST. Not removing the spots from your photos is a really bad habit. It’s hard to avoid having these spots, as the lens or sensor will get some dirt and dust on them, and having them cleaned on a consistent basis is not really something most photographers do. I know I don’t.

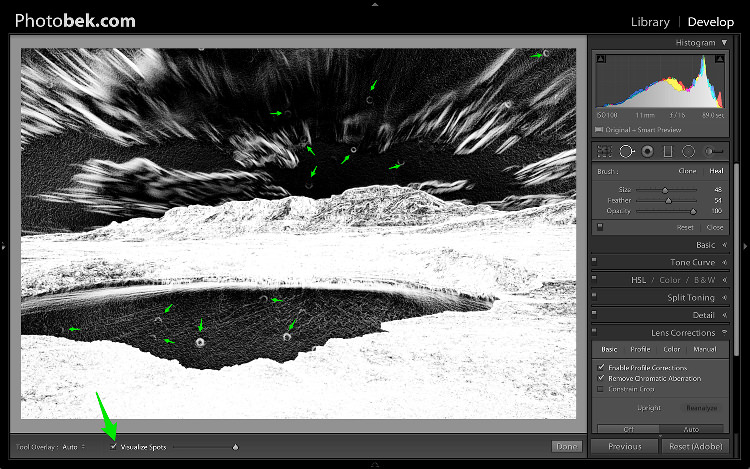
    Spots can ruin a photo in my opinion, I simply hate them, but I love getting rid of them and Lightroom makes it super easy to do. As you can see in the screenshot above I marked two very obvious spots with arrows but after using the Visualize Spots feature look what happens.

    4 Photobek Spot Removal 02

    BOOM!

    I know I shouldn’t be so happy since my lens (or sensor) is pretty filthy, but thanks to this great feature in Lightroom I can see pretty much all the spots and get rid of them.

    You can choose between Clone or Heal in the Spot Removal tool. I usually use Heal as it does a better job of removing the spots and picking the best places to copy over from.

    4. Basic Panel

    5 Photobek Basic 01

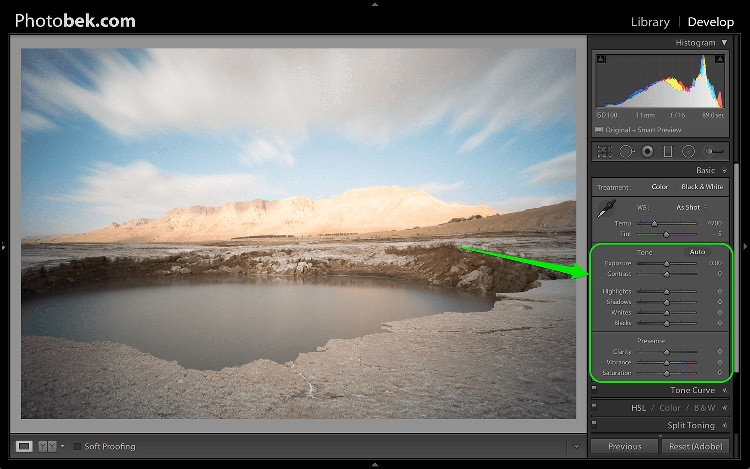
    This is where most of the magic happens, and this part makes the biggest impact on the photo. It has nine sliders (besides the two sliders for White Balance which we already took care of in step 2) and the most important thing for you to know, is that every photo needs its own adjustments as each image is different.

    The adjustments I’m going to make on this specific photo might not work so good on a different shot, so keep in mind that the overall process is similar and I’ll use all these sliders for every photo, but not necessary move them to the same locations.

    Let’s begin:

    4.1 Exposure

    6 Photobek Histogram

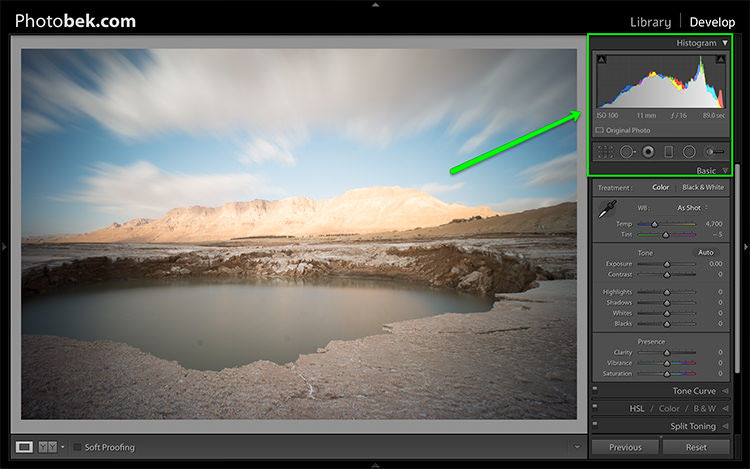
    Since the photo was exposed well, and there is no clipping as you can see in the histogram above, I didn’t need to make any adjustments to the Exposure slider, so I left it at 0.

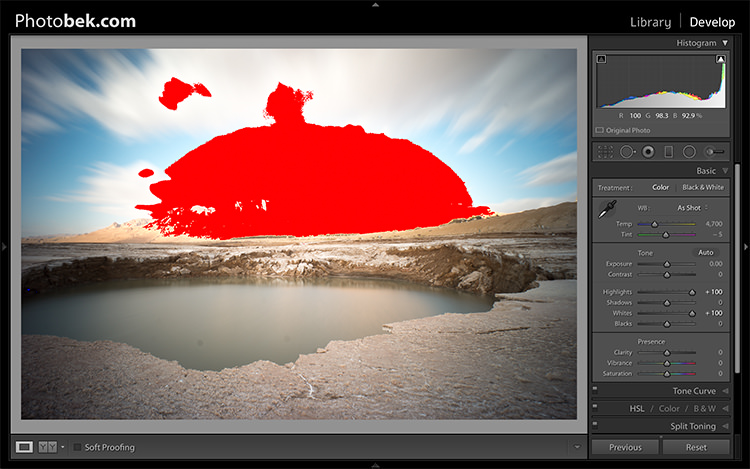
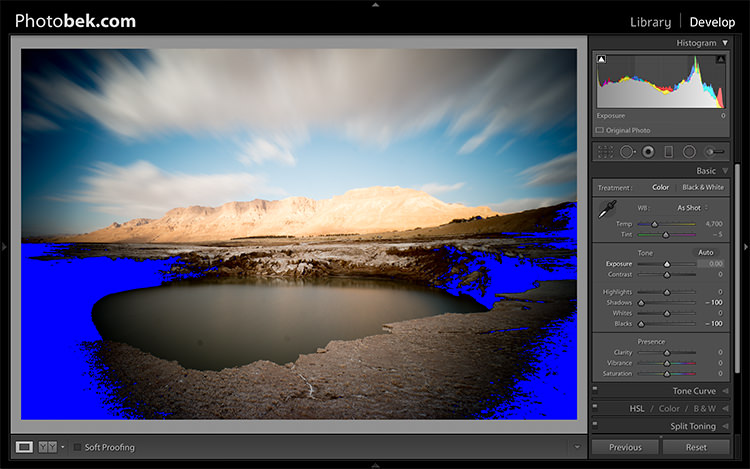
    The histogram is a great tool that you should keep your eyes on at all times during your post-processing work on an image. It will provide you with valuable information about the clipped areas in a photo (in case it has any).

    Here is what it would like if the highlights were clipped (press J or click/hover on the arrows that are shown at the top of the histogram to activate the clipping indicators).

    6 1 Photobek Histogram Clipped Highlights

    Here is what it would like if the shadows were clipped.

    6 1 Photobek Histogram Clipped Shadows

    Keep in mind that some clipping is perfectly acceptable, and might even be desired at some occasions. The trick is to find out where the clipping is occurring, and deciding whether a loss of detail in that area is acceptable or not, and that is entirely up to you to decide.

    4.2 Contrast

    I usually don’t mess around with the contrast slider much, as making the adjustments to the following sliders also has a big impact on the contrast of the photo, so I don’t find it necessary. I kept Contrast at 0 for this photo.

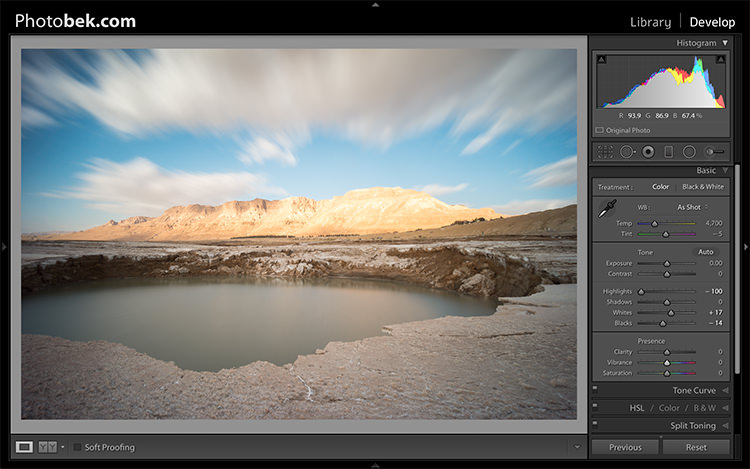
    4.3 Highlights

    The highlights slider is designed to bring back detail (moving slider to the left) in the brightest areas of an image, or to brighten (moving slider to the right) highlights while protecting against clipping.

    What you should do is drop the highlights slider all the way down to -100 while watching your histogram, and move it back up if needed. In the case of this photo I dropped it to -100 and kept it there, and you can clearly see that it brings back plenty of detail in the clouds and the mountain in the background.

    7 Photobek Highlights

    4.4 Shadows

    The Shadows slider will affect the midtone shadows, to the lower end of the deeper shadows. To brighten up the shadows, simply pull the slider to the right. To darken the shadows, move the slider to the left. For this photo I actually kept it at 0.

    4.5 Whites

    The Whites slider sets the White Point (brightness) or extreme tonal range of an image, by either lowering or raising this white value. The difference between Highlights and Whites is that the whites slider help you to define the true white in a photo, and the hightlights slider helps you recover lost detail in the highlights of your photo.

    While clicking on the option (MAC) or ALT key (PC) move the Whites slider to the right until you just start to see parts being highlighted in the photo (this indicates which parts are being clipped) then drop it back a little and stop there. For this photo I moved it to +17.

    4.6 Blacks

    The Blacks slider deals with the darkest areas of the image. While clicking on the option (MAC) or ALT key (PC) move the Blacks slider to the left until you see black areas appear (those areas are clipping in the shadows) than move it back a little and stop there. For this photo I moved it to -14.

    7.1 - Photobek - Shadows, Whites & Blacks

    Shadows, Whites and Blacks adjusted

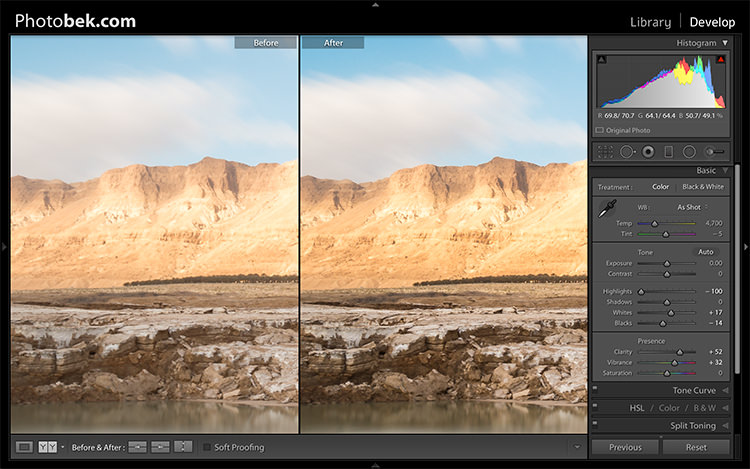
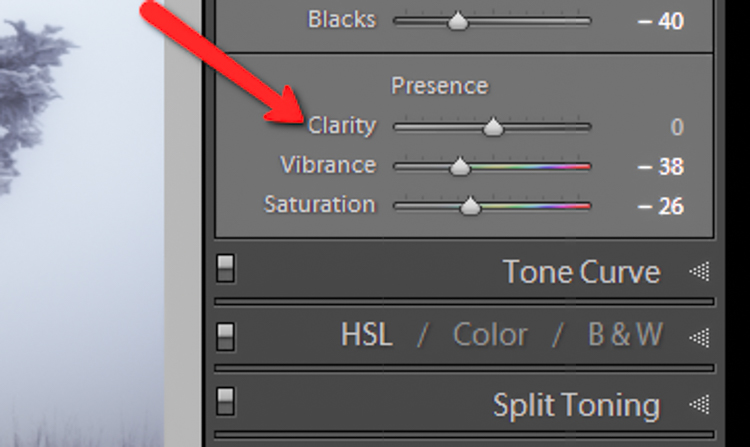
    4.7 Clarity

    Clarity is, in effect, a contrast tool. However, rather than boost contrast across the entire range of the image, it affects it only in areas of the image where it finds edge contrast. This makes it a more subtle tool than the contrast slider and it’s excellent for adding punch to your images, without making them look unnatural.

    Raise it up until you think it made the impact you want on the photo, but don’t over do it. For this photo I took it up to +52.

    4.8 Vibrance

    Vibrance is the close cousin of Saturation, and at first they may seem to be almost the same, but Vibrance is different. The Saturation control moves all the colors in the spectrum up or down in saturation, more or less together. Vibrance on the other hand, is a lot more selective about the way it saturates colors as it only saturates colors that need it, which means it doesn’t oversaturate colors that are already very saturated or colors of very low saturation.

    Raise it up until you think it made the impact you want on the photo, and again don’t over do it. For this photo I took it up to +32 to add more blue to the sky and more earth colors to the mountain.

    Clarity and Vibrance adjusted

    Clarity and Vibrance adjusted

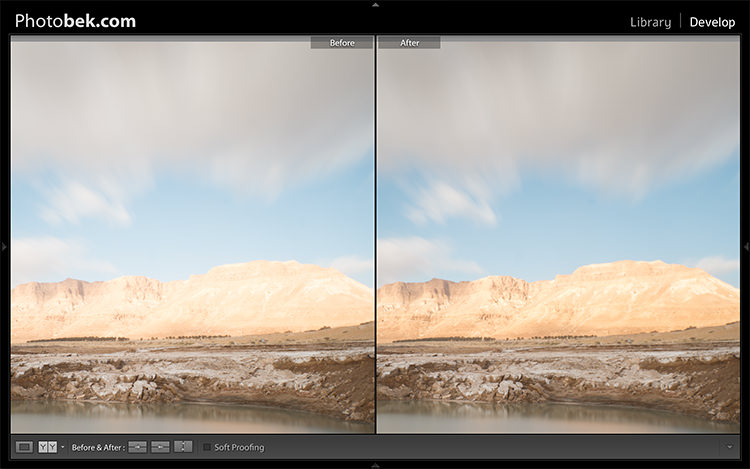
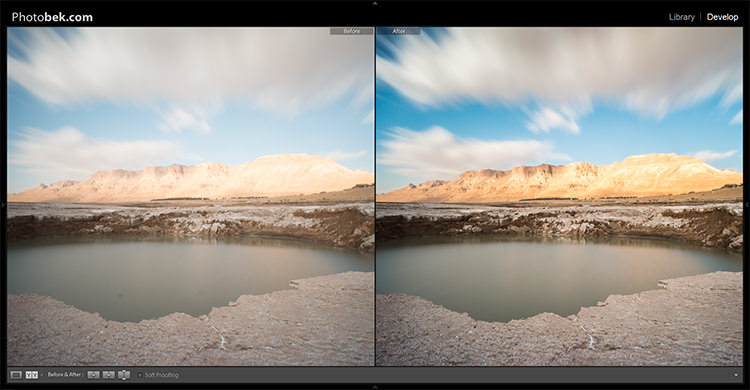
    Before and After

    As you can see, not much was done to the image and this entire process shouldn’t take more than a few minutes (depending on how many spots you have). I think it makes a world of difference to this specific image, and to any image for that matter.

    Here is the image as taken straight out of camera:

    8 Photobek Before

    Here is the image after the adjustments were made:

    9 Photobek After

    Finally, here are the before and after one next to the other:

    10 Photobek Before After

    I hope you enjoyed this tutorial, and more importantly, I hope you’ve learned something that you can actually implement on your own photos to make them POP.

    googletag.cmd.push(function() {
    tablet_slots.push( googletag.defineSlot( “/1005424/_dPSv4_tab-all-article-bottom_(300×250)”, [300, 250], “pb-ad-78623” ).addService( googletag.pubads() ) ); } );

    googletag.cmd.push(function() {
    mobile_slots.push( googletag.defineSlot( “/1005424/_dPSv4_mob-all-article-bottom_(300×250)”, [300, 250], “pb-ad-78158” ).addService( googletag.pubads() ) ); } );

    The post 4 Steps to Make Your Images Pop in Lightroom by Dror Bekerman appeared first on Digital Photography School.

    Digital Photography School

  • How to Create a Delicious Blurry Bokeh Background in 4 Easy Steps

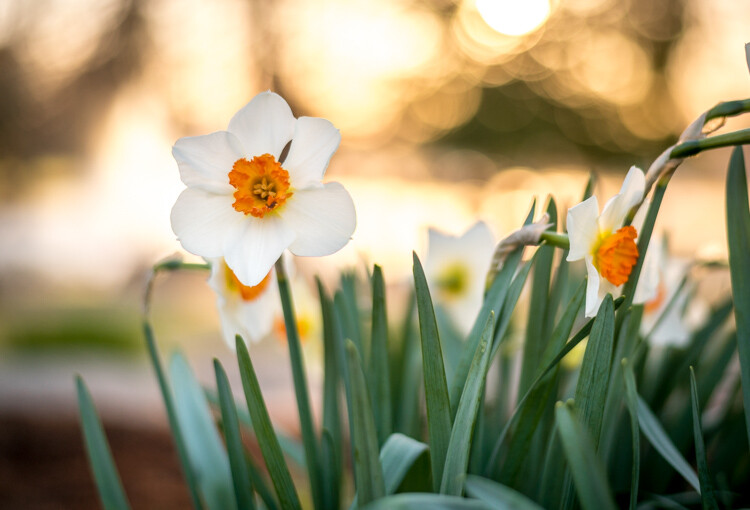
    Blurry backgrounds are nothing new when it comes to photography. The technique of blurring the background to emphasize a subject in the foreground has been used by photographers for decades, and by painters and other visual artists for hundreds of years. Now thanks to the proliferation of digital cameras this phenomenon has exploded in recent times.

    Many people like photos with a tack-sharp subject and a smooth blurry background, and even though some might say it’s more of an over-used trend, the truth is that bokeh is here to stay. The trick to using it effectively, is to learn how to use the physical properties of lenses and light to create the look you are going for. While some people turn to creative editing tricks like adding blurry filters or doing Photoshop gymnastics there really is no substitute for the genuine article. If this is something you have always wondered about or wanted to try for yourself, here are four easy steps to get you started.

    50mm, f/4, 1/350 second, ISO 400

    50mm, f/4, 1/350th of a second, ISO 400

    The term bokeh is a Japanese word that doesn’t have a precise English translation, but refers to the type and quality of the out-of-focus areas of an image. In other words, when the blurry parts of a picture look nice, you might say the image has good bokeh. While a thorough discussion of what bokeh is, what causes it, and what affect your lenses and lens elements have on the type and quality of bokeh could go on for several pages, this article is going to be a bit more basic look at how to create visually pleasing blurry elements in your photos. If you don’t want things to get too complicated, and aren’t quite ready for a thorough breakdown of aspherical elements or the circle of confusion, then get out your camera and follow along with these few simple tips to help you get the look you have always wanted.

    understanding-bokeh-golden-glow

    50mm, f/1.8, 1/6000th, ISO 100

    1 – Shoot with a wide aperture

    Take a look at the front of your lens, you will probably see a few numbers that look like 1:3.5-5.6, or 1:2.8, or f/4 (read: What the Numbers on your Lens Mean for more on how to find this). These numbers refer to the size of the aperture in the lens itself, and how big the opening can get. Ironically smaller numbers are bigger, and a lens that says 1:2.8 will be able to let in much more light than a lens that says 1:4 or f/4. (Some manufacturers use different schemes to show the aperture size but it’s always the number after the colon, or on the second side of the / that you want to look for when determining the maximum size of the lens opening.)

    The smaller the number, the wider your aperture will be, and the less light you will need to take a properly exposed photo. Wide apertures also mean your photos will have a shallower depth of field, and anything out of focus behind your subject will begin to take on a smoother, more visually pleasing blur. In other words, wide apertures help give you more bokeh.

    understanding-bokeh-leaves

    50mm, f/1.8, 1/4000 second, ISO 100

    If you’re itching to get some pictures with the same kind of buttery-smooth background blur you have seen in nature magazines or fashion spreads, put your camera in Aperture Priority mode (on Nikon) or Av (Canon, Pentax, etc.) and turn the control dial until the aperture value number is as close to zero as it can go. It helps if you have a prime lens that doesn’t zoom in and out, since they usually have wider maximum apertures, but even a kit lens can give you decent results if you have enough light. Now go out and find something to photograph, even if it’s just a coffee mug on your office desk.

    To put my money where my mouth is, I took my camera to work and literally snapped a picture of a coffee cup on my desk. No photoshopping or magic tricks here, just a wide f/1.8 aperture. 50mm, 1/100 second, ISO 160

    To put my money where my mouth is, I took my camera to work and literally snapped a picture of a coffee cup on my desk. No photoshopping or magic tricks here, just a wide f/1.8 aperture. 50mm lens, 1/100 second, ISO 160

    2 – Put your subject far away from the background

    If you have been trying to get the kind of silky, blurry bokeh you seem to notice in everyone else’s photos you might try this one simple trick and you won’t believe what happens! Simply putting a great deal of distance between your subject and whatever is behind it, can go a long way towards creating the bokeh you have always dreamed about.

    understanding-bokeh-flowers-sunrise

    50mm, f/1.8, 1/1000 second, ISO 100

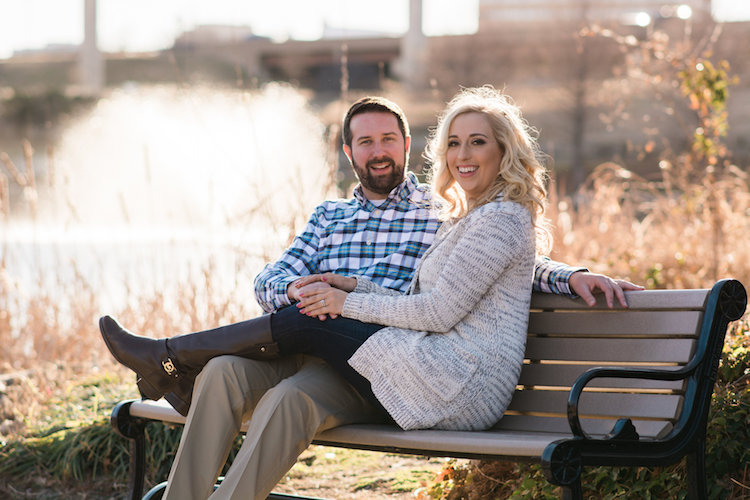
    If you are shooting portraits, try moving your subjects to a location where there is a great deal of space behind them, or even just repositioning yourself so you are looking at your subjects from a different angle that puts more distance between them and the background. In the photo below, I specifically shot the scene so that there was about 50 meters between the couple and the fountain, which caused it to have a nice blurry out-of-focus appearance that complements the woman and her fiancée quite well. I could have used a bench that was much closer to the fountain, but it would have had a very different affect on the picture, and it would not have given me nearly the same amount of bokeh as you can see in the final image below.

    understanding-bokeh-fountain

    85mm, f/2.4, 1/2000 second, ISO 200

    3 – Get close to your subject

    As I mentioned in the opening paragraph there are many different optical elements that come into play when dealing with bokeh and background blur, and certainly shooting with wide apertures while putting a great deal of distance between your subject and the background are critical elements of the equation. Another thing you can do, is position your camera and lens physically close to the subject you are shooting. Combine this technique with the first two, and you’re virtually guaranteed to get good results.

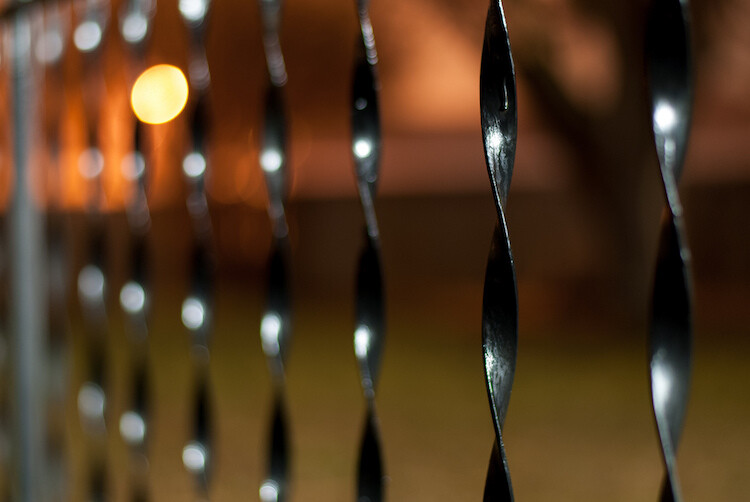
    understanding-bokeh-fence

    This shot has all the techniques rolled into one: a wide f/1.8 aperture, a far-away street light in the top left corner, and a very short distance between my camera and the fence bar on the right side.

    4 – Zoom in, waaay in

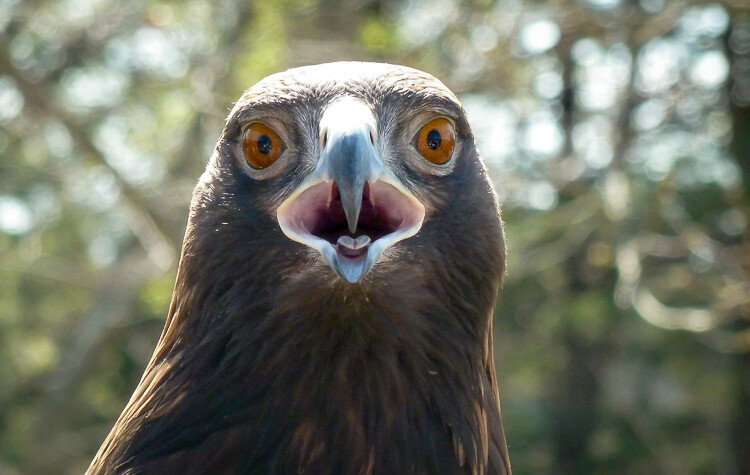
    If you are trying to get bokeh-licious shots and not having much luck, there’s another technique that could mean the difference between frustration and celebration. Due to how lenses collect, and focus incoming light rays, it’s easier to get blurry backgrounds with longer focal lengths. This is why these types of shots are difficult to get on mobile phones, which generally have lenses with a much wider angle of view. Grab your nearest camera, whether it’s a DSLR or a humble little point-and-shoot, and zoom the lens as far in as it will go. Now use the other tips I have already mentioned: set the aperture to the widest setting, find a subject that’s relatively close to you, and make sure there is plenty of room between the subject and the background.

    A golden eagle, taken with my 400mm f/4 lens on a Nikon D7200. A very expensive combination, but it produces outstanding results with silky-smooth bokeh.

    A golden eagle, taken with my 300mm f/4 lens on a Nikon D7200. A very expensive combination, but it produces outstanding results with silky-smooth bokeh.

    You might not get the photo of your dreams, but with a little bit of practice you should start to see some improvements, as you begin to understand how to use your camera to create sharp subjects with pleasing out-of-focus areas.

    Just kidding! I took the first shot with a $  150 Panasonic ZS7 pocket camera. All I did was zoom in as far as it would go. This is the same scene with the same camera a few seconds later, shot at the camera zoomed all the way out.

    Just kidding! I made that first image above with a cheap Panasonic ZS7 pocket camera, and all I did was zoom in as far as it would go. This is the same scene, with the same camera, a few seconds later – but zoomed all the way out.

    Now with all this being said, I have a challenge for all of you dPS readers: What is your favorite picture you have taken that has nice pleasing bokeh? Is it a portrait, a wild animal, or more along the lines of abstract art? Share your picture in the comments section below along with a few tips of your own to help others take similarly beautiful bokeh photos.

    googletag.cmd.push(function() {
    tablet_slots.push( googletag.defineSlot( “/1005424/_dPSv4_tab-all-article-bottom_(300×250)”, [300, 250], “pb-ad-78623” ).addService( googletag.pubads() ) ); } );

    googletag.cmd.push(function() {
    mobile_slots.push( googletag.defineSlot( “/1005424/_dPSv4_mob-all-article-bottom_(300×250)”, [300, 250], “pb-ad-78158” ).addService( googletag.pubads() ) ); } );

    The post How to Create a Delicious Blurry Bokeh Background in 4 Easy Steps by Simon Ringsmuth appeared first on Digital Photography School.

    Digital Photography School

  • Wedding Photography – Just How Specialized is it?

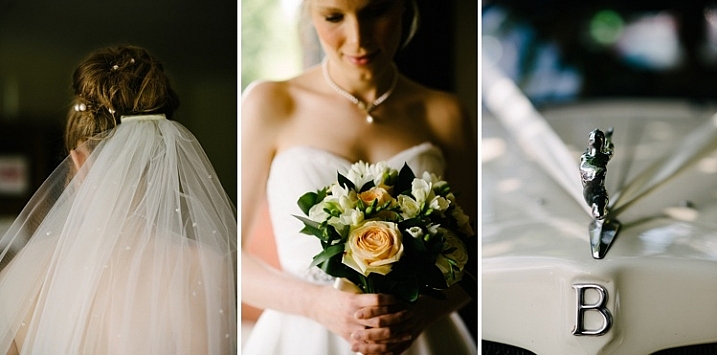
    how-specialized-is-wedding-photography

    Specializing in photography is all the rage right now. Being a specialist is synonymous to being an expert. Being an expert means you are more trustworthy, what you say and what you do carries more weight, and people can have deeper confidence in your knowledge.
    A specialist focuses their ability on one area of photography, and concentrates growing their knowledge to a very detailed degree within that area. The words special and specific come from this word, and further drive home its meaning.

    To specialize or not to specialize

    wedding-photography-how-specialized-is-it

    To specialize or not to specialize – that is the question. For many photographers wanting to stand out and be different, to be known and able to demand higher prices, this is a question they are facing. There are many genres of photography you can choose to specialize in such as: landscape, black and white, cityscape, macro photography, musicians and bands, portraits, people, events, weddings, baby, newborn, children, families, and fine art, just to name but a few. These areas vary in their specificity so that “people photography” can be as specific as it can be general – depending on how specialized you want to be. Nowadays, specialisms are being pushed into more defined niches such as…

    Examples of niches

    • Weddings – outdoors only, city weddings, big weddings, intimate weddings, six hours wedding coverage only, add on a variety of wedding styles such as vintage, modern, contemporary, classic, chic, etc.
    • Family – lifestyle only, portraits only, everyday candid photography, black and white only, active families only, adventures only, sunset and golden hour only, etc.
    • Children – 0-3 years only, 4-11 years only, teens only, newborn, studio, etc.
    • Street photography – black and white only, daytime only, night time only, etc.
    • Portraits – natural light only, studio light only, on location only, etc.

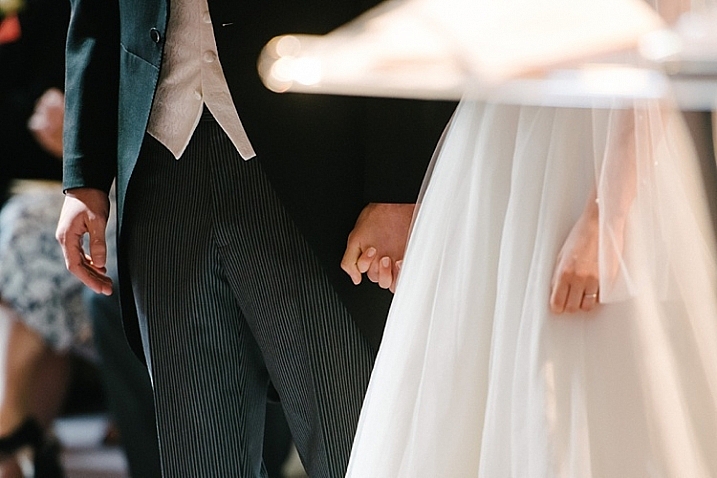
    wedding-photography-how-specialized-is-it

    Just how much of a specialism is wedding photography?

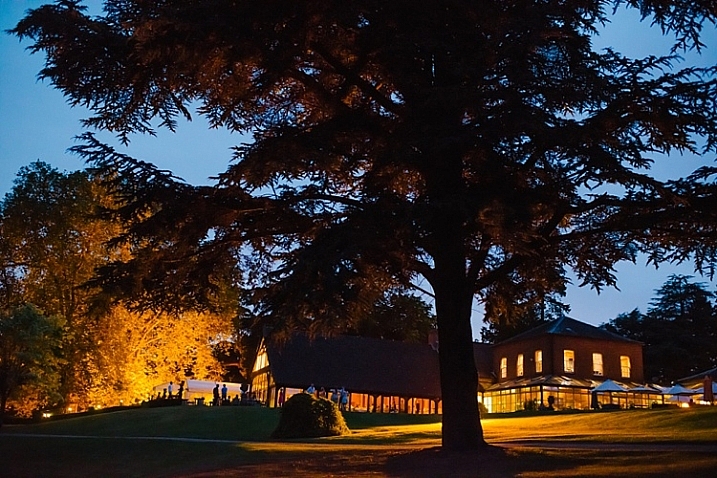
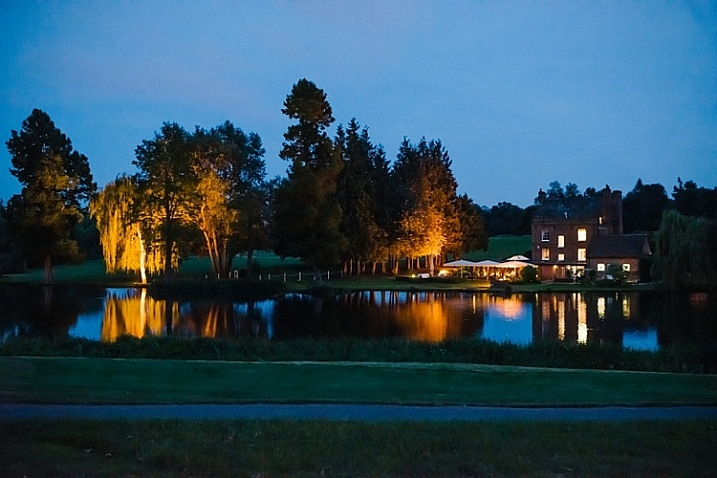
    Let’s deconstruct a wedding day to its main components in terms of the subject to be photographed, the skills that may be required, as well as the suggested lenses to use.

    • Subject: scenery and locations
    • Skills required: landscape
    • Lenses needed: wide angle zoom lenses, and fast primes; 16mm, 24mm, and 35mm

    wedding-photography-how-specialized-is-it

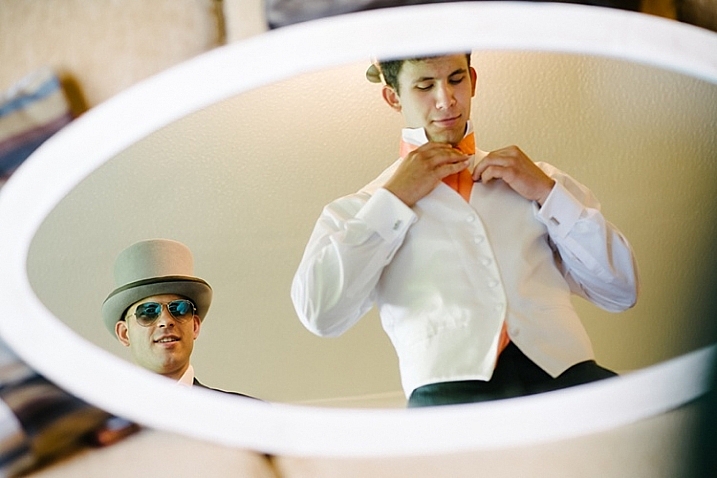
    • Subject: bride and/or groom getting ready
    • Skills needed: candid, reportage, portraits, macro for the accessories, people skills!
    • Lenses: 24-70mm, 35mm, a good macro lens

    wedding-photography-how-specialized-is-it

    • Subject: the wedding ceremony
    • Skills needed: documentary photography, creative, capturing emotions, special moments
    • Lenses needed: 70-200mm, 24-70mm, fast primes (working often in low light conditions)

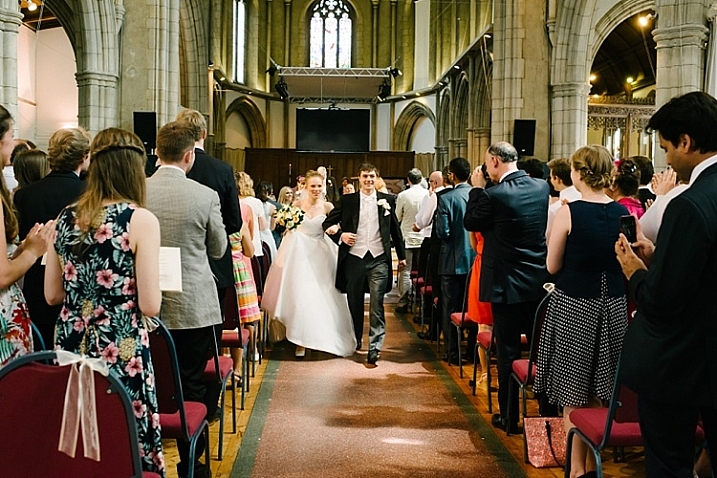
    wedding-photography-how-specialized-is-it

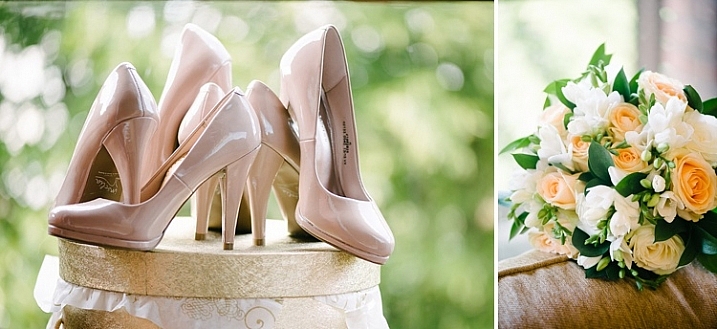
    • Subject: details of the wedding day
    • Skills needed: creativity, an eye for composition and colour, etc
    • Lenses needed: a macro lens, primes with large apertures

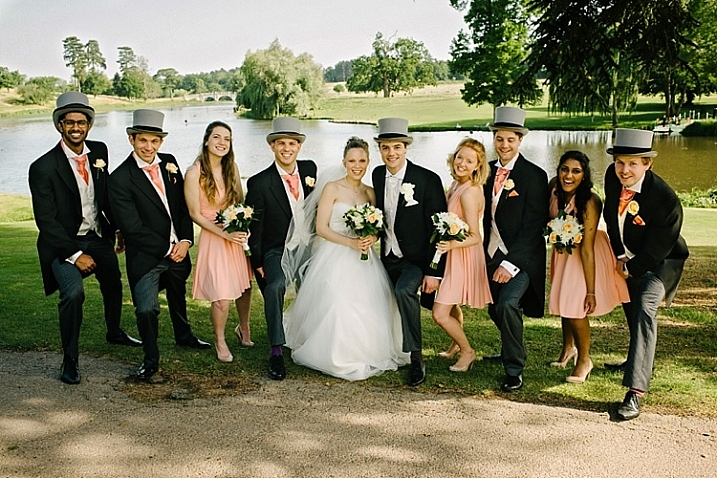
    wedding-photography-how-specialized-is-it

    • Subject: group portraits
    • Skills required: suffice to say you really need to have a solid understanding of the exposure triangle and depth of field
    • Lenses and gear needed: wide and zooms (you may also need speedlights and other lighting gear)

    wedding-photography-how-specialized-is-it

    • Subject: portraits of the bride and groom
    • Skills needed: portrait photography experience, creativity, wide scenes, night scenes, people skills
    • Lenses: 50mm, 85mm, 105mm, 70-200mm, wider primes and zooms

    wedding-photography-how-specialized-is-it

    • Subject: reception and leaving
    • Skills needed: lighting and use of flash, cake and food photography, working in low light conditions
    • Lenses: 24-70mm, 70-200mm, macro, large aperture lenses like a 50mm f/1.8

    wedding-specialist_0007

    To be a good wedding photographer, at the very least, you need to know how to shoot each component mentioned above, to a degree better than the average person with a shiny new camera or DSLR can. You are being paid to do the job, and that’s the bare minimum expected of you. To be a great wedding photographer, you need to be confident in your skills to deliver amazing photos in all these areas.

    wedding-photography-how-specialized-is-it

    As a wedding photographer just how much of a specialist are you?

    How many wedding photographers wake up one day, pick up a camera, decide to be a wedding photographer, and shoot an entire wedding knowing only one single thing? I would hazard a guess that many successful wedding photographers have spent hours behind the scenes, learning the ins and outs of various types of photography and the appropriate lens to use for each. Or they have done sessions in many, or all of the other areas of photography listed above, to get to a place where they can photograph a wedding and all the elements that come with it, and reach a very good, if not first-class standard.

    wedding-photography-how-specialized-is-it

    Wedding photography is a world of its own, and cannot be compared to something like purely wildlife photography or macro photography, and other highly specialized types of photography. Within the wedding photography world are various challenges, and you have to be a special kind of photographer to meet all those demands, while keeping cool and being on the ball throughout the entire day. Looking at this industry holistically, yes it is a specialism in itself given the amount of variety and skill required.

    wedding-photography-how-specialized-is-it

    But the deeper question is, do you think wedding photographers are specialists, or do they have to be a bit of everything to be considered good, high standard, or even an exceptional wedding photographer? Can someone be a specialist in all these areas and apply these specialisms into one global category such as wedding photography? Does knowing a bit of everything to fulfill the demands of wedding photography make a wedding photographer a jack of all trades, or a wedding specialist?

    wedding-photography-how-specialized-is-it

    wedding-photography-how-specialized-is-it

    It would be interesting to know what you think. Share your thoughts here and let’s start a discussion!

    googletag.cmd.push(function() {
    tablet_slots.push( googletag.defineSlot( “/1005424/_dPSv4_tab-all-article-bottom_(300×250)”, [300, 250], “pb-ad-78623” ).addService( googletag.pubads() ) ); } );

    googletag.cmd.push(function() {
    mobile_slots.push( googletag.defineSlot( “/1005424/_dPSv4_mob-all-article-bottom_(300×250)”, [300, 250], “pb-ad-78158” ).addService( googletag.pubads() ) ); } );

    The post Wedding Photography – Just How Specialized is it? by Lily Sawyer appeared first on Digital Photography School.

    Digital Photography School

  • First Look and Field Test of the Canon 80D

    Recently Canon released their latest upgrade in the EOS line, the 80D. It’s a direct update of its predecessor the 70D but it competes well in many areas when compared to the older 5D Mark III, and the 7D Mark II bodies.

    See what Chris and Jordan from The Camera Store think as they put the Canon 80D through various tests.

    It has some great dynamic range, focus pull features while doing video, and a rotating tilting screen. The guys feel that the 80D is the best DSLR in the Canon range right now, and that it’s a step in the right direction for Canon.

    What are your thoughts? Have you tried it out?

    googletag.cmd.push(function() {
    tablet_slots.push( googletag.defineSlot( “/1005424/_dPSv4_tab-all-article-bottom_(300×250)”, [300, 250], “pb-ad-78623” ).addService( googletag.pubads() ) ); } );

    googletag.cmd.push(function() {
    mobile_slots.push( googletag.defineSlot( “/1005424/_dPSv4_mob-all-article-bottom_(300×250)”, [300, 250], “pb-ad-78158” ).addService( googletag.pubads() ) ); } );

    The post First Look and Field Test of the Canon 80D by Darlene Hildebrandt appeared first on Digital Photography School.

    Digital Photography School

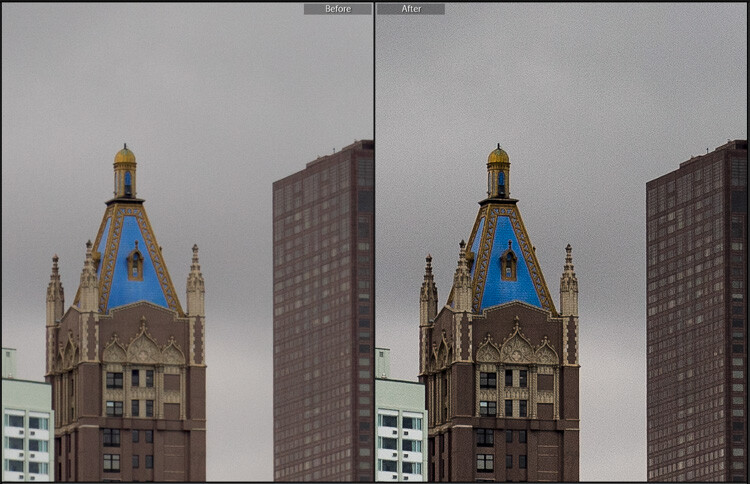
  • How to Make Your Photos Shine Using Clarity, Sharpening, and Dehaze in Lightroom

    The goal of any photographer is to make each and every photo stand out from the crowd. Making an image that pops is something that we all strive to achieve, but it’s not always easy to do. Luckily, there are tools at our disposal in Adobe Lightroom that can go a long way to help us achieve an image that we can be proud of, and that catches the attention of the viewer. What are these tools? They are many and varied, but there are three central processing techniques that can make your images transcend the average, and reach the potential you intended. They are Clarity, Sharpness, and Dehaze.

    These three tools are deceptively simple and subtle. When used properly, the enhancements they will make to your photos will be nearly imperceivable. They can take your image from good to great, with just a few simple clicks of the mouse. In this tutorial, I will show you how each one of these processing tools affect your photos, and how they can be put to best use, so that your photographs really stand out from the rest. Let’s get started!

    After CSD

    Clarity

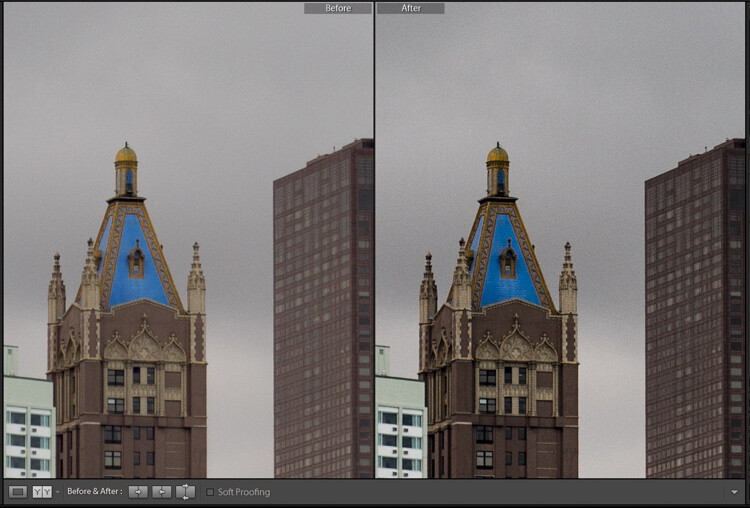
    The clarity slider has been around virtually since the inception of Lightroom. You can find it in the Basic panel of the Develop module. It functions to add definition and well, clarity, to your images. It accomplishes this by darkening the lines surrounding the perimeter of objects within your photo. Think of it as contrast on steroids. The clarity slider can really add a lot of punch to your photos, and add drama.

    Clarity

    Tips for Using the Clarity Slider

    • Don’t add too much. If you push the clarity slider too far to the right, you can begin to see unattractive halos around objects within the frame, resulting in a fake or unnatural looking photograph. If using it globally (applies to the entire image), do so judiciously. Be careful when applying the clarity slider to an entire image, most areas of your photo probably won’t need to be clarified.
    • It’s best to apply clarity after everything else. Since the clarity tool will add a good amount of contrast to your photo, it’s best to apply it towards the end of your workflow. While this is not always true, it is a good guideline to follow in order to avoid the need to backtrack.
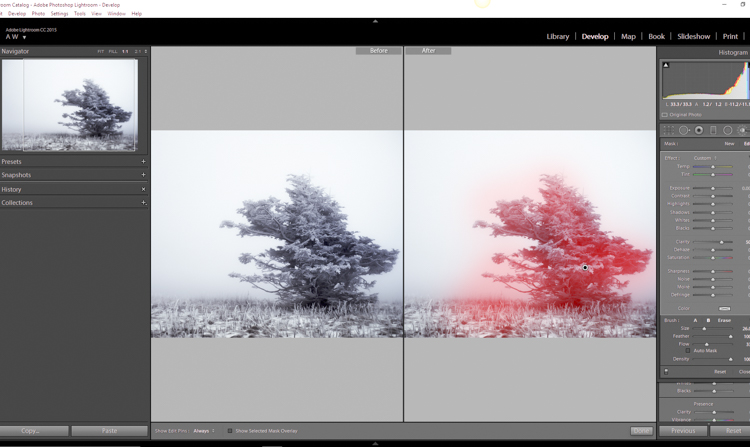
    • Use the Adjustment Brush or Graduated Filter tools to apply it to select areas of your image that need clarity. This will enable you to apply clarity only to foregrounds or backgrounds and to specific points you want to emphasize in the image.

    Clarity Adjustment

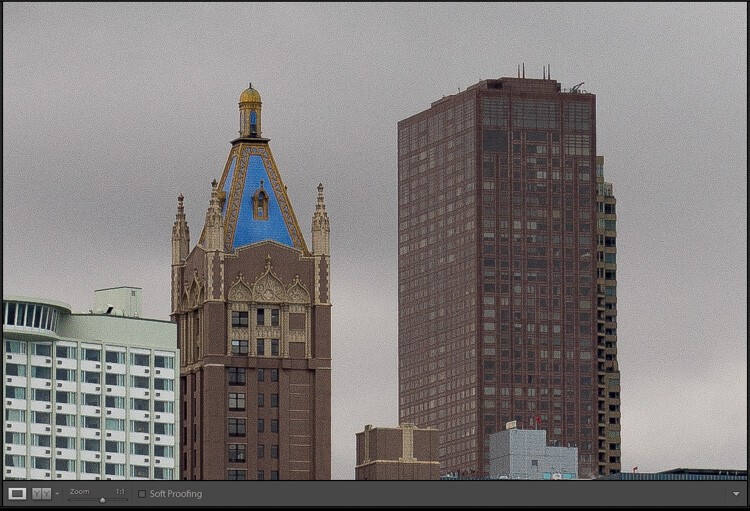
    Clarity applied, viewing at 1:1

    Clarity applied at +30, viewing at 1:1

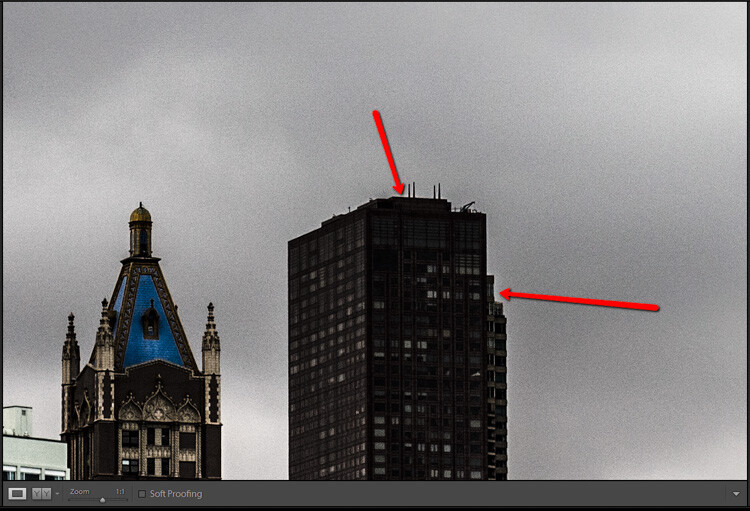
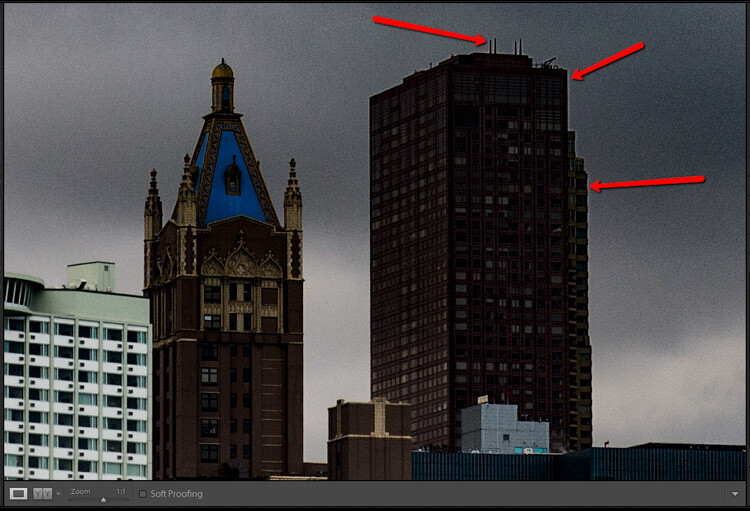
    Clarity slider taken too far, viewed at 1:1 (100%)

    Clarity slider taken too far, viewed at 1:1 (100%)

    Sharpness

    The art of sharpening an image can often make or break the composition. Sharpening is one of those awesome features of Lightroom which has been around from the beginning, and it only seems to be getting better with time.

    Sharpening

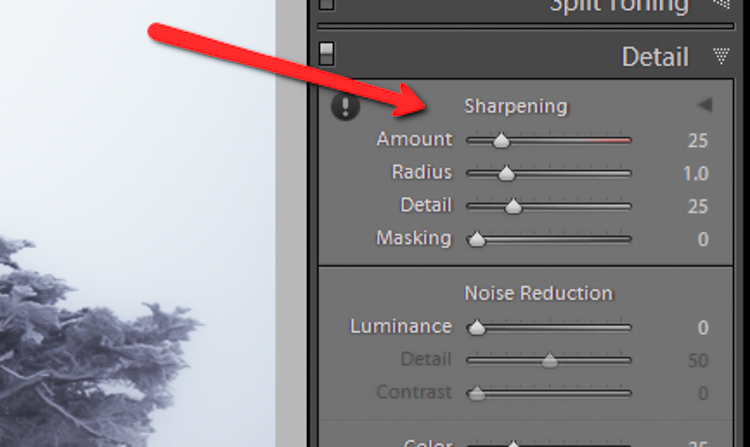
    The sharpening tool is located under the Details panel in the Develop module. Basically, sharpening is accomplished by adding contrast between pixels so that the area being sharpened appears to have more definition, compared to its surroundings. There are a few key tweaks that you can perform in order to get the most from the sharpening panel.

    Make use of the radius slider. The radius controls how many pixels around the perimeter of objects are affected by the sharpening. Think of this as the halo of sharpness. The greater the radius, the more apparent the sharpening will become. Don’t over do the details. You might think the more details you preserve in your sharpening, the better quality your image will be. This is not true. Usually, the farther you move the detail slider to the right, the more grainy and gaudy the image will be. Find a happy medium here and you will be happy in turn.

    Global sharpen at +50

    Global sharpen at +50

    Over sharpened

    Over sharpened – this is what too much sharpening looks like at 1:1

    Apply sharpening only to the areas you need to sharpen. It’s easy to simply sharpen an entire image instead of taking the time to selectively apply the edit. Rest assured though, if you apply your sharpening using the Adjustment Brush tool you will have a much more aesthetically pleasing result. Much like clarity, you usually do not need to sharpen the whole photograph.

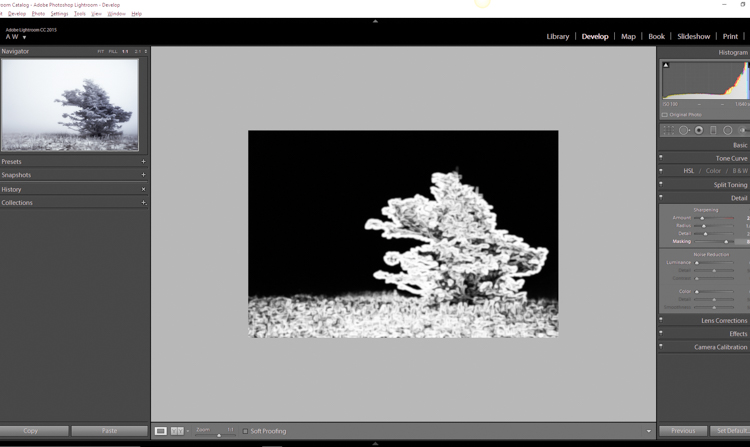
    Use the masking slider with the Alt key (Option key on Mac). The masking slider can be considered the most underrated asset in the sharpening panel. It dictates what areas will be sharpened. However, by itself the masking slider is rather lacklustre. This is where the Alt key comes into play. Hold down the Alt key while you adjust the masking slider.

    Sharpening Mask

    You will see that the image is transformed into a black and white relief image. The areas in white are where the sharpening will be applied; the areas in black will not be sharpened. This is a great way to fine tune your sharpening when adjusting globally. (Note: to keep people’s skin from becoming overly sharp and showing every pore and bump, move the masking slider until the skin areas are black and therefore unaffected by the sharpening adjustment)

    Dehaze

    This is a feature that was introduced very recently in Lightroom CC. It is a magical little function that people seem to either hate or love.

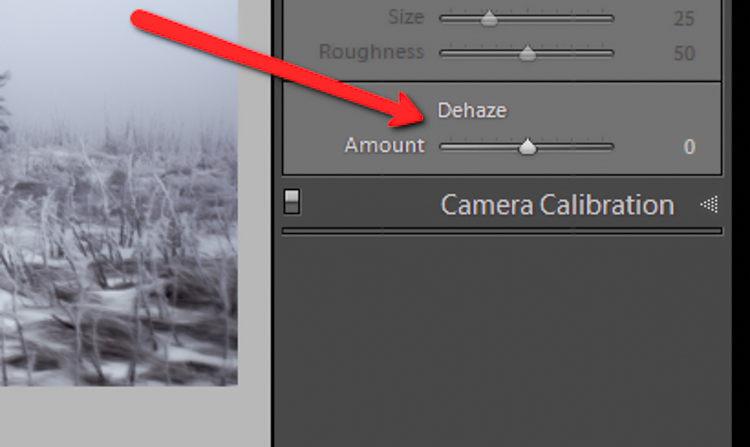
    Dehaze Slider

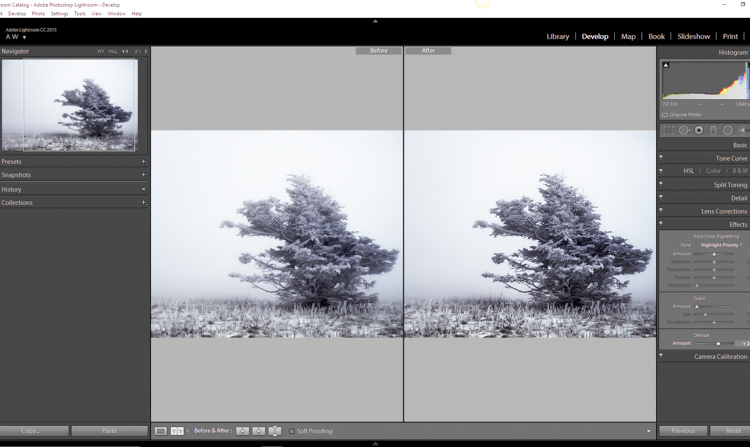
    I for one love this little guy. It’s located under the Effects panel. The explanation of how exactly it works is somewhat cryptic. Here is an answer pulled directly from Adobe Blog:

    The Dehaze technology is based on a physical model of how light is transmitted, and it tries to estimate light that is lost due to absorption and scattering through the atmosphere.

    Simply put, the dehaze slider can reduce haze within your images. It can also add a mystical fogginess as well if you choose (just slide it the other way).

    Dehaze

    Basically, it will make an otherwise hazy photo more clear. This comes in handy for photographs of the night sky when your want to make the stars more pronounced, or when you have to deal with physically dense atmospheric conditions.

    Tips for Using the Dehaze Slider

    • Keep an eye on your black points within the image. The dehaze slider can cause loss of shadow detail if you push it too far. Use the J key to show highlight and shadow clipping in order to preserve details.
    • Perform your white balance adjustments BEFORE you apply dehaze. The dehaze tool can do some incredible things for your photo, but it can also cause some funky color distortions if you adjust white balance after the fact. As always, strive to obtain optimal white balance before you ever begin to post-process an image.
    • Sometimes an image will benefit from added haze instead of dehazing. Experiment with adding a small amount of haze by moving the dehaze slider to the left. This can add an ethereal glow to some landscapes and even portraits.
    Dehaze +20 at 1:10 view

    Dehaze +20 at 1:10 view

    Dehaze pulled too far

    Dehaze pulled too far

    As with all post-processing, the less you have to adjust after the image has been made, the better off you will be. The tools in Lightroom are a fantastic way to bring out the true power of your photographs, if you use them deliberately, and with good judgment.

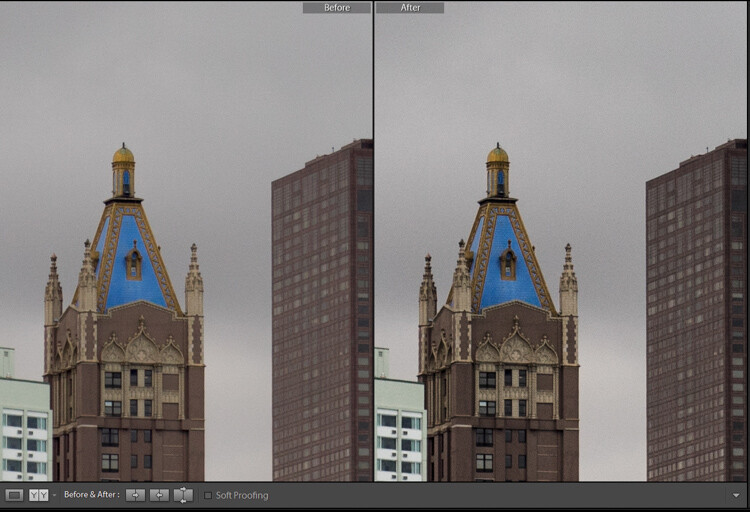
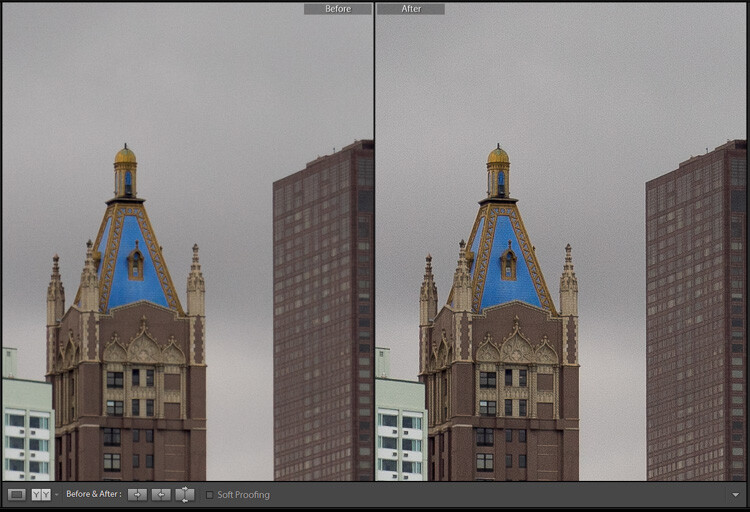
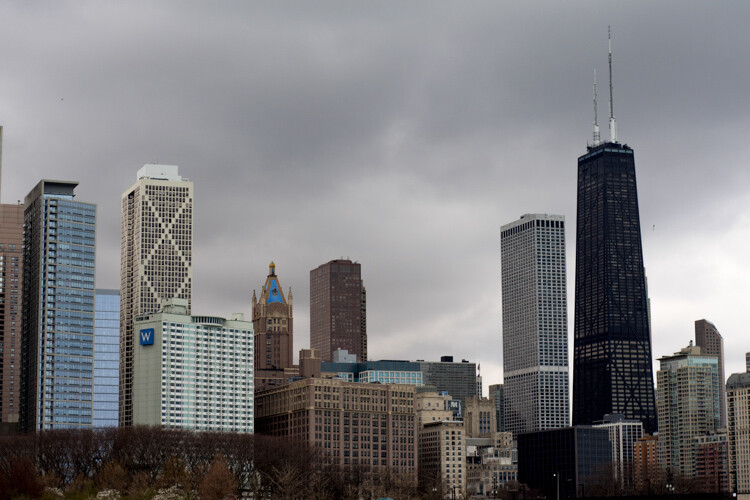
    Before clarity, sharpening and dehaze

    Before clarity, sharpening and dehaze

    After

    After

    After clarity, sharpening and dehaze were applied

    After clarity, sharpening and dehaze were applied

    Any adjustments you make to the clarity and sharpness of your photo should never make them appear unrealistic (with exceptions) or detract from your original vision. Even the dehaze tool should be used sparingly and only when required. Just as the saying goes that one brush stroke can ruin a painting, so too can one more click of the slider. The goal of post-processing is to enhance a photograph to the point of meeting your pre-visualzation. No more and no less. Experiment with the tips you’ve learned here and witness the hidden potential within your own photographs!

    googletag.cmd.push(function() {
    tablet_slots.push( googletag.defineSlot( “/1005424/_dPSv4_tab-all-article-bottom_(300×250)”, [300, 250], “pb-ad-78623” ).addService( googletag.pubads() ) ); } );

    googletag.cmd.push(function() {
    mobile_slots.push( googletag.defineSlot( “/1005424/_dPSv4_mob-all-article-bottom_(300×250)”, [300, 250], “pb-ad-78158” ).addService( googletag.pubads() ) ); } );

    The post How to Make Your Photos Shine Using Clarity, Sharpening, and Dehaze in Lightroom by Adam Welch appeared first on Digital Photography School.

    Digital Photography School

  • 5 Tips for More Professional-Looking Food Photography

    In an age where iPhones are shooting stellar images and high quality DSLRs are coming down in price, it’s becoming increasingly challenging for food photographers to make a living as professionals. As a food photographer in Seattle, I’ve noticed that many of my clients have become opinionated about what makes a good photo, and in many cases are shooting right next to me with their iPhones. I take it as a positive sign that clients, and most people with smartphones, are becoming more informed and educated about photography, but there is of course the notion that this could very soon make professional photography even more undervalued.

    So, what’s a professional food photographer to do? Here are some tips to help make sure you capture quality food photography images that attest to the value of paying you, a professional, to do the job.

    Tip #1: Don’t use natural lighting

    Food photography tips

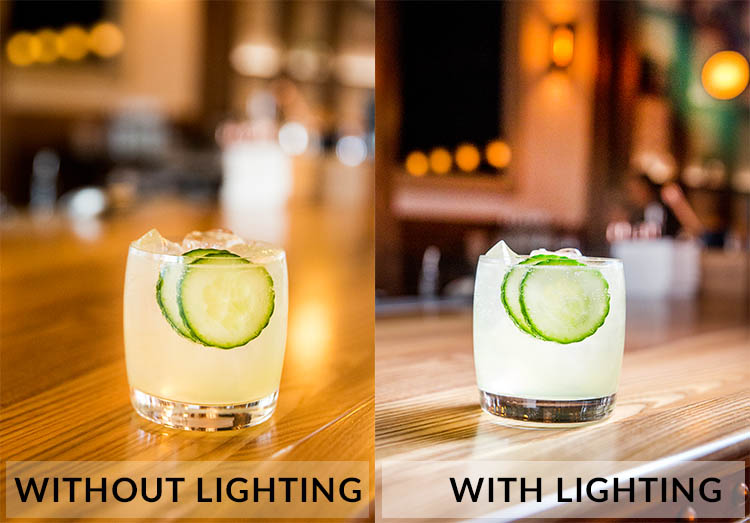
    Natural lighting is fantastic, and I still try to use it as often as possible. However, many of my clients have realized the value of using natural lighting and tend to shoot their iPhone photos in naturally lit areas. Taking into account the quality of iPhone photos these days, it’s not unusual that their cell phone photos look pretty darn good, even compared to my DSLR shots. To make sure your photos always look unquestionably better than those taken with a cell phone, use natural lighting less and do some experimenting with strobes and off-camera flash.

    Tip #2: Shoot in dark spaces

    Taking tip #1 into consideration, take full advantage of your professional-grade camera’s low lighting capabilities, and/or your strobe lighting knowledge, by shooting dishes of food in spaces where iPhones have a slim chance of performing well. This is also a good opportunity to incorporate some of the unique features of the restaurant’s interior spaces, into your main shot.

    Food photography tips

    Photographed in an extremely dark space, this photo wouldn’t have been possible without a DSLR and strobe.

    Tip #3: Use a macro lens

    While cell phone cameras are becoming equipped with better features with every new release, many still can’t shoot quality macro photos the way that DSLRs can. Use this fact to your advantage and make a macro lens your best friend when shooting food photos. Don’t be afraid to get up close and personal, and capture the details of the dishes you’re shooting. These photos may not be exactly what your clients have in mind, but at the very least it’s always a good thing to show them an alternative perspective that reminds them why they hired you.

    Food photography tips

    Tip #4: Be a creative director and/or food stylist

    Most amateurs approach food photos very statically, opting to shoot dishes from a seated position or overhead. Very few will get creative and incorporate people, props, or activity in their shots. This is your opportunity to shine as a food photographer. Move beyond standalone food photos and use your creativity to make a more dynamic shot. Ways to do this might be capturing action shots, adding a beverage or extra silverware in the shot, or even working with chefs to help them plate dishes in ways that will be photographically appealing. These skills are also part of the reason your client is hiring you, so don’t be afraid to exert your creative authority.

    Food photography tips

    Tip #5: Shoot tethered

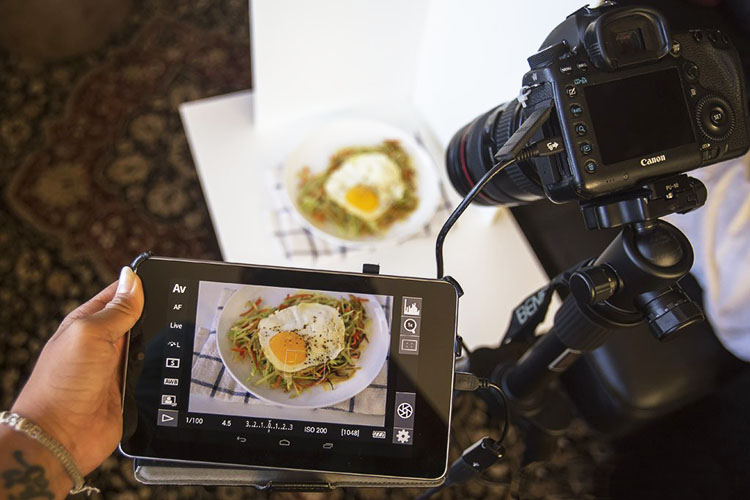
    A very simple, yet highly effective, way to come off as a polished, professional photographer is to shoot tethered. If you’re unfamiliar with tethered shooting, it is basically the act of connecting your camera to a computer or tablet, which allows your clients to see your shots on a screen just seconds after you’ve pressed the shutter. This might sound intimidating, but it’s a very simple way to make sure that you and your client are on the same page throughout the photo shoot. It also invites your client to actively participate in the shoot and give you feedback and their own ideas. Tethered shooting is very easy to do using a USB cord or even Wi-Fi technology if your camera has this capability. If you have the means to shoot tethered, definitely consider offering this service to your clients.

    Food photography tips

    Tip #6: Transmit photos via Wi-Fi

    If you have a client who is shooting alongside you with their iPhone, chances are it’s because they want access to photos for immediate posting on social media. Do yourself and your client a favor and offer to send them images on the spot using in-camera Wi-Fi, or do a few quick edits and transmit some shots directly from your computer if you’re shooting tethered. Depending on your agreement with your client, you could even charge a little extra for these services.

    Over to you

    Do you have other tips for offering more professional-looking food photography that outperforms iPhones and other amateur cameras? Let me know in the comments below!

    googletag.cmd.push(function() {
    tablet_slots.push( googletag.defineSlot( “/1005424/_dPSv4_tab-all-article-bottom_(300×250)”, [300, 250], “pb-ad-78623” ).addService( googletag.pubads() ) ); } );

    googletag.cmd.push(function() {
    mobile_slots.push( googletag.defineSlot( “/1005424/_dPSv4_mob-all-article-bottom_(300×250)”, [300, 250], “pb-ad-78158” ).addService( googletag.pubads() ) ); } );

    The post 5 Tips for More Professional-Looking Food Photography by Suzi Pratt appeared first on Digital Photography School.

    Digital Photography School

  • Weekly Photography Challenge – Urban Decay

    If you live in a city now is your chance to get out and hunt for some run down, dilapidated, crumbling buildings that say urban decay to you.

    Thomas Hawk

    By Thomas Hawk

    Weekly Photography Challenge – Urban Decay

    You can handle this challenge and subject however you wish to approach it. Shoot or convert to black and white, try some HDR, how about doing some light painting at night? The choice is yours. Go find a good subject, take a friend along too, and shoot away!

    NOTE: As always though – please put your safety and taking the proper precautions to ensure you aren’t trespassing on private property or endangering yourself or anyone else in the process of getting your photos. Safety and getting proper permissions come first!

    Pelle Sten

    By Pelle Sten

    Louis Du Mont

    By Louis du Mont

    Babak Fakhamzadeh

    By Babak Fakhamzadeh

    Toby Bradbury

    By Toby Bradbury

    Neal Wellons

    By Neal Wellons

    David Barnas

    By David Barnas

    Share your images below:

    Simply upload your shot into the comment field (look for the little camera icon in the Disqus comments section) and they’ll get embedded for us all to see or if you’d prefer upload them to your favourite photo sharing site and leave the link to them. Show me your best images in this week’s challenge. Sometimes it takes a while for an image to appear so be patient and try not to post the same image twice.

    Julian Lennon

    By Julian Lennon

    Freaktography

    By Freaktography

    David Barnas

    By David Barnas

    Darkday

    By darkday

    googletag.cmd.push(function() {
    tablet_slots.push( googletag.defineSlot( “/1005424/_dPSv4_tab-all-article-bottom_(300×250)”, [300, 250], “pb-ad-78623” ).addService( googletag.pubads() ) ); } );

    googletag.cmd.push(function() {
    mobile_slots.push( googletag.defineSlot( “/1005424/_dPSv4_mob-all-article-bottom_(300×250)”, [300, 250], “pb-ad-78158” ).addService( googletag.pubads() ) ); } );

    The post Weekly Photography Challenge – Urban Decay by Darlene Hildebrandt appeared first on Digital Photography School.

    Digital Photography School