Category: Photography

  • The Secret to Getting Tack Sharp Images for the Web

    Do your images end up looking soft when you resize them and export them for the web? When you resize an image, it loses some sharpness. With a 24 MP image measuring 6000 px you need to resize quite a lot to downsize it for optimal web use which is often around 800 px wide. That is why a set-once-and-forget Continue Reading

    The post The Secret to Getting Tack Sharp Images for the Web appeared first on Photodoto.


    Photodoto

  • Sony a6300 Mirrorless Camera – Thoughts and Field Test

    Sony has spent recent years charging full steam ahead into the full-frame mirrorless camera market. But they have also managed to satisfy the desires of APS-C shooters, mainly through their widely-popular a6000 mid-range mirrorless camera. In March 2016, just two years after the debut of the a6000, Sony released the a6300 with improved features, that still retain many of the characteristics of the older model.

    To be clear, Sony doesn’t intend for the a6300 to be a replacement for the a6000, meaning the older camera is still in production and can be purchased at a very attractive price point (around $ 549.00 for the body only).
    Sony a6300 Mirrorless Camera

    My Camera Background

    Before diving into this review, I want to clarify my digital camera experiences to make my perspective more apparent. The Sony a6300 is the very first mirrorless camera I’ve owned, besides my very brief experiment with the a6000 for comparison purposes. Until recently, I’ve shot almost exclusively with Canon DSLRs, namely the 5D Mark III and 6D. As a result, many of the a6300’s features such as its pop-out LCD screen and electronic viewfinder might seem like standard features to other mirrorless shooters, but for a Canon DSLR user like myself, these are newfound novelties that turned my world upside down. With that being said, let’s move on to the a6300’s specs.

    Key Features of the Sony a6300
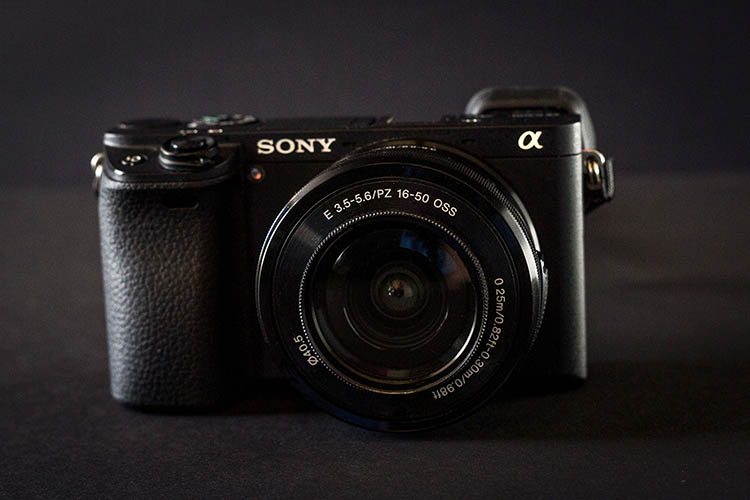
    Sony a6300 Mirrorless Camera

    The main improvement with the Sony a6300 is a newly developed sensor with a pixel count of 24MP (same as the a6000) that is packed with a whopping 425 phase-detection AF points, which is significantly higher than the a6000’s 179 AF points. According to Sony, the a6300 has the greatest number of phase-detection points to date, on an interchangeable-lens camera ,and makes the a6300 the camera with the world’s fastest autofocus.

    Video is another aspect that Sony upgraded on the a6300, with the inclusion of 4k video recording capabilities, the addition of a mic socket, and the ability to record time code. Besides the autofocus and video systems, the a6300 sees an OLED 2.36M-dot viewfinder, an improvement from the a6000’s OLED 1.44M-dot viewfinder. Battery life is also slightly improved at 400 shots versus 360 shots.

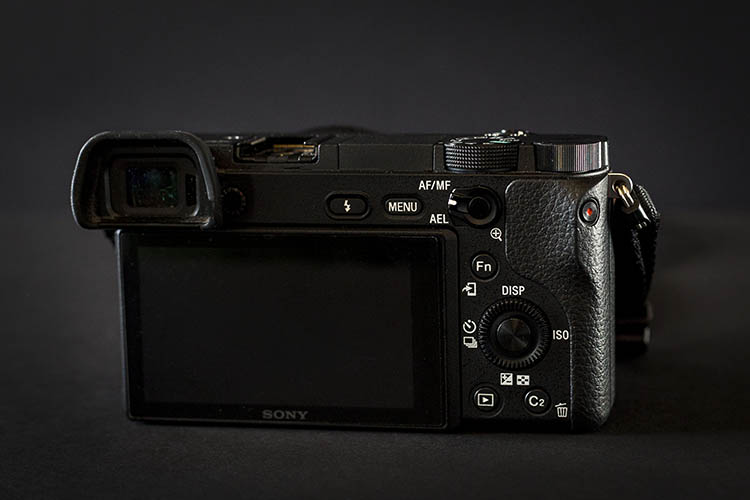
    Physically, the a6300 is only 2 ounces heavier than its predecessor, although it feels much more solid with its weather-sealed magnesium alloy build, that was lacking on the a6000. An AEL button with an AF/MF switch has also been conveniently added to the back of the camera, which sports and action shooters should find handy. Other than these few additions, the Sony a6300 doesn’t look or feel much different than the a6000.

    Overall, these added features of the a6300 clearly appeal to shooters looking to focus on action, sports, and video.
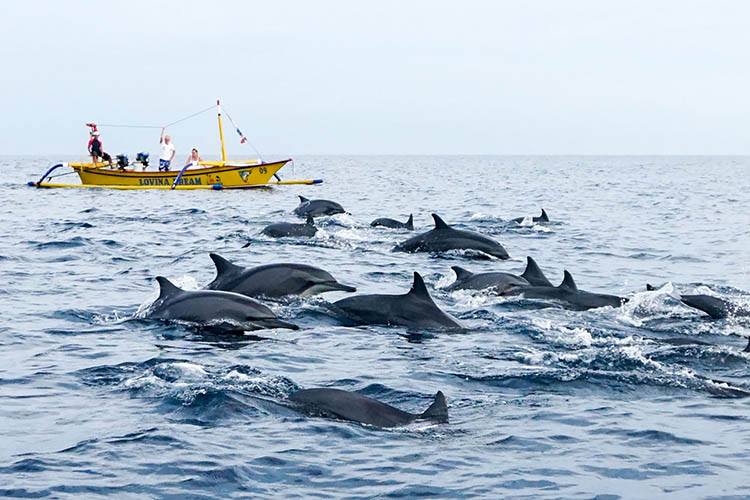
    Sony a6300 Mirrorless Camera

    Sample action shot with a Sony 16-50mm f/3.5-5.6 kit lens.

    Pros of the a6300

    While discussing the pros and cons of the a6300, it should be noted that many of the same features are also available on the a6000.

    Extremely compact

    As a DSLR shooter, the a6300’s compact size was particularly appealing. While testing the Sony a6300, I used both the kit 16-50mm f/3.5-5.6 retractable zoom lens, and the Sony 20mm f/2.0 pancake lens, and was amazed that both were incredibly lightweight and basically the same size. There is of course, the trade-off of both lenses being made of plastic and not feeling as robust as say a Fujifilm lens, but they both perform very well and weigh close to nothing. Pairing either lens with the a6300 makes for a very compact, low-profile camera system that is perfect for travel.

    Sony a6300 Mirrorless Camera

    An informal food photo taken at a restaurant table moments before consumption. Shot with a Sony 20mm f/2.8.

    Silent Shutter

    While many DSLRs offer a Silent Shutter that is still quite noisy, the a6300’s silent shutter feature makes the camera so quiet you wouldn’t even know a photo was being taken. It’s a great feature for undercover or candid photography moments when you truly want no sound associated with taking a photo. With that said, non-silent shooting on the a63000 produces a very crisp shutter snap, especially when firing away at the camera’s highest shutter speed of 11 frames per second.

    Panoramic shooting feature that actually works (most of the time)

    After consistently trying, and failing, to take advantage of panoramic shooting on a variety of devices from point and shoots to cell phone cameras, I was beginning to think that on-the-go panoramic shooting was a myth, until I tried it with the a6300. Unlike other devices, the a6300 will shoot and stitch together a near-perfect horizontal or vertical panorama even when your manual panning isn’t spot on. There were a few times when the camera insisted that I wasn’t panning straight enough to make a clear pano shot, but most of the time even my wobbly panning techniques were good enough for the a6300 to make sense of.
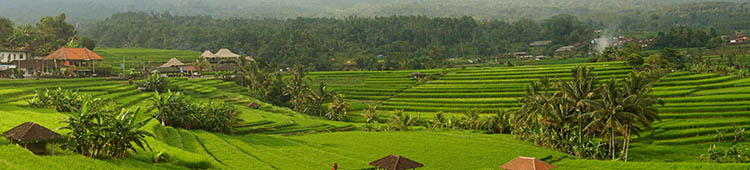
    Sony a6300 Mirrorless Camera

    Sample panorama shot with a Sony 16-50mm f/3.5-5.6 kit lens.

    Focus Modes + Face Recognition

    Easily two of the best features of the a6300 are the Face Registration and Eye AF (autofocus) features, which do pretty much what their names imply. Activating Face Registration allows you to program the a6300 to recognize and prioritize up to eight faces. This feature is incredibly handy when shooting a crowd of people, and the a6300’s accuracy of picking out the correct face is astounding. Eye AF works very similarly, but without the need to register (program them in) the eyes. Simply enable Eye AF on the a6300 and the camera will automatically search for your subject’s eyes and track them using continuous autofocus. This feature is so spot-on that the a6300 will even lock onto artistic renderings of eyes, such as a painted portrait.
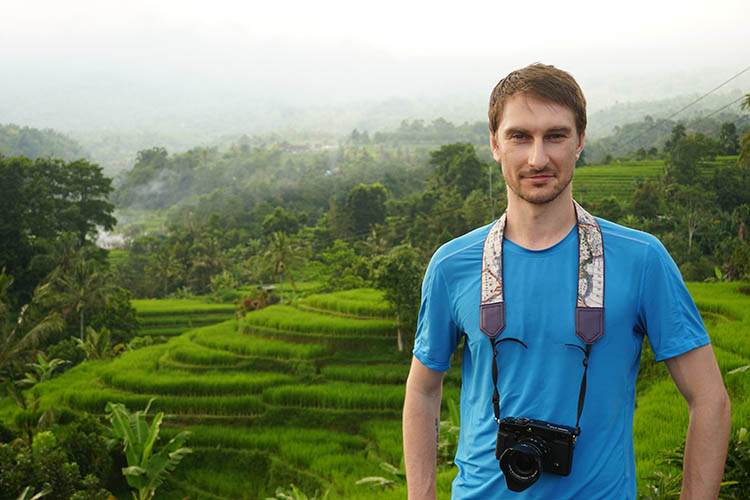
    Sony a6300 Mirrorless Camera

    Sample portrait shot with a Sony 20mm f/2.8 lens.

    Quick Wi-Fi connection

    Like most newer digital cameras today, the a6300 has Wi-Fi and NFC, to connect with smartphones and tablets for remote camera shooting, and wireless image transfer via Sony’s PlayMemories Mobile app. Setting up Wi-Fi on the camera is very quick and intuitive, and Sony’s accompanying app also includes an array of other options that can further enhance your shooting experience, such as time-lapse and multiple exposure apps, among many others.

    Built-in flexible flash
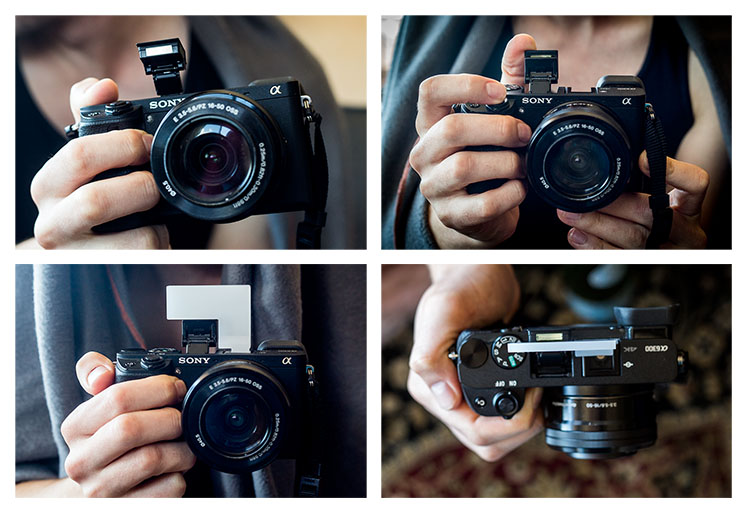
    Sony a6300 flash

    Thankfully, Sony kept one of the a6000’s best features on the a6300: a built-in pop-up flash. Extremely compact and flexible, the little flash can bend 45 degrees to tilt upwards, allowing for bouncing the flash off the ceiling.  Next to the pop-up flash is a hot shoe mount that can fire Canon or Nikon Speedlight flashes when used with an adapter.

    One accessory that can help fully utilize the pop-up flash are plastic bounce cards which attach to the a6300 via the hot-shoe mount, and hold the flash in an upright position.
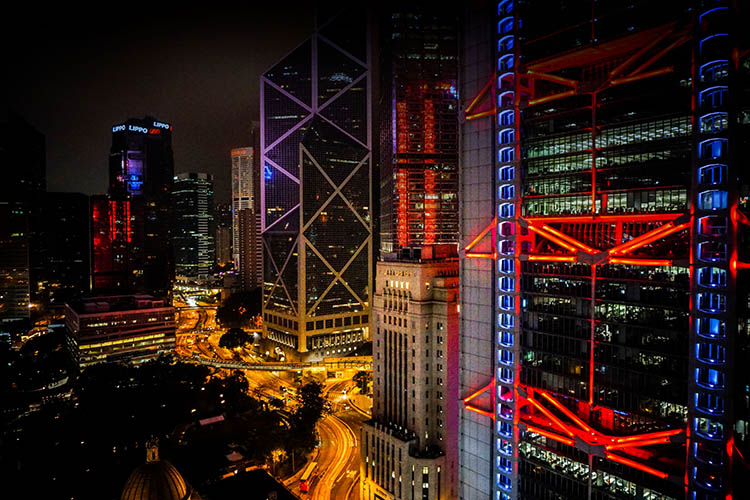
    Sony a6300 Mirrorless Camera

    Sample night shot with a Sony 20mm f/2.8 lens.

    Sony Lens Options

    Currently, there are over 70 Sony lenses that you can purchase to go along with your new a6300 body. Options range from compact, low-priced primes and larger, higher-priced zoom lenses. Cheaper prime options include the 16mm f/2.8, 20mm f/2.8, 28mm f/2, 30mm f/3.5 macro, 35mm f/1.8, and 50mm f/1.8, all ranging in price from $ 249.99-$ 449.99. Wide-range zoom lenses, without a fixed f-stop, are also somewhat affordable, such as the 18-200mm f/3.5-6.3 ($ 749.99) or the 24-240mm f/3.5-6.3 ($ 998.99)

    Sony 18-200mm f/3.5-6.3 ($ 749.99)

    However, Sony’s higher-quality lenses are much higher in price, which may be difficult to swallow if you’re converting from a DSLR kit. Larger, high-quality Sony primes such as the 24mm f/2 and 35mm f/1.4, prices are upwards of $ 1,200.00 and more. The same is true for Sony’s versions of traditional DSLR lenses such as the 16-35mm f/2.8 ($ 2,248.99), 24-70mm f/2.8 ($ 2,098.00), and 70-200mm f/2.8 ($ 2,999.99). If you’re a DSLR shooter with an array of lenses, you can always invest in a converter to use your DSLR lenses with your Sony camera body, but at the expense of slower autofocus.

    When you purchase either the Sony a6000 or a6300, you have the option of buying it body-only, or with a 16-55mm f/3.5-5.6 E-mount retractable zoom kit lens, which is valued at approximately $ 260.99 if purchased separately. For its size, range, and overall performance, the kit lens, plus a Sony prime lens, aren’t a bad starter combination, especially if you’re looking to keep your gear compact and lightweight, and aren’t quite ready to invest in higher-priced Sony E-mount lenses yet.

    ISO Performance

    Sony opted to improve the a6300’s high-ISO performance by including a native ISO range of 100-25,600 with the possibility of extending that ISO to 51,200. While the ability to shoot at higher ISO is great in theory, I found that ISO 6400 was the highest I could comfortably push the a6300 in darker environments, without sacrificing too much image quality. Even my RAW photos shot at ISO 6400 were a little too grainy for my taste, no matter how much noise-reduction I did in post-processing.
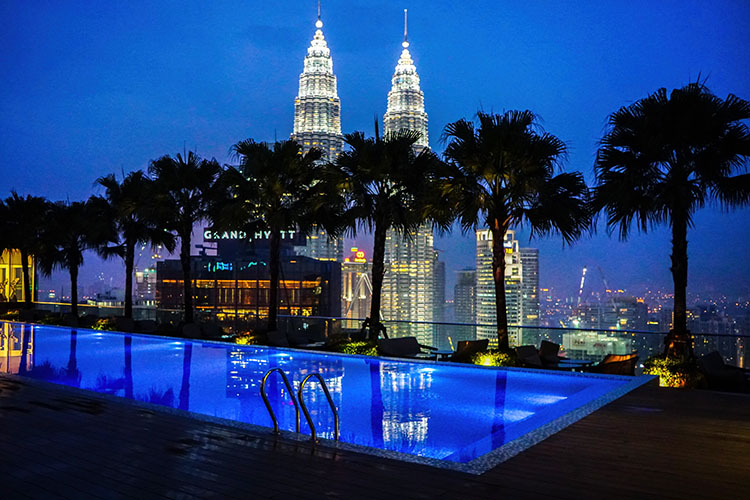
    Sony a6300 high ISO2

    Cons of the a6300

    Sony’s bloated camera menu

    A common complaint among Sony shooters, that I have to agree with, is that the camera menu is very difficult to navigate. It truly seems like Sony outfitted the a6300 with so many features, and tried to stuff them all into a menu, that it can take weeks for new Sony shooters to get used to using the camera.

    This could be easily solved if Sony allowed users to customize the menu a bit more, so that frequently-used features can be quickly accessed. As it stands, Sony only allows assigning custom functions to the camera’s physical buttons, and there aren’t nearly enough of those.

    With that being said, the trick to making sense of Sony’s menus is to customize as much of the camera’s settings as possible. Presently, I’ve customized the buttons and settings on the a6300 set to shoot almost identically to the way I shoot with my Canon 5D Mark III, making it easier to switch from one system to another.
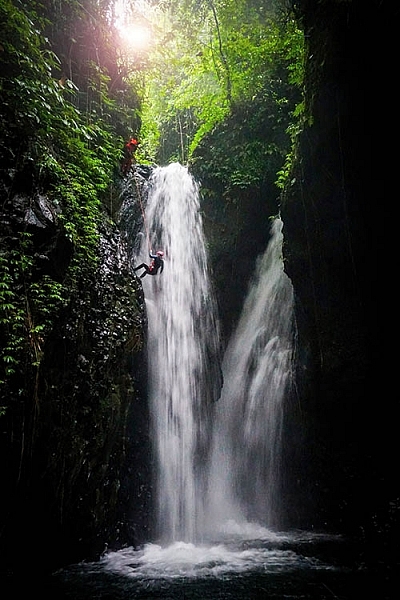
    Sony a6300 Mirrorless Camera

    Sample action shot with a Sony 16-50mm f/3.5-5.6 kit lens.

    LCD screen sometimes blanks out

    When it comes to the a6300’s LCD screen, I was grateful for its pop-out rotating feature, something that has been sorely lacking on Canon DSLRs. Some other reviewers complained about the a6300 lacking a touch screen LCD, but again, this is something I’ve never had on a camera, so the fact that it’s missing doesn’t bother me.

    One feature of the a6300’s LCD that was troublesome, was its occasional blackouts, which usually occurred right after rotating the screen. Oftentimes, the only way to get the LCD working again was to turn the camera off and on. With that said, using the electronic viewfinder (EVF) always worked without fail, even when the LCD blanked out.

    Over to you

    Do you already shoot with the Sony a6300, or are you considering making the move? What do you love about it, or what hesitations remain? Let me know your thoughts in the comments below.

    googletag.cmd.push(function() {
    tablet_slots.push( googletag.defineSlot( “/1005424/_dPSv4_tab-all-article-bottom_(300×250)”, [300, 250], “pb-ad-78623” ).addService( googletag.pubads() ) ); } );

    googletag.cmd.push(function() {
    mobile_slots.push( googletag.defineSlot( “/1005424/_dPSv4_mob-all-article-bottom_(300×250)”, [300, 250], “pb-ad-78158” ).addService( googletag.pubads() ) ); } );

    The post Sony a6300 Mirrorless Camera – Thoughts and Field Test by Suzi Pratt appeared first on Digital Photography School.


    Digital Photography School

  • Tokina AT-X 11-16 Pro DX II Review: Best Value from Wide Angle

    Tokina 11-16mm f2.8 is an ultra wide angle lens for crop sensor camera bodies (DX) with a moderately fast constant aperture of f2.8. It is Tokina’s top of the line lens (AT-X) with an internal focusing (IF) and Super-low Dispersion glass (SD). It is available in Canon, Nikon and Sony A mounts. Due to its focal length and fast aperture, Continue Reading

    The post Tokina AT-X 11-16 Pro DX II Review: Best Value from Wide Angle appeared first on Photodoto.


    Photodoto

  • How to Use Bracketing to get Your Best Shot – 3 Different Methods

    One of the most difficult and frustrating parts about shooting with film, back before the days of digital photography, was the limited amount of attempts you had to get the photo you wanted. I remember carrying around spare rolls of film in a fanny (waist) pack on a trip to Walt Disney World years ago, and carefully considering each photo, lest I get one setting wrong and blow the entire shot.

    How to use bracketing3 Different methods(1)

    Back then you had to wait days, or even weeks, to get your pictures back from a processing lab, and if a picture was too dark, grainy, or out of focus there was nothing you could do about it at that point. Fortunately, digital cameras are far more forgiving than their film-based counterparts, and have many systems in place to make sure you do get the shot you want. But even then, sometimes things still don’t quite work out.

    Thanks to a technique called bracketing, you can use the power of your camera, combined with the space available on most memory cards, to make sure you always end up with just the right photo every time.

    What is Bracketing?

    bracketing-typewriter

    There’s a classic children’s tale called Goldilocks and the Three Bears, in which a young girl enters the home of the bears and helps herself to their food, furniture, and futons. With each set of items there are three options: two that don’t quite work out and one that is, as the story goes, just right. While the story could be seen as a cautionary tale about the dangers of sneaking into the home of wild animals, and sleeping in their beds uninvited, its lessons can also be applied to photography.

    Essentially, Goldilocks demonstrates the concept of bracketing, by giving herself many options so she can make sure to have at least one that is precisely what she is looking for. In photography there are various types of bracketing, but all involve taking multiple photos, so as to ensure you have at least one good picture. Bracketing can also be used to combine different elements of various photos together to get the best of all versions. The three most common versions of bracketing involve exposure, focus, and white balance.

    If you have ever struggled to get just the right shot, or want to learn a new technique to improve your photography, this might be just the thing you’ve been looking for.

    Exposure Bracketing

    Modern digital cameras are pretty good when it comes to evaluating a scene, and giving you just the right exposure. You can even use different metering modes where your camera looks at either the whole scene, just the center, or even a specific part of the photo like the highlights or some faces. If you know precisely how to control your camera to get the shot you want, you can use these various metering modes, in tandem with your camera’s built-in light meter, to get just the right exposure.

    However sometimes it pays to take a few extra pictures to make sure you, like Goldilocks, get an image that is just right. This is where exposure bracketing comes in handy since you can take several additional photos, some underexposed and some overexposed, to make sure you go home with the perfect picture.

    bracketing-exposure-tree

    There are several ways to go about using the bracketing technique, and one of the most simple is to put your camera in Program Mode and use your camera’s exposure compensation function.

    First, take a picture that appears to be properly exposed. Then use the exposure compensation option to intentionally underexpose your image by one or two stops (-1 or -2). More than two stops is generally unnecessary. You are of course free to do so, but it’s quite rare that your camera’s meter would be off so much as to require more than two stops of exposure compensation to get the picture you want.

    Then use exposure compensation to intentionally overexpose your image by one or two stops (+1 or +2), and in the end you will have at least three photos from which to choose: one that your camera thinks is properly exposed, one that is underexposed, and one that is overexposed. This may seem kind of redundant, but it’s a nice insurance policy to make sure you get just the right photo you want. It works especially well if you are shooting landscapes, or other outdoor scenery, as the bright sunlight coming from overhead can sometimes cause your camera to meter a scene improperly, even if you think you have everything set up just right.

    Bracketing for HDR

    Another benefit of using exposure bracketing, is that it lets you create stunning works of art using a technique known as HDR, or High Dynamic Range. This requires the use of exposure bracketing, a tripod, and often some special software like Photoshop, Lightroom, or Aurora HDR Pro, to combine several photos into one.

    To get started with HDR you need at least three images, bracketed in full stops of exposure. Take one image properly exposed, then underexpose by one or two stops, and then overexpose by one or two stops. Some cameras do this bracketing automatically with a built-in bracketing function (AEB) but I often find that I like to control the exposures manually with exposure compensation, or by using manual mode. You can use more than that, but if you are just starting out three bracketed photos should be sufficient.

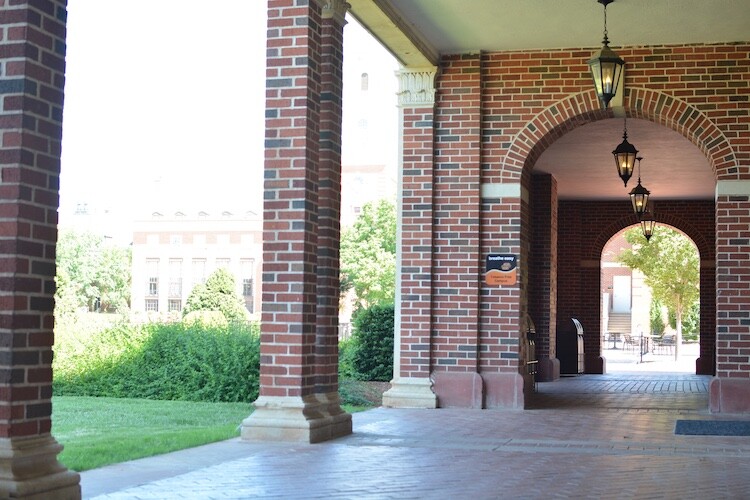
    Once you have your bracketed photos, load them into the software of your choice, and you can instruct it to combine them into a single photo that takes the best parts of all the images and creates a single frame-worthy masterpiece. To see this in action, first look at the following image, which despite having a fairly even exposure overall, still suffers in a few areas.

    This is an un-retouched JPEG image straight from my camera. The overall exposure is good but the sky is bright white and the hallway is a bit too dark.

    This is an un-retouched JPEG image straight from my camera. The overall exposure is good, but the sky is bright white and the hallway is a bit too dark.

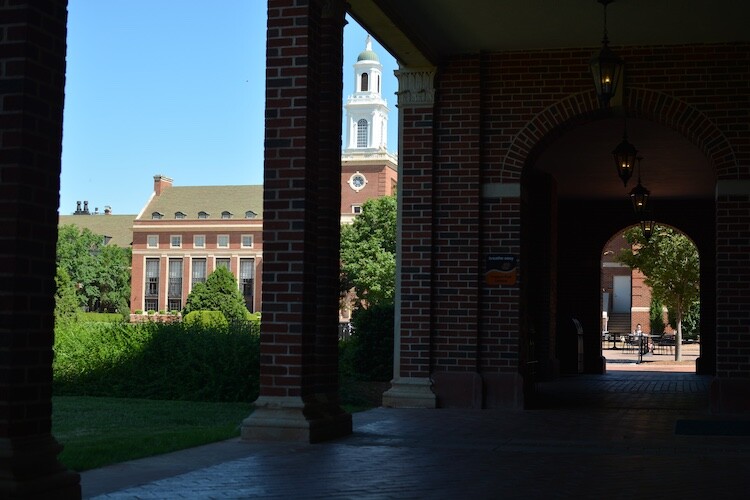
    I used exposure compensation to overexpose the image by two stops, which lost almost everything in the sky, but brought out much more detail and color in the darker areas of the hallway.

    The same image, over-exposed by two stops.

    The same scene, overexposed by two stops.

    Then I took a third image, this time underexposing by two stops, which made the dark parts really dark, but brought out much more color in the sky.

    This image was intentionally under-exposed by two stops.

    This image was intentionally underexposed by two stops.

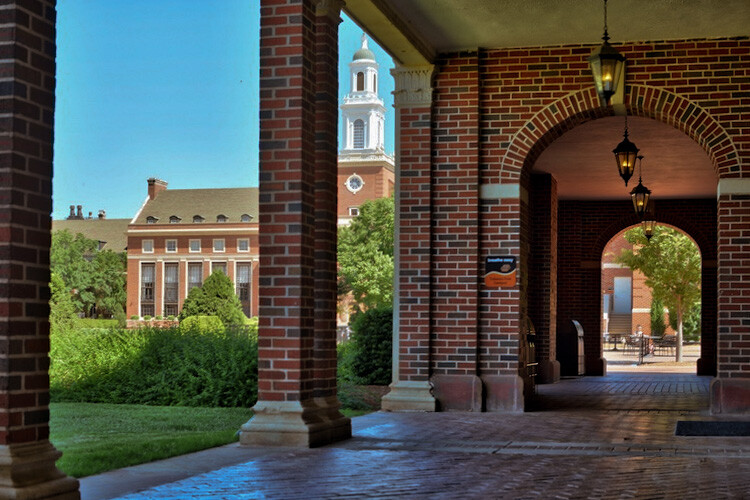
    Finally, I used Aurora HDR Pro to combine all three bracketed JPEG images into one that contains the best of all worlds. This shows how useful bracketing can be, and might give you some ideas for how to use it in your own photography.

    This final image was made using Aurora HDR Pro to combine all three bracketed shots into one, and final edits in LR including correcting the tilting building.

    This final image was made using Aurora HDR Pro to combine all three bracketed shots into one, and final edits in LR including correcting the tilting building.

    In recent years the image sensors on many cameras have gotten so good, that the use of exposure bracketing is not as critical as it was in days gone by. If you shoot in RAW instead of JPG, a single image will often contain so much information in the highlights and shadows, which you can recover using Lightroom or Photoshop, that you simply don’t need to take separate images and combine them later. One major disadvantage of this is the file sizes, which on some RAW formats can be anywhere from two to 10 times as large as a JPG file. At the end of the day though, exposure bracketing is still a valuable technique that many photographers rely on to get just the right result, and you might enjoy trying it out to see if it works for you.

    Focus Bracketing

    Another way to apply the bracketing technique is to take several images that are focused at various distances, which is especially critical when doing close-up photos or taking macro shots. On most cameras the autofocus generally works great to make sure things are crystal clear and tack sharp. But, when using very shallow depth of field, or focusing on objects that are extremely close, it’s not always going to produce the most reliable results.

    Often when doing this type of photography you will end up with pictures that are just slightly out of focus in one direction or another, either in front of the subject or behind it, and there is no way to fix that in Photoshop, or any other image editor.

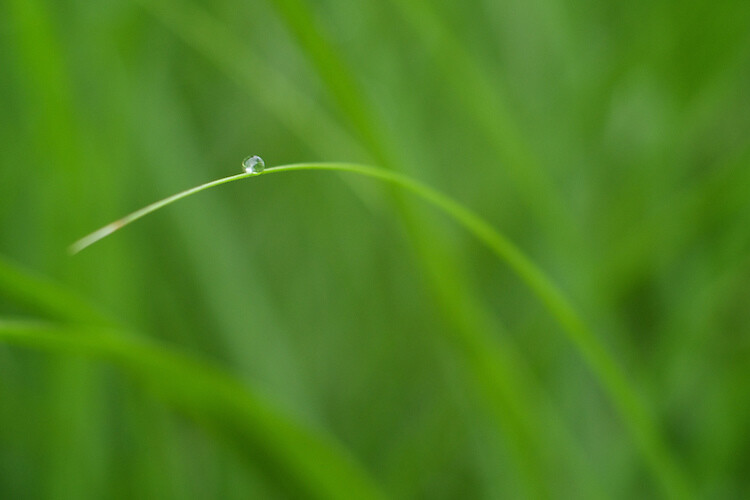
    I made this image by slowly adjusting the focus on my lens while I took several shots. Only one had the single strand sharp and in focus, but that one picture was all I needed.

    I made this image by slowly adjusting the focus on my lens while I took several shots. Only one had the single strand sharp and in focus, but that one picture was all I needed.

    The solution to this problem is to take not one picture, but several, and use manual focus instead of automatic. I start by intentionally focusing not on the subject but slightly behind it, then I slowly turn the focusing ring on my lens as I take several images in a row. I know it can be a bit intimidating to shoot using manual focus, but once you try using this technique, you will probably start to see how useful it can be.

    When you have your set of images loaded in Lightroom, or another image editor, you can then pick out the exact one you want, instead of hoping you got one in focus while relying on your camera’s built-in autofocusing algorithm. If you want to get into an even more advanced technique with focus bracketing, you can actually combine all your photos into one super-sharp image using a technique called focus stacking. But if that seems like a bit much for you, it’s still worth your time to try regular focus bracketing, just to make sure your close-up subjects are tack sharp.

    Nailing focus on the water drop was almost impossible, so I took several images while focusing manually to make absolutely sure I got at least one good image.

    Nailing focus on the water drop was almost impossible. So I took several images while focusing manually, to make absolutely sure I got at least one good image.

    White Balance Bracketing

    The final technique I want to discuss here is similar to the other two types of bracketing in that it also involves taking several photos of the same scene, while adjusting a single parameter. In this case it’s the white balance, instead of the exposure or focus. Most casual photographers use the Automatic White Balance setting on their cameras, which does a pretty good job most of the time. But every now and then it can leave an image with an ugly green or red tint, or all pale and washed out, because of improper white balance.

    The lighting conditions here wreaked havoc with my camera's Auto white balance, so I took five separate exposures and manually adjusted the white balance each time in order to make sure I got one good shot.

    The lighting conditions here wreaked havoc with my camera’s Auto white balance. So, I took five separate exposures, and manually adjusted the white balance each time, in order to make sure I got one good shot.

    White balance bracketing can be very useful if you shoot JPG, because your camera’s Auto white balance setting is not always as reliable as you want it to be. However, if you shoot RAW you have complete freedom to alter white balance as much as you want using a program like Lightroom, Photoshop, or almost any other image editor. Because the RAW format does not discard any photo data like JPG does, white balance bracketing is not needed when you are shooting. That gives you far more flexibility for fine-tuning things like white balance, as long as you are willing to take the time to do it.

    Do you find bracketing to be useful in your own photography? When have any of these techniques been especially useful to you? Share your thoughts, and any pictures as well, in the comments below.

    googletag.cmd.push(function() {
    tablet_slots.push( googletag.defineSlot( “/1005424/_dPSv4_tab-all-article-bottom_(300×250)”, [300, 250], “pb-ad-78623” ).addService( googletag.pubads() ) ); } );

    googletag.cmd.push(function() {
    mobile_slots.push( googletag.defineSlot( “/1005424/_dPSv4_mob-all-article-bottom_(300×250)”, [300, 250], “pb-ad-78158” ).addService( googletag.pubads() ) ); } );

    The post How to Use Bracketing to get Your Best Shot – 3 Different Methods by Simon Ringsmuth appeared first on Digital Photography School.


    Digital Photography School
  • 7 Last Minute Father’s Day Gifts for Photographers

    Father’s Day is just round the corner. If these words made your heart leap in panic, no worries. We have 7 surefire gift ideas for a photography-addicted Dad in your life. Whether it’s a pro photographer or a budding enthusiast you need to greet, there’s a great gift for every kind of photo buff on this list. And the best Continue Reading

    The post 7 Last Minute Father’s Day Gifts for Photographers appeared first on Photodoto.


    Photodoto

  • 10 Pro Tips to Design a Killer Mood Board to Present Your Work

    When you’re working on a design or photography project for a client, a mood board can be one of the best ways to get your vision across. A mood board is essentially a collage of things that inspired you for this particular project. They can help you really nail down the look and feel of your work, and make sure Continue Reading

    The post 10 Pro Tips to Design a Killer Mood Board to Present Your Work appeared first on Photodoto.


    Photodoto

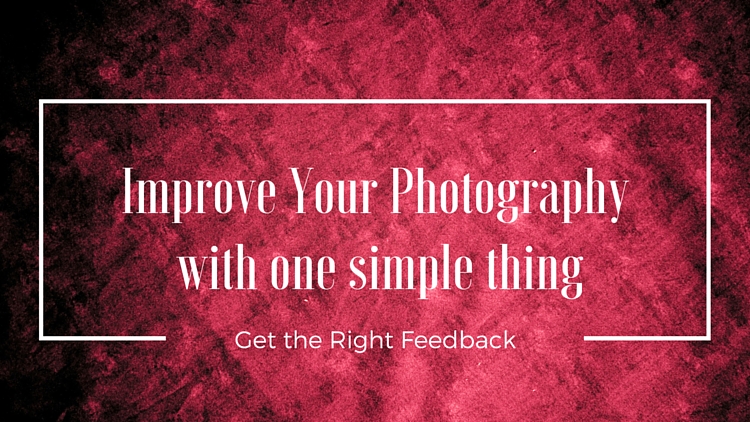
  • Improve Your Photography by Getting the Right Feedback on Your Images

    Have you ever felt that your photography isn’t improving as much as it once was? Do you feel that the level of your work is stagnating and not progressing much more?

    Improve Your Photography

    Yet you keep reading article after article, either on the web or in magazines. You hope that one of them will provide the next breakthrough for your work and help you rip through the barrier that will bring your photography to the next level. You show off your work to friends and family, and you hear the resounding praises of, “That’s a beautiful photograph” or, “You nailed it”, or any other form of overly positive, loving feedback. The people that you show your work to love it, but you feel that it’s just becoming a little boring, and the next image isn’t really any different from the last.

    Justin

    By Justin

    Do this one thing to improve your photography

    If this sounds like you, don’t panic; you’re very likely not alone! Even better, there is a very simple remedy for this. This remedy will not only help you now, but also continue to help you well into the future, and at all stages of your photographic journey. You won’t need to read anything extra for it, nor will you have to buy any equipment. To break through this barrier you need to do one thing: be more selective with the feedback you listen to.

    The trouble with feedback from people like friends and family is that, unless they are photographers themselves, they won’t tell you want you need to hear. Rather, they will tell you what you want to hear – which is generally positive reinforcements – however, when you come to think of it, no one really wants to hear that their latest photo is rubbish!

    But it’s this honest, yet brutal truth, that will ultimately help you take better photos. Sure, I’ll be the first to admit that it wasn’t the best feeling in the world when I was once told a collection of my photos weren’t that great. To make things worse, this came from a photographer whom I greatly admired and respected. It shook me up a little. It made me feel a little inadequate. It made me question if this was indeed the career for me, and if I actually had what it took to succeed.

    Arileu

    By arileu

    But I needed to hear it. I needed to know what my work was actually like. Being continually told that my work was great and amazing wasn’t really helping with anything other than inflating my ego. I needed to hear exactly how a seasoned photographer viewed my work, and I needed to hear it honestly and clearly. This feedback set me on the direction that I needed to take to improve my game, and because it wasn’t sugar coated, I had no ambiguity about any of the feedback I had received.

    Finding good feedback

    This kind of feedback is not something that you will get from friends and family. You have to go out there and find a third party. A person that not only has no emotional connection with you, but also who knows one or two things about photography. By removing the emotional connection, you open the door for truth and honesty.

    Quinn Dombrowski

    By Quinn Dombrowski

    How it’s delivered, however, is a variable you cannot control. This means you also need to bring something to the table; a thick skin. Some photographers, just like doctors, are fantastic at delivering bad news in a nice subtle, even positive, way. Others will tell you how it is, warts and all, without the sugar coatings. But where do you find this third party?

    There are many avenues you can take to find the right third party for getting feedback on your work. Social media, such as Instagram and Facebook, can be great. Facebook in particular has many useful groups where you can seek feedback and critique on your work. But if keeping it in person and face-to-face is more your thing, looking around at camera clubs is another option. The feedback you get at camera clubs may not always be accurate, but it is a useful tool to network with other photographers.

    S3aphotography

    By s3aphotography

    Just keep in mind exactly who your third party will be. You ideally would like your mentor to be involved in the genres you’re most interested in – there’s no point showing a wedding photographer, for example, a body of sport or landscape images. Also keep an open mind to having multiple people. This will help you smooth out any personal preferences each photographer may have, and find a more common denominator to look out for.

    Being more selective with who you seek for feedback will help improve your photography immeasurably. It won’t always be easy to hear your work being torn apart, but if you keep at it and keep your chin up, you will come out the other side a stronger photographer and perhaps even a stronger person.

    googletag.cmd.push(function() {
    tablet_slots.push( googletag.defineSlot( “/1005424/_dPSv4_tab-all-article-bottom_(300×250)”, [300, 250], “pb-ad-78623” ).addService( googletag.pubads() ) ); } );

    googletag.cmd.push(function() {
    mobile_slots.push( googletag.defineSlot( “/1005424/_dPSv4_mob-all-article-bottom_(300×250)”, [300, 250], “pb-ad-78158” ).addService( googletag.pubads() ) ); } );

    The post Improve Your Photography by Getting the Right Feedback on Your Images by Daniel Smith appeared first on Digital Photography School.


    Digital Photography School

  • Enter to Win one of 10 Copies of Corel’s AfterShot Pro 3 Photo Editor

    Win one of 10 Copies of AfterShot™ Pro 3 Photo Editor from Corel!

    Enter the After Photography Contest Today!

    After dark, after thought, after noon, after work, after school, after life, after all…

    You pick your after theme and have fun with it.

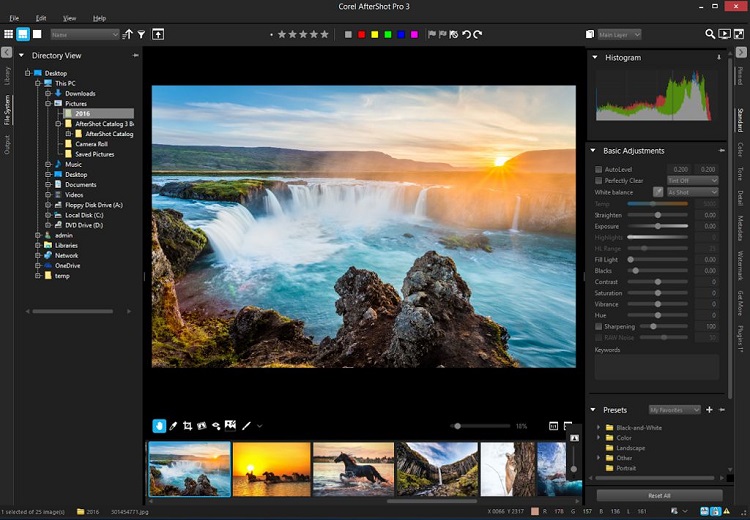
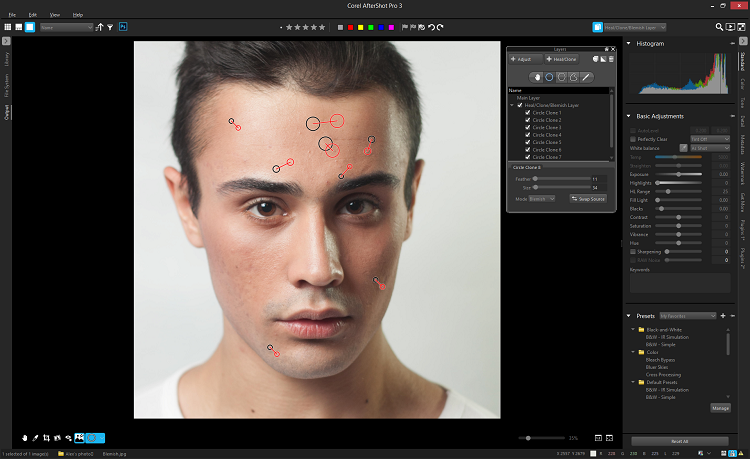
    ASP 3 workspace

    Over the last few years here at dPS, we’ve run very some very popular contests with our partners, to give away some of their great photographic products to lucky dPS readers. We are lucky enough to be able to do it again now.

    For this competition, Corel is giving away TEN copies of AfterShot™ Pro 3 Photo Editor!

    These prizes are designed to help every level of photographer create BETTER pictures. Since 1989, with the introduction of CorelDRAW, Corel boasts a range of award-winning products that includes graphics, painting, photo, video, and office software with a community of over 100 million strong. Each copy of AfterShot Pro 3 will be won by a different dPS reader.

    ASP3 box front

    Our 10 prize winners will receive the full version of Corel’s leading RAW Photo Editor – A $ 79.99 Value

    Corel® AfterShot™ Pro 3 is up to four times faster than Adobe® Lightroom (claim based on a batch export workflow, using Lightroom CC 2015.5.). It’s the photo editor that helps you reveal your true creative potential. With AfterShot™ Pro 3 there are no subscriptions, and no longer a need to spend hours editing at your computer. You can import, process, output faster, and get back to taking photographs. Take a look at a few of the new, improved and classic features:

    • Faster workflow
    • Simple photo management
    • New comprehensive watermarking
    • Enhanced highlight recovery
    • New blemish remover tools
    • New image preset library
    • Powerful batch processing

    Adobe®, Lightroom® and Photoshop® are either registered trademarks or trademarks of Adobe Systems Incorporated in the United States and/or other countries.

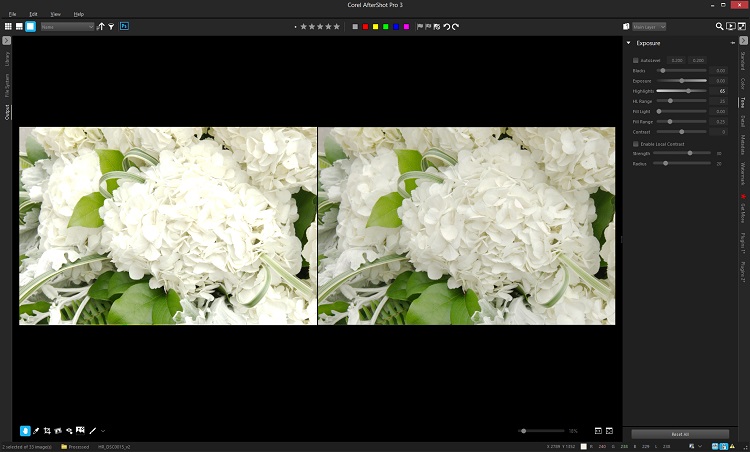
    ASP 3 Highlight Recovery

    New Blemish Remover

    Learn a little more about AfterShot Pro 3 HERE:

    ASP3 Logo

    How to win

    To win this contest you’ll need to:

    • Edit your favorite ‘After’ photo. To make it even better, download a free trial of AfterShot Pro 3 HERE
    • Post your After photo, along with a few words on how you feel AfterShot Pro 3 would help your photography in the comments section below, and of course, your After themed image. It’s as easy as that!
    • Do this in the next 21 days and on August 5, 2016, the team at Corel will choose the 10 best photos and comments, and we will announce the winners in the following days.
    • Deadline Is July 19, 2016, at 11:59pm PDT. Photos and comments left after deadline will not be considered.

    By best – we’re looking for people who have an understanding of photography post-processing, and how AfterShot Pro 3 may best suit your needs. So you’ll need to check out the product page to put yourself in the best position to win. Don’t forget to grab a free trial download.

    There’s no need to write essay length comments to win – but we’re looking to hear what you like about the software, and how it would help your development as a photographer. Don’t forget to include your favorite After themed photo. We encourage you to have fun and be creative!

    This competition is open to everyone, no matter where you live – but there is only one entry per person. To enter – simply leave your photo and comment below.

    ASP3 Logo

    Disclaimer: Corel is a paid partner of dPS.

    By entering the After photo contest, the Entrant is providing permission to Corel to publish their photo, if it is chosen as a winner, to be utilized within media post(s) by Corel announcing the winners and promoting. Entrants will be provided a full photo credit if photo is used, and will retain their copyright – Please click HERE or full contest rules, terms and conditions.

    googletag.cmd.push(function() {
    tablet_slots.push( googletag.defineSlot( “/1005424/_dPSv4_tab-all-article-bottom_(300×250)”, [300, 250], “pb-ad-78623” ).addService( googletag.pubads() ) ); } );

    googletag.cmd.push(function() {
    mobile_slots.push( googletag.defineSlot( “/1005424/_dPSv4_mob-all-article-bottom_(300×250)”, [300, 250], “pb-ad-78158” ).addService( googletag.pubads() ) ); } );

    The post Enter to Win one of 10 Copies of Corel’s AfterShot Pro 3 Photo Editor by Darlene Hildebrandt appeared first on Digital Photography School.


    Digital Photography School
  • 10 Quick Photoshop Tips to Improve Your Workflow

    Whether you are a Photoshop newbie or a guru, there is always something new to learn or discover in this extensive image editing software. One of the joys of using it,  is that there are many ways to do the same thing in Photoshop. Here are a few tips that are useful to improve your workflow, either by speeding it up or adding a few tweaks to your process.

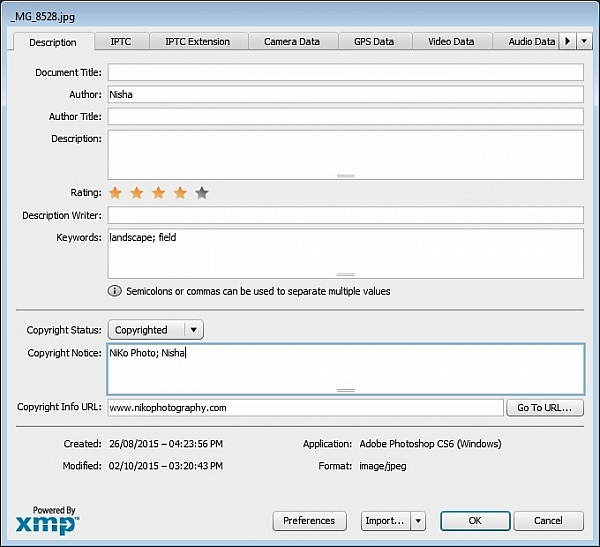
    1. Copyright Metadata Tip

    Many people use the terms watermarking and copyrighting interchangeably, but these are two different things. While arguments continue for and against watermarking images, in this digital age copyrighting your photos is still highly recommended. One of the best ways of doing this, is to embedding the copyright information right into the metadata of your image.

    Follow these steps:

    1. Click Ctrl + Alt + Shift + I (Mac: Command + Option + Shift + I), or go to File > File Info to bring up the Metadata panel
    2. Click on the Description tab (left one) and enter your copyright information in the relevant fields

    Copyright

    2. Color Correcting with Curves Tip

    As you may know, there are many way to correct color in Photoshop, and you may have even experimented with using a Curves Adjustment layer to achieve this. Sometimes, while working on this layer to color correct an image, you may inadvertently make the image lighter (or darker).

    An easy fix that allows you to apply your color correction, without affecting the tonal values of the image, is to set the Curves Adjustment layer’s Blending Mode to Color.

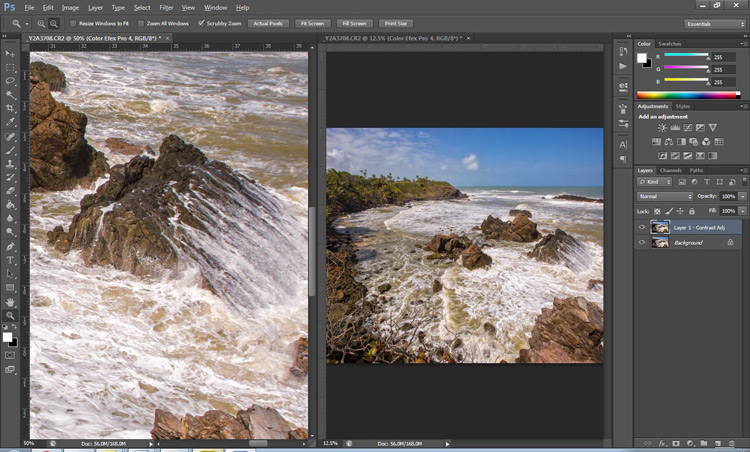
    3. Double Windows Tip

    ComparativeForEdit

    Zooming into your images can be helpful when editing details, but it can feel like a chore if you constantly have to zoom in and out to see how your changes affect the overall image. A simple solution to your problem is to open the same image in two windows. Now you will be able to put them side by side, at different zoom levels for your comparative purpose.

    1. With your image open, go to Window > Arrange > New Window for [file name of your image].  This this will open up a second window for the original image.
    2. Then, go to Window > Arrange > 2-Up Vertical and this will put your windows adjacent to each other. Now you have one zoomed out for an overall picture, and you can zoom in to edit the other.

    The coolest part is that all the adjustments you make to one window, will be reflected in the other.

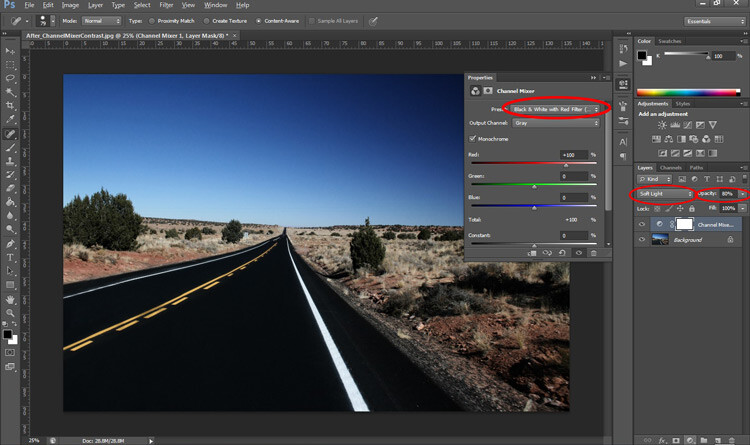
    4. Contrast with Channel Mixer Tip

    The Channel Mixer is an easy way to add great contrast to an image.

    1. Create a new Channel Mixer adjustment layer.
    2. Choose Black and White With Red Filter from the preset drop-down (in the Properties Panel).
    3. Change your blending mode for the adjustment layer to Soft Light.
    4. Play around with the opacity of the layer until you get the desired level of contrast.
    Before_ChannelMixerContrast

    Original Image

    After_ChannelMixerContrast

    Image Contrast changed using Channel Mixer

    5. Content Awareness Tip

    Several tools use Content-Aware, which is Photoshop’s method of examining your image, and calculating which pixels are needed to repair the selected area. At times though, even awesome tools such as the Healing tool or the Content Aware fill, do not return the best results when applied

    If you are not happy with what the tool has returned, simply apply the adjustment again. Yes you read that correctly, you can apply content aware a few times and get a more desirable result the second or third time around.

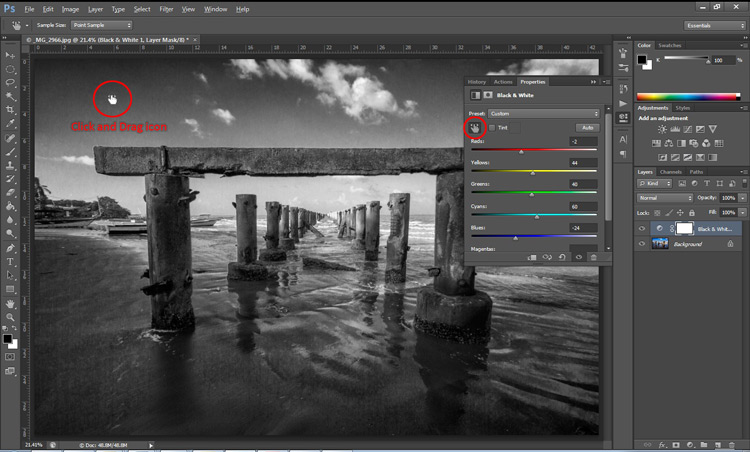
    6. Better Black & White Image Tip

    Making a black and white photo can be as easy (and boring) as desaturating your images (using Image > adjustment > desaturate). If you want to take it up a notch, try using a Black and White adjustment layer (from the Layers panel), where you can use up to six color sliders to control the main colors in your imag,e and adjust the relative brightness of each color.

    While you’re there, check out the very useful click and drag (targeted adjustment tool) icon. Click it, then click and drag (hold the button in while you drag) on any area of the image that you wish to make darker or lighter— to the left for darker, right to make it lighter

    BWAdjLayer

    7. Getting Historical Tip

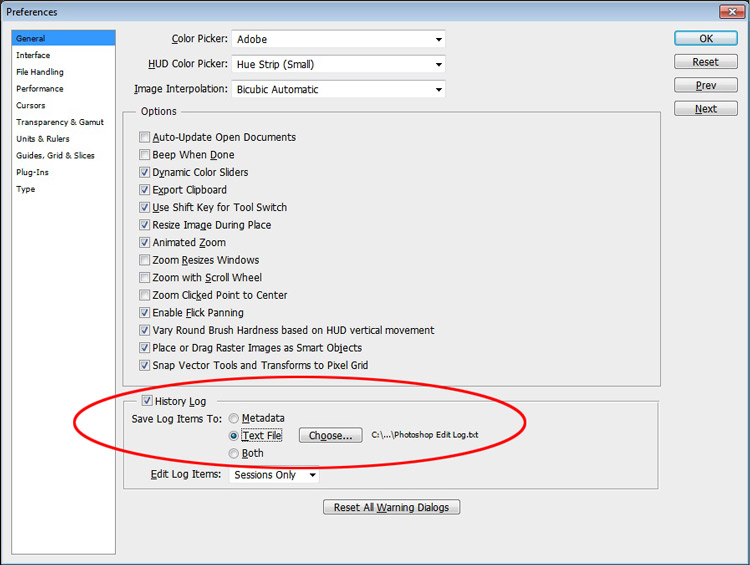
    Have you ever wanted to repeat your timely editing on another image and found your memory unreliable? Photoshop’s History Log is a great feature to turn on if you want to keep a text record of every single step you have done to your image.

    • Click Ctrl + K (Mac: Command + K) to bring up the Preferences panel.
    • In the General tab check the History Log and the Text File box, and choose a location to save the file (name it for easy reference later on).

    Now when you work on your image, and Photoshop will record every step you take. If you ever want apply the same steps to another image, just locate the text file and review.

    HistoryLog

    8. Check Spelling With Photoshop Tip

    Spell check is not something that would come to mind when you think of Photoshop, but yes it can do that too. All you have to do is click on Edit > Check Spelling and your visible text layers will benefit from more accuracy.

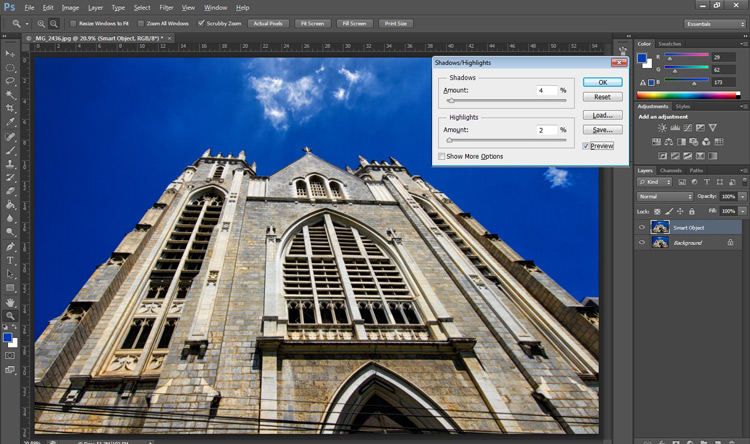
    9. Revealing Hidden Detail Tip

    To bring out hidden detail in the shadows and highlights of your image, one of the best tools is the (you guessed it) Shadow/Highlight Adjustment. Sadly though, it is not available for application via an Adjustment Layer, so for non-destructive use, first convert your layer to a Smart Object.

    Then go to Image > Adjustments > Shadows/Highlights and apply to recover those details.

    HighlightsShadows

    10.  Close Everything Tip

    Did you know you can close all your open images at once? Simply hold down the Shift key and click the close icon on any of your image windows.

    Conclusion

    While there are several ways to accomplish a task in Photoshop, hopefully there was something new hidden in these quick tips. Were any of these new to you or did you discover a new way to execute an old favorite? Maybe you can share some other must-know, or time saving tip,s that you use to be more efficient at post-processing in Photoshop.

    googletag.cmd.push(function() {
    tablet_slots.push( googletag.defineSlot( “/1005424/_dPSv4_tab-all-article-bottom_(300×250)”, [300, 250], “pb-ad-78623” ).addService( googletag.pubads() ) ); } );

    googletag.cmd.push(function() {
    mobile_slots.push( googletag.defineSlot( “/1005424/_dPSv4_mob-all-article-bottom_(300×250)”, [300, 250], “pb-ad-78158” ).addService( googletag.pubads() ) ); } );

    The post 10 Quick Photoshop Tips to Improve Your Workflow by Nisha Ramroop appeared first on Digital Photography School.


    Digital Photography School

  • The Secret to Finding the Hero Angle in Food Photography

    Have you ever stared at a photo of a food dish, and instantly thought that something looked a little odd? Like the shot wasn’t quite bang on, but you can’t quite put your finger on what it is? Chances are the dish hasn’t been shot using its hero angle.

    Rachel Korinek Food Photographer DPS Hero Angle 12

    You can have the freshest ingredients, the maddest styling skills, and be able to tame ever changing natural light, but if your angle isn’t complimentary to the food you’re shooting – you’re missing out on the full potential of creating a powerful food image.

    Never fear though, the secret to finding the hero angle in food photography is simple. Just approach the shoot with two things in mind; the height of the dish and/or the props, and the layers contained in them.

    The Height of Your Dish and Props

    The height of food basically falls into two categories; tall or flat.

    Tall subjects are simply anything with height – like a bundt cake, an ice cream cone, or a burger with the lot. For tall subject you will usually default to shooting somewhere between a 45 degree angle to straight on. Going beyond 45 degrees can sometimes limit being able to see the full dish and layering.

    Flat subjects are simply anything whose width is inherently larger than its height – like a tart, a cookie, or a pancake. For these types of subjects, default to shooting somewhere between straight above and a 75 degree angle. Going too close to 45 degrees will also accentuate their flat qualities.

    Rachel Korinek Food Photographer DPS Hero Angle 8 Rachel Korinek Food Photographer DPS Hero Angle 5

    But what about everything else? What about soup, salad, or how about liquids? I am so glad you asked, because this is where the fun starts.

    There are quite a few foods that are dependant on serve-ware. A burger or cake can hold their own, but liquids, soups, salads, and puddings cannot. Which category these guys fall into is dependent on the food styling prop in which they are presented.

    Take soup for instance, is it being served in a bowl, or is it a fancy cold soup served in a tall shot glass? The salad, is it served on a plate or a large glass bowl? What sort of holder is the liquid in; tall, short, opaque? Is it in a flat tray because you’re about to freeze it and turn into granita?

    Oh the possibilities are endless! But remember, they all fall into two categories, so you’ve got a 50/50 shot of getting it right. I’m pretty sure you’ve got this.

    The Layers in Your Dish and on Set

    There are two things to consider when thinking about layers in food photography. The layers present in your food dish and the layers present on set.

    Layers in a dish are the number of visual components in a recipe. The classic example is a burger with seven layers, bun, meat patty, cheese, sauce, slice of tomato, lettuce, bun. Or a layer cake with seven layers, cake, jam, cream, cake, jam, cream, cake. So to get the best food photography shots, you’ll want to choose an angle that exposes these layers in their best light.

    Rachel Korinek Food Photographer DPS Hero Angle 6 Rachel Korinek Food Photographer DPS Hero Angle 7

    Layers on set are the number of elements or props that you have on your set (props) on top of one another. For example, napkin, plate, and garnish would be three layers and would appear on top of one another. I don’t count the food/recipe as a layer as it is the subject and will always be present. If the prop layers are an important part of telling the food story, you’ll want to make sure your angle captures those elements too.

    Putting it all Together

    Now that you’ve thought about the height of your dish and the layers, you can marry those two, in order to figure out your hero angle. Let’s look at some examples.

    This is a little game I like to play called; Okay, Better, Hero. There is nothing wrong with any of these shots I’m about to show you per say, but there can only be one hero, right? That’s what we’re aiming for, so let’s dive right in.

    Turkish Delight (a flat dish without layers)

    Rachel Korinek Food Photographer DPS Hero Angle 1

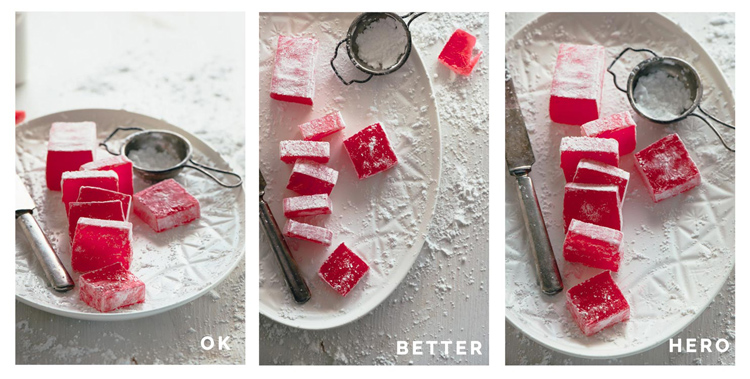
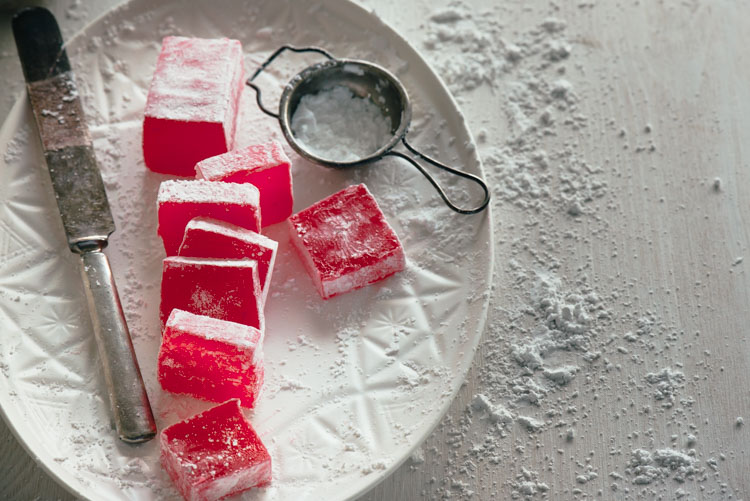
    I shot this Turkish delight with a 105mm micro (macro) lens, at a 25 degree angle, overhead, and 75 degree angle respectively.

    Because this is such a flat dish, you may expect that the overhead angle would be the most flattering. But really the 75 degree shot is hero angle, here is why. It is so close to overhead, yet allows you to capture the gorgeous light coming through the Turkish delight which adds to the richness of its colour.

    25 degrees also captures the colours, but accentuates the flatness of the dish, and detracts from the overall feel.

    Rachel Korinek Food Photographer DPS Hero Angle 11
    Horizontal variation, shot at the same angle.

    The Burger (tall dish with layers)

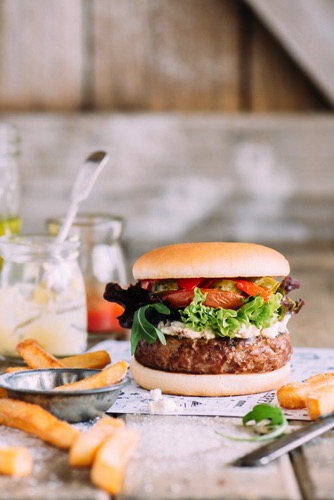
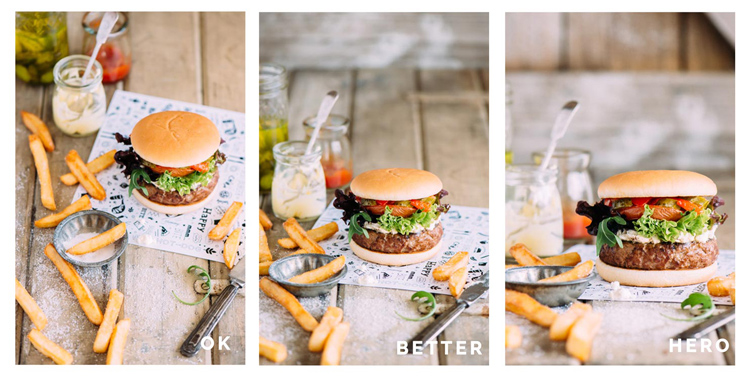
    I shot this burger with a 105mm micro (macro) lens, at a 45 degree angle, 25 degree angle, and straight on respectively.

    Rachel Korinek Food Photographer DPS Hero Angle 4

    The hero angle is the one shot straight on, because it allows the viewer to focus on all the delicious layers, and elongates the height of the burger which you naturally expect to be a tall food. Your mind thinks, the taller the burger, the more ingredients, and the more bang for your buck you get.

    The 45 degree angle doesn’t give you enough context of the layers, and the 25 degree angle makes the top burger bun look too flat.

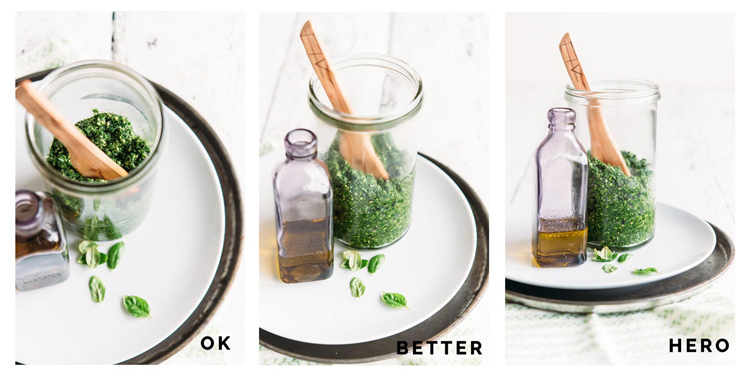
    Kale Pesto (tall dish without layers)

    I shot this with a 60mm micro (macro) lens, at a 85 degree angle, 45 degree angle, and straight on.

    Rachel Korinek Food Photographer DPS Hero Angle 3

    Pesto, being a sauce or condiment, is dependant on the serve-ware in which it is presented. As you want to show that there is enough of the pesto to coat an entire family size dish of pasta, it was shot in a tall glass. This also complimented the tall spoon, and bottle of oil in the shot as props.

    The 45 degree angle is workable, but straight on one is the hero angle here. It allows for an overall sense of how the dish is being served and stored, while still allowing the viewer to comprehend its texture.

    If you want to get into the nitty gritty, the 45 degree angle allows for reflection of the plate to show up in the glass, hindering the ability to see the texture of the pesto.

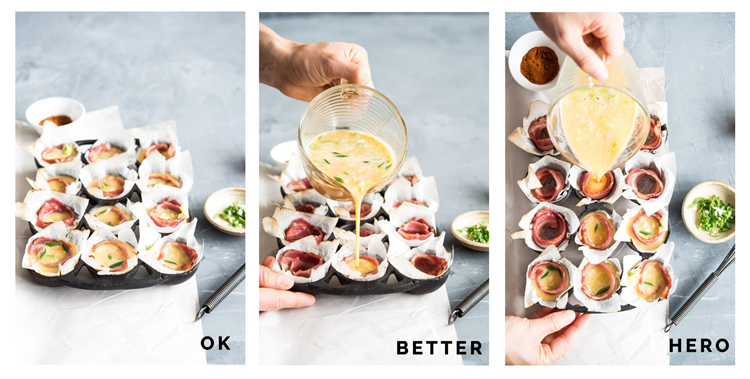
    Egg and Bacon Muffins (flat with layers)

    I shot this with a 60mm lens, at a 45 degree angle, 30 degree angle, and from directly overhead.

    Rachel Korinek Food Photographer DPS Hero Angle 2

    Here the 45 degree angle accentuates the flatness of the dish, but does show the layers. The 30 degree angle is better, but it doesn’t show the full layers of the dish as much as the overhead shot does. That’s why the overhead shot is the hero angle in this case. It allows you to see right into the dish, while still getting the action of the egg filling being poured into each compartment.

    Putting Finding That Hero Angle Into Practice – 5 Take Aways

    Next time you’re doing a food photography shoot, put the following into practice:

    1. Thinking about whether your dish falls into the tall or flat category.
    2. Are there layers in your dish, or through your use of props on set?
    3. For tall foods, especially those with layers, explore angles between straight on and 45 degrees.
    4. For flat foods, explore angles between overhead and 75 degrees.
    5. Take a few shots with different angles outside the recommended ones above, and look for the OK, better, hero shots.

    Do you have a favourite angle for food photography that you can always rely on? Please share in the comments below, as well as your food shots.

    googletag.cmd.push(function() {
    tablet_slots.push( googletag.defineSlot( “/1005424/_dPSv4_tab-all-article-bottom_(300×250)”, [300, 250], “pb-ad-78623” ).addService( googletag.pubads() ) ); } );

    googletag.cmd.push(function() {
    mobile_slots.push( googletag.defineSlot( “/1005424/_dPSv4_mob-all-article-bottom_(300×250)”, [300, 250], “pb-ad-78158” ).addService( googletag.pubads() ) ); } );

    The post The Secret to Finding the Hero Angle in Food Photography by Rachel Korinek appeared first on Digital Photography School.


    Digital Photography School