Category: Photography

  • Learn Ansel Adams’ Biggest Secret for Stunning Photography – Visualization

    Ansel Adams is the most widely known photographer in history, you don’t need to look very far to see one of his images. Would you like to know the whole key to Ansel Adams’ stunning photographs?

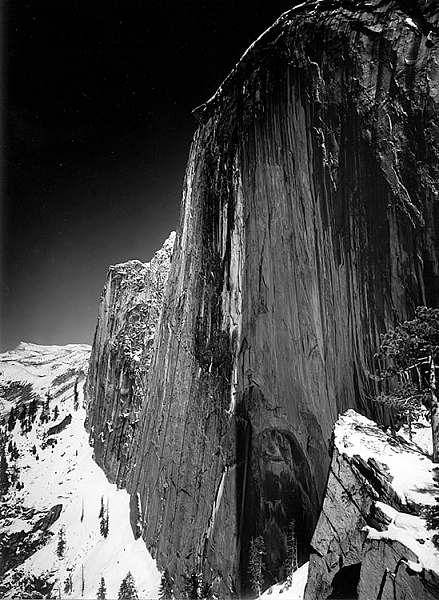
    This is a photograph of half dome in Yosemite taken in 1927 by Ansel Adams

    Monolith, The Face of Half Dome, by Ansel Adams (Image courtesy Ansel Adams Illumes and The Ansel Adams Gallery)

    In this this video interview with his son, Michael Adams, you will hear about his breakthrough as a photographer, when he went from merely recording an image, to being an artist who interpreted the image to tell the story he wanted.

    As you’ll hear, Ansel had his breakthrough when he climbed up to take a photograph of Half Dome, the iconic monolith in Yosemite, California. The moment he realized that the yellow filter just wasn’t going to convey what he saw and felt, he changed to a red filter which expanded the tones of the image and brought out the darkness of the sky, thereby creating the mood he had visualized.

    Ansel said, the whole key lies in first visualizing the image you want, rather than just snapping away.

    By first forming the image or idea in your mind’s eye, you can then set about to capture it. His son Michael summed it up with, “He knew what he wanted and he got what he wanted.”

    These are Ansel’s’ key points that you can practice to continually improve your photography:

    • Look at the external event, and then visualize what you want it to look like, clearly and decisively.
    • Try to make the photograph of what you saw and felt.
    • Train yourself to see what the camera sees by comparing what you see, with what it looks like in the camera.
    • Practice your craft and do your homework so you can make the photograph you desire by going through these steps to capture what you visualized.
    • Placing the camera: Find the best point of view of the lens.
    • Make a proper lens selection.
    • Decide on your depth of field and set your aperture.
    • Control your exposure and later, the development.

    As he said, with practice this becomes automatic and instinctive. Put Ansel’s advice into action and let me know your results in the comments below.

    googletag.cmd.push(function() {
    tablet_slots.push( googletag.defineSlot( “/1005424/_dPSv4_tab-all-article-bottom_(300×250)”, [300, 250], “pb-ad-78623” ).addService( googletag.pubads() ) ); } );

    googletag.cmd.push(function() {
    mobile_slots.push( googletag.defineSlot( “/1005424/_dPSv4_mob-all-article-bottom_(300×250)”, [300, 250], “pb-ad-78158” ).addService( googletag.pubads() ) ); } );

    The post Learn Ansel Adams’ Biggest Secret for Stunning Photography – Visualization by Marc Silber appeared first on Digital Photography School.


    Digital Photography School

  • Macro Photography on a Budget: An introduction to Close-up Filters

    close-up-filters-flower

    Have you ever seen some stunning pictures of insects, where you can clearly see each individual element of their compound eyes, or looked through your Instagram feed marveling at photos of flowers where you can see the tiniest detail on each individual petal? If so, welcome to the wonderful world of macro photography, one in which the little things in life are not only celebrated, but magnified to glorious proportions, and even the most mundane objects around us can take on beautiful otherworldly qualities when examined under near-microscopic detail.

    This particular type of photography is not only stunningly beautiful but often prohibitively expensive, at least for the casual hobbyist. A good macro lens can easily set you back several hundred dollars, and that’s not counting the accessories like a good tripod, a ring flash, and other gear that is liable to turn this past-time into a debt-inducing money pit. Thankfully there are several good alternatives like extension tubes and lens-reversing rings to aid you in your quest for beautiful macro photography, but my personal favorite is one of the cheapest options available: close-up filters.

    close-up-filters-anthers

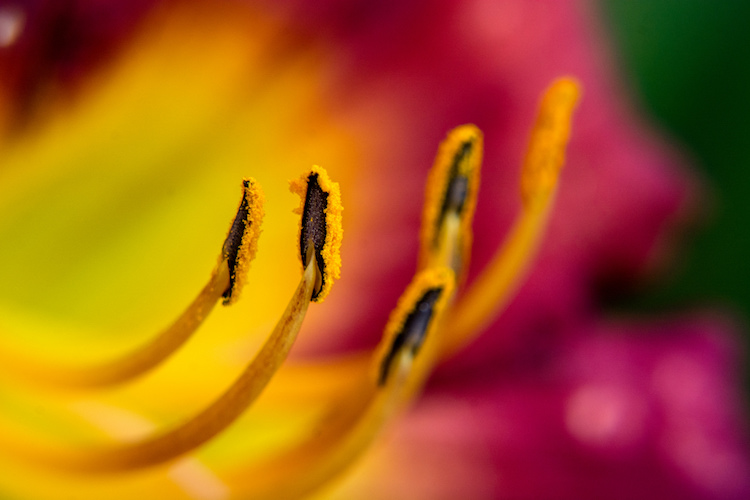
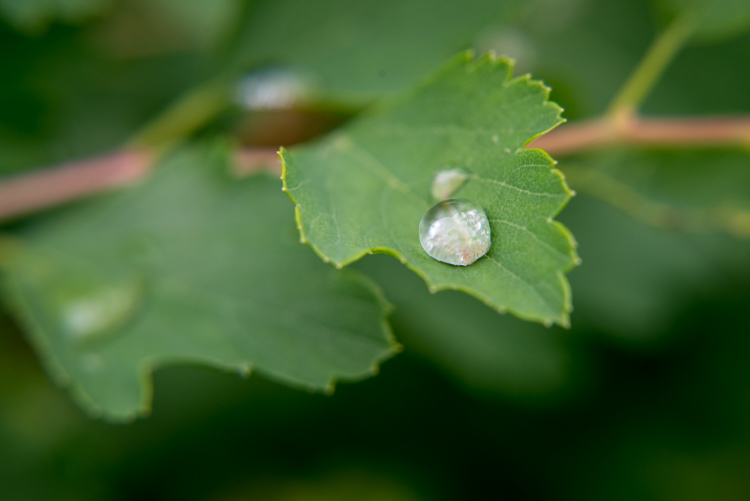
    This image, and all the other macro-style shots in this article, were not taken with an expensive macro lens but with a $ 35 set of close-up filters I screwed on to my 50mm lens.

    A true macro lens is designed to create true 1:1 (life-size) replications of very small things on the image sensor of your camera. If you have a coin that is 2cm diameter, a high quality macro lens will be able to take a photograph of that coin wherein it is literally the same size on your camera’s image sensor. Taking these types of photographs requires a host of light-bending optical gymnastics on the part of your lens. In the process there are almost always tradeoffs in image sharpness and overall light-gathering ability, which is why macro lenses cost so much money, because they contain special glass elements to minimize any optical imperfections.

    Close-up filters rely on a very simple, very old, idea to make it possible for any normal camera lens to focus on objects that are, as their name implies, very close to your lens. All lenses have a minimum focusing distance, which is as close as you can get to an object and still have it be in focus. A +2 filter will make it possible for a lens with a minimum focusing distance of 1 meter to now focus on something .3 meters away. A +10 filter would decrease the minimum focusing distance to .09 meters. The math is slightly complicated, but suffice it to say the higher the number on your filter, the closer your lens will be able to focus.

    close-up-filters-leaf-droplet

    Close-up filters are also very inexpensive and you can often find a set with three or four filters for under $ 40 that will work with your lens.

    A close-up view of close-up filters

    So what is a close-up filter? Simply put, it’s basically a magnifying glass that you screw onto the front of your camera lens. Just like their investigative counterparts wielded by famous fictional detectives through the ages, close-up filters rely on a single curved piece of glass that bends light in such a way as to enlarge whatever you are viewing. Don’t let the nomenclature confuse you; nothing is being filtered, but light is being altered before it enters your camera lens, in the same way that a magnifying glass alters light to make objects appear bigger.

    close-up-filters-eye

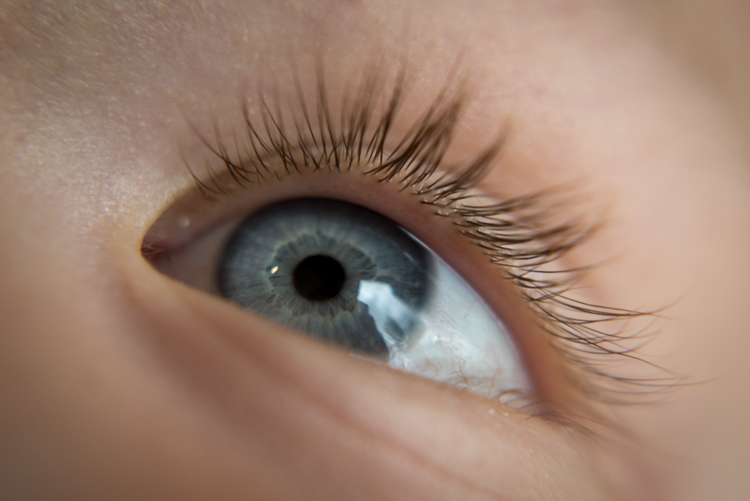
    The set of filters required to take a photo like this costs about the same as a movie and a large popcorn.

    Limitations

    Using close-up filters is a great way to get started with macro-style photography, but they have some very important limitations that you need to be aware of to start. First of all, they only do one thing, which is shorten the minimum focusing distance of your lens. You can’t use them for normal photography, since all you will see when you attach one to your lens is either a big blob of blur, unless you focus on something very close to your camera. It’s the same phenomenon that happens when you hold a magnifying glass at arm’s length instead of right next to your face, and it severely limits the usefulness of close-up filters.

    True macro lenses work for a variety of photographic situations, and due to their high-quality construction are generally much sharper than non-macro lenses, which make options like the Canon 100m f/2.8 or Nikon 105mm f/2.8 so highly praised. Screwing an inexpensive close-up filter on the front of your camera might let you get fun shots of flowers, but it will in no way equal the astounding optical properties of a true macro lens.

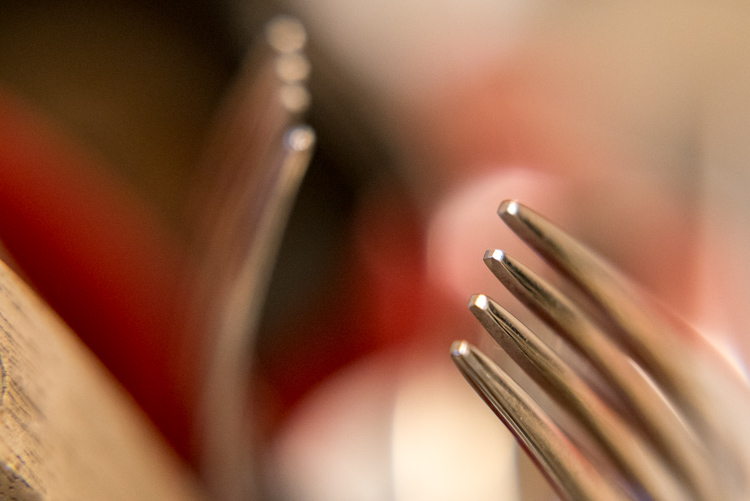
    Even something as mundane as forks sitting in a dish rack can turn into a work of art when viewed up close.

    Even something as mundane as forks sitting in a dish rack, can turn into a work of art when viewed up close.

    Another downside of close-up filters is that the images you create with them are not at all the same as what you can get from dedicated macro gear. Photos are generally much softer, will usually exhibit unpleasing artifacts like chromatic aberration, and don’t allow you to have the same pleasing background blur that you would get without the filters attached. Finally, while macro lenses will let you focus on objects that are very close as well as far far away, close-up filters will only let you focus on subjects that are right next to your lens. All these limitations might sound important, but they’re really not that big of a deal. Once you learn to work around them you can get some stunning images from your camera using close-up filters.

    Close-up filters are nowhere near as sharp and optically brilliant as a true macro lens, but they can still produce some pretty good results.

    Close-up filters are nowhere near as sharp and optically brilliant as a true macro lens, but they can still produce some pretty decent results.

    Advantages of close-up filters for macro photography

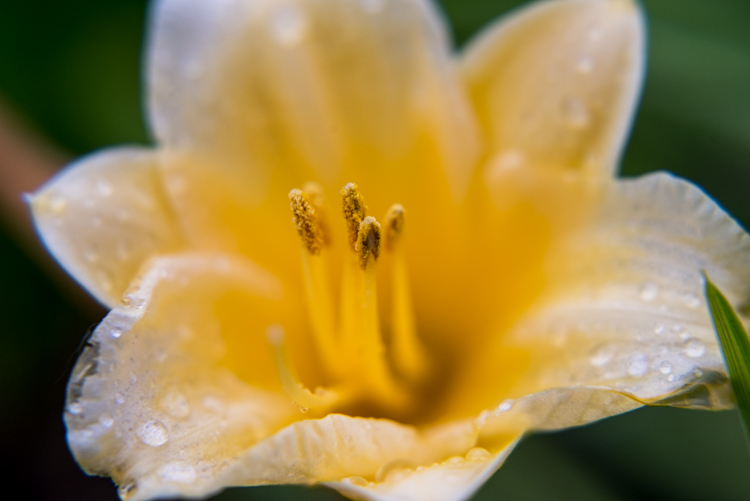
    After spending so much time pointing out the flaws with close-up filters you may wondering why you would want to even bother with them in the first place. As I mentioned earlier they are an incredibly inexpensive way to dip your toe into the waters of macro photography, and the results you can get from such a simple piece of glass will likely be far beyond what you ever thought possible shooting with your normal gear. The photo below of a yellow lily was taken with a standard 50mm lens and a +10 close-up filter, which is a fairly standard, inexpensive option. It’s not at all uncommon to find sets that include +1, +2, +4, and +10 filters all in one package that costs $ 40 or less.

    An un-cropped image taken with +10 and +2 filters attached to a 50mm lens. Note the severe blue fringing on the edge of the petals, which is the result of using filters instead of a true macro lens.

    An un-cropped image taken with +10 and +2 filters attached to a 50mm lens. Note the severe blue fringing on the edge of the petals, which is the result of using filters instead of a true macro lens.

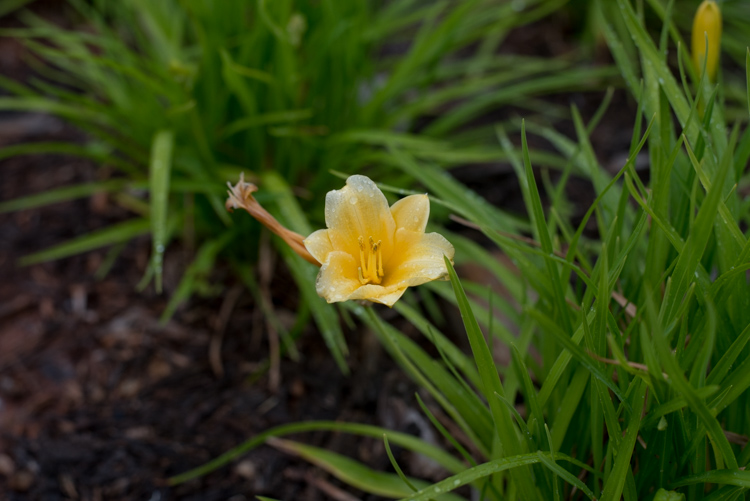
    After I shot that picture I took the filters off my lens and took another photo of the same flower as close as my lens would allow. As you can see there is a dramatic difference between the two images and even though the top picture is not as sharp as an image taken with a dedicated macro lens, the results are perfectly fine for someone just looking to dabble in this type of photography, without spending much money.

    The exact same flower. Without the filters, this was as close as my lens would focus.

    The exact same flower. Without the filters, this was as close as my 50mm  lens would focus.

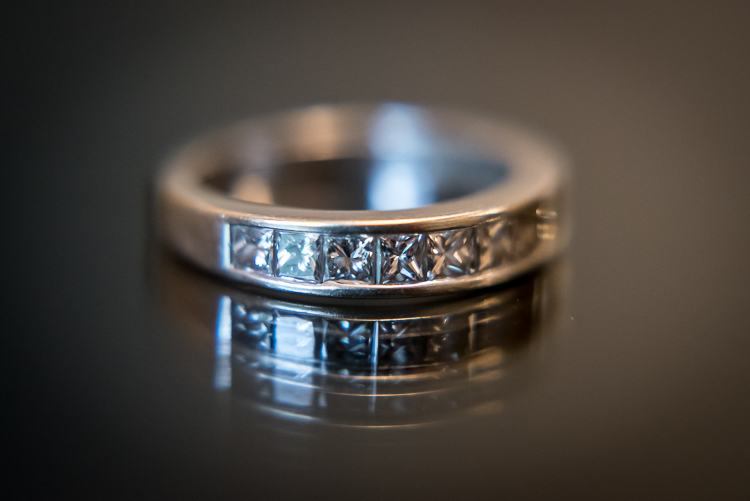
    Another fun feature of filters is that most of them can be stacked on top of each other, to get even greater magnification. To make the jewelry images below I used three filters on my 50mm lens: a +10, +4, and +2 all screwed into each other, and attached to the lens itself. I set the ring down on an iPad that was turned off to get a little bit of reflection, and while the result is not something I would use in a catalog or on a billboard, it’s more than enough to suffice for my needs.

    close-up-filters-ring

    It might look fancy, but the gear required to take this photo was pretty basic and inexpensive.

    Unlike other faux-macro solutions, like reversing rings or some of the cheaper extension tubes, close-up filters still allow you to use autofocus. Even so, you might get best results if you focus manually or use focus bracketing to make sure you get just the right shot. Finally, one of my favorite aspects of close-up filters is how small and portable they are. I like to keep a +10 and +4 in my camera bag and if I find myself in a situation that would be good for some macro shots it’s fast and easy to screw one on, take a few shots, and put it back in my bag.

    Are pictures taken with close-up filters as sharp and detailed as one would require for them to be printed in a magazine? No, not by a long shot. For truly brilliant close-up photos you need the right gear like a macro lens, but hopefully you can see why close-up filters, despite their limitations, do a decent job of getting you halfway there.

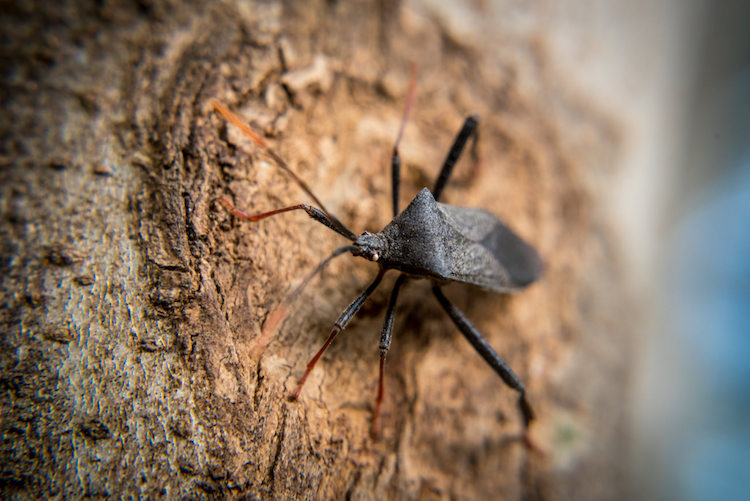
    This insect is about the size of a quarter but it appears exquisitely detailed and larger than life when photographed with a close-up filter.

    This insect is about the size of a quarter, but it appears exquisitely detailed and larger than life when photographed with a close-up filter.

    Choosing the right close-up filters

    Since close-up filters do not involve a lot of complicated technology and contain no moving parts, it’s hard to go wrong when looking for a set to buy. However there are a few considerations that you need to keep in mind.

    First, look for a set of filters that fit your lens. Check the thread size of your lens by looking for the  symbol for the Greek letter phi  and the numbers immediately before or after it will be the size you need (look inside the back of your lens cap). Common sizes are 52, 55, or 58mm, but depending on your individual lens it could be quite different so make sure to find the size that fits your lens before you buy any filters.

    Next it’s a good idea to get filters that are made from metal and glass, not plastic. Filters with a higher build quality are easier to screw on and off, less likely to get scratched, and may even include special anti-reflective coatings. You can sometimes find brand name options made by the big manufacturers like Canon and Nikon, but I get plenty of good results with third-party filters from companies like Hoya or Polaroid, and the results are just fine and they cost a fraction of the price as their officially-branded counterparts.

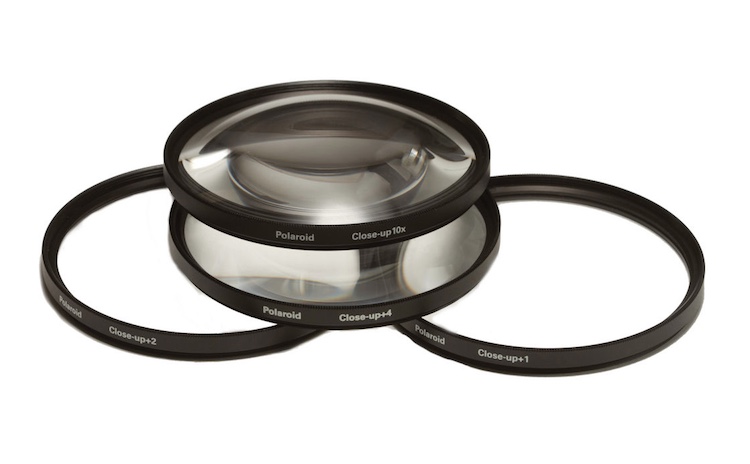
    A set of close-up filters filters like this will help you get macro-style images without breaking the bank.

    A set of close-up filters filters like this will help you get macro-style images without breaking the bank.

    I hope this article has helped you learn a bit more about this inexpensive but quite practical solution for taking macro-style shots. Do you have any experience shooting with close-up filters? Are you the kind of photographer who prefers to shoot with actual macro lenses? I’d be interested in hearing your thoughts in the comments below, and please feel free to share your favorite macro photos.

    googletag.cmd.push(function() {
    tablet_slots.push( googletag.defineSlot( “/1005424/_dPSv4_tab-all-article-bottom_(300×250)”, [300, 250], “pb-ad-78623” ).addService( googletag.pubads() ) ); } );

    googletag.cmd.push(function() {
    mobile_slots.push( googletag.defineSlot( “/1005424/_dPSv4_mob-all-article-bottom_(300×250)”, [300, 250], “pb-ad-78158” ).addService( googletag.pubads() ) ); } );

    The post Macro Photography on a Budget: An introduction to Close-up Filters by Simon Ringsmuth appeared first on Digital Photography School.


    Digital Photography School

  • Announcing the Winners of the Tamron Sunshine Photo Contest

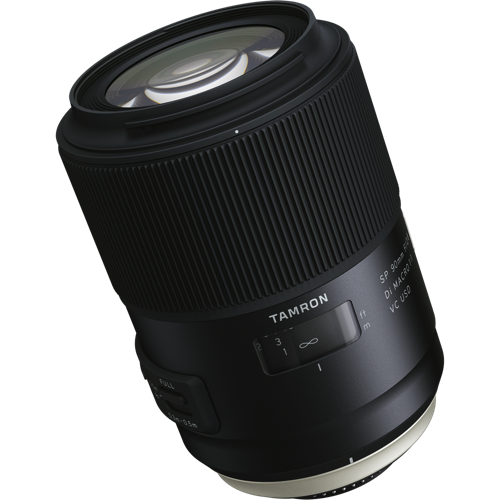
    The winners of the Tamron Sunshine Photo Contest for a Tamron 28-300mm Di VC PZD lens, a Tamron SP 90mm F/2.8 Di VC USD lens, and a Tamron SP 70-300mm Di VC USD lens are:

    A huge thank you to everyone who entered our recent contest to win one of the following lens: a 28-300mm Di VC PZD lens, an SP 90mm F/2.8 Di VC USD lens or an SP 70-300mm Di VC USD lens from our friends at Tamron. This was a sunshine themed competition, and many of you shared your beautiful images, so we encourage everyone to go back and scroll the comments section to view these wonderful photos.

    Yet again, the response was absolutely AMAZING with over 285 entries! But now, on to the winners. Drumroll please, and the winners are:

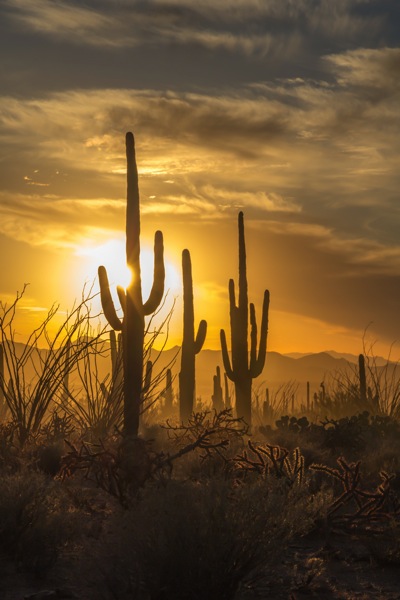
    First Prize – a Tamron 28-300mm Di VC PZD: the winner is Graham P.
    Grand Prize 28300VCPZD

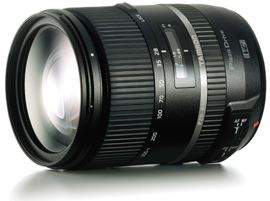
    Tamron 28-300mm Di VC PZD (model A010)- $ 849 value (For canon, Nikon or Sony cameras.)

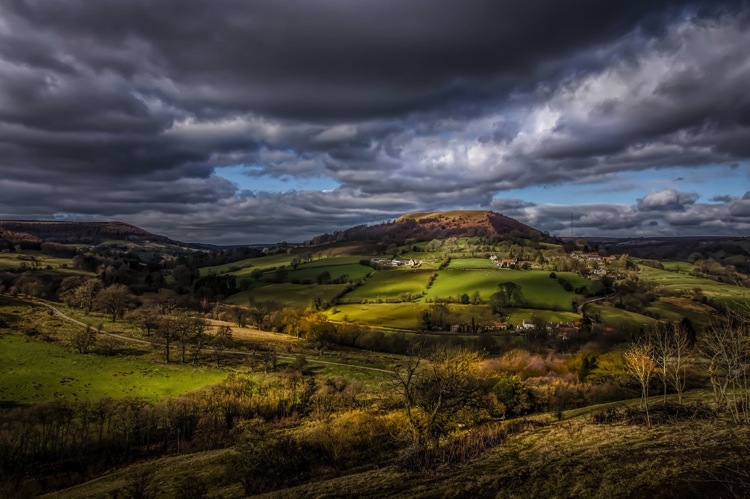
    Graham’s winning comment and image:

    It would be fantastic to win the Tamron 28 – 300 lens the need for a lighter kit as I am getting older is a must, this lens would not leave the camera and has all the versatility to capture everything from near to far in great detail and of course no more sensor dust from not switching lenses all the time. The image I have entered lookers great with the sun playing across the landscape.

    Graham P original

    Second Prize – Tamron SP 90mm F/2.8 Di VC USD: the winner is Annee.

    Second Prize SP 90mm

    Tamron SP 90mm F/2.8 Di VC USD (model F017-new) – $ 649 value (For canon, Nikon or Sony* cameras. *Sony mount model without VC)

    Annee’s winning comment and image:

    Wow! The new Tamron SP 90mm is a dream lens! I love bringing out details in wide landscapes but want to explore nature’s beauty at a more intimate level. I like to shoot into the sun and bright backgrounds but chromatic aberration and lens flare are problematic with my current lens. The optical construction of the new Tamron SP 90mm will be a major step forward for my art. I also love shooting from low angles where tripods are impossible. The enhanced VC functionality will help me achieve a steadier shot and the moisture-proof / dust-resistant qualities will be a blessing when I get a little too close to the ground! I’m always amazed at how little breeze is needed to move flowers and delicate objects out-of-focus. The increased focusing speed of the new Tamron SP 90mm combined with its large aperture will help me capture shots at the perfect moment.

    I could go on but, in short, this lens looks amazing! I know it will help me to hone my craft AND increase my passion for photography. I can’t wait to start playing with one!

    Annee original

    Third Prize – Tamron SP 70-300mm Di VC USD: the winner is Ron S.

    Third Prize70300VC

    Tamron SP 70-300mm Di VC USD (model A005) – $ 449 value (For canon, Nikon or Sony cameras.)

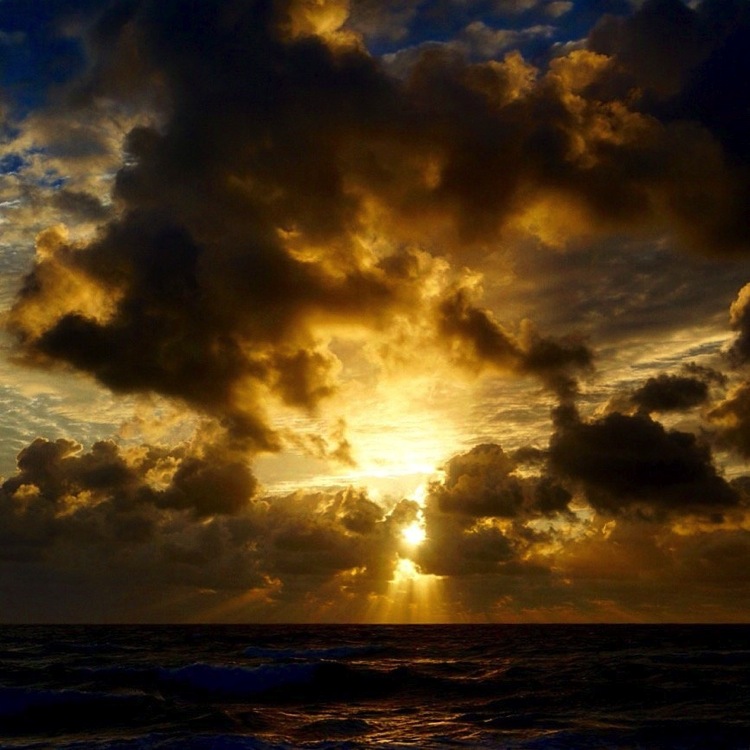
    Ron’s winning comment and image:

    I shot this sunrise from a life guards chair on Delray Beach in Florida. I was there well before sunrise, hoping to catch the sun breaking the horizon over the ocean, but the clouds were there too, blocking the sun. Finally, the clouds broke a bit, allowing the sun to come thru and the Rays to pinball off them, a more dramatic shot for sure than the one I had planned.

    I would use the telephoto zoom lens to give me more flexibility and reach with my travel photography and real close ups on the basketball court – I have season tickets for both the men’s and women’s at a local college and love sharing my amateur shots with the coach, players and college community via Instagram and Facebook.

    The macro lens would make my wife very happy – she’s an avid gardener but my photos don’t do her magnificent flowers justice. A first class macro lens would certainly help!

    I love that these lenses will fit my Sony NEX -6 e-mount, and, when the budget allows, A6000!
    Fingers crossed….

    Ron S original

    We were all thrilled with the entries: you tugged at our heartstrings, made us laugh, made us smile, but most importantly, you made us keep wanting to do more of what we are doing; providing you quality information and guidance to become a better photographer. We were so pleased to see that you came from every part of the world, young adults to grandparents, and everyone in between. Thank you all for your entries!

    Roadtrip ebook cover

    Now, for those of you that didn’t win, Tamron has invited ALL dPS readers download their 2015-2016 eBook Series! You can find those HERE!

    The winners will be emailed with details of how to collect their prizes. Please make sure to look for our email. Thank you again for all the wonderful submissions and to Tamron for sponsoring this competition.

    Tamron Rebates

    For all of you residing in the USA, when you do purchase your next Tamron Lens, make sure to take advantage of the rebates* up to $ 130 through June 30, 2016. Find additional information HERE!

    *Current rebate offers end June 30, 2016. US RESIDENTS ONLY.

    Tamron logo

    About Tamron

    Disclaimer: Tamron is a paid partner of dPS.

    googletag.cmd.push(function() {
    tablet_slots.push( googletag.defineSlot( “/1005424/_dPSv4_tab-all-article-bottom_(300×250)”, [300, 250], “pb-ad-78623” ).addService( googletag.pubads() ) ); } );

    googletag.cmd.push(function() {
    mobile_slots.push( googletag.defineSlot( “/1005424/_dPSv4_mob-all-article-bottom_(300×250)”, [300, 250], “pb-ad-78158” ).addService( googletag.pubads() ) ); } );

    The post Announcing the Winners of the Tamron Sunshine Photo Contest by Darlene Hildebrandt appeared first on Digital Photography School.


    Digital Photography School

  • 10 Pro Tips to Design a Killer Mood Board to Present Your Work

    When you’re working on a design or photography project for a client, a mood board can be one of the best ways to get your vision across. A mood board is essentially a collage of things that inspired you for this particular project. They can help you really nail down the look and feel of your work, and make sure Continue Reading

    The post 10 Pro Tips to Design a Killer Mood Board to Present Your Work appeared first on Photodoto.


    Photodoto

  • The Beginners Guide to Lightroom Presets

    Presets this and Presets that. It’s like the world has gone Lightroom Preset mad of late. Some people hate them, others rave about them! So where do you start? Well, the beginning is best really.

    When Lightroom was only a beta program (and for Mac only), one of the big features was that you could make changes to an image in the Develop Module, and save those settings to apply them to another image directly! They didn’t even have to be in the same shoot. (Lightroom organized by shoots then, not folders). Unlike Actions in Photoshop, the setting changes were immediate, and easy to undo. These were the first Presets. While they worked pretty much like Presets today, they weren’t as versatile as they are now.

    What are Lightroom Presets

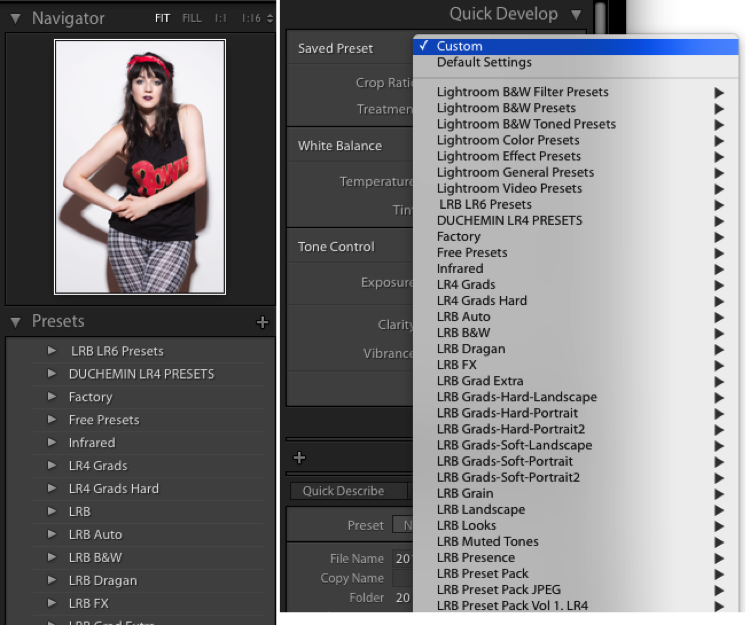
    Presets are files that allow Lightroom to apply particular Develop settings to an image. They appear in the Left Panel of the Develop Module in the Presets Panel. They’re also available in a drop down menu in the Quick Develop panel in Library.

    Presets1

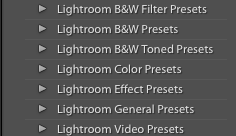
    Lightroom ships with a range of Presets, which are stored in folders based on the type of Preset within. This organization suggests a great way to store Presets: organize by what the preset does.

    Presets2

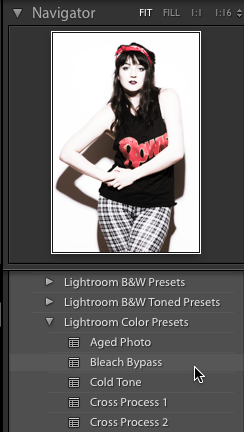
    With the Preset and Navigator panels open, hover over one of the default Presets (you may need to click on the folder triangle to open it). You should see the Navigator preview change to show what the preset would do to the image if you click and apply it. Now if only you could make the preview bigger!

    Presets3

    A preview of the preset will appear in the Navigator window top of the left side panel.

    Making your own Presets

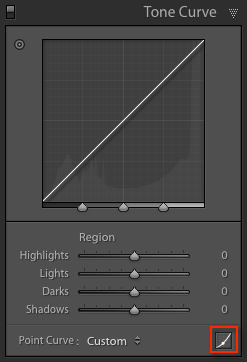
    You can get a handle on Presets by making them, exporting them, sharing them, and even importing Presets from other people. First you need to make changes to your image to be able to save a preset. You could start with a Tone Curve adjustment. First, go to the Tone Curve panel, and click on the Point Curve icon (indicated with the red box).

    Presets4

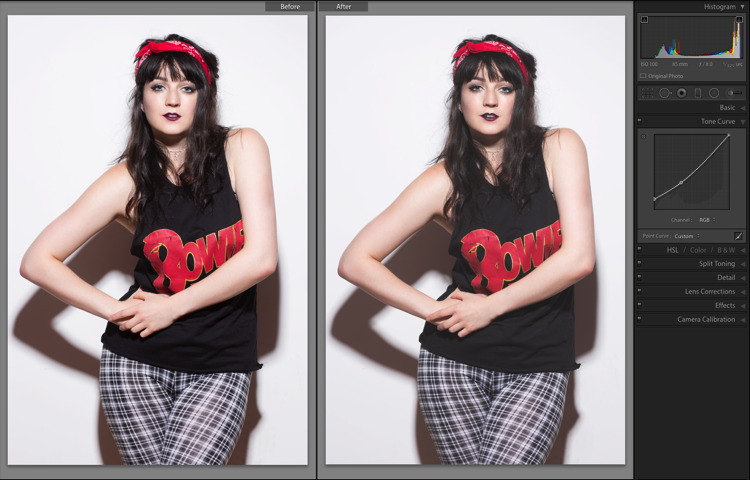
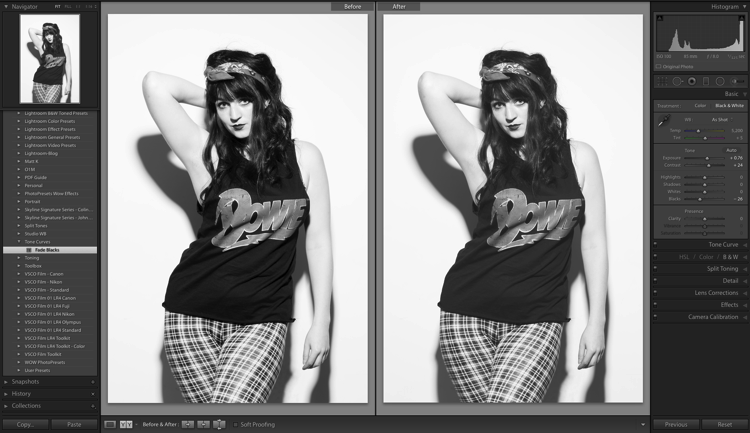
    Next, click about one third of the way from the bottom. Finally, click the square point on the bottom right of the box, then drag it up while holding the Shift key. The blacks in your image will fade to give a nice retro, matte-finish look. You can see the difference by pressing the Y key to see a before and after view.

    Presets5

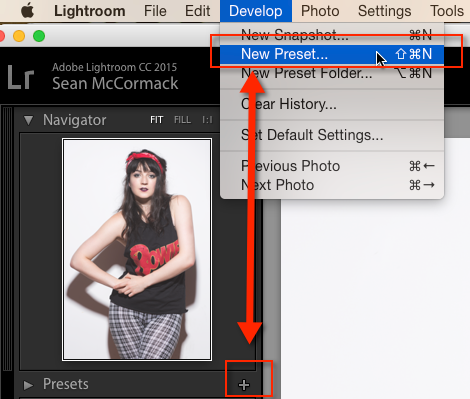
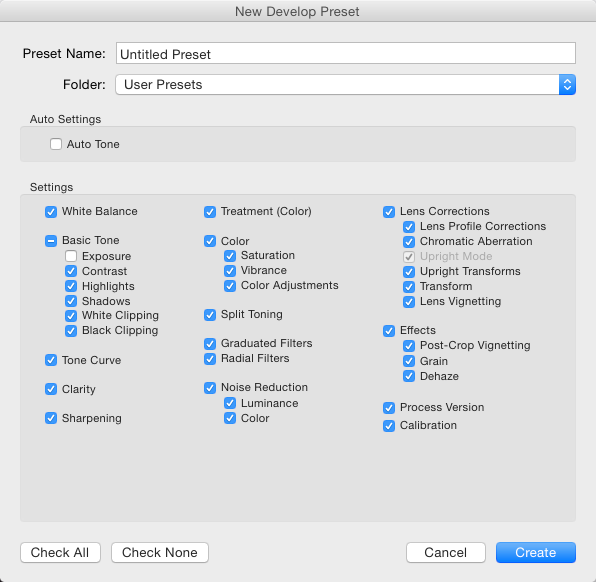
    To save this look to use again, go over to the Presets panel and click the plus (+) in the panel header. You can also choose New Preset in the Develop menu or use the keyboard shortcut: Shift + Control + N on PC, or Shift + Command + N on Mac. This opens the New Develop Preset dialog box, where you save your settings.

    Presets6

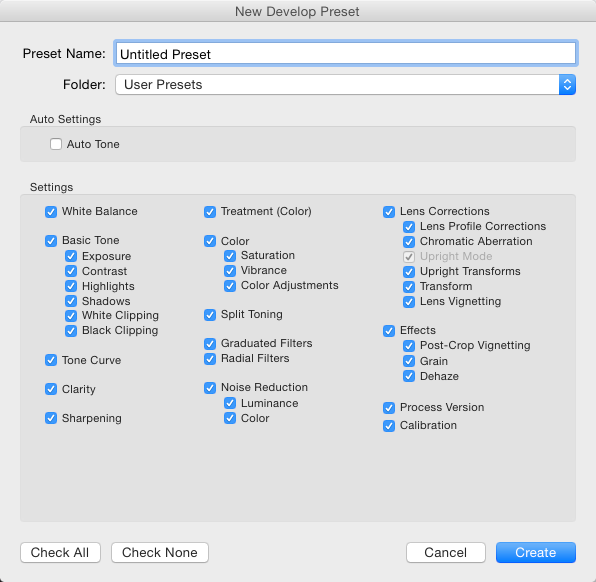
    This is a good time to talk about what to include when you save your Presets. You can just save everything into the Preset (which is the default). There’s no harm in that, but generally it means the preset will only work on images that look similar to the one you started with. It also means that preset will overwrite all develop settings in the image, so any other work you’ve done to the image will be lost.

    Presets7

    But, there is a better way. The second option (besides saving all settings) is you exclude Exposure from your preset. This means any changes to the apparent brightness of the image you made remain intact. That’s a win straight away.

    Beginners Lightroom Presets8

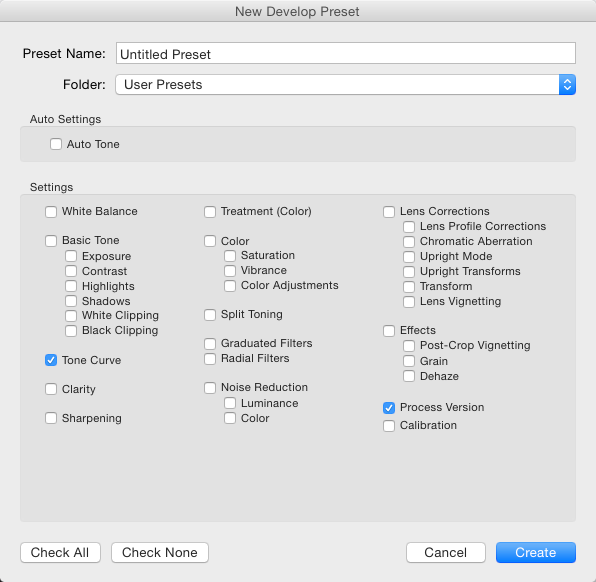
    The third option you have, is to save only the settings that are making the change to the images. You’ve just used the Tone Curve here, so you could press the Check None button, and then tick Tone Curve, followed by Process Version – it’s best to always include that last one so that all the other settings apply correctly.

    Beginners Lightroom Presets 9

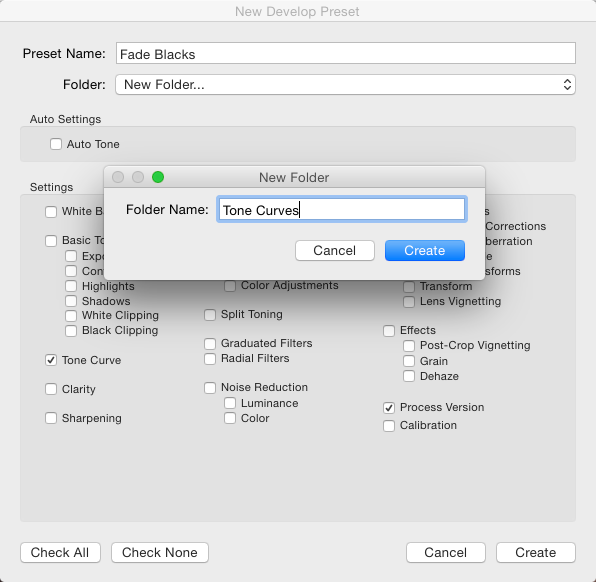
    For organization, you could also create create a new Folder for these Presets. To do that, click the Folder menu and choose New Folder at the top of the menu. Name the Folder Tone Curves. Finally, you can give the Preset a useable name. While flowery names might work for selling your Presets as artsy product, in reality, you’re better off using a name that reminds you what the Presets does. You could use Fade Blacks, or Lighten Blacks, for this one.

    Beginners Lightroom Presets 10

    Applying the preset to other images

    This Preset can now be applied to any other image. You could test with an image that has other settings already applied, like a black and white photo for example. Notice how the image remains black and whie after applying the Preset? If you’d saved everything into the preset, the image would’ve turned back into color, because one of the options selected was the B&W Treatment.

    Beginners Lightroom Presets 11

    Sharing the preset with others

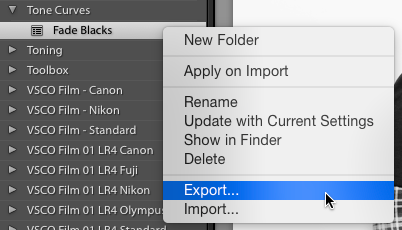
    You can also share this Preset by right clicking on it, and choosing Export. Notice that you can also choose Import from here (as well as Apply on Import) which is how you also get shared, or purchased Presets, into Lightroom. Apply on Import is different, and refers to when images are being Imported into Lightroom, selecting that will change the settings on each photo brought into Lightroom automatically. Also in this menu is, Update with Current Settings. This allows you to make changes to your settings, then save them to an existing preset instead of making a new one.

    Beginners Lightroom Presets 12

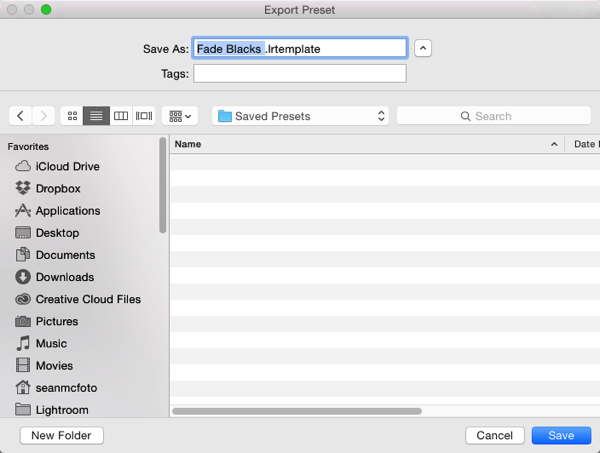
    Back to Export: When you click Export, you get an OS Save window. The suggested filename will be the name you gave the preset, followed by ‘.lrtemplate’, which is the required file extension for Presets. Save them somewhere useful, like a folder called Saved Presets.

    Beginners Lightroom Presets 13

    Where are your Presets stored?

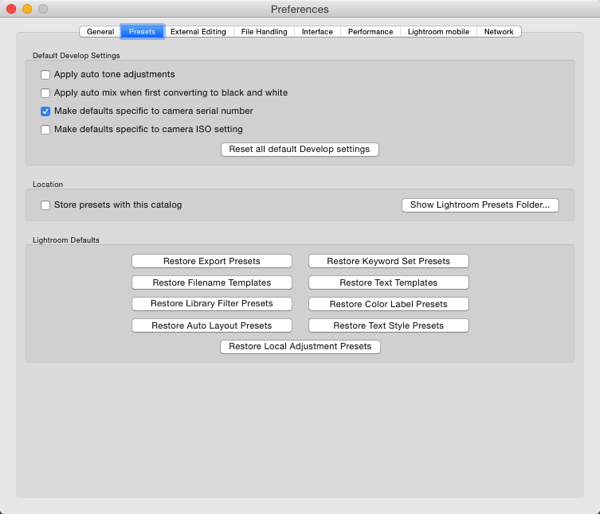
    You might be wondering where the Presets you haven’t exported are stored. Fortunately Lightroom does allow you access to them. You can get to them by opening Lightroom Preferences (which you’ll find in the Edit menu on PC, and the Lightroom menu on Mac). Click the Presets tab (in blue below) when the Preferences box opens. In the middle is a button that says Show Lightroom Presets Folder. If you click that a folder will open, with a subfolder called Lightroom selected. Open that folder to see all of Lightroom’s Presets and Templates folders for Develop, Slideshow, etc. The one you want is called Develop Presets.

    If you have a lot of downloaded or purchased Presets to add to Lightroom, it is quicker to open this folder, drag the new Presets into it (preferably in their own folder for organization) and then restart Lightroom to load them. Another way to get to a Preset is to use the Show in Finder/Explorer option from that right click menu earlier.

    Beginners Lightroom Presets 14

    The last thing worth a mention in this article is the Store presets with this catalog checkbox. This does what is says, but the practical reality is that it means if you then use another catalog, you don’t have access to your Presets. So in general I recommend not using that option.

    Hopefully now you know a lot more about Lightroom Presets than when you started. If you have any questions or comments please share them below.

    googletag.cmd.push(function() {
    tablet_slots.push( googletag.defineSlot( “/1005424/_dPSv4_tab-all-article-bottom_(300×250)”, [300, 250], “pb-ad-78623” ).addService( googletag.pubads() ) ); } );

    googletag.cmd.push(function() {
    mobile_slots.push( googletag.defineSlot( “/1005424/_dPSv4_mob-all-article-bottom_(300×250)”, [300, 250], “pb-ad-78158” ).addService( googletag.pubads() ) ); } );

    The post The Beginners Guide to Lightroom Presets by Sean McCormack appeared first on Digital Photography School.


    Digital Photography School

  • 2 Long Exposure Photography Hacks to Try if You Don’t Have an ND Filter

    We all love long exposures, well I personally do. They are a great way to create dynamism, movement, and add depth to your images.

    In this tutorial, I’ll show you two long exposure hacks that can be useful if your Neutral Density filters are not dark enough, if it’s too bright outside and you cannot get a long exposure, or if you simply don’t have any ND filters. Dark ND filters can be really expensive, so this is a good alternative.

    IMG 8076

    Long exposures create this surreal, and yet very pleasing effect to give a WOW factor to your images. Whenever you take a photo at night you will automatically get a long exposure, unless you use a very high ISO. For this tutorial I am talking about long exposures during the daytime, which are a bit more complicated to achieve.

    The two hacks involves taking nine different images, and stacking them together. Now before I actually explain them, I will briefly give you the best camera settings and shooting conditions:

    Shooting and camera settings

    • You will ultimately get the best results if you shoot on a cloudy day with a lot of wind. Why? Because on a cloudy day you will get clouds, and the wind is going to give them movement, and that’s what you want – movement. On a cloudy day, you will also get the minimal amount of light to be able to extend your shutter time.
    • You absolutely need a tripod, first all of all because your images need to be aligned, and you want your images as sharp as possible. With a shutter speed slower than 1/60th, you will start to get blurry results without a tripod.
    • Use a cable release or a 2-second timer every time you take an image. This again is a great way to avoid camera shake and get sharp results.
    • Focus on your subject and put the lens to manual focus, before you start taking your images. DO NOT refocus between the nine shots you are going to take.
    • Use an ISO of 100. You are on a tripod, so you don’t really need a higher ISO.
    • Use a very small aperture, like f/22. This will cut down the light entering your camera as much as possible and with an ISO of 100, will help slow down the shutter speed.
    • Shoot one or two hours before sunset, then you will also have a minimal amount of light to extend your shutter speed even slower.
    • Use your ND filters if you have some. If your ND filters are very dark (10 stop for example) you won’t need these hacks because you will directly get long exposures. If your filters are not dark enough, I would still recommend using them even if you have a one second exposure.
    • I recommend exposing, and focusing before putting your ND filters on, because after that – well you won’t be able to see clearly.

    Hack #1 – multiple exposure mode

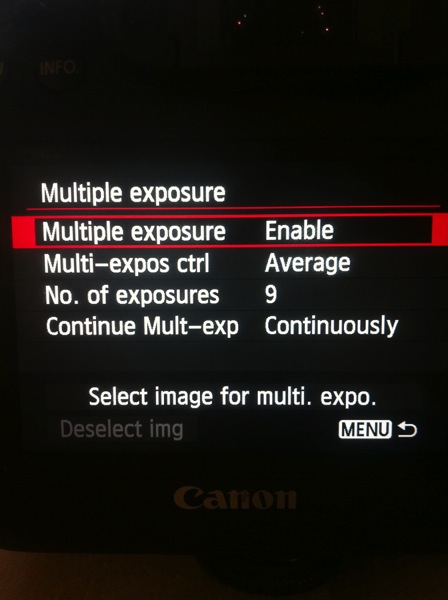
    The first hack consists of using the multi-exposure mode on your DSLR. If you do not have this mode, don’t worry the second hack works for all cameras. I personally use a Canon 6D, but this multi-exposure mode is mostly available for all sorts of advanced DSLRs.

    You will find this mode on your menu, you just need to enable it.

    IMAGE1

    For the settings:

    • Average for the Multi-expos ctrl option
    • Continuously for Continue Mult-exp setting

    You have the choice to pick how many exposures you want to shoot, the maximum will depend on your DSLR. I usually pick nine exposures to get as much movement on the clouds as I want.

    This mode will allow you to multiply your shutter speed by the number of exposures you shoot. For example, If you shoot a single image with an exposure of one second, you will get a total exposure of nine seconds if you shoot nine exposures. It works the same if you have an exposure of 15 seconds.

    With this mode, the camera will automatically stack the images together and give you one single image with all the cloud movement. This trick also works if you want some nice silky water.

    If the clouds are moving really fast, then I recommend waiting around two seconds before you take another shot. The main trick is to not have the clouds at the same position one shot after the other. If the clouds are moving very slowly then I recommend waiting around 10-15 seconds between shots.

    This mode will also tell you on your screen, how many images you have left to complete your multi-exposure.

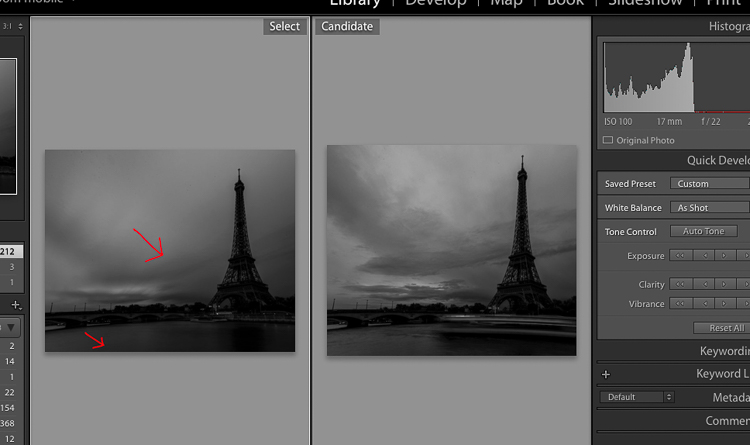
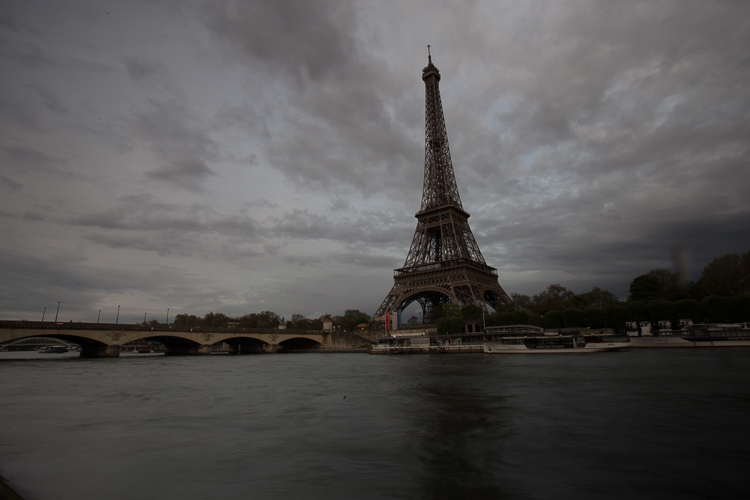
    This is an example of a long exposure I got using this method. My aperture was f/22, ISO 100, and I had a shutter speed of one second after using my ND filters. That wasn’t enough to get a long exposure with stretchy clouds, so I decided to use the multi-exposure mode. I took a total of nine shots, and you can see below the before and after using this mode. You can see that it does not only affect the clouds, my water looks nice and silky as well.

    IMAGE2

    Single image

    IMAGE3

    Nine shots using multi-exposure in-camera.

    IMAGE4

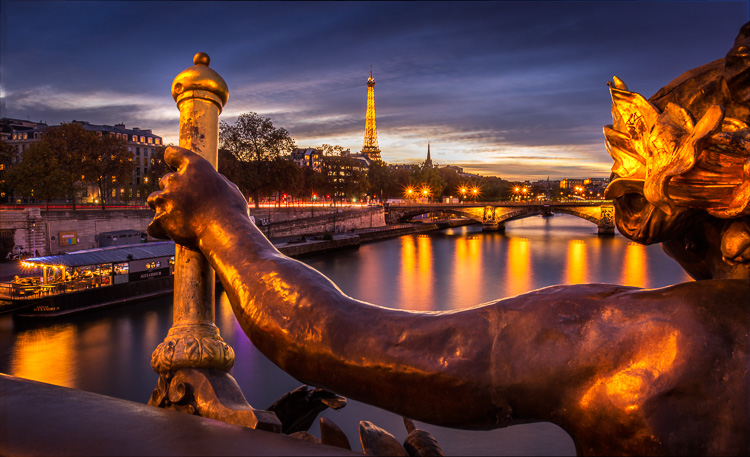
    After some retouching, I got this result!

    Hack #1 – multiple exposures merged in Photoshop

    The second hack consists of doing exactly the same thing but manually. If you are used to shooting time lapses, then this shouldn’t be too complicated to understand.

    The multi-exposure mode in-camera gives you automatically, and directly, the long exposure result in one image. For this hack, will shoot nine separate images, one after the other.

    You need to use the same camera settings I mentioned above (manual mode, manual focus, tripod, small aperture, ISO 100, release cable or 2-second timer). For the shooting conditions I would also recommend the same thing, and use ND filters if you have some.

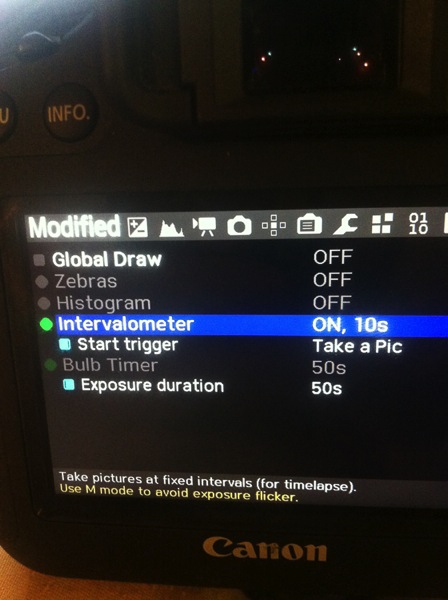
    You will basically shoot a time lapse of nine images only. Do not forget to have an interval of 10 seconds minimum between each shots. This process can be quite boring. I personally use the magic lantern camera hack that has an intervalometer built inside the camera. I can then pick how long I want my interval to be between each shot, and the camera will automatically take an image every 10 seconds, for example, until I decide to stop.

    IMAGE5

    You can buy an intervalometer or use the timer on your phone to count your intervals. It’s really up to you.

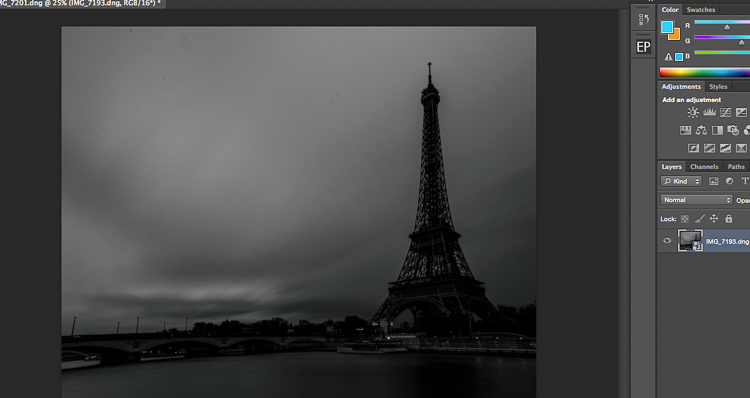
    Here’s an example of nine images I shot one after the other with an interval of 15 seconds between each. You can clearly see that the clouds are moving. For demonstration purposes, I have intentionally underexposed these shots.

    IMAGE6

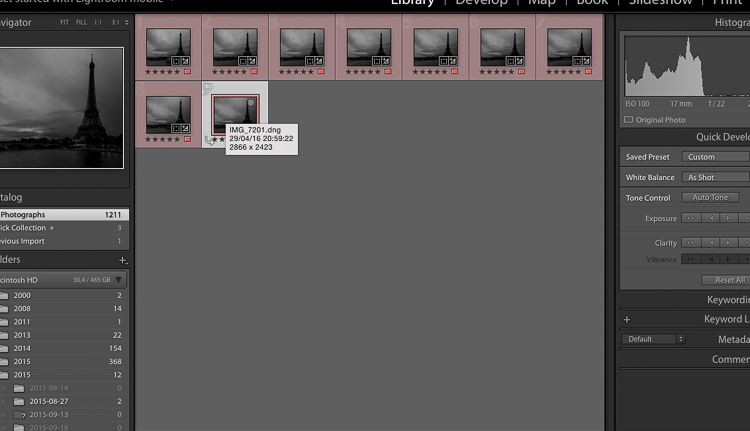
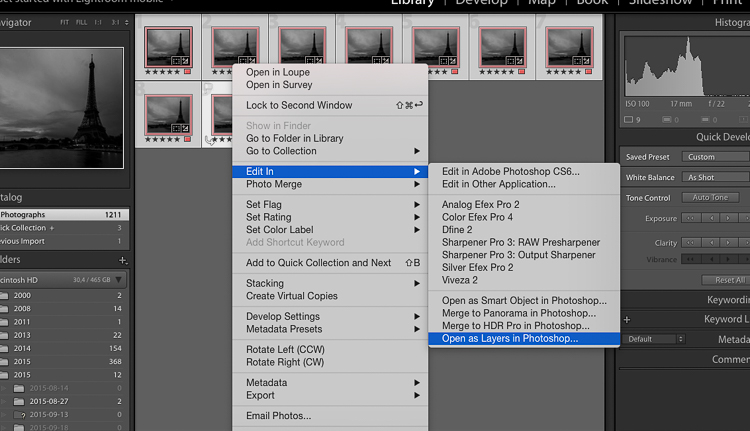
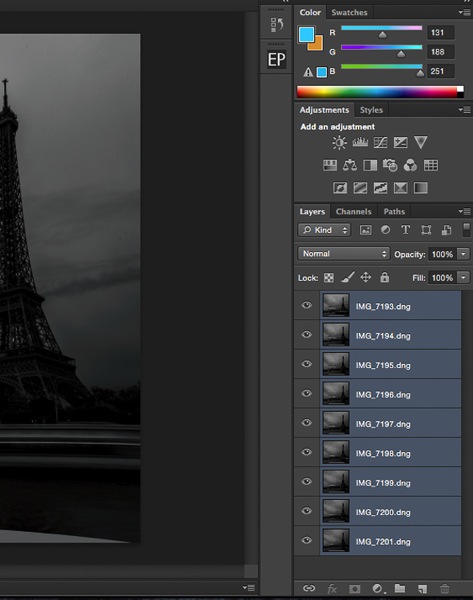
    So after you get all your images, import them into Photoshop as layers (from Bridge or Lightroom whatever fits with your workflow).

    IMAGE7

    Open as Layers in Photoshop after selecting the images in Lightroom.

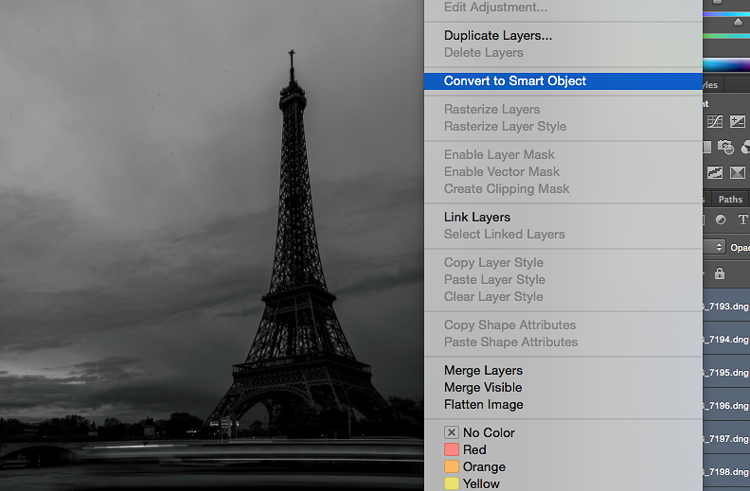
    Then next thing you want to do is to select all the layers, and create a smart object.

    IMAGE8

    IMAGE9

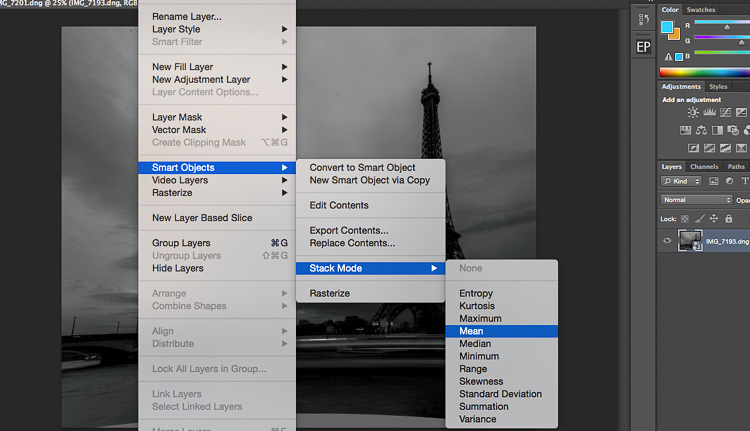
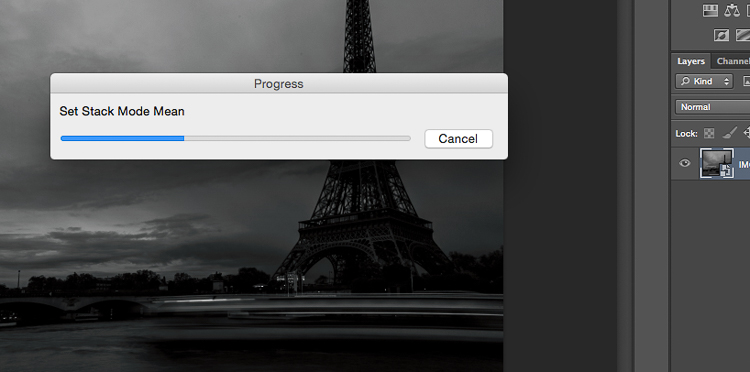
    After that go to Layers -> Smart Objects -> Stacking -> Mean.

    IMAGE10

    IMAGE11

    Photoshop will create a nice long exposure now, combining all the layers.

    IMAGE12

    Here’s the before and after:

    IMAGE13

    Before is on the right of a single image – after is on the left.

    Conclusion

    You don’t need super dark expensive filters to create long exposures. Of course, you will get the best results with them, but this is a pretty cool alternative. Now personally as a 19 year old student, I cannot spend a lot of money on gear, and so far these two hacks have worked perfectly for me.

    IMG_7663-Edit

    Enjoy the art, and share your hacked long exposure images in the comments below. I’d love to see your results.

    googletag.cmd.push(function() {
    tablet_slots.push( googletag.defineSlot( “/1005424/_dPSv4_tab-all-article-bottom_(300×250)”, [300, 250], “pb-ad-78623” ).addService( googletag.pubads() ) ); } );

    googletag.cmd.push(function() {
    mobile_slots.push( googletag.defineSlot( “/1005424/_dPSv4_mob-all-article-bottom_(300×250)”, [300, 250], “pb-ad-78158” ).addService( googletag.pubads() ) ); } );

    The post 2 Long Exposure Photography Hacks to Try if You Don’t Have an ND Filter by Yacine Bessekhouad appeared first on Digital Photography School.


    Digital Photography School

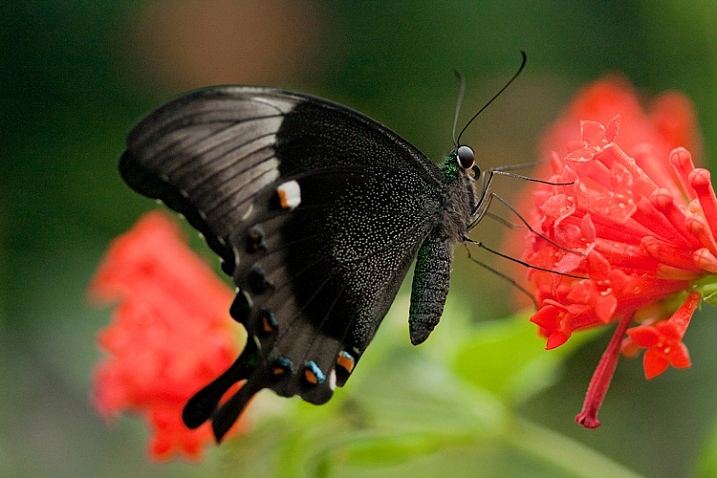
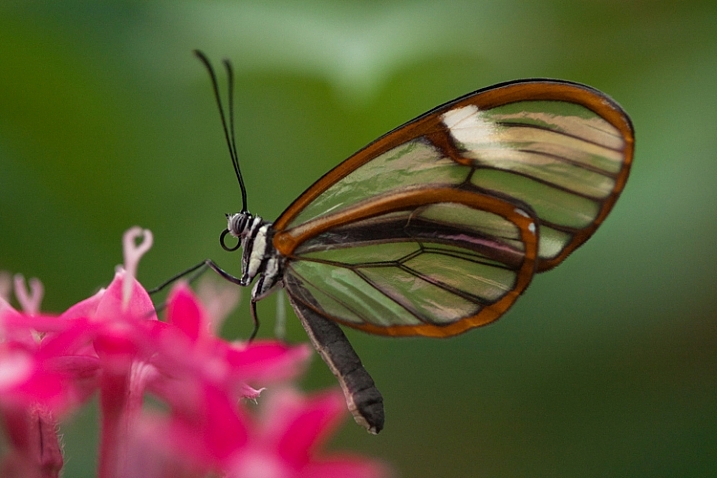
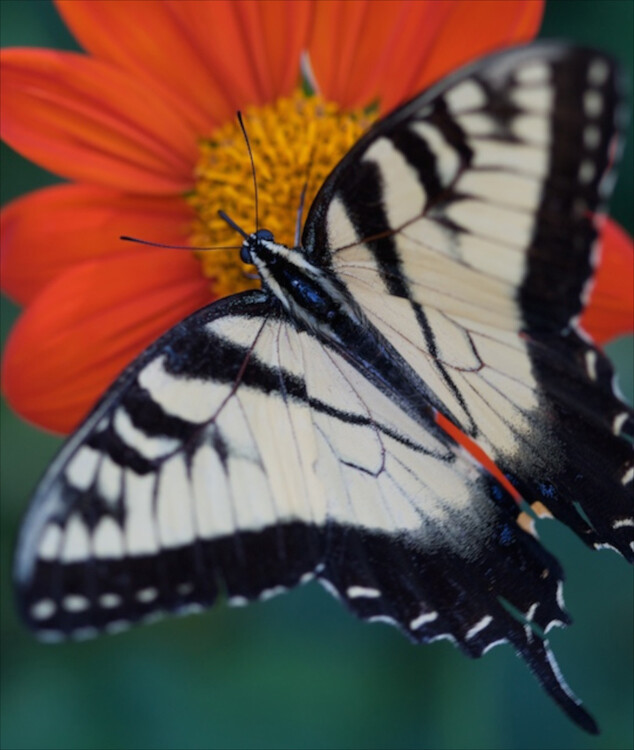
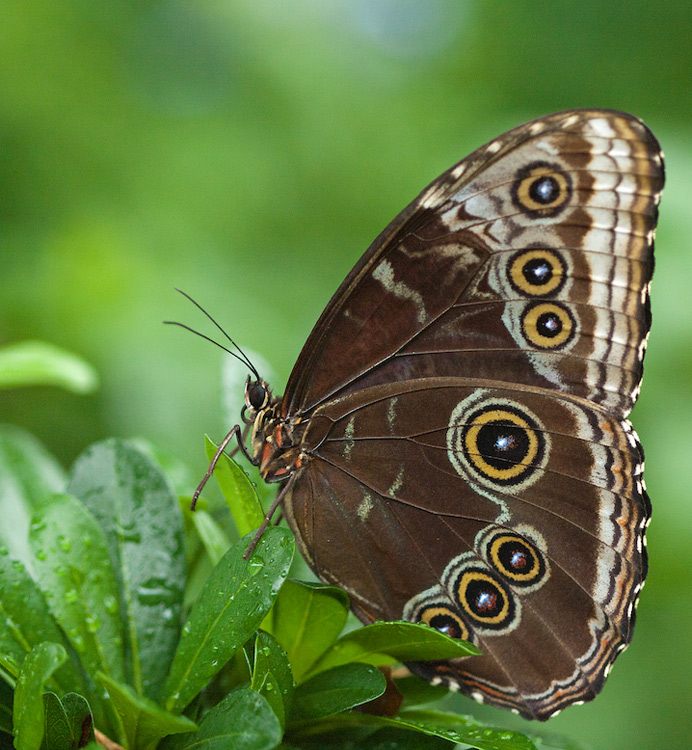
  • 10 Tips for Great Butterfly Photos

    Butterflies are wonderful subjects for photographs, but not always the easiest subject to shoot. You don’t have to wing it anymore, and let good shots be a product of chance. Follow these tips and you’ll come home with some great butterfly photos.

    how-to-photograph-butterflies

    1. Consider shooting with a telephoto macro lens

    To shoot close-ups of butterflies, you’ll want to use a telephoto macros lens. To get great shots, you need to get close to the butterfly, and having a 100mm or longer macro will help. If you don’t have a macro, don’t be discouraged, you can still make great shots with your zoom lens, you’ll just need to shoot more of the environment, but you can make beautiful images that way too.

    2. Find a location with flowering plants that attract butterflies

    how-to-photograph-butterflies2

    Specific plants, such as the butterfly bush, are known to attract butterflies. See if you can find a location in a park, zoo, or arboretum that has a flower garden with plants chosen specifically to attract butterflies. The more subjects you have to photograph, the better your chances are at nailing the perfect butterfly shot.

    3. Pick a spot and wait for the butterflies to come to you

    how-to-photograph-butterflies4

    Once you’ve found your garden, find an area that seems to have a lot of butterflies around. While photographing butterflies in flight seems like a great idea, it’s pretty difficult, and it will likely leave you frustrated.

    Take a minute or two and just observe. Butterflies seem to come back to the same flower over and over again. Just watch, then pick a flower and wait for the butterfly to come to you. I usually choose a flower that is in the shade. Harsh shadows take away from the beauty of the photograph. I also watch the background to make sure that it compliments the butterfly.

    4. Use a monopod or a tripodHow-to-shoot-butterflies1

    If you use a tripod, don’t lock it in. Leave the head loose, to give you some flexibility. I like using a tripod over a monopod for shooting butterflies. It helps me keep the camera in place and ready, and I can take my eye from the viewfinder as I watch and wait for them to come to my flower. Using a tripod also helps me to frame my photo ahead of time to keep the background very clean.

    5. Shoot in manual exposure mode

    In a situation like this, I prefer to shoot in manual mode. When I am focused on one particular area, the lighting, and therefore my exposure, isn’t going to change, or at least not very much. I like to shoot at least 1/500th of a second. I prefer to use a wide aperture for a narrow depth of field. But, if you are just starting out, give yourself a break by using an aperture that will give you more depth of field – f/8 would be a great starting point and you can adjust from there.

    how-to-photograph-butterflies5

    6. Focus on the butterfly’s eyes

    Some photographers like to focus on the wings, I choose to make sure the eye is as sharp as can be, and if the wings fall off focus a little bit, that’s okay. It’s easier to use a bigger depth of field, like f/8 or f/11, so I encourage you to try that first.

    I like to use a smaller f/stop in order to throw the background out of focus. It is much more challenging to shoot that way, but I like the effect it gives. It makes the butterfly really stand out from the background instead of blending in to its surroundings.

    7. Shoot the butterfly in profile

    how-to-photograph-butterflies6

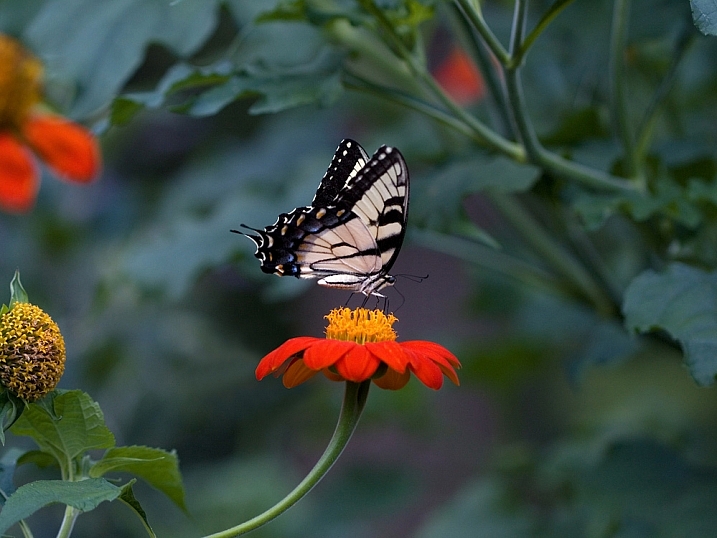
    If you are using a larger aperture, and shallow depth of field – shoot the butterfly in profile. That way, you have more of the butterfly in focus. I also love to see how the antennae stands out from the background, and love the details of their legs. Yes, there is beauty in the wings, but there is also an awe in those tiny legs that support the butterfly, as well as its tendril. Look beyond the obvious, to details for outstanding photographs.

    8. Shoot tight as well as loose to capture the environment

    how-to-photograph-butterflies3

    Notice the differences between the photographs above and below. It’s the same species of butterfly, in the same field of flowers – but one shot is cropped tighter and one is framed looser, with more space around the butterfly. Both are successful. Take note in the top photograph, how the antennae are framed with the orange flower to make them stand out. If my angle had been such to have the darker green in the background, it may not have been as successful.

    Also note that the orange in the wings mimics the orange flowers. Shooting great butterfly shots goes beyond just taking sharp photographs of wings!

    how-to-photograph-butterflies7

    9. Break the profile rule (above)

    I love this photograph because it feels like this butterfly is moving forward, into a new place. The head is sharp and the lower wings fall out of focus due to the narrow depth of field, but in this case, it really works because it pulls out attention to the butterfly’s eyes, and into the photograph. It gives the viewer the feel of looking over the shoulder of the butterfly into some new place.

    how-to-photograph-butterflies8

    This photo is successful because it moves beyond recording what the wings look like and creates a mood and sense of movement and anticipation.

    10. Have patience and have fun!

    Beautiful butterfly photos take time and patience, but they are worth it. If you don’t get it your first time out, keep trying. It’s a great chance to hone your skills and you might get an amazing shot.

    Please share your questions and butterfly images below and also remember to post them on the weekly challenge: Butterflies and Bugs happening here.

    googletag.cmd.push(function() {
    tablet_slots.push( googletag.defineSlot( “/1005424/_dPSv4_tab-all-article-bottom_(300×250)”, [300, 250], “pb-ad-78623” ).addService( googletag.pubads() ) ); } );

    googletag.cmd.push(function() {
    mobile_slots.push( googletag.defineSlot( “/1005424/_dPSv4_mob-all-article-bottom_(300×250)”, [300, 250], “pb-ad-78158” ).addService( googletag.pubads() ) ); } );

    The post 10 Tips for Great Butterfly Photos by Vickie Lewis appeared first on Digital Photography School.


    Digital Photography School

  • 8 Things to Consider Before You Buy Your Next Lens

    How to buy a camera lens

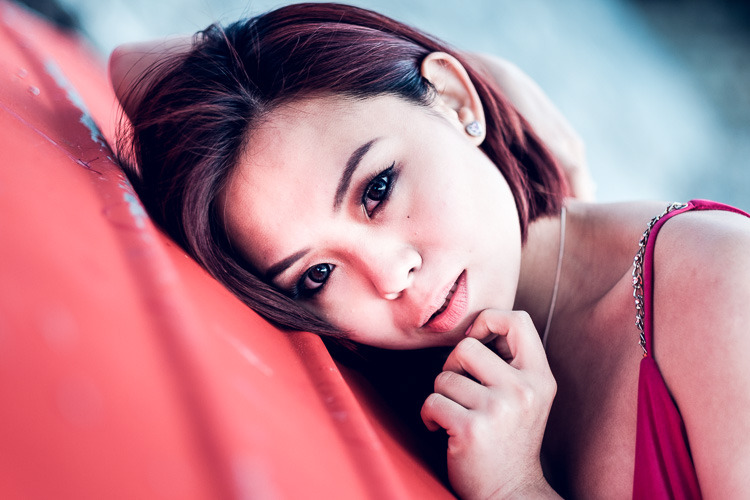
    Prime lenses are best for creating portraits like this one, taken with the aperture set to f/1.2 to blur the background.

    Are you thinking of buying a new lens for your camera? Stop, and read this article first.

    One of the hardest things to achieve when buying new camera gear is clarity. Why do you need a new lens, how much should you spend, and where does it fit into the big picture of your gear acquisition? Once you are clear on these points, it makes the process of deciding which lens (or lenses) to buy next much easier.

    Let’s look at eight things to consider before you buy that new lens:

    1. Budget – how much do you have to spend?

    Everybody’s budget is different, and the amount of money you have to spend determines which lenses come into consideration. But, no matter what your budget, hold that figure in mind while you read this article. You may see things in a different light afterward.

    My approach is to own as few, good quality lenses as possible. In other words – don’t over buy. Keep the big picture in mind. What lenses would you eventually like to own for your camera? How does your next purchase fit into this plan? Ideally, you should have a good idea of which lenses you need, and then you can plan accordingly.

    This type of thinking can lead to a big shift in what lenses you decide to buy. For example, a few years ago I became frustrated with the size and weight of my Canon system. I was also thinking ahead to some travel plans I had coming up, and realized it was important to keep my kit as lightweight as possible (hand luggage allowances are very low and strictly enforced in New Zealand airports). That led to the decision to switch to the Fujifilm X-Series system. I now have the lightweight kit required for traveling.

    2. APS-C or Full-frame?

    Most manufacturers offer both APS-C and full-frame cameras in their ranges. But this makes buying lenses even more confusing.

    Let’s say you own an APS-C camera. But at the back of your mind you think you might one day buy a full-frame body. That raises the question – do you buy a lens that works on APS-C bodies only (the advantage being that it is probably smaller and lighter than a lens that would fit a full-frame camera) or one that fits a full-frame body as well (which will probably be larger and more expensive)?

    Tricky question to answer, isn’t it? And that’s not even taking into account the difference that sensor makes to the lens’s angle of view.

    Ideally, you should decide when you buy your first camera body whether it should be APS-C or full-frame, then stick to the same sensor size in the future. It greatly simplifies the lens buying process, and eliminates a lot of confusion.
    How to buy a camera lens

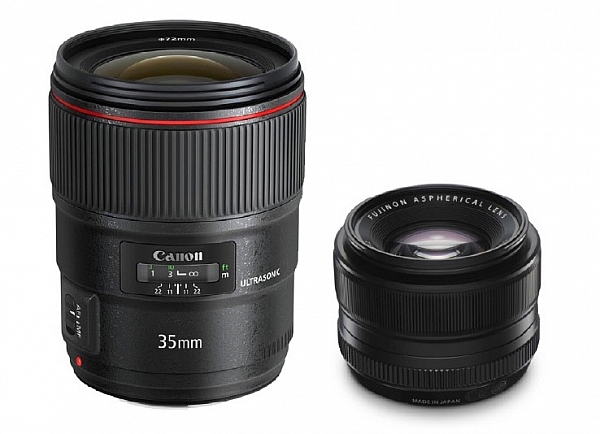
    What do these two lenses have in common? They are both 35mm f/1.4 lenses. The Canon one (left) is much bigger than the Fujifilm lens (right) because it is made to fit a full-frame camera. This is a good example of how sensor size, affects lens size.

    3. Don’t fall into the focal length trap

    The focal length trap is the belief that you need zoom lenses that cover every conceivable focal length. For example, if you start off with an 18-55mm kit lens, then buy a telephoto zoom, you might feel that you need one that starts from 55mm so that you don’t miss out on any focal lengths in between.

    This simply is not true. The next point explains the way you should be thinking about lenses.

    4. What subjects are you going to photograph?

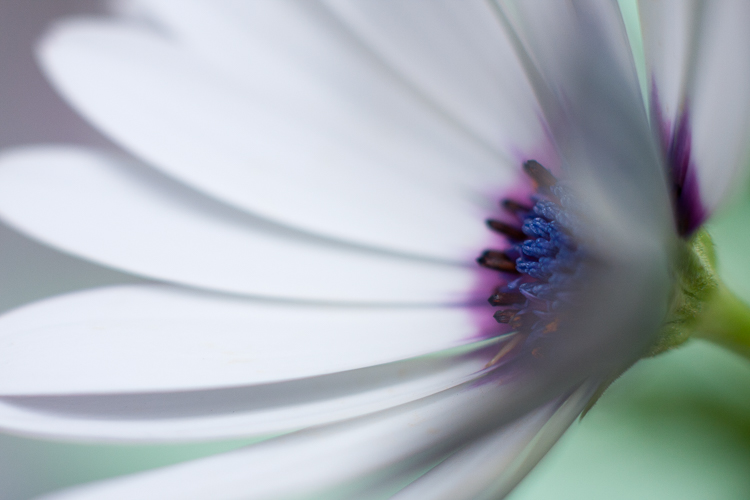
    Continuing with the 18-55mm kit lens example, you may find yourself considering the following second lenses: a 50mm prime as a portrait lens (giving you the benefit of high quality imaging and wide apertures), or a macro lens for taking close-up photos of insects and flowers, or wide-angle zoom for landscape photography, or a super-telephoto for wildlife and sports photography.

    The key point here is that lens choice is related to subject. The subject always comes first. Once you know what you are going to photograph, you can choose the best lens (or lenses) for the job. Focal length is a secondary consideration.

    In other words, don’t buy a lens because you think you should own it, buy it because you actually need it.
    How to buy a camera lens

    5. Should you buy a zoom or a prime lens?

    The benefit of zoom lenses is convenience. If you are a wedding photographer it is much easier to zoom from a wide-angle to a telephoto when you need to, than it is to change lenses. If you are a landscape photographer it is easier to use a wide-angle zoom to frame the scene precisely, than it is to change prime lenses (or it may not be possible to stand where you need to get the shot).

    The benefits of prime lenses are image quality and wider apertures. Compare an 18-55mm kit lens (typical maximum aperture f/5.6) with a 50mm prime with maximum aperture of f/1.4. There’s a four stop difference 16 times more light) between f/1.4 and f5.6, which helps you take photos with blurred backgrounds, and also to shoot in low light conditions, without raising the ISO too much. That’s why a 50mm prime is a better portrait lens than the 18-55mm kit lens (taking us back to the point about lens choice being driven by subject, not focal length).

    Some photographers prefer primes, others zooms – thinking about your priorities will help you decide which is best for you.

    For example, if you are a landscape photographer who always shoots at f/8, f/11, or f/16 then the wider apertures that prime lenses have are of little use to you, and a zoom may be a better choice.
    How to buy a camera lens

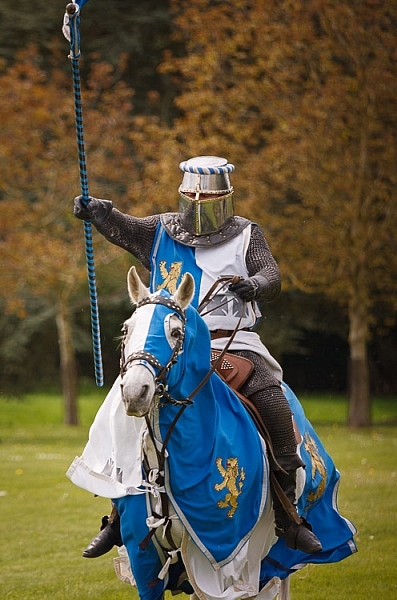
    Action photos require a telephoto lens and a camera with a good autofocus system capable of tracking moving subjects. A zoom will help you frame the subject accurately.

    6. Don’t forget about weight and size

    Think about the weight and size of your lenses carefully. After all, you are the one who is going to be carrying them around.

    But there is another thing you should also think about when it comes to size, and that is filters. You can save a lot of money on filters by buying smaller lenses. If you’re curious to see how much, do a search for circular polarizing filters and compare the prices of the same filter in 58mm and 77mm sizes. If you need to buy a lot of filters (landscape photographers take note) then you can potentially save hundreds of dollars by buying a smaller (the diameter of the lens or filter size is also smaller) lens.
    How to buy a camera lens

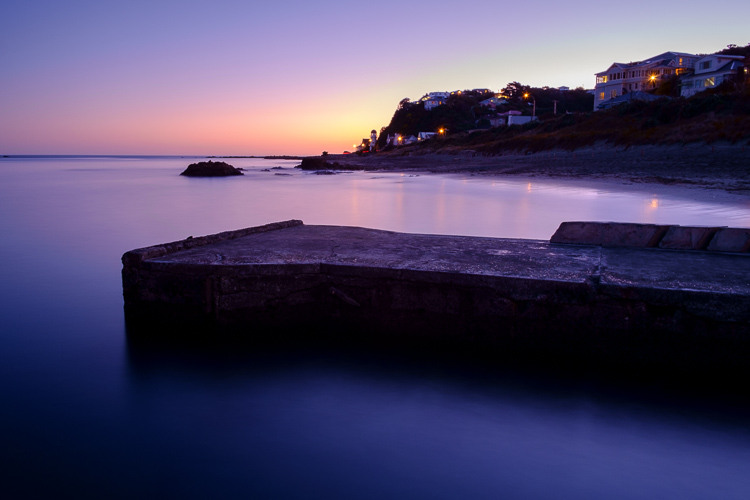
    Wide-angle zooms are ideal for landscape photos and will help you take photos like this. Bear in mind that smaller lenses also require smaller (and less expensive) filters.

    7. Build quality, weather proofing and autofocus

    Most manufacturers have inexpensive, middle range, and expensive or high end lenses. Inexpensive lenses may seem like a bargain at the time, but they won’t be built as well as more expensive ones, and they may also have inferior (i.e. slower and noisier) autofocus motors.

    At the other end of the scale expensive lenses tend to be built well, use good quality autofocus lenses (i.e. faster and quicker) and may also be weatherproofed (important if you take photos in bad weather or dusty conditions).

    Bear these points in mind when considering a lens. Don’t forget to ask how well the lens is built, whether it is weatherproofed, and the speed and quality of the autofocus motor.
    How to buy a camera lens

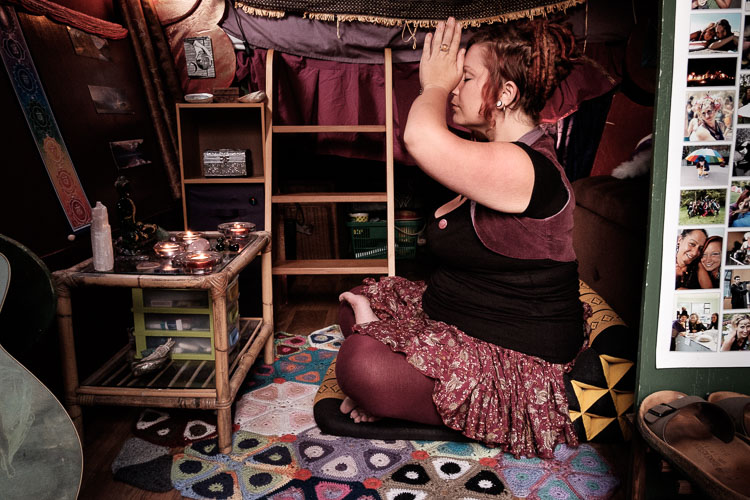
    Wide-angle lenses are also helpful for taking photos indoors, where you may not have space to move back to use a longer focal length.

    8. Brand name or third party?

    You can often save money by buying a third-party lens for your camera, but in my opinion it is best to buy a lens made by your camera’s manufacturer whenever possible. Unless you have a specific reason to buy a third-party lens (usually because the type of lens you need isn’t made by your camera’s manufacturer) then stick with OEM (Original Equipment Manufacturer) lenses. They hold their value better, and autofocus performance is usually superior.

    Editor’s note: for a good discussion on that topic, head to: Brand Name Versus Third-Party Photography Gear: Which is better?
    How to buy a camera lens

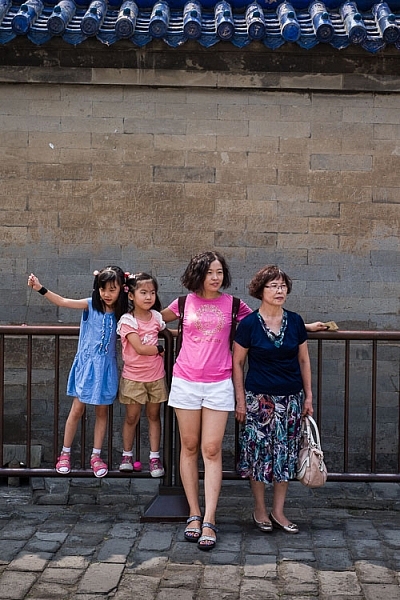
    If street and candid photography is your thing, then consider buying smaller lenses to help you take photos like this, without being noticed.

    9. Image Stabilization*

    An Image Stabilizer is a motor inside the lens, that moves the elements in a way that compensates for the movement created by camera shake. It is given different names by different manufacturers (Nikon, for example, calls it Vibration Reduction). It helps you take photos in low light, using lower ISO settings or smaller apertures, than would otherwise be possible. Lenses with Image Stabilization cost more than their non-stabilized counterparts, so think carefully about whether or not you need it, before paying the extra money.

    * Some manufacturers, like Sony and Pentax, build Image Stabilization into the camera body, not the lenses.

    Hopefully these points will help you decide which lens to buy next for your camera. If you have any questions about lenses let us know in the comments and I will do my best to answer.


    Mastering Lenses

    If you want to know more about buying and using lenses then please check out my ebook Mastering Lenses: A Photographer’s Guide to Creating Beautiful Photos With Any Lens.

    googletag.cmd.push(function() {
    tablet_slots.push( googletag.defineSlot( “/1005424/_dPSv4_tab-all-article-bottom_(300×250)”, [300, 250], “pb-ad-78623” ).addService( googletag.pubads() ) ); } );

    googletag.cmd.push(function() {
    mobile_slots.push( googletag.defineSlot( “/1005424/_dPSv4_mob-all-article-bottom_(300×250)”, [300, 250], “pb-ad-78158” ).addService( googletag.pubads() ) ); } );

    The post 8 Things to Consider Before You Buy Your Next Lens by Andrew S. Gibson appeared first on Digital Photography School.


    Digital Photography School
  • The Winner of $1000 from our 101 Landscape Lightroom Presets Competition is….

    Recently we launched 101 Landscape Lightroom Presets product. As part of the launch we put everyone who purchased a copy into the draw to win $ 1000 in camera gear. Those who purchased the bundle (101 Lightroom Presets and 101 Landscape Lightroom Presets) received 2 entries.

    The winner of this competition is Terrence Jones

    Congratulations – we’ve just emailed you with details of how we’ll get you your prize and can’t wait to see what you buy!

    landscape-lightroom-presets

    Thanks everyone else for picking up a copy of the the presets packs – we’ve received some amazing feedback and appreciate you supporting dPS with your purchase.

    googletag.cmd.push(function() {
    tablet_slots.push( googletag.defineSlot( “/1005424/_dPSv4_tab-all-article-bottom_(300×250)”, [300, 250], “pb-ad-78623” ).addService( googletag.pubads() ) ); } );

    googletag.cmd.push(function() {
    mobile_slots.push( googletag.defineSlot( “/1005424/_dPSv4_mob-all-article-bottom_(300×250)”, [300, 250], “pb-ad-78158” ).addService( googletag.pubads() ) ); } );

    The post The Winner of $ 1000 from our 101 Landscape Lightroom Presets Competition is…. by Darlene Hildebrandt appeared first on Digital Photography School.


    Digital Photography School
  • How to Enhance Urban Night Photographs Using Luminosity Masks in Photoshop

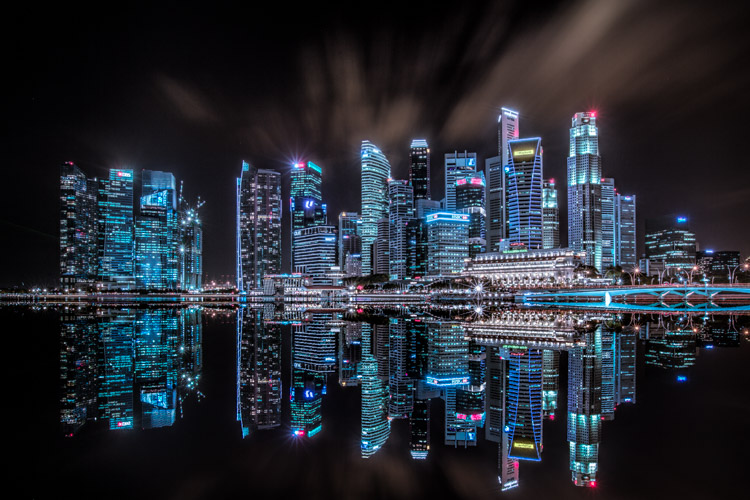
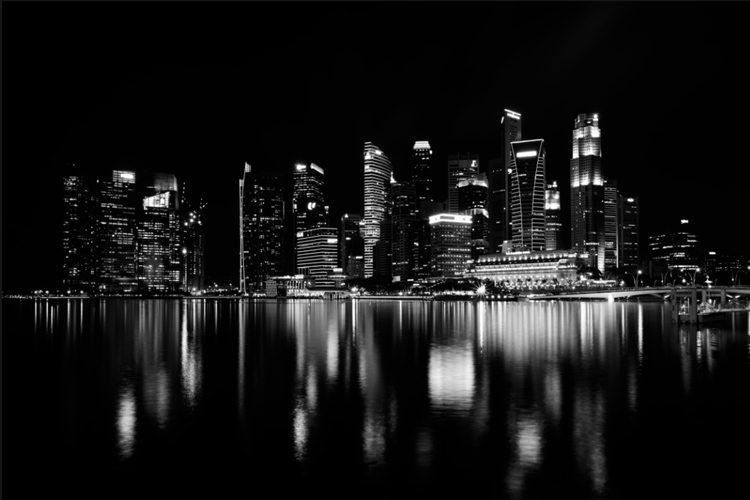
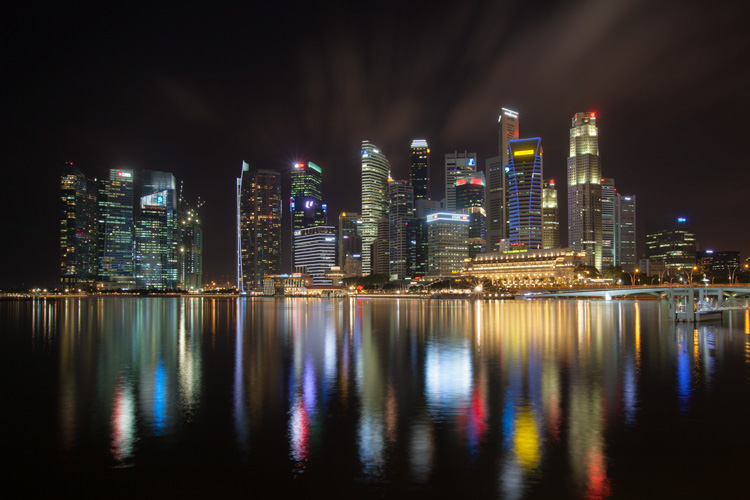
    As the sun sets on a city’s skyline, thousands of lights come flooding the concrete jungle, turning every urban scene into a photographer’s paradise. Every corner around the city suddenly seems too irresistible not to be photographed.

    Image 01

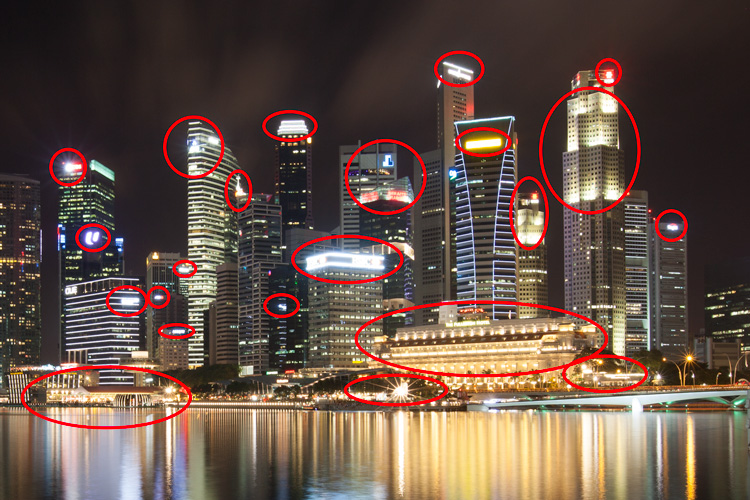
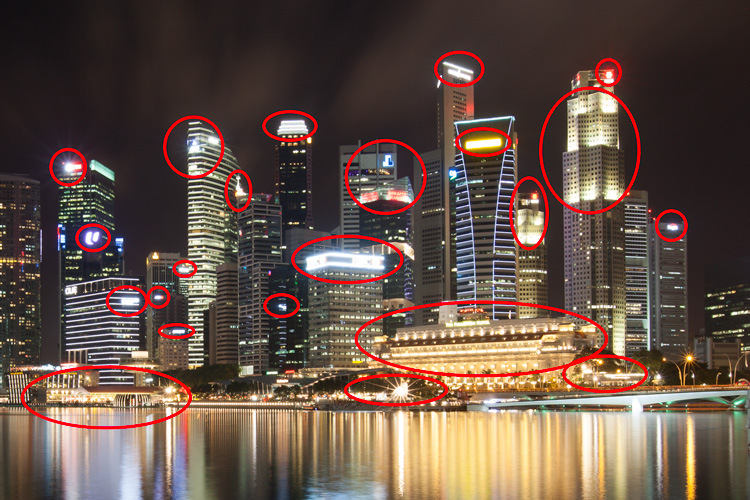
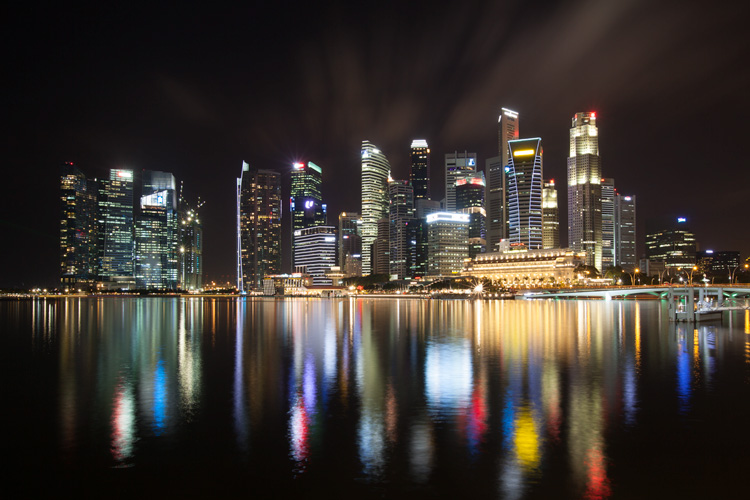
    Urban night shots is probably one of the most common photos taken at night. The way most people shoot cityscapes at night is to keep the camera still, press the trigger, and snap the shot. The result is often an uninspired image, with overexposed highlights due to the long exposure. This problem can be fixed by blending multiple exposures, to recover details in the highlights with luminosity masks.

    Image 02

    Overexposure of highlights circles in red.

    Using Luminosity Masks is a way of making a selection based on the luminosity (or brightness) value of the pixels. The main advantage of luminosity masks over other selection tools is its ability to feather the edges, which makes the transition seamless. One of the earliest articles detailing how luminosity masks works was published by Tony Kuyper. You can learn more about luminosity masks here.

    In this tutorial, I will show you step by step, how you can recover detail in the highlights of your urban night shots, using luminosity masks in Photoshop. There are two parts to this: taking the multiple exposure, and editing them in Photoshop with luminosity masks.

    Part one: How to take multiple exposures

    • Step 1: You need a tripod, and a camera that has aperture priority and manual mode.
    • Step 2: Mount your camera on the tripod and compose your image. In aperture priority mode, set the aperture and ISO settings you want, and take a shot with the default metering mode (usually matrix metering).
    • Step 3: Review the image on the LCD screen and take note of the shutter speed. Switch your camera to manual mode and dial in the ISO, aperture, and shutter speed that you used for the first shot.
    • Step 4: Speed up your shutter speed by one stop and take a shot again. For example, if the initial shutter speed was 30 seconds, stopping up by one stop would be 15 seconds (the shutter speed halves).
    • Step 5: Repeat step 4 until you can see details in the highlights by zooming in on the LCD screen on your camera, and checking the histogram for clipped highlights (blinks).

    Tip: Use a remote release and/or enable mirror lockup (in a DSLR) to ensure the sharpness of your photos.

    Part two: Recovering the highlights using luminosity masks in Photoshop

    Step 1: If you use Adobe Lightroom, select all the images you want to blend. Right click on the mouse, choose Edit in > Open as layers in Photoshop. Otherwise, you can open them individually in Photoshop, use the move tool and drag each image into a single file as layers.
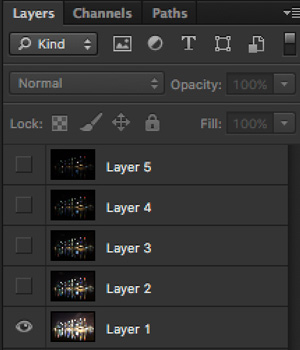
    Step 2: Make sure the images are arranged such that the brightest exposure is at the bottom of the layers. To make sure all images are absolutely aligned, select all layers, then go to Edit > Auto-Align Layers. You may have to crop the image a bit after alignment.

    Image 03

    The layers are arranged so that the brightest image is at the bottom.

    Step 3: Make sure you have luminosity masks Photoshop Actions to add and remove luminosity masks. If you don’t, you can download it here (the file is zipped, so make sure you unzip it first, then follow the instruction on how to install it here).

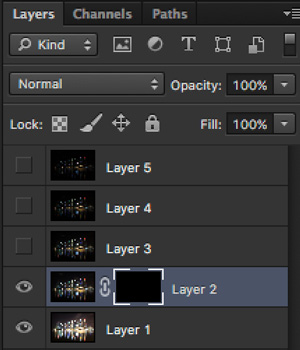
    Step 4: To start off, make all layers invisible except the bottom two (layer 1 and 2). You can do so by unchecking the eye icon next to each layer. Next, create a mask for Layer 2 and fill it with black.

    Image 04

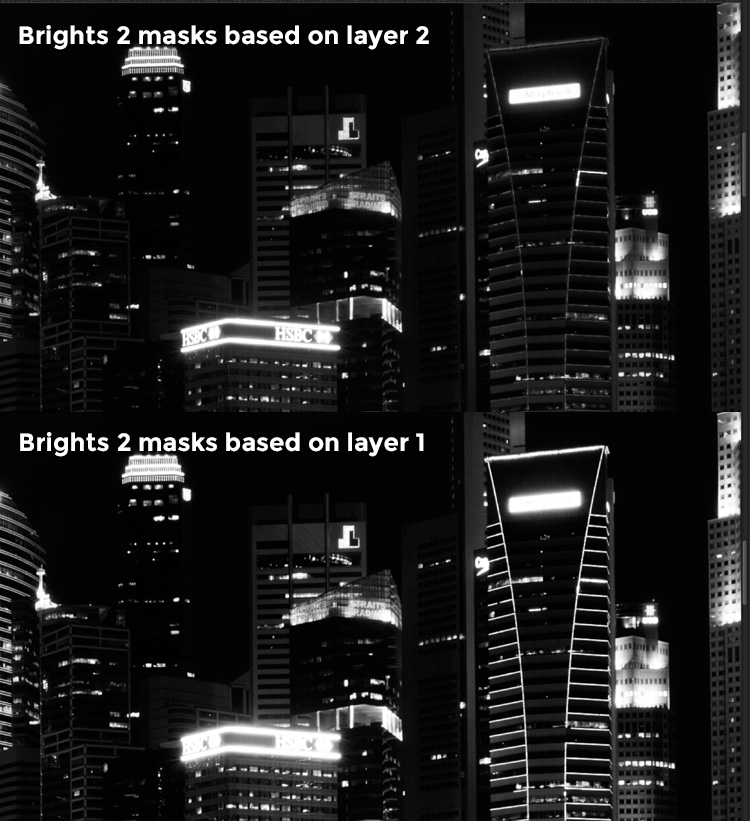
    Step 4: Next, generate luminosity masks based on Layer 1 (the brightest exposure). To do that, select Layer 1 on the layers panel, and generate the luminosity mask with the Photoshop Action.

    Step 5: Go to Channels panel, select a Brights luminosity mask that targets just the highlights. In this case, Brights 2 seems like a good choice because it is not too restrictive and has good feathering on the edges.

    Image 05

    Step 6: Select Brights 2 luminosity mask by holding down CMD (Mac) or CTRL (Win) and left click on the mask. You should see marching ants appear on the image. Depending on your image, if you do see a pop-up window that says “Warning: No pixels are more than 50% selected…”, don’t worry about it and just click ok.

    Step 7: Go back to the layers panel and click on the mask on layer 2. Select the brush tool, set the opacity to 50%, color to white, and paint over the layer mask to blend the darker exposure (Layer 2) into the brighter exposure (Layer 1 below). Depending on your image, you can choose to paint just the brightest highlights or all of them. In this example, I chose to paint all the highlights. If you find the marching ants annoying, hit CMD (Mac) or CTRL (Win) + H key to hide them.

    Image 06

    Details in the highlights are gradually recovered.

    Step 8: Delete the luminosity masks generated previously because you now need luminosity masks based on the brightness of Layer 2, where you have just blended in the darker exposure. To do so, remove the current luminosity masks with the Photoshop Action.

    Step 9: Now select Layer 2 and generate luminosity masks with the Photoshop Action.

    Step 10: Select Layer 3, add a layer mask, and fill it with black.

    Step 11: Go to the Channels panel, select a brights mask that targets the highlights. In most cases, selecting the same mask should do the job. In this example, I have chosen the Brights 2 mask again.

    Image 07

    Comparison of Brights mask for Layer 1 and Layer 2.

    Step 12: Hold down CMD (Mac) or CTRL (Win) and click on Brights 2 mask to select once again. Go back to layers panel and click the mask on Layer 3, then use a white brush as before, and paint over the highlights again. You should see details being recovered gradually. At this stage, you should consider painting over the brightest highlights only instead of the whole image. In this example, I only painted the highlights as circles in the illustration below.

    Image 02

    Step 13: Repeat Steps 8 to 12 until you are done with all the layers. Your final image should have a more balanced exposure, with details in the highlights. You can then apply further tonal or color adjustments, and sharpening to your image.

    Image 08

    Final image.

    Bonus: Adding a reflection and color to the lights

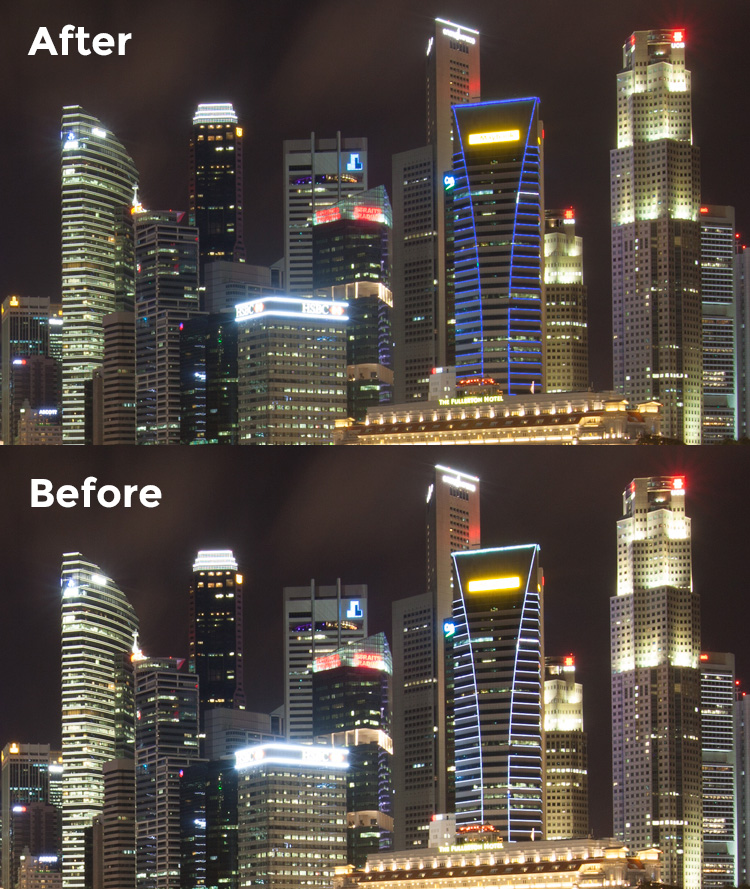
    This involves a lot of editing, and may not be for everyone. For those of you who are into post-processing, you can clean up the image by removing unwanted objects, add a reflection, and change the color of the lights.

    Adding a reflection

    This only works if you have an empty foreground in your image like the example here.

    • Step 1: Use the rectangular marquee tool and make a selection of the city’s skyline. Then, copy and paste it as a new layer.
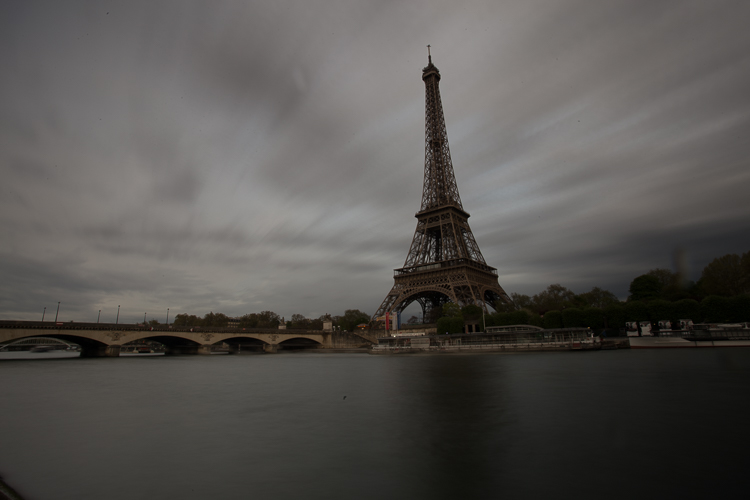
    Image 09

    Copy and paste the selection as a new layer.

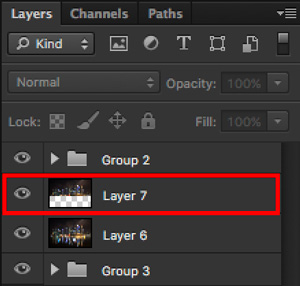
    • Step 2: Select the layer of the copy, hold CMD (Mac) or CTRL (Win) + T to transform. Move your cursor to the image, right click and select > Flip Vertical. Use the move tool to position the flipped image lower to align the border.
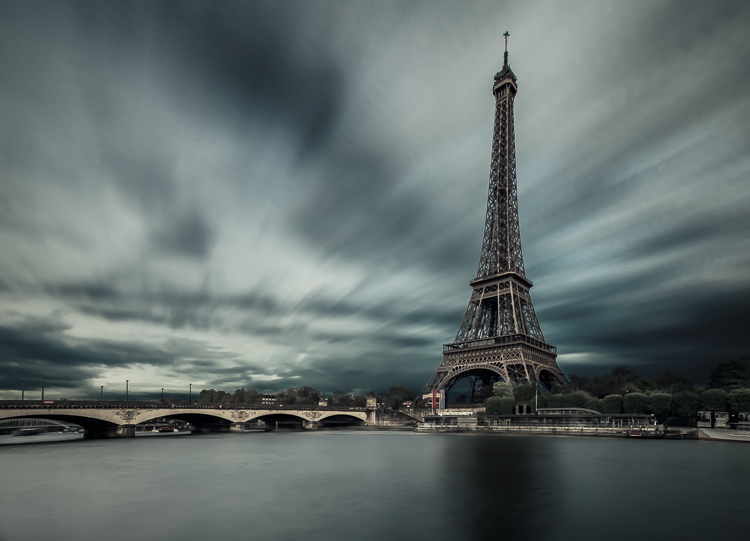
    Image 10

    • Step 3: You can add a ripple effect to the reflection by going to the top menu and selecting Filter > Distort > Ripple. Keep the size of the ripple to medium, set the amount you like, and press ok.
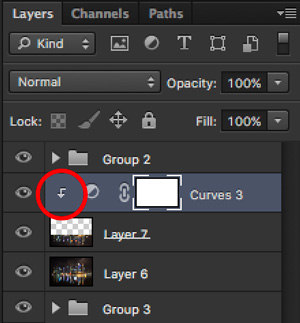
    • Step 4: Increase the contrast of the reflection by adding a curves adjustment layer, and clip it to the reflection layer only. To do that, right click on the curves layer and select Create Clipping Masks. You should see a little arrow on the curves layer pointing down at the layer below it. You can also reduce the opacity of the reflection layer if you like.
    image-11

    Clipping curves adjustment to the layer below.

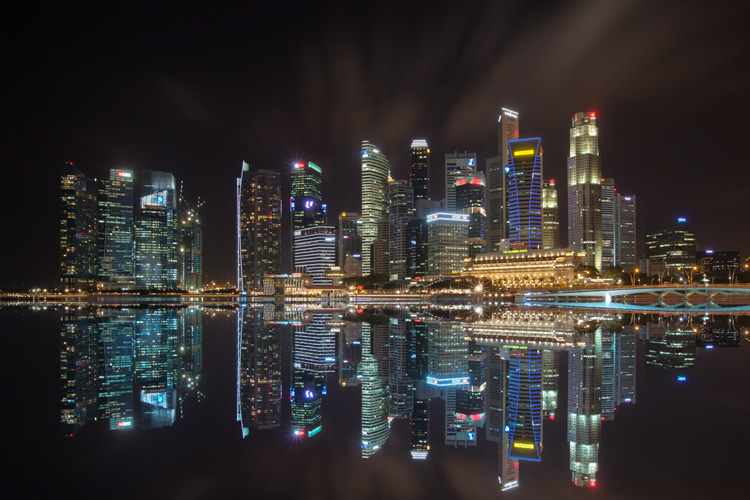
    Image 12
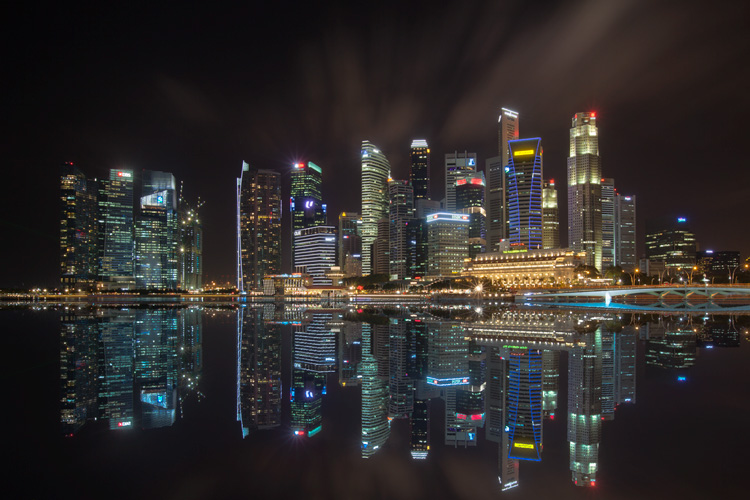
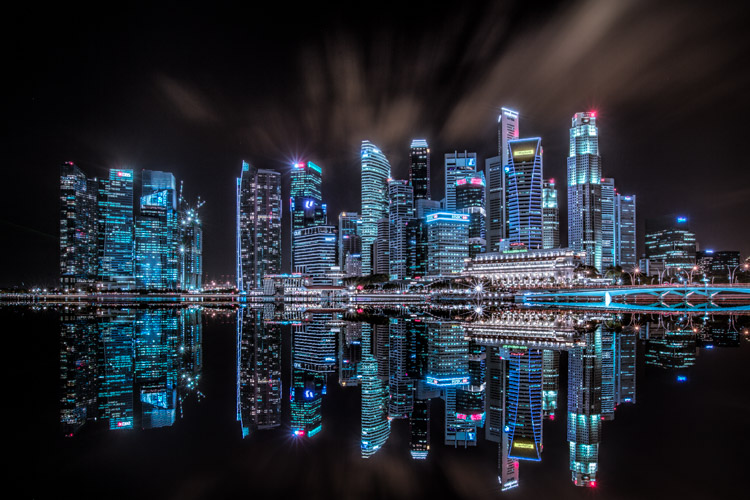
    Final image with reflection.

    Adding color to the lights

    • Step 1: You need a visible layer to begin with. If you don’t have one, you can go to the menu on the top and choose Layer > Merge Visible.
    • Step 2: Generate luminosity masks based on this layer. Remember to delete any luminosity masks you had before this.
    • Step 3: Select a brights luminosity masks that targets the highlights. In this example, I know from before that brights 2 mask works very well, so I’m going to choose it again. Select it by holding cmd (Mac) or ctrl (Win) + left click on your mouse.
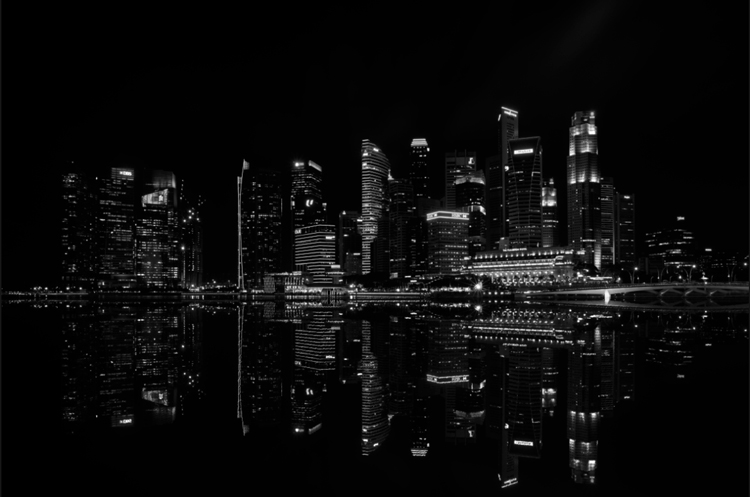
    Image 13

    Brights 2 luminosity mask.

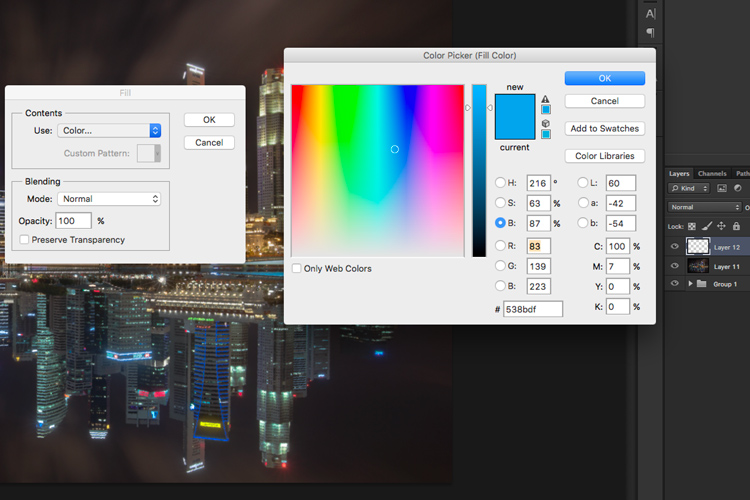
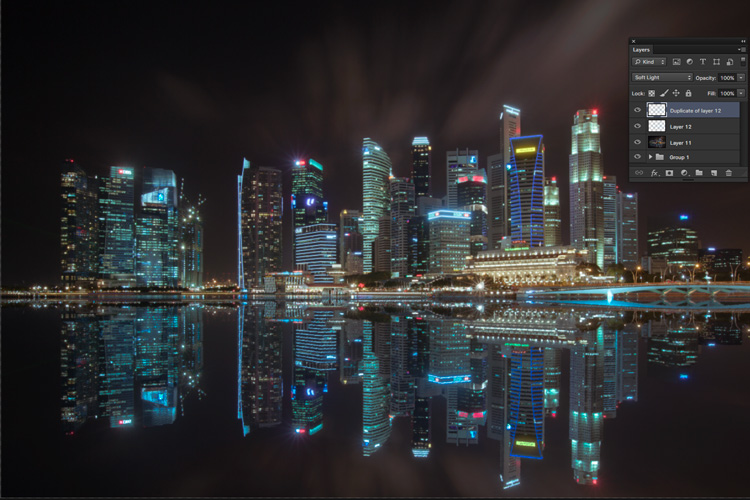
    • Step 4: Add a new layer, and change the blend mode to soft light. The selection should be automatically loaded onto this new layer already.
    • Step 5: Now fill the with the color of your choice by holding down Shift + Backspace, select a color, and press ok. You should now see the color of the lights have changed subtly.

    Image 14

    • Step 5: If you want the effect to be stronger, duplicate the layer once or twice until you like it.
    Image 15

    Duplicate the layer for a stronger effect.

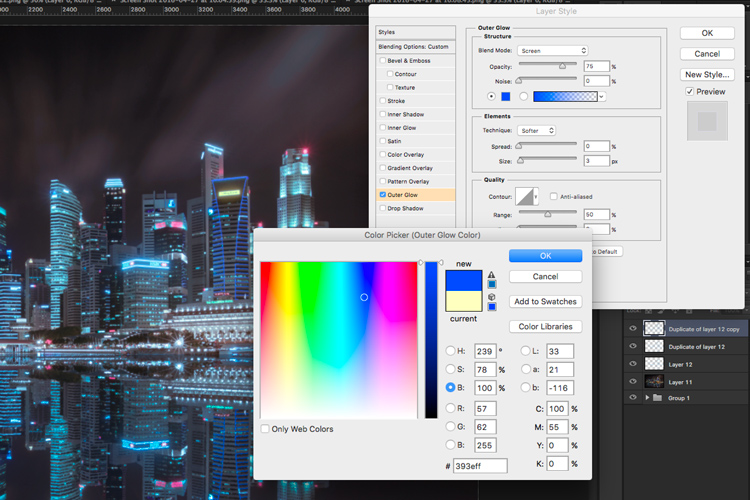
    • Step 6: The final step is what makes the lights glow. Double click on the top layer to bring up the layer style. Check the box for outer glow, and pick a color that is slightly darker than the one you have used before. Click ok and your done!
    Image 16

    Apply outer glow for the final touch.

    Apply a few other tweaks and sharpening and you’ve got yourself a cool urban night cityscape!

    Before

    Before

    Image 01

    After


    googletag.cmd.push(function() {
    tablet_slots.push( googletag.defineSlot( “/1005424/_dPSv4_tab-all-article-bottom_(300×250)”, [300, 250], “pb-ad-78623” ).addService( googletag.pubads() ) ); } );

    googletag.cmd.push(function() {
    mobile_slots.push( googletag.defineSlot( “/1005424/_dPSv4_mob-all-article-bottom_(300×250)”, [300, 250], “pb-ad-78158” ).addService( googletag.pubads() ) ); } );

    The post How to Enhance Urban Night Photographs Using Luminosity Masks in Photoshop by Yaopey Yong appeared first on Digital Photography School.


    Digital Photography School