Category: Photography

  • Lighting 103: How to Gel Big Lights

    Abstract: How to economically gel umbrellas, beauty dishes and soft boxes

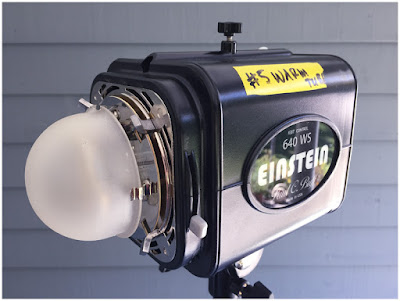
    When using bigger lights (such as an Einstein e640, seen above) gelling gets a bit more complicated and expensive. Why? Big lights have protruding flash tubes and modeling lights, and potentially big modifiers.

    But for each kind of modifier, there are workarounds that will allow you total gel coverage without having to buy large sheets of gels.Read more »
    Strobist

  • 4 Beginner Tips for Creating Dramatic Portraits with One Flash

    In this article, I will explain how you can use a transmitter/receiver, or transceiver system to achieve simple dramatic portraits using only one flash. Below is a step-by-step guide on how to get you started.

    Background

    I used to fear using anything other than natural light. One of the reasons was that I had a notion that using artificial lights such as off-camera flash and strobes is too difficult and requires deep technical knowledge. Well, yes and no. To master it, you have to understand lighting ratios and learn to make mental calculations of light from various sources and suchlike. But to start using it, not really.

    My first experience of off-camera flash was using the Creative Lighting System (Nikon) capability between my speedlight and my camera. Most of my early attempts were unsuccessful especially with the limitations of the line of sight infrared system. It was unreliable too, especially when shooting under pressure or caught on the hoof. I also used overexposed my light with my very untrained and inexperienced eye when I was just starting out.

    4 Beginner Tips for Creating Dramatic Portraits with One Flash

    Wireless triggers

    Enter wireless radio transmitters and receivers (or transceivers) such as the Pocket Wizard, CyberSyncs, brand’s own (Nikon and Canon) and the super affordable Yongnous. A transmitter which is connected to your camera sends the message to the receiver which is attached to the flash unit. Transceiver units, on the other hand, can act as both receiver and transmitter so that you can use them on either the camera or the speedlight but you would still need one unit to attach to each piece of equipment.

    These wireless transceivers are a game changer without a doubt. They are simple to use and are reliable most of the time as well. I use Cybersyncs for my studio strobes and Yongnous for my speedlights and find the Yongnous are incredibly reliable and user-friendly with hardly any misses. However, the Yongnous cannot be used for strobes.

    #1 Choose the look and mood for your portrait

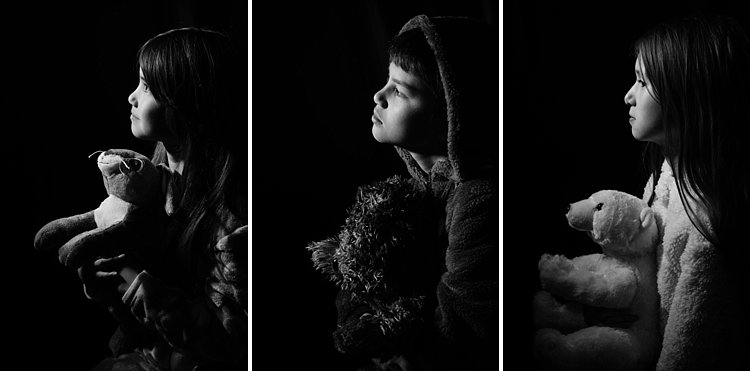
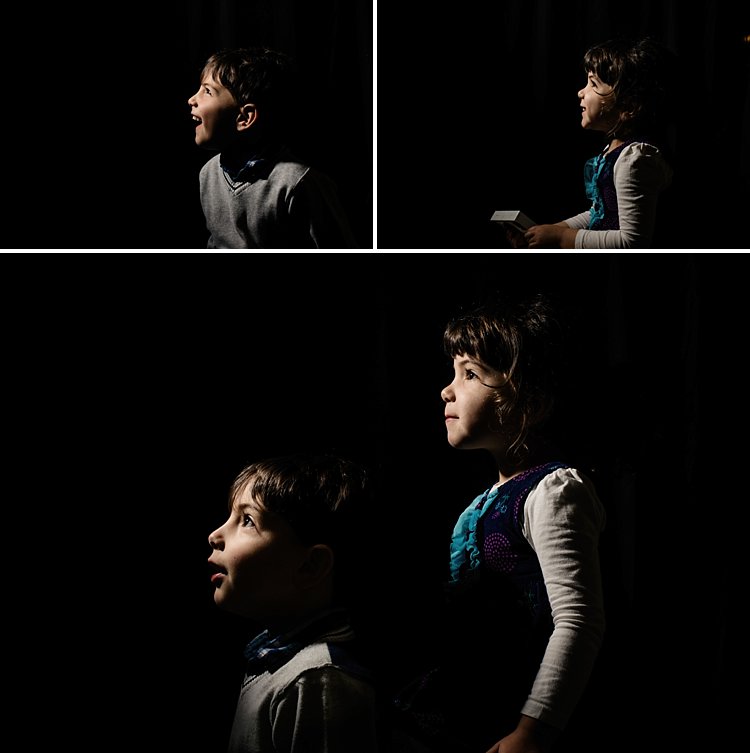
    Do you want super dramatic low key portraits or the other end of the spectrum – high key, bright and airy? The mood of your picture will dictate your background and of course the camera and flash settings. I have chosen a black background for these portraits to achieve a high contrast between the brightest parts of the image and the shadows. This will keep the overall mood dramatic and the lighting low key with plenty of black areas.

    #2 Set up your equipment

    If you have transmitter and receiver units, attach the transmitter to the hotshoe of your camera while the receiver needs to be attached to the flash (speedlight or strobe). If you have a transceiver, this can go on either camera or flash but you still need two units, one on each piece of equipment.

    It’s also a good idea to put your flash unit on a light stand. I used a studio strobe mounted on a light stand but attached it to a boom arm for more flexibility in angling the light. Note: A boom arm is not necessary at all for a simple beginner setup. Without a light stand, you can always mount your flash on a cabinet or steady surface, making sure it doesn’t topple over. Most speedlights come with little plastic feet that are handy for this purpose.

    4 Beginner Tips for Creating Dramatic Portraits with One Flash

    #3 Modify your light

    One of my rules is to always modify the light. The only time I shoot with a bare flash is when I use it as a kicker light at wedding receptions or to light a backdrop. At all other times, I will always modify it somehow or bounce it to maximize the softness of the light or to minimize the harshness depending on the situation.

    For this look, I wanted the flash to point directly at the subject, in a narrow beam and not have any spill onto the background. A gridded snoot would do the job controlling the light direction, but I didn’t have one. Plus I probably would have found that the light was still a bit harsh without further modification. I ended up McGyvering my own modified snoot using a black card and the diffuser panel of a 5-in-1 reflector. I twisted the reflector (like you would when putting it away) so that it was only a fraction of its size and I then had a 3-layer diffusion panel. This was taped to the strobe and with black card wrapped around it to direct the light onto my subject like a beam.

    There are two factors that are crucial for getting soft light; the distance between your subject and the light and the size of the light. The closer the light is to the subject, the softer it is. The larger your light source is, the softer it will be. My light source was not very big at all, so to leverage maximum softness I decreased the distance to the subject. The light was positioned about an arm’s length away from the subject, quite high up at a 45-degree angle. This was to mimic natural light coming from a high window.

    #4 Try various settings

    I wanted to shoot at f/8 so I metered the flash. You don’t require a handheld light meter to do this, by the way, you can just start with a few trial and error test shots to find the correct setting. I started off with the lowest power on my strobe but ended up cranking it up as the 3-layer diffusion cut out quite a lot of the light. My settings for these were: f/8, 1/60th,  ISO 400 and my strobe power high at 7. The strobe settings will vary depending on the brand you are using.

    4 Beginner Tips for Creating Dramatic Portraits with One Flash

    This is just one of the many ways you can create portraits with one flash. Try it and experiment with other angles, moods, and light settings and you may be amazed at what one light can do!

    Share your portraits here too in the comments below.

    googletag.cmd.push(function() {
    tablet_slots.push( googletag.defineSlot( “/1005424/_dPSv4_tab-all-article-bottom_(300×250)”, [300, 250], “pb-ad-78623” ).addService( googletag.pubads() ) ); } );

    googletag.cmd.push(function() {
    mobile_slots.push( googletag.defineSlot( “/1005424/_dPSv4_mob-all-article-bottom_(300×250)”, [300, 250], “pb-ad-78158” ).addService( googletag.pubads() ) ); } );

    The post 4 Beginner Tips for Creating Dramatic Portraits with One Flash by Lily Sawyer appeared first on Digital Photography School.


    Digital Photography School

  • Quick Review of the Kupo Click Stackable Light Stand

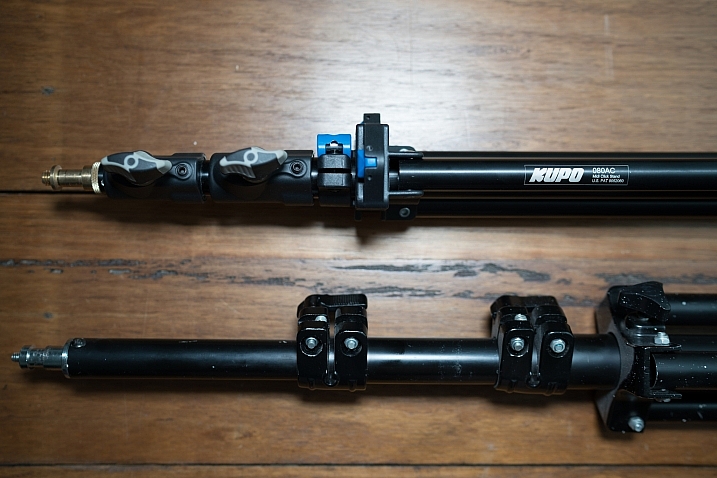
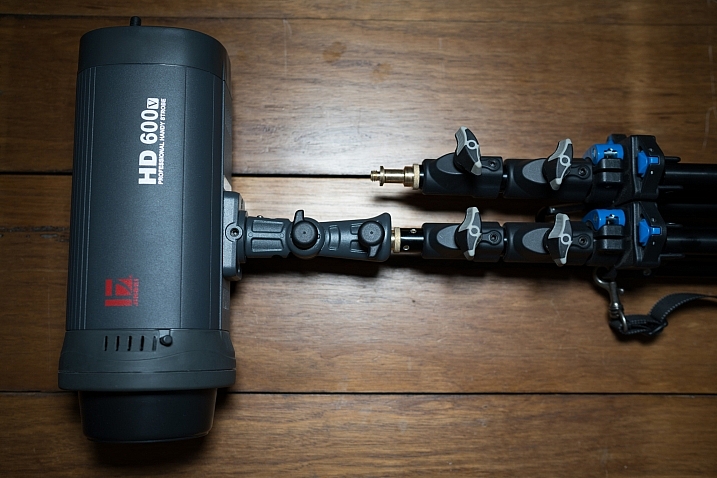
    I’ve recently started using a pair of Jinbei HD600 studio lights for my photography and what I love about them is that they are self-contained units. They don’t have any requirements for power cables, etc., as they’re battery powered, wireless studio lights. What was starting to bug me, though, was that I only had heavy light stands to mount them on. Not a problem when you’re working in a studio, but when you have to visit a client to do a headshot or a quick portrait of someone, having to take a C-Stand along isn’t always ideal (especially if you’re on public transport).

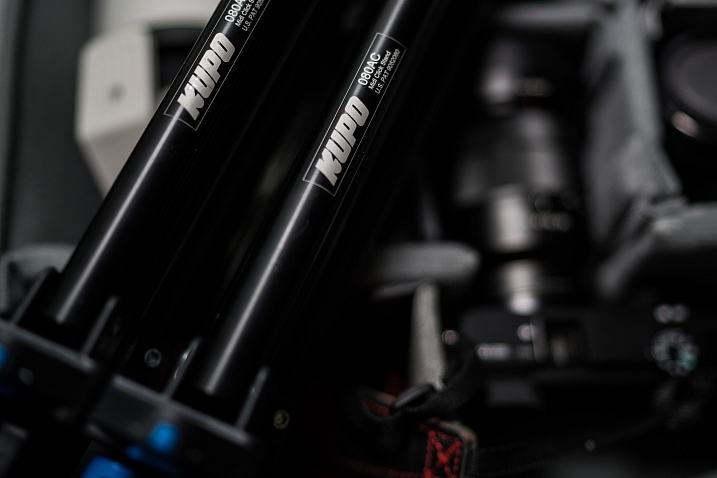
    I wanted to stick with Kupo gear as I’m very happy with the quality and innovation of their products, so I asked the crew at ProTog what my options were. They suggested I hold out for the Kupo CLICK stackable lighting stands. I did and I’m very happy I did. Here’s my review…

    Check out the Kupo Click Light Stands on Amazon or on B&H Photo’s website.

    Kupo click light stand

    My wish list

    I had a few simple ideal specs for the stands that I was after:

    • I wanted them to be light enough to sling over my shoulder when I was on the go.
    • They need to not suffer from bad build quality due to being light weight.
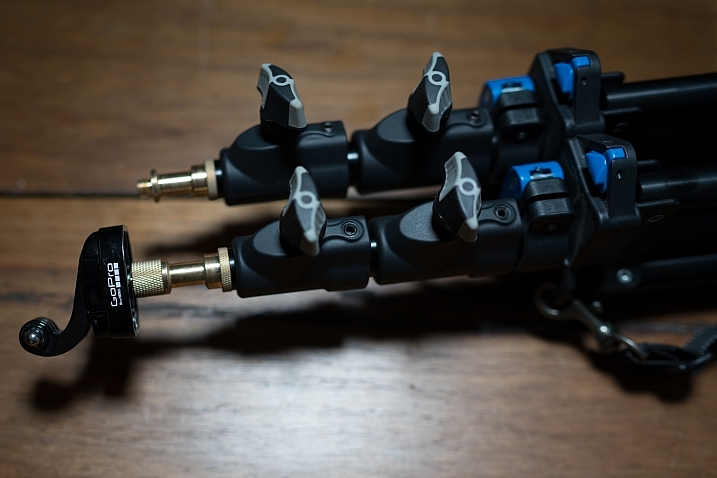
    • I wanted to be able to quickly use them for either a well-placed strobe on an outdoor shoot, a quick portrait in an office or studio, and maybe even to mount a GoPro on to run a quick timelapse of a session.

    Features of the Kupo Click

    The Kupo Click had everything I wanted in a portable light stand. Let’s take a look through the feature list.

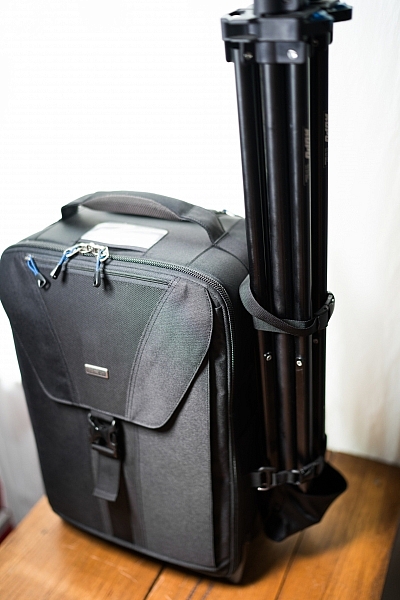
    • Coming in at 1.3kg (2.9 pounds), the weight was just fine, easily able to attach a pair of stands to the side of my ThinkTank Airport TakeOff roller.
    • In terms of load, the diminutive stands were capable of holding a 5kg (11 pounds) payload, more than I’d need to place atop the aluminum light-weights.
    • The tubes are also double pinned to the threaded ends, this makes them a lot less likely to fail when compared with my old stands, after a few months of heavy use, the stands haven’t loosened up in the slightest.

    Kupo click light stand

    Kupo click light stand

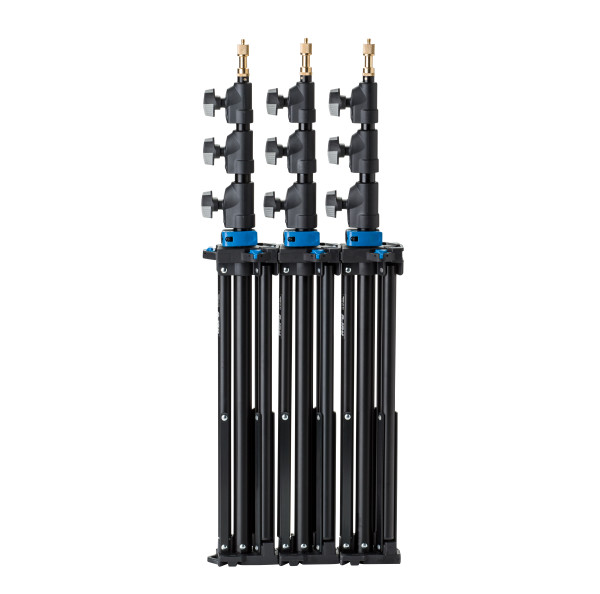
    The Click

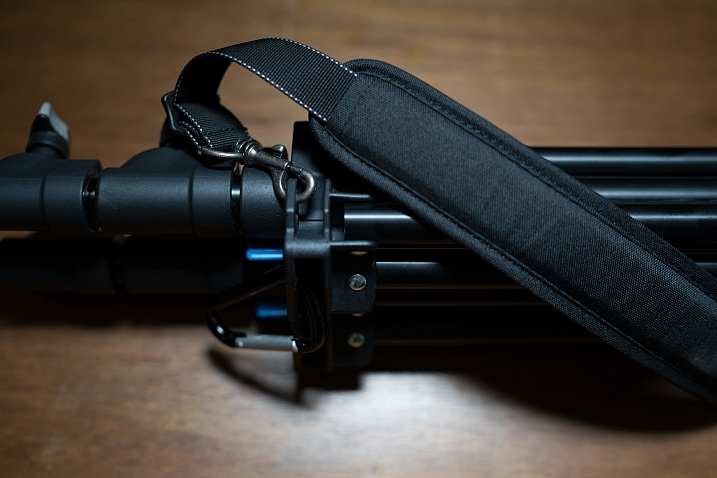
    The Kupo Click light stands allow you to click them together either side by side or on top of each other. So you can essentially have one of them flat on each side of your bag with some little attachment straps, or you can have them side by side (above) and sitting in the tripod cup on your rolling camera bag, or you can use a strap (sold separately, I didn’t get one as I used a regular strap with a clip attached to sling mine over my shoulder, see below)

    Kupo click light stand

    Kupo click light stand

    Kupo click light stand

    The stands have a sweet built-in air damper that prevents damage to your lights if you accidentally undo the locks by cushioning the column on release. I have tested this and it works. The midsection is better than the top section at slowing descent, but it certainly does slow down the inevitable crash and ultimately a replaced flash tube!

    Attaching your lights

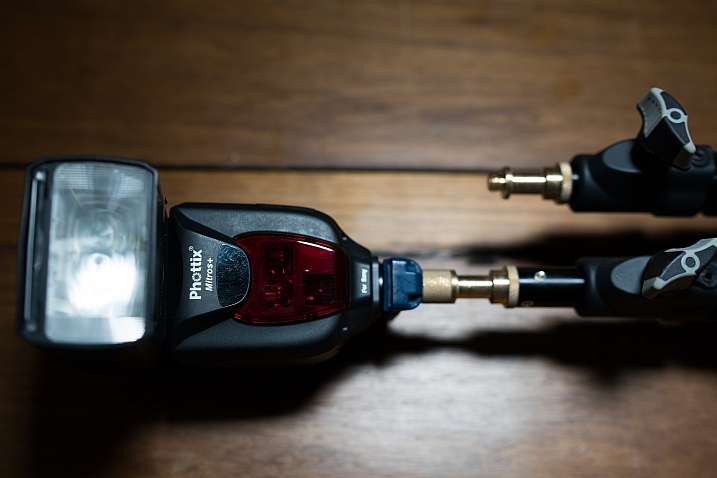
    The stands are equipped with a 5/8″ top stud with a 3/8″ threaded, plus a removable 1/4″-20 threaded top, this lets you mount a whole raft of lighting gear, as well as Sony ActionCam / GoPro mounts (The 1/4 20″ adaptor) which I like to use often on a shoot, or just to pop a camera up high for some reason or other – you can attach a regular ball head and mount your camera on that.

    Kupo click light stand

    Kupo click light stand

    Kupo click light stand

    Bottom line

    I’ve had these stands a few months now and have had many chances to use them and abuse them. They pack away well, they’re all the things I was after in a light stand. I can’t fault these stands and for the price, I’d say they’re one of the best on the market and well worth your hard earned coin. Five stars.

    googletag.cmd.push(function() {
    tablet_slots.push( googletag.defineSlot( “/1005424/_dPSv4_tab-all-article-bottom_(300×250)”, [300, 250], “pb-ad-78623” ).addService( googletag.pubads() ) ); } );

    googletag.cmd.push(function() {
    mobile_slots.push( googletag.defineSlot( “/1005424/_dPSv4_mob-all-article-bottom_(300×250)”, [300, 250], “pb-ad-78158” ).addService( googletag.pubads() ) ); } );

    The post Quick Review of the Kupo Click Stackable Light Stand by Sime appeared first on Digital Photography School.


    Digital Photography School

  • An Unconventional Composition Technique to Improve Your Photos

    Last month I sat down and reread Michael Freeman’s book, “The Photographer’s Mind.” which I do occasionally. I find that by revisiting the words of other photographers I remind myself of the multitude of tools available to us. There’s so much we can do to create fresh and amazing photographs.

    One of those ways is to push our skills and update our thinking. I think I’ve read through Freeman’s book about two or three times now. Every few years I take it off the shelf again. His books are insightful and interesting to read. Freeman offers up unique ideas for composition using both conventional and unconventional techniques. The books are readily available. You can also check out our review of one of Freeman’s other books here; “The Photographer’s Eye”. In this article, let’s journey through one of the concepts he discusses in his book, “Engineered Disorder”.

    An Unconventional Composition Technique to Improve Your Photos

    The details of the image are broken up into sections by the heavy shadows.

    What is Engineered Disorder?

    Freeman explains that Engineered Disorder is the active effort of a photographer to use non-conventional methods of composing photographs. Essentially, we are breaking the rules to create interesting images. Engineered Disorder means that we forget about conventional methods like unifying elements within the frame. We might allow ourselves to create uncluttered compositions. In one chapter Freeman talks about different methods of creating Engineered Disorder and bucking the system. He mentions using techniques such as disconnects, disruptive foreground, breaking the frame, superimposed layers and extremes of contrast. Maybe these terms sound complicated and a little too complex to understand, but they don’t have to be.

    Let’s break down one of these techniques and see what’s involved in creating Engineered Disorder. We will discuss the use of extreme lighting or chiaroscuro to create disconnect within an image. It’s one of my favorite techniques. I love to include deep blacks and bright highlights in my compositions.

    Chiaroscuro

    Chiaroscuro – chi·a·ro·scu·ro – the treatment of light and shade in drawing, painting, and photography.

    Using this technique means that we employ very hard lighting to break up the unity of a composition. The image becomes a series of pieces that communicate meaning but are broken up by dark shadows and bright highlights. Conventional composition techniques would say that using this type of technique makes for a bad photograph, but remember we are pushing the elements of composition.

    An Unconventional Composition Technique to Improve Your Photos

    The strong shadows in this image hide some details from the viewer. The leaf can only be viewed in pieces. This means a viewer has to pause and take in each part of the image separately and then piece together the whole scene. Making a viewer stop and study your image is important. Given the number of photographs out there you want to make viewers take some time to digest your images rather than scan through and move on. 


    Experimenting with dark and light

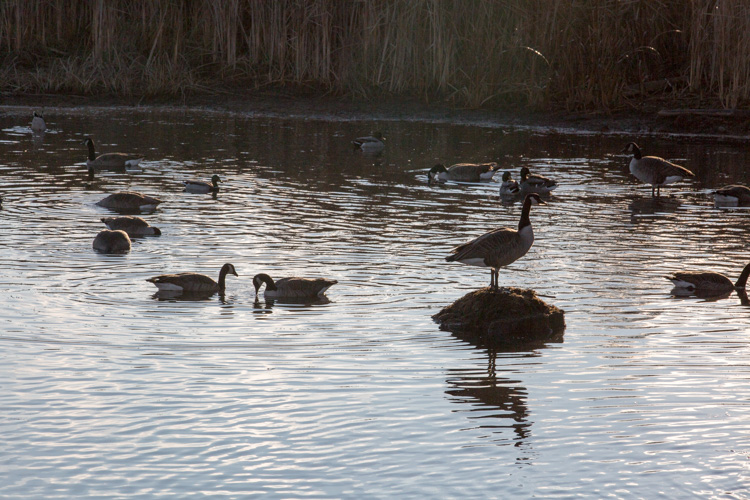
    Consider my careful experimentation with Chiaroscuro. This image portrays the common Canada goose in a much more unique fashion. In the opening moments of golden hours, these geese become elegant shadows. The different sections of light and dark create interesting graphic qualities within the image.

    An Unconventional Composition Technique to Improve Your Photos

    In this second image, I’ve used auto tone to create a more conventional image. While the actual shot is very similar, these two different treatments create considerably different photographs. Which one do you prefer?

    An Unconventional Composition Technique to Improve Your Photos

    A more conventional exposure.

    Other examples

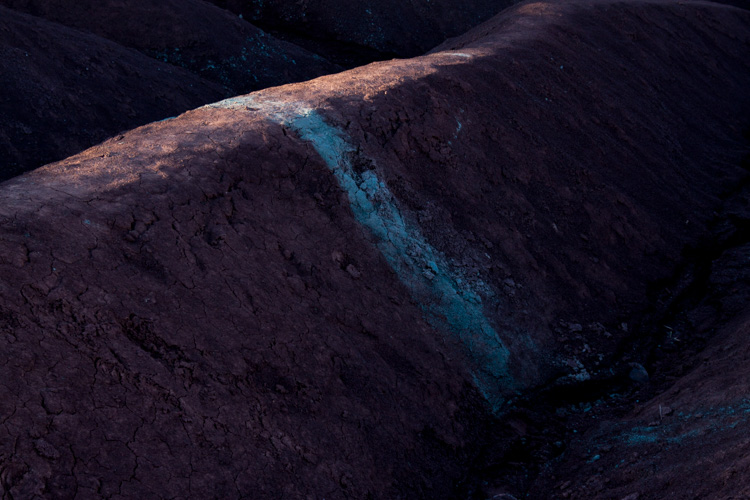
    Here’s another example of Chiaroscuro. This is a photograph of a unique area near my home. Everyone calls this place The Badlands. The red and gray clay create these beautiful graphic designs which draw visitors to the area. The hills are in danger of being destroyed by visitors, but the area is truly beautiful. The shadows and the light create beautiful diagonal lines in this particular image.

    An Unconventional Composition Technique to Improve Your Photos

    This are is now off limits to visitors because of the damage caused by walking on the hills.

    In this final image, the light and darks highlight different circular objects. Perhaps this image isn’t as disconnected as the others but it still presents a unique treatment for the door of a fishing boat. The image focuses on graphic design elements of the boat rather than the uses of the vessel. The image has been turned into an abstract and most viewers will need to analyze the image before they can determine the exact subject matter.

    An Unconventional Composition Technique to Improve Your Photos

    Conclusion – your turn

    Experimenting with different techniques is never a bad thing. You can learn and improve your photos by playing with unconventional techniques. Creating these images certainly pushed the dynamic capabilities of my camera. Exposing for deep shadows can be a challenge all on its own, but it’s a lot of fun to try out these different techniques.

    While we’ve only discussed one of the methods for creating Engineered Disorder, these three examples clearly highlight the technique. It’s better to fully understand just one compositional method rather than scratching the surface of several techniques. Give it a try, and go a little bit extreme. Break away from the conventional and search for ways to compose images that harness the power of Engineered Disorder in your photography. Please share your results in the comments below.

    googletag.cmd.push(function() {
    tablet_slots.push( googletag.defineSlot( “/1005424/_dPSv4_tab-all-article-bottom_(300×250)”, [300, 250], “pb-ad-78623” ).addService( googletag.pubads() ) ); } );

    googletag.cmd.push(function() {
    mobile_slots.push( googletag.defineSlot( “/1005424/_dPSv4_mob-all-article-bottom_(300×250)”, [300, 250], “pb-ad-78158” ).addService( googletag.pubads() ) ); } );

    The post An Unconventional Composition Technique to Improve Your Photos by Erin Fitzgibbon appeared first on Digital Photography School.


    Digital Photography School

  • How to Take Amazing Night Photos

    Have you ever been interested in taking night shots, but never known where to begin?

    Night photography can be intimidating, even for seasoned photographers who are used to taking shots during the day.

    Well, now you can learn how to take amazing photos from dusk till dawn with our brand new Night Photography video course – launched in the last few hours.

    Night photography course eml 01

    In this online video course by regular dPS writer Jim Hamel you will learn:

    • How to master exposure at night to take your photos from average to amazing
    • The secrets to finding the best subject matter and locations
    • The must-have gear to get these stunning shots
    • Detailed retouching techniques to make your photos pop
    • What to look for and how to set up your shot
    • All the technical aspects to nailing the shot

    This is our biggest course ever – with 9 learning modules, 11 practical ‘field work’ videos and over 6 hours of videos so you can learn everything you need to know to take beautiful photos at night.

    Here’s just a taste of what’s inside:

    Best of all – if you pick it up today you can take advantage of a wonderful early bird offer.

    Early Bird Offer – Save 50% and receive a Bonus

    As part of our early bird special on this course, we’re offing 50% off the regular price. Normally $ 99 – today you can pick up our new night photography course for just $ 49!

    In addition to that great saving we are also including a “The Complete Guide to Shooting the Night Sky”, a 40 page ebook dedicated to photographing stars. This great eBook is yours free if you buy but only for a limited time.

    Discover the Secrets to Great Night Photography Today

    We’re so excited to share this course with you today. Everyone we’ve shown it to loves what Jim teaches.

    The early bird price and bonus is only available at this price for the next 3 weeks, so grab it while you can here and start your journey to learning how to take amazing night photography images.

    We Guarantee You’ll Love this Course

    Like all dPS products our Night Photography Course comes with a 60 day money back guarantee. While we’re confident you’ll love this course if for any reason you decide it isn’t for you please just contact our support team within 60 days and we’ll refund your money – you can even keep the bonus eBook as our gift to you for checking out the course.

    googletag.cmd.push(function() {
    tablet_slots.push( googletag.defineSlot( “/1005424/_dPSv4_tab-all-article-bottom_(300×250)”, [300, 250], “pb-ad-78623” ).addService( googletag.pubads() ) ); } );

    googletag.cmd.push(function() {
    mobile_slots.push( googletag.defineSlot( “/1005424/_dPSv4_mob-all-article-bottom_(300×250)”, [300, 250], “pb-ad-78158” ).addService( googletag.pubads() ) ); } );

    The post How to Take Amazing Night Photos by Darren Rowse appeared first on Digital Photography School.


    Digital Photography School

  • How to Use Graduated Neutral Density Filters for Landscape Photography

    Since the camera was invented, we have tried to copy one of the greatest wonders of our body; the human eye. Unfortunately, despite being over 100 years since the first time that we captured light, we are still far from overcoming Mother Nature.

    Why? Because in the visible spectrum your eye sees much better than your camera.

    How to Use Graduated Neutral Density Filters for Landscape Photography

    Dynamic Range

    The parameter that describes this behavior is called Dynamic Range. This basically defines the difference between the minimum and maximum value of brightness that a device (like your eye or the sensor of your camera) is able to record. In the real world, Dynamic Range defines the ability of your camera to see details in very dark areas and very clear (bright) areas of the scene.

    If you’re wondering how much more your eye sees, the answer is staggering. Your eyes have about twice as much range that they can see and capture.

    How to Use Graduated Neutral Density Filters for Landscape Photography

    The problem

    That’s why when you look at a marvelous sunset with your eyes you’re able to see all the details in the scene (in both the sky and the land). But as soon as you try to capture it with your camera, you’ll get an overexposed sky or a underexposed foreground. The Dynamic Range of your camera is only able to capture detail in one of those areas so you have to choose.

    But if even the best cameras have a Dynamic Range which is only half that of the human eye. So how can we hope to shoot a beautiful sunset or a wonderful sunrise and capture all the marvelous details?

    There are different methods to overcome this problem, but my favorite is the use of Graduated Neutral Density filters (GND).

    graduated neutral density filters

    What is a Graduated Neutral Density Filter?

    A Graduated Neutral Density Filter is one made of two distinct parts; a completely transparent area, and a darker section. By setting the darkest part of the filter to correspond with the brightest portion of the scene, you can reduce the exposure difference (dynamic range) in the frame.

    To reduce the exposure difference is to reduce the dynamic range of the scene, and thus allow your camera to simultaneously capture detail in both bright and dark areas of the scene. Basically, to make an analogy, GND filters are like a kind of sunglasses for your camera.

    Types of GND filters

    Graduated Neutral Density Filters are typically distinguished by the type of transition that exists between the transparent and dark areas of the filter. For this reason, we can identify three families of GNDs:

    1. Hard-edge filters, which are characterized by a clear boundary (it’s obvious where one begins and the other ends) between the transparent and dark areas. They are therefore used when the separation between the bright and dark areas of your scene is very defined, such as the horizon at sea.
    2. Soft-edge filters are characterized by a soft transition (they change from light to dark more gradually) and are therefore used when the transition between light and dark areas is not so clear. A classic example is a shot in a mountainous area.
    3. Reverse filters, which are nothing more than hard-edge GNDs with the dark area that fades away the more you move from the line of separation to the upper border of the filter (meaning it’s darker in the middle than on the edge). Basically, they were invented to better manage sunrises and sunsets, where the light is more intense on the horizon line (middle). If you love seascapes like me, this filter will be one of your best friends forever!

    How to Use Graduated Neutral Density Filters for Landscape Photography

    Which to buy?

    Another distinction is between filters is the construction material. Higher quality filters are made of optical glass. Putting an inexpensive resin filter in front of a lens worth hundreds (or thousands) of dollars is not a great idea.

    Finally, GND filters are distinguished by graduation, or their ability to block light through the darkest area. Essentially how dark they are at the extreme. Normally in landscape photography, this difference is between one and four stops during sunset and sunrise, depending on weather conditions. This is the reason why you will find these gradations almost exclusively on the market.

    Shop for Graduated Neutral Density filters on Amazon.com or on B&H Photo Video’s site (they ship worldwide).

    How to use a GND filter in the field

    The use of GND filters in the field is very simple; try to take exposure readings in the darkest and in the brightest areas of the scene (usually the sky). The exposure difference will indicate the intensity of the filter to be used. Let’s assume that the light meter reading for the sky is 1/250th, and the one for the rocks in the foreground is 1/30th. The difference between those readings is three stops (250th > 125th > 60th > 30th), so to balance the exposure you must use a 0.9 (3-stop) GND.

    At this point, just mount the filter with its dark side over the brightest part of the scene. This is why a GND screw-in filter does not make sense. You would not have the possibility to align the dark area in accordance with the scene as well as a drop-in style filter.

    How to Use Graduated Neutral Density Filters for Landscape Photography

    To avoid having to hold the filter with your hands (that could be a problem if you are going to use them together with other filters) you can buy a holder, that once mounted in front of your lens will do the job for you. There are many valid solutions on the market, but the best one (in my opinion) is the V5 Pro Holder by NiSi filters. This is the only one that lets you simultaneously install three different filters and a polarizer without any vignetting issues (as wide as 16mm on full frame cameras).

    At this point, the limited Dynamic Range of your image will be just a bad memory!

    How to Use Graduated Neutral Density Filters for Landscape Photography

    googletag.cmd.push(function() {
    tablet_slots.push( googletag.defineSlot( “/1005424/_dPSv4_tab-all-article-bottom_(300×250)”, [300, 250], “pb-ad-78623” ).addService( googletag.pubads() ) ); } );

    googletag.cmd.push(function() {
    mobile_slots.push( googletag.defineSlot( “/1005424/_dPSv4_mob-all-article-bottom_(300×250)”, [300, 250], “pb-ad-78158” ).addService( googletag.pubads() ) ); } );

    The post How to Use Graduated Neutral Density Filters for Landscape Photography by Francesco Gola appeared first on Digital Photography School.


    Digital Photography School

  • 5 Common Post-Processing Mistakes to Avoid

    For today’s photographer, post-processing is a critical element of image making. Sure, when you first get started with digital photography, you might shoot in JPG mode and allow the camera to make decisions about things like color and contrast. But when you’re ready to take control of your images, it’s time to shoot in RAW format and make the important decisions about how you want your final image to look yourself.

    Estuary in Campbell River BC by Anne McKinnell - 5 Common Post-Processing Mistakes to Avoid

    When you first start shooting in RAW, you might think your images look a bit gray and bland. That’s because the decisions that the camera was making before are now left up to you. That can be a bit daunting! But here are some tips to help you avoid the most common post-processing mistakes and make sure you are helping your images and not hurting them.

    Remember, the purpose of post-processing is not to fix bad photos, but to bring out the best in good photos.

    Mistake #1 – Lightening shadows too much

    Always try to get the best exposure possible in camera. You’ll get a better result when you start out with a good exposure rather than relying on the highlights and shadows sliders in post-processing to balance it.

    That said, sometimes you will still want to use the shadows slider to lighten your shadows to bring more detail in the darker areas of your image. Just be careful not to overdo it, or you’ll end up with an image that no longer looks natural.

    This is overdone, the shadows have been pulled too far here and it no longer looks natural. Notice it also introduced noise into the sky.

    Convict Lake, California by Anne McKinnell - 5 Common Post-Processing Mistakes to Avoid

    Shadow adjustment in moderation is better.

    If you try to equalize the brightness of the highlights and shadows, you’ll end up with a photo that not only looks unnatural, but the lack of contrast will make the image look boring. Contrast is a good thing! This is especially true when you have a scene with a reflection. The reflection should always be darker than the scene it is reflecting, as it is in nature.

    Mistake #2 – Over saturation

    Another way to create an unnatural looking image is to over saturate everything. It’s a tempting thing to do because a little bump in saturation and vibrance makes such a big difference. Again, just don’t overdo it. A little goes a long way.

    Before you touch those sliders, spend a bit of time thinking about your image and the colors in it. Sometimes adding saturation globally is not the best idea, especially if you have a scene that contains many different colors. Instead, consider using the HSL (Hue/Saturation/Luminosity) panel, choose Saturation, and use the target tool to add saturation to one color in your scene. For example, you might want to add saturation to the main subject to draw attention to it.

    Over saturation leaves the colors looking odd.

    Yellow flower with bee by Anne McKinnell - 5 Common Post-Processing Mistakes to Avoid

    Better saturation levels.

    Mistake #3 – Over sharpening

    First of all, never use sharpening to try to fix a photo that is out of focus. It just doesn’t work. Sharpening cannot fix blur. However, if you have an image that is in focus, adding a bit of sharpening can make it extra crisp and realistic.

    Again, consider adding sharpening locally (to one select area) not globally, especially if you have areas of your scene that are purposely out of focus, such as when you have a shallow depth of field. Also, the sky usually looks better when it is smooth, so you don’t want to add sharpening there. Keep in mind that adding sharpening will increase noise, which is another reason not to add it globally. Rather, just add it to the main subject or areas of your scene with a lot of detail.

    This has been over sharpened, you can see artifacts throughout the image here.

    Deer by Anne McKinnell - 5 Common Post-Processing Mistakes to Avoid

    Better level of sharpening.

    In Adobe Camera Raw, use the Detail panel to add sharpening. Then, hold down the option (or alt) key and use the masking slider. As you move the slider, the areas that appear black do not have sharpening applied and areas that are white do. This is an effective way to add sharpening to the areas of your image that have details. Another option is to use the adjustment brush to brush sharpening on where you want it.

    Mistake #4 – Over cropping

    The crop tool is a handy way to refine your composition, remove unwanted elements on the edges of the frame, and make sure your horizon line is straight. But don’t use it to remove all the “negative space” in your scene.

    You don’t need to fill the frame with your subject. A little breathing room keeps the image interesting. Think about creating a balance between the space taken up by your subject and the space around it. This is not necessarily an equal balance.

    Cropped too tight on the subject.

    Bisti Badlands, New Mexico by Anne McKinnell - 5 Common Post-Processing Mistakes to Avoid

    Cropped to leave negative space and lead your eye to the subject.

    Mistake #5 – Too much Noise Reduction

    Sometimes the nature of the light requires the use of a high ISO. Perhaps you need both a small aperture and a high shutter speed for your scene, so increasing the ISO is the only way to get a good exposure. That’s okay. The noise caused by using a high ISO can be reduced in post-processing using the noise reduction slider.

    But nobody said that all images must have no noise. Not all images have to be perfectly smooth looking. Especially if there is a lot of detail and texture in your subject. Using too much noise reduction can create blurry splotches in areas that were previously sharp.

    Too much noise reduction has been applied here and overall the image now looks blurry.

    Kofa National Wildlife Refuge, Arizona by Anne McKinnell - 5 Common Post-Processing Mistakes to Avoid

    Noise reduction scaled back.

    You may have noticed a theme in these common mistakes. Don’t over do it! Small adjustments go a long way to bringing out the best qualities of your images, but taking it too far can just as easily ruin them.

    After you process your image, take a break from it and look at something else. Maybe even give it a day to settle. Then, when you look at it again, it will be more obvious if you have taken the processing too far.

    googletag.cmd.push(function() {
    tablet_slots.push( googletag.defineSlot( “/1005424/_dPSv4_tab-all-article-bottom_(300×250)”, [300, 250], “pb-ad-78623” ).addService( googletag.pubads() ) ); } );

    googletag.cmd.push(function() {
    mobile_slots.push( googletag.defineSlot( “/1005424/_dPSv4_mob-all-article-bottom_(300×250)”, [300, 250], “pb-ad-78158” ).addService( googletag.pubads() ) ); } );

    The post 5 Common Post-Processing Mistakes to Avoid by Anne McKinnell appeared first on Digital Photography School.


    Digital Photography School

  • Join Me For a Drop-In Studio at GPP2017

    Just a quick heads-up for anyone headed to Gulf Photo Plus in Dubai that I’ll be holding a drop-in studio session on the afternoon of Weds., Feb 15th. It’s not an official class, just something cool happening on the side.

    You can learn more about it here, but basically it is free and we’ll be experimenting/learning/failing/etc. Specifically, we’ll be working with gels in the context of future posts in the just-started Lighting 103 module. So I thought it would be espcially cool to possibly incorporate photos of some of Strobist’s international readers as we get further into the course.

    Which is why you are getting this invite!
    Strobist

  • East Coast? Late March? Come to Reading, PA.

    Hey folks, just a quick heads up that I will be teaching at the Dynamic Images Photo Conference in Reading, PA, on Saturday, March 25th. The conference is put on by the Berks Photographic Society, a rather large camera club that has been doing conferences for 58 years.

    Reading, PA is within easy reach of Baltimore, Philly, New York and Intercourse. So if you are looking for something to do on the last weekend in March, there is a whole three-day roster planned with concurrent seminars, workshops, shooting sessions, etc.

    My afternoon talk will be a similar approach to that of The Flash Bus tour back in 2011. (Evolved a bit, of course.) So if you missed that, now’s your chance to get a few hour’s worth of start-from-zero flash photography firehose. It’s suitable for beginner through intermediate level lighting photographers, so please do not be intimidated by the planned pace.

    I am but a Saturday afternoon cog in the three-day weekend machine. There are lots of other things going on, with multiple instructional paths from which to choose happening at once. The entire three-day weekend is $ 169, but you can get 10% off by using the coupon code “dynamic.”

    The seats are opened to their membership first, so if you want to attend I would get on it sooner rather than later. Full info is here.

    Hope to see you there. I’ll be the guy in shorts.
    Strobist

  • Four Advantages of Using Lightroom Collections

    In this article, I will explain Lightroom Collections, a very powerful cataloging feature. We’ll focus on how using Lightroom Collections and Collection Sets can help you build a significant portfolio of your best work. Then we’ll move on to the difference between Standard and Smart Previews and how combining Smart Previews with Collections makes it even easier to review and process your best work. Next, we’ll learn how Lightroom Mobile dovetails with Collections and finish up with a few tips on using both of them to share your images. It’s a lot of info (it’s a long one) so buckle up.
    Four Advantages Lightroom Collections

    A little background first

    A year ago at a photography conference run by a consortium of local camera clubs, I had the pleasure of introducing Lightroom expert Tim Grey to the audience. After I introduced him, I sat in on his seminar. He asked everyone to raise their hands if they organize their image files chronologically by date. Knowing that most experts agree this is a terrible way to organize your files, very few attendees admitted to organizing this way. I raised my hand because of course, I do. It just makes my brain happy to be chronological. Mr. Gray asked me how I could ever keep track of or find images by date, so I explained how I also used Lightroom Collection Sets and Collections. He laughed at me and told me to put my hand down. He felt I didn’t really organize things chronologically at all.

    Use Lightroom Collections to Build Your Portfolios

    The main goal of Lightroom Collections is to create cohesive groupings of your best images. Naming and how you sort and organize your images is up to you, based on how and what you shoot. The key to building a portfolio using Collections is to include only your absolute best images. If you shoot 10,000 images on a two-week photo trip, the images you put in your Collections are the top 1%, the best-of-the-best. These are the ones you share online, upload to sell as stock images, prepare an exhibit or your work, or make some prints for your own walls.

    How to Create Collections and Collection Sets

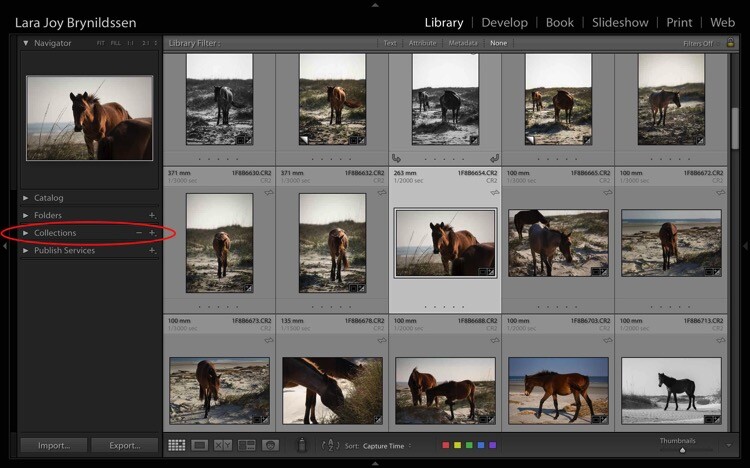
    You can find Collections in the Develop Module, on the left-hand panel between Folders and Publish Services. To create a new Collection or Collection Set, click the + (plus sign).
    Four Advantages Lightroom Collections 1

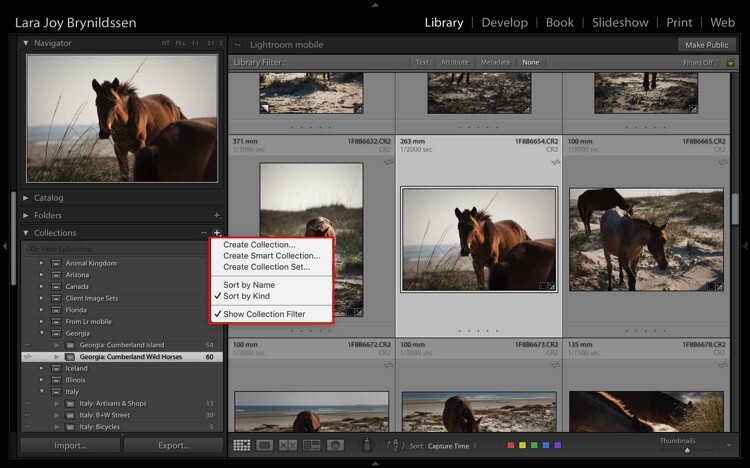
    Once you click the + (plus sign), a dialog box pops up. Click Collection Sets to create a container that will hold multiple, related Collections. Or, if you just have one group of images that isn’t related to anything else, click Collections.
    Four Advantages Lightroom Collections

    NOTE: In this article, we’re focusing on Collections, not Smart Collections, which work a bit differently. Read this for more on that topic: How to Create and Use Smart Collections in Lightroom.

    Collections Versus Collection Sets
    Four Advantages Lightroom Collections 1 2

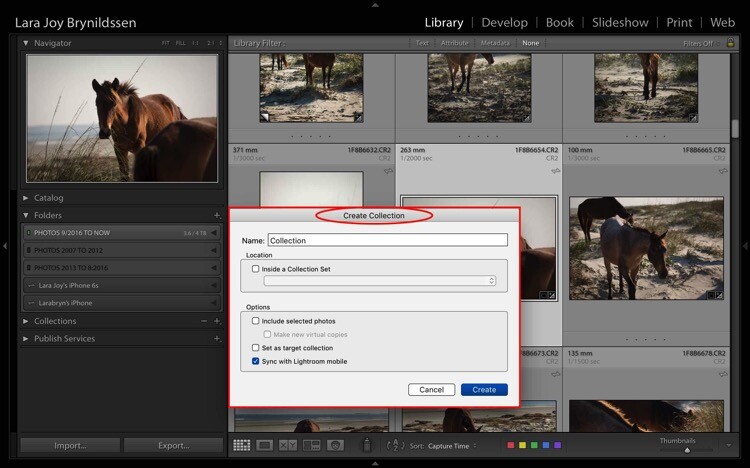
    This is the dialog box for creating a Collection.
    Four Advantages Lightroom Collections 1 3

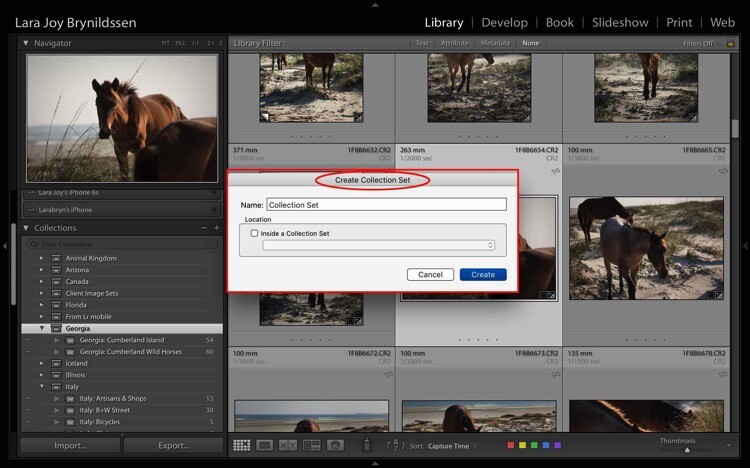
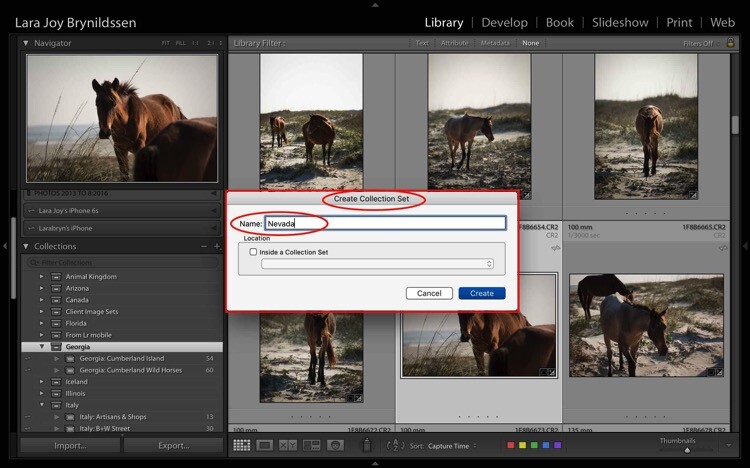
    This is the dialog box for creating a Collection Set.
    Four Advantages Lightroom Collections 1 4

    I’m headed to Nevada soon so I created a new Collection Set for Nevada. To do this, type the title of your Collection Set in the 1st box and click Create.
    Four Advantages Lightroom Collections 1 5

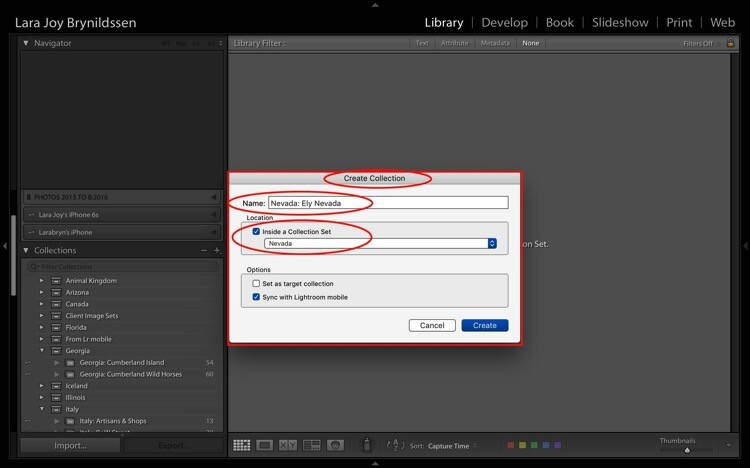
    When I’m in Nevada, I’ll be staying in Ely so I created a Collection within my Nevada Collection Set for Ely.

    To do this, first, check the box indicating that this Collection sits inside the Nevada Collection Set. When titling Collections, repeat the title of your Collection Set (e.g. Nevada: Ely Nevada). This is important because it helps maintain the file structure in Lightroom Mobile. (More details on that in a few paragraphs.) Make sure you also check the box to Sync with Lightroom Mobile.
    Four Advantages Lightroom Collections 1 6

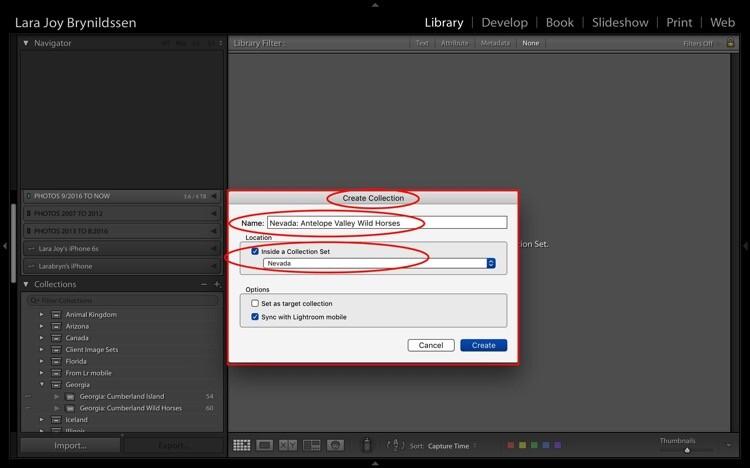
    Second Collection for wild horse images.

    I’ll also be photographing the wild horses in the Antelope Valley HMA, so I created a second Collection within my Nevada Collection Set for that called – Nevada: Antelope Valley Wild Horses (as shown above).

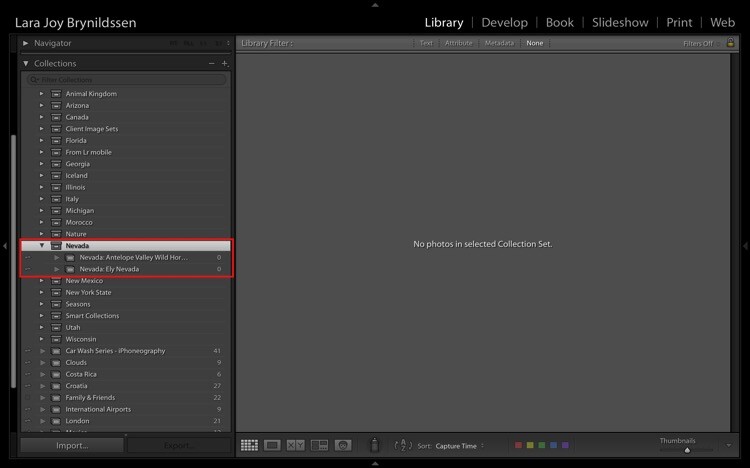
    Now you can see the new Nevada Collection Set within the Collections tab on the left panel (below). Note that the icon for the Collection Set is like a large file box. The icons for the two collections inside of it are smaller, like file folders. Both say that they contain zero images because I haven’t added anything to them yet.
    Four Advantages Lightroom Collections 1 7

    How to Name Your Collections Sets and Collections

    As you can see, I most frequently organize based on location. My Collection Sets are often names of countries or American states. That works for me since I travel a lot to make my images and I often go back to the same places over and over again. When I create a collection of my best images of Italy, I’m not interested in whether I made the image in 2013, 2014, 2015 or 2016. I’m interested in whether it’s the best image I’ve ever made in that region of that subject.

    If you’re a macro flower photographer, it might make more sense for you to name your images by flower type and color. E.g., your Collection Set could be called Peonies, and your Collection names would be Peonies: Pink, Peonies: White, Peonies: Purple.

    You would be able to continue that naming structure across all flower types that you photograph: Zinnias, Dahlias, Daisies, etc. By naming this way, if you get a request for an image of a pink peony, you know exactly where to find it. Click your Peonies Collection Set and scroll down to the Collection called Peonies: Pink.

    If you want to have more comprehensive portfolio-like collections, you can have a Collection Set called “Best of”. Your Collections can be called Best of: Peonies, Best of: Zinnias, etc. You can even have a Collection called Best of: All Flowers, which would be the most superlative macro flower images you have ever made.

    Collections Add a Second Level of Organization to Your Files

    Basically, Collections are a secondary organization structure for your images. The first (for me) is chronological organization. Think of those folders as archives. All images live there. Collections are a second tool to harness the best of those images and make them easier to find. How you name them doesn’t matter as much as consistency. By consistently naming your Collections, you’ll be able to take the most advantage of their features and quickly locate your portfolio-worthy images.

    Think of a Collection like a bookmark. Each time you create a Collection, you’re basically bookmarking the images inside of it so that you can quickly and easily find them by clicking on that Collection. You can bookmark each image as many different ways as you want by adding them to multiple Collections. A flower image could be in your Collection called Peony: Pink. It can also be in Best of: Peonies and Best of: All Flowers.

    The main purpose is always to include your best work. You never want to scramble to find that great image you think you took two years ago in in Italy but you’re not sure exactly when? Or what town? By using Collections, you’ll always know exactly how to find that awesome image which is worth its weight in gold.

    Adding Images to Collections

    Four Advantages Lightroom Collections 1 7 3

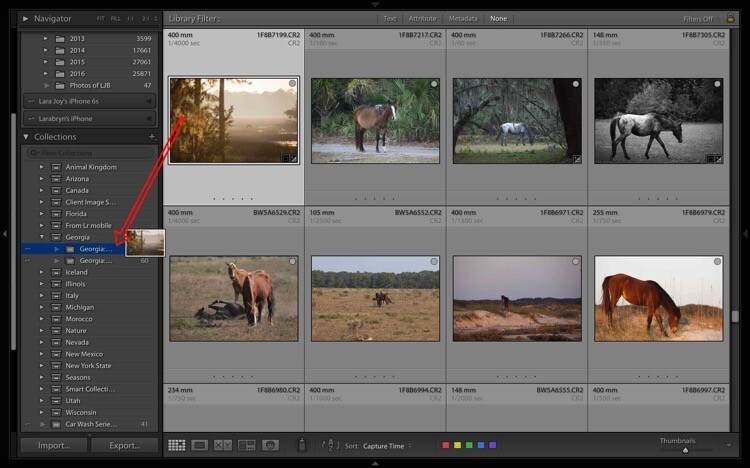
    Now that you know how to create and name Collections, and why they’re useful, YOU need to add some images to them. First, select an image. The one above is from a group of images I made on a recent trip to Georgia (USA). I like it and have processed it, so now I select and drag the thumbnail to the Georgia: Cumberland Island Wild Horses Collection. Once the Collection name is highlighted, just release the image and it will drop into the Collection.
    Four Advantages Lightroom Collections 1 7 1

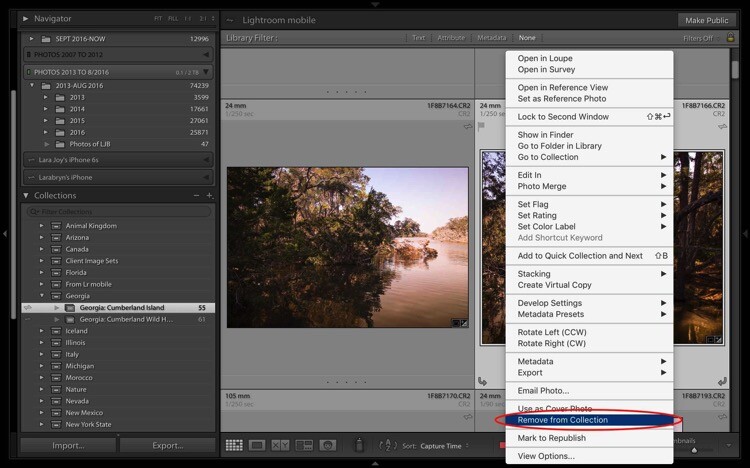
    To remove an image from a Collection, first select it. You can see it’s highlighted in pale gray, which means it’s been selected. Right-click and when the menu pops up, scroll to the bottom and select Remove from Collection. Voila! The image will be removed from the Lightroom Mobile Collection too.
    Four Advantages Lightroom Collections 1 7 2

    Bonus Feature That Makes Collections Even More Useful

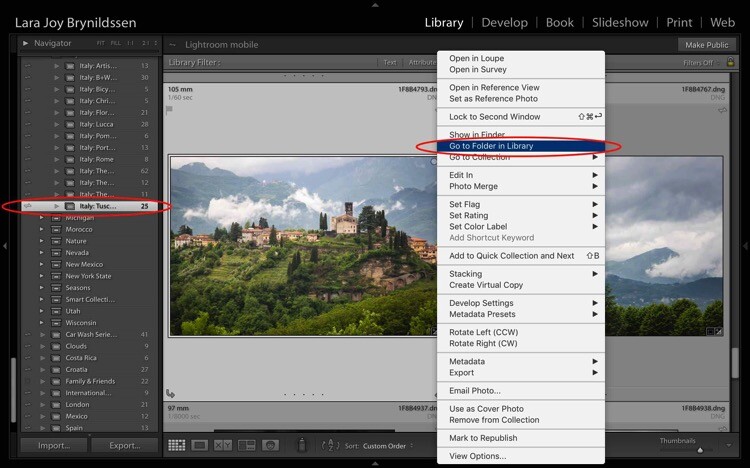
    If you are looking through your Collections and find the perfect image, but wish it was shot in vertical rather than landscape format, you need to be able to find the original folder where your image file lives. Luckily, Lightroom builds in a neat little trick to help you to quickly jump to that folder.
    Four Advantages Lightroom Collections 1 8

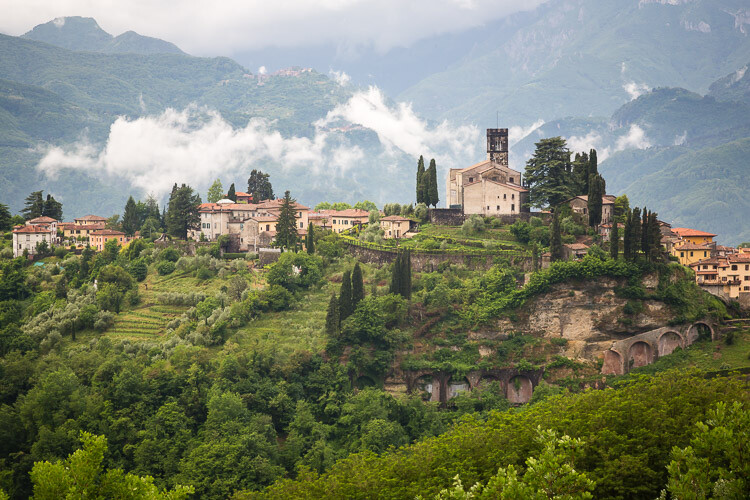
    For example, in the Italy: Tuscany Collection, there is a beautiful landscape looking over Barga with lush green grass and heavy clouds sitting on the mountains above the village. To check whether this image is available in a vertical orientation, select the image and right-click to bring up a menu. Scroll to the top of the menu and click; Go to Folder in Library.
    Four Advantages Lightroom Collections 1 9

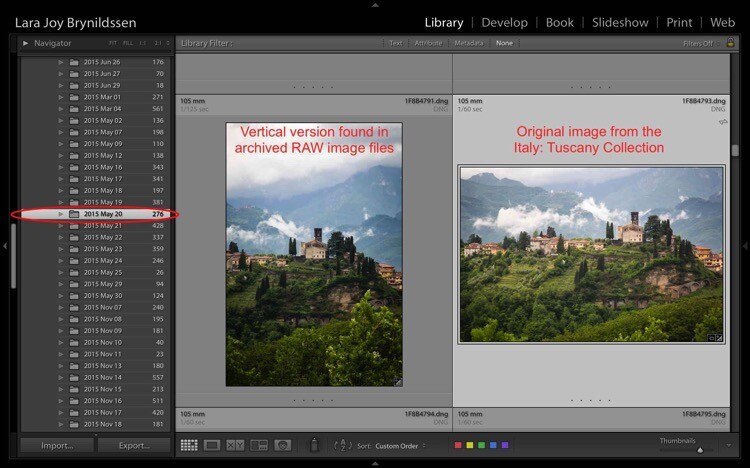
    Lightroom takes us from the Italy: Tuscany Collection to the main folder where all of the RAW images taken that same day actually live on the hard drive. You can see in the left side panel we’re now in the 2015 May 20 folder. I think of these folders as archives. They contain all the RAW images I shoot, even the so-so ones or the ones that are near duplicates of other, better images. And – good news – there is a very similar image in a vertical orientation.

    Standard Previews Versus Smart Previews

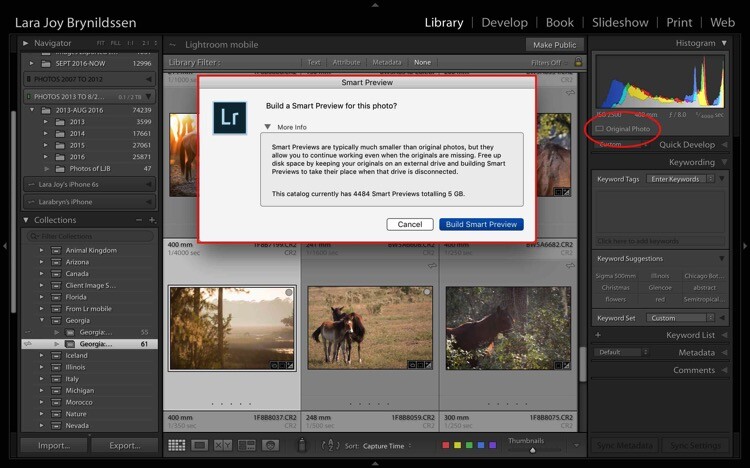
    Whenever you upload images using Lightroom, Lightroom creates a small Standard Preview. This preview is like a tiny little jpeg allowing the program to quickly show you your image. If you want to edit that image, Lightroom usually needs to be able to access the original image file.

    If you have just a few images, you can keep the files on your computer’s hard drive but since you’re an avid photographer, you probably have your images saved on external drives. The more images you take, the more external hard drives you probably have containing all of your images. If you’re looking for your best Italy images from the last 10 years, you might have to look through images on four hard drives. That can get a little unwieldy. To solve this problem, create Smart Previews for all of the images that you have organized in your Collections.

    Creating a Smart Preview

    To create a Smart Preview, click on the icon next to where it says Original Photo in the right side panel. A dialog box will pop up. Click Build Smart Preview.
    Four Advantages Lightroom Collections 1 10

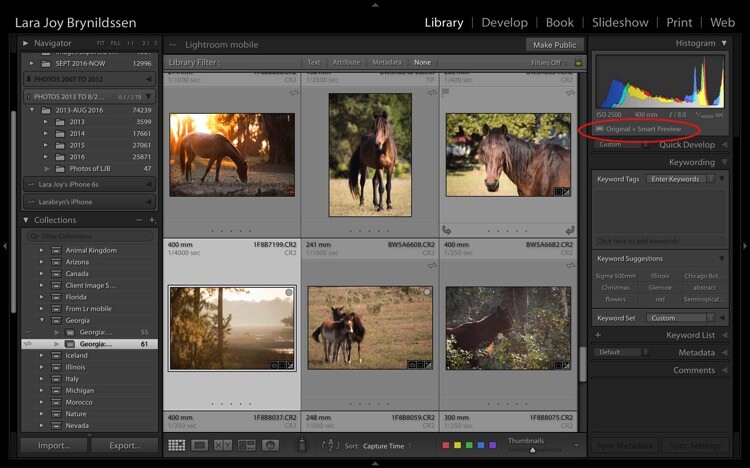
    Now in the right side panel, you can see that the icon has changed and the text now reads Original + Smart Preview.
    Four Advantages Lightroom Collections 2

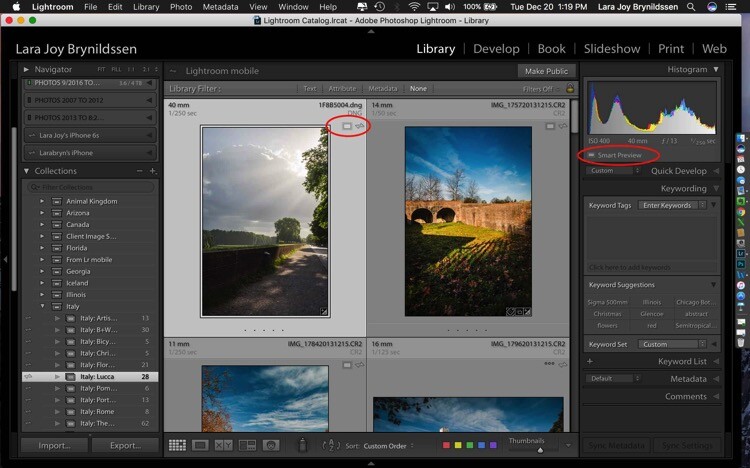
    A Smart Preview is a larger jpeg than the Standard Preview. The advantage is that it lives on your computer with your Lightroom Catalog files. A Smart Preview takes up far less space than an actual image file but it still contains plenty of information available in it for you to increase the size of the image on your screen, to magnify the details, and even to process it within the Lightroom Develop Module. Any changes you make to the Smart Preview will carry over to your original image once you connect your hard drive too.
    Four Advantages Lightroom Collections 2 1

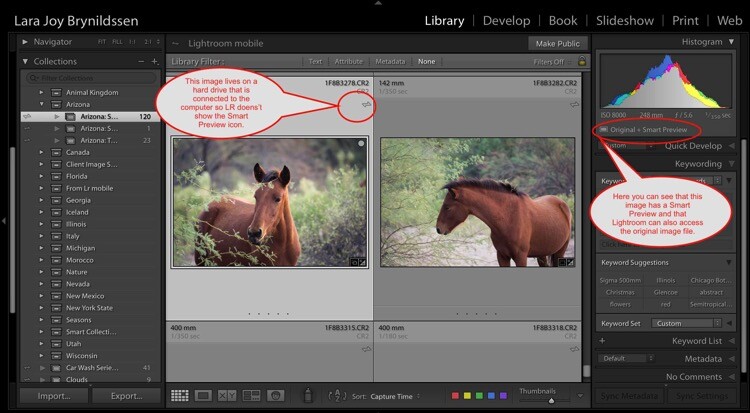
    This file is a Smart Preview. You can see the icon on the image and also in the side panel on the right.

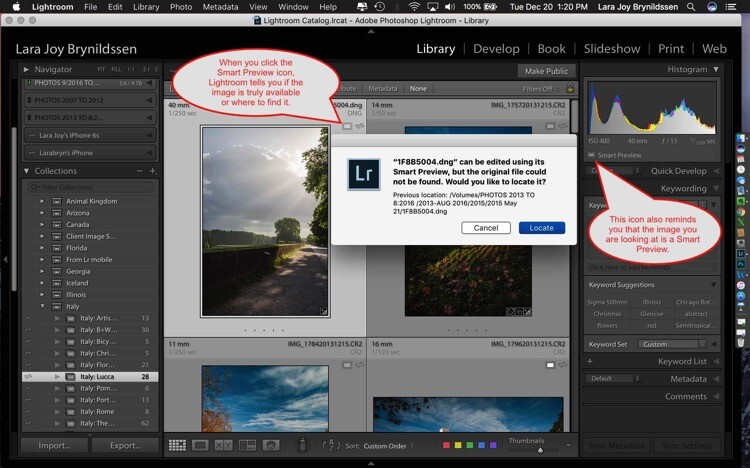
    If you click on that icon, Lightroom shows a dialog box letting you know the image isn’t available but that Lightroom knows where it should be. In this case, if I attach the external hard drive and click Locate, Lightroom will find the image for me. Note that LR is also telling me that I can process the image without the original which is exactly what I want.
    Four Advantages Lightroom Collections 2 2

    NOTE: You cannot export an image if you are only working from a Smart Preview. You also cannot edit it outside of Lightroom (e.g., like Edit in Photoshop).

    Here you can see that since the external hard drive for this image is attached to the computer, the full image file is available. Lightroom doesn’t show the Smart Preview icon in the Grid View since you’re working with the actual file. In the side panel on the right, LR does show you that this image has a Smart Preview available.
    Four Advantages Lightroom Collections 2 3

    How are Smart Previews Helpful?

    Let’s say you’re printing images for a solo exhibition, and want to showcase your images of Italy. There’s no need for you to slog through the 25,000 images on your miscellaneous external hard drives. All you need to do is open Lightroom, click on Collections, and scroll down to your Italy Collection Set.

    Because you’ve made Smart Previews for all your images, you don’t even need to have the hard drives which contain the actual images connected to your computer. This is the key to pairing Smart Previews with Collections. Even if your external hard drives are at home and you only have five minutes before you head back to work, you can begin selecting exhibition images on your laptop. Once you get home and can connect to your external hard drives, you can finish the selection and start printing.

    How Lightroom Mobile Dovetails with the Collections Feature

    If you are an Adobe Creative Cloud member you are getting so many more features than constant updates to Photoshop and Lightroom. One of those features is Lightroom Mobile. The mobile app doesn’t have the processing power of the full version but I don’t typically use it to edit images so that’s not an issue for me. I use it mainly to have my best images at my fingertips all the time.

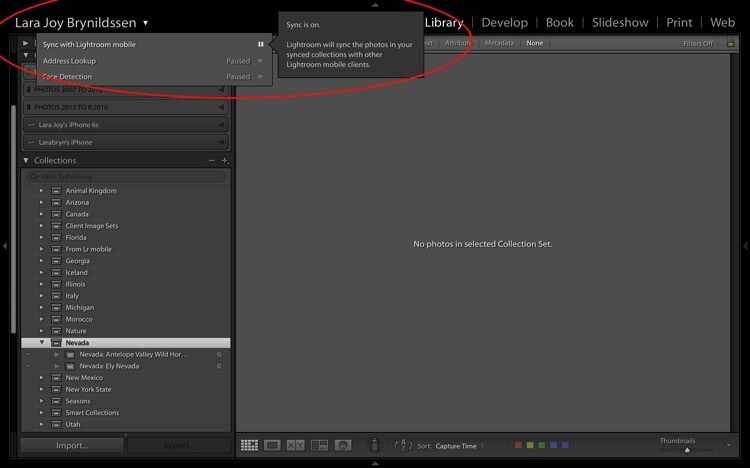
    Sync with Lightroom Mobile

    To Sync with Lightroom Mobile, you need to be logged in to your Adobe CC (Creative Cloud) account and you have Sync turned on. Click your nameplate in the upper left corner to ensure you are logged in and Sync is on. My nameplate has been customized, yours might simply say Lightroom. Here you can see that Face Detection and Address Lookup are off but that Sync is on. If you’re ever confused about the on and off positions, just hover your cursor over the box or triangle. A dialog box will pop up letting you know if that feature is on or off.
    Four Advantages Lightroom Collections 3

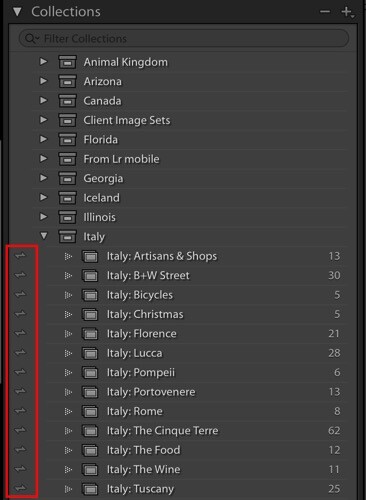
    On the left of each collection is a double-sided arrow (see below). This indicates that these Collections are being synced with Lightroom Mobile.
    Four Advantages Lightroom Collections 3 1

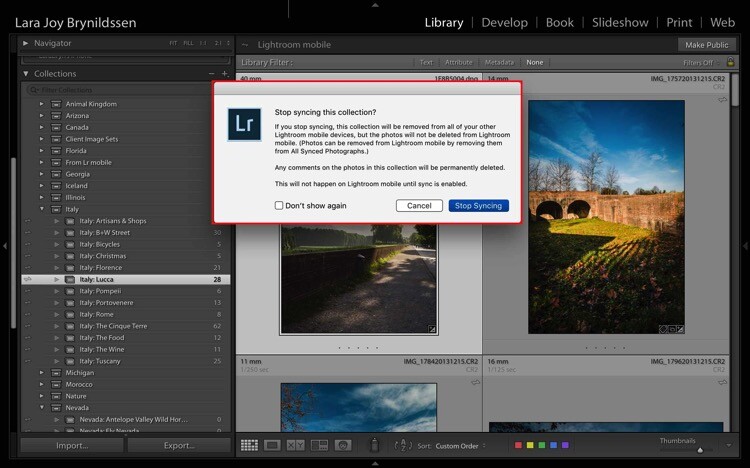
    You can toggle Sync with Lightroom Mobile on and off by clicking this arrow. When you turn syncing off, Lightroom will double check with you and let you know that it will remove these images from Lightroom Mobile too.
    Four Advantages Lightroom Collections 3 2

    If you leave Sync with Lightroom Mobile on, Lightroom will sync the images in your Collections to the mobile app. This is a good time to install the app on your phone and tablet if you haven’t already. Now that you’ve installed the mobile app and logged in, your phone or tablet will be busy grabbing copies of those collections.

    While Lightroom Mobile is working, you’ll see the cloud icon in the upper left-hand corner will have three moving dots. When the dots stop moving, the mobile app should be synced with your desktop or PC.

    Four Advantages Lightroom Collections 3 3

    Remember earlier when we created a Nevada Collection Set? And then created a Nevada: Ely Nevada Collection and a Nevada: Antelope Valley Wild Horses Collection? Here they are in Lightroom Mobile.
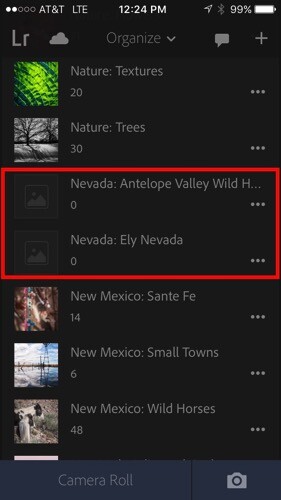
    Four Advantages Lightroom Collections 3 4

    We’ve been working a lot with the Italy Collection Set too and you can see all of those folders here on the mobile app.
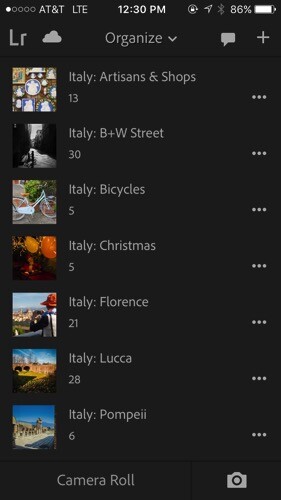
    Four Advantages Lightroom Collections 3 5

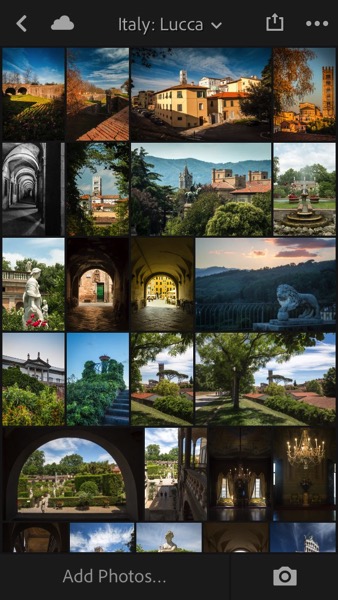
    When you click on one of the folders – for example, Italy: Lucca – you’ll see that the images are exactly the same as they are on the desktop version.
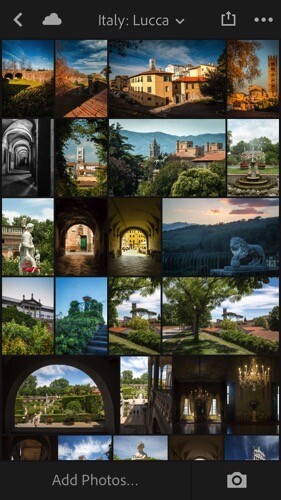
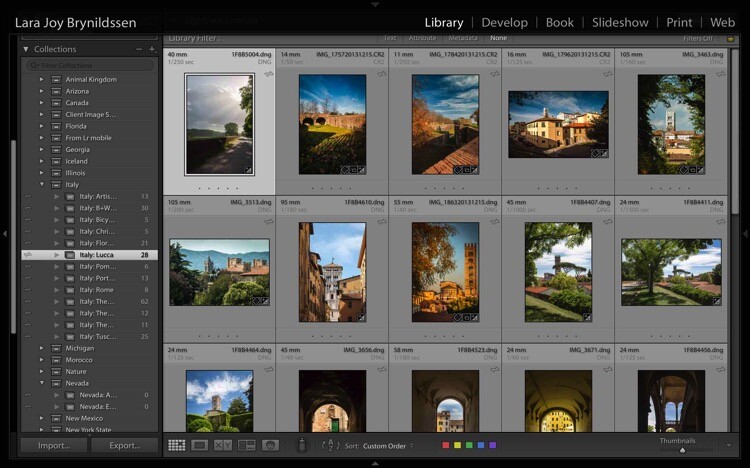
    Four Advantages Lightroom Collections 3 6

    Four Advantages Lightroom Collections 3 7

    Why Collection Names are Important in Lightroom Mobile

    Remember back when we were setting up our Collection Sets and Collections on the desktop version? We repeated the name of the Collection Set in each Collection. It seems a little clunky to do it that way but hopefully now that we’re in Lightroom Mobile, you can see why we’ve chosen to name things that way. Lightroom Mobile doesn’t have Collection Sets. Instead, the mobile app organizes everything alphabetically by title.

    If we hadn’t repeated the name of the Collection Set when we named our Collections, the names wouldn’t be specific enough. For example, I might not know what images are in a file called Artisan Shops if I don’t know those shops are in Italy. Now, by adhering to this slightly clunky naming structure, if someone (i.e. a publisher, client, gallery owner, friend or fellow photographer) wants to see your Italy images, you can open the app on your phone, scroll down the alphabet to Italy and show them the most important group of images.

    NOTE: You can actually change the organization method in Lightroom Mobile by clicking the Organize menu. For our purpose of building portfolios of your best work, it’s best to stick with the default, Alphabetize by Title.

    Using Collections to Share Images from the Desktop Version of LR

    For many of us, sharing our images is the very heart of why we do what we do. Lightroom has built some handy features right into Collections to make it as easy as possible to share our portfolios.

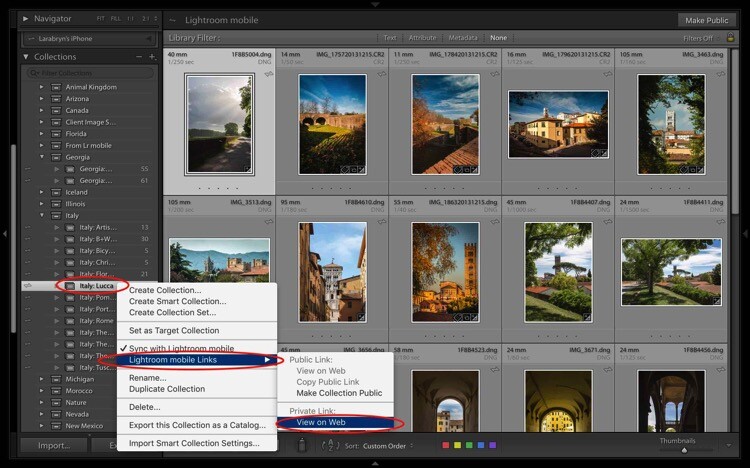
    Let’s start with the desktop or full version of Lightroom. The first way we can share a Collection or portfolio of images is by right-clicking on a Collection. Let’s click on Italy: Lucca. A dialog box pops up. Click on Lightroom Mobile Links. Then, in the second dialog box, under Private Link, click on View on Web.
    Four Advantages Lightroom Collections 4

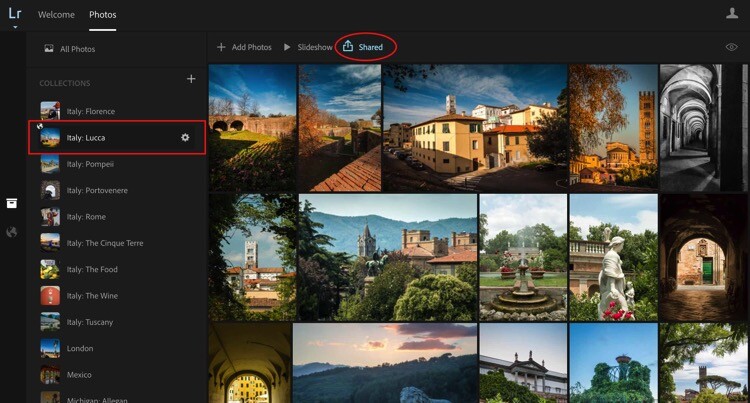
    That takes us online to Adobe.com. If you’re not signed in, you’ll need to sign in now. You can see that once again, we’re in the same collection where we started. It’s titled the same and the images are in the same order. You can easily share by clicking on the Shared icon that is a box with an arrow sticking out of it.
    Four Advantages Lightroom Collections 4 1

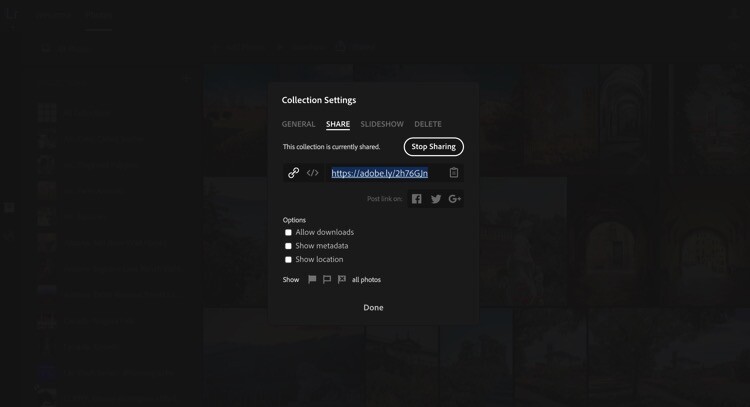
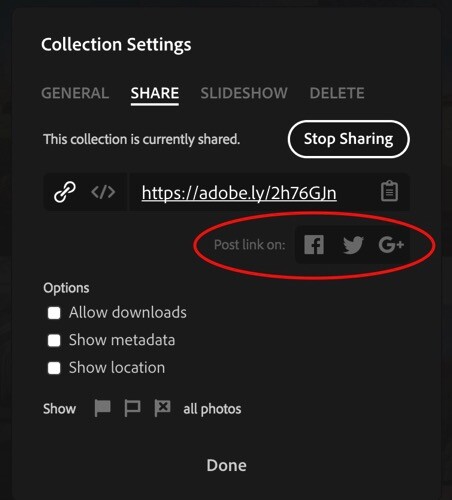
    Once you click that icon, another dialog pops up. This dialog gives you a link to share. Here’s the link to my Italy: Lucca Collection. https://adobe.ly/2h76GJn. There are also a few options you can choose to specify how much about your images you want to share.
    Four Advantages Lightroom Collections 4 2

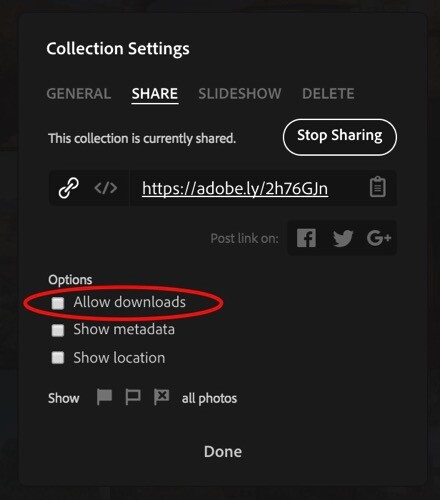
    Depending on where you’re sharing your Collection and why the only box I would suggest you almost never check is Allow Downloads. If you prefer to be credited for your work and to be paid, do NOT check this box or allow anyone to download your images.
    Four Advantages Lightroom Collections 4 2 1

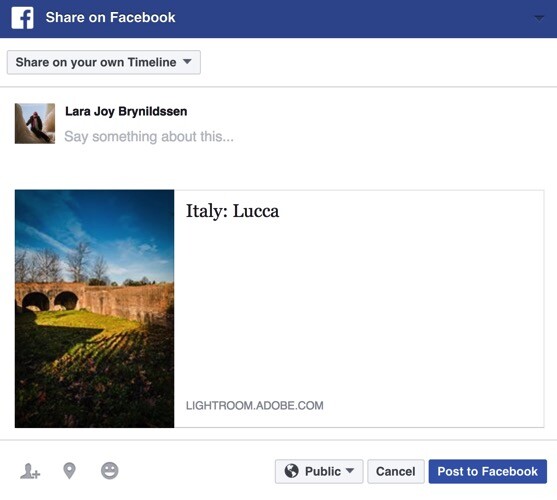
    You can share your entire Collection on Facebook, Google+, or Twitter too. Tap the icon for your favorite social media site and follow the prompts. Lightroom will post the link to your entire Collection.
    Four Advantages Lightroom Collections 4 2 2

    Four Advantages Lightroom Collections 4 3

    Four Advantages Lightroom Collections 4 4

    Four Advantages Lightroom Collections 4 5

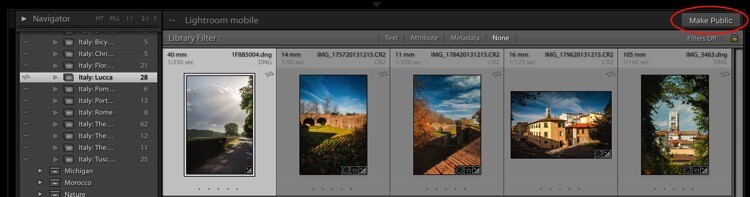
    Another way you can share your images from the desktop or full version of Lightroom is to click the Make Public button in the top right corner.
    Four Advantages Lightroom Collections 4 6

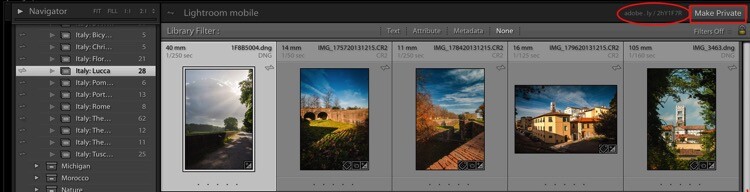
    Once you click that link, Lightroom will generate a public link.
    Four Advantages Lightroom Collections 4 7

    When you click a public link, Lightroom again takes you to Adobe.com only this time, you’re not the only one who can see it. Anyone online can see your public Collection as a web gallery. To make the Collection private again, just click the button that says Make Private.
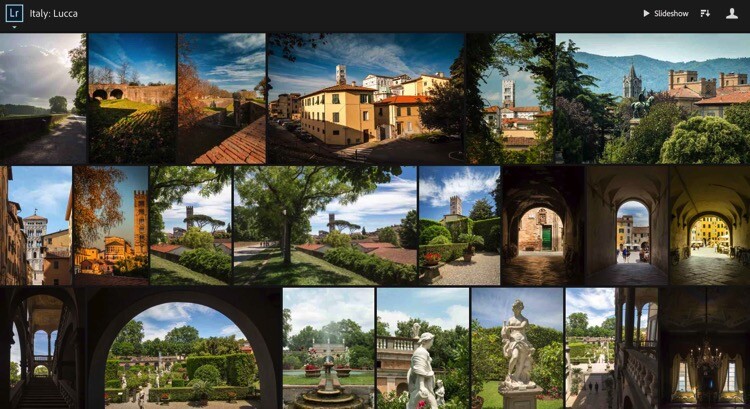
    Four Advantages Lightroom Collections 4 8

    Using Collections to Share Images from Lightroom Mobile

    You can also share from the Lightroom Mobile in almost exactly the same way, with the same options.

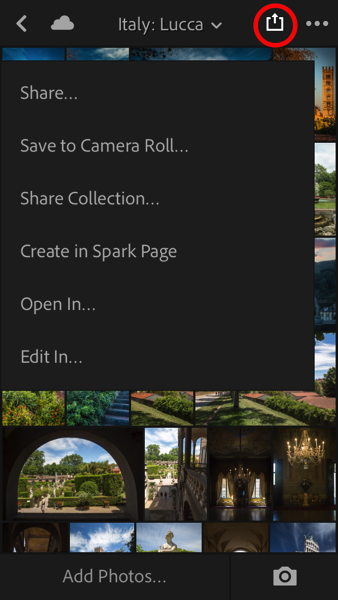
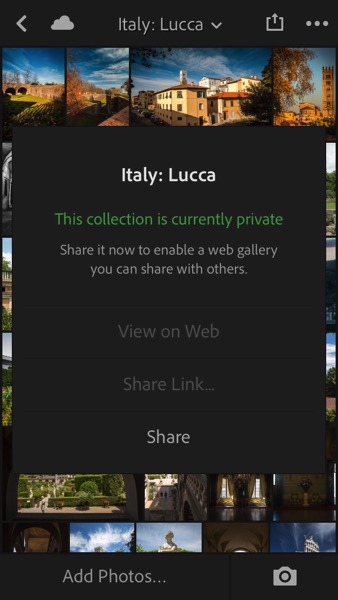
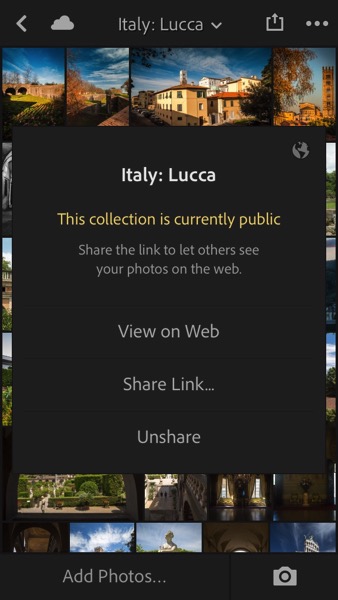
    Here we have the Italy: Lucca Collection. When you tap the Share button (the box with the arrow sticking out of it), you pull up a dialog. Tap Share Collection. Another dialog box pops up giving you the option to make the Collection Public by tapping Share at the bottom of the dialog. If you change your mind, tap Unshare.

    Four Advantages Lightroom Collections 4 9 Four Advantages Lightroom Collections 4 10
    Four Advantages Lightroom Collections 4 11 Four Advantages Lightroom Collections 4 12

    Why do you even need these links?

    You might be thinking at this point that while it’s pretty cool to have shareable links to your Collections, you don’t really need them. That brings us back to the idea of building a portfolio. Regardless of whether you are an amateur photographer hoping to go pro someday, or whether you are a very serious enthusiast, building a portfolio is going to help you improve your photography.

    More than that, sharing your portfolio enables you to get feedback on what you think are your best images. If you have a trusted mentor, you can share a link to one of your Collections with her, she can view the images, comment, and you can use her feedback to improve.

    These links can also be used to share the image files from your shoot if you are a pro and work with clients. If you’re looking to sell your travel images, you can share a link with a local tourism bureau or to a travel magazine when you pitch a story. Or, if you were in Italy with friends and want them to see why exactly you always carry 30 pounds of camera gear with you when you travel, send them a link to one of your Italy Collections. They’ll re-live the trip as they scroll through your images and maybe even offer to carry some of your gear the next time you travel together.

    Sharing to Instagram from Lightroom Mobile

    Your sharing options from Lightroom Mobile are similar to the sharing options from the full desktop version and also include Facebook, Twitter, and email. One of the best ways to use the Lightroom Mobile app is to share to Instagram. Since uploads to Instagram can only be done from your phone, if you want to share images from your DSLR, it’s always a bit of a trick getting them over to your phone in a quick, easy way. Lightroom Mobile is the perfect solution.

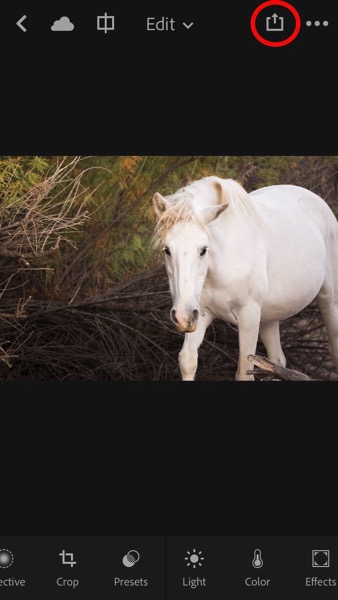
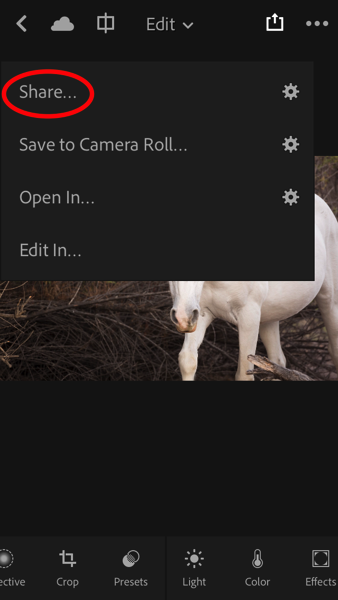
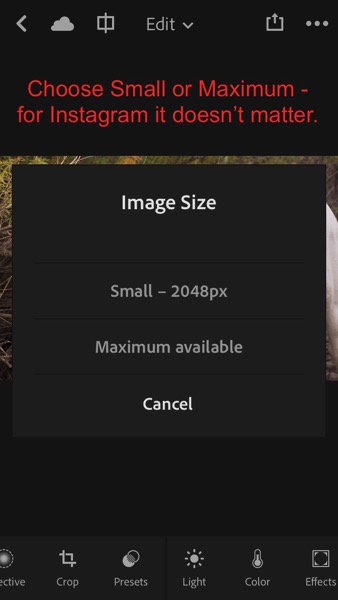
    My Instagram feed is only images of horses so let’s jump to Arizona: Salt River Wild Horses Collection. Click on the image you want to share. Tap the Share button (the box with the arrow sticking out of it). In the dialog box that opens, tap Share…. Then, in the Image Size dialog box that opens, tap either one (it doesn’t matter so much for Instagram). Finally, in the next box that opens, click the icon that says Import with Instagram.
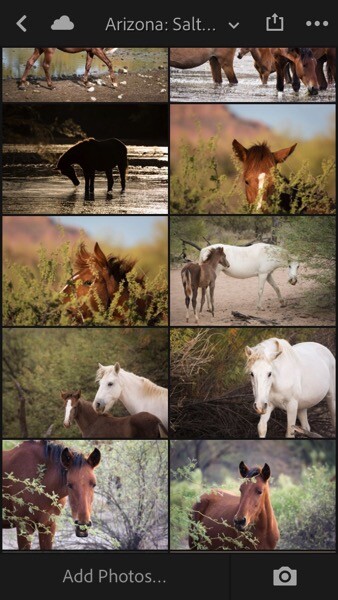
    Four Advantages Lightroom Collections 5

    Four Advantages Lightroom Collections 5 1 Four Advantages Lightroom Collections 5 2
    Four Advantages Lightroom Collections 5 3 Four Advantages Lightroom Collections 5 4
    Four Advantages Lightroom Collections 5 5 Four Advantages Lightroom Collections 5 6

    You might also see an icon that just says Instagram. I don’t use that one because it gives fewer options. The Import with Instagram button takes you right into the app with all the native options to Instagram. Now you’re all set. Caption and hashtag as you normally would and go on your merry way.

    NOTE: I’ve really just posted that image to Instagram. Go find it and give it some love so I can give you bonus points for reading all the way through this very long article.
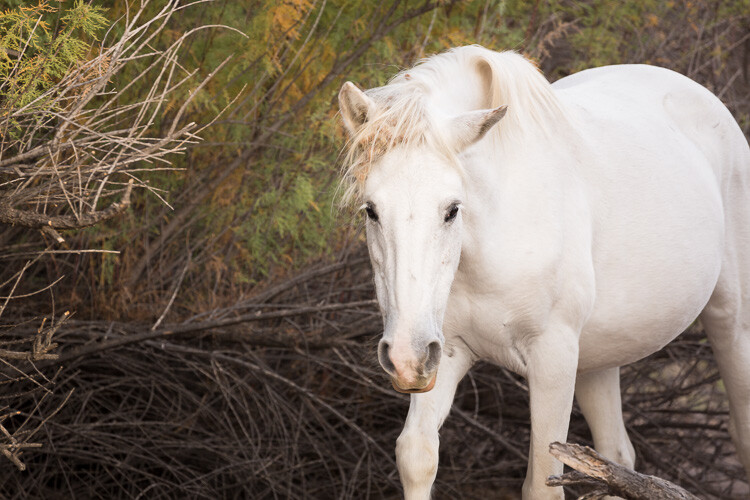
    Four Advantages Lightroom Collections 5 7

    As long as you consistently sync to Lightroom Mobile, you can easily share your images to Instagram on a daily basis and eventually, your feed will be a living portfolio of your best images.

    How do you use Lightroom Collections Sets and Collections?

    The goal with this article was to show you how to set up and use Lightroom Collections to build your portfolio, to demonstrate the utility of Smart Previews, to clarify how to sync with Lightroom Mobile, plus a few tips on using Collections to share your images.

    Do you use Lightroom Collections? Do these ideas work for you?

    Share with me in the Comments below. I’d love to know how you build and share your portfolios.

    googletag.cmd.push(function() {
    tablet_slots.push( googletag.defineSlot( “/1005424/_dPSv4_tab-all-article-bottom_(300×250)”, [300, 250], “pb-ad-78623” ).addService( googletag.pubads() ) ); } );

    googletag.cmd.push(function() {
    mobile_slots.push( googletag.defineSlot( “/1005424/_dPSv4_mob-all-article-bottom_(300×250)”, [300, 250], “pb-ad-78158” ).addService( googletag.pubads() ) ); } );

    The post Four Advantages of Using Lightroom Collections by Lara Joy Brynildssen appeared first on Digital Photography School.


    Digital Photography School