RSS
 

Archive for the ‘Photography’ Category

Weekly Photography Challenge – Framing

02 Dec

There are many ways to compose or images and many different elements you can use for effective composition. Framing is one such element of composition that can be very powerful for leading the viewer’s eye when done well.

Eastman Kodak House (the home of George Eastman who founded Kodak) framed by the trees in the front garden.

Weekly Photography Challenge – Framing

Framing isn’t just about finding an archway, window, or doorway to shoot through though. You need to have a strong and interesting subject inside the frame. An empty parking lot framed with a stunning doorway is still a boring, empty parking lot.


Here some tips if you need help with your framing:

  • How to Use Framing in an Urban Environment
  • Tips for Framing your Images to Tell a More Compelling Story
  • How to Use Framing to Create a Sense of Scale
  • Tips for Using Natural Framing to Improve Your Composition
  • How to Use Framing for More Effective Compositions

I shot this Japanese style pagoda closer up, but it was lacking something. So after walking down the path, I turned around and shot it again, this time using the large trees as framing elements.

Simply upload your shot into the comment field (look for the little camera icon in the Disqus comments section) and they’ll get embedded for us all to see or if you’d prefer, upload them to your favorite photo-sharing site and leave the link to them. Show me your best images in this week’s challenge. Sometimes it takes a while for an image to appear so be patient and try not to post the same image twice.

Share in the dPS Facebook Group

You can also share your images in the dPS Facebook group as the challenge is posted there each week as well.

The post Weekly Photography Challenge – Framing by Darlene Hildebrandt appeared first on Digital Photography School.


Digital Photography School

 
Comments Off on Weekly Photography Challenge – Framing

Posted in Photography


Video Tips: Composition Dos and Don’ts For Creating Better Images

01 Dec

How you compose or arrange your frame is one of the keys to creating interesting and compelling images. So learning some composition rules, and when to break them is essential.

Here are three short videos to help you see what to do and what to avoid in your composition.

Composition Mistakes to Avoid

Learn what not to do in this video including:

  • Double subjects
  • Looking out of the frame
  • Tangents (lines cutting through the subject)
  • Lazy composition

Beginner’s guide to composition

In this second video, Jordan from Sleeklens gives you four tips you can use to help elevate your photography composition.

?

The four tips covered include:

  1. Rule of thirds
  2. Balance
  3. Symmetry
  4. Leading Lines

9 Composition Tips

Finally, in this last video from COOPH you will see nine more composition tips based on the images of master photographer, Steve McCurry.

?

Do you have any other composition tips you would like to share? Please do so in the comments section below.

The post Video Tips: Composition Dos and Don’ts For Creating Better Images by Darlene Hildebrandt appeared first on Digital Photography School.


Digital Photography School

 
Comments Off on Video Tips: Composition Dos and Don’ts For Creating Better Images

Posted in Photography


How to use Off-Camera Flash to Create Dramatic Images with Cross Lighting

01 Dec

Learning to use off-camera flash allows you to create and shape light, giving you plenty of new opportunities for dramatic photography.

But for many photographers, starting up with flash can be intimidating. It’s not just a matter of aiming a flash at your subject and hoping for the best. Choosing the wrong angle or positioning for your flash can have a negative effect, casting unflattering or irregular shadows.

A tennis player lit by off-camera flash cross lighting

A tennis player lit by off-camera flash cross lighting

I remember when I was starting out with off-camera flash I would sometimes get images where the light simply didn’t look right. But when it’s used effectively, flash adds to an image – it shouldn’t make the lighting seem unnatural or otherworldly (unless, of course, that’s the effect you’re going for – to each their own!).

But where’s a good place to start? Where should you put your flash in order to get good light? This article will show you one method you can use called cross lighting that you can use to create dramatic images with off-camera flash.

What is cross lighting?

For both beginners and pros alike, cross lighting is a very quick and simple setup that results in a dramatic, well-lit shot.

Like the name implies, this setup features two light sources on opposite sides of the subject. Hitting your subject from both sides adds a sense of depth to the image, while still producing natural-looking light.

An example showing an off-camera flash cross lighting setup for a portrait of a tennis player.

An example showing an off-camera flash cross lighting setup for a portrait of a tennis player.

The key or main light

Typically you want your light that will provide the most illumination, also know as the key light, placed in front of the subject and a bit to one side. For portraits, you will typically want to use a modifier on your light, such as a softbox or umbrella. This isn’t a requirement – but it will help soften the shadows and create more flattering light on the subject.

The purpose of this key flash is to light up the subject’s features and put a sparkle of catch light in their eyes.

A demonstration of the key light only in a cross lighting setup - How to do Cross Lighting to Create Dramatic Off-Camera Flash Images

We convinced this model to act as our stand-in for a few quick portrait shots. Here is an image with only the key light, an off-camera flash positioned to the right of the camera.

Add a second flash as a rim or separation light

The second light is placed behind the subject on the opposite side as the first one. The purpose of this light is to create an “edge” of light around your subject. This is traditionally called a “rim light” or a “separation light” since it helps to separate the subject from the background.

Demonstration of cross lighting on a subject

By adding a second light to the left of the camera and behind our model, we’ve created a rim of light that separates him from the background for a much more pleasing and dynamic image. Notice the highlight on his hat and hand on the left side.

Voila! This quick setup is an easy way to get started and start exploring the creative potential of a shoot. As you begin to snap pictures, you may find something about your setup that you want to change, but the cross lighting gives you a solid foundation from which to build.

An alternate setup of the previous cross lighting example with the off- camera flash locations reversed

We’ve flipped the orientation of the lights for this shot – while keeping the same cross-lighting style. Now our key light is on the left, and the rim light is provided from the right.

Quick to set up

One of the reasons I love using this setup for off-camera flash is that it takes away the guesswork and provides a solid foundation of light that you can then begin to work with and modify.

And also that it takes only moments to set up! When you start lugging around multiple flash units, light stands, and modifiers, it’s nice to have a consistent starting position that provides even lighting.

An example image showing the setup of flash units for cross lighting - How to do Cross Lighting to Create Dramatic Off-Camera Flash Images

An overview of our setup, with the flashes oriented for cross-lighting and our subject right in between.

The final image of a carpenter, photographed using cross lighting - How to do Cross Lighting to Create Dramatic Off-Camera Flash Images

The final shot, where the light has given a sense of depth to make the subject stand out from the clutter behind him.

It’s a good idea to get the correct flash power for your key light dialed in before adding your second flash. Trying to figure out the correct outputs for two lights at the same time and adjusting in your camera on the fly is a recipe for a headache.

Cross lighting with a single flash

One of the reasons this setup is so easy and versatile is because you don’t necessarily need to use two flash units – the sun can step in as either your key or secondary light.

This approach is particularly effective at golden hour. As evening falls and soft, warm light floods across the fields, you have a ready-made separation light. Many natural light photographers are already familiar with this and use this rim light in their shots.

Example of a portrait shot with cross lighting using a single off-camera flash as a key light and the sun as a secondary light

The key light here is an off-camera flash fired into an umbrella just outside the left edge of the image. The sun, coming from the right, acts as the secondary light. The key here is in balancing the flash with the natural light.

The benefit of adding an off-camera flash as a key light is that you can create a much more dramatic image with dark, rich colors. Colors lose their vibrancy as they get brighter. By keeping the exposure low and using your off-camera flash to light up your subject, your background can be full of vivid contrast and color.

Using the sun as your key light

The sun doesn’t always have to play second fiddle to your flash. You can create the same effect by using the sun as your key light – coming in at your subject from a slight angle – and then using your off-camera flash as the rim or separation light.

The biggest drawback here is that you can’t adjust the power of the sun quite as easily as you can on the back of your flash! However, taking the time to learn how your camera settings can make a picture darker or lighter, and how you can use this skills in conjunction with your off-camera flash, will give you allow you to build the shot you want.

Cross lighting with a flash and a reflector

Here’s the last variation of this setup. By setting up your off-camera flash on one side of the subject and angling a reflector just right on the other, you can mimic the effect of two light sources. This approach might take a bit of practice and a steady hand, but it’s a fun way to learn what you can accomplish as you learn how to control light.

An example of a portrait using a reflector and sunlight to create cross light

Here we used a reflector to provide the key light from the left side of the shot, while the sun comes from the back right.

Give it a shot

Learning to maneuver and shape light is a fun challenge. Being able to quickly and reliably get top-notch results with flash is an important aspect of photography – especially if your model or clients are waiting impatiently for you to get your lighting figured out.

By starting with cross lighting and working from there, you have a reliable method for nailing some great shots. Please share your comments, questions and cross lighting images in the comments section below.

The post How to use Off-Camera Flash to Create Dramatic Images with Cross Lighting by Frank Myrland appeared first on Digital Photography School.


Digital Photography School

 
Comments Off on How to use Off-Camera Flash to Create Dramatic Images with Cross Lighting

Posted in Photography


Lightroom Mobile – The Secret to Shooting and Editing on Your Smartphone

30 Nov

Why use Lightroom Mobile

Many people don’t realize the benefits of using Lightroom Mobile with your Adobe Lightroom Subscription. When you subscribe to Adobe’s Photographer’s plan, not only will you receive Adobe Lightroom Classic, but you also get access to Lightroom Mobile.

Lightroom Mobile - The Secret to Shooting and Editing on Your Smartphone

Lightroom Mobile is a cloud-based program which originates from your Lightroom Classic desktop. It’s easy to set up, and Adobe’s help desk is there to quickly assist if you have any questions. You not only have the ability to share your images across multiple devices, but you can also shoot and edit quality RAW images right from your phone or tablet.

 Setting up Lightroom Mobile

The first thing you need to do is enable Lightroom Mobile from within your desktop version of Lightroom. This will signal Lightroom to sync the files that you select. Below is a screenshot of Lightroom’s Activity Screen that shows the status of Lightroom mobile. The activity screen is located in the upper left-hand corner of your Lightroom desktop page.
Lightroom Mobile - The Secret to Shooting and Editing on Your Smartphone

Creating Collections

The secret to working with Lightroom Mobile is to create collections within your Lightroom desktop version that you want to sync with Mobile. It will not automatically sync everything in your Lightroom catalog, you have to tell it which images you want to show on your devices and this is done through collections. I wouldn’t recommend syncing all your images to Lightroom Mobile. Leave this for special collections and your portfolio.

Select a group of images you would like to include in a collection and navigate to the collection module on the left panel of the Lightroom desktop app. Click the + sign in the collections pane to create a new collection.

Lightroom Mobile - The Secret to Shooting and Editing on Your Smartphone

Create a new collection.

Once you have created the collections and added images to them, you need to be sure that these collections will sync. When you first create them, there is a box to tick to enable Lightroom Mobile and syncing between devices – make sure that is checked off.

Lightroom Mobile - The Secret to Shooting and Editing on Your Smartphone

Enable Lightroom Mobile

If you don’t enable Lightroom Mobile upon import or when you create a new collection, you can always enable it after the fact by making sure the firebolt is enabled located to the left of the collection name. Just tick the box next to the collection you want to sync and the firebolt will show.

Lightroom Mobile - The Secret to Shooting and Editing on Your Smartphone

Firebolt Icon is Located to the Left of the Collection Title

To stop a Collection from syncing with your device, do one of the following in the Collections panel:

  • Click the firebolt sync icon next to the name of the Collection to turn it off.
  • Right-click a Collection and deselect Sync With Lightroom Mobile from the sync menu.

Viewing Images on Your Device

If your Lightroom Mobile is enabled correctly, you will need to sign into the Adobe Creative Cloud with your password. The mobile version should start filling up with the collections you enabled on your Lightroom desktop. You can also enable Lightroom Mobile to automatically pull images that you take from your Mobile device. Make sure you create a special collection of those images only.

Creating Images with Lightroom Mobile

With the current version of Lightroom mobile, you can create images on your Smartphone with the app. It gives you the option of either shooting in JPG or DNG. You can also shoot in automatic or professional mode and use a variety of presets. I prefer to shoot an image without any preset adjustments made to it and apply any edits afterward. That way you will always have the un-retouched original image.

The automatic shooting mode on Lightroom mobile works really well. It gives you separate focus and exposure points as well as overexposure indicators that show up as a series of parallel lines indicating highlight clipping. These three tools are the keys to getting a good shot on your mobile device. If you scrub left or right on the screen, the highlight clipping indicators will go away when the exposure becomes balanced. If portions of the image are overexposed, it will show up as you see in the image of my white dog below.

Lightroom Mobile - The Secret to Shooting and Editing on Your Smartphone

Automatic Shooting Mode with Over Exposure Highlights

The beauty of using Lightroom Mobile is you can edit images on your Mobile device or from your main computer. They can be located in a collection taken with your DSLR, or they can be images taken with your cell phone and located in your Lightroom Mobil collection.

Note: if you have your monitor calibrated, the colors may come out differently on your pad or phone if you decide to edit from there. No editing is permanent within Lightroom, so it’s an easy fix if it doesn’t look right on your main desktop computer.

One of the keys to success in mobile photography is to get it right in the camera just like a DSLR. Using these tools with this intuitive mobile app will help you accomplish that goal.

Please keep in mind, your phone or tablet is not a DSLR, so know that the images will not be of the same quality as a high megapixel DSLR. However, the Lightroom Mobile camera app gives you some great tools to create some really nice Smartphone images.

Editing in Lightroom Mobile

Once you have created your images and imported them to Lightroom Mobile (either from your desktop or from your smartphone), you have almost as many options for editing on your device as you do on your desktop.

If you tap on the edit screen in the top left corner, it will open up a menu of several different editing options.

Lightroom Mobile - The Secret to Shooting and Editing on Your Smartphone

Select the Edit Tool

On the edit screen, you can choose to edit the image globally or choose selections and edit specific areas individually. This is how to start a post-processing workflow, whether you’re using Lightroom Classic CC desktop version or Lightroom Mobile.

Then you can go through the different options for post-processing, starting with light, color, effects and finishing off with detail. You can also make a selection in your image and go through all of those same adjustments, just affecting the selected areas.

Local Adjustments

By tapping on the selective icon on the bottom left, it will bring up a menu with a paintbrush. Tap on the brush, and then select the middle brush size and paint with your finger over the area you would like to edit. If you overdo it, you can use the eraser tool to clean up your selection. After you make the selection, then you can make any number of adjustments on just that area. Once you have made all the necessary adjustments, save your edits.

Lightroom Mobile - The Secret to Shooting and Editing on Your Smartphone

Using this technique will give you the most interesting effects by truly painting with light and not just adding random light adjustments for the whole image.

Give Lightroom Mobile a try and make it a part of your everyday photo organizing and editing. Give some of these selective tools a try and let me know how it goes in the comments area below.

The post Lightroom Mobile – The Secret to Shooting and Editing on Your Smartphone by Holly Higbee-Jansen appeared first on Digital Photography School.


Digital Photography School

 
Comments Off on Lightroom Mobile – The Secret to Shooting and Editing on Your Smartphone

Posted in Photography


Water in Red Mountain Open Space – Fat Bike Exploration

30 Nov

As a paddler I am always looking for water. Anytime! Anywhere! In November 2017 I made several visits to Red Mountain Open Space north of Fort Collins with my new Salsa Mukluk fat bike. I covered all possible trails. Technically, […]
paddling with a camera

 
Comments Off on Water in Red Mountain Open Space – Fat Bike Exploration

Posted in Photography


The dPS Ultimate Guide to Fine Art Photography

30 Nov

Daring to be Different

One of the contentious topics in the world of photography these days seems to be what exactly is fine art photography. Ultimately it is what the photographer deems it to be, but in the world of art, there is a lot more to it. If you want to get recognition as an artist that uses the medium of photography, then there are certain expectations of what your body of work should be like and how you go about executing it.

Galleries and collectors are not going to collect work or invest in art when there isn’t a lot of consistency within that body of work. One fine art image is not enough to make you a fine art photographer. The work needs to be done with intention, with a direction, and have a consistency over all the images. A style is developed that is recognizable in all the images.

It is important to look at other famous artists, not just photographers, but painters and sculptures, to see how their work has evolved. See how you can do something similar with your photography. Photography is no different to those other mediums and the same definitions that apply to them are also applicable to fine art photography.

Who can be a fine art photographer?

01 leannecole fine art photography

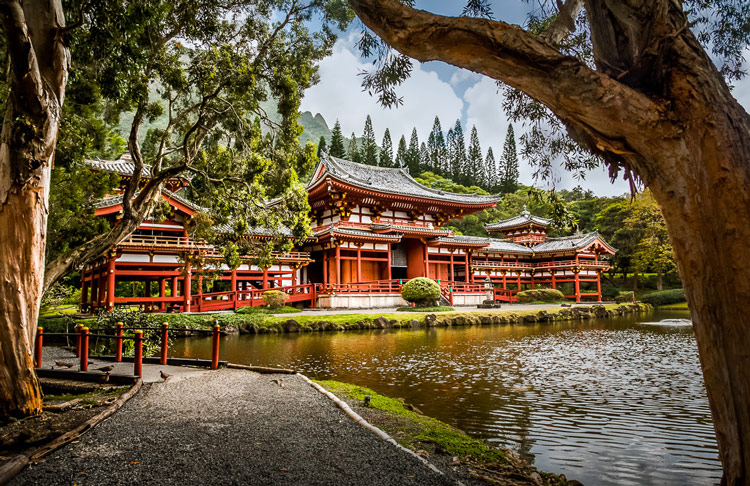
A long exposure that was taken during the day, but the light in the image has been manipulated to make it look like it was taken at a different time.

Anyone can be a fine art photographer; there are no hard and fast rules about it. Though it does demand a fair amount of dedication. There are no rules or special qualifications that a person needs to follow or have before they call themselves a fine art photographer.

Some of the things that help define a fine art photographer

Perhaps the best way to describe how you can be a fine art photographer is to look at how they work. There is a lot more to it than simply creating beautiful images. We can all do that, but an artist works towards something. Their work is done with intention, and they have a direction they are following. Finally, there is a consistency to their work. Let’s take a look at each of these points individually.

Intention

Often when you go out to take photos, you pick a place because you think you might get nice images at that location. That is most likely never going to be a problem for you. But if you want to be considered more of a fine art photographer then you need to go to places that you know will help you create images that will further your work, and build your portfolio. There has to be some intention behind why you photograph things.

2420 leannecole fine art photography

The cityscape that has some differences, but it is quite effective and if I was short of images for an exhibition this one would be included.

For example, a fine art portrait photographer who does images of people in certain scenes, like dark moody beach scenes, is not going to go and take photos of a baby in a park. Well, they might for a friend, but they wouldn’t include that work in their portfolio.

Artists are always trying to take photos that work with what they already have. They go out with the intention of photographing subjects that follow the direction of their work.

Direction

This is a lot like intention, but it means the photographer has direction. If they are taking photos somewhere, they are being directed by their previous work. This helps them to get images that will continue to follow that style.

06 leannecole fine art photography

Before processing.

07 leannecole fine art photography

After processing to give it my signature style.

Consistency

For the same reasons as intention, that same portrait photographer is not going to photograph a baby because it won’t give their workflow any consistency. For a fine art photographer, you need to have work that is fairly consistent and looks like it all belongs together.

That doesn’t mean it has to be the same subject all the time, it can also be a similar processing style. All the images are processed in a similar way so they look consistent when a gallery or investor is looking at the portfolio.

The more consistent you are the more galleries and investors will be interested in your work.

Consistency is important and making sure the images all have the same feel and look is important in creating a body of work.

This is definitely the case. I asked the curator for Stills Gallery in Sydney, Josephine Skinner, about how important it is that there be consistency in a body of work. This is what she had to say:

It’s very important. If an artist were contacting us, I would hope to view a resolved body of work, both conceptually and materially. Of course, we’re used to working with artists as they develop new work for an exhibition, but a cold submission won’t pique my interest unless you establish your capacity to deliver.

What is a body of work and how do you create it?

A body of work is where you have several pieces that show the consistency and intention that was spoken about earlier. When you have a body of work it should have a similar style and look as though one person created it all.

The subject matter should be all the same or very similar. There needs to be a number of images in the body of work so you can have an exhibition. The actual amount will depend on where you are exhibiting and how many are needed.

This is a selection of my work, notice the similar processing style, subject matter, and mood across all the images.

Contact sheet 02

Contact sheet 01

Artist Statement

Whether you want to believe it or not, an artist statement is very important. It doesn’t have to be an essay, but putting what you are trying to achieve with your photography down on paper is a great way to help with those areas that we just discussed; intention, direction, and consistency.

When writing one you want to be clear about why you are doing what you are doing. What is important about it and why you have chosen the medium of photography?

Here is what Josephine had to say about artist statements:

An artist statement is helpful: be brief, clear and use accessible language.

Some statements can waffle on and not make much sense. It is good to sound professional, but it should be concise and leave the audience of your work with a very clear understanding of what you are trying to achieve.

This image was taken with the intention of being able to change the mood and make it look different.

03 leannecole fine art photography

The final image. Many aspects were changed so this image would look like it was taken at night with just one light shining.

Look at some fine art photographers that are practicing now

Have you ever been told that if you want to be a good writer that you should study and read the writing of those in the same field? The same can be said for fine art.

If you want to be an artist then you should study and look at the work of other great artists, in this case, fine art photographers. Though, you should include a wide range of artists as photographers can also learn a lot from painters, drawers, printmakers, and sculptors.

08 leannecole fine art photography

This image of the 12 Apostles doesn’t really belong with most of the work, but it still has the same. The light has been manipulated, so it almost belongs. But, the different subject matter would make mean it would probably not be included in an exhibition.

You really need to look at what your work is and find similar photographers. There is such a large number of photographers working at the moment, that it’s hard for me to tell you who to study. But here is a list of a few fine art photographers to give you a starting point.

  • Julia Anna Gospordarou
  • Bill Henson
  • Tracey Moffat
  • Cindy Sherman
  • Brook Shaden – artist statement and gallery of work.
  • Andreas Gursky
  • Joel Grimes
  • Art Wolfe
  • Annie Leibovitz

What is an Artist CV?

15 leannecole fine art photography

A cityscape image before processing.

16 leannecole fine art photography

The final image showing how the light has been changed to create this look.

This is very similar to a work CV (curriculum vitae) or resume. But instead of listing all the jobs you have had, you list everything that galleries and other people in the art world might want to know about you.

They usually start with your education, where you have studied and when. Then you list what solo exhibitions you have had if you have had any. The goal is to end up with a massive list of those. Then you follow those with the group exhibitions in which you have been involved. Then you might add what prizes you have won.

Finally, comes a list of places where your work has been published. For example, if you have had work published in a magazine. You can also include collections and in this section, you will mention if you have sold work to important places like a major public gallery, for instance.

09 leannecole fine art photography

Another image that has the same look and processing, but doesn’t belong. It does belong more than the image of the 12 Apostles though.

Every time you approach a gallery you will be asked for your Artist’s CV. If you don’t have one, it is time to start working on it. They are usually one page.

Here is a link to my CV as an example.

Do you need to study Fine Art at a Tertiary Level?

The simple answer to this is no, you don’t have to study at a tertiary level to be a fine art photographer. But the long answer is that if you do, you will gain a greater understanding of the many aspects of being an artist. The really good places also give you studio space and impose the need to work in that space like a professional artist would.

10 leannecole fine art photography

Another one of the power stations, that could work, but wouldn’t be included in an exhibition.

There are so many other things you learn as well, for example, how to develop your style or your body of work. Or, how to create the consistency we talked about earlier. You begin to understand how the gallery system operates and how to approach them. Often you are given opportunities to exhibit your work so you can get an idea of what it is like. These can help you to get a start on your artist’s CV.

The lecturers are usually artists themselves, so they can guide and mentor you. They understand what you are going through and their advice can be invaluable.

Getting a Bachelor of Fine Art is never a bad thing. Many other artists and galleries will take you more seriously because you have shown a commitment to your practice.

12 leannecole fine art photography

This one is a little different, but it still fits the artist statement.

Where to study it if you so choose

There are places all around the world and where you study will depend on where you live, the cost, and if you are accepted. Look at other artists and see where they studied. Do your research to find out what is available near you. Find out how many graduates of that institution have had successful careers when they finished.

Not all art schools are equal. Some have very good reputations, while others will get you the degree, but not necessarily the prestige. For example, in Melbourne, you can get a Fine Arts Degree from many places, but two are more sought after, University of Melbourne, Faculty VCA, and RMIT University. People take more notice if you have attended and graduated from those schools.

14 leannecole fine art photography

This image appears as though it would work, but since the rest of the images are more cityscapes and not close-ups of anything, it would not be included. If more similar images were made, I may have to reconsider that decision.

Keep in mind that this type of degree will not lead to a paying job, and you are being trained to be an artist. It is expected that you will work at it full-time when you finish. Of course, most artists end up doing other jobs to supplement their income until they are making enough from their art. Though this appears to only happen for a few. Nearly all teach or have other jobs to pay the bills.

I had a lecturer once that told us if we were still doing art and exhibiting our work 10 years after graduation we would make money from it. Unknown if this is true, but it is a nice sentiment.

Visit galleries and see what others exhibit

2220 leannecole fine art photography

This was taken near a marina, but it is too different and I couldn’t make it look like the other images, so it would never be included in an exhibition.

To get a great understanding of what fine art photography is one of the best things you can do is visit art galleries, both public and commercial. You can see how the artist works, look at the consistency and also how the work all looks when it’s put together in an exhibition.

Look for commercial galleries that are exhibiting photography works, or better still find ones that specialize in fine art photography. If you can’t visit them in person, then look on the internet. They all have websites and usually show the works of the artists they represent.

Study the work and the artist. If you find some whose work you really like, pay a lot more attention to them. Find out what motivates the artist, look at their artist CV, and see if you can find an artist statement. That will really help you to understand their intention, direction, and the consistency.

Public galleries often have some of their collection online, but you are usually required to go and look. Don’t be disappointed if the photography section if very small, other artworks often get more wall space. You can look for galleries that specialize in photography, for example in Victoria, Australia there is a place called Centre for Contemporary Photography and that is all they show. It’s a great way to see what other photographers are doing.

18 leannecole fine art photography

Like the ocean image, this has the same look and feel, but the subject matter doesn’t match.

Here are a few others:

  • International Center of Photography in New York City
  • A Gallery for Fine Photography in New Orleans – they carry prints by many famous and iconic photographers including Ansel Adams, Julia Margaret Cameron, Henri Cartier-Bresson, W. Eugene Smith, Edward Steichen, Elliott Erwitt, and many others.
  • Center for Creative Photography in Tucson, Arizona. They house a large collection of photography archives including many of Ansel Adams original negatives.
  • Maison Européenne de la Photographie in Paris dedicated entirely to photography.
  • Torch Gallery in Amsterdam
  • Galleria Carla Sozzani in Milan
  • Magnum Photos and Gallery – they represent several iconic photographers’ work and have a gallery in Paris, as well as events in many cities worldwide and a great online gallery for viewing.
  • The Photographers’ Gallery in London, England.
  • Camera Work in Berlin.

Study about all art, its history and what is happening now

Part of being an artist is keeping yourself informed. As previously stated, you should be going to galleries and seeing other exhibitions. It is so important to read and study other artists. It can help you understand what their lives were like and what drove them to create their art.

It is also good to keep up to date with what is happening in the world of art. Who is winning awards, what work is really popular right now, and how you could fit in. Look at who is being exhibited and which galleries are showing their work.

Look at painters, sculptures, and other mediums

Don’t limit your photography study to just photographers. You should also look at painters, sculptures, printmakers, and drawers. You can learn a lot from them as well.

Rembrandt lighting is a type of lighting pattern that portrait photographers strive to create. It involves a triangular spot of light on the cheek of the portrait subject. Photographers have been trying to replicate that style for years, but it came from a painter – Rembrandt.

13 leannecole fine art photography

The image is similar, but it probably wouldn’t be included in an exhibition. It doesn’t quite fit.

In some ways, painters were our earliest photographers as they tried to paint what they saw. Looking at their work is very important. You can learn a lot about subject-matter and more importantly, about composition. For those artists, the composition was key and they would have spent a great deal of time working on that element of their craft. Study how they put their paintings together and learn.

Sculptors create compositions and often work conceptually. If you are interested in conceptual photography then looking at how these artists work can help you find direction. See what lengths they go to in creating their sculptures.

Living an artist’s life and what that means

There is a myth that many creatives were “suffering artists”. That to be an artist you had to be in some kind of struggle. The other myth is about being the “starving artist”, so if you are going to be an artist you have to also be very poor.

An image that would be part of the body of work. It follows the theme of the rest of the images.

The first is a myth, you don’t have to be on some internal struggle to be an artist. It has been said that you have to go through disasters in your own life in order to help you create masterpieces. It isn’t true, of course. Very normal people create the most amazing artworks. There is a lot more to it than some emotional suffering.

In the past, many artists were starving. Even in today’s world, making money as an artist is incredibly hard. There are more people wanting to be artists than there are people wanting to buy the work. The reference to starving was more to do with making no money and not having enough to buy food.

The reality is that most artists live very normal lives. They often work part-time jobs to survive and live in ordinary houses. They are often very normal people. There are some eccentric artists, but they are more the exception to the rule. Many have studios and workspaces, and every free moment they get, they work in their art practice.

11 leannecole fine art photography

A cityscape that would work in an exhibition, it has the same feeling as the others.

Exhibiting your work

There are various different kinds of galleries and if you want to exhibit your work then you need to start studying them. Find out which ones are the best for you to approach first of the several different types (large public and private).
First, you need to find out what the galleries are looking for. Once again, Josephine has some advice for those wanting to approach galleries:

The first piece of advice I would have is to do proper research into which galleries you approach and be selective with those you do. We get submissions from painters, for instance, who haven’t even looked on our website to find out we exhibit photomedia and video. In the process of narrowing it down, bear in mind that if a gallery has an emphasis on photomedia that doesn’t mean that all forms of photography will fit with their broader aesthetic and focus. Also, be conscious that each artist brings something unique to a gallery so diversity is desired – they probably won’t want someone whose practice mirrors an existing represented artist. Lastly, each gallery has a different policy for receiving submissions, so a good idea is to call and ask what they prefer. Don’t just show up and expect to sit down with the Director!

17 leannecole fine art photography

A cityscape taken from an observation deck. While it is a cityscape it also would not be included. It really does not have the same look at the others.

That is great advice and a good idea for all artists. Do your research and study the galleries you are interested in to see if they are a good fit for you. You can also ask questions to see what they have to say. They will often be more than happy to talk to you about what type of work they are looking for, and how to submit your work.

Josephine has provided some information on how they find new artists:

Our focus is contemporary photomedia and video, so we tend to look at art prizes that are often interdisciplinary, such as the Hatched Graduate exhibition at PICA, and keep an eye on what’s happening in ARI (Artist Run Initiatives) spaces. These platforms provide an initial filter because the work has already undergone a process of competitive selection. Galleries with a more traditional or commercial aesthetic would probably look elsewhere.

Most galleries will have information and guidelines about how to send in proposals for exhibitions; you need to follow those closely. They get a lot of submissions and if you don’t do what they ask then you could be eliminated straight away. Do everything you can to get them to look at your artwork.

Preparing your work to exhibit

2320 leannecole fine art photography

The subject matter fits with much of what the fine art work is about, but it’s the wrong colors and sends a different message than the others.

Having an exhibition of their work is the ultimate goal for most artists. It is where they develop a name and reputation. If you want that too, then you have to make sure your work is good enough to show.

There are so many decisions to be made before you do a show. You have to decide who will print your work and how it will be printed. Part of the reason for exhibiting is to sell your work and if it doesn’t look good then people won’t buy it.

Before the work is sent to be printed you need to make sure that there aren’t any defects in the images. When they are blown up, sensor spots or other unwanted items in your scenes will be enlarged as well. They could end up standing out so much that they take over the image. Magnify the image on your computer (view at 100% or 1:1 size) and look very closely for any mistakes or faults.

20 leannecole fine art photography

Work in an exhibition.

19 leannecole fine art photography

Work that is packaged and ready to be sent to an exhibition.

Find a professional printer who will work with you. Look for one that you can rely on, and who knows their business. They should be able to help you figure out the best way to present your work. There are so many options for photographs these days. You can do canvas prints, put images on fine art paper, and even have them on metal, which is very popular right now.
Then you are faced with the option of framing or not. Most galleries will answer that question for you.

Read my article: How to Prepare a Photography Exhibit of Your Work for more on this topic.

Editioning your work

This is not compulsory, but one thing that many photographers do is edition their work. This means they will only sell a certain number of that image or a limited edition. The artist sets the edition to what they think they might sell.

2520 leannecole fine art photography

A cityscape that is very similar to many I do, but I wouldn’t include this image as it doesn’t have the impact that many of the others do.

For many artists starting out, the number of editions is usually small, around 10 or 20. The more successful an artist becomes, the more expensive the images get, and often the edition number increases as. Some will do editions of up to 200 photos.

For most of us though, especially starting out, it isn’t necessary to do editions. You may only sell one or two copies of an image. As sales pick up and you begin to make a name for yourself it is good to consider putting out editions of your work.

If you die your work will double in price

This is probably the biggest myth out there about fine art photography and art in general. While it is true that when some artists die their work becomes a lot more valuable, it isn’t the same for everyone. If the artist had a successful career and was being collected by a lot of people then there is some truth in this.

2120 leannecole fine art photography

Image with similar colors and a long exposure, but it is not an image I would include in an exhibition.

When they die their work gains in value because it becomes rare. As no new work will be produced, all of their previous work becomes more valuable. That’s all there is, a finite amount, so it will increase in value.

For most artists, our death will only matter to those around us and our artwork will only increase in sentimental value. It’s sad, but you dying likely isn’t going to cause an increase in the value of your work.

Being a fine art photographer

There are many steps you can take that will make you a fine art photographer. There are many different paths and it is up to you to decide which ones you will take. In the end, being an artist is about doing work with intention, having a direction and working consistently.

2620 leannecole fine art photography

This would very definitely be included. The light has been changed and it works with the artist statement.

Artists usually exhibit their work with the idea of gaining a reputation so collectors will purchase it. This, in turn, leads to their work increasing in value and they can sell more. Being an artist is a noble profession and one that dates back hundreds of years, who doesn’t want to belong to that group?

The post The dPS Ultimate Guide to Fine Art Photography by Leanne Cole appeared first on Digital Photography School.


Digital Photography School

 
Comments Off on The dPS Ultimate Guide to Fine Art Photography

Posted in Photography


4 Tips for Better Nightscape Photography

29 Nov

4 Tips for Better Nightscape Photography

A nightscape is a representation of any place or scene at night. If you are venturing into this area of photography, you will quickly realize that there are some other things to consider along with getting your exposure right. Here are a few tips to help you.

1. Settings and Gear

Shooting nightscapes is a very cool way to teach yourself shooting in low-light conditions. The location and conditions will vary your settings, but there are a few things you can keep in mind. For example, digital noise is detected easily in darker areas. So, while newer cameras are handling noise better, it is a good practice to keep your ISO setting as low as possible.

4 Tips for Better Nightscape Photography
Since light is at a premium at night, it is a good time as any to work with more open apertures (smaller f-number), to let in more light. At night, sometimes your background details are lost anyway, so there are few added benefits of having a large depth of field. Star effects are a nice exception to this (created when shooting point light sources with a smaller aperture like f/11).

It’s also a great time to experiment with longer shutter speeds. During the day, keeping your shutter open means you need to add filters to cut the light. At night you need to add light and can use shutter speed to be more creative.

4 Tips for Better Nightscape Photography

Before you frown on High Dynamic Range (HDR) images, consider what value it adds. Bracketing is a good way to deal with the very contrasty reality of night photography.

Note: Long exposures also add noise as your sensor heats up (known as thermal noise). This makes it a good time to check that Long Exposure Noise Reduction box on your camera menu.

2. Location Scouting

As with other genres of photography, your location is important. Start with a plan of what you want to capture. Maybe it’s the city at night, that elusive Milky Way; exciting light trails left by cars or some sort of nightlife action. While some of these coexist, most times they are independent of each other and require their own unique conditions.

4 Tips for Better Nightscape Photography

Since photography means thinking about your light source(s) at all time, night photography needs added consideration for obvious reasons. What are the light sources in your location? Is it a street lamp, the moon, building lights, traffic or do you have to walk into the scene with your own light (light painting)?

When shooting landscape images at night, you could get there before nightfall and observe how the light changes. If you do not have the luxury of time, there are phone apps that help you figure out the light direction of your location. Scouting for a location can be as simple as a google search, someone’s recommendation or making an actual trip to understand the environment. Familiarizing yourself with your destination in advance gives you a photographic advantage and even keeps you safer.

Bonus Tip: Water can be an asset to night photography especially where there are light reflections.

4 Tips for Better Nightscape Photography

3. Moonwatching

The moon is a fascinating subject. Since it is a light source, you need to take it into consideration when scouting and planning your nightscape shots.

If it is your subject, then you may want it at its peak for drama (full moon, supermoon, or harvest moon) and shoot on a clear night to capture as much detail as possible. After you have worked out the correct exposure for shooting the moon, try composing it into a scene.

4 Tips for Better Nightscape Photography
On the other hand, if you are shooting other celestial objects (e.g. the Milky Way, meteors, or star trails), it might be preferable if the moon is barely there or not so dominant (new moon to the first quarter). Like sunrise and tides, there are many apps that can help you figure out moon phases and direction in relation to your location.

4 Tips for Better Nightscape Photography

4. Other Environmental Notes

Condition your gear!

Since temperatures usually drop at night, you need to be aware of moving your camera from warmer to colder conditions (the reverse is also true). Any seasoned night photographer can attest that “lens fog” is a nuisance as it blocks/cuts the light passing through your lens. Lens hoods help a little with reducing moisture build-up on your glass.

So another bonus of arriving at your location a little earlier is giving your gear time to acclimate to your shooting conditions.

4 Tips for Better Nightscape Photography

Walk with a flashlight

A flashlight is an asset for several reasons. You can use it to ensure proper footing for yourself or your tripod. It also helps when you need to make changes to your camera settings (knowing your controls off-hand is very useful in the dark).

More than these practical uses, it can play a part in your night photography as well. Use it to light paint areas in your image or even create a light spot to help with focusing.

4 Tips for Better Nightscape Photography

Conclusion

Night photography provides a great learning environment and gives you the opportunity to play around with your settings. Depends on what you are shooting, your available light is not changing quickly (if at all) and this gives you more time to experiment and get it right. You can take advantage of less traffic around or use it to your advantage (shooting nightlife).

Be safe while you’re out there and scout beforehand if possible. If you are an avid night photographer, share with us some of your night photography tips in the comments below.

The post 4 Tips for Better Nightscape Photography by Nisha Ramroop appeared first on Digital Photography School.


Digital Photography School

 
Comments Off on 4 Tips for Better Nightscape Photography

Posted in Photography


7 Tips for Business Cards for Photographers

29 Nov

Having a proper business card is the first step towards establishing branding as well as earning potential customers, regardless of whether you are a freelance photographer or engaged within photography agencies. Not only do they serve to boost the reputation of an individual or corporation, they are also an opportunity to showcase the many good qualities one has to offer. Continue Reading

The post 7 Tips for Business Cards for Photographers appeared first on Photodoto.


Photodoto

 
Comments Off on 7 Tips for Business Cards for Photographers

Posted in Photography


Review: Interfit Honey Badger Studio Strobe and Universal Remote

29 Nov

Right now is a great time to be a studio photographer. Never before has there been such a multitude of options available to you in terms of photographic lighting. It seems that the recent surge in new photographers has lit a fire in the industries that create photographic gear. Lighting is a sector that has seen a huge influx of new options and new innovations.

Interfit has been one of those companies that constantly add to the mix for a while now. Not only do they make affordable studio strobes and continuous lights, they also make a ton of lighting modifiers and an indescribable amount of other studio accessories. If you need something for your studio, chances are that Interfit makes it.

Review: Interfit Honey Badger and Interfit Universal Remote

Stylish design is usually absent from studio lighting, but the Interfit Honey Badger aims to remedy that.

The newest light in Interfit’s range is the Honey Badger. A small, mid-powered studio strobe that fits into the low-middle pricing range. the light itself is in a stylish, bright yellow casing which adds a bit of a flourish to the monolight (the sort of product which is usually lacking in any sort of aesthetic design). I had chance to spend some time with and review the Honey Badger as well as the Interfit Universal Remote. Here are my thoughts.

amzn_assoc_tracking_id = “dpsgeneral-20”;
amzn_assoc_ad_mode = “manual”;
amzn_assoc_ad_type = “smart”;
amzn_assoc_marketplace = “amazon”;
amzn_assoc_region = “US”;
amzn_assoc_design = “enhanced_links”;
amzn_assoc_asins = “B075GVFXR7”;
amzn_assoc_placement = “adunit”;
amzn_assoc_linkid = “e644907a41a59013d380e1b2156daf51”;

What Exactly is a Honey Badger?

If you’re not familiar with the light’s namesake, a honey badger is a medium-sized mammal found in Africa and Asia. At first glance, they’re adorable. However, honey badgers are infamous for being unstoppable murder machines that maim, mutilate and maul everything in their path. You’ll often find them near the top of lists of the world’s most dangerous animals.

Knowing that you can probably figure out what Interfit are going for with their branding. You have a small, stylish light that’s cute to look at, but packs a punch when set loose in the studio.

So did they achieve that? The short answer is – yes, quite well.

The Strobe

As per the Interfit website, the specifications for the Honey Badger are as follows:

Review: Interfit Honey Badger and Interfit Universal Remote

The biggest takeaways here are the seven stops of power range up to 320ws (which is pretty decent for a strobe in this price range), the S-mount, and the built-in receiver.

No HSS or TTL

Before I get into anything else, let’s address the elephant in the room. Announcements of new studio strobes these days always seem to include the wonderful features of High-Speed Sync (HSS) and Through the Lens metering (TTL), both relatively new features in the world of studio strobes as they have been previously limited to flashguns (speedlights). The Honey Badger does not have these features. Then again, its price point reflects their absence.

Price

The Honey Badger sells in the US for $ 299.99 and the UK for £259.99, putting it squarely in the low-middle range of the market. For this price range, it packs a decent punch and pulls its weight easily.

The Interfit Universal Remote is sold separately at a more than reasonable $ 79.99 USD and £39.99 UK.

Built-in Receiver

What the Honey Badger does include, which surprised me a little, is a built-in receiver. This means that you can fire the strobe with a transmitter on your camera without having to worry about extra receivers, errant sync cables, and dead batteries. Interfit sells a Universal Manual Remote (covered by this review) that works with the Honey Badger and a selection of other Interfit lights.

Power

Review: Interfit Honey Badger and Interfit Universal Remote

While 320ws is a long way from the power output you can get from some strobes, it is more than enough in most everyday situations. As long as you bring your lights in close to your subject like I do, you should have no problem obtaining apertures of f/8 and f/11 for portraits and f/16 and beyond for tabletop set-ups.

If you’re working out of a home studio or another small space, the power output of the Honey Badger is likely going to be enough for you.

Size

Review: Interfit Honey Badger and Interfit Universal Remote

As far as strobes go, the Honey Badger is quite small and highly portable.

The size of the Honey Badger was far more noticeable than the color when I first took it out of the box. This light is small. For comparison, above is a photo of it next to a Bowens light with similar specifications and a Canon 580 EX II Speedlite.

I can speculate on both the advantages and the disadvantages of the size of the Honey Badger.

I have no way of testing it, but I imagine that fitting three or four of these lights into a carry-on sized Pelican case would be pretty easy. If you’re a traveling photographer, being able to easily transport that many studio strobes might be a huge bonus.

When I attached one of my own modifiers, a large Interfit Strip-box, the small size of the strobe and the narrowness of the strip-box allowed me to point the light straight down. This isn’t usually possible without a boom arm and it got me pretty excited about the possibilities. (That said, one of the kits that Interfit offer with the Honey Badger includes a stand with a boom arm.)

Review: Interfit Honey Badger and Interfit Universal Remote

The shape of the Honey Badger may allow you more configurations with some modifiers.

On the other hand, we live in a world where appearances matter. Between the size and the color, the Honey Badger does look a little bit like a toy. Throughout the rest of this review, I will try to assure you that the Honey Badger does perform well, but if you have clients that like to see big productions with big lights everywhere, they may be less than impressed.

The Softbox

Review: Interfit Honey Badger and Interfit Universal Remote

The Honey Badger kit I tested included a 24” popup softbox. It’s a small softbox; I can’t say much more than that about it. In fact, it’s identical to a Neewer branded one that I bought a few months ago for use with my speedlights. The only difference is the Interfit branding. It is of good quality, fits snugly on the Honey Badger and has no apparent effect on the color temperature of the light that passes through it.

If your intent is to shoot portraits, especially in a fixed studio environment, you’re going to want a bigger light modifier. The softbox is useful and you will be able to get results from it, but you will want to find something much larger.

If you purchase this kit, be forewarned. The softbox comes in a pouch much smaller than its actual size. When it comes out of that bag, it opens itself with quite a lot of force. Don’t do what I did and please, please hold it away from your face.

S-Mount

Review: Interfit Honey Badger and Interfit Universal Remote

With a Bowens S-mount, the Honey Badger gives you access to a vast range of modifiers.

The fact that the Honey Badger has a Bowens S-Mount on it is a major advantage in my opinion. There is a vast range of modifiers available that fit the S-mount, ranging from cheap imports to high quality, but far more pricey, proprietary modifiers from brands like Interfit and Bowens. I may be a bit biased as I am a Bowens user, but if I were to invest in the Honey Badger system, that S-mount would make my life so much easier.

As an aside, Bowens has gone out of business. That doesn’t mean you should forsake the S-mount. As mentioned, there are hundreds of products and dozens of other lighting systems that use the S-mount. Bowens might be going, but modifiers that fit the S-mount are going to be around for a long while yet.

White Balance

The Honey Badger has a color temperature of 5600k. This means it’s a touch warmer than the flash White Balance setting in Lightroom. If you like warmer tones in your images, this is not a problem. However, if you would prefer a more neutral look, remember that you will need to dial your White Balance back a hundred degrees. Bear in mind, if you’re using cheaper modifiers, they tend to have a significant effect on your color temperature which renders this point moot anyway.

Diffusion Dome

Review: Interfit Honey Badger and Interfit Universal Remote

The frosted diffusion dome covering the flashbulb gives an extra layer of diffusion behind your modifier.

Unlike most strobes, the Honey Badger has a frosted dome over the flashbulb. This adds a tiny amount of diffusion to the bare bulb. In most cases, you’re never going to want to shoot with a bare strobe, but I tried it anyway. The light is as hard as you would expect, but it is possible to use it to creative effect.

Modeling light

When I first turned the Honey Badger on, I didn’t expect an LED modeling light. This is a plus as it means that your subjects aren’t going to boil under hot lights. In fact, I used the Honey Badger nearly constantly in four studio sessions and it never even got warm, never mind overheating.

The Interfit Universal Remote

Review: Interfit Honey Badger and Interfit Universal Remote

The Interfit Universal Remote allows you to control the Honey Badger (and other Interfit strobes) from the top of your camera.

I will admit that using the Universal Remote to control the Honey Badger from the top of the camera is an absolute pleasure. I tend to work in confined spaces anyway, but not having to actually walk to the light to change the power output was fantastic. The remote is easy to use as well, and all the functions are labelled clearly. When I’m next in the market for new strobes, this remote may very well play into my considerations. I imagine a scenario where I don’t have to dodge behind a subject to the back of a studio to change the power output on a pair of rim lights. I can dream right?!

That said, the remote was the only problem I had while testing the Honey Badger. For the first 20 minutes or so, I couldn’t figure out why the modeling light was turning itself off. I was convinced there was a problem with the light itself, but it turns out that for whatever reason, on the unit I tested, the modeling light shuts off any time you change the power output via the Universal Remote. I don’t know why this would be and I am unaware if it was a problem isolated to the unit I used, but it did not do the same when you change the power output on the actual strobe.

With a price tag of $ 79.99 USD (£39.99), if you are interested in the Honey Badger, or other Interfit lights, this remote is a no brainer.

The Test

For the first test, I set up the Honey Badger straight out of the box with everything included (24” softbox and the Universal Remote). I had the whole thing set up in no time and once the batteries went into the remote, all the channel settings were sorted out in seconds. (It really is that easy.)

Pop-up Softbox

Review: Interfit Honey Badger and Interfit Universal Remote

To start with, I placed the light at 45 degrees in a basic Rembrandt setup. Because the softbox is so small, I brought it in really close to the subject (about a foot away).

Review: Interfit Honey Badger and Interfit Universal Remote

Review: Interfit Honey Badger and Interfit Universal Remote

From here, I moved the soft box away a short and distance and further to the subject’s left. I wanted to take advantage of the harder light from the smaller softbox and try to create some images with deep, defined shadows.

Review: Interfit Honey Badger and Interfit Universal Remote

Strip-Box

Review: Interfit Honey Badger and Interfit Universal Remote

I happen to own a large Interfit strip softbox (which I adore), so that was the next modifier to go on the Honey Badger. At first, I was overcome with glee as I realized I could point it straight down thanks to the Honey Badger’s small size; however, I chose not to keep it that way as it’s not the most flattering light for human subjects.

Instead, I put it straight in front of my subject, slightly above and pointed straight at her nose for a basic butterfly lighting set-up.

Review: Interfit Honey Badger and Interfit Universal Remote

Review: Interfit Honey Badger and Interfit Universal Remote

Bare-bulb

Review: Interfit Honey Badger and Interfit Universal Remote

As mentioned, I felt inclined to see what the light from Honey Badger looked like as a bare bulb. The diffusion dome got the better of my curiosity. In my opinion, it’s perfectly usable. You won’t want to use it a lot, however, but the hard light might suit some high fashion portraits quite well.

Review: Interfit Honey Badger and Interfit Universal Remote


7’ Parabolic Umbrella with Diffusion

Review: Interfit Honey Badger and Interfit Universal Remote

This is where I started to see some possible limitations with the Honey Badger. I wanted to see if the Honey Badger could cope with a giant parabolic umbrella. The answer is yes, but not without extra pieces of equipment. The light itself does have a hole for an umbrella, but I wasn’t willing to see if it would hold that much weight. Instead, I placed a Bowens umbrella reflector on it and attached the modifier.

Because the light is so small, I had to bring the umbrella really close to the light before it would support the umbrella’s weight. With the light so close to the umbrella, it was not able to use the full surface area of the modifier. The 7’ umbrella effectively became a 4.5’ umbrella. This is not the end of the world, but it was annoying. There are plenty of options for umbrella holders and mounts on the market that would solve this problem, I just don’t happen to own any of them.

Review: Interfit Honey Badger and Interfit Universal Remote

Beauty Dish with Grid & Diffusion Sock

The final variation I tried was using a 24″ beauty dish with both a grid and a diffusion sock. For this setup, the light was placed about 10 feet in front of the subject for a harder light and to reduce the speed of the light fall off so that more light hit the background.

Extra images

Below are other photos taken using the Interfit Honey Badger and the included pop-up softbox.


Pros and Cons

Having used it for a while, I can tell you that the Honey Badger has more pros than it does cons (and a few of the cons are hyperbolic).

Pros of the Honey Badger

  • Reasonably priced
  • Small
  • Reasonably powered
  • Bright LED modeling light
  • Bowens S-mount
  • Fast recycling times (I never had to wait for it)
  • Built-in receiver
  • The Universal Remote works like a charm
  • Doesn’t overheat easily
  • Good build quality
  • Stylish in appearance

Cons

  • The light might be too small in some situations
  • 24” softbox is too small for many studio situations, albeit perfectly functional
  • Modeling light turns itself off (on the unit I tested) when the power is adjusted via the Universal Remote
  • No HSS or TTL
  • May have issues supporting the weight of large modifiers like an 8’ Octabox

Overall

In the end, I enjoyed using the Honey Badger. It is a good quality, competent light that would suit any photographer working a studio environment, especially for those setting up a home studio. The Universal Remote really adds to the experience as well, making power adjustments from the top of the camera a breeze.

amzn_assoc_tracking_id = “dpsgeneral-20”;
amzn_assoc_ad_mode = “manual”;
amzn_assoc_ad_type = “smart”;
amzn_assoc_marketplace = “amazon”;
amzn_assoc_region = “US”;
amzn_assoc_design = “enhanced_links”;
amzn_assoc_asins = “B075GVFXR7”;
amzn_assoc_placement = “adunit”;
amzn_assoc_linkid = “e644907a41a59013d380e1b2156daf51”;

If you’re looking for HSS or TTL functionality, or a light with a self-contained battery, no, the Honey Badger is not for you. For anything else, the Honey Badger is absolutely worth your consideration.

Disclaimer: Interfit provided the product on loan to our dPS author so he could test and do this review. However, all reviews on dPS are 100% the author’s unbiased opinion. 

The post Review: Interfit Honey Badger Studio Strobe and Universal Remote by John McIntire appeared first on Digital Photography School.


Digital Photography School

 
Comments Off on Review: Interfit Honey Badger Studio Strobe and Universal Remote

Posted in Photography


Strobist Lighting Cookbook

29 Nov

Introducing the Strobist Lighting Cookbook. Read more »
Strobist

 
Comments Off on Strobist Lighting Cookbook

Posted in Photography