The post Here’s How to Shoot in Harsh Light [Video] appeared first on Digital Photography School. It was authored by Jaymes Dempsey.
It’s a tip often given to beginners:
Only photograph when the light is soft and beautiful.
But what if you can’t find the time to get out during the soft light, and you still want to take photos? Or what if you’re in a jaw-dropping, once-in-a-lifetime location and the light is just too bright? What then?
That’s when it pays to know how to create stunning shots in harsh light.
In this video, professional photographer Nigel Danson explains how to capture gorgeous images even in the worst lighting situations. Danson’s discussion centers around landscape photography, but the tips apply to many photographic genres.
To discover how to create beautiful images in harsh light, check out the video below. And then leave a comment with your favorite tip, trick, or piece of advice for harsh light photography!
The post Here’s How to Shoot in Harsh Light [Video] appeared first on Digital Photography School. It was authored by Jaymes Dempsey.
With technology rapidly changing and becoming better every year, many people are asking the age-old question “which camera is better?” You now have an array of options including DSLR Cameras, Mirrorless Cameras, Phone Cameras and Point and Shoot Cameras. Having so many options can become overwhelming and make you wonder, where should I invest my money? But the truth is Continue Reading Photodoto
Comments Off on DSLR vs Mirrorless vs Smartphone vs Point and Shoot: Best Camera?
The post How to Shoot Images for Book Covers: The Essential Guide appeared first on Digital Photography School. It was authored by Charlie Moss.
There’s lots of information out there about making money shooting stock images. However, the most successful stock photographers have a secret – they’re shooting niche content for specialist agencies! There are lots of different specialist fields that you might consider, but in this blog post, I’ll walk you through how to shoot images for book covers.
Let’s get started.
How to break into the book cover industry
There are several specialist book cover stock agencies that exist purely to match clients with photographers and illustrators. These agencies can be a great way to get into shooting book covers.
However, book cover stock agencies do require a good portfolio as part of your application. If you don’t already have a portfolio suitable for a book cover agency and you want to get started right away, you can try networking with potential clients on social media – Instagram is a great place to connect with other creatives.
Think about format and layout
One of the most important things to think about when it comes to shooting book cover images is the aspect ratio. Book covers are almost always produced in a vertical format, so landscape images generally won’t be of interest to book cover designers.
Left: Canon EOS 5D Mark II| Canon EF 100mm f/2.8 Macro USM | 100mm | 1/125s | f/8.0 | ISO 100 | Window Light + Reflector Right: Canon EOS 5D Mark II| Canon EF 70-200mm f/2.8 IS II USM | 70mm | 1/640s | f/2.8 | ISO 800 | Available Light
Books can be printed in all different sizes, meaning that no single aspect ratio is the best for shooting cover photos. Therefore, book cover designers will usually need to crop images to make them fit on a cover.
Keep this need to crop in mind when you shoot images for book covers, and make sure you don’t place any interesting parts of the subject or composition near the edge of the frame. This will give a designer more options when using your images in different book cover layouts.
Leave some blank space
When you shoot images for book covers, you can’t just think about the photo. You also need to leave room for the title of the book and the author. In other words, there should be at least one place in your book cover shot that is plain enough to place text.
Left: Fujifilm X-T20 | Fujifilm XF 35mm f/1.4 R | 35mm | 1/280s | f/1.4 | ISO 200 | Window Light Right: Fujifilm X-T20 | Fujifilm XF 35mm f/1.4 R | 35mm | 1/3500s | f/1.4 | ISO 200 | Available Light
You can achieve these plain sections by using simple colors, by shooting areas with less detail, or by using a shallow depth of field to blur backgrounds and foregrounds.
There’s no rule dictating where book cover designers must put the title and author text. However, it’s good practice to shoot several variations of each image, including compositions that leave room in the middle of the photo, as well as compositions that leave room at the top and bottom.
Plan your images out
If you’re finding it hard to shoot compositions that allow for text placement, then go old school and get out your sketchbook.
Take a pen and paper, draw some empty rectangles, and start imagining all the different places a designer might put the title and name of the author. You can then start to imagine how and where you might leave blank space.
These are a set of sketches based on the bestseller listings of a popular bookseller. The boxes show the text location on the cover of each book.
To take your shots to the next level, think about the props you’d like to use in your photos and how they might fit into the sketches you just made.
Playing around in a sketchbook can really improve your images and save you lots of time.
Finding inspiration
If you’re trying to come up with ideas for potential book cover images, I highly recommend browsing through a bookstore. You don’t have to do this in person; there are plenty of opportunities to browse book covers on the internet, as well!
You’ll quickly get a feel for the different styles of cover images across various genres.
It’s also a good idea to follow the social media feeds of publishers in your favorite genres. Many publishers regularly post pictures of upcoming books, which will give you a sense of industry trends.
If you’re an author, but not a photographer
So you’re a self-published author who wants to do the design work for your book yourself? That’s great, and all of the tips above still apply. However, you might find some of our beginner’s articles helpful; these will help you understand the creative potential of your camera.
It’s also important to be realistic when shooting images for your book cover; photography isn’t instinctive for everyone, and the best photographs are usually the result of years of hard work and practice.
However, if you put your mind to it and you learn the basics, there really is no reason why you shouldn’t shoot photos for your own book cover. Though it’s always worth asking a few trusted friends for their opinion when it comes to the final layout – especially if you have friends who buy and read a lot of books!
How to shoot images for book covers: Conclusion
Whether you want to diversify your photography business and start shooting images for a book cover agency, or you simply want to create your own book cover for your self-published book, the tips above should get you started. Follow traditional rules of composition, make space for titles and other text, and seek out inspiration in your genre.
Ultimately, if you’re looking to start shooting images for book covers, the best advice is to jump right in. Put together a portfolio, then get it out there for people to see. Ask around to determine which stock agencies work best for photographers you know, and see if you can get your pictures on a new bestseller!
The post How to Shoot Images for Book Covers: The Essential Guide appeared first on Digital Photography School. It was authored by Charlie Moss.
The post When to Shoot in RAW vs JPEG (and Why) appeared first on Digital Photography School. It was authored by Simon Ringsmuth.
There has been a longstanding debate in the photography community about RAW vs JPEG file formats. Both have their benefits and drawbacks, so determining which one to use isn’t as simple as you might think.
In fact, rather than thinking about RAW vs JPEG as a single choice to make, it’s best to reframe the question entirely. So don’t think about which format to always use.
Instead, think about when to use RAW and when to use JPEG.
Nikon D750 | Nikon 70-200 f/2.8G ED VR II | 180mm | 1/350s | f/4 | ISO 2000
Understanding RAW and JPEG formats
If you’re new to digital photography, terms like “RAW” and “JPEG” might seem a little strange. So what actually is a RAW photo? And what is a JPEG photo?
When you press the shutter button on your camera, it takes in color and light data, then converts the data into a photograph. RAW is one type of file format that your camera can use, and it’s found on dedicated cameras like DSLRs and MILCs.
A RAW file is the unprocessed image data straight from the sensor. It must be converted to a usable image format via a program such as Lightroom or Luminar. RAW files are much larger than JPEG files, and they often don’t look good until they are edited. Therefore, a longer post-processing time is required, and memory cards fill up quicker. But you do get a flexible file that can be endlessly edited to look exactly how you want.
Nikon D750 | Nikon 70-200 f/2.8G ED VR II | 200mm | 1/500s | f/11 | ISO 100. A RAW file gave me far more freedom to edit this photo compared to if it had been shot as a JPEG.
JPEG images are RAW files that are instantaneously converted by the camera into a format that is easy to share. In the process, however, JPEGs lose some of the data captured by the image sensor.
JPEG files have widely used since 1992, and the original intent was to create an image format that was a nice compromise between quality and file size. If you’re old enough to remember the early days of the internet, you know that bandwidth was a precious commodity, and a single image file could take several minutes to download on a dial-up modem. JPEG helped solve that problem and quickly became the dominant format for digital photos. This legacy lives on today, and nearly every digital camera and mobile device can shoot JPEG photos.
So which format is better? That’s a question only you can answer, and it all depends on your photographic goals. But it’s a bit like deciding between a truck and a sedan, a microwave and an oven, or whether to wear shoes or sandals.
In other words, it’s not a question of whether JPEG is better than RAW or RAW is better than JPEG. Instead, it’s about deciding when to shoot in RAW or JPEG and why.
Fujifilm X100F | 23mm | 1/170s | f/2 | ISO 200. I didn’t want to edit this photo, so I shot a JPEG and was perfectly happy with the result.
When to shoot in RAW
There’s no question that RAW files offer much more flexibility during the editing process. When it comes to recovering highlights, bringing out detail in the shadows, adjusting exposure, and all other types of edits, RAW reigns supreme.
While RAW does have some downsides, the advantages can easily outweigh the disadvantages.
In general, I recommend shooting RAW in the following situations:
You’re shooting paid photos for clients
When working with clients, you want all the flexibility you can get. The best-laid plans can often go awry, and despite all your preparedness, you can still end up with images that are too dark, too bright, or need severe color-correcting.
This is where RAW excels, as it lets you recover as much information as possible to fix errors or tweak the image to your liking.
Nikon D750 | Nikon 70-200 f/2.8G ED VR II | 200mm | 1/3000s | f/2.8 | ISO 400. Here, the backlighting resulted in a severely underexposed image. I was able to save it because I shot in RAW.
You know you’ll be doing extensive editing
If you are shooting in extreme conditions, you’re pushing your camera and your skills to the limit, or you’re even just taking normal pictures that you know you will be editing, then RAW is a good choice.
If I’m taking more than just casual snapshots, I like to err on the side of caution; I’ll shoot in RAW, even if I’m not sure how much editing I’ll be doing.
This one is a little tricky, since it’s difficult to predict whether you will or won’t want to edit your pictures years or decades down the line.
Some photographers like to shoot everything in RAW just to be on the safe side. While it’s impossible to predict the future, it’s difficult to imagine any scenario in which RAW files would offer less flexibility than JPEGs or other file formats.
We might reach a point years down the road where machine learning and artificial intelligence are able to give RAW-style flexibility for lossy formats like JPEG, but we’re not there yet. RAW formats are used by world-class institutions like the National Archives in the United States. Such facilities certainly know a thing or two about storing images for the long term, and if RAW is good enough for them, then it’s likely good enough for you.
Nikon D7100 | Nikon 50mm f/1.8G | 50mm | 1/350s | f/4 | ISO 200. When my kids were little, I didn’t know as much about photography as I do now. I shot everything in RAW, just in case I needed to edit my photos years later.
When to shoot in JPEG
Some people are of the opinion that all pictures should be shot in RAW, but I tend to disagree.
While RAWs do have advantages over JPEGs, there’s nothing wrong with capturing JPEG files if they work for you. Just because some people shoot in RAW doesn’t mean you have to!
In general, I recommend using JPEG in the following situations:
You like the look of your camera’s JPEG files
The biggest advantage of RAW is also one of its key disadvantages; having the freedom to adjust your photos ad infinitum isn’t much of an advantage if you don’t really want to edit them.
All camera manufacturers configure their cameras to process JPEGs with a certain look or style. As such, the straight-out-of-camera JPEG files can look much better than RAW files. And if you don’t plan on editing your pictures, then these JPEGs are probably the better option.
Fujifilm X100F | 23mm | 1/200s | f/2 | ISO 200. I like the Fujifilm JPEG files just fine, and as such, I almost never shoot in RAW with my Fujifilm camera.
I shot in RAW frequently – until I got my Fujifilm X100F camera. I quickly realized that I quite liked the look of its JPEG film simulations such as Classic Chrome and Provia. Soon, I had stopped shooting in RAW entirely on my Fujifilm, because I just liked the JPEGs better. I could certainly edit the RAW files, but I realized over time that I didn’t want to. I liked the JPEGs just the way they were (and I still do!).
If you like how your JPEG files look, then don’t worry about RAW and keep using JPEG. It doesn’t make you any less of a person, or photographer, just because you want to let your camera do some of the editing for you.
And even though JPEG files can’t be edited as much as RAWs, you can still make some basic changes, such as adjusting exposure and correcting the color. You shouldn’t expect the same flexibility that you’d get when editing RAW files – but if that’s not your goal, then JPEGs will be fine.
Fujifilm X100F | 23mm | 1/2000s | f/2 | ISO 200. I shot this as a JPEG and was still able to tweak the white balance just a bit in Lightroom. Would RAW have worked better? Perhaps. But I like this shot anyway.
You’re capturing casual snapshots of friends and family
RAW files have more flexibility than JPEG files – but if you’re shooting lots of casual pictures or snapshots of friends, family, and everyday life, then RAW just might be overkill.
RAW files take up more space on your memory card, they can be a chore to edit, and they are also difficult to share. The latter is especially important for these slice-of-life photos, and most casual shots don’t really require much in-depth editing, anyway.
Fujifilm X100F | 23mm | 1/480s | f/5.6 | ISO 200
When you shoot JPEG files, you lose some of the flexibility of the RAW format – but you gain the ability to easily share photos, and you don’t have to deal with conversions and editing software.
On family vacations, it’s not uncommon to share memory cards before everyone leaves, just to make sure everyone has everyone else’s photos. This is just easier with JPEGs, since every device and operating system works great with the JPEG file format.
You’re photographing sports and fast action
This might seem a little counterintuitive because sports and action shots sometimes need to be edited afterward. It’s difficult to nail the exposure and white balance when shooting some types of sports, which is why photographing in RAW can be useful.
However, it’s not uncommon to end up with hundreds or even thousands of photos after a sporting event, especially if you use your camera’s continuous shooting mode. The sheer quantity of images can turn the task of editing into an arduous process that ends up taking far too much of your time.
Nikon D750 | Nikon 70-200 f/2.8G ED VR II | 98mm | 1/750s | f/2.8 | ISO 100. I shot JPEGs with the Overcast white balance setting, so all I had to do was crop a few shots, instead of meticulously editing the hundreds of photos I got from this game.
As a result, it can actually be a good thing to shoot in JPEG when you know you will end up with a massive amount of photos. You can learn to tweak JPEG settings in-camera, such as lifting the shadows and manually setting the white balance to maintain uniformity across your pictures. This isn’t the same as editing each image by hand, but it’s a lot easier!
The internal buffer on your camera won’t fill up as quickly when shooting in JPEG mode due to the smaller file size. This means you can take more images without waiting around while your camera transfers them to your memory card. Those precious seconds can make all the difference at sporting events or other situations where the action comes frequently and you don’t want to miss a shot.
Fujifilm X100F | 23mm | 1/450s | f/5.6 | ISO 200
A Compromise: RAW+JPEG
If you’re still not sure when to use RAW vs JPEG files, just know that there is no correct answer. Whichever file type you choose is fine as long as it works for you.
If you feel comfortable using RAW, then great. If you’d rather shoot in JPEG, go for it. And if you want the best of both worlds, you really can have your cake and eat it, too.
You see, most cameras let you choose a mode called RAW+JPEG. As you might expect, this mode saves both RAW and JPEG files for every shot. It can eat through your memory cards in a hurry, but as long as you don’t mind the increased storage requirements, you can avoid making the RAW vs JPEG decision altogether and just use both formats.
When I first started getting into photography, I suffered from a severe case of RAW guilt.
I thought that if I didn’t use RAW, then I wasn’t a real photographer, because real photographers shot in RAW. I thought JPEGs were for the unwashed masses and should be shunned by any picture-taker who took themselves seriously. It took me far too long to realize that this type of gatekeeping has no place in photography.
As long as you have a process that works and you’re happy with the result, then don’t let anyone tell you that you’re doing it wrong. And if you haven’t yet figured out when to use RAW vs JPEG and you’re looking for some advice, then hopefully this article gave you some ideas.
I’d love to hear your thoughts about when you shoot in RAW versus JPEG and why. So share your opinion in the comments section below!
The post When to Shoot in RAW vs JPEG (and Why) appeared first on Digital Photography School. It was authored by Simon Ringsmuth.
The post How to Shoot in Low Light – 9 Commonly Asked Questions appeared first on Digital Photography School. It was authored by Bruce Wunderlich.
This image of a moonrise over Marietta, Ohio was taken 20 minutes after sunset during the blue hour; the sun had set and the sky was a dark blue. The city lights create a great warm glow over the city.
According to British photojournalist Donald McCullin, “There is no such thing as bad light, just misunderstood light.” Yet many photographers still consider low light to be bad light.
The purpose of this article is to encourage you to not consider low light as inferior or unusable, but to instead look for subjects that work well with the available low light. Shooting in low light can often be a struggle, however, which is why I’ll answer nine of the most frequently asked questions about low light photography.
Keep in mind that low light photography is not exclusively night photography. Low light photography opportunities may appear at any time of the day.
For instance, shooting waterfalls in low light allows you to use a slow shutter speed, prevents overexposure of the white water of the falls, and helps you create a beautiful silky effect (by blurring the moving water).
Using a flash will light up any subject, of course, but let’s take a look at how to improve your photography in naturally-occurring low light.
Low light photography FAQs
Low light creates very dramatic scenes. Dark storm clouds turned this potential sunrise into a great low light opportunity.
1. My low light images are blurry. Would a better lens alleviate the blur?
The short answer to this question is, “Yes.” A fast lens with a maximum f-stop of f/1.8, for instance, will give you better results than a kit lens with a maximum f-stop of f/3.5 or f/5.6.
But even the faster, more expensive lenses will give you undesirable results if you’re using the wrong settings. You see, the wider aperture opening on fast lenses allows you to use a faster shutter speed, which helps you capture a sharper image – but unless you dial in the correct shutter speed, your shots will often turn out blurry anyway!
Lenses with larger maximum apertures are called “fast” because they allow you to shoot with faster shutter speeds, thanks to the additional light that enters your camera through the bigger aperture opening.
2. What are the best camera settings for shooting in low light?
These are the best low light camera settings:
Manual mode
Shooting in Manual mode is essential for successful low light photography, as it allows you to control every functional aspect of your camera.
Once in Manual mode, you basically have three ways to get more light onto your camera sensor:
Shutter speed
Aperture
ISO
These three controls are together called the exposure triangle, and each of the settings can have a positive or negative result on your image’s exposure.
Therefore, learning how to use shutter speed, aperture, and ISO for the best result is the key to low light photography.
Note that your in-camera light meter will reveal where adjustments should be made to the camera settings, and well-exposed images will be the result.
Shutter speed
If you are shooting handheld, a good rule of thumb is to set your shutter speed to match the reciprocal of your focal length.
For example, if you are shooting at 50mm, your shutter speed shouldn’t be any slower than 1/50s. Of course, if the subject of your photo is moving, then you will need to increase your shutter speed to freeze the action. Because while choosing a slower shutter speed will allow more light into your camera, you’ll also risk getting a blurry result.
A great blue heron in a fight was the subject of this low light image. I shot this at 1/250s, f/5.6, and ISO 1250. Using a combination of a slower shutter speed and a higher ISO, I was able to create the blurry wings while panning to match the speed of the fight.
Aperture
In most low light situations, you will probably need to shoot with your aperture wide open.
But if there is enough light to shoot with a smaller f-stop, you’ll get an increased depth of field.
So here’s what to consider:
Choosing a wider aperture will let more light into your camera, but will decrease your depth of field. And this could lead to an important part of your image being out of focus.
So what should you do?
Generally, it’s better to risk an out-of-focus shot than to guarantee a blurry one – so, if necessary, widen that aperture!
ISO
The higher the ISO, the brighter the resulting shot.
But there’s an important trade-off here:
The higher the ISO, the more digital noise you’ll be adding to your image.
So keep your ISO as low as possible, and only increase your ISO after you have decreased your shutter speed and widened your aperture.
Shoot in RAW
For the best results, shooting in RAW is recommended.
This is for one simple reason: Your camera will save more shadow detail in RAW format compared to the compressed JPEG format.
Also, it is very helpful to learn how to check your histogram; that way, you don’t have to just rely on what you see on your camera’s LCD screen. Use the histogram to check your exposure, and avoid clipping the highlights and shadows.
I used the low light at Huntington Beach, California to create this black and white image with a five-second exposure.
3. How do I take low light action shots?
Shooting action in low light can be very challenging, and it is almost always going to require you to shoot with your aperture at its widest setting.
Once your aperture is set, adjust your shutter speed to match the action you are trying to freeze. Of course, depending on the situation, there may simply not be enough light. If that is the case, adjust the ISO to a higher setting until a good exposure is set. If your ISO setting is so high that you are getting an unacceptable amount of digital noise, you have two options:
Either add light with a flash or some other source, or live with the noise and try to remove some of it in post-processing.
Sometimes, with the noise issue, it comes down to getting the shot with noise versus not taking the shot at all.
4. How do I reduce the digital noise level in low light images?
The simple answer to this question is to shoot at the lowest ISO that you can. But it is also a good idea to know the ISO at which your camera produces noise that you consider unacceptable.
And always make sure your exposure is correct. Even at a low ISO, if your image is underexposed, you will have some noise in the shadow areas.
A cloudy day at Blackwater Falls, West Virginia allowed for a long exposure without blowing out the highlights.
5. How do I focus in low light?
Another reason for blurry images in low light is the fact that some cameras just aren’t manufactured to focus properly with less light.
So what should you do?
Try shining a light on your subject to give your camera enough light to focus. You can also use your lens’s focusing ring to fine-tune your focus.
Focusing via the central AF point may also help, as it usually focuses faster and more accurately than surrounding AF points.
6. How can I take pro-like images in low light?
Here are four things that most pros do in low light:
Use a tripod
Shoot in RAW
Shoot in Manual mode
Use the histogram
Low light makes for great silhouettes!
7. How do I choose the best white balance for low light?
Set your white balance to match your environment:
Tungsten for photographing indoors with light from a regular lightbulb
Fluorescent for light from fluorescent bulbs
Cloudy for low light created by an overcast day
Shade for shooting in a shaded or shadowy area
One thing to remember:
If you are shooting in RAW, you can adjust your white balance later in post-processing.
But if you are shooting JPEGs, it is very important to get your white balance correct in-camera. For this reason, if your camera is set to capture JPEGs, you should not use the automatic white balance function. White balance is hard, and sometimes impossible, to correct later in a JPEG.
8. Should I raise my ISO or lower my shutter speed in low light?
Assuming that you are shooting with your aperture wide open, in most situations this is an easy one to answer:
Adjust your shutter speed!
And only raise your ISO as a last resort.
Remember that raising your ISO is going to add more noise into the image.
Now, most new DSLRs do a much better job with noise levels at higher ISO settings. But as I mentioned earlier, it is a good idea to know what noise levels are unacceptable, and what ISOs these correspond to. In situations where your subject is moving, it may become necessary to boost the ISO to keep your shutter speed fast enough to freeze the action.
Fog created the low light conditions in this fall image.
9. Why aren’t my low light shots sharp even when I use a tripod?
Remember that, in most low light, you will be shooting with your aperture wide open (or nearly so).
Hence, your depth of field will be very shallow (which can lead to blurry results).
So be extra careful to lock your focus (you can even try back-button focus) on the part of your scene that needs to be in sharp focus.
Case in point:
When shooting a low light portrait, it is important to have the subject’s eyes in focus. So focus on the eyes!
Also, if your subject is moving, increase your shutter speed until the subject is frozen by your camera. And when shooting with a tripod, make sure your camera’s image stabilization is turned off, because it can actually create blur!
10. A bonus tip
In low light, the LCD screen on the back of your camera is going to look very bright – and this will give you an inaccurate sense of your photo’s exposure.
So if your camera has an adjustment for the brightness of your LCD screen, turn it down. You want to ensure your image will not seem overly bright when you view it!
How to shoot in low light: conclusion
The trick to low light photography is to take control of your camera, and know that every action or setting will have a reaction.
Now, how is that different from photography in any other type of light?
It’s not, really. Just consider photography in low light as an opportunity to be creative.
Now over to you:
What subjects do you like to shoot in low light? And do you have any low light shooting tips? Share your thoughts in the comments!
The post How to Shoot in Low Light – 9 Commonly Asked Questions appeared first on Digital Photography School. It was authored by Bruce Wunderlich.
A Sony a6300 and an Edelkrone motorized slider: interesting marriage of technique and technology?
Like a lot of people, I’ve always had an interest in macro photography, which unfortunately never really developed into anything more than the odd shot of a flower or two. Then a couple of years ago I sold my seldom used 100mm F2.8 Sony macro lens when I moved from Sony A- to Sony E-mount. At the time I thought my macro shooting days were behind me.
But then I became interested in focus stacking, which is a technique used to blend several images focused at different points so that the depth of field can be increased beyond that of a single image. It can be used for multiple types of shots, but is typically used with close-ups or macro images.
This watch shot was comprised of 50 images taken with a Sony a6300 and 18-55mm lens at F7.1. The camera was a set to 1/25th at ISO 100. The images were blended in Helicon Focus.
About 18 months ago I bought a set of budget Neewer extension tubes to use with my Sony a7 III and Sony a6300. While not really specifically meant for 1:1 macro work, they come in handy when shooting product shots as they let you focus a lot closer to the product (as opposed to without them).
This pile of screws was shot 1:1 with the 7 Artisans 60mm Macro ( F8 at 1/60th and ISO 800). The 30 frames were then blended in Helicon focus.
The other part of this equation is that I’ve been using Edelkrone equipment for a couple of years now and I’ve always been intrigued by the fact their small motorized slider (SliderOne V2 $ 499) has a minimum travel distance of 0.222 ?m. Could this be used for focus stacking in combination with a time lapse sequence?
Using a slider for focus stacking does present some potential problems. For starters, moving the entire camera could introduce errors with perspective and isometric distortion. However, I’m never one for the easy way out, so I decided to investigate further.
This stack of 30 images (55mm F8, 1/60th, ISO 800) was blended in Helicon Focus taken under constant LED lighting.
What type of equipment is used, typically?
Strictly speaking, focus stacking doesn’t require complicated equipment like a slider. Many digital cameras, including a variety of Olympus and Panasonic models, even offer the ability to do all the focus stacking internally by automatically re-focusing the lens and blending the images in-camera. But the slider and dedicated post-processing software allow for a far greater degree of control over the final image.
Additionally, if you’re not using those Olympus and Panasonic cameras, you don’t necessarily need to use a dedicated macro lens; a standard kit lens and some extension tubes can work very well to get you started. You do, however, need to manually refocus the image every time you take a shot so that at least part of the image is in focus each time. Your results can be a bit hit-or-miss if you do it this way, and the software to assemble the images can cost you some money.
Details of technique and equipment
I tried a few different setups for my images, but all of them included the slider and a Sony a6300. Initially I did try using the Sony 18-55mm F3.5-5.6 with a set of Neewer extension tubes (NW-S-AF3A, 10 and 16mm $ 49.99) and some of the images can be seen here. I had to be a little more careful with the lighting when using these tubes as they don’t have internal felt flocking and can cause some lack of contrast and flare if not used carefully, due to internal reflections.
Inexpensive extension tubes can give you extra options for close up photography
While the subject image was relatively large compared to the sensor, it wasn’t quite at a 1:1 ratio, it ended up being ~1:1.1 using both tubes at the closest focus for this lens. In all cases the lens was set to manual focus as was the camera, a careful juggling act was performed to get the right balance of light level, aperture, shutter speed and ISO. After a bit of experimentation I found that I needed to use an aperture of F8; this gave enough sharp areas of focus for each exposure without the need to increase the number of shots.
After a bit of experimentation I found that I needed to use an aperture of F8; this gave enough sharp areas of focus for each exposure without the need to increase the number of shots
I then decided it was time so see how a different macro would work with my setup, so I picked up the low cost 7 Artisans 60mm F2.8 ($ 159.00) to experiment with. This is a true 1:1 ratio lens with a de-clicked iris and manual focus-only. It’s incredibly well constructed with a metal body and allows a close-focus distance of 26cm (about 10.25 inches). It has no communication with the camera body so EXIF iris data is not available. It allows a working distance of 14cm and you can unscrew the lens hood to allow more light in if required.
This set of 30 images was shot with 2 flashes, at (F8, 1/100th, ISO 200) at 52mm with extension tubes.
Of course setting up the shot is 90% of the work – aligning the camera and making sure the axis of movement is exactly perpendicular to the center of the object can take some time when you have a lot of axes of adjustment. Distortion can be mostly corrected for in post-production, but it also takes time.
Trying to eliminate dust, or at least as much of it as possible is also a major part of this sort of photography. I don’t mind the fix it in post attitude but I’d rather try and reduce the amount of work required.
This is about the maximum depth of field I could achieve as the tip of the key is close to exiting the frame. Blended in Photoshop, 60 images at F8, 1/60th, ISO 400.
Lighting is also a key component. I always like to keep things simple so some of my photos were only lit with a single light, and some with up to three. The shot of the key is an example of where more light sources were needed to give more interesting reflections. The lighting of course is crucial and this also took significant time to get right. In the end, I settled on using constant LED lighting rather than flashes as I found they gave me more control.
In the end I settled on using constant LED lighting rather than flashes
After a bit of trial and error I settled on 30-60 shots for each set of exposures. The number of shots was based around the amount of movement of the slider; if you are only traveling a few millimeters then you can get away with 30 shots, but for other scenes – like the watch – I needed 60. Initially I tried 15 shots per move but when the focal planes were blended in software I found too many out of focus areas.
This slightly odd shot of styling gel on a CD is another 60 image stack (F8, 1/60th, ISO 320) processed in Helicon Focus.
Processing the images
For post-processing I decided to try two different solutions: Photoshop, i.e. something that most people are familiar with, and Helicon Focus, a dedicated piece of software. I also chose to work with Raw files. My PC setup for this was by no means high end, I used a self-built Windows 10 PC with 32GB of RAM and a Ryzen 1700X CPU and stored the photos on a 500GB SATA SSD.
For post-processing I decided to try two different solutions: Photoshop, i.e. something that most people are familiar with and Helicon Focus, a dedicated piece of software
I started with Adobe Photoshop ($ 9.99 a month for a 12 month subscription). You can use Adobe Lightroom to apply adjustments to each Raw image globally and then import them as separate layers into Photoshop. I then aligned the images using the auto-align function and then I had to auto-blend all the layers into one. This was a few too many steps for my liking. It is possible to load Raw files directly as an image stack using the built-in script option, but then you still need to auto-blend the images and correct for any exposure changes you want to make.
It would take around 2-3 minutes to load 60 Raw images and align them it then took an additional 2-3 minutes to produce the final image. It was then possible to tweak layers that didn’t quite work by cloning data from layers above or below.
A set of 60 shots at F8, 1/160th at ISO 640 with the 7 Artisans 60mm 1:1 macro. The raw result from Photoshop, an uncropped image showing areas that couldn’t be blended without errors
The Raw Helicon focus result – auto cropped by the software, although this can be turned off.
I also wanted to see what Helicon Focus could offer. The basic Lite package costs $ 30 per month or $ 115 for a lifetime license. It works a little differently than Photoshop. Loading the images can be done directly from the Raw files with basic development settings set up within Helicon Focus itself. I found that the time taken to load 30 Raw images was significantly reduced compared to Photoshop, around 5-10 seconds to load and 3-4 minutes to blend the final picture. After the initial compilation of the image it would then take only about 20-30 seconds to render any subsequent adjustments to the algorithms.
I found that the time taken to load 30 raw images into Helicon Focus was significantly reduced compared to PS
Helicon focus offers three ways of blending the images (weighted average, depth map and pyramid) and also a couple of sliders (radius and smoothing) to help tweak the final result. Helicon exposes to the user what it is doing as it draws a depth map from your images, something that was fascinating to watch, a bit like seeing images from a scanning electron microscope. Like Photoshop you can also clone data between image layers but I found that most of the time Helicon produced a better image or at least one that could be improved by adjusting the algorithm and some of the parameters without the need for cloning.
The depth map that Helicon Focus produces can be adjusted with the radius and smoothing sliders
It’s also very easy to compare the results from the three different algorithms as Helicon gives you a timeline at the bottom of the main window which allows you to look at your session history. You can then easily choose to view any of the versions you have created and see which one works best.
By default Helicon will automatically crop the final image (although this can be changed in the settings). Photoshop makes geometric adjustments and either leaves transparent areas of the image or gives you the option to content aware fill these areas.
Which software should you use? It comes down to what sort of photographer you are
Over all, I found that Helicon’s interpolation is better, and useful if you have fewer images – although it can’t work miracles. Although its Raw development options are limited, you can load images directly from Lightroom.
So which software should you use? I think it comes down to what sort of photographer you are. If you want to make minute adjustments to your image, then Helicon Focus is probably the tool for you, otherwise, Photoshop works fine.
General tips for success
The parts of the petals closest to the camera are causing blending problems here, that’s because they were never in focus.
As a whole, I found that I needed more setup time than I had originally thought. Working at this scale can introduce errors that I was not able to see initially in the viewfinder or on the rear LCD. My advice is to shoot a few frames and then process, to see what adjustments you might have to make, rather than shooting hundreds of images only to find that they won’t work. Below are five other tips from my adventure in macro photography:
Set up your slider for the farthest shot first as this will be the limiting factor to your framing.
Make sure you have a solid tripod and base for your subject. As you may end up with an exposure set that takes minutes to capture, any movement can ruin the resulting image.
Run at least two seconds between exposures, this gives time for the slider movement to settle down. If you plan to use flashes to light your subject you may need to increase this to allow for them to recycle. Use the silent shutter or electronic curtain if possible, this also reduces shake.
Set everything to manual, including white balance. Sometimes small shifts in white balance can cause issues when blending images.
Take more images than you think you need even if you don’t end up blending all of them. It can be very difficult to see what is in focus on your camera’s LCD even when using peaking or expanded focus.
How it worked and what I learned
The most important takeaway: shooting macro with a slider does work. It wasn’t perfect and I could definitely improve things, but it was a successful proof-of-concept.
Like anything, it takes time to get good results and this is achievable by careful setup combined with some experimentation. If you are thinking that focus stacking might be an area of interest for you, don’t think you need go off and purchase a motorized slider; manually changing your focus also works. However, you may find that the optical construction of some lenses (like the 7 Artisans 60mm) don’t allow manually re-focusing without the image size changing quite drastically thanks to focus breathing. If that is the case, a normal lens and some extension tubes may prove a better option.
As for me? I’ve been bitten by the macro bug again.
Chris’ macro gallery
$ (document).ready(function() { SampleGalleryV2({“containerId”:”embeddedSampleGallery_2283835564″,”galleryId”:”2283835564″,”isEmbeddedWidget”:true,”selectedImageIndex”:0,”isMobile”:false}) }); Articles: Digital Photography Review (dpreview.com)
Comments Off on How to: Shoot better macro photos using a slider and focus stacking
Have you ever dreamed of starting your own YouTube channel? In this video, we discuss the pros and cons of working of shooting from a studio vs. shooting in the field.
Subscribe to our YouTube channel to get new episodes of DPReview TV every week.
The post 4 Ways to Shoot Portraits in the Middle of the Day appeared first on Digital Photography School. It was authored by John McIntire.
One of the first things you learn when starting out in portrait photography is that the midday sun does not provide great lighting conditions.
As with all things in photography, there are plenty of exceptions. But, for the most part, this is sound advice. Because of the harsh, contrasty light, and the deep shadows that such light produces, shooting portraits in the middle of the day can be a real challenge.
Creating portraits on location in the middle of the day can prove a real challenge, thanks to unflattering light from the high sun. Fortunately, there are loads of ways to get around this and take back all those wasted shooting hours.
Canon 5D Mark III | Canon EF 50mm f/2.5 Macro | 50mm | 1/800 sec | f/5.6 | ISO 200
Of course, you can always go and find a bit of open shade for more flattering light, but what do you do when isn’t an option? And what do you do when you have a location that you love, but the light isn’t perfect at the moment?
You could always wait. But with portraits, you can’t necessarily count on another person’s enthusiasm for waiting around for the right light. Fortunately, there are a lot of tools that will help you modify the midday sun so that the light is more flattering for portraiture.
By far, the easiest way to shoot in the middle of the day is to do so on an overcast day with heavy cloud cover. Of course, just like waiting around for the golden hour, you can’t always wait around for clouds.
Canon 5D Mark III | Canon EF 85mm f/1.8 | 85mm | 1/2000 sec | f/2.8 | ISO 200
This article will give you an overview, along with the basics, of four techniques for manipulating, or completely altering, the light from the midday sun to help you get better portraits.
1) Reflector as key
The first of these techniques only requires a reflector. Either white or silver will do, but if you opt for a 5-in-1 reflector, you will have both at your beck and call.
In strong sunlight, the white reflector should work most of the time. If the light is a bit dimmer, you may need to opt for the silver reflector.
In direct sunlight, the shadows are heavy and unflattering. An easy and cheap method of countering this is through the use of a silver reflector.
Canon 5D Mark III | Canon EF 85mm f/1.8 | 85mm | 1/1600 sec | f/4.5 | ISO 400
To get started with using a reflector as your key light, place your subject so that the sun is behind (or at least to the side of) them.
Now, raise the reflector up and point it back towards your subject. It should be placed opposite the sun. You should be able to see and watch what the light bouncing off the reflector is doing. Adjust the reflector’s position until you are getting the effect that you are after.
When using a reflector like this, make sure it’s above and pointed at your subject. You will be able to watch what the light is doing.
While using a reflector in this way, there are a few things to keep in mind. Because the reflector is your main light source (or key light), it is usually best to make sure that it is above your subject. Lighting from above in this way will help to ensure more natural and flattering results. Lighting from below will result in unnatural-looking shadows that won’t be flattering to your subject.
The silver reflector has killed most of the shadows from the sun and brought up the exposure of the subject’s eyes for a much more flattering light.
Canon 5D Mark III | Canon EF 85mm f/1.8 | 85mm | 1/800 sec | f/4.5 | ISO 400
Another thing to keep an eye on is your exposure. Because you are working with natural light, you will be able to rely on your camera’s meter. Where you might find a problem is when the light reflecting off of the reflector isn’t as strong as any sunlight in the scene.
Do watch what the light is doing very carefully. Here, the reflector has come down too low and the light is hitting the subject’s arm and the lower side of her face first. This is not flattering.
To ensure a good exposure on your subject, meter from their skin. An easy way to do this is to use your camera’s spot metering mode and meter a place on your subject’s skin that is being lit by the reflector.
Just remember that your camera’s meter is measuring for 18% grey and a lot of skin tones do not fall anywhere near that range. Subjects with lighter skin may require a bit of overexposure, while subjects with darker skin will need you to compensate with underexposure. In most cases, 1/3 to 2/3 of a stop will be good enough.
2) Diffusion
You might not be surprised to see that direct overhead sunlight doesn’t make for a very good portrait.
Canon 5D Mark III | Canon EF 50mm f/2.5 Macro | 50mm | 1/3200 sec | f/5.6 | ISO 400
A diffusion panel is a great option for manipulating the harsh midday sun and achieving better portraits in the middle of the day.
Diffusion panels are sheets of material that you place between the light source and the subject. The material spreads out the light, making it softer and more suitable to portraiture. If you have a 5-in-1 reflector, you probably already have one of these.
Alternatively, there are a lot of options on the market, including massive diffusion panels that cover a large area.
Using a diffuser (or a diffusion panel) is a great and affordable way to soften the light from the sun.
Canon 5D Mark III | Canon EF 50mm f/2.5 Macro | 50mm | 1/500 sec | f/5.6 | ISO 400
To use a diffusion panel for these purposes, simply place it between the sun and your subject. Because we are talking about the middle of the day, depending on where you are in the world, the sun should be pretty close to straight above your subject. In this case, the diffusion panel would go above your subject. This will have the effect of softening the light; once you’ve done this, you should be able to meter and start taking images.
All that you have to do is place the diffusion panel between your subject and the sun. Because this diffuser cuts out two stops of light, you can clearly see how much darker the area in shade is compared to the rest of the scene.
There are a few things to watch out for while using a diffuser. A lot of diffusion panels are made to reduce the exposure of the light in your scene by a certain number of stops. This is important to take into account because the diffuser will only be altering the exposure of the light falling within its area of effect. If your subject is a fair distance from the background, the background will appear two stops brighter than it did in any shots you may have taken without the diffuser.
Here, you can clearly see the effect the diffuser has on the subject and the ground that it covers. You can also see how much brighter the background becomes when you expose for the subject.
This may result in overexposed backgrounds. To minimise this, you can make sure that the diffuser is covering everything in your frame by choosing a background closer to your subject, or by using a background that’s very dark in the first place.
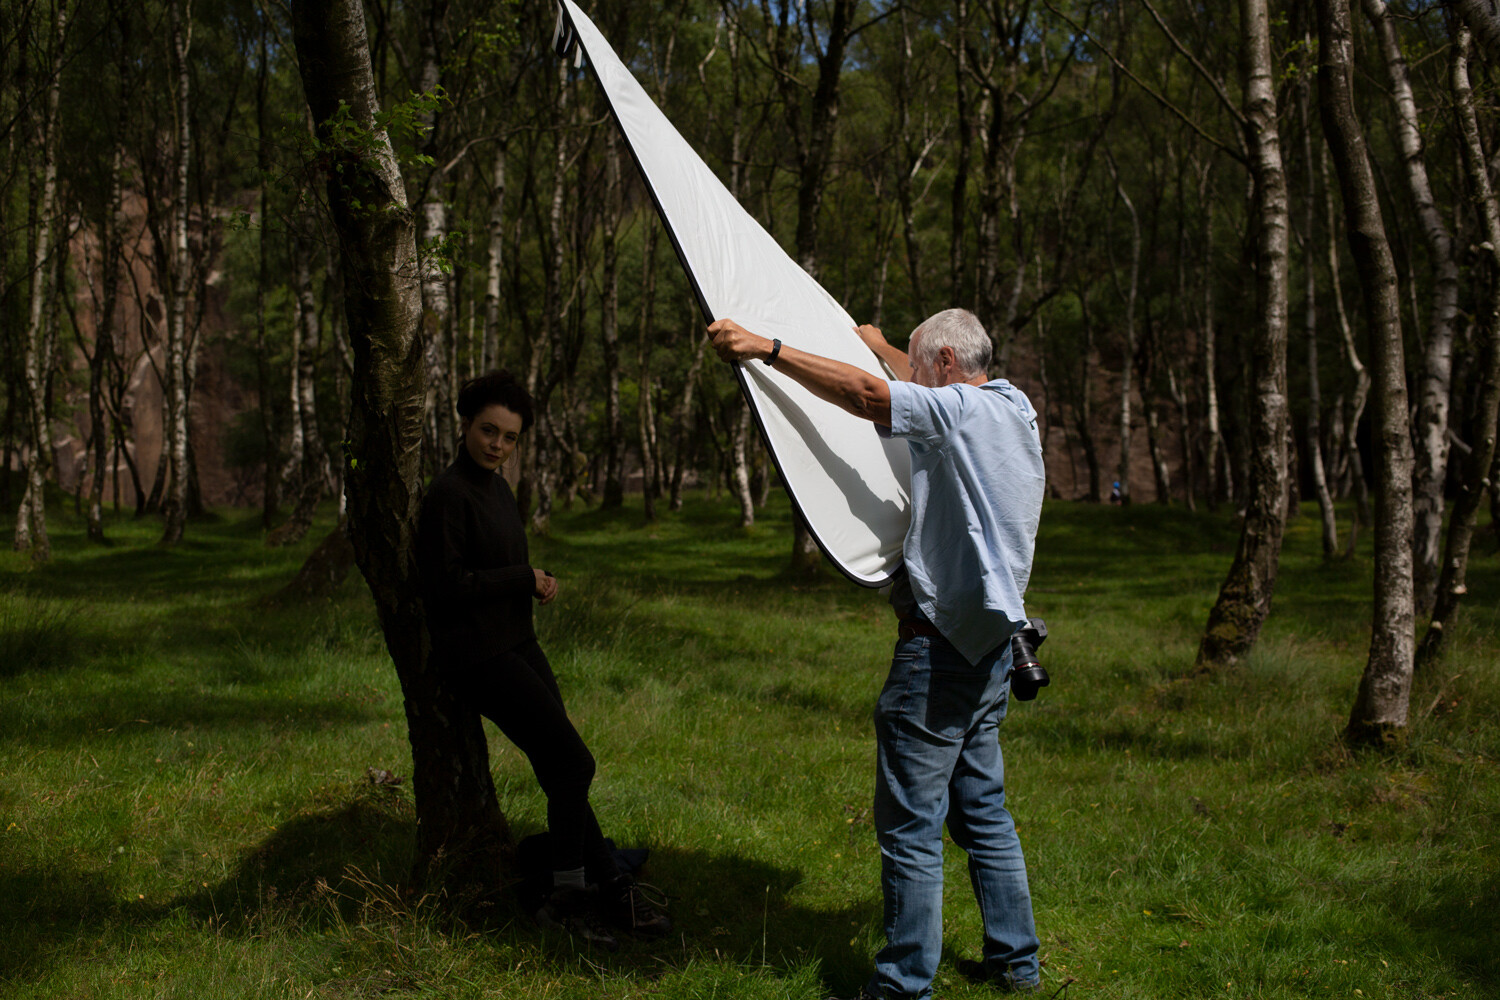
This diffusion panel catches even the slightest breeze very easily. Without a dedicated stand, it required two people to hold it in place and, even then, it had its moments.
Also, large diffusion panels like the one I have used in this example are very light. If there’s even a slight breeze, they pretty much act like a sail. You may need a dedicated stand or extra bodies to hold them in place.
3) Flash as fill
More direct sunlight, more unflattering light. Using flash to fill in the shadows is another useful technique for portraits in the middle of the day.
Canon 5D Mark III | Canon EF 50mm f/2.5 Macro | 50mm | 1/1600 sec | f/5.6 | ISO 400
If you have the equipment, using off-camera flash as fill light to the sun’s key light is a great way to help you take portraits in the middle of the day. The job of the fill light is to bring up the exposure of the shadows created by your key light (the sun, in this case). This will reduce the contrast in your scene and even out the exposure.
Here, you can see that the shadows from the sun still exist, but they are much brighter. This reduction in contrast makes for a much more suitable portrait.
Canon 5D Mark III | Canon EF 85mm f/1.8 | 85mm | 1/640 sec | f/4 | ISO 100
There are a lot of ways to do this, but I’ll go over a basic method that requires the least amount of extra equipment.
It doesn’t matter if you are using a speedlight or a full-powered strobe; the principles remain the same.
The first thing you need to do is obtain an exposure for the ambient light. Do this by using your camera’s meter and taking a test shot as if you weren’t going to be using flash at all. The one exception here is that you need to ensure that your final shutter speed is slower than the max sync speed on your camera. This is often around 1/250 seconds, but do check your manual just in case. Once you’ve ensured that all of the highlight tones are present in your frame and not overexposed, you should have your working settings.
Note: If the sunlight is very bright and you cannot get the shutter speed to go slower than your max sync speed, you may want to consider using High-Speed Sync.
Now, turn on (and connect) your flash. While you are getting started with fill, I suggest placing your flash in an on-axis position. This means the flash is on the same line as the lens of the camera from the subject’s position. Although if you are using a speedlight on top of the camera, I recommend getting it off for more flattering results.
Getting the flash off-camera will always provide a more flattering light. (Please forgive my visitor. He just wanted to see what was going on.)
You can use Manual mode of E-TTL mode on your flash. Either will work fine, but E-TTL might help to get you closer to the desired exposure in less time.
Once your flash is set up, take a test shot. Look at the shadows in your image. Are they too bright? Turn down the power on your flash and take another test shot. Repeat this until the shadows appear how you want them. Do your shadows seem unchanged, or are they still too dark? In the latter case, turn up the power.
One thing that I suggest you take into account immediately is modifiers. For fill lighting, you will generally want as soft a light source as possible. The light from a bare speedlight will never be soft. A modifier like a translucent umbrella is dirt cheap and as portable as an actual umbrella, and they work well with both small and large flashes.
Use as big of a modifier as you can for softer light. Portable softboxes like this one work well. So do translucent umbrellas if you want a cheaper, even more portable option.
Another thing to look out for with fill lighting is how much you are filling in the shadows. Remember, the goal in using a fill light is to bring up the shadows so that they aren’t as dark in high contrast situations. You want to avoid having the exposure of your fill light as bright as the exposure from your key light. Try to aim for at least one stop between the exposure for your key and fill, but don’t be afraid to extend it more. Oftentimes two, three or even four stops of difference is the right choice.
4) Flash as key
Yet more unflattering light, this time with a more extreme solution. Here you will learn how to overpower the sun and use your own light.
Canon 5D Mark III | Canon EF 50mm f/2.5 Macro | 50mm | 1/800 sec | f/5.6 | ISO 200
Another way to use flash for portraits in the middle of the day is to use your flash as the key light. This will require a fairly powerful flash, as you will need it to appear brighter than the sun in your exposure, as you will now effectively be using the sun as a fill light. There are two main ways to go about this. These are using your flash in Manual mode and using your flash in E-TTL mode with High-Speed Sync (HSS).
Because it is fairly easy to get started with your flash in E-TTL mode with HSS (provided that you have the right equipment), that is what this article will discuss.
Using High-Speed Sync on a high-powered strobe allows you to overpower the sun and light the scene with your flash. The sunlight will still be present, but it will be a few stops darker than your key light.
Canon 5D Mark III | Canon EF 50mm f/2.5 Macro | 50mm | 1/800 sec | f/5.6 | ISO 200
High-Speed Sync allows you to use flash at shutter speeds far faster than your maximum sync speed. Since shutter speed is what governs the exposure of ambient light while using flash, this means that you can use a shutter speed that underexposes the light from the sun.
Adding the flash as key at this point will shape the main light on your subject with whatever modifier you are using, while the shadow areas will be filled in by the ambient light. This is a great technique that works in a huge variety of situations, but it does require a bit of specialist equipment.
Most speedlights have HSS functionality and more and more full-sized strobes are coming to market that have it, as well.
To get started using this technique for portraits in the middle of the day, select the aperture that you want to work with. Using the meter in your camera, meter the scene and underexpose it by the desired amount. You can evaluate the histogram to decide whether it is dark enough, or too dark.
Underexposing the ambient light by three stops was too much in this case. Evaluate based on taste and your desired output, then adjust as required.
Canon 5D Mark III | Canon EF 50mm f/2.5 Macro | 50mm | 1/2500 sec | f/5.6 | ISO 200
Now, set up your flash with your chosen modifier for the lighting pattern of your choice. Rembrandt and Butterfly are two basic patterns that work great most of the time. Now, connect your flash to the camera and turn it on, making sure that it is set to both E-TTL mode and HSS mode.
Take a test shot.
Adjust the exposure compensation of your flash as required to get a good exposure of your subject. Referring to the histogram will help you figure out how much exposure compensation you need to use at a glance. If your image is too bright, dial in -1/3 to -2/3 of a stop at a time until you have the desired effect. The same applies for too dark images. Just dial in +1/3 to +2/3 of a stop instead.
The test shot in this instance was way too overexposed. Simply dial in exposure compensation on your flash unit or trigger and keep evaluating until it is right.
Canon 5D Mark III | Canon EF 50mm f/2.5 Macro | 50mm | 1/800 sec | f/5.6 | ISO 200
Once you have a decent exposure, you should find that you have a nicely-lit portrait with all of the shadow and highlight details present in your image.
This is a very basic overview of High-Speed Sync and doesn’t even come close to covering what’s possible with the technique, but it should get you started with the basics.
Outro
Learning how to use just one of these techniques can open up hours worth of time that you would normally avoid shooting portraits in.
Canon 5D Mark III | Canon EF 50mm f/2.5 Macro | 50mm | 1/640 sec | f/4 | ISO 100
While there are plenty more methods for shooting portraits in the middle of the day, the ones listed here should go a long way to get you started.
There is no reason that you should feel limited by the time of day (and the lighting it brings) when you are photographing people.
Even with a few basic tools and techniques, you can stop being at the mercy of the light and, instead, take control of it and manipulate it to your needs. If nothing else, doing so will open up countless hours in the day that you can use for your portrait photography that you would normally be advised to avoid.
The post 4 Ways to Shoot Portraits in the Middle of the Day appeared first on Digital Photography School. It was authored by John McIntire.
Writing is not for photographers. This is the most ridiculous statement I have ever heard, and as a photographer, I have heard many. Do you know what is even more absurd about this declaration? For a long time, I am the one who swore by it. This was following the demise of my first personal photoblog. You can say Continue Reading
The post 8 Amazing Hacks To Be A Pro Photographer Blogger: The Definitive Guide I’m Using To Write How I Shoot appeared first on Photodoto.
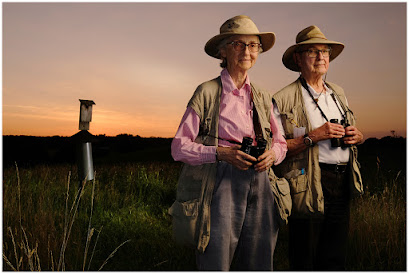
Whenever you have control over the time of day in which you'll be shooting a location portrait, always remember that the hour that wraps around sunset will offer you at least five different lighting environments in which to work.
And for today's portrait of birders Jo (left) and Bob Solem, we're going to use three of them.


You must be logged in to post a comment.